Modeler12
-
Posts
1,716 -
Joined
-
Last visited
Content Type
Profiles
Forums
Gallery
Events
Everything posted by Modeler12
-
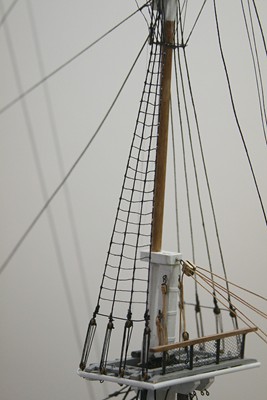
 You know the fun has just begun. Well, not really, but the bow of this baby has more lines than any artist or comic could imagine. Conny has them all. The picture above only shows a touch of what I read on the plans. When you look at the actual photographs the bow lines seem like a nightmare. I am trying to add lines from the center out, but also keep track of the 'stays' which are first before the running lines. Having said that, you might notice the tan line for the jib. The loose line will be where the jib sail will be hooked to (there will be another one for the flying jib). The reason I did not want to attach this stay to the mast above is that the sail has 'hooks' that are already closed and I figured to thread the 'stay' right up through them when I am ready. Another one of those 'plan ahead' kind of things. I am waiting to add the flying boom as long as I can. It just sticks out too far and I am afraid to touch those thin things with my headgear. Tomorrow??
- 732 replies
-
- 3
-

-
- constitution
- model shipways
- (and 1 more)
-
Here is a suggestion, Geoff. It is pretty obvious that the eyebolts should line up fairly well in order for the 'rod' to go through. There is very little force on them and I used CA. You might make a dry run first and then put a drop of CA at the base of each bolt.
-
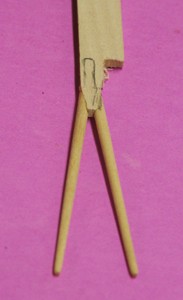
In order to finish the bobstays, I needed six more small bullseyes. Although I had an order outstanding, I did not want to wait and tried to make some myself. They are not perfect, but will be painted black, so this should work. Here are two still attached to the dowel. I kept the drill inside while filing the contour. This gave me the support I needed. A small exacto saw was used to cut them off.
-
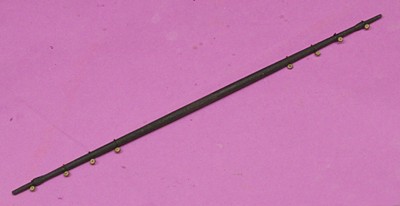
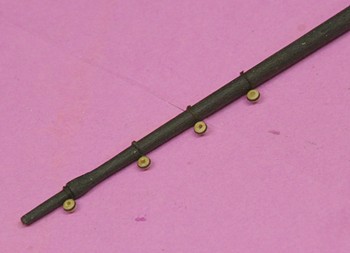
It is my understanding that the jackstays were used for several reasons. The footropes are lashed to them, but so are the large sails. In addition they were handy for the crew to hold on to them while working with the heavy sails. I installed them and made the eyebolts that hold them in place. It is a bit more work, but I needed them for the three sails I am using.
-
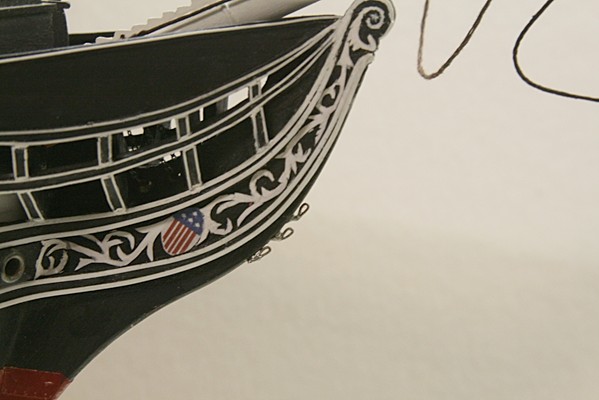
Thanks you. The picture below is what I used to sort of locate the three tiedown 'rings'. Both pictures are a bit dark, but by the time the ropes are attached I think it will blend ok. Instead of blackening the three rings, I will just paint that part.
-
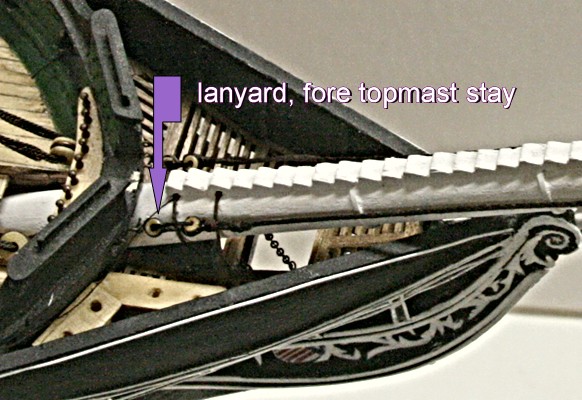
I am afraid if I get a bit sloppy, but the 'snake' between the two fore stays is a too far apart. But for now it will have to do. It is amazing how the various lines at the bow come together. It is another area where you have to think ahead!!! I ran out off 1/8 inch bullseyes and will have to wait with the loose ends that connect to the bow stem. The lines you see below are the loose things floating in space until I get more bullseyes. Note: be sure to get more of the !/8 inch or 3.5 mm bullseyes. You will run out. The others are ok. The three metal loops in the stem were made by bending some wire and soldering the 'loop' together (plus a bit of sanding). They were installed in pre-drilled holes with epoxy. Also, don't believe what Mr. Hunt said about eyebolts installed with AC glue. They will pull out unexpectedly. The one below had to be glued in place again with some epoxy.
-
Here is the next step on the bow. The poor foremast has been waiting for some support. So, I added the two fore stays as called for in the plans, including the 'half hearts' and 'full hearts'. Then there is the way the line is connected at the top, referred to as a 'mouse'. Between the rats, mouse, hearts and Flemish horses, this is turning into zoo. And then there is the 'snake' not yet shown, but it goes between the two stays.
- 732 replies
-
- 2
-
-
- constitution
- model shipways
- (and 1 more)
-
Chuck does that mean you are not going to finish the Winchelsea????? You know, of course, that when you go into a business like this you have to give up something. Or do you have now more free time from your mother-in-law and space to do all of this?? I am glad you compared the stupid things put out by Model Expo with real blocks. It has been a pat peeve with me for a long time. Yours. How can I order a bunch of various sizes for my next project?
-
Thanks for the insight, guys. I can hardly wait, but . . . . I am on a roll with the bow and want to continue that before starting anything too exciting. Otherwise I may never come back to the front end. Geoff, I hate to tell you this, but another spar sprung up. I had forgotten about the bowsprit spar. It is the one suspended from the bowsprit. Is there anyway you can borrow or know someone who has a lathe? It sure helps.
-
Indeed, Geoff, but it won't last long. Making chips of wood is nice though. I still have to make the spritsail yard. And then there are the 'boats', your pieces of craftsmanship that I like to copy as much as I can.
-
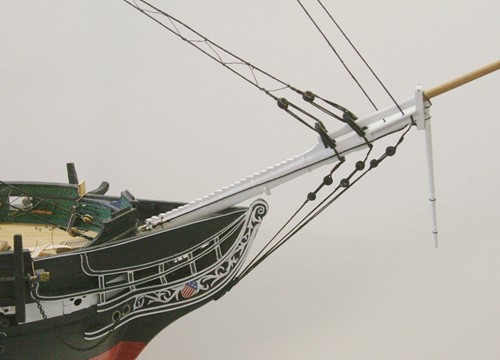
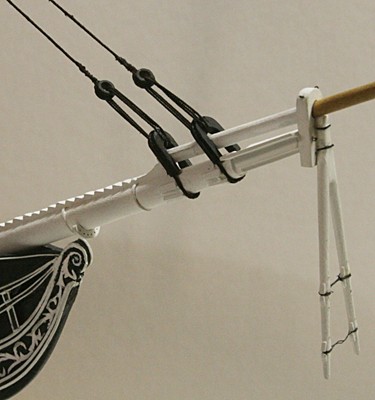
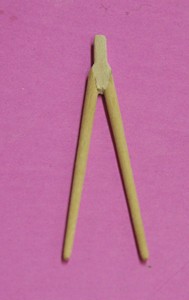
The martingale is painted and ready to be installed onto the bowcap.

-
You are quite right about the travel distance. It seems very short. In this case it may have something to do with clearing the stern gun port. But, than again, that would mean that it should be a lot wider. On most sailboats, the travel sideways is usually done by having a slider on a metal track. It is used to control the boom and hence the sail so it can be switched from lee to windward when tacking.
-
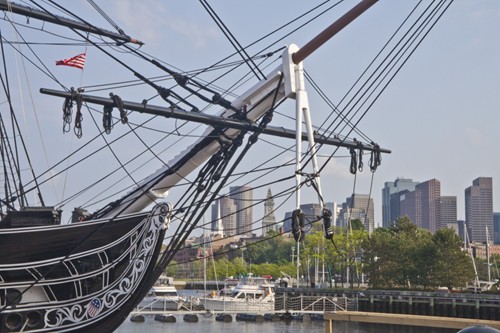
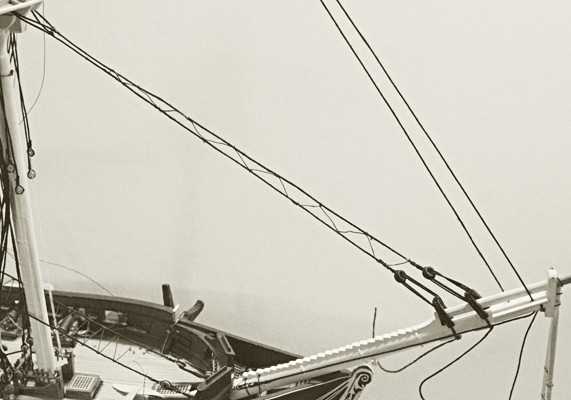
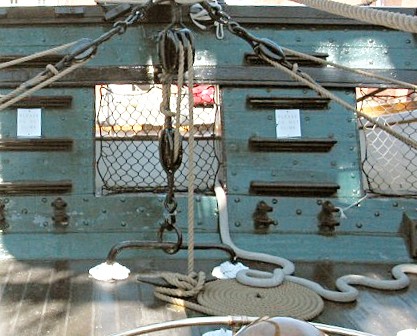
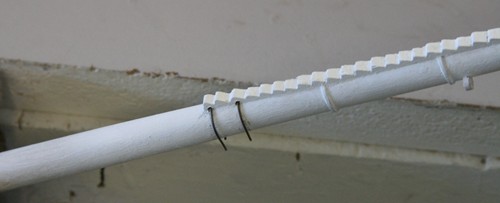
You asked for a picture. Here is one showing the horse and the cleat with sheet on the USS Constitution. The white part at the two bottoms of the horse are actually knotted ropes (Turkish heads, I believe). They are more for decoration.
-
I did too and also index cards, but I found the photo paper to cut smoother and cleaner with no fuzz what so ever.
-
Air brushing
Modeler12 replied to wthilgen's topic in Painting, finishing and weathering products and techniques
Bill, you have seen lots of good ideas here. Let me make a couple more suggestions. A good airbrush 'gun' is important, but don't forget that you also need a compressor and perhaps a couple other add-ons. I am using a compressor that I bought at Home Depot for less than $100. It is small, can be carried around, yet has a reservoir (not big, but big enough for general use). I can control the outlet pressure from zero up to 110 psig. It is good for checking tire pressure, blowing dust from small machines, etc. It just is not big enough to handle large spray guns. It works very well with an airbrush like mine. I think this is a lot more of a compressor than the little guys that are intended only for airbrush applications. The airbrush I have is the Badger 105 Patriot. It is easy to use after some practice. The paint viscosity is important and requires some experimentation, but the little rascal works great. I use it primarily with acrylic paints, but you can use it with solvent based paints or finishes. The problem with the latter is that the cleanup is more time consuming and important. Also, for solvent based paints you should have a water trap. The compressor puts out ambient air and in the process compresses humidity which turns into water. That should be 'trapped' with a unit that you can buy at an automotive outfit. Is it worth $200? Not, for casual use in modeling ships, in my opinion. It does a nice job for the occasional use, but many thin coats of paint by hand can give similar results. The airbrush is just a nice way to do it quicker and more smoothly. The cleanup afterwards is a definite negative. Here is one example of where I used it.
-
Before I used index cards to make 'things'. I used them to cut strips, paint them black and added them to make various metal brackets. Then I found out that to use the stiffer, smoother paper used in photography printing actually works better. There is no fuzz, no ragged edges, etc. Now I save a few old prints, not for sentimental reasons, but to use them for metal brackets. I cut a sliver off, paint the back side and . . ..
-
After some paint, the bowsprit is starting to look ok. Next comes the martingale that will be attached to the front of the bow cap. I made this out of three pieces, two dowels and a flat section 1/8 inch thick. The three pictures below were taken at a bad angle and the piece looks too short and stubby. The actual one looks better. I have drilled the six holes in the legs and added the chocks. Tomorrow I'll paint it and add it to the bowsprit. I still need to make the traveling iron and a couple other pieces and then it is back to rigging.

- 732 replies
-
- 2
-
-
- constitution
- model shipways
- (and 1 more)
-
AKA "Belgian askewed ready knots". Get my drift?
-
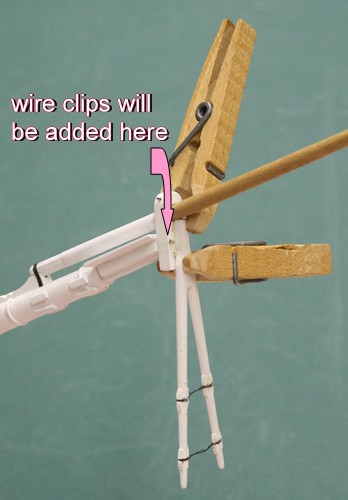
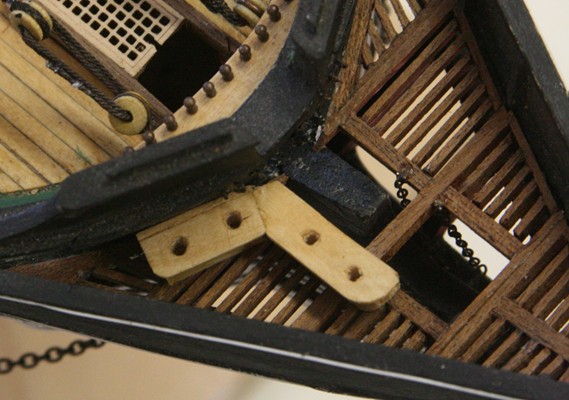
Earlier I showed how I had planned to attach the two straps and chains around the bowsprit and through the stem. That just did not work right for me. The chain and straps were in the way when I started painting the white bowsprit. So I cheated . . . I cut the straps off, took a section of chain and looped that through the holes in the stem and glued them to the head deck as shown below. Then I took some wire and put them through the holes in the steps of the bowsprit. The wires and chains are not attached but they will be hidden from view at that spot by the two heads.
-
Air brushing
Modeler12 replied to wthilgen's topic in Painting, finishing and weathering products and techniques
I can see that happening, Andy. If I had a booth I certainly would be using it. What I found is that for the small parts I am dealing with, the overspray is pretty much taken care of by using paper towels behind the part and keeping the part up and away as much as possible. -
Pat, that is interesting. I wonder why the Constitution would have seven of those. I'll go under the assumption that they were primarily intended as John mentioned. But the knots were called out as overhead-square seasaw brittels. They will be in a bag, so it doesn't matter.
-
I have not noticed that effect, Geoff. I am using cotton and the standing rigging is coated with a pretty heavy layer of a water based stain. I think that during the drying period the rope shrunk enough to make it more stable. Anyway, I can try the white glue thing on a couple sections of the ratline to see if it shrinks.
-
i agree. I cannot imagine how the ship could tack if there were sheets only on one side. This applies to all sails that I am aware of. I am building the Conny and may have plans that might be of interest to you. Drop me a note.
-
Geoff, your St. Benard (what's his/her name?) has been an inspiration to me all along. If it hadn't been for your dog, I would not be wearing those great magnifiers and be lost in deep-down under. --- No reflection on our great friends down there somewhere, of course---- I am making progress. Indeed it is nice to be retired and do as I please (well, let me rephrase that, because of the Admiral): do mostly as I want to and work on the ship between other 'duties'. Sometimes I think it would be nice to still be working and making some money, like some of you lucky guys. But at my age, no one want me Ratlines. Like everything else with this hobby, once you get the hang of one part and how to do it, you get better at it. I have never done any ratlines and thought of them as a way to catch those dirty guys that eat my veggies in the backyard. But I am close to finishing the port side of those dirty b . . . . Those thin shrouds of the top/gallant section are a 'pregnant dog' when it comes to adding the rats the way I did it.