Modeler12
-
Posts
1,716 -
Joined
-
Last visited
Content Type
Profiles
Forums
Gallery
Events
Everything posted by Modeler12
-
 Indeed, Mark, and you don't need a torch to do that. A simple candle flame will work.
 -
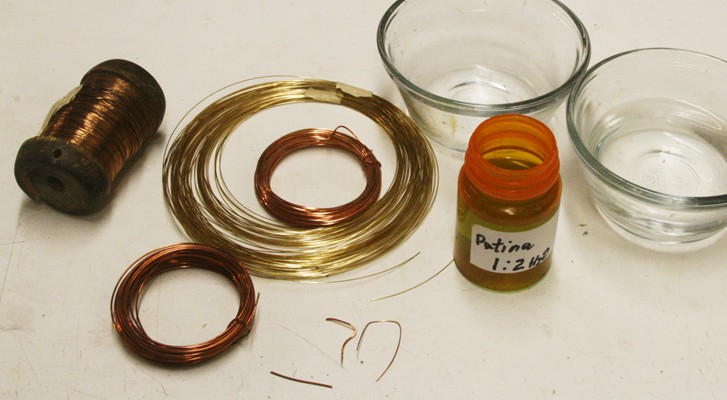
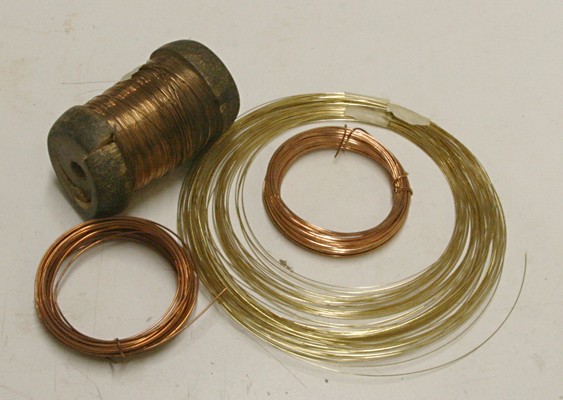
We are all working with one or more of the copper alloys. Perhaps it is good to know some of their characteristics. Here is a good web site http://www.diffen.com/difference/Brass_vs_Bronze But how does that effect us, model ship builders? To make strops, hooks and other parts that require delicate bending it would be nice to have a wire that is malleable. Copper is, but it also is soft and prone to corrosion. Brass is also, and used a lot for just that purpose. Bronze is the 'unknown' for most of us. It falls between brass and copper in composition but may have some neat usages for us. Somehow I inherited this spool of 26 gauge bronze (at least it looks like that compared with brass and copper). It is ancient but I have used it a few times. It is harder to bend than brass, but for me it gives a sturdy, beefier 'hook'. It takes a bit more care but you might try it if you can find it. Too bad I don't have a spool in a thinner gauge. It took a piece of each and experimented with the 'Patina' that I described earlier for blackening metals. Below are the results. The brass wire, bought at a craft shop, did not do well because it has this protective coating. However, after I rubbed that with some steel wool it came out just as well as all the others.


-
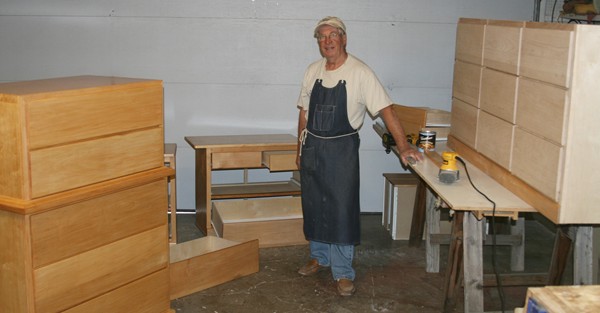
Brian, I am not saying that stains based on 'spirits', as you say, are not good. It is just that I have been using this particular brand of stain for many years making furniture. I found that the water based stain goes on very smoothly, is easy to clean up and lasts practically forever. I am a former user of Miniwax and got tired of having the stuff dry up in the can and not give me the nice coverage I wanted. Using either one for staining lines and ropes may make very little difference. That is a can of Verathan in the background. I use that for the final finish. It is also a water based version. The color of these cabinets was New Pine again by General Finishes.
-
Have a look at a former post http://modelshipworld.com/index.php?/topic/702-coloring-handmade-rigging-line/ My recommendation is a good quality water based stain. It dries fast for thin lines and rope, coats very uniformly with one application and comes in a multitude of colors including a very dark brown (almost black). Check out Espresso by General Finishes.
-
Mark, I have looked and will look again at your pictures. They are great and it is interesting to follow your build ala H. Hahn. They are going to help me if I proceed with my next project. Thanks again.
-
I might add that the use of selenious acid as a blackening agent did not come about until the 20th century. So, its use for old ship guns never happened, at least not on purpose
-
The kit I received included blocks that were not only bad looking but too big. I had gone ahead and used them for the gun tackles but was not at all happy with the results. For details go to the following http://www.brentjes.com/Conny%20Deck.html#tackles As I mentioned there I ended up buying new blocks that look much better.
-
Wefalck you are right on. What we use now to blacken gun barrels (or anything else, for that matter) does not matter. The question was what was used back then for the real thing. I don't know for a fact, but I am sure that if vinegar (acetic acid) were used to clean the barrels before being painted it would do a decent job. I suppose that different nations did different things, but the main question has been answered, I believe.
-
May I offer you one more bit of advice about all of this? When I did the gun tackles I found that the blocks were very large and the tackle was so close together that there was hardly any room to pull the carriage and gun forward. There were two solutions to part of this: Make the blocks smaller (I ordered better ones than supplied in the kit) Make the hooks shorter. Easy, right? Well, actually, not. I made the hooks part of the block. I did this by drilling a tiny hole in the block and gluing the hook into that. Not easy, but for me it worked. You have to be prepared that the hole(s) in the block can be quickly cleaned out or re-drilled so the line can go through. Experiment!!!
-
Allan, I can understand that you would like a copy of these two volumes. Here is what my local librarian found out and I quote him: I was able to find "The Arming and Fitting of English Ships of War" by Brian Lavery at CSU Long Beach and San Jose State Libraries. You may request a copy using the LINK+ system. Adrian B. Caruana's "History of English Sea Ordnance" is not available in LINK+, so that eliminates 40 public and academic libraries in California and Nevada. A copy (volume II) was listed on Amazon.com for almost $2,000.00. I checked in the University of California Berkeley catalog, but did not find it listed. I checked the catalog for New York Public Library and did not find this title. The US Library of Congress has "A History of English Sea Ordnance, 1523-1875" by Adrian B. Caruana. The call # is VF57 .C37 1994 and is only accessible in the Jefferson or Adams Building Reading Rooms. Of course, this would require a trip to Washington, DC. http://www.loc.gov/index.html http://www.loc.gov/visit/maps/ I hope this helps. Unfortunately, Mr. Caruana's book is indeed a rarity. I will get the copy he mentioned by Brian Levary, but as you can see this will come from either Long Beach or San Jose Cal State libraries.
-
Thanks Allan, our local library is connected with a lot of others in California and I have been able to get a couple good books through that system. I will give it a try tomorrow. On hind sight, I find it interesting that for more than 200 years the guns of war changed very little. The basic gun barrel looked almost the same, lead shot, or some modifications there of, were thrown out in the hope that it might hit something, and gun powder was stored in little canvas bags until needed. Just think what has happened now in weapon design during the last fifty years or so. I would not be surprised if part of the slow changes was because the British Admiralty was very strict in controlling how and what was to be done by their navy and suppliers of materials and goods. There was no incentive to make improvements.
-
My guess is that making gun barrels was not an exact science but a trial and error thing. Early in the game they must have determined that if a barrel blew up you made it thicker. If you wanted a bit more accuracy you made it longer. If weight was a concern you made them shorter. Since the barrels were cast out of iron the hoops were not really necessary, but since they were 'barrels' hoops were added. I am looking at six pounders and will probably consider six feet like Chuck is using. That gives a ratio of length to bore of about 20 to 1.
-
I stand corrected. Mr. Hahn did explain in the text (page 196) that the length varied according to various sources or usages. He mentioned that the ratio of 15:1 as suggested by Brewington results in a short barrel and further on explains all the different sizes he found for Alfred. Furthermore he goes on to describe other aspects of gun barrel designs that are interesting. It goes to show that I should not go by just reading diagrams and plans. Read the rest.
-
Thanks guys, that is good information. I was really surprised that Harold did not clarify this in his book. But now I know which way to go with my next build and gun sizes.
-
That is what the formula also said. But what is that 'so many' calibers number? When I plug in the caliber to the formula of Harold Hahn it comes up that A = A. Russ, if you have other information about how long gun barrels were for specific ships, etc. I would like to know and, if you don't mind, please send me a message accordingly. Thanks Russ, you are always on the ball!!!.
-
I am trying to find out how long cannon barrels were on eighteenth century ships. The late Harold Hahn, Master Ship Model Builder, published a neat diagram in his book with formulas to determine the size based on caliber. However, his formula for the length of the barrel does not 'compute'. The length A is indeterminate. This may have come up before, but does anyone have a solution? I would like to know the length of the barrel for typical six pounders. BTW the same page in his book has some great diagrams of gun carriages (again all based on caliber).

-
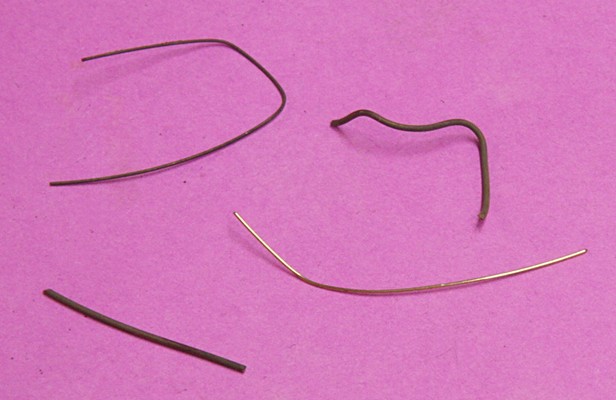
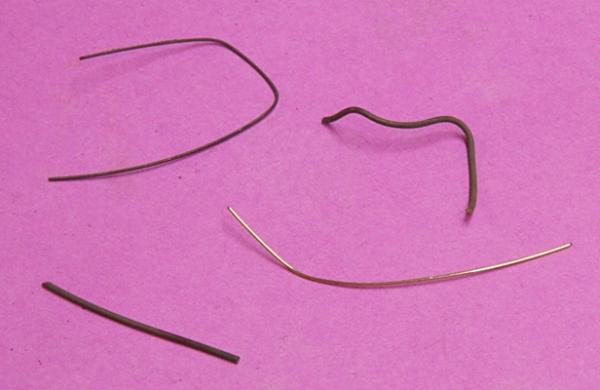
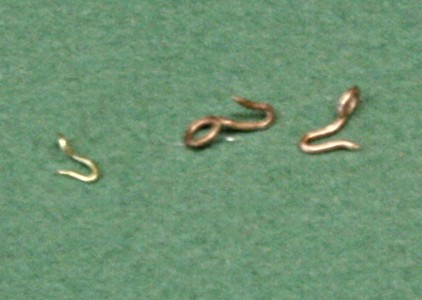
Rather than showing pictures of the three steps in making hooks, let me just explain. Sorry about the fuzzy picture below, but it shows two hooks made with the 26 gauge and one with the 28 gauge brass wire. Hooks can be made with the 'eye' at right angles to the hook (as shown), or with the hook in line. I guess it depends on how you use it. The way I did this was to start by making an eye as described above. With the wire still long, I bent the hook. Then added a slight reverse bend that was then cut at an angle to give it the point. It takes a bit of practice and I am now a bit rusty with this. After making a few more it will come back, I hope.
- 732 replies
-
- 1
-

-
- constitution
- model shipways
- (and 1 more)
-
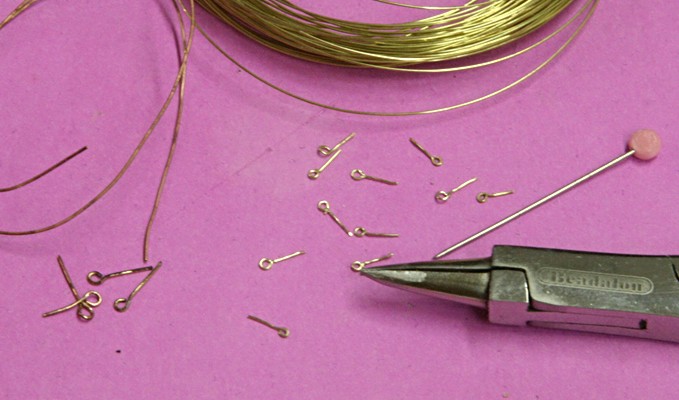
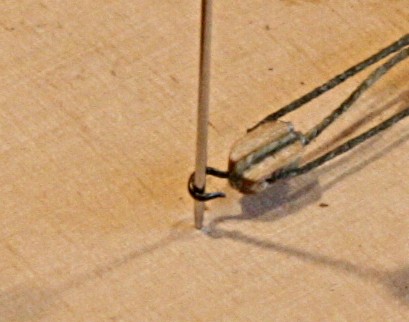
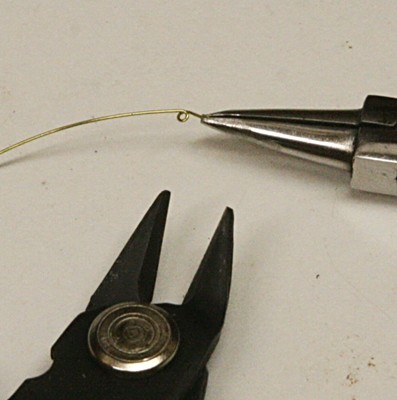
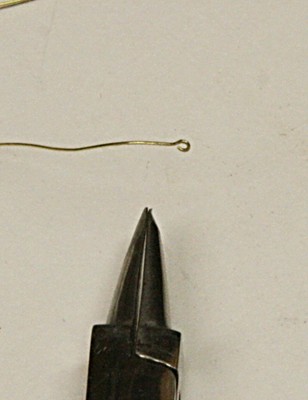
As mentioned, I decided to step back, clean up and organize. I keep making a few eyebolts when needed. So, now I decided to make a batch that should last for a while. Here is how: Wire gauge: I have brass and steel wire which are 26 and 28 gauge. For my model at 76 :1 scale that translates to a diameter of 1.22 inch and 0.91 inch full scale. When made into eyebolts the average outside diameter of the 'eye' measures 6.0 and 4.5 inch respectively. You can see some of them below. Because six inches seems a lot, I have concentrated on using the 28 gauge brass for most of them. To make them, I start by wrapping the wire around a steel pin (see above). This results in a piece shown below. I cut off one end close to the eye, and then finish by grabbing the loop with the needle nose pliers and twisting the loop back so it is in line with the bolt part. This may take some adjusting to close the loop (not yet done for the one above). They are not all perfect, but this goes rather quickly once I get going. Next I will try to show how I make 'hooks'.


- 732 replies
-
- 1
-
-
- constitution
- model shipways
- (and 1 more)
-
Can you give us an example of these new glues? or is this something that is being developed in the Ukraine? I and others, I am sure, would like to know what you have in mind. Are you talking about adhesives or 'glues' that may be of interest to model ship building? Are some of these new materials as versatile as the glues we have been using and talking about? Or is this too difficult to answer?
-
Epoxy has been used for decades throughout the aircraft industry. If it were true that all epoxies tend to crack with time and temperature than all aircraft would be grounded. It is true that you can formulate an epoxy that uses the 'wrong' hardener or ratio and result in a brittle mess, but that is not to say it is true in general. I would agree with Augie that for our purposes we don't have to worry about the occasional mistake of mixing the wrong batch and I have not experienced any real problems with epoxy due to age and temperature. I am now retired after having been involved with advanced composites (which included a lot of epoxy applications) for more than forty years both in R&D as well as production.
-
Geoff, the alignment of those eyebolts and jackstays is perfect!!! Great job, my friend. I wish mine were that good.
-
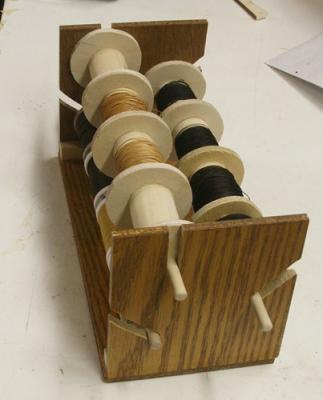
It works pretty well, Geoff. I may have to make a couple changes. I need at least one more spool for the standing rigging. Found an envelope with another size. What I need to do is to make the one inch dowel parts a bit shorter (make the spools narrower). There seems to be plenty of room for what I have. Luckily I did not glue the rings to the dowels. They are all loose. The other thing is to add knobs at the end of the 1/4 inch dowes to make it easier to wind.
-
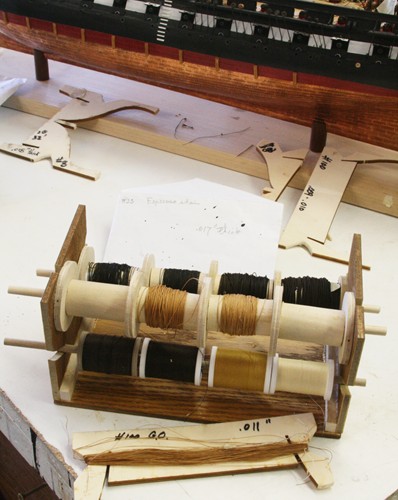
It may be a while before I can post more pictures of my progress. I need to take time out to do a bit of house cleaning. One thing that constantly irks me is that the supply of lines are helter-skelter. I have some wound on pieces of wood and others in envelopes. They are never where I am looking for them. I made this little rack to hold twelve spools. Some dowel and scrap wood did the trick. I still have to transfer the running line you see on the scrap winder to one of the spools. Labels will be along the bottom to identify what they are. One set is for the standing lines (espresso color), one for the more common running line sizes (GO for golden oak), and the one on the bottom is for spools of sewing thread I use for whipping. The slots in the end allow me to remove them if I want to change spools. I still have other rope and lines in some envelopes but those are the ones I don't use often or are short left overs.

- 732 replies
-
- 2
-
-
- constitution
- model shipways
- (and 1 more)
-
Good question, Alistair. I am planning on having mine with the wind coming from about three o'clock. That would mean that the sails are filled towards the port side (my 'bad side' and facing a wall when displayed). I know small sailing ships will list towards the leeward side and I would assume large ships do also but to a much lesser degree. Again, since I will have this thing inside a glass display case I don't intend to have it list too much and definitely not in the wrong direction. I decided to do it that way when I saw the picture of the Pride below. You can see that the square sail and its spar are going a bit sideways but the sails are all nicely filled. The flags are swept towards the stern and leeward, unlike when the ship has a following wind. With a following wind the spanker would be much further out to port or starboard and the jibs would be much fuller also. But that is just a thought. I figured that this type of display will also show the masts and the various blocks that guide the lines that operate the sails without obstructions. Anyway these are some thoughts and we will see how it comes out. I like to add another thought when looking at the picture above. Many people think that a sailboat uses the wind to push it along. That is true if the wind is following, but if it comes from the side and particularly from the direction shown above, the boat is actually being pulled forward. That is because the wind goes around the sails faster in front than the back. This creates a negative pressure in the front and the boat is pulled in that direction. It is the same effect of airplane wings. Also, because of this, it is not the wind itself that causes the boat to tilt, but this deferential pressure.

-
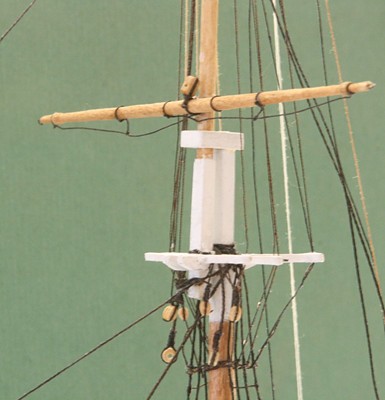
Sometimes it is good to take a look at the details; and pictures help me to see my faults or next steps. I hate to show these but they may give you some ideas what the rigging is about when it comes to raising sails. Around the topgallant crosstrees there are no less than seven blocks/bullseyes. The one not shown in the picture below is the principal one that goes to the halyard to raise the spar and sail. It will be added later. The four double blocks are for the various lines that lift the sails after they are in place (bunt and leech lines and reef tackles). They are for tuning and controlling the sails, so if you don't show sails, don't add them. For me it was a lot of extra work. I also want to replace the white line that goes to the top for the flag halyard. It is too white, too thick and I don't want it to stand out like that. The footropes will be adjusted much later.