Modeler12
-
Posts
1,716 -
Joined
-
Last visited
Content Type
Profiles
Forums
Gallery
Events
Everything posted by Modeler12
-
 Sounds like an interesting project, Goeff. Knowing that your machine is excellent (as well as your previous work) I am sure that the results will be great. Have you experimented with dyeing any of the rope? I know you had before, but I like to keep track of your progress. I had some help (my wife) when I drew lines through the dye. They were up to about 40 feet long and required some clips and a paper towel swipe to make sure they were clear and too over loaded with stain. I am sure you will come up with a good way to do those long lines.
 -
Geoff, that is quite a setup for making your ropes. It again, shows that a great machine and a great operator makes the difference between so-so and marvelous output. I like the idea here also that you can make rope a lot longer with the spools mounted on the traveling head. I am surprised that, back in the olden days, they did not think of that rather than having long-long sheds and long walk-ropes I also agree with your analysis that cotton allows you to dye and glue the threads (or ropes) better than when made out off synthetics. Keep it up. BTW do you have a picture of some rope samples you have made??????? When can I order some of this for my next project????
-
Thanks fellows for those nice comments. I must admit that I have not done much on my Conny for a few weeks. Summer, etc. . . . . What I have been doing is update my web site with the pictures I have taken during the rigging process. I have a ways to go yet, but if you are interested in my personal log go to http://www.brentjes.com/coonyrigging2.html It is an ongoing affair and is subject to changes and additions. There are two parts in the works.

-
I assume that the bottom of the masking tape is the waterline. Looking at your pictures, I would suggest that you remove part of the last (fifth) row and put two strips of copper along the water line. Then you could fill in the rest with horizontal strips. That way I think you would be pretty close to what others suggested by way of the drawing.
-
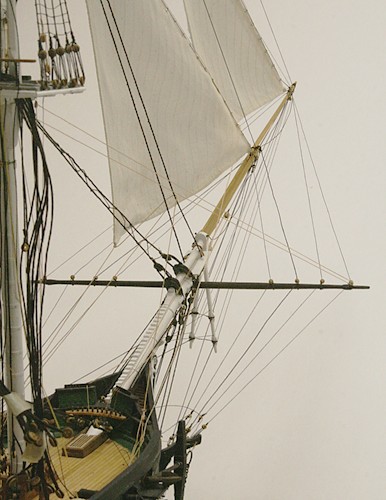
Mike, it would be a wonder (and wonderful sight) to see the USS Constitution in 'full sails', however, I am only adding six out of the thirty-some sails that she might have carried in the past. Even at that, I am having a difficult time but enjoying the challenge. Kim, I appreciate your input about fixing the sails with hair-spray. I have read about using that and decided to try my wife's starch instead. It is less 'sticky'. It sprays on nicely and can be dried/ formed in a similar way you described with a hair dryer. I have taken a cautious route and only tried it briefly (not completely) on the three sails thus far. It works and I know that I can do more later after more of the rigging is in place. I might give hair spray another try on an old piece, but then, if disappointed, I might go back to 'starch' for the square sails. This is a bit like learning to play the F cord on a guitar!!?? I am still trying to finish more of the shrouds and other rigging before adding the mizzen top-sail with its various lines. For now, while the weather is rather hot here, I will postpone much action.
- 732 replies
-
- 2
-

-
- constitution
- model shipways
- (and 1 more)
-
Tools for scratch building
Modeler12 replied to ronald305's topic in Modeling tools and Workshop Equipment
Before scratch building a master piece, you might consider starting with a kit. The experience would give you a lot of insight about how and what kind of tools are needed to build one and then the other. I have done a lot of wood working over the years, but building a ship model from a kit is a whole new experience. I have slowly added some tools to do this and am now considering scratch building my next project. -
At the scale you are working, I would take a 'short cut' and make the parts out of card stock or an old photograph. The latter cuts nice and smooth to the same width for each piece. Below is how I did it on my Connie at 1:76 scale.

-
Looks great!!!
-
I agree that the sails would have been sewn all the way to indicate that they are seams. The scale of your model should also be considered when making the sails. I used a very light weight cotton for my Connie model which is at 1:76 scale. Anything smaller could lead to the scale problems mentioned. If I were you I would paint the emblem. They would never be exposed to the weather on your model and adding additional materials to both sides would make the sail too thick.

-
Here are a couple pictures of the copper plating I used. It starts with a roll of copper foil 1/4 inch wide. You can buy that at stain-glass hobby shops or at one of the model ship stores. Instead of cutting the individual plates, I cut the foil into sections about seven inches long. It saved me a lot of time and effort to align the plates. For more details you might have a look at http://www.brentjes.com/connyhull4.html


-
We are sitting in a lodge while the rain is soaking our tent and gear. Iguess this the year of wet vacations for us. We are here with the whole family so not all is lost.
-
GREAT DETAILS, GEOFF. Right now I am up in the mou, Mountains with limited internet, but I will follow up when Ii get back next week.
-

-
Well, not exactly. We were in Europe on a river cruise and got flooded out. The boat trip turned into a bus trip with sleeping arrangements on floating hotels. All river traffic had come to a complete halt on all major rivers in Europe. Here is where we were supposed to dock in Budapest. A couple of your ship boats would have been handy. It is good to be back home after that expensive excursion.

-
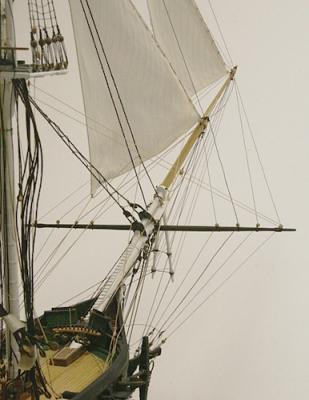
Geoff, you are doing fantastic work on those spars. I like the way you added the studding spars. The fittings are perfect. I am afraid I tend to go too quickly with mine and overlook the details. I just need to pay more attention to your work. Keep the pictures coming.
-
Jim, you are coming right along with those ratlines. Looking good, my friend. I know that too much time doing those things gets to you and to switch to others lines along the way is good for the 'moral'. Nice job on the bow lines. I just got back from our 'vacation' and will follow you progress with interest. Have you given the sails any thought? I assume you are still planning to add those six sails!!!???
-
Just so I don't get too confused, when you are referring to 'stay tackles' you are talking about the line that goes between the two pendant (one on the main and on the foremast). Right? One thing that is not cleat to me is when a boat, for example, is lifted off the center of the ship, the main stay would be in the way. It is right above the center and low enough to be a hindrance. I assume that some more manhandling would take care of that as the 'main and fore tackles' lifted part of the boat??? Were the main and preventer stays, per sec, ever used to help lift cargo (with an additional tackle, of course)?? I suppose that the pendants really got a workout for all of this. This whole subject is interesting.
-
Mark, Steve and Marc, thanks for the 'bon voyage' messages. Appreciated. We're actually leaving tomorrow, so I did have some time to work on Conny. I added the spritsail yard and all the rigging that goes with that. More 'confusion' at the bow. But I think I got it straight any way (including another pair of braces, six more eyebolts, eight more bullseyes and 12 more blocks). This is sounding like a Christmas carrol. I guess I am ready for a vacation. How any sailor could keep all those lines clear in his mind is beyond me. But when at sea for 'two years before the mast', I guess it gets ingrained.

- 732 replies
-
- 1
-
-
- constitution
- model shipways
- (and 1 more)
-
I would not mix. If anything you might consider a light color on port and a dark on starboard (or the other way?).
-
Not too much will be happening for the next three weeks.

-
Whow, that calls for a major overhaul, but repairable? Are you sure it was not the worms that got to this? Does it smell near those openings? Arsenic, may be? Seriously though, some of those 'compounds' do have an effect on bonding with PVA, for example. The top looks great, so I would spend some time on redoing the bottom. Consider using epoxy.
-
Right on Henry, and barrels, which is what I am interested in right now.
-
cable laid vs rope (left vs right twist)
Modeler12 replied to davec's topic in Masting, rigging and sails
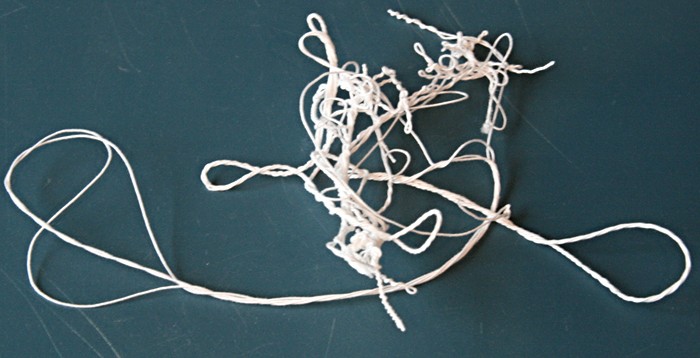
I am sorry Pat, but this reasoning is not correct. The tensile strength of a rope, or any other form, is dependent on the tensile strength of the material. When it is twisted it will affect the overall strength, but the direction in which is twisted has no bearing on that. If the material is twisted into a 'yarn' to start with, and if that should be twisted in the clockwise direction, then that should not be made into a rope that is also in the clockwise direction. The result could be disastrous as shown below when I tried that for 'fun'. Flexibility is not achieved by going that route. But perhaps I misunderstood your reply.
-
It is the one on display in Dublin, CA at their maritime museum and it was built by John Frazier using a solid block of oak with planking on top of that. I don't recall which ship it is.
-
Thanks John, I had a sneaky suspicion that the lower spars had to be used to make the transfer. To carry the heavy load I see additional 'lifts' were added to the spars. Great drawings. For the 36 foot pinnace I did a quick calculation and came up with a weight between 6000 and 7000 pounds. That means that each tackle had to carry around 3500 pounds. Even when that is broken up with a double and triple block it still is a heck of a job to man handle that kind of load. Obviously it took many deckhands to do this.