Modeler12
-
Posts
1,716 -
Joined
-
Last visited
Content Type
Profiles
Forums
Gallery
Events
Everything posted by Modeler12
-
 Ohio gaziamas, Bob. What do they call the Japanese art that involves folding paper to create things? For mine I actually used scissors. As I was cleaning off my work area and moved the three square sails, I realized that one of them was lashed to the spar the wrong way. It is upside down, but should be easy to repair. Boy, it is so easy to get things mixed up. Another 'gotya'. Thanks for you comments, fellows.
 -
When you consider that a lot of clothing are made out of polyester versus cotton. Which will tend to shrink in the dryer???
-
Port side done; tomorrow my 'good' side'. Oh, I forgot the little oval flag.
-
I was thinking of starting the boats, Goeff, and then I thought about the bow carving. I need to do that before the bowsprit gets too far along. I am going to experiment with a couple different ideas other than the styrene (I don't have any thick enough and the nearest hobby shop is quite a drive from here). I will let you know what the outcome is, if any.
-
Suggestion about soldering. I had trouble also with having the iron too hot and scorching the blocks or deadeyes. Since then I rigged up a 'dimmer' like you use on a house switch. I took a 'blue box' and front plate, but wired the inside so it has an extension cord with plug to go to the house outlet, and another socket at the other connection for the soldering iron. If you need more details let me know. After some experimenting, i found about the right setting on the dimmer to get the iron hot enough to do a good 'touch and let go' type of soldering for tiny parts. Like Bob said, and I think we all know that pretty well, make sure the wire is clean (no plastic coatings to protect it), rub it with steelwool and use flux. Then practice, practice and some more. Just like anything else. Don't try to make the first one perfect, it won't happen.
-
Air brushing
Modeler12 replied to wthilgen's topic in Painting, finishing and weathering products and techniques
Von, I appreciate that when someone does this kind of painting for a living or doing some major jobs that a spray booth is important. But for the typical small jobs we are talking about in model building, I wonder if some decent ventilation, care to keep your nose clean, and using acrylic (instead of solvent based) paints while wearing a mask is not really all you need. I have done some small work with the unit I have in my garage with the door wide open and have not noticed any bad effects. I grant you that all it involved was painting three masts and a few spars (at different times, no less). -
What is correct tension on rigging lines
Modeler12 replied to Beef Wellington's topic in Masting, rigging and sails
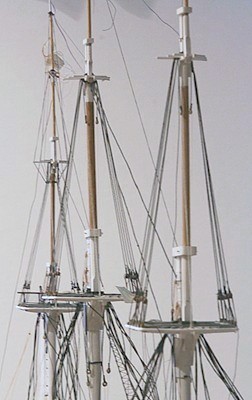
I agree with Norman about not being hasty in tying off the lines as you go along. I just finished doing the stays and top shrouds on my Conny and found that I had to redo a couple of those lines because as I went higher up those lines tended to distort what I had done before. It was not serious, but enough to see the difference. And believe me, your eyes are better than any gismo to determine tension. One problem, of course, is that the untied lines end up get in the way of what you want to do next. I did as much as I could, made a judgement call and tied off those lines I thought would be unaffected by what came next. Here is part of the result. I like to add one more comment about the effect on the masts alignment. When I started to do the rigging of the three masts seen above, I noticed that the main had a slight tilt to port (compared with the other two). As I went along with the topmast, topgallant and royal shrouds I kept that in mind but did not do anything really 'tight' about it. Sure enough, it did not take much because they now line up very nicely. However, to reiterate, the fore and aft alignment can be changed drastically with tension in the stays.

-
Thanks all you guys for the nice compliments. From now on there will be a lull. I need to get going on other parts of the ship and I don't know exactly what I am going to do next.
-
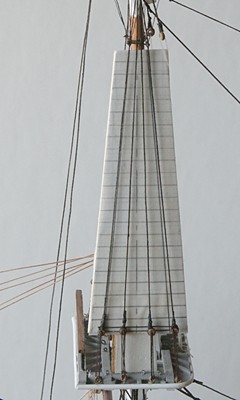
I had not finished the rigging of the topgallant shrouds when I took the pictures above. They are now in place and ready for the ratlines. The first picture below is the main and the foremast is second. The ratline template is for the mizzen. However, this will be a very tedious job and I may hold of for a while. My eyes are going buggy enough.

-
Jim, I tried your method quickly to see if it had any merits. I have some wire that is .009 inch diameter. That translates to about 0.7 inches on my scale. I made a template (which I need to do any way) and made a few attempts to use the thin wire. I finally gave up because I cannot see how I can crimp the ends uniformly as I go along. I know I am not following your suggestion to the point, but I also cannot constantly rotate my model to get to the other side. Thanks for this idea.
-
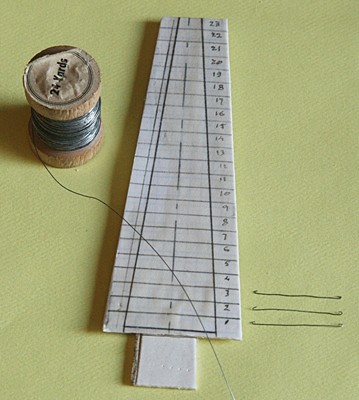
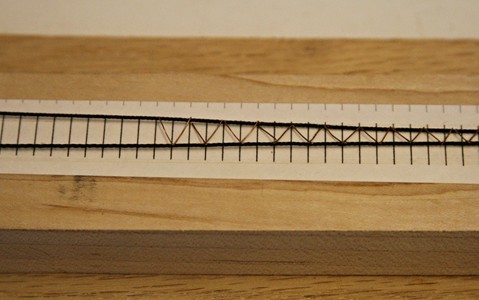
I used this same idea for making the 'snake' between the main and preventer stays on my Conny. The vertical lines you see are on the paper as a guide for even spacing.
-
Thanks Harvey. Indeed this is fun. Slow but fun. My wife keeps asking me, with a big smile on her face, if I don't get tired of bending over this thing. And I reply with a smirk, that yes maybe I need a break, any suggestions?
- 732 replies
-
- 1
-

-
- constitution
- model shipways
- (and 1 more)
-
Among the ratsnest of lines there is some hope, I hope. It is actually starting to look ok. Thus far I have strung, tied and served 28 deadeyes, and only 64 more to go I think it is about time those deadeyes served me. Time out for dinner and a good night sleep.
- 732 replies
-
- 1
-
-
- constitution
- model shipways
- (and 1 more)
-
If that is the way it was done, it is the same as whipping the end of a line. See http://en.wikipedia.org/wiki/Common_whipping It is the same idea that Frankie mentioned above. For an animated version see http://www.animatedknots.com/commonwhipping/index.php?LogoImage=LogoGrog.jpg&Website=www.animatedknots.com#sailors That, incedently, is a good source for all sorts of knots. If the lump is a problem, you might try to unwind part of the rope and spread out the final tie through the loop (make a couple loops). Somehow your first picture at the top seems like the rope is too thick compared with the mast.
-
Vince, that is exactly my point. The question was 'What tools are a waste', and my answer was 'conversion charts' for the simple reason you just mentioned. And my final point is to Dan is that 13/16 simply means 13 divided by 16 and in the formula i use a division comes before an addition. Hence 7 + 13/16 equals 7.8125.
-
Dan, have another look at the picture I posted just before you said this. Besides, my little formula is simpler than yours because I added the 7 to the division of 13 by 16. Then the whole thing is multiplied by my favorite number 25.4. The one thing I still think is crazy that here we are with a world wide membership of model ship builders and we cannot change the darn system to metric. Let's not buy plans and drawings unless they are in mm. Let's buy wood from our supplier and call out the sized in mm. or cm. Then we can all have a beer and smile.
-
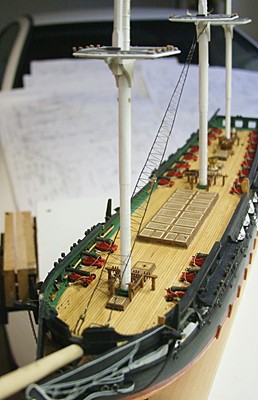
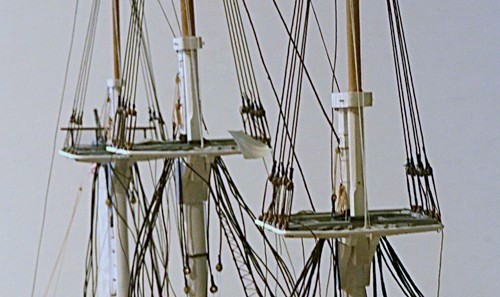
BUSY, BUSY and this is only the start. I still need to add the royal backstay, the various halliards, shrouds, ratlines, mizzen top sails and all its lines . . . . Slow but surely, i see some progress. Not shown are all the mast tops and most of the fore and aft stays. Now I am standing most of the time to work on this old lady.

-
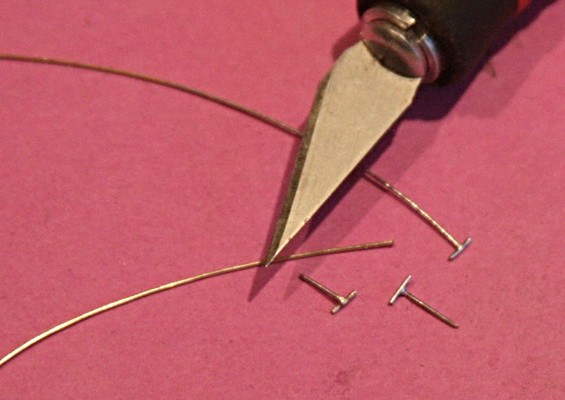
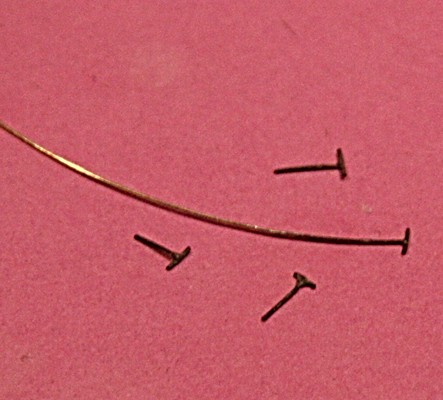
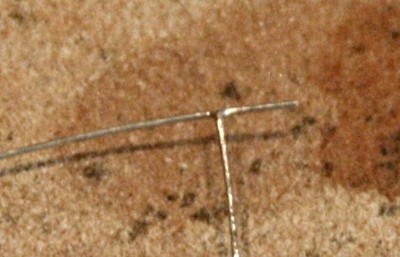
The question about blackening brass wire keeps coming up. Again if using some steel wool or sandpaper cleaning does not do the job for you, here is another option. If you are going to use the wire for strops or other parts that require soldering, do that first. I like to coat the wire with a thin layer of solder and then make the solder joint. I show this below for some tiny cleats I needed. After I trimmed the ends, I blackened them in the 1 : 2 solutions. As you can see that worked fine on the solder ends and only so-so where the brass wire was still exposed (the very end was not in the solution). These were very tiny cleats (I rejected one) that are for some thin halliards coming from above.
-
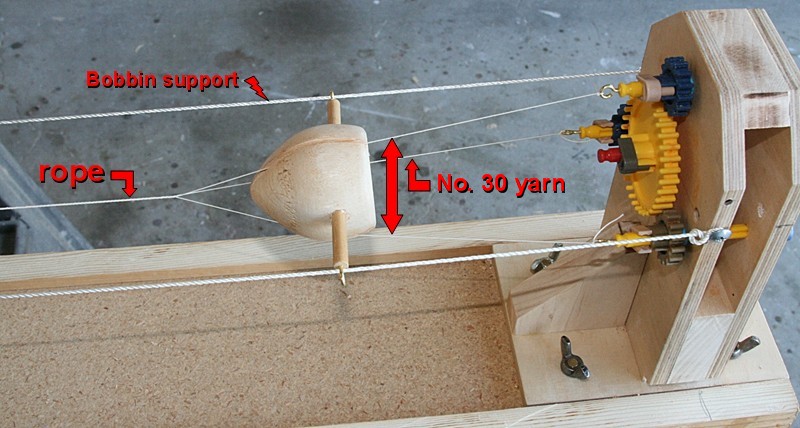
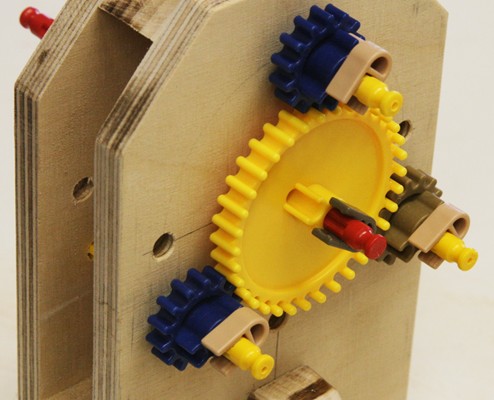
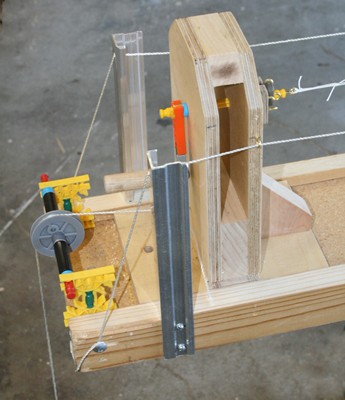
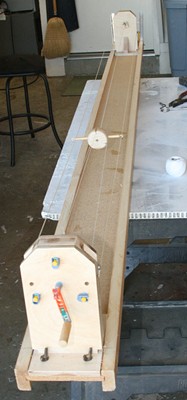
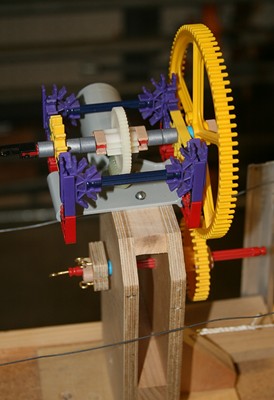
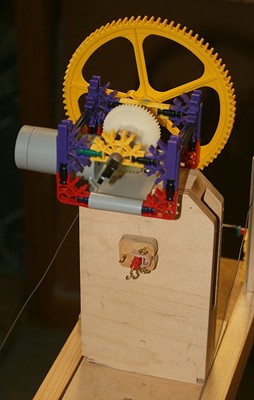
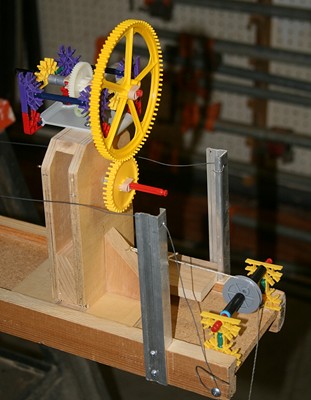
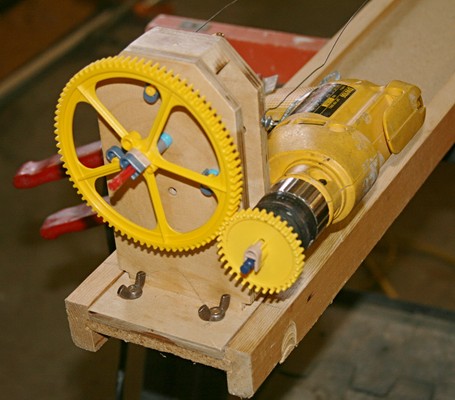
Some time ago I read up on making a ropewalk. The important part is that the three or four threads making up the rope have to be spun independently. It required three sets of gears. Along comes my grandson and his KNEX ‘tool box’. This toy is great for youngsters who have some interest in building things. It is a modern version of the ‘erecto set’ I used to have. I scratched my head and decided to use the various gears and shafts to build my ropewalk. The pictures below probably explain the details better than I can in words. The end to the left is the sled which has to be able to slide in the track. A string with the grey pulley has some weights hanging down to keep an even tension. Notice a little crank at one end. That was quickly replaced with an electric hand drill. Likewise another hand drill spun the other end. This worked fine and I made lots of rope. The problem was, however, that I have to be able to turn both ends as I am making rope. I would give one end a few spins, stop and go to the other end. One reason they call this a ‘rope walk’, I guess. Sometimes my admiral would help me, but she is not always available. So back to the KNEX tool box. I jury rigged one end with a large and smaller gear driven by a variable speed hand drill. Notice the twister tie on the trigger. Now I can ‘control’ the speed, use a switch at the other end to operate the drill while I was holding a hand drill at the far end. Still not good enough. KNIEX has several types of electric motors. I mounted one on top of the moving sled, hooked it up with another set of gears. Now I stand back and watch the action without touching anything except the switches. Besides, the results are much better with a more uniform twist all along the eight foot length of rope.


-
Ship Modeler's Workbench
Modeler12 replied to CaptCraig's topic in Modeling tools and Workshop Equipment
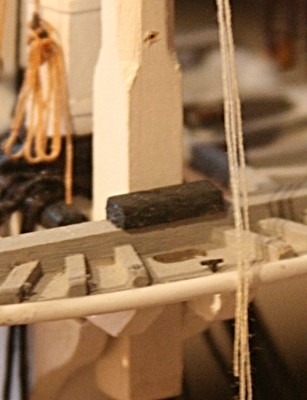
Sometimes it helps to think small. Here is a 'work bench' that is portable. Usually it sits on my work table, but now I have it mounted to an ugly block of wood so I can put it right next to the rigging I am doing. The upper shrouds had their deadeyes installed but I had to whip the ends of the shrouds. This helps me since I have only two hands.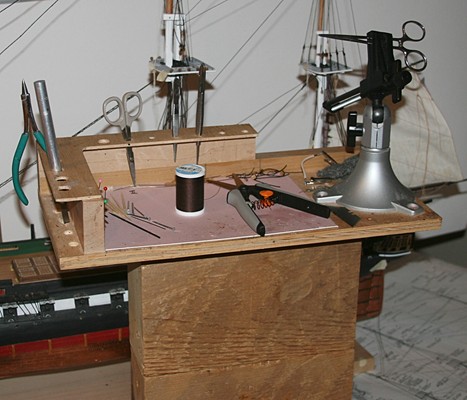
-
Roger an other way to learn about all these terms is to go along with your build and when you come across a term look it up in one of those books mentioned or have a close look at you plans. Don't sit down with a dictionary and read the words, just associate them with the parts in hand. I am building my first major model and that is how I am learning the lingo. A year ago I didn't know a leechline from a buntline (and I still get them confused some times).
-
Where do flag halliards go? Deck or top?
Modeler12 replied to Modeler12's topic in Masting, rigging and sails
Ok Frankie where did that come from? It is appropriate for me because when the model is in a display case the flags and banner will be at or above eye level and 'many an eye will dance to see'. Sorry, I had to look this up and of course I should have known: http://en.wikipedia.org/wiki/Old_Ironsides_(poem) But I had never read this before. I will add this to my collection of 'stufffff'. Thanks Frankie -
Where do flag halliards go? Deck or top?
Modeler12 replied to Modeler12's topic in Masting, rigging and sails
Here is my first crack at the banner. It is not the final size and it will be attached to the halliard, not the truck. But this gives me an idea how to go about it. The white and tan halliards you see are still hanging loose.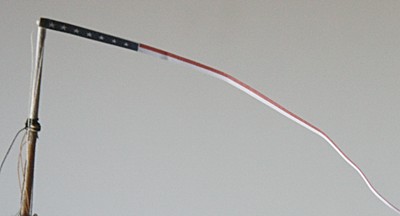
-
Where do flag halliards go? Deck or top?
Modeler12 replied to Modeler12's topic in Masting, rigging and sails
Great info, Henry. Thank you and I know exactly where to get it. I have written permission from the fellow who manages the flag web site I mentioned before. Here is what it looks like and what the Flag site explained: At one time, masthead pennants were extremely long; the 1854 Tables of Allowances issued by the Bureau of Construction, Equipment and Repair prescribed pennants measuring up to seven inches by 100 feet for ships of the line and 6.75 inches by 90 feet for frigates. Originally all U.S. masthead pennants had 13 stars, but, since those flown in boats to signify the presence of a commanding officer were too small for all the stars to be distinguished clearly, a seven-star version was adopted only for boats in 1854. With changes in the design of warships, the length of the pennant for shipboard display was gradually reduced until 1933, when the maximum size was set at 2 1/2 inches by 6 feet and the number of stars for all pennants was fixed at seven. The one exception to these specifications is the special case of homeward bound pennants. The term "commission pennant" was officially adopted in lieu of "masthead pennant" in 1922. I will have to redraw this full scale (and unfolded) in order to make a cloth copy. The same as I did with the others I showed.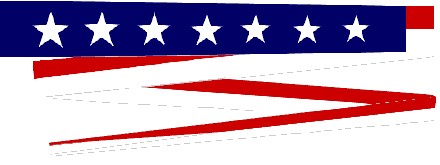
-
Steve, I have bookmarked your log. I have not even started to make the boats but like the way you and Geoff are going about them. Thanks for all the pictures they help a lot.