Modeler12
-
Posts
1,716 -
Joined
-
Last visited
Content Type
Profiles
Forums
Gallery
Events
Everything posted by Modeler12
-

Spanker inhaul/outhaul on the USS Constitution
Modeler12 replied to Jose Gonzales's topic in Masting, rigging and sails
I really think that you have the boom too high. For what ever it is worth here is a picture of the actual Conny in Boston. I am sure the picture was taken by someone at eye level. The boom is resting on the boom rest and would go up a little bit when sails are raised, but not all that much. My guess is in total from deck to boom would be about seven feet.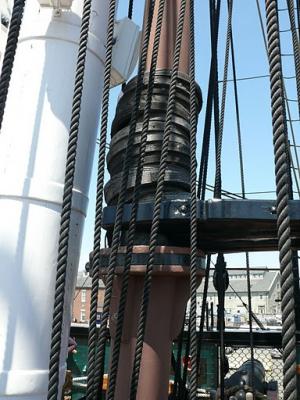
-
Michael, very clever design. I like it. If you have not yet solved the flapping ends, you might consider making a whipping for the last few windings. Here is an animated way, but I am sure you are well aware of this already. http://www.animatedknots.com/commonwhipping/index.php?Categ=ropecare&LogoImage=LogoGrog.jpg&Website=www.animatedknots.com
-
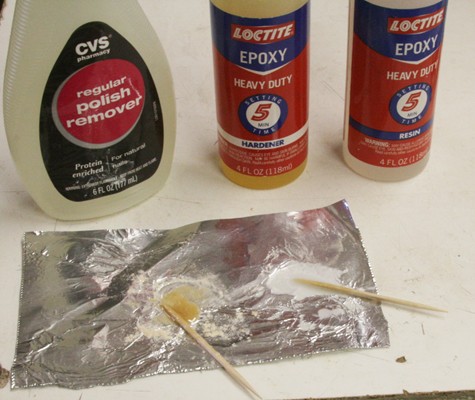
Clean up of epoxy with alcohol (I assume you mean the kind that you don't drink, Augie) is indeed easy. Acetone works great and you can use your wife's nail polish remover if you don't have the more 'pure' kind. A drop of acetone will thin the epoxy mix if you think it is too thick (too viscous). Some saw dust will thicken it. You can also buy the Loctite epoxy with a 60 minute pot life. But I found that a drop of acetone not only thins the mix but lengthens the pot life by quite a bit. Don't use acetone if you want the resin to cure fast. I have not tried alcohol for that purpose, but I assume that small batches will take longer because the solvent has to evaporate before full cure sets in. Likewise if you want to make it black, for example, add a drop of solvent based paint or black powder if you have it (graphite from a pencil). But don't use water.
-
Clamps, what kind do you use?
Modeler12 replied to Modeler12's topic in Modeling tools and Workshop Equipment
Wayne, I wished I still had the smaller versions of those clamps. Mine are now a bit rusty, large and clumsy. Steve, I have seen that also, but have not yet used them that way (way past planking on my current build). Dank je well Anja, dat zijn clamps die ik ook heb maar die gebruik ik meer voor groter karwijtjes. Word er nog steeds jenever in Schiedam gemaakt? -
Bob, you are reading too much. I just made two more 'adjustments' with the starch and hair dryer. Again, the result is not perfect but a lot better than when I fist started. Before fine tuning the jibs and spanker (which worked just fine the same way), I want to wait until I do the first square sail. Like I showed earlier, I did lie the ship on its side and propped up the stern to let gravity help me. I am not quite sure how I will be doing the square sails. They will be at a slight angle to simulate a starboard tack and show a bit more of the masts and rigging inboard.
-
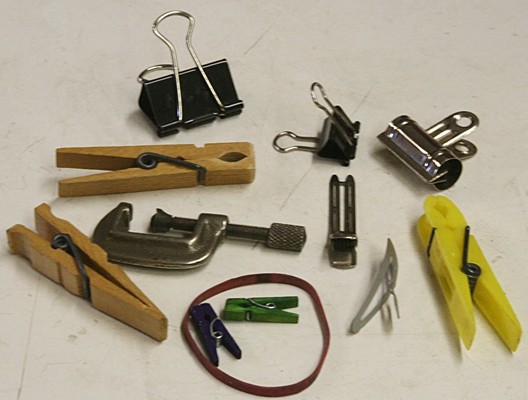
I keep finding more uses for various clamps and clips. What am I missing when looking at the variety below? There are small c-clamps, binder clips, rubber bands, hair clips and clothes pins (modified tips, large and small, and reversed). Not shown are a couple hemostats and tweezers.
-
When installing eyebolts epoxy is the best way to go. When I first started modeling I was using CA but quickly found out that the results could be very erratic. Some bolts pulled out with very little force while epoxy always held tight, especially when installed through thin planking. In fact, I ran some experiments and found that the epoxy bonded bolts would actually open up rather than pull out. The force was more than 10 pounds. PVA is no good when bonding metal to wood or itself. Hence, I would not rely on using it for that application. A couple more comments about being messy and time consuming. For me it takes hardly any more time to squeeze out two drops of epoxy and mixing it than grabbing a tube of CA. Once ready I can apply epoxy with the tip of a toothpick where as with CA I have to carefully squeeze out a drop and hope it won't be too much (as happens with all of us). To get CA on your fingers can be a real mess, especially if they are wet or sweaty. Once applied CA cannot be cleaned up with water and requires acetone to dissolve. I do use CA and PVA a lot. But more for applications such as stropping metal or rope to blocks and bonding planking to frames (wood to wood). In those cases they work fine. Even Harold Hahn, the master ship modeler, used epoxy for most of those applications as well.
-
I am another epoxy believer. Shelf life: I have a gallon container of resin (half full) that I have had for at least 10 years. The hardener likewise lasts 'forever'. Usage: I use the five minute epoxy most often and use a toothpick to mix a tiny amount on a piece of scrap wood. Strength: As mentioned, epoxy is one of the strongest to bond almost anything to anything. Metals no problem as long as they are clean. It is used in aircraft, spacecraft and lots of other crafts including sail boats. Gap filling: Once cured, the epoxy itself is very strong (which is not true of most of the other glues mentioned). Because of that, epoxy can be very useful when bonding parts that have a gap or sloppy fit. I am using it right now to hold spars to the mast. Once epoxy is cured it has to be removed by cutting it away. Hence it is pretty permanent. Even acetone will not do the job in most cases. Methylene chloride works but is awful to work with. Messy? Other than quickly mixing two parts together (as I mentioned above), the mix is no more messy than any other glue (at least in my opinion). The gallon container of slow curing epoxy I have is very fluid and I may have to add a filler (sanding wood dust in most cases) to increase the viscosity. That adds to the 'messiness'? I will always wash my hands after using it, because I know that the skin of my arms are sensitive to it. But what is messy about that?
-
I agree: don't glue the masts unless you are absolutely sure every else has been taken care of (and that is much later during the build). Drill the holes close to what you think is needed. Step the masts into the deep holes and use a 'template' to make sure they are somewhat lined up fore and aft, and then go forward. Fine tune later.
-
Steve, I like what you are doing with the different types of wood and colors. Are you using stain or actually different woods? I am taking notes because sooner or late I will have to tackle those little guys and it looks like a lot of fun. Some time ago I picked up various pieces of wood from McBeth, in Berkeley. They specialize in exotics and have a scrap bin where you pick out what you want and pay by the pound. Some of it included ebony, walnut, mahogany and some blood wood. Below is a nativity scene I made for our grand-kids. It is actually a puzzle with different joints that take some time to figure out and assemble. There is no glue, just dovetails, dowels and sliding parts. And, no, I did not carve the figures. I have several pieces of that wood left over and can use that for the boats.

-
That my friend, is because there was a light wind a few days ago. They were just luffing. But now, after, some adjustments with Mother Nature and her spray starch, a warm breeze is coming from about north by northeast and the jibs and spanker are nicely filled. The topsails are begging to be raised and set. It is hard to take pictures showing what they really look like because of the light, shadows and background. And since I am not a pro at taking pictures I will leave it at that.
- 732 replies
-
- 1
-

-
- constitution
- model shipways
- (and 1 more)
-
Furled , unfurled or no sails -Preference
Modeler12 replied to Canada Steve's topic in Masting, rigging and sails
Scot, I decided to use the six sails as the USS Constitution used during her last sail in the harbor of Boston. Someone mentioned this was one way for battleships to enter an 'engagement'. The six include the spanker, three topsails and two jibs. I have raised the spanker and jibs and am now working on doing the same with the three square sails. Like you said, this will show some action while looking at the deck with all its 'furniture'. -
Spanker inhaul/outhaul on the USS Constitution
Modeler12 replied to Jose Gonzales's topic in Masting, rigging and sails
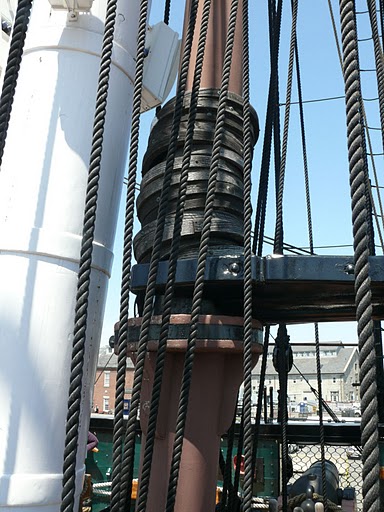
Marquardt's book shows it that way and so do the plans for the Model Shiipways kit. I put the outhaul cleat where the plans call for it, but now that you mention it, that would be a long way up from the deck. It is not too bad when the boom is in its saddle. I am surprised that it is not closer to the mast, so one could climb up that part to reach it. Lots more things to hold on to. -
Geoff, if there is one thing I keep running into is the numerous eyebolts all over the place. Even if you don't have sails there are so many little things such as blocks on rigging lines which are then attached to the masts, etc. I am getting a bit better at making eyebolts (I assume you are too). But as soon as I think I have enough, a few days later I find some more are needed. Right now I am hoisting the spars. Royal spars no problem. Then the halyard for the topgallant spars had to come down because I forgot to add a block at the end where the block is also attached to the mast. At the places where lines go through a spar or mast I may have to redrill holes that got plugged with CA (around the mast with the shrouds in particular). But slowly it is coming together. Meanwhile I am drafting up plans for my next venture.
-
You know Alistair and Bob, this hobby can be habit forming. Every time I start something on this ship it is a different experience. Be it planking, making masts and spars, or rigging (not to mention making sails on a sewing machine), there is always a challenge ahead. Right now I am starting to add the spars to the top and attaching the halyards to their lanyards. I will keep them close to the final length but not permanently attached to the channels. I keep thinking to do as much as I can from the inside out (meaning belaying the various lines around the masts). That is why I am holding off with the bottom shrouds. After the top spars are in place I will switch over to the bow again with the spritsail spar and more lines there.
-
Bob, there is one little problem with bearings. They have a tendency to roll. When I added more they all concentrated in one spot and made a bulge right there. Thus far I have found that more than one treatment works best for me. I can then decide what areas need a bit more, etc. To be sure, the hair dryer is important because it does help to smooth out wrinkles. (Don't tell your wife I said so). I suppose I could use smooth pebbles, but have not tried that. Maybe when I do the square sails.
-
Furled , unfurled or no sails -Preference
Modeler12 replied to Canada Steve's topic in Masting, rigging and sails
JRB you have a lot of questions that cannot be answered in a few sentences. I suggest you get the book by Lennarth Petersson 'Rigging Period Ship Models'. It will answer all your questions and then some by way of more than 100 pictures. -
Yes, I have seen a picture of that setup and tried it. My problem was that the two fans I tried to use did not have enough flow and the bellowing was not much. The method also involved using thinned white glue which created a mess plus (at least on the square sails) I had to add a lot of lines and reefing knots. That would add to the mess. I gave up on that, but may try the starch again on the square sails before or after they are up. This afternoon I gave the jibs another coating and thus far they are going in the right direction. The flying jib needs a little more attention.

-
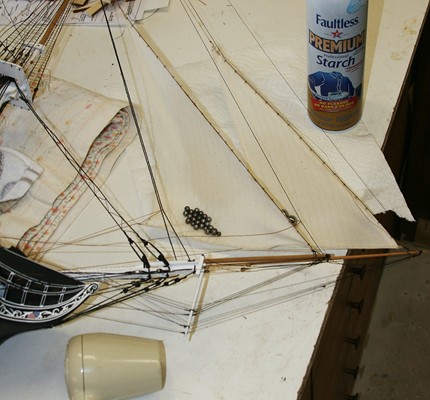
After the two jibs were rigged, I tried to make the sails look filled. I put the model on its side, put some ball bearings inside the sails and sprayed them with a thin coat of starch. That was then 'set' with a hair dryer. Starch works. It stiffened the sails, but I did not get the results I wanted. I am going to do it again and distribute the bearings to other locations. I want to see if I can get nice full sails. Then I also noticed that the starboard sheet was twisted around one of the other lines. Luckily I had not tied that one down and can redo the sheet tackle on the port side. I also had too much tension on the 'loose' starboard sheet. It distorted the two stays. When on a starboard tack, the windward sheet should be lying loose. Some of the other running lines you see are the downhauls and outhauls for both jibs. So, a couple more corrections. At least the halyards worked out very well. Sorry, no picture.


-
Painting White Metal
Modeler12 replied to Micklen32's topic in Metal Work, Soldering and Metal Fittings
Mick, since you have obviously started to paint and would like to start all over again, I would check with a paint store and buy some paint stripper. Again be sure all is clean. Then follow the good advice listed above (well may be not all, because I have a feeling that you don't want to get involved with airbrushing, etc). -
Thanks guys. I just hope the anchor will hold. The sails are still luffing, but not for long. Next step is to rig the halyards and sheets. I will also add the downhauls. it means more blocks and I may run out again. I keep thinking to do as much as possible from the center line outwards. In the case of the halyards I might even go from the deck upwards.
-
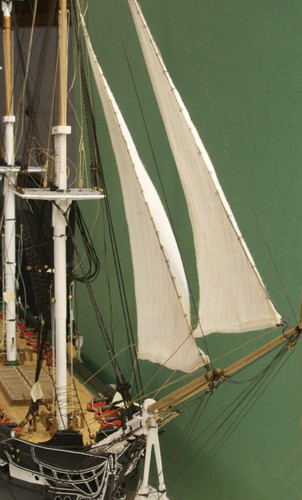
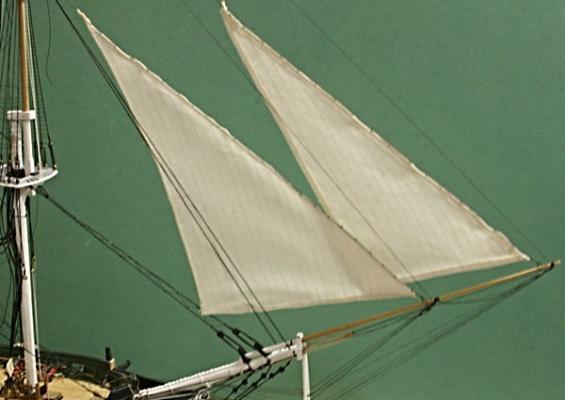
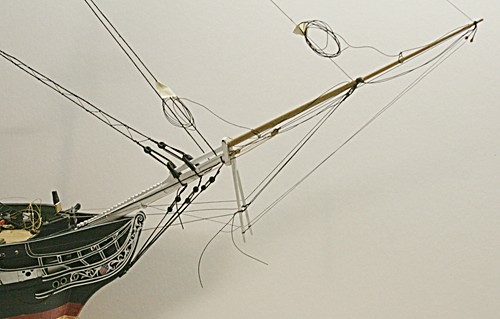
Jib and flying jib as a dry fit. No halyards, no sheets, just a flutter of sails.
- 732 replies
-
- 1
-
-
- constitution
- model shipways
- (and 1 more)
-
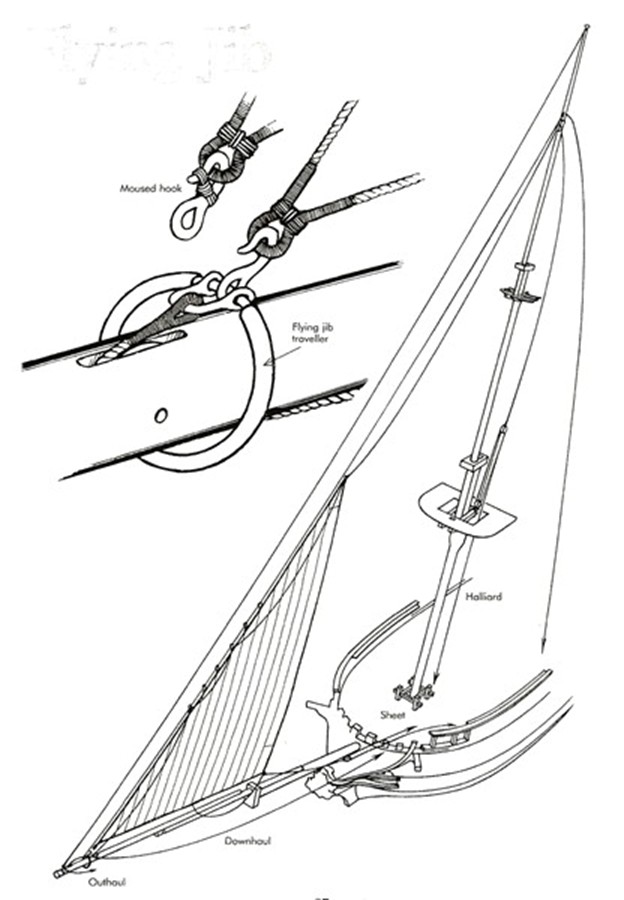
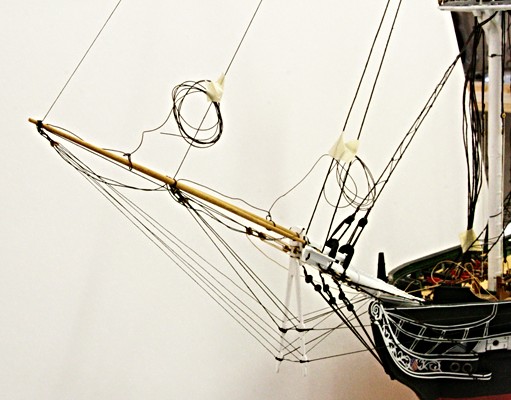
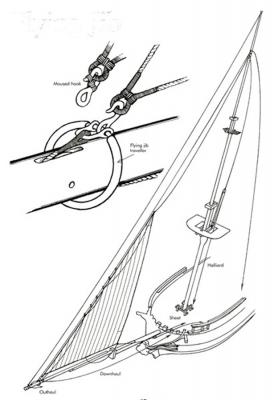
The bow rigging is almost finished. Now I want to raise the jib and flying jib sails. That is what the loose lines are for. However, the plans do not provide information about the halyards nor sheet sizes and how they are to go. The belaying plan is the only thing to go by. To make things more confusing is that in Marquardt's book the belaying of the halyard is done along the bulwarks. That does not make sense because the halyard would have to be fed in between the shrouds. Then in Lennarth Petersson's book the picture is clear, but he shows the halyard at the deck to go through fore bits, not just any old pin. I like Petersson's approach best so I will go with that lay out. I will just wing the line thicknesses and block sizes. He also has a nice picture of how the jib sheets are rigged. Too bad he does not make any attempt to identify block or line sizes. I might add that the 'loose lines' I show above are the jib and flying jib stays. The sails will be hooked to them. The sketch shows them going to the bulwark to the far right. That is for the flying jib; the jib stay goes to starboard. My guess is that these two lines need to be adjusted when the traveler moves back or forth (depending on whether the sail is lowered or raised). Hence these stays go to a pin. I will still make them black.
-
As I go along it becomes more evident that there are too many lines on this bow. I know, someone will say they all serve a purpose, but it is lost on me. I keep adding rope, learning why they might be there and wonder what those old folks were trying to do to us. We are the ones who want to follow their lead, right? When I think of the bowsprit as a horizontal (almost) mast, the sides are 'stayed' by the bowsprit shrouds (not yet there) and the others are also like stays. Then there are all those other lines that basically are intended to help that whole business. What a waste when you think of how the modern sailboats are put together. Why didn't they have better materials back then, like aluminum and stainless steel, or kevlar? Anyway, so much about my thoughts on 'old times'. Models are still interesting to make. And for the time being I am not going to identify each of those lines.
-
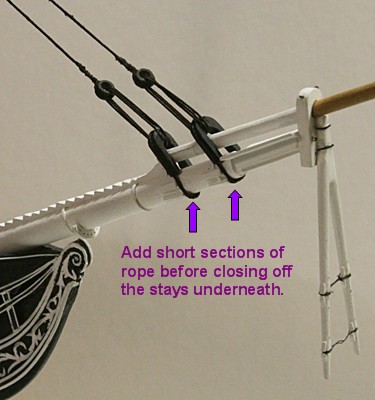
Thanks you guys. Like I said the bow has numerous lines. Looking at the plans I just realized that there are four more bowsprit stays that go to the side of the ship. Two on each side. More bullseyes to make. Geoff, stock up my friend, sooner or later you are going to run out. I also realized that I had put the eyebolts for those lines in the hull a long time ago and did not use epoxy back then. They are awfully loose and will have some tension on them. More epoxy work. One more suggestion about the bow. When I put in those two large forestays with the open hearts, I closed them off underneath the bowsprit. What I should have done is to add three short sections of line (three for each stay). One should go underneath and one on each side. They would be used for those side stays and the one that goes to the stem. I ended up having to drill a small hole under the 'strap' and feed a rope through that. Tedious and not necessary if I had thought about it at the time. Another 'gotcha'.
- 732 replies
-
- 2
-
-
- constitution
- model shipways
- (and 1 more)