Modeler12
-
Posts
1,716 -
Joined
-
Last visited
Content Type
Profiles
Forums
Gallery
Events
Everything posted by Modeler12
-

what powertools to buy
Modeler12 replied to Adrieke's topic in Modeling tools and Workshop Equipment
Routers are not too useful for model ship building. I have done a lot of woodworking and I have three routers (one handheld plunge, one table mounted and one for doing dovetail work). Since I started making my ship model I have not touched any of them. One reason is that the smallest bit I have is 1/8 diameter and my setups are too course for any of the detailing. Cutting grooves and making molding can be done with razor blades that have a pattern cut into the edge. Use search here to find out how. -
How to install pedestal stands
Modeler12 replied to LMDAVE's topic in Modeling tools and Workshop Equipment
If you can turn your model completely up-side-down it would be simpler to locate the spots for the two holes and drill as close to vertical as you can. Of course, the question then is how to hold the model in that position. You might consider having someone hold it as steady as possible. The other way is to hold the model sideways and do the same thing. Either way you have to make sure the drill goes in perpendicular to the keel. I would not worry too much about the hole through the baseboard. In fact, you might want to drill that hole a bit larger as long as the brass pedestal covers it. You want to have plenty of clearance because to accurately locate and drill the pilot hole in the keel is difficult and any deviation can be taken up with the base hole. Once this is all done, I would agree with Chazz that 'you don't really need much to hold the hull to the baseboard'. But if you mount the model early in the game (like I did and I also used a 'working' base) there could be a lot of twisting and sideways movement while handling the hull. It is the sideways forces that can cause problems. -
Hi Jim, I just sent you a little note not realizing you found my build log here (and Alistair: no problem hijacking OK?). As I mentioned, this is a great forum and in my opinion a lot better than Mr. Hunt's. It has a great membership from all over the world. Even New Zeeland I have learned a lot from all these pros.
-
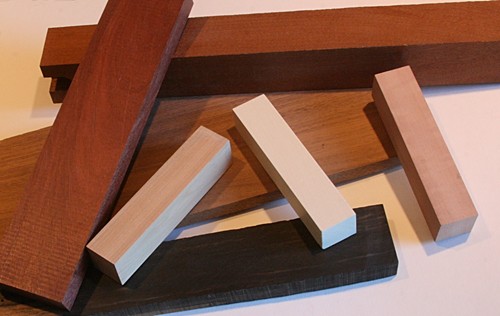
That is one reason I wanted to plan this thing well in advance. I have some different kinds of wood but will need to order much of it precut. Below are samples of ebony, bloodwood, walnut, mahogany, Swiss pear (right), boxwood and holly. So there can be lots of contrasts. The bloodwood, for example, could be for the bulwarks and gun ports, holly for the decks and walnut for the hatch trim (like I did on the Conny). Any way there is lots of time before I go too far.
-
Thanks Jeff. Now that the cat is out of the bag, let me add that I would like to use wood as much as possible and minimize paint. That is why I want to do some planning about the kinds of wood for the various areas. I might even consider using ebony for the lower spars like Harold did. He used that black stuff a lot and I have never tried it (even though I have a piece on my shelf that has been there for eons). The other thing is that I want to accumulate information about what typical cargo might have looked like and I would love to hear from others about that. Barrels, of course, what about extra sails, carpentry wood, spare parts, etc?? Mark Taylor has already given me a great web site for French ship models. Since this was a former French privateer, that might make the interior more interesting (I am thinking ovens, furniture, etc).
-
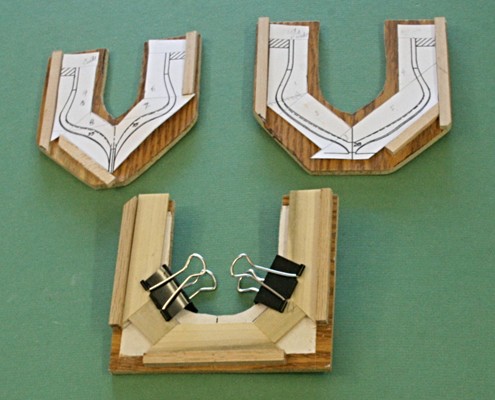
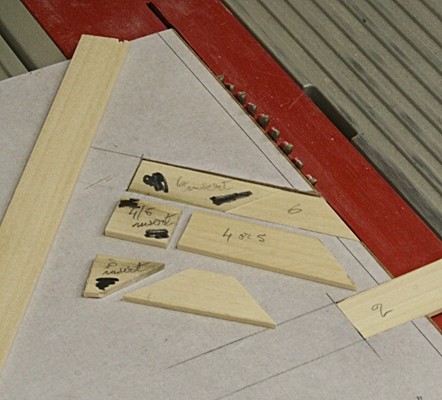
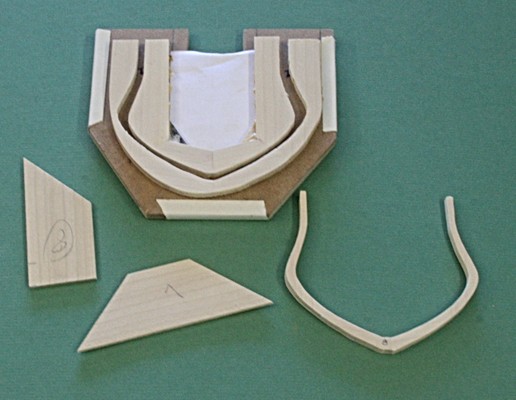
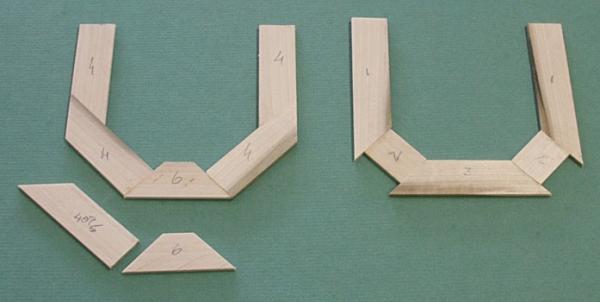
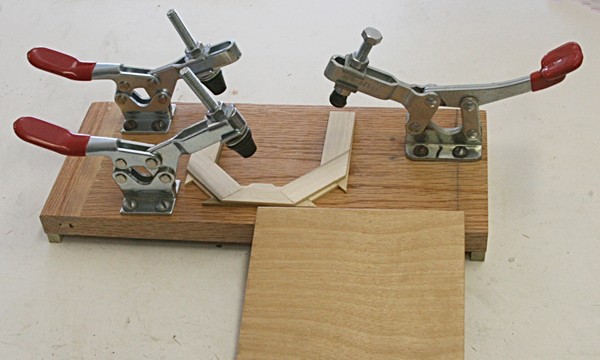
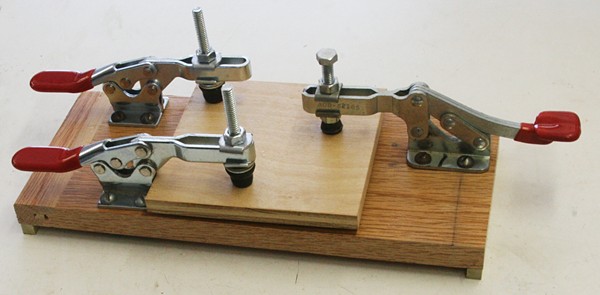
Although I am not yet finished with my current build, I went ahead and decided to buy the plans from Chris Hahn (Harold Hahn’s son). The ship is the Pelican which was captured by the British from a French privateer when it was still the Frederick. Harold Hahn described the history in his book and also showed how he made this rather small ship model. I was intrigued by the fact that it is made with frame and plank construction (something I have not yet done) but yet is mostly planked, whereas most of his other models leave the bottoms open to show the frames and parts of the interior. This model has one side fully planked, but the starboard side has a large section that is cut away to fully show the interior along with a couple of the frames. I like that idea since it gives me a chance to show the actual hull construction as well as the living quarters and storage areas of this ship. Harold made this model to his usual 1/8 to the foot scale. I decided to increase that to 3/16 or 64:1. Hence the first thing I did was to enlarge the three drawings in the package from Chris. The reason I am starting this log is to show what I have done thus far. I wanted to make sure I have some idea what I am getting into, what kind of tooling and materials I need and then put this aside until I am finished with my Conny. So, what have I done? At first I thought I would go all out and use boxwood for the frames. I quickly found out that to do that would mean throwing a lot of nice wood in the garbage can. Harold made his frames by laminating several pieces together such that the grain runs mostly in the ‘strong’ direction, but also he used two pieces on top of each other with the seams located in different sections, thus strengthening the whole part. He also basically used one shape for all of his ‘solid’ frames and another for the canted frames and those that are attached to the deadwood and stem. I followed his method and made a couple laminates, glued them up and cut out one frame. The picture above shows that I used strips that were 1.5 inches wide by 3/32 inch thick. It also shows all the waste involved. To make one laminate uses six different shapes. The angles of these shapes varied from 90, 75, 60 and 45 degrees. A lot of setups and pieces!! At this point I re-designed this by using pieces that have only 90 and 45 degree cuts. I also reduced the width from 1.5 to 0.75 inches. This saves a lot of material and is also easier to rip. Even at that, I used poplar wood since most of the frames don’t show any way. Those dark areas are not burn marks. It is part of the wood coloring and has no effect on the strength. To be sure, this does not work for all the frames. There are a total of 45 frames and I was able to make the new setup work for 20. For the others I had to go to one inch wide strips and make two fixtures as shown below. But I still was able to limit the angles to 90 and 45 degrees. Again I made sure that there are no narrow cross sections with the grain running in the ‘wrong’ direction. Harold had a nice idea for cutting the pieces from the strips. He made a fixture that fitted his table saw. It had cutouts for each piece. I did something similar but instead of a cutout for each segment, I made ‘inserts’ (marked with a black dot) that would allow me to cut the six segments using only two slots. My table saw has a sliding table which is real handy for this kind cross or miter cutting. After the two patterns are edge glued, they are laminated back to back. For this I will be using the fixture with the three toggle clamps shown below. After fine tuning the height of these clamps they can apply a lot of pressure. I will be using PVA for this bonding, and, yes, wax where glue might stick to the fixtures..
-
gluing on oiled wood
Modeler12 replied to klimi's topic in Painting, finishing and weathering products and techniques
When you say you have 'oiled the hull' do you mean you have actually used oil on it or is a 'finish' that is called oil, such as Tung Oil? The reason I ask is that if it is a wood finish that you have applied you should read the instructions on the can and perhaps all that is required is a light sanding before bonding. ??? -
Storing all those lines and ropes
Modeler12 replied to Modeler12's topic in Masting, rigging and sails
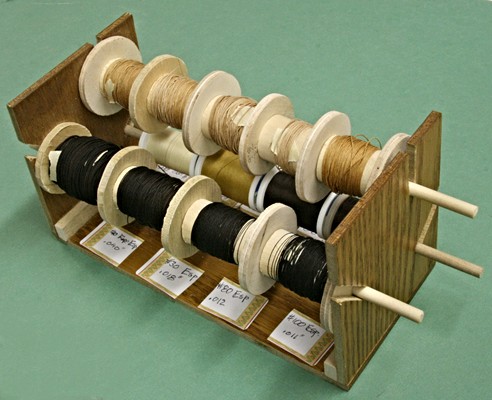
What I like about this thing is that it is small enough to move around and since I do some of my work in my office (when it is too warm or cold in the garage) it is handy. Notice also that each spool (except the threads) has several pieces that are held in place with a piece of tape. Before I had these darn short sections all over the place. -
I agree with a lot that was said above. But when you think about Tung Oil, for example, it is an oil and would not be too good for adhesion with PVA. Epoxy might do it for you, but why not consider a water-based finish? I have used water-based polyurethane for years and even glued parts together with that coating (after a light sanding) using carpenter's glue (not white glue). JPett mentioned General Finishes as a good manufacturer. And indeed they have all sorts of good products including the water based versions I mentioned. Check http://www.generalfinishes.com/retail-products/water-base-top-coats-sanding-sealers/high-performance-polyurethane-topcoat#.UY78raKsiSo
-
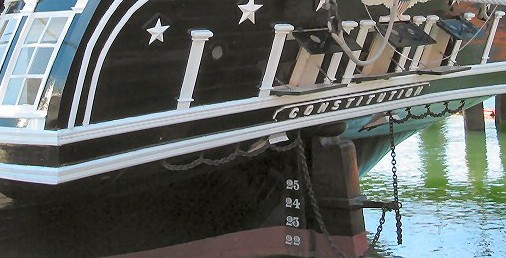
I agree with Jean Pierre. The picture below shows two chains that are attached to an extension of the rudder. This looks like more than just a way to save and retrieve a damaged rudder. It is another way to steer.
-
How to install pedestal stands
Modeler12 replied to LMDAVE's topic in Modeling tools and Workshop Equipment
Absolutely yes, drill pilot holes. I would suggest that you try this first on a piece of scrap that is about the same thickness as the keel of your model. Preferably of the same kind of wood. The drill bit should be about the diameter of the 'root' of the screw. Meaning the thickness of the screw without the thread. The idea is that the screw thread should be biting into the wood and the body of the screw has clearance. There are tables for this but they are intended for 'wood screws' and what you show looks like a deck screw or sheetrock screw. Again experiment. -
That is only a fraction better than "Passa Blocks'. Any others?
-
Not as a profession, if that is what you mean. I just like to make saw dust. Have done so for many years in my spare time. Besides furniture I have made wooden toys, garden gates, and a lot of scrap. And Janos, I agree with you that a bit of variation is good in most cases. If your model is not supposed to represent a brand new ship but one that has been out at sea a lot, the running rigging will age, has to be replaced from time to time and would not look the same. I have seen pictures of 'modern' sailing ships in port that show all beautiful white lines hanging from the belaying pins, but I wonder how real that really is.
-
Thanks Mark. Since you know what I am thinking about, I will go the Hahn way. I might make a couple frame laminates of woods like cherry, poplar, mahogany and birch (all of which I have) and see what gives. I also have some walnut and oak but I don't think those would work too well. Still in the planning phase.
-
I don't want to go way back but do have a question about the frames. Harold's plans that I have seen use up to nine pieces of wood to make each frame. Then he cuts the laminated sections to the shape. That results in a lot of waste. Is that how you did it? I was thinking of using boxwood but now realize I would be throwing a lot of nice wood in the garbage can. I probably will be using a less expensive wood for the frames.
-
While rigging all those lines and ropes for stays, shrouds and running lines, I had a tangled mess of different pieces lying around. After staining I had some that were coiled and stored in envelopes while others were wound on wooden scraps. Finally I decided to make a little gismo to store them. I took some one inch dowel, drilled holes and made the frame you see below. The spools can be taken off and others put in place. One section is for sewing thread I use for whipping. Little tags on the bottom keep track of what I have. There is still more but I decided to only keep the ones I use most often on this rack. The whole thing is about seven inches long. It is not pretty, but effective.
-
No apologies necessary, J.Pett, and I will join you in a beer. The last time I was in Texas, though, we were in a 'dry county' and beer could only be bought at a 'coke machine' with special coins at the 'country club'. But I am sure you know the routine. I had a look at the 'ebony veneer' at Rocklin and indeed it was called 'Mexican ebony' but really was Katalox, which is a dark brown wood much like the stain I use to 'tar' ropes. Interesting.
-
Woodcraft has a store about four blocks from where I live. I consider that local, don't you? Now ebony is not exactly local. Again, Rockler carries a lot of things and I have their brochure near by and have ordered from them in the past. But I prefer others if I can. Just a personal thing because of one bad experience that has nothing to do with this discussion.
-
Yes, Rockler does carry a lot of items. Most are intended for folks like us who like to 'hobby around'. I have bought several things from Rockler in the past, but afterwards found that in general I could do better by going on line with other places (McFeely's for one) or simply go to my local hardware store. The selection of wood 'samples' from Rockler may seem good, but it is not the kind I would consider useful for ship modeling. Am I stepping out of bounds on this one?? BTW another place (a bit expensive but with very good quality stuff) is Woodcraft http://www.woodcraft.com/search2/search.aspx?query=exotic%20wood Sorry, perhaps a better site is http://www.woodcraft.com/category/1001038/wood-products.aspx
-
Having said the above about Hobby Mill, let me add another source for rough lumber to the list that was started. http://macbeath.com/information/contact/contact.html MacBeath is a large retailer in all sorts of wood and has locations in a few spots in the US. Check out the heading 'products/exotics'. I have been to the store in Berkeley a couple times to buy wood for my furniture projects. But what I like is that they have a 'scrap bin' with all sorts of leftovers that is sold by the pound. I have some bloodwood, ebony and others. I don't know if other stores have the same thing. But you might contact the above if you want to find out more.
-
Gary that is great. Thank you. As I mentioned, I was thinking of using six feet for the 6 pounders and that seems to be about the right choice. Does the book (lucky you for having a copy) mention anything about who Armstrong and Frederick were. Was Frederick a Frenchman by chance? I know there was a French privateer ship that was named Frederick. Just curious. Right after I posted the above, I found an interesting article that not only explained who the two fellows were but also more details about gun design. Apparently Armstrong's designs were not very good, according to the article they all failed. http://arc.id.au/Cannon.html
-
Mini table saw blades
Modeler12 replied to bigcreekdad's topic in Modeling tools and Workshop Equipment
Have a look at this http://www.hobbymillusa.com/byrnes-saw-operation-2.php The blades can be bought direct from Thurston. Here is their web site http://www.thurstonmfg.com -
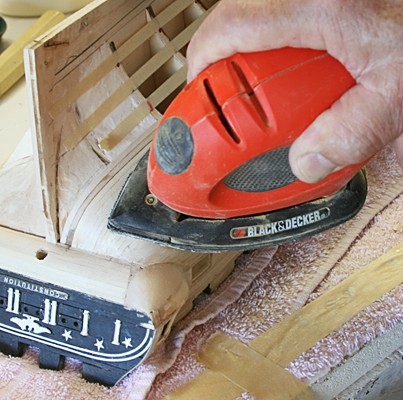
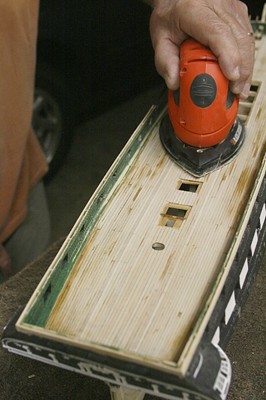
Here is another tool. It is called a 'mouse' made by Black and Decker and sells for about $35 at Home Depot. I have used it to sand the deck and hull and for this kind of work it is a fine little sander. It comes with different size 'feet' for tight corners.