


Brucealanevans
-
Posts
450 -
Joined
-
Last visited
Reputation Activity
-

 Brucealanevans got a reaction from jablackwell in Charles W Morgan by Brucealanevans - FINISHED - Model Shipways
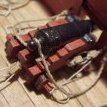
Update.
Here's the tryworks. I haven't put the side braces and wood sheathing on yet.
This took time but was not really hard. Took some time mixing paint to get a good brick color that wasn't too red - the admiral didn't like the color on my test wall of bricks.
Almost 500 bricks!
I'm relatively pleased, although the eye goes immediately to the "errors". One chimney is a bit wider, and the walls sloped in enough that I had to mount the cauldrons below the top rather than having the room to drop them through the top.
However, I like the overall effort as my modeling skills improve (3rd wooden ship build).
After the supports/sheathing, probably will make the tank and scrap box before moving on to the next most fiddly bit - the winch. I'll have to dry fit the bowsprit and put the bowsprit bitt in place first, I think, and likely the framing for the anchor deck.
-
 Brucealanevans got a reaction from Julie Mo in Charles W Morgan by Brucealanevans - FINISHED - Model Shipways
So I've finally finished the planking and a rough sanding. Some work on filler for cracks, etc. yet to go.
-
 Brucealanevans got a reaction from DavidG in Charles W Morgan by Brucealanevans - FINISHED - Model Shipways
Update.
Here's the tryworks. I haven't put the side braces and wood sheathing on yet.
This took time but was not really hard. Took some time mixing paint to get a good brick color that wasn't too red - the admiral didn't like the color on my test wall of bricks.
Almost 500 bricks!
I'm relatively pleased, although the eye goes immediately to the "errors". One chimney is a bit wider, and the walls sloped in enough that I had to mount the cauldrons below the top rather than having the room to drop them through the top.
However, I like the overall effort as my modeling skills improve (3rd wooden ship build).
After the supports/sheathing, probably will make the tank and scrap box before moving on to the next most fiddly bit - the winch. I'll have to dry fit the bowsprit and put the bowsprit bitt in place first, I think, and likely the framing for the anchor deck.
-
 Brucealanevans got a reaction from dgbot in Charles W Morgan by Brucealanevans - FINISHED - Model Shipways
So, here is the skylight in place.
I'm relatively pleased with the result, although there's too much overhang of the top window panes - the coaming I put in place was thicker than it should have been so the base part was slightly smaller, and I didn't allow for that when I built the top from the plans.
Overall tho, pleased with the result. 2 weeks of intermittent work.
Next on to the next most fiddly bit - the tryworks. After a break.
-
Brucealanevans got a reaction from dgbot in Charles W Morgan by Brucealanevans - FINISHED - Model Shipways
I put a piece of wood into the window to hold the work while I was adjusting. It had rapidly become clear that otherwise slats or rods would squirrel out and I couldn't finish one until I came up with this. Not necessary on the single panes for the top since those could rest on the table during construction.
Then I lined up the slats, being careful to retain the orientation from the drilling in the jig.
I decided to use very small diameter steel rod/wire rather than copper, because it was smaller, and wouldn't bend during adjustment. The perfectly straight rods give a better look, in my opinion.
After cutting a piece slightly smaller than the distance between the pillars, I then would ease the rod through the same hole in successive slats. Trying to put all the rods through the holes and then dropping the assembly into place seemed like a better method, but it didn't work for me. The holes in the slats (smallest drill bit that my drill press would handle) didn't "hold" the rods, and they would inevitably slide out during the manuvering. After multiple tries I had to go to this method, which is maddenly tedious but I was usually able to succeed in one or two tries. Magnification helped to align the rods and the holes in successive slats.
Very difficult, especially for someone who has an espresso addiction and two espresso machines in the kitchen.
The slats could be moved around to allow a fine tweezer access to guide the rod to the next slat hole. One twitch and the whole thing flies out to begin again. It worked best to put the first and last rods in. Once they were all the way in and the rods could drop between the pillars, things were more stable for the following rods.
-
 Brucealanevans got a reaction from SkerryAmp in Charles W Morgan by Brucealanevans - FINISHED - Model Shipways
The Hull has been declared "done" and mounted on a base.
Will begin working on deck structures next.
Plan to take my time and have the discipline to toss and start over if I'm not happy with anything.
I've been working on this for a year and see no need to rush.
-
 Brucealanevans got a reaction from MikeB4 in Charles W Morgan by Brucealanevans - FINISHED - Model Shipways
Here's the finished tryworks sitting but not cemented to the deck.
The chicken coop is a bit clunky, but overall I'm fairly pleased.
-
Brucealanevans got a reaction from SkerryAmp in Charles W Morgan by Brucealanevans - FINISHED - Model Shipways
Here's the finished tryworks sitting but not cemented to the deck.
The chicken coop is a bit clunky, but overall I'm fairly pleased.
-
Brucealanevans got a reaction from MikeB4 in Charles W Morgan by Brucealanevans - FINISHED - Model Shipways
Update.
Here's the tryworks. I haven't put the side braces and wood sheathing on yet.
This took time but was not really hard. Took some time mixing paint to get a good brick color that wasn't too red - the admiral didn't like the color on my test wall of bricks.
Almost 500 bricks!
I'm relatively pleased, although the eye goes immediately to the "errors". One chimney is a bit wider, and the walls sloped in enough that I had to mount the cauldrons below the top rather than having the room to drop them through the top.
However, I like the overall effort as my modeling skills improve (3rd wooden ship build).
After the supports/sheathing, probably will make the tank and scrap box before moving on to the next most fiddly bit - the winch. I'll have to dry fit the bowsprit and put the bowsprit bitt in place first, I think, and likely the framing for the anchor deck.
-
Brucealanevans got a reaction from dgbot in Charles W Morgan by Brucealanevans - FINISHED - Model Shipways
Update.
Here's the tryworks. I haven't put the side braces and wood sheathing on yet.
This took time but was not really hard. Took some time mixing paint to get a good brick color that wasn't too red - the admiral didn't like the color on my test wall of bricks.
Almost 500 bricks!
I'm relatively pleased, although the eye goes immediately to the "errors". One chimney is a bit wider, and the walls sloped in enough that I had to mount the cauldrons below the top rather than having the room to drop them through the top.
However, I like the overall effort as my modeling skills improve (3rd wooden ship build).
After the supports/sheathing, probably will make the tank and scrap box before moving on to the next most fiddly bit - the winch. I'll have to dry fit the bowsprit and put the bowsprit bitt in place first, I think, and likely the framing for the anchor deck.
-
Brucealanevans got a reaction from SkerryAmp in Charles W Morgan by Brucealanevans - FINISHED - Model Shipways
So, here is the skylight in place.
I'm relatively pleased with the result, although there's too much overhang of the top window panes - the coaming I put in place was thicker than it should have been so the base part was slightly smaller, and I didn't allow for that when I built the top from the plans.
Overall tho, pleased with the result. 2 weeks of intermittent work.
Next on to the next most fiddly bit - the tryworks. After a break.
-
 Brucealanevans got a reaction from schooner in Charles W Morgan by Brucealanevans - FINISHED - Model Shipways
So, here is the skylight in place.
I'm relatively pleased with the result, although there's too much overhang of the top window panes - the coaming I put in place was thicker than it should have been so the base part was slightly smaller, and I didn't allow for that when I built the top from the plans.
Overall tho, pleased with the result. 2 weeks of intermittent work.
Next on to the next most fiddly bit - the tryworks. After a break.
-
Brucealanevans got a reaction from dgbot in Charles W Morgan by Brucealanevans - FINISHED - Model Shipways
Once all the rods were in, gluing the end slats to the pillars fixes everything in place. After adjusting the position of the other slats, I fixed them in place with a drop of thin Zap at each joint.
One more side window, and then the two small end windows to go. All the windows for the top are already done.
Looking forward to painting, adding the "glass" and assembly this weekend, perhaps.
This thing has been a real challenge to make - everything is so darn small!
I hope with some sanding and a good paint job it will look the way I wanted it to.
-
Brucealanevans got a reaction from SkerryAmp in Charles W Morgan by Brucealanevans - FINISHED - Model Shipways
Once all the rods were in, gluing the end slats to the pillars fixes everything in place. After adjusting the position of the other slats, I fixed them in place with a drop of thin Zap at each joint.
One more side window, and then the two small end windows to go. All the windows for the top are already done.
Looking forward to painting, adding the "glass" and assembly this weekend, perhaps.
This thing has been a real challenge to make - everything is so darn small!
I hope with some sanding and a good paint job it will look the way I wanted it to.
-
 Brucealanevans got a reaction from ScottRC in Charles W Morgan by Brucealanevans - FINISHED - Model Shipways
I put a piece of wood into the window to hold the work while I was adjusting. It had rapidly become clear that otherwise slats or rods would squirrel out and I couldn't finish one until I came up with this. Not necessary on the single panes for the top since those could rest on the table during construction.
Then I lined up the slats, being careful to retain the orientation from the drilling in the jig.
I decided to use very small diameter steel rod/wire rather than copper, because it was smaller, and wouldn't bend during adjustment. The perfectly straight rods give a better look, in my opinion.
After cutting a piece slightly smaller than the distance between the pillars, I then would ease the rod through the same hole in successive slats. Trying to put all the rods through the holes and then dropping the assembly into place seemed like a better method, but it didn't work for me. The holes in the slats (smallest drill bit that my drill press would handle) didn't "hold" the rods, and they would inevitably slide out during the manuvering. After multiple tries I had to go to this method, which is maddenly tedious but I was usually able to succeed in one or two tries. Magnification helped to align the rods and the holes in successive slats.
Very difficult, especially for someone who has an espresso addiction and two espresso machines in the kitchen.
The slats could be moved around to allow a fine tweezer access to guide the rod to the next slat hole. One twitch and the whole thing flies out to begin again. It worked best to put the first and last rods in. Once they were all the way in and the rods could drop between the pillars, things were more stable for the following rods.
-
 Brucealanevans got a reaction from texxn5 in Charles W Morgan by Brucealanevans - FINISHED - Model Shipways
I made a simple jig to hold the five strips in alignment (reinforced with a piece of tape) that I could put into the x-y apparatus on my drill press. This allowed me to be certain the holes in each strip were in alignment and allowed me to drill cleaner, more well spaced holes than I was able to do with a twist drill.
-
 Brucealanevans got a reaction from dafi in Charles W Morgan by Brucealanevans - FINISHED - Model Shipways
The Hull has been declared "done" and mounted on a base.
Will begin working on deck structures next.
Plan to take my time and have the discipline to toss and start over if I'm not happy with anything.
I've been working on this for a year and see no need to rush.
-
Brucealanevans got a reaction from ScottRC in Charles W Morgan by Brucealanevans - FINISHED - Model Shipways
The Hull has been declared "done" and mounted on a base.
Will begin working on deck structures next.
Plan to take my time and have the discipline to toss and start over if I'm not happy with anything.
I've been working on this for a year and see no need to rush.
-
Brucealanevans got a reaction from SkerryAmp in Charles W Morgan by Brucealanevans - FINISHED - Model Shipways
Getting pretty close to starting on all the deck furniture, but every time I look at the plans, I find some detail to add that's easier when the deck is clear.
I did put in the 4 freeing ports (on the inside). One is visible on the far left side of the bulwark in the second picture.
Haven't decided if I will make them visible on the outside with incised outlines and small hinges, but I suspect I will.
-
Brucealanevans got a reaction from SkerryAmp in Charles W Morgan by Brucealanevans - FINISHED - Model Shipways
Instead of painting the area black that will be under the skylight, I put in a "picture" from a 3d modeling program. Not much if any will be visible, but it was fun. I'm going to be using very thin rod/wire for the skylight so some of this, at least forward, may show.
I'll probably mount a compass in the aft end of the skylight (on top of the virtual beams) as shown in photos of the vessel. Certainly won't show, but I'll know it's there.
Put the scupper pipes in as well, just for fun.
-
Brucealanevans got a reaction from dgbot in Charles W Morgan by Brucealanevans - FINISHED - Model Shipways
Thanks to John for technique for lettering, which I was worried about.
Done in a black text block in Microsoft Word, then cut out and applied with decoupage glue and coated with 2 thin coats.
I "glazed" the stern ports with a product from Micro Mark - a white viscous liquid that can be drawn across small windowed areas and dries clear.
I ended up doing the 3 starboard and larboard ports the same way, but without the circular frame.
-
Brucealanevans got a reaction from texxn5 in Charles W Morgan by Brucealanevans - FINISHED - Model Shipways
The Hull has been declared "done" and mounted on a base.
Will begin working on deck structures next.
Plan to take my time and have the discipline to toss and start over if I'm not happy with anything.
I've been working on this for a year and see no need to rush.
-
 Brucealanevans got a reaction from Landlubber Mike in Charles W Morgan by Brucealanevans - FINISHED - Model Shipways
The Hull has been declared "done" and mounted on a base.
Will begin working on deck structures next.
Plan to take my time and have the discipline to toss and start over if I'm not happy with anything.
I've been working on this for a year and see no need to rush.
-
Brucealanevans got a reaction from Landlubber Mike in Charles W Morgan by Brucealanevans - FINISHED - Model Shipways
Getting pretty close to starting on all the deck furniture, but every time I look at the plans, I find some detail to add that's easier when the deck is clear.
I did put in the 4 freeing ports (on the inside). One is visible on the far left side of the bulwark in the second picture.
Haven't decided if I will make them visible on the outside with incised outlines and small hinges, but I suspect I will.