


aliluke
-
Posts
1,320 -
Joined
-
Last visited
Content Type
Profiles
Forums
Gallery
Events
Posts posted by aliluke
-
-
Hi Bob
Just been back through all of your logs. You are a grandmaster in this art at all levels. Humbled I am but inspired too. Thanks for posting these remarkable builds. Simply stunning work.
Best
Alistair
-
Looks like you are on to it Ron - a fine bowsprit rig. I dreaded the rigging on my ship but ended up enjoying it.
Cheers
Alistair
-
I wouldn't worry Ken - I've seen lots of logs with the kit rope and they came out great. Morope just makes it easier to tension in my opinion. It also has other characteristics which might make it harder to use...anyway it was my first rigging experience so I can't claim the high ground for the recommendation of any rope type!
Cheers
Alistair
-
Thanks all,
Just spotted your question Robert. I did the rope coils off the boat just coiled them around 2 metal spikes and painted them with diluted white glue (I'm sure this is illustrated in other logs). Of course you end up with three ends to the rope 2 on the coil and one more from the belayed line. You just have to position the coil to cover at least one of the ends.
Ken - I think the difference is the rope you used. I used Morope which is very springy. The beauty of this is that it will look taut at a variety of tensions so you don't need to pull it very hard at all to get a taut appearance. This was especially useful for the shroud rigging and aligning the deadeyes thereon. I didn't pull out any eyebolts or hooks on the model during rigging and all the lines look tight and stay tight.
Cheers
Alistair
-
Hi Ken
Those chainplates look good. I left off that sweep port in antiipation of the very problem you have encountered but I agree with your decision to leave it be. Once the shrouds are on you'll hardly see it anyway. Another choice though could be to put a swivel gun post over it?
Cheers
Alistair
-
Hi
I'd take you up on that too. My email can stand 9MB and is lukejansen@xtra.co.nz
Thanks
Alistair
-
Hi Ken
1. I used brass wire for the chains - I did not use what came with the kit. I beat it flat after formed, blackened and painted it. I followed another log for the method but that has disappeared in the fall of MSW V1.
2. I rigged the lanyards after installing the chains and deadeyes and shrouds with their deadeye. The rope I used was very springy which made equalising the deadeye spacing between the shroud and the channel very easy.
Note also that the deadeyes have a rounded and flattened face - make sure the rounded face faces outboard - it looks better and mixing them up doesn't look good at all. Another trick is make sure the deadeyes can spin within their strope/chainplate. When gluing one of the chainplates into the channel I also glued the deadye, in the wrong orientation, into the strope/chainplate by accident and didn't discover this until I came to rig = big re-work on that channel...
Cheers
Alistair
-
Wow! A stunning build. Will keep watching with interest.
Thanks
Alistair
-
That looks really good Ken. Decking is great. It is amazing how much of that detail - scarf joints and nibbing gets covered up in the end but still I'm glad I made the effort like you did. I had to really work at the bow sprit to get it to sit down on the deck and have the right angle forward of that - i.e. perpendicular to the mast. I can see you're in for that work. I also added some details to the swivel cannon posts which you might want to look at. You will have to watch out for rigging interference with your aft most swivel posts. A lot of lines come down at that point onto the quarter deck rail. I fixed the shroud swivel post after I'd done the shrouds and it worked out fine.
Definitely use the small eyebolt for the cannon rig. I think you can see it on my log. I used a very soft and fine black jewellers wire for the hooks this worked really well. I did a mini photo tuttorial on that on MSW V1 but unfortunately I have lost the photos do to a computer meltdown.
Look forward to your progress.
Cheers
Alistair
-
Hi Jay
I'm going to put in plug for Morope here - too late for you but for others... The beauty is that it is springy so you can achieve a look of tension with differing levels of tensioning applied to each line. In other words, you don't need spacers for the deadeyes at all. You just align them by applying more or less force to each shroud through the lanyards and, although they aren't, they all look evenly tensioned. You have to get the shroud length more or less right - shorter than absolutely correct is better - but aligning deadeyes with springy rope - Morope - is really easy.
That being said I've never worked with anything as small as those deadeyes and the sheer complexity of a Constitution rig would scare the .... out of me.
Good work all the same and great to see your progress.
Cheers
Alistair
-
Hi Jay
Fun or not the rigging turns her into a sailing ship. I enjoyed watching that transformation on my little build. I'm sure on Conny it will be greater and all the more satisfying. Great work and I look forward to your progress pictures.
Cheers
Alistair
-
Hi Bob
Great to see this build back here. A stunning model and a benchmark for Fair American or any other kit for that matter. Utterly beautiful work. Thank you for sharing. I will return to ths log often to be inspired and to admire.
Cheers
Alistair
-
Hey Ron
Great to see you keeping going. The masts and spars will really transfrom the model - a whole other dimension. When others said to me "Now the fun begins" I doubted it but they were right. Masts and rigging turned out to be my favourite part mostly because each spar and line turned the model into something new. Enjoy - it's looking really good.
cheers
Alistair
-
Wonderful work Hamilton. Having seen your other builds elsewhere, I hope you don't mind me saying that your skills have increased remarkably. Your build continues to tempt me towards this model - as did Dan's build of the same - but the shipping costs to NZ still exceed the purchase price! I can never justify that, my bad luck to live so far away.
A great model and very well rendered by your hand. I really like your enhancements too. Congratulations! A beauty.
Cheers,
Alistair
-
Great work Jim. The skylight is an absolute gem. Your Bluenose is turning into one very fine model.
Cheers,
Alistair
-
Bob
A well made ship. Be proud and thank you for sharing. Beautiful work and lovely to behold!
Alistair
-
Hi Robert
You may feel it is slow going but you are setting a very, very high standard. A benchmark. Beautiful jointing.
We'll get impatient to see more progress but as good as it is we'll just have to learn to wait and enjoy it when it is posted!
Cheers
Alistair
-
Beautifully made Bob - as you always do. An interesting subject and a very fine model to highlight it. Congratulations and thank you for sharing.
Cheers
Alistair
-
Hi Ken
Just spotted your question...no I can't - all the photos of the build were lost when my hard drive failed. All my model files for the AVS and many other ships that I was researching and scheduling just disappeared. I'm only just starting to realise how much I lost, nothing compared to the MSW V1 crash though...
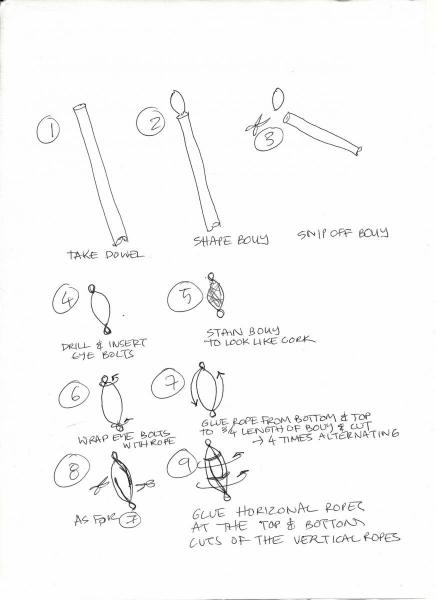
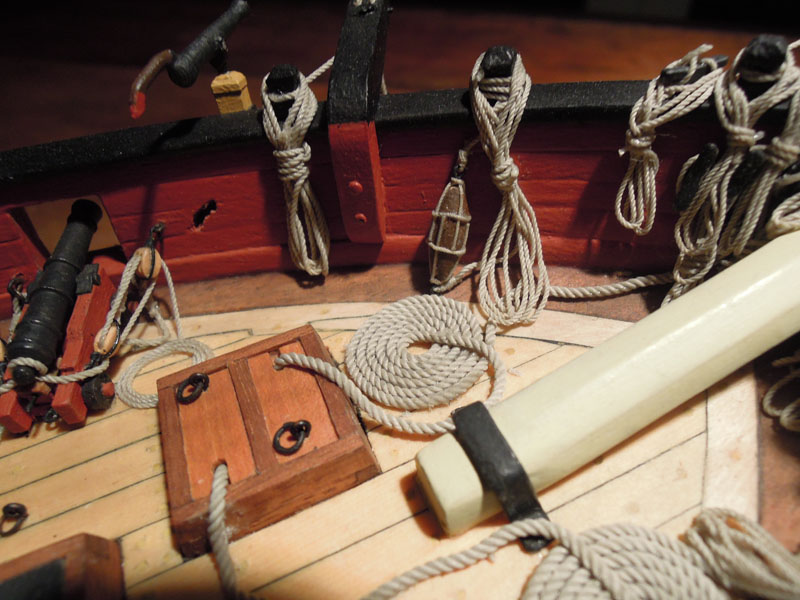
I attach drawings of my memory of the process and a picture of the result on the finished ship. Best I can do I'm afraid. It is a cheats method but at this scale you can't even see knots this small in such rope. I think the rope was 0.25mm diameter. The bouy is about 10 - 12mm long. It is as close I can zoom in with my camera and an observant eye would see that my bouy rope has two cut ends...one too many.
Cheers
Alistair
- MarisStella.hr, CiscoH, CaptainSteve and 1 other
-
 4
4
-
Hi Ryland,
great to see this back up on the logs. Your work is so crisp and clean and does perfect justice to this great model. Your's is a benchmark! I look forward to seeing your progress (although I know from MSW V1 that you are further ahead...).
Cheers
Alistair
P.S. I just figured I can save from here my AVS photos so although I lost everything else due to my computer failure, I can still get back my photos. Phew.
-
Great stuff Chris. Your attention to lifting up the details is fantastic. A good guide for future builders = me!
Cheers
Alistair
-
Hi Jim
Great to see you back here and Bluenose is looking great. Such an elegant hull and very well executed. Like Jay I'd worry about the dories when it comes to rigging but I'm sure you're in control.
I'll be keeping up with your log. Thanks for posting.
Cheers
Alistair
-
-
Hi David
Looks like we'll all be back soon. Great work on the Niagara - followed you on MSW 1. It also great that we are all re-populating this site. It would be good to have your AVS build photos back too!
Cheers,
Alistair

Constitution by Geoff Matson - Model Shipways 2040 - 1/76 scale
in - Kit build logs for subjects built from 1751 - 1800
Posted
Hi Geoff
Just caught up on your log. Beautiful work indeed. I always tip my hat to those who take on this model - it is epic and you doing it a great justice. Will follow from now on.
Cheers
Alistair