
HOLIDAY DONATION DRIVE - SUPPORT MSW - DO YOUR PART TO KEEP THIS GREAT FORUM GOING! (Only 13 donations so far - C'mon guys!)
×
.jpg.4b9546914df2c235b4fe82d7c03670bd.jpg)

Worldway
-
Posts
628 -
Joined
-
Last visited
Content Type
Profiles
Forums
Gallery
Events
Everything posted by Worldway
-
 I was wondering if anyone uses hide glue or Old Brown Glue and what their opinion is of it. I did do a forum search on the topic and found a couple of older discussions but nothing current. I see that it is a reversible glue in the sense that parts can be unglued using heat and water. I thought that might be a benefit to someone like me who tends to do a lot of rework. I know there is a downside to hide glue, whereby it has to be heated. Apparently, and correct me if I’m wrong, Old Brown Glue is basically a hide glue that doesn’t need to be preheated. I also read that hide glue tends to shrink when drying effectively pulling the parts together tighter. Just wondering if this might be something worth considering.
 -
I thought I would shift focus and move on to sails for the time being. I had a friend give me the patterns for his Bluenose sails but they weren't the correct scale. I also wasn't sure if the kit provided me with enough material to make the sails; considering I will likely have to remake a few of them as a learning exercise. I went to our local Fabric shop and picked up some material that was similar to the material provided in the kit. I don't know if the material is to proper scale (thickness) but for now it will do. I also picked up some tracing paper and started tracing out the sails. I plan on photocopying the patterns before I attempt to use them. I have a feeling the copies will be needed. I have been loosely following Bob Hunt's practicum. However, with the Bluenose he does not cover the sails. His practicum is for a ship without sails. His series of practicums increase in skill level as the builder moves from one practicum to the next. With the Bluenose he didn't cover the sails as this practicum was designed for the beginner. Luckily I do have a couple of articles on sail making and, of course, I got all the information at my fingertips on this forum.
PR.thumb.jpg.cdbcbd0745b65f4cb15bf7c9b4841198.jpg)
PR.thumb.jpg.967a2e6d4eea89d5840e6195ad53590d.jpg)
-
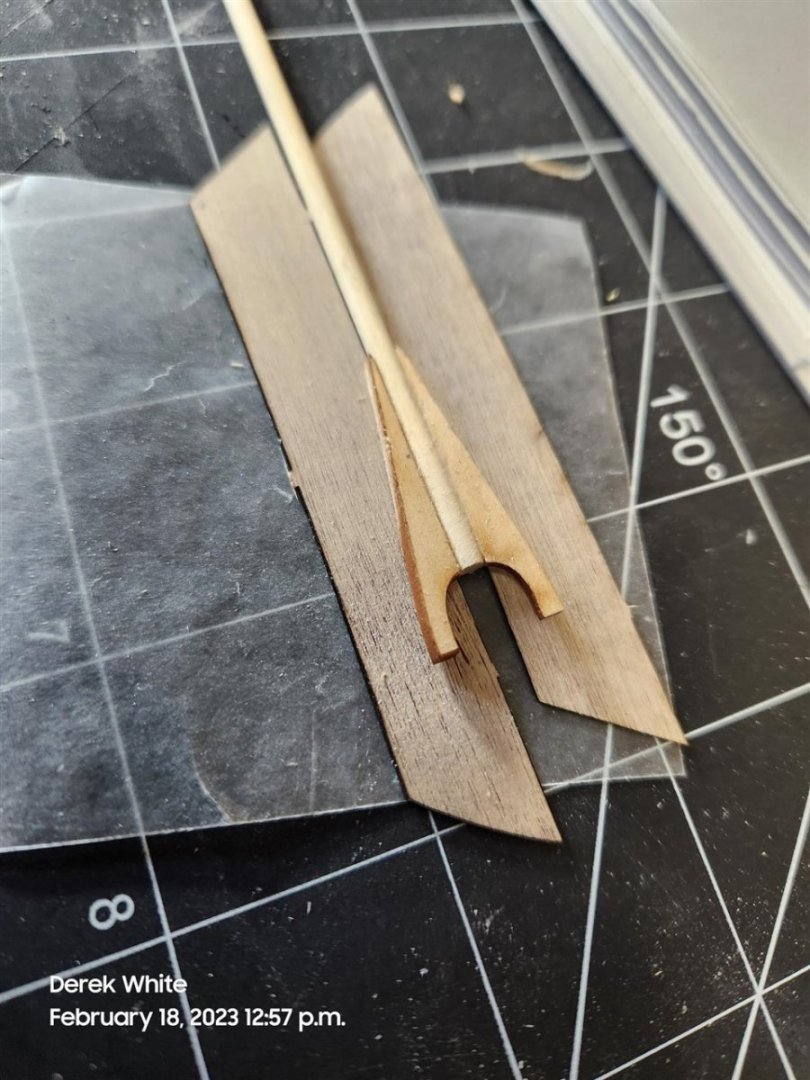
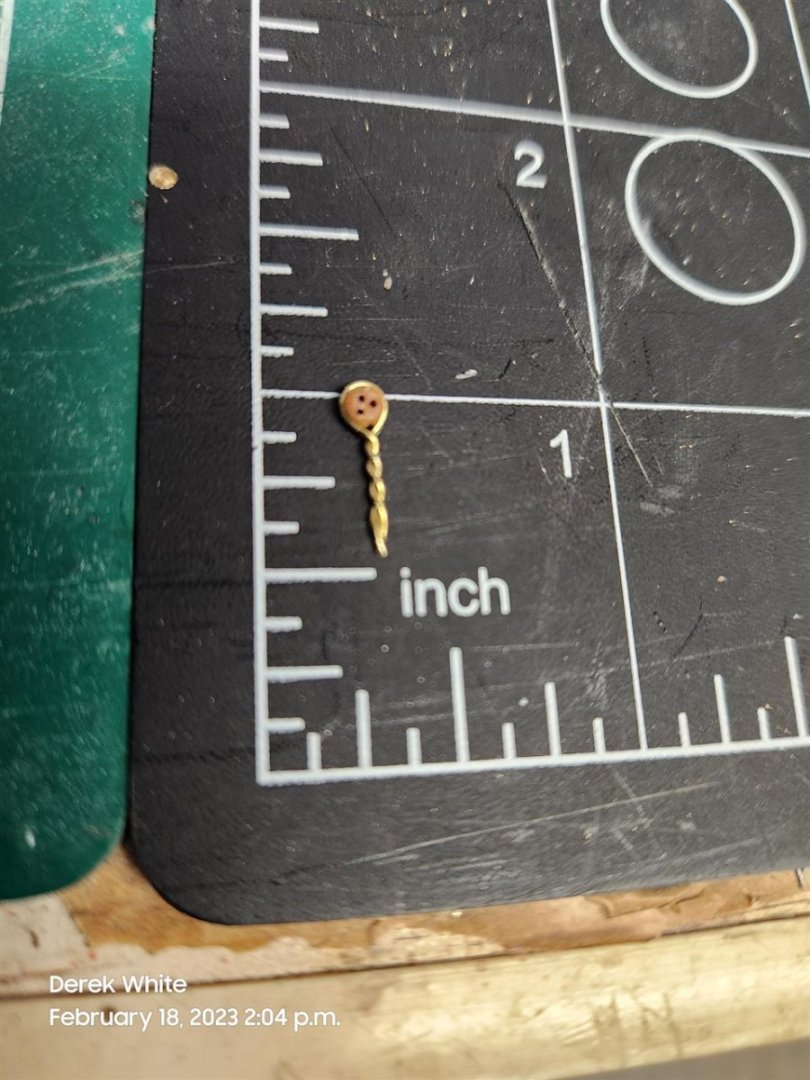
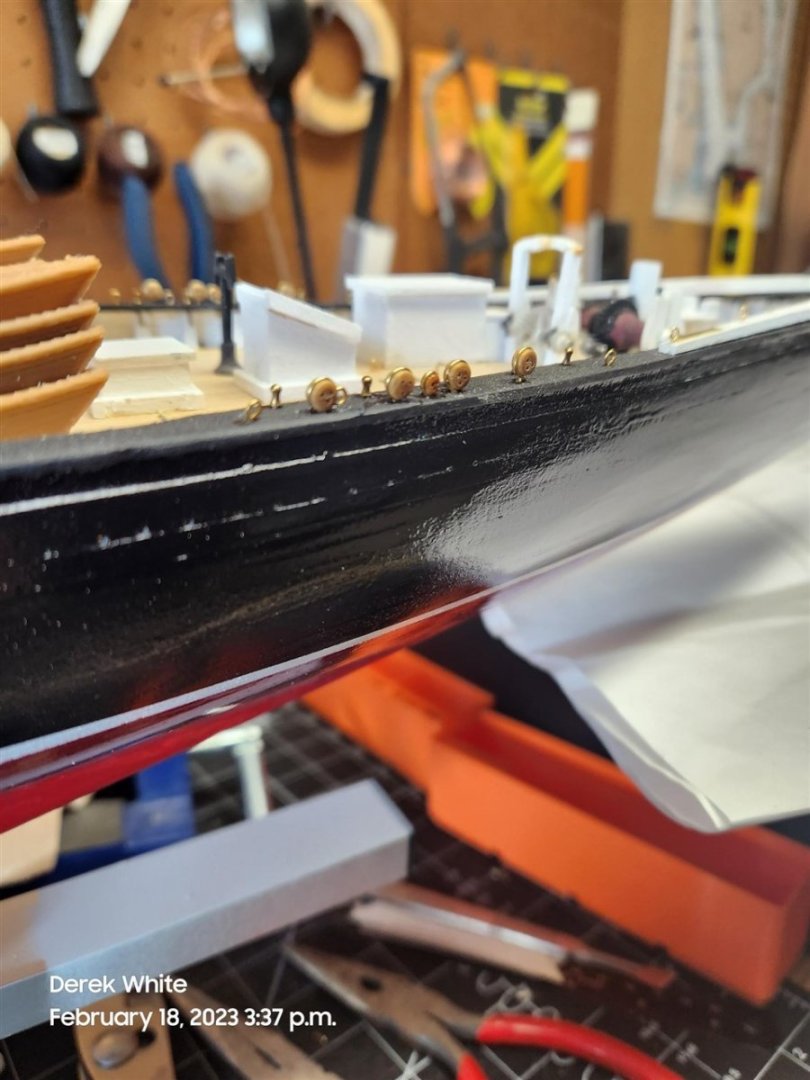
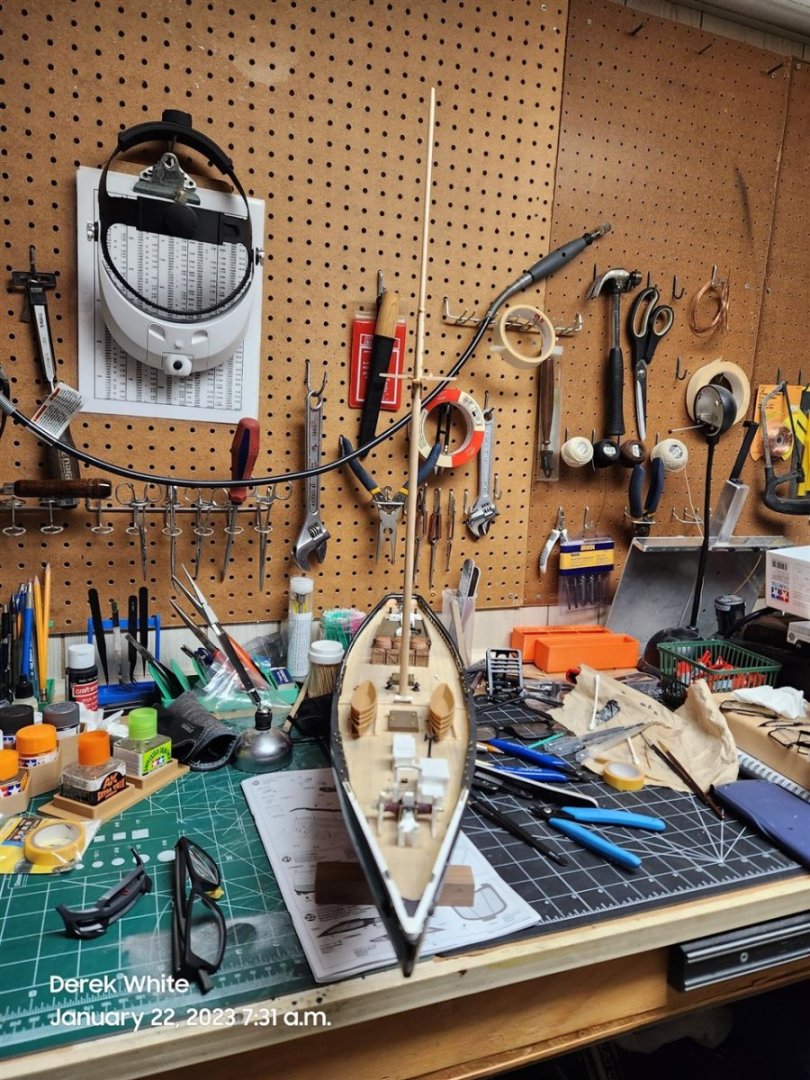
Started today working on the fore gaff. The kit comes with laser cut jaws. I used the material originally supplied to assemble the dories as shims to center the jaw on the gaff. Once assembled, I set this aside to let the glue dry. I wanted to finish the bowsprit, or at least paint it and install it so I could eventually install the traveler block. I originally installed the two strips of wood on either side of the center line of the bowsprit but was unhappy with how it turned out so I removed them and tried again. In removing them, I did a little damage but I think I cleaned it up OK. I contemplated scrapping and starting over again but decided it wasn't necessary. While studying the drawings I discovered that I had yet to install the deadeyes on the ship's rails. So I wrapped them in the 0.014" dia wire. It was a little fiddly but went pretty well non the less. I had some issues drilling holes and installing them properly. I purchased a set of micro drill bits off Amazon and found "a deal". However, they weren't the best quality and they broke pretty quickly. So I started drilling with the correct size, broke it, switched to another size, broke it, etc. etc. Also, because I hadn't installed the main rail and monkey rail with the accuracy required, I couldn't install the deadeyes in the proper locations on the external edge. As such, I'm not sure if I will add the metal straps below the deadeyes. It won't align properly and think it would look worse instead of adding more realism to the finished model.

-
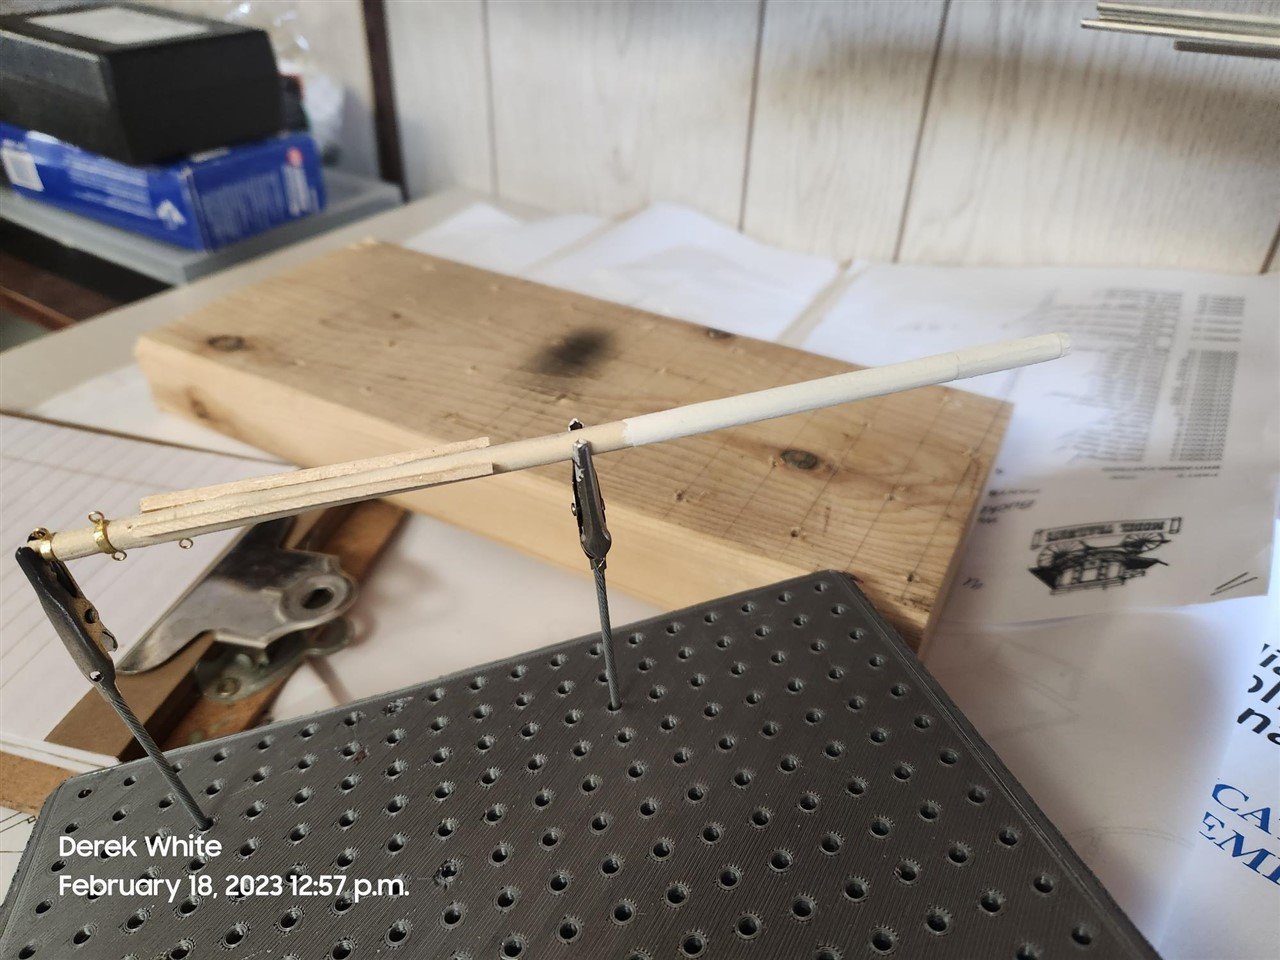
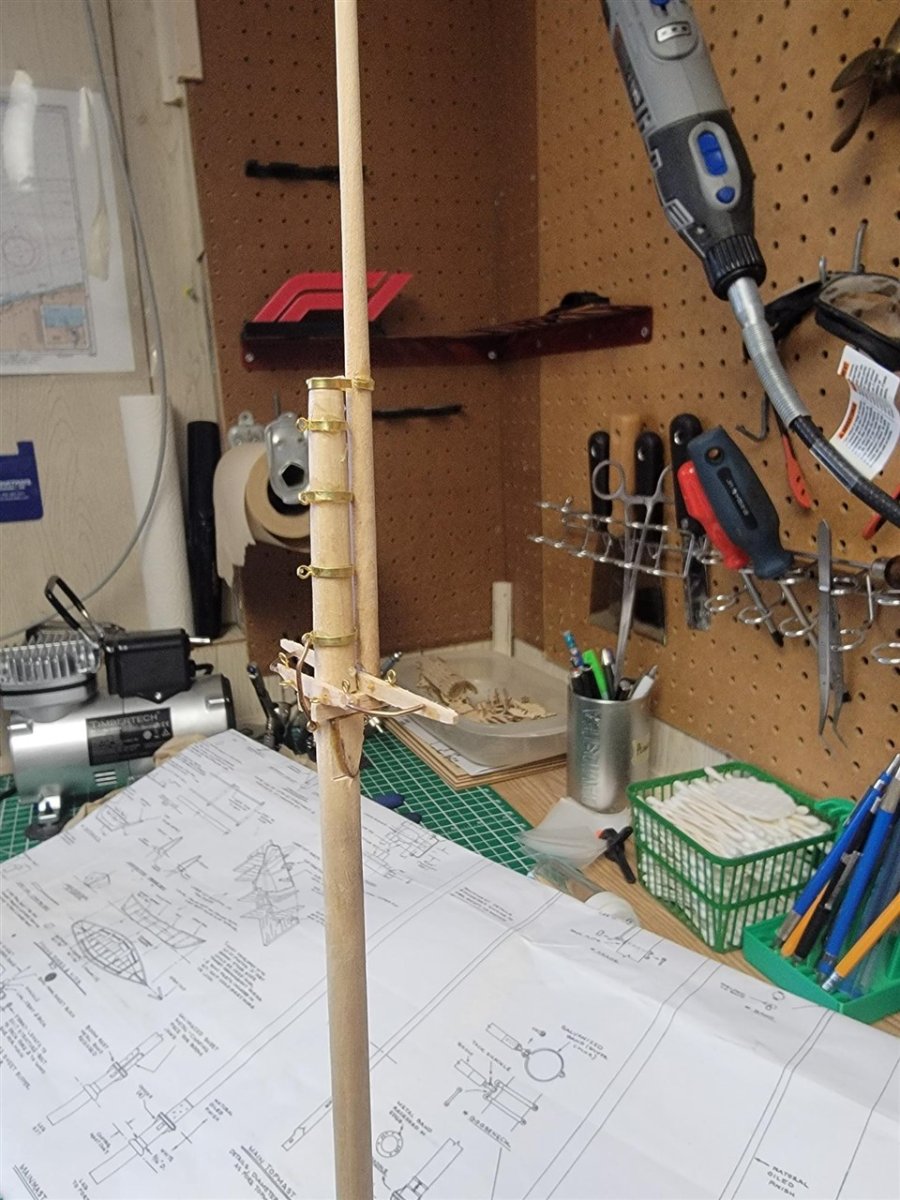
Today I finished up the main mast. For the chafing piece for the boom jaws, I had a piece of brass tubing that I cut to length and slid on the mast. I installed the 4 chocks, cutting pieces out of 1/16" x 1/8" basswood. I also made sure I installed the mast hoops first. I found that the quantity of mast hoops I had didn't total the same quantity that shows on the drawing. Not sure what to do, I simply divided the total quantity by 2 and used half on the main mast and will put the other half on the foremast. Hopefully I can make it work from there. The drawing shows a white band at the bottom of the mast called a Canvas Mast Coat. I had some spare fabric and cut a strip to suit and glued it on. I still haven't permanently installed the main mast. Probably won't until all the masts, booms etc are done. I think I will work on the bowsprit or the fore boom and gaff before tackling the foremast.
PR.thumb.jpg.a21097616acc1de13718f5ce1a36ac43.jpg)
PR.thumb.jpg.f9b0b35a789451cdbc2a559d82fe15b8.jpg)
PR.thumb.jpg.f64a982311fe09476f24bb32c8e99b9a.jpg)
PR.thumb.jpg.82ce2cd1204976d881cec2ab360f31fa.jpg)
PR.thumb.jpg.5a264481ac209bff45a08e2e8ae507c1.jpg)
-
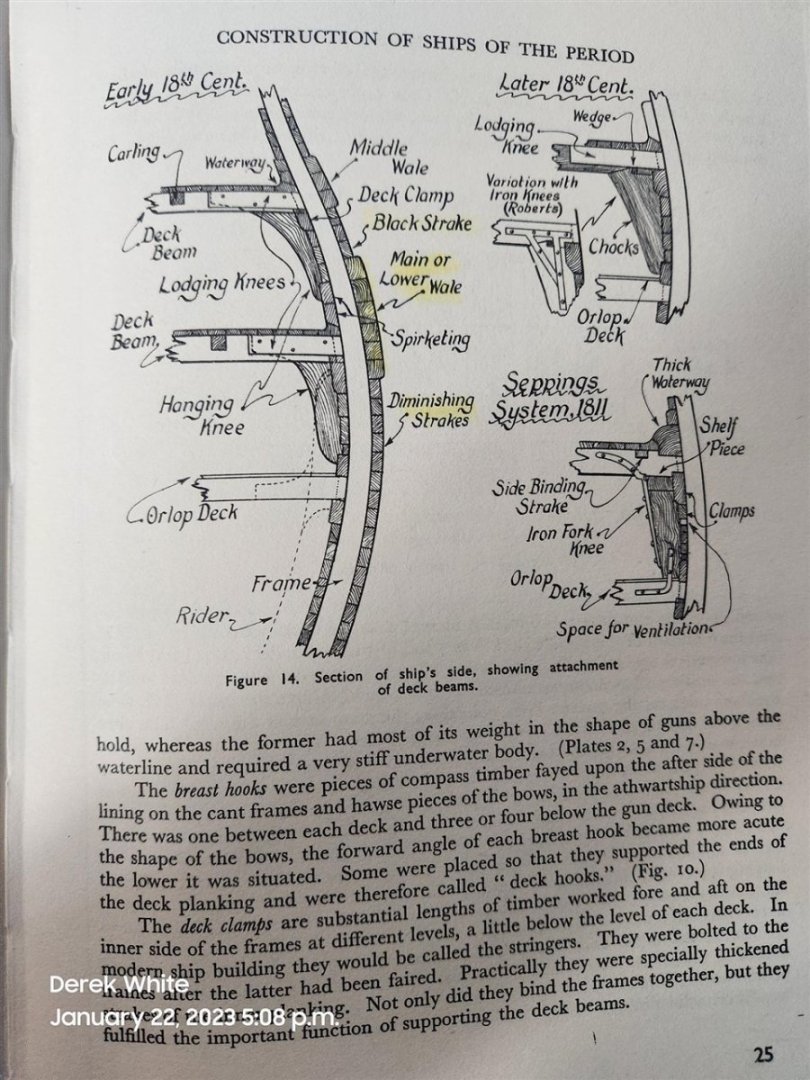
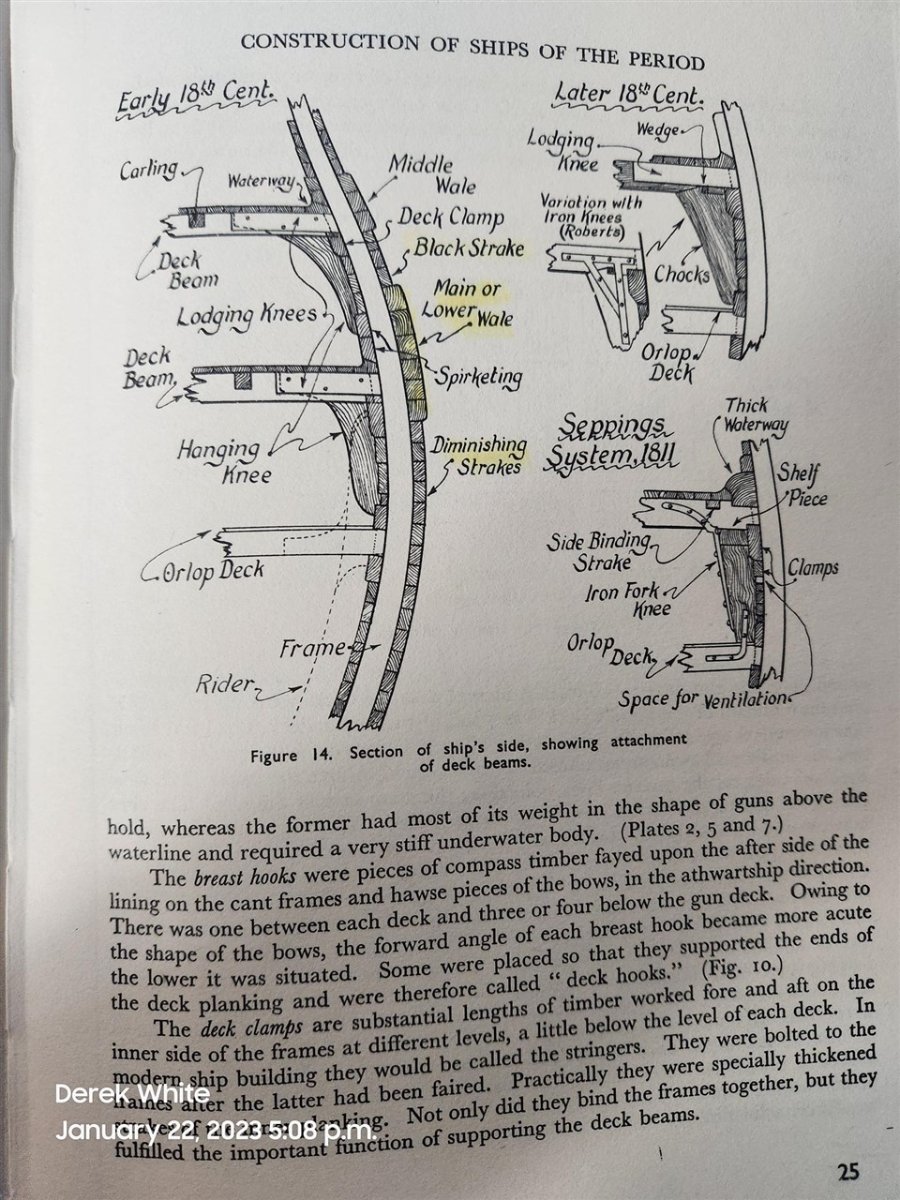
Hi Alan, I'm not sure if the following will shed any light on your problem but I found this in my book The Anatomy Of Nelson's Ships. I may be completely off base. If so, please disregard.
-
Thanks Alan, it's been a journey, that's for sure.
-
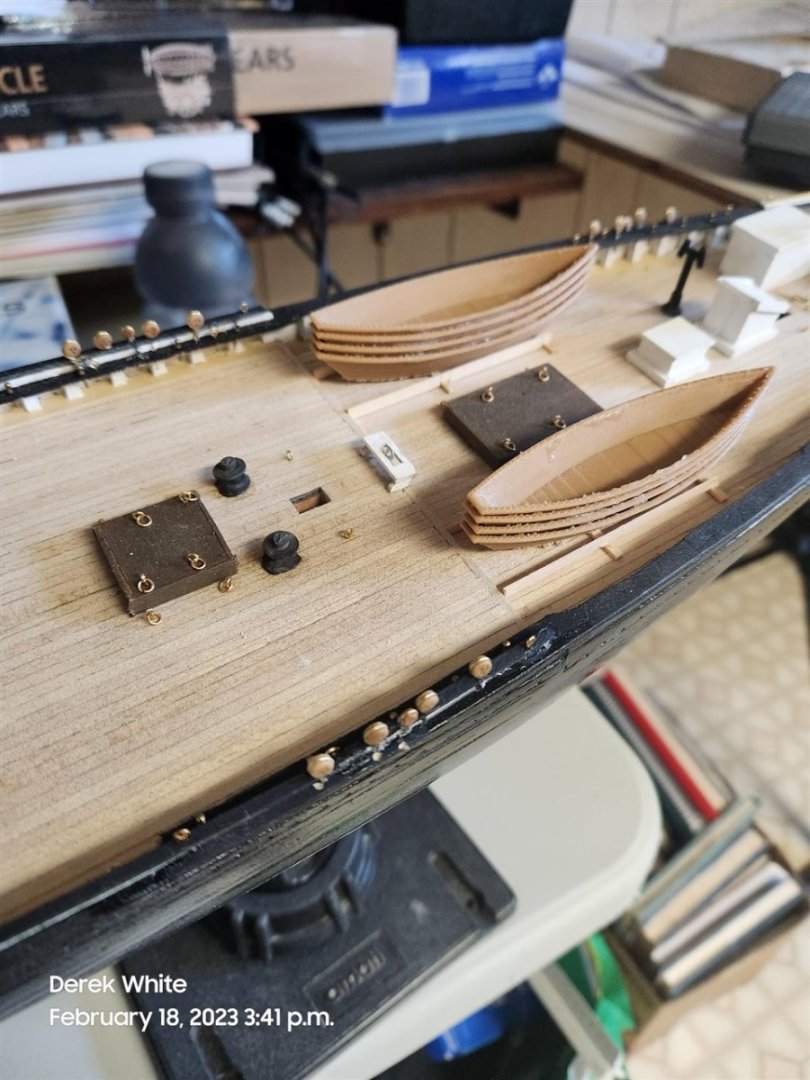
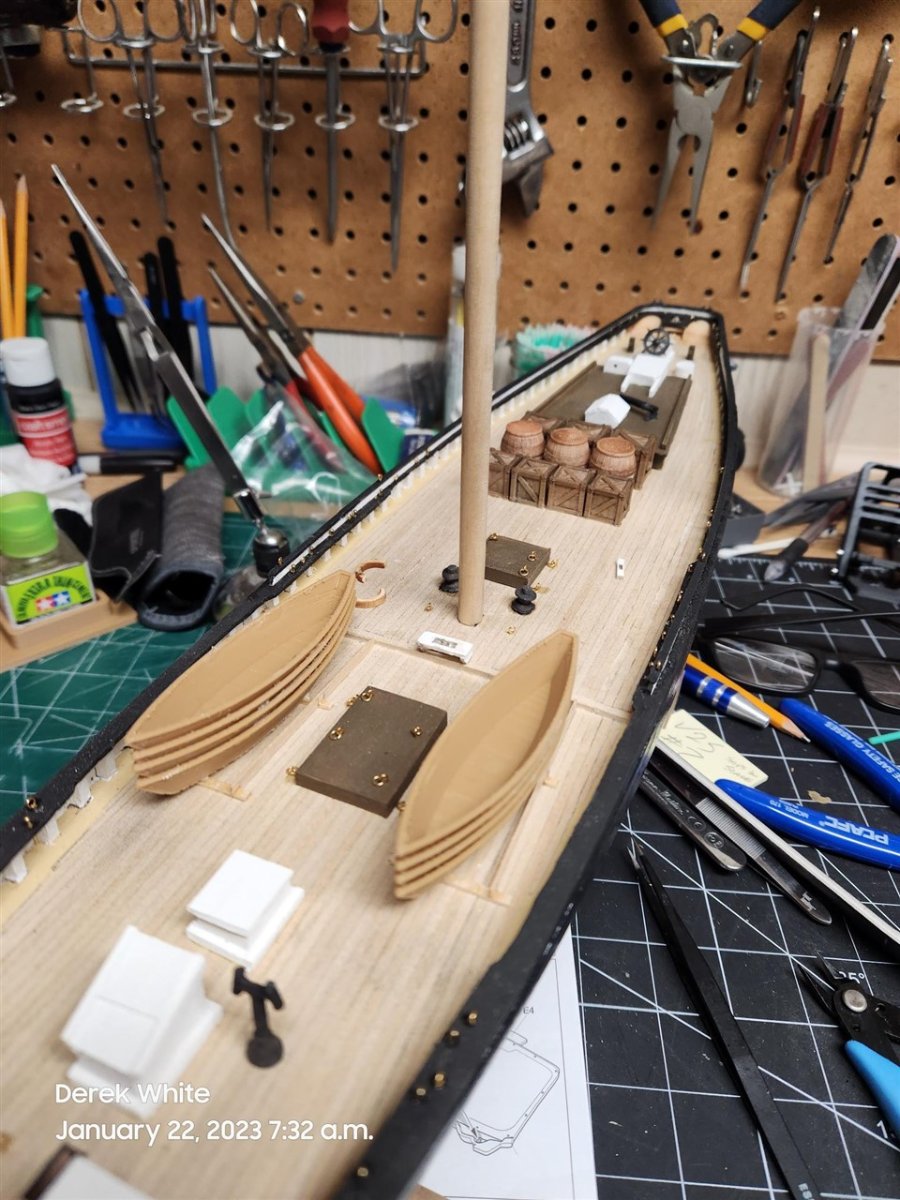
It's been quite a while so I thought I would offer a brief update on the progress of my Bluenose. I can say that progress has been very slow however I have not abandoned the project nor do I plan to. I keep getting sidetracked but always seem to gravitate back to the shop, and I can say that my interest in ships and ship history hasn't diminished. I have projects in mind that I would like to do in the future but am determined to finish the ones I have started and abandoned. I have 3 other ships in the drydock that I would like to finish first before I tackle anything new. At one point I thought about finishing the Bluenose without the sails but quickly decided that the sails are one of the recognizing features of the Bluenose. I was fortunate enough to have a friend give me his patterns for the sails so should make that task a little easier. I have pretty much finished the deck complete with the 8 dories normally carried when she was used as a fishing vessel. I've yet to lash them down. The main mast is almost complete. It's not permanently mounted yet but it's close. I plan to start on the foremast shortly. As previously reported, the dories and the crates/barrels are 3D printed. Although not authentic, I think the crates/barrels add a little to the deck. I will still add to this build log as I progress. I hope that I will post more often in the future and hopefully have the Bluenose complete in a timely manner.


-
Very nice work
-
Hello Mark and welcome
-
Hi Per, I got the STL file for the dory from Thingiverse. The link to the file is https://www.thingiverse.com/thing:236917 I scaled it and made multiple copies for the same print using my slicer program. If you're not familiar with the site, they have thousands of files you can download for free. I also got the barrels and crates from the same site.
-
I've spent some time printing new dories for the Bluenose along with some crates and barrels to add to the deck. The dories I had printed at my local library were a little on the large side and had a lot of supports added. I found that, because of the relatively small size, they didn't need any supports therefore didn't need any cleaning up. Of course they will still need to be painted and have some details added but it's a good start.
.jpg.d149f30489bd3712ba9caebac06e08f0.jpg)
.jpg.40b75159514a576c6eb654c8b4a749dd.jpg)
-
As an FYI, I have had an order in with Sig Mfg which has been backordered for over 2 months. I have been in contact with them and am told that it's because of boats unable to unload. As of November 17th they were still waiting for the shipment. I don't have a definitive date yet but have asked them to keep it on backorder as I'm in no immediate rush. I should mention that they have been fantastic to deal with and have replied to me promptly and courteously.
-
Thanks Per. I pick up the printer on Saturday and will spend the better part of the weekend getting familiar with it. I'm looking forward to using it. I plan on also downloading Fusion 360 so I can develop my own files (hopefully). If I can master this fast enough I may go back in my Bluenose build and 3D print some of the Britannia fittings which didn't turn out so well and reinstall them.
-
Alan, according to the library's web site they use PLA plastic filament (Polylactic Acid). It's quite rigid. The detail wasn't too bad and was good enough for what I needed. As a side note, I broke down and bought a 3D printer. I ended up buying the Creality Ender 3 2V. I looked at resin printers but figured I would get more use out of a filament printer as I wanted it for a lot more than just modelling. Plus I don't have to deal with possibly dangerous chemicals. We'll have to talk some day soon so I can see what your 3D printing experience has been like and perhaps compare notes. Luckily, our IT department at work has a printer and has offered to help me plus there is a lady at work who uses one extensively in a side business she has and has also offered to help me. David, I happened upon the library's website and noticed they did 3D printing so I thought it might be a good solution. Like you, I hated trying to put the dories together and eventually I gave up with a pile of scrap. I wasn't going to add the dories to the Bluenose until I saw the library's site. I found a file on Thingiverse which I rescaled and emailed to the library. I had no idea if I was sending them the correct file or if the scale would show up correctly or if I nested the duplicates properly. I talked with one librarian who runs the printer and she looked at everything I sent her and told me it was fine. I was happy with the results. I had a quick look at the website you suggested and will definitely be spending more time there, not just for the sails but for other build aspects as well. As far as sails go, I met up with Alan a few weeks ago and he was showing me a sail he made with silk span and I was very impressed with the results. So I'll be experimenting with it as well. So many options. John, I'll be happy to help as much as I can as I'm sure anyone on MSW would. However, I'm a beginner and am learning as I go as this is only the second build I've done.
-
I solved my Dory problem. I downloaded a file from Thingyverse, rescaled it, emailed it to my local library and had them 3D printed. For the $3.50 it cost I would say well worth it. I need 8 for the Bluenose but ended up with 10. It gives me two to play around with. There will be two stacks of 4 each. Only the top of each stack will need to be detailed. I'll work on that over the next bit. First up is to remove all the flashing and clean them up a bit.
.jpg.70dc710bbf5f7ed379878e78c8821fac.jpg)
-
Cheers from Port Hope, Ontario, Canada
Worldway replied to Peter Rumgay's topic in New member Introductions
Hi Peter, welcome to MSW. I grew up in Trenton so I am familiar with your neck of the woods. -
I have had an order in with SIG for about a month now. When I placed the order they told me that their silkspan is on backorder and would be about 4 weeks before they had more and asked me if I wanted to cancel the order or keep it on backorder. I decided to keep it on backorder and am expecting it any day now.
-
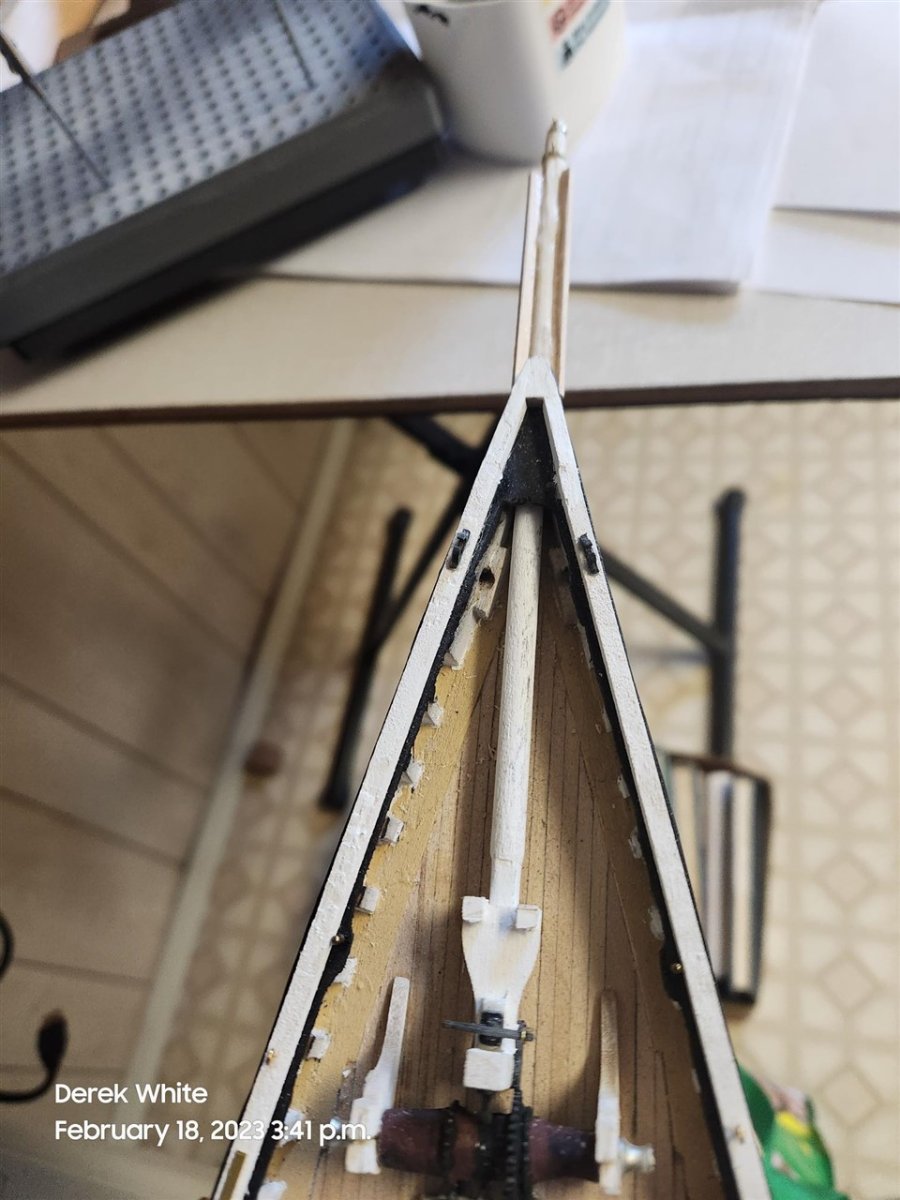
Thanks for the information Alan and Bob, it proved to be very helpful. One thing I did to guide me along was to label the foremast with port/starboard/aft. It helped me to ensure I had the correct orientation with the mast. Also I found the tenon at the base of the mast very useful in aligning or indexing the mast as required. I cut the mast to length then tapered as required along the port/starboard/aft side. I found that by cutting the length of the dowel down to size and tapering 3 sides I virtually removed all warpage I have. I then cut out for the cheeks and trestle trees. I again used my guide blocks to limit the depth of cut and to index the mast. After installing the cheeks and trestle trees I installed the halliards, making sure they were tapered per the drawing. After that I installed the halliard bands. I used brass strips that came in the kit and cut them to length (circumference). I drilled a hole for the eyebolt, installed it with the band and secured it with glue. I made a lot of progress this weekend and am relatively happy with the results. I realize there are some areas where I wished I had taken a different approach. One big regret I have is not darkening the eyebolts on the deck furniture and rails. I have a darkening agent which would have made it simple. I probably should have darkened the brass bands and eyebolts on the foremast as well. I think I'll spend the next few days trying to understand the drawings better and get a better understanding of the components that goes into the masts, booms etc. I was feeling a little overwhelmed (information overload) this afternoon and need to take a step back to review. I want to compare my Practicum with the drawings to understand where I'm going and the steps that need to be taken.
.jpg.045cbb90d12e1b270f48eddc48474edf.jpg)
.jpg.ad1a34f90c903d4537605393a3a15b3a.jpg)
-
This could start to get very interesting. The practicum I'm using for guidance doesn't do the rigging for sails. The thought being is that the practicum is based on a beginner level and adding sails only complicates things. However, I really want sails. Therefore, I have a challenging journey ahead of me and will be using this forum for guidance as I go. I did start by taking a length of 5/16" dowel and cut the base to form a 5/16" x 3/16" tenon on one end. I got the idea of using a 1/4" sized block as a saw guide knowing if I cut down to the block I would be cutting down 1/16". I then used my X-Acto chisel to remove the waste Once the one side was complete, I shimmed it using a 1/16" spacer block to assure myself that I was cutting 180 degrees from the previous and repeated the process. Nice tight fit However, I noticed that I have a slight warp in the dowel. It won't be as bad when I cut it down to length however I still want the warp removed. Is there an easy way to remove a minor warp? Also, the drawings says to taper the mast on the aft side & P/S. What does that mean or refer to??
.jpg.b68038ee41f400c032bb0aa59a2b419a.jpg)
.jpg.2e62a4eb20fece6e442a6069a32a853f.jpg)
.jpg.206df8da8144b2c8176fb01fea287d7e.jpg)
.jpg.ca978322bb81a055b68fcefa147c1d5c.jpg)
.jpg.e43dd222367ddc3d6612036a0fc668bd.jpg)
-
I spent the last two days painting and finishing the deck details. I also attached all the eye bolts and belaying pins. I haven't installed the dory kids yet because I'm still undecided if I will have the dories or not. Also, I didn't spend as much time as perhaps I should have on the windlass. The plans show wooden wedges installed but I thought, for simplicity, I would simply paint the windlass. One problem I encountered was with the cathead. The cast piece was very fragile and broke apart. Even if it hadn't it may have been too brittle to use anyway. Perhaps the blackening process weakened the fitting. I'll have to come up with some other way of duplicating it. It's been a lot of tedious work and has been a long time in the making. The next steps are onward and upward. I'm looking forward to the masts and rigging although I tend to think that it will be quite tedious as well. This is my first attempt at rigging a ship so I hope it goes well for me.
.jpg.5eed9c7f52ddd27f37378eab236a72af.jpg)
.thumb.jpg.b8663f9807171f56ee9b14ab8385e43f.jpg)
.jpg.74bc12f4592a3ea3668dcbd12d8aab95.jpg)
.jpg.d92c11a4678d485b9bd0eb154521eeec.jpg)
.jpg.c658f01bc4acd4cbb61699aeb63d0ade.jpg)
.jpg.4b518b39de88fd3f804e3fec1472a3da.jpg)
-
Disaster struck, and it's likely not what you're thinking, it's even worse. I have a small shop and my workbench is at a height for standing while using. A while back the admiral bought me a higher than normal chair so I could sit at the bench. Excellent to have, one problem thought. I'm not a tall man, only 5' 6". In order to get in the chair I actually have to use a small foot stool to boost myself up with. Once settled, it always seems I have to get up to grab something anyway so the chair was becoming more of an annoyance than a luxury. However, today I was doing a lot of bench work and was happily using my chair. In order to minimize the amount I had to come down off it, I moved a portable workstation closer to the chair. It's where I set out a couple of drawings and the instructions and other things I could refer to when needed. It's also where I store my Byrnes table saw. After dinner I wanted to go down to the shop to get a few more things done. I went to prop myself up in the chair and lost my balance. I fell slightly backwards, stumbling, unable to get my footing and I inadvertently pushed the portable workstation over. Of course, everything fell off the table on onto our cement floor, including my Byrnes saw. I was devastated. I didn't care about anything else that fell, just the saw. I immediately picked it up, set it on the bench and started to assess the damage. The most obvious was the fence. But as I looked closer at things I noticed that the brass knurled nut on the fence slide wouldn't turn. I removed the assembly and couldn't see any obvious signs of damage but the screw is probably bent and will need to be replaced. I had one of the screws holding the table down break off. It will have to be removed and replaced. I also found another screw lying on the ground which broke off somewhere but for the life of me can't find where it came from. From what I can tell that was the extent of the damage. I've emailed Jim to get an idea of parts replacement costs, hoping I can replace a few parts and it will be good as new again. If I lived closer I would likely sent the complete saw back to him to be rebuilt properly. The worst part is, this saw hasn't been used a great deal. I bought it with a thought that one day I would like to try my hand at scratch building and have slowly been amassing tools and equipment to do that. I would hate to have significant damage on a saw that I've yet to truly enjoy. But having said that, for the tumble it took, it came out pretty unscathed. Here's hoping Jim will be able to send me what I need and I'll be able to make the saw new again.
.jpg.fae745341bbc9a82f3714acdcafaff55.jpg)
.jpg.9f9ccfb7767c84b3b217edc0339ca9ff.jpg)
.jpg.0694e1f41aac0a8040be57cafedd245d.jpg)
.jpg.a7f3c27824e50bf7a473588f16ae92bf.jpg)
.jpg.3efa2b3bfa6f6ea0e6d0bfd9992d9b41.jpg)
-
Just a bit of an update. Tomorrow I'm hoping to start painting the deck furniture. I spent time today finishing last minute details and getting acquainted with my airbrush. I've never used an airbrush so spent time watching videos on use and care. One (or two) things I did was make my own batch of air brush cleaner and acrylic paint thinner. Very simple to make with easy to get, inexpensive ingredients. I put the bottles in a larger plastic pail as I they contain liquid with isopropyl alcohol and I'm not sure if it will react with the plastic bottles I have them in. In case there is a leak the larger bucket will contain the liquid. I also bought a package of alligator clips mounted on wires. I'm hoping they will work well holding the objects as I airbrush them. I then drilled holes in a 2 x 6 to hold the clips while the paint dries. I painted the cap rail and am in the process of forming the monkey rail base. I used the leftover after removing the monkey rail from the laser cut sheet in order to form the monkey rail base curve for the taffrail. I soaked the strip wood for 15 minutes before forming it but it still crimped in spots around the tight curve. Hopefully, if everything goes as planned, I'll be reporting on a successful paint job tomorrow.
.jpg.b1171ee649b209b1a8883ba3c36b50dd.jpg)
.jpg.6006e61944a8539afb1c9c3d23a88b7a.jpg)
.jpg.d8850895d569177439c504bea788a9a8.jpg)
.jpg.c177bcbeb81aad309d2d009a03f41743.jpg)
.jpg.faddf224b28396609b0bc9f7d7f5682b.jpg)
-
Getting close to finishing the deck furniture. The hoisting engine box is almost completed. I just have to add the clutch cover box. I will build this bit out of a solid piece of wood. I've glued up some wood and am waiting for it to dry prior to completing that part. I glued up the arms of the jumbo boom crutch. Finally this afternoon I completed the samson post, bowsprit bits and platform I'm hoping to be in position next week to break out the air brush. I want to paint the deck furniture and the main rail. Hopefully after that I will be in a position to finish the monkey rail and permanently install the deck furniture.
.jpg.95782a3c9dae5db3d2e3ca554366b4ed.jpg)
.jpg.86cde7a9fa708e6b18c4b71b40a79915.jpg)
.jpg.eb86edc3bd2e86647dbb7b132caa97a6.jpg)
.jpg.ae717c059076b80172bb8449368ab2d5.jpg)
-
Thanks Allan, Yes, I am referring to the original Bluenose. One source I have is from Wikipedia which states: " Bluenose, being a Lunenburg schooner, used the dory trawl method. Lunenburg schooners carried eight dories, each manned by two members of the crew, called dorymen." I will do a bit of further investigation to see if I can find any additional detail.
-
Just a curious question. All pictures I can find of the Bluenose don't show any kind of cover over the dories even though they are stored upright. The Bluenose typically had 8 dories, stacked in 2 groups of 4. I would have thought they would get filled with water without a covering. Are my assumptions wrong?

PR.jpg.fbbfe473865681a1f32c753a5f5b77bd.jpg)
PR.jpg.53443dfc3e58549b28431b0e5458685b.jpg)


PR.jpg.527cedaa8db4c0786b8699ef98515b50.jpg)
PR.jpg.5b089f750a05438c6d92090eeadd6101.jpg)
PR.jpg.89a02be54022d53cc50df4b2fe2f840f.jpg)
PR.jpg.ed32df50499800f7134534102ebd1e4e.jpg)
PR.jpg.f1c46613c0946319d523b207994a06a3.jpg)


.jpg.503e1be970deb0f56e9eca82a8cb878f.jpg)
