Hubac's Historian
-
Posts
3,316 -
Joined
-
Last visited
Content Type
Profiles
Forums
Gallery
Events
Everything posted by Hubac's Historian
-
 Hello NekO, Great to hear from you! Yes, thank you for your kind comments. The protective sweep of planking that matches the thickness of the wales; this is a detail I will be adding, just after I scribe in the "hunting port". I wanted to get the placement of the port right before adding in the sweep of thicker planks between it and the next port aft. My decision to scribe the hunting port - as opposed to actually cutting it in - is based mostly on the fact that it wasn't an armed port. Also, this is one detail where I can allow myself to be a little lazy and not go the extra mile. What's new with the Royal Balsa, these days?
- 2,699 replies
-
- 2
-

-
- heller
- soleil royal
- (and 9 more)
-
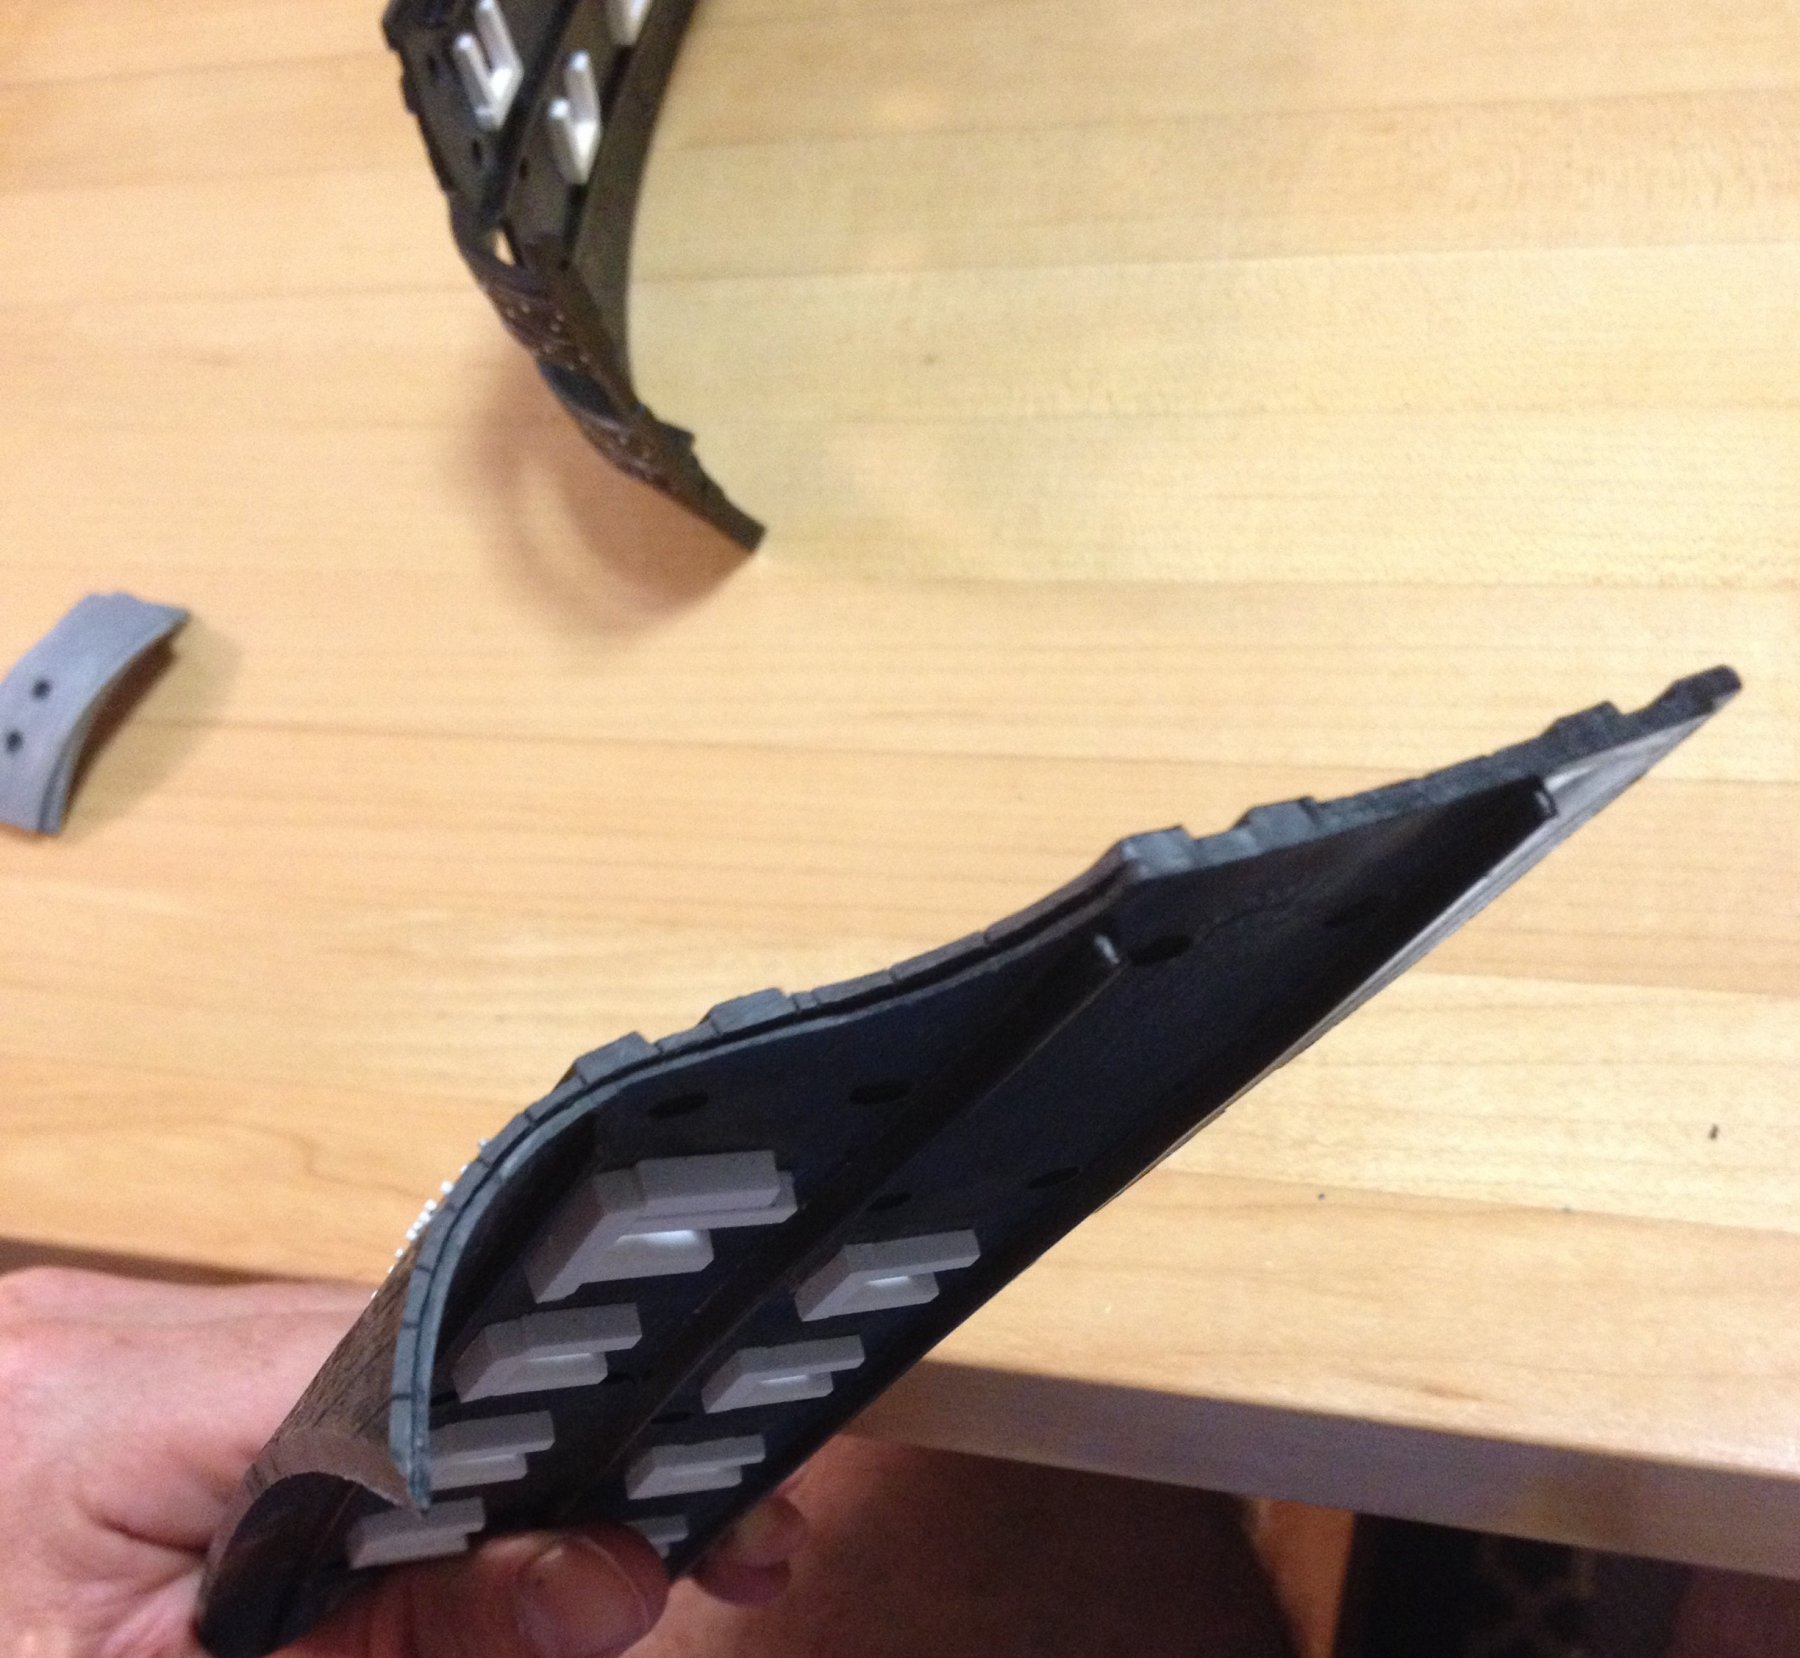
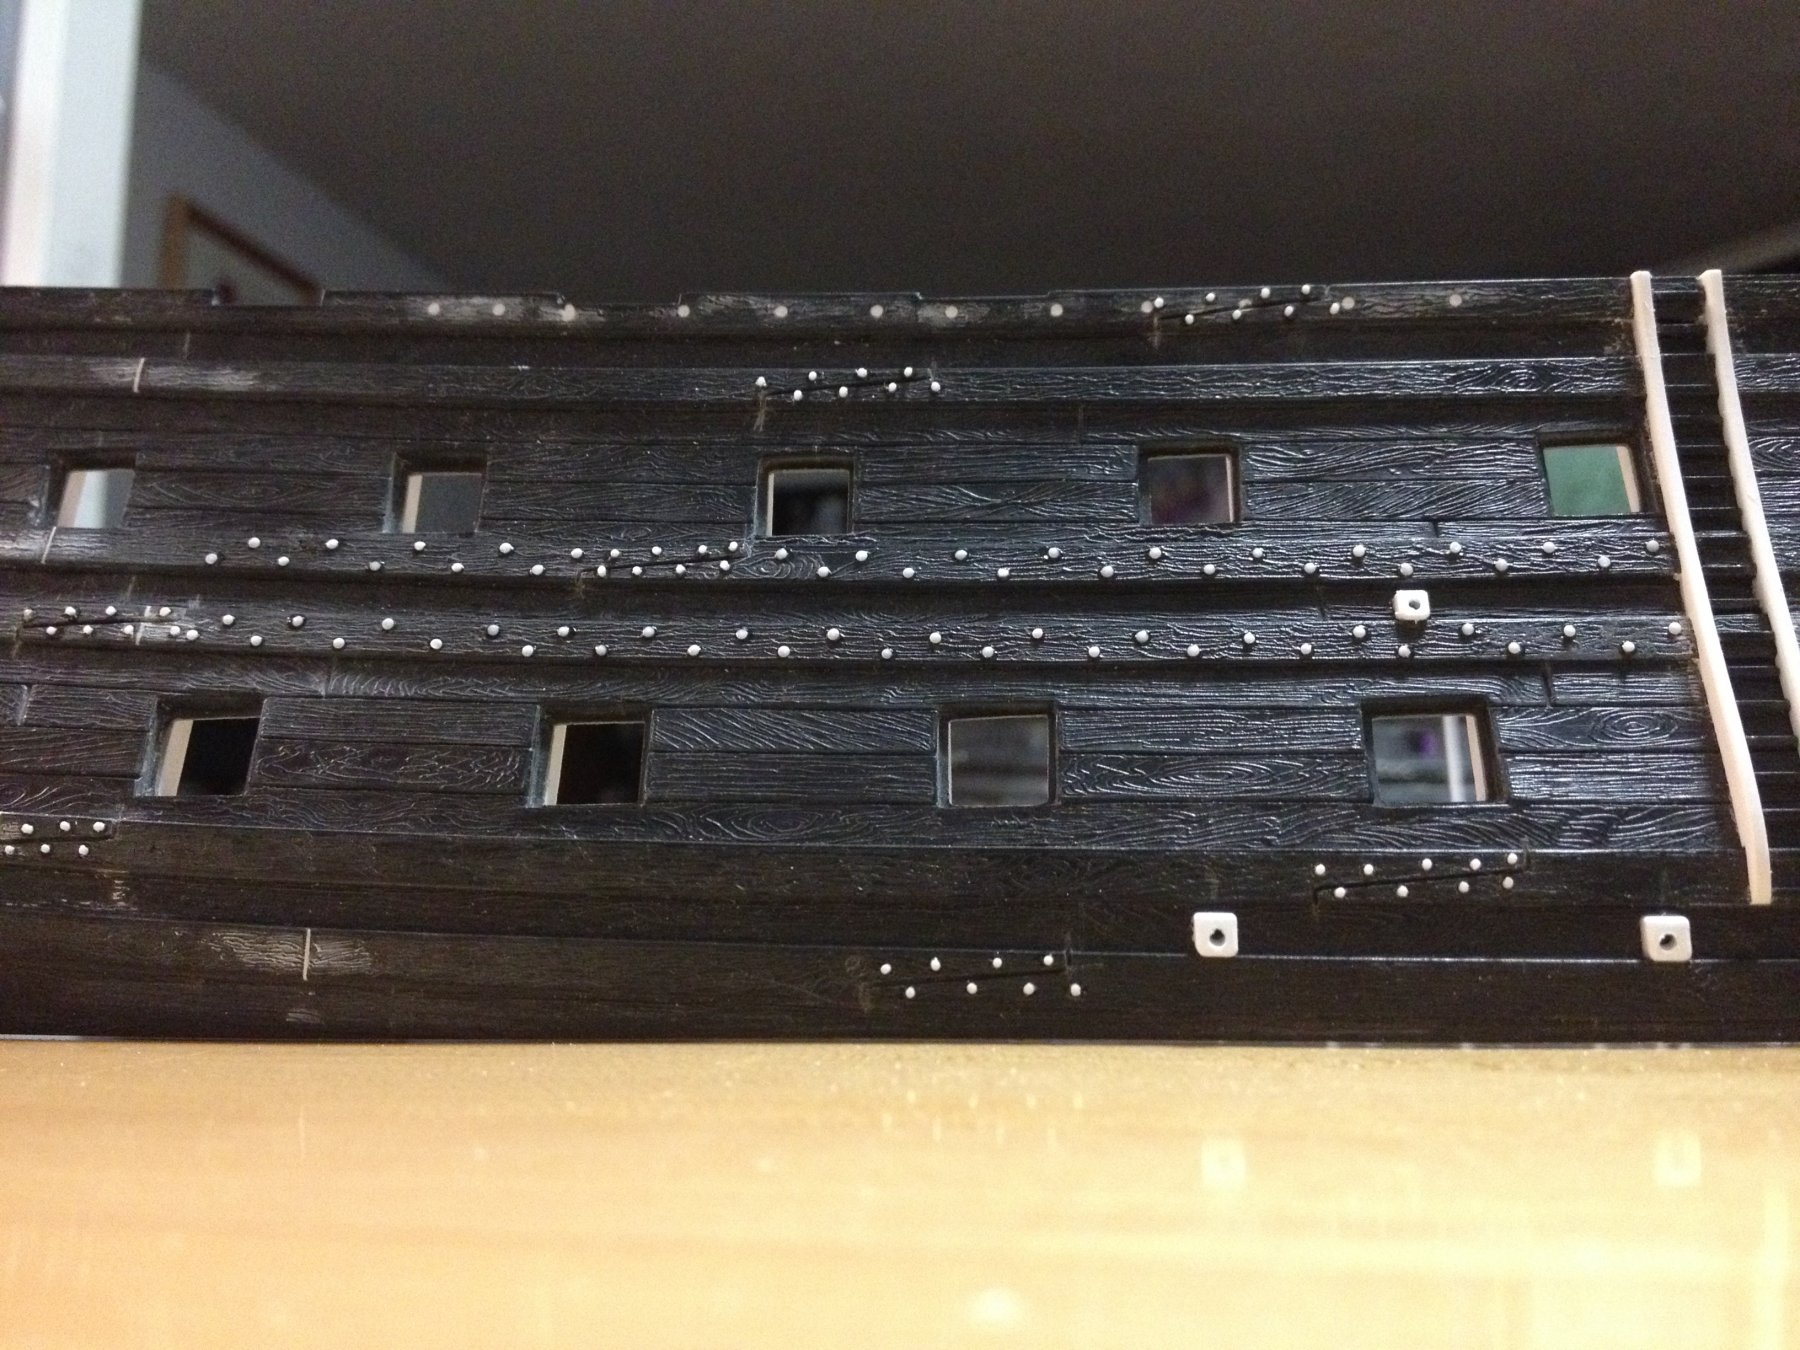
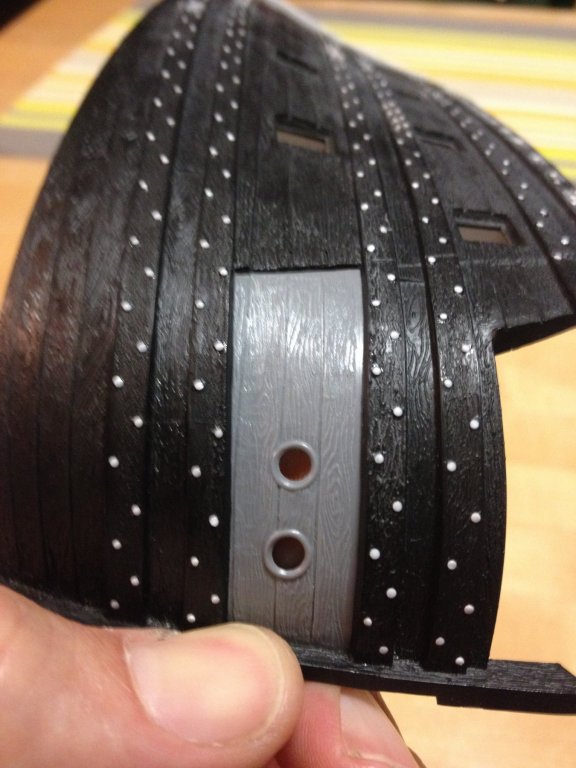
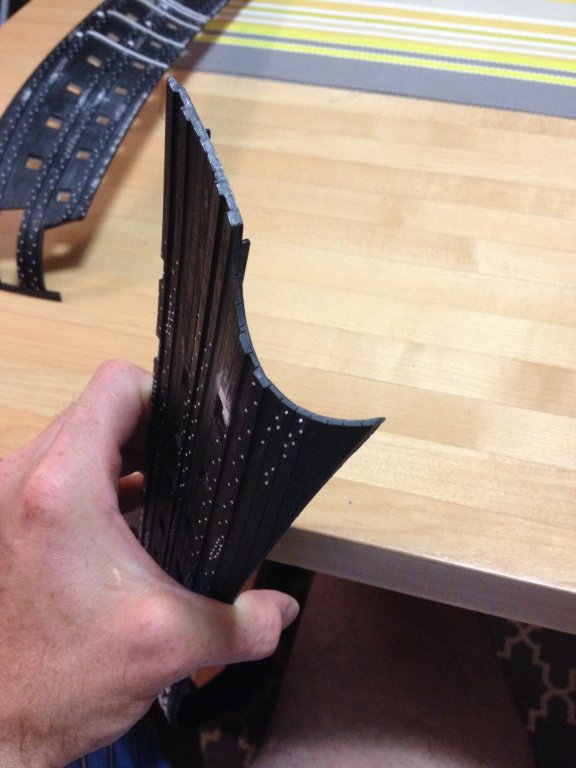
With the continuous bolting of the wales complete, I turned my attention to the hawser insert pieces, and I think I've done a fairly Doogie Hawser job of surgically in-letting the port side hawser piece. The issue at hand is the dark ridge that you see, here, on the starboard side. The planking is moulded and intended to be a smooth continuum, but the piece does not fit flush, and this is unnatural. However, after using my fabulous Dremmel Micro to cut a diminishing rebate into the mounting edge of the piece, the aft edge sits flush with the rest of the planking. This is not at all difficult to do, it is simply a matter of holding the piece in place, as you scribe the lower edge of the upper wale into the plastic, and the upper edge of the lower wale, with a single edge razor blade. An emmory board cleans up the transition and the piece fits perfectly. A little work on the aft joint, where it meets the hull, is required in order to minimize the need for putty - a touch of Squadron, though, and a little judicious leveling should make that transition line completely disappear. I will have to do the same on the starboard side, obviously, and I will also have to fill and re-drill the hawse-holes, back closer to the stem, after I have performed my magically surgical widening of the hull, at the stem. Just as the prior example illustrates my desire to make this model look less like the plastic kit that it is, the next example strives for a greater verisimilitude with real practice. Here, I am showing the transom profile, which previously, I had trimmed back a generous 1/16", to the mounting ledge for the transom piece. That's why the hull thickness seems so exaggerated, below the main wale, because it includes the mounting ledge. The reason for doing this was so that I can model-in the round-up of the square-tuck stern. However, even after grinding away the existing mounting ledge, the side planking still is way out of scale. Ordinarily, with plastic models of this type, one would glue in the transom piece, and then fill-in any gaps - and then maybe, maybe scribe back in the partially filled plank lines. As I will be building up the transom and stern from scratch, on the other hand, I saw this as an opportunity to thin the hull wall at the transom edge to a more scale-realistic plank thickness. Into which, I then engraved the plank butt-ends This process also creates, on the inboard hull a new mounting ledge for the transom planking that will be installed later. Rinse, and then repeat on the starboard side! Following that, I will glue in the hawser pieces, and then scribe-in and detail the 15th "hunting port," at the bow of the lower battery. As this is already a fairly long build-log, and I've only just gotten started, I will periodically mention "the truth," or what "should be." What the first battery should consist of is 16 piercings (to be consistent with what is known of SR1), with 15 armed at all times; the 16th "hunting" port at the bow would only be armed by shifting the next gun, aft, into position when SR (and La Reyne, for that matter) were appropriately in pursuit of the enemy. For my purposes, even a vestigial scribed 15th port - while it's not 16 - is still closer than 14. Comme-ci, Comme-ca; a compromise of sorts.


- 2,699 replies
-
- 9
-
-
- heller
- soleil royal
- (and 9 more)
-
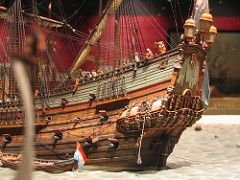
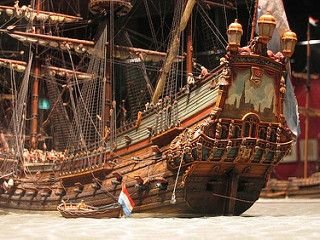
I certainly agree with you, Dan, about experimentation, and experiment I will! The results you achieved on the Sovereign are very good. I'm glad you mention the darkening effect around the boltheads of Herbert's models. I believe this effect is intended to represet the iron staining of the fasteners in the oak; a happy convergence of technique and intent. One of the things I will experiment with is lightly dry-brushing the through-bolt heads (at the scarfs and the transom knees, only) with some kind of dark grey, almost black color. I think that, along with the staining residue left from the opaque wash will create a nice effect. I will also probably use a more translucent wash coat, sparingly, to see what sort of depth that adds. Even though the period of time I am trying to represent is relatively brief (1689-1692), and the ship was newly re-built, her hull would already have darkened considerably, just being on the water. But then, a lighter sand base coat, would be another way of modulating the oxidation so that it is appropriate for the age of the new timber. The other thing that I find interesting about Herbert's model of Hollandia (last two pictures) is the darkened band of the two lower wales, which I suppose would represent a protective coat of creosote, or black stuff. On SR, this is always represented as being painted black, but might it be more realistic to indicate a darkened appearance? I have likewise been debating, for example, whether to paint the wales, up to and just below the main deck guns, a near black, in a matte finish. The argument for painting the wales is that, with so many through-bolt fasteners, the paint would effectively seal the area right around each bolt head. But, then again, would a darkened creosote color be more appropriate? All of these are points for debate! In other news, Henry (Popeye2Sea) has very graciously agreed to send me the extra parts I need for my splice and dice experiments into broadening and lengthening the hull. It is really heartening that this community is so supportive and helpful with their knowledge and advice, and spare parts! Without it, I'm not sure what the status of this project would be. Thank you, Henry! And thank you, Dan and everyone else who stops by, weighs in, and likes this or that. It is all greatly appreciated.
- 2,699 replies
-
- 4
-
-
- heller
- soleil royal
- (and 9 more)
-
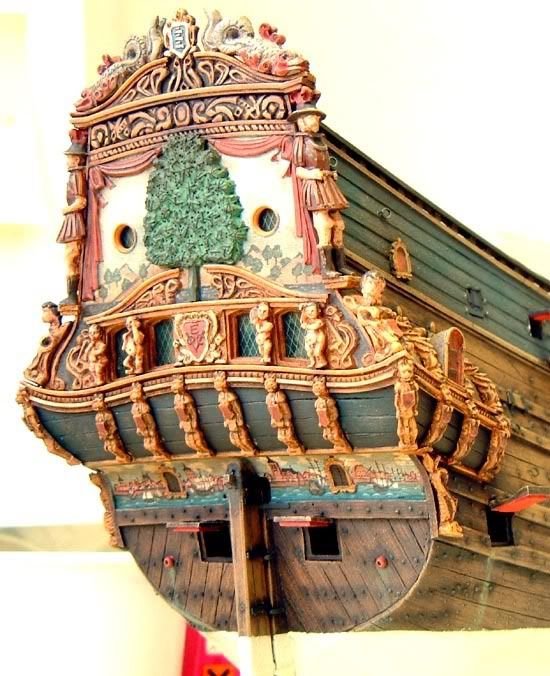
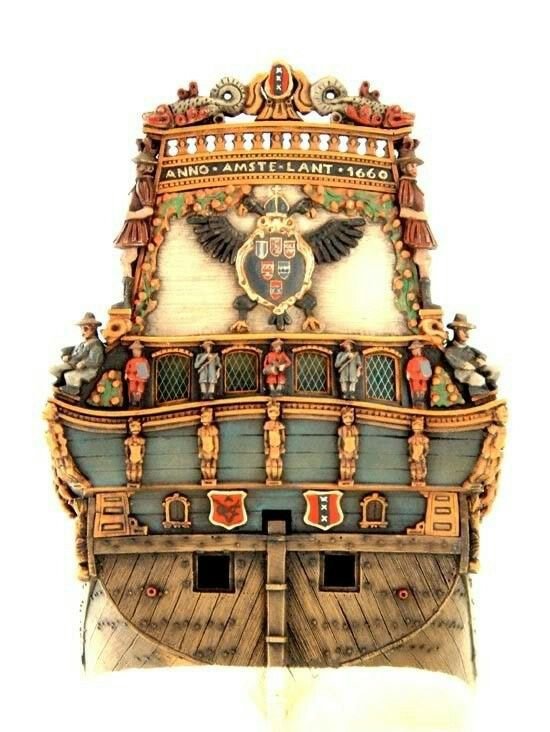
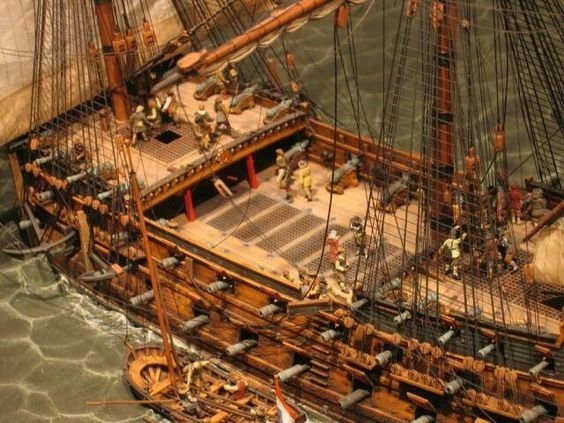
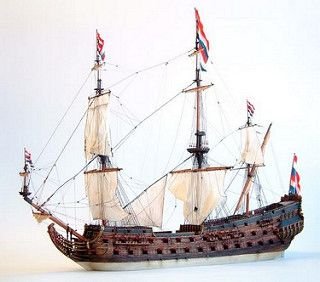
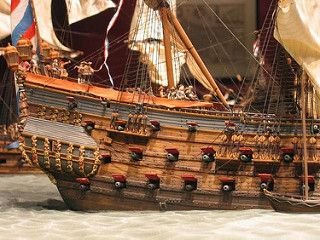
So, without further delay, this is Herbert Tomesan's finish protocol, as related by Herbert himself: "I sand the plastic first by grain 80 or even sometimes 40. Were you can't reach it, the tip of a scalpel will also create wood structure. After that I spray everything with Humbroll 63. I have no experience with acrylics, but after spraying the primer and then applying something like acrylic dessert yellow you let it dry. After drying you paint everything with Winsor and Newton "van Dyck's brown". Use it as pure as possible. It will look like shoe polish. This you will have to remove directly after applying. Take most off with a piece of cloth (towel) after that taking more off by big brush (cheap one with tough hair, after that softer brush and at the end with Q-tips, or the tip of your finger. Do a test with a small shipmodel first (the rowing boat, or a santa maria.)" And here are a few examples of the results. All models are completely scratch-built-up upon vaccu-formed shells with an assortment of sheet and strip styrene. Herbert is amazing! And, in my opinion, his models really capture the essence of the Van de Veldes. Just look at Hollandia (last two pictures): TheT The Provincien, below (first pic only. Not sure what ship the following two pics are) Hollandia
- 2,699 replies
-
- 5
-
-
- heller
- soleil royal
- (and 9 more)
-
Cedric - regarding the Danish website: I had been methodically scanning through the list. I found the image you had referenced a while ago, which was a starboard broadside view of maybe the Foudroyant of 1693. Quarter galleries were indicated, but no ornamentation was shown. Are you thinking of a different image? Do you have an approximate idea where in the numbered list it can be found?
- 2,699 replies
-
- 2
-
-
- heller
- soleil royal
- (and 9 more)
-
No kidding, EJ! I maintain a Pinterest board that I call "Scale Realism". First of all, the water effects that some of these steel navy guys achieve are astounding - you would swear you're Gulliver staring down at these miniature worlds that are rendered with photographic realism. Then, there are the fire effects guys who are modeling planes exploding on runways with blast point, changing fire and smoke intensity; it is just not to be believed!
- 2,699 replies
-
- 3
-
-
- heller
- soleil royal
- (and 9 more)
-
You know, EJ, I haven't the heart to do it to the waterline model I'm making, right now, but a part of me thinks it would be really fun to do a diorama of a battle scarred SR, after the Battle of Barfleur, off the coast of Cherbourg, as the fire ship inches ever closer, off her starboard quarter. I'm going to give Henry full license to retract his offer, if he is having second thoughts, but it would be fun to poke a few cannon ball holes into his warped hull halves to experiment and try to see whether I could achieve a good splinter effect, at scale. Cedric, I also appreciate your offer, but I will wait and see, first, whether Henry and I can work something out. That is also a generous offer, on your end, Dan which I may take you up on in some way shape or form. At some point, when my ship starts becoming a thing, I'll need to say farewell to my first SR. A close friend of mine has always admired the ship, but his wife might have other ideas about the available real estate on their home. Maybe she (the ship, not his wife😜) can live in your storage locker until I find a home for her. Speaking to your advice on paint and finish Dan, I was quite delighted, yesterday, to hear from Herbert Tomesan, who's scratch work in plastic is largely the inspiration for this build. I had written to him, asking about his particular finish protocal, and he wrote back in very specific terms that he gave me permission to share. It is surprisingly simple, and the results are impeccable. I will publish a post, later, when I can also publish pictures of his diorama models of Hollandia and the Provincien. Thank you Herbert!
- 2,699 replies
-
- 3
-
-
- heller
- soleil royal
- (and 9 more)
-
No worries, Reklein! You know, Vic, that isn't a bad idea about taking the whole kit. I'm not sure how enthusiastic my father would be about my stashing yet another model in his basement, which he is forever trying to get me to consolidate. The Heller Victory, which truly is a fantastic model, is the crown of the fleet, and it is just waiting for me to own a home where it will have space to co-exist with SR. My thought with the Victory was to convert her from the 1805 appearance to her 1765 appearance, which I think would be highly feasible, so long as I were willing to re-build the stern and trim down the heightened sheerline to the vestigial, ornamental rail. But those are all musings for another decade in life. For the time being, I only keep with me in NYC the parts that I am working on (again, space issues), while the rest sits in the box in PA. The truth is, though, that the vast majority of what comes in the SR box will be better made from scratch, when the time comes for that.
- 2,699 replies
-
- 2
-
-
- heller
- soleil royal
- (and 9 more)
-
And the list grows... I suppose I could also do with 4 - 6 of the stern balcony corbel supports, since I'll be making the middle and upper balconies wider.
- 2,699 replies
-
- 2
-
-
- heller
- soleil royal
- (and 9 more)
-
Wow, Really?!! Henry, that would be incredible! There are a few very specific pieces that I am interested in and they are the following, in no particular order: The upper bulwark pieces (to cut out the arched port surrounds) The upper stern plate for the windows The bowsprit pieces (knees of the head) that support the figurehead and fit in behind the figurehead - these were particularly warped on mine and may only be salvageable with judicious use of heat The bulkhead plate that fronts the forecastle The figures of Europe and Asia (horse and camel) The lower stern gallery corbel figures of Winter, Spring, Summer and Fall (that Battle of Barfleur painting that I posted recently has me wondering about something, if I could ever see a closeup of SR) Perhaps, also, the middle and upper stern balconies, which I may be able to extend to the new stern width with a similar cutting and splicing effort - again, this was one of the kit details that was particularly nicely worked, and it would be hard to do better from scratch, especially considering that there is a pretty close fidelity, there, to the Berain drawing. Come to think of it - if you still have the warped lower hull pieces, I could salvage the aft 3/8" for my stern extension pieces (cutting the same dimension away from the upper bulwark pieces); these would then become the hull extensions I would have had to cast from resin. Likewise, my 1/4" bow widening pieces could also be cut from the warped hull halves and fixed to my modified hull halves. With that in mind, I would also need the bow hawser inserts, if you haven't already glued them in place. That would be ideal - saving me an enormous amount of time and effort. What would you like for your trouble and expense? I would be more than happy to pay your price for them, and of course, the shipping. But only so long as you don't see yourself doing anything with the kit now or ever.
- 2,699 replies
-
- 3
-
-
- heller
- soleil royal
- (and 9 more)
-
Hello Vic! Yes, the hull is being widened by a half inch, in order to accomodate the six-light stern that is shown in the Berain drawing. That is largely the reason why I am cutting the hull down to a waterline diorama - because doing so will enable me to cast resin bow extension pieces from the most bluff/flattest portion of the hull, near the stem. When I approximate the new hull width, by standing the hull halves, opposite each other, the impression of the model as a seaworthy craft is, in my opinion, greatly improved. I have been thinking for some time that I will recycle the kit's window frames for the stern, and simply make a resin casting for each missing sixth window. Lately, I've been thinking that I might just try and buy someone's abandoned, and partially built SR kit, so that I can salvage the missing sixth windows, as well as the main deck arched gunports that I want to place in a more correct, vertical plane. Right now, there is an early pressing of the kit, like the one I am working with, on EBAY for $36. The shipping is more than the highest bid. When one considers that I inherited this kit, a small cash outlay doesn't seem so bad. Also, if I had a second kit at my disposal, I have an idea that I could lengthen the reclining figures of Europe and Asia (atop the tafferal) by splicing in two seperate 1/8" slices, from the kit-bash box of spare parts, somewhere in the figures' legs and the bodies of the horse and camel. I could, then, re-shape the bottom edge of these figures to closely scribe to the new and altered cyma curve of the tafferal. Theoretically, it would be easier than re-modeling the figures in polymerized clay. I haven't, yet, given that idea a serious look to see exactly how and where that might be feasible. Does anyone out there want to sell a partially built or damaged beyond repair Heller kit?
- 2,699 replies
-
- 3
-
-
- heller
- soleil royal
- (and 9 more)
-
Welcome Ger!
-
Hi Cedric, Thank you very much for the kind words, and thank you to everyone else for their likes and comments and reading along. It is all very much appreciated. I think that, after I bolt the other half, I will turn my attention to fitting the hawser pieces. You are right, Cedric, that the initial fit is poor. One thing I and so many others who have built this model before are guilty of, is leaving a step in the ship's sides where the planking meets this separate hawser insert. This time around, I will take pains to cut a diminishing rebate into the top and bottom edges of the hawser piece, so that the aft edge meets flush with the ship planking. That should minimize the necessity for filler to hide the joint. I will wait until after I have made and installed the bow extension pieces, to fill in and re-locate the existing hawse-holes. Because the extensions will push the hawse holes further away from the stem - which would look distracting and strange (and just plain wrong) - one or both will need to be re-drilled back to their correct position. Until then, though, I have an army of tiny plastic slivers to flash and mount to the other side. In recent weeks, I have been the beneficiary of unusual amounts of bachelor time, as my wife and kids spent the past two weeks, out on Long Island. But we are all home now and the craziness of the school year is about to start up again, so progress will be necessarily slower.
- 2,699 replies
-
- 2
-
-
- heller
- soleil royal
- (and 9 more)
-
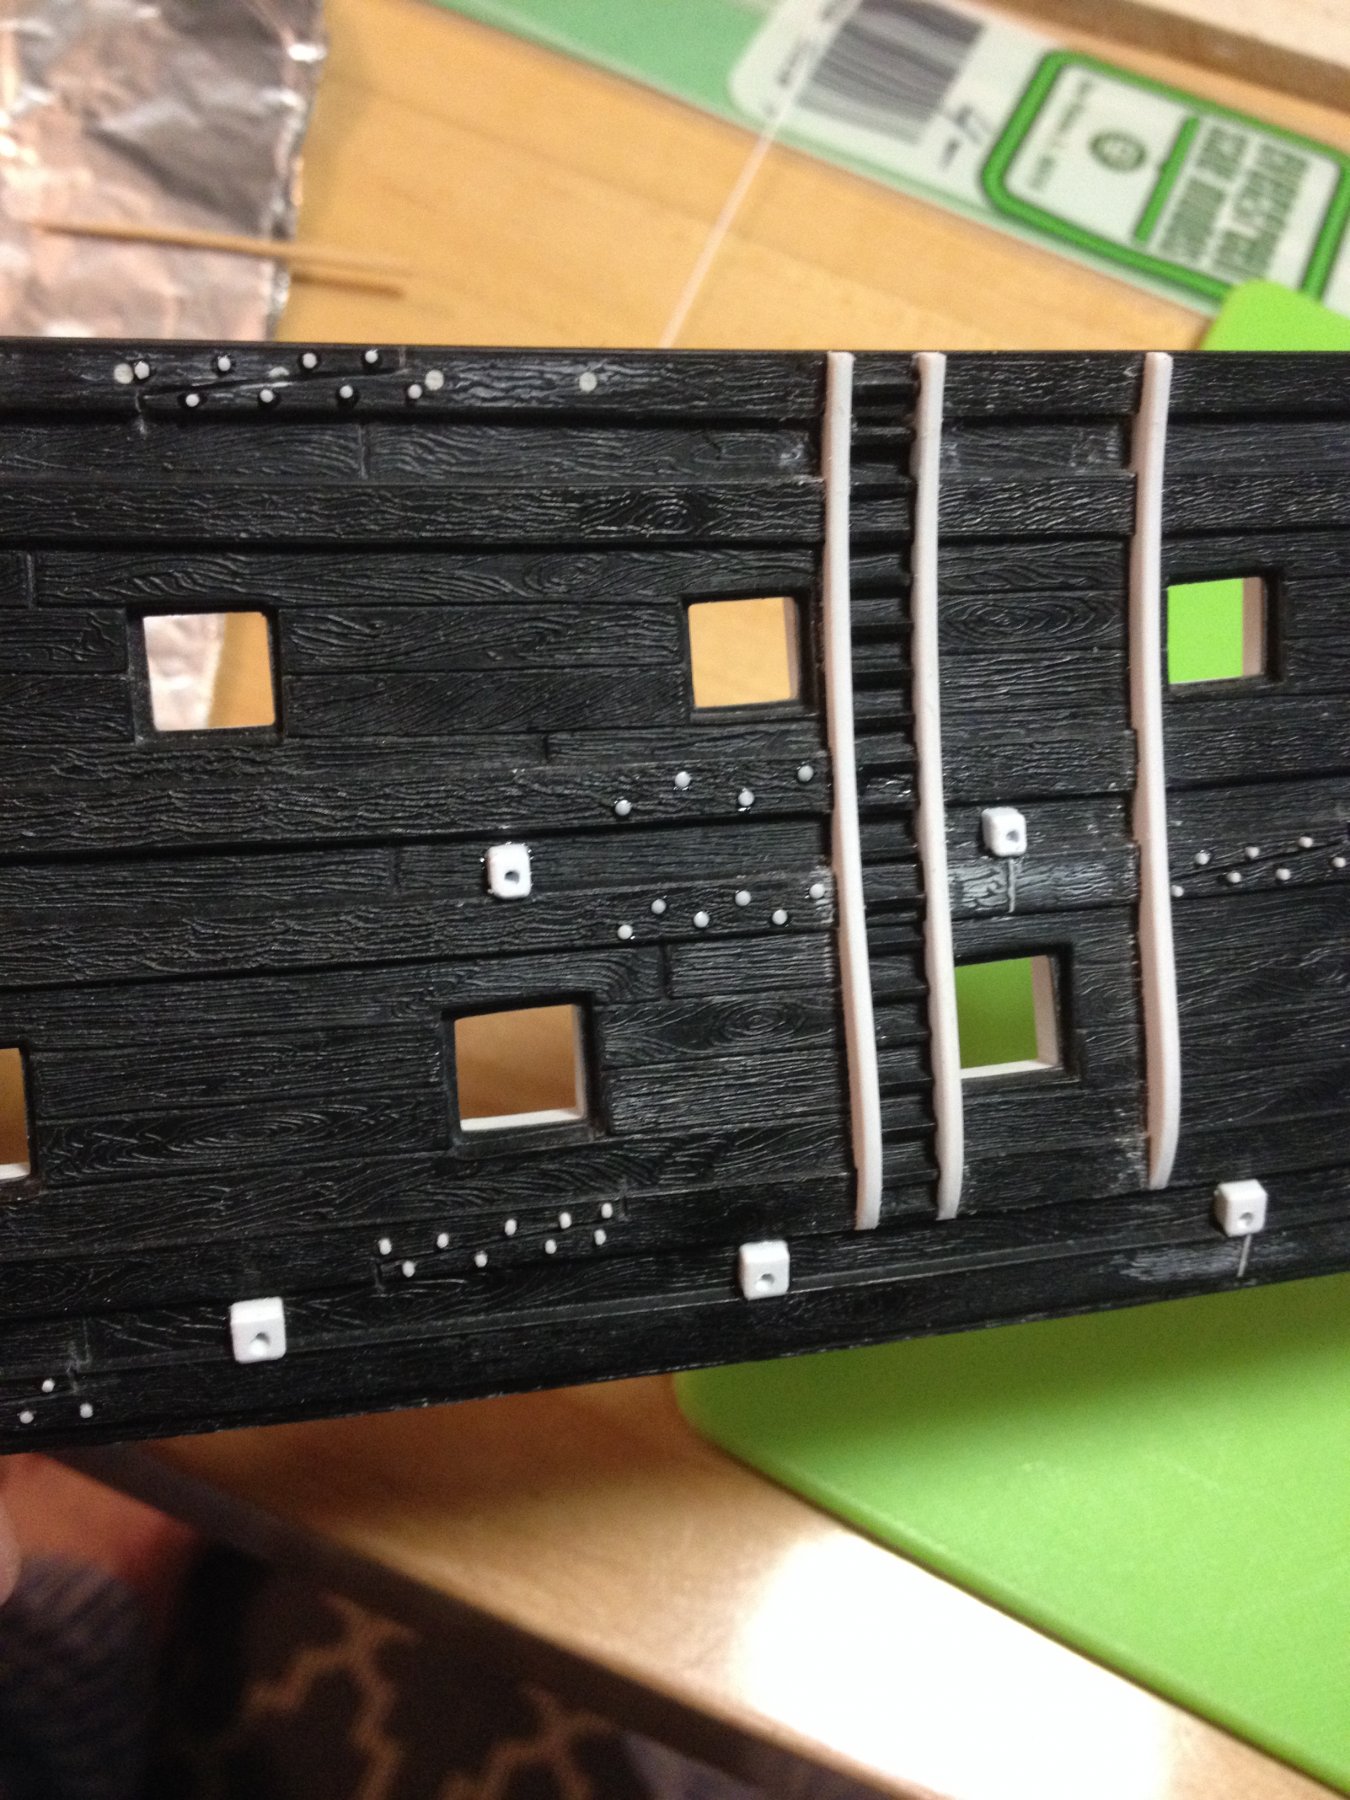
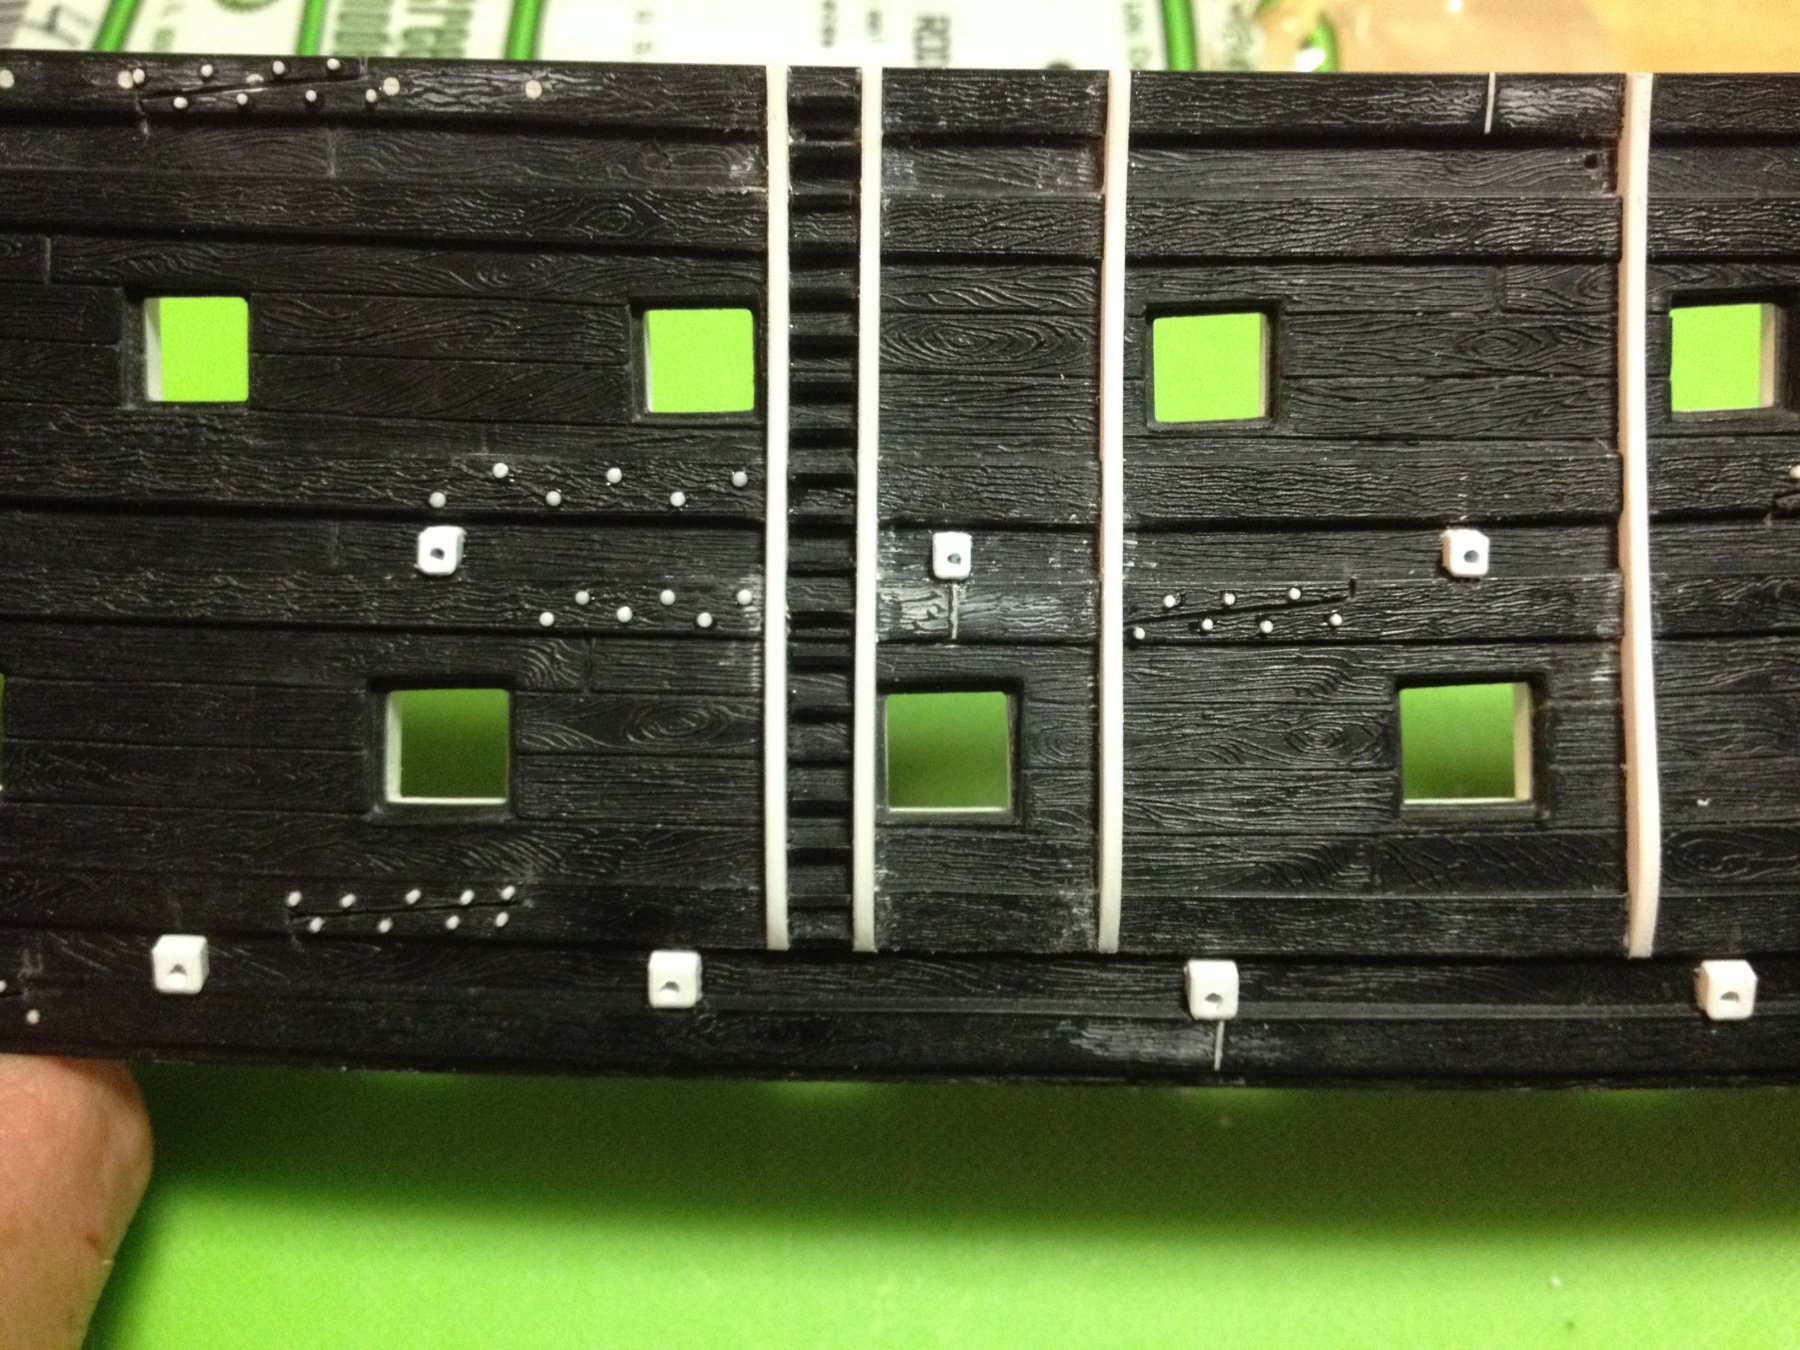
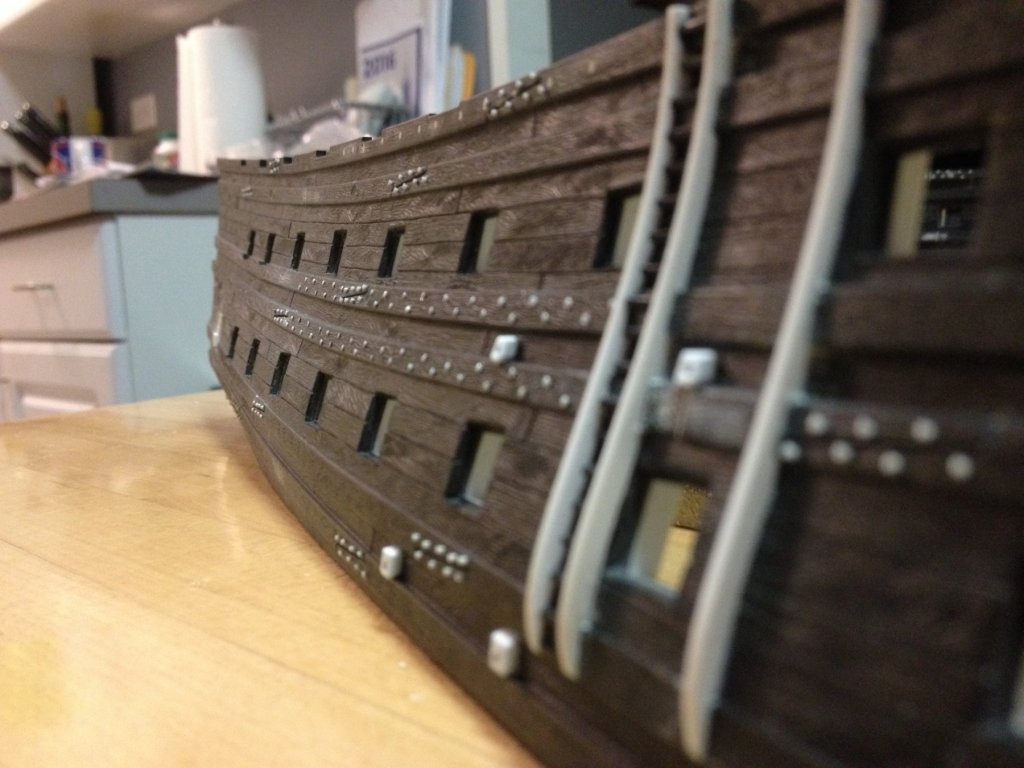
One side of wales continuously bolted: The spacing is not absolutely perfect and uniform, but it would not be so, in life. I worked the wales in consecutive pairs, four bolt heads per glue application, so that there would be a general sense of uniformity about the thing as a whole.

- 2,699 replies
-
- 6
-
-
- heller
- soleil royal
- (and 9 more)
-
Out of curiosity, Gerard, in which epoch of naval architecture did the limber hole/limber way become a regular feature of French naval architecture?
-
Hi reklein. I'm not sure what you mean. Do you mean that the bolts, themselves, should run vertically, and parallel to the centerline of the ship - as opposed to horizontally, and parallel to the waterline?
- 2,699 replies
-
- 1
-
-
- heller
- soleil royal
- (and 9 more)
-
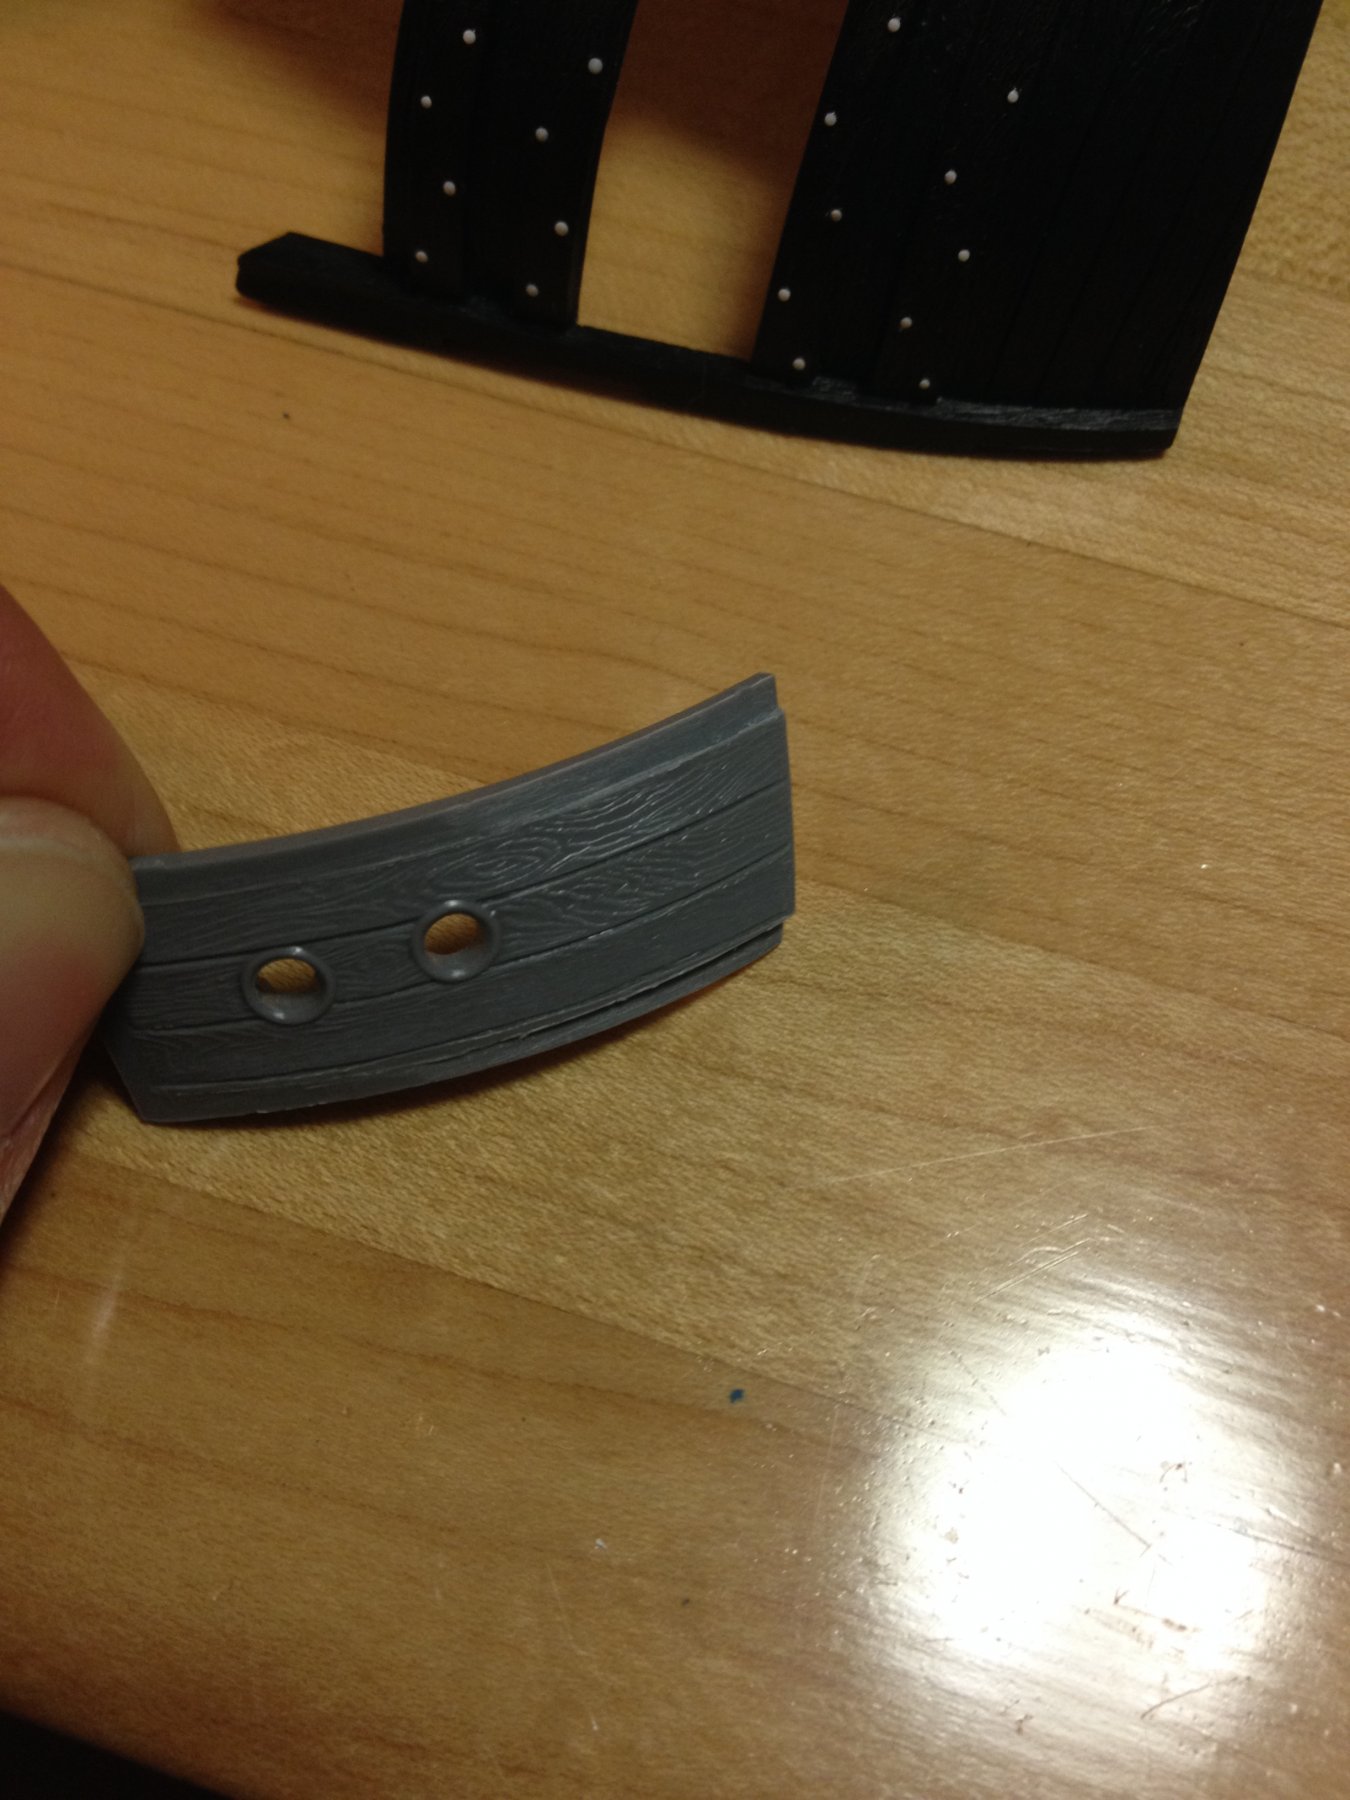
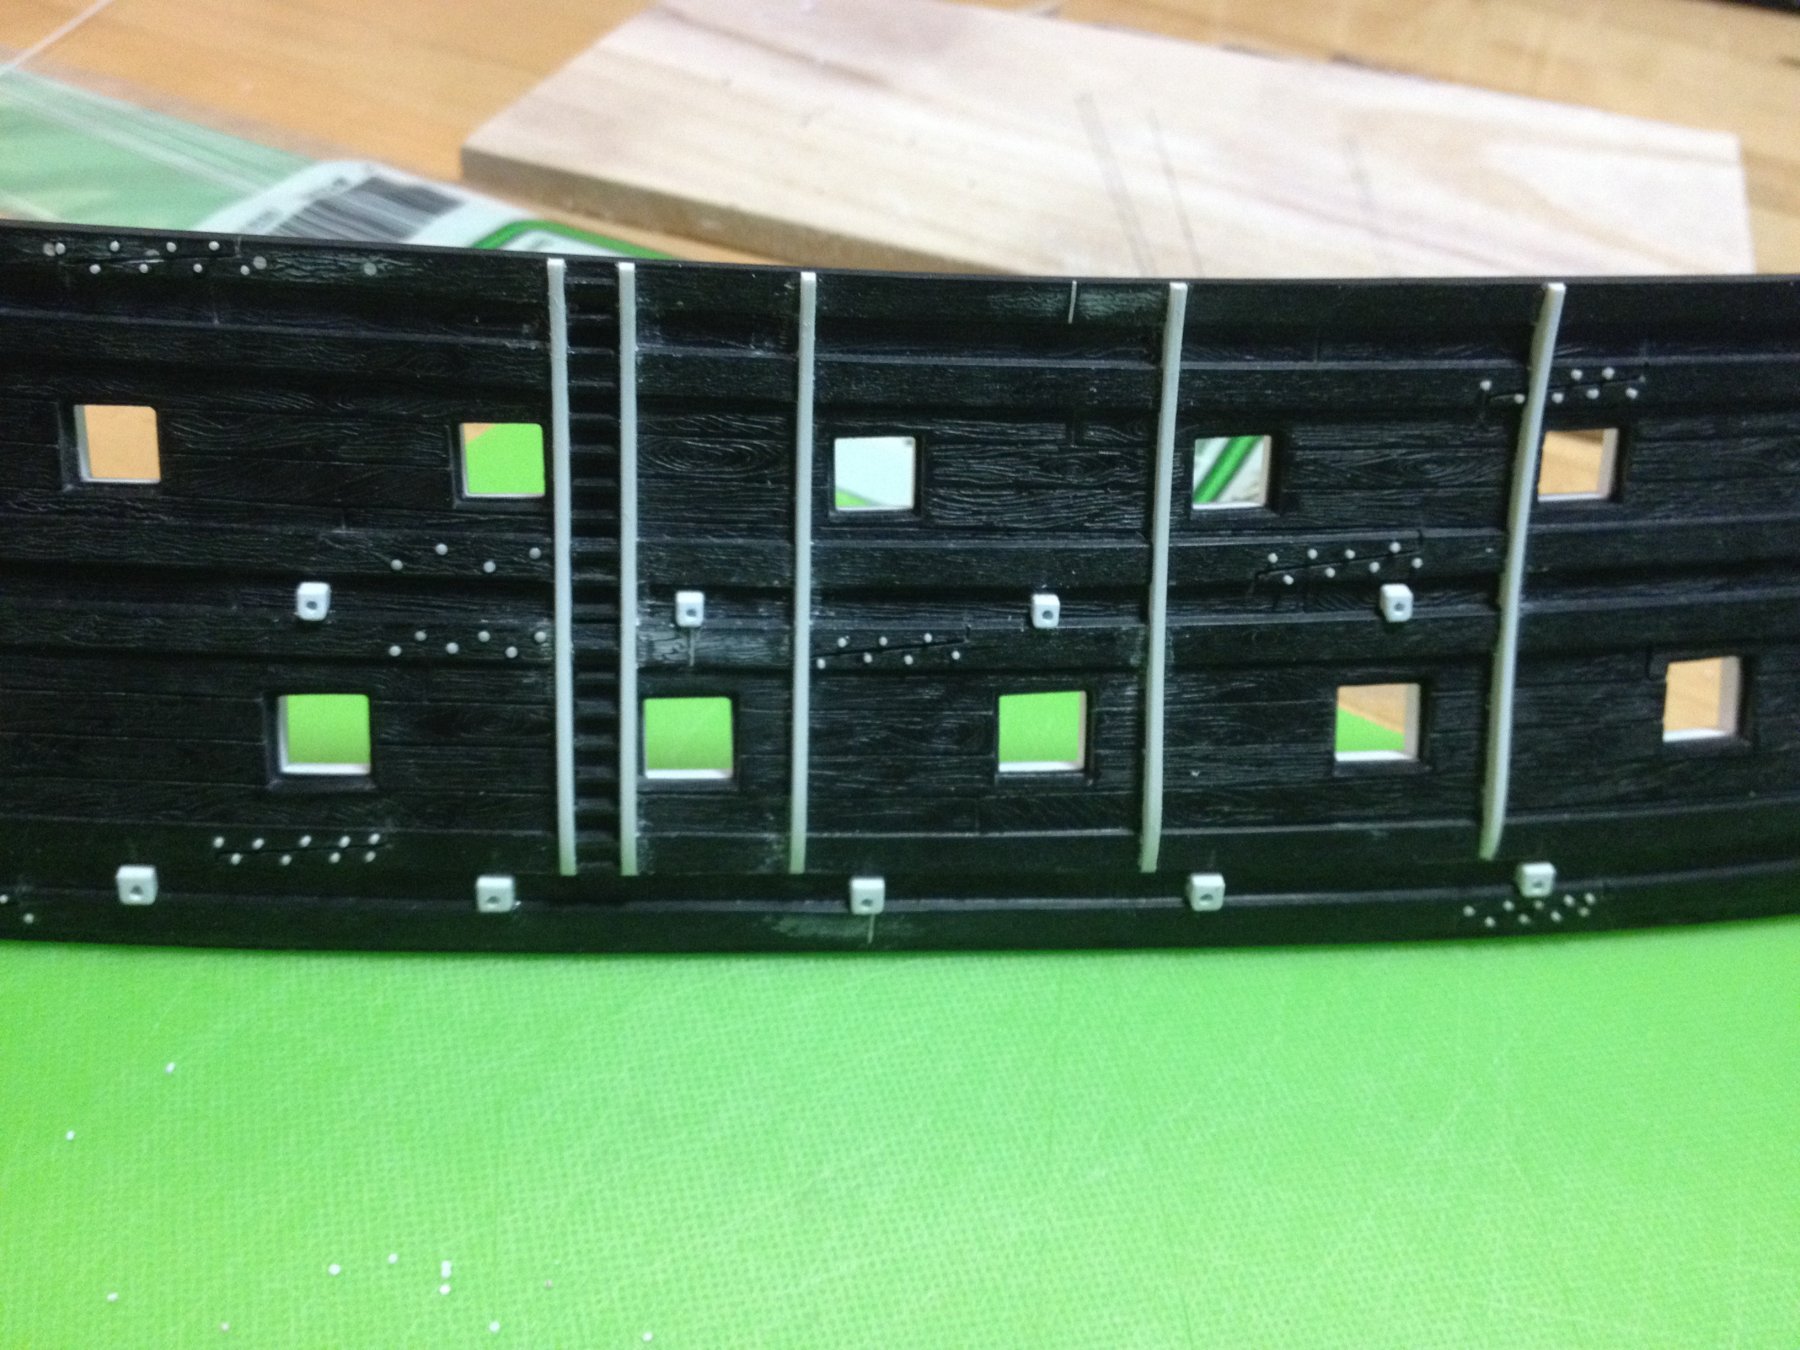
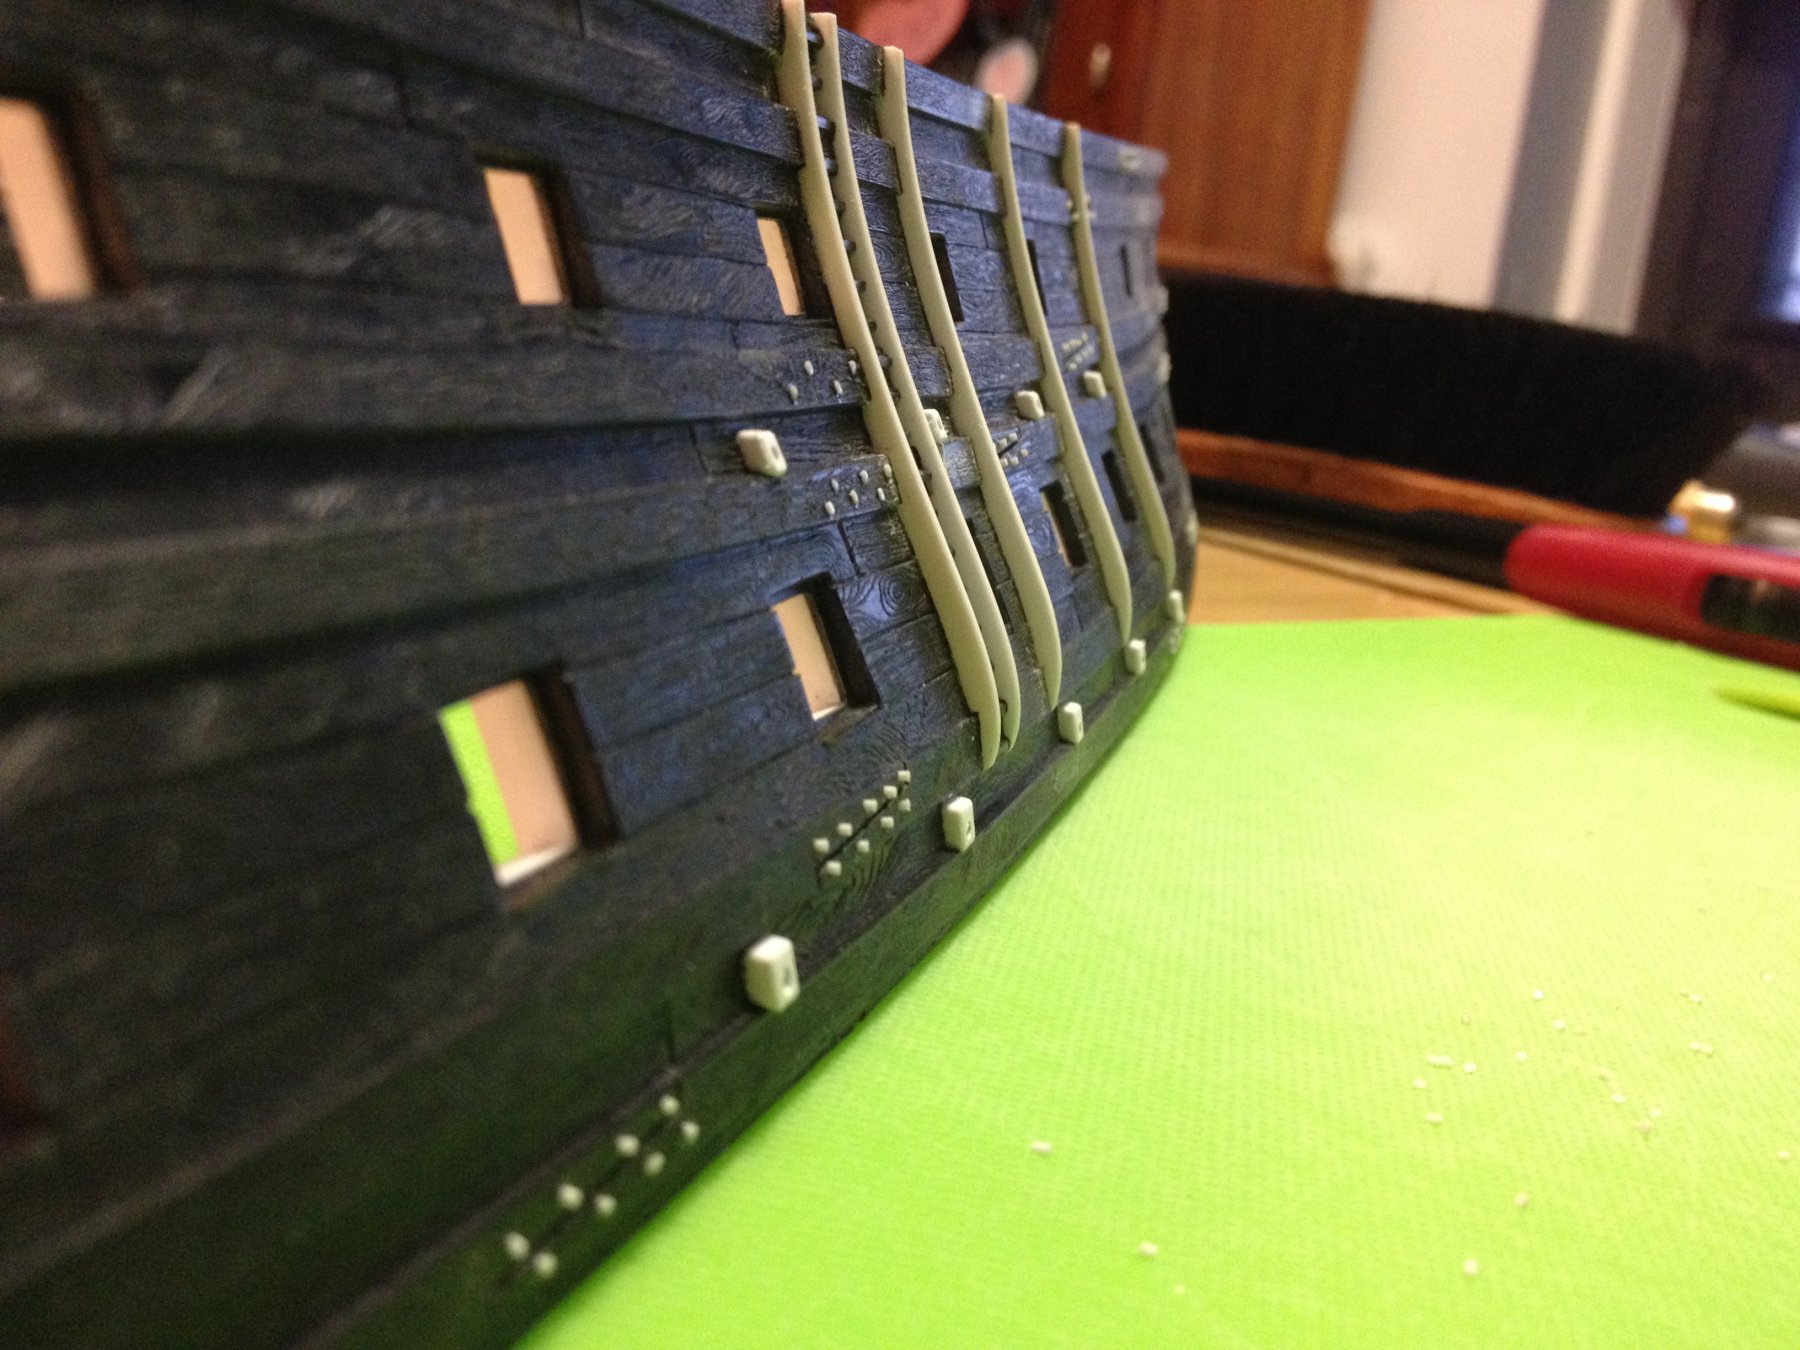
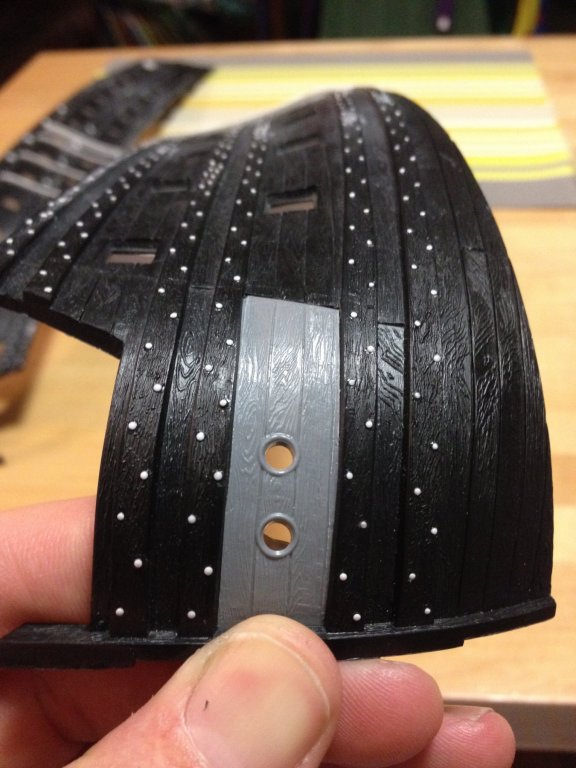
These first two pics feature the scuppers. The lower tier of five were made from bevelled slivers of .125 square styrene rod; drilled, mounted and shaped in place. The upper tier was made from .100 square rod and similarly shaped. Both tiers extend just past the wales, but not beyond the skids. Ultimately, I'd like to attach the sort of backflow sleaves, or socks, that are apparent on the lower tier of so many VDV portraits, but I'm not sure what a suitable material may be for this; tissue, silkspan? I don't know. The next three pics focus on the continuous bolting of the wales that I described in a previous post. It took a little experimenting to determine how thin a sliver would flash nicely with a wand lighter, but eventually, I figured it out. This first pic shows two alternate spacings on adjacent wales. The lower wale has spacing that is too cramped, so I settled on the spacing of the upper wale. This last pic, I think, shows the relatively low relief of these "bolts," which I hope will show convincingly under paint. The through-bolts, at the wale scarfs, will stand proud by comparison, though. Finally, despite many attempts to delete this last, redundant picture - for some reason, the site refuses to delete it. So, here's another look at that...


- 2,699 replies
-
- 8
-
-
- heller
- soleil royal
- (and 9 more)
-
My vote, EJ, is for the ultra-marine. 'Will definitely pop more, and after staring at my first SR (French Blue) for the past 20+ years, I've grown tired of it.
-
Well, you certainly have your work cut out for you, Cedric, but your plan seems a good one to me. I realised, after the fact, that I probably should have asked you this question on your build-log for La Reyne, as people following your build would benefit from hearing your answer. I will be more sensitive to that, in the future😉
- 2,699 replies
-
- 3
-
-
- heller
- soleil royal
- (and 9 more)
-
I've been thinking about this problem you are tackling, Cedric, concerning the forward sheer of the decks. If your intention is to lower the forward sheer so that the wales forward of midships run more nearly parallel with the waterline - then all the forward wales, right up to the main deck level will need to be similarly adjusted. The trouble comes with the juncture of the lower hull with the upper bulwarks; the forward, upper bulwark will no longer fit, if you change the shape of the top, main deck wale. So, this must necessitate building new upper bulwarks from scratch, right? Or, you could adjust the run of the lower and middle deck guns/wales and leave the top sheer of the main deck wales, as it is, but I'm not sure how that would look, relative to the mIn deck guns.
- 2,699 replies
-
- 2
-
-
- heller
- soleil royal
- (and 9 more)
-
Hey Cedric! Thank you for the kind compliments! Yes, while I haven't placed the so-called "hunting ports" yet, I will represent them as closed ports that are scribed in to the plastic. I'll make up hinges and ring bolts for them. The thing about the Heller kit that I have always found perplexing is why they make separate inserts for the hawsers. I have yet to glue these in place, but when I do, I can then scribe in the hunting ports. And you're absolutely right, vis-a-vis nothing ventured nothing gained! Making my castings and extensions are what this project is all about, so that is the freedom of plastic - if it doesn't work exactly as planned, I can heat and manipulate the extension pieces to fit. I will find a way, and am really excited to experiment with making castings. Will you be posting drawings sometime soon, Cedric?
- 2,699 replies
-
- 3
-
-
- heller
- soleil royal
- (and 9 more)
-
No, EJ, I was not previously aware of that app, but it sounds perfect for the scaling of the masts and spars, among many other things.
- 2,699 replies
-
- 2
-
-
- heller
- soleil royal
- (and 9 more)