gsdpic
-
Posts
840 -
Joined
-
Last visited
Content Type
Profiles
Forums
Gallery
Events
Everything posted by gsdpic
-
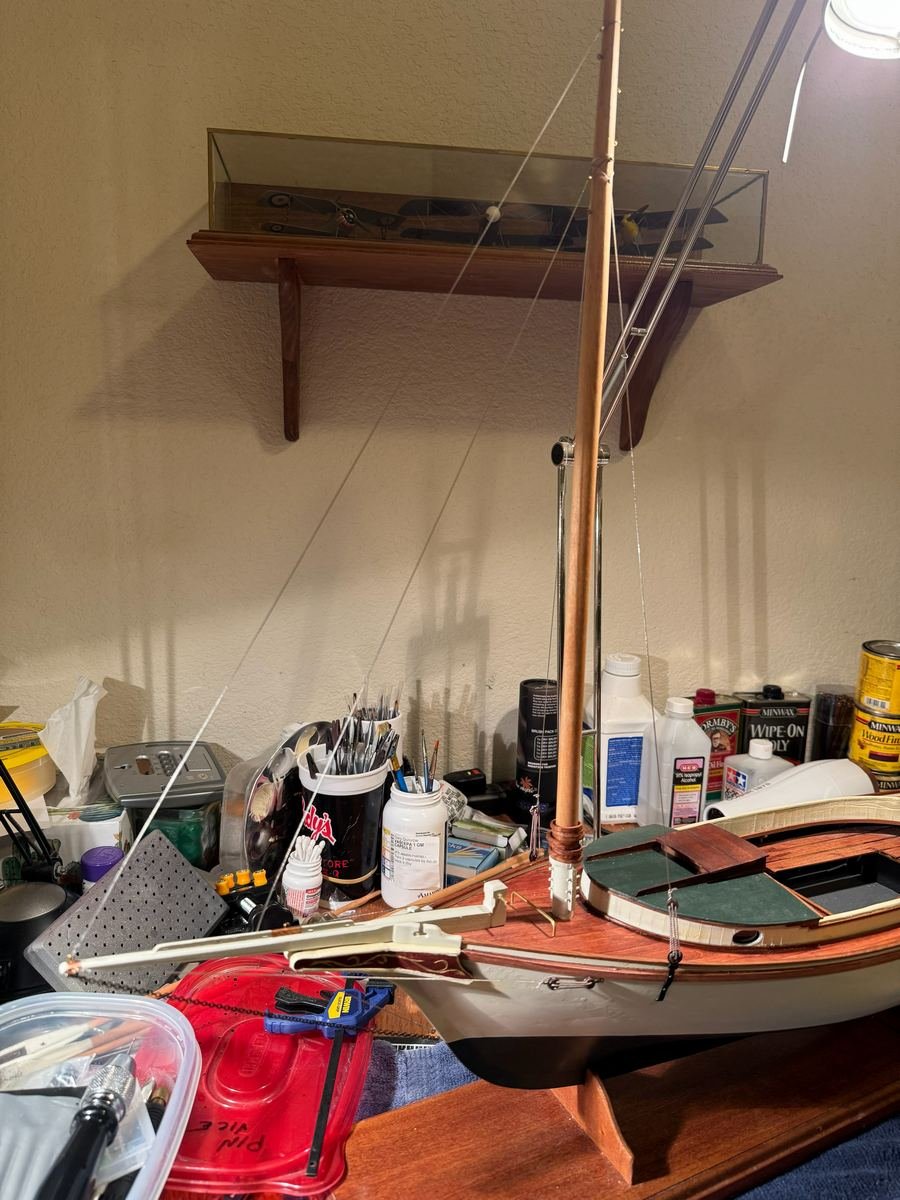
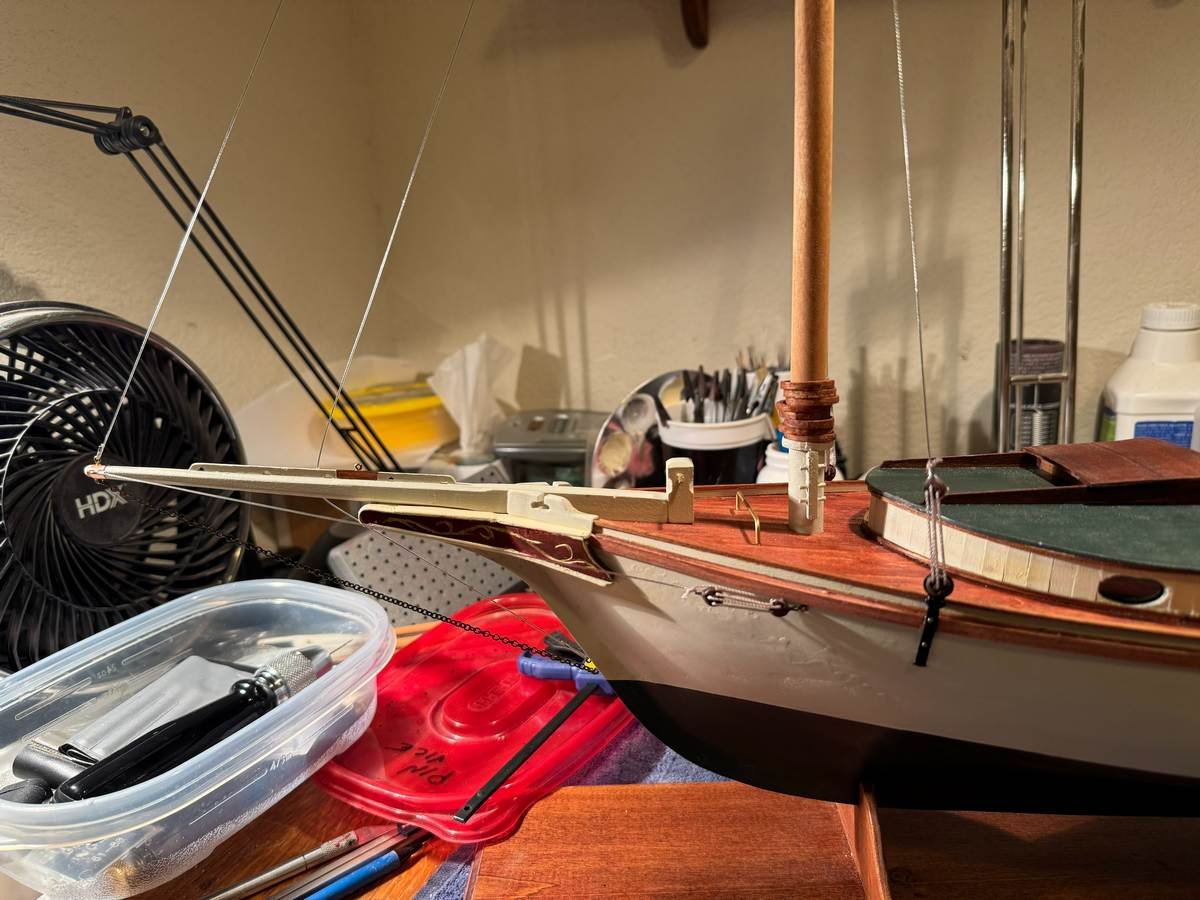
As always, thanks for the likes. I've now added the lazy jacks on the main sail and also added the two front sails. I have pretty much completed the rigging, though as you can see, nothing is tied off. The lines are just hanging loose or in some cases weighted down with spring clothes pins. The installation of the front sails went well, though I did chop off about 3/8ths of an inch of the jib club (the plans refer to it as a jib club even though, I think, it is attached to a sail referred to elsewhere as the stay sail. I am not a sailor so don't really know one from the other). I meant to mention last time that it was odd there was no sort of parrel specified for either the gaff or boom. The plans showed both with jaws, and showed a hole at the end of the jaws, but I did not see any mention anywhere of a parrel to hold the gaff or boom to the mast. In my case, the jaws were just barely wide enough for the mast, so it was a bit of a friction fit, but I did add a small piece of copper wire between the two holes in the jaws to further hold the gaff and boom in place. I think I will redo the main sail out haul along the boom, as I just figured out that I did not do it correctly. Then I will tie everything off and form some rope coils in appropriate places, and look for any other finishing touches. But I fully expect to declare this one done in the next few days.

- 90 replies
-
- 9
-

-
- Friendship Sloop
- bluejacket shipcrafters
- (and 1 more)
-
Great recovery! That picture of the air box really shows off your fantastic finish.
-
Thanks for the likes or for just stopping by to take a quick look. I've now attached the main sail, along with the boom and gaff. I still need to tie off and trim some of the rigging and I need to rig the "lazy jacks". Then it will be on to the two front sails which should be much easier to rig, so I am getting close to the finish line.

- 90 replies
-
- 6
-
-
- Friendship Sloop
- bluejacket shipcrafters
- (and 1 more)
-
Strange that the reaction only happened where the black number decal was. Maybe it was somehow related to having two layers of decals there. Otherwise, the finish looks fantastic. Good luck resolving the issue with the bubbles on the numbers.
-
Welcome Andy. Also check out the forum sponsor Evan Designs. The sponsors are listed on the lower right hand corner of the main home page, at least in a PC browser. Evan Designs sells LEDs for lighting various projects (ships, doll houses, other models, etc) and also has some how-to info.
-
Wow, been almost a month since I last posted. Thanks for the patience of anyone following along. Of course in that month I made another tangent 🙄: But now I have sown the sails. I used pretty much the same technique as with my America build, and I documented it in that build log so won't bother doing so here. I do need to still punch some holes where the sails are attached to the various spars and need to add the reef points. But then it is on to the simple running rigging to get the sails attached.

- 90 replies
-
- 3
-
-
- Friendship Sloop
- bluejacket shipcrafters
- (and 1 more)
-
Off to a great start. That polished aluminum on the interior is looking especially good. I used matte aluminum on mine. The replacement JPS decals look good too....the gold color looks pretty accurate. As I recall when I built mine, some of the third party decals looked more like yellow and not so much like gold. Your upper cowl looks good too; mine had a bit of twist/warp to it. Anyway, you are bringing back some memories. I am looking forward to see what you do with the kit, I am sure your efforts will outshine mine.
-
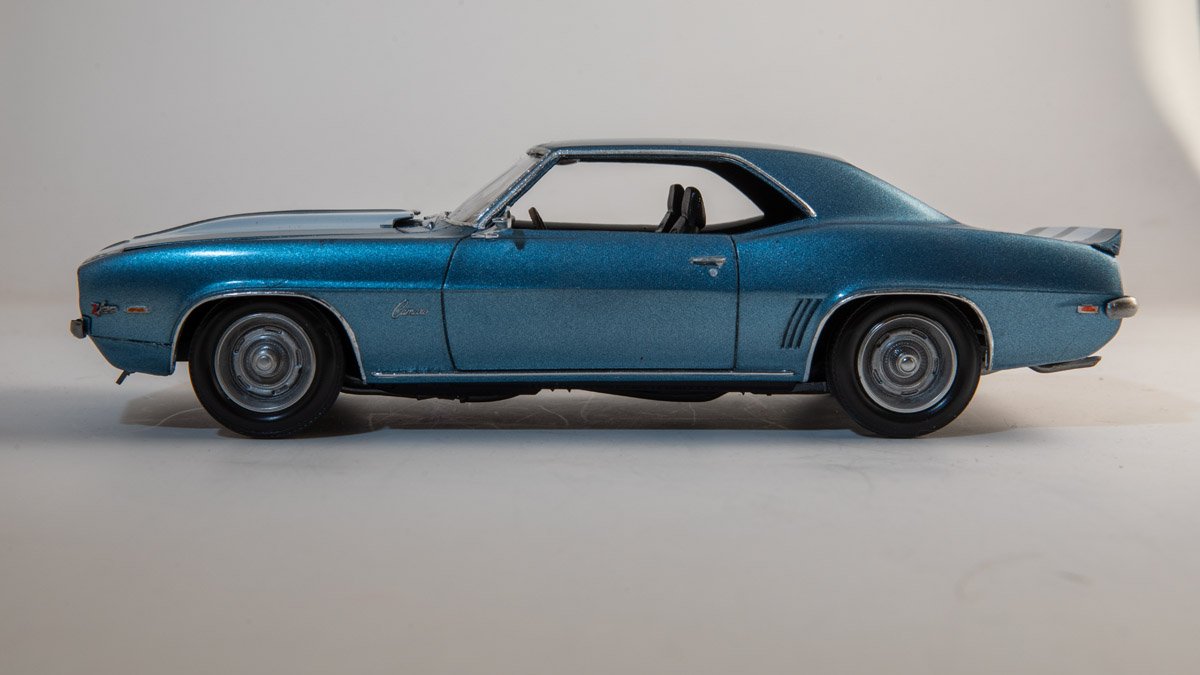
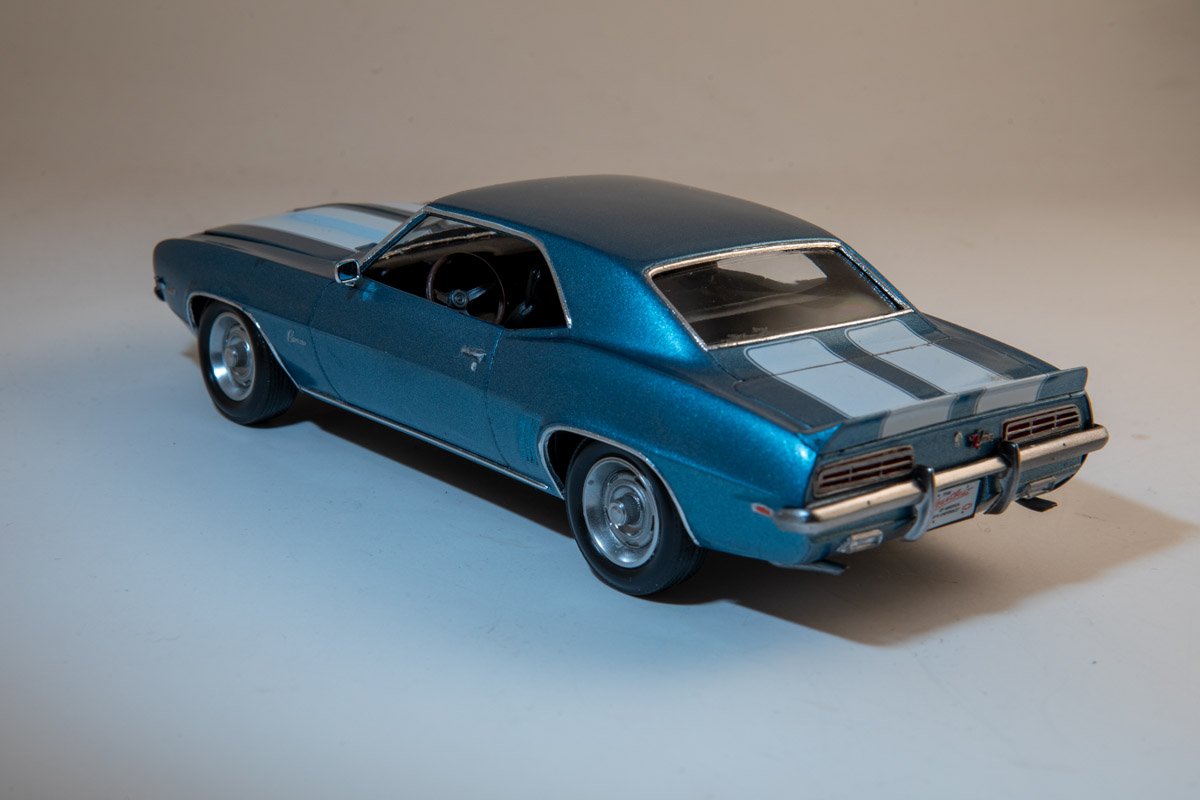
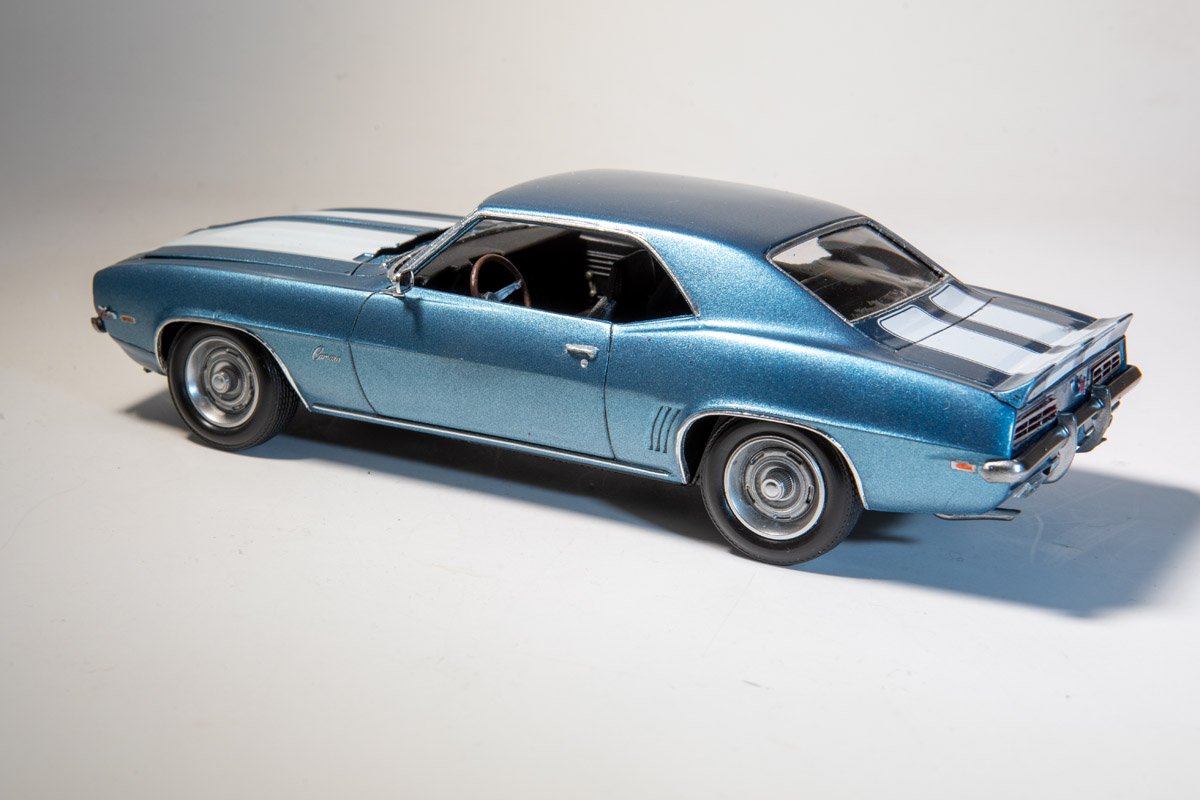
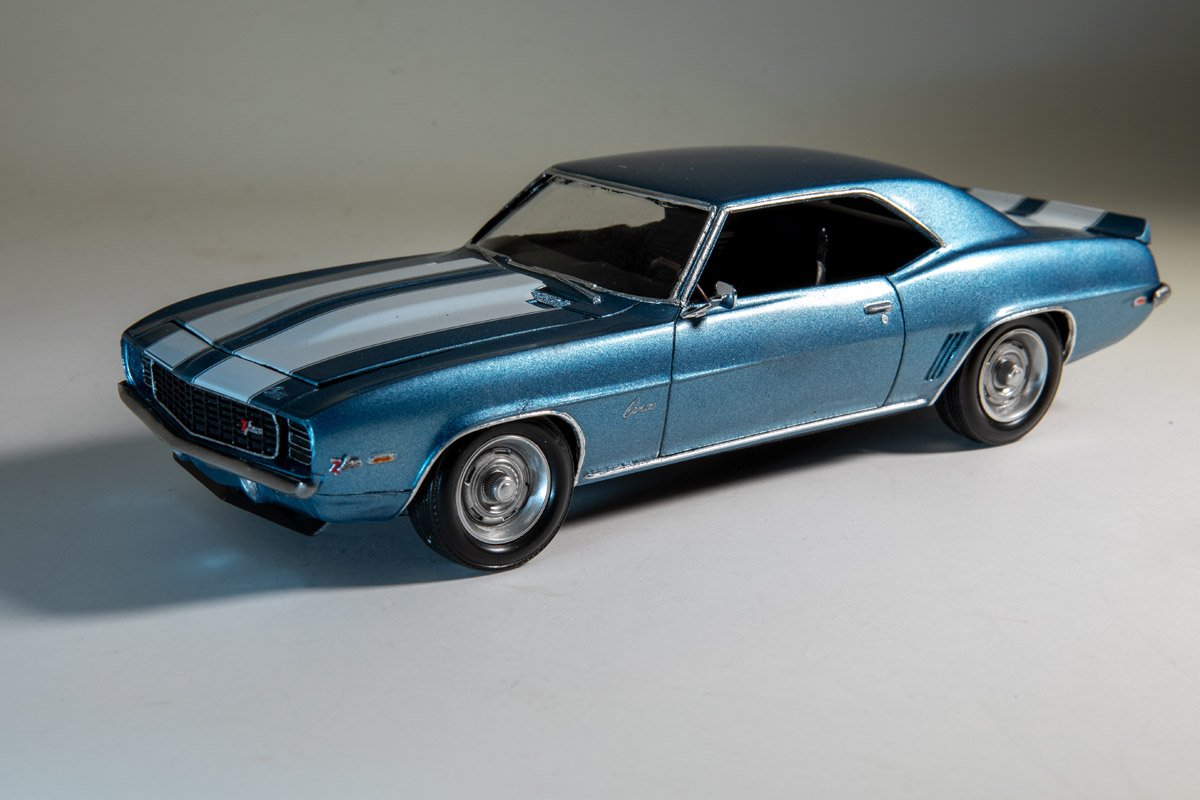
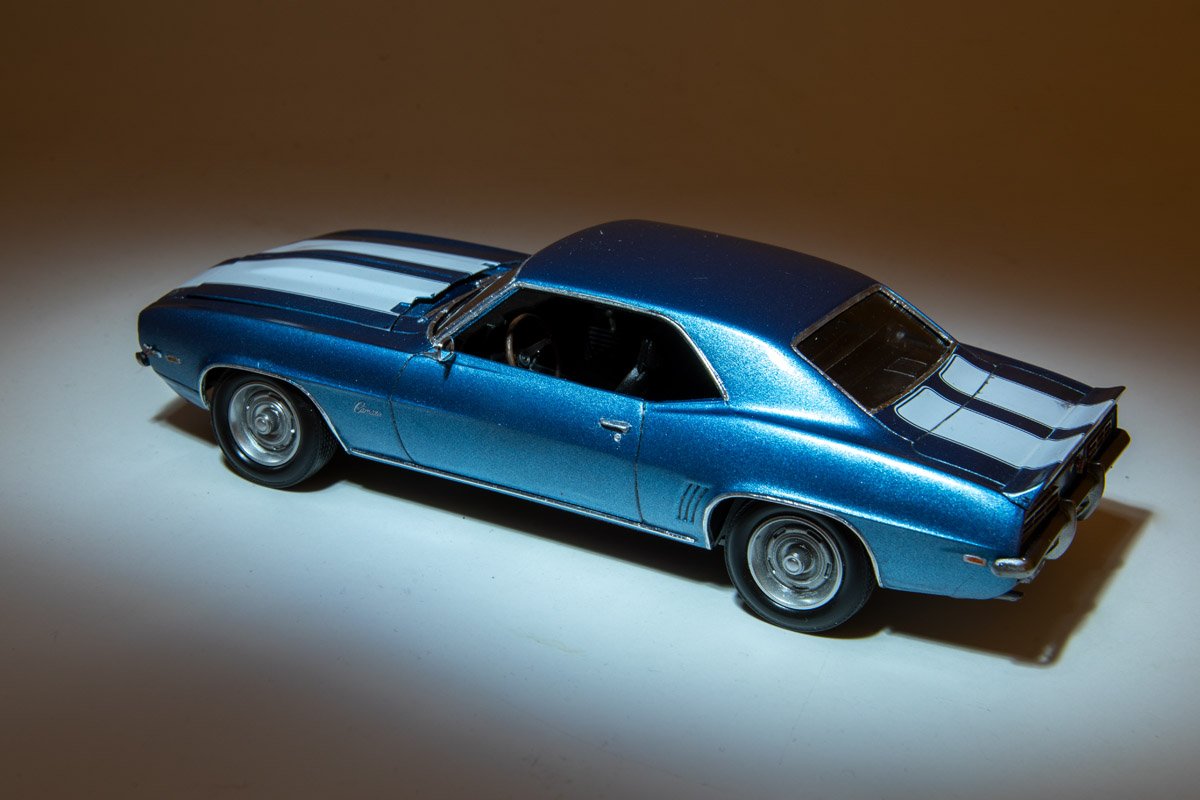
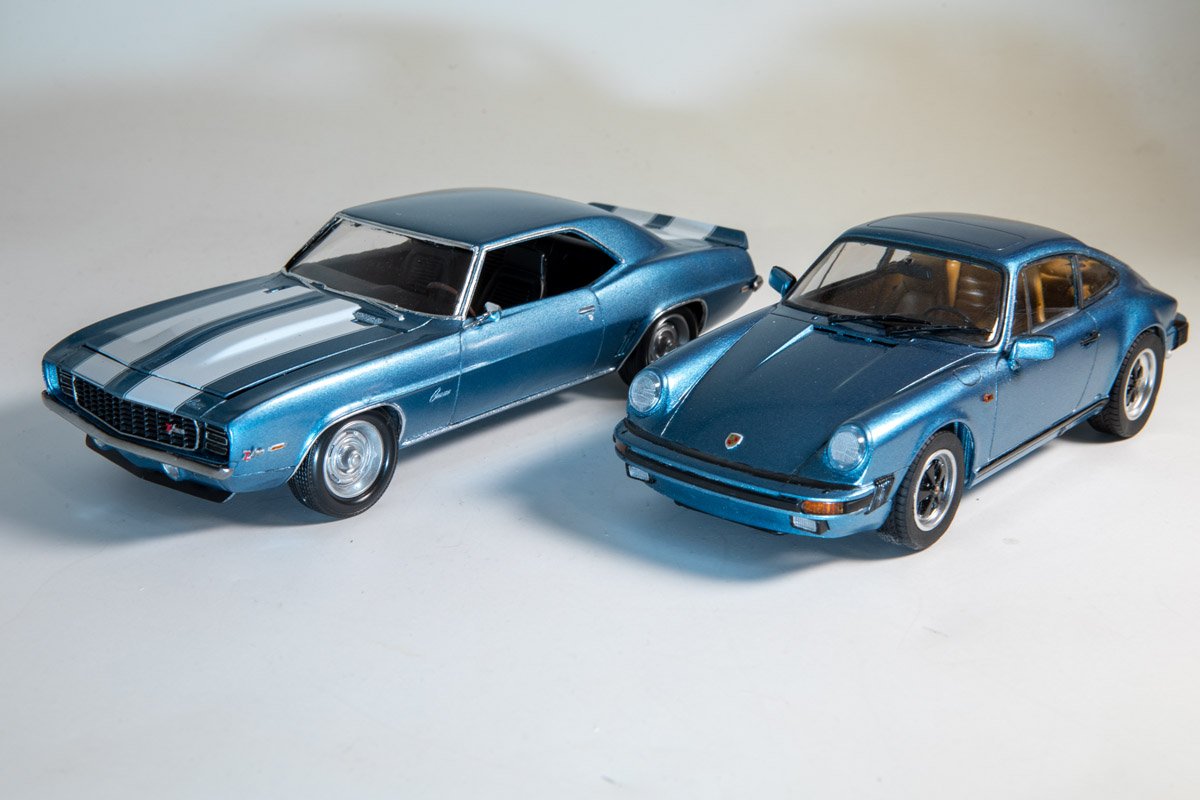
Well I keep going off on a tangent from my Friendship Sloop to build another car, trying to reduce my stash though I keep buying more for some reason. Below are a few pictures of Revell's 1969 Chevy Camaro Z/28 RS. As you can see in the last picture, I used the same color as on my mid 80's Porsche 911. It is actually a Porsche color but I figured it was close enough to Chevy's LeMans Blue metallic. Thanks for looking, hope you enjoy. I swear I'll drag that sewing machine out and make those sails for the sloop.
-
- 4
-
-

-
Glad you came back to post the final pictures. Very well built, very attractive build. The stained wood, red window frames, and blue/gray top all look great together. I lived in Raleigh long ago....sounds like about the time you moved there. I was there from 1989 to 1997. Went to grad school at NC State then worked in the area for about 6 years before transferring to Austin.
-
Excellent work on the carving and gilding!
-
Wow, the paddle wheel looks great. I imagined it was a bit larger until I saw the picture of your hand holding it. That was quite a project on its own.
-
The whole build looks really good, but the finish on the main prop is really outstanding, with the wood, yellow paint, and three different metal colors, and just the right amount of shininess.
-
Just catching up on your build. The finish looks great. One of these days I'll get serious enough about modelling to wear gloves while handling the under construction build.
-
Well done Glen, amazing work! As for Johnny's suggestion.....I think you should model that list picture and have the whale boat glued to the top of the inside of the bottle!
- 156 replies
-
- 5
-

-
- Queen Annes Revenge
- bottle
- (and 1 more)
-
Lotus 49C by DocRob - FINISHED - Ebbro- 1/20 - Plastic
gsdpic replied to DocRob's topic in Non-ship/categorised builds
Looks great from here. And I agree with your earlier comment about the pre-printed tires....they look good and add a lot to the model. -
Lotus 49C by DocRob - FINISHED - Ebbro- 1/20 - Plastic
gsdpic replied to DocRob's topic in Non-ship/categorised builds
Looks great, like you are overcoming all the challenges well. That rear suspension does look like a delicate and fiddly piece. -
Been a bit since I did an update, but I now have the standing rigging complete. I started by painting the traditional metal blocks and deadeyes that Bluejacket supplies. I used some primer first then a couple different flavors of Tamiya brown paint. It works ok though as usual, it can be easy to scratch off the paint while handling the blocks or deadeyes. I then attempted to start the rigging using the thin stranded copper wire supplied in the kit but I was not happy with it. It was difficult to work with, unraveled when you cut it if you did not first put CA on it, difficult to fasten, and I felt it was too thin. It was a quarter millimeter so full size that would just be 3 millimeters in diameter, less than an eighth of an inch. So I dug into my stash of stuff from earlier projects and found some beading wire and crimp tubes. It was also multi stranded but coated in clear plastic which held the strands together. I think the plastic also gave something for the crimp tubes to bite into. After crimping I also put a dot of CA on but I am not sure that was necessary. Anyway, there were only about a half dozen bits of standing rigging, so once I got into it, the job went pretty quick. And yes I realize that I should have had the chain plates leaning forward, more in line with the rigging, but too late now. Thanks for looking in. I guess it is now time to get out the sewing machine and start working on the sails.

- 90 replies
-
- 4
-
-
- Friendship Sloop
- bluejacket shipcrafters
- (and 1 more)
-
Thank you both for your replies. I recall using some beading wire and crimp tubes for a previous project. Perhaps I'll pursue that option.
-
Hi all. I am building the Bluejacket 1/12th scale Friendship sloop from around 1900. For the standing rigging, the kit supplies very fine stranded copper wire. I am not a fan of the stuff....it is difficult to work with and I am not sure I like the look. For one thing, it seems undersized. The wire is a quarter millimeter in diameter so that would only be 3mm full size, which is less than an eighth of an inch. Two questions.... 1. Any idea why the kit would use stranded copper wire? Would a sloop from 1900 have used some sort of metal cables for the standing rigging? 2. Any suggestions for working with it, particularly fastening it? The instruction say it does not solder well so they suggest just using CA but that also seems not very secure. Perhaps Nic or Al ( @MrBlueJacket or @alross2 ) can provide some insight. Anyone else is welcome to chime in as well. Thanks for any help or suggestions.
-
Metallic paint questions....
gsdpic replied to CPDDET's topic in Painting, finishing and weathering products and techniques
Interesting....the polished brass is not listed on alclad's web site but it is available from other sellers. I'd reconsider the alclad black base, see my comment above, though maybe you will have better luck with it. I've not used the "dull aluminum" but the regular aluminum and semi-matte aluminum both produce a nice finish. For the non-polished Alclad metal colors, I've just used generic medium gray primer. I tend to use splash paints primer but others will likely work as well, including Alclad's gray primer/microfiller. -
Metallic paint questions....
gsdpic replied to CPDDET's topic in Painting, finishing and weathering products and techniques
I've used the Alclad line of airbrush metallic paints with generally good results: https://alclad2.com/ However, they don't seem to have brass or bronze, though I know their "pale gold" produces a really nice finish. The highly shine colors are sprayed over a gloss black base.....I'd recommend against the alclad gloss black base and use the Tamiya LP-1 gloss black lacquer. I tried the alclad gloss black base and it seemed to never completely dry/cure. AK Interactive also make both metallic paint and a few metallic paint markers. I've heard good things but never used either. https://ak-interactive.com/ -
https://www.amazon.com/dp/B0B84DXZK8?ref=ppx_yo2ov_dt_b_fed_asin_title&th=1 It's not the highest quality, most precise thing as you can guess from the price bit it has its uses.
- 90 replies
-
- 1
-

-
- Friendship Sloop
- bluejacket shipcrafters
- (and 1 more)
-
Thanks for the likes and for the comment, Glen. I have the mast and spars almost done now. I added the jaws and other wooden bits and I've painted some of the ends, and stained the areas where the various sails are attached. Then I added the eyebolts specified by the plan and drilled holes as well. The one thing yet to do....the boom is supposed to have a couple of cleats on it. I've not yet decided if I am going to use the metal cleats supplied by bluejacket or make some wooden ones. I don't have any sort of drill press, but this cheap amazon clamp proved to be useful while drilling holes. Other views of the gaff, boom, and mast:


- 90 replies
-
- 6
-
-
- Friendship Sloop
- bluejacket shipcrafters
- (and 1 more)
-
Lotus 72D by gsdpic - FINISHED - Tamiya - 1/12 - PLASTIC
gsdpic replied to gsdpic's topic in Non-ship/categorised builds
That's a good question, though it has been 2 years and I do not remember for certain. As you can tell from the first post, the kit I had was rather old....it was not one of the new re-issue kits. I almost wonder if the yellowing of the clear fuel lines had just happened naturally. Otherwise, maybe I just used some Tamiya clear yellow on the tubes. -
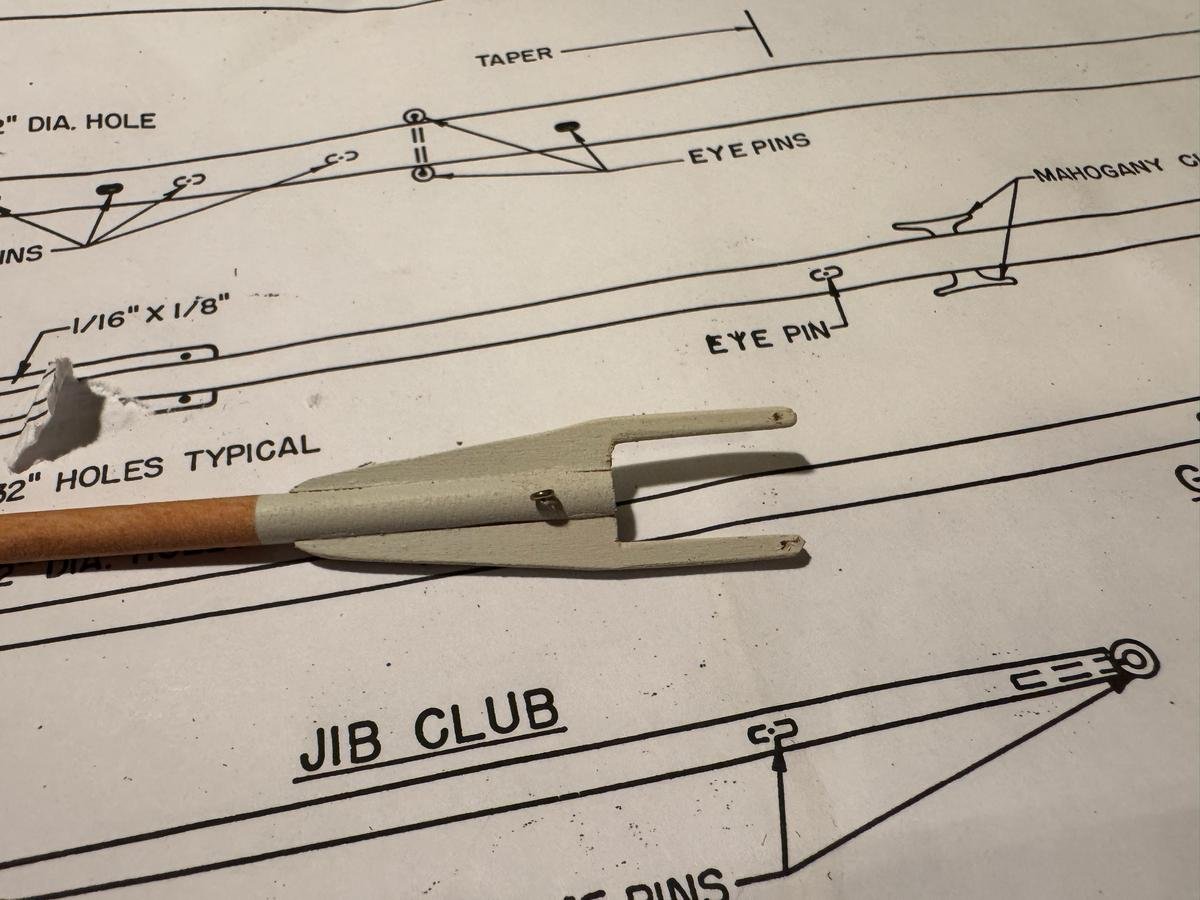
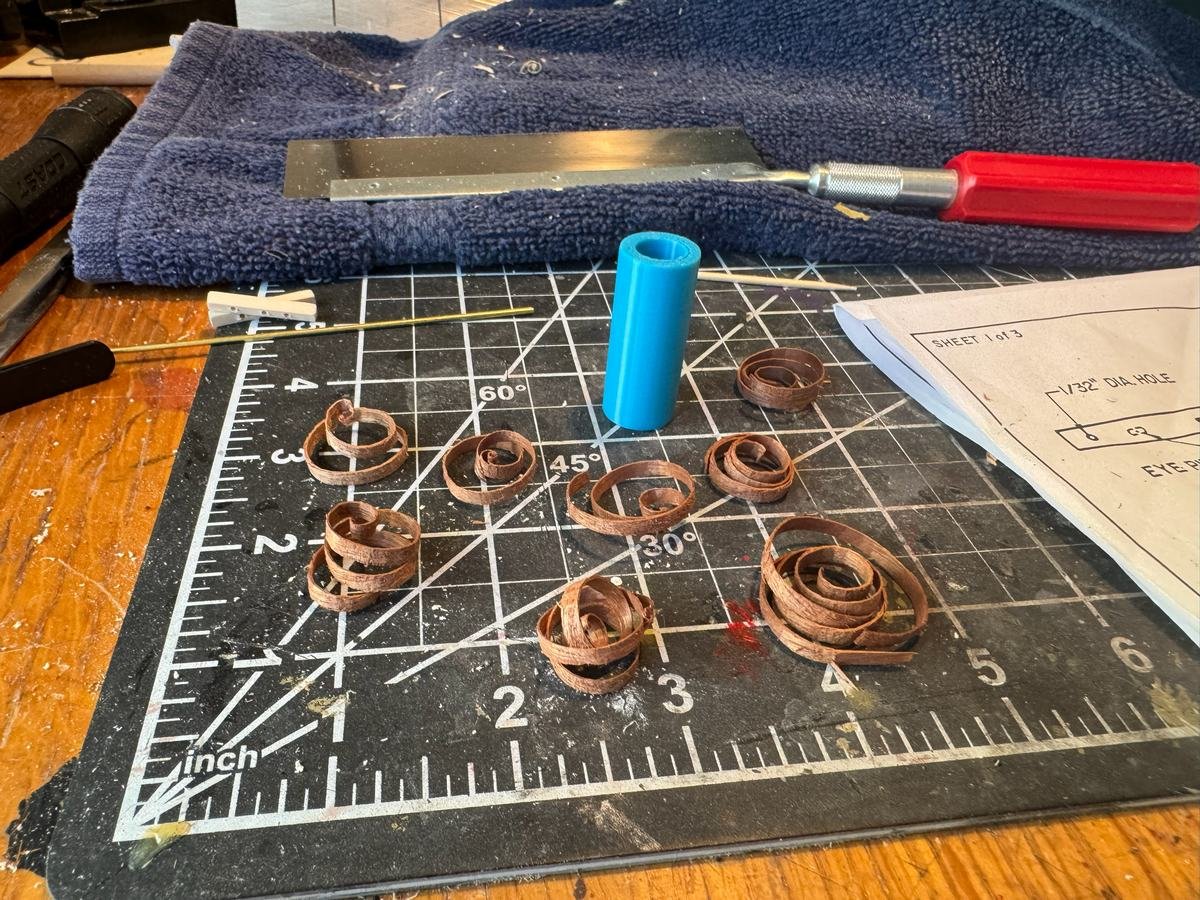
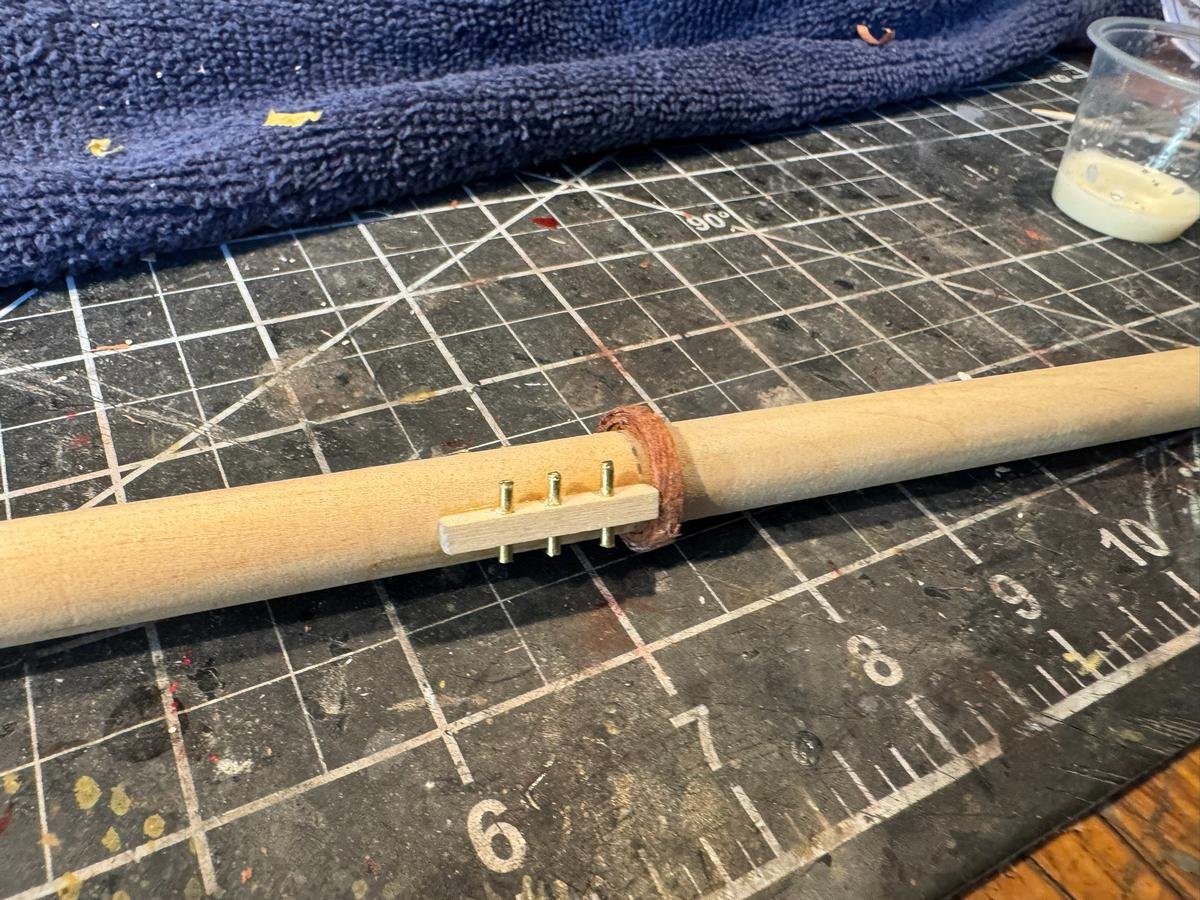
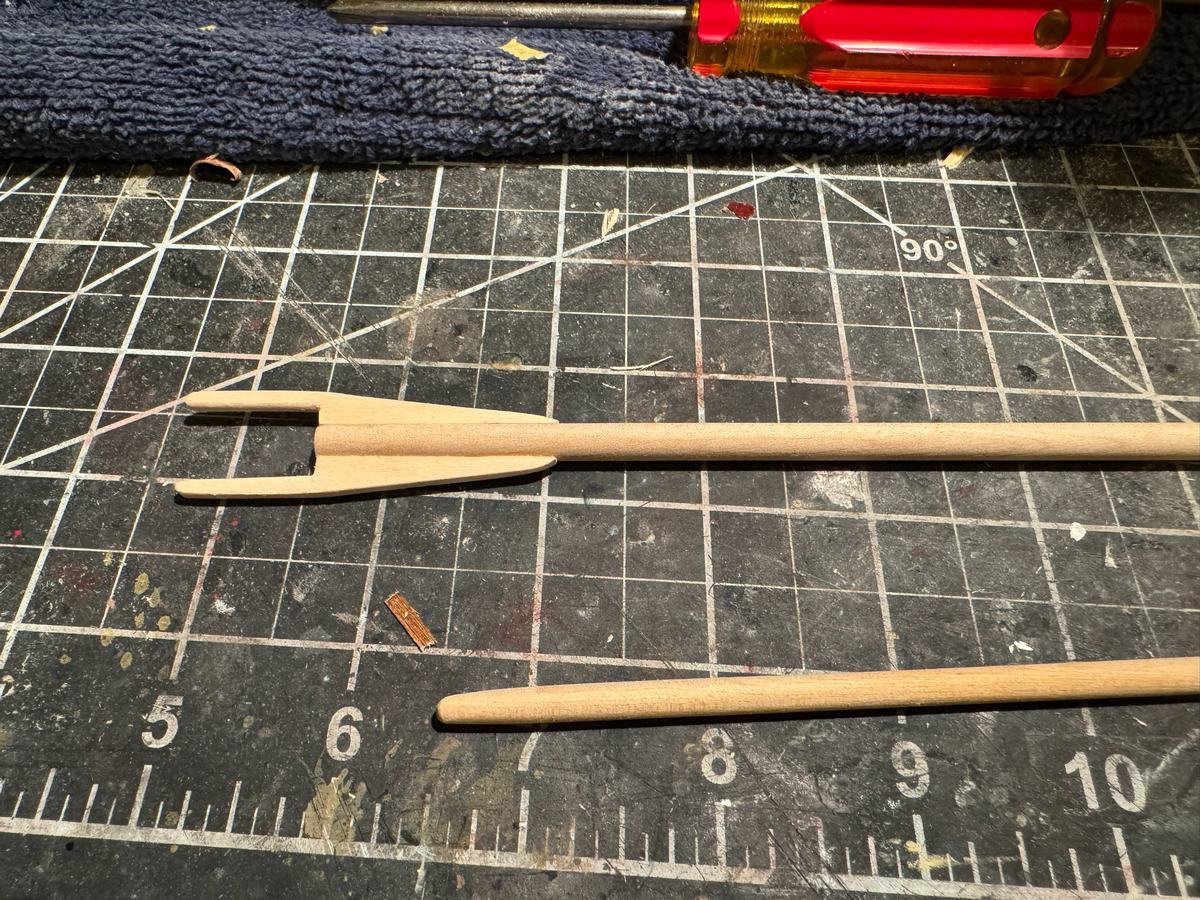
This time with some pictures. Continue to work on the mast and spars and the mast rings. Similar to when I built the America, I am making wooden mast rings. I start with shavings created with a small plane that naturally curl, wrap them around a circular object and coat them liberally with diluted PVA. More details below. First, I start with the shavings and the jig/former. For the shavings, I used a small plane on some of the leftover 1/16th x 1//8th mahogany. They tend to be pretty rough but I am hoping I can smooth things out adequately. As for the former, I have exploited at least 1% of the potential of 3d printing by printing this tube that is 5/8ths of an inch in diameter, to wrap the shavings around. The mast is 1/2 inch in diameter so this will allow the mast rings to fit easily over the mast. Here you can see 5 rings wrapped around two formers, and three rings that I have removed from the formers. To wrap the rings, I start by using CA to glue on end of the shaving to the tube, then wrap it around securing the end with more CA. If I need to add more layers, I grab another shaving and secure it with CA just on the ends. Once satisfied, I brush on a bunch of highly diluted PVA and let it sit over night to dry. I then sand the outer surface of the rings while still on the former, try to remove the ring from the former without breaking it, then carefully sand the top and bottom surfaces. Below is the main mast, the end that goes into the deck on the left. The picture shows the boom rest, created similarly to the mast rings, as well as one pin rail. There is a second identical one on the other side. And finally, the end of the gaff with its jaws, as well as the simple jib club. I still need to do the main boom....the dowel needs to be cut and tapered and then jaws added. then all the spars need to have some holes drilled and eye pins put in place. I also still need to figure out exactly which parts will be painted vs stained.

- 90 replies
-
- 4
-
-
-
- Friendship Sloop
- bluejacket shipcrafters
- (and 1 more)