


gsdpic
-
Posts
840 -
Joined
-
Last visited
Content Type
Profiles
Forums
Gallery
Events
Everything posted by gsdpic
-
Looks like a Barred Owl to me.
-
Oh man, that is sad to see. I think I’d let the clear dry then try to carefully sand off the blobs then do another coat or two of clear. Good luck with whatever you try; we have faith that you’ll overcome this challenge. If you get to the point of binning the kit, don’t do that, send it to me 😎. Just kidding I am sure you can recover from this.
-
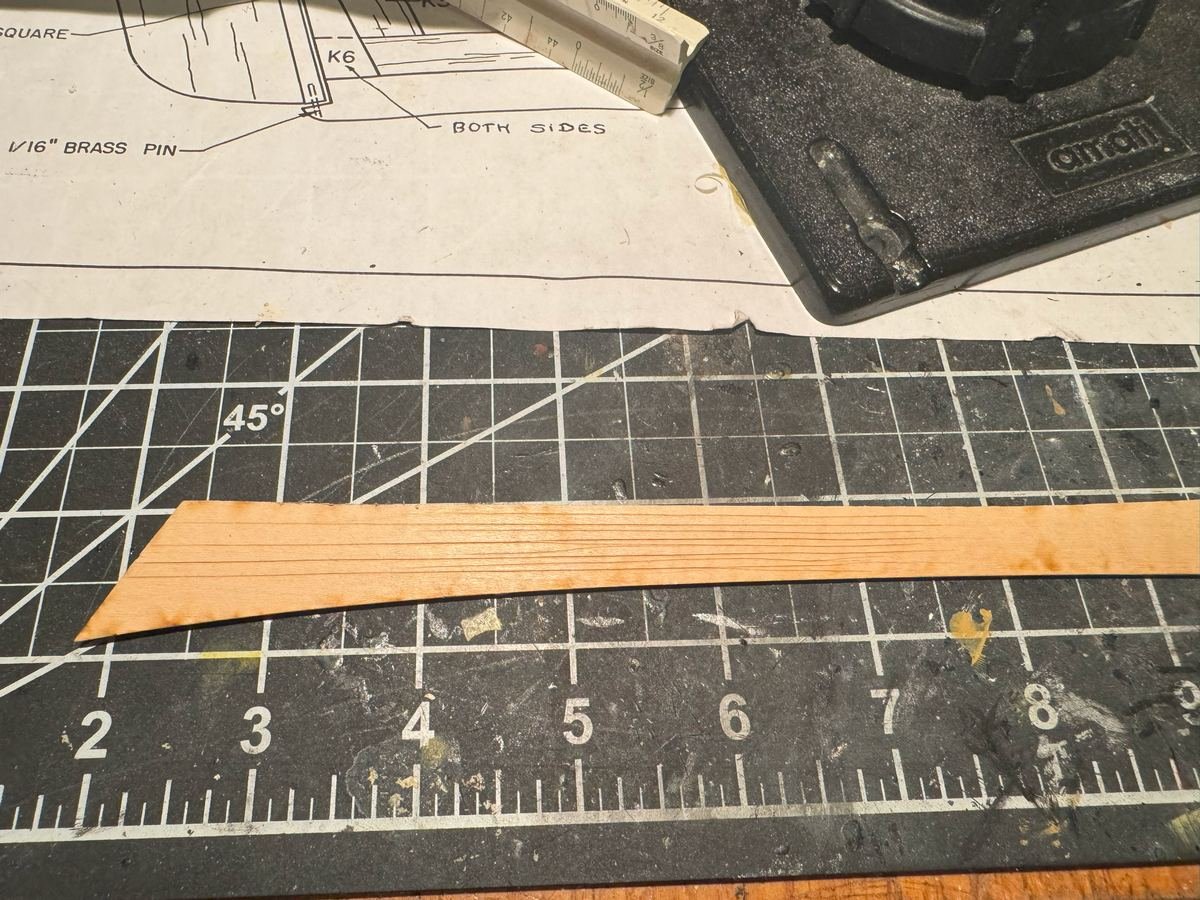
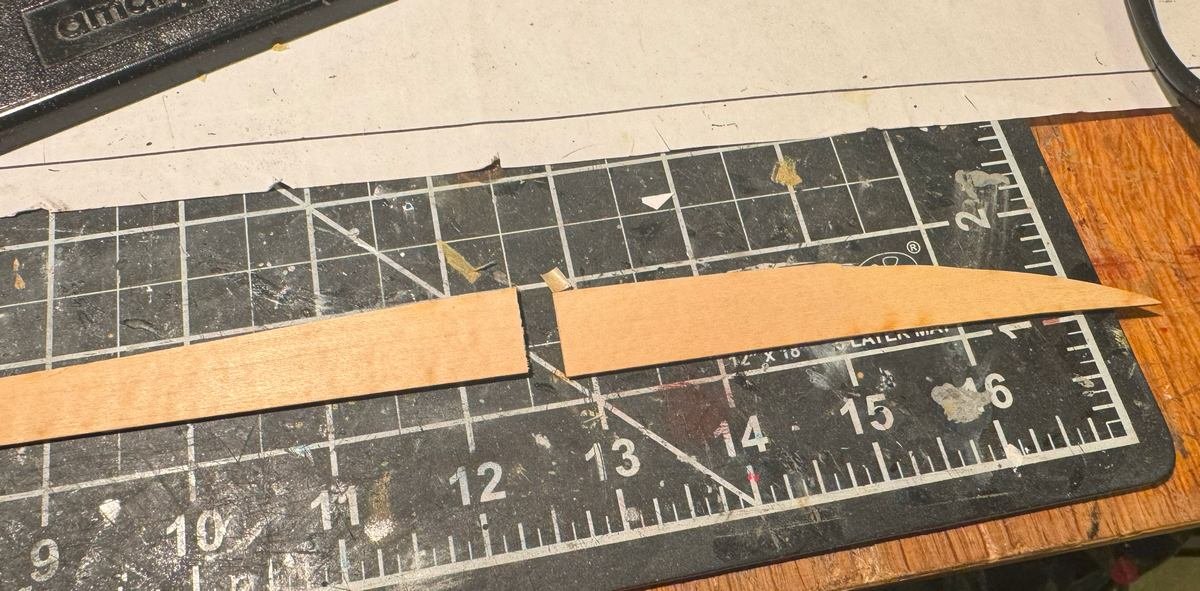
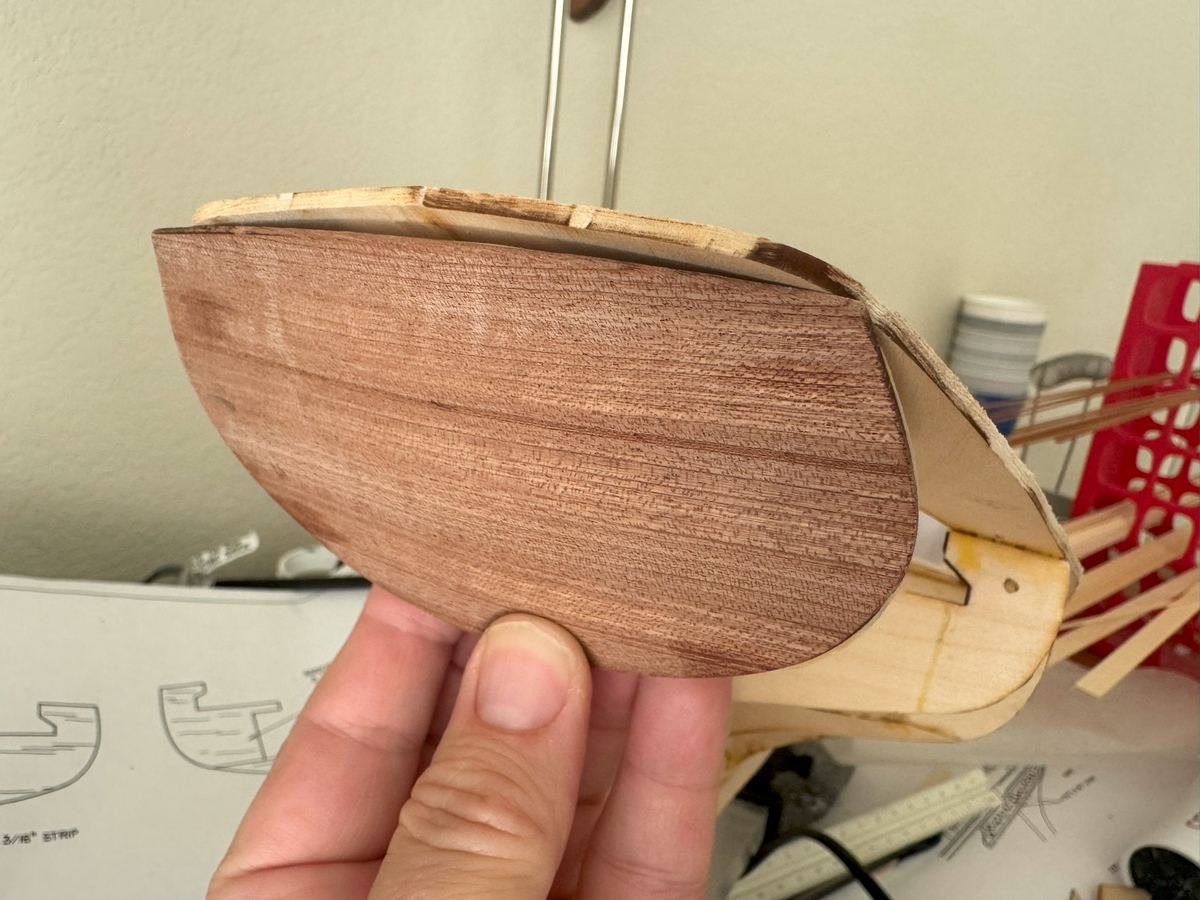
I have put on the two laser cut planks on both sides now. Just above them are two planks that are 3/8ths inch wide, while the rest of the hull is planked with 1/4 inch wide planks. I've put on those two 3/8" planks and also glued on the transom, as can be seen in the pictures below. Though obviously I still need to cut the planks to meet up with the transom. The instructions suggest switching now to work from the sheer down with the 1/4" planks. The instructions even give a small diagram and table suggesting how to taper the planks. e.g. plank #7 is tapered 1/8" over 7 inches on one end and over 9 inches on the other end. Unfortunately, I don't find anywhere that indicates which end of the plank is which....is the 9 inch taper at the bow or at the stern? It is also a little odd that they have the planks nearer the keel tapered more than the upper planks. I'll likely just measure things out and do the tapering on my own.
- 90 replies
-
- 5
-

-
- Friendship Sloop
- bluejacket shipcrafters
- (and 1 more)
-
Excellent small scale work as always. And good plan to escape the winter. When I visit family in Indiana in the winter I always wonder why/how people live there and I am sure Maine winters are worse. Though I admit I've had thoughts of moving back to Indiana. And you've got your glass of red wine. I've always felt that wine and x-acto knives are not a good combo Of course I'm pretty uncoordinated even without the wine.
- 165 replies
-
- 1
-
-
- Red Jacket
- Marine Model Company
- (and 2 more)
-
I should have included this initially....here's a picture of the cockpit of the completed model. You can just see the rudder yoke. I can fairly easily stick my finger in and touch the control stick but no way to get all the way to the rudder pedals.

- 34 replies
-
- 10
-
-
I was just looking at your review of this kit earlier today and was quite impressed. I'll eagerly follow along to see how it all goes together.
-
First, thanks for the pointer to my build log. I hope it helps you or others. I'll be interested to follow along this ambitious project. The kit was, at times, challenging, and your modifications will only add to that. I admit though that I was both a bit disappointed and a bit relieved when I realized the kit did not have moving control surfaces as you propose to do. Looking at your plans above, I have two concerns. First, on the finished model, the rudder pedals are barely visible, let alone accessible to move with your finger. So while it might be cool to have the rudder pedals move the rudder you might need some alternate way to actually cause that motion. Second, in your picture of the wings and ailerons, it appears that the control horns are on the top of both the upper and lower wing. I believe that the control horns on the lower wing must be on the bottom, else you would end up trying to move something by pushing the cable. On the AL kit, the lower wing control horns are on the bottom so I assume you would have discovered this at some point but thought it better to point it out now while you are still planning.
-
Yea these older kits with the bare minimum number of bulkheads can be tricky. Hope I can do it justice. Welcome aboard Glen
- 90 replies
-
- 2
-
-
- Friendship Sloop
- bluejacket shipcrafters
- (and 1 more)
-
They sometimes say to treat each plank as its own little project and that is definitely the case for the first few planks on this model. I put on the port side triangular plank, and then did the starboard side second plank which was also laser cut. I am not quite sure of the terminology here....I am aware of the term "garboard plank" but not sure how it applies in this case with that triangular plank mostly over the deadwood, followed by a plank that maybe fits the term garboard plank better even though it is the second plank up in the stern. The plank is tricky as the bottom edge needs to be adjusted to fit tightly but the plank also needs to twist from near vertical at the stem and stern to 45 degrees or so in the middle. I first attempted doing some paper or card templates to get the bottom shape but it was impossible to do without getting some distortion. I also tried just holding the plank up and marking it but that was unwieldy. I ended up actually cutting the plank in two pieces to make it easier, with the cut being at the second bulkhead. I added scrap wood to the bulkhead to give more gluing surface. Also at the fourth bulkhead the plank is about 5/8ths inch wide but needs to fit into a concave curve in the bulkhead. To help that, I scored the inside of the plank. Unfortunately one of those was a bit deep and the plank ended up cracking there. With all that, I managed to fit the plank and glue them in. On both pieces, I glued and clamped one end of the plank, let that dry, then glued and clamped the other end. In the end, it all came out ok especially considering the hull will be painted. Here's the plank cut in two. I ended up shaving off some of the bottom of the plank in the area of bulkhead three (left edge of this picture) and also in the curve on the right side of this picture. I also angled the bottom of the plank for a better fit in the mid section. The scoring on the inside of the plank to facilitate the longitudinal curve: The scrap wood added to bulkhead 2 to give more gluing surface: The two plank pieces glued and clamped. I had previously glued/clamped the ends of the plank around bulkhead 2. Here I am gluing the opposite ends of the two pieces. And after the glue has set. Yea, far from perfect but as I said, it will all be painted so I can hide some of the seams. I promise I won't keep posting for every single plank.

- 90 replies
-
- 5
-
-
- Friendship Sloop
- bluejacket shipcrafters
- (and 1 more)
-
Excellent and quick progress on this build. Bluejacket lists some brass pedestals on their web site though it appears to me the top slot is too narrow for your needs. Perhaps they might be able to suggest something.
-
I did not glue on the transom yet, but I have started some planking. The kit includes two laser cut planks per side for just above the keel. I've put on the first of those on the starboard side, which goes from the stern post about half or two thirds of the way to the front. It was a small challenge to get it to fit nicely and to shape it in a pretty good twist. The next plank above it will be even more of a challenge to do, I think.
- 90 replies
-
- 2
-
-
- Friendship Sloop
- bluejacket shipcrafters
- (and 1 more)
-
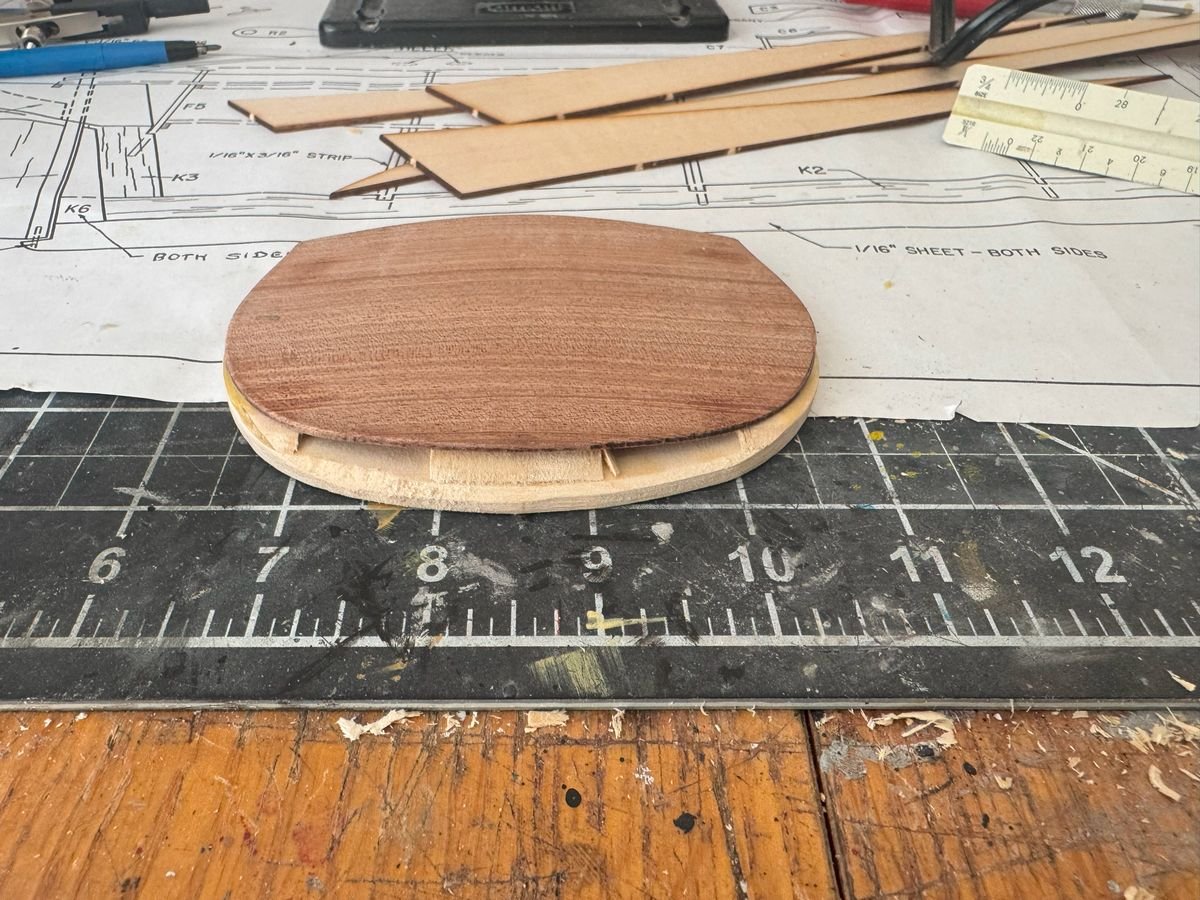
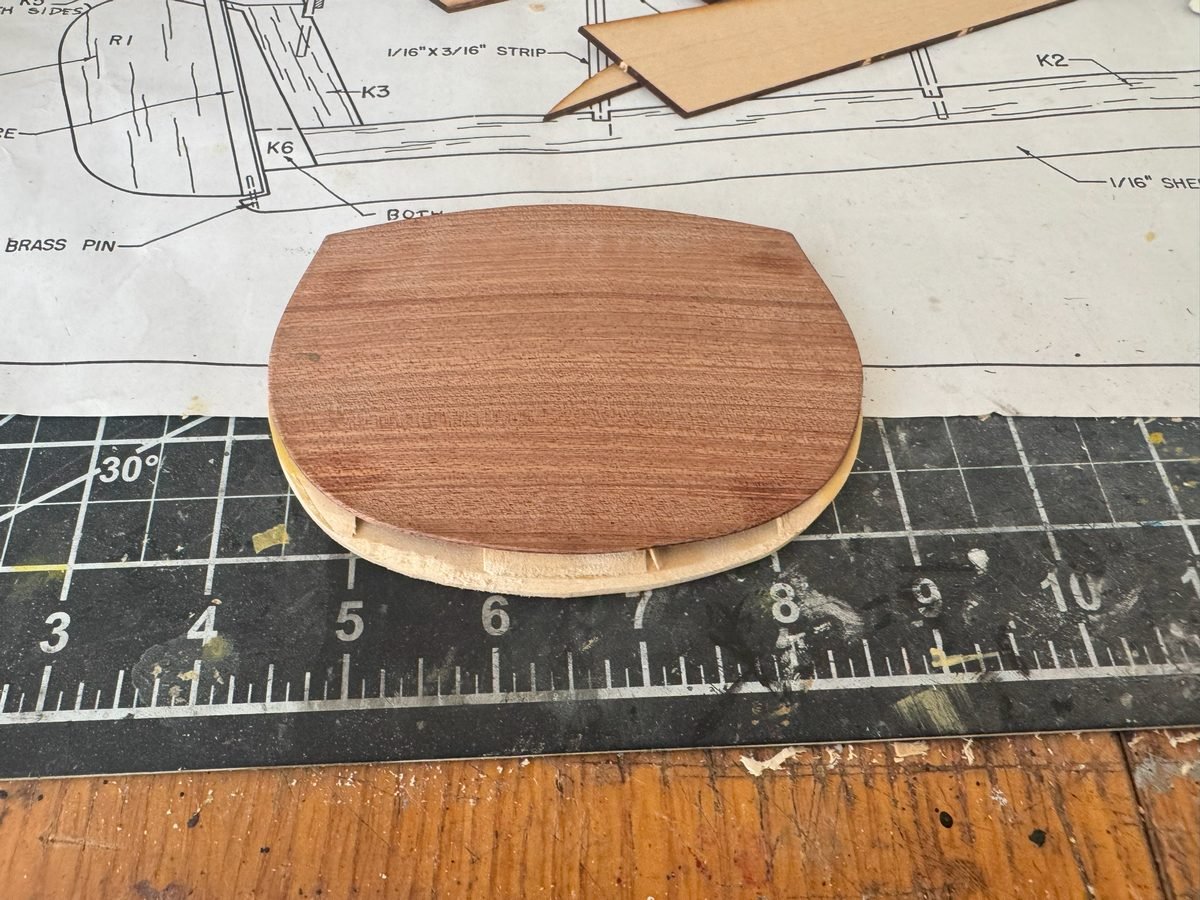
Thanks for the likes or just looking in. I've been working on shaping the transom. It is much better now but still far from perfect. However, it is not entirely clear what "perfect" would look like. I will probably go with what I have now, do the planking and then perhaps do a trim piece around the transom edge to hide any plank edges, etc. I am thinking I will leave this transom piece unpainted, just treated with varnish or tung oil, so I am hoping for a relatively neat finish.
- 90 replies
-
- 4
-
-
- Friendship Sloop
- bluejacket shipcrafters
- (and 1 more)
-
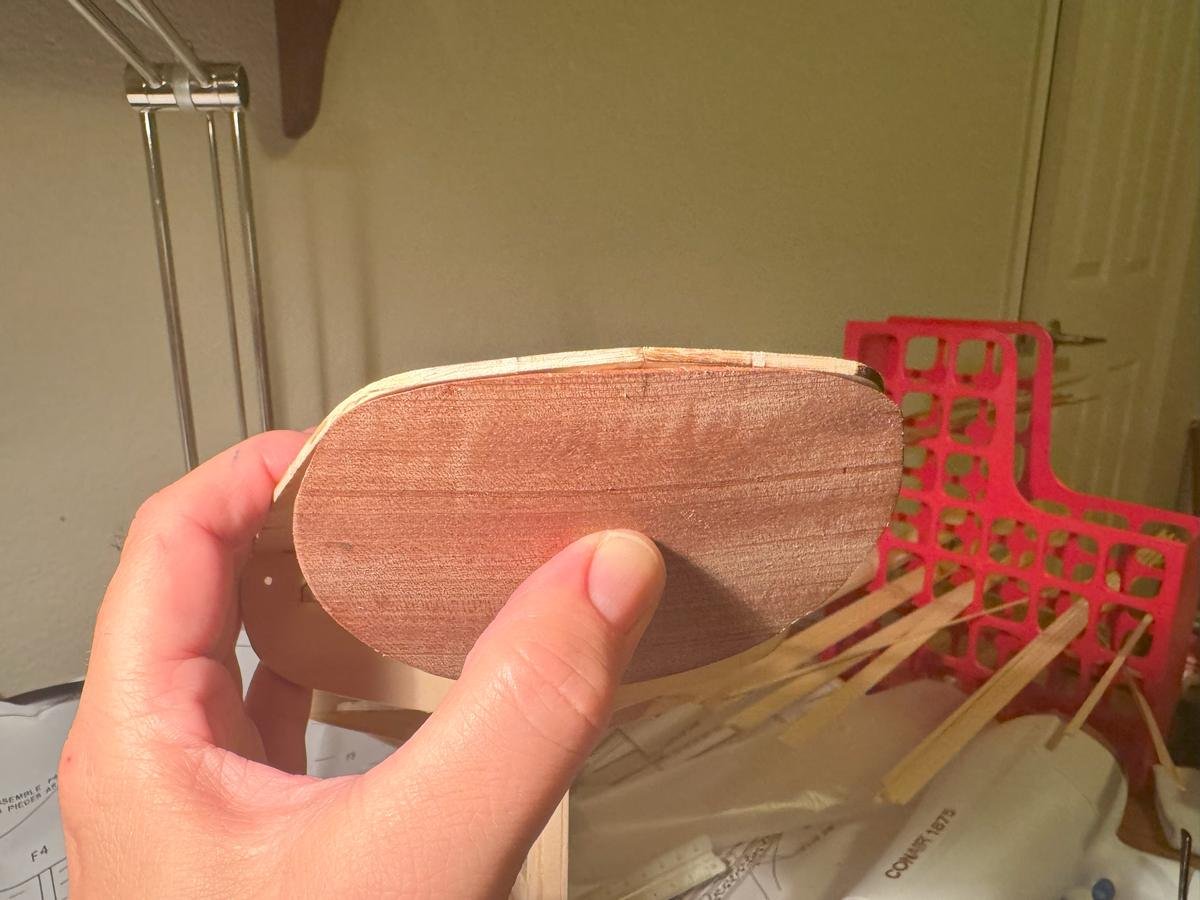
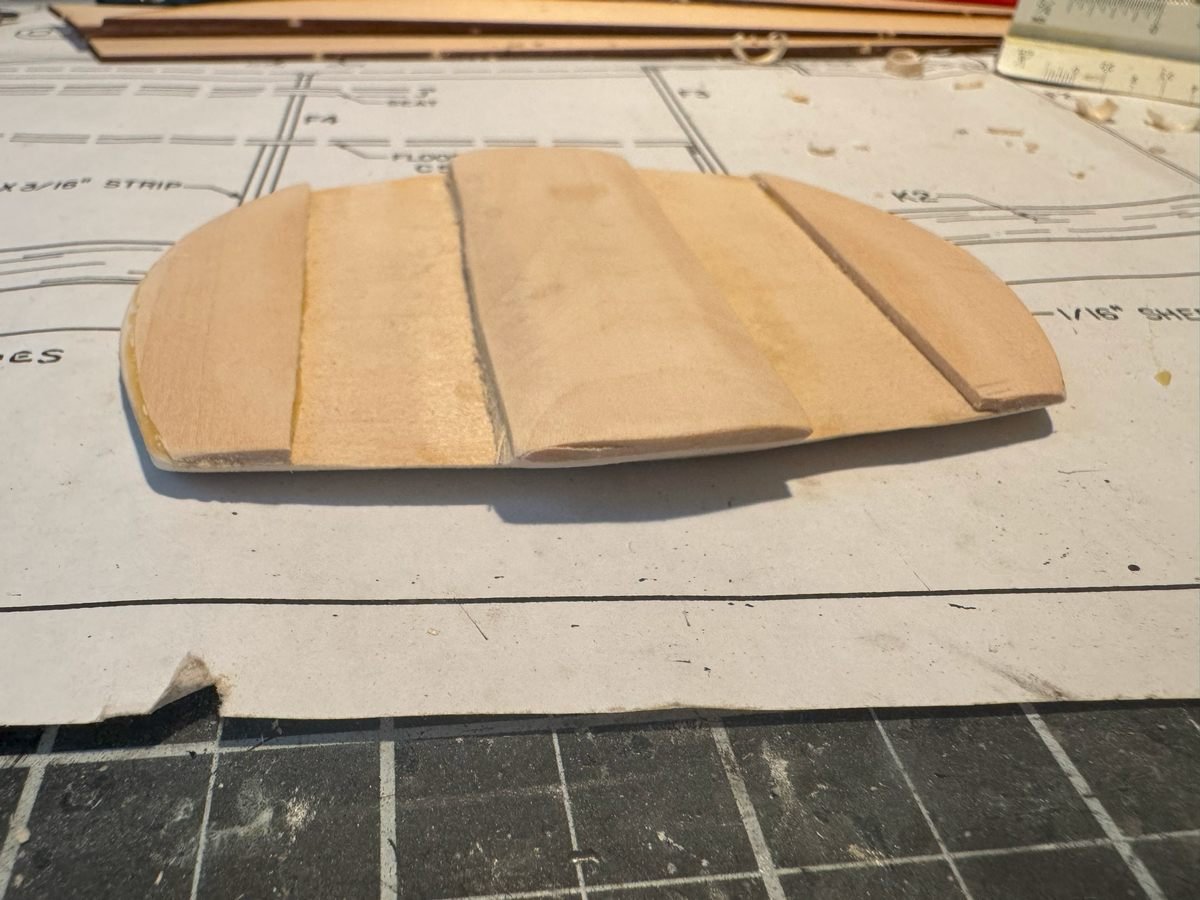
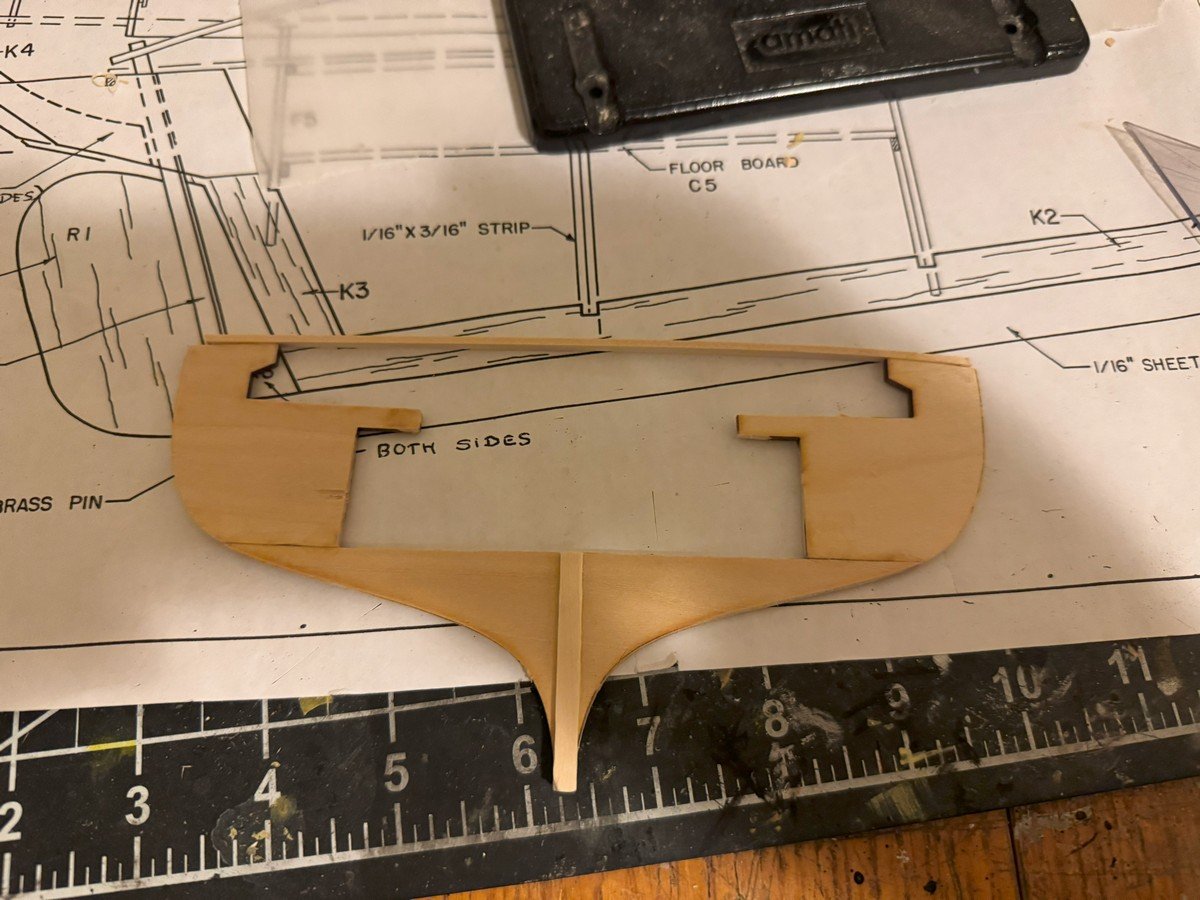
Well, before planking I need to work on the transom. The kit supplies a 3/16th laser cut piece of basswood for the transom, plus a laser cut 1/16th piece of mahogany. The instructions also say that the transom could just be planked and in fact that is what they show. Finally, the plan sheet also shows that the transom could be rounded some after planking. However that seems dubious if you use the 1/16th piece of mahogany. I also noticed that the laser cut deck was a bit long and would hang over the transom a bit. I threw all that info into the mental blender and came up with a plan. First, I added some vertical pieces of scrap wood to the base transom piece. I also started fairing the large base piece. I scraped, planed, and sanded those down so that I could apply the mahogany piece and end up with a rounded transom. I think it will fit better but I have a lot of work to do to get it the correct shape with the correct fairing for the planking.
- 90 replies
-
- 5
-
-
- Friendship Sloop
- bluejacket shipcrafters
- (and 1 more)
-
Good work and thanks for the info/explanation. Between your build and docrob's cobra build, I alternately look forward to and dread starting on my MFH Eagle Gurney-Weslake.
-
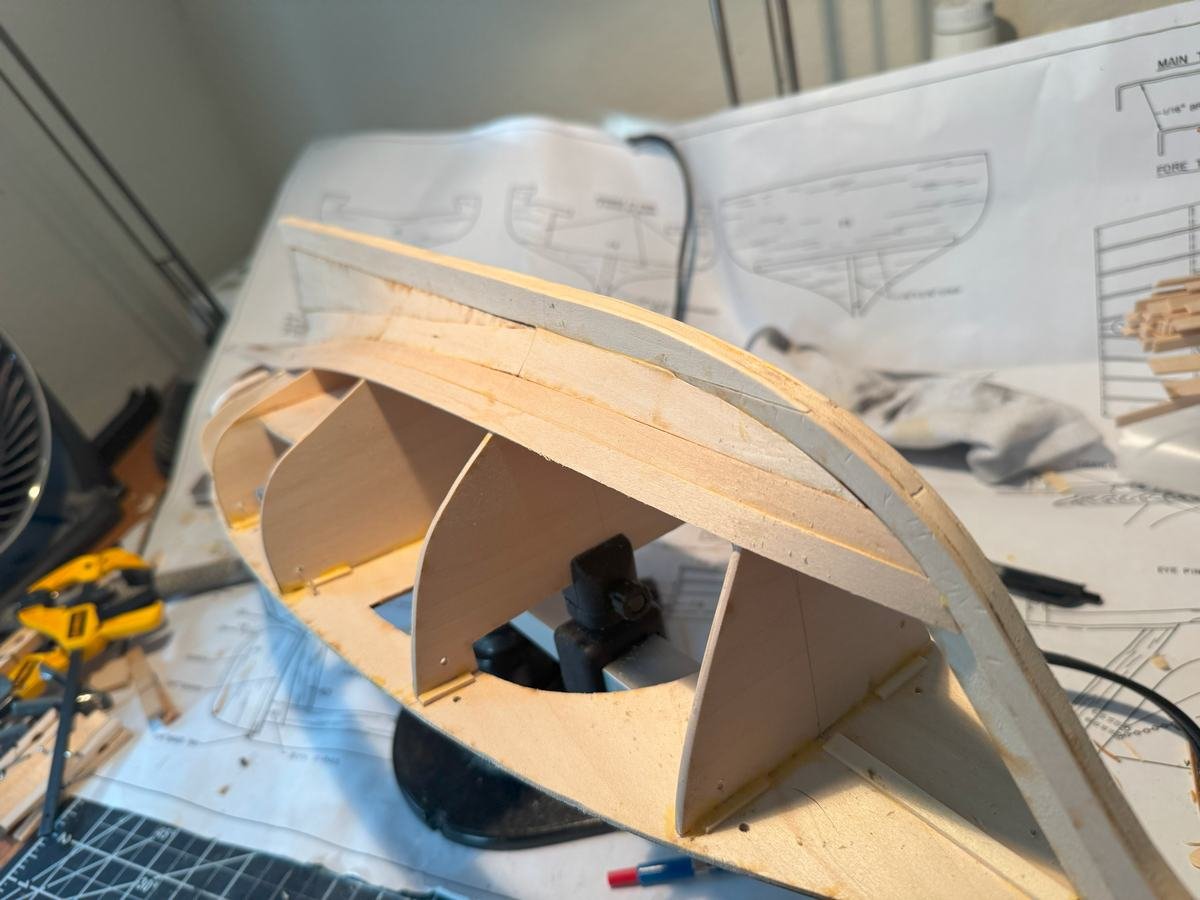
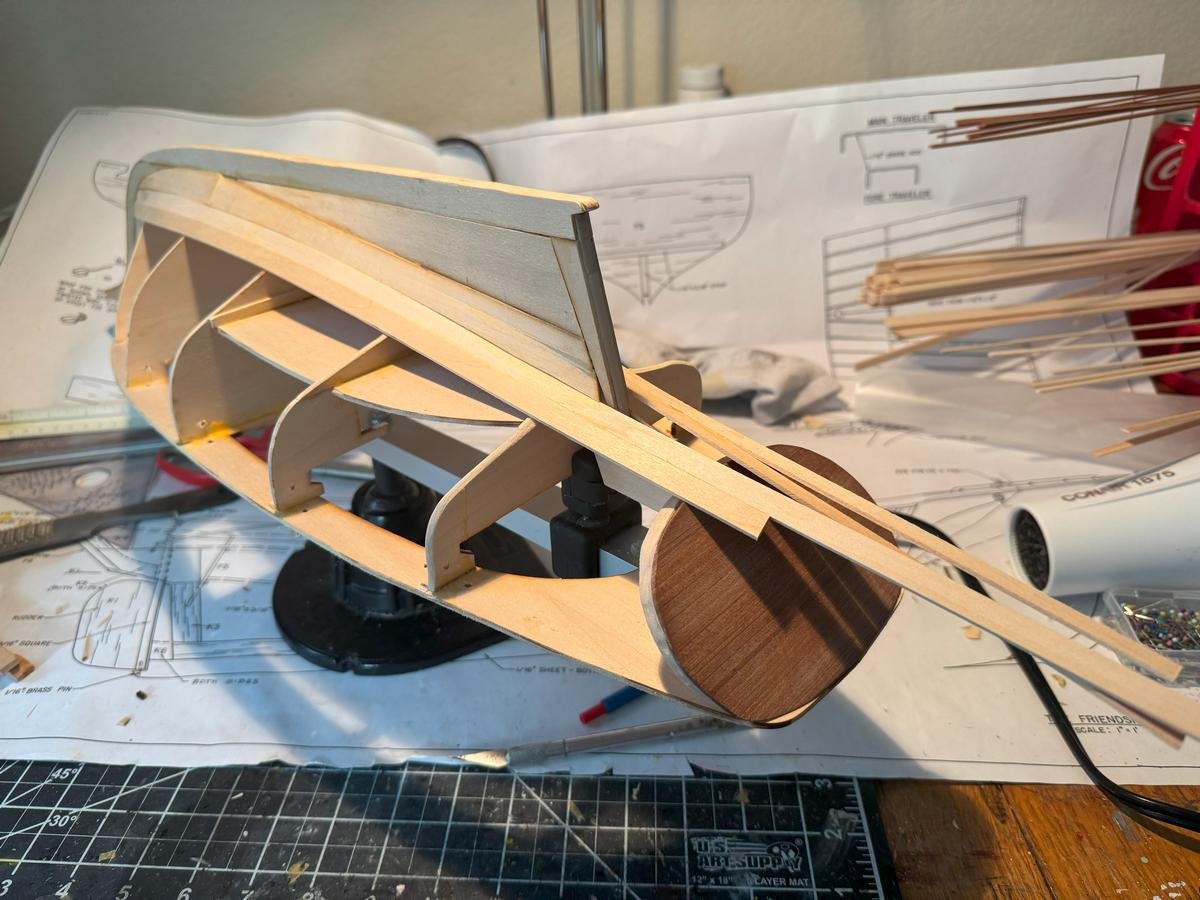
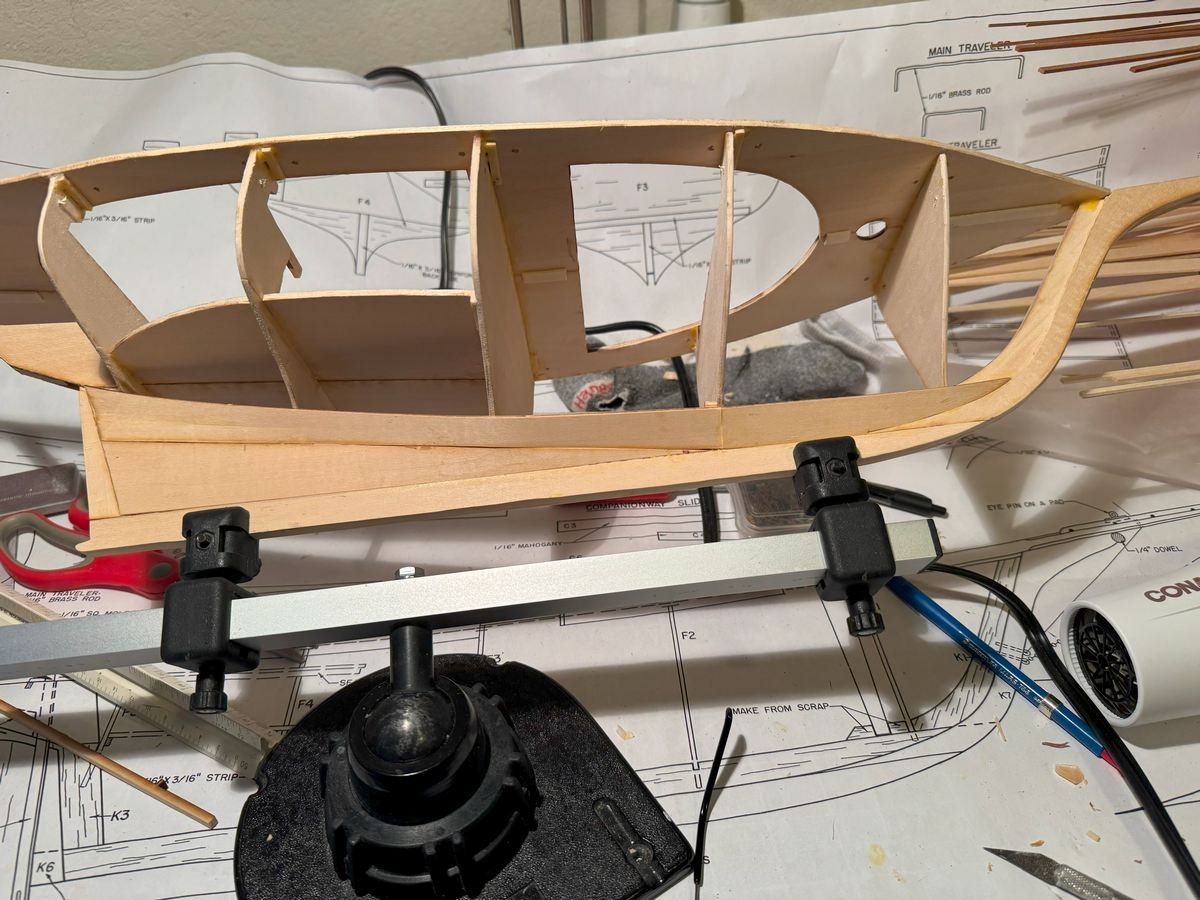
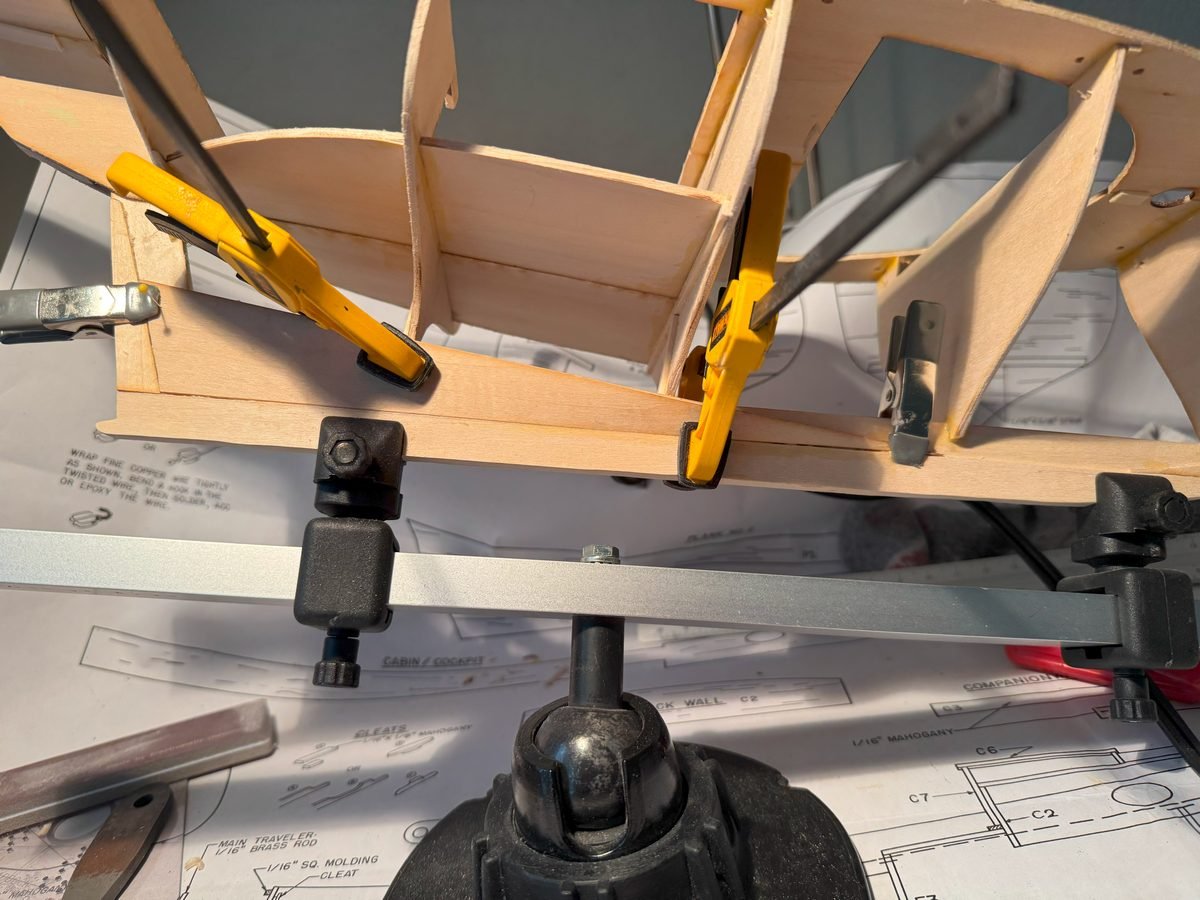
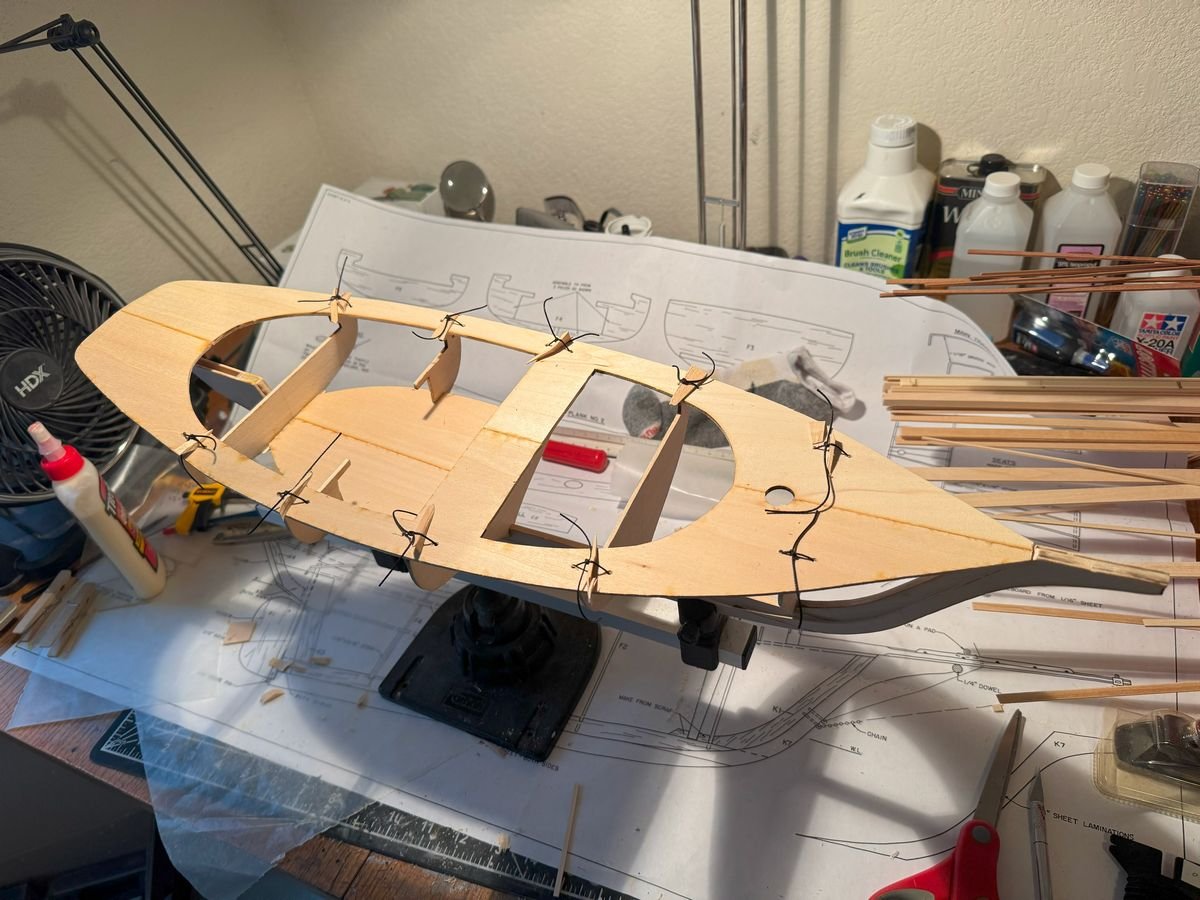
I now have the main structure of the sloop complete. As mentioned above, I removed those extra bits of strip wood and glued in the remaining frames with the cockpit floor. From there, I started working on the deck, which was a bit of a puzzle. First, the deck seemed to be a bit long, and the front of the laser cut pieces came to a point which did not make sense based on where (I think) the front of the deck should be. First, I glued the two halves of the sub deck together, adding a bit of extra wood underneath to help hold things together and provide more gluing surface. I then cut off the tip of the subdeck to meet up with the stem, though the subdeck still seems a bit longer than needed. Then I considered how best to hold the subdeck on the frames while gluing. The subdeck needs to bend a bit in two directions so I needed some way to clamp it in place. Since the subdeck will be planked, I decided to drill some holes in both the subdeck and the bulkheads and then I'd tie the subdeck down. I also added some extra strip wood to help locate the bulkheads on the underside of the deck, as seen in the first two pictures. Then I drilled holes near the tops of the bulkheads and put some pieces of old scrap rigging line through those holes. Finally, I put some glue on the tops of the bulkheads, put the subdeck in place, tied off the rigging line to hold things in place, then pushed some basswood wedges into the string loops to make things tighter. I will let that all dry, then go back and add more glue to the bulkheads, both where they meet the keel and where they meet the subdeck. Then I think I will be ready for planking.
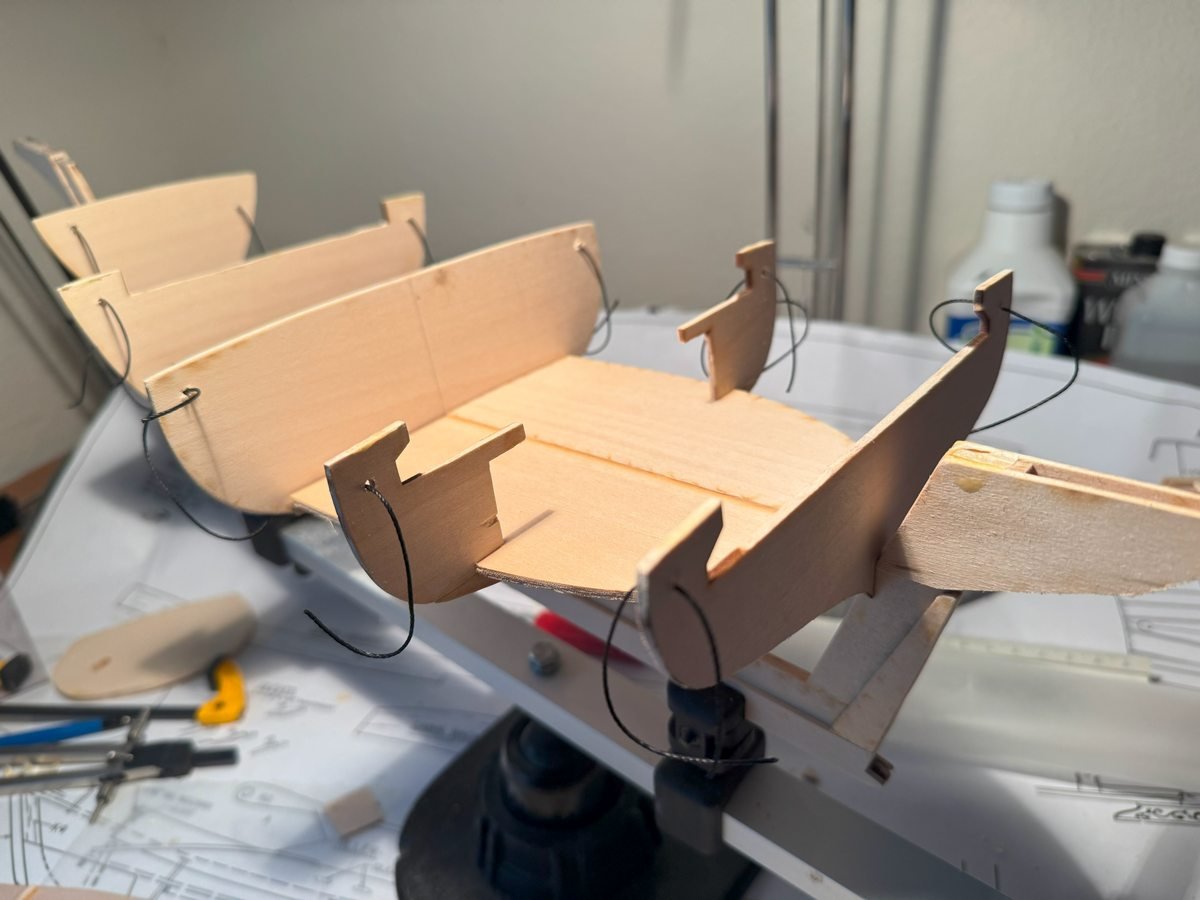
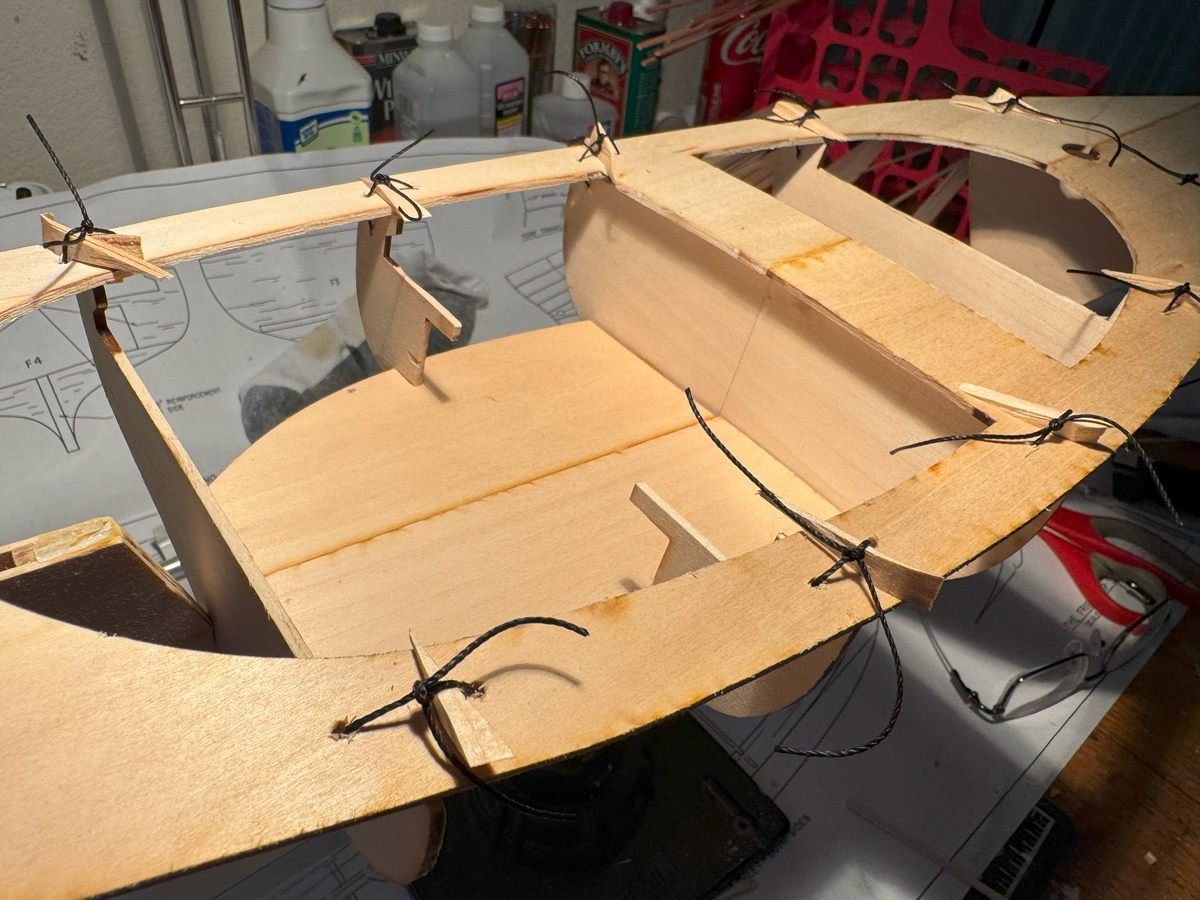
- 90 replies
-
- 4
-
-
- Friendship Sloop
- bluejacket shipcrafters
- (and 1 more)
-
Looking good! The frames and stringers all look very stout. You mentioned the basswood sheets…do the instructions just have it single planked? That would seem a little questionable for an RC boat. The one Dumas mahogany speed boat I built long ago was double planked with balsa and mahogany.
- 72 replies
-
- 1
-
-
- Miss Adventure
- Model Shipways
- (and 2 more)
-
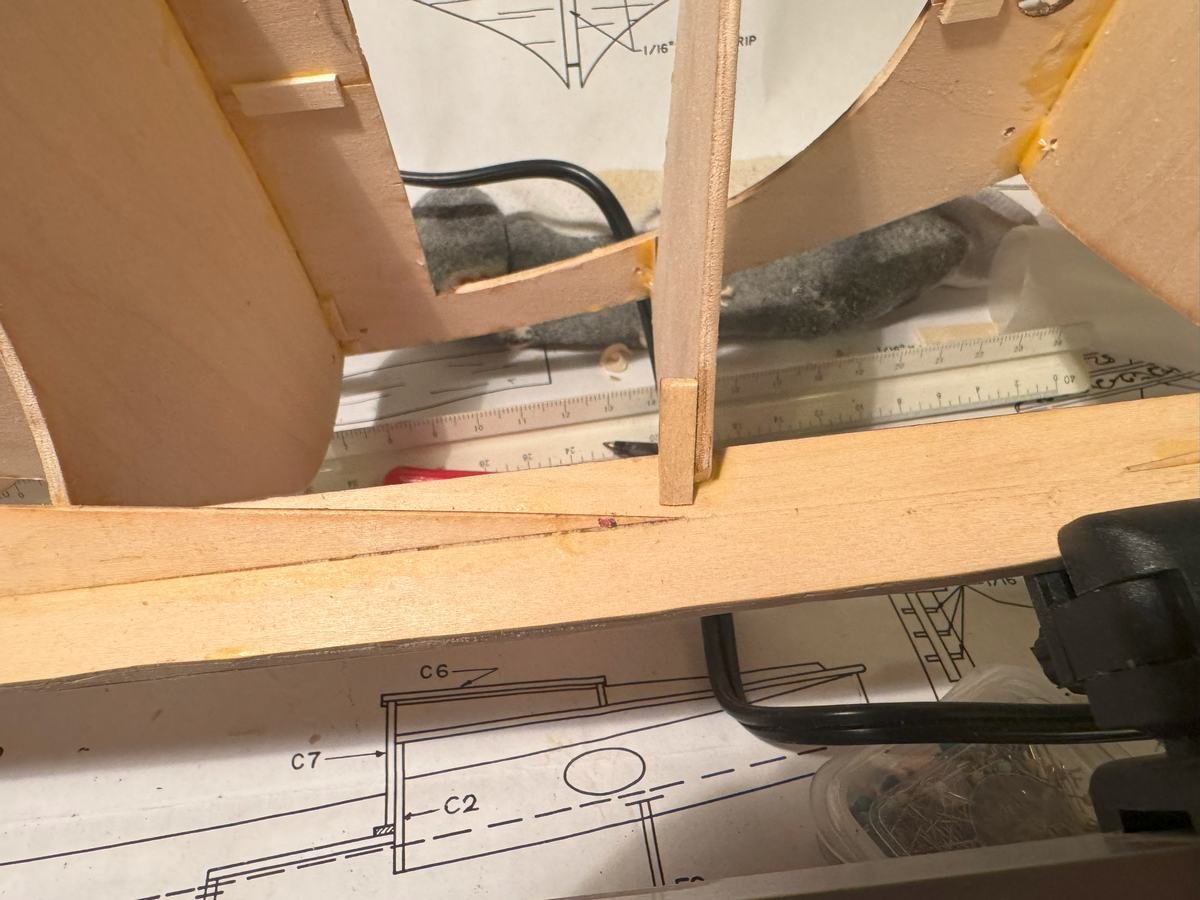
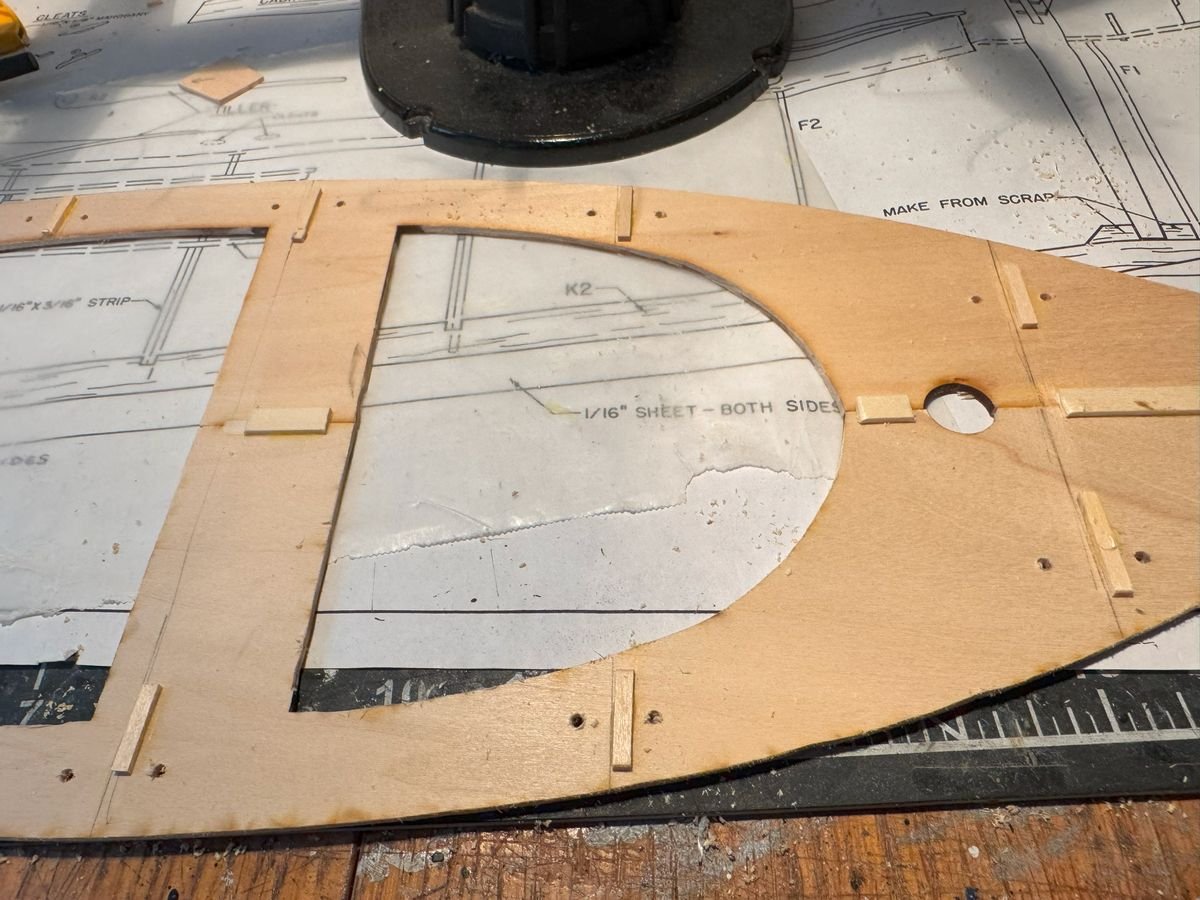
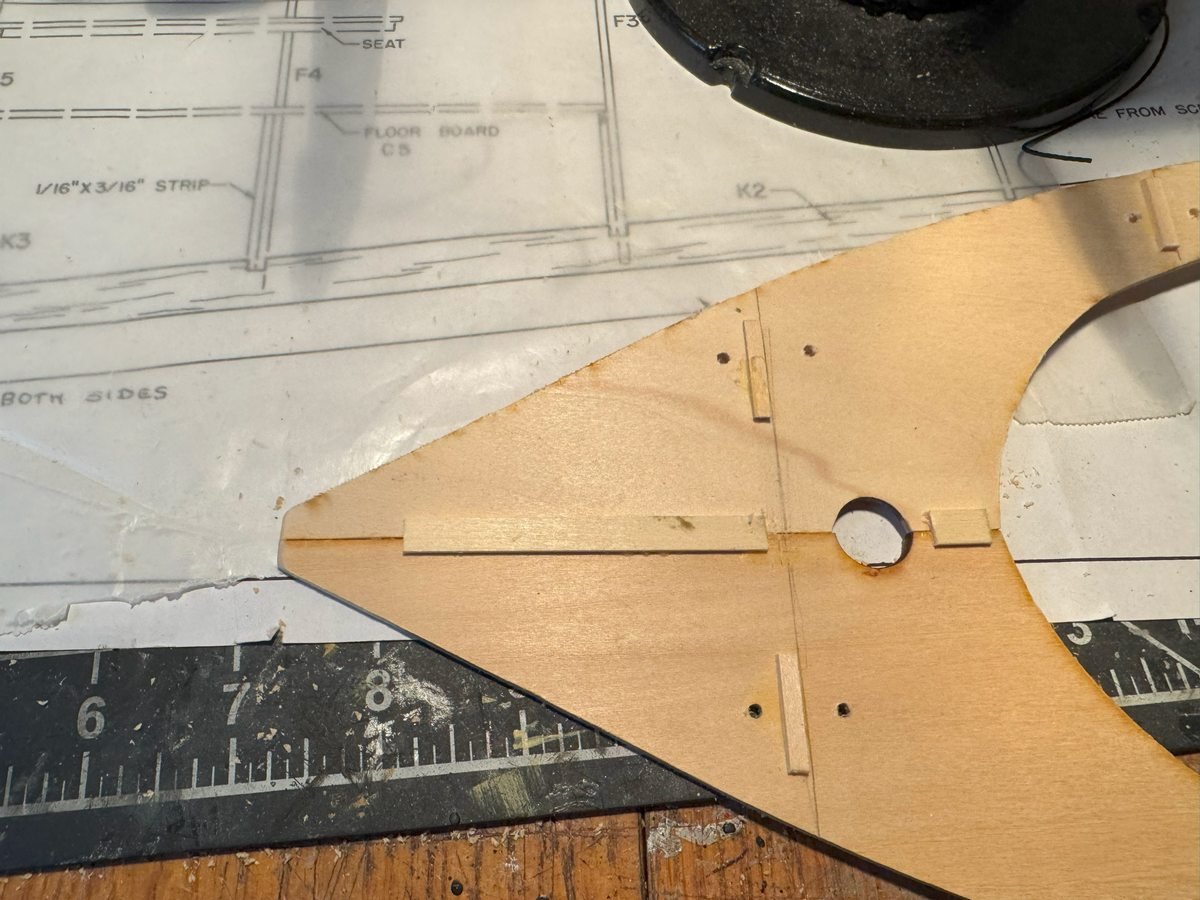
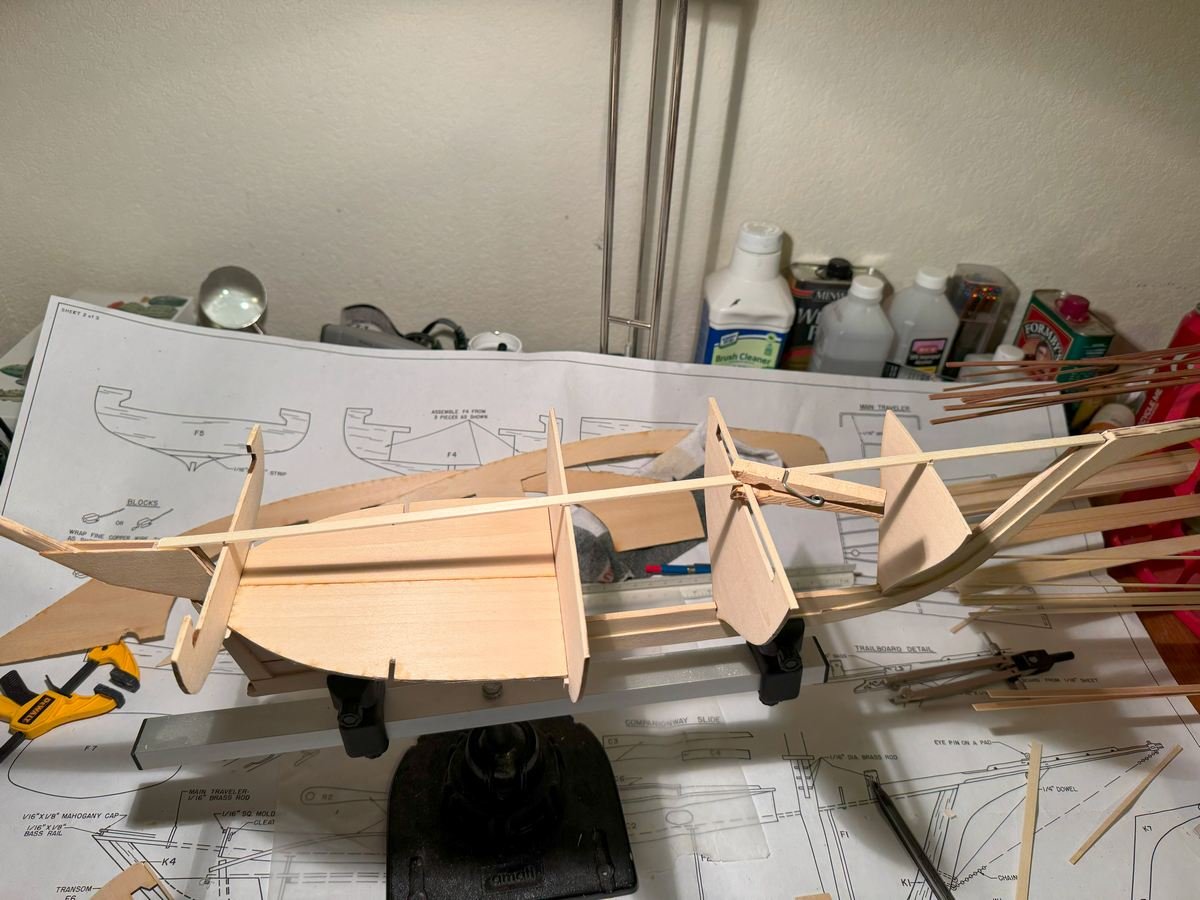
I've run into my first bit of issues, though nothing serious. Several of the frames/bulkheads are open across the top, and the instructions suggest putting a temporary strip wood across that top opening, like this Furthermore, they suggest a strip of wood across the top of the keel assembly from stem to stern. It is not entirely clear where this was to be attached but I believe the photos in the instructions show it attached as I have done below. However, this does not make a lot of sense because the tops of the frames, or the tops of the attached strip wood do not really line up with that line across the top of the keel assembly. For now I have removed the strip of wood across the very last (left most in the picture) frame. The forward three frames I have attached with just a tiny dot of wood glue. The shown cockpit floor is just put in place to help keep the third and fifth frame aligned. My plan is to remove the strip of wood across the top of the keel assembly and the top of frame 2. I will then glue in frame 4 and the cockpit floor, again using just a small amount of glue. Then I will place the laser cut deck pieces on top of the frames and, I hope, get everything aligned, assuming the small amount of glue used provides some flexibility. Once it is aligned I will add more glue to the connections between the frames and the keel to make sure it is all solid.
- 90 replies
-
- 4
-
-
- Friendship Sloop
- bluejacket shipcrafters
- (and 1 more)
-
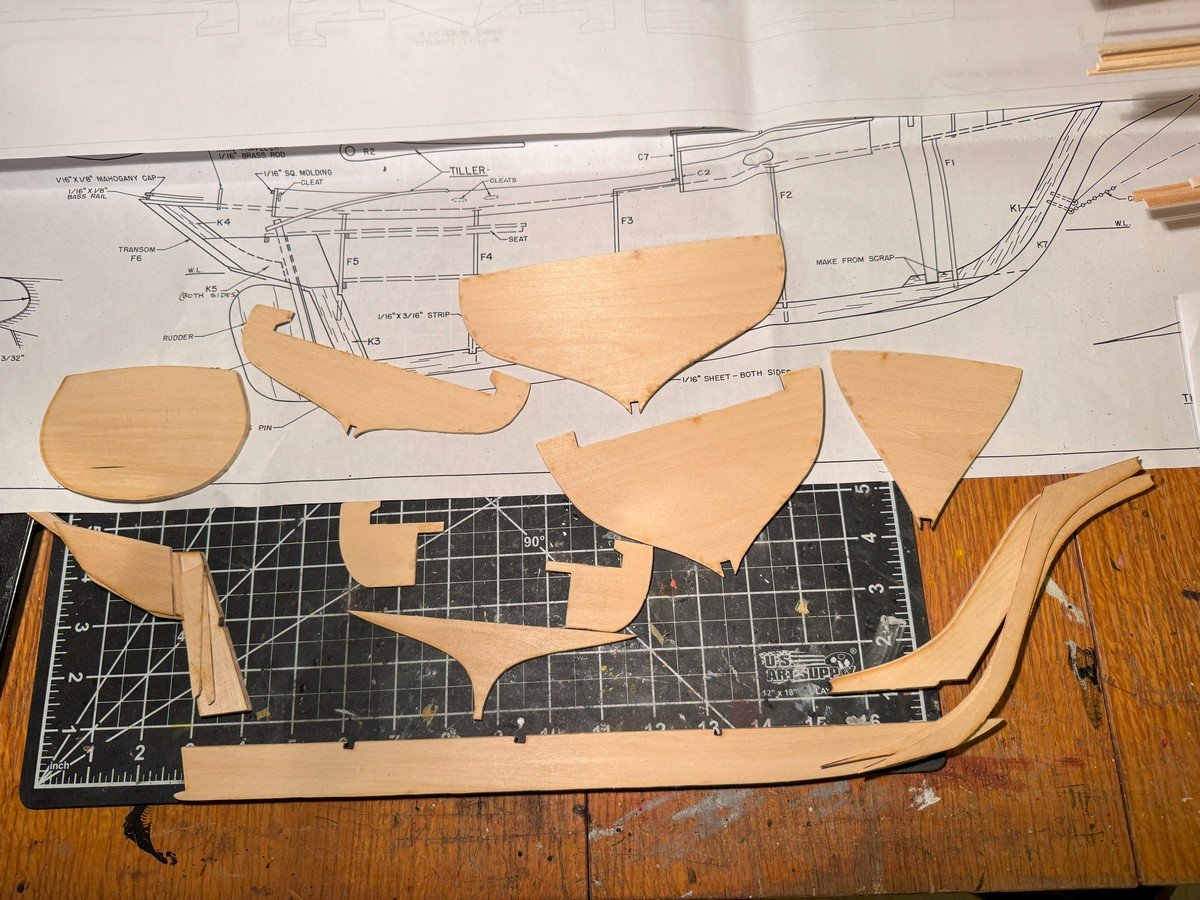
Thanks for taking a look or hitting the like button. I've now completed the keel assembly and the prep of the frames by adding supports for the cockpit floor. The keel assembly was a bit interesting....there are four main pieces of 3/16ths thick basswood and then you laminate on 4 pieces of 1/16th bass wood on each side, so 12 total pieces. The odd thing is that 10 of those 12 pieces are laser cut but the remaining two are left for you to cut out of a simple basswood sheet. The shape is not in any way complex, so not a big deal, it just seemed an odd choice. Next is to start attaching the frames/bulkheads to the keel and then the deck and cockpit floor to tie everything together. I feel like it might also be wise to make a decision about eventual mounting and drill some holes through the keel if needed.

- 90 replies
-
- 5
-
-
- Friendship Sloop
- bluejacket shipcrafters
- (and 1 more)
-
Looks like you are meeting the challenges so far. Thanks for documenting what you've run in to and how you've approached the issues. I expect to have some similar challenges with my friendship sloop. And yes, I also suspect that both these kits may be from the original Laughing Whale. At they very least, both are rather old designs with too few bulkheads. The number of and spacing of the bulkheads/frames on the friendship sloop is similar.
-
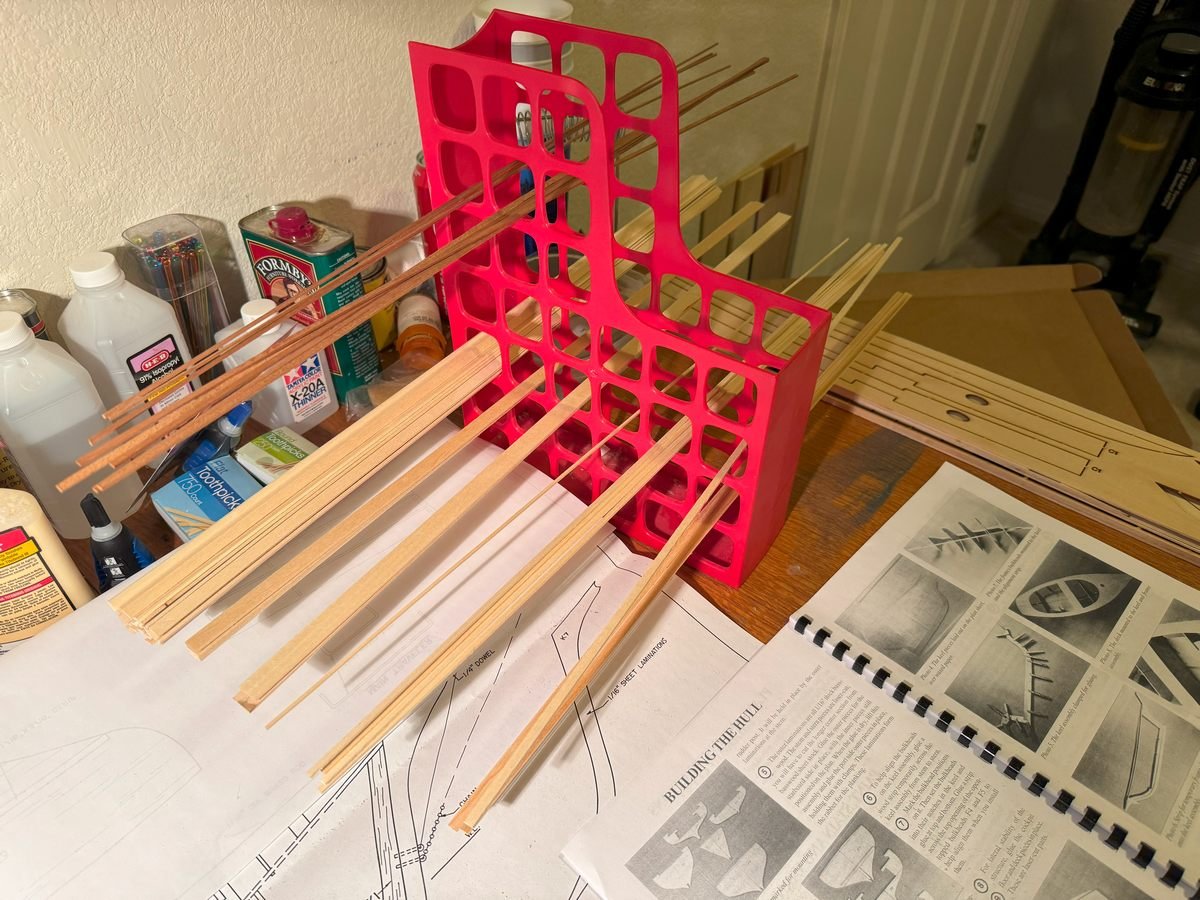
Thanks @JacquesCousteau for the link. I've looked through many of those pictures and picked out a few that had interesting details. I've now completed my prior project and cleaned up my work area and made the most basic of starts on this build. I've organized the strip wood (still waiting on the replacements for the stuff that was missing but the post office says it will be delivered any day now). I've also cut the bulkheads and keel pieces out of the laser cut sheets and sanded off much of the laser char.
- 90 replies
-
- 6
-
-
- Friendship Sloop
- bluejacket shipcrafters
- (and 1 more)
-
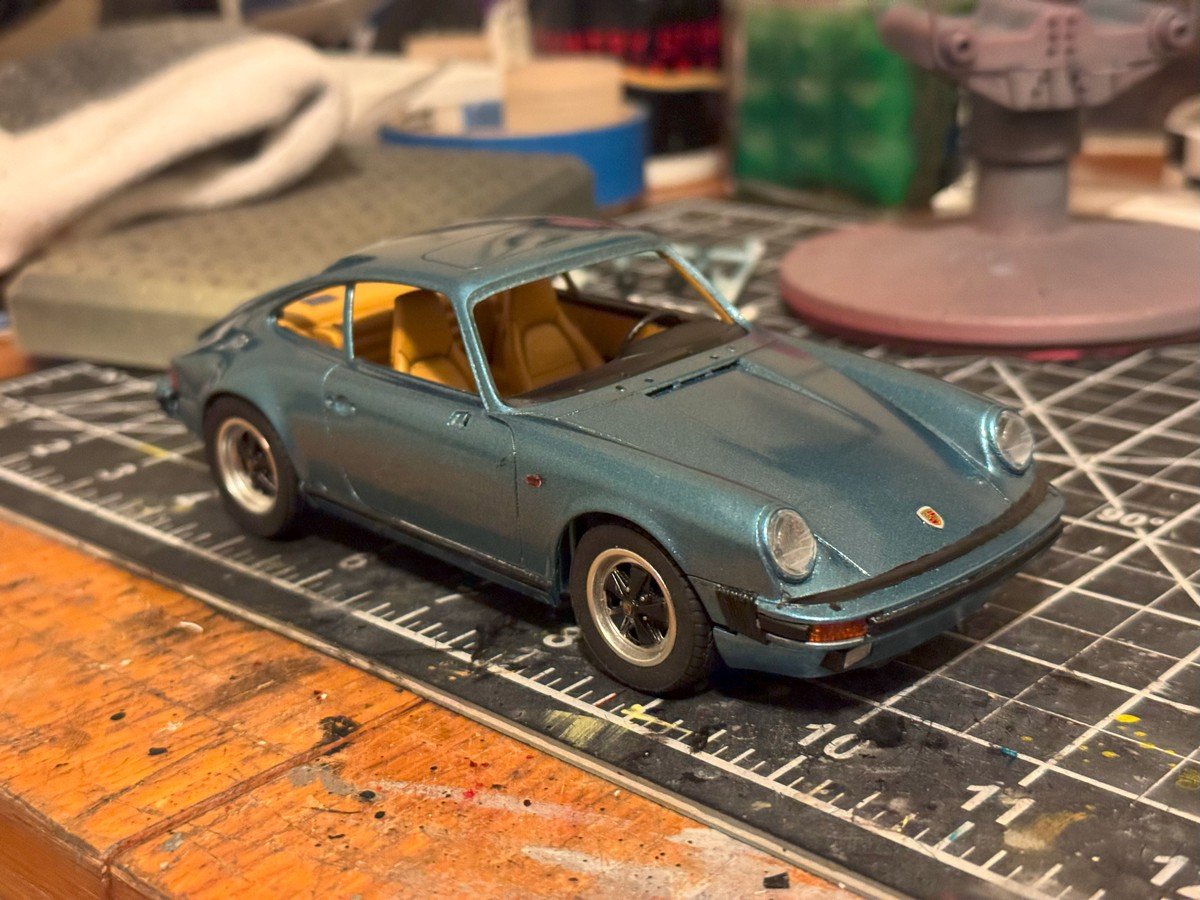
Thanks all for the likes and comments during this build. I have now finished this build and taken a few final photos away from the workbench. I was quite impressed with this kit. Sometimes the Revell kits can be a bit hit-or-miss depending on the history of the kit but this one was well detailed and everything fit together very well. I had virtually no problems getting stuff to fit together. Also, as noted earlier, the decals were high quality too. I was also pleased with the paint from scalefinishes.com. Of course it is not perfect, there are still some flaws here and there in the paint, but overall I am pleased.


- 25 replies
-
- 15
-
-

-
Porsche Carrera 3.2 by kpnuts - Revell - 1/24 - PLASTIC
gsdpic replied to kpnuts's topic in Non-ship/categorised builds
I found that Revell kit to be a very good kit. Everything fit well together and it seemed well detailed. Though I am a little surprised you did not find a kit that already had a whale tail. -
Thanks all for the likes and comments. Glad I am not the only one who clutters my work space. Getting very close now. One unusual thing about this kit is that the windows are put on from the outside at the end of the build. Usually the go on from the inside before putting the interior into the body. I still have to paint some black edges around the windows, which is always a little nerve wracking, and then just have a few other small accessories like wipers, mirrors, door handles, etc and I'll be done.
- 25 replies
-
- 13
-
-
-
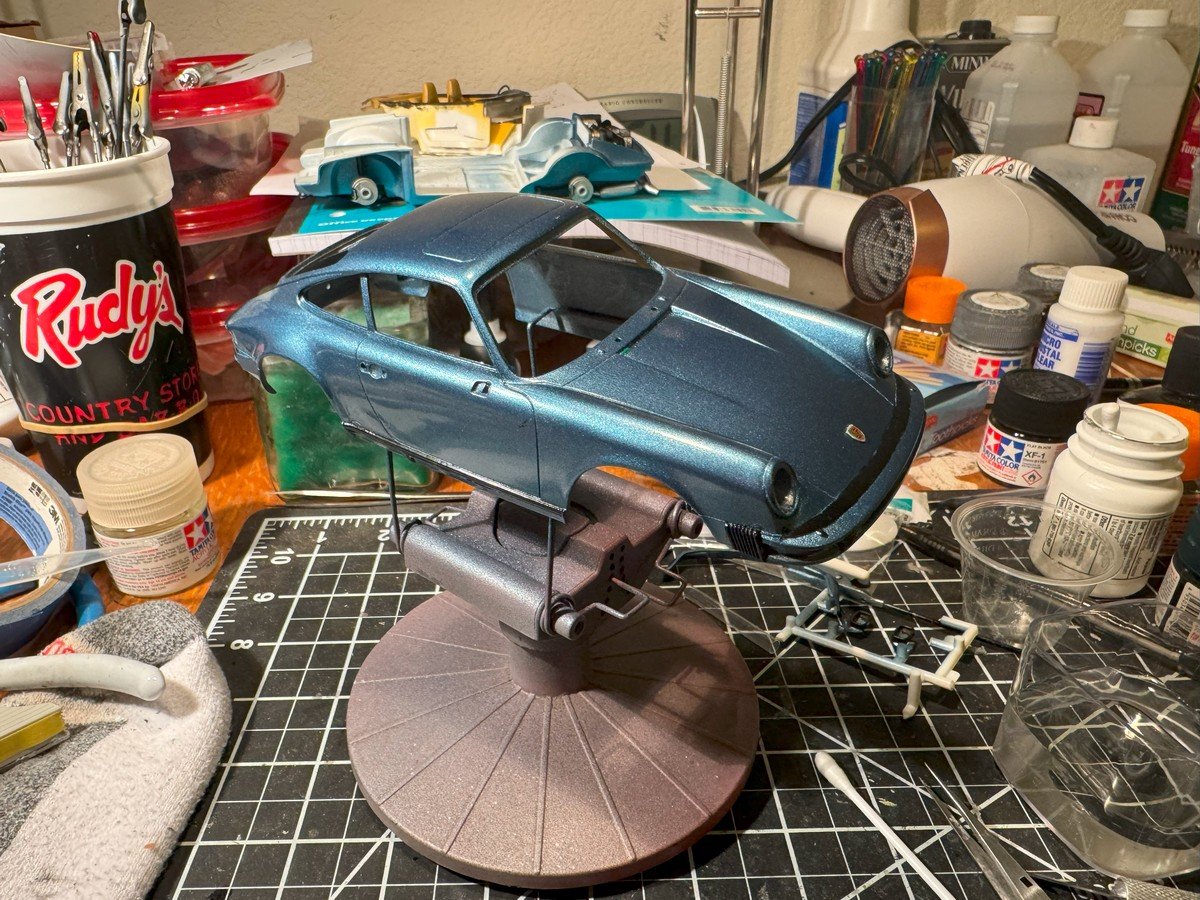
Thanks all for stopping by, for hitting the like button, and for the patience. After a bit of a not entirely planned break, I've resumed work on this build. I've mostly been doing additional detailing of the body. In the picture you can see that I have clear coated it and also painted some of the black details. I've also been adding a few more small decals here and there. Most of what I have left are adding the clear parts, some of which need to be painted with clear red or clear orange. But I really don't have far to go. And yes as I build, I have the bad habit of allowing the work area to get more and more cluttered, shrinking the space I have to do work.
- 25 replies
-
- 12
-
-
Well when I opened this build log I thought I was just a few days away from completing that Porsche build. But I guess by starting this log I was just asking for life to get in the way. I still think I'll get started soon. And I heard back from Bluejacket that they are sending the missing strip wood.
- 90 replies
-
- 2
-
-
- Friendship Sloop
- bluejacket shipcrafters
- (and 1 more)
