drobinson02199
-
Posts
1,075 -
Joined
-
Last visited
Content Type
Profiles
Forums
Gallery
Events
Everything posted by drobinson02199
-
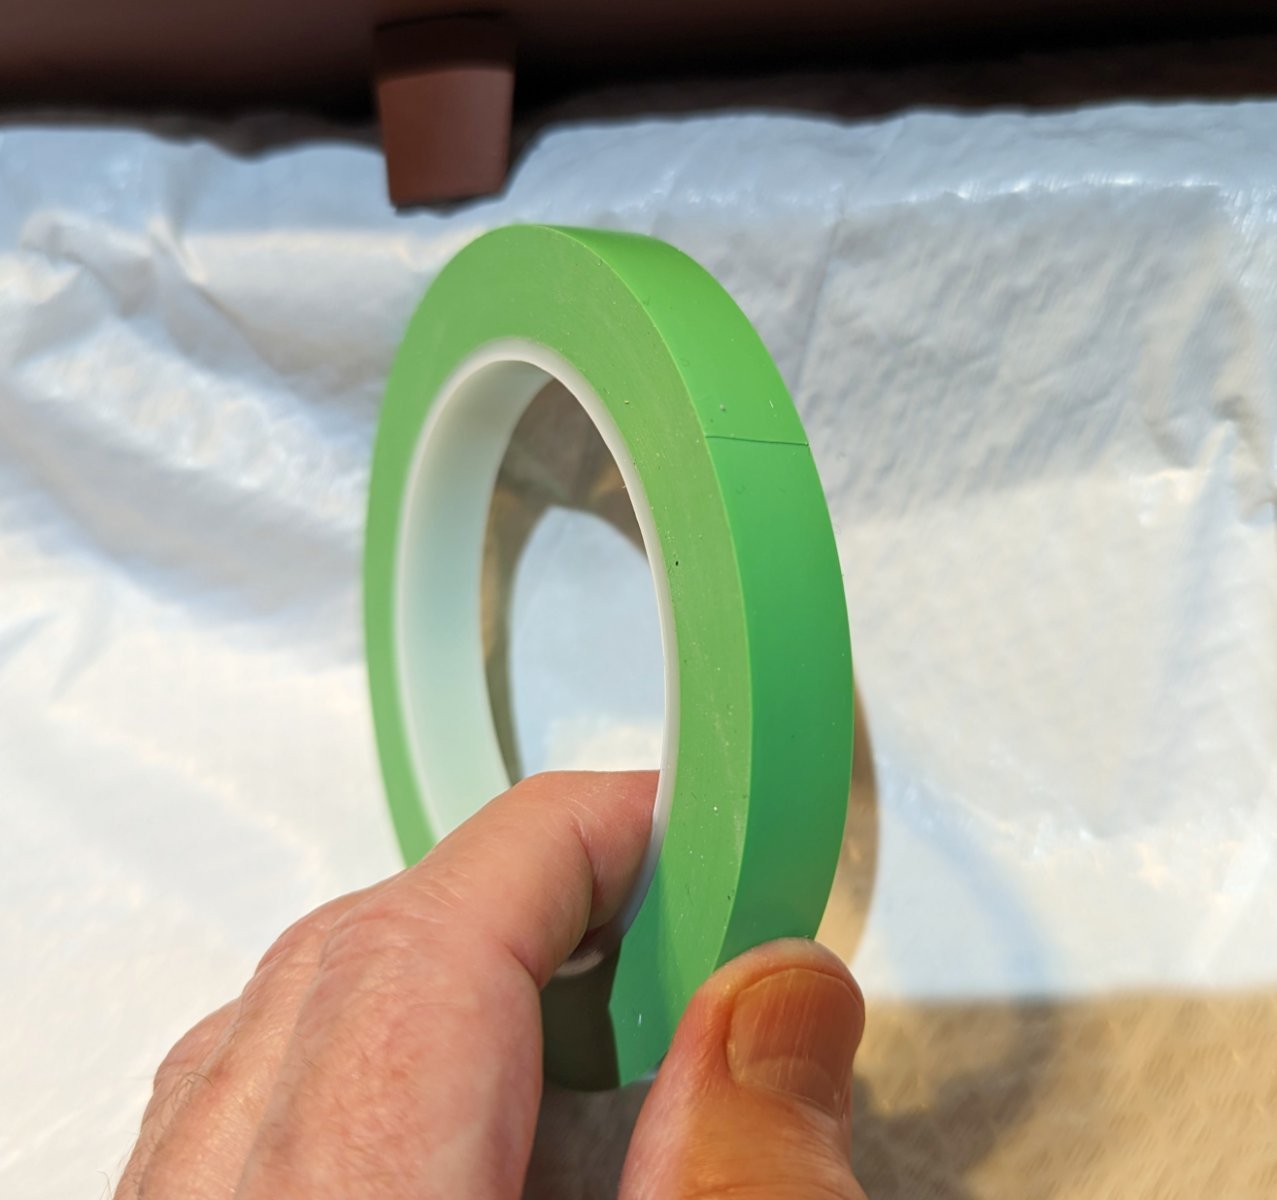
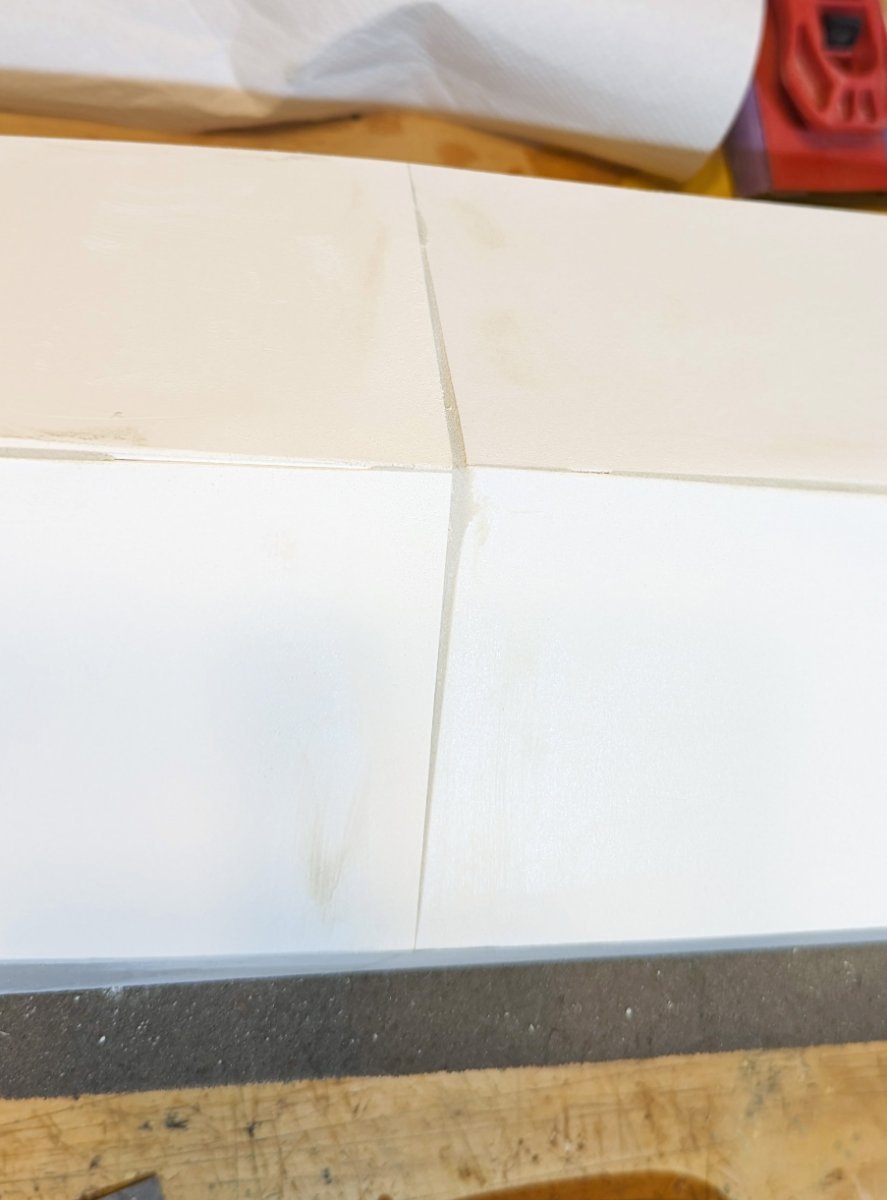
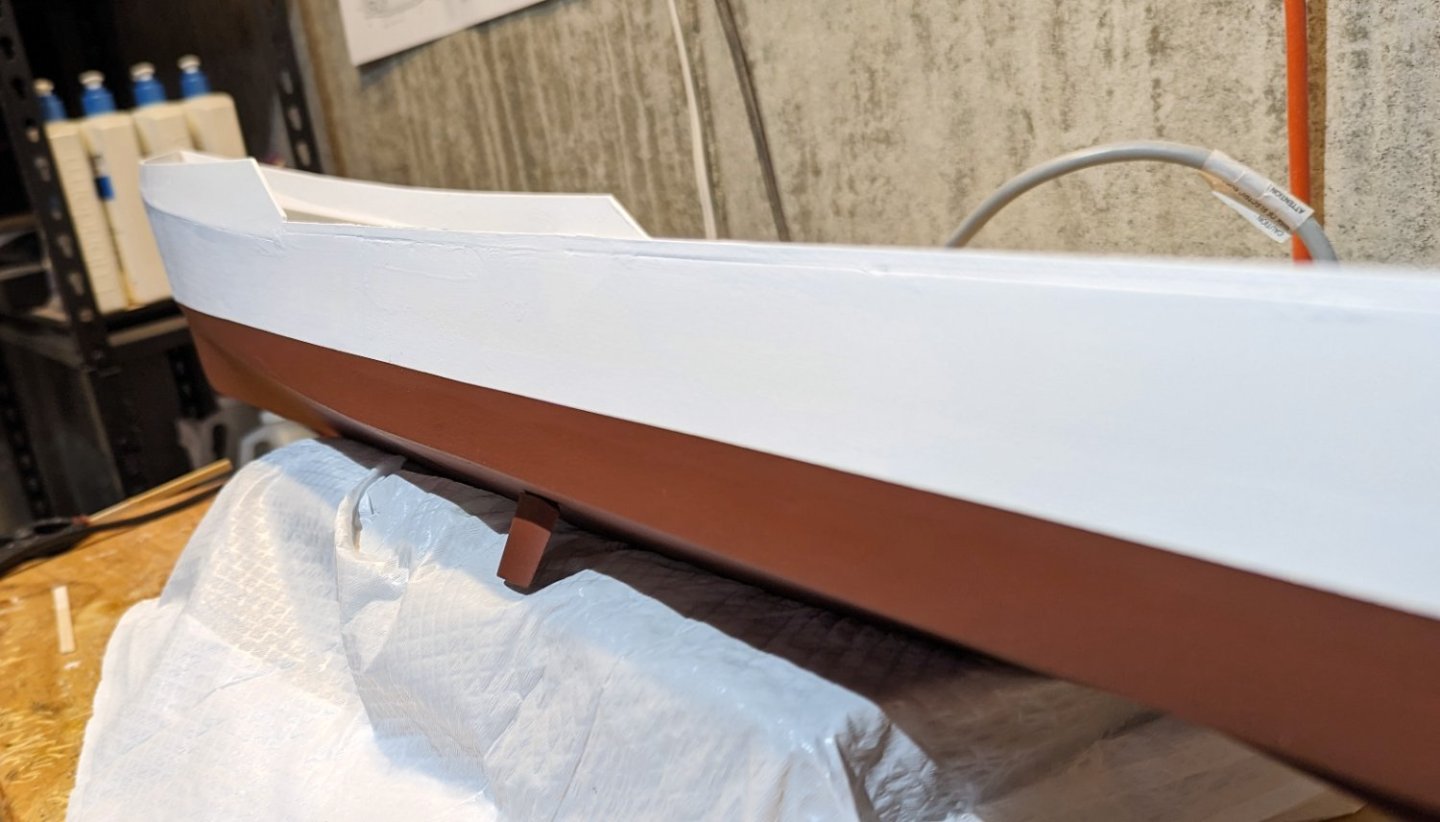
 Finished painting the hull. This is by far the best waterline I've ever done, and I attribute that to some vinyl masking tape I found on Amazon. Instead of piecing Frog tape to follow the line curve, this stuff just flexes to do it. I also used a tip I got from this site, which is to run a bead of varnish down the edge to seal it. I can give anyone who is interested in the product the Amazon reference -- just send me a message. Regards, David
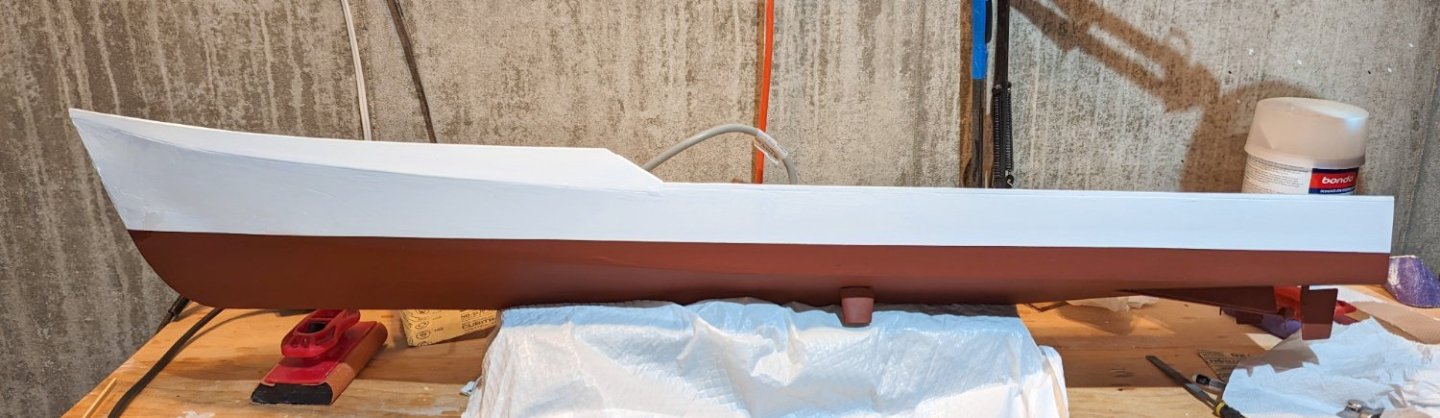

- 46 replies
-
- 8
-

-
- Fast Response Cutter
- Dumas
- (and 2 more)
-
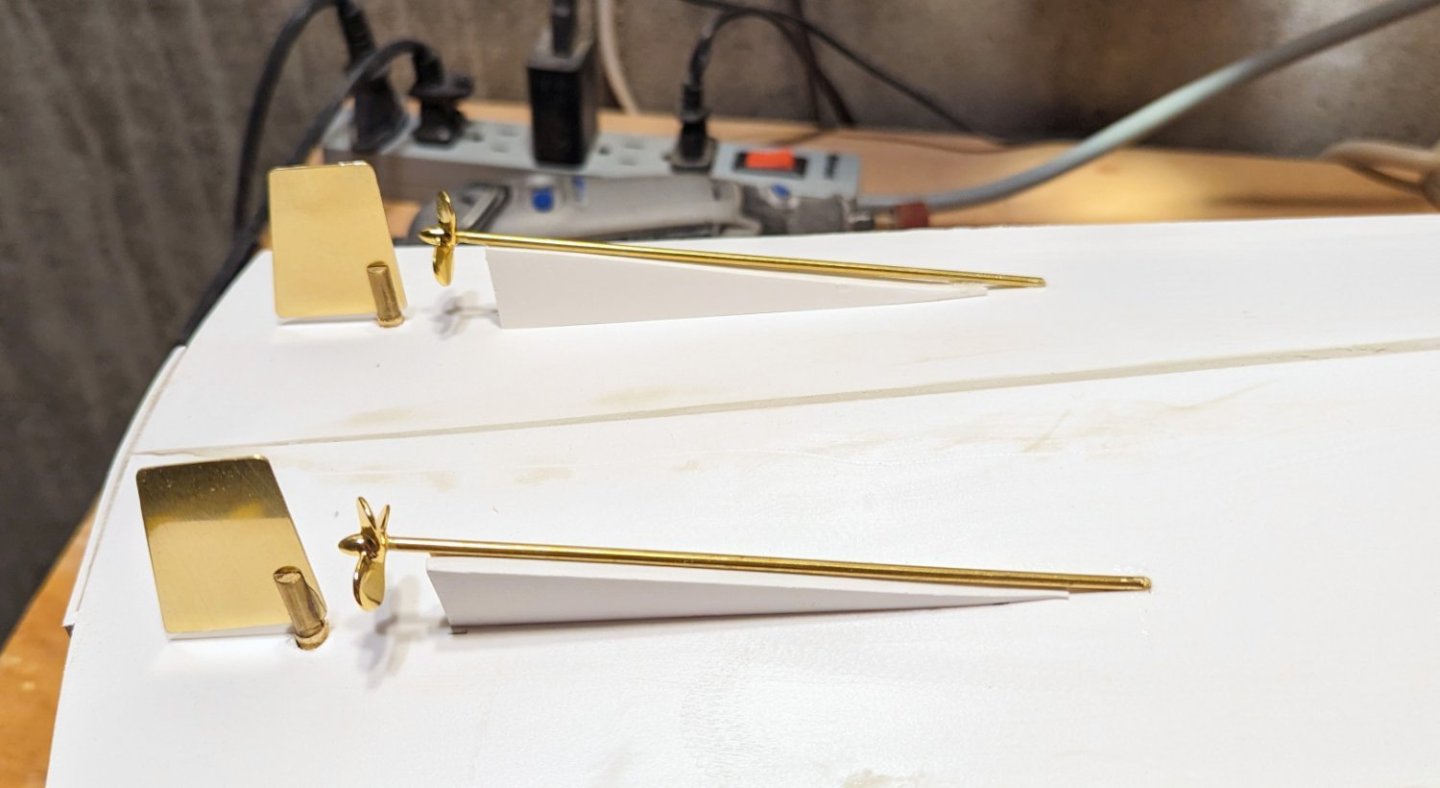
Stabilizers mounted. Now it's time to paint the bottom of the hull. Regards, David
- 46 replies
-
- 6
-
-
- Fast Response Cutter
- Dumas
- (and 2 more)
-
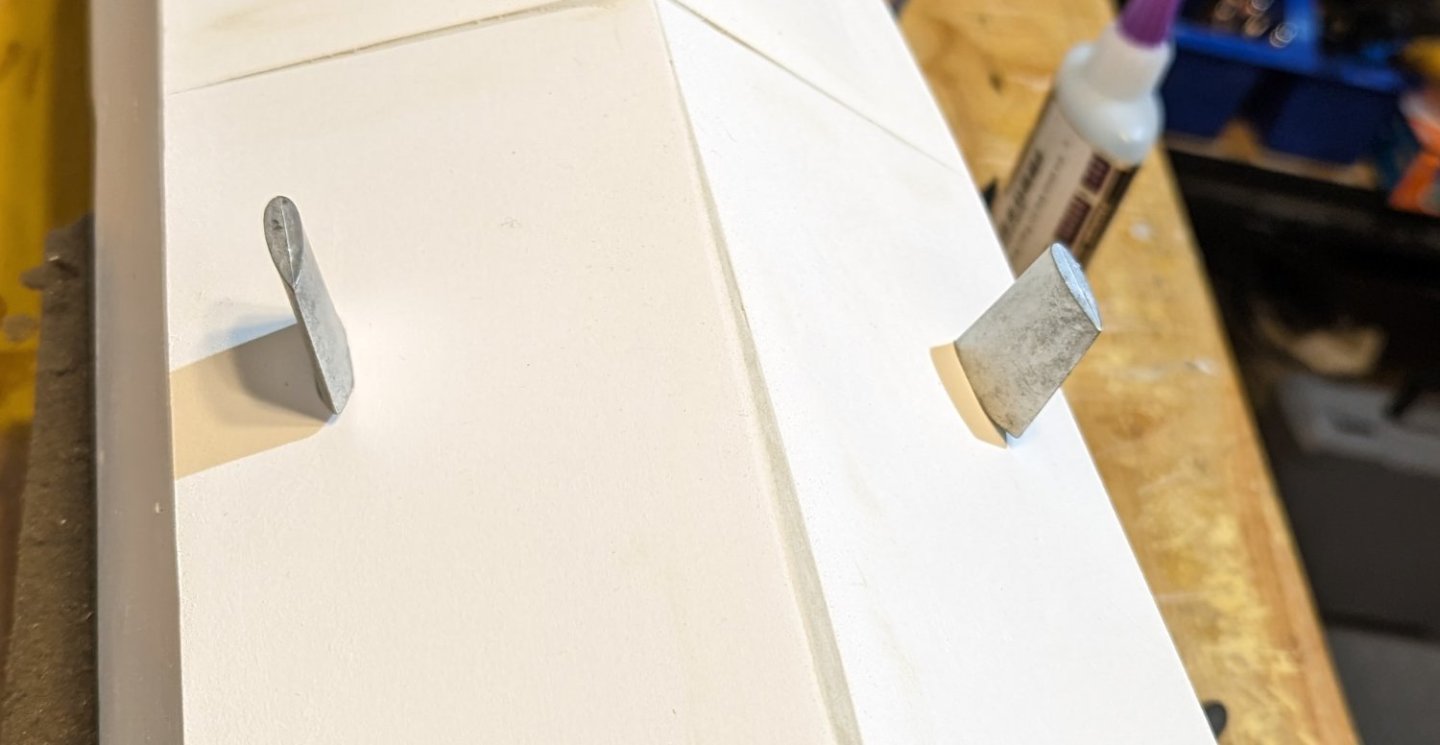
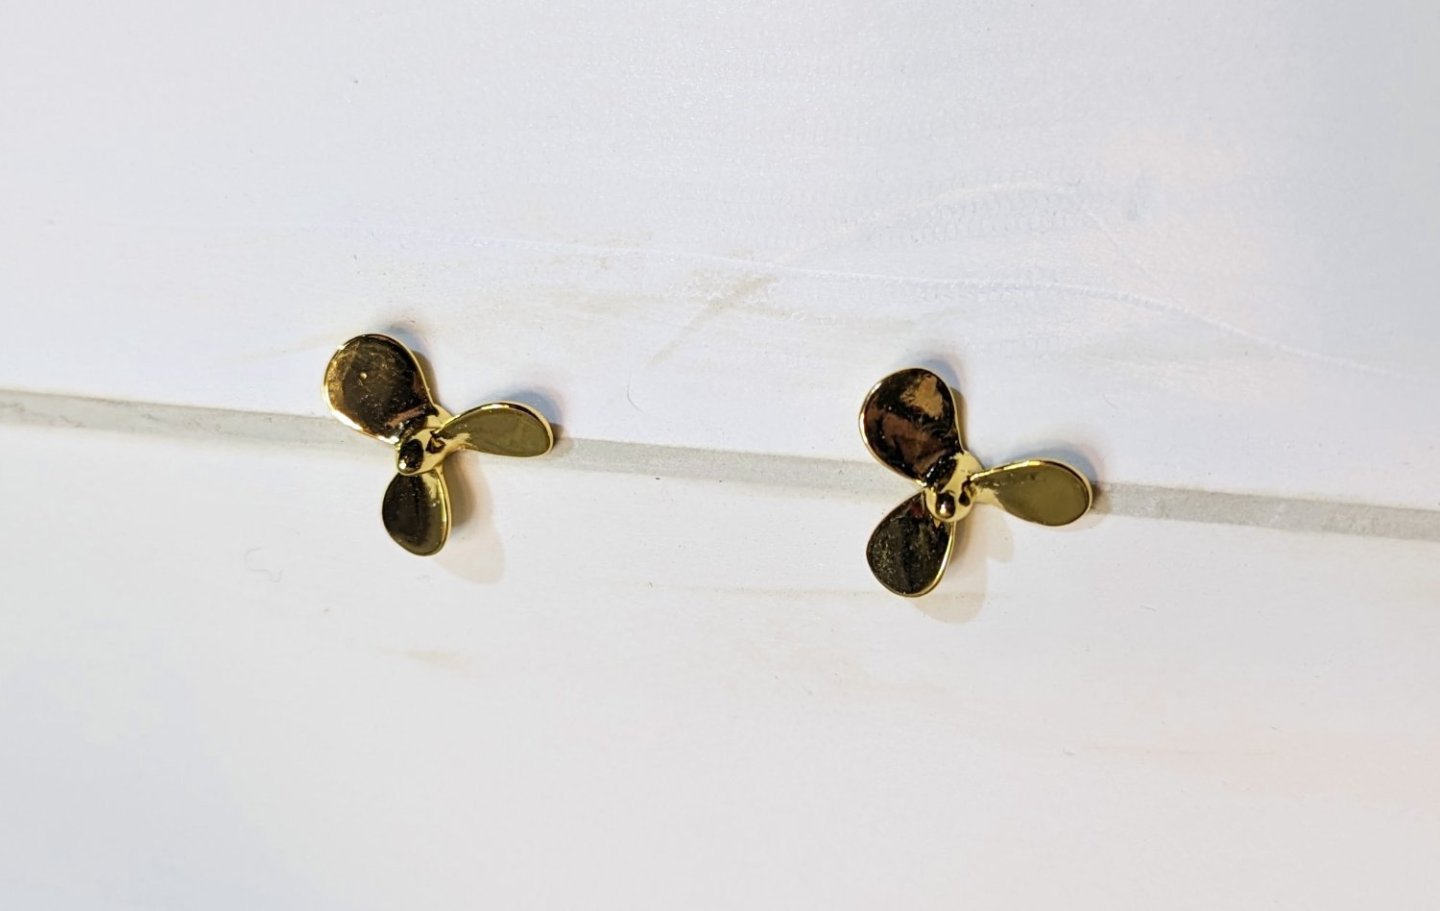
Finished painting the upper part of the hull white and marked the waterline. Now finishing the bottom fittings before painting the rest of the hull red-brown. An oddity of this kit for someone like me who is building it as a static model (vs. R/C). The rudders and fittings to install them are included in this kit. BUT, the props and shafts are not, although the skegs are. The props are in the "running hardware" accessory kit, which is a cool $134 on top of the $375 I already paid for the model. No way. There's a clear asymmetry in the way parts are supplied with the base kit for a static modeler, and I think I will write Dumas about it. Props and enough to mount them as dummies should be in the base kit. So I went onto Amazon and found some nice brass props for $10 for the pair, used some brass rod from my "spares" supply, and voila . . . what you see. All of this will be painted red-brown so the brass and white skegs will all blend together. Regards, David
- 46 replies
-
- 9
-
-
- Fast Response Cutter
- Dumas
- (and 2 more)
-
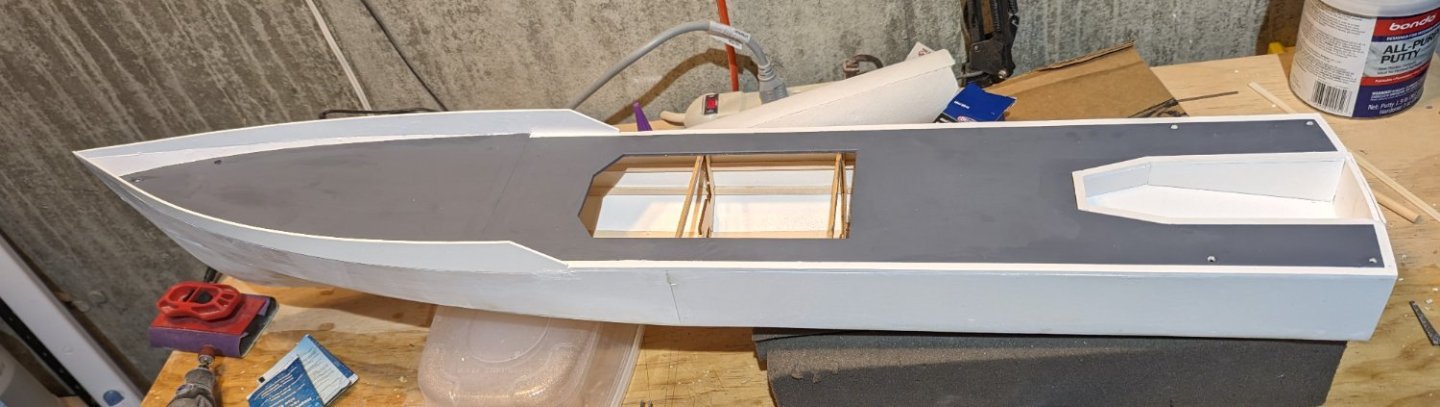
The main decks are painted and installed. Lots of touch up needed. You can see holes drilled for gooseneck vents -- also had to drill a hawse hole which is just barely visible in this pic. Regards, David
- 46 replies
-
- 6
-
-
- Fast Response Cutter
- Dumas
- (and 2 more)
-
Boat well installed and deck edging applied. At this point in the construction, things move along pretty fast. We'll see if that continues. Regards, David

- 46 replies
-
- 6
-
-
- Fast Response Cutter
- Dumas
- (and 2 more)
-
Bow deck and bow bulwarks installed. The bulwarks need Bondo to finish the seams, but . . . Bondo really gives off strong vapors. The air handlers for our den and bedroom are in the same area as my workroom. So the Bondo session earlier this week caused some recriminations. I need to set up a temporary workspace in the garage for future Bondo operations. Regards, David
- 46 replies
-
- 9
-
-
- Fast Response Cutter
- Dumas
- (and 2 more)
-
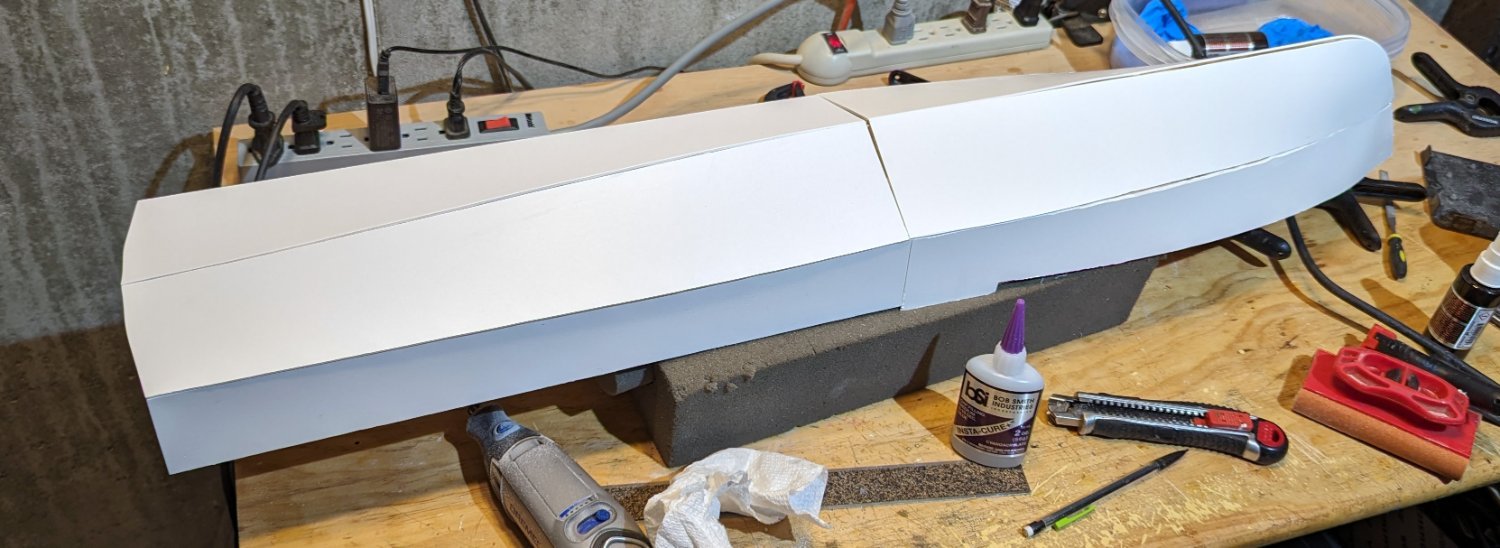
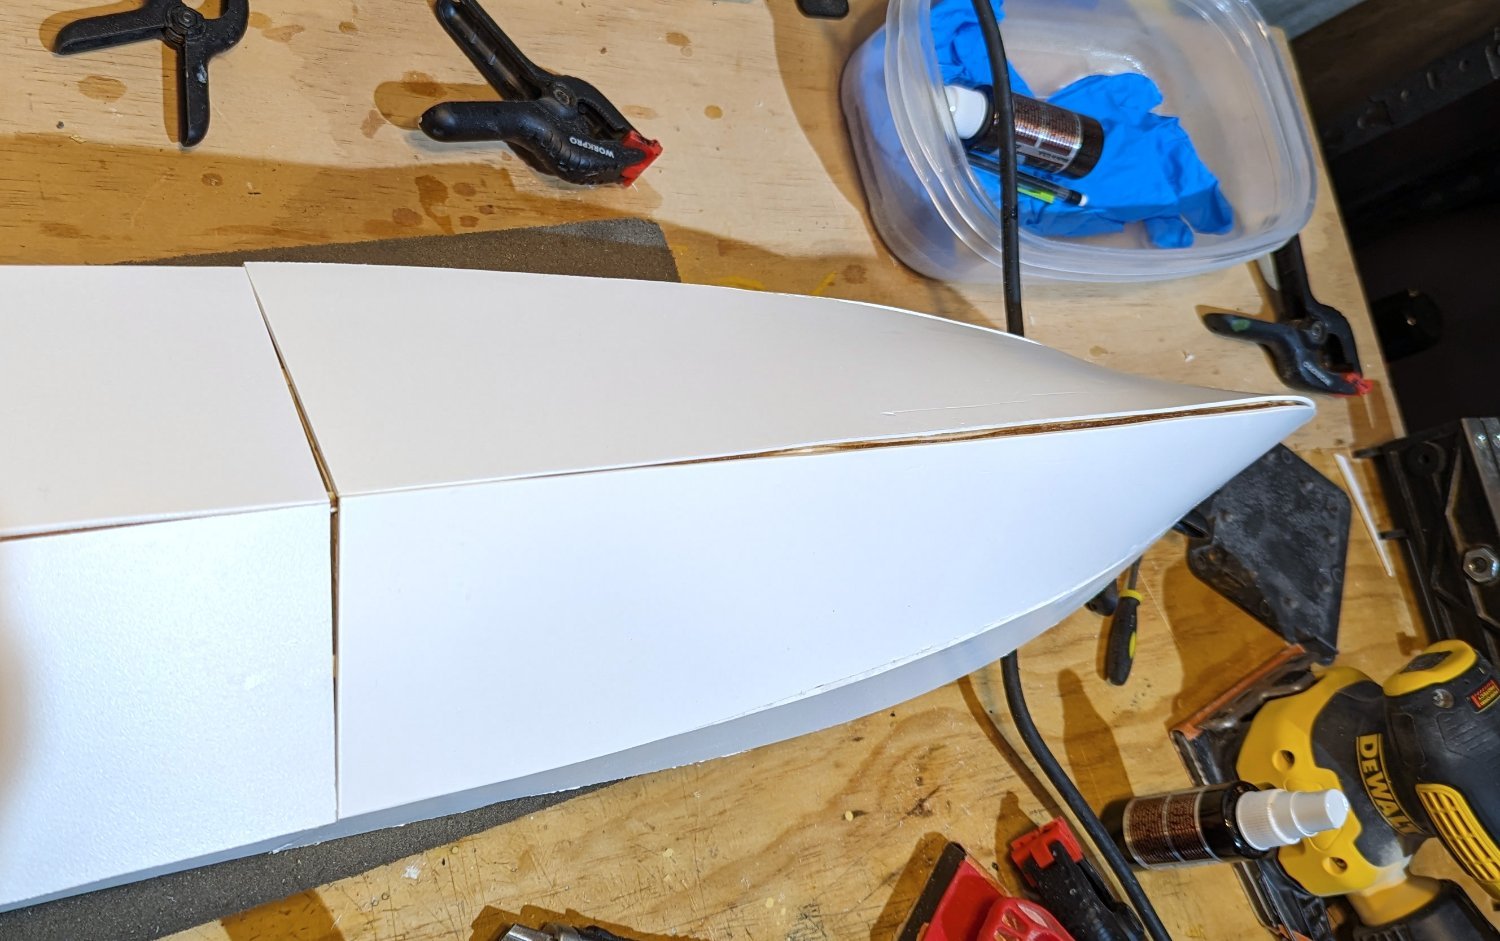
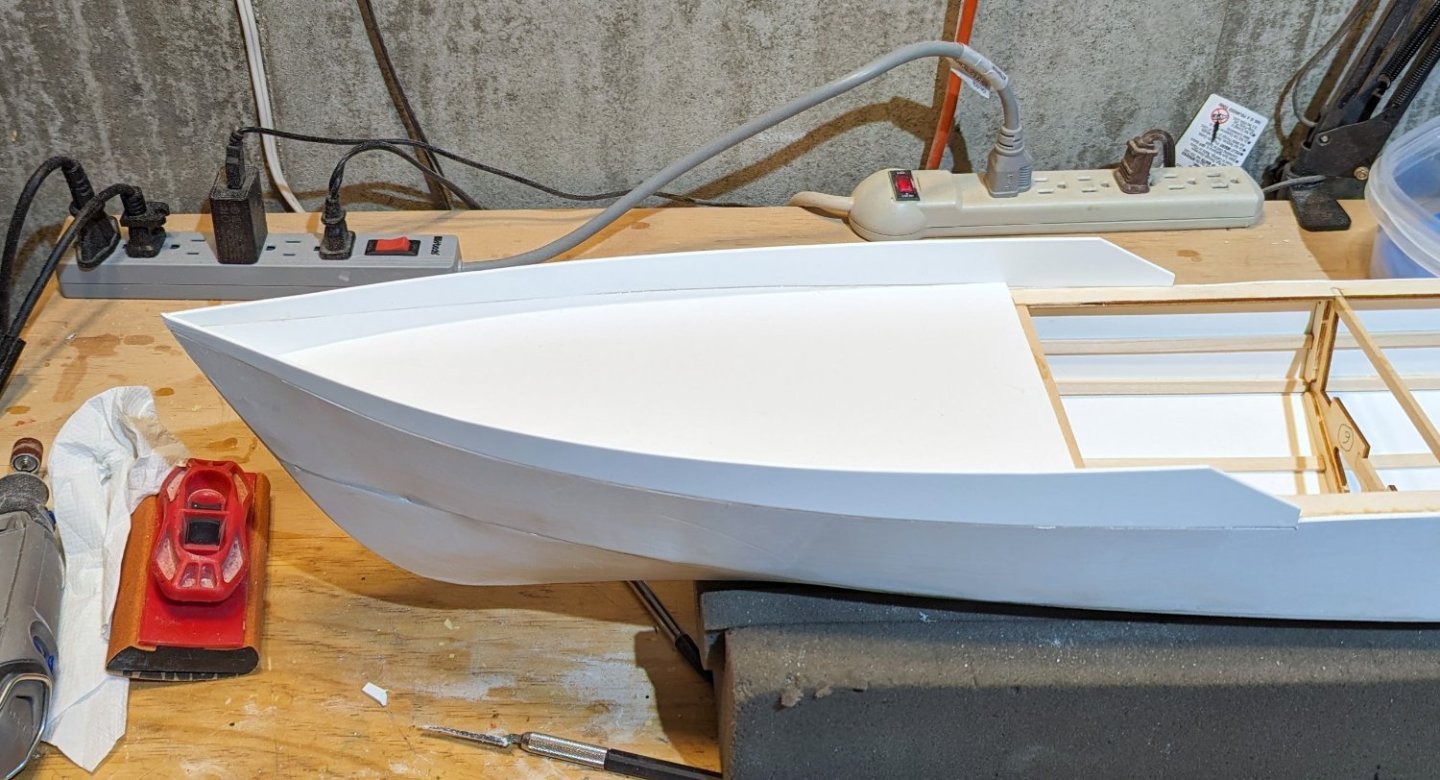
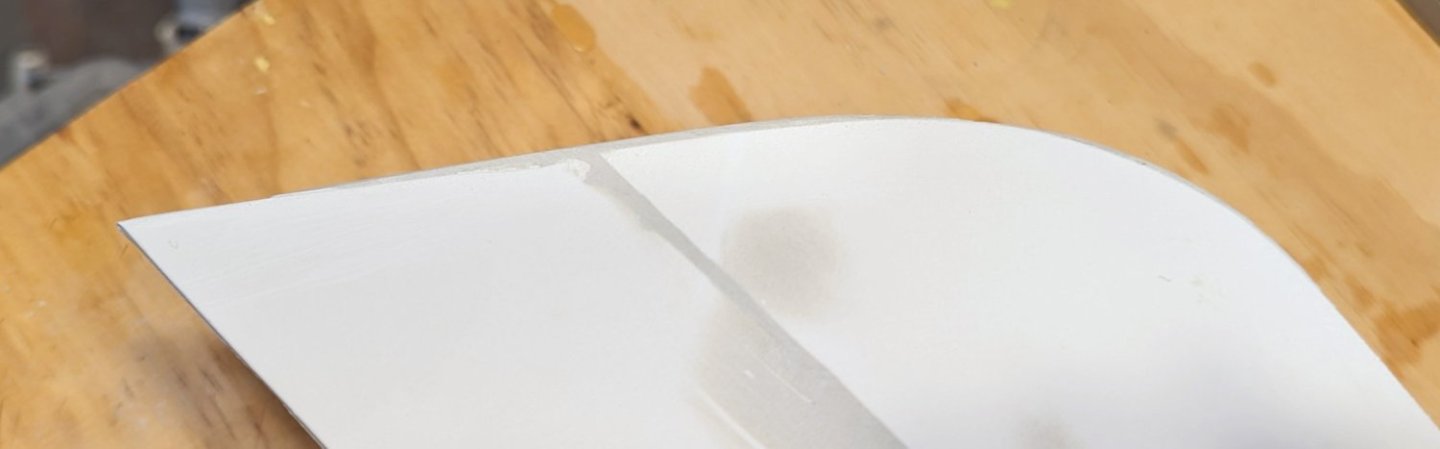
I've now applied Bondo to all of the hull gaps and imperfections -- pictures shown. There are probably some areas needing touch up, but they will become visible when I put the first coat of paint on. The bow curve, made of 4 pieces that come together, was pretty uneven, and I had to sculpt a smooth bow curve out of Bondo. I'm pleased with how that came out. Regards, David


- 46 replies
-
- 7
-
-
- Fast Response Cutter
- Dumas
- (and 2 more)
-
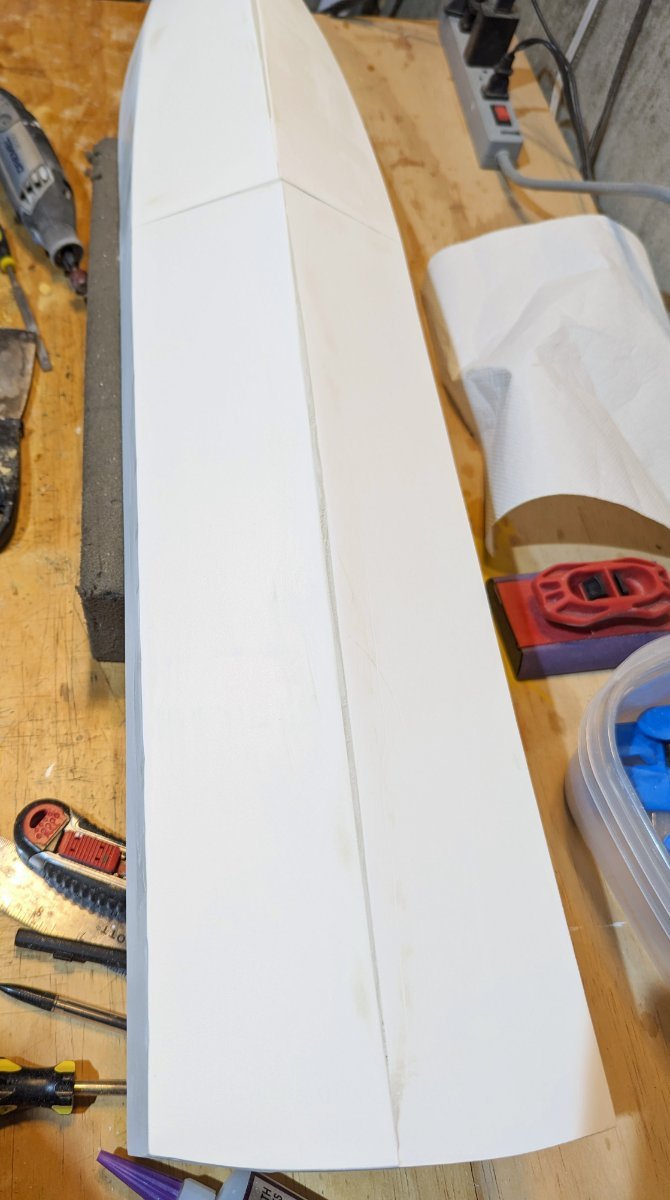
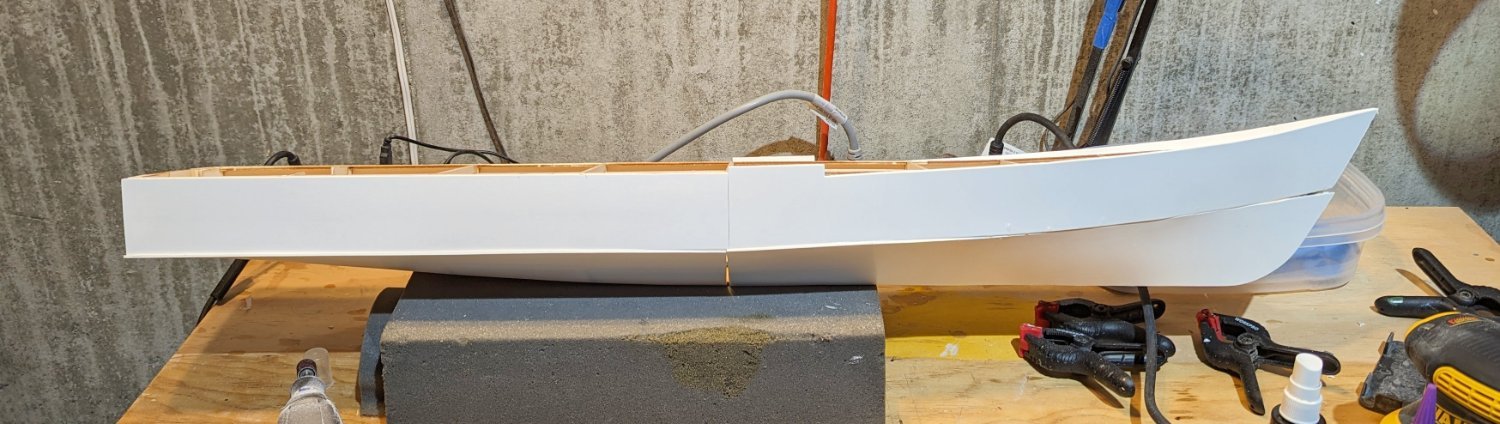
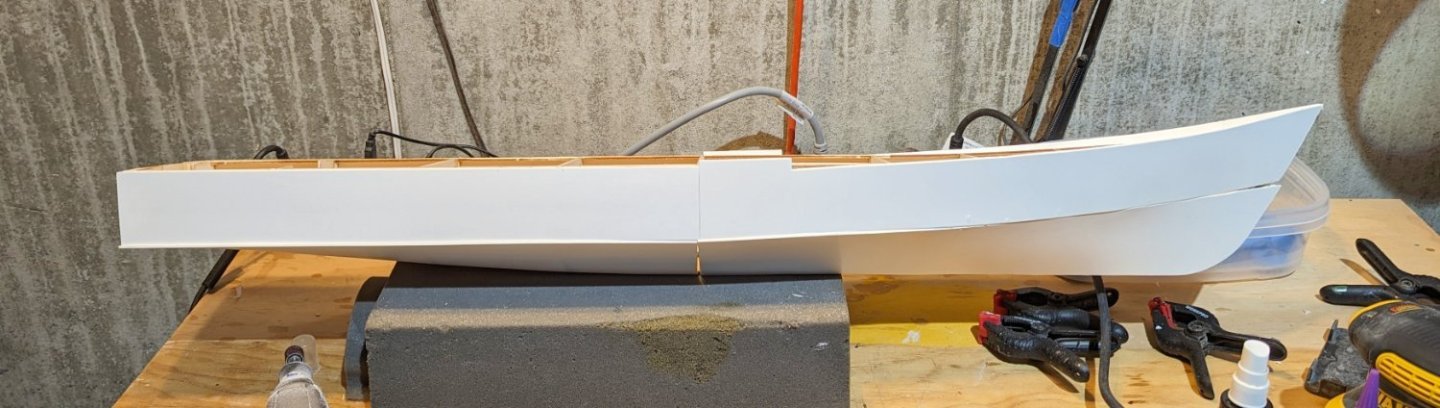
Rough sheeting of the hull is done. I say rough, because as you can see, the sheets don't fit perfectly and there are a lot of gaps. Fortunately, Dumas uses Bondo putty to deal with their styrene, so I'll be doing some sanding and puttying to clean up the hull. One note: sawdust falls to the floor; some gets on you even if you are wearing a work apron, and a vacuum cleaner takes it right off. Styrene seems to be attracted to clothing, and it's hard to get it all off. So I have taken to wearing the painting clothes that I keep near my workbench when I work on the styrene. Regards, David


- 46 replies
-
- 7
-
-
- Fast Response Cutter
- Dumas
- (and 2 more)
-
Bob: I think the frames popped loose perhaps because of the melamine, but also because they are very thin, so any lateral force on the foot is going to twist it a bit and loosen the bond. Yes, I would absolutely glue the frames. It's the best way I can think of to get the frame measurements right, and to get the frames absolutely vertical. And all of that is pretty critical when you start working with the hull sheeting. But I'd pop the frame off before starting the sheeting. Regards, David
- 46 replies
-
- 5
-
-
- Fast Response Cutter
- Dumas
- (and 2 more)
-
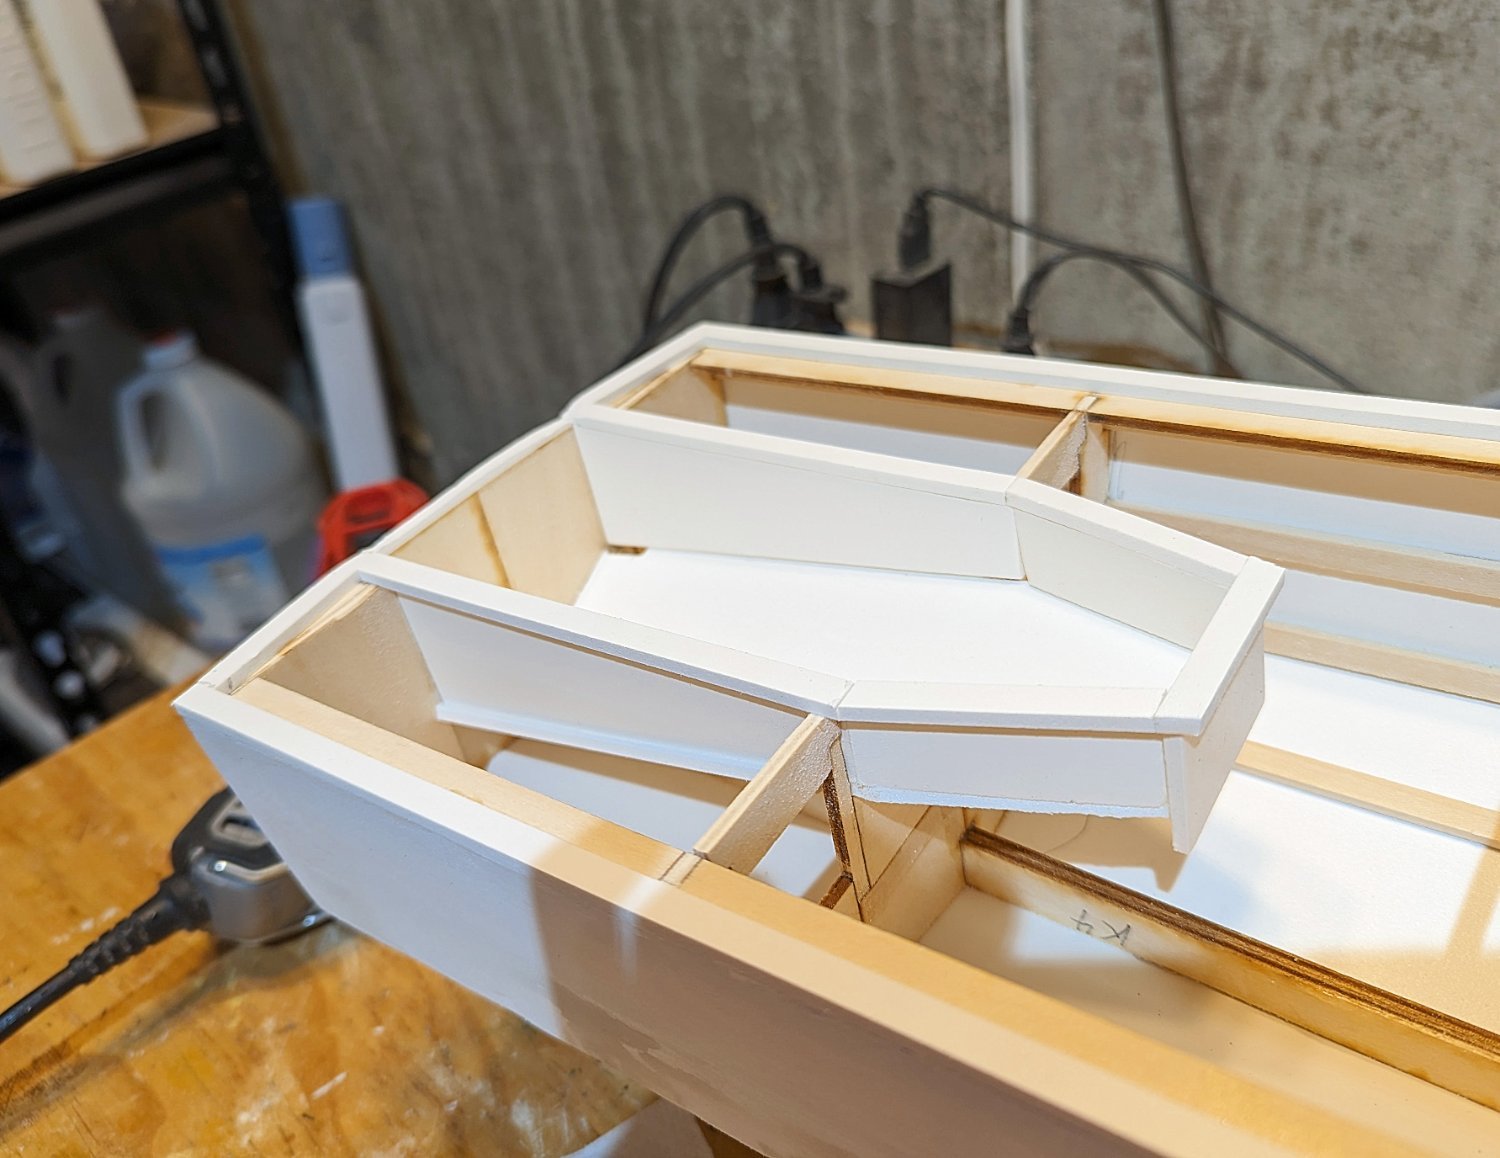
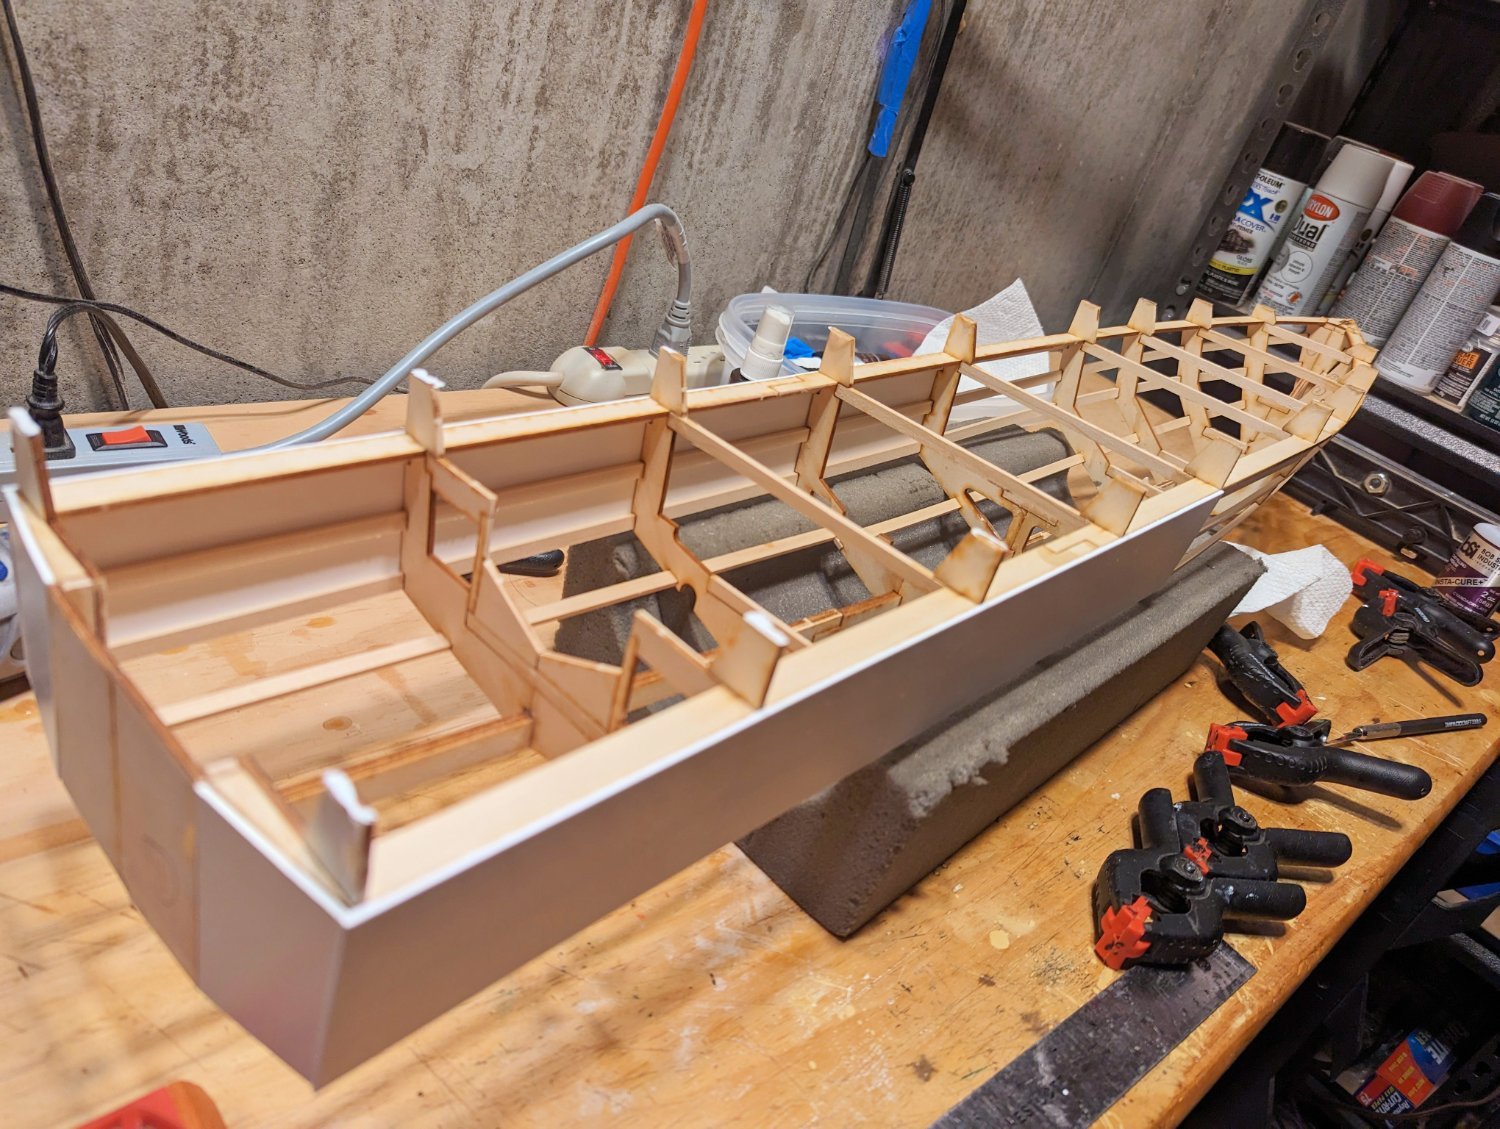
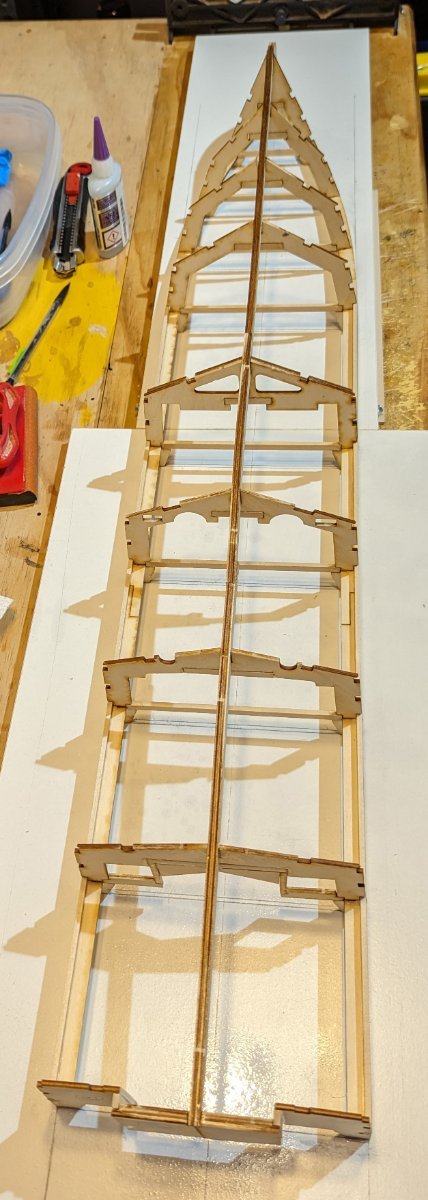
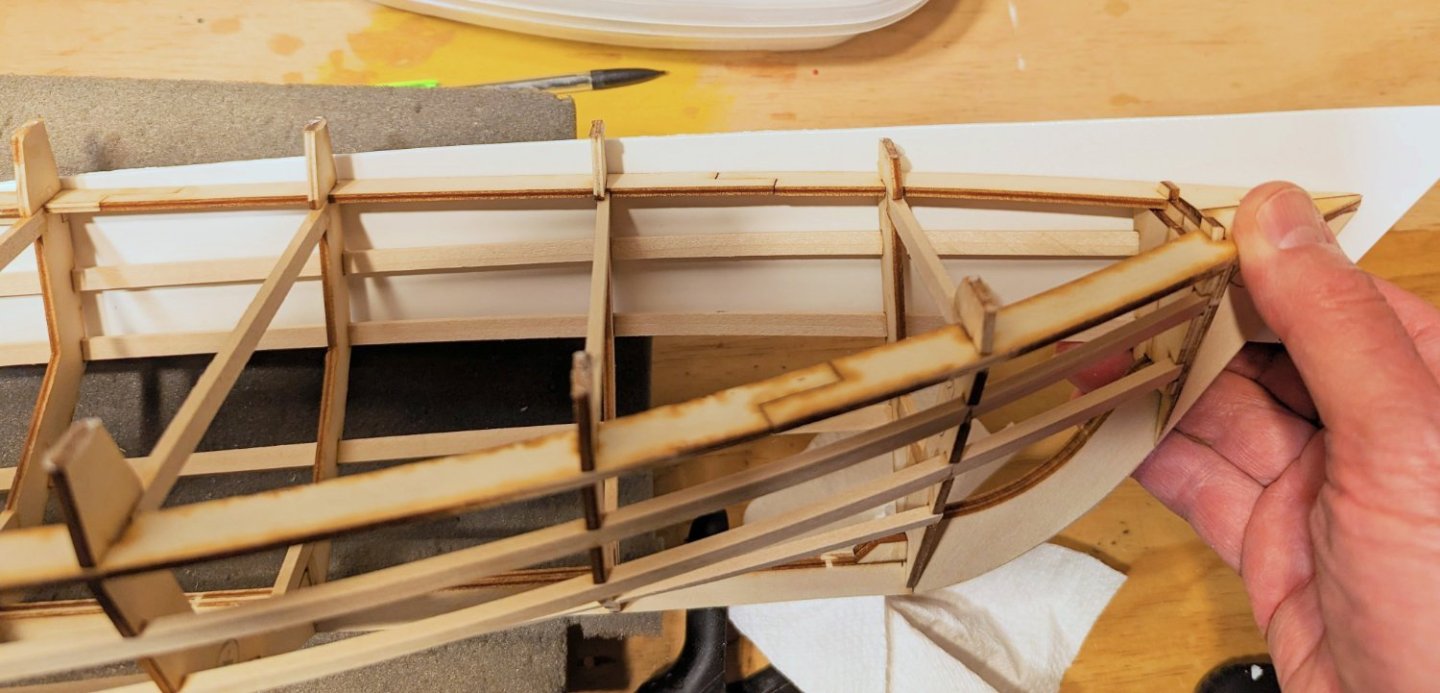
Some sequence issues relative to the instruction book sequence. First, to Bob G's point about knocking the feet loose: I used a palm sander to smooth out the hull, and the vibrations popped the hull right off the building board with no damage. The instructions have it staying stuck to the board for the hull sheeting steps. But having it free is good news for a couple of reasons: If you look at the picture below, I'm holding one of the side pieces in place by hand, and as you see, it extends up past the sheer to form a bulkhead at the bow. When the frame was on the building board, the point of the bow was right down on the board, so adding that side piece with the boat stuck to the board would not have worked. Second, as the picture shows, with the side piece extending up past the "feet", if those go on ahead of removing the feet, which is what the instructions say, then sawing off the feet on the forward part of the ship would be really difficult with that bulkhead in the way. So I have taken the feet off now, before installing those mid-boat to bow side sheets. They came off pretty easily. You can also see the rear side sheets already installed. I don't find having the boat off the board to be a problem -- in fact it's a blessing. I have a foam cradle which helps me to hold the boat steady, and because I can now turn the side I'm working on to the most convenient angle, it's much easier than it would be if the hull frame was still attached to the board. Regards, David

- 46 replies
-
- 6
-
-
- Fast Response Cutter
- Dumas
- (and 2 more)
-
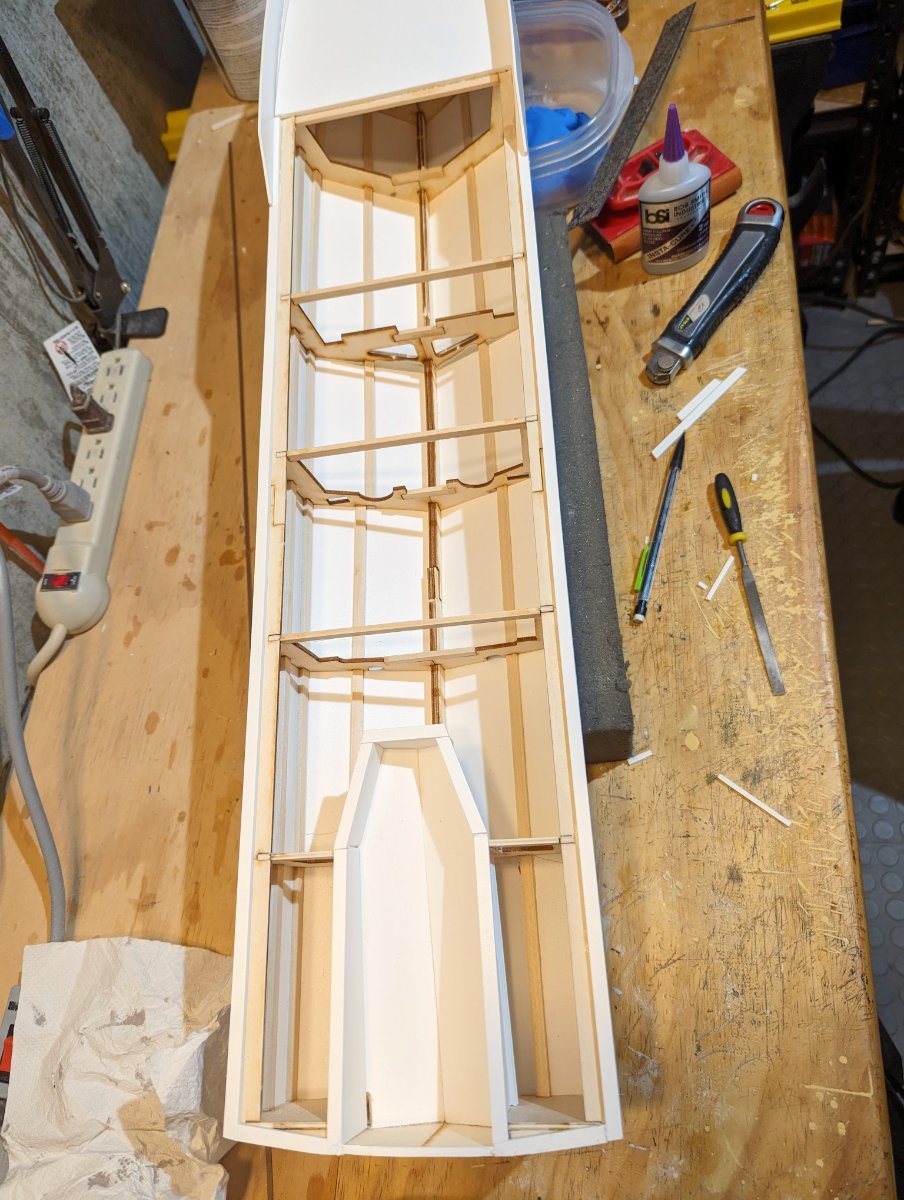
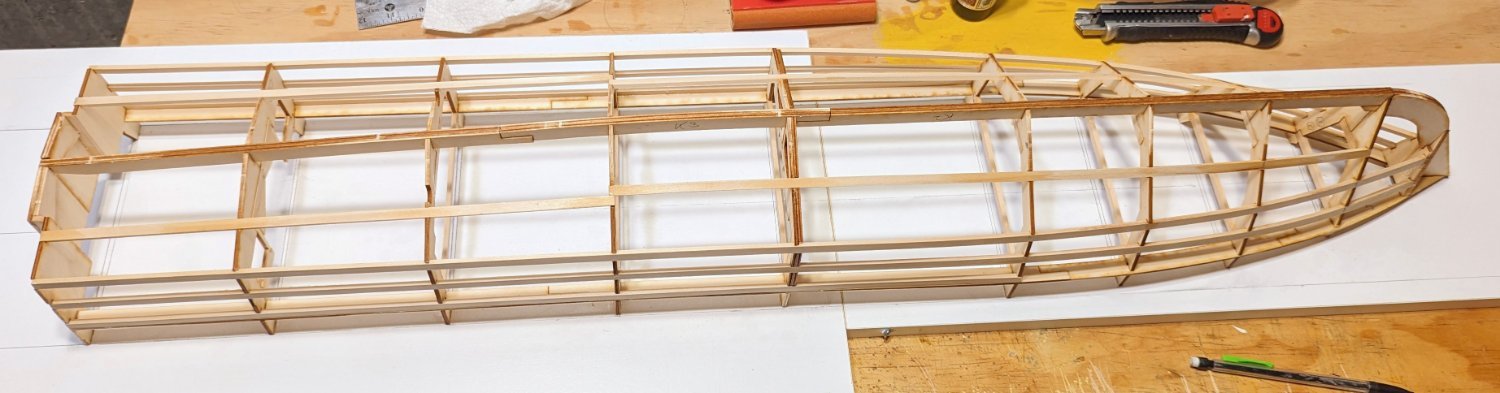
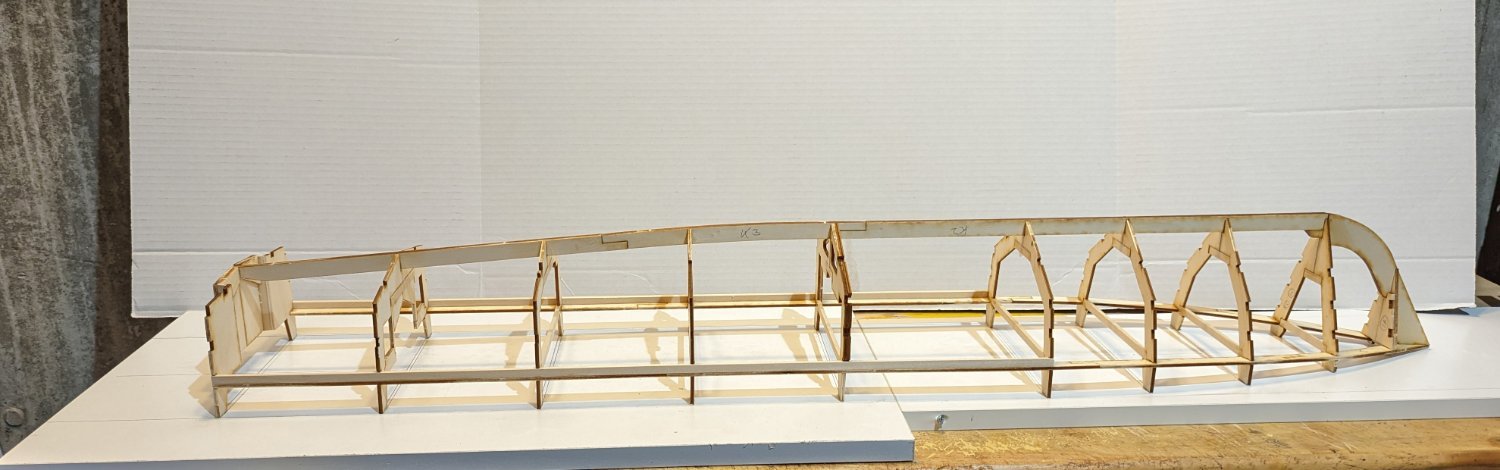
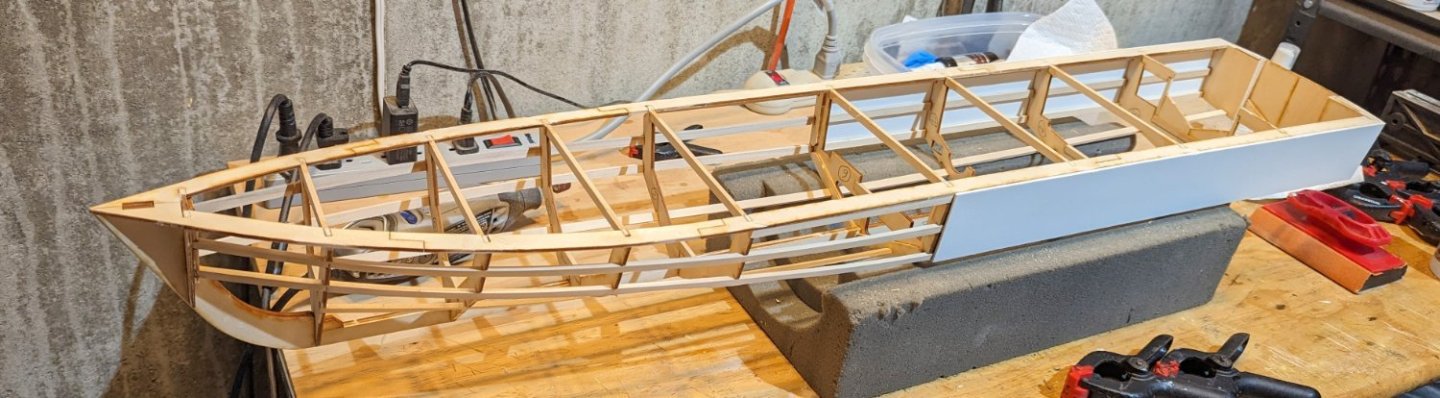
Now all of the hull frame stiffeners are installed. Regards, David

- 46 replies
-
- 8
-
-
- Fast Response Cutter
- Dumas
- (and 2 more)
-
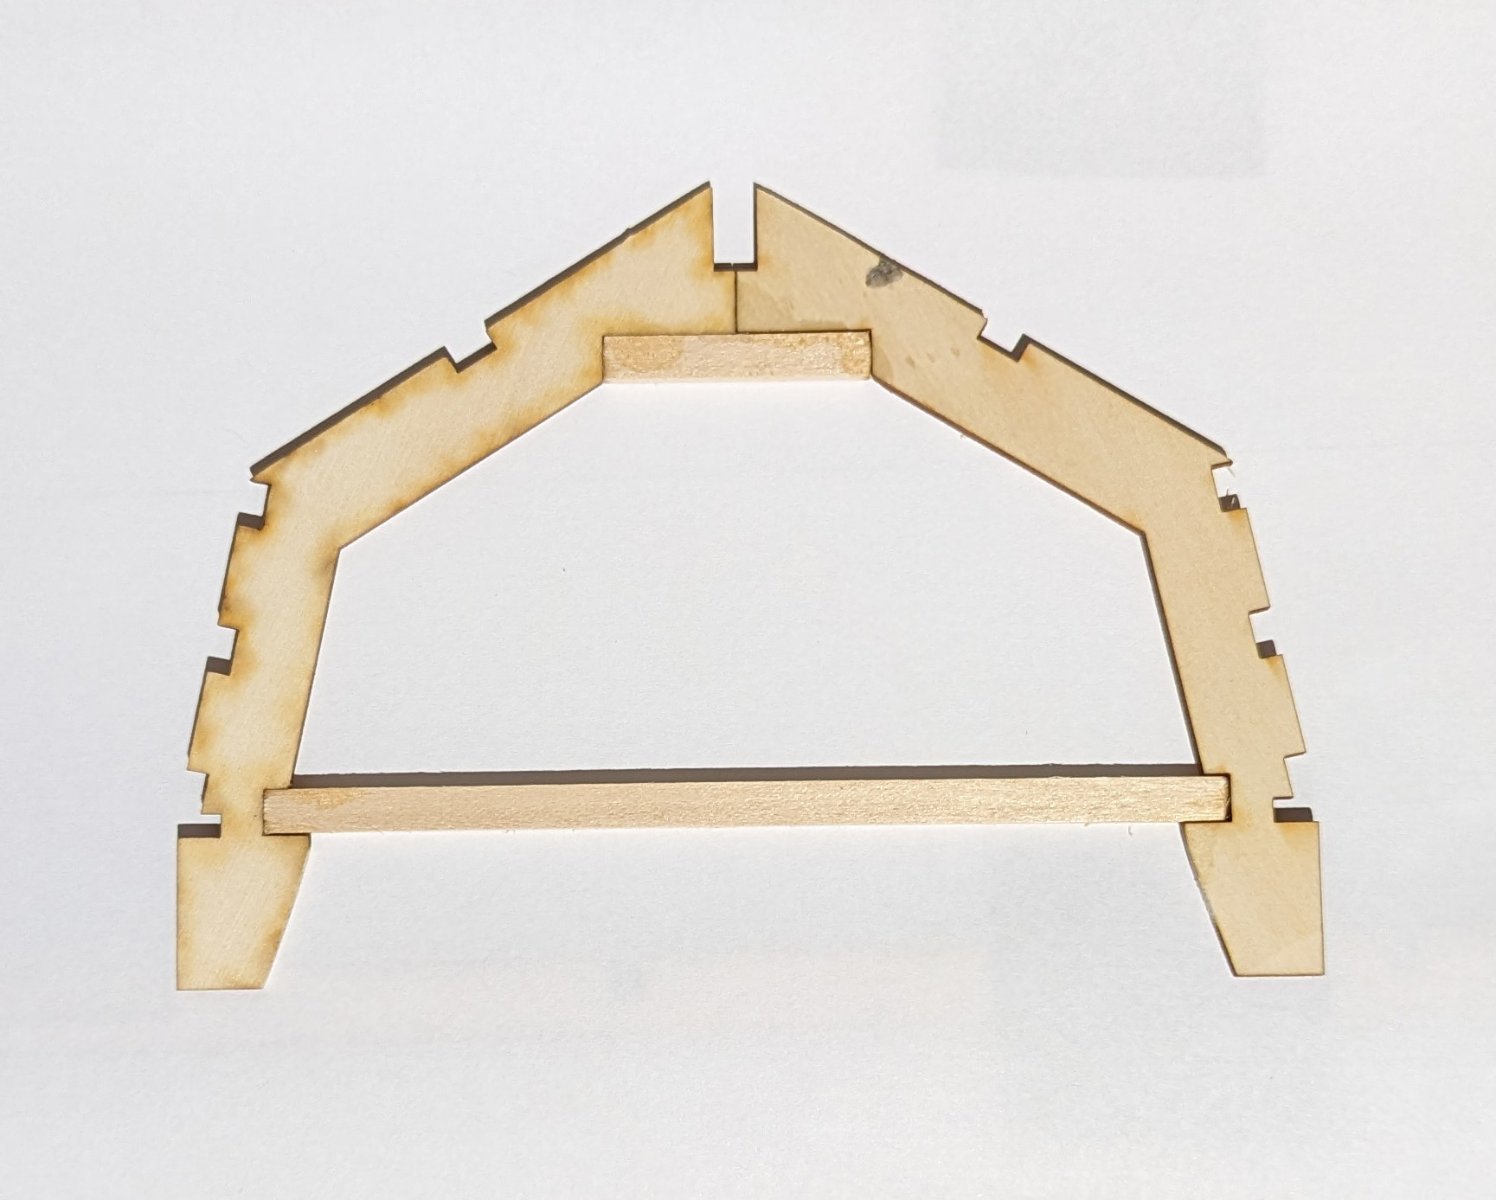
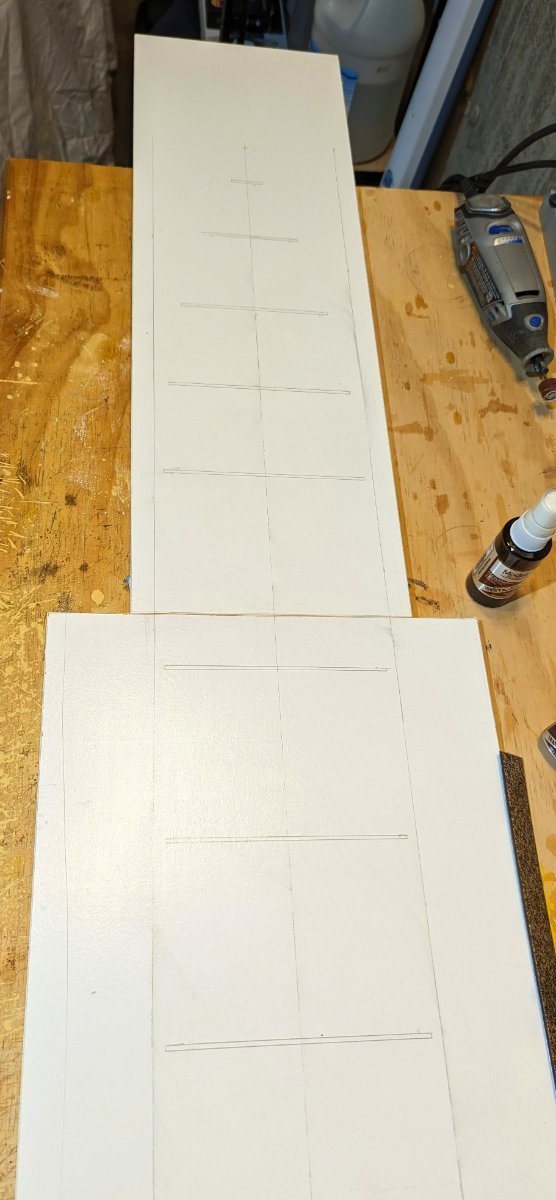
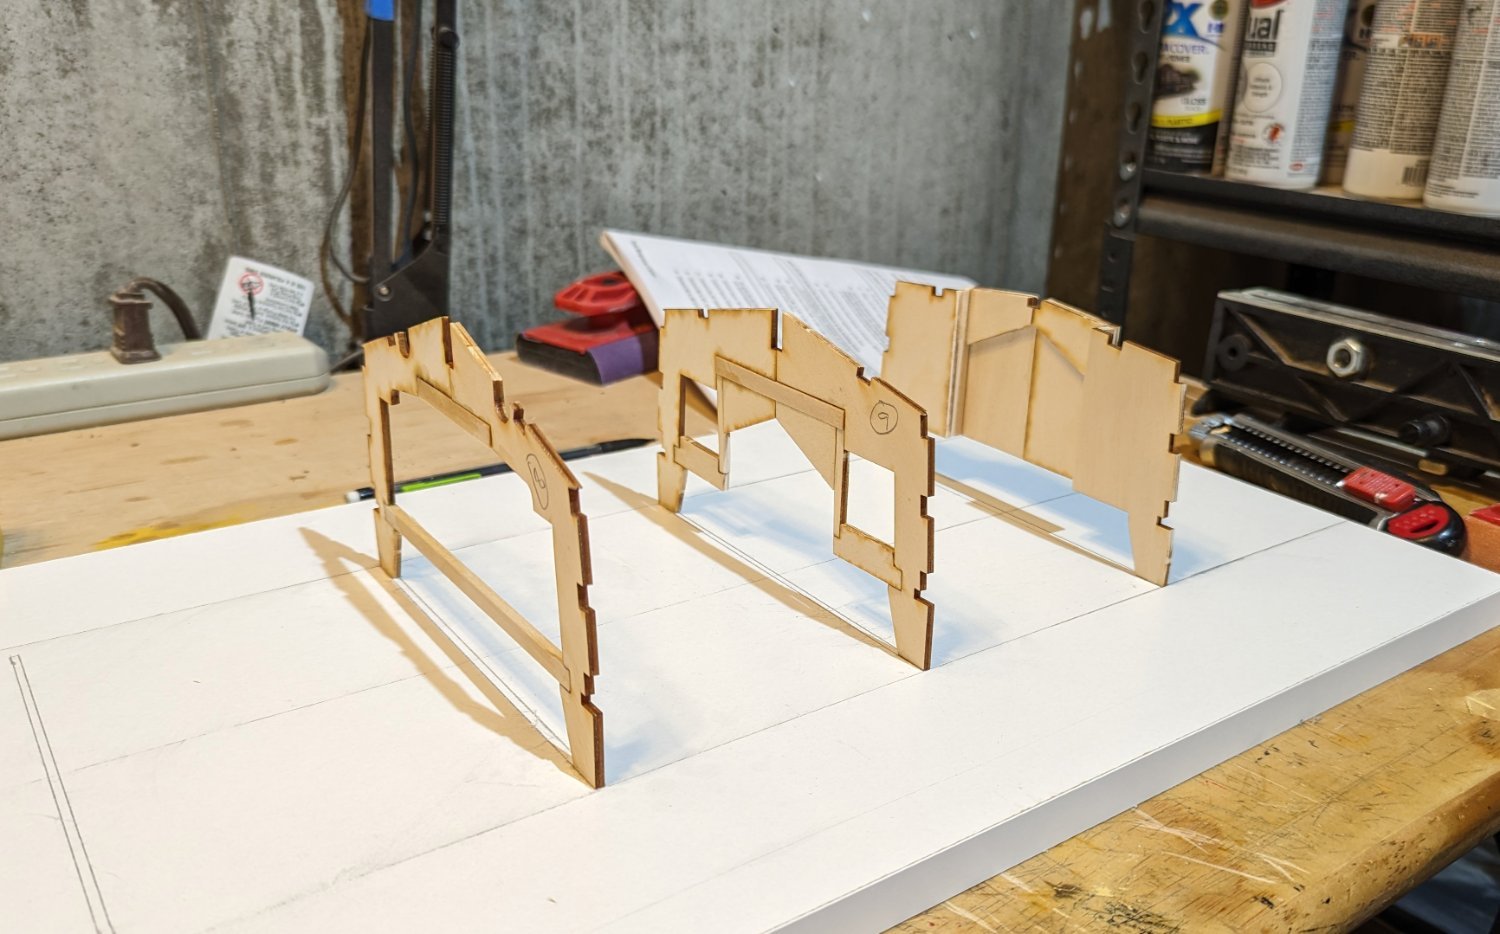
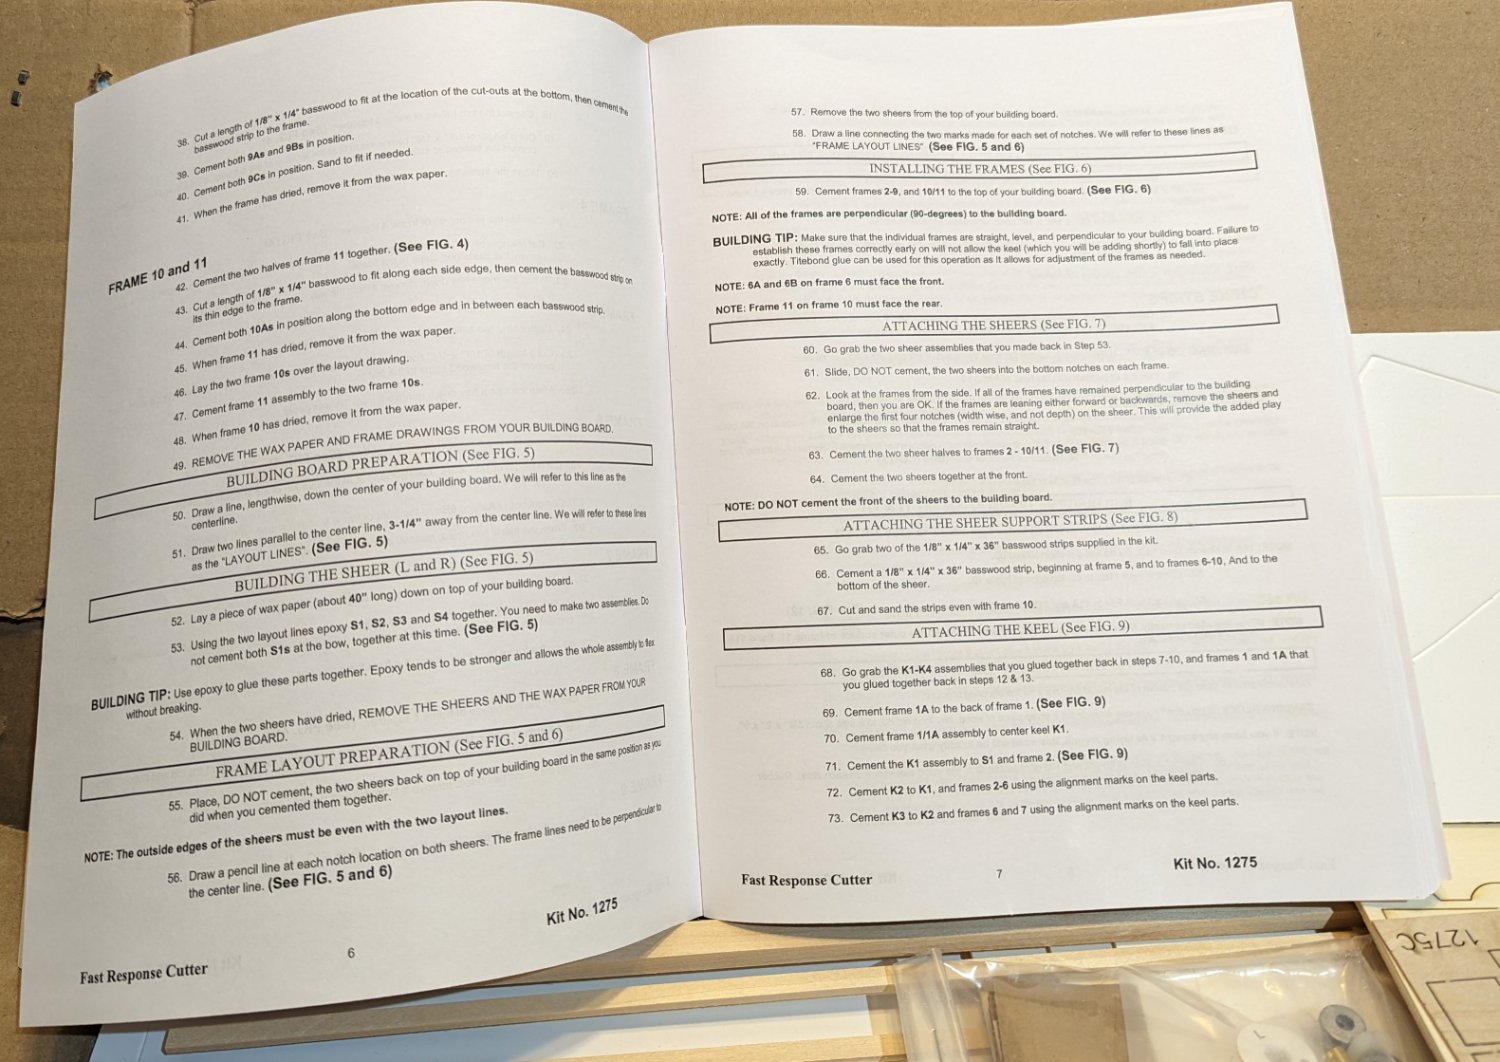
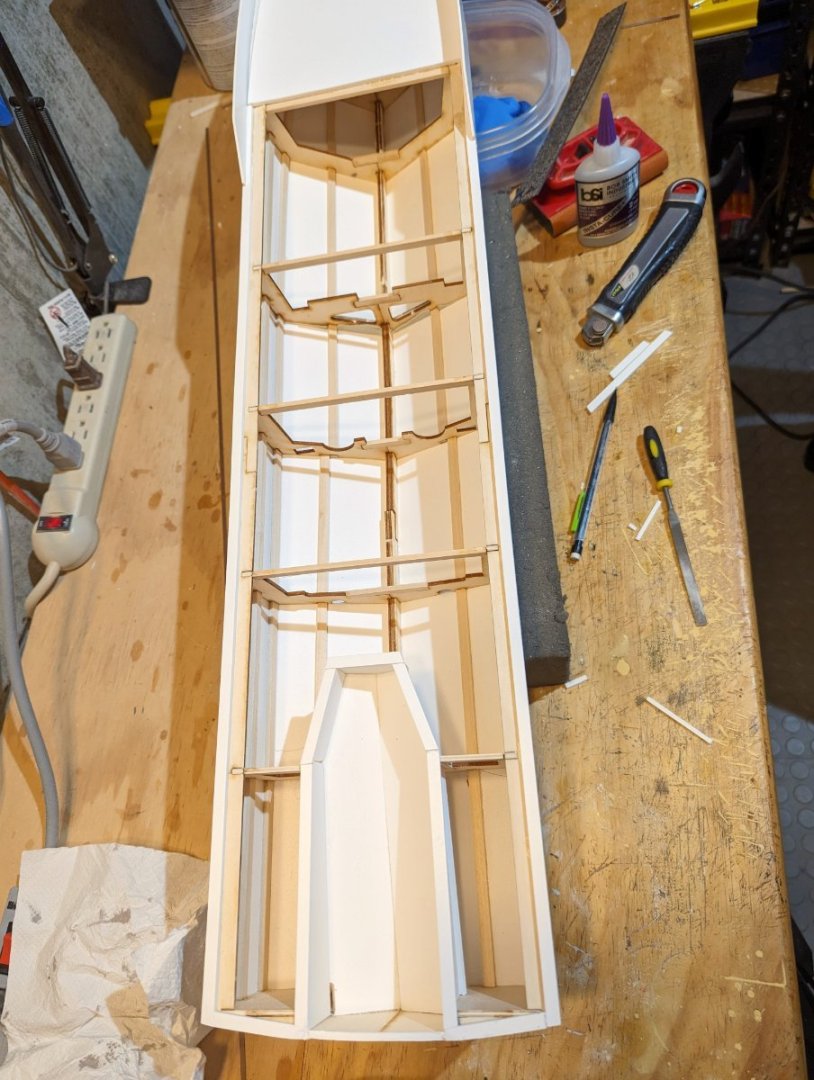
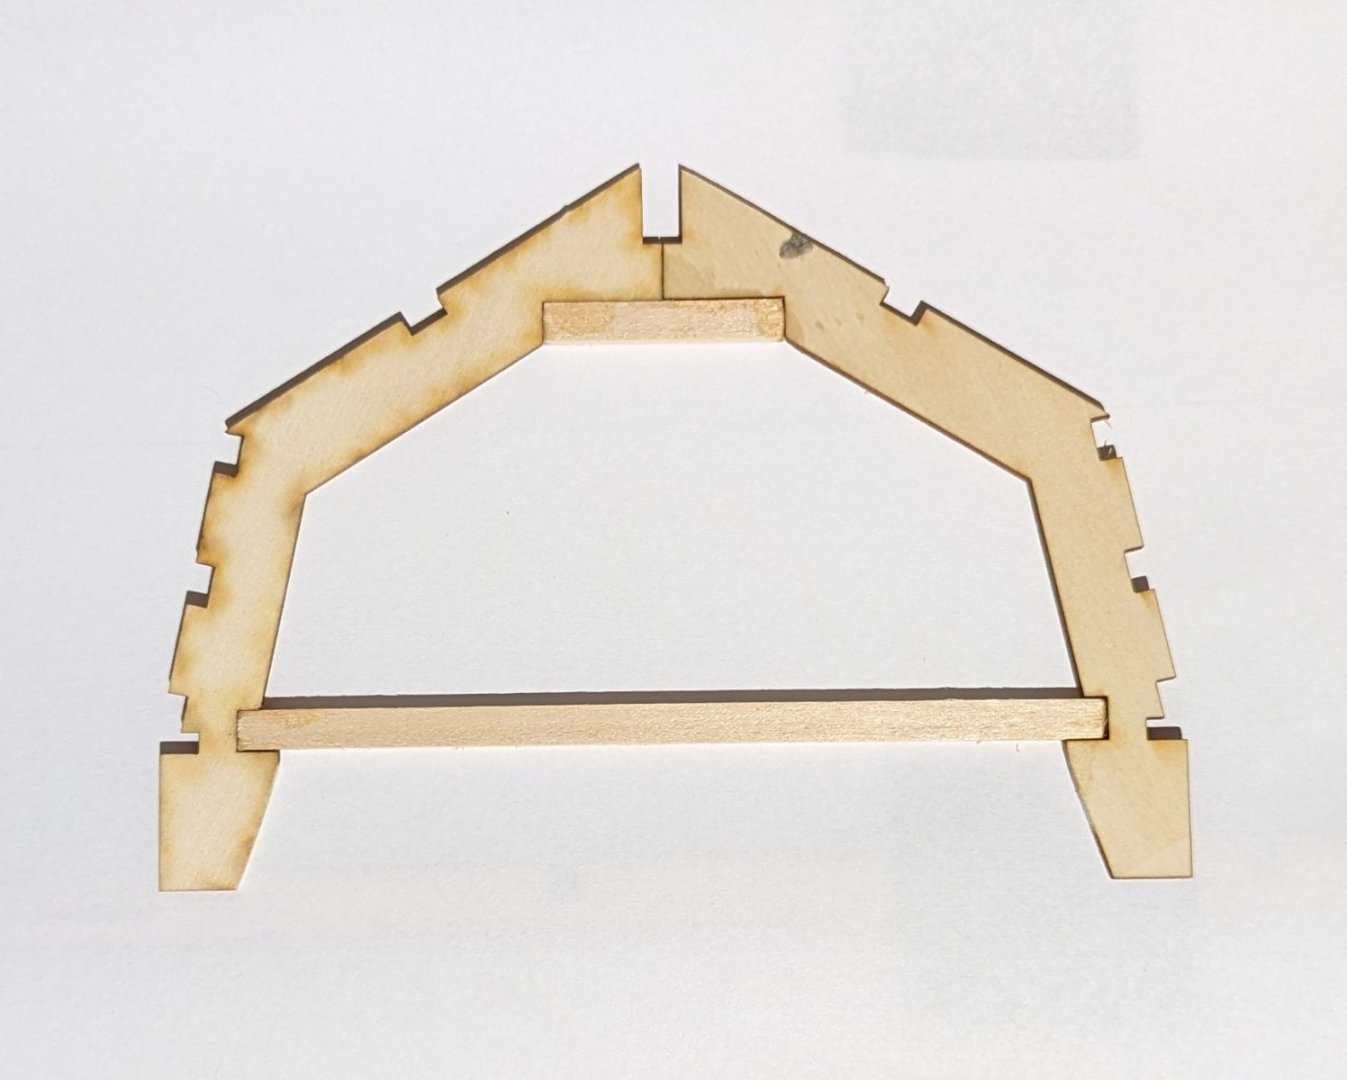
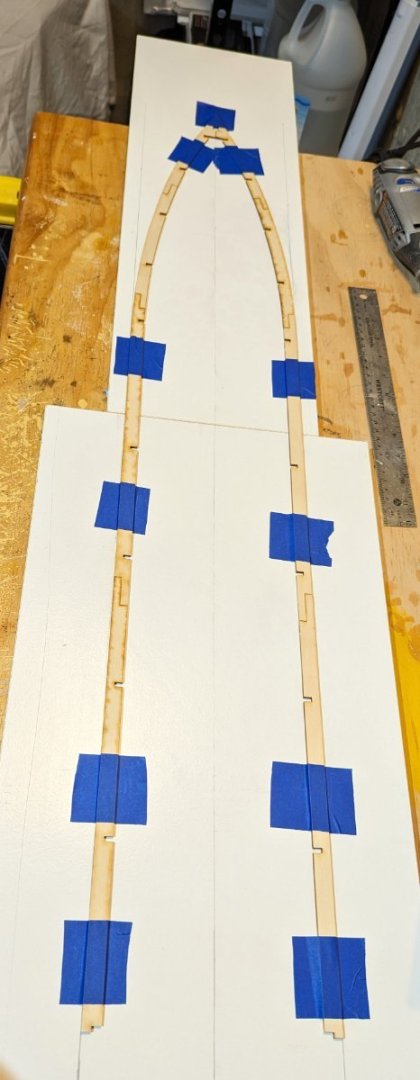
The hull construction on this model is really different from the typical keel and bulkhead structure of plank-on-bulkhead ships, and I thought it might be interesting to describe it. You have to come up with a "building board" that's at least 40" long. I used two spare melamine shelves that I attached end-to-end. I'll repurpose the smaller one as the base once I'm done with the board. You mark the building board with measured lines. Then you build the frames from mirror image pieces buttressed with wood strips. One pictured here. What are called "sheers" are assembled (4 pieces to a side) and laid out on the measured lines, gluing them once everything lines up. Then I used tape to keep them in place while I marked the positions of the frames. You can see the lines for the frames across the building board. Then you glue the frames to the board -- the rear three are shown below. Yes, glue them (!), and after the hull is built and the PVC sides are on, you knock them loose with a putty knife. Took a lot of care to make sure the frames were dead perpendicular to the board as I glued them on. Used a lot of CA accelerator. Once all the frames are glued on, you slide in the 39" long sheers, and assuming they fit, you glue them. I took a lot of care on the measurements, and so I only had to enlarge two sheer slots on one side to get it all to fit. I was pleasantly surprised at how well everything lined up and came together. Then the keel goes on, and the hull has taken shape. Next step is to add stiffener strips to the hull, and I'll post another picture when that's done. A nice fun change from the more familiar hull building process. Regards, David


- 46 replies
-
- 10
-
-
- Fast Response Cutter
- Dumas
- (and 2 more)
-
Bob: I'm glad you'll be following this -- and I hope I build her in a way that honors your USCG memories. I'm going to build it as a static model. Regards, David
- 46 replies
-
- 4
-
-
- Fast Response Cutter
- Dumas
- (and 2 more)
-
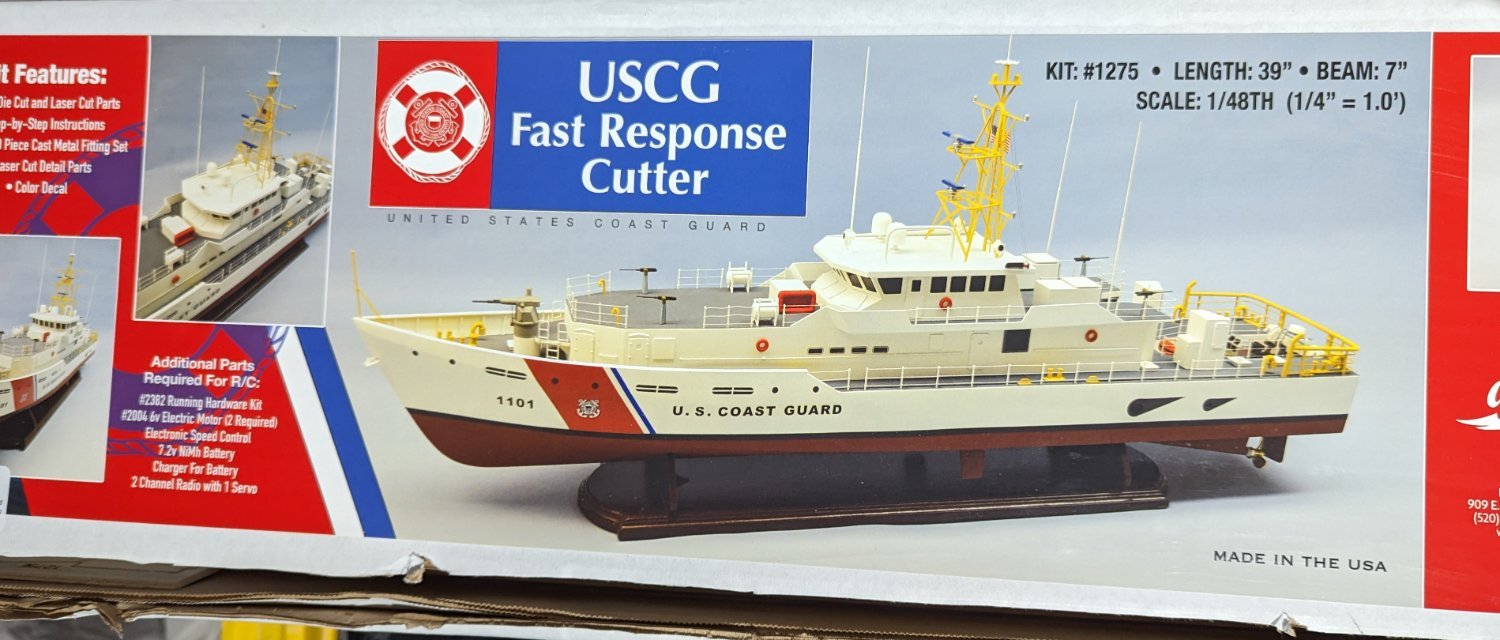
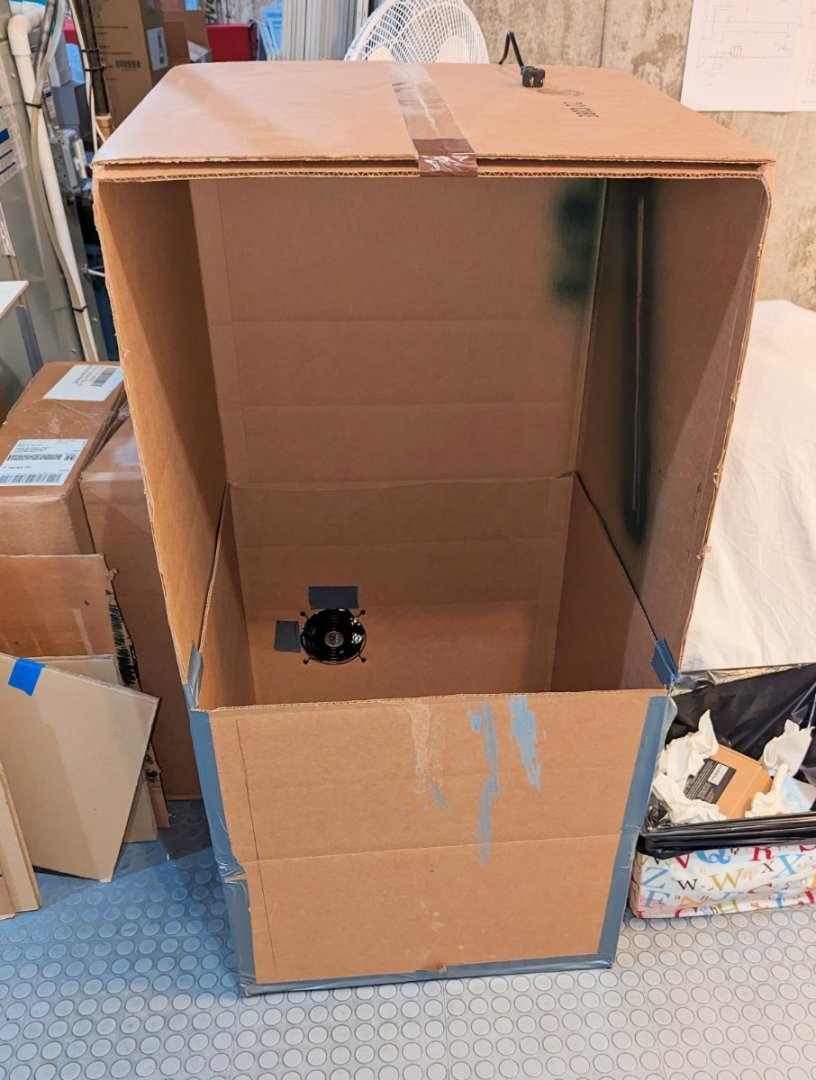
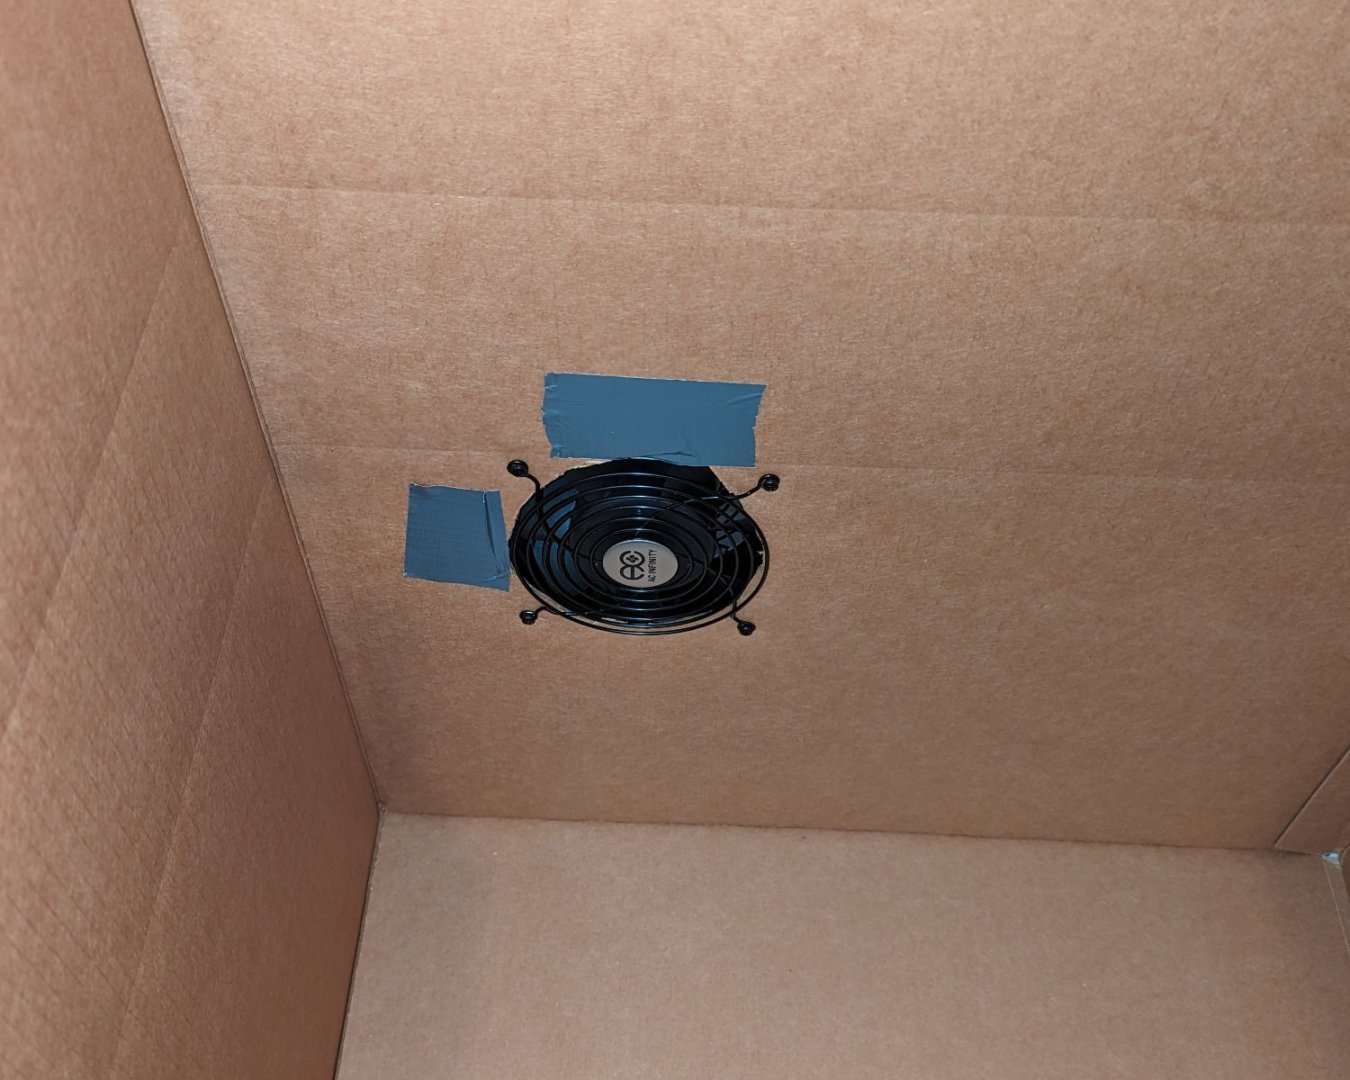
After finishing my 2+ year HMS Victory project, I had planned to take some time off from modeling and pick up again when I returned from a vacation trip in mid-September. But I find myself getting antsy for a project, so here goes . . . I picked this model because I wanted something simpler after the complexity of Victory -- and something without ratlines! This is a Dumas model, and based on a couple of other Dumas kits I've built, it will require something of a mental shift from the construction of European kits: First and foremost, everything is in inches! The hull is expanded PVC over a wood frame Dumas uses styrene strips for some finish items where other kits would use wood I've included some "what's in the box" pictures. You can see one of the PVC sheets. Also some pictures of the manual and accompanying drawings. Dumas has really excellent detailed instructions with step-by-step drawings. Finally, looking at this kit and also looking forward in the instructions for the Amati Bismarck, which will be my next model after this, I've realized that I'm going to have to do some spray painting. I have developed an aversion to spraying because it's too cold here in the winter to do it someplace like the garage, and the "backspray" mist gets all over everything in my workshop. So I built the "spray booth" shown here (it's on its side in the pictures), with a small fan installed in the rear. I've tested it, and if you put a piece of tissue over the fan, it acts as a filter and the fan draws out the spray mist. We'll see how it works in practice. Now on to the kit. For anyone who follows, hope you enjoy this one. Regards, David


- 46 replies
-
- 8
-
-
- Fast Response Cutter
- Dumas
- (and 2 more)
-
Thanks for the good words, Bob.
-
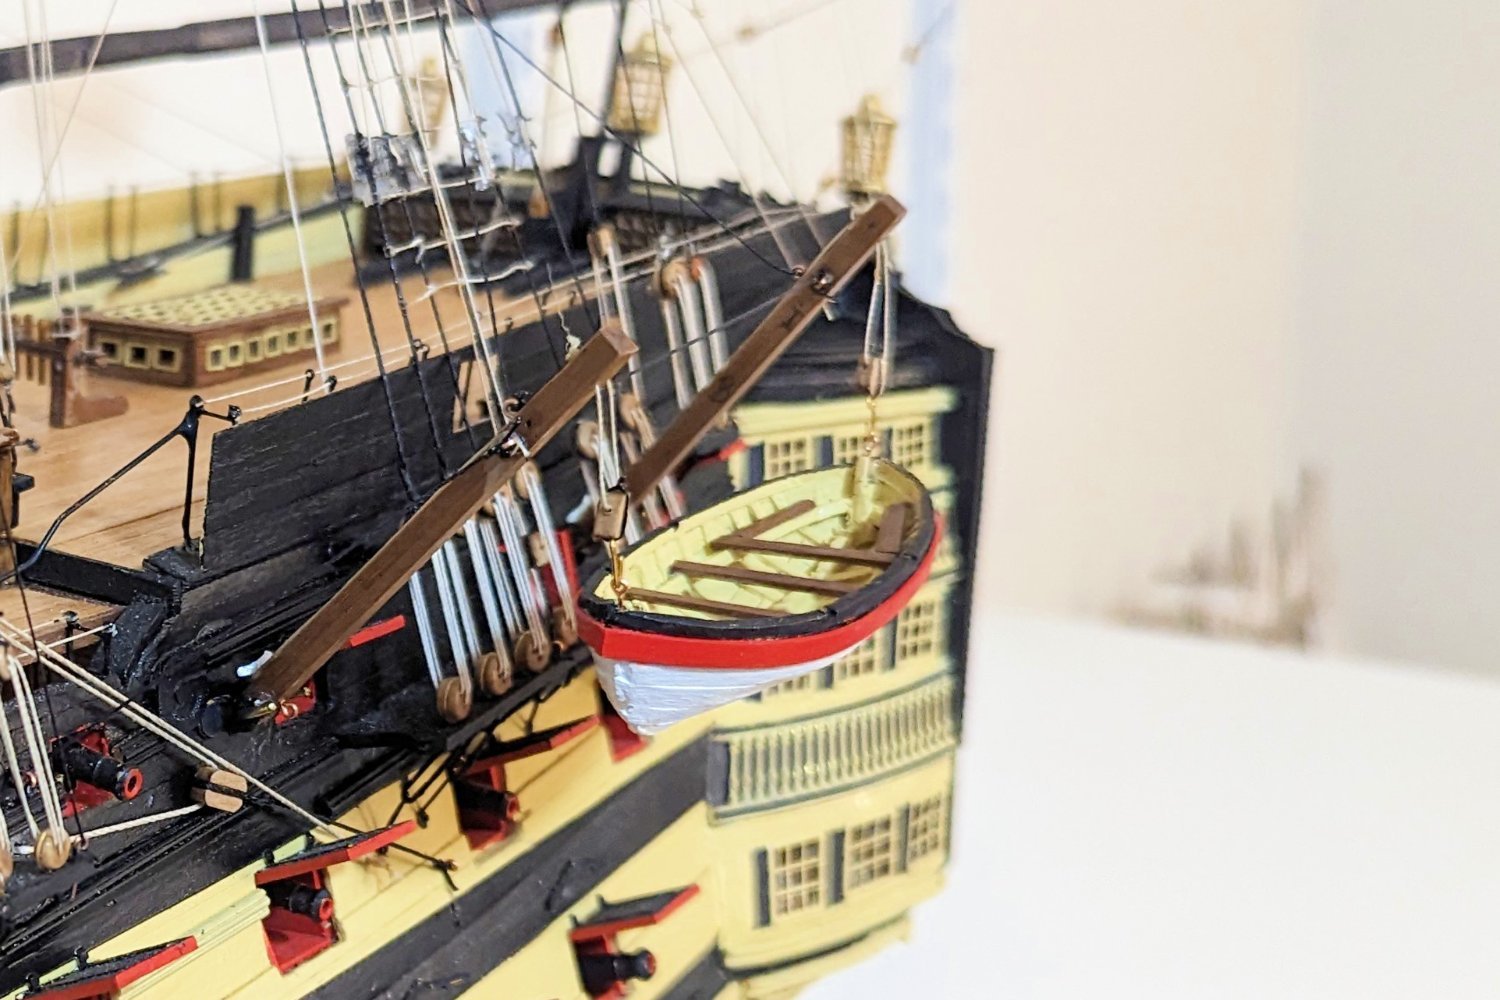
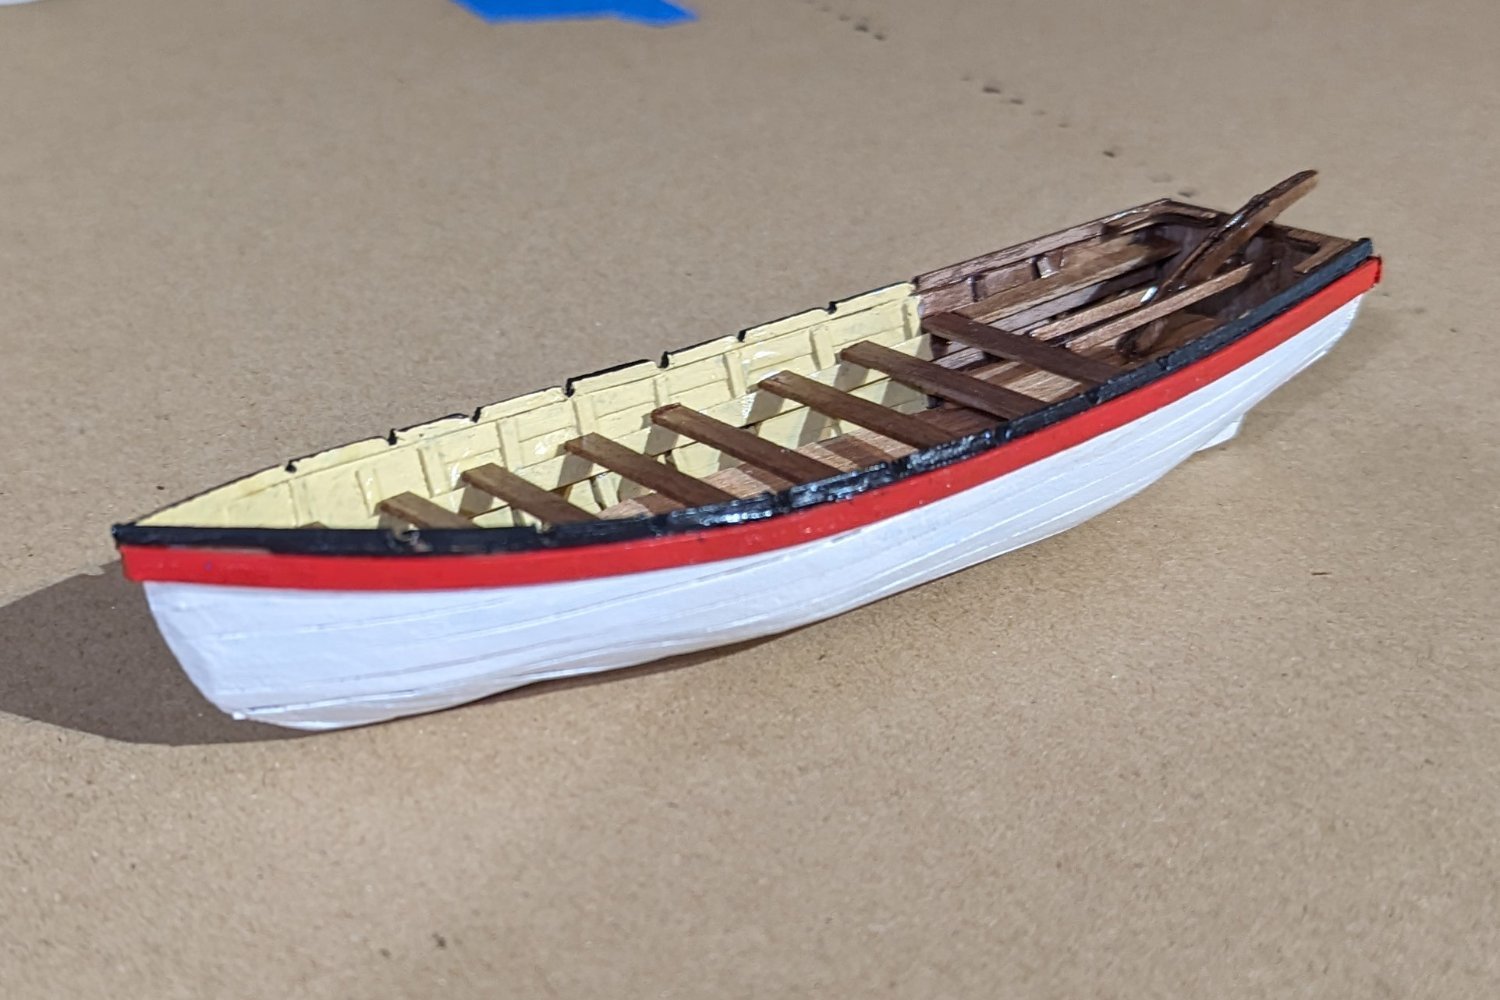
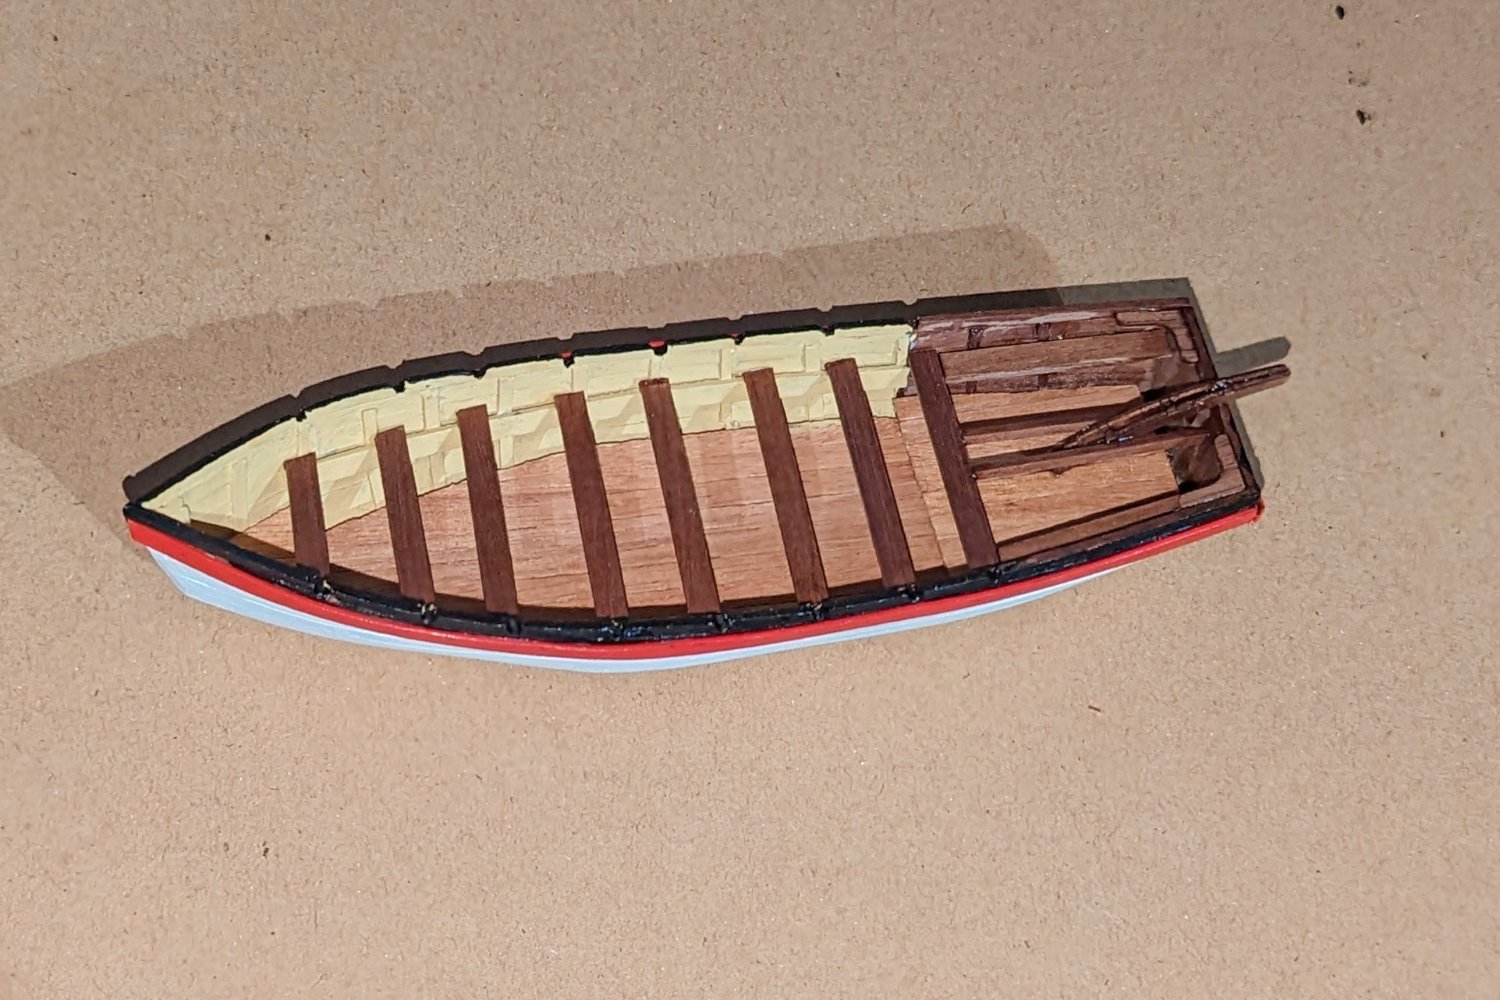
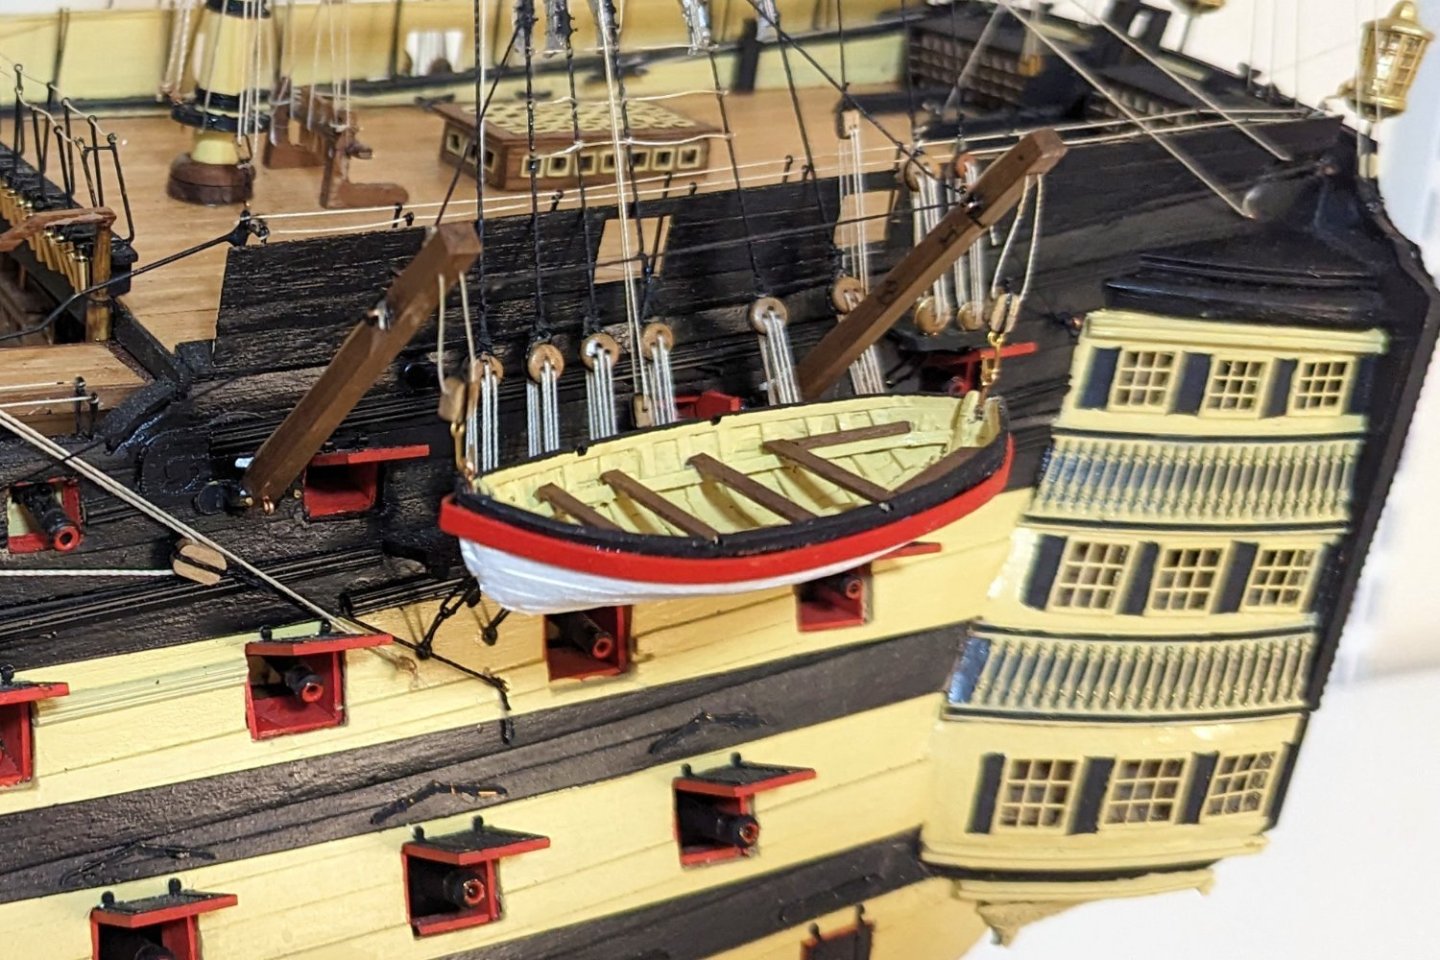
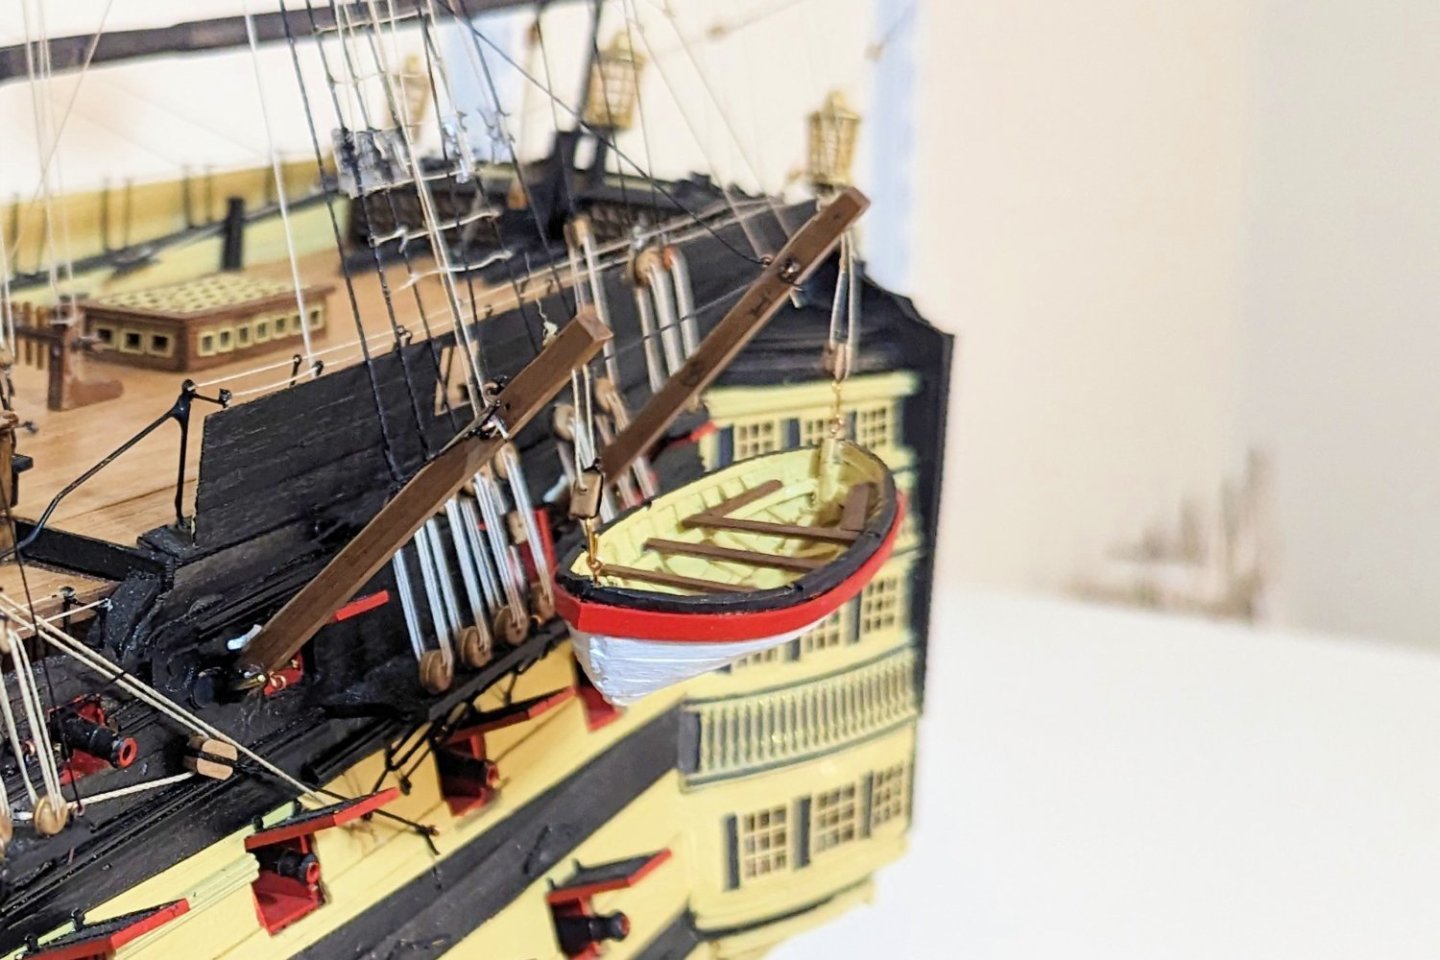
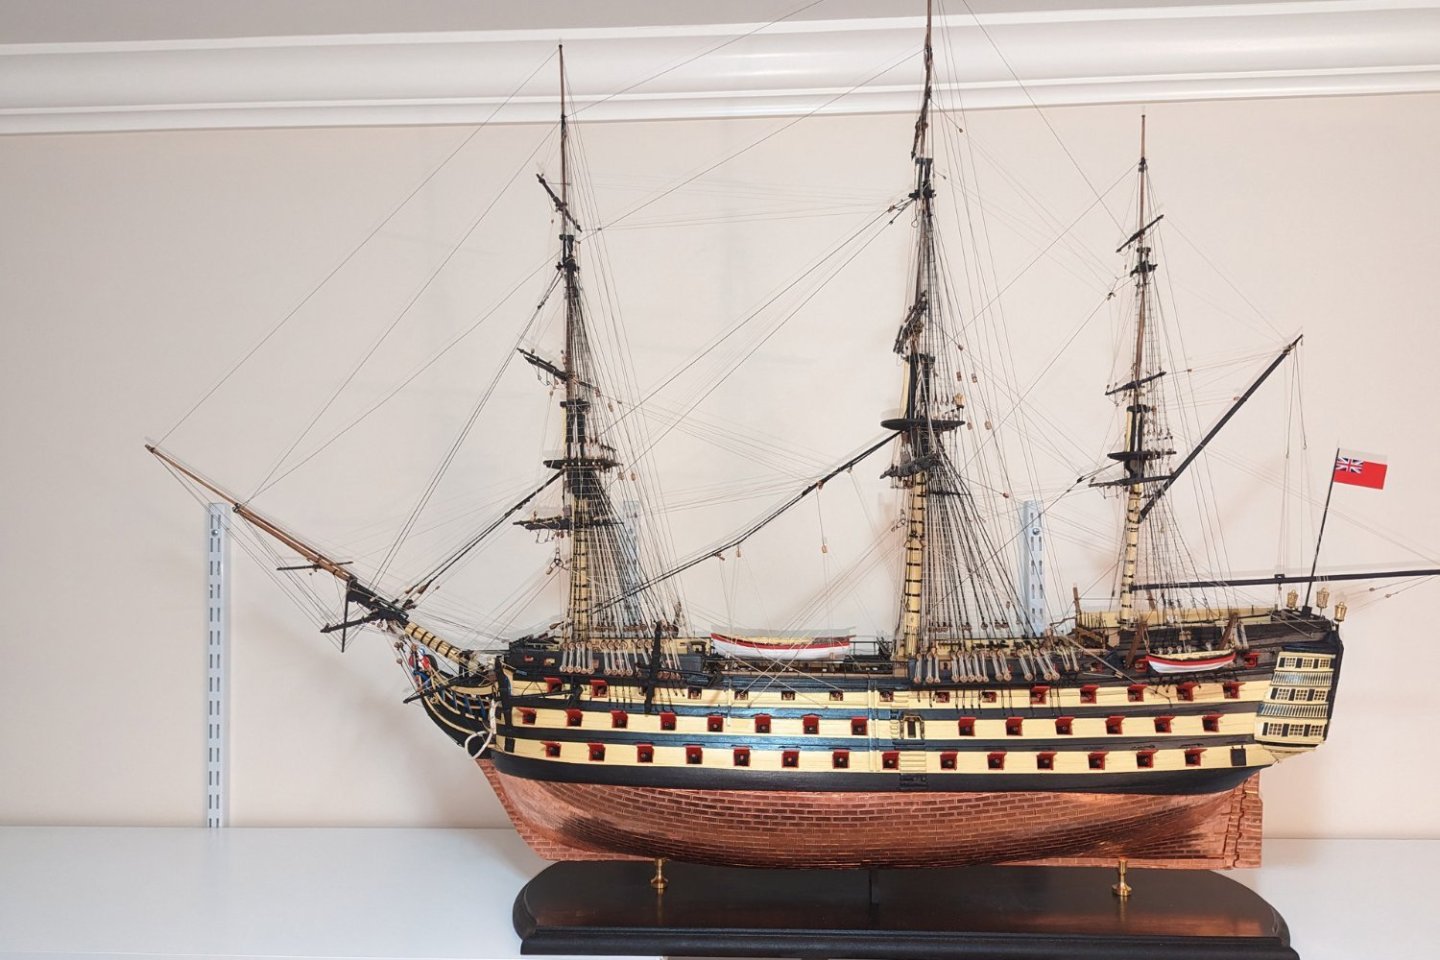
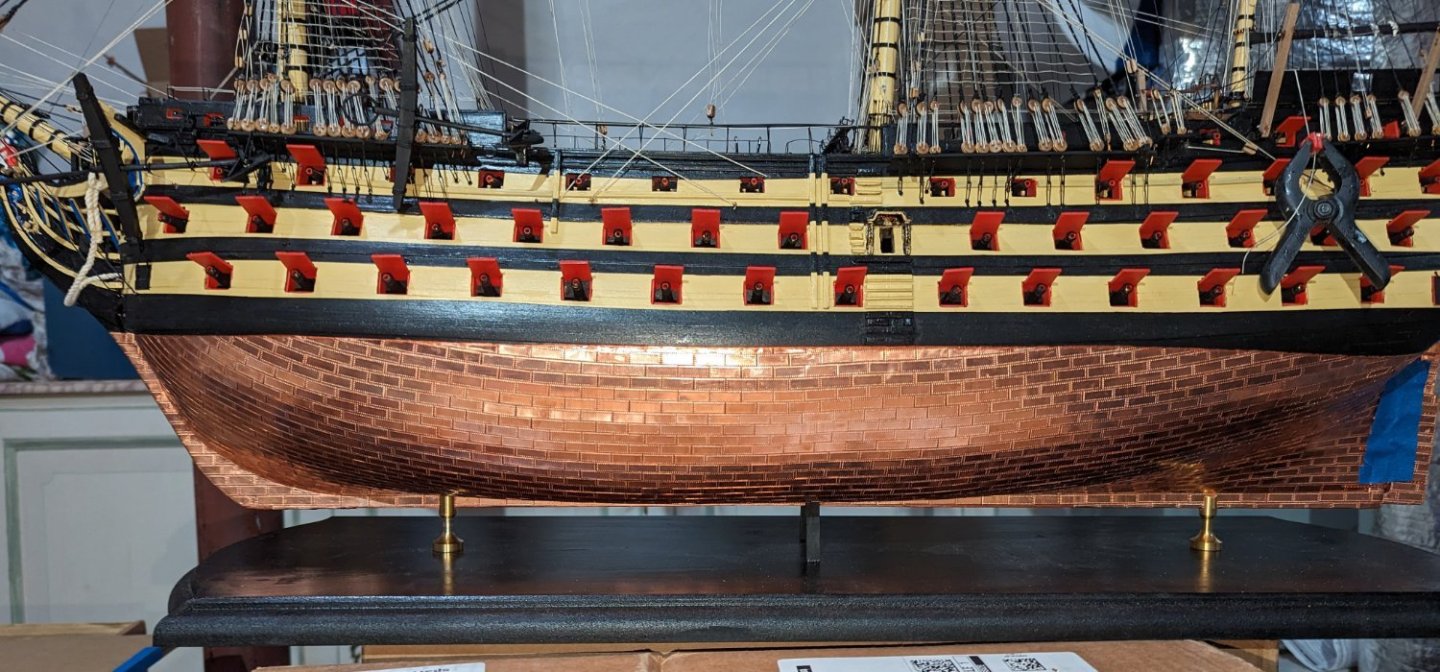
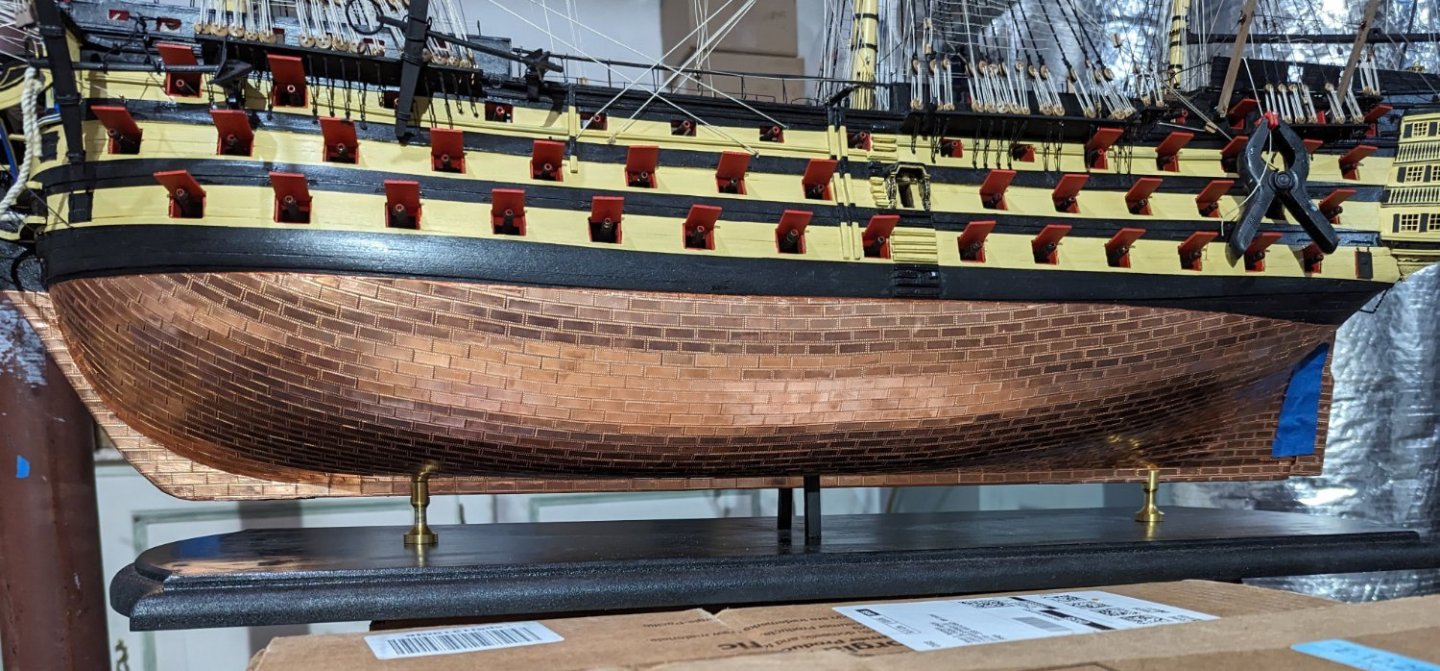
FINISHED! My 2 year one month build is finally done. The last step was building the cutter and mounting it on the rear quarter davits. Pictures of that here, plus one full view of the ship. A set of completion pictures with different views of the model is posted in the gallery of kit-built models. Thanks to all of you who came along for the ride -- I appreciated the support. Regards, David
- 218 replies
-
- 13
-
-

-
- Victory
- Caldercraft
- (and 1 more)
-
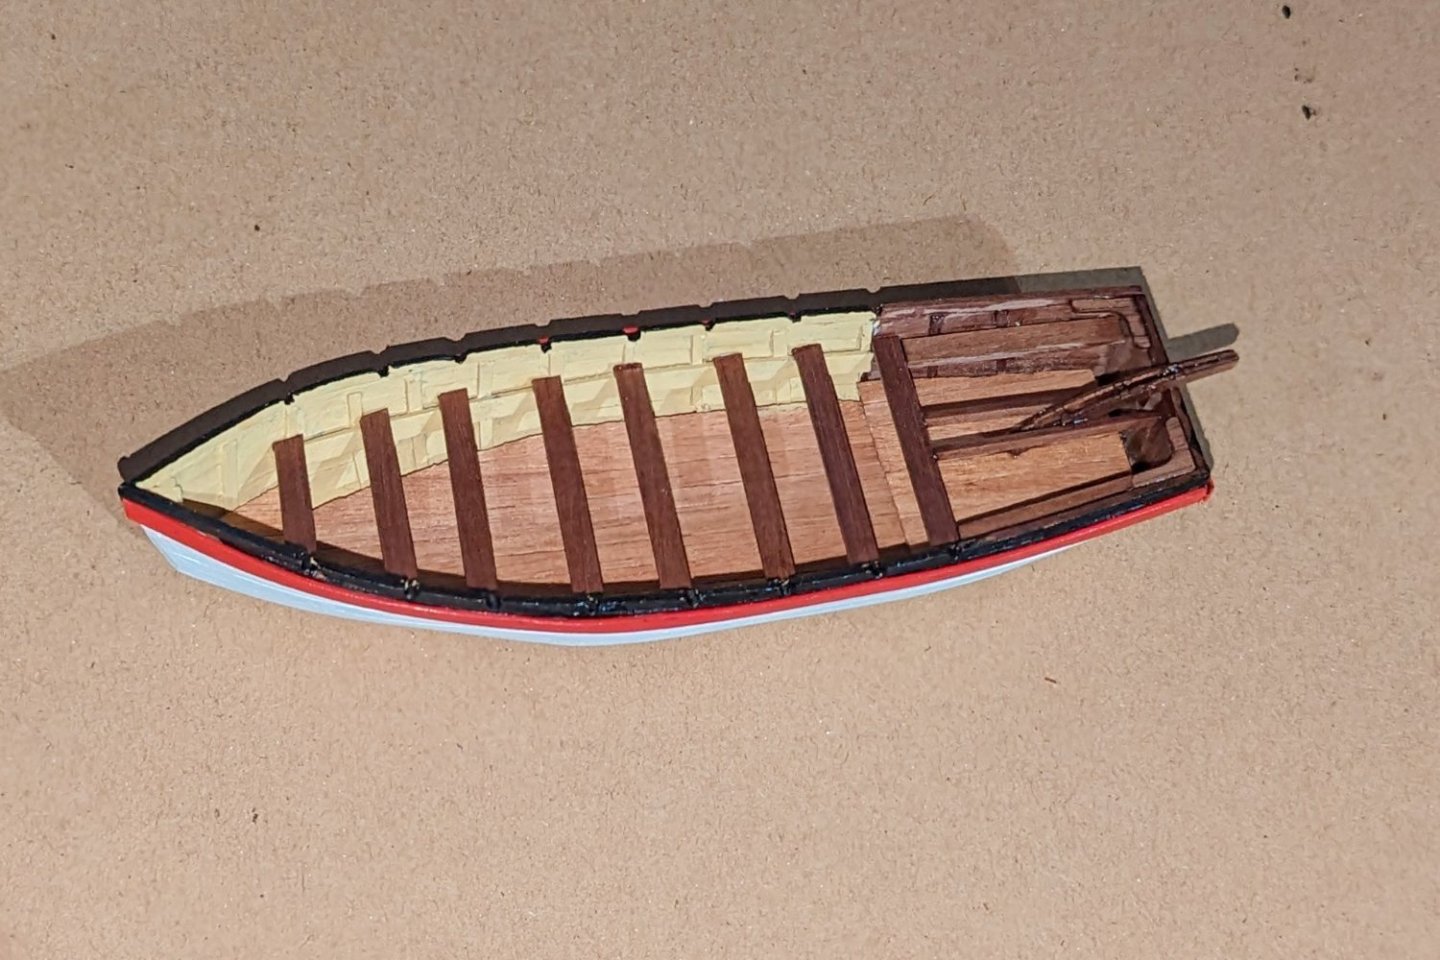
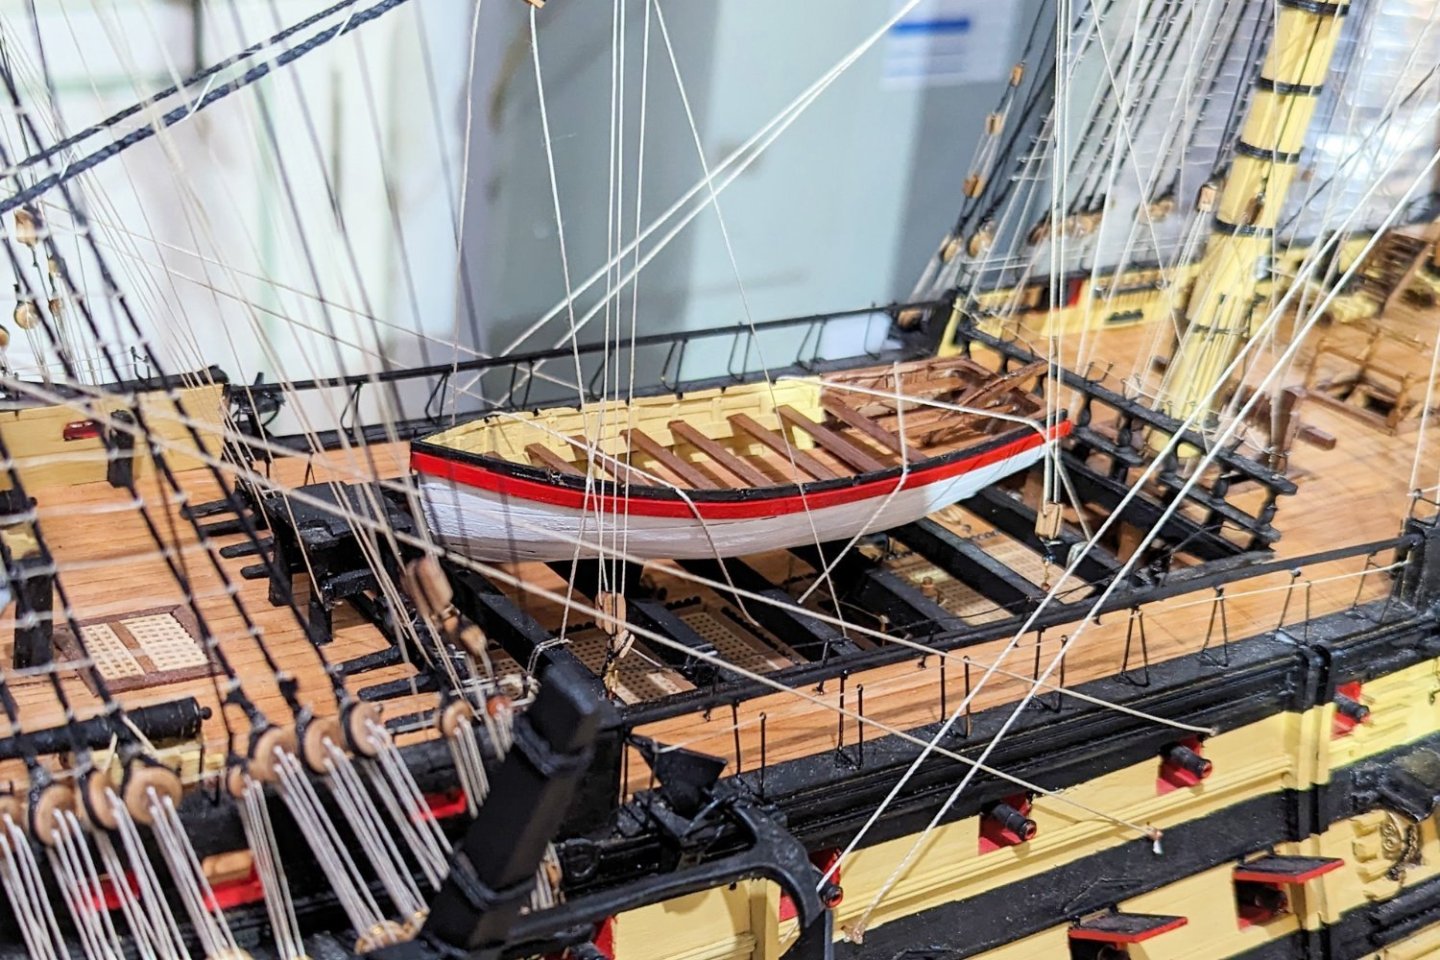
I have built the largest of the four small boats that come with the kit -- the launch. Took me about a week. The boat is double-planked, and even though it's small, the planks are small too so it takes some time. I took a few liberties vs. the instructions: I used 1 x 4 maple for the flooring vs. the .5 x 3 walnut that was called for. My original reason was a concern about having enough .05 x 3 strips to do all four boats, but as time passed that became moot (see below). Actually, I kind of like the contrast. I bypassed the winch, which in the pictures of the boat makes it look kind of messy to my eye, so I just left it off. I'm all for visual appeal vs. historical accuracy. The instructions call for the gunwale to be yellow, but I used red to give some "snap" to the look of the launch. I left out the oars, which didn't paint well, and the rudder piece, which is supposed to be stored in the boat when not in use -- and I just didn't want to junk it up. Pulling back to the boats overall -- I have decided to just build one more, the cutter. It's a perfect size to fit on the rear davits, and I want to hang a boat off those davits on the "display" side. In addition, if you build the launch, barge and pinnace, when you mount them on the skid beams side by side, you obscure all the nice detail below. I kind of like the look of just one boat on the skid beams, so I mounted the launch, finished positioning the hoists, and that's what you see here. Regards, David

- 218 replies
-
- 4
-
-
- Victory
- Caldercraft
- (and 1 more)
-
Thanks, Zappto
-
Thanks, Bob
-
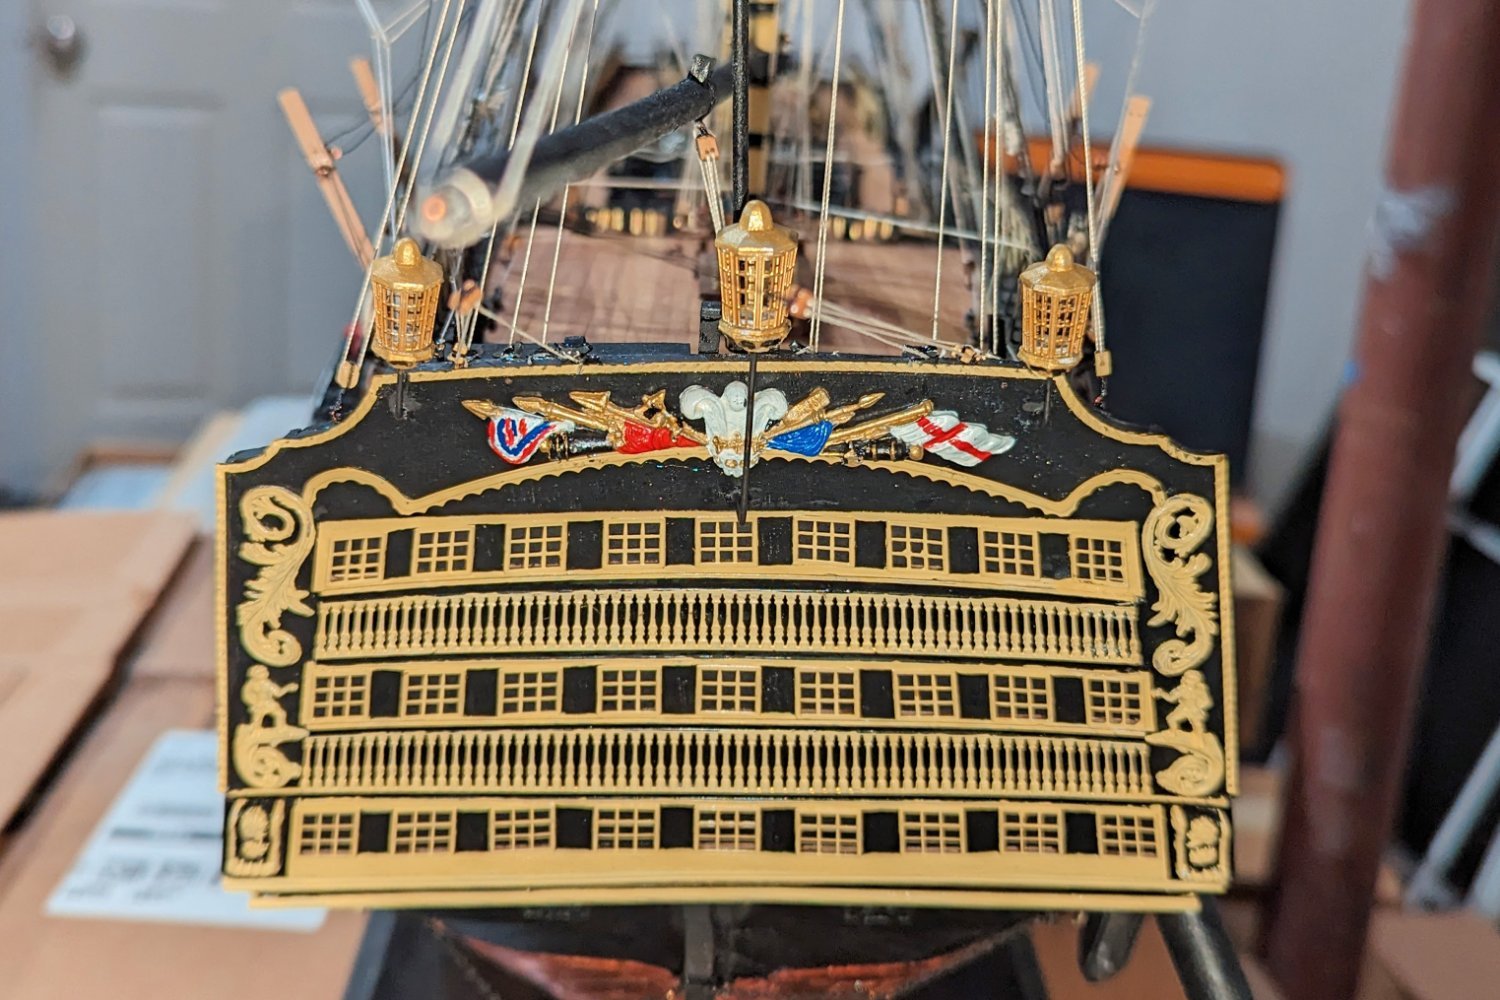
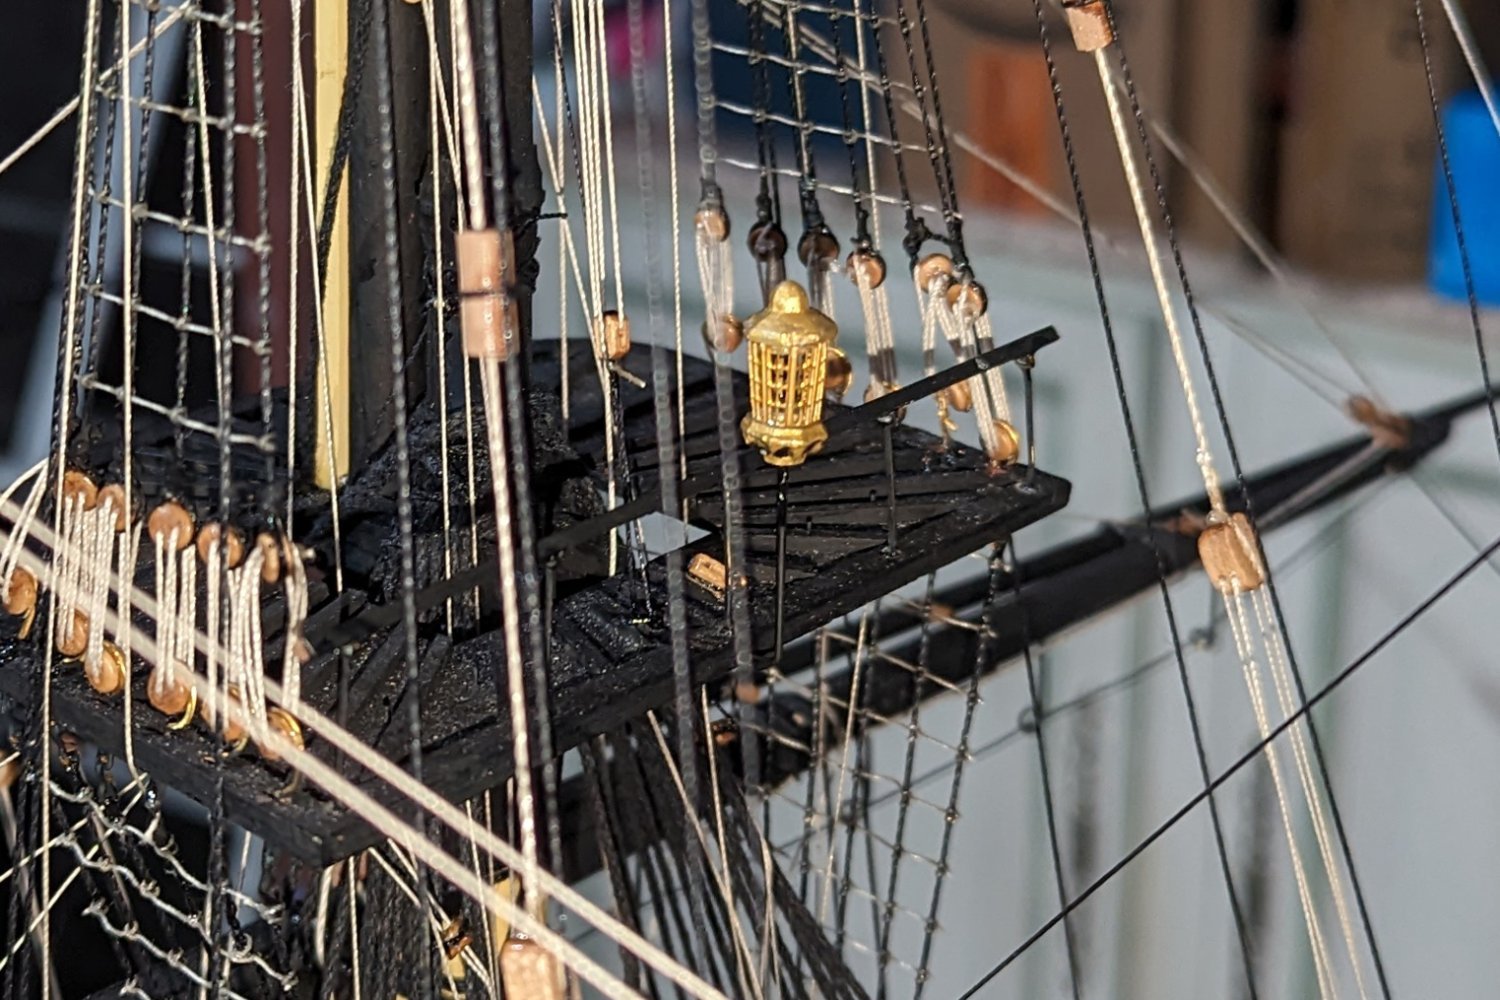
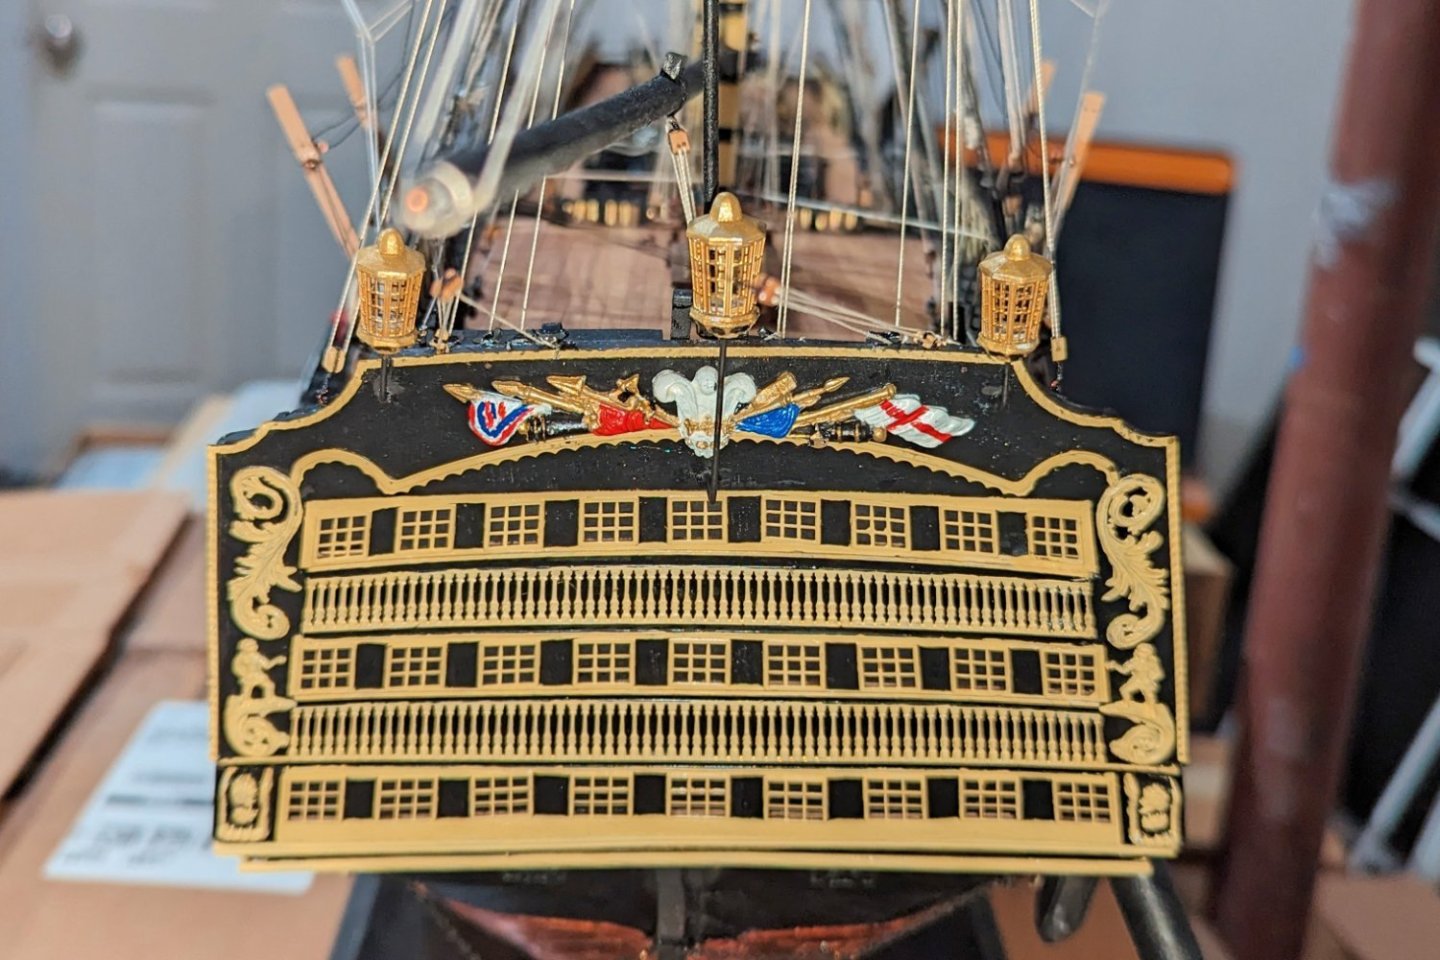
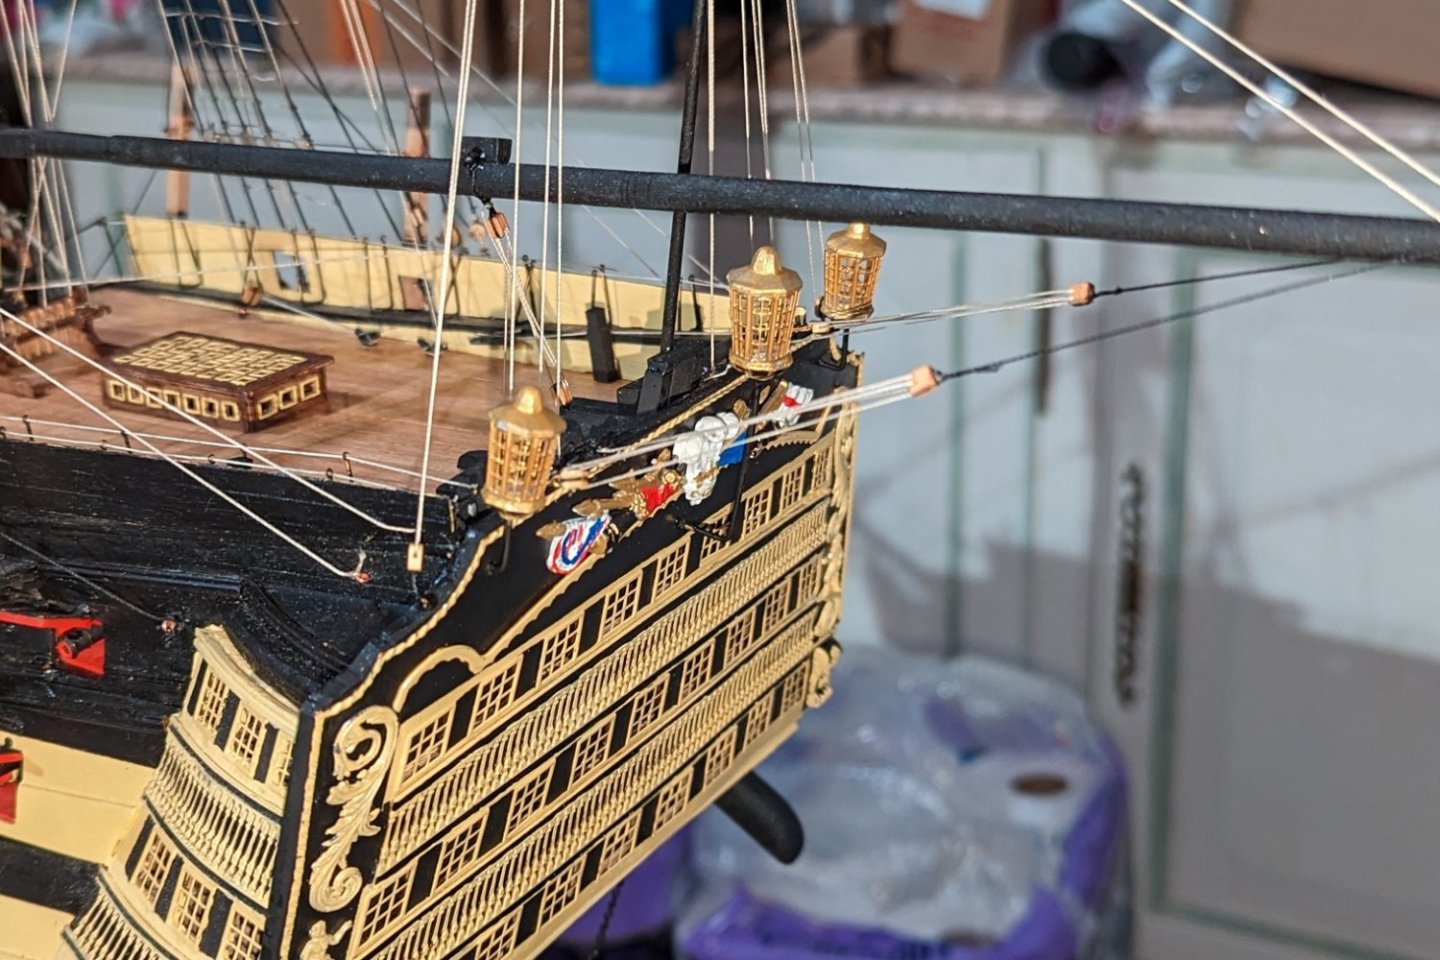
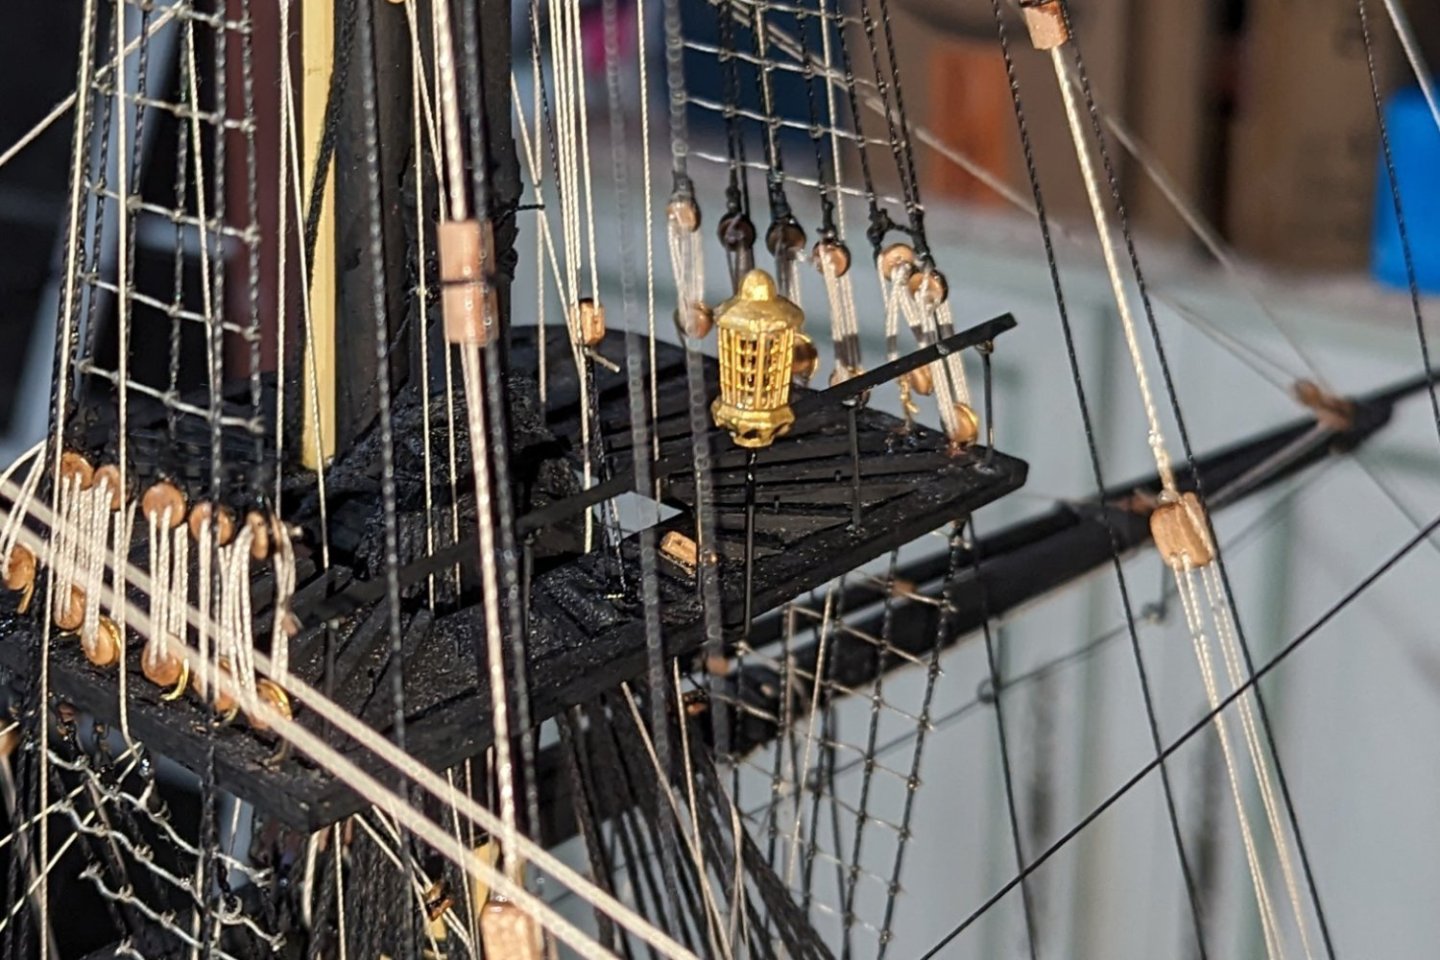
Something of a milestone here. I haven't finished the project yet, but I have finished all of the work on the ship itself (except for adjusting the davits). What remains is building the four small boats. I started this ship in June, 2021 -- so at 2 years one month (and not yet quite finished) this is my longest build. Pictures below show the stern and main mast lanterns. I also got the ship off of the temporary cradle and onto brass mounting columns. But it's a really HEAVY ship, and had too much lateral sway, so I added two small wood columns under the hull and now it's solid as a rock. A couple of pictures below showing that. Regards, David
- 218 replies
-
- 13
-
-
-
- Victory
- Caldercraft
- (and 1 more)
-
No, I looked all over. And even weirder now that I see your totally logical two sheets of four. Regards, David
- 218 replies
-
- 1
-

-
- Victory
- Caldercraft
- (and 1 more)
-
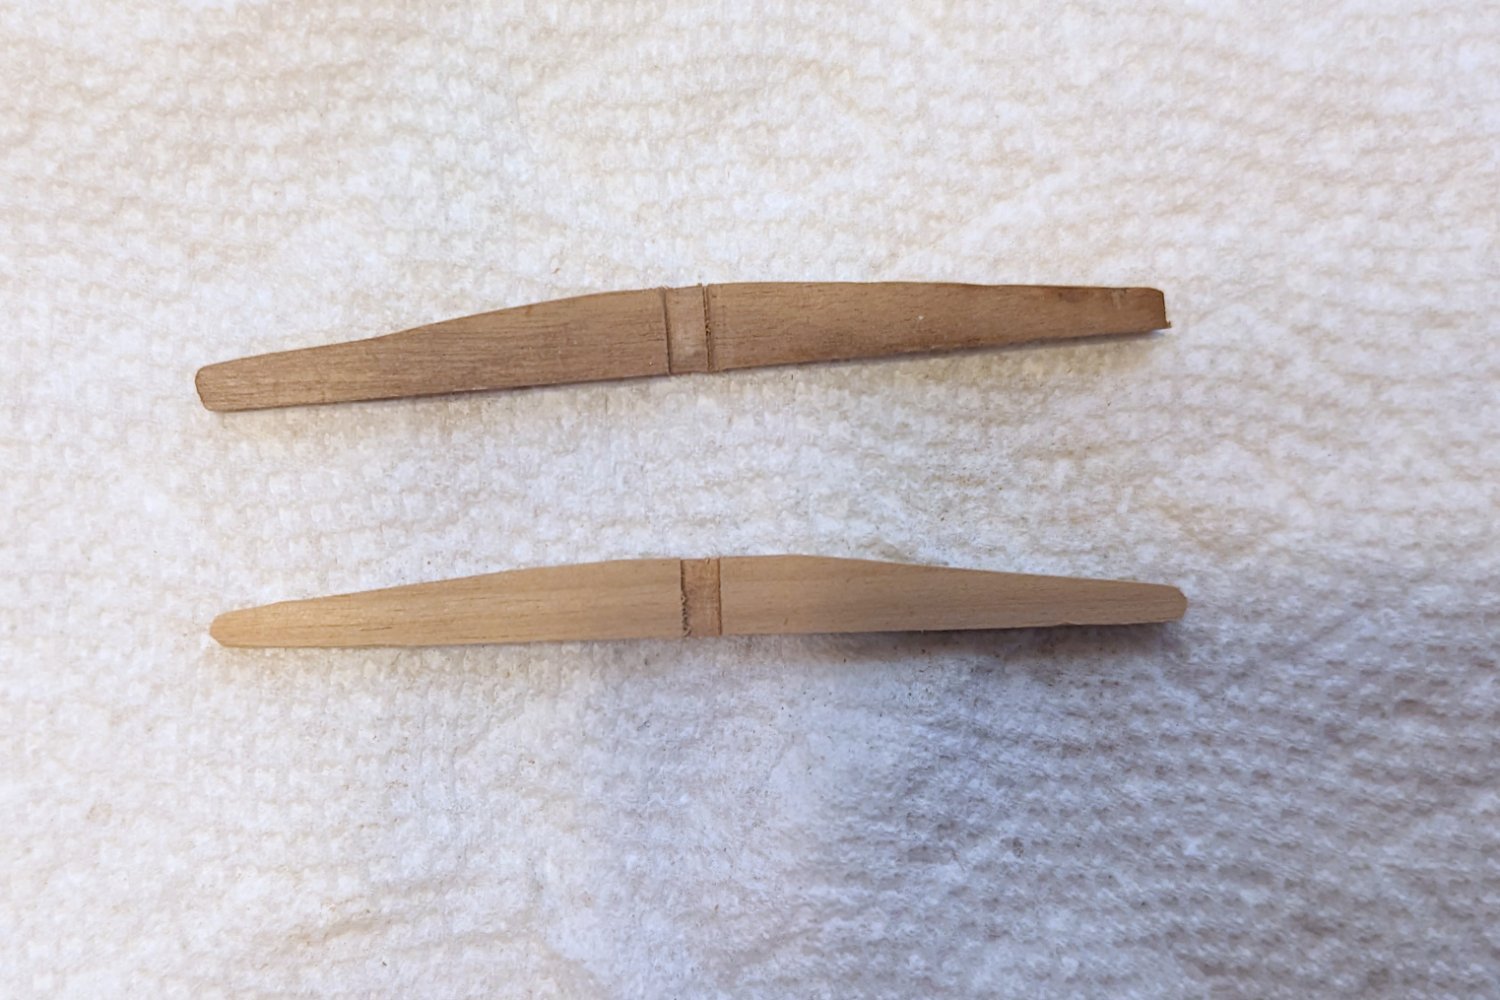
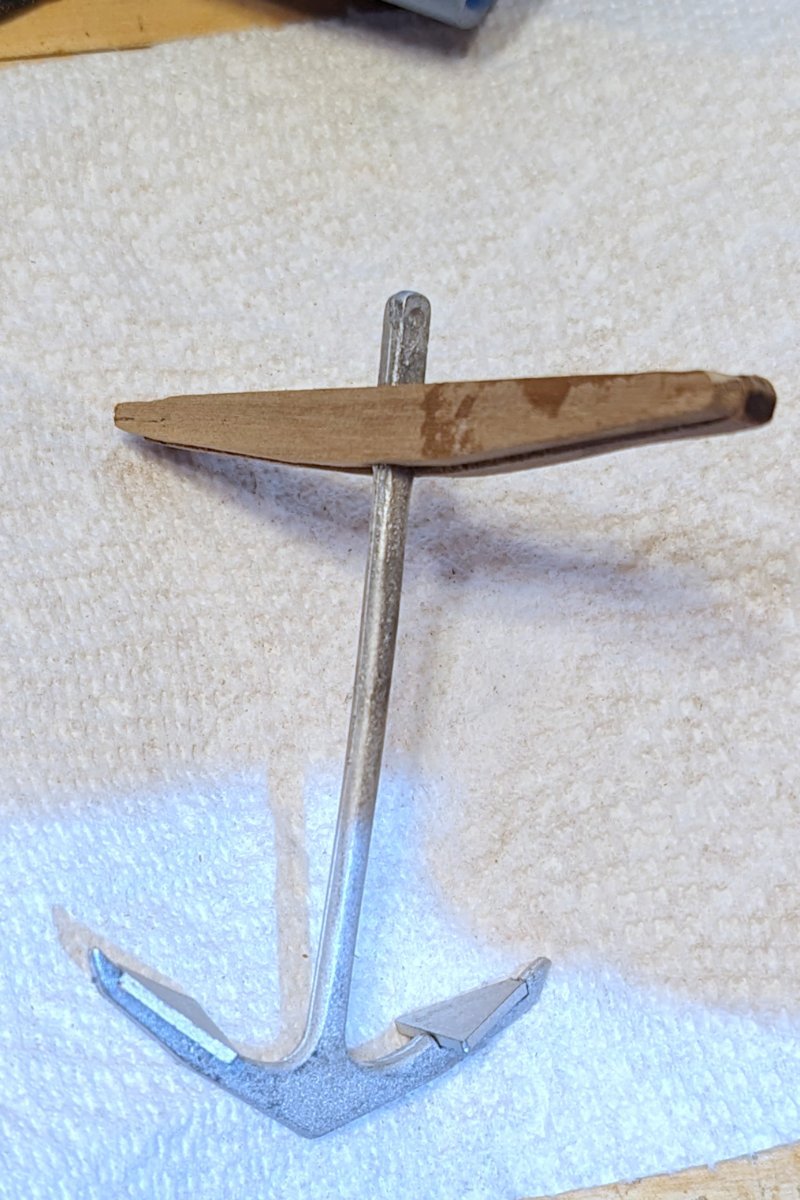
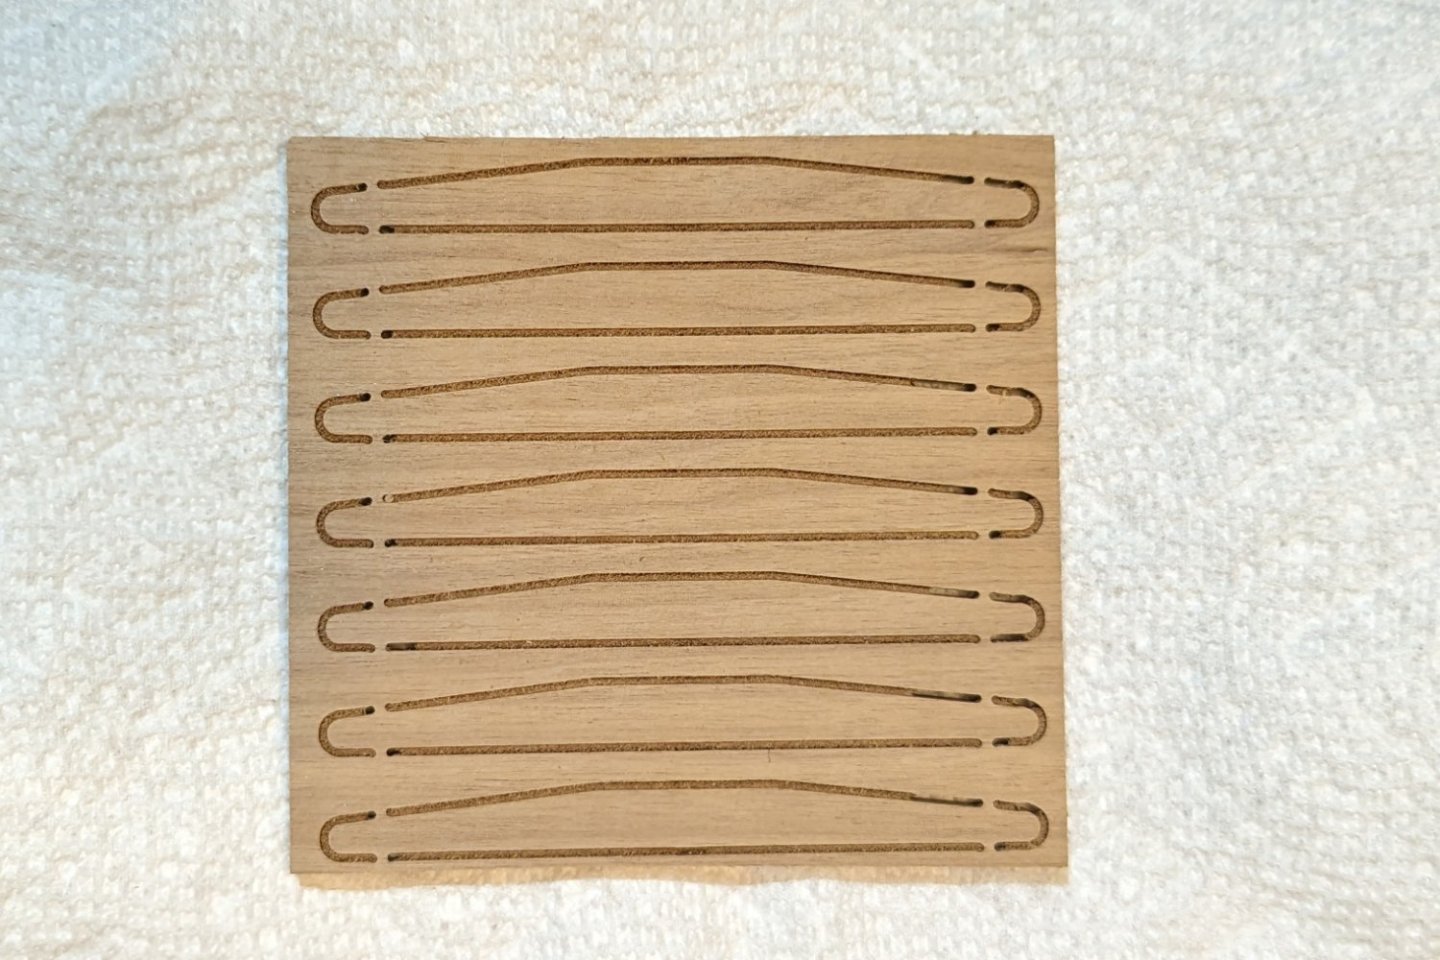
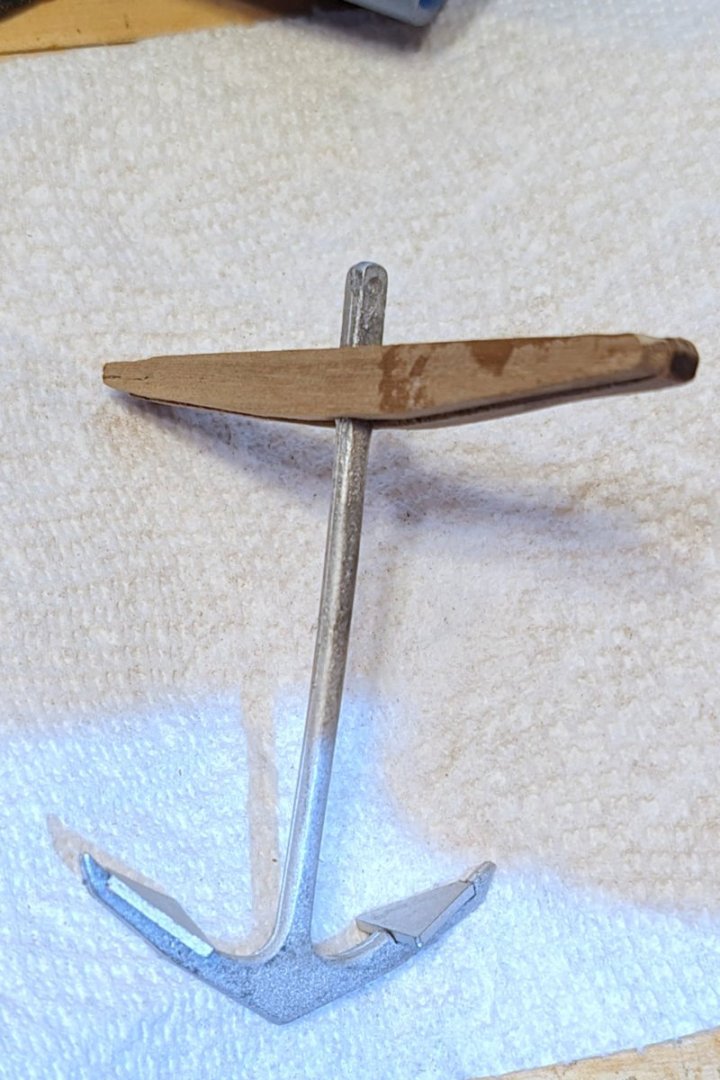
Something odd in my kit. When I went to get the anchor stocks -- 8 needed -- there were only 7 in the wood sheet. There isn't an eighth anywhere. The parts book says 8. But curiously, there is no drawing of that wood sheet in the book. If you look below, you will see a finished sheet with even sides and only 7 stock halves. Really, really odd. So I had to make one, which I did out of a scrap piece of the 5mm walnut sheet, sanded down to 4mm thick and then shaped. I have since sanded the mounted stocks you see below, and now have painted them black (no picture here of that), and you can't tell which one has the handmade stock. So all's well that ends well -- but really odd with that finished sheet and missing one stock. Regards, David

- 218 replies
-
- 5
-
-
- Victory
- Caldercraft
- (and 1 more)
-
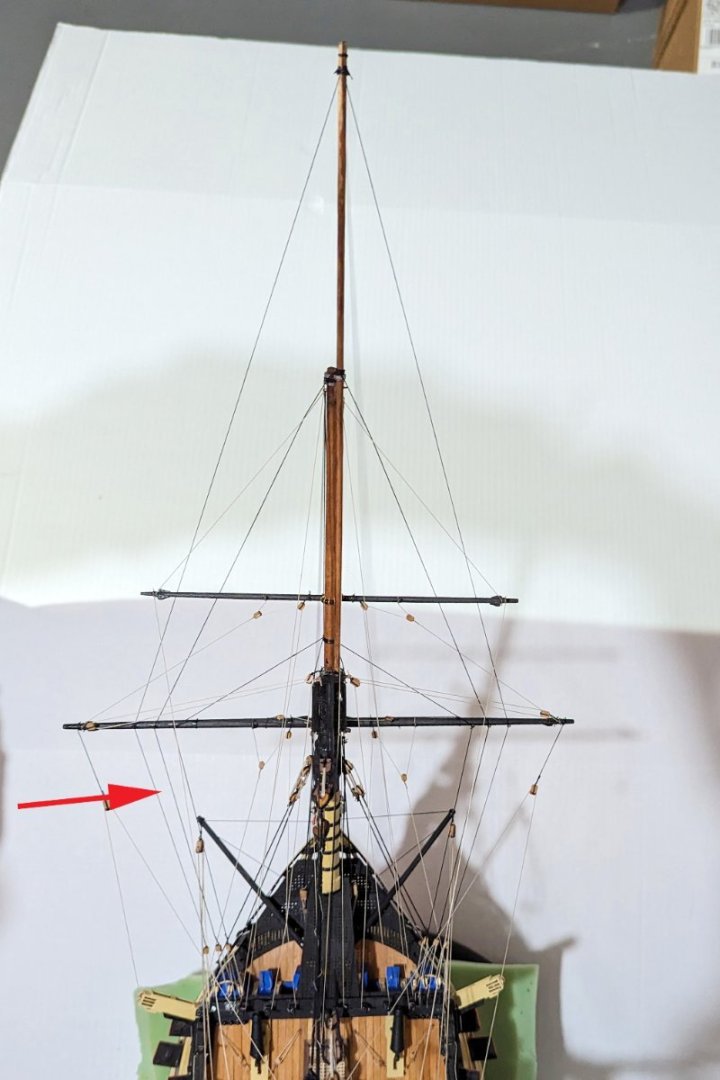
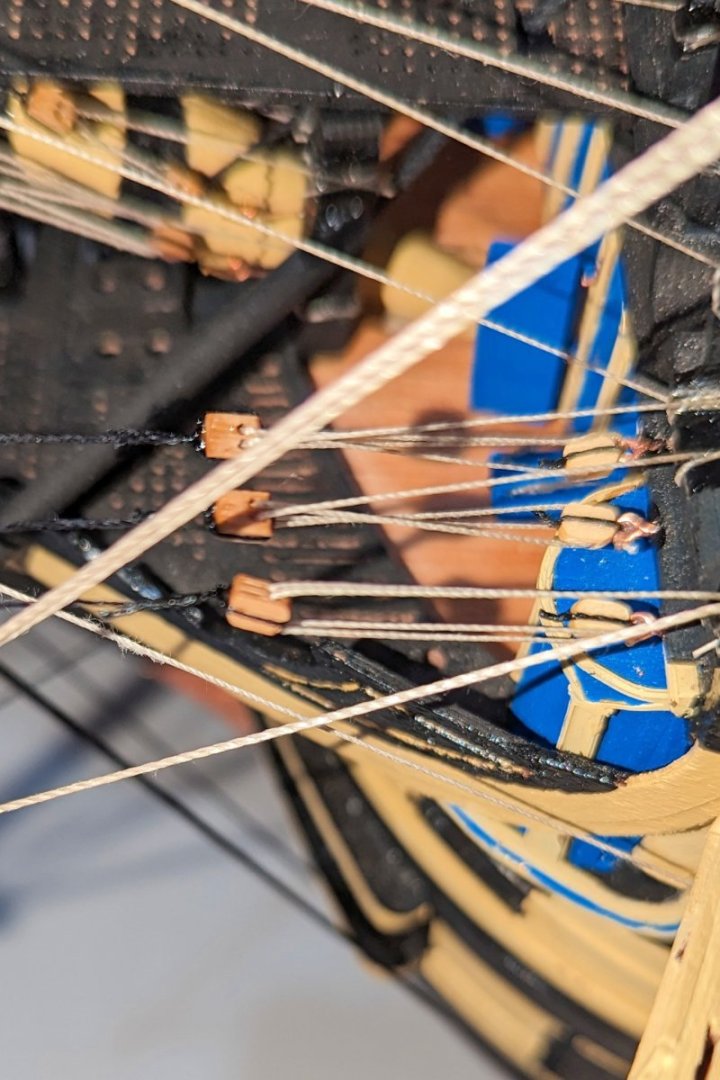
Finished rigging the bowsprit guy lines. The red arrow shows them running up in parallel from the beakhead to the spritsail yard, and then diverging to different points on the sprit. The manual wants you to use a single thread for both sides of the black line, which requires you to seize a block into the attached line near the beakhead, and which would make precise alignment difficult (or impossible for me). So I started at the beakhead end with one line per side, got the blocks lined up (with a slight slant to the stern to match the direction of the guys), and then attached them to the appropriate points on the sprit. Not sure why the manual doesn't do it that way. OK, getting close now. What's left for the main ship is the anchors and the lanterns. Then I will build the small boats. Regards, David
- 218 replies
-
- 5
-
-
- Victory
- Caldercraft
- (and 1 more)