


flying_dutchman2
-
Posts
1,735 -
Joined
-
Last visited
Content Type
Profiles
Forums
Gallery
Events
Everything posted by flying_dutchman2
-
 If you get the Nautical Research Journal, the Autumn 2013 Vol. 58. No. 3 back cover has a detailed picture of the bow of a "Napoleonic prisoner-of-war model of a 74 gun ship-of-the-line, French/English, circa 1790. It is from Bonhams.com/maritime auction. This ship went for $22,500. Here is another one: ***//bonhams.com/departments/COL-MAR/ Pretty cool. Marc
 -
I will find a way to get this book. It has always amazes me how these models were made with the bare minimum of tools. I also heard that the red on these ships is blood. Marcus
-
Thanks for the information about Spanish cedar. My biggest pet peeve about Common names is that they make NO sense. Who ever comes up with some of them needs to have there head examined. Furthermore, they are so local. For some strange reason the common name of Juniperus virginiana is Eastern Redcedar with all other species known as juniperus. The wood of the tree species is used for furniture (cedar chests). In the Chamaecyparis family there is: Chamaecyparis nootkatensis (Alaska Yellow Cedar) Chamaecyparis thyroids (Atlantic Whitecedar or Whitecedar False cypress Chamaecyparis lawsoniana (Port Orford Cedar or Oregon cedar or Lawson Falsecypress) When people ask me about some species in English I go through my "brain" hard drive and come up with all sorts of species. Then I describe them and see what the person thinks it is. Bottom line...... I hate common names........ but it is necessary. Marc
-
From a Forestry/Botanical point of view.. (quoted from several of my Taxonomy books) Cedar is found in most parts of the world. It is a coniferous tree and is part of the pine family. They grow rapidly when exposed to direct sunlight. Cedar trees are used as decorative or ornamental purposes while landscaping Benefits Of Cedar The major uses of cedar tree are from its bark and oil. The bark of the cedar tree produces scented wood, known as cedar wood. Cedar oil is extracted from the cedar wood. The wood is used for the following: - It is resistant to decay and hence is suitable to build outdoor furniture. - It produces aesthetically beautiful furniture. - It is easy to work with as it is lightweight and doesn’t crack or split easily. - It is highly durable. - It can absorb sound effectively, so are used in building ceiling shingles. - It is a good insulator; hence, when a home is built using cedar wood, it helps keep the home warm in winter and cool in summer. - Though its color fades after a while, it can easily be restored. - It doesn’t spread fire easily hence it is suited for building purposes. - It is a natural anti-termite, which is it prevents furniture form rotting. - Due to its lightweight and strength, western red cedar is used to make guitars. Uses Of Cedar Tree Types Each Cedar species has its own distinct features that serve a lot of purposes. - Northern white cedar is used for building canoes and fences. - Australian red cedar is most valuable of all cedar since it used in building ships. Did not say if it was for life size ships or model ships. - California incense cedar is used for making pencils. - Eastern red cedar is also used for fence-building. - Japanese cedar is used for building houses. - Spanish cedar is used on clothing for its fragrance and insect repelling quality. The oil is used for the following: - It is used as an insect repellent. - In ancient times, it was used to preserve dead bodies. - It is used as incense in temples. - It is used as aromatic oil, because its woody odor works as a sedative and effectively treats stress and anxiety in people. - Due to its aroma, it is used as an ingredient in perfumes. - It is used for preservation of spices. - It is used as an antibacterial. - Its health benefits include effectively treating respiratory infections. - It is beneficial to hair, as it helps eliminate dandruff and protects the hair against hair fall and graying. - It also effectively treats skin infections such as acne. - It is also used in treating arthritis, especially rheumatoid. - It is also used for its antiseptic property. Thank you for reading. Marc
-
Here is a link from Jack Panzeca who is building the and his homemade steam gadget. http://modelshipworld.com/index.php/topic/5712-oseberg-viking-ship-by-jack-panzeca-billing-boats-125-scale-9th-century-modified/page-11 http://www.rockler.com/steam-bending-kit-w-free-bentwood-carryall-plan-download Marc
-
Like ammonia, alcohol dissolves the lignin in the wood. The other thing is that people used to use anhydrous ammonia, but that is a bit too dangerous to use so they started using household ammonia. Forget all the chemicals to bend wood. Like Kurtvd19 says, 'water is still the best method'. Use the natural ingredients and not the man-made ones. Many of you have different methods that you use and it works for you. To me this is cumbersome. Too many steps and I am not in a hurry. When museums restore a model and or build one they use water only. Plant physiology on a cellular level: Water will soak and make the dry intact cell walls of the individual lignin spaces moist and pliable. You bend to form, clamp it and it will dry naturally. Leaving some of the cell walls intact and others cracked, but most of the individual cells are still there. Water evaporates but ammonia and alcohol melt the cell walls. Try spraying alcohol or ammonia on plant leaf and see what happens. Do it in 90 degrees F and see the leaf melt in front of your eyes. Once the cells and cell walls melt and the chemical evaporates it leaves larger holes here and there. The integrity of the lignin is gone and makes the wood wobbly. Meaning it has bubbles. I will not bore you with the very detailed plant cell physiology of the steps of how wood deteriorates with chemicals. There have been many scientific articles written on this subject and the above is some of the basic information. avsjerome2003 - Surfactant or sticker is pretty similar to dish washer soap like Dawn. In horticulture a surfactant is mainly used to make a herbicide stick to the plant. Once dry, the chemical does its job. Also there is a minimum run-off when spraying it on the plant, like they say a "sticker". Soap does the same thing and it is what I use. If you want more details I can give you some links of some deep explanations on this subject. Marc
-
I am working on that. Will post a thread in the museum part of the forum. One for the Rijks museum and on for the Naval museum. Marc
- 220 replies
-
- 3
-

-
- finished
- volvo open 70
- (and 1 more)
-
So true AND it screws up the wood. As it says, 'degrade" the wood. It becomes a 'different state', it no longer is the original piece of wood. In the long run the wood degrades and becomes wobbly. There are many processes of bending wood but water/steam is still the one of best method to bend wood. It has been around for centuries. There are several Dutch naval painting's that show the bending of planks for ships. Some of the replica's that were built in the Netherlands (Amsterdam and the Utrecht), the bending of 3 inch thick planks were done with steam. On a later date I will add another quote on chemical bending vs natural bending. Marc
-
Batavia by *Hans* - FINISHED
flying_dutchman2 replied to *Hans*'s topic in - Build logs for subjects built 1501 - 1750
Looks to be ready for display in het Scheepvaart (Naval) museum in Amsterdam. I like the sails on the ship. My motto is, " a ship is complete with the sails". 95% of the model ships in museums have sails, either fully open or furled. Excellent job. I love the stern on the Batavia. The "Michiel de Ruyter" is a movie I have to see. I will just wait for Netflix or VuDu. Marc -
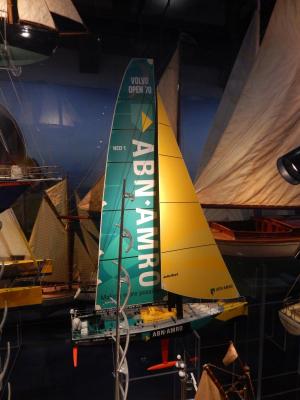
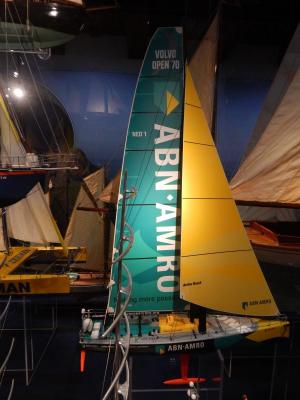
While I was on vacation at the naval museum in Amsterdam I took these pictures from the model Volvo 70 ABN-AMRO. It was part of model display of 400 years of yachting in the Netherlands. Antique models from 1600 to modern models of 2000. btw. I took 500 pictures of models, paintings, figureheads, etc. all from Dutch ships. Marc
- 220 replies
-
- 6
-
-
- finished
- volvo open 70
- (and 1 more)
-
Batavia by *Hans* - FINISHED
flying_dutchman2 replied to *Hans*'s topic in - Build logs for subjects built 1501 - 1750
Beautiful workmanship. Excellent job and the colors look good as well. I do like the head carvings. I remember in the 90's the Batavia was in Philadelphia (one of the SAILS) and I took many pictures of her especially all the carvings. Marc -
Every carving you show is just beautiful. The details for such a small piece is amazing. You are an excellent carver. Hard stikke mooi schip. Marc
-
Pete; What is the material you are making the sails from and where do you purchase that? This boat would look cool as R/C. Marc
- 220 replies
-
- 1
-
-
- finished
- volvo open 70
- (and 1 more)
-
Batavia by *Hans* - FINISHED
flying_dutchman2 replied to *Hans*'s topic in - Build logs for subjects built 1501 - 1750
:)Hans; The Batavia is coming along very beautiful. You are doing an excellent job on this ship and I have been following closely on your built. I love the lines of this ship as well as the colors. What book/article is the ezelhoofd and rakketalie from? The "rakklootjes", (bottom right)...... . Interesting name LOL. Marc -
The boat looks great and agree, I love the color of the stain. The nails look neat as well. Marc
-
The built looks great, lots of steps that I will remember when I built this boat. When I look at the hull, it looks like half a boat because the stern is so wide. I expect it to tapper. What are you going to do about sails? Create your own or is there a manufacturer that makes custom sails for this type of model. In between working on the Statenjacht Utrecht, I am also working on a Soling 1m. Because this boat is one of the most popular RC sail model there is company that will create any sails you design. After doing some advanced searches on Google I found 4 large plans as PDF's (ABN 1 & 2, Illbruck and Ericsson). In due time I will built one of the ABN boats. Marc
- 220 replies
-
- 1
-
-
- finished
- volvo open 70
- (and 1 more)
-
Just downloaded and scanned the pages. Interesting material. Thanks Marc
-
Looking good already. Makes it look so easy the way you are building this boat. Seems building these boats is a hit as there are several sites that show others building them as well. This Aussie has a beautiful build log from the "Volvo 70 Ericsson" http://www.rcuniverse.com/forum/rc-sailboats-89/8076736-volvo-70-ericsson-build-log.html Marc
- 220 replies
-
- 1
-
-
- finished
- volvo open 70
- (and 1 more)
-
Here is a Dutch guy who built the ABN-AMRO as an RC pond yacht http://www.mijnalbum.nl/Album-HB6GKQON-Foto's-in-Nootdorp.html Update from the above guy. http://s694.photobucket.com/user/noordje_01/library/?sort=6&mediafilter=pendingcomments&page=1 Pete, where are you getting your plans from? Marc
- 220 replies
-
- 1
-
-
- finished
- volvo open 70
- (and 1 more)
-
Dutch flat bottom boats have these as well, it is like a keel. But these boats have a keel, so my guess is to give them extra stability. Marc
- 220 replies
-
- 1
-
-
- finished
- volvo open 70
- (and 1 more)
-
Here is a bit of history for everyone. Notice when they first started that there were many more boats/crew than the present? http://www.kriter.tv/history/whitbread_history.pdf Marc
- 220 replies
-
- 1
-
-
- finished
- volvo open 70
- (and 1 more)
-
This is going to be an interesting built. I always watch these races when National Geographic has made a movie from it. I'll be following this one. The name Whitbread race has been around for a long time. This is also a race where people die while sailing. Especially around the 70's where there wasn't as much modern technology. It is the ultimate sailing experience. Marc
- 220 replies
-
- 1
-
-
- finished
- volvo open 70
- (and 1 more)
-
Hi Jack; Season is always slow as parents buy stuff for kids for school, family vacations and parties. People have less money until September. I like your phrase of the "brown season". I am building the Utrecht. Have taken the pictures of cutting out the frames, also the many boo boo's I made (but basswood is cheap) and need to post them. I am using several methods, POF and the typical 17th century Dutch ship building - keel, a few frames, build up hull planking and use a template to add the rest of the frames. Presently lots of clearwings (hawk moth family) on all the red flowers in the yard and I saw the first Luna moth. They are becoming rare in this area. They are attracted to the mercury lamps in sports fields. Joining the NRG is a good thing. Having these two organizations together (NRG & MSW) is a win win situation for everyone. It creates a powerhouse in many areas of ship modeling. All that talent together under one roof, so to speak. Regards, Marc
-
In the 90's I created a similar program in MS Access with a SQL database attached. Does pretty much the same thing. I spent around 2 years putting this together. Works well but after looking at this book collector program I think I am going to switch. I hope I can import all my data from Access to the Book Collector app. In addition it is from a Dutch company and I always like to support my fellow countrymen. Marcus
-
Naval History On This Day, Any Nation
flying_dutchman2 replied to Kevin's topic in Nautical/Naval History
1498 - Christopher Columbus on his third voyage discovers the island of Trinidad

