flying_dutchman2
-
Posts
1,735 -
Joined
-
Last visited
Content Type
Profiles
Forums
Gallery
Events
Everything posted by flying_dutchman2
-

Naval History On This Day, Any Nation
flying_dutchman2 replied to Kevin's topic in Nautical/Naval History
February 28 1653 - -Mar 3] 3 Day Sea battle English beats Dutch 1893 - Launching of USS Indiana (BB-1), first true battleship in U.S. Navy. 1959 - USS Strong rescues 13 Arab fishermen from Bahrain when their fishing boats floundered in a storm. 1980 - Blue crew of USS Francis Scott Key (SSBN-657) launches 4 Trident I (C-4) missiles in first C-4 Operational Test. WWII 1942 - February 28, Sat. Pacific Battle of Java Sea, begun late the previous afternoon, concludes. Japanese heavy cruiser Haguro torpedoes and sinks Dutch light cruiser De Ruyter (Doorman's flagship, in which he is lost) while Nachi torpedoes and sinks Dutch light cruiser Java; remnants of the Allied force flee to Surabaya, sheltering briefly there before trying to escape to Australia. In the wake of the battle, submarine S-37 (SS-142) encounters boat from the sunken De Ruyter and recovers two U.S. Navy sailors who had been serving in a liaison capacity in the Dutch ship. Before continuing on patrol, the U.S. submariners provide the Dutch seamen with rations. S-37's sistership S-38 (SS-143) rescues survivors from sunken British destroyer HMS Electra. Japanese land on north coast of Java. Battle of Sunda Strait begins shortly before midnight as heavy cruiser Houston (CA-30) and Australian light cruiser HMAS Perth (Captain Hector M. L. Waller, RAN), attempting to retire from Java, accidentally encounter Japanese transport force and escorting ships (Rear Admiral Takagi Takeo) in Banten Bay, Java, and engage them (see 1 March). Minesweeper Whippoorwill (AM-35), while searching waters south of Tjilatjap for survivors of sunken seaplane tender Langley (AV-3), rescues crew of British freighter City of Manchester, that had just been torpedoed, shelled and sunk by Japanese submarine I-153 at 08°16'S, 108°52'E. Gunboat Tulsa (PG-22), in the vicinity on the same errand, takes on board the injured British merchant sailors and treats the wounded. Atlantic German submarine U-578 torpedoes and sinks destroyer Jacob Jones (DD-130) off the Delaware capes, 38°42'N, 74°39'W. Unarmed U.S. tanker Oregon is torpedoed, shelled, and sunk by German submarine U-156 about 150 miles northeast of Mona Passage, 20°44'N, 67°52'W; U-156 machineguns the crew trying to launch one of the lifeboats, killing six men. One group of 26 survivors reaches Puerto Plata, Dominican Republic, on 4 March; U.S. tanker Gulfpenn rescues other group of four men the following day. PBY (VP 73) mistakenly bombs and damages submarine Greenling (SS-213) outside submarine sanctuary off New London, Connecticut. 1943 - 28 February, Sun. Pacific TBF (VGS 11) bombs Japanese shipping at Buin, and completes destruction of previously damaged ammunition ship Hibari Maru. Japanese cargo ship Kashii Maru is sunk in collision with Kasagisan Maru off Shimoda, Honshu, 34°39'N, 138°58'E. Mediterranean U.S. freighter Daniel Carroll, in convoy TE 16, is torpedoed by German submarine U-371 off the coast of Algeria, 37°05'N, 04°02'30"E, but is towed by a British tug to Algiers, arriving there the following day; she suffers no casualties to either her merchant crew or her 27-man Armed Guard or 30 passengers. 1944 - 28 February, Mon. -- Pacific Destroyer Abner Read (DD-526) is damaged by grounding off eastern New Guinea, 08°44'S, 148°27'E. Submarine Sand Lance (SS-381) sinks Japanese transport Kaiko Maru just east of Musashi Wan, off Paramushiro, Kurils, 50°20'N, 155°26'E, but is later damaged when she runs aground off Paramushiro. Submarine Balao (SS-285), in attack on Japanese convoy, sinks army cargo ship Akiura Maru and transport Sh_h_ Maru about 90 miles northwest of Manokwari, New Guinea, 00°06'N, 132°53'E. 1945 - 28 February, Wed. -- Pacific TG 78.2 (Rear Admiral William M. Fechteler) lands Army troops (186th Regimental Combat Team, Reinforced, of the 41st Division) on Puerto Princesa, Palawan Island P.I.; TG 74.2 (Rear Admiral Ralph S. Riggs), consisting of three light cruisers and four destroyers, provides support. The operation is unopposed. Off Iwo Jima, destroyer Bennett (DD-473) is damaged by aircraft bomb, 24°46'N, 141°19'E; destroyer Terry (DD-513) by shore battery, 24°48'N, 141°33'E and medium landing ship LSM-42, by mortar fire; collisions account for damage to submarine chaser PCS-1461 (with small craft), 24°46'N, 141°19'E, and tank landing ships LST-641 and LST-787, 24°46'N, 141°19'E. On Iwo Jima, as the 3d Battalion, 27th Marines, battles a Japanese counterattack, Pharmacist's Mate First Class John H. Willis is wounded while administering first aid to casualties. Although evacuated to an aid station, he sneaks away, returning to the front lines and resuming his duties with his assigned platoon. Going to the aid of a wounded man in a shell hole, Willis is treating the casualty when enemy troops lob hand grenades into the position. Willis throws out eight in succession, but a ninth explodes in his hand killing him. His courageous actions, witnessed by his platoon, prompt them to repulse the Japanese thrust. For his conspicuous gallantry, Willis is awarded the Medal of Honor, posthumously. Elsewhere on Iwo, Pharmacist's Mate Second Class George E. Wahlen, USNR, voluntarily rushes to the aid of an adjacent platoon that has suffered heavy casualties, treating 14 men before returning to his own unit. He braves heavy mortar and rifle fire to do so, actions that, together with that performed on 26 February, establish him as a hero in the eyes of the marines he serves (see 2 March). USAAF B-24s attack Japanese convoy in Okinawa area, sinking motor sailship No.7 Kokoku Maru. Atlantic Destroyer escort Fowler (DE-222) and French L'Indiscret sink German submarine U-869 off Morocco, 34°30'N, 08°13'W. Marc -
WOW, that is a most impressive build.. AMAZING. The detailed metal work on it is enough to make me drool. Did you built the brass frames and the motor driven gear-winches from scratch. If so that is some beautiful detail. The wood on the deck has a worn look. Very realistic. The rigging on the winches looks so real. The rigging on this boat is intense as well. You really have to concentrate that every rope goes in its correct position. Your sketches look great as well. Engineering or mechanical drafting background? I also like that you have some figures on the deck. What type of fabric do you use for your sails? Linen or silk? On my Yacht Mary I used linen and I liked that. Also goes well with the sewing machine. The sails look great and my philosophy is that, a ship without sails is not a ship. It gives you the complete model with all the rigging needed. I find that you do outstanding work. What is the ships final destination? European Maritime museum? I enjoyed following the log and learned some new methods from it. Thanks for sharing. Marc
-
You have a small collection and I have way too many of them. Keep parts in them as well as computer parts. Because they close nicely with the little lock, nothing falls out. I make fine rings out of the old fashion ball point pens I still see lying around. The springs are nice and round and easy to cut. The admiral got on my case the other day when I took apart an old vacuum cleaner which she was throwing in the trash. I started separating all the parts I could use and trash. Then I found a little motor with copper wire on it and started unraveling that. She told me if I need that so bad go buy it, and it would be new and I did not have to clean it. So I did that, but kept a few parts I can mold into something else. Marc
- 396 replies
-
- 3
-

-
- Idea
- Bright Idea
- (and 1 more)
-
Naval History On This Day, Any Nation
flying_dutchman2 replied to Kevin's topic in Nautical/Naval History
egkb is very observant about a particular subject and asked me the following question: I Googled the following: "British authorities detained American vessels at Gibraltar" After reading the site from the Gibraltar port authority and numerous newspaper articles, it is that everyone that passed the "rock" had to pay a duty tax and many ships smuggled contraband as well. These illegal activities continue to this day. For the longest time the Spanish did not recognize Gibraltar. Lots of illegal fishing by the Spaniards. Gibraltar became one of Britain's most important possessions in the Mediterranean. It was a key stopping point for vessels en route to India via the Suez Canal. A large British naval base was constructed there at great expense at the end of the 19th century. British control of Gibraltar enabled the Allies to control the entrance to the Mediterranean during the Second World War. Here is the free book on Internet Archive - no copyright. Title: American Rights & British Pretensions on the Seas. The facts and the Documents, official and Other, Bearing upon the Present Attitude of Great Britain toward the Commerce of the United States. Written in 1915 at Harvard University by a lawyer. The first chapter explains a great deal and is very interesting. https://archive.org/details/americanrightsbr00hale Hope this answers your questions. There is a lot written about this subject and many countries have protested as well. Marc -
Naval History On This Day, Any Nation
flying_dutchman2 replied to Kevin's topic in Nautical/Naval History
February 26 1590 - Mauritius of Nassaus sails to Breda. 1804 - Vice-admiral William Bligh ends siege of Fort Amsterdam, Willemstad. 1811 - Congress authorizes first naval hospital. 1852 - British frigate Birkenhead sinks off South Africa-458 die 1913 - Approval of experimental wind tunnel for Navy. 1944 - 1st female US navy captain, Sue Dauser of nurse corps, appointed WWII - 1940 February 26, Mon. -- Captain Raymond A. Spruance relieves Commander Reuben L. Walker as Commandant Tenth Naval District. U.S. passenger liner Washington is detained at Gibraltar by British authorities. 194 - February 26, Thu. Pacific Submarine S-38 (SS-143) bombards Japanese radio station on enemy-occupied Bawean Island, that had been set up the previous day. Small reconnaissance seaplane from Japanese submarine I-25 reconnoiters Melbourne, Australia. Atlantic Unarmed U.S. bulk carrier Marore is torpedoed, shelled, and sunk by German submarine U-432 off the North Carolina coast, 35°33'N, 74°58'W. U.S. tanker John D. Gill rescues 25 survivors; 15 more men land at Coast Guard Big Kinnakeet Lifeboat Station. There are no casualties. U.S. tanker R.P. Resor is torpedoed by German submarine U-578 five miles off Sea Girt, Delaware, 39°47'N, 73°26'W; of the 41-man merchant crew and 8 Armed Guard sailors on board, one civilian and one Armed Guard sailor are rescued by submarine chaser PC-507. Coast Guard cutters Icarus (WPC-110) and Antietam (WPC-128), yacht Zircon (PY-16) and coastal minesweeper AMc-200 converge on the scene; Eagle Boat PE-55 attacks sound contact in the vicinity without result (see 1 March). U.S. tanker Cassimir is sunk in collision with U.S. freighter Lara 48 miles from Frying Pan Shoals lightship, 33°28'N, 77°34'W. 1943 - 26 February, Fri. Pacific Japanese auxiliary minesweeper Kyo Maru No. 3 is mined and sunk off Rangoon, Burma, 15°36'N, 96°15'E. 1944 - 26 February, Sat. -- Pacific Submarine Gato (SS-212) attacks Japanese convoy Wewak No.20 as it proceeds along the Palau-Hollandia track, and sinks passenger-cargo ship No.3 Daigen Maru about 140 miles northwest of Hollandia, 01°51'N, 139°00'E. Narita Maru rescues over 700 of the 1,200 troops being transported in No.3 Daigen Maru. Submarine Grayback (SS-208) is damaged by land-based Japanese naval aircraft, East China Sea, 25°47'N, 128°45'E.8 Motor torpedo boat PT-251 runs aground during action with Japanese barges in southern Empress Augusta Bay; and is then sunk by shore battery, Solomons, 06°30'S, 155°10'E. USAAF B-25s (14th Air Force) attack shipping in port of Tourane, French Indochina, sinking Vichy French surveying vessel Astrolabe and dredging ship Gilmot, 16°04'N, 108°13'E. Vichy officials consider Astrolabe a total loss, given the absolute impossibility of raising her with the means available in French Indochina. Mediterranean Tank landing ship LST-349 sinks after running aground off south coast of Italy, 40°55'N, 12°58'E; LCT-36 sinks after grounding off Naples. 1945 - 26 February, Mon. -- Pacific Lieutenant General Millard F. Harmon, Commanding General, USAAF Air Forces, Pacific Area, departs Guam for Oahu, via Kwajalein, in his C-87 transport. The aircraft (its last reported position 11°15'N, 174°15'E) never reaches its destination. An extensive coordinated search by all services ensues for the next 20 days but fails to locate any trace of the missing plane or its passengers. Off Iwo Jima, storm damages heavy cruiser San Francisco (CA-38), destroyers Colahan (DD-658), Halsey Powell (DD-686), Benham (DD-796), John W. Weeks (DD-701), Stephen Potter (DD-538), and Preston (DD-795); attack cargo ship Muliphen (AKA-61) is damaged in collision with heavy cruiser Salt Lake City (CA-25), 24°46'N, 141°19'E. Tank landing ships LST-760 and LST-884 are damaged by shore battery fire, 24°46'N, 141°19'E. On Iwo Jima, Pharmacist's Mate Second Class George E. Wahlen, USNR, attached to a rifle company in the 2nd Battalion, 26th Marines, retrieves a wounded leatherneck from in front of his company's lines and carries him to safety. Wahlen, wounded in the left eye before he accomplishes this heroic act, will continue to discharge his duties with similar courage over succeeding days (see 28 February and 2 March). Light cruiser Pasadena (CL-65), 31°20'N, 141°15'E, and destroyer Porterfield (DD-682), 33°10'N, 143°30'E, are damaged by gunfire from Japanese guardboat that penetrates task group formation south of Honshu. Minesweeper Saunter (AM-295) is damaged by mine off El Fraile island Luzon, 14°17'N, 120°38'E. Planes (VC 82) from escort carrier Anzio (CVE-57) sink Japanese submarines I 368, 35 miles west of Iwo Jima, 24°43'N, 140°37'E, and RO 43, 50 miles west-northwest of Iwo, 25°07'N, 140°19'E. Destroyer escort Finnegan (DE-307) sinks Japanese submarine I 370 120 miles south of Iwo Jima, 22°45'N, 141°27'E. USAAF planes sink Japanese tanker No.9 Takasago Maru at 20°01'N, 111°44'E. Japanese merchant cargo ship Zuisho Maru is damaged bygunfire, near Hong Kong. Europe U.S. freighter Nashaba, bound for Ghent, Belgium, in convoy TAM 91, sinks after striking a mine in the Schelde estuary, 51°22'18"N, 02°55'25"E. There are no casualties among the 27-man Armed Guard. Marc -
Thanks to both of you giving me a heads up. I have a list and will see what they have. Also I may just order some books from the publisher "De Bataafse Leeuw" and just have them shipped here. But I won't expect much. Thanks again. Marc
-
Naval History On This Day, Any Nation
flying_dutchman2 replied to Kevin's topic in Nautical/Naval History
Kevin; I'll just continue with today and consider the mix-up as a minor glitch in my thought process. Marc -
Piet Excellent build. Colors look good together and I like the planking on the deck. With such a large boat you can build many details. Thanks for sharing. Marc
-
Naval History On This Day, Any Nation
flying_dutchman2 replied to Kevin's topic in Nautical/Naval History
I am so sorry, will not happen again. Marc -
Naval History On This Day, Any Nation
flying_dutchman2 replied to Kevin's topic in Nautical/Naval History
February 23 1795 - U.S. Navy Office of Purveyor of Supplies is established. This is the Navy Supply Corps Birthday. 1919 - Launching of Osmond Ingram (DD-255), first Navy ship named for an enlisted man WWII 1940 - February 23, Fri. -- U.S. freighter Lehigh is detained for several hours at Gibraltar by British authorities, but is allowed to proceed the same day. 1942 - February 23, Mon. Pacific Japanese submarine I-17 shells oil refinery at Ellwood, California. Submarine Tarpon (SS-175) is damaged when she runs aground in Boling Strait, N.E.I. and becomes stranded (see 24 February). Atlantic U.S. freighter Lihue is torpedoed by German submarine U-161 about 275 miles west of Martinique, 14°30'N, 64°45'W; Lihue, damaged, engages U-161 in a surface gunnery action before the freighter is subsequently abandoned and the crew rescued by British tanker British Governor. Canadian armed merchant cruiser HMCS Prince Henry places a salvage party on board in attempt to save Lihue. Minesweeper Partridge (AM-16) tries to tow Lihue to safety, but the crippled merchantman sinks short of St. Lucia, the intended destination. There are no casualties to either the 36-man merchant crew or the 9-man Armed Guard. Unarmed U.S. tanker Sun is torpedoed by German submarine U-502 about 54 miles north of Aruba, 13°02'N, 70°41'W, and although initially abandoned is reboarded. She is ultimately repaired and returned to service; there are no casualties among the 36-man crew (see 5 July). Unarmed U.S. tanker Republic, torpedoed by German submarine U-504 on 21 February, having drifted onto reefs off Hobe Sound, Florida, sinks. 1943 - 23 February, Tue. Atlantic Battle to protect convoy ON 166 continues as German submarines continue the onslaught. After Canadian corvette HMCS Trillium's attempt to scuttle U.S. freighter Expositor (torpedoed the previous day by U-606) with depth charges fails; it falls to German submarine U-303 to administer the coup de grace to the hardy American merchantman. U-186 then torpedoes and sinks U.S. freighter Hastings at 46°30'N, 36°23'W as well as British motor tanker Eulima; from Hastings, nine merchant sailors (of the 41-man civilian complement) perish, but all 20 Armed Guards and the ship's sole passenger survive, rescued by Canadian corvette HMCS Chilliwack. U-707 torpedoes and sinks straggling U.S. freighter Jonathan Sturges at 46°15'N, 38°11'W; no. 1 lifeboat (with 19 survivors on board) from Jonathan Sturges encounters one from torpedoed Dutch motorship Madoera (three men on board) and transfers eight men to the Dutch lifeboat to equalize the number of survivors in each craft; Jonathan Sturges's no. 3 lifeboat (nine men) locates one merchant sailor in the no. 2 boat and four Armed Guards from the ship; that second group of survivors is then divided between boats no. 2 and no. 3 to distribute them evenly (see 12 March and 6 April). German submarines attack Curacao, N.W.I.-bound convoy UC 1, which is shepherded by four U.S. destroyers, two British frigates and three corvettes. Despite the proximity of the Anglo-American escort force, U-382 torpedoes Dutch motor tanker Murena; U-202 torpedoes British tankers Empire Norseman and British Fortitude, and U.S. tanker Esso Baton Rouge, the last-named ship at 31°15'N, 27°22'W. British sloop HMS Totland rescues Esso Baton Rouge's survivors, who include 24 of the 25-man Armed Guard and 41 of the 43-man merchant complement. District patrol craft YP-336 sinks after running aground, Delaware River. 1944 - 23 February, Wed. -- Pacific During strikes on Japanese shipping in Tanapag harbor, Saipan, F6Fs, TBFs and SBDs from carriers Essex (CV-9) and Yorktown (CV-10) (in TG 58.2) damage cargo ship Shoan Maru, 15°15'N, 145°45'E; planes from carrier Bunker Hill (CV-17) (in TG 58.3) sink cargo vessel Seizan Maru off Tinian, 15°00'N, 145°30'E. Submarine Balao (SS-285), in attack on Japanese convoy about 35 miles north of Biak, New Guinea, sinks army cargo ship Nikki Maru, 00°11'S, 135°00'E. Submarine Cod (SS-224) sinks Japanese fleet tanker No.3 Ogura Maru off Halmahera, 04°23'N, 129°05'E. Submarine Plunger (SS-179), in attack on Japanese convoy, sinks transport Kimishima Maru about 200 miles northwest of Chichi Jima, 30°11'N, 140°49'E. Submarine Pogy (SS-266) attacks Japanese convoy, sinking merchant cargo ship Horei Maru, 26°20'N, 126°11'E, and damaging merchant tanker Teikon Maru, 26°22'N, 126°16'E, about 60 miles west of Okinawa. Submarine Snook (SS-279) attacks Japanese convoy, sinking transport Kayo Maru about 120 miles north- northwest of Chichi Jima, 28°49'N, 141°13'E. Submarine Sunfish (SS-281) and planes from carrier Yorktown (CV-10) sink Japanese collier Shinyubari Maru about 40 miles west of Saipan, 15°23'N, 145°03'E. Submarine Tang (SS-306) sinks Japanese repair ship Yamashimo Maru west of Saipan, 14°45'N, 144°32'E. The cataclysmic explosion of the enemy auxiliary damages Tang, but not badly enough to prevent the boat from remaining on patrol. Japanese gunboat Eiko Maru is sunk by aircraft north of Saipan, 15°12'N, 144°52'E, as she proceeds to the position of the loss of Fukuyama Maru that had been sunk by Tang (SS-306) on 22 February. Japanese cargo ship Gyoko Maru is destroyed by accidental explosion in Naha harbor, Okinawa, 26°13'N, 127°40'E. Indian Ocean U.S. tanker E.G. Seubert, in convoy PA 69, is torpedoed and sunk by German submarine U-510 about 200 miles fromAden, 13°45'N, 48°56'E; three of the 27-man Armed Guard (including its commander) perish, as do three of the ship's merchant complement. Australian minesweeper HMAS Tamworth and Indian Navy corvette RINS Orissa rescue survivors. 1945 - 23 February, Fri. -- Pacific Motor torpedo boats sweep Coron Bay, P.I., destroying launches, lighters, a lugger, and setting fire to a large fuel dump. Off Iwo Jima, shore batteries damage tank landing ships LST-684 and LST-792, 24°46'N, 141°19'E and medium landing ships LSM-46 and LSM-47; operational casualties damage hospital ship Solace (AH-5), motor minesweeper YMS-361, and medium landing ship LSM-92; as well as submarine chaser PC-877 and tank landing ship LST-716, 24°46'N, 141°19'E; friendly fire damages submarine chaser PCS-1461, 24°46'N, 141°19'E. Submarine Hammerhead (SS-364) intercepts Japanese convoy, sinks escort vessel Yaku 15 miles south of Cape Varella, French Indochina, 12°42'N, 109°30'E, and eludes counterattack by Coast Defense Ship No.31. District patrol craft YP-94, aground and damaged off Tugidak and Sitkinak Islands, Aleutians, since 17 February, breaks in two and sinks. USAAF B-25s (Fifth Air Force) on antishipping sweep off French Indochina, attack Japanese convoy HI-88-G and sink submarine chaser Ch 35, and damage submarine chaser Ch 20 and small tanker No.35 Nanshin Maru off Cape Padaran, 10°15'N, 107°31'E. Japanese merchant cargo ship Bizan Maru is damaged by aircraft, 23°14'N, 116°49'E. Mediterranean Conversion of tank landing ships into seatrain LSTs is completed at Palermo, Sicily. LST-32 is to ferry roling stock from Bizerte, Tunisia, to Reggio, Italy; LST-140 is to ferry rolling stock from Oran, Algeria, to Marseilles, France. Open lighter YC-693 is struck from the Naval Vessel Register this date.[5] Europe U.S. freighter Jane G. Swisshelm is damaged by explosion of V-2 rocket at Antwerp, Belgium. Only three men of the combined complement of 8 officers, 36 enlisted men, 27 Armed Guards and one passenger report any injuries. U.S. freighter Henry Bacon, straggling from Scotland-bound convoy RA 64, is sunk by German planes after her Armed Guard puts up a stiff fight against a large number of attacking aircraft, 67°00'N, 07°00'E. Seven of the 26-man Armed Guard die in battle. British destroyers HMS Opportune, HMS Zest and HMS Zambesi rescue the survivors. Marc -
I will look for them when I go to the Netherlands in Sept/Oct of this year. Visit my mother and buy some Dutch naval books at the Rijks museum and Maritime museum. Marc
-
Naval History On This Day, Any Nation
flying_dutchman2 replied to Kevin's topic in Nautical/Naval History
February 23 1633 - Samuel Pepys, London England, navy expert/composer (Diary, Memoirs) - Birthday 1795 - U.S. Navy Office of Purveyor of Supplies is established. This is the Navy Supply Corps Birthday. 1919 - Launching of Osmond Ingram (DD-255), first Navy ship named for an enlisted man 1944 - Carrier groups under Spruance attack Saipan, Tinian and Rota in the Marianas 1945 - Marines and a Navy hospital corpsman raise flag on Mt. Suribachi, Iwo Jima WWII 1940 - February 23, Fri. -- U.S. freighter Lehigh is detained for several hours at Gibraltar by British authorities, but is allowed to proceed the same day. 1942 - Pacific Japanese submarine I-17 shells oil refinery at Ellwood, California. Submarine Tarpon (SS-175) is damaged when she runs aground in Boling Strait, N.E.I. and becomes stranded (see 24 February). Atlantic U.S. freighter Lihue is torpedoed by German submarine U-161 about 275 miles west of Martinique, 14°30'N, 64°45'W; Lihue, damaged, engages U-161 in a surface gunnery action before the freighter is subsequently abandoned and the crew rescued by British tanker British Governor. Canadian armed merchant cruiser HMCS Prince Henry places a salvage party on board in attempt to save Lihue. Minesweeper Partridge (AM-16) tries to tow Lihue to safety, but the crippled merchantman sinks short of St. Lucia, the intended destination. There are no casualties to either the 36-man merchant crew or the 9-man Armed Guard. Unarmed U.S. tanker Sun is torpedoed by German submarine U-502 about 54 miles north of Aruba, 13°02'N, 70°41'W, and although initially abandoned is reboarded. She is ultimately repaired and returned to service; there are no casualties among the 36-man crew (see 5 July). Unarmed U.S. tanker Republic, torpedoed by German submarine U-504 on 21 February, having drifted onto reefs off Hobe Sound, Florida, sinks. 1943 - 23 February, Tue. Atlantic Battle to protect convoy ON 166 continues as German submarines continue the onslaught. After Canadian corvette HMCS Trillium's attempt to scuttle U.S. freighter Expositor (torpedoed the previous day by U-606) with depth charges fails; it falls to German submarine U-303 to administer the coup de grace to the hardy American merchantman. U-186 then torpedoes and sinks U.S. freighter Hastings at 46°30'N, 36°23'W as well as British motor tanker Eulima; from Hastings, nine merchant sailors (of the 41-man civilian complement) perish, but all 20 Armed Guards and the ship's sole passenger survive, rescued by Canadian corvette HMCS Chilliwack. U-707 torpedoes and sinks straggling U.S. freighter Jonathan Sturges at 46°15'N, 38°11'W; no. 1 lifeboat (with 19 survivors on board) from Jonathan Sturges encounters one from torpedoed Dutch motorship Madoera (three men on board) and transfers eight men to the Dutch lifeboat to equalize the number of survivors in each craft; Jonathan Sturges's no. 3 lifeboat (nine men) locates one merchant sailor in the no. 2 boat and four Armed Guards from the ship; that second group of survivors is then divided between boats no. 2 and no. 3 to distribute them evenly (see 12 March and 6 April). German submarines attack Curacao, N.W.I.-bound convoy UC 1, which is shepherded by four U.S. destroyers, two British frigates and three corvettes. Despite the proximity of the Anglo-American escort force, U-382 torpedoes Dutch motor tanker Murena; U-202 torpedoes British tankers Empire Norseman and British Fortitude, and U.S. tanker Esso Baton Rouge, the last-named ship at 31°15'N, 27°22'W. British sloop HMS Totland rescues Esso Baton Rouge's survivors, who include 24 of the 25-man Armed Guard and 41 of the 43-man merchant complement. District patrol craft YP-336 sinks after running aground, Delaware River 1944 - 23 February, Wed. -- Pacific During strikes on Japanese shipping in Tanapag harbor, Saipan, F6Fs, TBFs and SBDs from carriers Essex (CV-9) and Yorktown (CV-10) (in TG 58.2) damage cargo ship Shoan Maru, 15°15'N, 145°45'E; planes from carrier Bunker Hill (CV-17) (in TG 58.3) sink cargo vessel Seizan Maru off Tinian, 15°00'N, 145°30'E. Submarine Balao (SS-285), in attack on Japanese convoy about 35 miles north of Biak, New Guinea, sinks army cargo ship Nikki Maru, 00°11'S, 135°00'E. Submarine Cod (SS-224) sinks Japanese fleet tanker No.3 Ogura Maru off Halmahera, 04°23'N, 129°05'E. Submarine Plunger (SS-179), in attack on Japanese convoy, sinks transport Kimishima Maru about 200 miles northwest of Chichi Jima, 30°11'N, 140°49'E. Submarine Pogy (SS-266) attacks Japanese convoy, sinking merchant cargo ship Horei Maru, 26°20'N, 126°11'E, and damaging merchant tanker Teikon Maru, 26°22'N, 126°16'E, about 60 miles west of Okinawa. Submarine Snook (SS-279) attacks Japanese convoy, sinking transport Kayo Maru about 120 miles north- northwest of Chichi Jima, 28°49'N, 141°13'E. Submarine Sunfish (SS-281) and planes from carrier Yorktown (CV-10) sink Japanese collier Shinyubari Maru about 40 miles west of Saipan, 15°23'N, 145°03'E. Submarine Tang (SS-306) sinks Japanese repair ship Yamashimo Maru west of Saipan, 14°45'N, 144°32'E. The cataclysmic explosion of the enemy auxiliary damages Tang, but not badly enough to prevent the boat from remaining on patrol. Japanese gunboat Eiko Maru is sunk by aircraft north of Saipan, 15°12'N, 144°52'E, as she proceeds to the position of the loss of Fukuyama Maru that had been sunk by Tang (SS-306) on 22 February. Japanese cargo ship Gyoko Maru is destroyed by accidental explosion in Naha harbor, Okinawa, 26°13'N, 127°40'E. Indian Ocean U.S. tanker E.G. Seubert, in convoy PA 69, is torpedoed and sunk by German submarine U-510 about 200 miles fromAden, 13°45'N, 48°56'E; three of the 27-man Armed Guard (including its commander) perish, as do three of the ship's merchant complement. Australian minesweeper HMAS Tamworth and Indian Navy corvette RINS Orissa rescue survivors. 1945 - 23 February, Fri. -- Pacific Motor torpedo boats sweep Coron Bay, P.I., destroying launches, lighters, a lugger, and setting fire to a large fuel dump. Off Iwo Jima, shore batteries damage tank landing ships LST-684 and LST-792, 24°46'N, 141°19'E and medium landing ships LSM-46 and LSM-47; operational casualties damage hospital ship Solace (AH-5), motor minesweeper YMS-361, and medium landing ship LSM-92; as well as submarine chaser PC-877 and tank landing ship LST-716, 24°46'N, 141°19'E; friendly fire damages submarine chaser PCS-1461, 24°46'N, 141°19'E. Submarine Hammerhead (SS-364) intercepts Japanese convoy, sinks escort vessel Yaku 15 miles south of Cape Varella, French Indochina, 12°42'N, 109°30'E, and eludes counterattack by Coast Defense Ship No.31. District patrol craft YP-94, aground and damaged off Tugidak and Sitkinak Islands, Aleutians, since 17 February, breaks in two and sinks. USAAF B-25s (Fifth Air Force) on antishipping sweep off French Indochina, attack Japanese convoy HI-88-G and sink submarine chaser Ch 35, and damage submarine chaser Ch 20 and small tanker No.35 Nanshin Maru off Cape Padaran, 10°15'N, 107°31'E. Japanese merchant cargo ship Bizan Maru is damaged by aircraft, 23°14'N, 116°49'E. Mediterranean Conversion of tank landing ships into seatrain LSTs is completed at Palermo, Sicily. LST-32 is to ferry roling stock from Bizerte, Tunisia, to Reggio, Italy; LST-140 is to ferry rolling stock from Oran, Algeria, to Marseilles, France. Open lighter YC-693 is struck from the Naval Vessel Register this date.[5] Europe U.S. freighter Jane G. Swisshelm is damaged by explosion of V-2 rocket at Antwerp, Belgium. Only three men of the combined complement of 8 officers, 36 enlisted men, 27 Armed Guards and one passenger report any injuries. U.S. freighter Henry Bacon, straggling from Scotland-bound convoy RA 64, is sunk by German planes after her Armed Guard puts up a stiff fight against a large number of attacking aircraft, 67°00'N, 07°00'E. Seven of the 26-man Armed Guard die in battle. British destroyers HMS Opportune, HMS Zest and HMS Zambesi rescue the survivors -
That will happen as I always add sails. If there are no sails the boat looks rather naked. Marc Mine just broke off. I put a sheave in the top of the mast to make it look real (like Doc did with his long boat in the club). There was too much wood eliminated so the strength was gone. Where the sheave was I put a combo of wood putty and CA. Molded it quickly and then wrapped rope. Same idea that I did with the main mast to the flag staff. Drilled a hole in the mast for the topsail. No sheave. I'll take pictures. Marc
- 85 replies
-
- 1
-
-
- yacht mary
- mamoli
- (and 1 more)
-
Just finished the rigging, turned around and my sleeve from my elbow caught on the flag staff on the jib.... sheered it right off. Then turn around and do it again and this time I break the top of the mast................... AAAAAARRRRGGGHHH :angry: Calmed down, repaired the jib and looks like new. The mast is a different story. I did fix it but that took me an hour or so. I have to be careful. But then it is wood and can get fixed all the time. So I finished all the sails and on the drawing of where the sails are printed on they are an exact match. Stitch the main sail to the gaff and see if the gaff fits....... not at all. I look at the sail plan with rigging drawing and the sails are a different dimension. Compare both sheets of plans.... and boy... it is completely different. Non of them are the same. Main sail is off by 2cm in length. What did the drawing man do? Is he on meth? So now I have to improvise. Like I said before, MAMOLI's plans suck big time. Nothing on CAD, it is all hand drawn. Descriptions are a joke. So far this kit has been bashed for about 75% and it increases all the time. The rigging, and sail plan look very much like the Utrecht. This is Ok as this did not changed much with a century. The Mary is from the mid 1600 and the Utrecht from the mid 1700. I feel all better having discussed my booboo's and frustrations. Thanks for reading. Marc
-
Naval History On This Day, Any Nation
flying_dutchman2 replied to Kevin's topic in Nautical/Naval History
February 22 1512 - Amerigo Vespucci, Italian explorer (America), dies at 60. 1627 - Olivier van Noort, Dutch navigator (b. 1558) Dies. 1744 - Battle at Toulon: English-French & Spanish fleet. 1865 - RADM Porter's gunboats' bombardment cause surrender of Wilmington, NC . 1870 - After arriving on USS Nipsic, and supported by USS Guard and USS Nyack, the Darien Expedition, commanded by CDR Thomas O. Selfridge, Jr., begins active operations ashore at Caldonia Bay to survery the Isthmus of Darien, Panama, for an interoceanic ship canal. 1909 - Great White Fleet returns from round the world cruise to Hampton Roads, VA 1943 - USS Iowa (BB-61), the lead ship of the last class of American fast battleships, is commissioned. 1974 - LTJG Barbara Ann Allen becomes first Navy designated female aviator. WWII 1940 - February 22, Thu. -- U.S. freighter Sahale, detained by British authorities at Gibraltar the previous day, is released. 1942 - February 22, Sun. Pacific Submarine Swordfish (SS-193) disembarks Philippine President Manuel Quezon and his party (embarked since 20 February) at San Jose, Panay, P.I., to continue their journey out of the archipelago. Atlantic U.S. tanker Cities Service Empire is torpedoed and sunk by German submarine U-128 25 miles north of Bethel Shoals, 28°00'N, 80°22'W. Destroyer Biddle (DD-151) rescues survivors from life rafts while Coast Guard cutter Vigilant (WPC-154) goes alongside and rescues men directly from the burning ship. All told, 3 of the 9-man Armed Guard are lost, in addition to 11 of the 41-man civilian complement. Unarmed U.S. tanker W.D. Anderson is torpedoed and sunk by German submarine U-504 about 12 miles northeast of Jupiter Point Lighthouse, 27°09'N, 79°56'W. The sole survivor of the 36-man crew swims ashore at Stewart, Florida. Unarmed U.S. freighter West Zeda is torpedoed and sunk by German submarine U-129 about 125 miles southeast of Trinidad, B.W.I., 09°13'N, 69°04'W. Schooner Emeralda rescues the entire 35-man crew, who suffer no casualties in the encounter with the U-boat. 1943 - 22 February, Mon. Atlantic Battleship Iowa (BB 61) is commissioned at New York, New York, the first of the four-ship Iowa class that will be the last American battleships built. Battle to protect convoy ON 166 in the North Atlantic continues. British rescue ship Stockport rescues Empire Trader's survivors; German submarine U-92 torpedoes Norwegian motor tanker Nielson Alonso (which is again torpedoed by U-92 and then by U-753, but is eventually scuttled by Polish destroyer Burza); U-606 torpedoes a trio of merchantmen: U.S. freighters Chattanooga City at 46°54'N, 34°30'W, and Expositor at 46°52'N, 34°26'W, as well as British steamer Empire Redshank. Chattanooga City sinks. Canadian corvette HMCS Trillium rescues all hands (including the 21-man Armed Guard) from Chattanooga City as well as 34 of 41 merchant sailors (two of whom die of their wounds) and the entire 21-man Armed Guard from Expositor. Trillium scuttles Empire Redshank. U-606's opportunity to savor her triple play is short-lived, for Canadian corvette HMCS Chilliwack and Polish destroyer Burza depth charge U-606 and drive her to the surface, where Coast Guard cutter Campbell (WPG-32) rams and sinks her at 47°44'N, 33°43'W. Campbell, damaged in the encounter, is taken in tow by Burza. German submarines locate Curacao, N.W.I.-bound convoy UC 1; four U.S. destroyers comprise part of the escort force (see 23 February). Pacific District patrol craft YP-72 sinks after grounding off Spruce Cape entrance to Kodiak, Alaska. Japanese army cargo ship Kuwayama Maru sinks off Soembawa Island as the result of damage inflicted by submarine Thresher (SS-200) the previous day, 07°53'N, 119°13'E. 1944 - 22 February, Tue. -- Pacific TF 58 (Rear Admiral Marc A. Mitscher) planes bomb Saipan, Tinian, Rota, and Guam, in first strike against the Marianas. TF 58 planes sink Japanese transport Shoan Maru off Saipan, 15°15'N, 145°42'E; planes from TG 58.2 and TG 58.3 sink transport Seizan Maru off Saipan, 15°00'N, 145°30'E. Marines land on Parry Island, Eniwetok Atoll, under cover of naval bombardment and carrier-aircraft bombing; this operation completes U.S. control of Eniwetok Atoll. Infantry landing craft LCI-365, LCI-440, and LCI-442 are damaged by friendly fire. TG 39.4 (Captain Arleigh A. Burke) bombards Japanese airstrips, pier area, and anchorages at Kavieng; destroyers Charles Ausburne (DD-570), Dyson (DD-572), and Stanly (DD-478) sink Japanese minelayer Natsushima off New Ireland, 02°40'S, 149°40'E; the same three destroyers, joined by Conway (DD-507) and Spence (DD-512), sink tug Nagaura about 160 miles northwest of Kavieng, 00°54'S, 148°38'E. Other Japanese ships sunk during this action include auxiliary submarine chaser No.8 Tama Maru and small cargo vessels Choryu Maru and No.9 Tokuyama Maru. Destroyer Division 45 sinks Japanese auxiliary netlayer Kyosei Maru in Isabel Channel, New Hanover. Submarine Gato (SS-212) sinks Japanese repair ship Yamashiro Maru off Truk, 07°13'N, 151°38'E. Submarine Puffer (SS-268), despite presence of escort vessel, sinks Japanese army transport Teiko Maru (ex- French passenger liner D'Artagnan) about 120 miles northwest of Kuching, Borneo, 03°10'N, 109°15'E. Submarine Ray (SS-271) lays mines off Saigon, French Indochina. Submarine Tang (SS-306), in attack on Japanese convoy, sinks gunboat Fukuyama Maru about 60 miles southwest of Saipan, 15°14'N, 144°55'E. Japanese auxiliary submarine chaser Cha 29 is sunk by mine (possibly laid by submarine Silversides (SS-236) on 4 June 1943) near Kavieng. Navy SBD and TBF aircraft pound Japanese shipping in Keravia Bay, Rabaul, sinking guardboats No.2 Fuku Maru and No.2 Tenjin Maru, army cargo ship Taisho Maru, merchant tanker Takatori Maru, and damaging minelayer Nasami. Vichy French river gunboat Francis Garnier is sunk by mine sown by USAAF planes (14th Air Force) in South China Sea off Cape St. Jacques, French Indochina, 10°30'N, 108°00'E. Atlantic Motor torpedo boat PT-200 is sunk in collision with unknown object off Long Island, N.Y., 41°23'N, 71°01'W. Mediterranean Five German E-boats approach Anzio beachhead during the night, but all are driven off without inflicting any damage. Submarine chaser PC-621 claims destruction of one E-boat and drives another ashore. German submarine U-969 attacks convoy GUS 31 off the coast of Algeria, irreparably damaging U.S. freighters Peter Skene Ogden and George Cleeve, 37°18'N, 06°59'E; other than one fatality on board the former, there are no casualties to the American ships. Both ships are towed and beached to facilitate salvage: Peter Skene Ogden at Herbillon and George Cleeve to Bone, Tunisia. Both are later written off as total losses. 1945 - 22 February, Thu. -- Pacific Off Iwo Jima, damage occurs when destroyer escort Melvin R. Nawman (DE-416) collides with tank landing ship LST-807, 24°46'N, 141°19'E, and tank landing ship LST-779 collides with pontoon barges at 24°46'N, 141°19'E. Submarine Becuna (SS-319), despite presence of two escort vessels, sinks Japanese merchant tanker Nichiyoku Maru off Cape Padaran, French Indochina, 11°28'N, 109°06'E. Japanese fleet tanker No.2 Tatekawa Maru is damaged by USAAF mine (laid by 20th Air Force B-29s) and runs aground in Padaran Bay; USAAF B-25s (5th Air Force) complete the destruction of No.2 Tatekawa Maru later that day, 11°08'N, 108°44'E. Japanese submarine chaser Ch 41 is damaged by aircraft, 10°15'N, 107°15'E. Japanese army ship Ikuta Maru is sunk by aircraft, Rabaul, New Britain. Thanks for reading. Marc -
I do this as well and it works great. Marc
-
I am assuming you drill holes first or because the bristles are of such a small diameter, you push a pin to make the holes. I would love to know the process, as this is something I want to do in my next built. Thanks, Marc
- 396 replies
-
- 2
-
-
- Idea
- Bright Idea
- (and 1 more)
-
@ Daniel Siemens. Your ships in a bottle are so intense. The details on such a small scale is amazing. The shrouds and the sails......... amazing. I love looking at your finished builds. Excellent wo9rk. Marc
- 396 replies
-
- 1
-
-
- Idea
- Bright Idea
- (and 1 more)
-
Piet "knows" his beer and as I would say in Dutch, "Hou je taai". Which roughly means in English - Be well and strong. The boat is looking good and I like the color of the green. I have not read the complete log, but is the green the final color? Marc
-
Naval History On This Day, Any Nation
flying_dutchman2 replied to Kevin's topic in Nautical/Naval History
February 21 1673 - Michiel A de Ruyter appointed lieutenant-admiral-general of Dutch fleet. 1705 - Edward Hawke, 1st Baron Hawke, British naval officer (d. 1781) - His birthday. 1944 - Marines with support of naval bombardment and carrier aircraft secure Eniwetok atoll 1945 - USS Bismark Sea (CVE-95) struck by a kamikaze off Iwo Jima and sunk in 90 minutes with loss of 318 men. USS Saratoga (CV-3) struck by 5 kamikazes but survived with loss of 123. Bismark Sea was last carrier lost in combat during World War II. WWII 1940 - February 21, Wed. -- U.S. freighter Sahale is detained by British authorities at Gibraltar (see 22 February); freighter Exhibitor, detained since 17 February, is allowed to proceed. 1941 - February 21, Fri. Carrier Enterprise (CV-6) arrives off Oahu and launches 30 USAAC P-36s that will be based on Wheeler Field. 1942 - February 21, Sat. Pacific Submarine Triton (SS-201) sinks Japanese merchant cargo vessel Shokyu Maru in East China Sea, 60 miles south of Quelpart Island, 32°10'N, 126°28'E. Atlantic Unarmed U.S. tanker J.N. Pew is torpedoed and sunk by German submarine U-67 about 225 miles west of Aruba, D.W.I, 12°40'N, 74°00'W; two survivors reach the coast of Colombia, 35 miles east of Riohacha (see 14 March). Unarmed U.S. tanker Republic is torpedoed by German submarine U-504 about three miles east of Jupiter Inlet, Florida, 27°05'N, 80°15'W; three crewmen perish in the initial explosion, while two drown in the abandonment. One lifeboat reaches shore unaided (18 men on board) while U.S. tanker Cities Service Missouri rescues six men from a second boat (see 23 February). Europe Admiral Leahy receives instruction to see Admiral Darlan immediately about German submarine U-156's receiving assistance at Martinique. Unless the Vichy French can assure the U.S. government that no Axis ships or planes will be allowed to enter French ports or territory in the Western Hemisphere, and that unless such assurances are rigidly maintained, the United States "will take such action in the interest of security of the Western Hemisphere as it may judge necessary and in accordance with existing inter-American obligations." Leahy writes in his diary that everything points to his early recall to Washington "for consultation" (see 16 April). 1943 - 21 February, Sun. Pacific Marines (3d Marine Raider Battalion and 10th Defense Battalion detachment) and Army troops (elements of the 43rd Division) occupy Russell Islands in Operation CLEANSLATE, the inaugural movement through the central Solomons. Supported by TU 62.7.2 (Captain Ingolf N. Kiland), the landings are made with no opposition. Four light cruisers and four destroyers of TF 68 (Rear Admiral Aaron S. Merrill) and Henderson Field, Guadalcanal-based Saratoga (CV-3) Air Group provide cover. Submarine Sawfish (SS-276) damages Japanese oiler Ose off Oagari Jima, 29°29'N, 132°48'E. Submarine Thresher (SS-200) attacks Japanese convoy northeast of Soembawa Island, N.E.I., damaging army cargo ship Kuwayama Maru, 07°53'N, 119°13'E (see 22 February). Dutch submarine O 24 sinks Japanese merchant motor vessel Bandai Maru off Salang Island, 07°50'N, 098°09'E. Atlantic Battle to protect ON 166 from German submarines begins as U-332 and U-603 torpedo and sink Norwegian motor tanker Stigstad; U-92 torpedoes British steamer Empire Trader (she will be scuttled by Canadian corvette HMCS Dauphin). Coast Guard cutter Campbell (WPG-32), British corvette HMS Dianthus and Canadian corvette Dauphin, aided by flying boats, temporarily drive off U-332, U-454, and U-753 threatening the merchantmen. Coast Guard cutter Spencer (WPG-36) sinks German submarine U-225 at 51°25'N, 27°28'W. U.S. freighter Rosario, steaming in convoy ON 167, is torpedoed and sunk by German submarine U-664 at 50°13'N, 24°48'W. Fourteen of the 17-man Armed Guard, and 14 of 44 merchant crewmen are picked up by British rescue ship Rathlin; the rest perish with the ship. British merchantman Penrith Castle rescues 15 merchant seamen and 13 Armed Guard sailors, survivors of freighter Roger B. Taney, that had been sunk by U-225 on 7 February (see 20 March). 1944 - 21 February, Mon. -- Pacific Navy SBDs and TBFs bomb antiaircraft positions at Lakunai aerodrome and shore installations at Rabaul, sinking guardboat No.2 Yawata Maru. USAAF B-25s (5th Air Force) strike Japanese five-ship convoy (evacuating 751st Air Group maintenance people to Japan, via Palau) off New Hanover, sinking auxiliary submarine chasers Cha 38 and Cha 48, 02°30'S, 149°55'E, transport Kokai Maru and gunboat Kowa Maru, 02°30'S, 150°15'E, and damaging tug Nagaura, which, after effecting repairs, rescues some of the survivors of the two Marus and continues on her voyage north (see 22 February). Submarine Cero (SS-225) damages Japanese army cargo ship Hasshu Maru north of New Guinea, 00°10'S, 139°45'E. British submarine HMS Tally Ho sinks Japanese army cargo ship No.6 Taigen Maru in Strait of Malacca, 04°00'N, 101°00'E. 1945 - 21 February, Wed. -- Pacific Navy and USAAF planes bomb and strafe Japanese installations at Truk. Off Iwo Jima, kamikazes sink escort carrier Bismarck Sea (CVE-95), 24°36'N, 141°48'E, and damage carrier Saratoga (CV-3), 24°56'N, 142°01'E (Saratoga is also hit by a bomb); escort carrier Lunga Point (CVE-94), 24°40'N, 141°44'E; tank landing ships LST-477, 24°40'N, 141°44'E, and LST-809, 24°08'N, 142°06'E; and net cargo ship Keokuk (AKN-4), 24°36'N, 141°48'E. Small carrier Langley (CVL-27) is damaged by bomb. Japanese mortar fire damages tank landing ship LST-390, 24°46'N,141°19'E. Collisions account for damage to destroyer Williamson (DD-244) and oiler Suamico (AO-49), 24°39'N, 142°01'E; destroyer Bradford (DD-545) and tank landing ship LST-812; attack cargo ship Yancey (AKA-93) and heavy cruiser Pensacola (CA-24), 24°46'N, 141°19'E. Heavy weather damages medium landing ship LSM-43. Tank landing craft LCT-175 founders and sinks in heavy weather, 04°27'N, 133°40'E. Destroyer Renshaw (DD-499) is torpedoed by Japanese submarine RO 43 south of Siquijor Island P.I., 24°36'N, 141°48'E. RO 43 escapes a ten-hour search by destroyers Waller (DD-466) and Shaw (DD-373) around Siquijor Island. Japanese Coast Defense Vessel No.72 and Coast Defense Vessel No.150 are damaged in collision off Wenchow, China. Submarine Gato (SS-212) sinks Japanese merchant cargo ship Tairiku Maru in Yellow Sea off west coast of Korea, 35°24'N, 125°23'E. Japanese merchant tanker Eiyo Maru, damaged by submarine Guavina (SS-362) the previous day, sinks off Cape Padaran, French Indochina, 11°22'N, 109°22'E. Japanese cargo ship Fukusei Maru sinks after running aground off Cape Shirazaki, Honshu, 41°00'N, 142°00'E. -
Naval History On This Day, Any Nation
flying_dutchman2 replied to Kevin's topic in Nautical/Naval History
February 20 1653 - Defeat of Dutch fleet under Admiral Van Tromp by Admiral Blake off Portsmouth. 1962 - USS Dixie (AD-14) rescues lone crewman aboard a sailing yawl adrift for four days. 1974 - S-3A Viking ASW aircraft (carrier jet) introduced officially, given to VS-41. If the WWII history is too boring as so much happened, let me know and I will try to condense it WWII On this day in WWII in 1940 and 1941, nothing happened (well something happened.........) 1942 February 20, Fri. General Commander in Chief U.S. Fleet directs Atlantic and Pacific Fleets to establish Amphibious Forces. Pacific TF 11 (Vice Admiral Wilson Brown Jr.), en route to attack Rabaul, is spotted by Japanese reconnaissance flying boats (Yokohama Kokutai). Although the American attack is cancelled, Japanese naval land-based bombers (4th Kokutai) attack TF 11, centering their efforts upon Lexington (CV-2). In the ensuing battle off Bougainville, combat air patrol F4Fs (VF 3) and SBDs (VS 2) (the latter utilized in the anti-torpedo plane role) and ships' antiaircraft fire annihilate the enemy formations. In the battle, Lieutenant Edward H. O'Hare (VF 3) shoots down five bombers in six minutes, a phenomenal performance that earns him the Medal of Honor. Submarine Swordfish (SS-193) embarks Philippine President Manuel Quezon, his wife and two children, Vice President Sergio Osmeña, and other Philippine government officials off Mariveles. In the wake of the Japanese carrier strike the day before, Darwin, Australia, is abandoned as an Allied naval base. RAF and USAAF air operations from the field outside the port, however, will continue. Japanese invade Timor Island, N.E.I. Destroyer Stewart (DD-224), damaged by shellfire in the Battle of Badoeng Strait the previous night, suffers further damage when, improperly shored and placed on blocks, she rolls on her port side in a Dutch floating drydock at Surabaya, Java. Atlantic U.S. freighter Delplata is torpedoed by German submarine U-156 about 60 miles west of Martinique, 14°45'N, 62°10'W. Small seaplane tender Lapwing (AVP-1) rescues the 52 survivors (including the 13-man Armed Guard) and then scuttles the irreparably damaged merchantman with gunfire. Unarmed U.S. freighter Azalea City is torpedoed and sunk by German submarine U-432 about 125 miles east-southeast of Ocean City, Maryland, 38°00'N, 73°00'W. There are no survivors from the 38-man crew. Europe Admiral William D. Leahy writes to President Roosevelt that he expects a recall "for consultation" since the French have not responded positively to Roosevelt's message of 11 February. President Roosevelt, while sympathetic to Admiral Leahy's position, subsequently informs his ambassador to Vichy that "to hold the fort [in Vichy] is as important a military task as any other in these days." Leahy is thus retained in France. On the same day that Leahy writes to the President, however, German submarine U-156 puts in to Martinique to put ashore one of the men wounded by the premature barrel explosion on 16 February (see 21 February). 1943 20 February, Sat. Pacific Motor minesweeper YMS-founders and sinks, Coos Bay, Oregon. Submarine Albacore (SS-218) torpedoes and sinks Japanese destroyer Oshio about 140 miles north-northwest of Manus, Admiralty Islands, 00°50'S, 146°06'E. Albacore escapes damage in the resultant depth-charging by an accompanying enemy warship. Submarine Halibut (SS-232) torpedoes and sinks Japanese transport Shinkoku Maru about 450 miles north of Ponape, Carolines, 15°09'N, 159°30'E. Japanese auxiliary patrol vessel Yoshida Maru is damaged by mine (probably laid by submarine Sunfish (SS-281) between 14-17 December 1942), 34°28'N, 137°20'E. Japanese army cargo ship Aragane Maru sinks as the result of damage inflicted by gunfire from heavy cruiser Indianapolis (CA 35) and destroyers Coghlan (DD-606) and Gillespie (DD-609) off Attu, 53°05'N, 171°22'E. Atlantic German submarines sight New York-bound convoy ON 166, which is escorted by Coast Guard cutters Spencer (WPG-36) and Campbell (WPG-32), one British and four Canadian corvettes. During the night of 20-21 February, Coast Guard cutter Spencer (WPG-36) depth charges U-604. USAAF B-24 locates German prize tanker Hohenfriedberg 500 nautical miles southwest of Cape Finisterre; consequently, British heavy cruiser HMS Sussex intercepts and sinks the Axis vessel. Indian Ocean Hospital ship Atlantis rescues the last 10 survivors of U.S. freighter Deer Lodge, torpedoed by German submarine U-607 about 60 miles east of Port Elizabeth, South Africa on 16 February. 1944 20 February, Sun. -- Pacific TG 58.1 (Rear Admiral John W. Reeves Jr.) planes bomb Japanese installations on Jaluit Atoll, Marshalls. Submarine Pogy (SS-266) sinks Japanese cable layer Nanyo Maru about 100 miles east of Formosa, 24°12'N, 123°20'E, and merchant cargo ship Taijin Maru northeast of Formosa, 24°14'N, 123°17'E. USAAF B-24 damages Japanese cargo vessel Tasmania Maru northwest of Wewak. Mediterranean Tank landing ship LST-348 is sunk by German submarine U-410, 40 miles south of Naples, Italy, 40°57'N, 13°14'E. LCT-340 founders and sinks in heavy weather off coast of Algeria, 36°49'N, 01°55'E. 1945 20 February, Tue. -- Pacific Army troops, covered by USMC aircraft, are landed on Biri Island P.I., to insure control of San Bernardino Strait. Off Iwo Jima, light cruiser Biloxi (CL-80) is hit by friendly fire, 25°47'N, 141°15'E; destroyer Bradford (DD-545) collides with uncharted submerged wreckage, 24°45.8'N, 141°19.44'E; attack transports Napa (APA-157) and Logan (APA-196) are damaged in collision, 24°46'N, 141°19'E; tank landing ship LST-779 and medium landing ship LSM-216 are damaged by mortar fire. Submarine Guavina (SS-362), attacking Japanese convoy rounding Cape Padaran, French Indochina, damages merchant tanker Eiyo Maru, 11°22'N, 109°22'E. Submarine Hawkbill (SS-366), attacking Japanese convoy about 175 miles northwest of Singapore, sinks merchant cargo ship Daizen Maru, 00°42'S, 106°18'E. Although Hawkbill claims sinking one other cargo vessel, the two ships in company with the lost freighter, Kanto Maru and Nankai Maru, survive unscathed. Submarine Pargo (SS-264) sinks Japanese destroyer Nokaze off Cape Varella, French Indochina, 12°48'N, 109°38'E; destroyer Kamikaze, in company with Nokaze at the time of Pargo's attack, unsuccessfully counterattacks with depth charges. Submarine Pintado (SS-387) is damaged by aerial bomb, Gulf of Siam, 07°25'N, 111°56'E, but remains on patrol. Japanese army ship Rozan Maru is sunk by mine below Taku, China. Japanese cargo vessel No.34 Kashiwa Maru is sunk by mine off Surabaya. Marc -
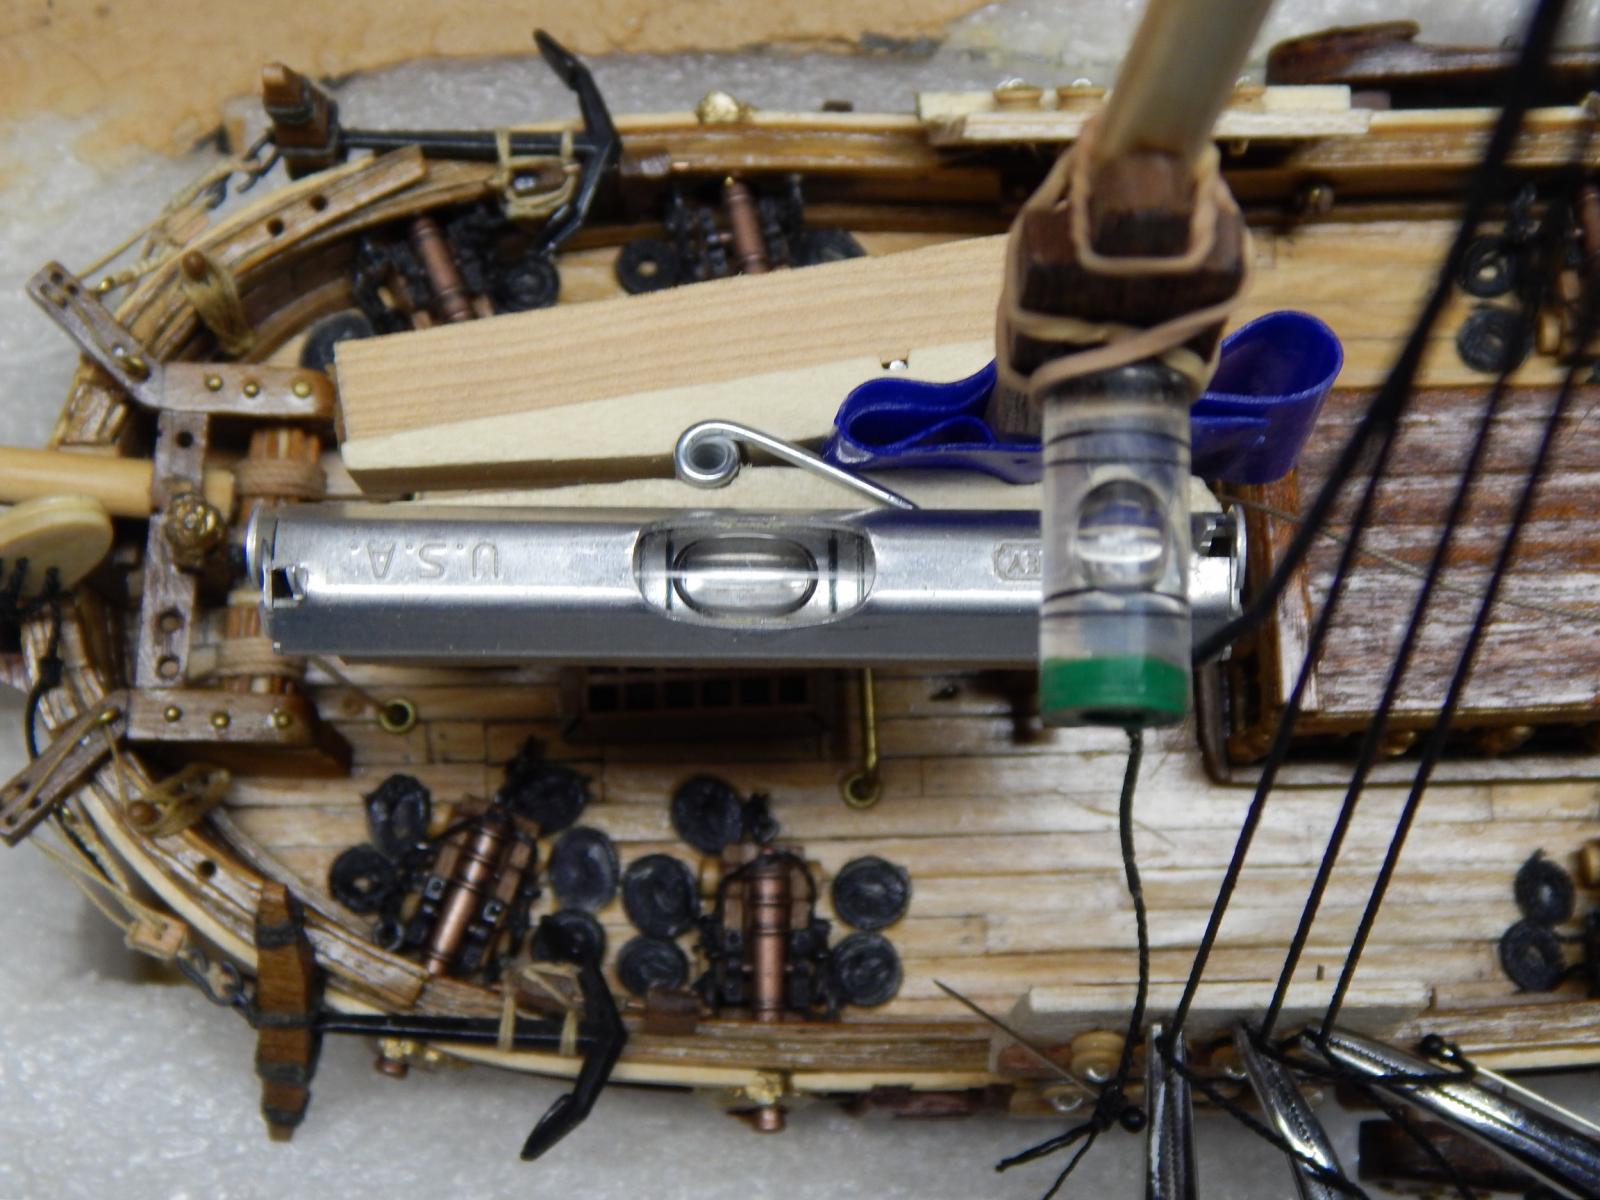
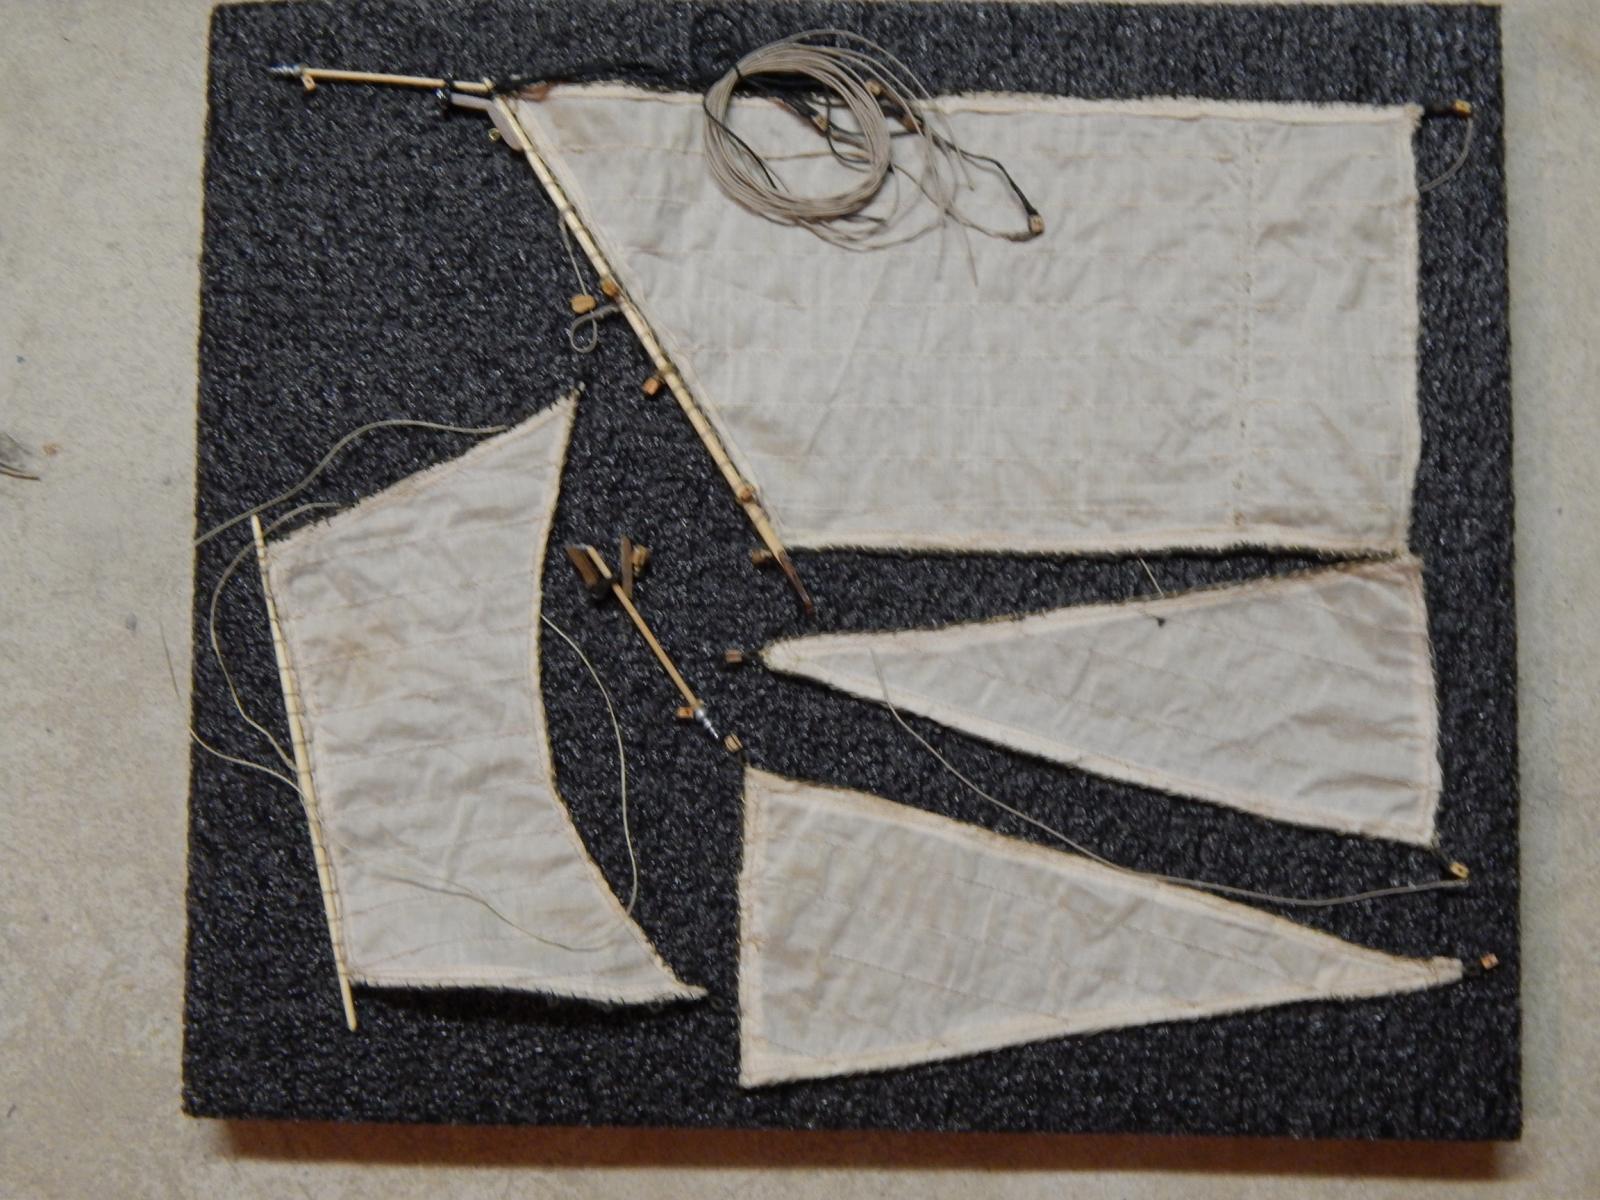
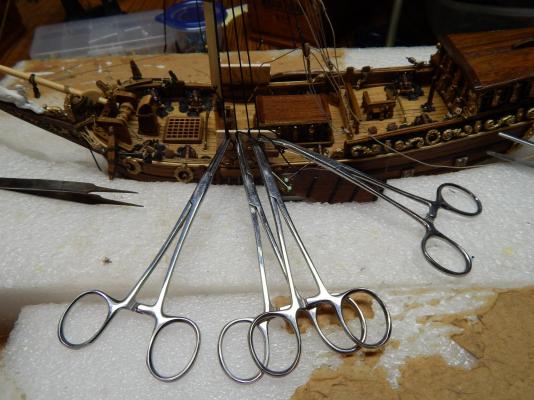
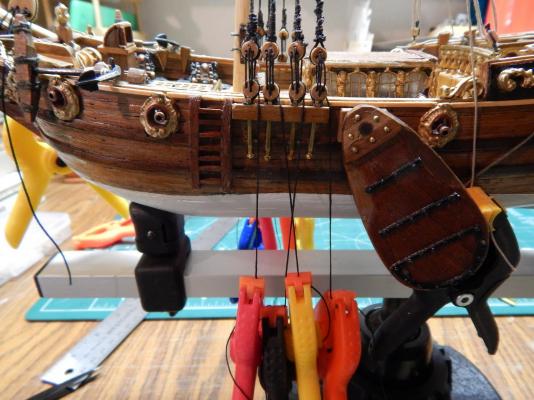
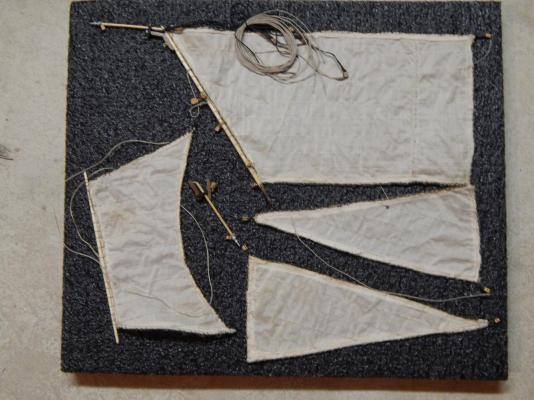
Started on the shrouds, I use hemostats the pinch the ropes together around the dead eyes so I can serve them. Once all the dead eyes are in place, I connect them and use small clamps (weight) to keep the rope taught. Then I adjust the rigging so shrouds are not too slack, the mast is as straight as possible and the dead eyes are even. Once it looks good, I will complete the shrouds. I use little levels to keep the boat straight. Of course the work table has to be straight as well. Completed sails with bolt rope, clew lines, blocks, roping, spars and a gaff.

- 85 replies
-
- 5
-
-
- yacht mary
- mamoli
- (and 1 more)
-
Yes, I do and yes, she is not the "norm". Very few people built boats like these. Except the Dutch modelers on this site. The Mary http://modelshipworld.com/index.php?/topic/4294-the-first-royal-dutch-yacht-%E2%80%9Dmary%E2%80%9D-1646/ It is heavily bashed as she is not correct. Not much has changed in a hundred years (1650-1750) when it came to rigging and sails of the yachts. So I followed the Plans and the books from the Utrecht and some Dutch Paintings. I like the boat and all types of yachts. If you look at my signature, these are the boats I plan to build. Marc
-
This boat looks beautiful. "Complete", sails, anchor and paddles for rowing. Personally, I think a boat is not complete when it doesn't have sails on it. I know the boat is a small scale so all the details are intense. Just gorgeous and I am drooling over the details. Marc
-
WOW, pre-made sails, I have never seen that before. That is one big and long boat. Marc