flying_dutchman2
-
Posts
1,735 -
Joined
-
Last visited
Content Type
Profiles
Forums
Gallery
Events
Everything posted by flying_dutchman2
-

Naval History On This Day, Any Nation
flying_dutchman2 replied to Kevin's topic in Nautical/Naval History
1498 - Christopher Columbus on his third voyage discovers the island of Trinidad -
Hi Jack; I was perusing the site for different built logs and saw yours. Great looking built. Lots of very fine detailed work. Excellent work. Love the uniqueness of how the planking overlaps the next plank. The Vikings knew how to built their boats. Thanks for the link of the steam bending kit. Using a PVC pipe is better than the wood box. The wood would warp with all that water. The nails always make a ship look more realistic and I like the way you did this and you are using a divider? Unique tool for that. btw. As usual your nature photography is superb. The Atlas moth is awesome. Pristine and looks like it just emerged as the wings are not yet frayed. The cucumber beetle on the daisy is nice and crisp as well. Marc
-
WOW, that is beautiful. Excellent workmanship. Marc
-
I have this book as well and it is excellent. Well written, great pictures and detailed. Marc
-
Batavia by *Hans* - FINISHED
flying_dutchman2 replied to *Hans*'s topic in - Build logs for subjects built 1501 - 1750
It's a beauty and the colors are so vibrant. Marc -
Batavia by *Hans* - FINISHED
flying_dutchman2 replied to *Hans*'s topic in - Build logs for subjects built 1501 - 1750
I misspelled "Rode". It should be "Roode" Probably somewhere on earth and maybe a ship as well. I know it is a restaurant in Amsterdam -
Batavia by *Hans* - FINISHED
flying_dutchman2 replied to *Hans*'s topic in - Build logs for subjects built 1501 - 1750
Instead of the name "Batavia" the ship should be called "De Rode Leeuw" (The red Lion). Nicely sculpted. Marc -
Thank you for the complements. Overall I am pretty satisfied and there is room for improvement which will be on the next boat. But the Utrecht has to wait until Fall. I am still working on a static 52" freighter, the "Scout" (kit made by Sterling - PA). My father-in-law worked on this but never finished it. Need to get it done and donate to Chicago Maritime Museum. Marc
-
Put it on my wishlist on Amazon. I like the pricing. New $290 and used $26.00 I wonder how they do this. Sometimes with books like this they use random numbers.
-
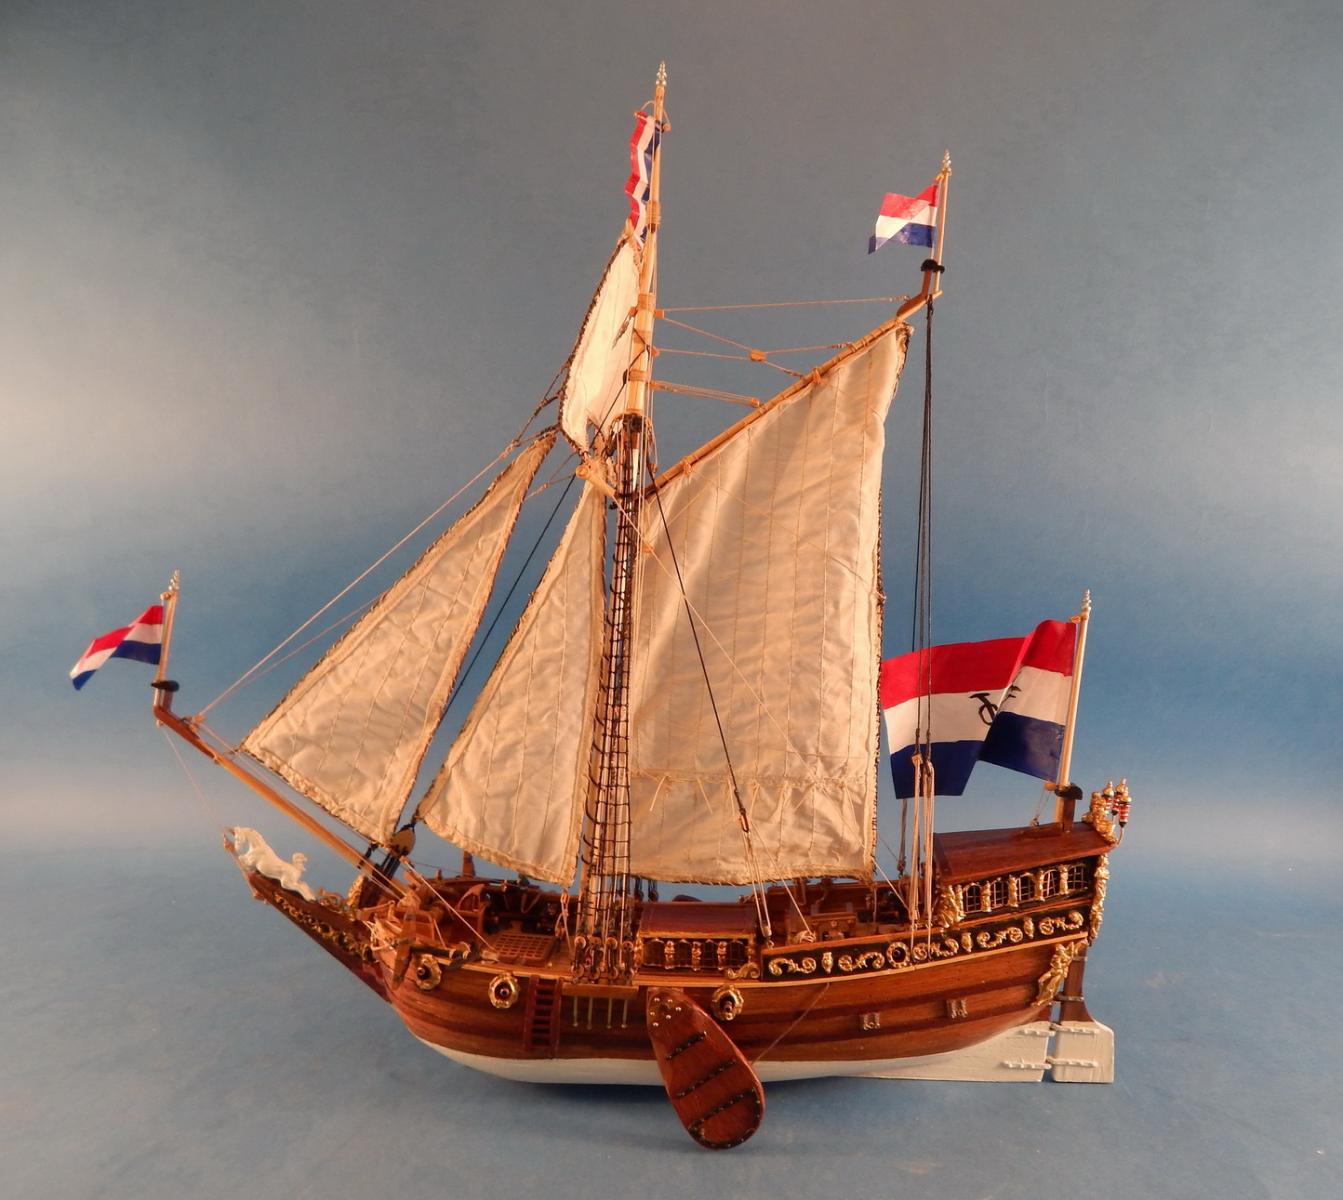
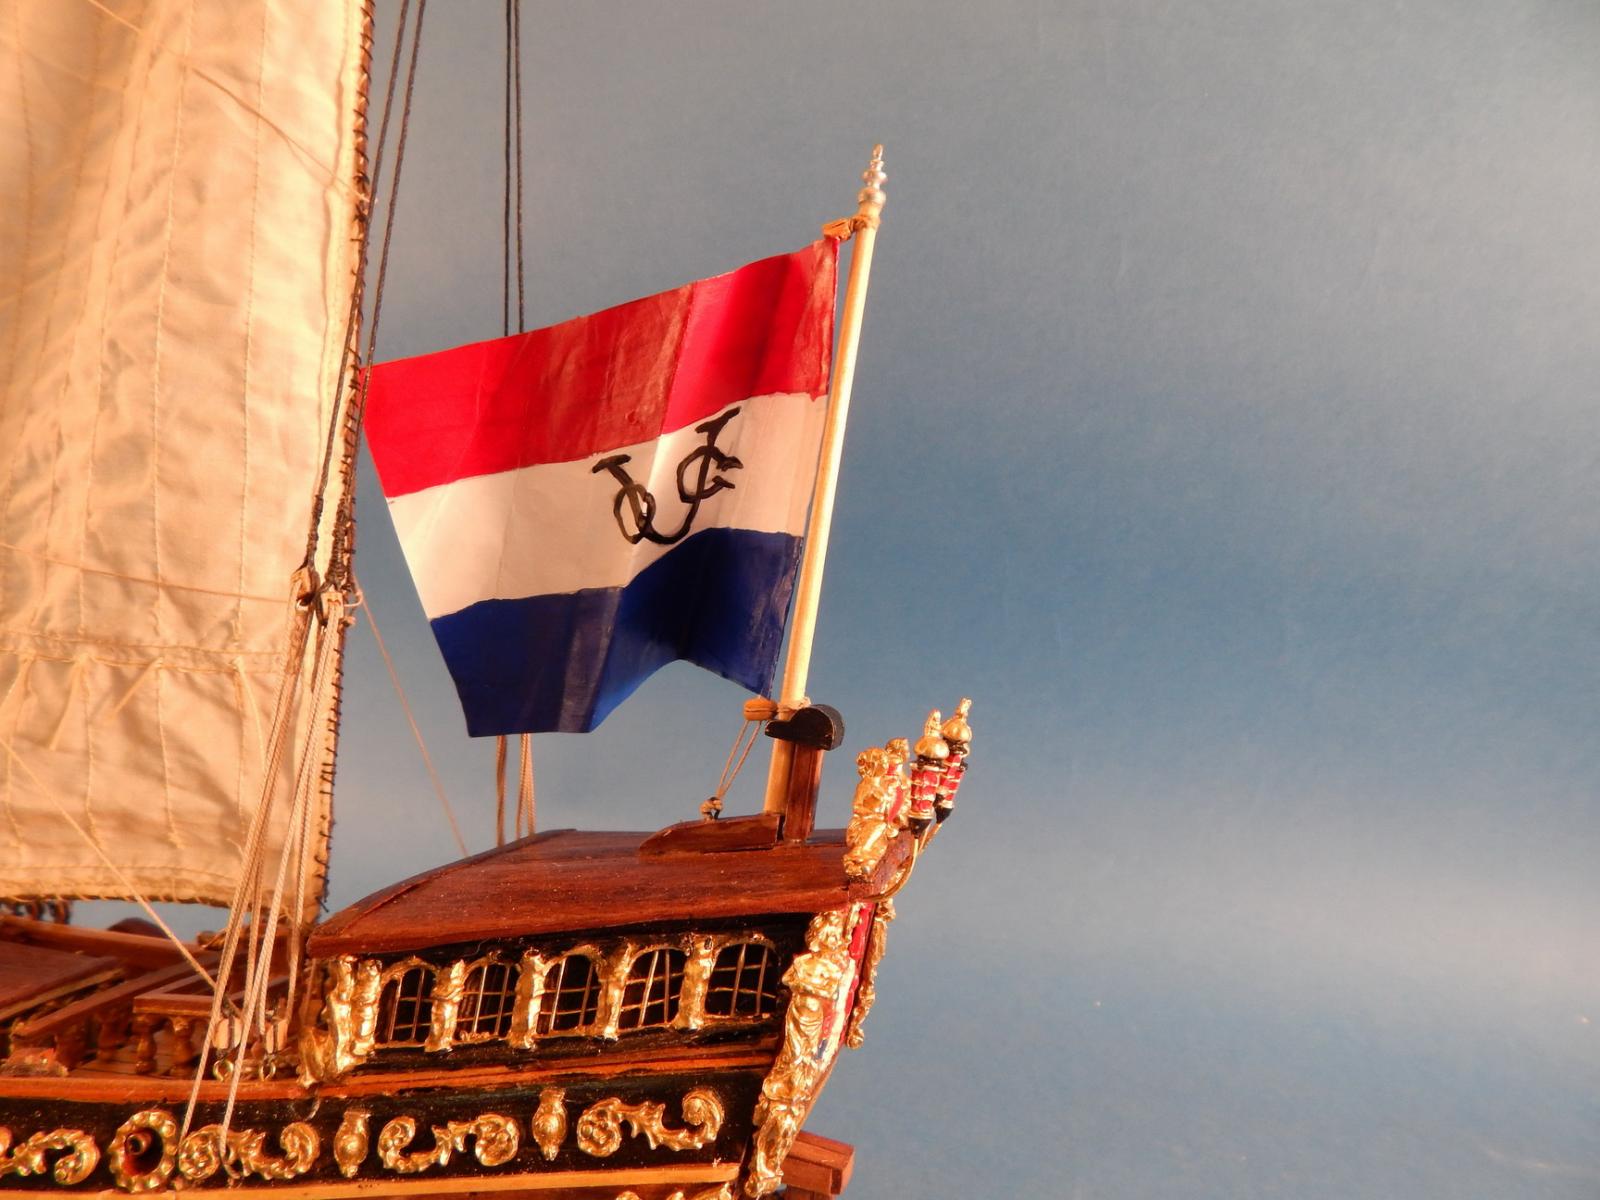
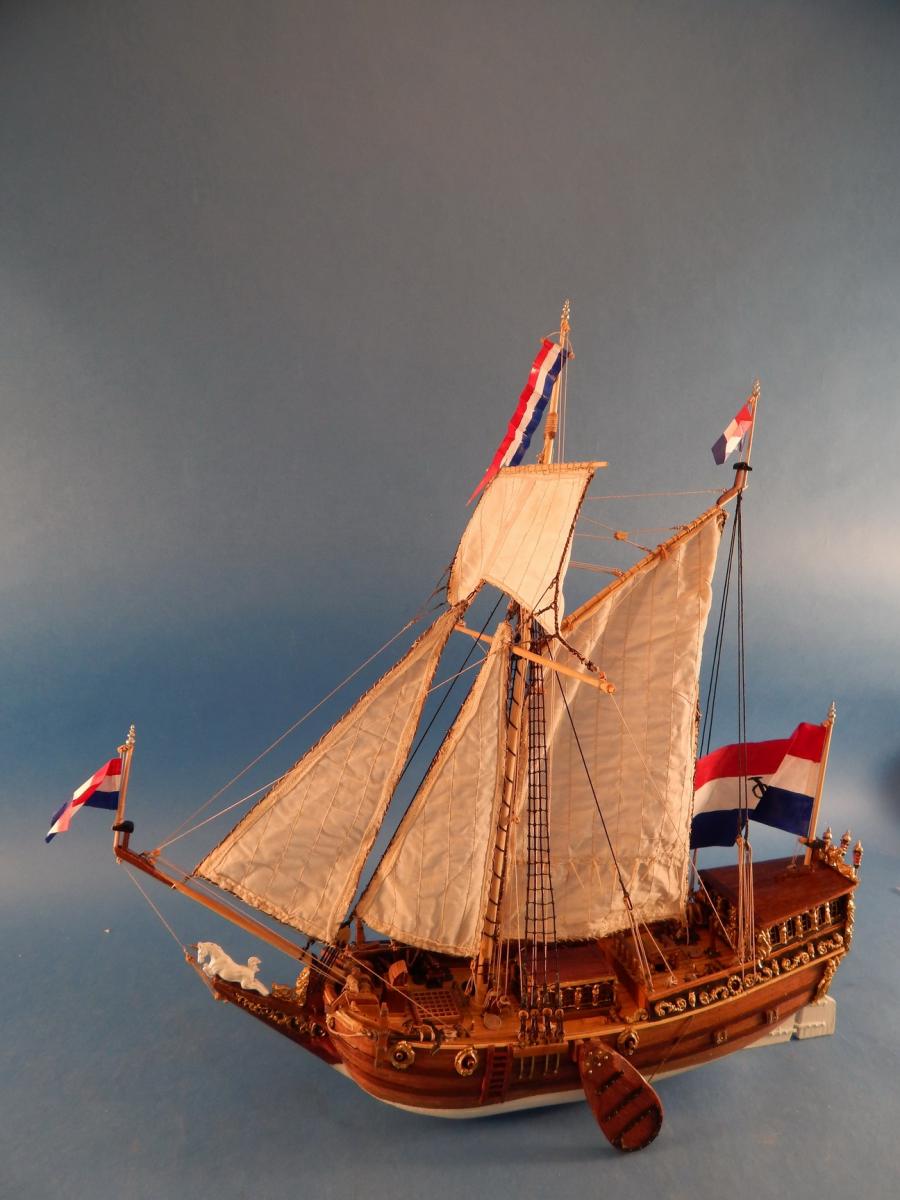
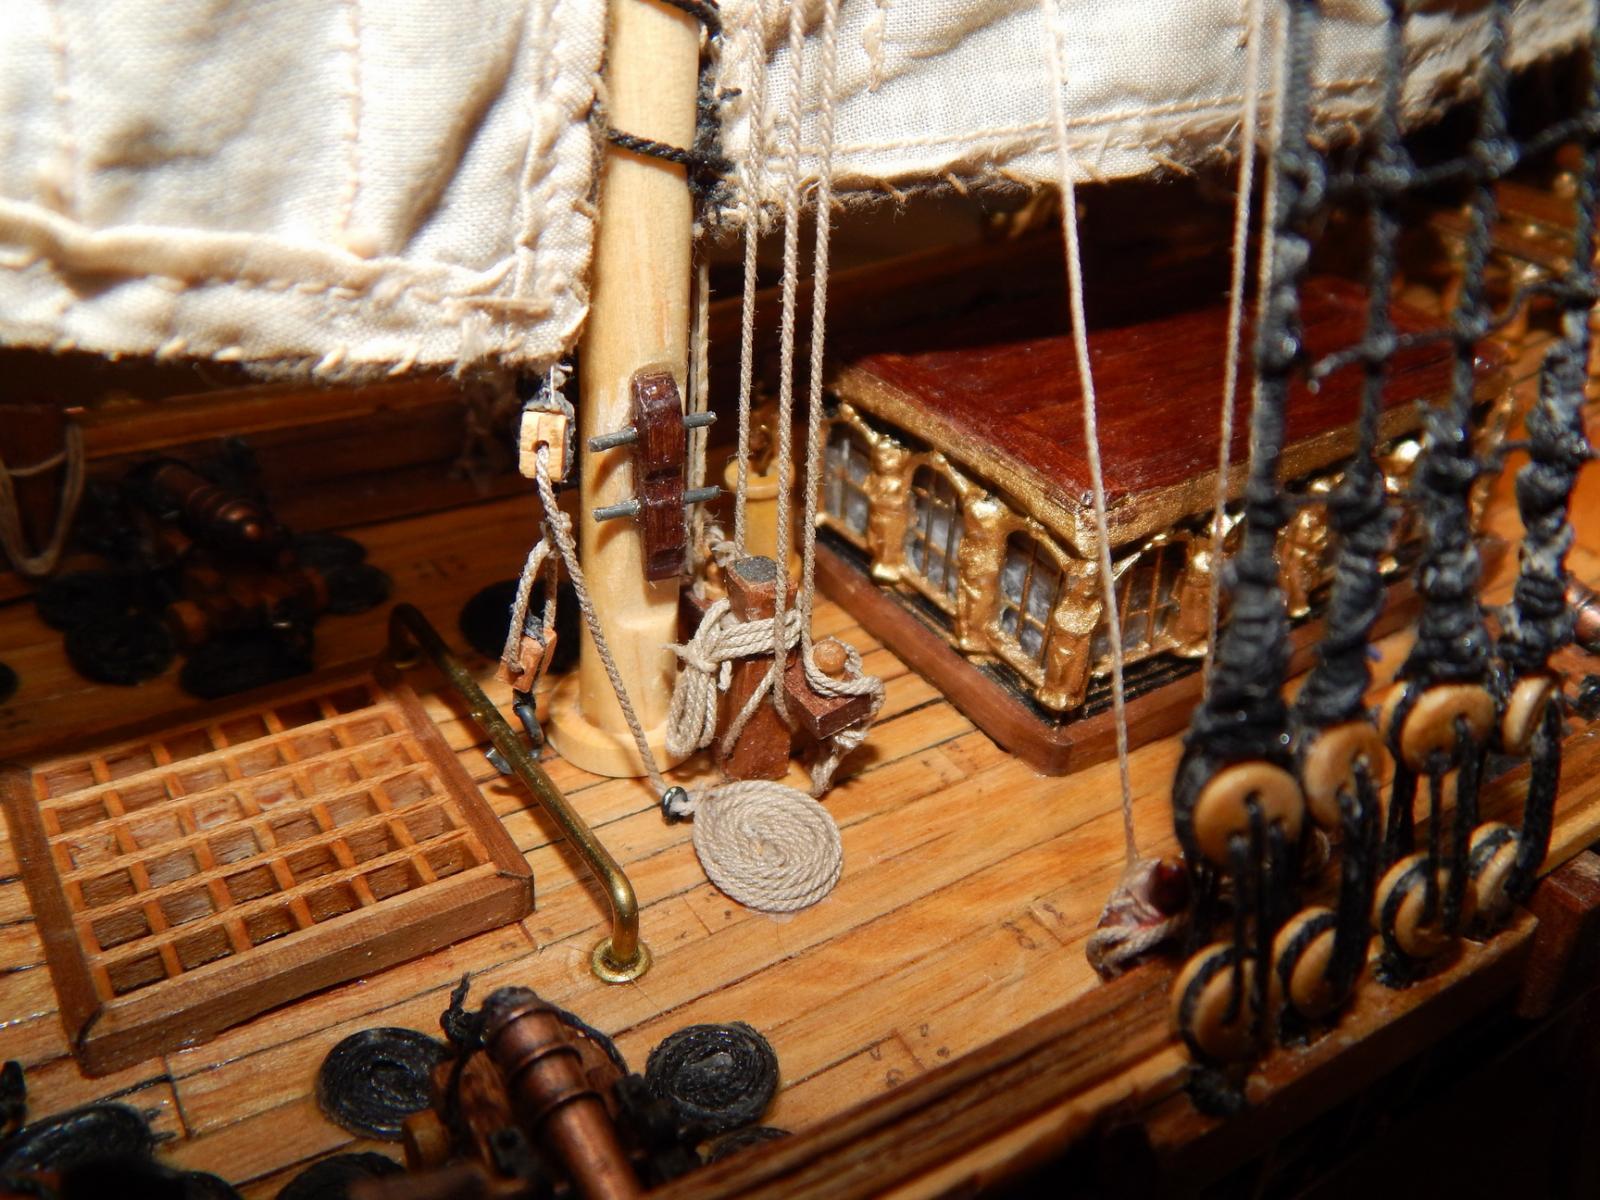
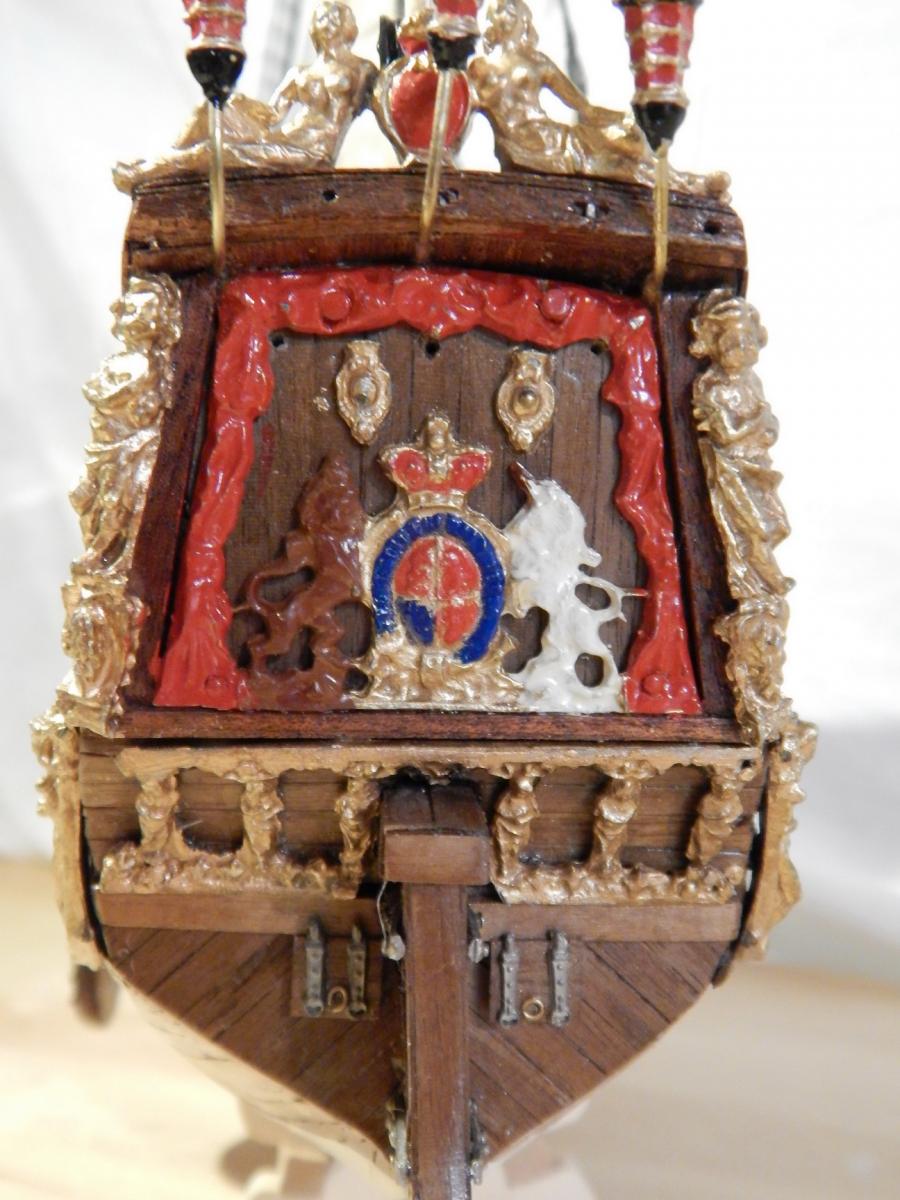
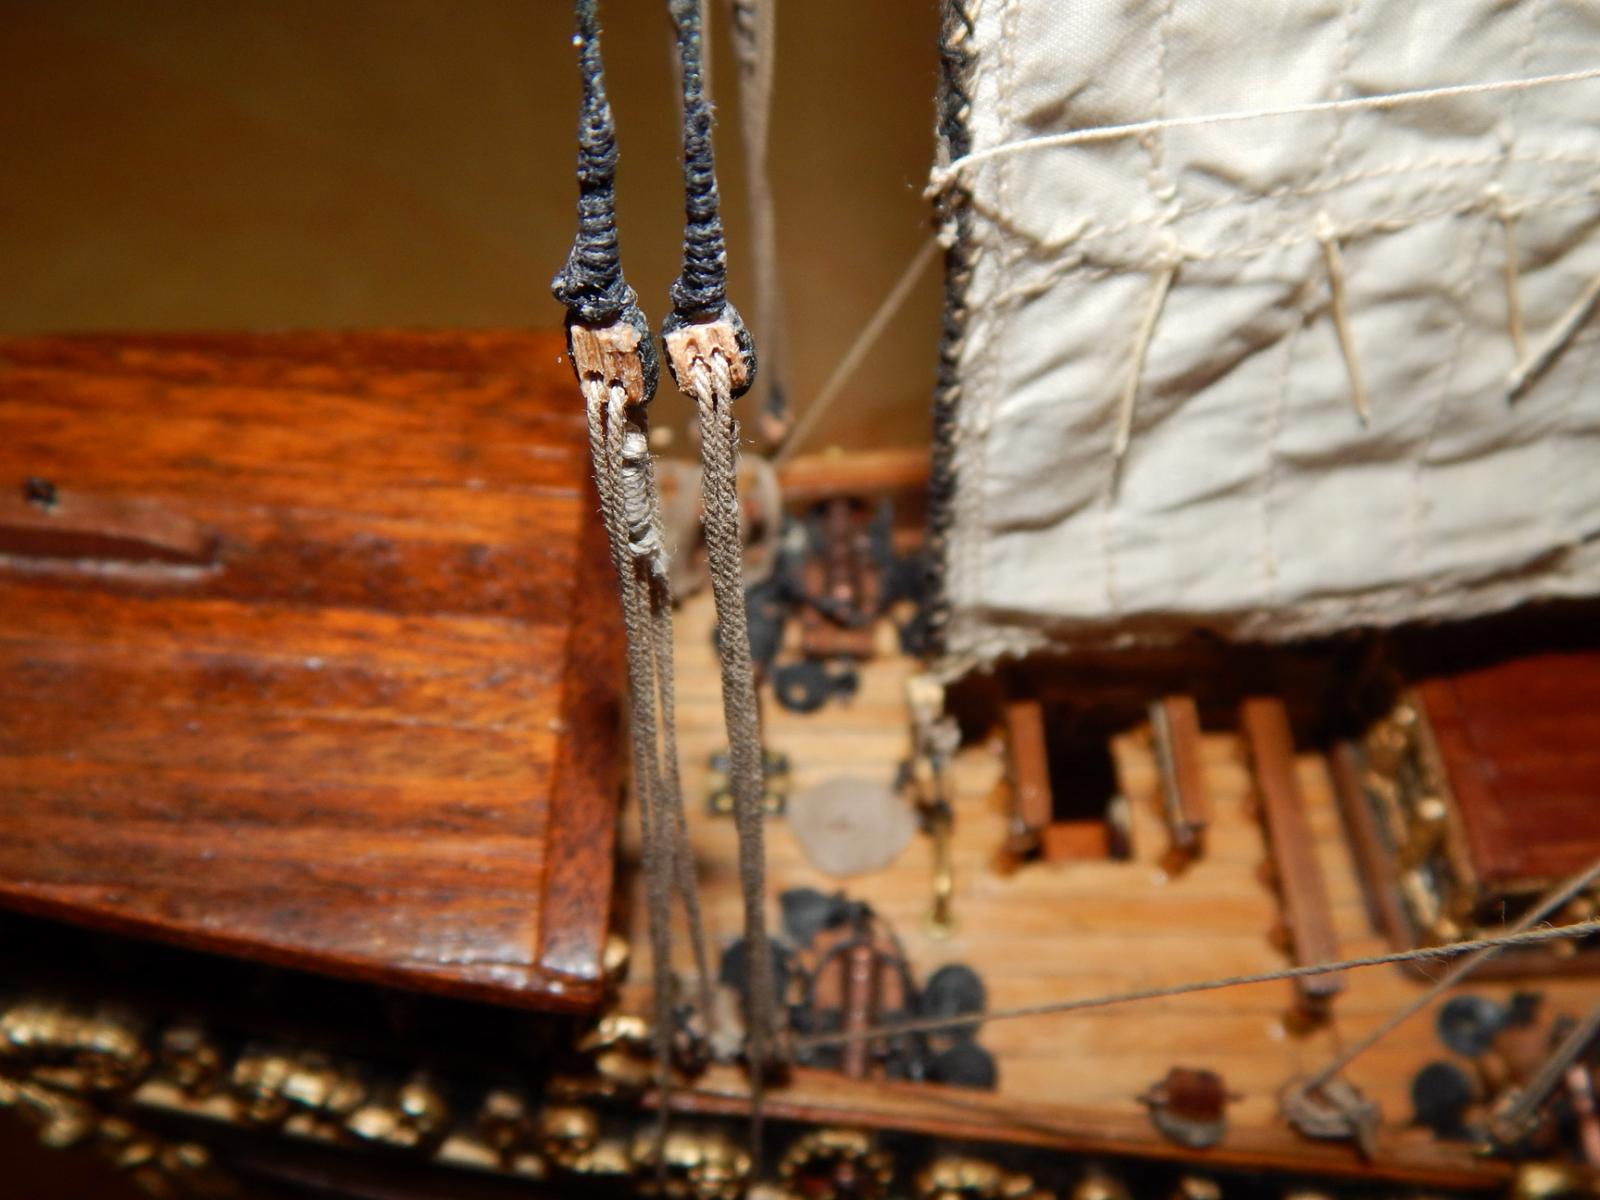
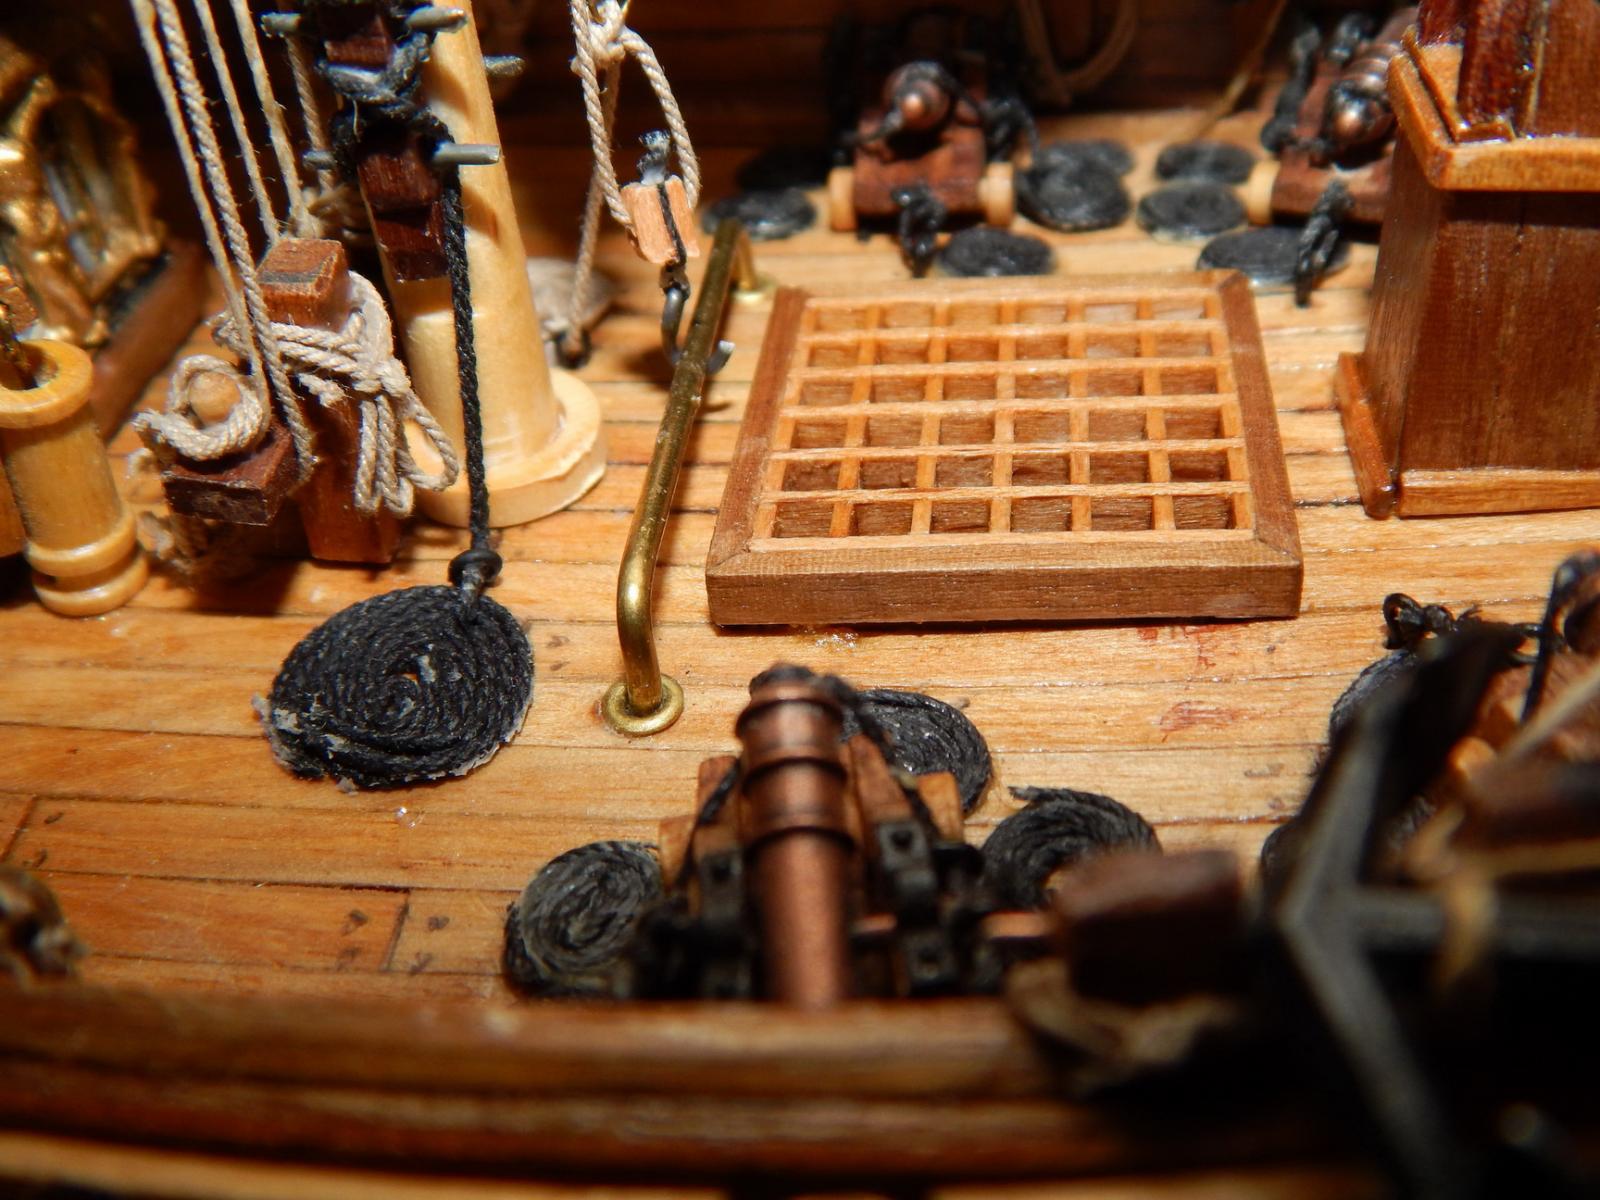
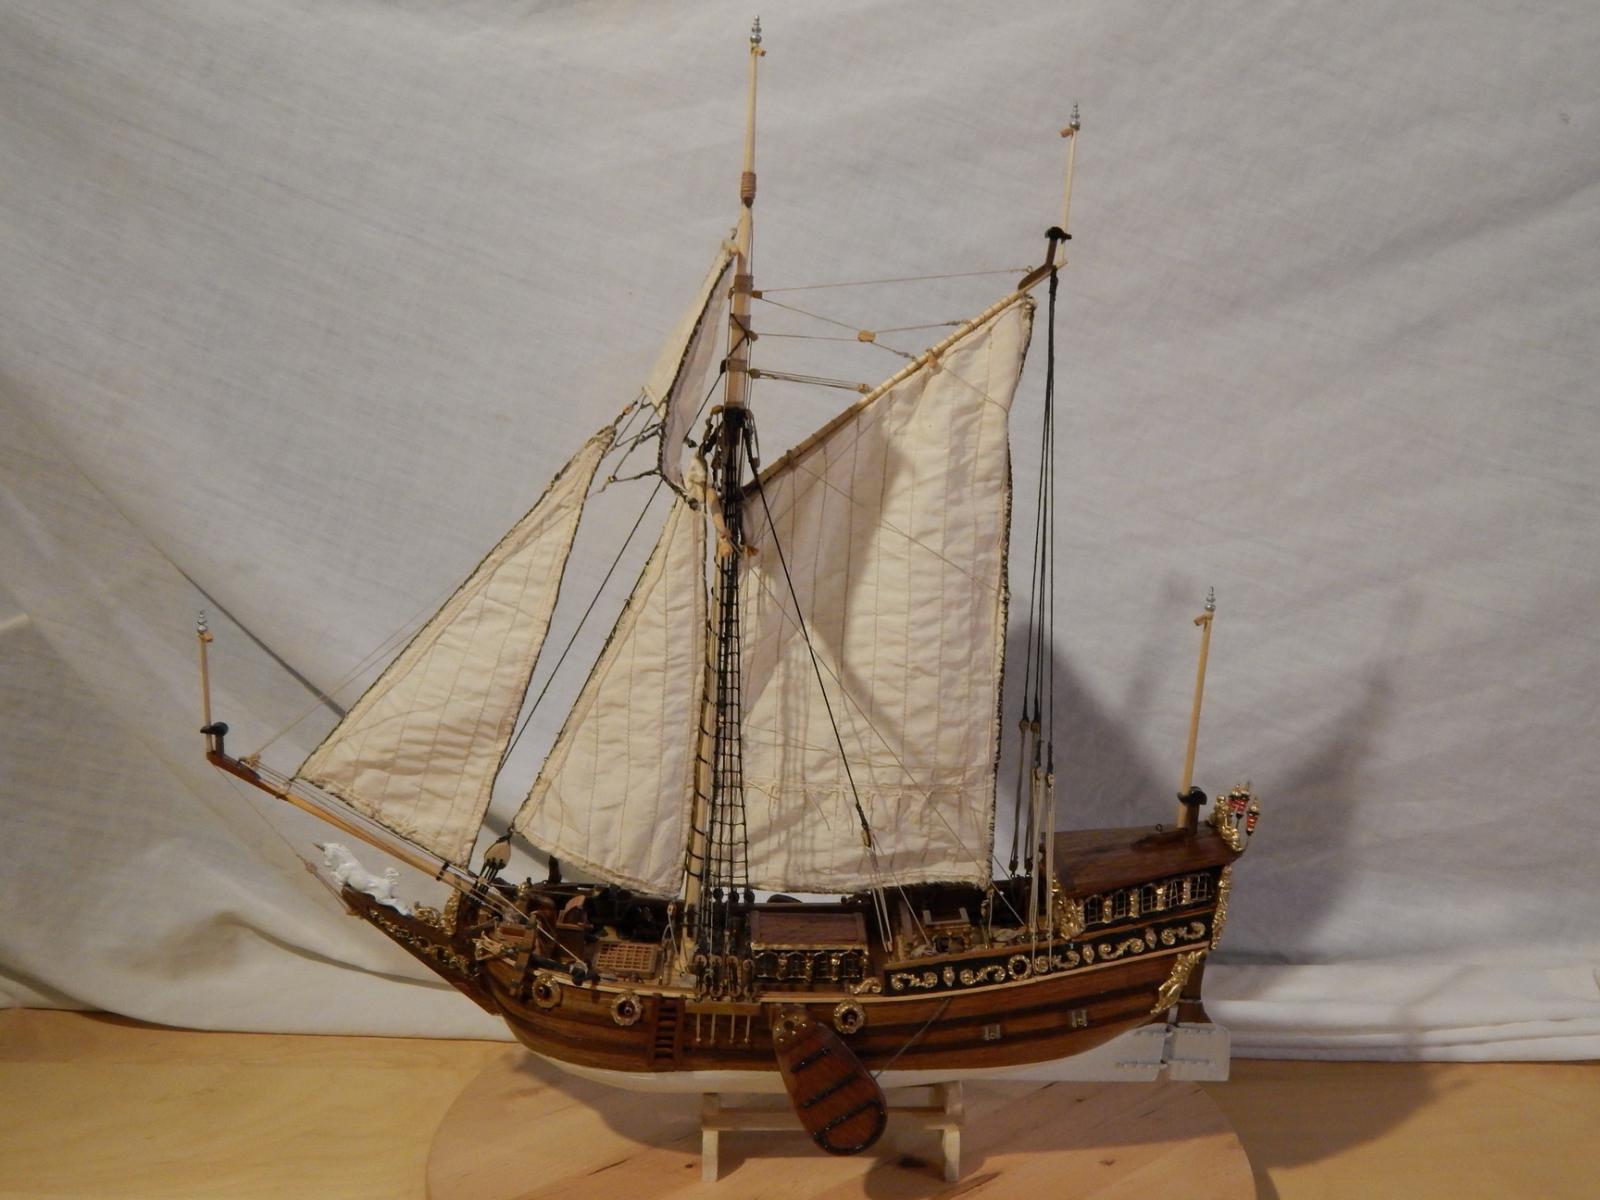
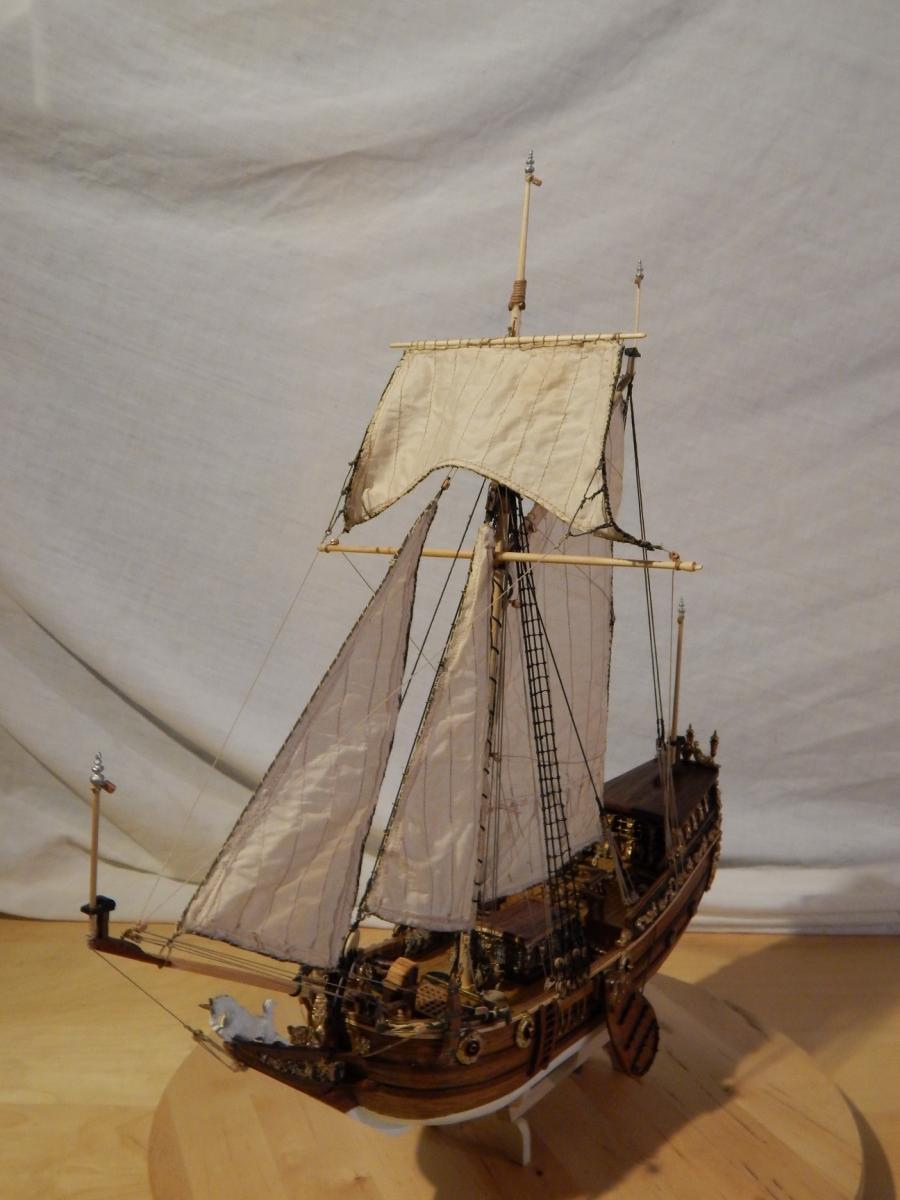
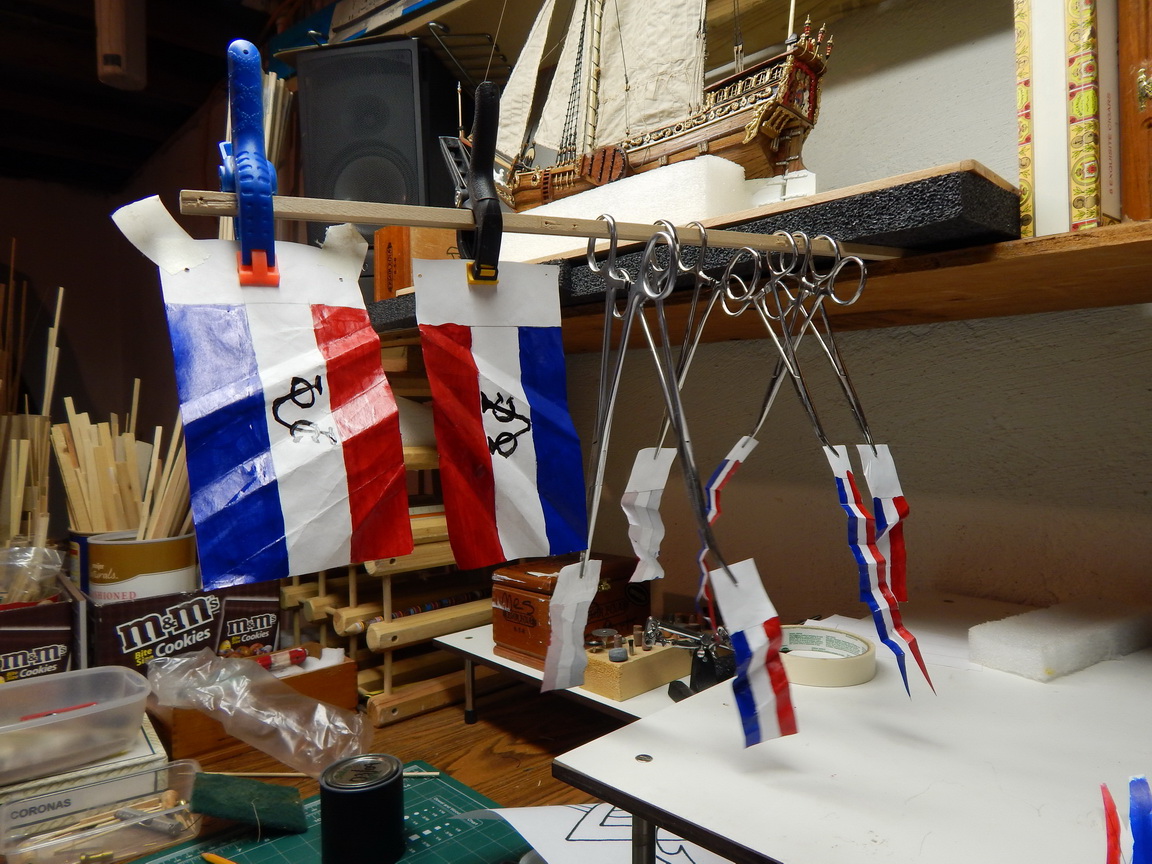
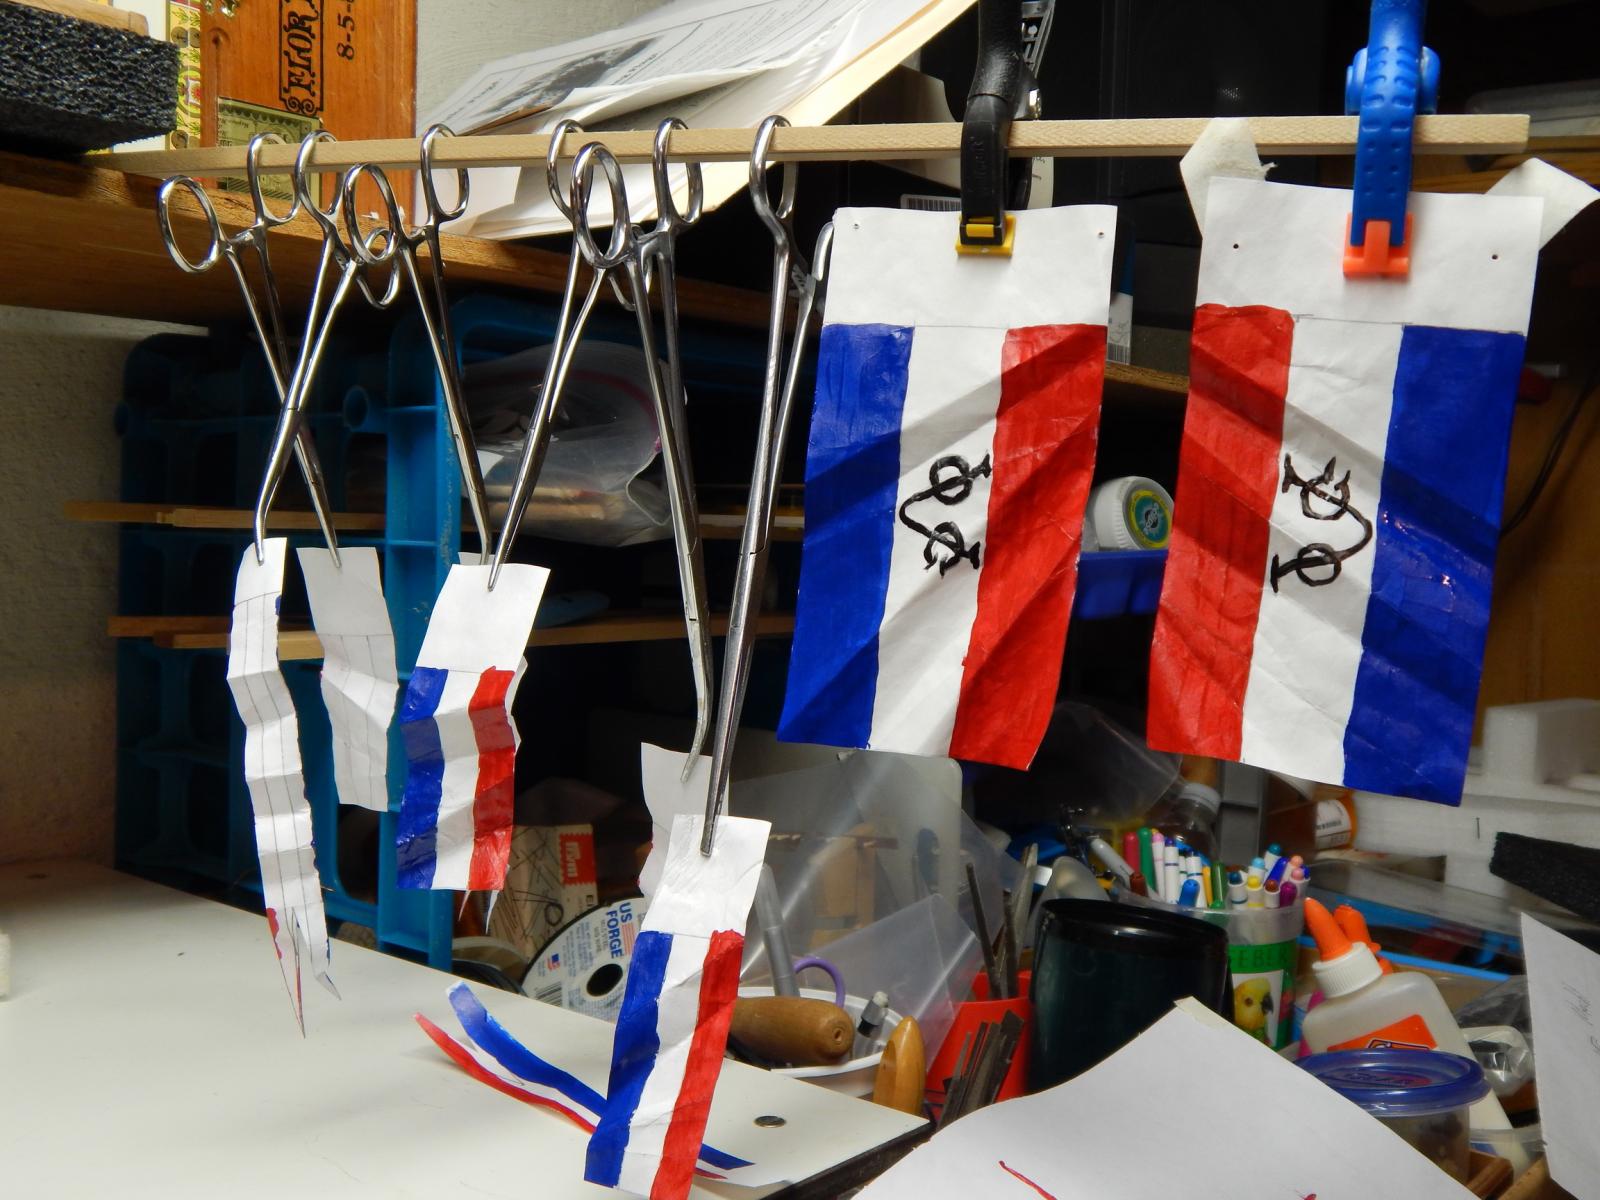
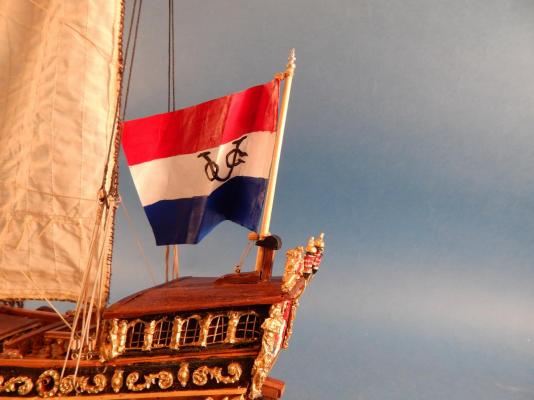
These are the last shots with the flags in place. Taken on a light table. I painted the VOC emblem on the flags as this was the era that the VOC had yachts. I omitted the one sided British flags that came with the kit. In a couple of months I will add the display case pictures. Thanks for viewing. Marc


- 85 replies
-
- 8
-

-
- yacht mary
- mamoli
- (and 1 more)
-
Here are some of the last pictures of the 99.9% completed model. Flags still need some Dullcoat. The stand needs to be finished and the display case needs to be built. This will not happen for several months as I am very busy at work. Spring started really late so everything is extended. Furthermore, due to the killer cold winter we had, there is a need for many replacement plants needed in the landscape. I order 50 - 3 gls pot, red roses (Double Knockout) and they are out the door in a week. I just can't keep up with the demand. I manage a garden center. So here goes Marc Flags are drying. More drying.


-
CAD software
flying_dutchman2 replied to cog's topic in CAD and 3D Modelling/Drafting Plans with Software
Frank; Thanks for the link to Inkscape. I will try this. I did use progeCAD but I wasn't that satisfied with the results. (I know I spent much money on this) Changed to TurboCad and the IMSI forums have helped me tremendously. I already use Delftship and GIMP. The above combination works good for me. I am not a student or teacher so I can't get cheap software. Marc -
Batavia by *Hans* - FINISHED
flying_dutchman2 replied to *Hans*'s topic in - Build logs for subjects built 1501 - 1750
Nice lamp and I like the dogs head. The colors on this ship are very vivid. Marc -
Scott; I wondered about this holiday as well and my wife who is 1/4 Chippewa always thought it was a joke as she tells whoever brings it up that the native Americans where on this continent way before anyone else. She also thinks there should be "Native American" day. They have a holiday for every ethnic minority but not them. Wayne; Interesting information. Thanks for sharing. Marc
-
There is another book from Ab Hoving and Cor Emke, but it is not on the list. This will be for Summer or Fall. Similar boat as the Utrecht. Hoving & Emke are picking 10 or 15 of the many flat and round bottom boats in the Netherlands and writing a history and adding plans. Just in time when I finish the Utrecht. Marc
-
Batavia by *Hans* - FINISHED
flying_dutchman2 replied to *Hans*'s topic in - Build logs for subjects built 1501 - 1750
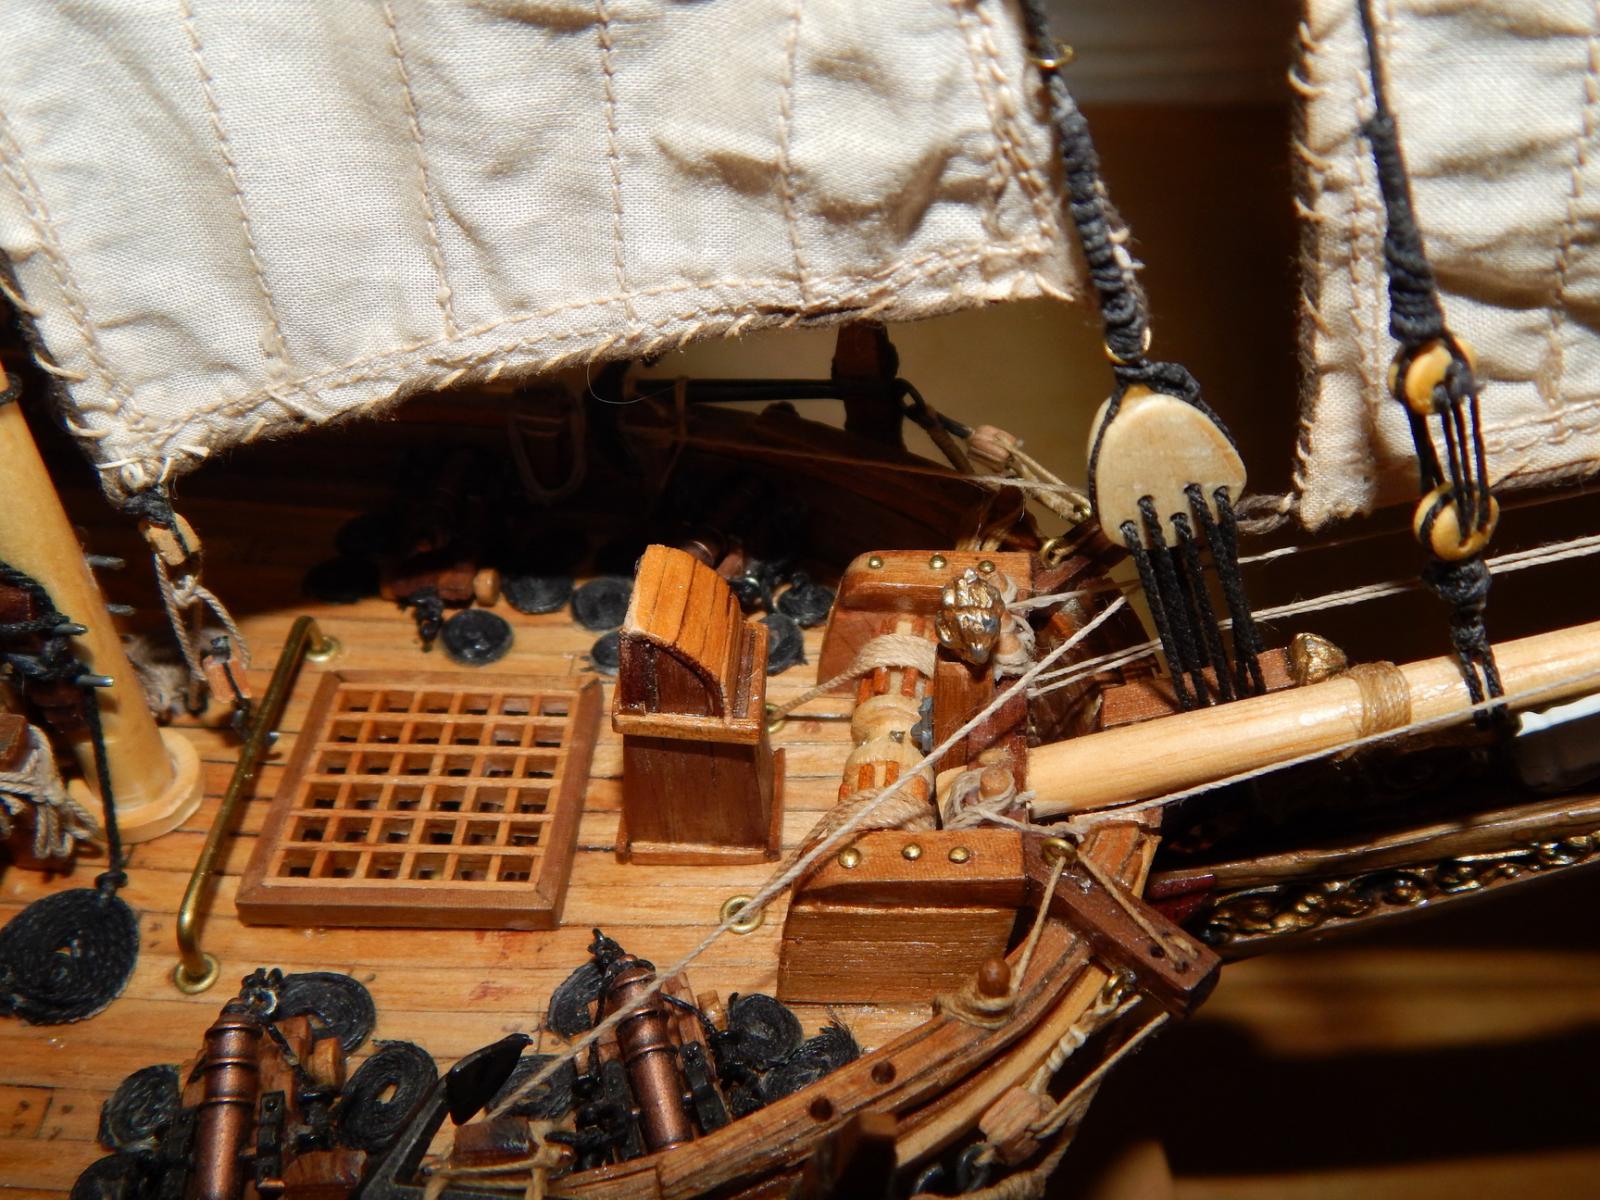
Hans; You are the first person that adds that detail to a ship. It is necessary and many a sailor fell through the hole in the ocean and drowned. On another note. The details on the Batavia are beautiful. You are pretty much adding everything that is on the replica and probably on the original ship. Marc -
Naval History On This Day, Any Nation
flying_dutchman2 replied to Kevin's topic in Nautical/Naval History
I picked up a book at gutenberg.org about the "History of Holland. Very interesting, very detailed and information I have never read before. The following naval officer is famous of capturing four fleeing galleons trapped on the Cuban coast. Hein captured 11,509,524 guilders of booty in gold, silver, and other expensive trade goods, such as indigo and cochineal, without any bloodshed. The capture of the treasure fleet was the company's greatest victory in the Caribbean. Pieter Pietersen Heyn (Hein) (25 November 1577 – 18 June 1629) was a Dutch naval officer and folk hero during the Eighty Years' War between the United Provinces and Spain. Early life Hein was born in Delfshaven (now part of Rotterdam), the son of a sea captain, and he became a sailor while he was still a teenager. In his twenties, he was captured by the Spanish, and served as a galley slave for about four years, probably between 1598 and 1602, when he was traded for Spanish prisoners. Between 1603 and 1607 he was again held captive by the Spanish, when captured near Cuba. In 1607, he joined the Dutch East India Company and left for Asia, returning with the rank of captain (of the Hollandia) five years later. In 1618, when he was captain of the Neptunus, both he and his ship were pressed into service by Venice. In 1621 he left his vessel behind and traveled overland to the Netherlands. In 1623, he became vice-admiral of the new Dutch West India Company (WIC) and sailed to the West Indies the following year. In Brazil, he briefly captured the Portuguese settlement of Salvador, personally leading the assault on the sea fortress of that town. In August with a small and undermanned fleet he sailed for the African west coast and attacked a Portuguese fleet in the strongly defended bay of Luanda but failed to capture any ships. He then crossed the Atlantic ocean again to try and capture merchant ships at the city of Vitória, but was defeated by a resistance organized by the local citizenry with the assistance of the Portuguese garrison. After finding that Salvador had been recaptured by a large Spanish-Portuguese fleet Hein returned home. The Dutch West India Company, pleased with Hein's leadership qualities, placed him in command of a new squadron in 1626. In subsequent raids during 1627 at Salvador, he attacked and captured over thirty richly laden Portuguese merchant ships before returning to the United Provinces. Modern historians today often classify Hein as a pirate, though he was more properly a privateer; the Dutch Republic was locked in mortal combat with the Habsburgs and Hein was among the most successful and famous commanders it employed during the Eighty Years' War. While many privateers behaved no better than common pirates, Hein was a strict disciplinarian who discouraged unruly conduct among his crews and had rather enlightened views for the times about "Indian" tribes, slaves and members of other religions. Also, he never was an individual privateer but rather commanded entire fleets of warships. Spanish treasure fleet Battle in the Bay of Matanzas In 1628, Admiral Hein, with Witte de With as his flag captain, sailed out to capture a Spanish treasure fleet loaded with silver from their American colonies and the Philippines. With him was Admiral Hendrick Lonck and he was later joined by a squadron of Vice-Admiral Joost Banckert, as well as by the pirate Moses Cohen Henriques. Part of the Spanish fleet in Venezuela had been warned because a Dutch cabin boy had lost his way on Blanquilla and was captured, betraying the plan, but the other half from Mexico continued its voyage, unaware of the threat. Sixteen Spanish ships were intercepted; one galleon was taken after a surprise encounter during the night, nine smaller merchants were talked into a surrender; two small ships were taken at sea fleeing, four fleeing galleons were trapped on the Cuban coast in the Bay of Matanzas. After some musket volleys from Dutch sloops the crews of the galleons also surrendered and Hein captured 11,509,524 guilders of booty in gold, silver, and other expensive trade goods, such as indigo and cochineal, without any bloodshed. The Dutch didn't take prisoners: they gave the Spanish crews ample supplies for a march to Havana. The released were surprised to hear the admiral personally giving them directions in fluent Spanish; Hein after all was well acquainted with the region as he had been confined to it during his internment after 1603. The capture of the treasure fleet was the company's greatest victory in the Caribbean. As a result, the money funded the Dutch army for eight months (and as a direct consequence, allowing it to capture the fortress 's-Hertogenbosch), and the shareholders enjoyed a cash dividend of 50% for that year. Hein returned to the Netherlands in 1629, where he was hailed as a hero. Watching the crowds cheering him as he stood on the balcony of the town hall of Leyden he remarked to the burgomaster: "Now they praise me because I gained riches without the least danger; but earlier when I risked my life in full combat they didn't even know I existed...". Hein was the first and the last to capture such a large part of a Spanish "silver fleet" from America. Lieutenant-Admiral He became, after a conflict with the WIC about policy and payment, Lieutenant-Admiral of Holland and West Frisia on 26 March 1629, and thus factual supreme commander of the confederate Dutch fleet, taking as flag captain Maarten Tromp. He died the same year, in a campaign against the Dunkirkers, the highly effective fleet of Habsburg commerce raiders and privateers operating from Dunkirk. As it happened his flotilla intercepted three privateers from Ostend. He deliberately moved his flagship in between two enemy ships to give them both simultaneous broadsides. After half an hour he was hit in the left shoulder by a cannonball and was killed instantly. He is buried in the Oude Kerk in Delft. Commemoration The Piet Hein Tunnel in Amsterdam is named in his honor, as is the former Dutch Kortenaer class frigate, Hr. Ms. Piet Heyn. A direct descendant of Hein was Piet Hein, a famous 20th century Danish mathematician, physicist and poet. A song praising Admiral Hein's capture of the Spanish "silver fleet" written in 1844 is still sung by choirs and children at primary school in the Netherlands. (I learned this song as well and still remember this.) Thanks for reading. Marc -
To dgbot and Jack P. thanks for the answer to my question. Will go to my nearest hobby shop and locate a little bottle. Marc
-
Thanks Dan. What is Dulcoat? I think Kurt mentioned that as well in the last meeting. Marc
-
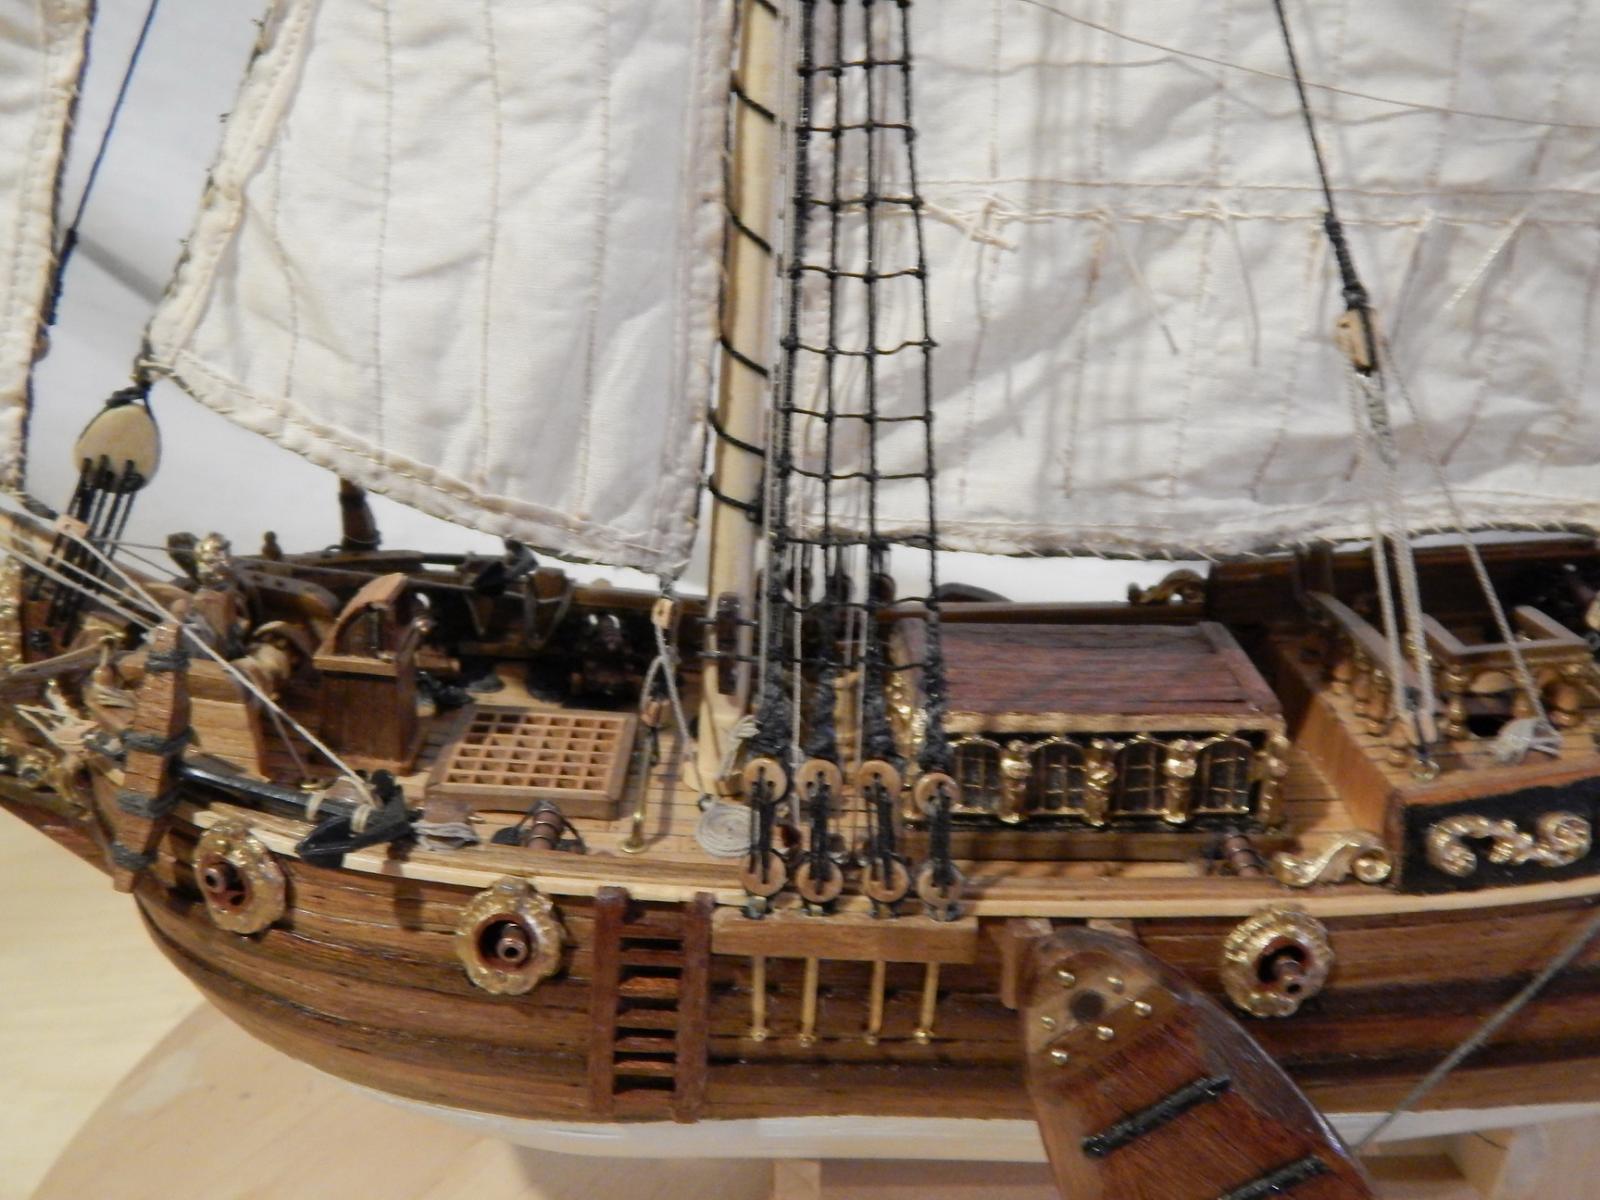
As I am very busy with work there is little time for modeling but I did finish the flags and will work on it some more later on today. The flags fall nicely but I think the colors are too bright. I checked numerous paintings and pictures of replicas and on the replicas they are pretty bright as well. So what do other members think? Marc


- 85 replies
-
- 4
-
-
- yacht mary
- mamoli
- (and 1 more)
-
I'll get this book as I am planning to built a Soling 1 meter which I purchased used through my ship club. There are many websites on improved construction and R/C tips about the Soling 1 mtr. Armed with this book and the wealth of information from these sites my boat should become an excellent pond yacht. Marc
-
Resources on American privateering
flying_dutchman2 replied to DBorgens's topic in Nautical/Naval History
Dave; There is so much out there on that particular subject. I am giving you 2 sites where you can see where the interest lies. My first site on what I research is https://archive.org This is a site where all the books are FREE, there is no copyright infringement. The books are 100 or more years old. As my field is Dutch ships I have found a slew of information/books on Dutch ship building. I looked up privateering and below is the page. https://archive.org/search.php?query=american%20privateering http://www.archives.gov/ http://search.archives.gov/query.html?qt=privateering&submit=GO&col=1arch&col=social&qc=1arch&qc=social Marc -
My old neighborhood has large ponds here and there. They are attached to peoples backyards, so you need permission to sail. I have acquired a seat on the water's edge and once Sol1m is finished spent a leisurely afternoon, sailing. I don't think sailing the pond yacht on Lake Michigan. Marc