flying_dutchman2
-
Posts
1,735 -
Joined
-
Last visited
Content Type
Profiles
Forums
Gallery
Events
Everything posted by flying_dutchman2
-

Naval History On This Day, Any Nation
flying_dutchman2 replied to Kevin's topic in Nautical/Naval History
February 19 WWII 1941 •Feb 19, Wed. Rear Admiral William P. Blandy relieves Rear Admiral William R. Furlong as Chief of the Bureau of Ordnance. Coast Guard Reserve is established. 1942 February 19, Thu. Pacific Japanese forces land on Bali, N.E.I. Battle of Badoeng Strait begins as Allied naval force (Rear Admiral Karel W.F.M. Doorman, RNN) of three cruisers and accompanying destroyers attacks retiring Japanese Bali occupation force (Rear Admiral Kubo Kyuji) in Badoeng Strait. Destroyer Stewart (DD-224) is damaged by gunfire of destroyers Oshio and Asashio, 07°18'S, 112°46'E. Dutch destroyer Piet Hien is sunk; 30 of her survivors find motor whaleboat jettisoned by destroyer John D. Ford (DD-228) and proceed unaided to Java. Dutch light cruisers Java and Tromp are damaged by Japanese gunfire. Japanese destroyers Ushio and Michisio are damaged by Allied gunfire. Japanese carrier striking force (Vice Admiral Nagumo Chuichi) attacks Darwin, Australia; 189 planes from carriers Akagi, Kaga, Hiryu and Soryu bomb shipping, airfields, and shore installations; carrier bombers sink destroyer Peary (DD 226), 12°30'S, 130°50'E, U.S. Army Transport Miegs and U.S. freighter Mauna Loa (on board the latter all hands--37-man crew and seven passengers--survive); and damage seaplane tender (destroyer) William B. Preston (AVD-7). U.S. freighter Portmar is damaged and beached (one of her 34-man crew is killed; two of the 300 embarked soldiers perish as well; 12 men are injured); freighter Admiral Halstead (carrying drummed gasoline) is damaged as well (she suffers no casualties). In related actions, U.S. freighter Florence D, under charter to the Army and carrying a cargo of ammunition, rescues eight-man PBY (VP 22) crew (Lieutenant Thomas H. Moorer) off north coast of Australia, near Darwin, and later comes under attack by Japanese carrier aircraft that bomb and sink the ship (one man of Moorer's crew and three of the 37-man ship's complement are killed in action); Australian minesweeper HMAS Warrnambol and mission boat St. Francis rescue the survivors. Japanese carrier planes also bomb and sink Philippine motorship Don Isidro (chartered by the U.S. Army to run supplies to Corregidor) off northwest coast of Bathurst Island, 11°00'S, 130°00'E; 11 of the 67-man crew and one of the 16 embarked soldiers are killed. HMAS Warrnambol rescues the surviving crew and passengers. Japanese naval land attack planes (Kanoya and 1st Kokutais) bomb airfield at Darwin. Submarine S-37 (SS-142) is damaged by grounding off the northeast corner of Lembogan Island, Lombok Strait, N.E.I., but continues on patrol. Aviation Chief Machinist's Mate Harold F. Dixon (Naval Aviation Pilot) and his two-man crew (VT 6), whose plane ditched due to fuel exhaustion on 16 January, reach Danger Islands, 10°48'S, 165°49'E, having spent 34 days at sea in their rubber boat. They have subsisted on occasional fish speared with a pocket knife, two birds, and rain water. While the straight line distance traveled measures 450 miles, the estimated track is approximately 1,200 miles. Dixon is awarded the Navy Cross for heroism, leadership, and resourcefulness. Atlantic Destroyer Dallas (DD-199) rescues 46 survivors from Brazilian tanker Olinda, sunk the day before by German submarine U-432. Unarmed U.S. tanker Pan Massachusetts is torpedoed and sunk by German submarine U-128 about 20 miles off Cape Canaveral, Florida, 28°27'N, 80°08'W; Coast Guard lighthouse tender Forward (WAGL-160) and British tanker Elizabeth Massey rescue 18 survivors from the 38-man crew. U.S. freighter Lake Osweya is torpedoed and sunk by German submarine U-96 in the North Atlantic, 43°14'N, 54°45'W. Although U-96 sees three lifeboats pull away from the ship, no survivors from the 30-man merchant complement or the seven-man Armed Guard are ever found. Caribbean Transport William P. Biddle (AP-15) arrives at Guantanamo Bay, Cuba, and disembarks the 9th Defense Battalion. 1943 Pacific Heavy cruiser Indianapolis (CA 35) and destroyers Coghlan (DD-606) and Gillespie (DD-609) (TU 8.6.2), intercept Japanese army cargo ship Aragane Maru bound for the Aleutians and engage her northwest of Attu, Aleutians. Submarine Gato (SS-212) torpedoes Japanese ammunition ship Hibari Maru off eastern Bougainville, 06°27'S, 156°05'E. Hibari Maru is beached off Buin (see 28 February). Submarine Grampus (SS-207) torpedoes Japanese transport/aircraft ferry Keiyo Maru, 04°55'S, 152°26'E. Submarine Runner (SS-275) is damaged by aerial bomb off the Palaus, 07°35'N, 134°25'E, and is forced to terminate her patrol. USAAF B-17s bomb Japanese shipping off Buin, Bougainville, damaging transport Tokai Maru, 06°45'S, 155°50'E. Atlantic Submarine Blackfish (SS-221) torpedoes and sinks German patrol craft VP 408 (ex-trawler Haltenbank), 43°30'N, 002°54'W, but is damaged by depth charges from what she reports as two converted trawlers, and is forced to terminate her patrol. 1944 19 February, Sat. -- Pacific Marines and Army troops (Brigadier General Thomas E. Watson, USMC) supported by naval bombardment land on Eniwetok Island. The operation is under the command of Rear Admiral Harry W. Hill. USAAF, USN and USMC land-based aircraft bomb airfield and other Japanese installations at Rabaul. The area has been repeatedly pounded, and after this date theJapanese abandon air defense of Rabaul. Submarine Cero (SS-225) attacks Japanese cargo ship No.18 Shinsei Maru while en route to Palau, 03°34'N, 136°36'E, but does not score any damage on her quarry. Submarine Grayback (SS-208) sinks Japanese army cargo ship Taikei Maru southwest of Takao, Formosa, 21°48'N, 119°50'E; subsequently, Grayback sinks army cargo ship Toshin Maru, 21°46'N, 120°06'E, which had arrived on the scene and rescued Taikei Maru's survivors. Submarine Jack (SS-259) attacks Japanese convoy of six tankers shepherded by escort vessel Shimushu in South China Sea about 300 miles west of Luzon, sinking merchant tankers Kokuei Maru and Nanei Maru, 14°34'N, 114°11'E; Nichirin Maru, 15°40'N, 115°48'E; and Ichiyo Maru 15°46'N, 115°57'E. USAAF B-25s (5th Air Force) sink auxiliary submarine chaser Cha 34 west of Kavieng, 02°45'S, 150°47'E; B- 25s, A-20s, and P-38s (5th Air Force) wipe out Japanese convoy O-902 off Kavieng, sinking submarine chasers Ch 22 and Ch 40, 03°04'S, 150°42'E, and cargo vessels No.1 Shinto Maru and Shinkiku Maru, 02°46'N, 150°42'E. USAAF B-24s and B-25s sink Japanese cargo vessel Ebon Maru at Kusaie. USAAF B-24s (14th Air Force) sink Japanese cargo ship Tairyu Maru and damage auxiliary submarine chaser Chikuzen Maru in Formosa Strait, 25°25'N, 121°30'E. Japanese cargo ship Kogen Maru is sunk in collision in Kii Channel, 35°00'N, 135°00'E. Mediterranean Motor torpedo boats engage German convoy southeast of Elba. Light cruiser Philadelphia (CL-41) arrives off Anzio to provide gunfire support; she is thrice under shore battery fire but suffers no damage in the encounters. Destroyer Madison (DD-425) conducts unsuccessful hunt for enemy submarine believed off Anzio. 1945 19 February, Mon. -- Pacific Preceded by intense naval and air bombardment, 4th and 5th Marine Divisions (Lieutenant General Holland M. Smith, USMC) land on Iwo Jima in Operation DETACHMENT. The operation is under the overall command of Admiral Raymond A. Spruance, Commander Fifth Fleet; Vice Admiral Richmond K. Turner is the Joint Expeditionary Force Commander. Naval gunfire and aircraft will support the troops ashore during this difficult campaign. Offshore, collisions account for damage of varying degrees to heavy cruiser Chester (CA-27) and amphibious force flagship Estes (AGC-12), 24°13'N, 141°25'E; heavy cruiser Indianapolis (CA-35) and ammunition ship Shasta (AE-6) (during replenishment operations); destroyer escort Finnegan (DE-307) and infantry landing craft LCI-627, 22°46'N, 141°19'E; and attack cargo ship Starr (AKA-67) and heavy cruiser Salt Lake City (CA-25), 24°46'N, 141°19'E. Destroyer John W. Weeks (DD-701) is damaged by shore battery, 25°32'N, 141°01'E; hospital ship Samaritan (AH-10) by friendly fire, 24°46'N, 141°19'E. Japanese mortar fire damages medium landing ships LSM-74, LSM-145, LSM-245 and LSM-323. Army troops covered by USMC aircraft are landed on the northwest coast of Samar and on Capul Island P.I., to insure control of San Bernardino Strait. Japanese merchant ship Zuiho Maru is sunk by aircraft in Yangzte River near Kiukiang, China. arines with naval gunfire support land on Iwo Jima; island secured 16 March. Marc -
Gorgeous, I love this boat. Great colors and beautiful details. Note: the Friese Tjalk from Billing looks exactly like the model the Authentic Shipmodels Amsterdam used to sell in the 80's. I have that model. Marc
-
Naval History On This Day, Any Nation
flying_dutchman2 replied to Kevin's topic in Nautical/Naval History
February 18 1846 - General order on Port and Starboard 1944 - Amphibious Force under RADM Hill lands troops on Engebi Island, Eniwetok 1955 - 1st of 14 detonations, Operation Teapot nuclear test WWII 1942 - February 18, Wed. Atlantic Destroyer Truxtun (DD-229) and stores issuing ship Pollux (AKS-2) run aground during storm near Placentia Bay, Newfoundland; the former just east of Ferryland Point and the latter off Lawn Point. Minesweeper Brant (AM-24) arrives on scene and contributes rescue parties as well as brings medical officer and corpsmen from destroyer tender and Support Force flagship Prairie (AD-15). The tragedy produces deep admiration for the lifesaving efforts of the local population. "Hardly a dozen men from both ships would have been saved," one observer writes later, "had it not been for the superb work of the local residents." Many men jeopardize their own lives frequently to save the American sailors; several hang by lines over the cliffs to keep survivors from dragging over sharp rocks as they are pulled up from the beach below; others go out in a dory, risking swamping several times in the rough waves; after working all day rescuing Truxtun's people, some of the local inhabitants then toil all night rescuing Pollux's men with a stamina that defies description. Though poor, the men, women, and children of the town of St. Lawrence turn out to outfit the "survivors with blankets, warm clothes, boots, fed them, cleaned them up as best they could and turned them in their own beds." Subsequently, they turn a deaf ear to offers to pay for food and clothing used in succoring the shipwrecked Americans. Destroyer Wilkes (DD-441) also runs aground off Lawn Head, 46°53'N, 55°28'W, but manages to free herself from her predicament and escape the fates of Truxtun and Pollux. Brazilian tanker Olinda is torpedoed and sunk by German submarine U-432 at 37°30'N, 75°00'W (see 19 February). Caribbean U.S. freighter Mokihana is torpedoed by German submarine U-161 while lying at anchor at Port of Spain, Trinidad, 12°55'N, 80°33'E; there are no casualties among the 36-man merchant crew or 9-man Armed Guard. 1943 - 18 January, Mon. Pacific Submarine Greenling (SS-213) damages Japanese ammunition ship/survey vessel Soya in Queen Carola Channel, 02°04'S, 150°37'E. Submarine Silversidess (SS-236) sinks Japanese fleet tanker Genyo Maru about 90 miles southwest of Truk, 06°19'N, 150°15'E, but is damaged by depth charges from escorting warship and is forced to terminate her patrol. USAAF B-24 sinks Japanese transport Senzan Maru off Kavieng, 03°29'S, 149°02'E; submarine chaser Ch 16 rescues survivors. USAAF B-17s and P-39s sink Japanese cargo vessel Yamafuku Maru off Shortland Island. Japanese collier Tokachi Maru is sunk by Japanese mine west of Surubaya, Java, N.E.I., 06°50'S, 112°12'E. U.S. tanker Mobilube is torpedoed by Japanese submarine I-21 off coast of New South Wales, Australia, 33°57'S, 157°20'E; Australian minesweeper HMAS Kapunda provides assistance as the tanker remains afloat. Other than three men killed in the initial explosion, no other members of the ship's complement (that includes an 11-man Armed Guard) perish. Mobilube is towed to Sydney by salvage tug St. Aristell, but is eventually declared a total loss. 1944 - 18 February, Fri. -- Pacific After preliminary landings had been made the previous day, TG 51.11 (Rear Admiral Harry W. Hill) lands Marines and Army troops on Engebi Island, Eniwetok Atoll, in Operation CATCHPOLE. TF 58 (Vice Admiral Raymond A. Spruance) repeats strike on Japanese installations and vessels at Truk; TF 58 planes sink destroyer Fumizuki, 07°24'N, 151°44'E; submarine chaser Ch 29, 07°25'N, 151°45'E; and motor torpedo boat Gyoraitei No.10, 07°31'N, 151°59'E. Destroyer Squadron 23 (TG 39.4) (Captain Arleigh A. Burke) bombards Japanese positions at Kavieng; destroyer Squadron 12 (Captain Rodger W. Simpson) shells Rabaul, Japanese installations on the Crater Peninsula, and bivuoac and supply areas at Vunapope and Cape Gazelle. British submarine HMS Trespasser sinks Japanese gunboat Eifuku Maru off Burma, 07°55'N, 93°03'E. USAAf B-25s (14th Air Force) sink Japanese transport Shinsoku Maru south of Takhow Island, Wenchow, China, 28°23'N, 121°51'E. U.S. aircraft sink Japanese auxiliary submarine chaser Cha 17 off Kavieng, 02°30'S, 150°30'E. Japanese cargo ship Gokenzan Maru is stranded and sunk off northwestern Hokkaido, 44°01'N, 141°38'E. Mediterranean Heavy German air attacks, as well as artillery fire, continue on beachhead at Anzio on an almost daily basis; harbor tug YT-198 is sunk by mine off Anzio, 41°27'N, 12°38'E. Elsewhere in the Mediterranean theater, tank landing craft LCT-205 capsizes in Gulf of Tunis, while being towed; tank landing craft LCT-340 is stranded by heavy weather at Pantelleria, Italy. Heavy weather also damages large infantry landing craft LCI(L)-211, resulting in her being towed to Palermo, Italy; and minesweeper Pilot (AM-104) is accidentally rammed by U.S. merchant ship Samuel Ashe and damaged off Naples, Italy, 40°48.7'N, 14°16.5'E. 1945 - 18 February, Sun. -- Atlantic District patrol craft YP-94 sinks after running aground off Trinity Islands, 56°32'N, 154°22'W. Pacific Battleship Washington (BB-56) and destroyer Hailey (DD-556) are damaged in collision off Iwo Jima. Destroyer Waldron (DD-699) is damaged when she intentionally rams Japanese guardboat at 29°27'N, 141°34'E. Dortch (DD-670) sinks Japanese auxiliary submarine chaser Ayukawa Maru northwest of Iwo Jima, 27°35'N, 121°16'E, but is damaged by gunfire in the encounter. Light minelayer Gamble (DM-15) is damaged by kamikaze, 24°55'N, 141°08'E. High speed transport Blessman (APD-48) is damaged by horizontal bomber, 25°05'N, 141°10'E. TF 58 planes sink Japanese gunboat No.2 Hiyoshi Maru at Futami, Chichi Jima, 27°05'N, 142°11'E. Destroyers Barton (DD-722), Ingraham (DD-694) and Moale (DD-693) sink Japanese guardboats No.35 Nanshin Maru west of Torishima, 30°00'N, 137°30'E; No.3 Kyowa Maru south of Honshu, 31°00'N, 137°30'E; and No.5 Fukuichi Maru off Torishima, 30°00'N, 141°00'E. -
Naval History On This Day, Any Nation
flying_dutchman2 replied to Kevin's topic in Nautical/Naval History
February 16 1804 - Lieutenant Stephen Decatur, with volunteers from frigate Constitution and schooner Enterprise, enters Tripoli harbor by night in the ketch Intrepid to burn the captured frigate Philadelphia. Decatur's raid succeeds without American losses. England's Lord Nelson calls this "the most daring act of the age." 1815 - USS Constitution captures British Susannah 1967 - Operation River Raider begins in Mekong Delta Happy Reading WWII 1941 February 16, Fri. -- U.S. freighter Excalibur is detained for several hours by British authorities at Gibraltar but is released; freighter Exermont, detained since 14 February, is allowed to proceed as well. British destroyer HMS Cossack violates Norwegian territorial waters, boards German tanker Altmark in Jøssingfjord, and recovers 303 merchant seamen from ships destroyed by German armored ship Admiral Graf Spee during her commerce-raiding activities. 1943 February 16, Mon. Caribbean Operation NEULAND begins with simultaneous attacks on Dutch and Venezuelan oil ports to disrupt production and flow of petroleum products vital to the Allied war effort; German submarine U-156 shells refinery on Aruba, N.W.I. and torpedoes and damages U.S. tanker Arkansas as she lies alongside Eagle Dock; a second torpedo misses the ship and runs up on the beach. There are no casualties among the 37-man crew. The enemy does not emerge from the action unscathed, however, for the explosion of a shell prematurely in a gun barrel injures two men on board U-156, which will receive permission to put in to Martinique (see 20-21 February). Atlantic Unarmed U.S. tanker E.H. Blum blunders into U.S. minefield off Cape Henry, Virginia, 36°57'N, 75°52'W and is damaged by mine and breaks in half (see 17 February). Coast Guard cutter Calypso (WPG-104) rescues 42 survivors from Brazilian steamship Buarque, that had been sunk by German submarine U-432 the day before (see 17 February). Pacific Japanese planes bomb U.S. Timor-bound convoy, escorted by heavy cruiser Houston (CA-30) and destroyer Peary (DD 226); U.S. Army transport Miegs and U.S. freighter Mauna Loa are damaged by near-misses. On board the latter, one crewman is killed; of the 500 troops embarked, one is killed and 18 wounded. Houston's heavy antiaircraft fire saves the convoy from destruction, but the imminent fall of Timor results in the recall of the convoy and its routing back to Darwin (see 19 February). 1943 16 February, Tue. Pacific Submarine Flying Fish (SS-229) sinks Japanese stores ship Hyuga Maru 24 miles off Pagan, Marianas, 18°30'N, 145°57'E. Submarine Triton (SS-201) departs Brisbane for her sixth war patrol. She will never be seen again (see 6 March). Atlantic Fleet Air Wing 16 (Captain Rossmore D. Lyon) is established at Norfolk, Virginia. Indian Ocean U.S. freighter Deer Lodge is torpedoed by German submarine U-607 about 60 miles east of Port Elizabeth, South Africa, and abandoned (see 17 and 20 February). 1944 16 February, Wed. -- Pacific TG 58.4 (Rear Admiral Samuel P. Ginder) planes bomb Eniwetok. Destroyer Phelps (DD-360) and minesweeper Sage (AM-111) sink Japanese submarine RO-40, 45 miles northwest of Kwajalein, Marshalls, 09°50'N, 166°35'E. Submarine Skate (SS-305) sinks Japanese light cruiser Agano 170 miles north of Dublon Island, Truk, 10°10'N, 151°40'E. Submarine Tinosa (SS-283) continues pursuit of convoy engaged the previous day, and sinks Japanese army cargo ship Chojo Maru off Sarangani Island, 09°15'N, 127°05'E. USAAF B-25s (38th and 345th Bomb Groups) carry out succession of attacks on Japanese convoy off New Hanover and Kavieng, sinking submarine chaser Ch 39, auxiliary submarine chaser Cha 16, and transport Sanko Maru, 02°24'S, 150°06'E. Japanese transport Sanko Maru is sunk by aircraft off New Hanover Island, 02°24'S, 150°06'E. Mediterranean Destroyer Hilary P. Jones (DD-427) is damaged by near- miss of bomb off Anzio. 1945 16 February, Fri. -- Pacific TF 58 (Vice Admiral Marc A. Mitscher) planes bomb airfields, aircraft factories, and shipping in the Tokyo area, Japan; attack is repeated on 17 February. Fire support vessels and carrier-based aircraft begin three-day prelanding bombardment and bombing of Iwo Jima, Volcano Islands. Destroyers Ingraham (DD-694) and Barton (DD-722) are damaged in collision off Iwo, 31°45'N, 141°54'E. TF 92 (Rear Admiral John L. McCrea) bombards Japanese installations at Kurabu Zaki, Paramushiro, Kurils. Army forces, preceded by naval bombardment and attack by army aircraft, land on Corregidor, Luzon; 503d Parachute Infantry are air-dropped onto the main plateau while the 3d Battalion, 24th RCT is lifted to the island in navy medium landing craft (LCM). Support landing craft (large) [LCS(L)] and infantry landing craft (rocket) [LCI®] provide covering fire close-in. Motor torpedo boats also support the operation, at one point rescuing stranded army paratroopers. Submarine chaser PC-1119 is damaged by shore battery, off Luzon, 14°23'N, 120°35'E. Special gunfire support unit of six destroyers (Captain Robert W. Cavenaugh) is formed to provide naval gunfire support for the conquest of Corregidor. Between 16 and 28 February, this unit will deliver pin-point fire that proves a considerable help to the final elimination of Japanese troops on the island. Support landing craft LCS(L)-7 is sunk by Japanese assault demolition boats off entrance to Mariveles harbor. Submarine Sennet (SS-408) sinks Japanese minelayer Naryu southeast of Honshu, 32°10'N, 135°54'E, but is damaged by depth bombs from enemy aircraft. Oiler Patuxent (AO-44) is damaged by internal explosion from gasoline vapors. Coast Guard lighthouse tender Bramble (WAGL-392) is damaged by grounding on Lockwood Rock, Wrangell Narrows, Aleutians (see 17 February). Japanese army cargo ship No.23 Ryoyu Maru is sunk by aircraft, 14°36'N, 109°06'E. PB4Y-1 (VPB-117) sinks Japanese army cargo ship I ida Maru in Cape St. Jacques harbor, French Indochina, 10°20'N, 107°06'E.; Japanese merchant cargo ships sunk on this date: No.3 Seikai Maru, by aircraft, Central Pacific (exact location unspecified); Kaian No.10, by aircraft, Yangtze River, Wuhu, China; and No.2 Nagaoka Maru, by aircraft, off Hachijo Jima. Japanese naval vessels damaged on this date: Coast Defense Vessel No.47, by aircraft, Yokohama, Japan; escort destroyer Amakusa, by aircraft, east of Izu Oshima; auxiliary submarine chasers Cha 211, Cha 225, and Cha 236, by aircraft, Shimoda, Japan; and auxiliary minesweeper Hagoromo Maru, by aircraft, 10 miles south of Miyake Jima. USAAF B-24 damages small Japanese cargo vessel No.23 Yoshitomo Maru off Qui Nhon, French Indochina. USAAF P-51s sink Japanese auxiliary powered sailing vessel Minsui Maru in Yangtze between Wuhu and Hankow. Mediterranean Motor torpedo boat PT-303 and two British motor torpedo boats, operating out of Leghorn, Italy, engage two southbound enemy barges off Vernazza with doubtful results. Atlantic Destroyer Edison (DD-439) is damaged when accidentally rammed by British merchant tanker Benedick in New York harbor. Marc -
My library does this as well. Read some older journals/diaries from Dutch sailors on slavers. These books came from a library in Houston and Library of Congress. So if anyone just wants read about it go to your library first. They are all technologically connected these days and if it is in there database they will get it for you. I did this with several model building books. I liked some of them and purchased them "used" from Amazon. Marc
- 5 replies
-
- 3
-

-
- Abel Tasman
- Heemskerck
- (and 7 more)
-
Recently I finished reading a Dutch book on the Angelo-Dutch wars and other major battles and the Dutch called the "Sovereign of the Seas" - "the Golden Devil". or in Dutch that would be. De Gouden Duivel. Marc
-
Naval History On This Day, Any Nation
flying_dutchman2 replied to Kevin's topic in Nautical/Naval History
My extended naval history facts which will keep you reading. February 15 1856 - USS Supply, commanded by LT David Dixon Porter, sails from Smyrna, Syria, bound for Indianola, Texas, with a load of 21 camels intended for experimental use in the American desert west of the Rockies. 1898 - U.S. battleship Maine blows up in Havana Harbor. 1940 - President Roosevelt embarks in heavy cruiser Tuscaloosa (CA-37) at Pensacola, Florida, for a cruise to Panama and the west coast of Central America to discuss Pan-American defense and to inspect the Panama Canal. Destroyer Goff (DD-247) collides with and sinks harbor tug Wicomico (YT-26) in Hampton Roads, off Naval Operating Base, Norfolk. Goff, her bow damaged in the mishap, rescues Wicomico's 11-man crew. WWII 1941 - Naval Air Station, Kaneohe Bay, Oahu, T.H., is established, Commander Harold M. Martin in command. 1942 - Pacific Singapore surrenders to the Japanese. Japanese army paratroops secure vital oil refineries at Palembang, on southeast Sumatra, N.E.I.; enemy capture of this territory establishes sea and air control of the Karimata Channel and Gaspar Strait. Having proceeded through Gaspar Strait to the north of Banka and failed to contact the Japanese force (which has already reached Banka Strait), ABDA striking force (Rear Admiral Karel W.F.M. Doorman, RNN) is attacked by Japanese naval land attack planes (Genzan, Mihoro, and Kanoya Kokutais) as well as carrier attack planes from carrier Ryujo. Australian light cruiser HMAS Hobart is straddled, while near misses damage U.S. destroyers Barker (DD-213) and Bulmer (DD-222), which will need to retire to Australia for repairs. U.S. Army transport Meigs, U.S. freighters Mauna Loa and Portmar, and Australian coaster Tulagi, escorted by heavy cruiser Houston (CA-30), destroyer Peary (DD-226) and Australian corvettes HMAS Swan and HMAS Warrego sails from Darwin, Australia, for Timor (see 16 and 19 February). Atlantic Brazilian steamship Buarque is torpedoed and sunk by German submarine U-432 30 miles southwest of Cape Henry, 36°35'N, 75°20'W (see 16 February). U.S. tanker Point Breeze suffers explosion in engine room that damages steering gear, forcing the ship to go around off Throggs Neck, New York; one man is killed and one is blown overboard. Point Breeze later floats free and is towed to New York for repairs. 1943 - Pacific Joint air command designated Aircraft, Solomons (Rear Admiral Charles P. Mason) is established with headquarters at Guadalcanal. Submarine Gato (SS-212) sinks Japanese stores ship Suruga Maru in Bougainville Strait, 06°27'S, 156°02'E. Submarine Pickerel (SS-177) attacks Japanese convoy, sinking cargo vessel Tateyama Maru off the east coast of Honshu, 39°18'S, 142°08'E. USAAF aircraft sink Japanese cargo ship Kokoku Maru in the Bismarck Sea, 05°32'S, 150°09'E. Atlantic U.S. tanker Atlantic Sun, straggling from convoy ON 165, is torpedoed and sunk by German submarine U-607, 150 miles off Cape Race, 51°00'N, 41°00'W; other than one deckhand rescued by U-607, all hands (45 merchant sailors, a 19-man Armed Guard and one passenger) perish with the ship. 1944 - Pacific TF 31 (Rear Admiral Theodore S. Wilkinson) lands Third New Zealand Division (Major General H. E. Barraclough) on Green Island, east off New Ireland. TF 38 (Rear Admiral Walden C. Ainsworth) (two light cruisers and five destroyers) covers the operation from the south; TF 39 (Rear Admiral Aaron S. Merrill) (two light cruisers and five destroyers) from the north and east; Solomons-based aircraft also operate in support. During Japanese air attack on invasion shipping, tank landing ship LST-486 is damaged by near-miss of bomb off Green Island. Naval aircraft from Abemama, Gilbert Islands, bomb Wake Island. Submarine Aspro (SS-309) sinks Japanese submarine I-43, transporting sailors from the Sasebo Special Landing Force to Truk, 280 miles east-southeast of Guam, 10°23'N, 150°23'E. Submarine Gato (SS-212) sinks Japanese guardboat No.3 Taiyo Maru off Rabaul, New Britain, 04°00'N, 150°10'E. Submarine Snook (SS-283) sinks Japanese merchant cargo ship No.2 Hoshi Maru off south coast of Korea, 34°23'N, 128°23'E. Submarine Steelhead (SS-280) damages Japanese cargo ship Enju Maru 110 miles from Chichi Jima. Submarine Tinosa (SS-283) attacks Japanese convoy east of Mindanao, P.I., sinking army cargo ship Odatsuki Maru east of Dinagat Island, 09°30'N, 127°00'E (see 16 February 1944). British submarine HMS Tally Ho sinks German-manned Italian cargo submarine UIT-23, 04°53'N, 100°15'E. USAAF B-25s and A-20s damage auxiliary netlayer Matsu Maru at Rabaul. USAAF B-25s (14th Air Force) sink Vichy French patrol craft Ping Sang off Hongay, French Indochina, 21°00'N, 107°22'E. Mine laid by 14th Air Force B-24s on 10 February sinks Japanese merchant cargo ship Ryoka Maru off entrance to Yangtze River, 31°16'N, 121°46'E; a mine also sinks merchant cargo ship Hoshi Maru off south coast of Korea, 34°27'N, 128°45'E; Mediterranean Off Anzio, destroyer escort Herbert C. Jones (DE-137) is damaged by radio-controlled bomb, 41°27'N, 12°35'E, and large infantry landing craft LCI(L)-2 is damaged by mine, 41°24'N, 12°43'E. Bomb holes freighter Elihu Yale; the explosion start fires that spread to tank landing craft LCT-35 alongside, destroying that vessel as well. Firefighting efforts by fleet tug Hopi (ATF-71) ultimately prove successful but Elihu Yale is later written off as a total loss. Two of the 40-man Armed Guard perish in the attack, as do three of the 45-man merchant complement and seven of the 182 stevedores working cargo. Tank landing craft LCT-152 rescues survivors from Elihu Yale and LCT-35. 1945 - Pacific TG 78.3 (Rear Admiral Arthur D. Struble) lands army forces (151st Infantry RCT and 3d Battalion, 34th RCT) in the Mariveles Harbor area of Bataan Peninsula, Luzon; the troops encounter only light opposition andquickly secure the town and the nearby airfield. Medium landing ship LSM-169 is damaged by mine off Mariveles; motor minesweeper YMS-46 is damaged by shore battery, 14°23'N, 120°36'E. TF 58 planes sink Japanese guardboats No.3 Choyo Maru and No.2 Santoku Maru off southern Japan, 30°00''N, 141°00'E, and 30°00'N, 143°00'E, respectively. Aircraft damage Japanese fast transport T.16 off Iwo Jima. Japanese auxiliary minesweeper No.3 Taihei Maru is damaged by aircraft off Yonaguni Island. -
Naval History On This Day, Any Nation
flying_dutchman2 replied to Kevin's topic in Nautical/Naval History
February 14 1630 - Dutch fleet of 69 ships reaches Pernambuco, Brazil 1840 - Officers from USS Vincennes make first landing in Antarctica on floating ice -
Naval History On This Day, Any Nation
flying_dutchman2 replied to Kevin's topic in Nautical/Naval History
February 13 1601 - John Lancaster leads first East India Company voyage from London 1913 - Naval Radio Station, Arlington, VA begins operations 1945 - First naval units enter Manila Bay since 1942 1968 - Operation Coronado XI begins in Mekong Delta -
AND AFFORDABLE AS WELL mARC
-
Naval History On This Day, Any Nation
flying_dutchman2 replied to Kevin's topic in Nautical/Naval History
February 12 1502 - Vasco da Gama sets sail from Lisbon, Portugal on his second voyage to India. 1709 - Alexander Selkirk, Scottish seaman is rescued after 4+ years from Fernandez Island (inspiration for Daniel Defoe's "Robinson Crusoe"). 1762 - British fleet occupies Martinique. 1945 - USS Batfish (SS-310) sinks second Japanese submarine within three days. 1947 - First launching of guided missile (Loon) from a submarine, USS Cusk. -
Checked out the DB and it looks great. Here is several other wood kit co. and some modern RC ones as well. Some of these have the ships no one else carries. Amati http://amatimodelusa.com/ Aeronaut http://www.faber-modellbau.de/index.php/katalog/showarticles/37210-1-standmodelle.html German Dusek http://www.dusekshipkits.com/ Czech Republic Dumas (was already mentioned). euromodel-ship http://www.euromodel-ship.com Graupner http://www.cornwallmodelboats.co.uk/acatalog/graupner_rc_boats.html German-nice tugs-RC Robbe http://www.cornwallmodelboats.co.uk/acatalog/robbe-boats.html German - Tugs RC Krick http://www.cornwallmodelboats.co.uk/acatalog/krick_model_boats_rc.html German New Maquettes http://www.cornwallmodelboats.co.uk/acatalog/new-maquettes-model-boats.html UK I like your phrase when the page has no picture, "This will be coming along very shortly. Mr. Friskington is working extremely hard as you can see". Regards, Marc
-
I've never heard of this. I wonder what parameters you take in account for a ship modeling championship. How do you decide what is the best? What do you base your decision on? Who comes up with the guidelines for the "best"? Do you also sit next to this person while he builds? Are techniques judged as well? I know, so many questions...... I need to research this on the NET. Marc btw. I will check out this link as I am curious what a "ship modeler champion" is. I just downloaded the PDF. What an amazing detail. No detail is omitted. It looks like he took the original ship and shrunk it with all the details and items that make up the ship intact. The metal work is intense, the canon barrels have all the printings of the original. The nails on the deck planking are exactly aligned and spaced, almost too perfect.
-
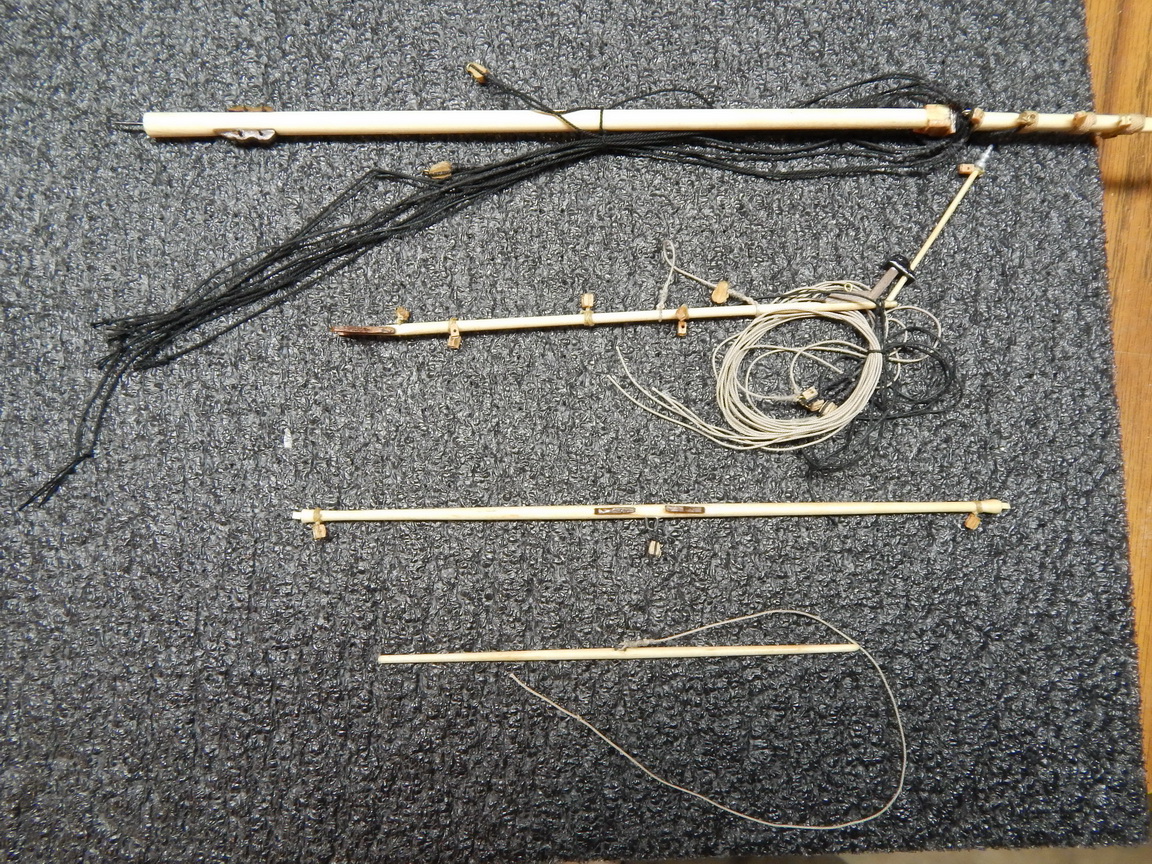
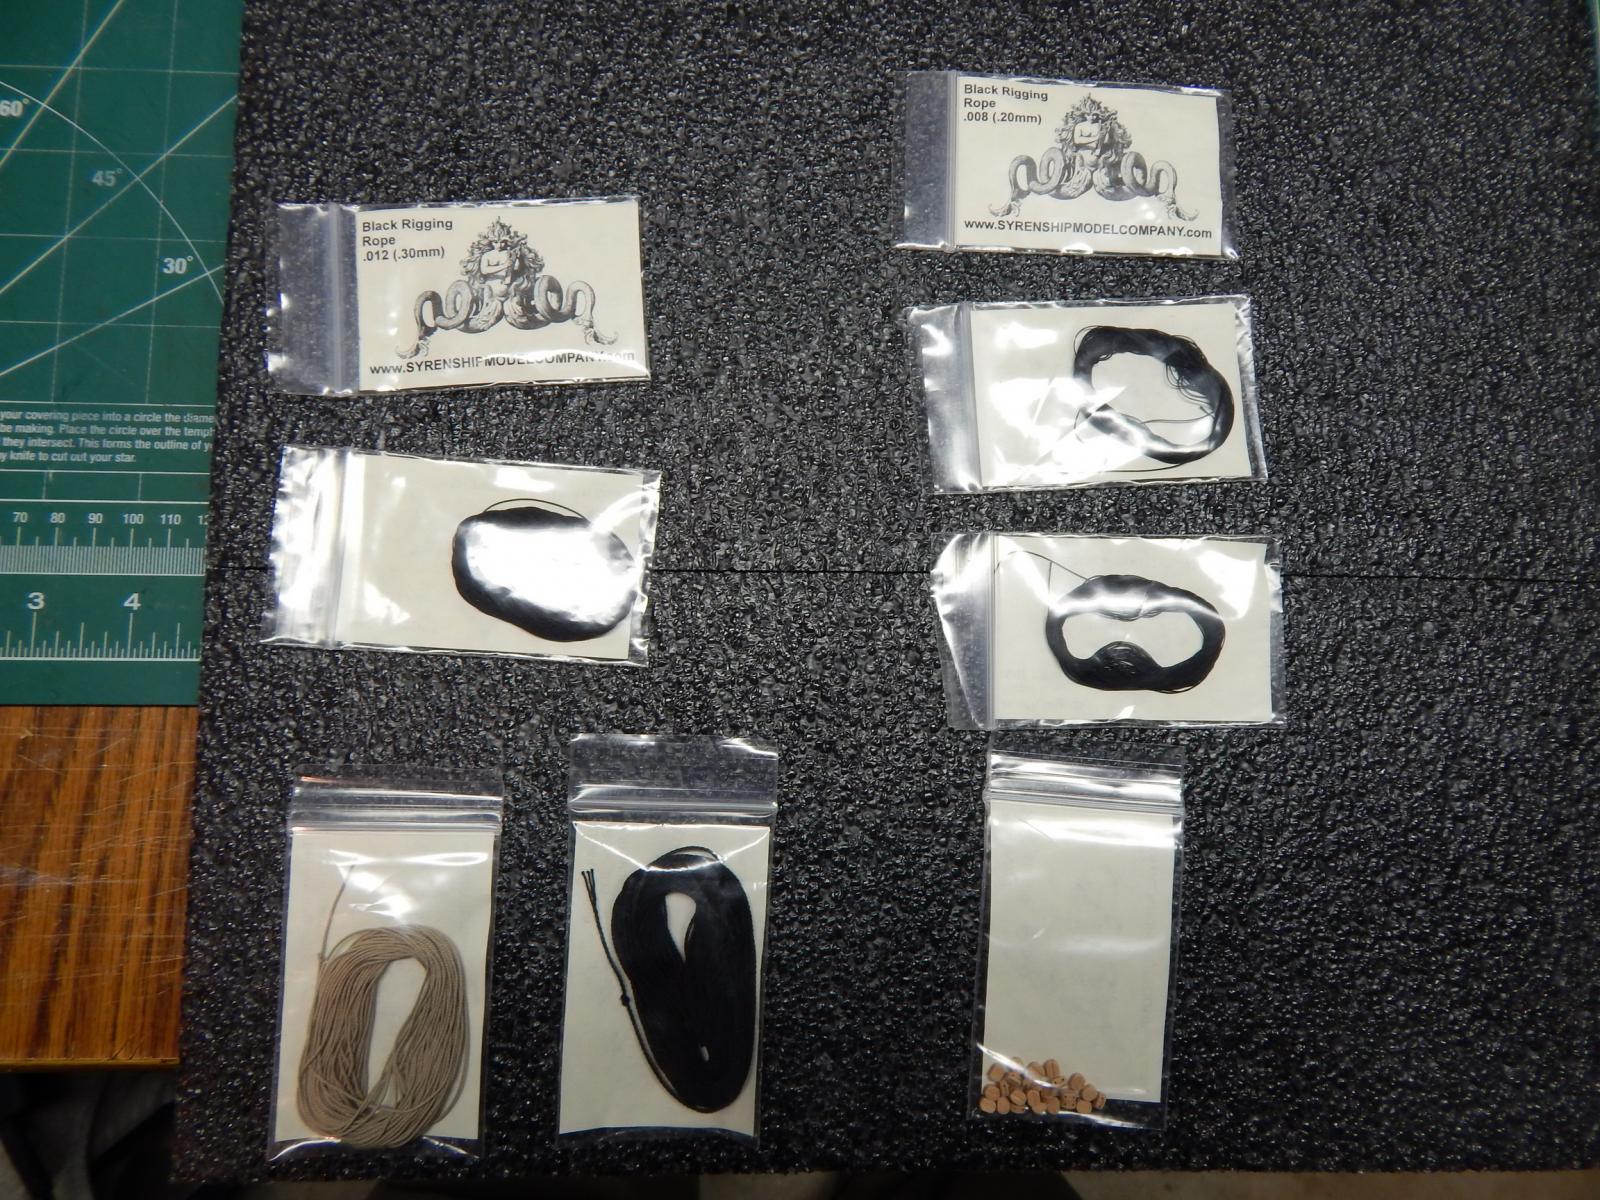
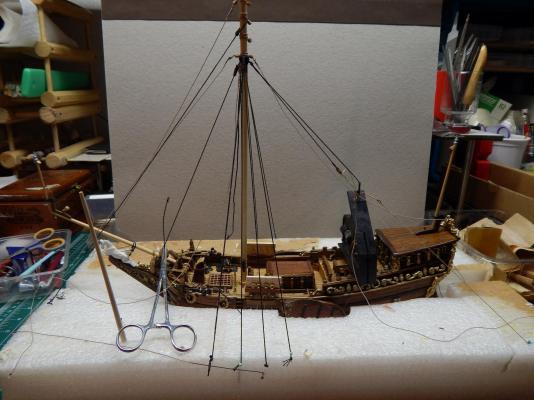
I used the darkest blackest tea leaves I had. Brewed a very strong cup and dunked the sails in it for about 10 minutes, swirled it around and rinsed under cold water and washed with soap to neutralize the reactions. Tea is full of tannins. The rope is a joke. I used the .80mm only for the anchors and all the rest of the rope came from the Syren M.C from C. Passaro. This kit is heavily bashed. Lots of items and where they are placed are not correct. I used some of my Dutch language books of flat bottom boats to compare and the book on the Statenjacht Utrecht. Then there are numerous paintings on the NET from Willem van de Velde and the Elder and they have detailed paintings from VOC ships with Staten and Royal yachts. Marc
-
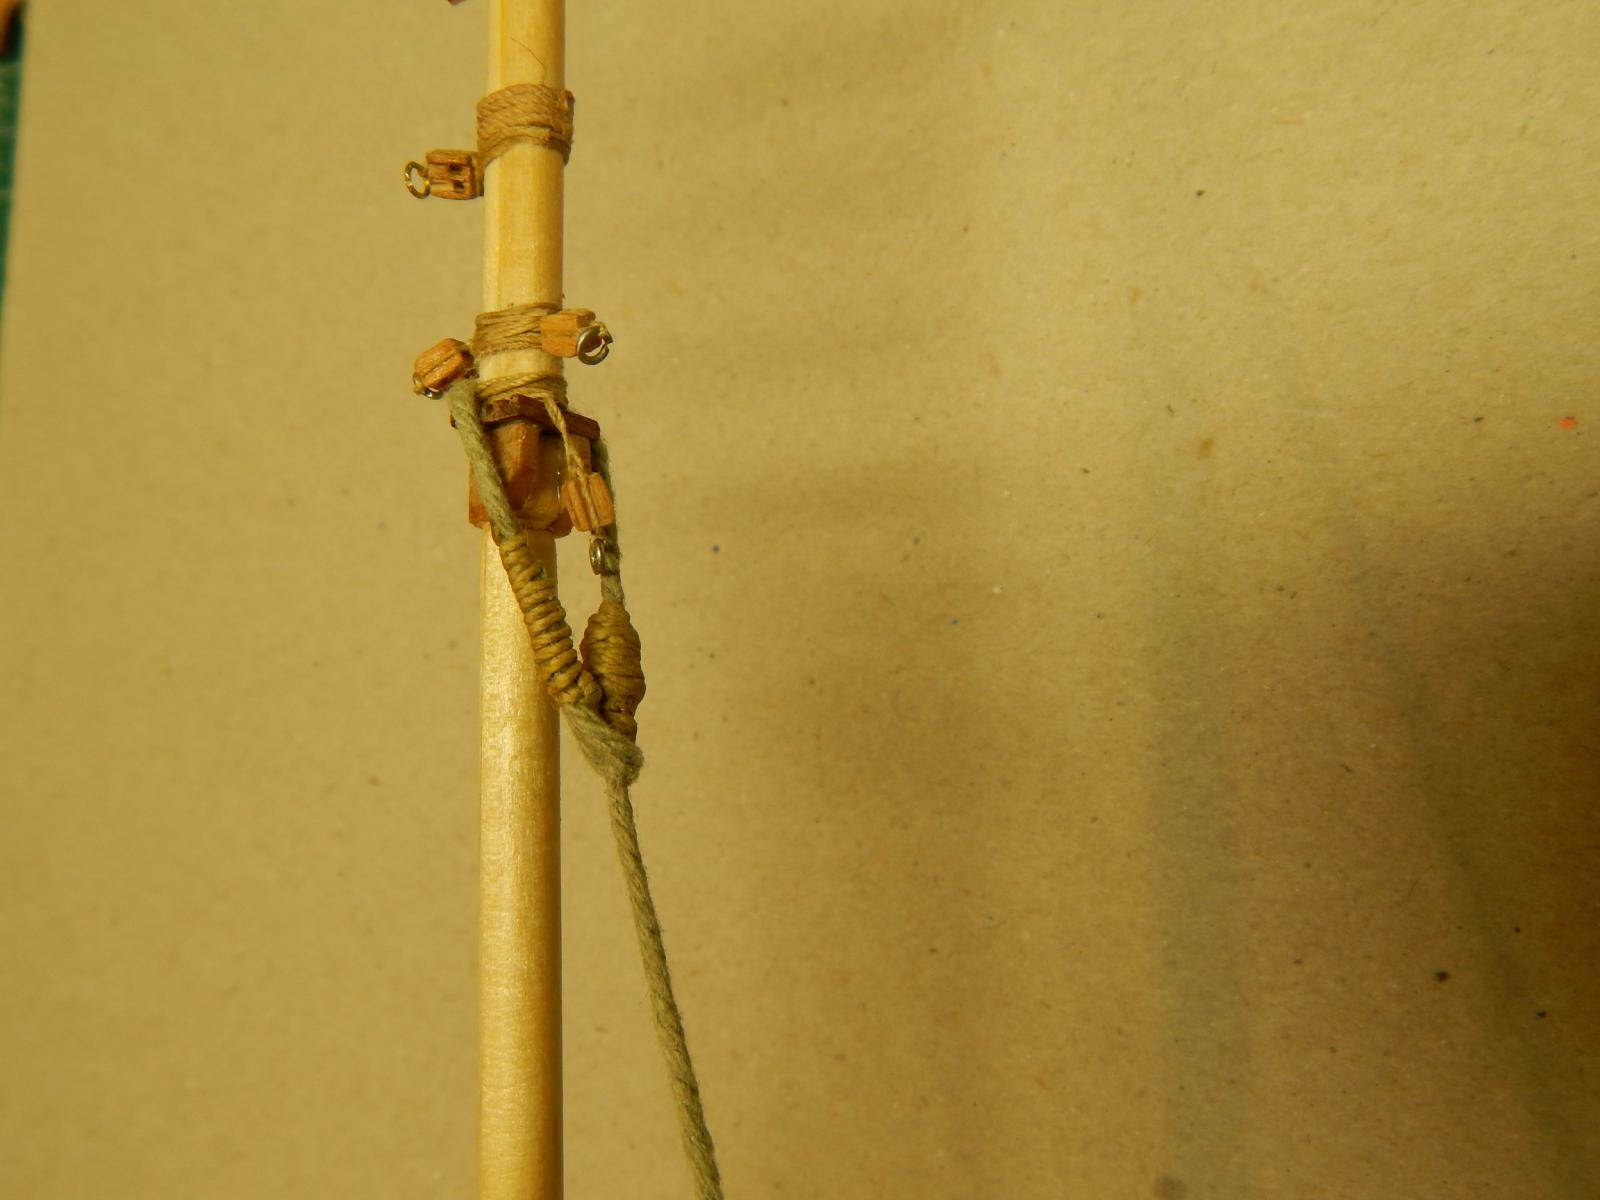
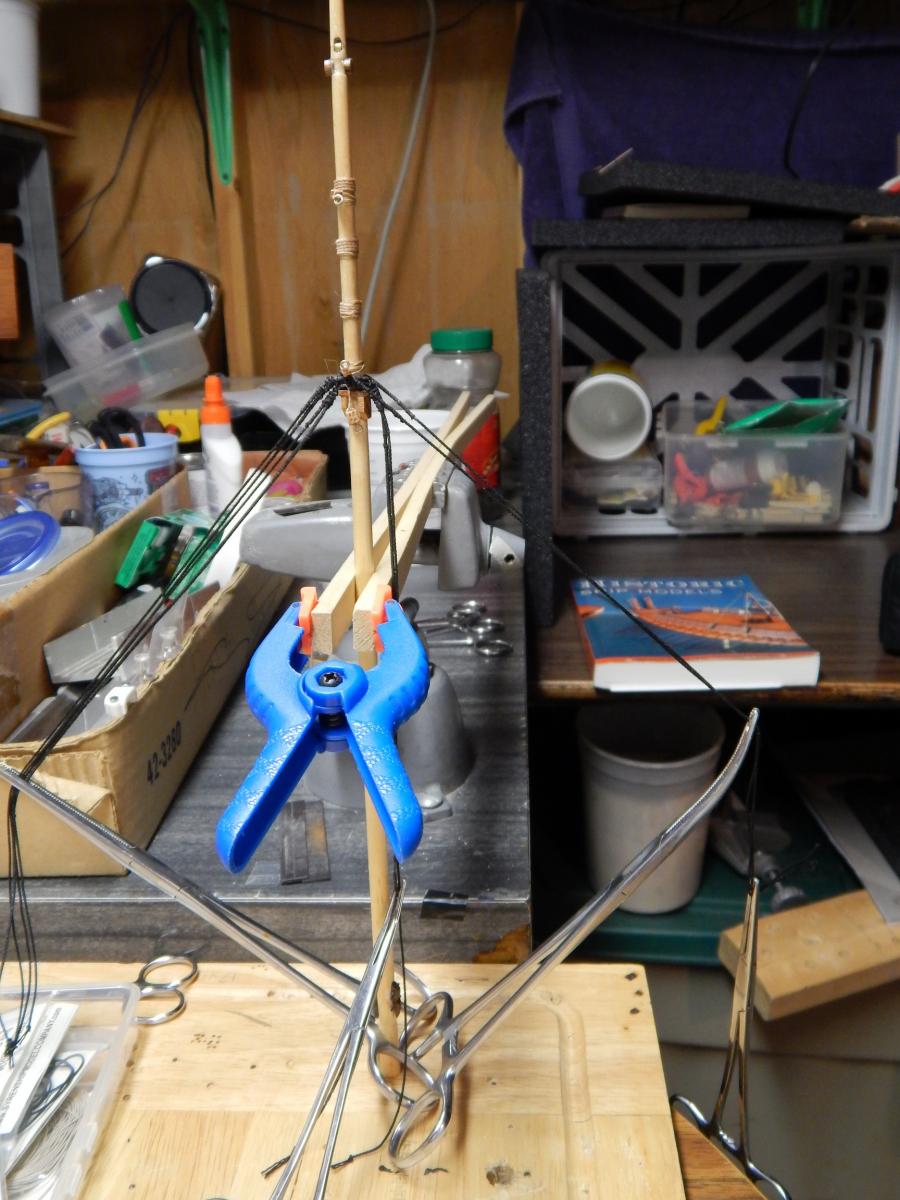
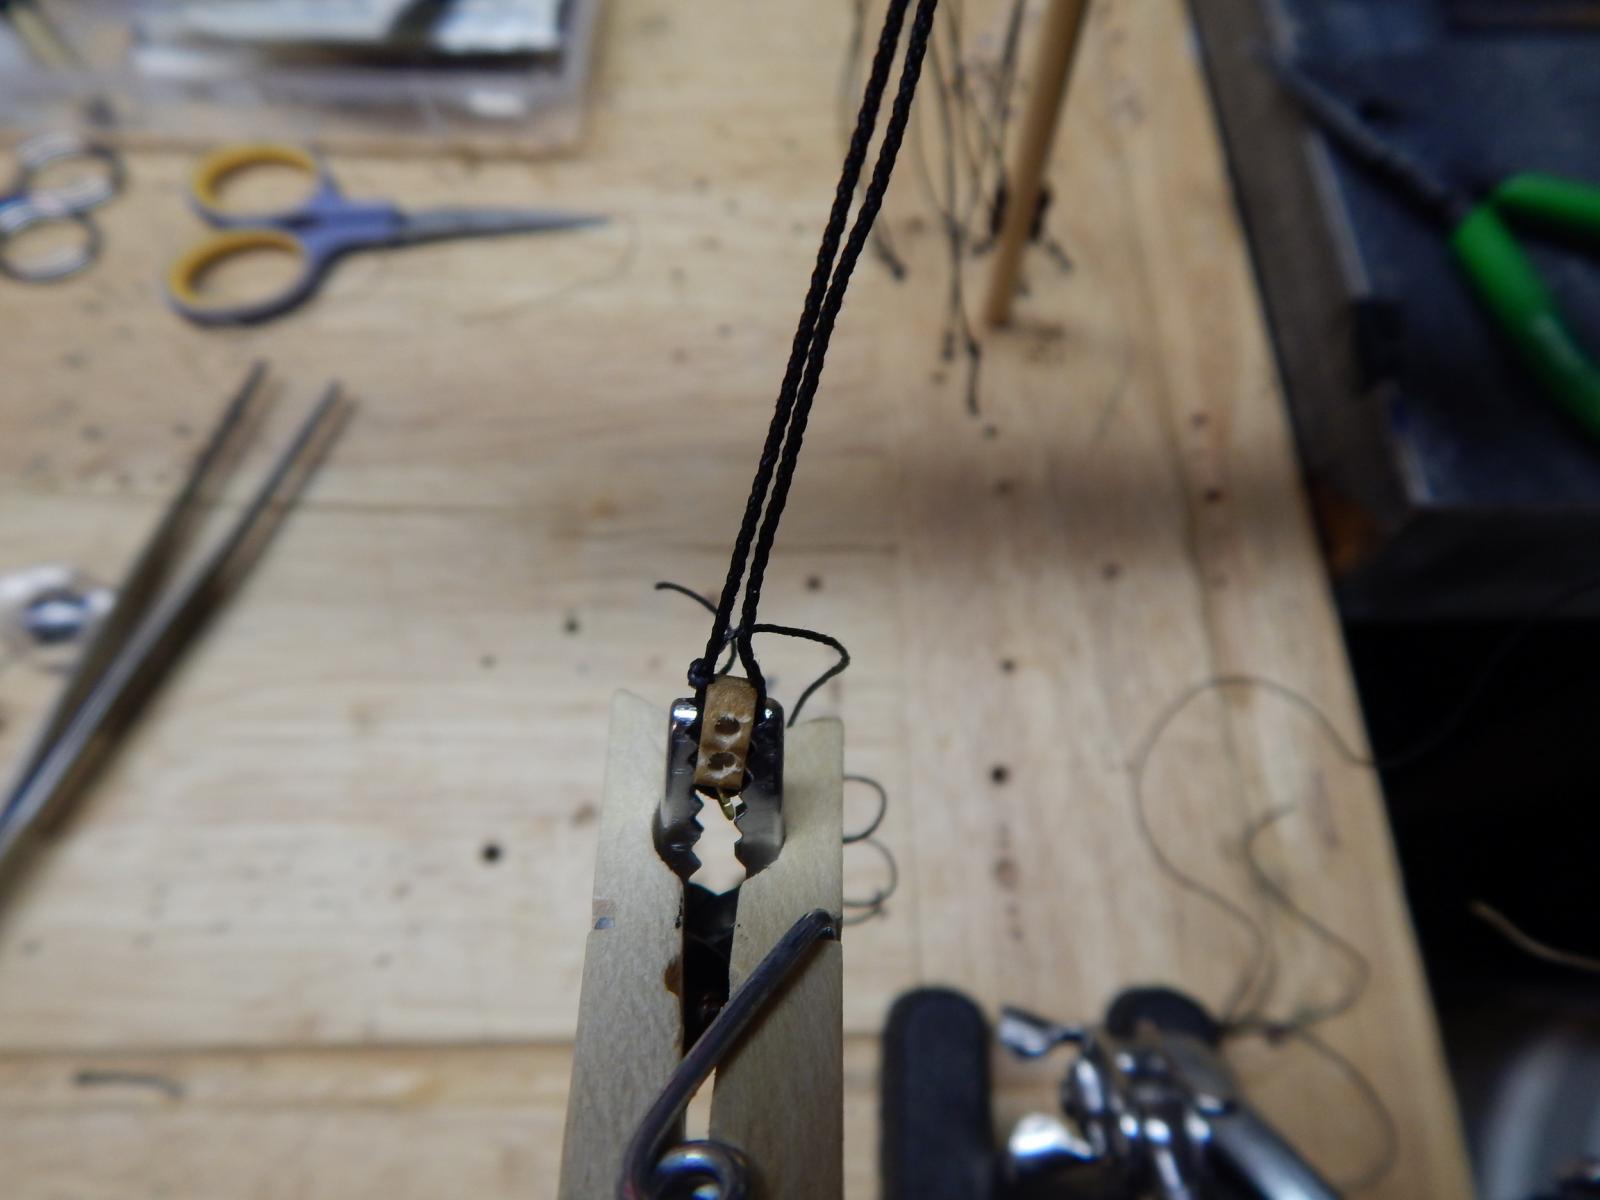
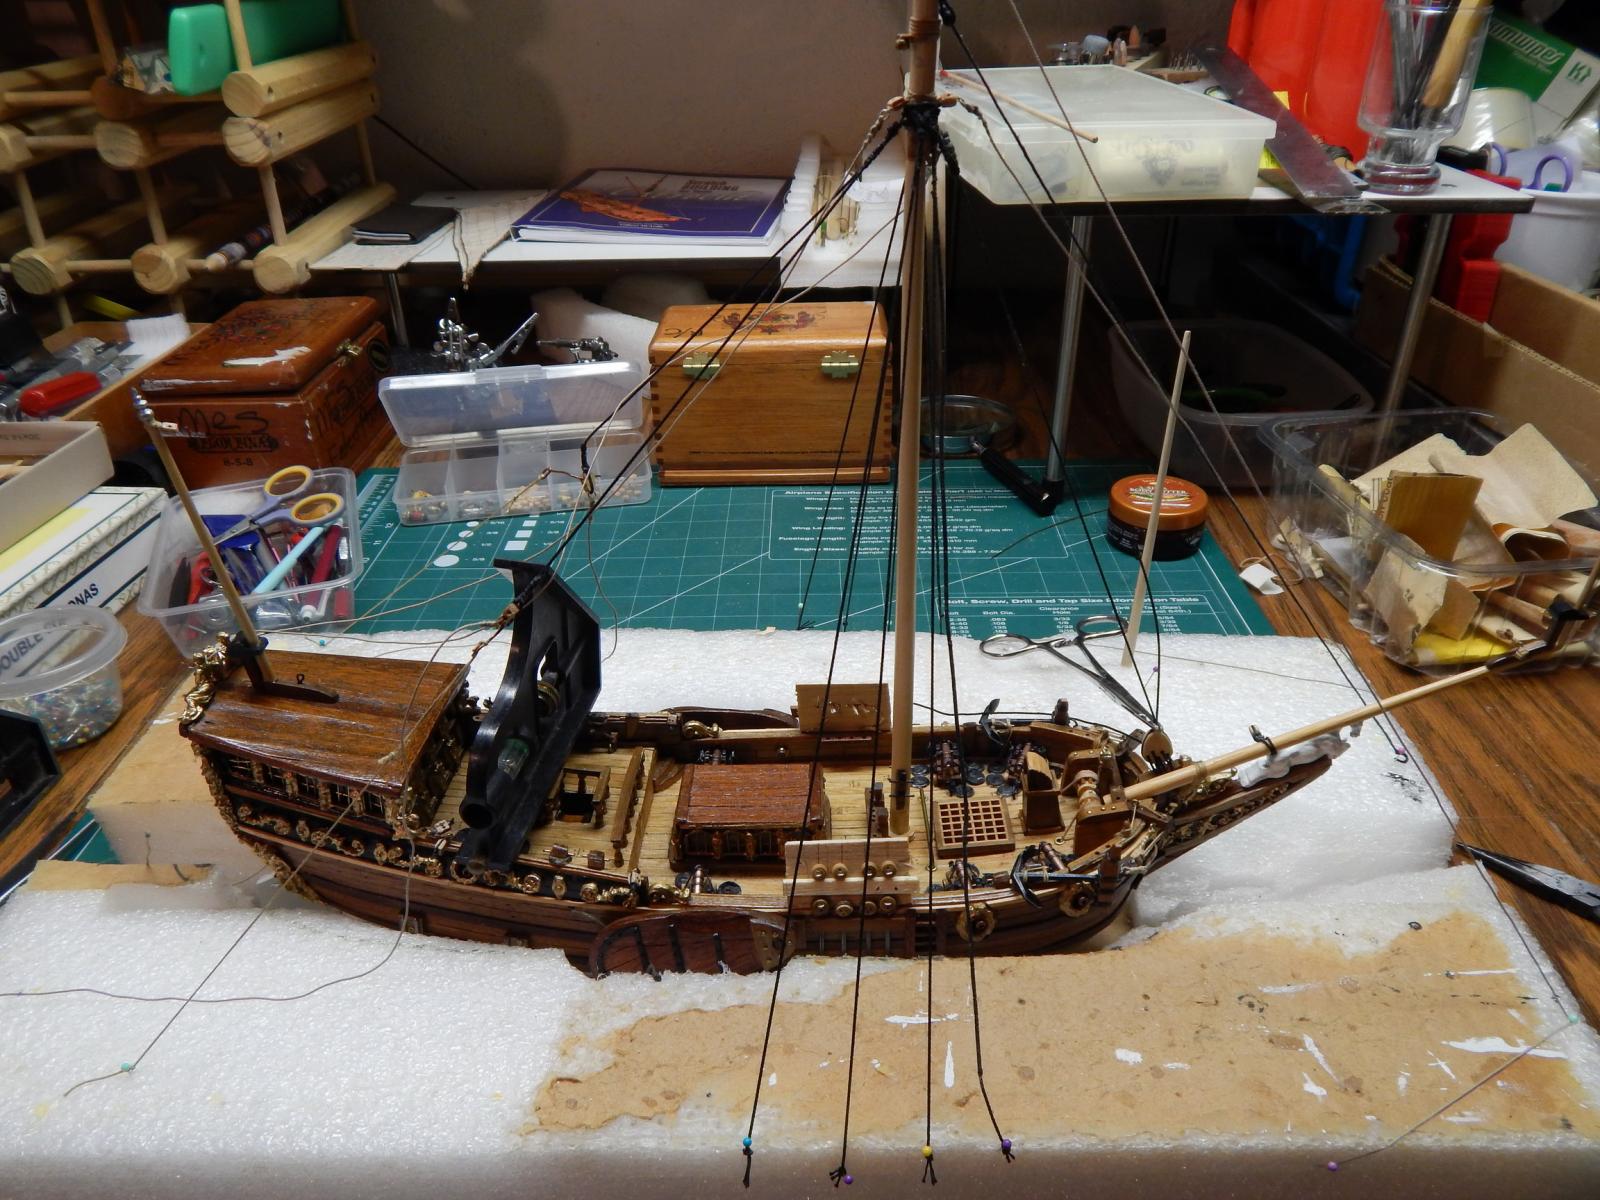
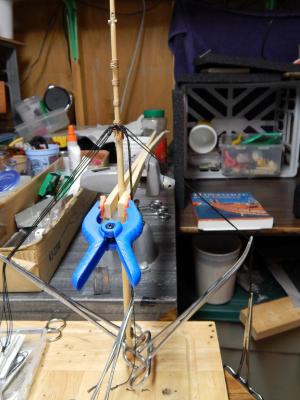
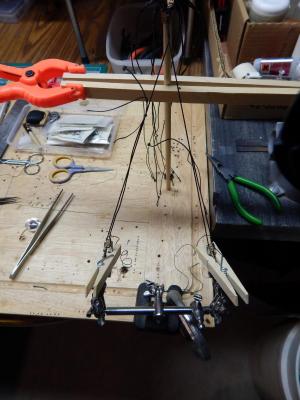
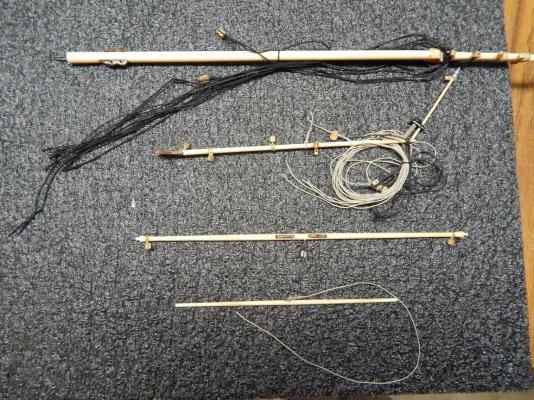
Various pictures of tying the standing rigging such as the shrouds, the rope for the sails, etc. first to the mast and gaff. Next the completed rigging on the mast and spars. Put the mast in its place with a mast ring. I never glue the mast. The rigging will hold it in the boat. Here the boat is put in thick Styrofoam (the stuff DELL uses to ship there hardware). I have several little levels to make sure the boat is level on the X and Y plane. I also spread out the rope and the next step is to stretch the shrouds to straighten out the mast. All the time measuring with the level to keep it as straight as possible. I know nothing is ever straight on a boat but I would like to come close. -------------------------- Next I am working on the sails (pictures coming soon). I have dyed the sails with tea (yes, you heard it right). I don't like the brown dyes available. I used that for older builds and the brown looked too fake. The sails look "used" and the color is not consistent.


- 85 replies
-
- 3
-
-
- yacht mary
- mamoli
- (and 1 more)
-
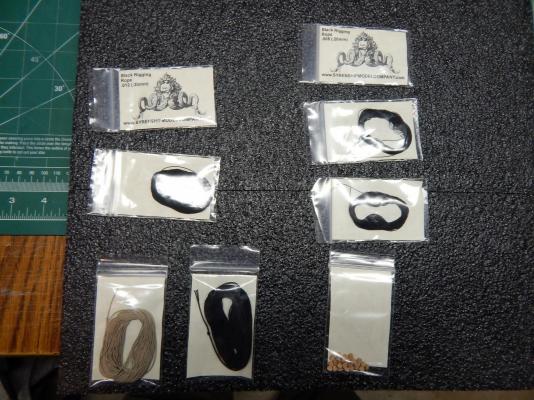
Received the roping from Chuck P. (Syren M. Co), which is absolutely gorgeous. The thick roping actually looks like roping, unlike what some kits include.
- 85 replies
-
- 2
-
-
- yacht mary
- mamoli
- (and 1 more)
-
Naval History On This Day, Any Nation
flying_dutchman2 replied to Kevin's topic in Nautical/Naval History
February 11 1862 - SecNav directs formation of organization to evaluate new inventions and technical development which eventually led to National Academy of Science. 1971 - U.S. and USSR sign a treaty prohibiting the deployment of nuclear weapons on the ocean floor. Death 1160 - Minamoto no Yoshitomo, Japanese general (b. 1123) -
Naval History On This Day, Any Nation
flying_dutchman2 replied to Kevin's topic in Nautical/Naval History
February 10 60 - St Paul thought to have been shipwrecked at Malta 1900 - Appointment of first naval governor of Guam, Commodore Seaton Schroder. 1960 - USS Sargo (SSN-583) surfaces at North Pole. -
Naval History On This Day, Any Nation
flying_dutchman2 replied to Kevin's topic in Nautical/Naval History
February 9th 1943 - Organized Japanese resistance on Guadalcanal ends. 1744 - Battle at Toulon (French/Spanish vs English fleet of Adm Matthews) -
Naval History On This Day, Any Nation
flying_dutchman2 replied to Kevin's topic in Nautical/Naval History
1862 - Joint amphibious force capture Roanoke Island, key to Albemarle Sound. 1890 - USS Omaha sailors and marines assist Hodogary, Japan in subduing large fire. 1744 - French/Spanish fleet leaves Toulon. -
Naval History On This Day, Any Nation
flying_dutchman2 replied to Kevin's topic in Nautical/Naval History
February 7th. 1815 - The Board of Naval Commissioners, a group of senior officers, is established to oversee the operation and maintenance of the Navy, under the direction of the Secretary of the Navy. 1955 - Seventh Fleet ships begin evacuation of Chinese nationalists from Tachen Islands 1965 - In response to a Viet Cong attack on barracks area at Pleiku, South Vietnam, aircraft from carriers, USS Coral Sea, USS Hancock, and USS Ranger attack North Vietnamese area near Donghoi. -
Naval History On This Day, Any Nation
flying_dutchman2 replied to Kevin's topic in Nautical/Naval History
Both of you are covering everything. My sources have all the same info. Marc -
Naval History On This Day, Any Nation
flying_dutchman2 replied to Kevin's topic in Nautical/Naval History
1894 - 1st US steel sailing vessel, Dirigo, launched, Bath, Me -
Naval History On This Day, Any Nation
flying_dutchman2 replied to Kevin's topic in Nautical/Naval History
On this day in History: 1709 - British sailor Alexander Selkirk is rescued after being marooned on a desert island for 5 years, his story inspires "Robinson Crusoe". 1800 - USS Constellation (CAPT Thomas Truxtun) defeats la Vengeance. 1862 - USS Hartford, Captain David G. Farragut, departs Hampton Roads for Mississippi River campaign. -
Naval History On This Day, Any Nation
flying_dutchman2 replied to Kevin's topic in Nautical/Naval History
1662 - Dutch garrison on Formosa surrenders to Chinese pirates. 1788 - 1st US steamboat patent issued, by Georgia to Briggs & Longstreet. 1941 - United States Fleet reorganized, reviving Atlantic and Pacific Fleets 1942 - USS Enterprise and Yorktown make first WW II air strike, Japanese Marshall Islands 1955 - Operation Deep Freeze, a research task force, established in Antarctic