flying_dutchman2
-
Posts
1,735 -
Joined
-
Last visited
Content Type
Profiles
Forums
Gallery
Events
Everything posted by flying_dutchman2
-
 Piet, Thank you very much for the detailed information on how to make water. Going to copy it in my general hobby notebook. Marcus
- 378 replies
-
- 6
-

-
- java
- pacific crossroads
- (and 2 more)
-
Piet, You may have mentioned this somewhere in your build and if so I can't find it. What materials do you use to create water? What kind of paint do you use? Can you recommend any books, articles, website that give detailed instructions on how to do this? (I have a book from SeaWatch Publ., Waterline Dioramas by Justin Camarata) I want to practice making water for some of my future ships. Thanks. Marcus
- 378 replies
-
- 6
-
-
- java
- pacific crossroads
- (and 2 more)
-
DIY Workbench Mini Vac Cleaner with Trap
flying_dutchman2 replied to Tecko's topic in Modeling tools and Workshop Equipment
Small diameter clear tubes can be found at home depot, etc. This vacuum setup has been used for over a century in Entomology (study of insects). When collections are made for very small insects. Instead of using a vacuum, you can use a bellows or suck really hard. Insects that are in leaf matter on the forrest floor. I saw a similar setup in one of my Anatomy of Insect books from 1909. Marcus -
DIY Workbench Mini Vac Cleaner with Trap
flying_dutchman2 replied to Tecko's topic in Modeling tools and Workshop Equipment
COOL!!!! thanks for sharing Marcus -
Catching up on your ice yacht. It is coming along nicely. Love the details of this scale. Marcus
-
Great work, Piet, especially your bow waves. The water looks very realistic. Something I need to learn how to do this as well. Marcus
- 378 replies
-
- 9
-
-
- java
- pacific crossroads
- (and 2 more)
-
The deck framing looks really good, Kees. It is starting to come together. Marcus
- 193 replies
-
- 6
-
-
- wilhelmina vii
- fishing
- (and 1 more)
-
Kees, The rudder looks great, love the details as well. Marcus
- 193 replies
-
- 5
-
-
- wilhelmina vii
- fishing
- (and 1 more)
-
So far it looks promising. Looking back at the pictures of the Rocket, she sure looks sleek. I would have loved to see them outrun a train. That must have been a sight to see. Marcus
-
Hi Jack, I want a front seat for this built. This is awesome and looking forward to its progress. Marcus
-
Beautifully done. Both the sails and the rigging look good. I pawned my Mary off to a friend who is an arborist, and in return he is going to take down a 70 year old Russian elm that got hit by lightning last year, (a $1500.00 savings for me). I built a display case for her as well. Marcus
-
Piet, Those guns are looking good especially at that size. Excellent workmanship. Marcus
- 378 replies
-
- 5
-
-
- java
- pacific crossroads
- (and 2 more)
-
I am pulling up a chair as well and after you talked about herring, I wanted some. Marcus
- 193 replies
-
- 6
-
-
- wilhelmina vii
- fishing
- (and 1 more)
-
Well done. She is looking good. Marcus
-
The barrel and the carriage look great. Couple of those on the deck is going to look good. Initially I thought of adding canons to the Utrecht but in the end omitted this as the boat is a pleasure yacht eventhough the plans call for it. Now that I see what Chuck's material looks like, once I do a fluit, I will order them from him. Marcus
-
Nice diagrams. I think that one could use these plans to built a ship or two. One needs to be well versed in that area of ship building. marelibre.com looks like an interesting site, bookmarked it. Thanks Marcus
-
Popeye 's tip is good. I do something similar. Collect the saw dust from the wood you are sanding. Add just enough white glue to make a paste. Mix well and then apply to the area. I use toothpicks. I also use it in areas to strengthen parts. Once dry it sands well and it is strong. I keep it handy in syringes and in different colors. Marcus
-
Jan, pictures would be great. Thanks Marcus
-
I need to get that boek from Versteeg. Is it still in print? I built all four of them and Friese tjalk anno 1900. Wanted to get that King Size 32 pounder Cannon at the scale of 1:12 length was 40 cm but it was beyond my price range. My ships moved from Holland to Africa to the US back to Holland and in storage. Salvage the sails and using the tjalk's main sail for my Utrecht's topsail. Marcus
-
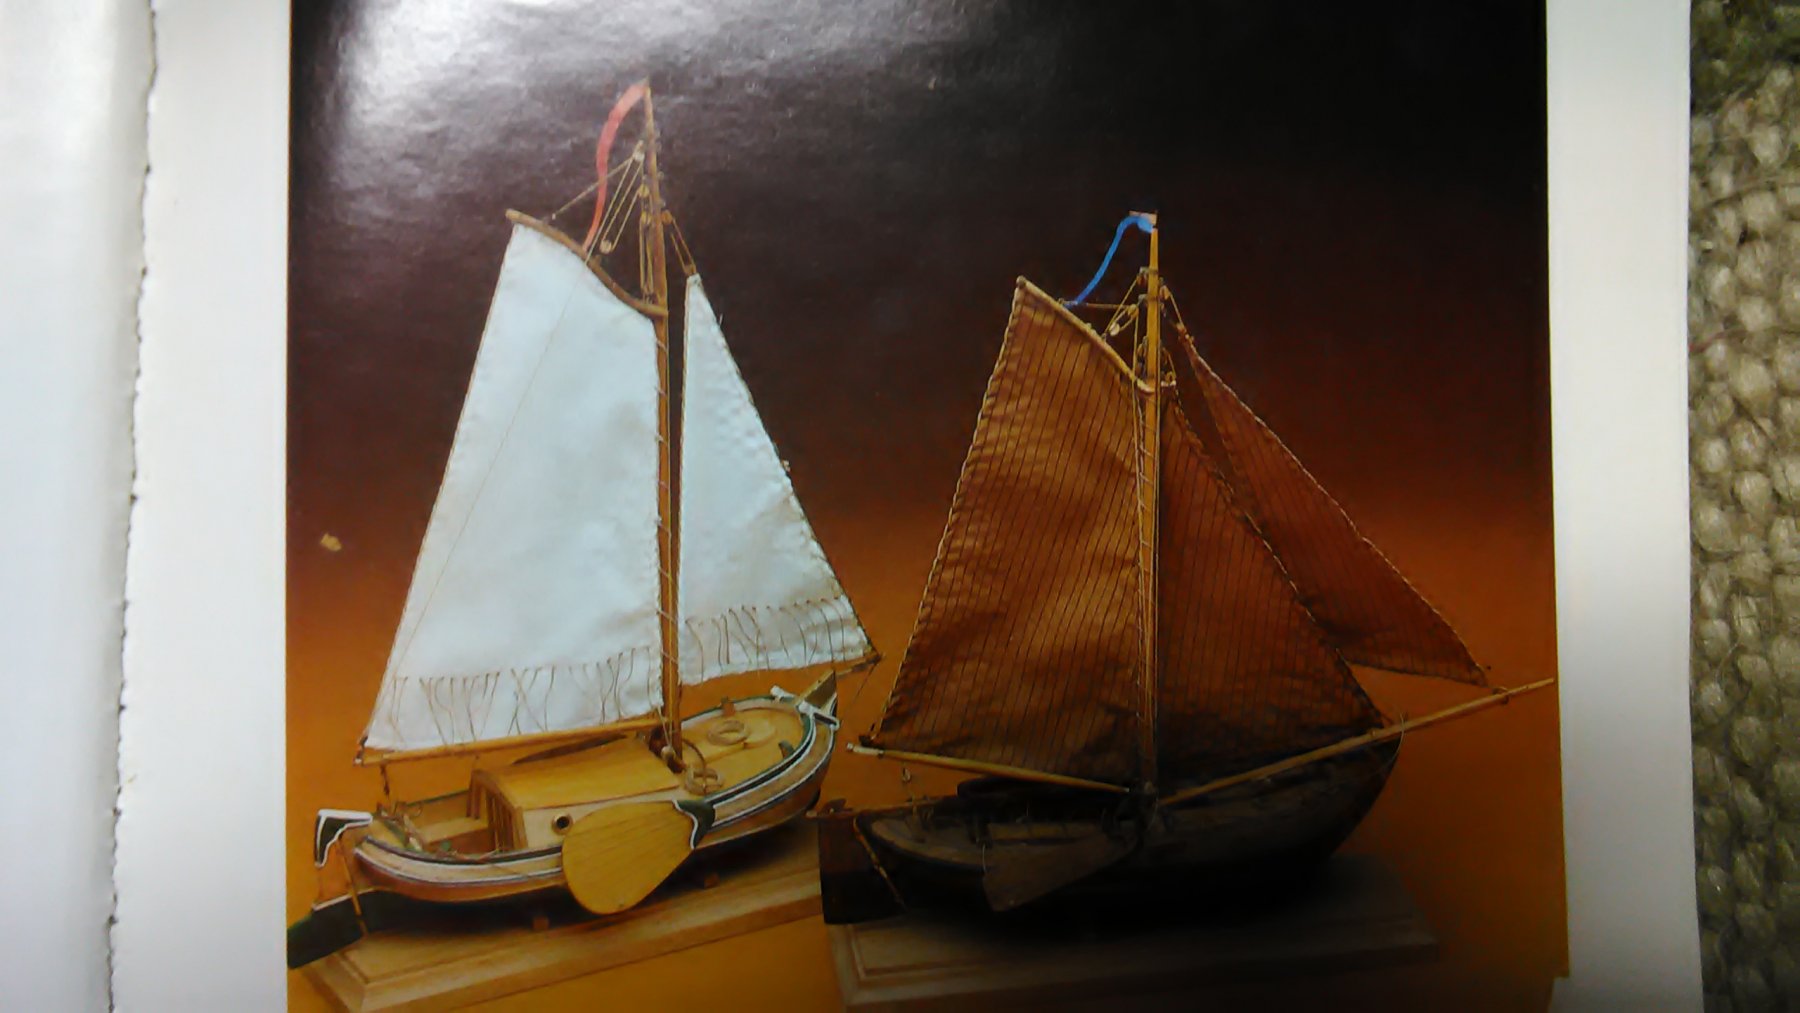
Very few boeier kits were made, but there was one from the Authentic Shipmodels Amsterdam. I built it in the 80's. Still have the catalog. This company made a series of four flat bottom boats. Their description of a boeier is as follows. "With an authentic boeier there are no straight lines. Everything is round. Nowhere on the boat is a flat surface. Boeiers were luxury yachts of the 19th century and you still see them on the lakes in the Netherlands. The picture below is from the catalog, it is the one on the left. On the right is a botter (built that too) . Marcus

-
Bit late, as usual, good looking ship. (hartstikke mooi). I don't have the plans of this one, but will get them somehow. It is nice to see what the model looks like when finished. You did an excellent job and I love the sails on her. Marcus