


lmagna
-
Posts
5,885 -
Joined
-
Last visited
Content Type
Profiles
Forums
Gallery
Events
Everything posted by lmagna
-
 hello glued Should be fairly simple................. Grab a log and cut away anything that doesn't look like the Blue Devil, throw it in the water and watch it capsize! (See your other posting in "a glutton for punishment") Hope that helps Lou
- 83 replies
-
- 2
-

-
- melvin
- blue devil
- (and 2 more)
-
Bill You have a better memory than I do! I could have not told you the year if my life depended on it, to say nothing of the price. 1967 seems about right though. That would have made me about 18 fresh out on my own with a little money to spend on toys now and then and still prior to getting to play in Hueys for Uncle in his tourist resort half way around the world. Lou
-
Bill Oh come on! I can't be the only dumb kid that spend days building this ship for minutes of of fantasy realization! You need to come clean as well and provide the details! Lou
-
The Blue Devil was my first foray into motorized ships. I build her right out of the box, set the gearbox to use the figure eight cam and set her on her maiden voyage at my local pond. All went well for the first part of the pattern even though it was a bit scary watching the ship heel when turning. Then half way through the second figure eight, while as far from shore as possible, a slight gust of wind came up broadside and over she went! Capsized and sank almost instantly with the props still turning in the air! I was devastated. I managed to wade out and retrieve the ship but I never sailed it again. I could be wrong, but back when I built it as a kid I think it was possibly the largest, (Longest) model ship you could buy. I don't remember how much it cost back then but it could not have been much more than a few dollars or I would not have been able to afford it. Lou
-
I originally thought I had something new and original to possibly add to this topic, but after reading through it in more detail it turns out that my ideas have been expressed elsewhere. But then I thought that if the same ideas were expressed often enough then possibly it would increase the possibility of seeing what we would like to see at some point. First off getting my personal period/ship/nationality choices out of the way, my preference would be American vessels of the American Revolutionary war, with ships like Lexington, Providence, Cabot, and Andrew Doria to name a few that would be representative of the majority of American vessels of the time. I feel these small ships are much more representative of the Continental ships of the time than the larger frigates most commonly offered by companies. The added advantage of these types of vessels is that they are smaller and could be built to a larger scale without taking over the house and having reduced rigging can make an interesting model that is more within the range of a beginner or novice. That is where most of the rest of the idea comes in. It seems like most of the beginner kits have solid hulls to make it easier to obtain the hull shape without having to learn planking. I think that retaining this idea or using the bread and butter method of making semi solid hulls, along with Chuck's method of planking the much easier areas above the wales is kind of the best of both worlds for beginners, learning planking while not having to deal with the more complex bilge, bow and lower stern. This would also make the kit less expensive if the pricing on other solid hull kits are any indication. Here is where I think another departure from the normal kit could be taken. An upgrade kit could be offered that instead of the solid hull it would include bulkheads and profile piece along with the extra wood needed to build the same vessel as a POB kit appealing to the more advanced modeler. The same thing could take the kit to the next level by replacing the POB items with material needed to build a POF kit. All of the same ship but different levels of challenge for the builder, at different levels of cost of course. Then the manufacture could also offer upgrade lumber to replace the standard kit selection. I am not so certain about PE items. I do feel that there are many items that would enhance a kit of any level and of course make a much more refined and detailed model just as they do in the plastic kits of airplanes, ships, and cars. I just do not know if the PE parts should be included in the kits or if they should be an aftermarket item like in the plastic kit industry. The hard to make carved details of the ship could be offered at additional cost for people like myself who have absolutely no talent in carving. They could be made from almost any material that glues well and holds the details of the original. Again Chuck is doing some very innovative work in this area. It would be nice to see a few figures that match the scale/nation/period as well. I think models could be produced in this manner profitably and sales would possibly be extended on any given kit by offering several versions of the same kit to appeal to the skill levels of various potential customers. The same person could build the same vessel more than once as their abilities increased if they desired without having to return to the exact same kit. The same manufacturing technique could be applied to virtually any kit the manufacturer chose to release, and for each named ship that was created there could be at least three or four versions of the model. Hopefully this would increase the longevity of the kit sales for the manufacturer as well. Hope this is still within the parameters of this subject and I did not stray too far into manufacturing rather than just “What ship”. Lou
-
vossy I don't know about you, but my wife would get a little put out with me if I make a statement like that! Lou
-
Hello Alex You are embarrassing me! I look at the quality and speed of your build and then look over at my poor attempt at progress and also realize I will have to kick it up a few notches to even approach your quality. Looking forward to your next installment. Lou
-
Moflea Again great progress. I am glad that the beads worked out for you. I have a bottle of 1.5mm beads that i bought just for this ship and even though they only cost a few dollars it is nice to see that they look so nice in your Union build before I do it on mine. On my "Union" I made many changes to make it look more like a late 18th century Brigantine, at least I hope so. In some ways it would have been better if I had made it into an early 19th century brig as the hull is a better shape for a ship of that time but I did not want to do that time period and I would have had to do MANY more cannons on the more open decks! When I got to the transom I just felt that it needed to be a more rounded shape and different design, so I changed it. The first attempt ended up not shaped right. the second looked OK until I looked at it close up like in the pictures you take and it made me want to do better so now I am almost finished with what I hope will be something worth looking at and not to be ashamed of. I would be finished with it except a few things in my daily life have changed and have kept me all too busy in dealing with them. Lou
-
Great job Alex As you know the reason I am following your build is to show me how to try and make my kit at least partly as good as you have done. I am currently stuck on redoing my third redesigned transom! I wish I had an idea for the shiny beads but to be honest I don't. I think there are some beads out there that are made of plastic instead of glass that could take paint better but I am not sure. I also think you will find that the shine on the parrels will not be as noticable when you start filling in all that open space with rigging and stuff. After all they are REALLY small. Keep it up, you are definitely showing me the way. Lou
-
Hello Michael I am not certain which part you are referring to but I have had some good results in the past using hot water. Not boiling hot but hot enough to make putting your hand in it uncovered uncomfortable. You can wear gloves and start reforming the part while still under water then hold it in place after you pull it out and let it cool. You can pratice with a piece of sprue to get the method down and be comfortable with it. Lou
- 106 replies
-
- 1
-
-
- constitution
- revell
- (and 2 more)
-
Hello Eddie I am not certain if it will be helpful or if I am just adding fuel to the fire, but I always thought that the Revell Constitution rigging plans for their 1/96th scale kit were a good remedial starter for novice riggers of 17/18th century square rigged ships. http://manuals.hobbico.com/rmx/85-0398-rigging.pdf While they are not strictly for the Fair American I would think that with the plans you already have combined with the step-by-step sheets for the Constitution you should find a number of similarities between a brigantine and frigate. Hopefully other more experienced people both with the Fair American and period rigging practices will either confirm or deny the validity of this assumption. There are a number of books on rigging as well that are certain to be more accurate and detailed, but at least with the ones I have, none of them are quite as "Simplified" in their approach as the Revell set. Hope this is a little help at least. Lou
-
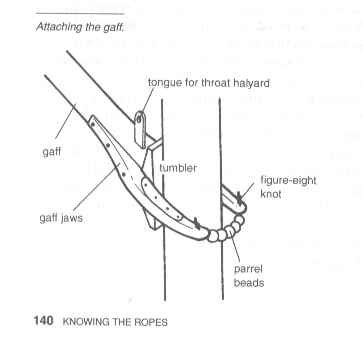
moflea I know what you mean about ships and loving them. I have been loving them since childhood as well but even though I live less than a mile from the ocean I have spent very little time on ships of any kind, and I am almost 70. As for the parrels for the gaff and boom you could use the small seed beads you can get at most craft stores: http://www.michaels.com/dazzle-it-10%2F0-czech-glass-seed-beads-purple-lined-aqua/10478801.html They are very small. For that matter you can also possibly use the double beads: http://www.michaels.com/darice-preciosa-twin-2-hole-czech-glass-beads-transparent-red-dyed/10478791.html when you start doing the rigging as blocks. They are pretty small as well. i think that if you are unsure about the strength of the gaff jaws then you could cut them out of brass sheet, cut a slot into the boom and gaff and glue them into place. When you can paint them black or cover them top and bottom in thin wood you would have very strong gaff jaws without going out of scale size. Good luck Lou
-
moflea How about just adding a gaff parrel and rely on the rigging to hold the boom and gaff in place?
-
Hello moflea I am in no way an expert. I can only hope that mine looks half as good as you are doing with this kit when I get to your point! But to me the quality of your build and the methods you are using are nothing short of outstanding for this kit. It looks like you will have a model to be proud of when you are done. Lou
-
I agree with Dave By simply adding a resistor in line close to the switch on your unit you can change the brightness of your lights considerably. You may want to get a little higher wattage resistor just in case though, as the current drop you might want for all the lights in the string might cause some unwanted heat at the resistor. You are working with pretty low voltage and LEDs so this may not be an issue but you may still want to check it out. Another slightly more labor intensive method if your lights are not putting out much heat, would be to get some Evergreen Plastic white tubing that has an inside diameter large enough to fit over the lights. Cut the tubing lengthways in half and make short covers over each light. You should get a difussed light through the plastic and if you leave an opening between the top and under the spar deck you should also get light shining upward rather than outward. You could also paint or otherwise cover the plastic to dim or direct the light anyway you want. Someone with more experience may also have other ideas like totally burying the LEDs completely under the gun deck and running strands of fiber optics the terminate in the location you want the light to emit from. just some ideas, hope one or more of them are useful to you. Lou
- 106 replies
-
- 1
-
-
- constitution
- revell
- (and 2 more)
-
Great job! I am certain that you will love the final results when you are done and it will be a blast showing guests when they come to your house and see the ship. You might want to set the spar deck in place temporally and see if there is any light leak through the plastic deck before you install it permanently. if there is then you will be able to block it with either paint or foil on the bottom of the upper deck. Looking forward to your further progress Lou
- 106 replies
-
- 3
-
-
- constitution
- revell
- (and 2 more)
-
Hello Sam Your carving skills have transformed this small ship into a masterpiece. I am new and have just discovered this build but, I will be certain to follow it as long as you are willing to share the results of your formidable skills! Makes my poor attempt at the Constructo kit look pathetic! Lou
-
Hello moflea I enjoyed your posting about this build. I am building the same kit although it is an older version and has a different name. So far I have almost completely redesigned the kit and have used almost nothing of the original wood. You are further along in your build than I am and your work looks very nice. I almost wish I had done the same thing and built it more out of the box. If I had gone just a little further the kit would have made a much better early 19th century brigantine than a late 18th century vessel. Looking forward to more installments on your build. I also agree that it is a very small model to work with. Lou
-
Hello Michael G I have been working with pretty much the same thing, only it is with the 1/350th Minicraft Titanic that I am making for my admiral as a kind of night light. Here was my solution for the battery situation. http://www.ebay.com/itm/2-5-10m-LED-Mini-Silver-Wire-String-Fairy-Party-Wedding-Light-Controller-Adapter-/401346315583?var=&hash=item5d721ac53f:m:msovzGbpbO8O4fm6l_c32vw These lights are pretty much the same as what you have but there are many more lights available if you want. Plus they will plug in so that you will not have to bother about batteries down the line. The inline switch also allows for some brightness control and of course some somewhat useless flashing modes. I wish it had a flicker mode instead of flashing. In my case I am placing many of them into the hull to shine through the drilled out portholes. Then I am lining all the under decks and cabin interiors with foil to stop light leaking through the lighter plastic of those parts. I also will be installing the lights through the keel but I think I will be able to hide the female plug inside the hollow stand with the switch in a convenient location. Good luck on your installation. Lou
- 106 replies
-
- 2
-
-
- constitution
- revell
- (and 2 more)
-
How to make old plans readable
lmagna replied to Gerhardvienna's topic in CAD and 3D Modelling/Drafting Plans with Software
Gerhard Thanks for the link. Nicely done patrol boat. I like the jig system you made as well. I am wondering if it could be made to work without the use of a lathe. All I have for rotary work is a drill press. Lou -
How to make old plans readable
lmagna replied to Gerhardvienna's topic in CAD and 3D Modelling/Drafting Plans with Software
Thank you for the video Gerhard. I will try and find the other videos on YouTube as well. Lou -
"I think they can be had in 1 mm.......but scratch making them seems to be the latest craze." I think that possibly you didn't spell the last word right! Shouldn't that be "crazy" Making a couple or even a few block in 1mm or 1.5mm would be OK I suppose, making enough to rig a frigate, or even worse, enough to rig both this ship AND the Thermopylae could drive one over the edge. In my case I need to use special care as I am not that far from the edge to begin with! At least that is what the Admiral tells me. Lou
- 140 replies
-
- 3
-
-
- jolly roger
- lindberg
- (and 1 more)
-
No problem on the reply, I am being a little off topic anyway. Glad to hear you made an extended Fathers Day of it all. Now you will be extending into my birthday, (Tomorrow) As for eBay, my preferred method is to hold my bid until the last fifteen seconds or so, (Ten is better but a little nerve racking) and bid the very highest I feel I can justify. Sometimes that is as much as twice or more than the showing bid! Much of the time I win because it is possibly unexpected by the other bidders and there is very little or no time to counter my bid. On the times I lose I at least have the satisfaction that I made the winner pay a much higher price than they would have. I did that a few months ago on a bid for a Fair American solid hull kit in 1/96, (+-) scale made in Holland by a company I never heard of. I placed my bid with something like 30 seconds to go and darn if one of the other bidders didn't manage to place another SIX bids before the bidding was up! I still won the bid because he only made small bids instead of going for broke but the extra few seconds cost me $30 extra! I tend to stay away from Oldmodelkits.com because they seem to be a bit over priced in most cases. Just my opinion. What is over priced when you can find it nowhere else? I am looking forward to how your 1/96 scale blocks work out as I also have some spare plastic stuff in the stash box and if your's turns out I may do the same when the time comes, but I still cannot help but think they will be massive at this scale. I also think you are right in that 2mm blocks seem to be about the smallest available commercially. I wonder if Chuck could make them to order in a smaller size? Another alternative I have been considering is using the small (1mm?) craft beads then filling and painting after rigging. Lou
- 140 replies
-
- 3
-
-
- jolly roger
- lindberg
- (and 1 more)
-
Denis Hope your dog walk went well. Isn't this Fathers day? The day that the other half is supposed to do all that kind of stuff? In case you haven't found them yet the links for the two eBay listings are : HERE and HERE I am surprised that the first one does not have any bids while the second already has two! I would think that having two 1/96 scale kits would be better than one. I have the problem of hording kits that I find interesting. It is a bad habit but in the long run tends to save a ton of money. I have model kits that when I bought them were VERY inexpensive. If I was to buy them now in some cases I would be out hundreds of dollars for each kit. I also went through a phase of building 1960s prototype, endurance, and Can Am sport cars some of them are now worth several hundreds of dollars each if I could find them, and others are available no where at all. Ever hear of a Bre Hino Samurai? At any rate it is interesting on what you intend with the rigging on this kit. I was thinking that what I was going to do when I built it again was to rig it with the little loops provided and then fill them in and paint them so they would look like solid blocks. Lou
- 140 replies
-
- 2
-
-
- jolly roger
- lindberg
- (and 1 more)
-
Where do you get the time for a blog? I am feeling a bit overwhelmed just trying to keep progress on the dumb Constructo kit that I stupidly thought would be a "quick build". Now I am adding the 1/350th Titanic, with lights, to my list and I want to do the Sultana as a gift as well! I'm retired and don't seem to have that much time! By the way there are a couple Revell Thermopylae listed on eBay for what seem to be a good price in case you don't think you have enough to do. One of them is a dual kit sale that also includes the Cutty Sark. Just trying to be helpful. I'll go back to my corner now. Lou
- 140 replies
-
- 5
-
-
- jolly roger
- lindberg
- (and 1 more)