Tim Moore
-
Posts
350 -
Joined
-
Last visited
Content Type
Profiles
Forums
Gallery
Events
Everything posted by Tim Moore
-

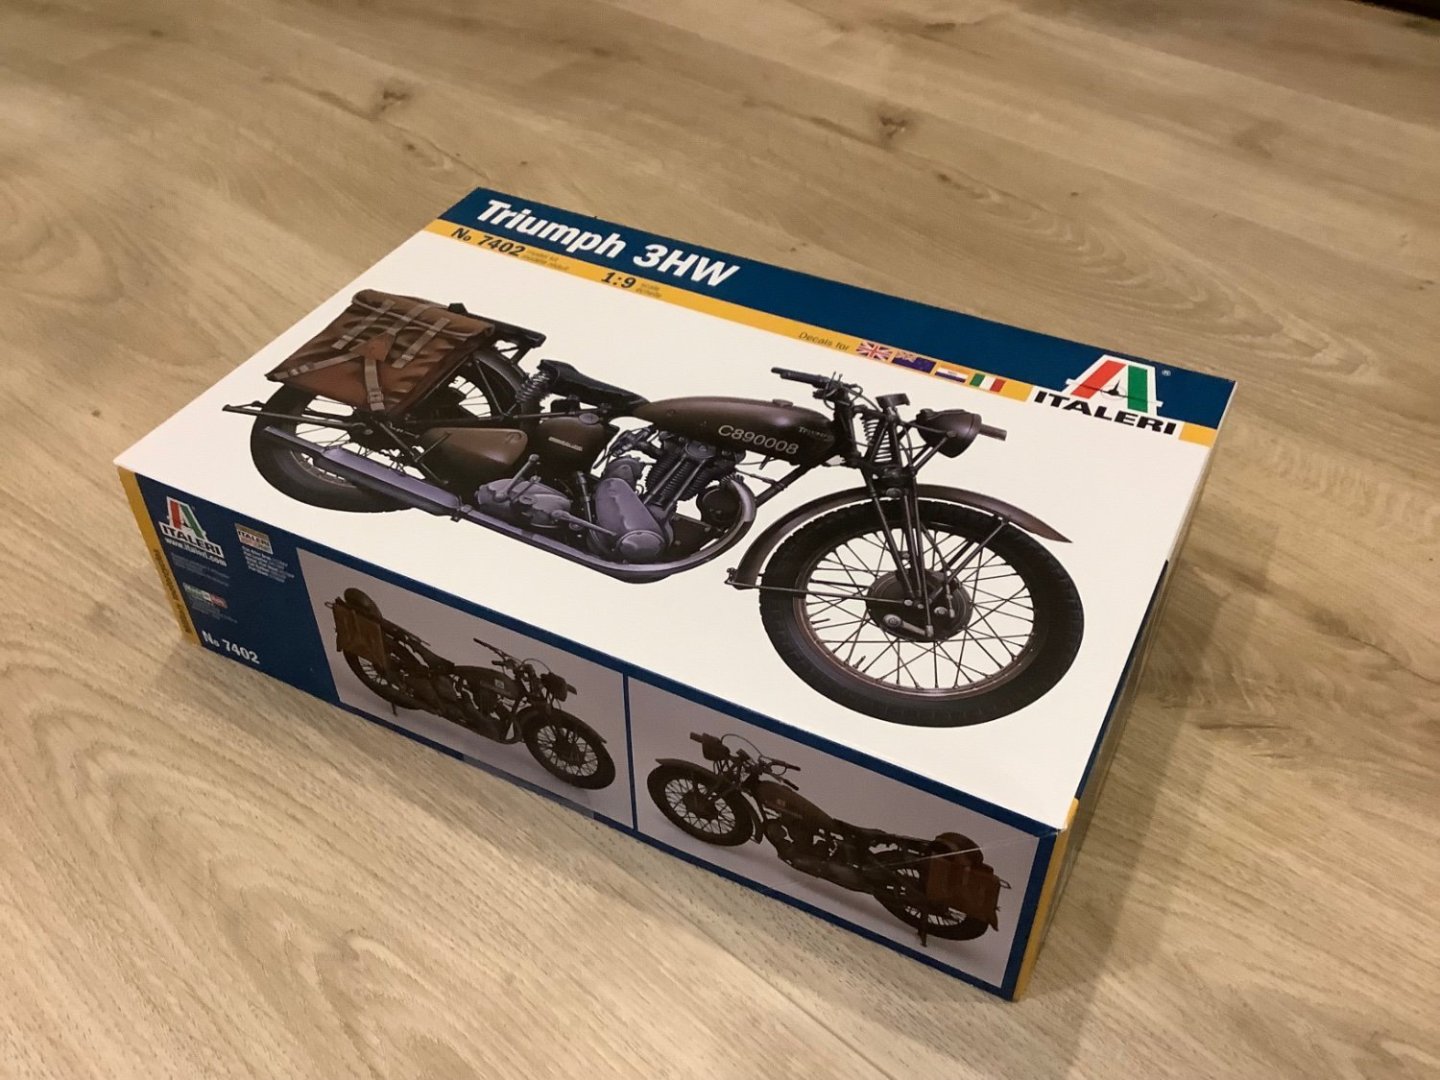
Triumph 3HW by Tim Moore - Italeri - 1/9
Tim Moore replied to Tim Moore's topic in Non-ship/categorised builds
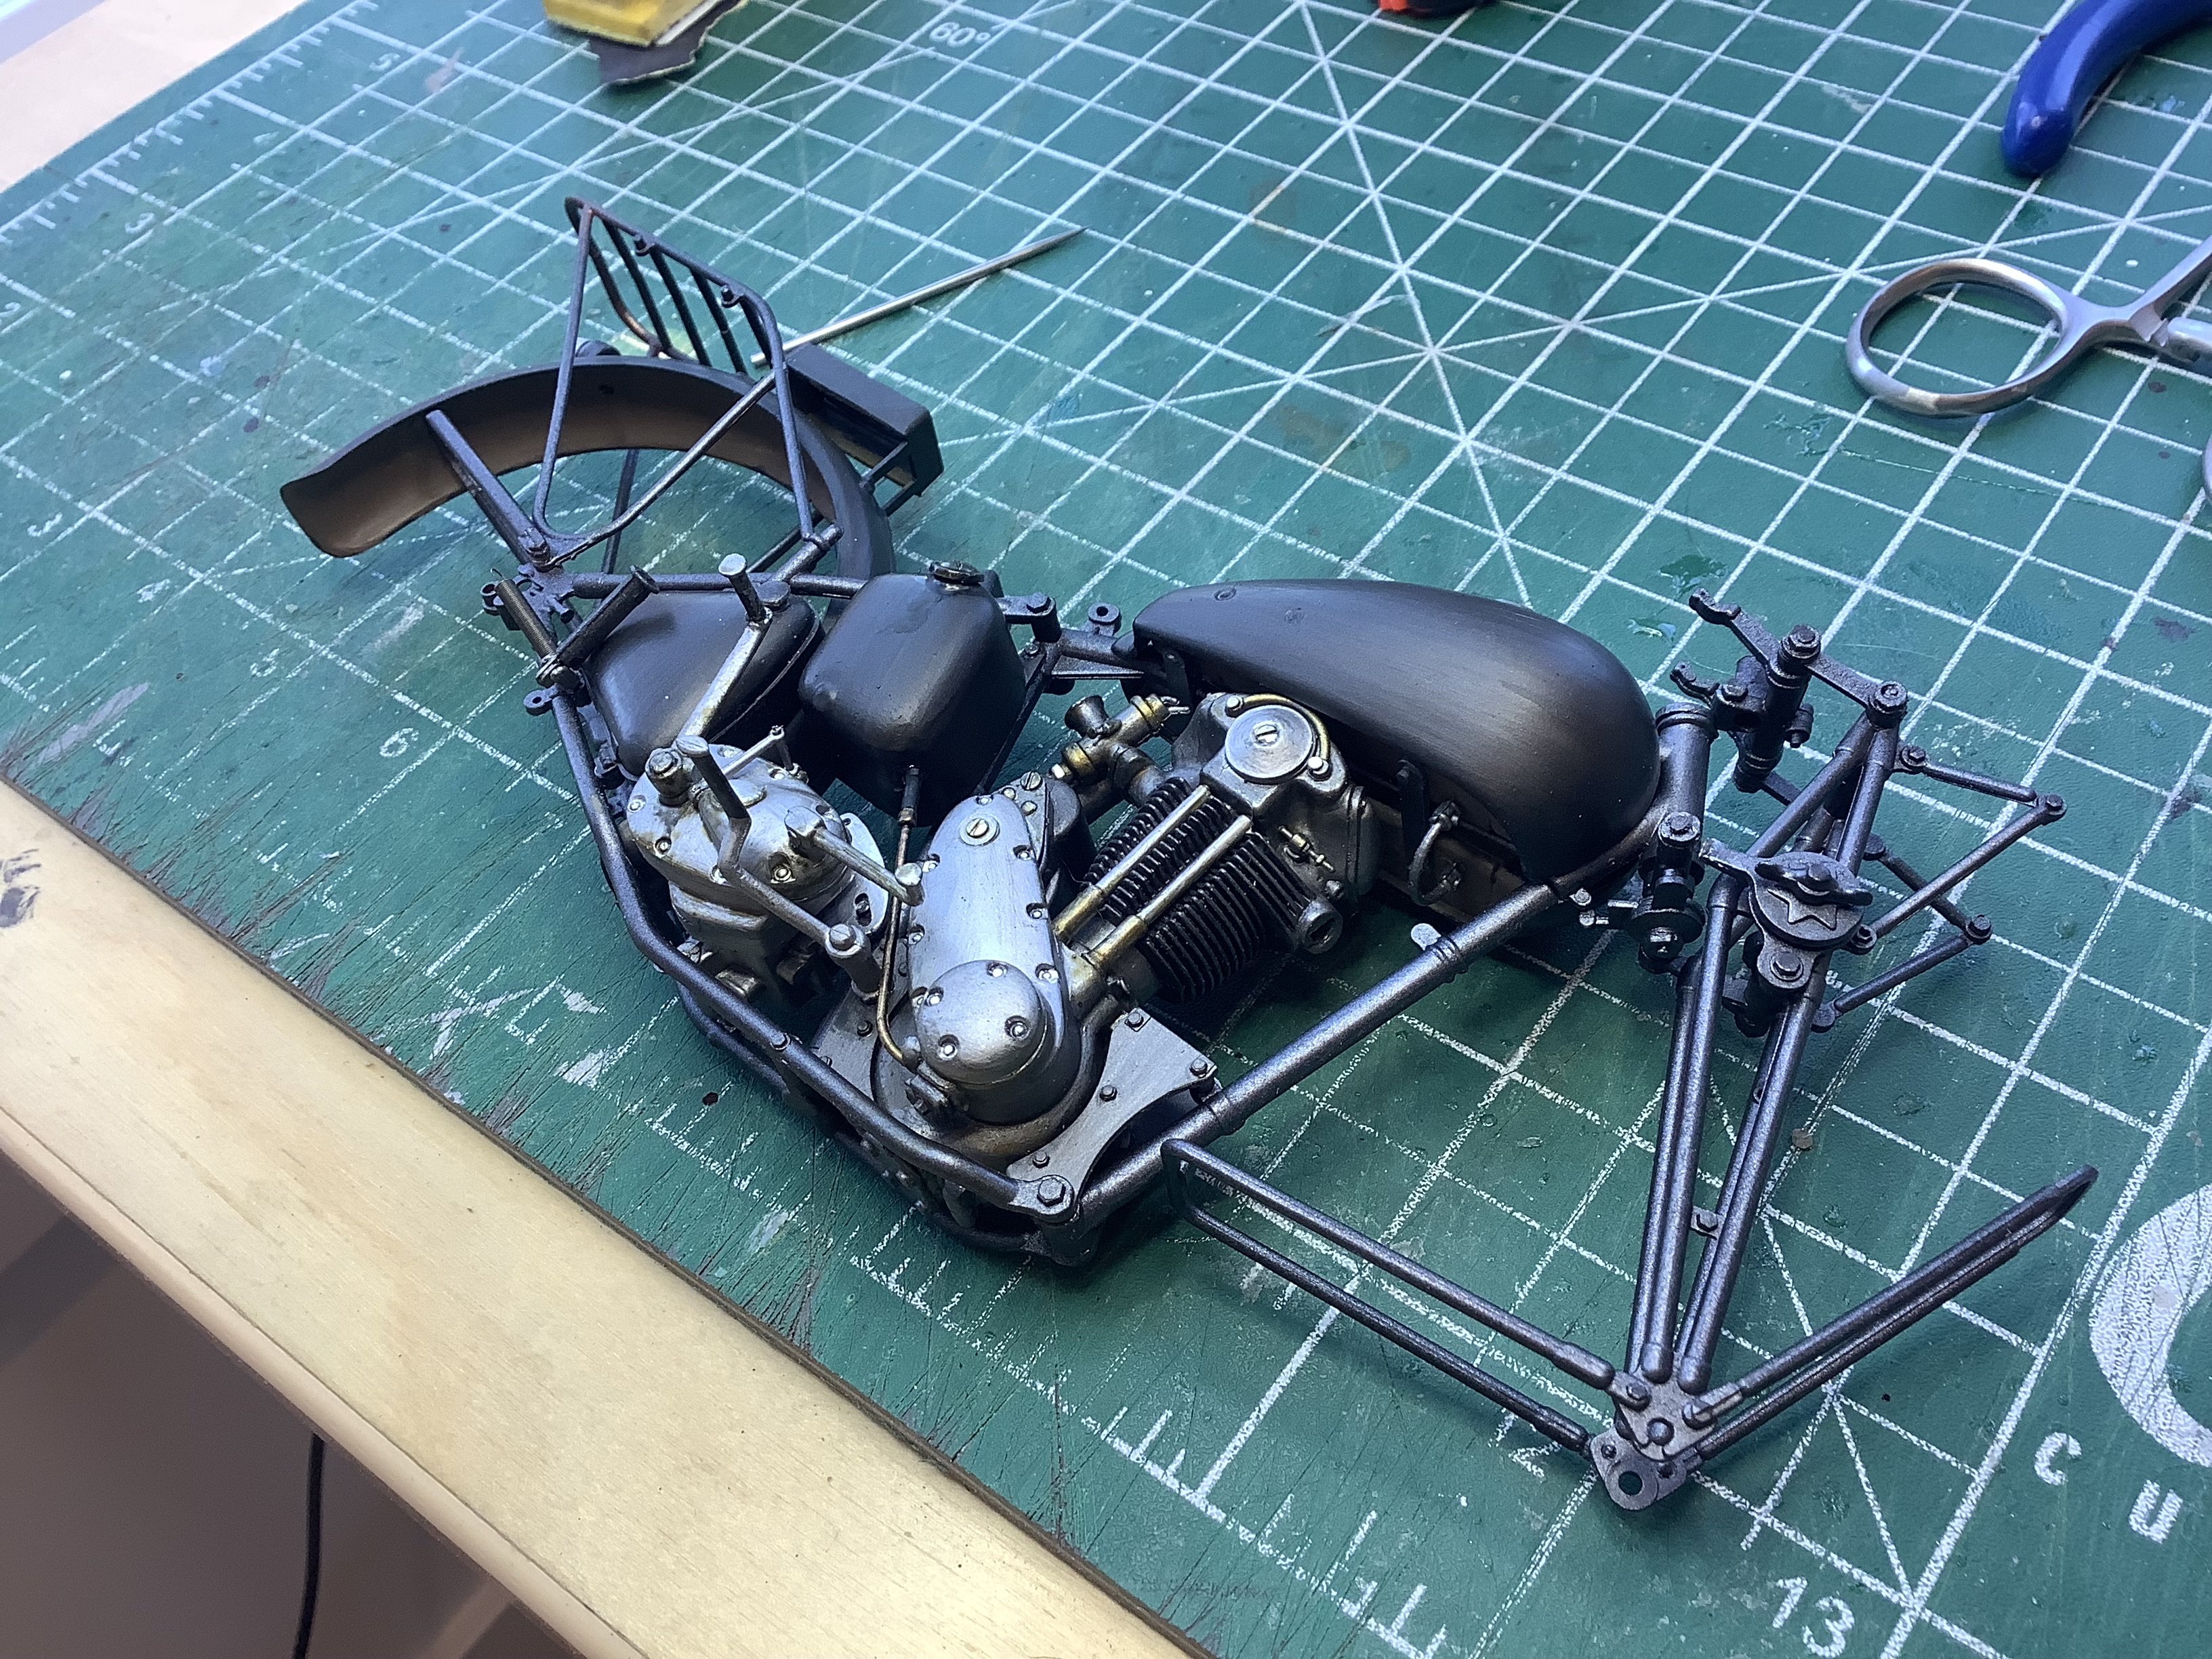
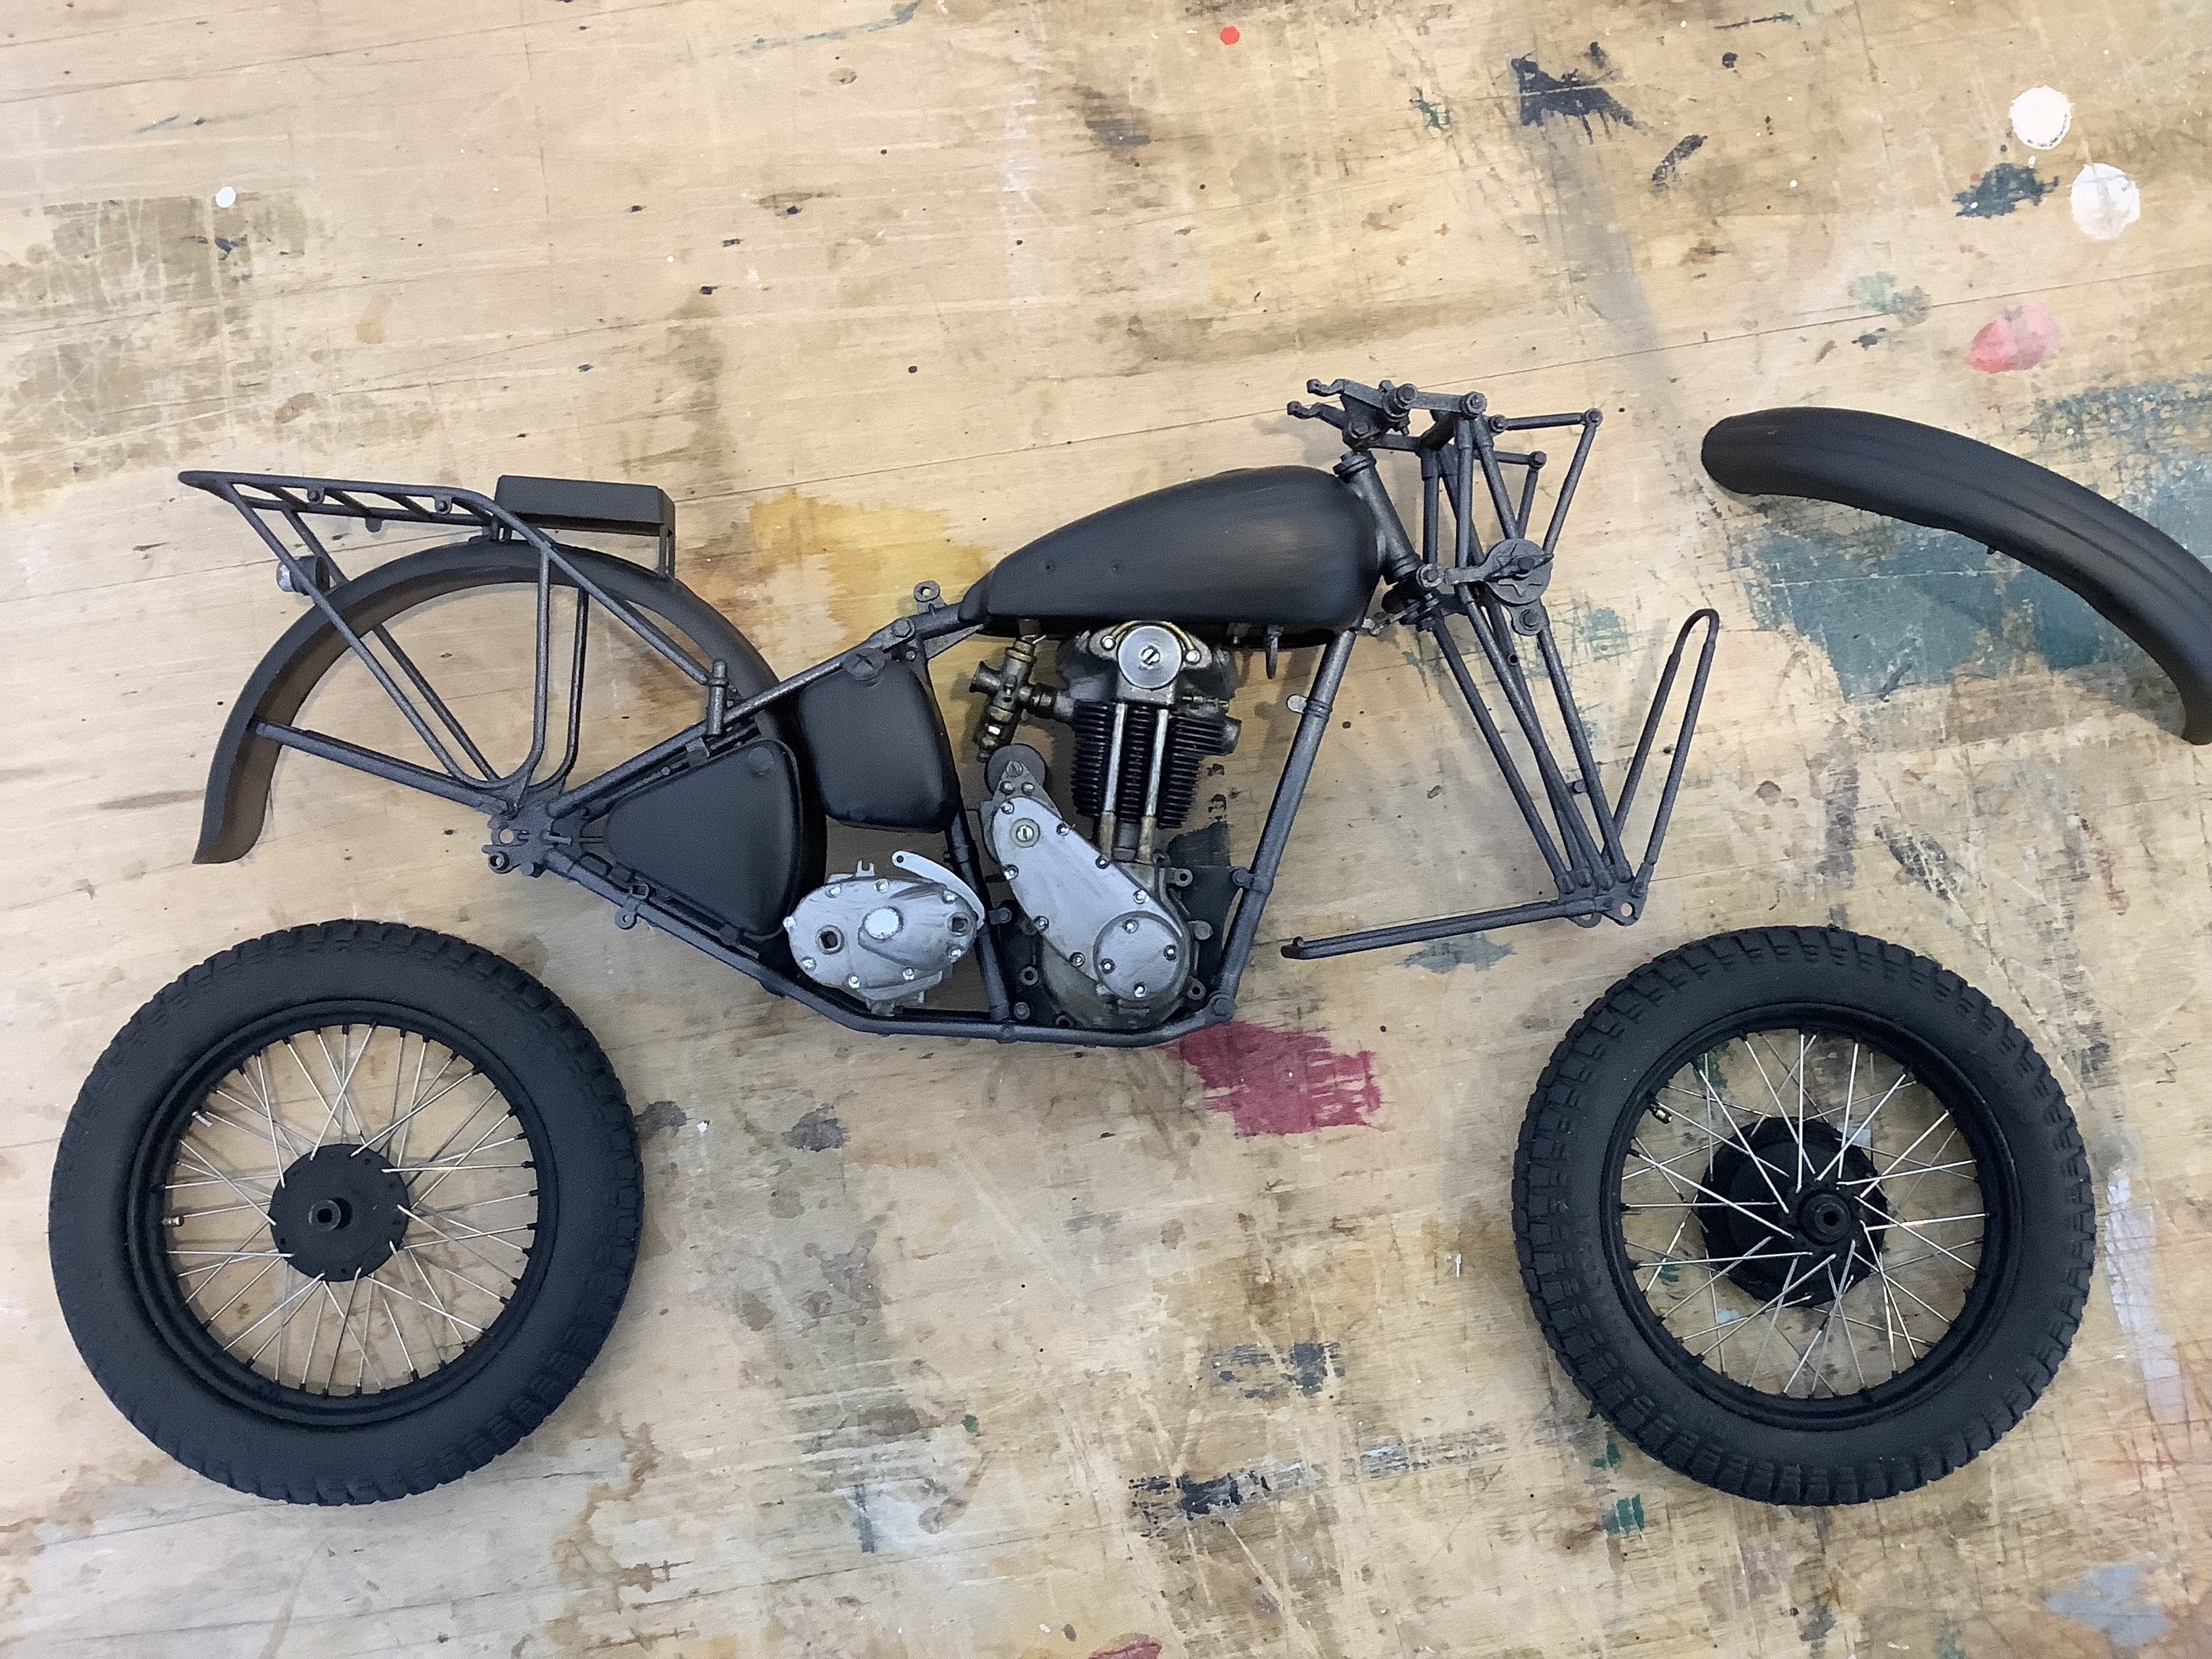
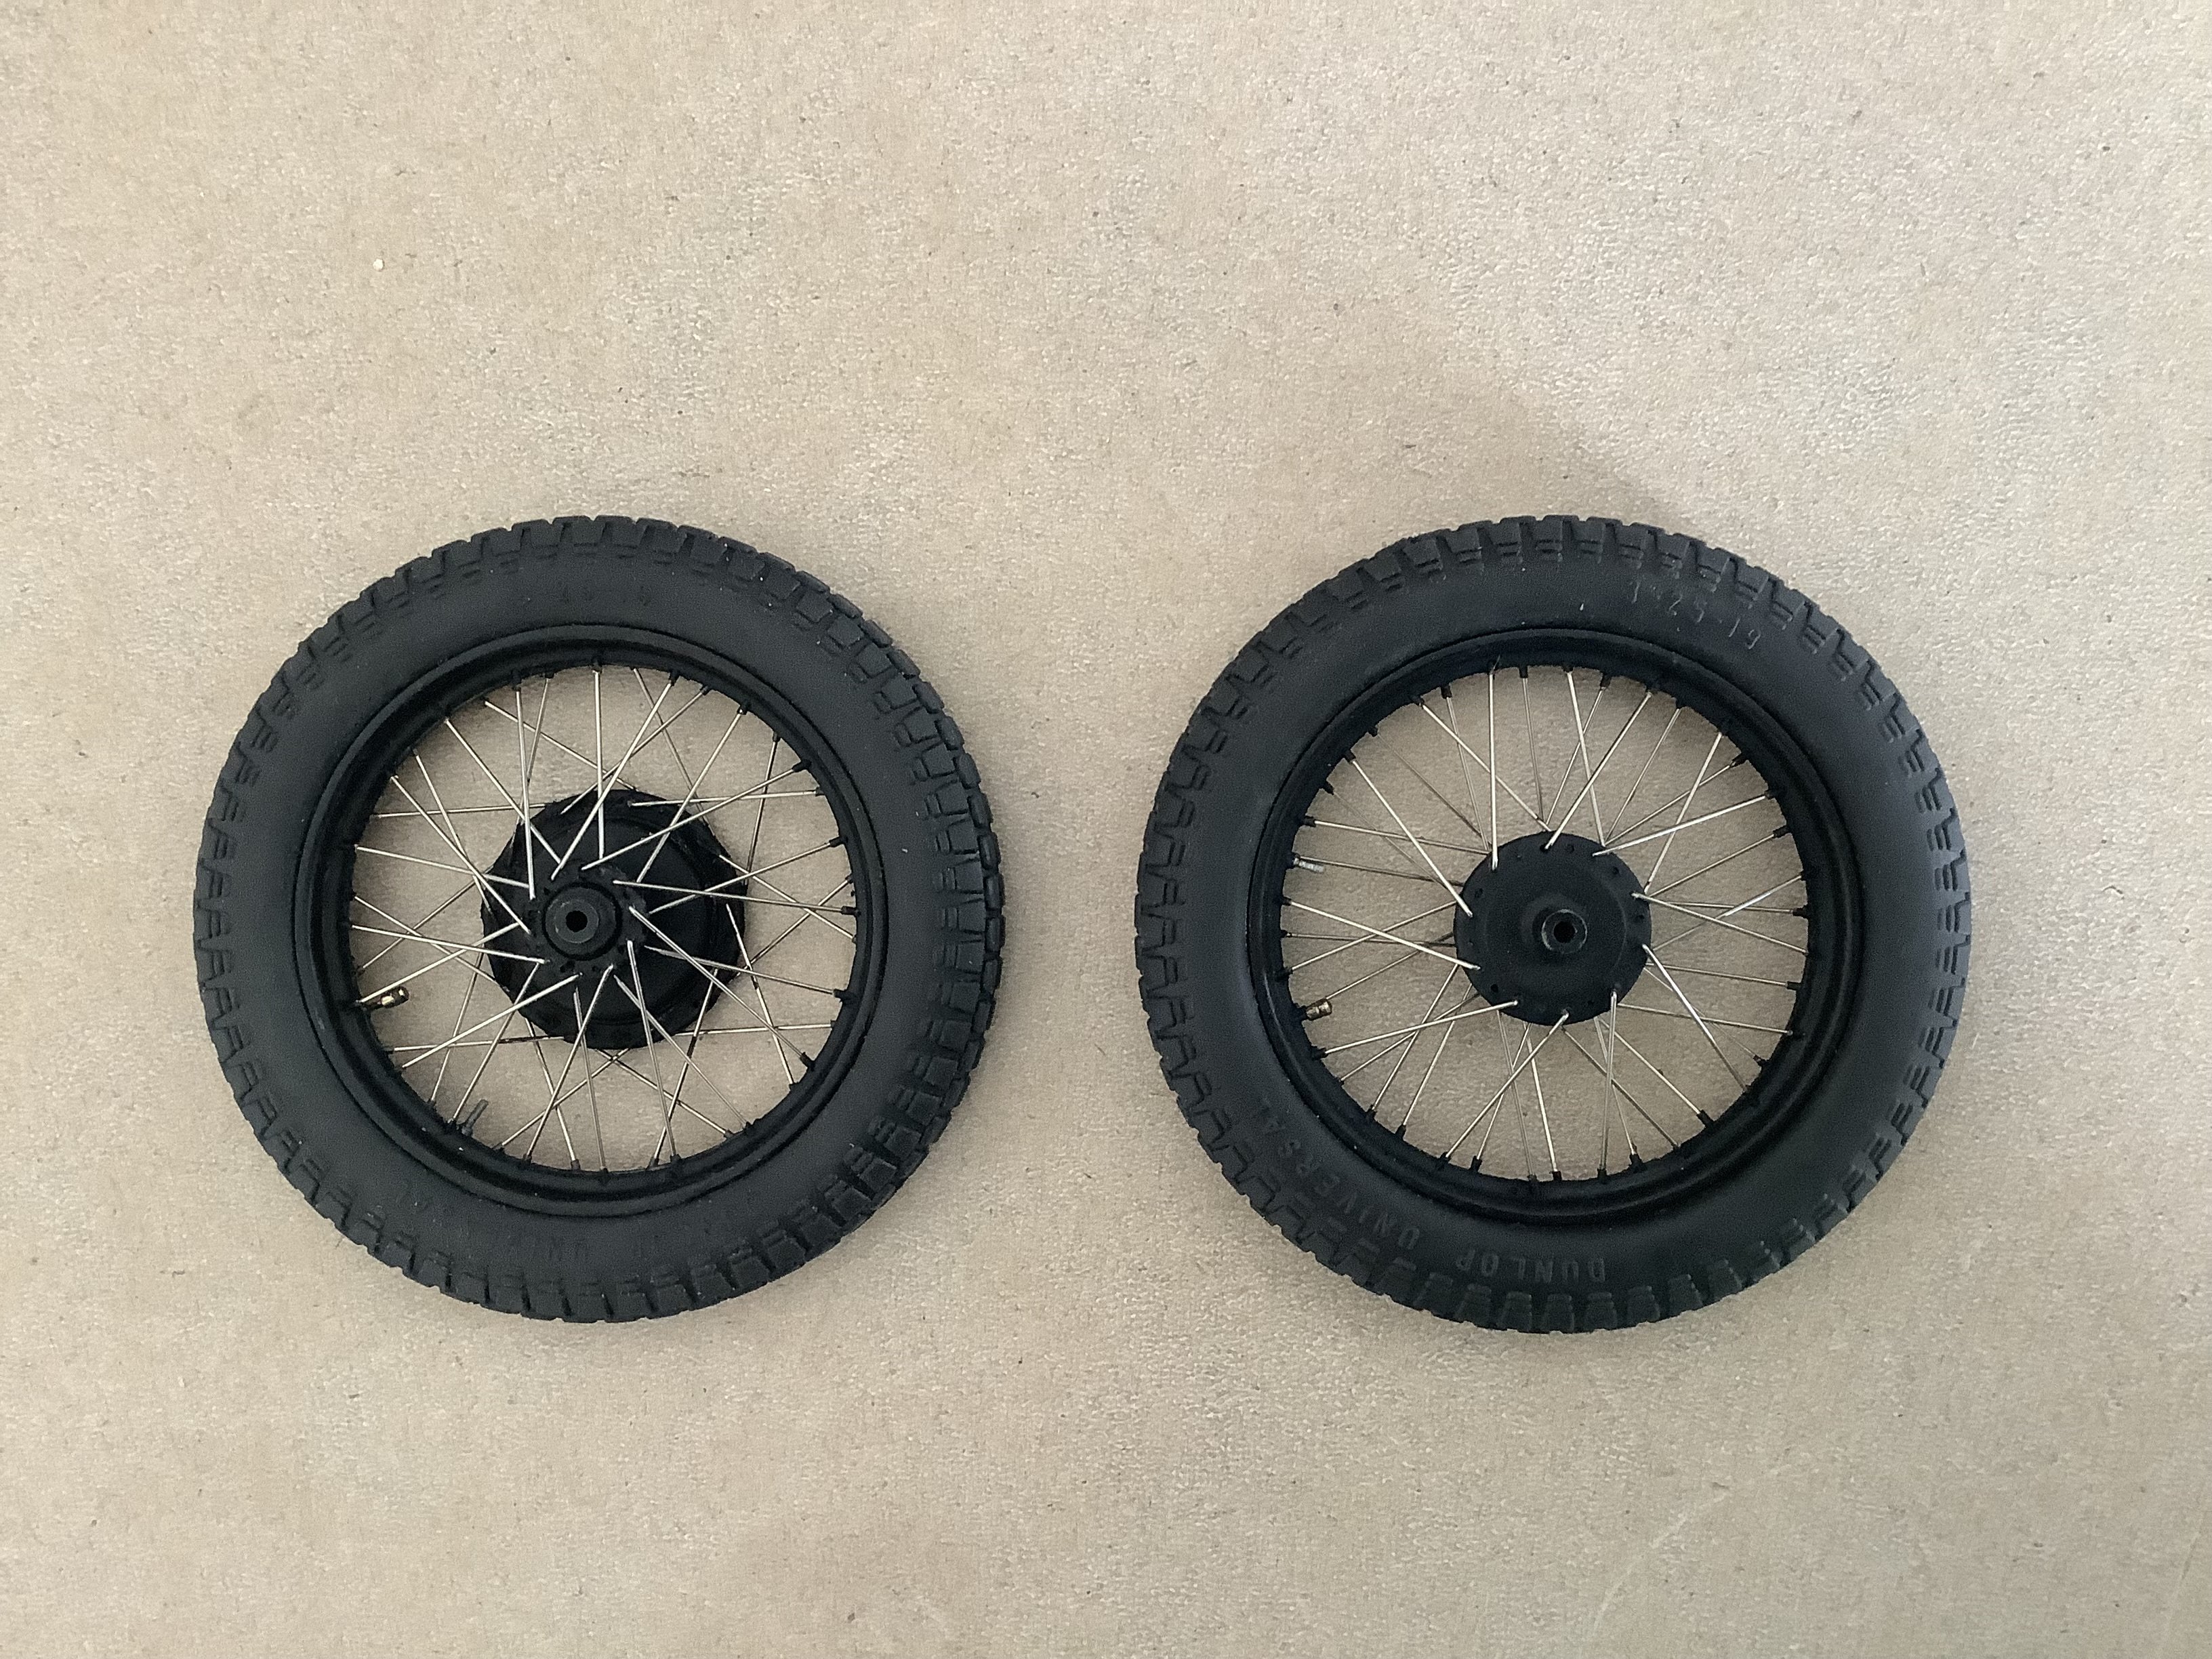
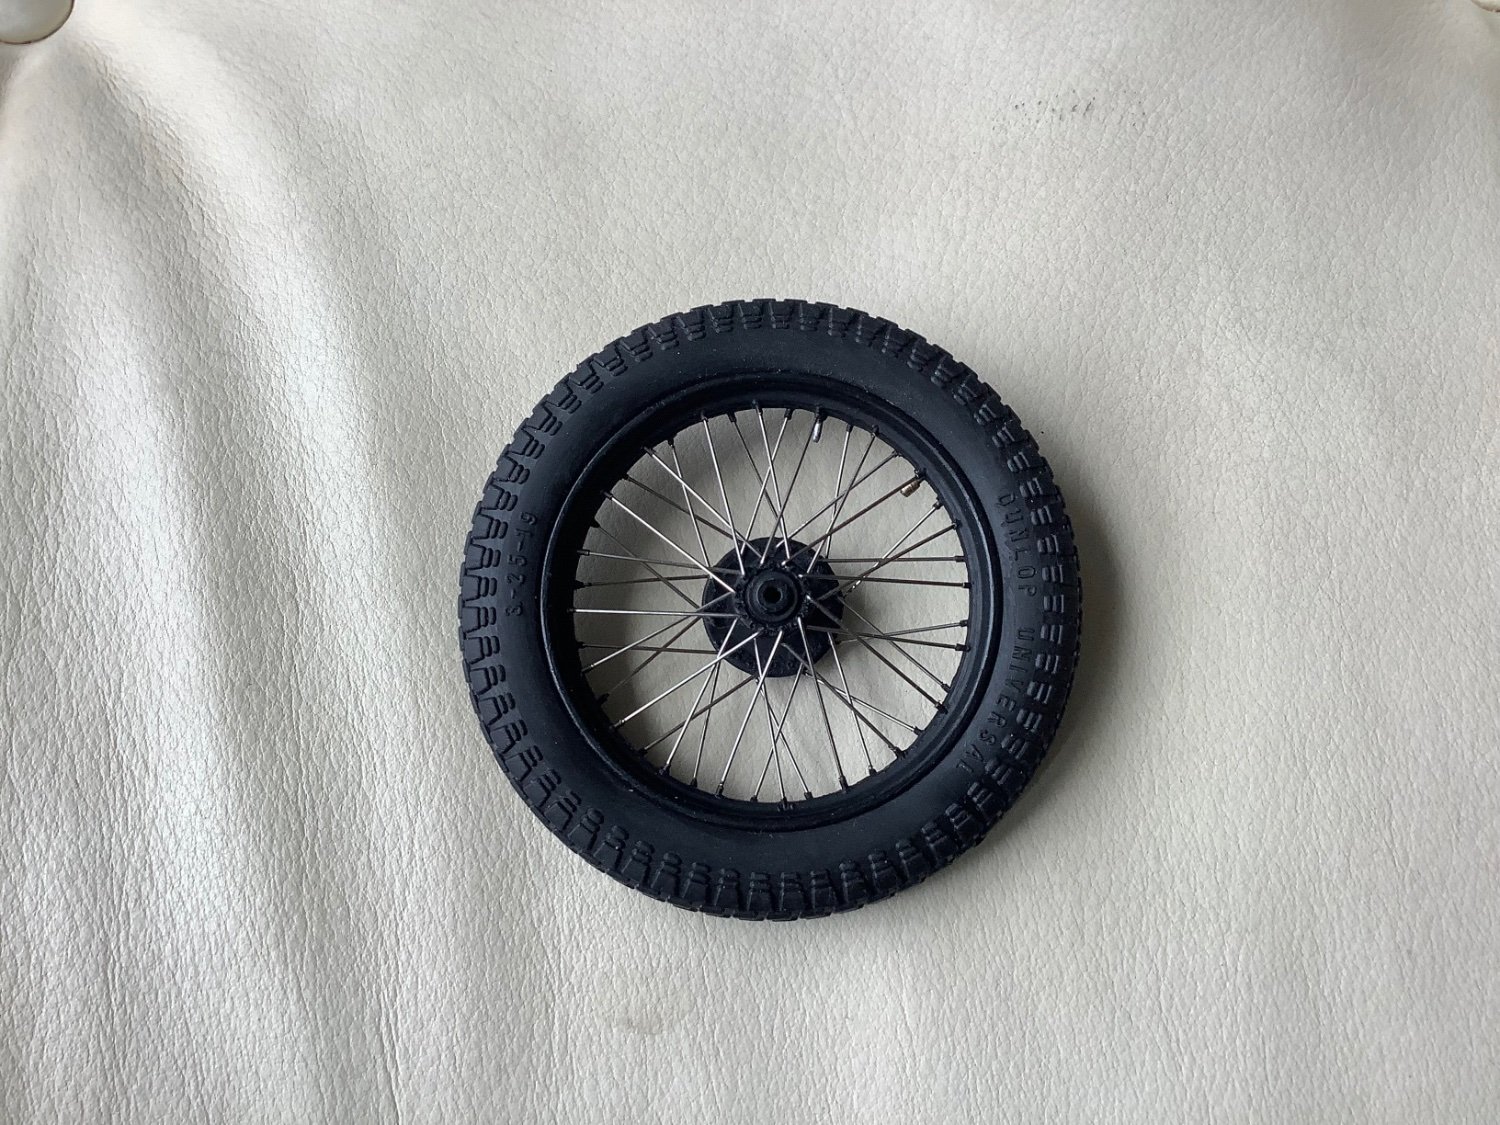
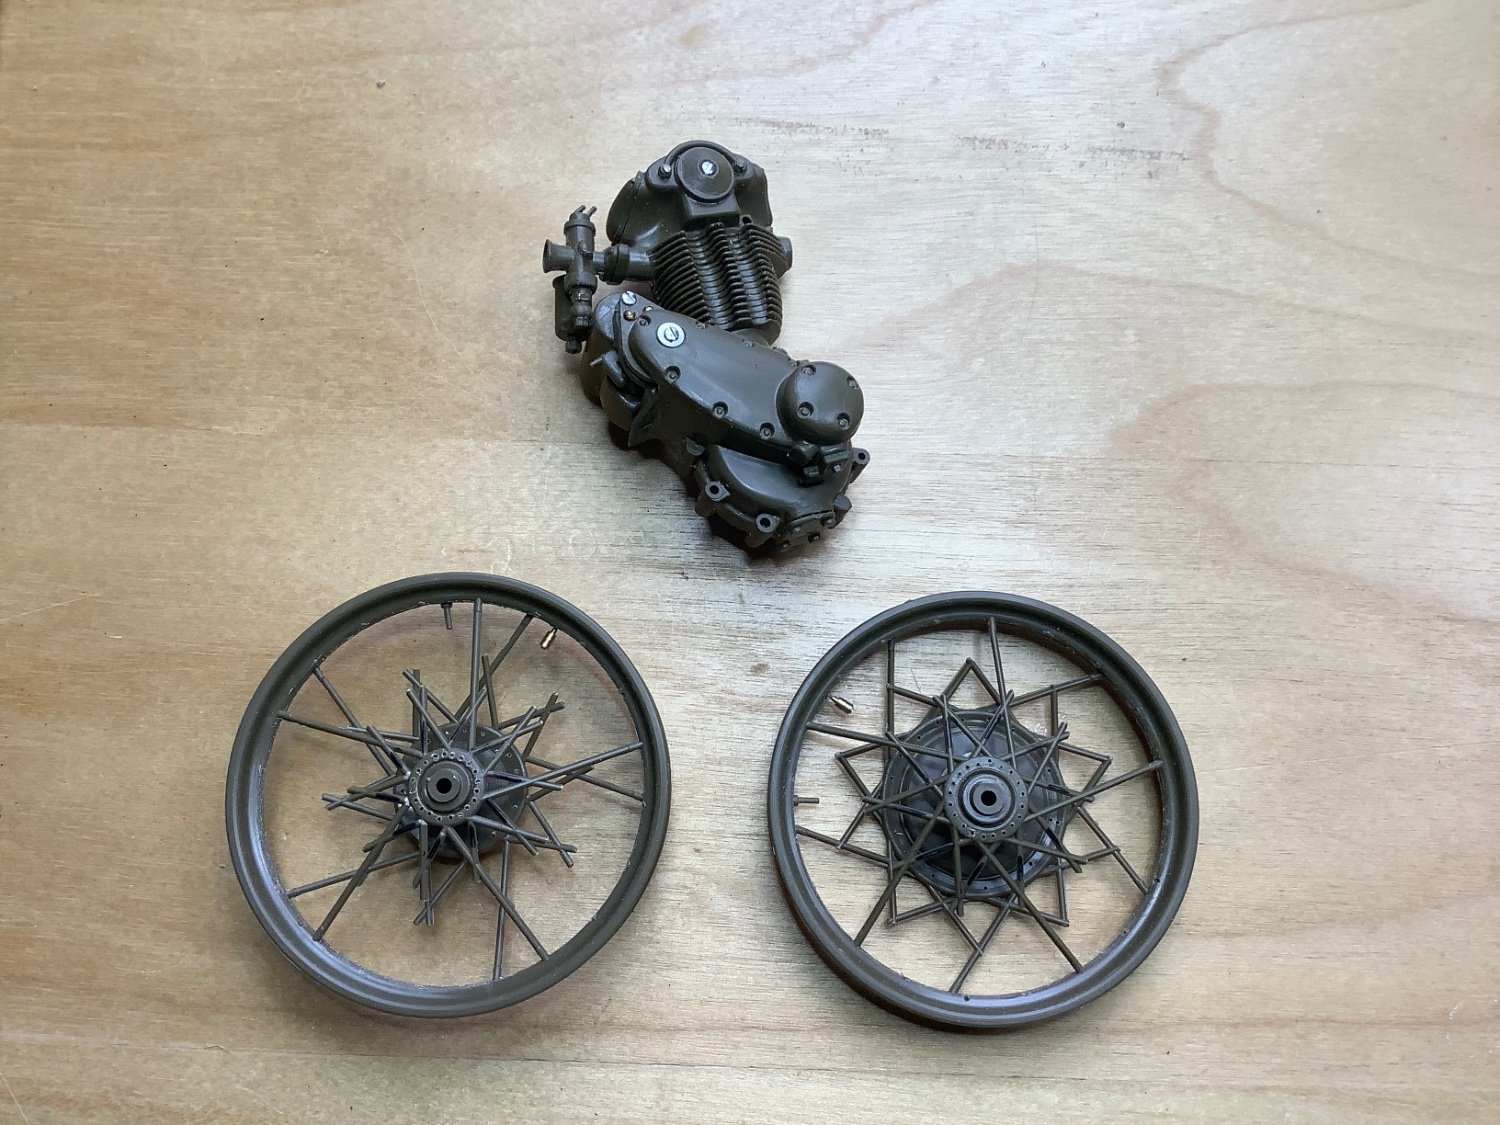
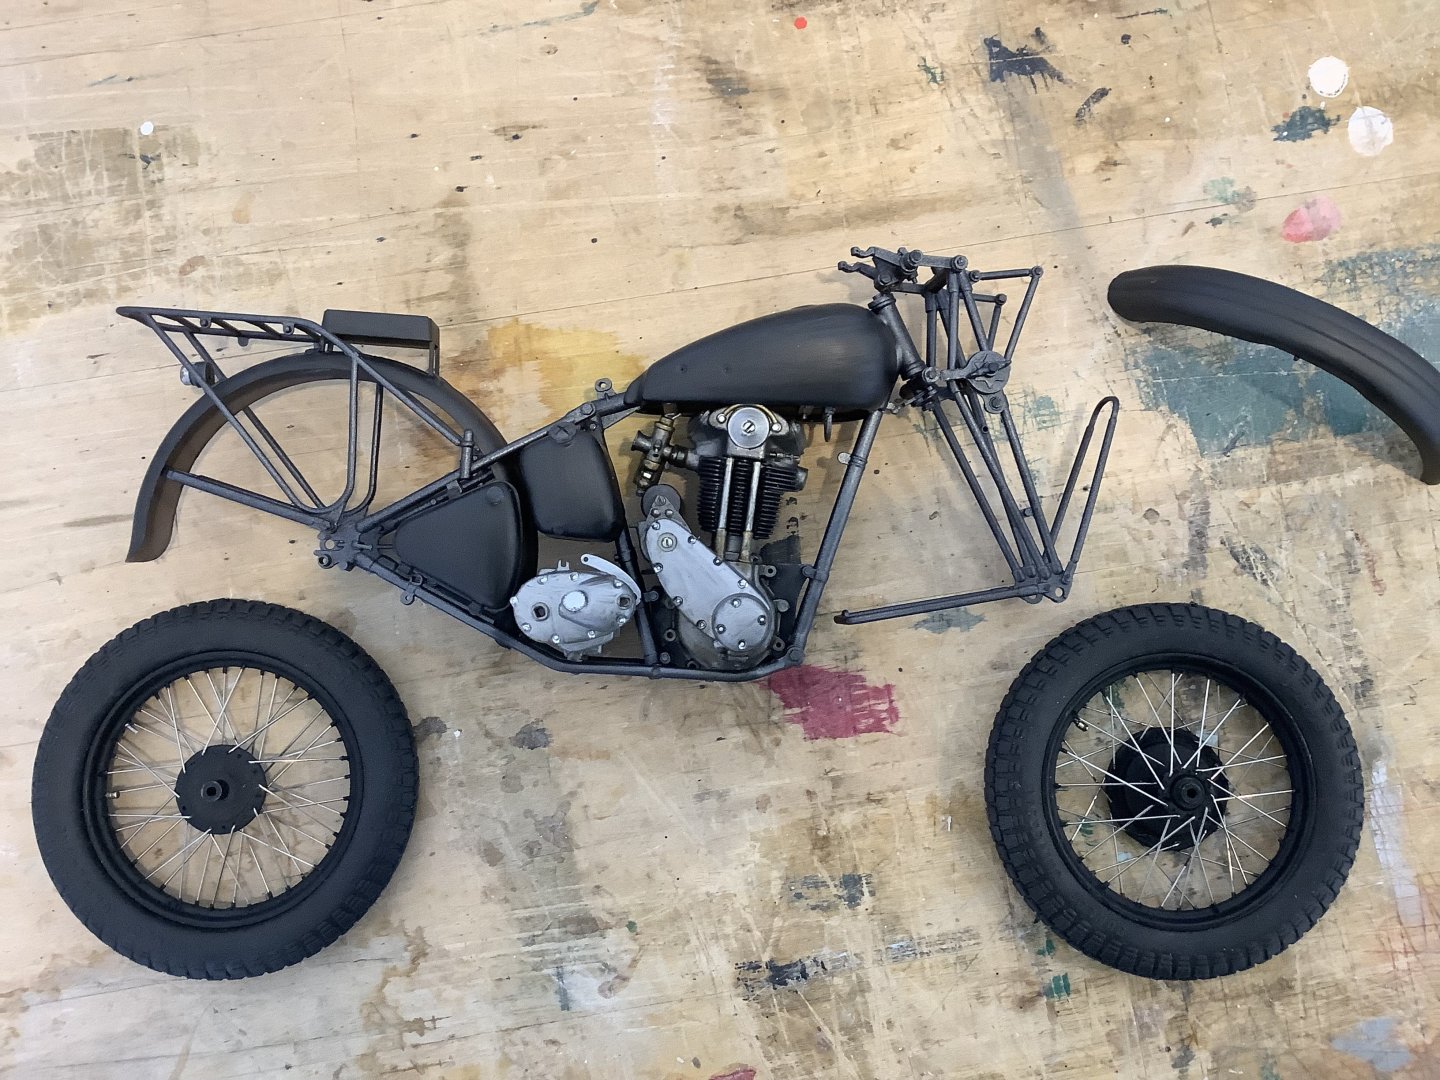
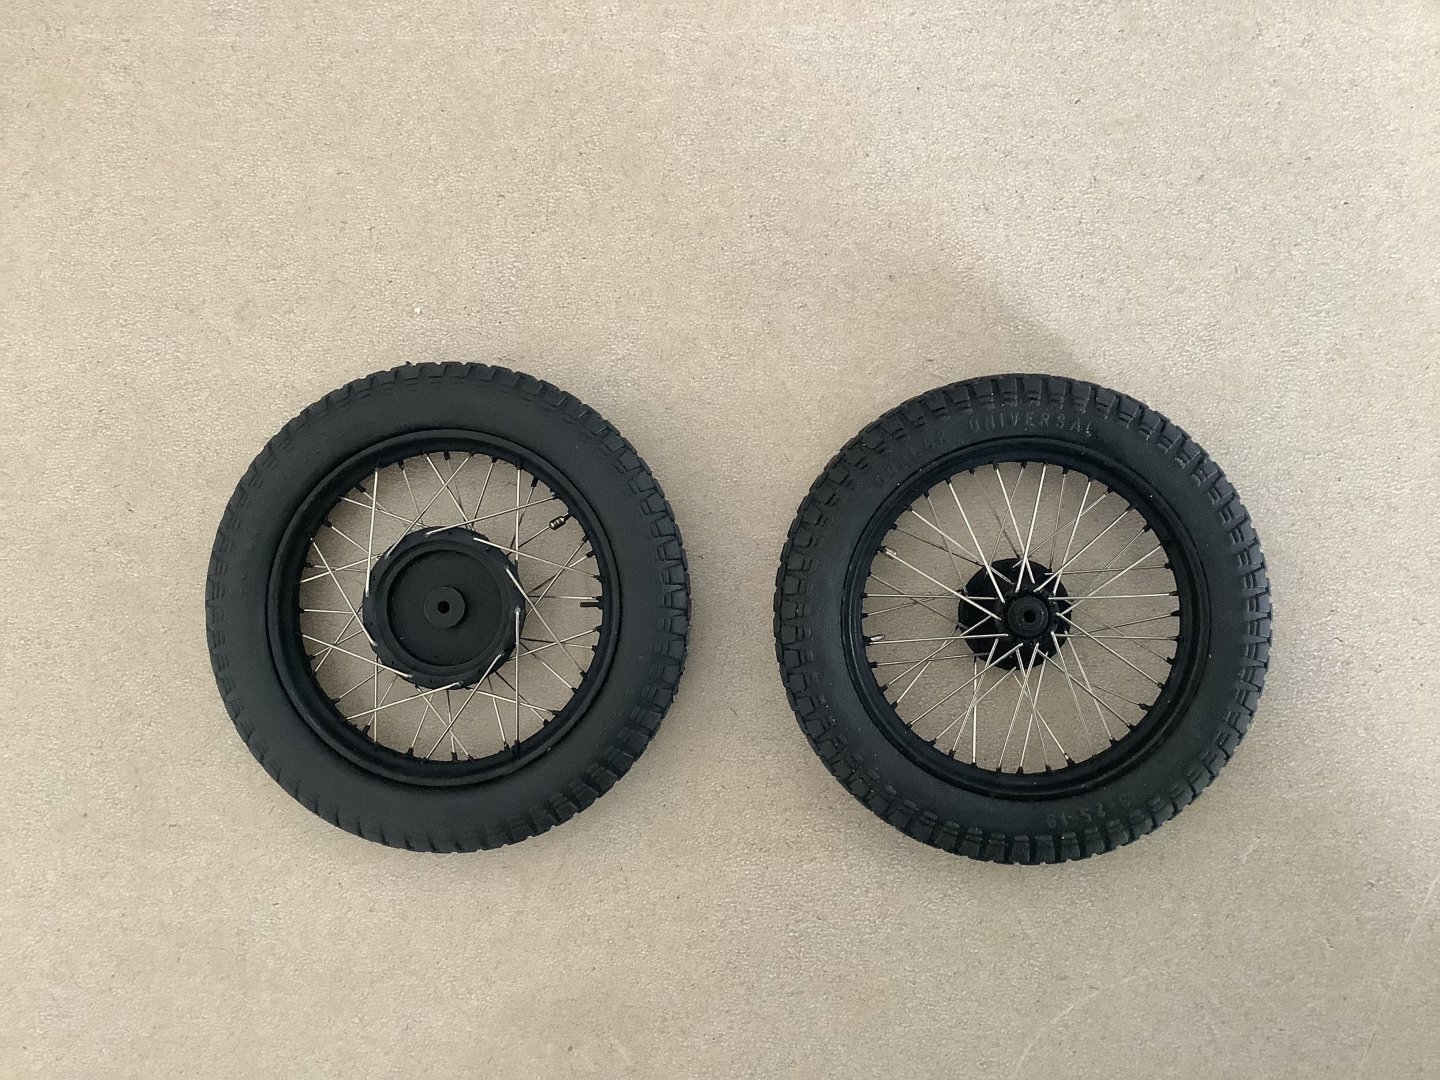
Thanks Patrick! Bit of a minor struggle getting the rear wheel and chain assembly in place since it is all connected and has to be shoehorned into the frame. Thankfully managed it without messing things up too badly. After cementing it all I realized I had missed a small internal lever assembly that was supposed to go in first. Will be an interesting exercise in surgery trying to get it in now but hopefully not impossible. Most of my detail painting and aging is being done with combinations of Vallejo steel, dark steel, aluminium, black and metallic black, and oil stain. I’m pleased with the way the hub looks with the respoked wheel, all looking very metallic.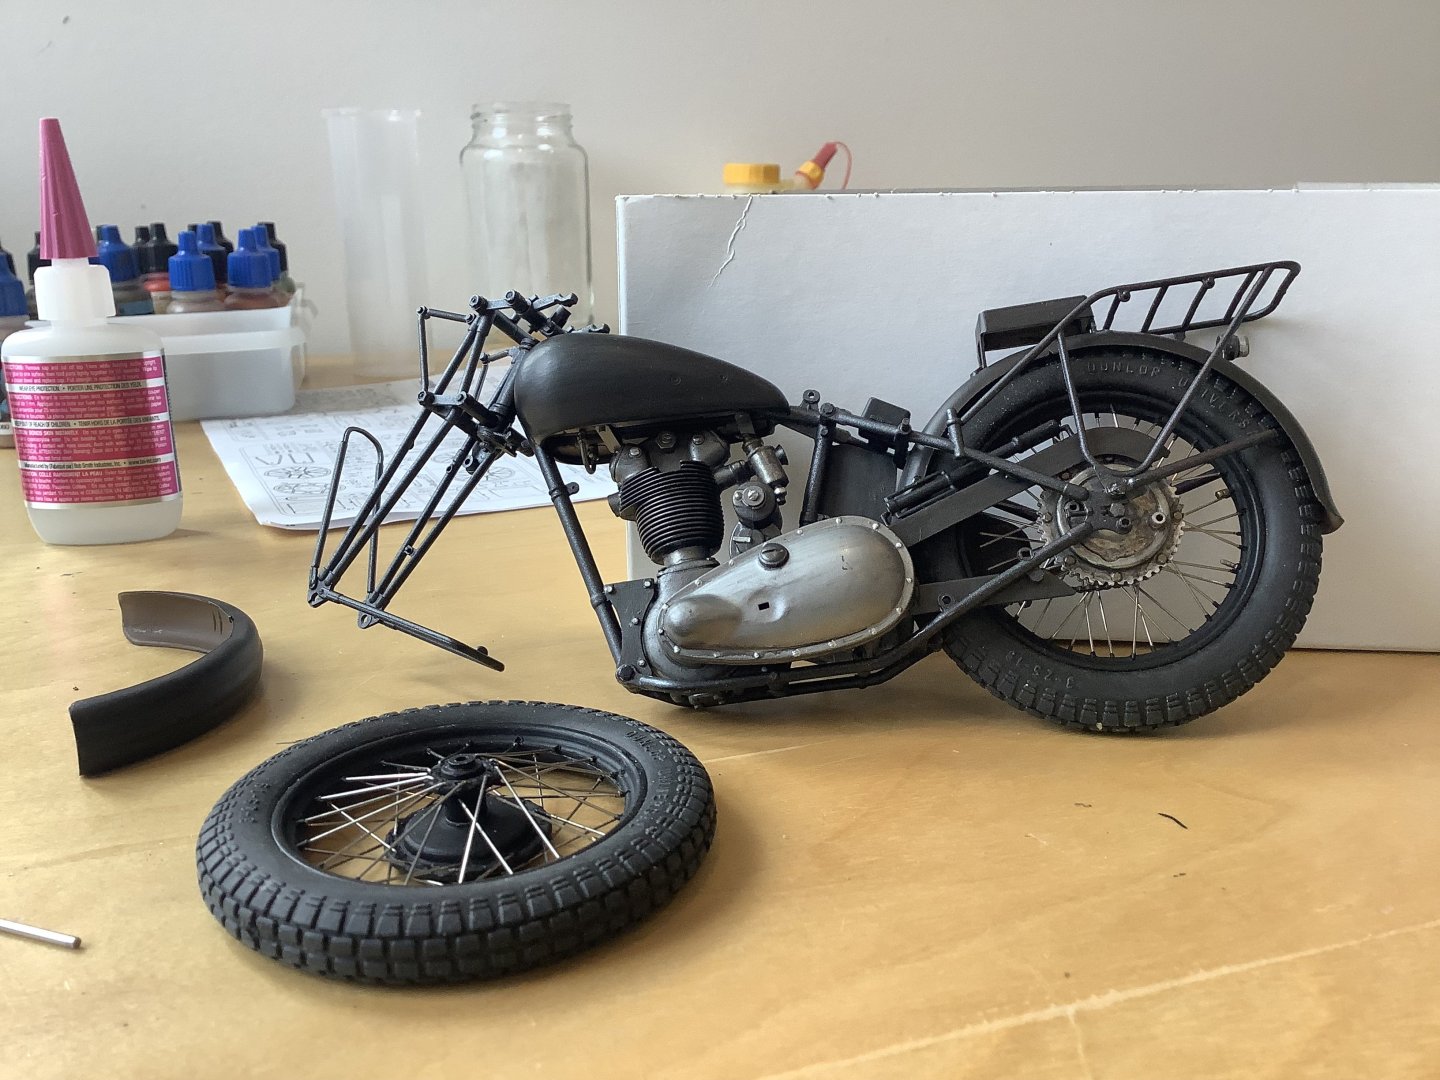
- 77 replies
-
- 17
-

-

-

-
Triumph 3HW by Tim Moore - Italeri - 1/9
Tim Moore replied to Tim Moore's topic in Non-ship/categorised builds
Just a bit tricky installing the lines from the oil tank due to access, and there not being any positive connection point at either end. Thought about using some brass wire instead of the plastic parts but went with the kit part and paint at the end of the day, think it’s believable. Rear wheel and chain install is next.
- 77 replies
-
- 13
-
-
Triumph 3HW by Tim Moore - Italeri - 1/9
Tim Moore replied to Tim Moore's topic in Non-ship/categorised builds
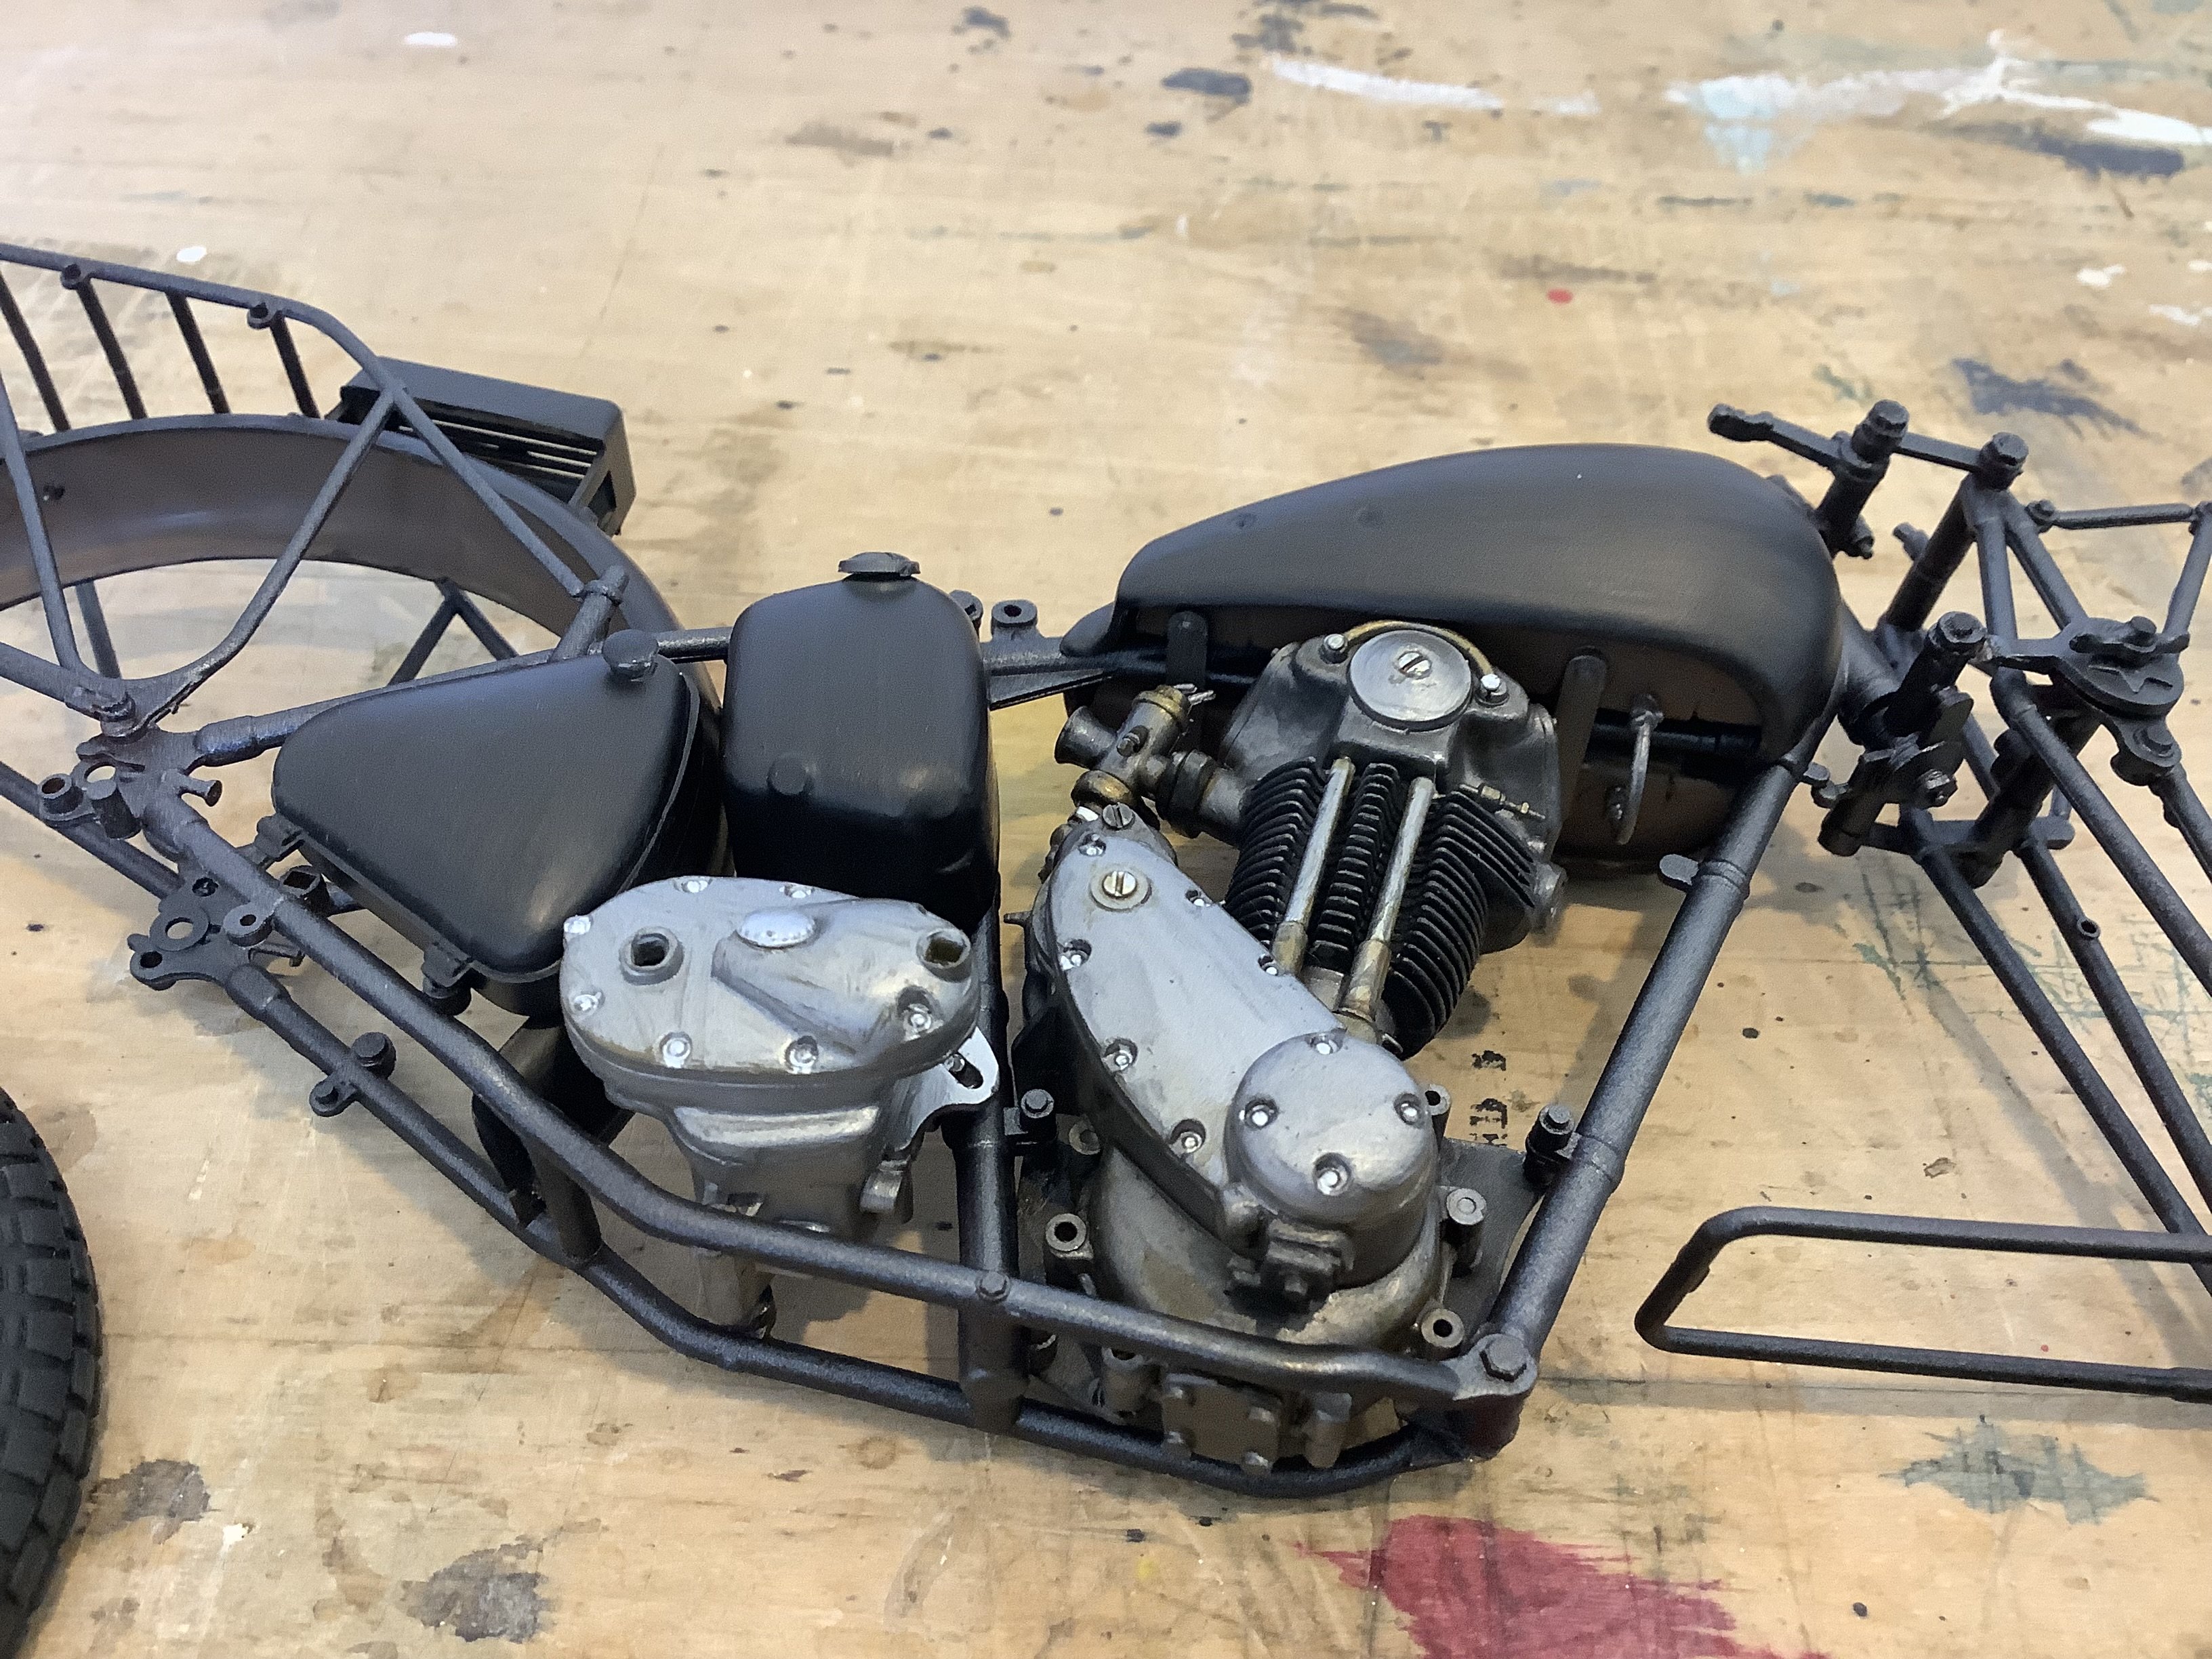
Inspired by the blackness and metallica of the wheels I seem to be heading towards a sort of black and white rendition, bereft of any actual historical fidelity. The tank, fenders and other body parts are in a dark iron lacquer, just because I happened to have it on the table and liked the finish. Looking forward to adding all the bits and pieces of this motorbike. Might seem a little boring colour wise, but I thought all the saddlebags, seat and other paraphernalia that is in this kit might provide a good opportunity for colour contrast with the overall black theme.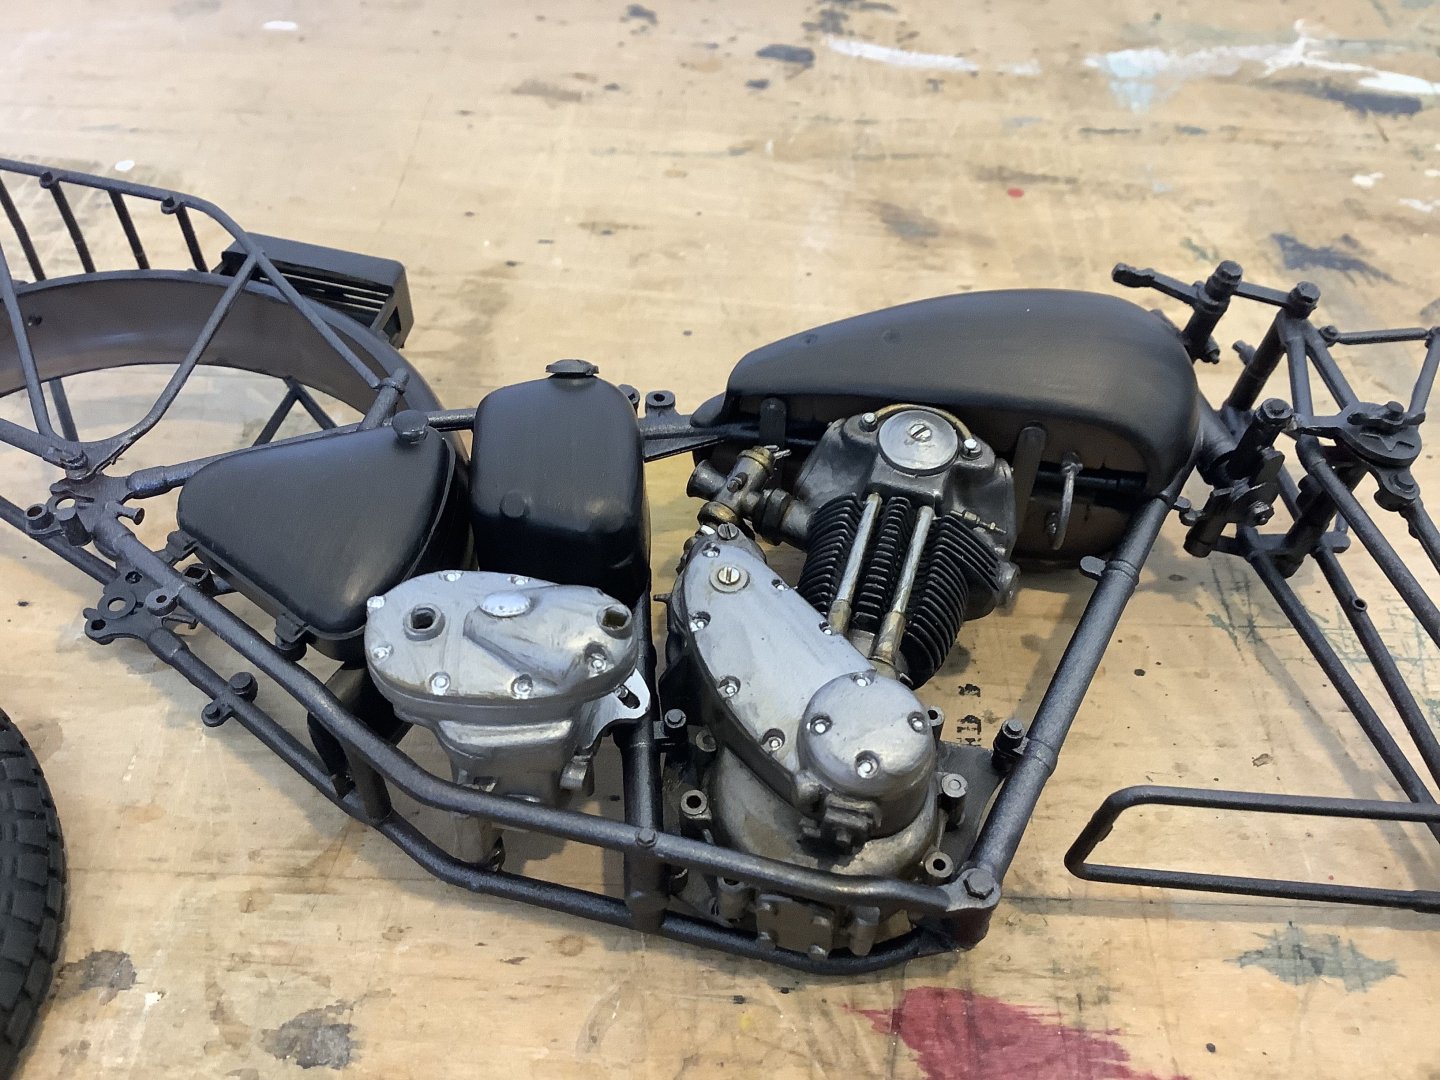
- 77 replies
-
- 15
-
-
-
Triumph 3HW by Tim Moore - Italeri - 1/9
Tim Moore replied to Tim Moore's topic in Non-ship/categorised builds
Haha thanks Shipman and CDW, appreciate both viewpoints! -
Triumph 3HW by Tim Moore - Italeri - 1/9
Tim Moore replied to Tim Moore's topic in Non-ship/categorised builds
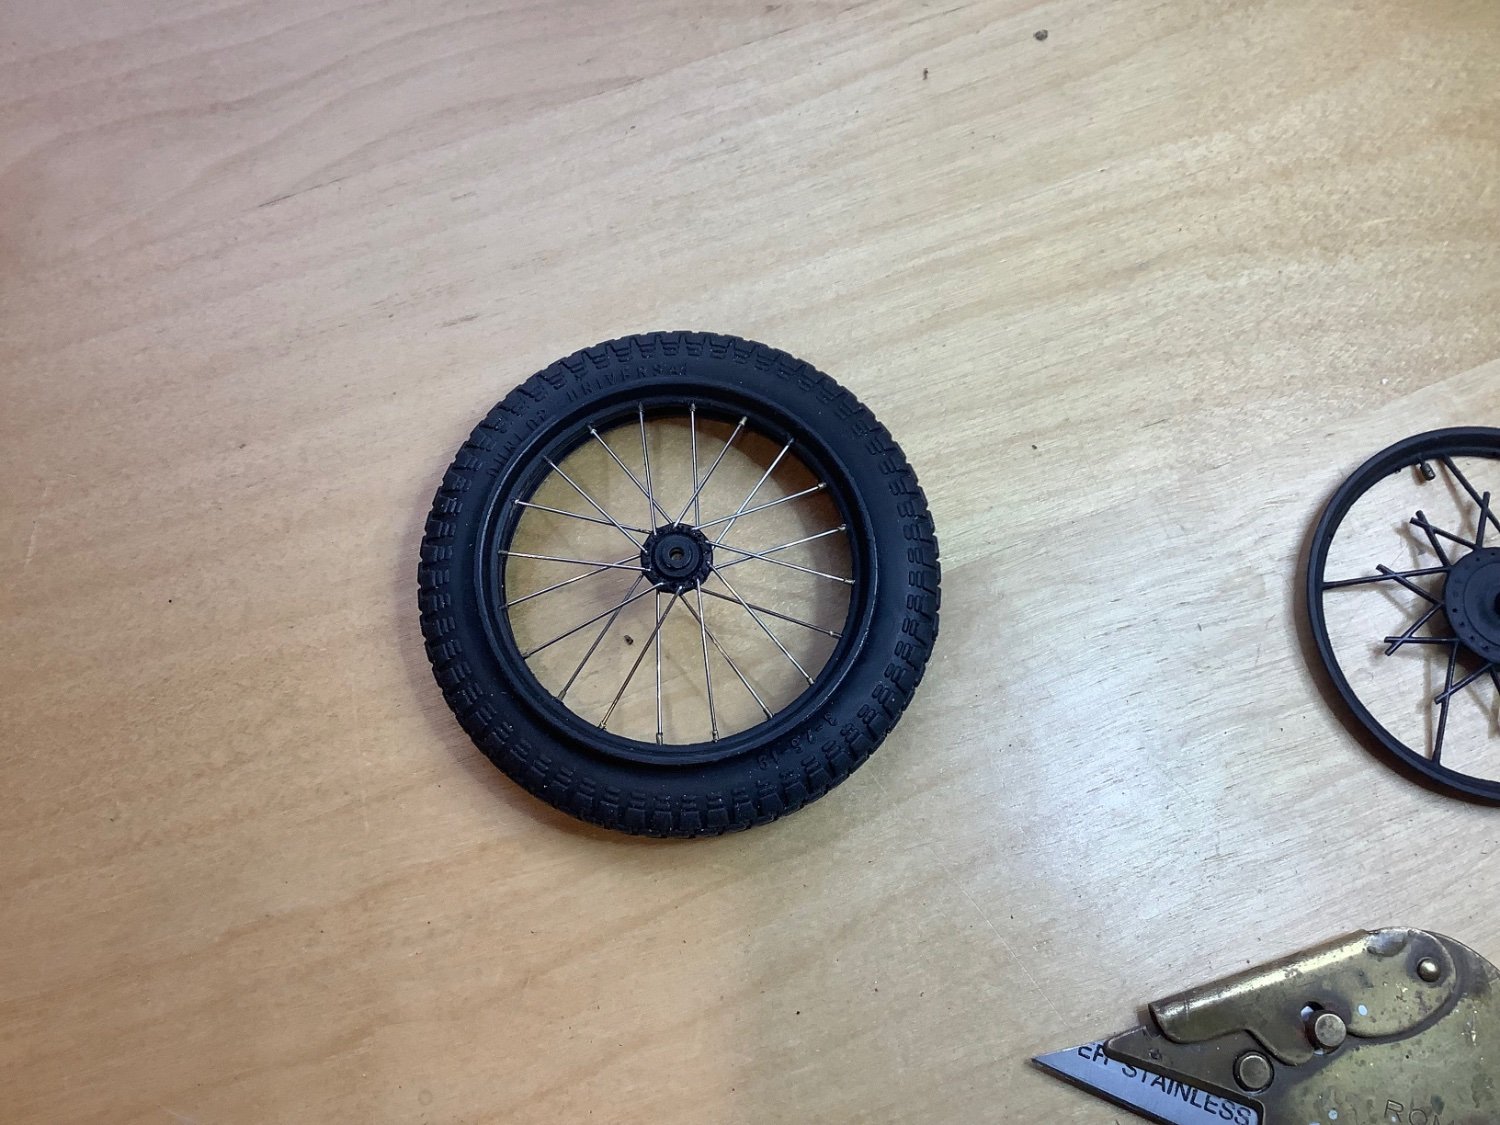
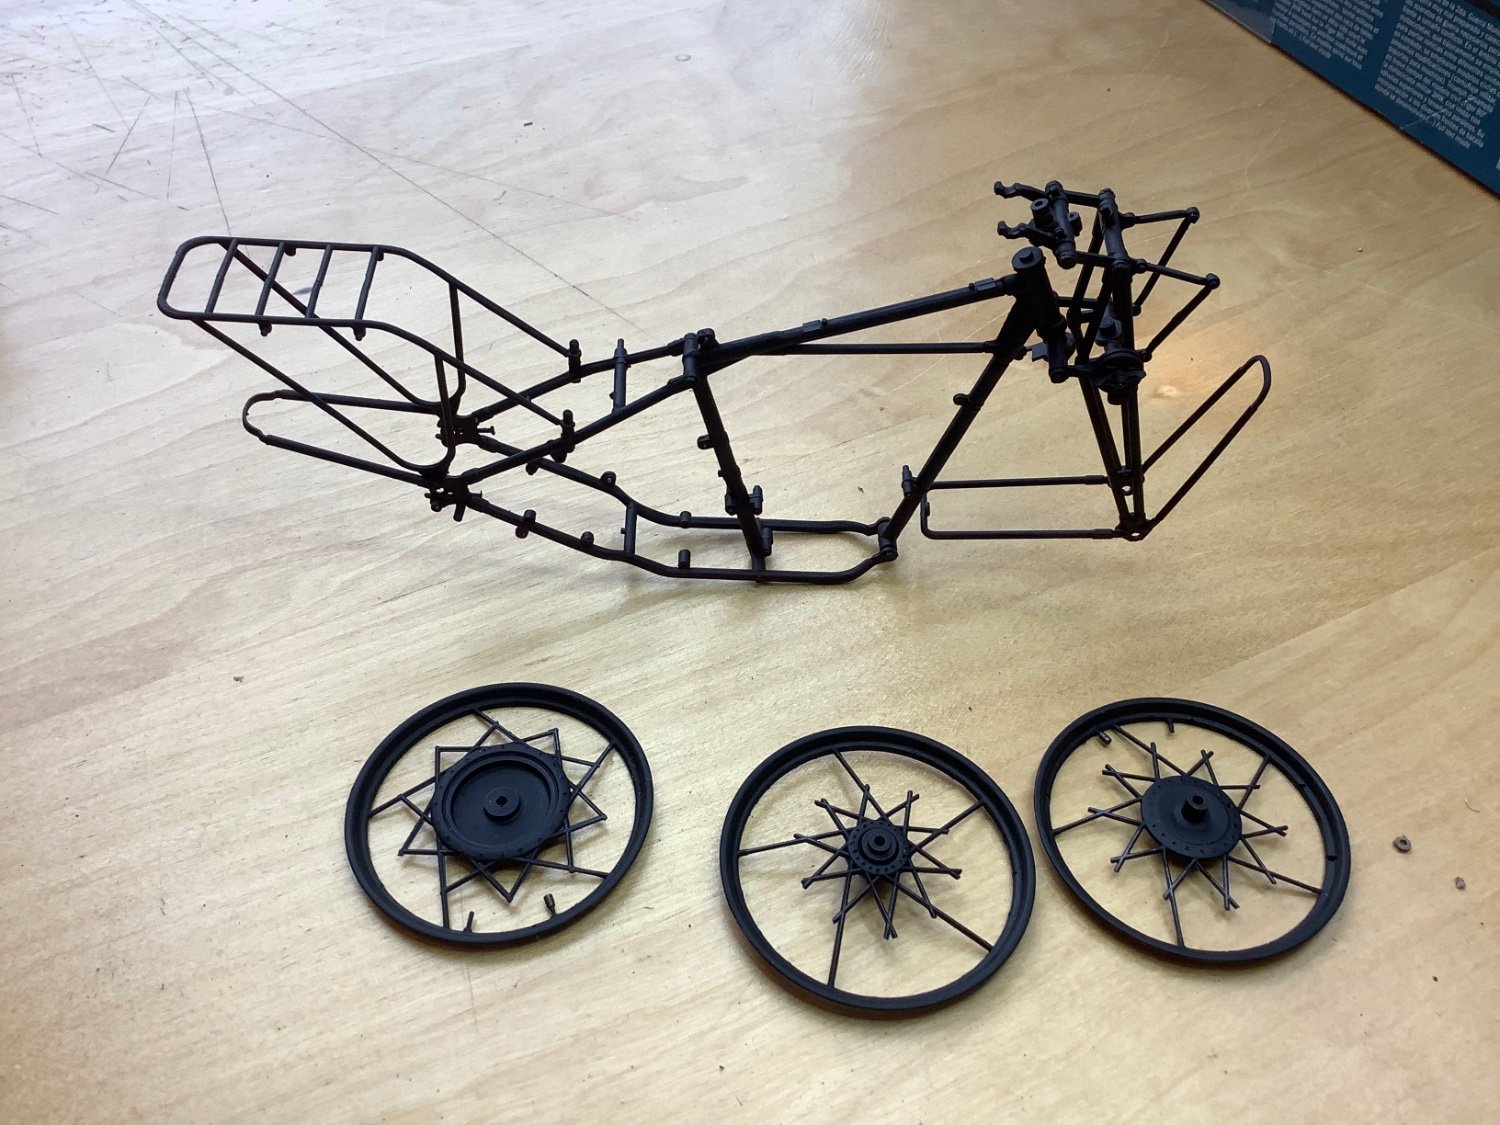
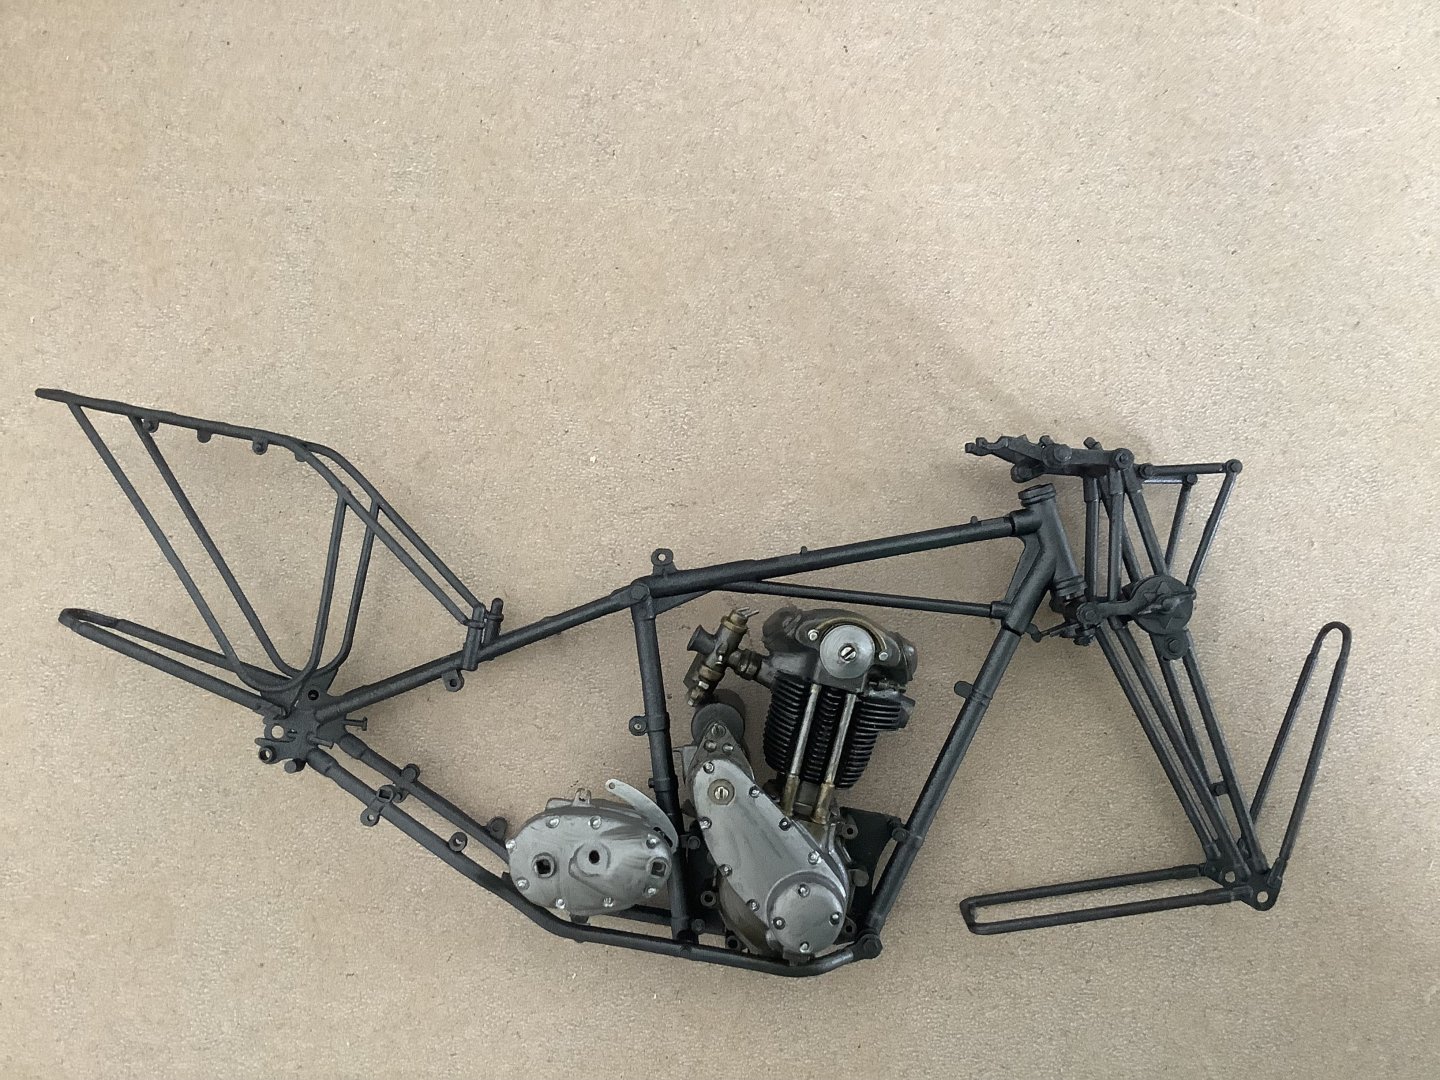
Ok after a disgraceful delay due to work priorities I finally have gotten back to the Triumph and remembered what I was doing. I now have two very nice looking wire spoked wheels. The method of leaving a few plastic spokes in place and working your way around the wheel replacing them worked very well, the final wheel remained true and the hub centred. You have to take a little care to keep the correct spoke pattern, but not that difficult once you get your sequence going. One key piece of advice I would have is to make sure the two wheel rim sides are strongly welded together using CA before trying to mount the rubber. Learned that the usual hard way. I assembled all the frame tubing and airbrushed it a metallic black, followed by a satin spray to dull it down a bit. I’ll probably do the body components another colour. Mounted the engine, will add some more finish detail with it in place.
- 77 replies
-
- 19
-
-
Stupendous result Jeff! What an awesome model. A lot of painstaking work I know but you really brought it home.
-
Bugatti Type 35b by kpnuts - Italeri - 1/12
Tim Moore replied to kpnuts's topic in Non-ship/categorised builds
Freaking good work! The engine, manifolds and body look very convincing. -
Beautiful job on the panel Rob, really. I have a Wingnut Wings for my next non ship build, the DH. 9a Ninak, so I’m quite interested in yours. Yours seems a good quality kit in very capable hands. I bought the Ninak solely because the box and artwork were so attractive, that’s how shallow I am. Haven’t opened it yet.
-
Triumph 3HW by Tim Moore - Italeri - 1/9
Tim Moore replied to Tim Moore's topic in Non-ship/categorised builds
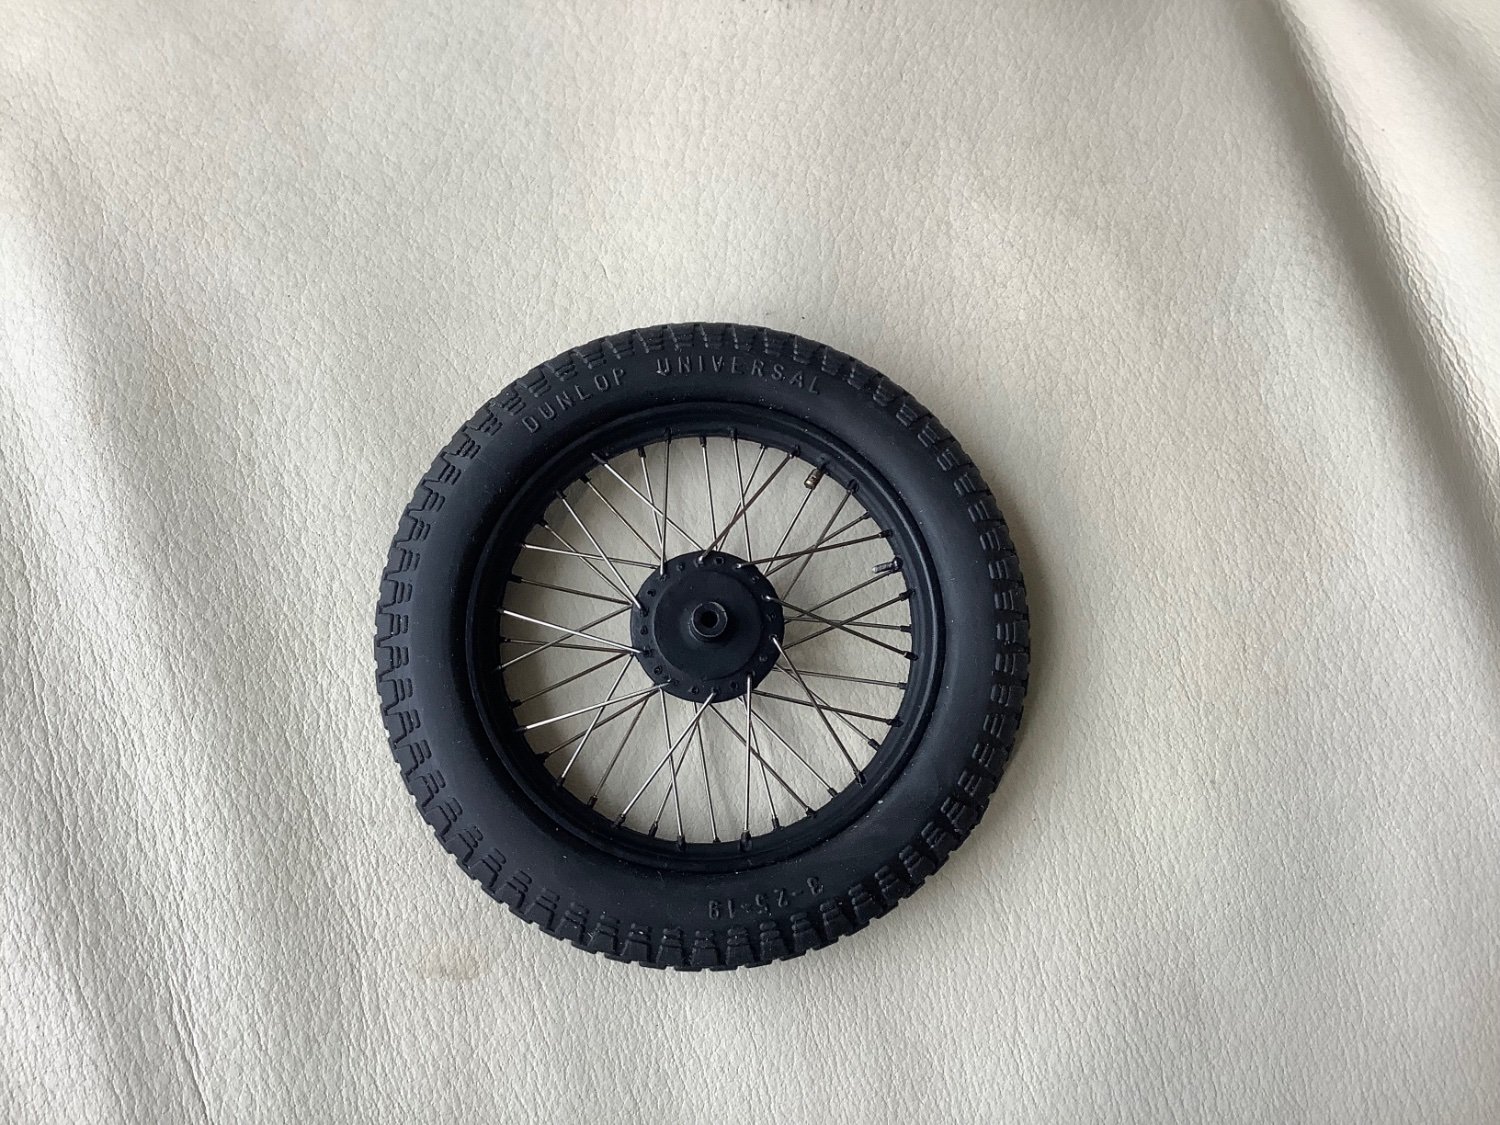
One wheel assembly completed with the 40 steel spokes…should add interest to the model. Replaced the inflation nipple with a bit of leftover brass from Mikasa, and painted the spoke nipples around the rim. They looked kind of cool left as brass but I think painted is a probably a little more realistic. Overall I’m quite happy with the outcome as opposed to the plastic version.

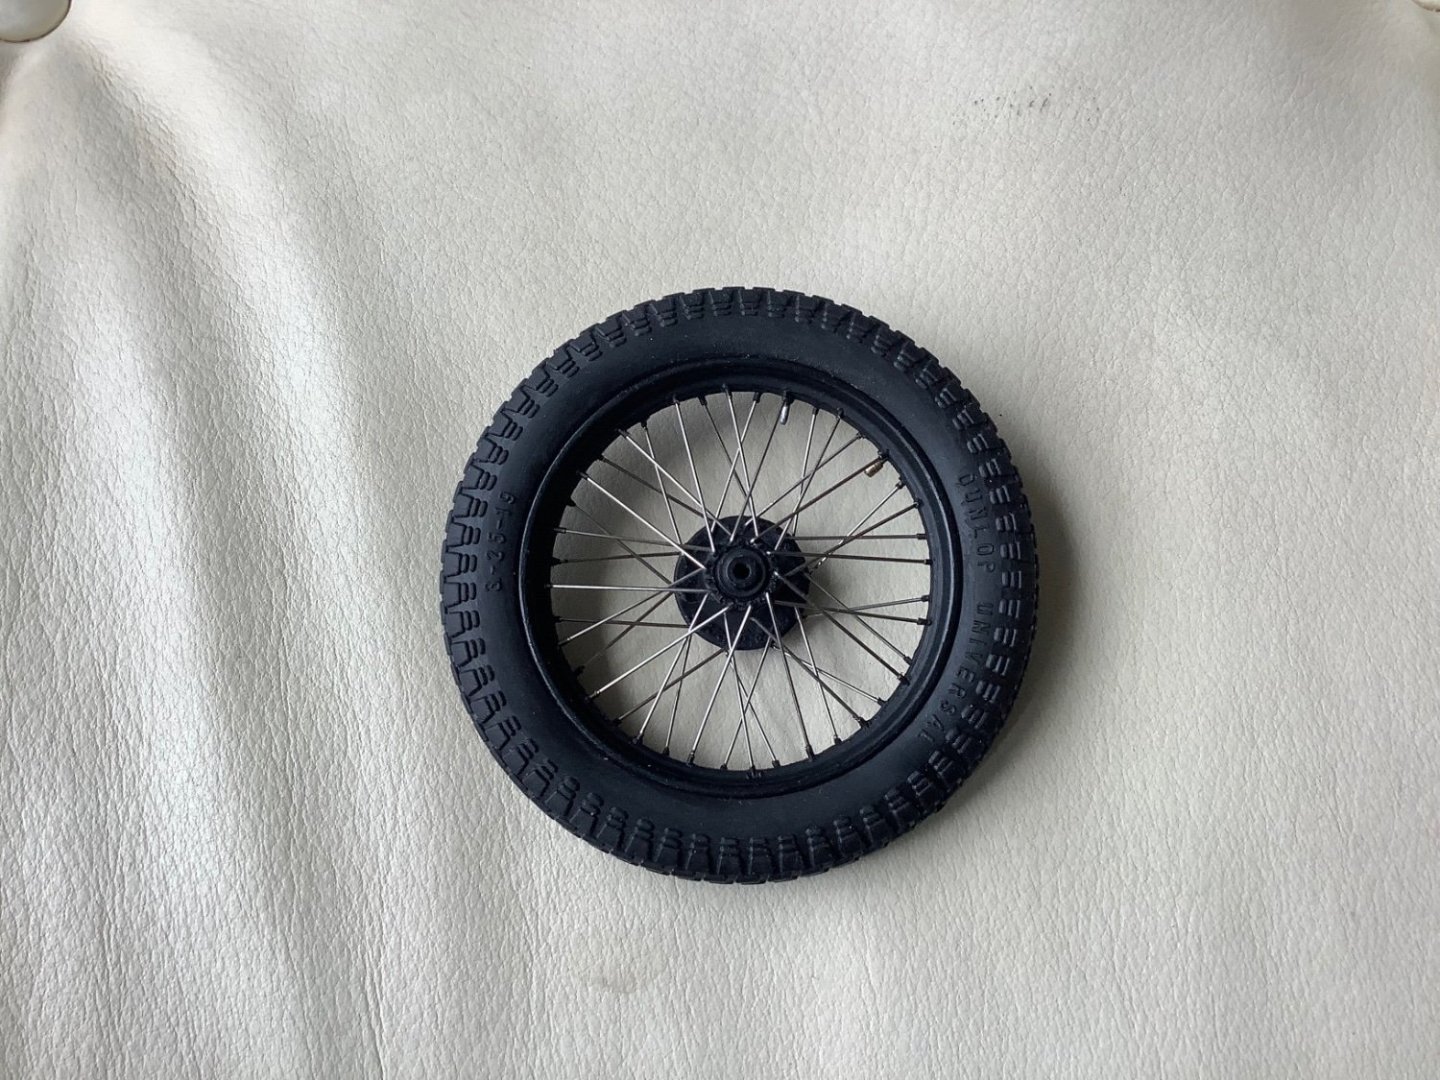
- 77 replies
-
- 20
-
-
-
Triumph 3HW by Tim Moore - Italeri - 1/9
Tim Moore replied to Tim Moore's topic in Non-ship/categorised builds
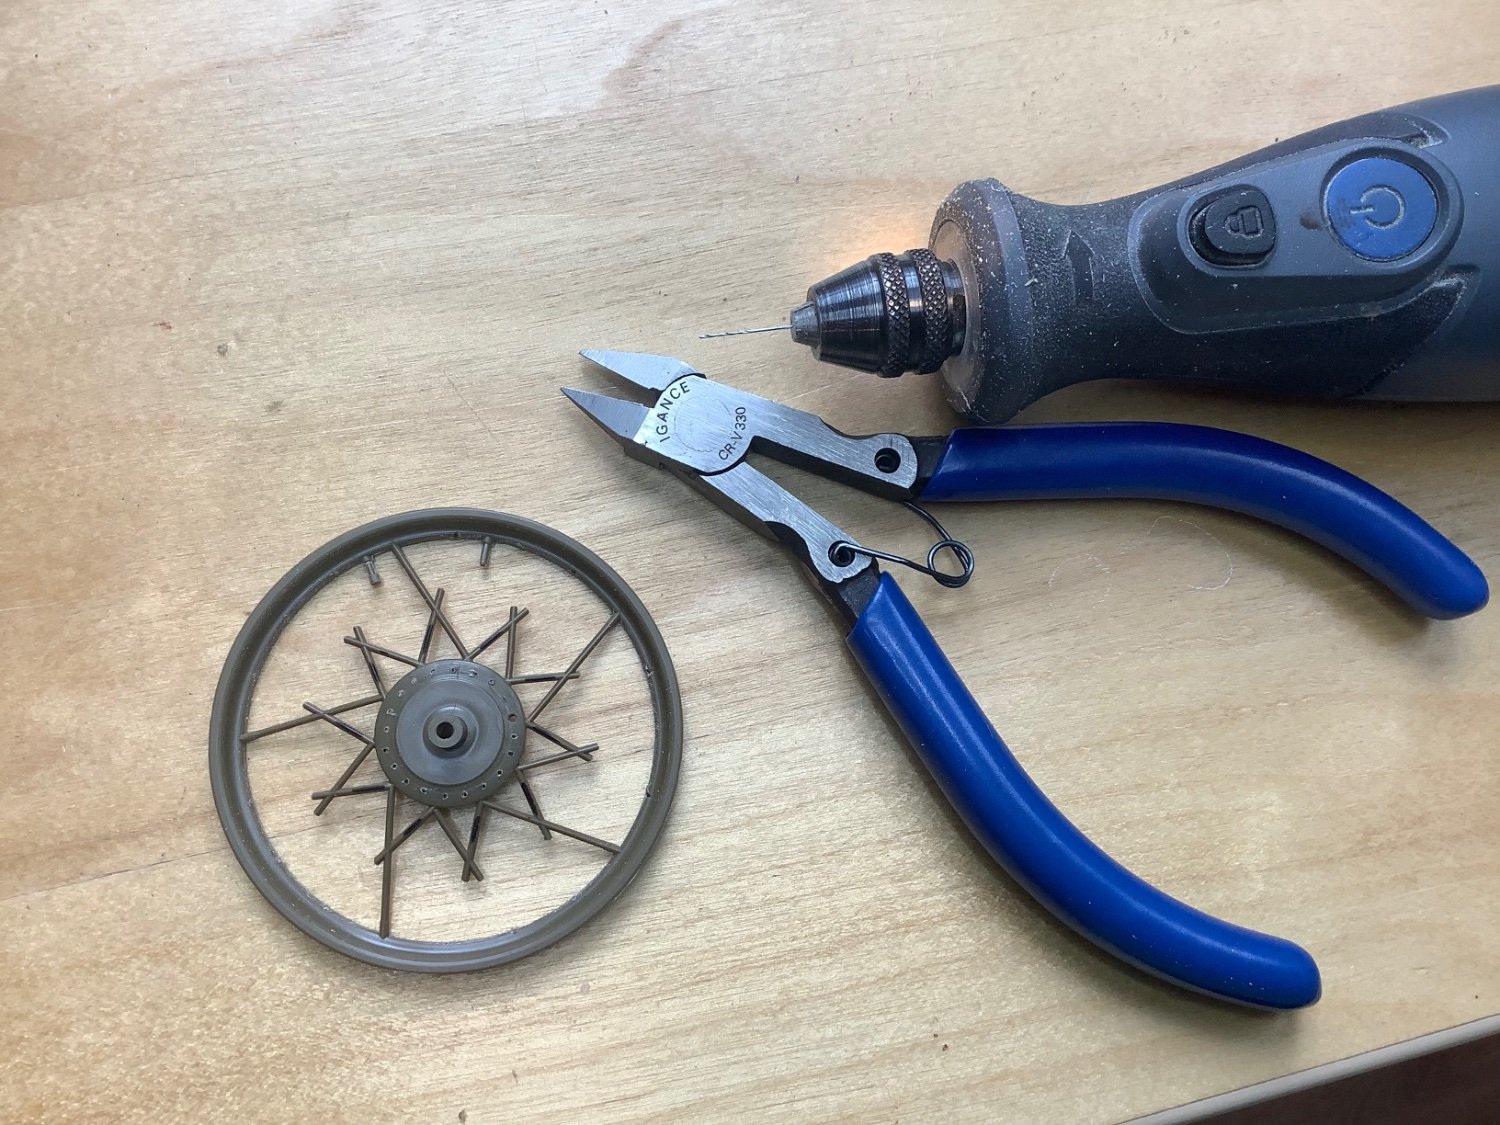
Thanks Shipman; for the nipples I used some tiny brass tube that is 0.6mm inside diameter, which just fits around the 0.5mm wire rods I’m using for spokes. Basically after drilling the holes in the hub and rim, I cut a length of wire rod, bend the end to go through the hole in the hub, and then slide the brass rod down the outside end of wire, through the rim, apply a dab of CA to fix it, and then cut off the excess rod and tube outside the rim. -
Genius work Rob! Your salting technique has really worked to give that interior an authentic grubby look.
-
Triumph 3HW by Tim Moore - Italeri - 1/9
Tim Moore replied to Tim Moore's topic in Non-ship/categorised builds
The first side of one wheel successfully re spoked, so 3 more to do. Should look ok with some touch ups.

- 77 replies
-
- 16
-
-
-
Triumph 3HW by Tim Moore - Italeri - 1/9
Tim Moore replied to Tim Moore's topic in Non-ship/categorised builds
Hi James and thanks. Funny you mentioning the Bonneville, I’m actually using a photo of a Bonneville VE Day commemorative bike as a visual reference for my build. Not trying to replicate it, just the general look of it. Certainly very similar though. Design has stood the test of time. Tim -
Triumph 3HW by Tim Moore - Italeri - 1/9
Tim Moore replied to Tim Moore's topic in Non-ship/categorised builds
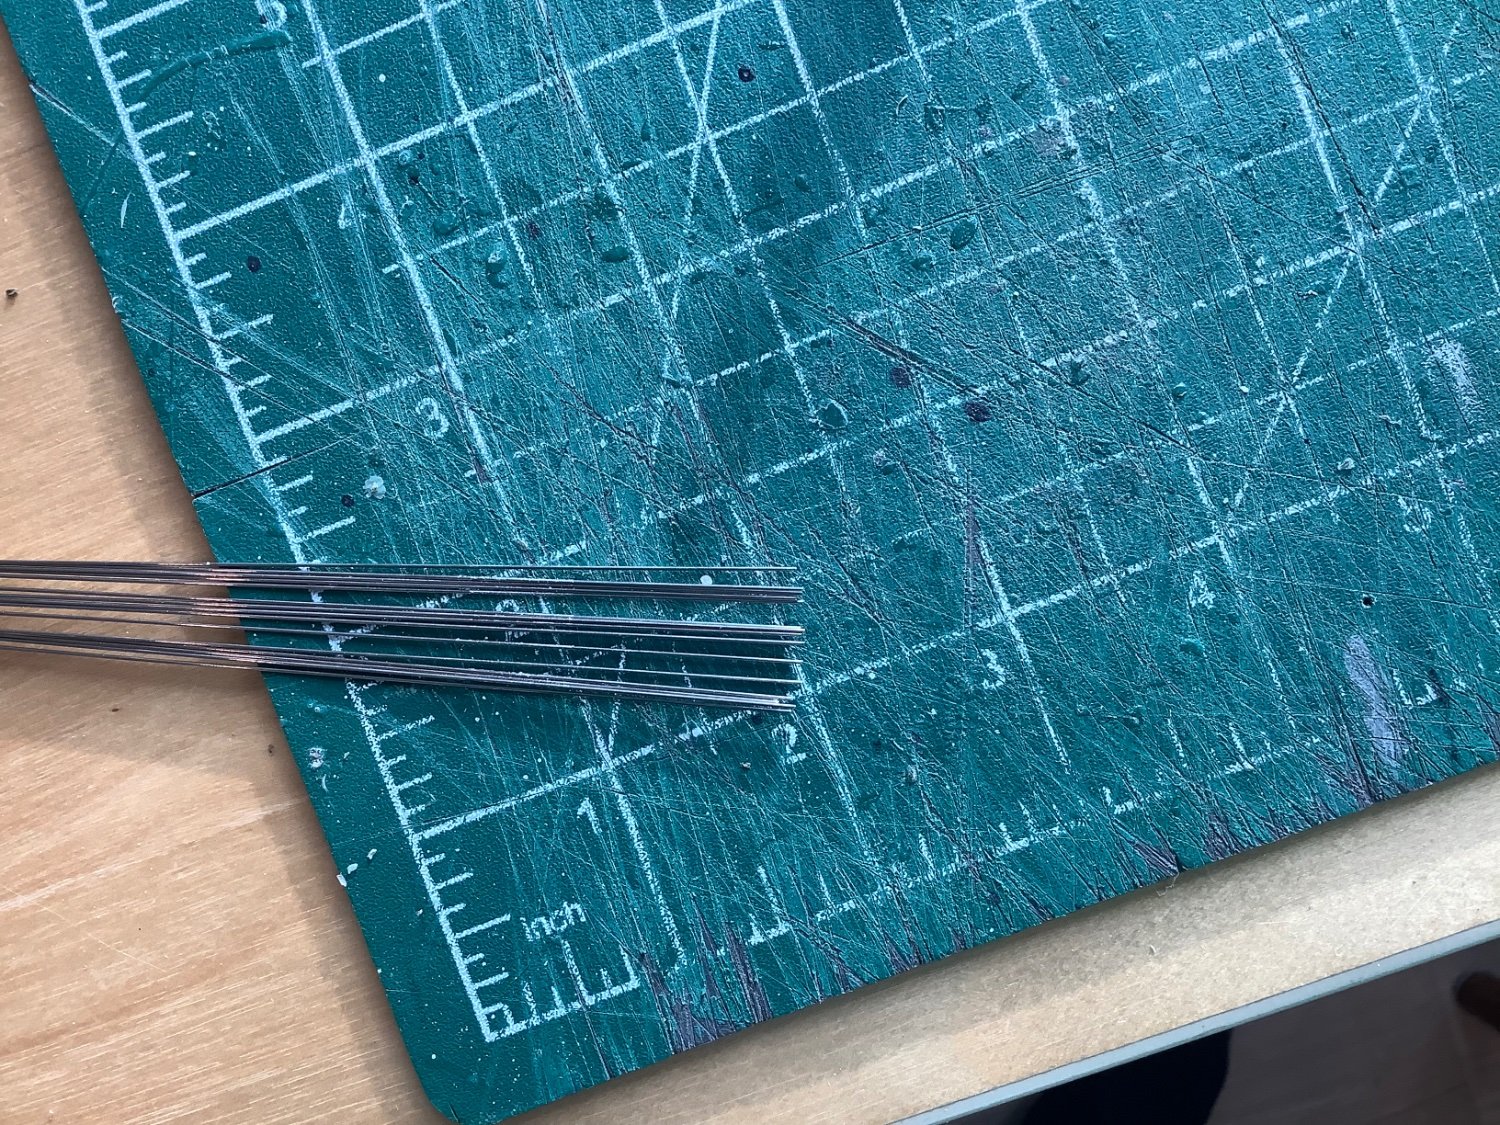
Wheel spoking in progress after finally getting my supplies. I’m using 0.5mm wire rods and short stubs of 0.8mm brass tube to create some sort of nipples at the rim. Remnants of the plastic spokes remain to hold the hub on centre and guide me on location and alignment, easy to screw this up otherwise I would think. I’m ignoring the assembly sequence of the model in the directions and have put together all the main components of the frame, so I can paint it distinctly from the body parts. Hopefully I can shoehorn everything on board later on. I’ve sprayed on a base coat of black to begin with.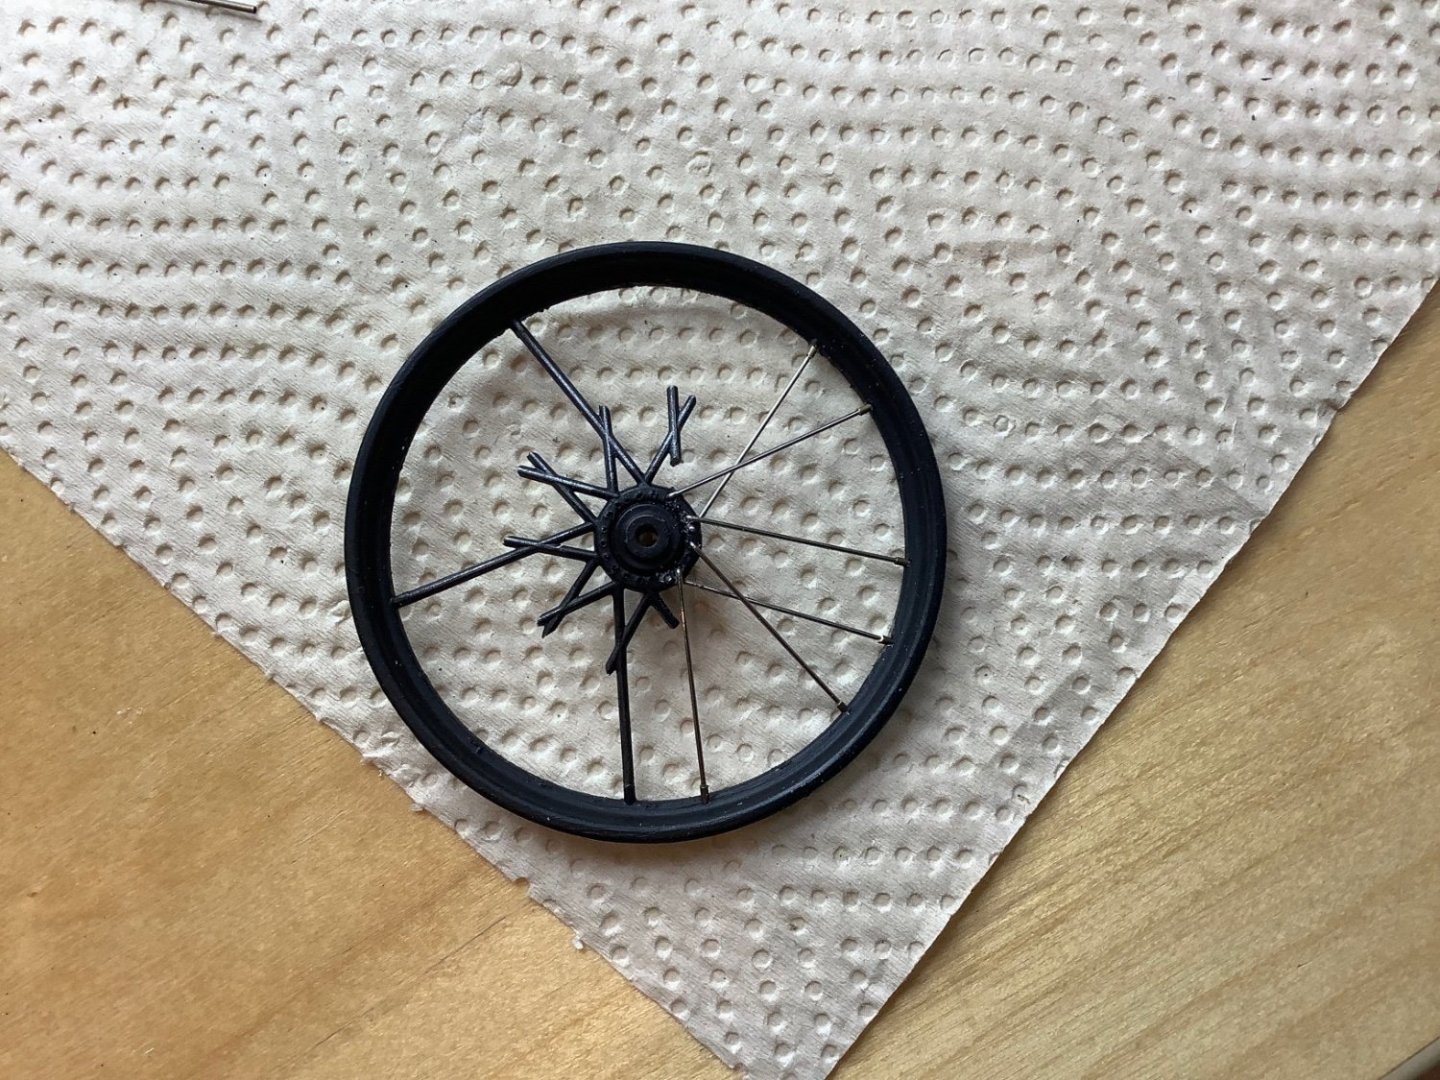

- 77 replies
-
- 16
-
-
Hi David. I used Bob Smith extra thick CA on the planking of my Amati Fifie and it worked well, fast and easy.
-
Triumph 3HW by Tim Moore - Italeri - 1/9
Tim Moore replied to Tim Moore's topic in Non-ship/categorised builds
Thanks Yves that’s a good solution. I think the wire I have should work, it’s really just thin wire rods. If it isn’t stiff enough or looks too fragile I have something slightly thicker I can use.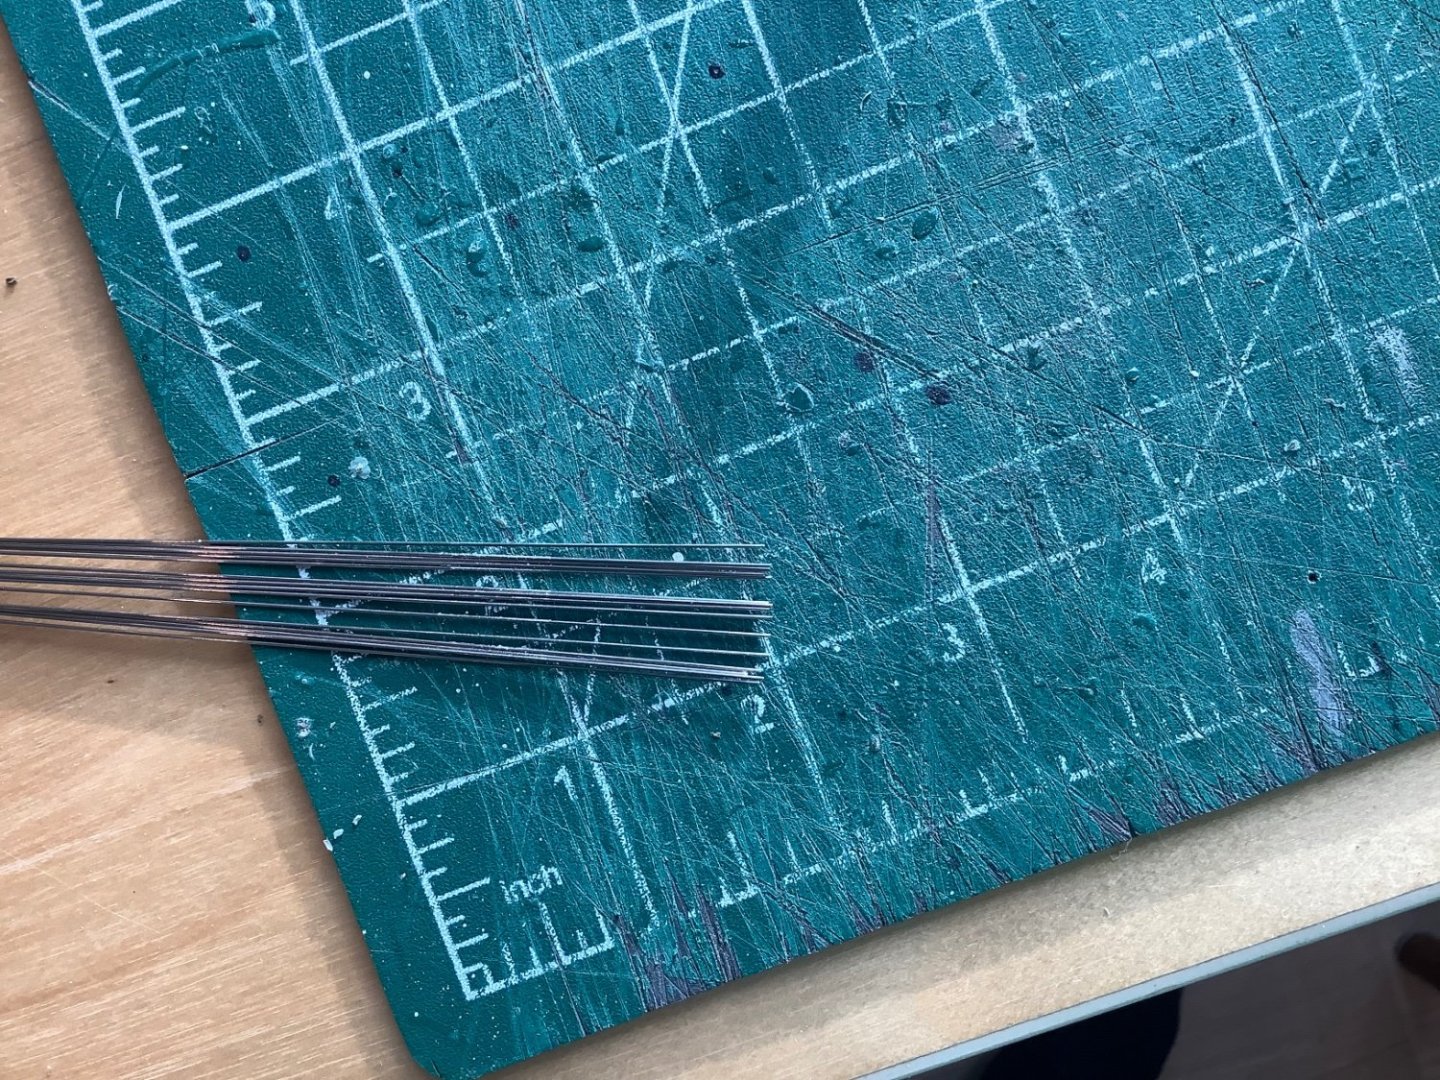
- 77 replies
-
- 12
-
-
Triumph 3HW by Tim Moore - Italeri - 1/9
Tim Moore replied to Tim Moore's topic in Non-ship/categorised builds
Thanks Alan, Patrick, Yves and all those who have checked in. It is good to be back modelling after a year of moving and working on the new house. Started on the wheels. There are 20 spokes on each half, making a total of 80 for the two wheels. That means I need 160 holes located with some precision around the 4 hubs and outer rims, so I can knit the wire spokes into the plastic. I made an indent in the hub using a tiny steel awl, then used a 1/64 bit in my dremel. It’s careful work, especially on the two smaller hubs. I then snipped off most of the plastic spokes at the rim, leaving 5 to keep the hubs centred while I go about installing the wire. I left the inner part of the plastic spokes intact for now, they gave me an alignment guide when I drilled the rims in terms of direction of the holes, and will help me get the first wires in the right holes. After I get a few wires in place and the hub is stable, I’ll cut everything away. That’s the theory anyway. I will be using some 0.5mm wire I have for the new spokes. Seems a bit thin perhaps but after looking at photos of real bikes it may be pretty close to scale. Now that I’ve started this and see what’s ahead, I’m considering awarding my bronze medal for modeling insanity to wheel spoke replacement, the gold having already gone to ‘rigging a three masted ship’ and silver to ‘neurosurgery with Pontos microscopic photo etch’. I’ve a feeling Chris Coyle might say the origami paper folding in his card modeling would knock one of those out of the medals, but I’ve never done a card kit. Have to leave the wheels for a bit until supplies arrive next week, as I realize I should paint the rim and hubs before the new spokes go in. So I’ll leave them in abeyance and start on some engine assemblies.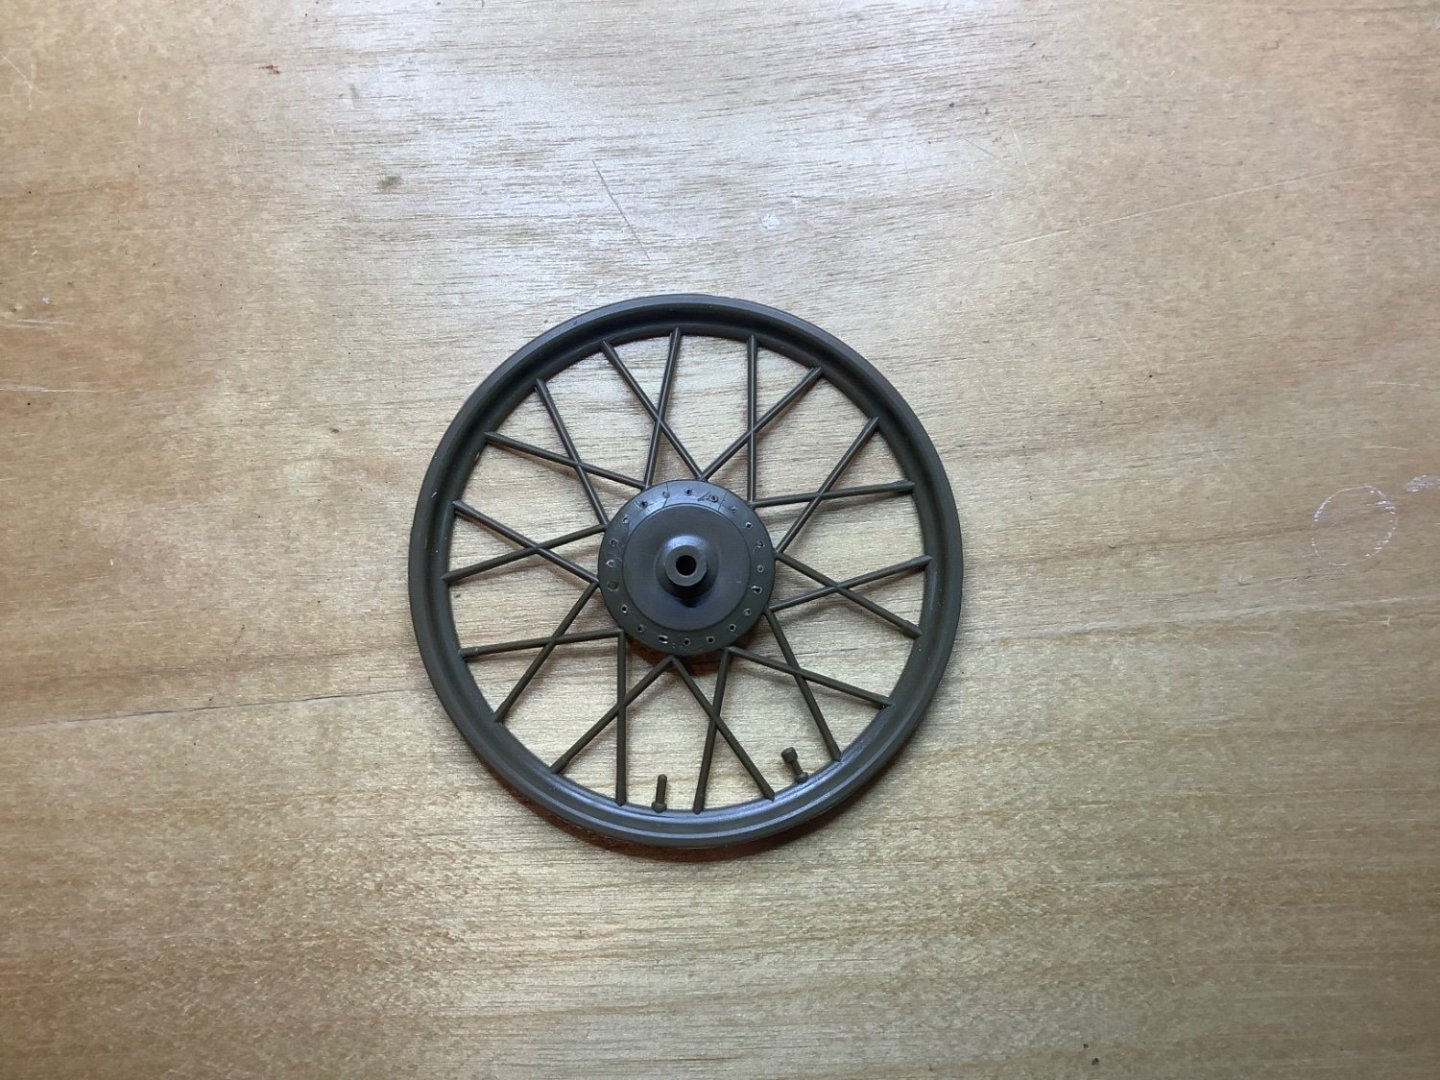


- 77 replies
-
- 13
-
-
Hello there MSW, I’m finally resettled in the Pacific Northwest. I’m missing my custom built model cabin back in Ontario, but to get back in the swing of model building I thought about how much I enjoyed doing that Fiat 806, so have picked up another Italeri kit, the vintage Triumph 3HW motorcycle. It’s been done here before and I enjoyed the fine work by CDW on his rendition. I'm going to start off with some preliminary assembly of the engine and wheels while I wait for some paint and other supplies to make it out our way on Vancouver Island. My general goal will be to add a few custom details, play around with paint effects and weathering, but nothing definite yet. Not sure if I will go with the military look or not. I tend towards an organic approach to my models, which is a fancy way of saying I don’t really know what I’m doing. Think I’ll attempt a wheel spoke rebuild, to add a little finesse, hope not to make a hash of that.
- 77 replies
-
- 17
-
-
Hi Jeff. We moved across the country late summer and are now living on Vancouver Island. Mikasa unfortunately suffered some damage in the move, which I’m going to have to repair before finishing her off. A week or twos work there for sure. Been really busy doing some new house renovations here which has kept me away from the model studio, but I hope to back at it soon in the new year. Might do something new first before tackling Mikasa again, you are right it’s a pretty intense build especially with the Photo etch add ons.
-
Hi Pete, great looking job! I simply used Elmers pro bond wood filler from my local hardware store, applied first with a palette knife for rougher areas where I needed some fill, rough sanded, then more filler thinned out with water and painted on broadly with a wide hobby brush to blend everything together. After very light final sanding I applied a spray can primer over the whole model. The grey primer I used is pretty thick which gave me a good base for final airbrushing. Tim
-
Lyle, your Bounty is looking amazing. I really like the look of your aged sails. A real beast of a model this is, a triumph pulling it off like you have.
-
Thanks Craig and Popeye, much appreciated…I’m just packing up and preparing to move from Ontario to Vancouver Island end of this month. As soon as we get settled and I can get a new model workshop up and running, I hope to pick out another vehicle to take a crack at here in shore leave.
-
Paasche Airbrush TG-3AS
Tim Moore replied to David W's topic in Modeling tools and Workshop Equipment
Hi David, I have that Paasche Talon airbrush with 3 heads and have used it on several projects. The integral cup is a decent size and works fine. It can deliver really excellent results. I’ve had issues from time to time with paint not always flowing properly and getting gummed up in the needle, requiring some fiddling and careful cleaning. I’ve only used it with Vallejo airbrush paint and their flow improver. -
Thanks Lyle, seasons greetings to you and your family out there! Yes my kids have been complaining about the snow on Vancouver Island, but it looks like things will be melting and get back to the usual rain next week. Your Bounty is looking good. I chose the Sierra product because I like the idea of exploring some different fabrication, painting and weathering techniques, and to get back to woodworking. I’ll probably modify things a bit, do some experimentation. Might start incorporating some dioramas on future models so this might be a good intro into that.