Tim Moore
-
Posts
357 -
Joined
-
Last visited
Content Type
Profiles
Forums
Gallery
Events
Everything posted by Tim Moore
-
Andrew: What a cracking result, a really unique and lovely boat you have crafted. The fish in a box are great, so is everything really.
- 206 replies
-
- 3
-

-

-
- Vanguard Models
- Brixham trawler
- (and 2 more)
-
Haha good spot. yes actually I just moved all my big ship models upstairs to the den, so not much down in the basement. Fiat needs a better spot.
-
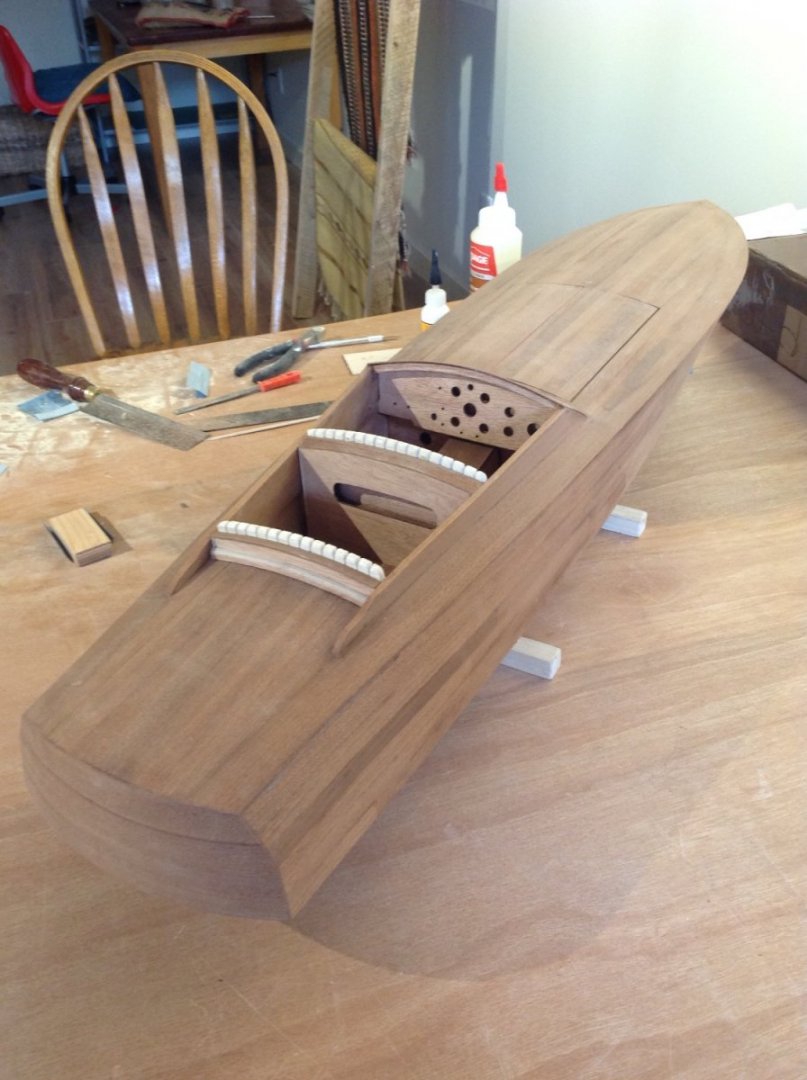
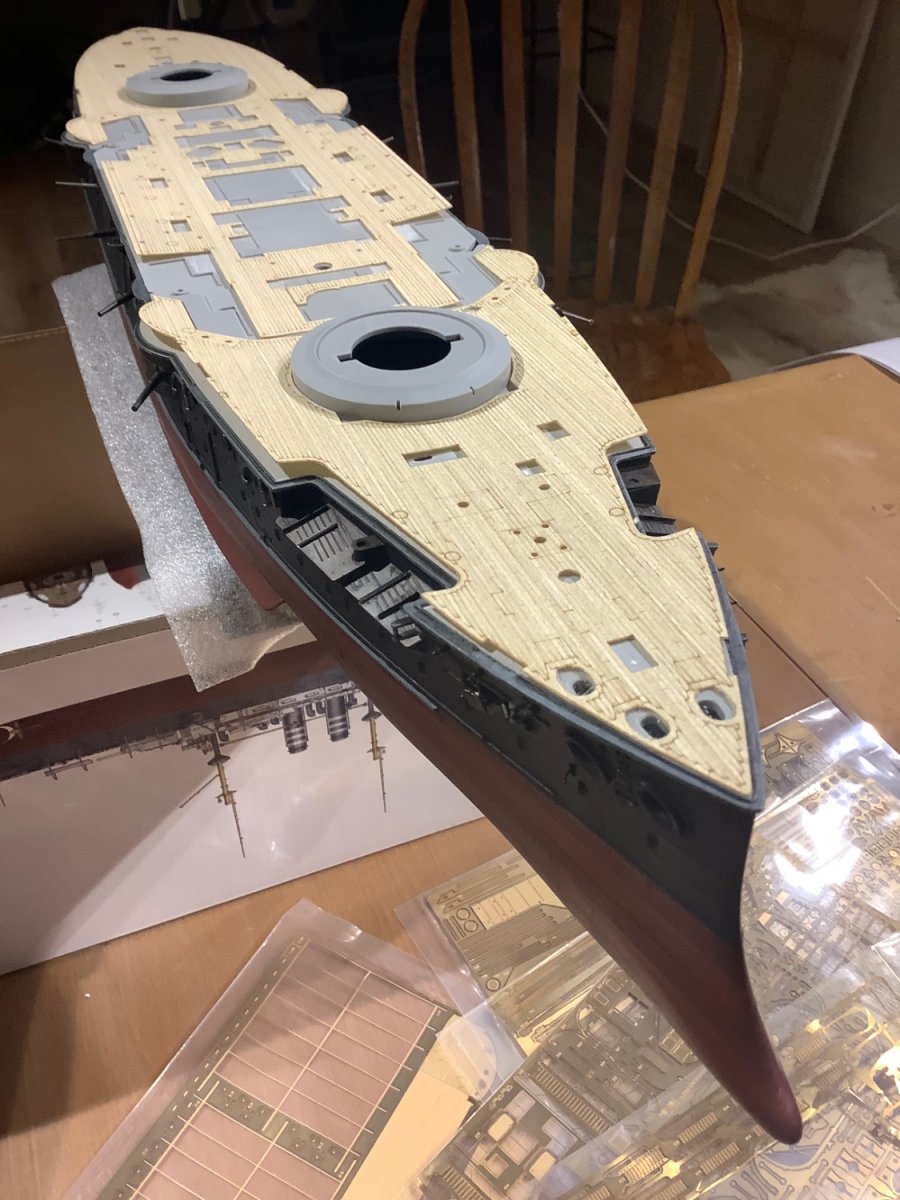
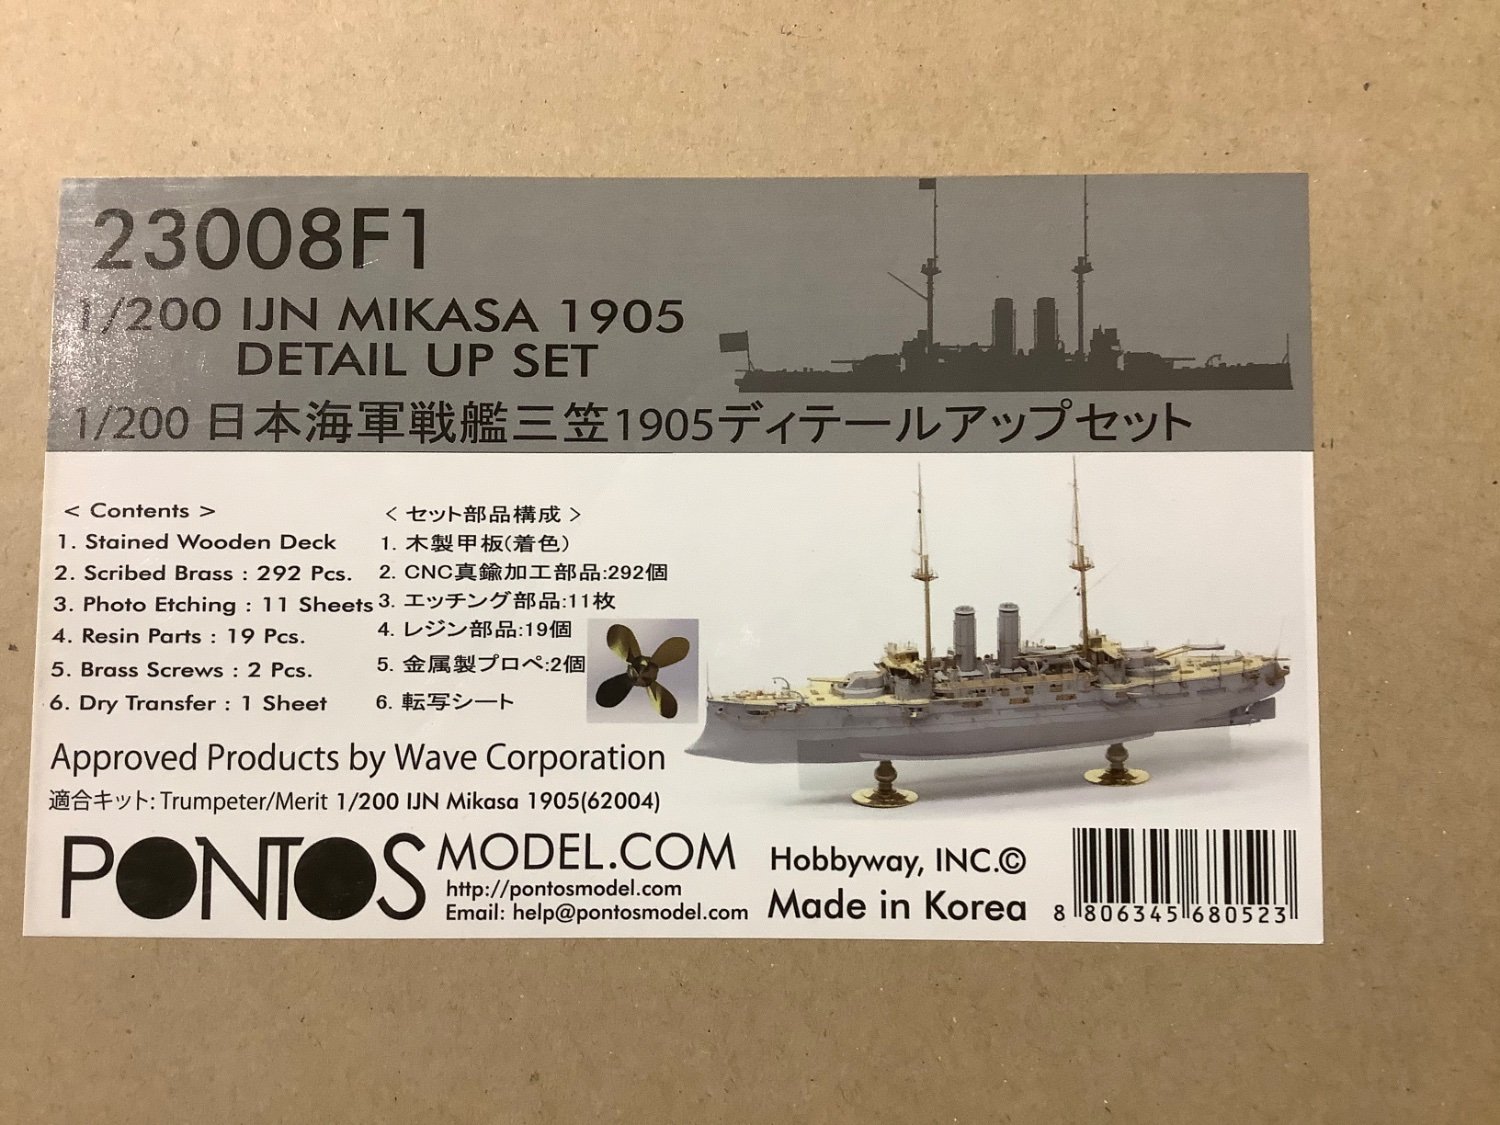
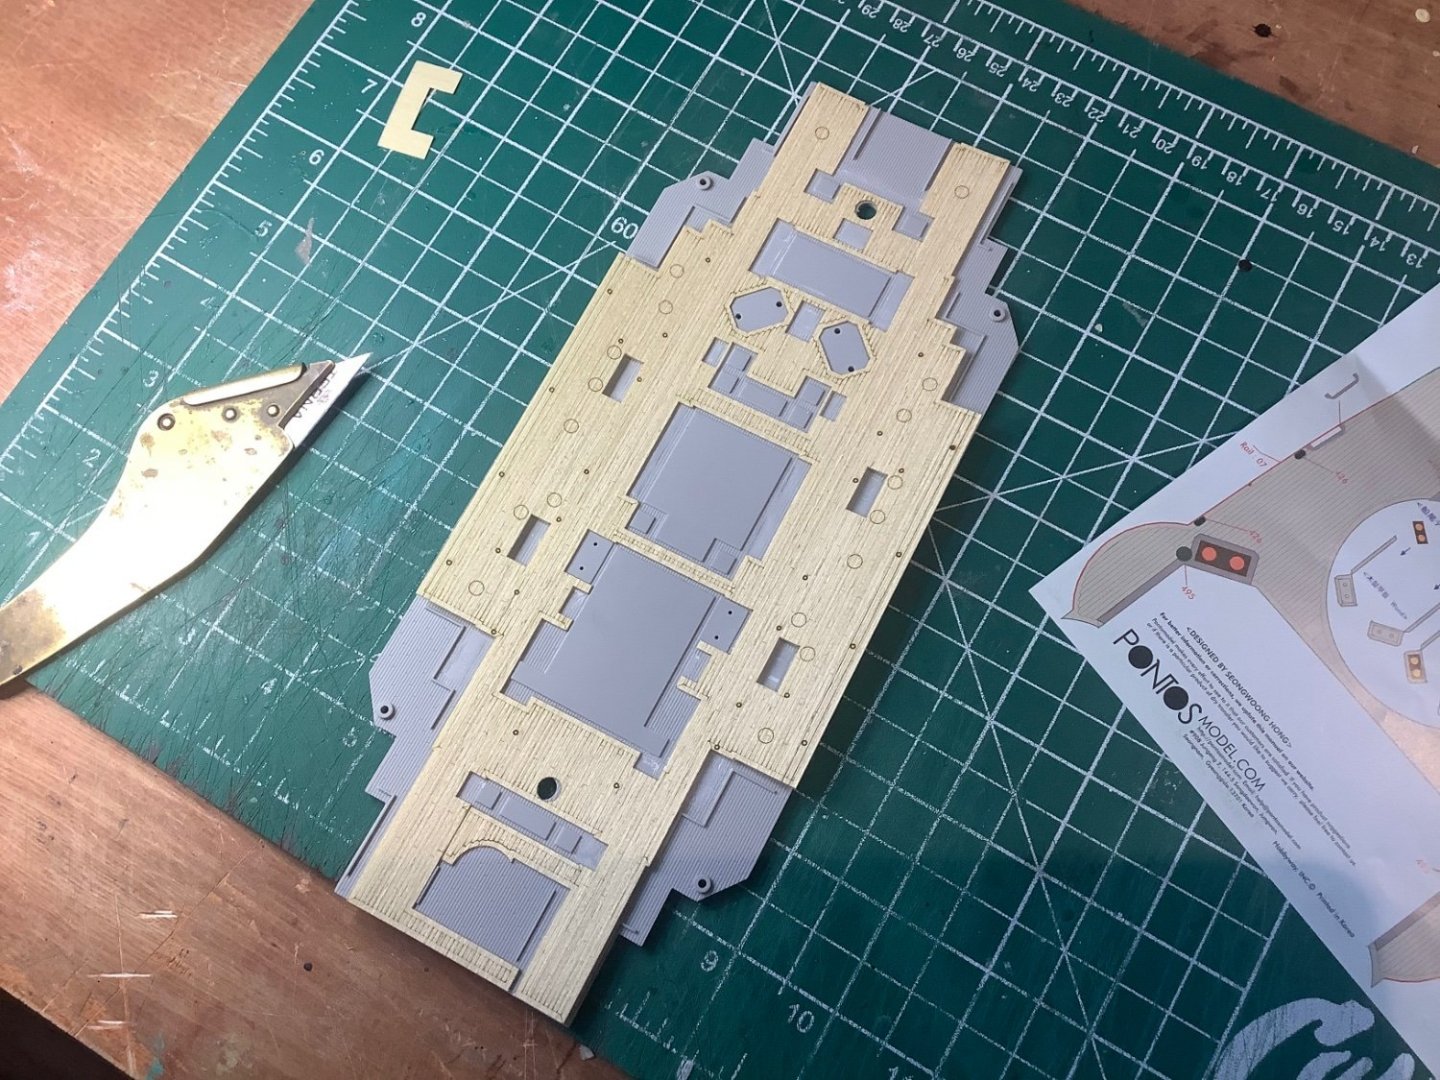
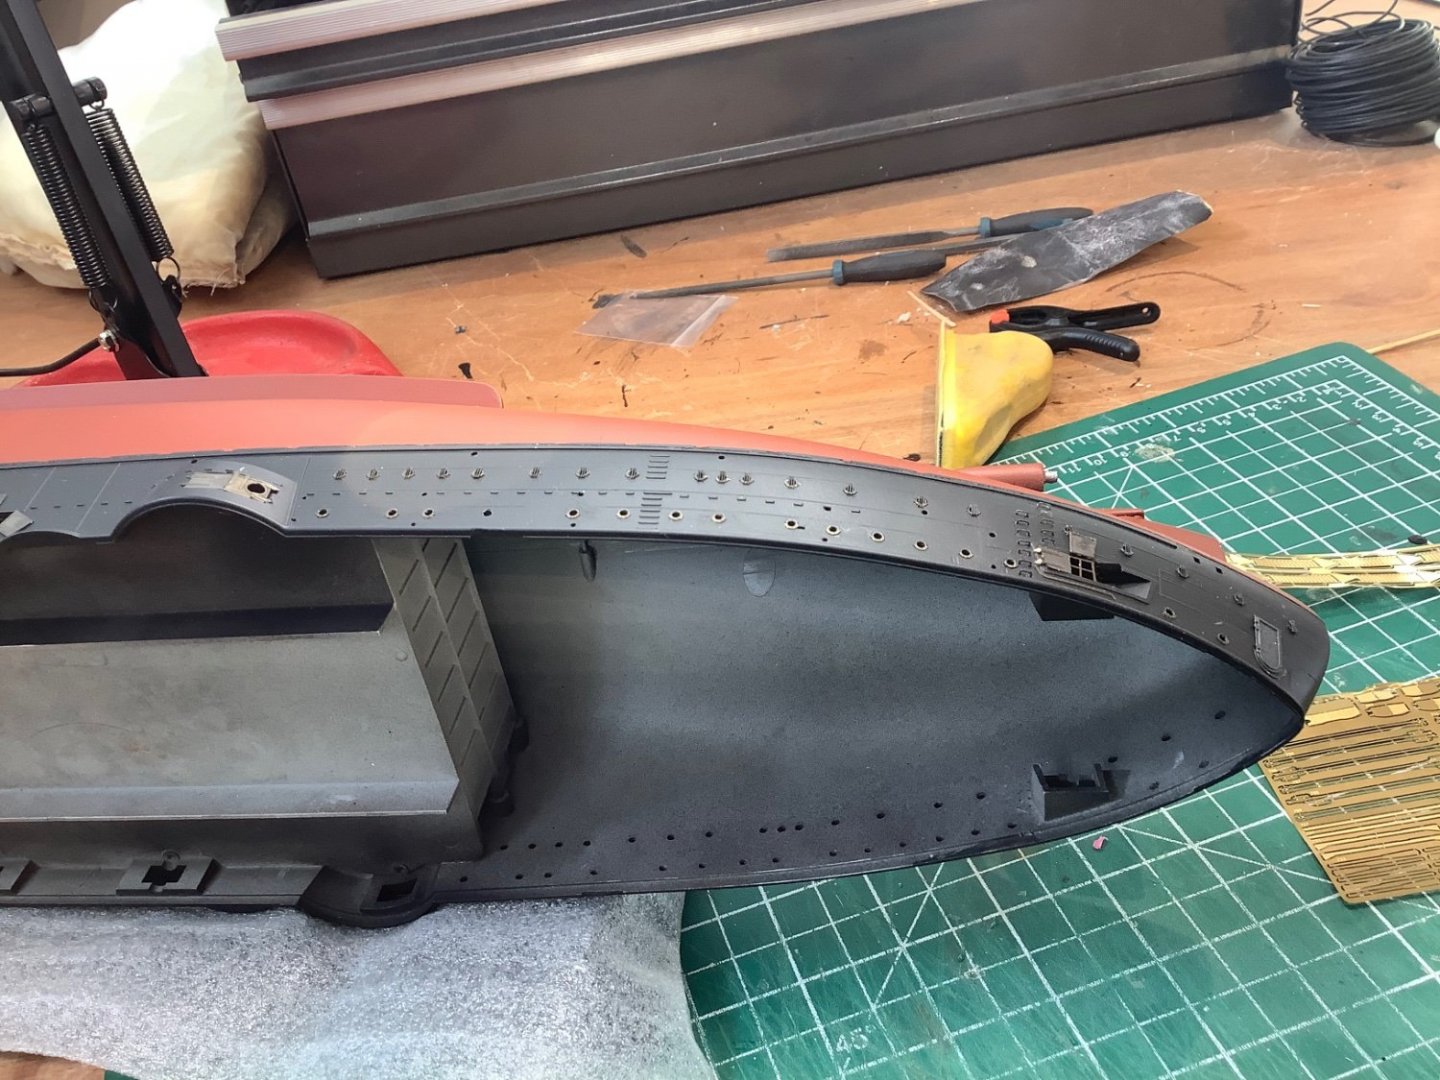
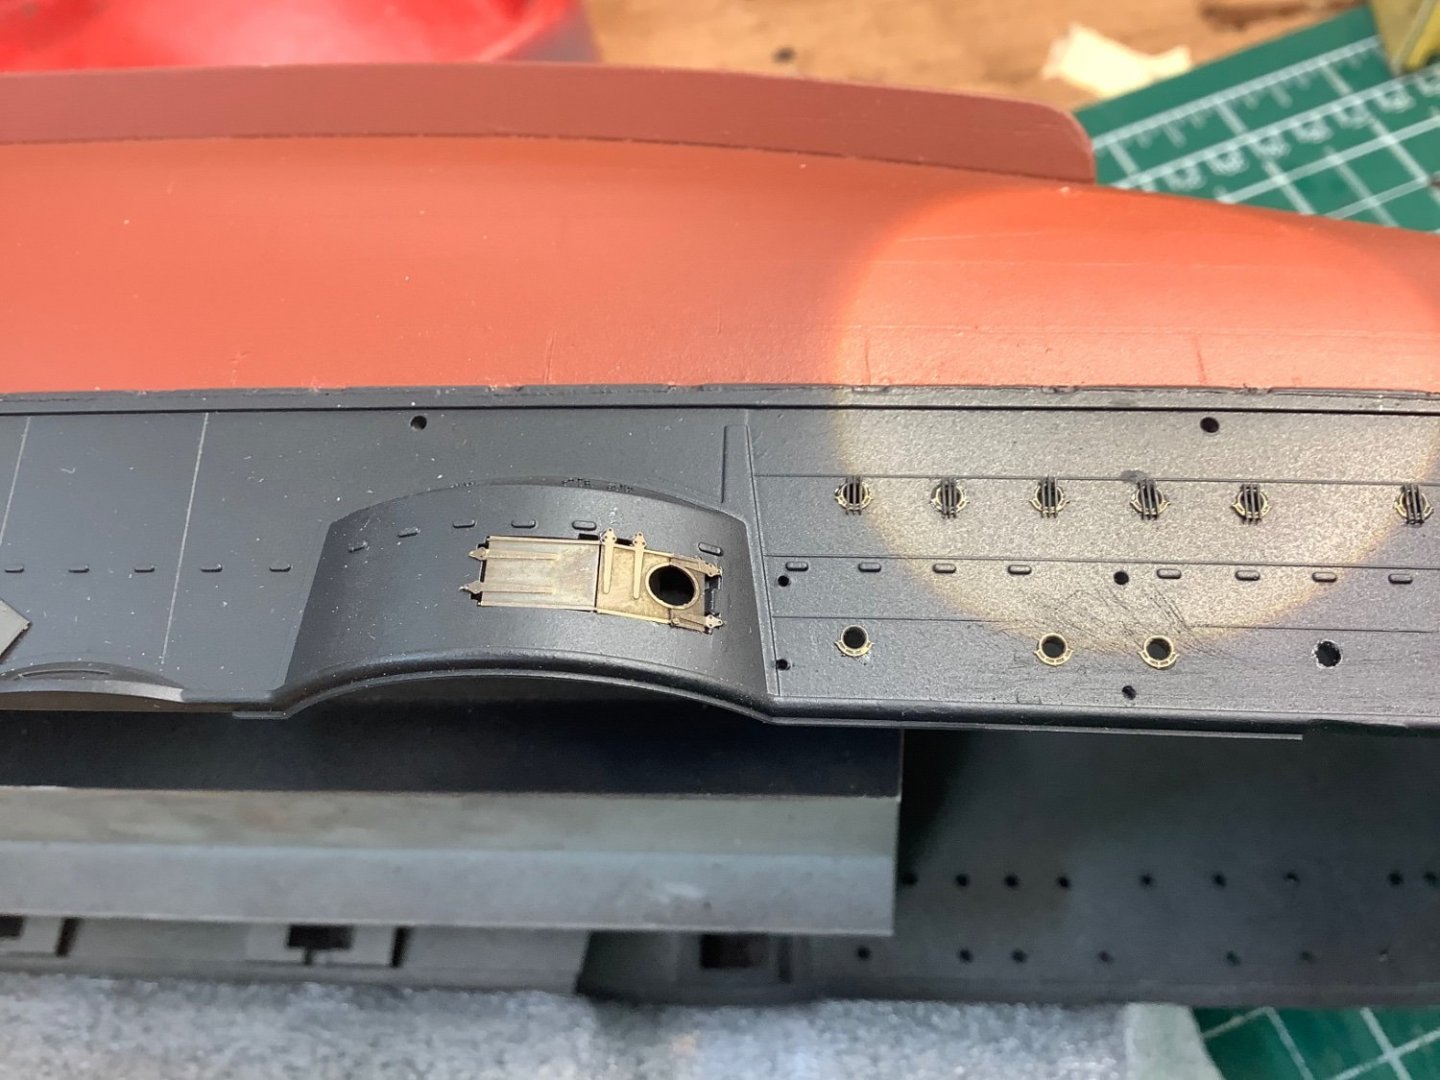
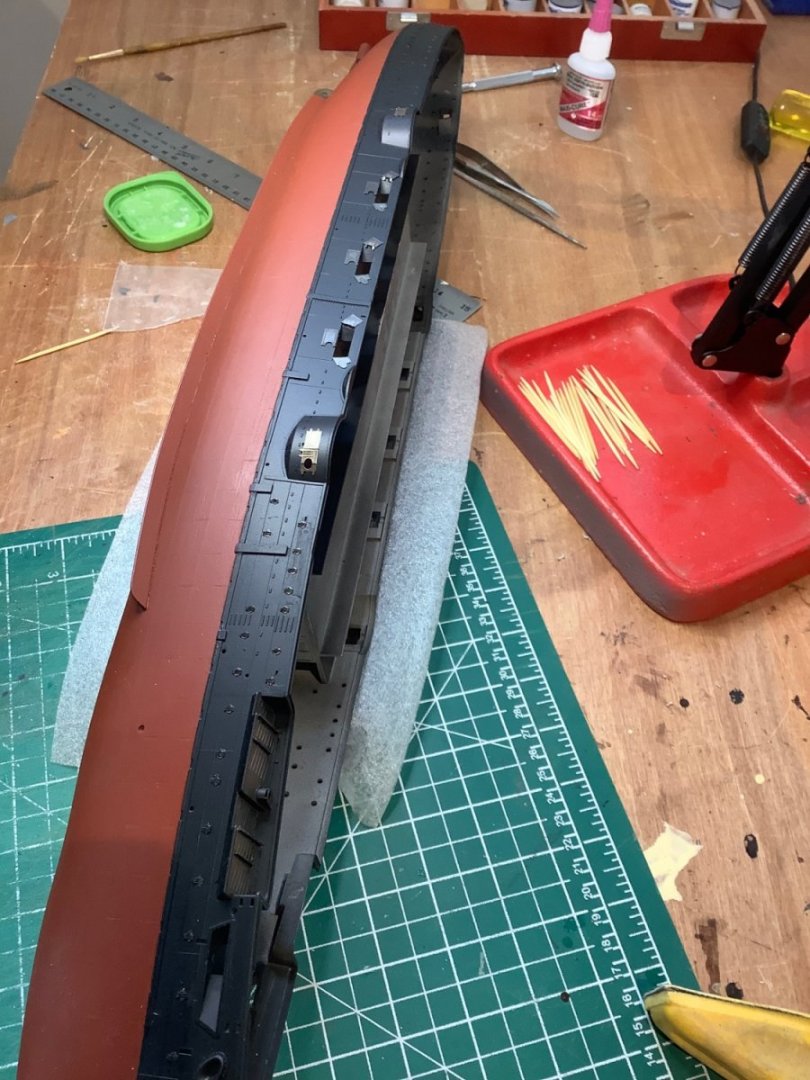
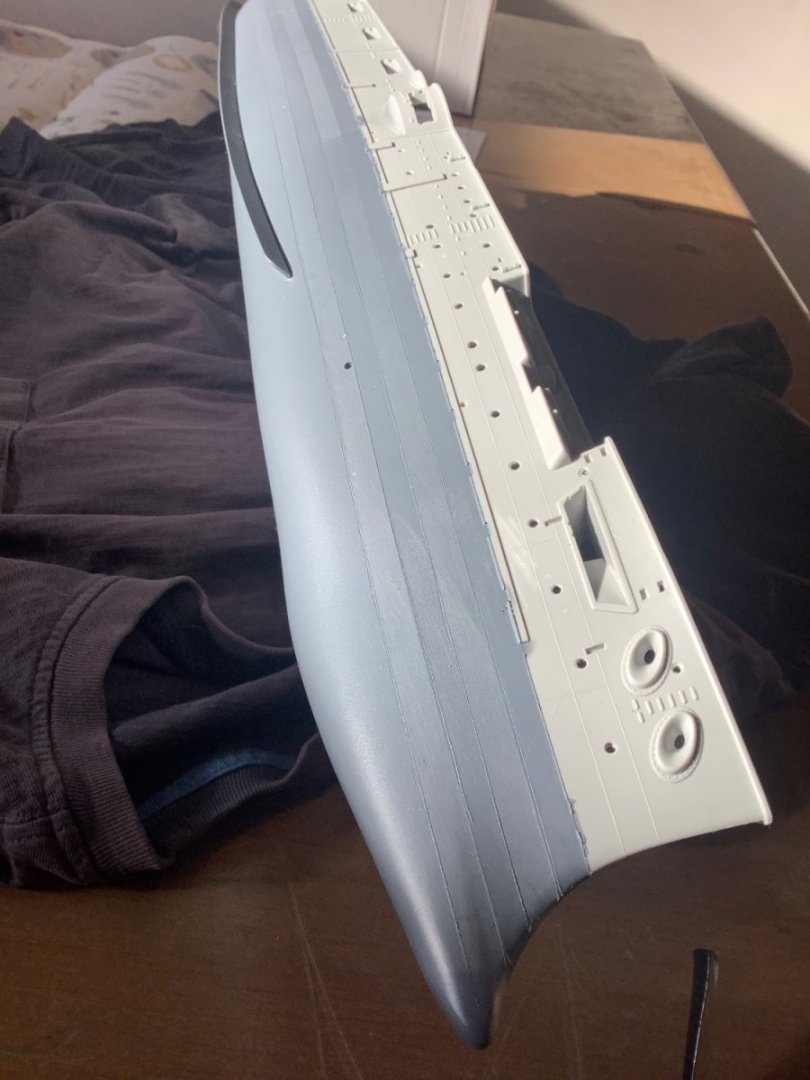
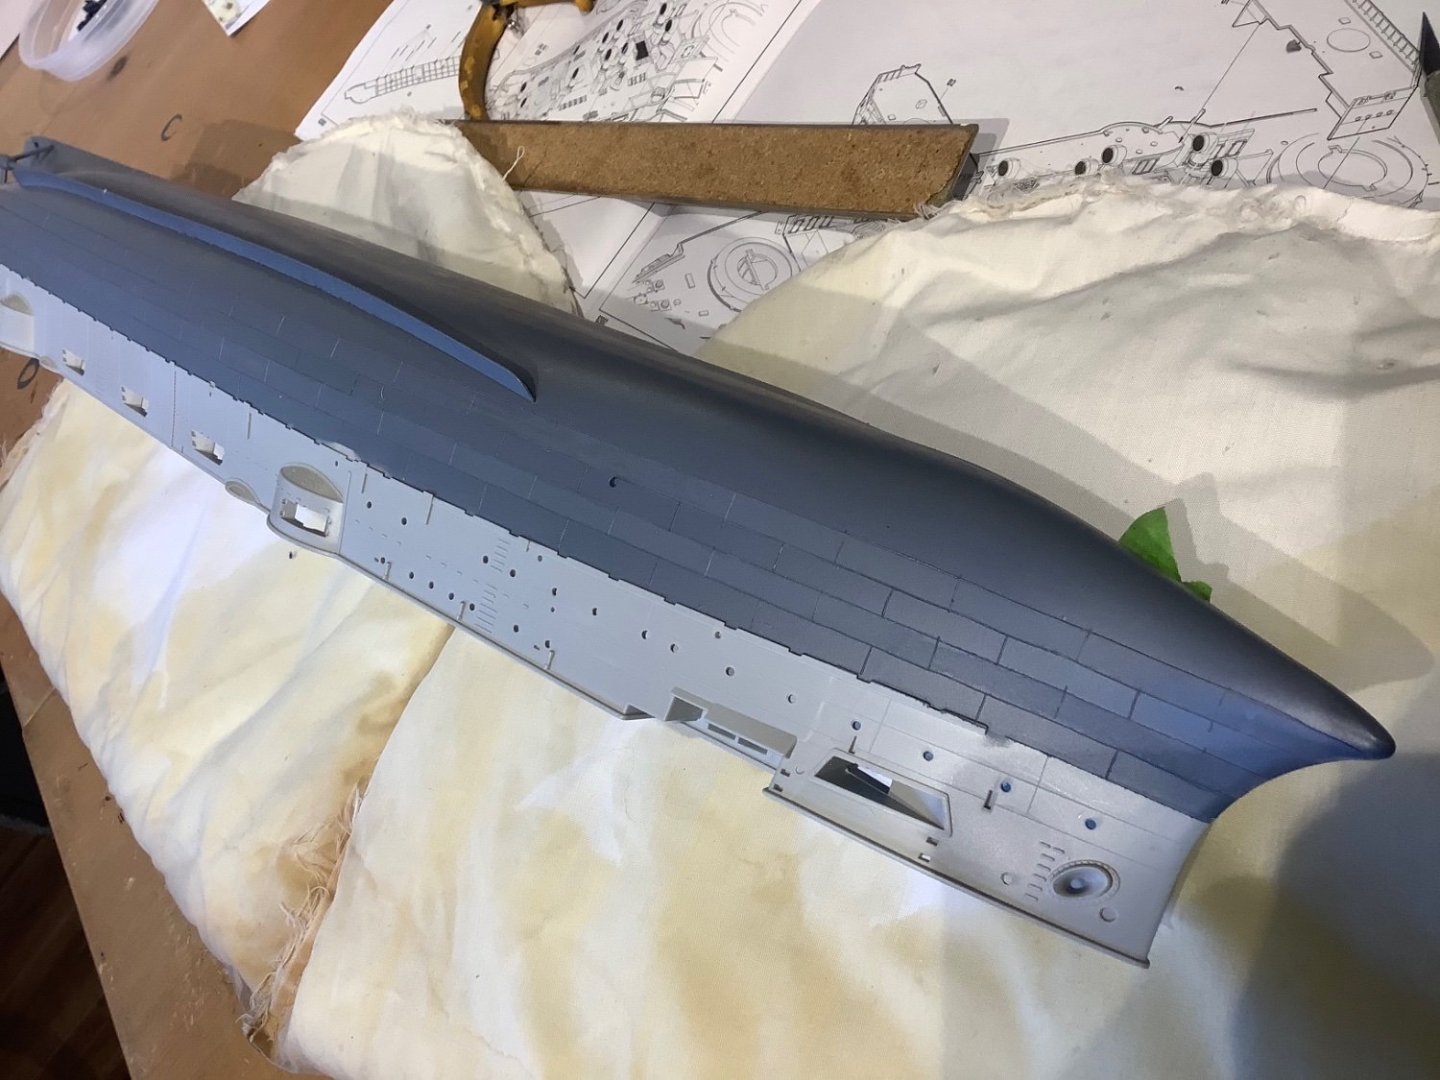
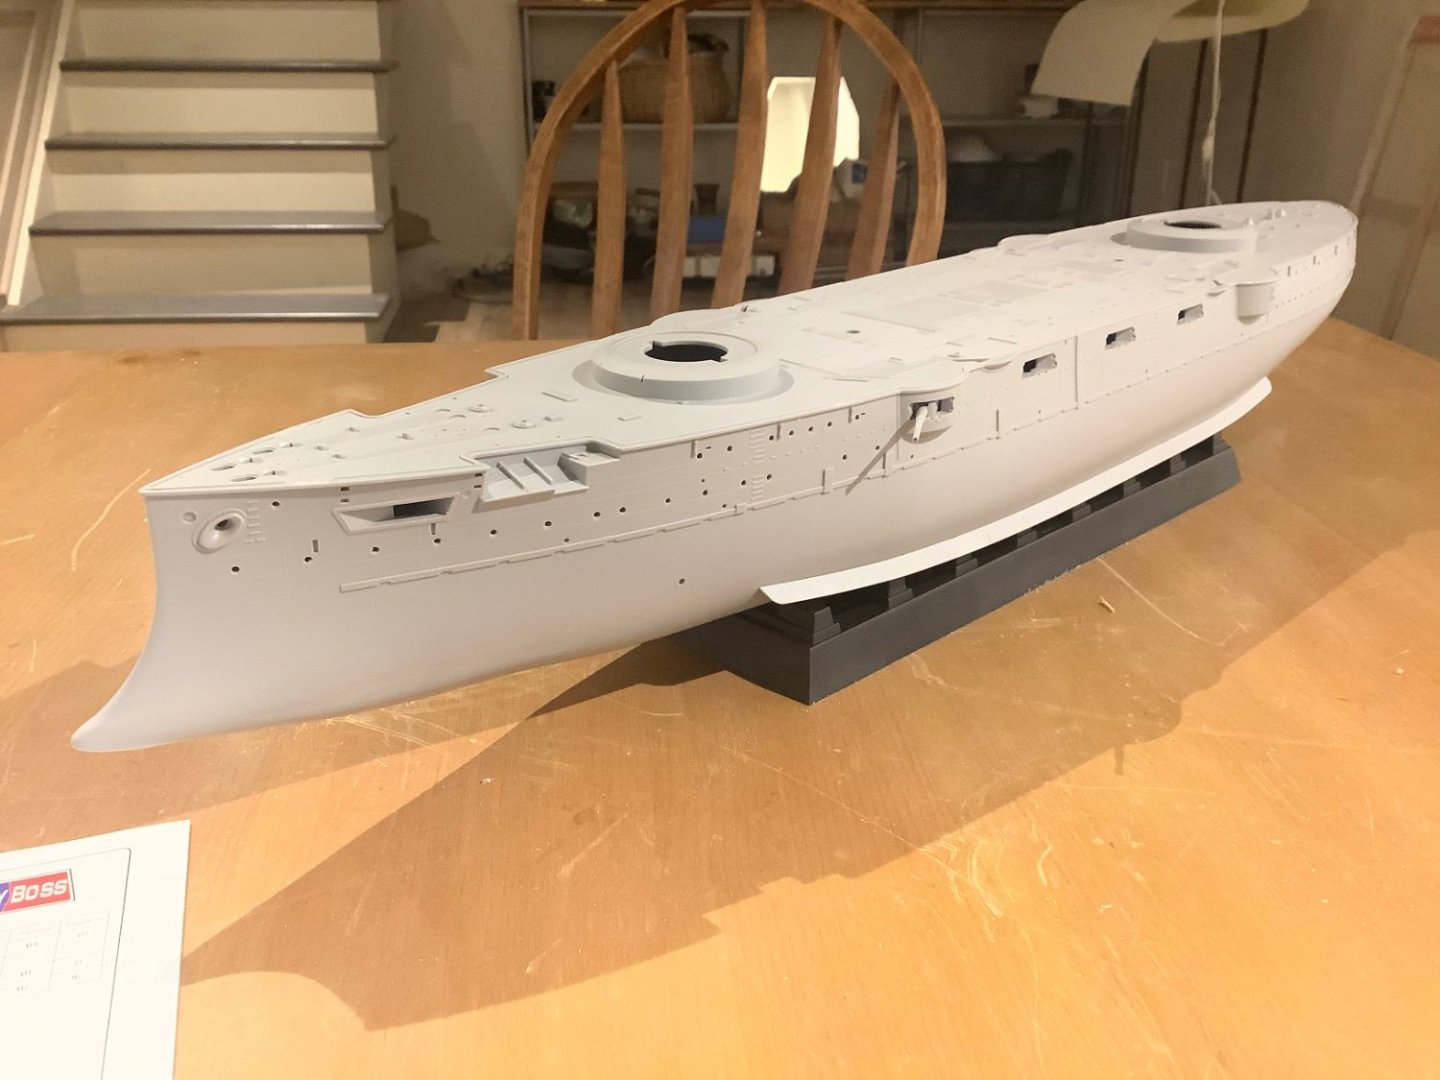
Progress: Enough on the hull for now, I’m fairly happy with what I’ve got so it’s in the parking lot. Started on the centre section of the superstructure, which first requires application of the upgrade wood deck. It looks a bit involved, removing a lot of the embossing on the kit and then cutting out the wood deck in a complex pattern like some sort of circuit board. In fact it’s pretty straightforward, the plastic is easily modified with a sharp chisel, and my fur cutting knife makes short work of carving out the preprinted deck. I’ve tested the self adhesive and it seems to work well. After finishing fore and aft I just need to come up with a staining solution before laying it down. May get out the old weathering chemicals from my Fifie build again! Musings: the Pontos set is a bit of a hide and seek proposition. The instruction sheets are fine for describing the fabrication and installs locally, but they put zero effort in giving you the big picture. At this price point, I expect better. Takes a while to sort it all out and I find it kind of irritating spending time on that as opposed to crafting pieces. I’ve used many of the brass details on the hull, but dispensed with all the bracket assemblies which attach at the top at various locations. I made up a few, painted and installed them and thought they looked terribly fussy from a design perspective so have replaced with sections of brass rod that look more battleship-like to me.
-
Hi Cap’n I am currently building a 1:200 Mikasa and am incorporating a wooden deck, which I will be starting on sometime in the next couple of weeks. The answer to your question depends on the wooden deck upgrade you are working with. I am using the upgrade kit from Pontos that also involves a lot of other photo-etch parts. The wooden deck in this upgrade kit has a self adhesive backing, but I understand you can alternatively use glue. In my case, there are many embossed protrusions on the plastic deck that first have to be removed before applying the wood deck. Tim
-
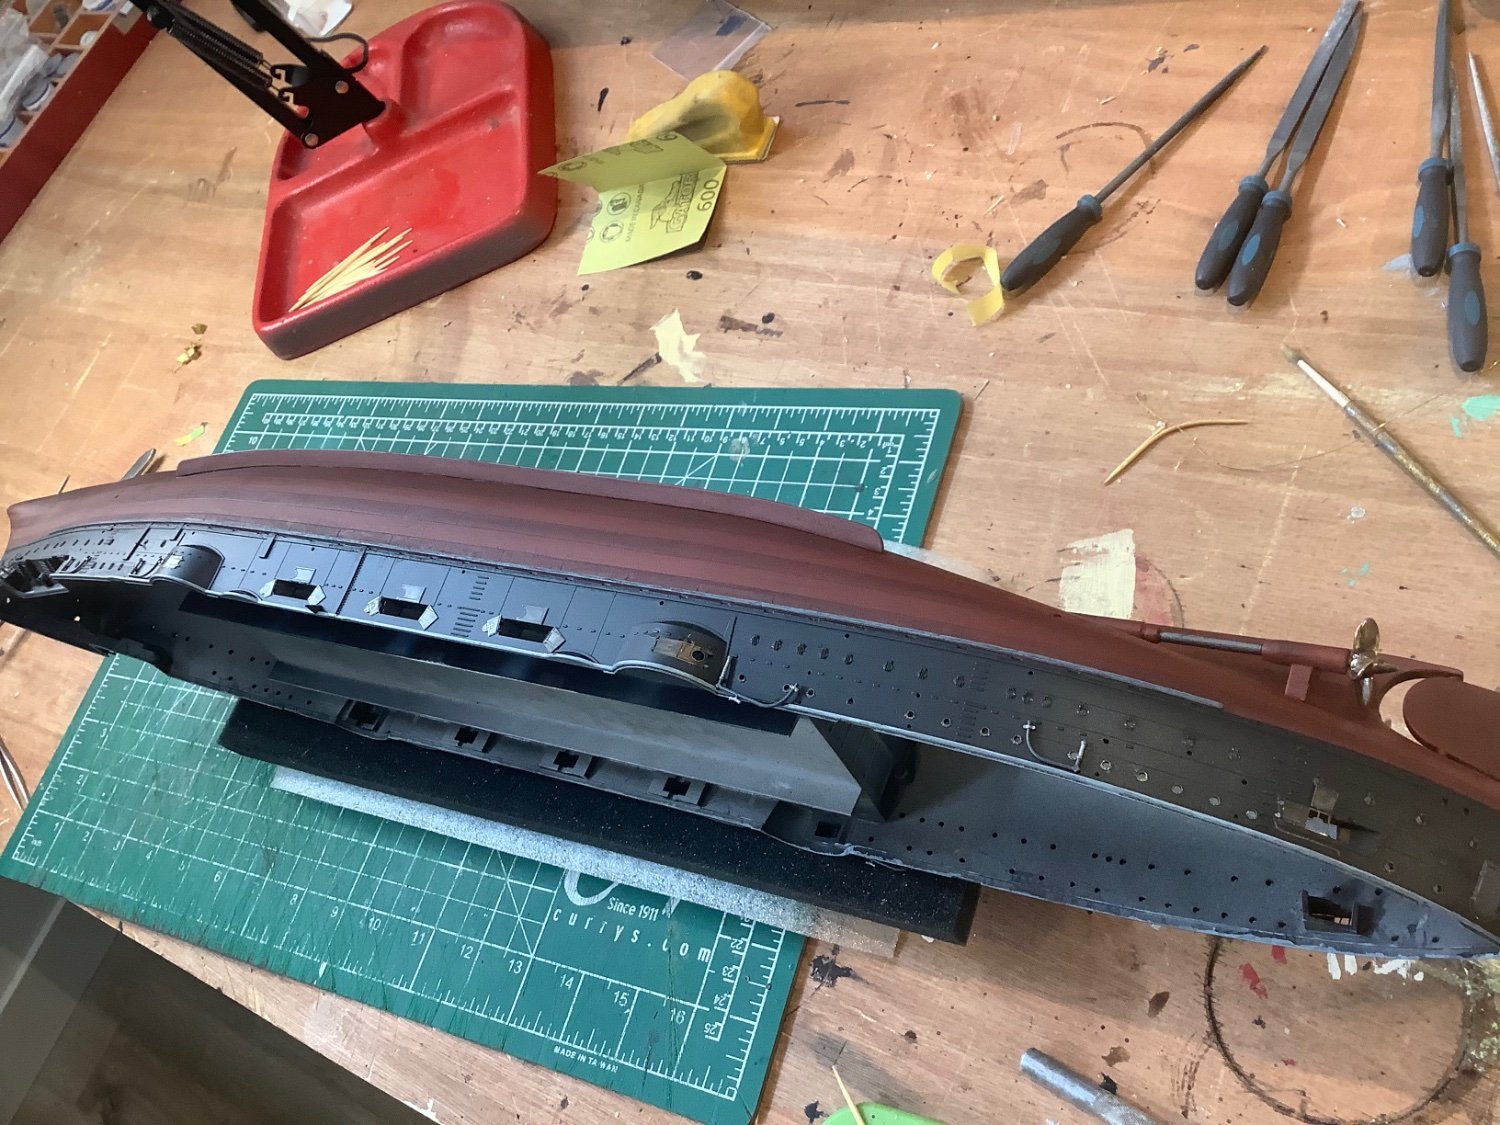
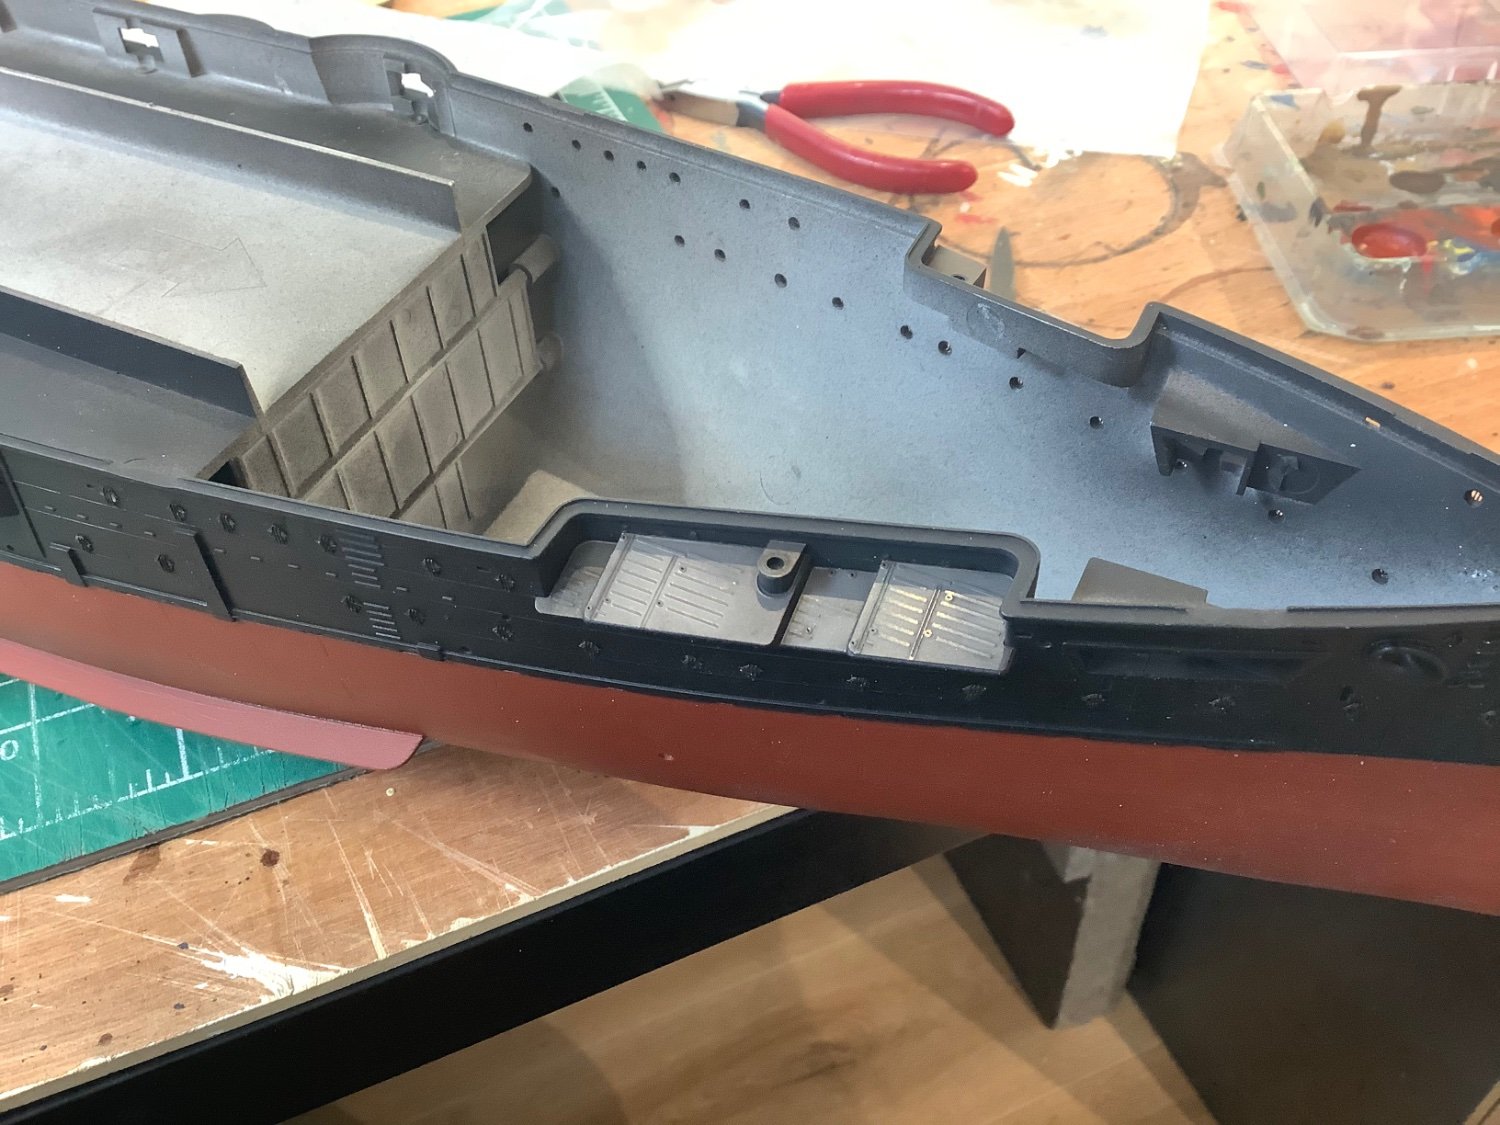
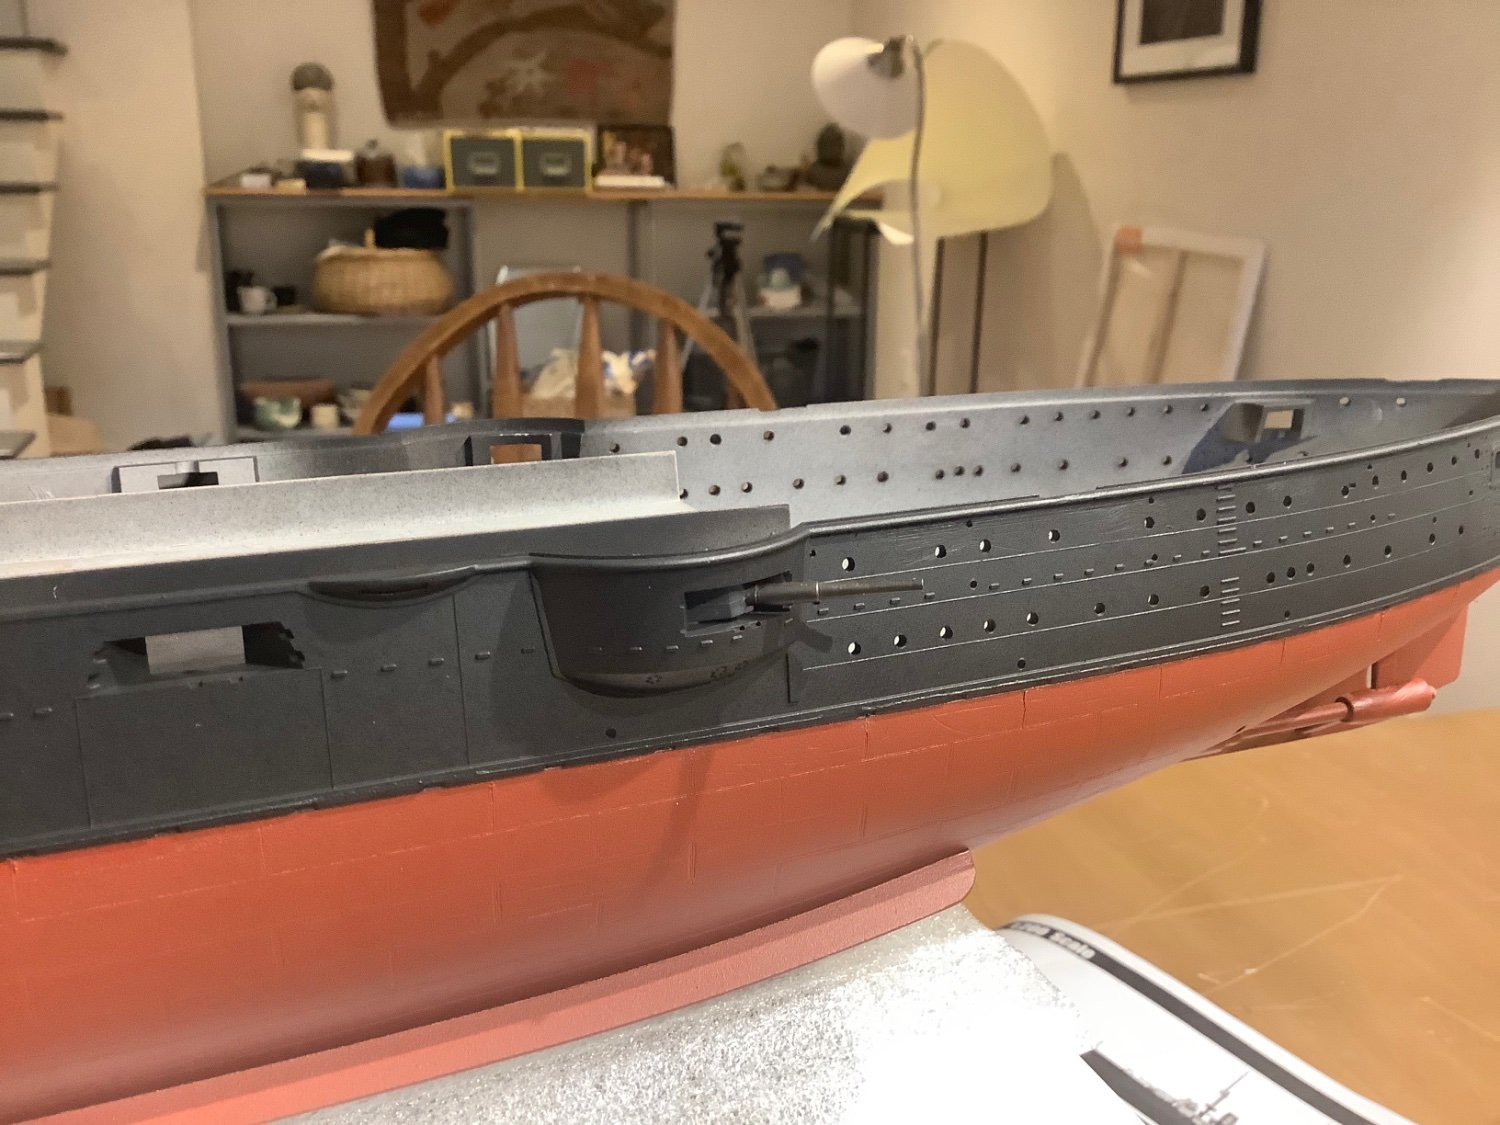
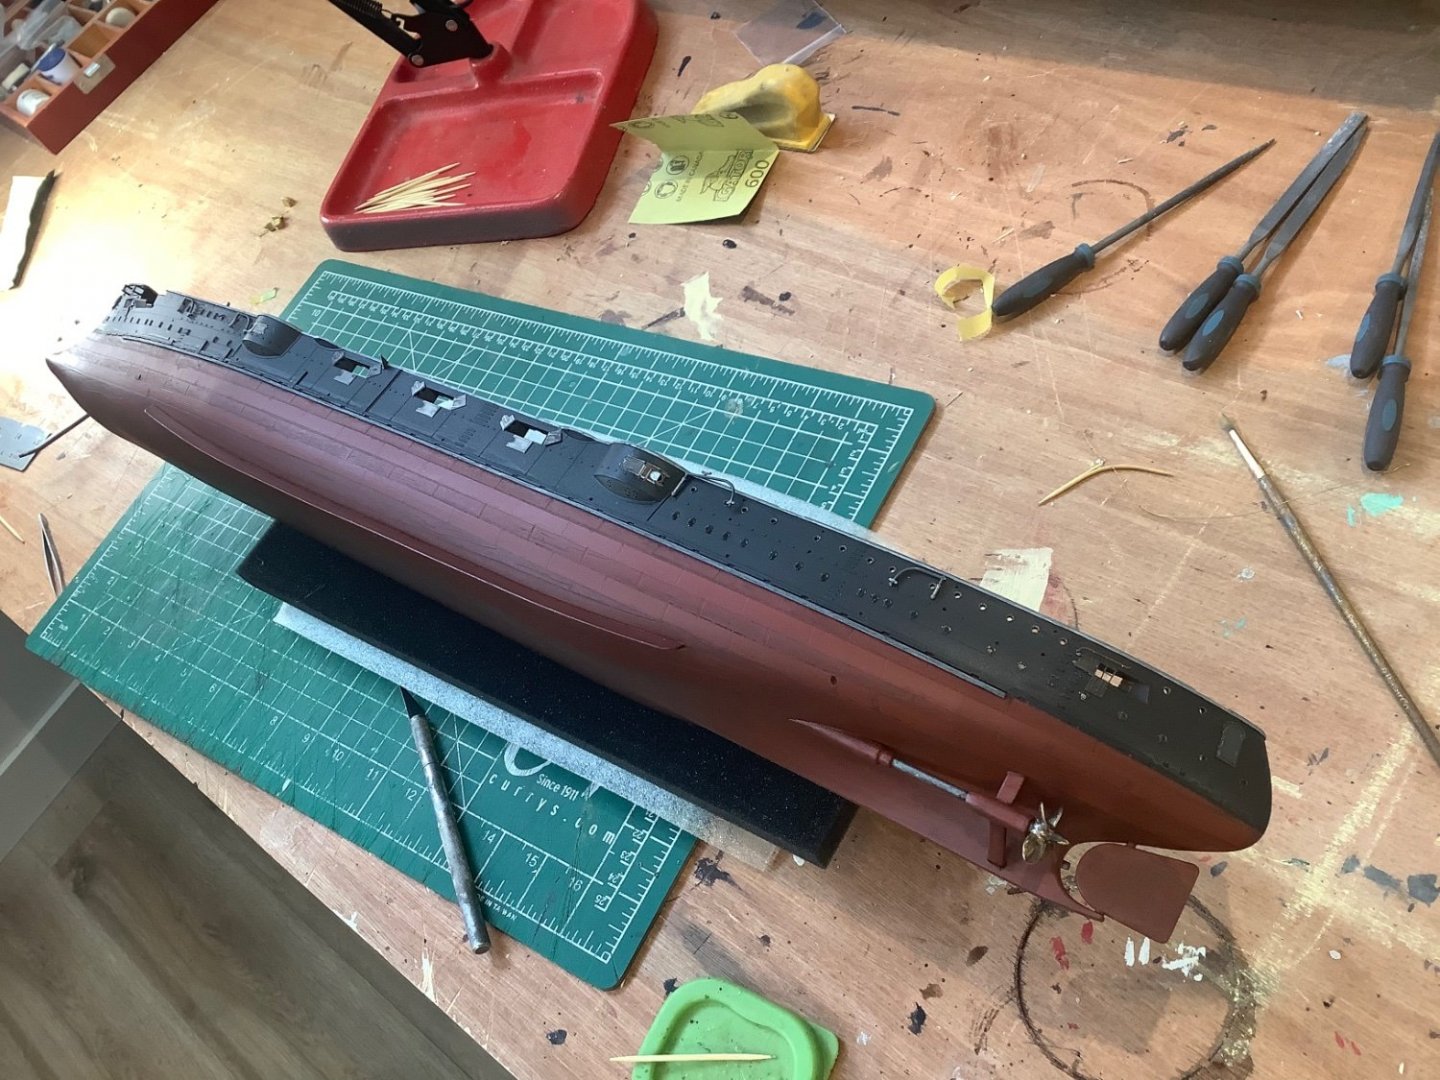
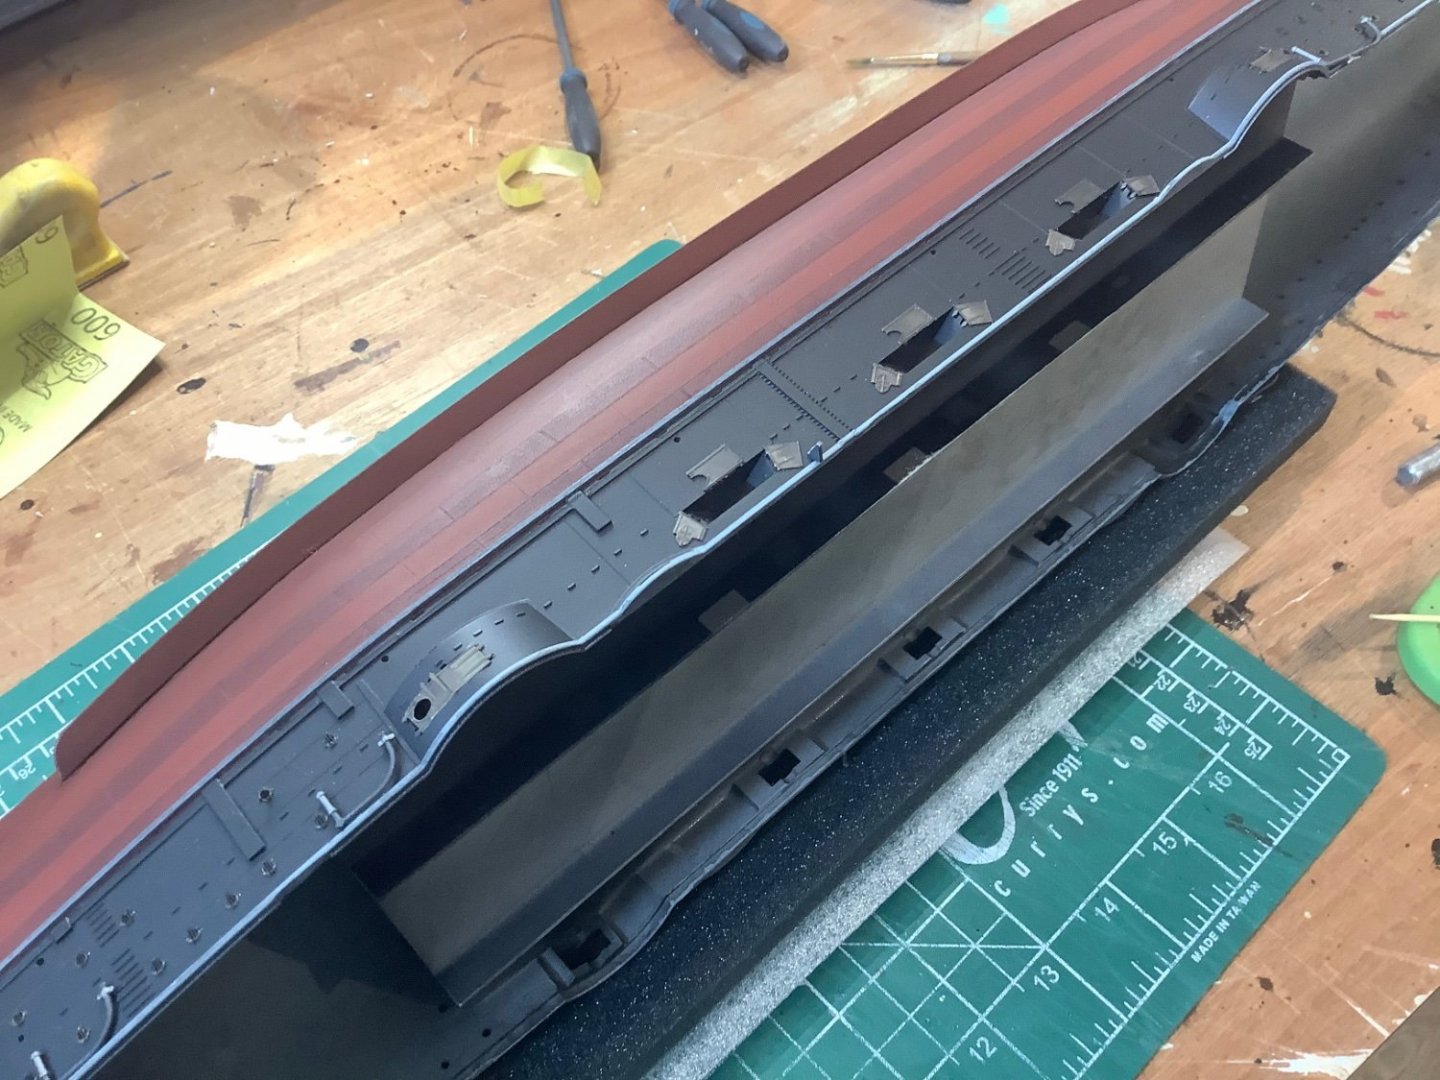
Progress: some more hull detail added, used a wash to darken it, which looks way better, and add visual interest/texture and definition between plate lines. Still much more work to do on that. It’ll be more subtle when finished, hopefully with the richness I’m looking for. Added a grey trim piece just below the black, and painted the deck trim grey, both to give more definition overall. I’ll play around with the hull a few more days then probably set it aside and begin on the deck for a change of pace. I’ll leave most of the weathering until later to tie it all together. Musings: my hat goes off to the PE enthusiast Swiss watchmakers out there. I’m good with doing it a while under the glass but after a day or two the tiny brass work gets a bit tedious to me, particularly if there isn’t a visible payoff. I suppose I’m just more at home with woodwork at present. I’ll probably do some PE editing on Mikasa, dispense with one or two things where it isn’t very visible or that different from the kit package after finishing. On the 4” fore and aft guns, for instance, I completed the Pontos upgrade on one, looked nice in my hand, installed it and realized the work is largely invisible. The brass props are nice, I aged them in gun blue for a few seconds just to take off the raw shine that wouldn’t work with the presentation I’m doing, repolished them with the dremel and painted the nacelles. I’m keen to get the 6” guns I finished earlier mounted in the hull I think it’s going to look sweet.

- 62 replies
-
- 13
-
-
Thanks Mike - yes I’ve done those guns in brass and they will look great on install. The plastic ones in the kit are actually drilled though and looked “good enough” at the time. The kit as-is is good quality, not that I’ve gone anywhere near it the last week being now buried in micro PE work. I cannot imagine your challenge at 1/700! I have enough trouble seeing detail on this 1/200 being more used to the larger scale of wood boats and such.
-
Progress: Detailing the hull. This is not a two day project. Musings: I find on most modelling projects it takes a while to get in rhythm with what you’re up against and trying to achieve. I’m not there yet with Mikasa but starting to get a feel for where I’m going with her.
- 62 replies
-
- 12
-
-
Progress: Not a huge amount, but made a start on some of the photo-etch enhancement on the hull. Finished the portholes, ladders and various other fiddly bits (technical term). Colorizing the brass either gunmetal or aged bronze in most cases where it will lay against the black. I bronzed the portholes before install, with the overlaying bars black, although these are so small the distinction is barely visible to the naked eye. Kit musings: The PE is undeniably exquisitely manufactured. Bit of work to lay on the small stuff - all 120 or so portholes, ladder rungs, etc, but at the end of it all it’s not that big a visual impact unless you are a small rodent or maybe an owl. The Pontos illustrations don’t seem to bother with the portholes at all.

- 62 replies
-
- 11
-
-
Hey thanks Blue, that’s neat! We probably both ruined our poor mothers’ Christmases with our newborn caterwauling.
-
Do you use these, comments?
Tim Moore replied to Dave_E's topic in Modeling tools and Workshop Equipment
Hi Dave. I haven’t used either of the first two devices. The pick type thing on the right seems like it might be useful. The tools I mostly rely on for rigging are some long, fine tweezers and a collapsible eye needle. -
Hi Ras - well done on your Fifie! I love all your cool little add ons. Tim
-
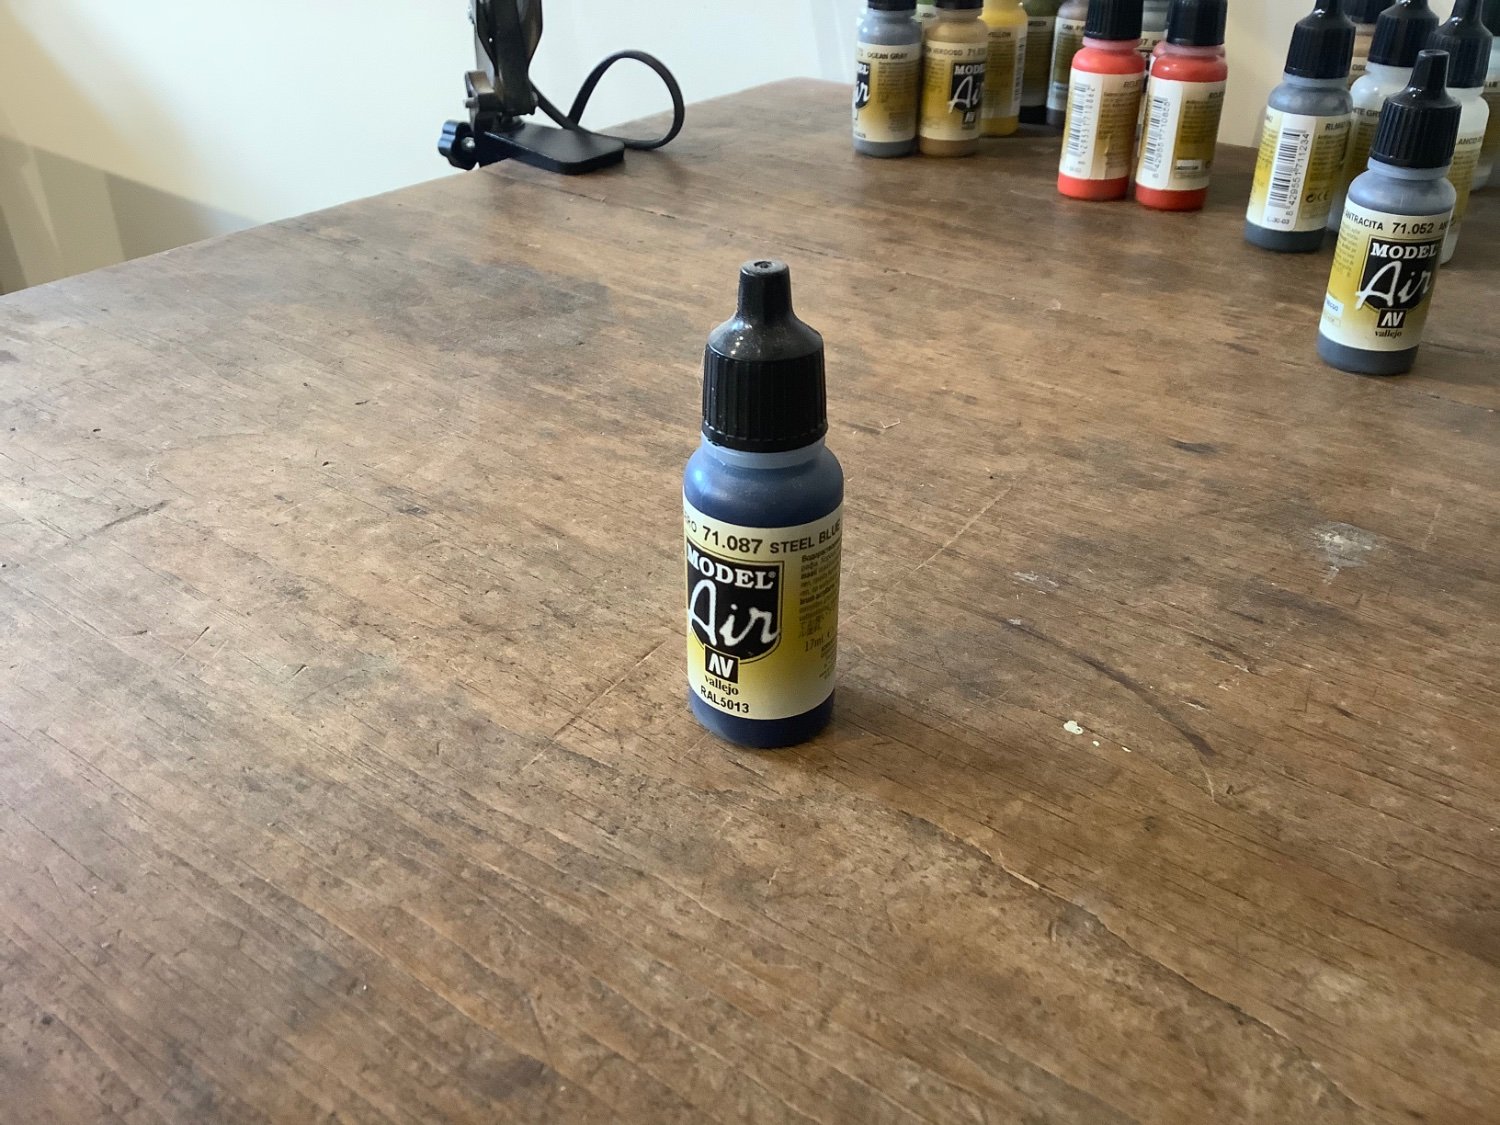
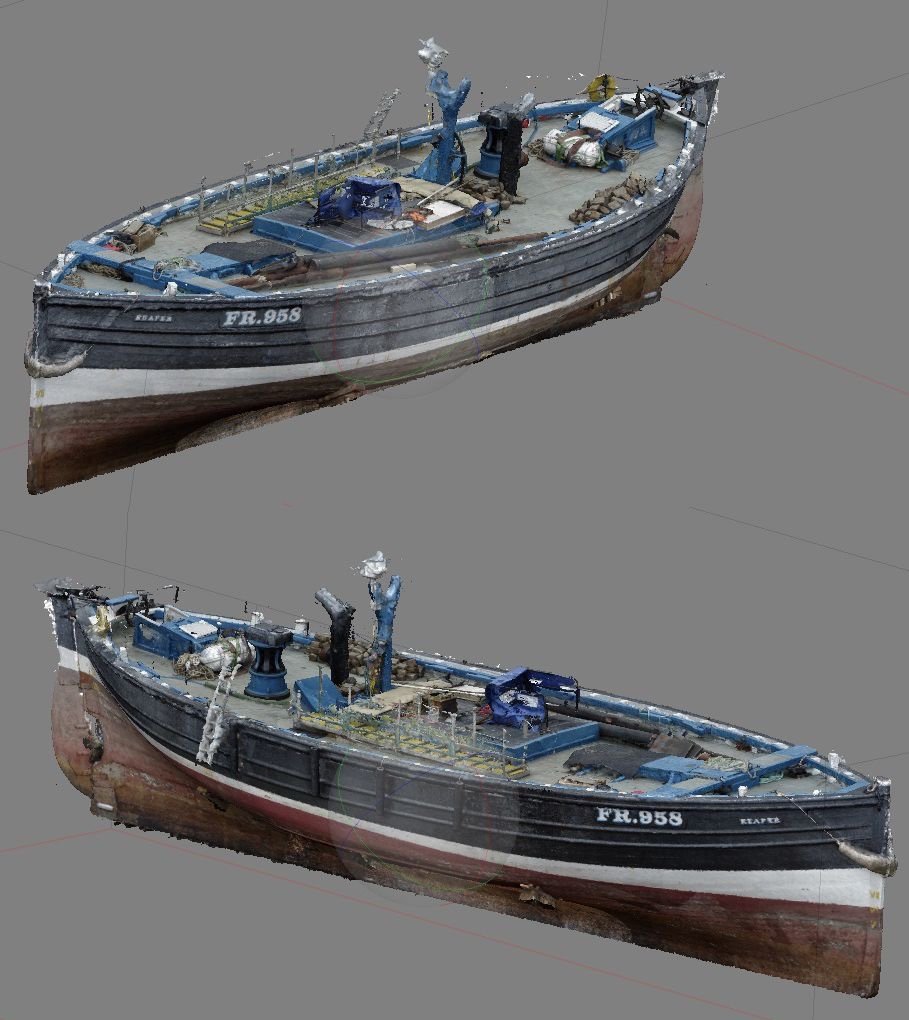
Hi Rick, thanks! The blue I used on my Fifie is Vallejo Model Air “Steel Blue” 71.087. Although this line of paint is designed for airbrush I find it works really well hand brushed on raw wood and gives a vivid result. I don’t use any sealer or primer. The general inspiration for my Fifie interpretation was the original Reaper, shown here so you can see the authentic blue. I thought it needed to be slightly punchier so took some liberties.

- 79 replies
-
- 5
-
-

-
- Fifie
- Victory Models
- (and 1 more)
-
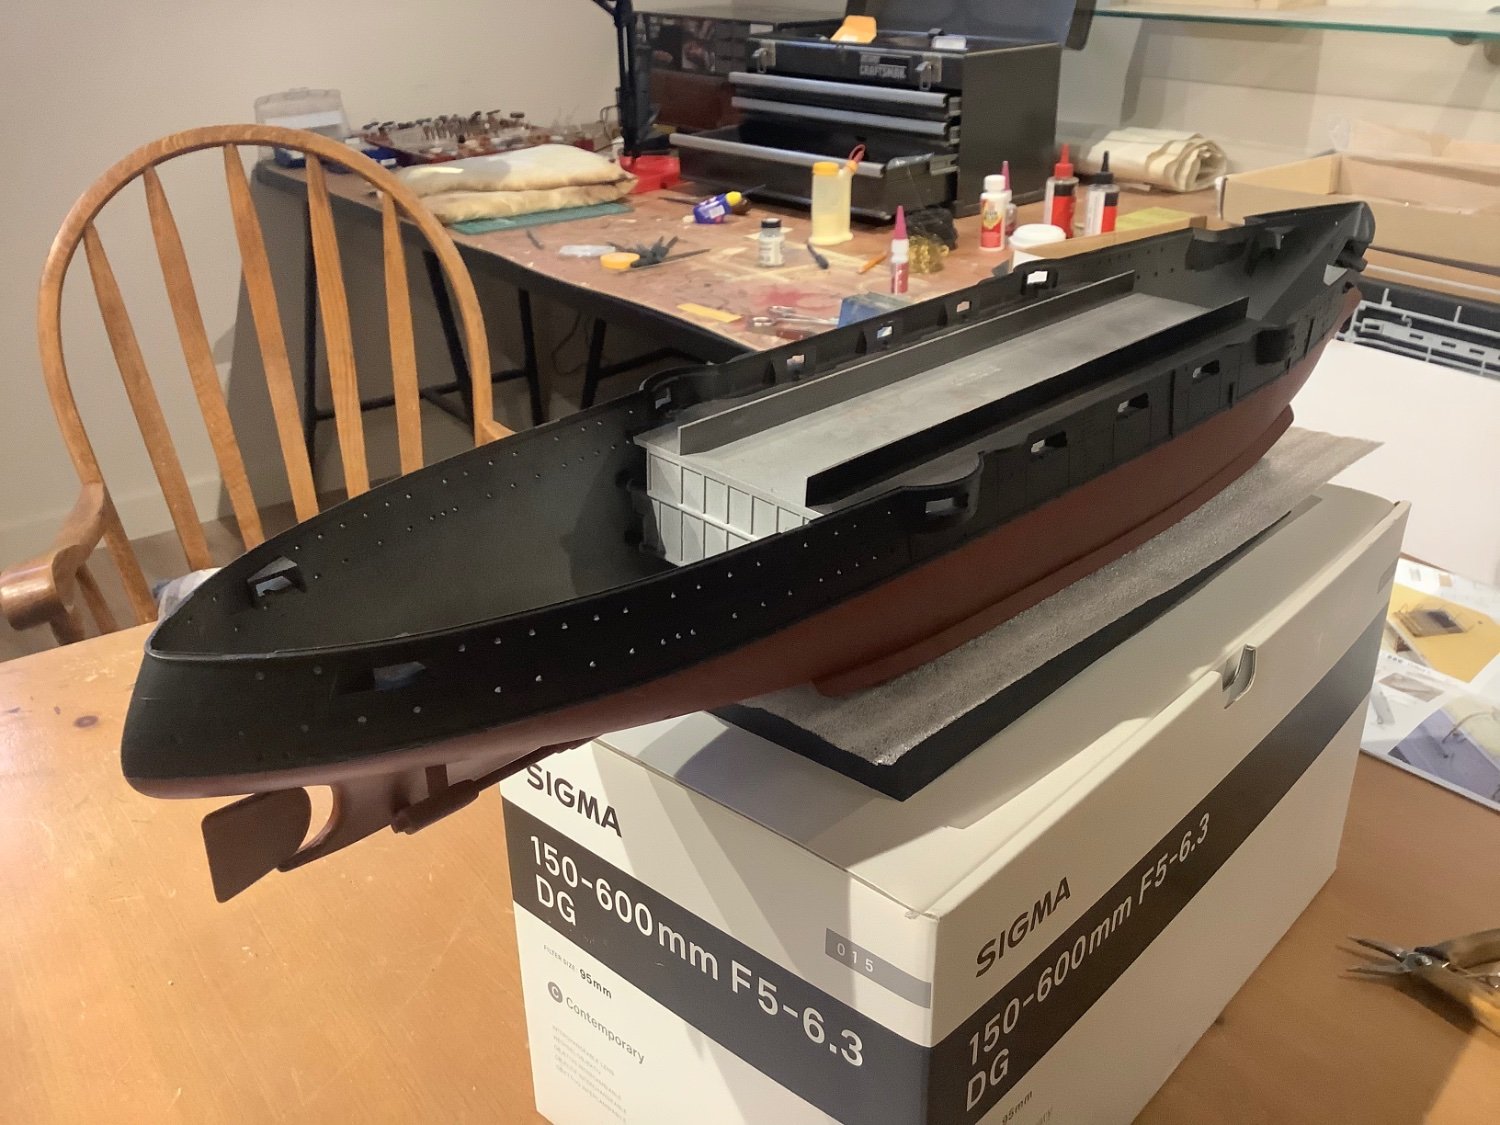
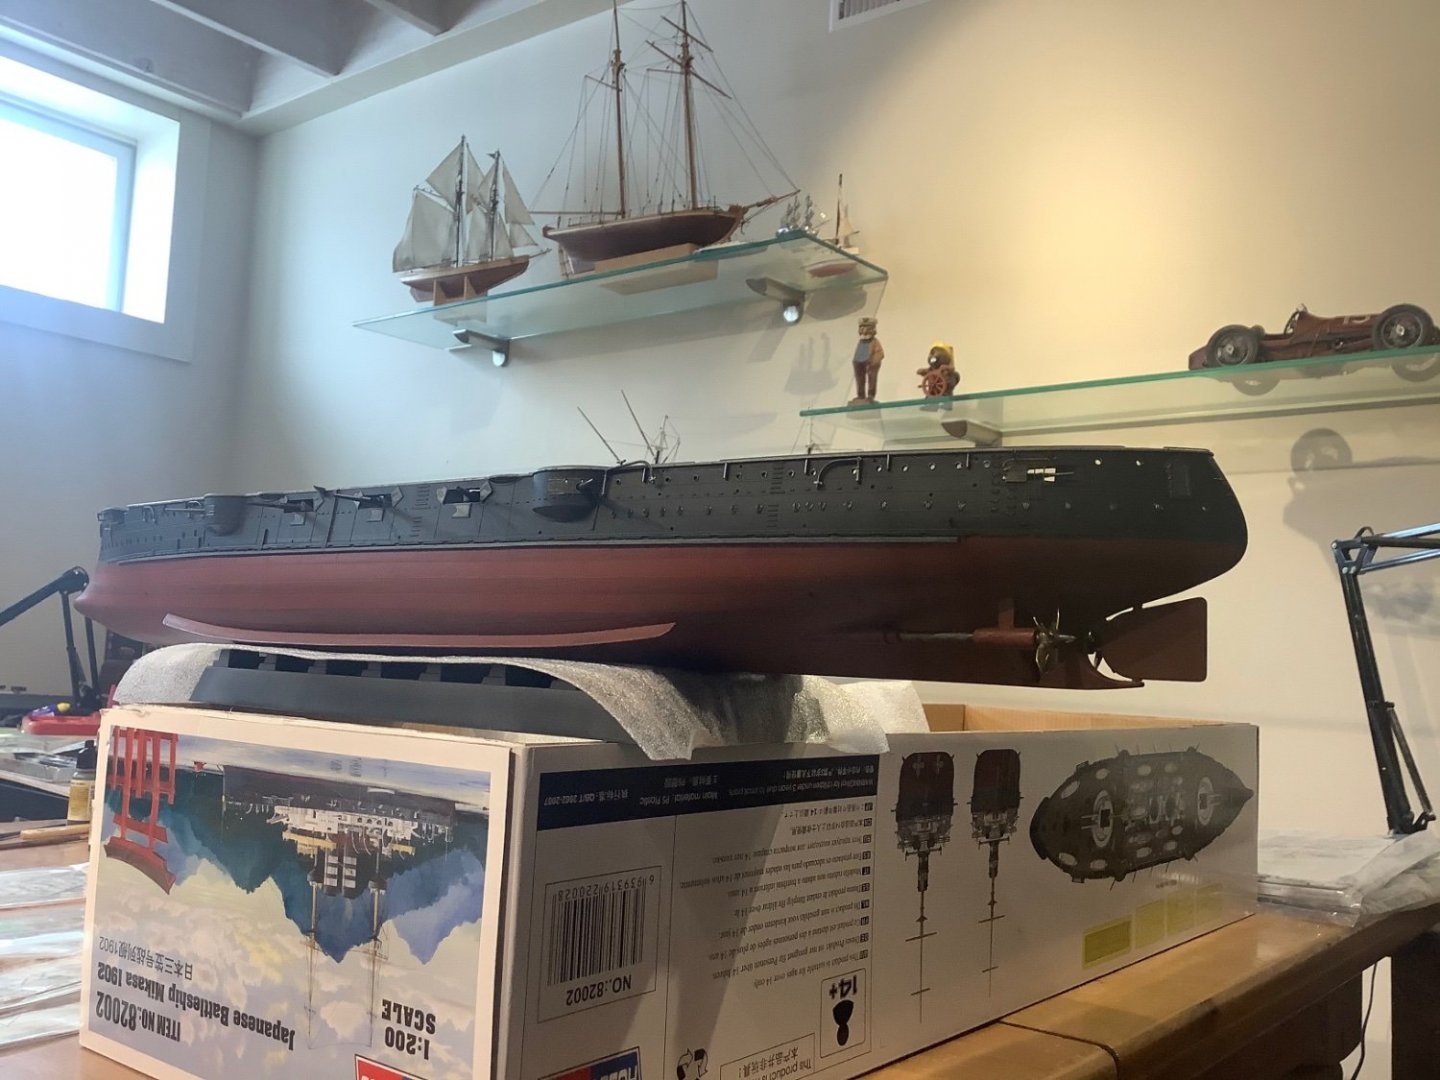
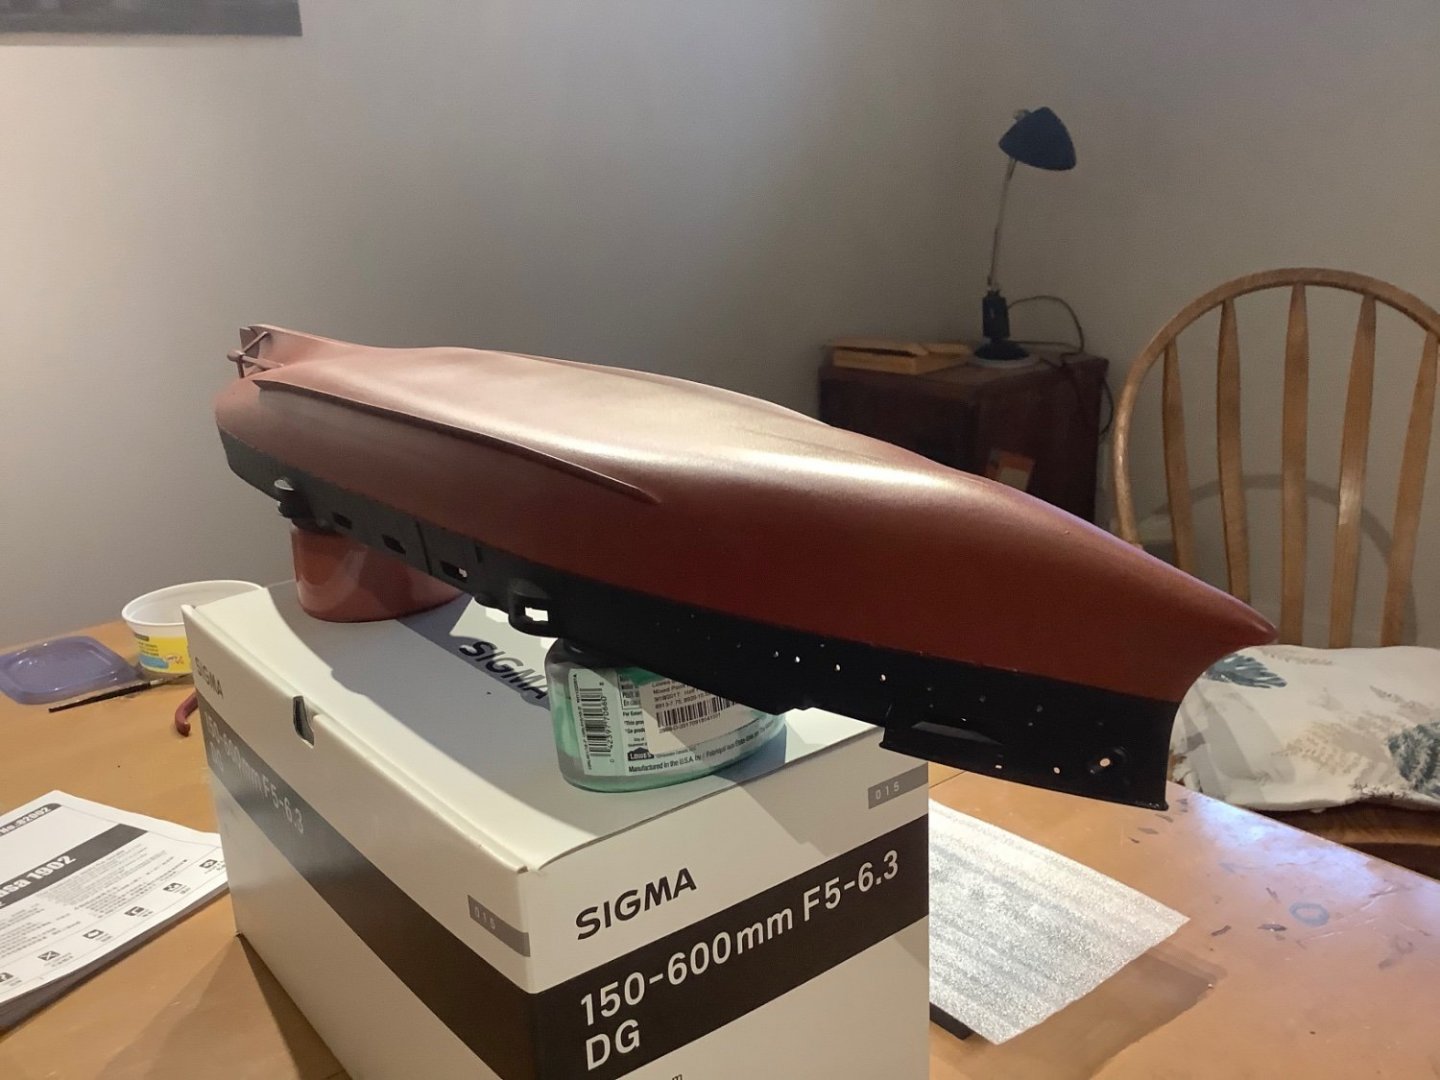
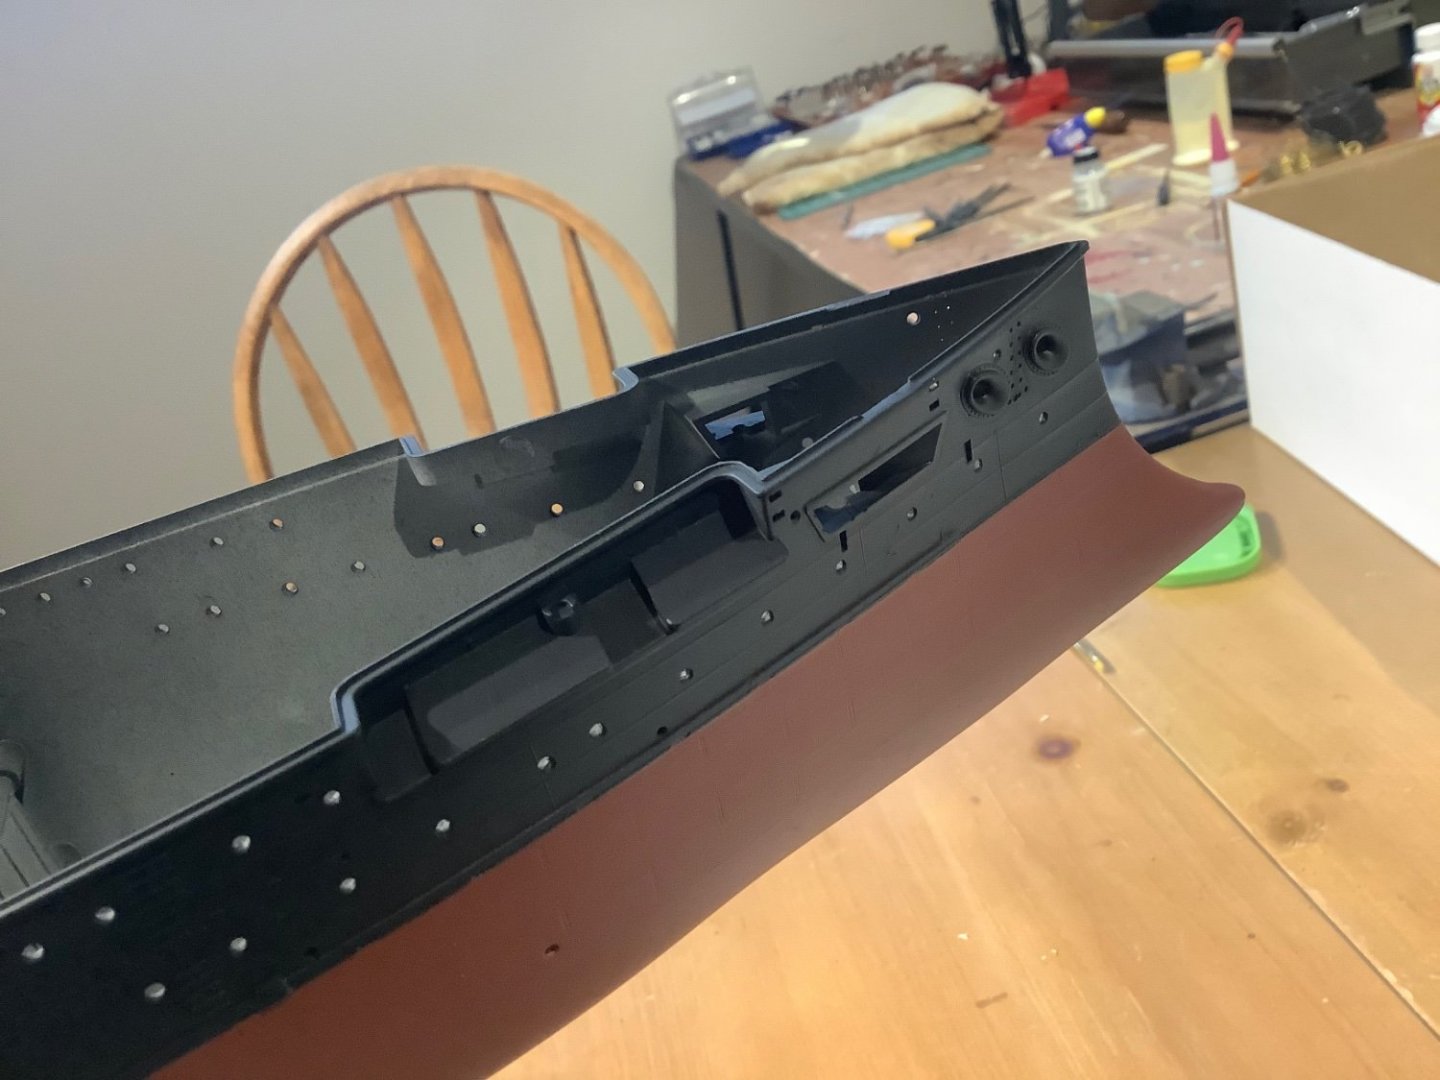
Progress: Delay waiting for supplies, paint etc and due to various domestic duties but I’ve punched back in at shipyard now. The 14x6inch guns are all done and look mighty good I have to say. I’ve removed all the hull detail to allow for the Pontos upgrades, pre painted the base hull and finished with a satin acrylic topcoat to fix it. I will be applying most of the brass detail after bluing to add realism and retain a metallic patina. I’m hoping this will give the model an interesting texture and visual appeal, retaining all the Pontos complexity. I scribed the lower part of the hull to etch in a series of plates before painting, which I wanted to do in a white grey tone originally. Didn’t really care for how it looked, a bit too dramatic for my taste so I sanded it down and reluctantly went with the traditional red oxide. The plating is much more subtle now, although not sure it shows as well in photos as it is in reality. I’ve gone for a true black above the water for contrast with all the later fittings. It all looks a little stark at the moment but when all the detail and weathering goes on it will be a different kettle of fish. Kit Musings: After looking through the Pontos box it all looks like a piece of cake and I should be launching this Mikasa by about mid century. My plan is to do most or all of the attachments on the hull, and then set that aside and work on the deck and superstructures, and only marry the two much later in the build. If any of the Mikasa alumni are reading this and know of a flaw in this strategy please let me know.


- 62 replies
-
- 17
-
-
-
Thanks Alan, you are so right about the angle. You get it perfectly straight, and then look at it at another angle, make another adjustment….and then repeat about 30 times until you realize you probably had it right the first time.
-
Hi Ken. Thanks for comment, yes I’m going to be using most of Pontos, adapting some. it’s just an illustration of the quality of this base kit; a builder can make a really nice product even without the add ons. The upgrades are like a hundred extra little model kits in themselves.
-
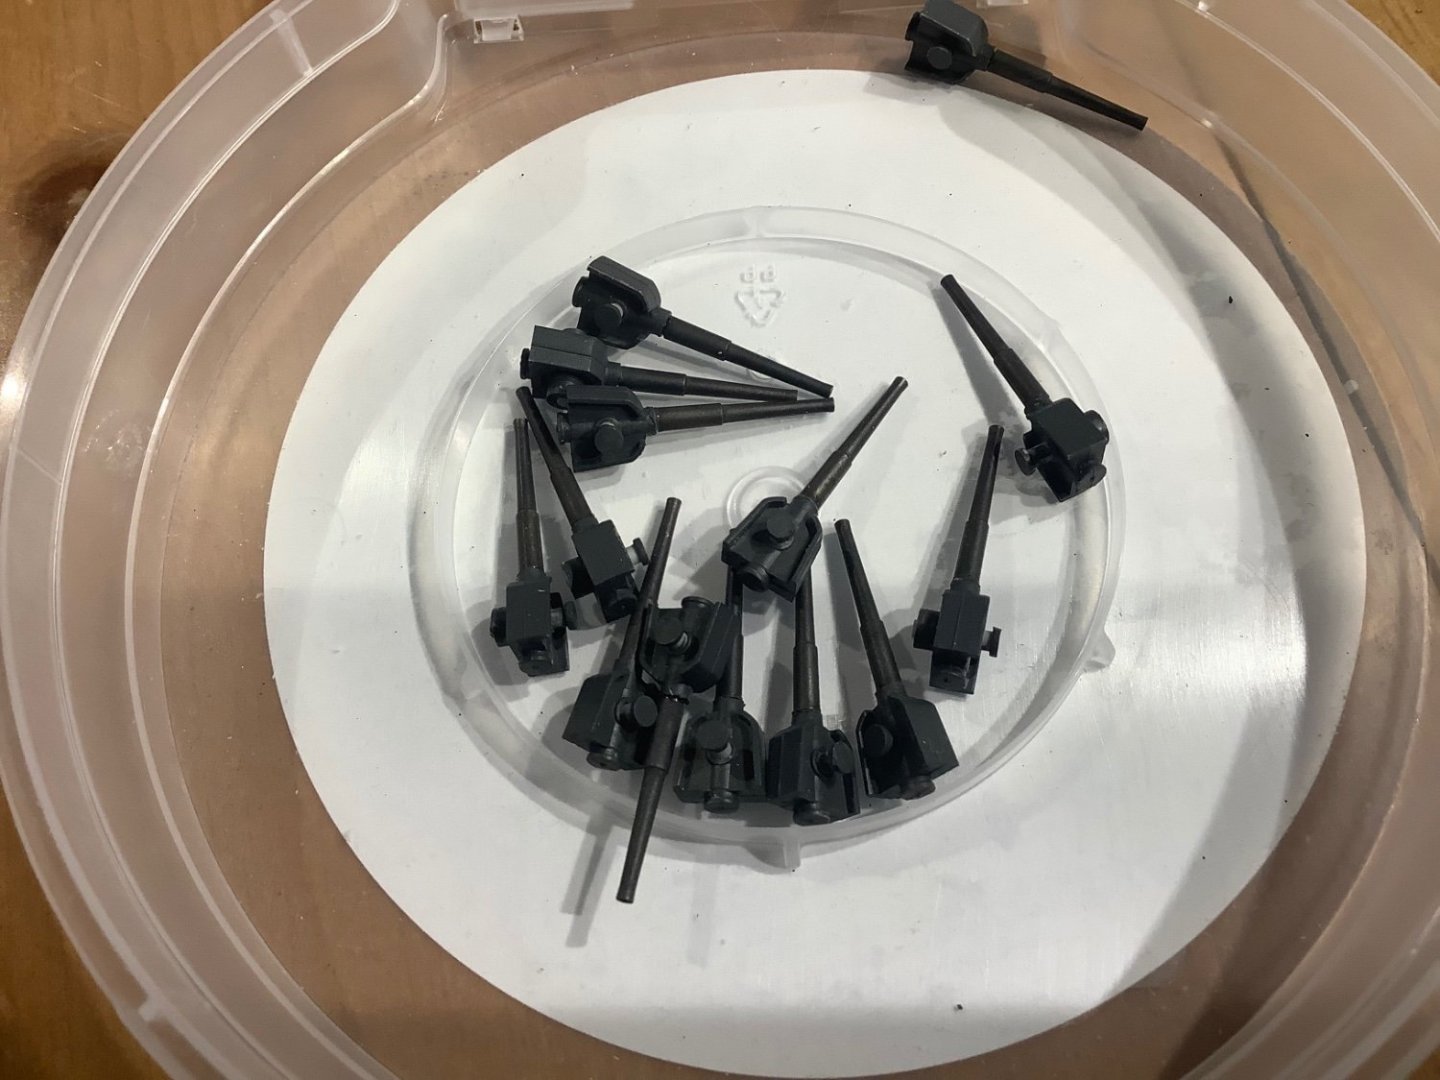
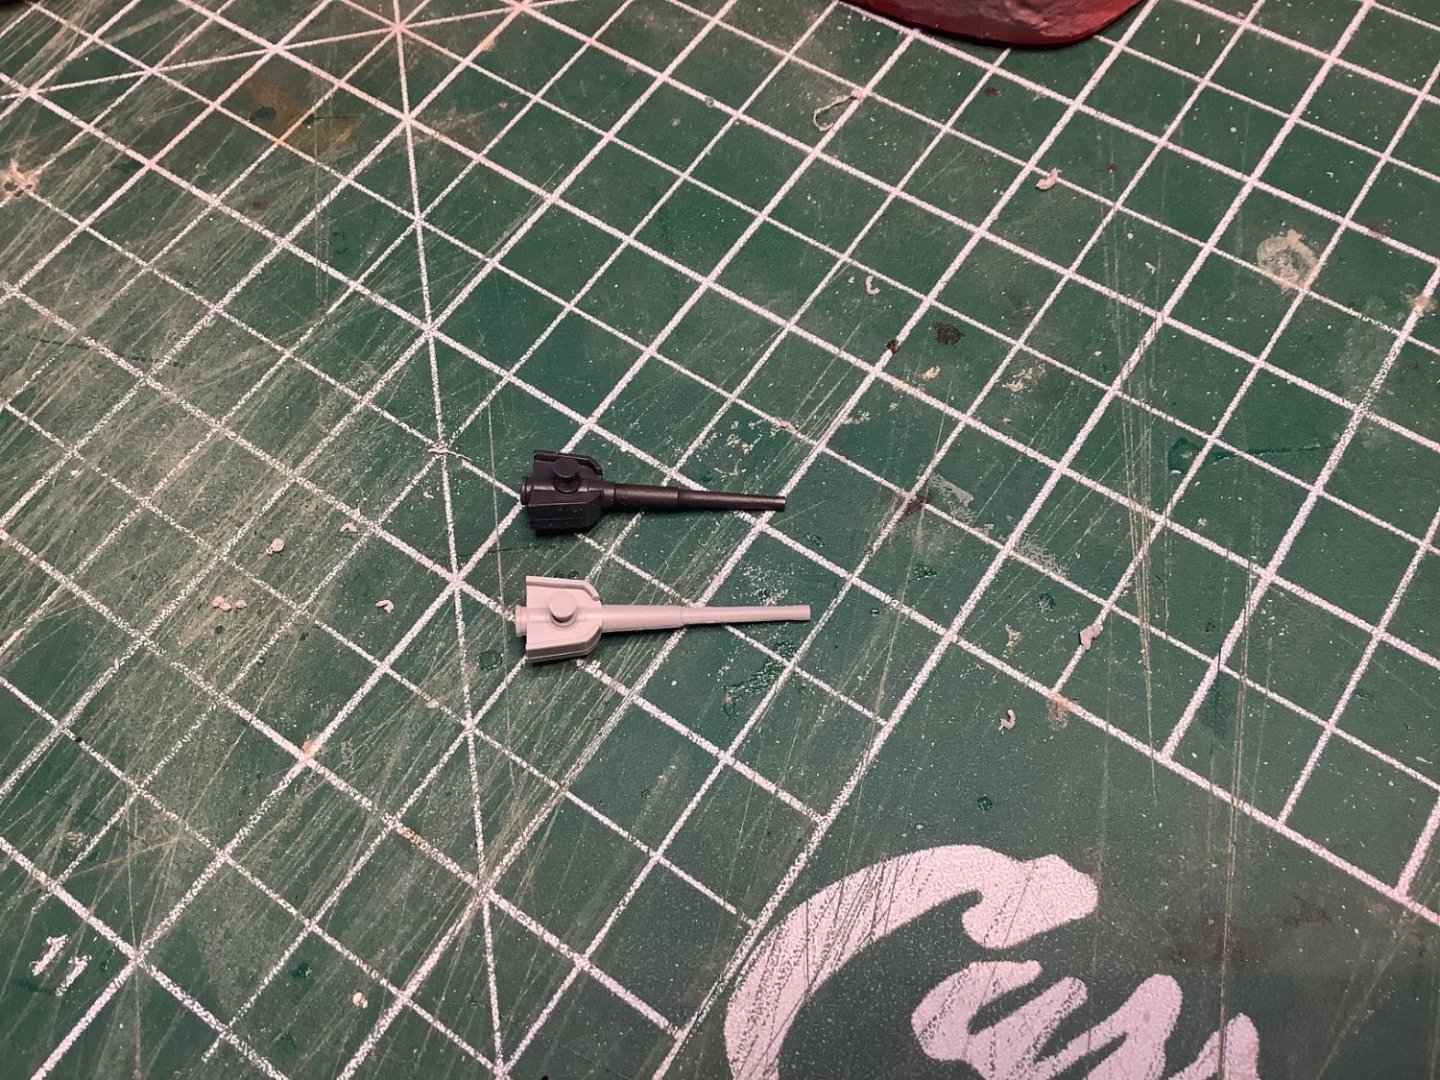
Since the goal here is a super detailed gem of an old imperial battleship, I think the first thing I will do is perhaps a little subtle texture on the lower hull. There’s lots of detail above the waterline but it’s featureless below. Some primer is now on but that will have to harden up a while before I can do much with it. In the meantime, I’m playing with the 6” guns. There are 14 of these that poke out through the hull. The kit already provides a very nicely done version. Pontos gives you the option of going to the trouble of cutting off the perfectly good plastic barrel and replacing it with a smaller brass one. I see two good options here. Option 1 is the most sensible, and is to just go with the kit as-is and airbrush everything with the gun installed on the hull, which I think will look excellent. Option 2 is to do the Pontos brass barrel replacement to possibly minimal benefit at the end of the day. So naturally that’s what I’ll do since it’s Covid year 3 winter and, like what else is there to do. I’ve left a short stub on the plastic to give the brass a little extra reach, which to me looks more like the real ship was. I’ve used my bluing process to chemically turn the brass into the subtle patina of an actual gun, as opposed to paint. So I will make these all up like this, but then I will have to install them after the hull is fully painted. This shouldn’t be a big problem since I don’t plan on fixing the deck down for ages yet. The photo below shows the two options, so you can be the judge if all this will be worth it.


-
Jeff: I’m just looking through the Pontos bits and pieces. And I do mean bits. I’m gaining an appreciation for your microscopic efforts on this Mikasa.
-
Hi Darren I use a paasche so thought I’d try and help. Firstly yes the nozzle is all there, this is a good higher end brush. The knurled bit is part of the air supply hose and stays put there on its swivel fitting. The airbrush starts at the top of your red line. You should be able to lock the knurled end of the hose and screw off the fitting counterclockwise, wrapping some tape around fitting and gently using two pairs of small pliers if you have to. Don’t damage the rubber o ring in doing this. A touch of wd-40 on the thread will resolve matters if it’s really stuck tight. Forgive me if I’ve misunderstood your issue but I think that’s what you are asking about.
-
The ‘Pontos upgrade kit’ showed up today after making it through the Byzantine Canadian customs machinery and all their infuriating last century processes and handling fees. Great value is not the first thing that comes to mind when I look at what is there and it’s final cost, but I suppose there’s a limited demand factor at play here. So descent into the madness of super detailing can begin.
-
I’ll just put a placeholder down for my next construct, the Japanese pre- dreadnought Mikasa which just squeaks in this file category being circa 1902. Something new for me as my only other plastic boat effort was a Calypso many many years ago, a hack rush job on my part I need to atone for with the plastic gods. I got this Hobby Boss kit from a Canadian supplier. It must be the same product as various others of this ship under different labels (Trumpeter etc.). First impressions. Compact size. Good value. The plastic is really, really good. Highly detailed, workable, not brittle, and a real mother lode of part complexity. I’m almost questioning my judgment in getting the pricey Pontos upgrade, I think I could do a lot out of this box with some good detail painting and a few of my own bits of customization, but we will see. I ordered the Pontos at the same time but it is still between me and the supplier in the U.S.. No doubt marooned somewhere in the gears of the Canadian customs bureaucracy and postal system. Just poking about tentatively while I wait. In an hour and a half I have a hull with portholes and a deck! The fit is amazing. With wooden ships I’m a month and a half of planking to get here. Gives me something to look at while I ponder what to make out of this kit in terms of an overall assembly, painting and presentation scheme. I have a construction project starting in about a month, so I’ll just be making a start on this over next few weeks, I expect this Mikasa will be with me awhile.
- 62 replies
-
- 17
-
-
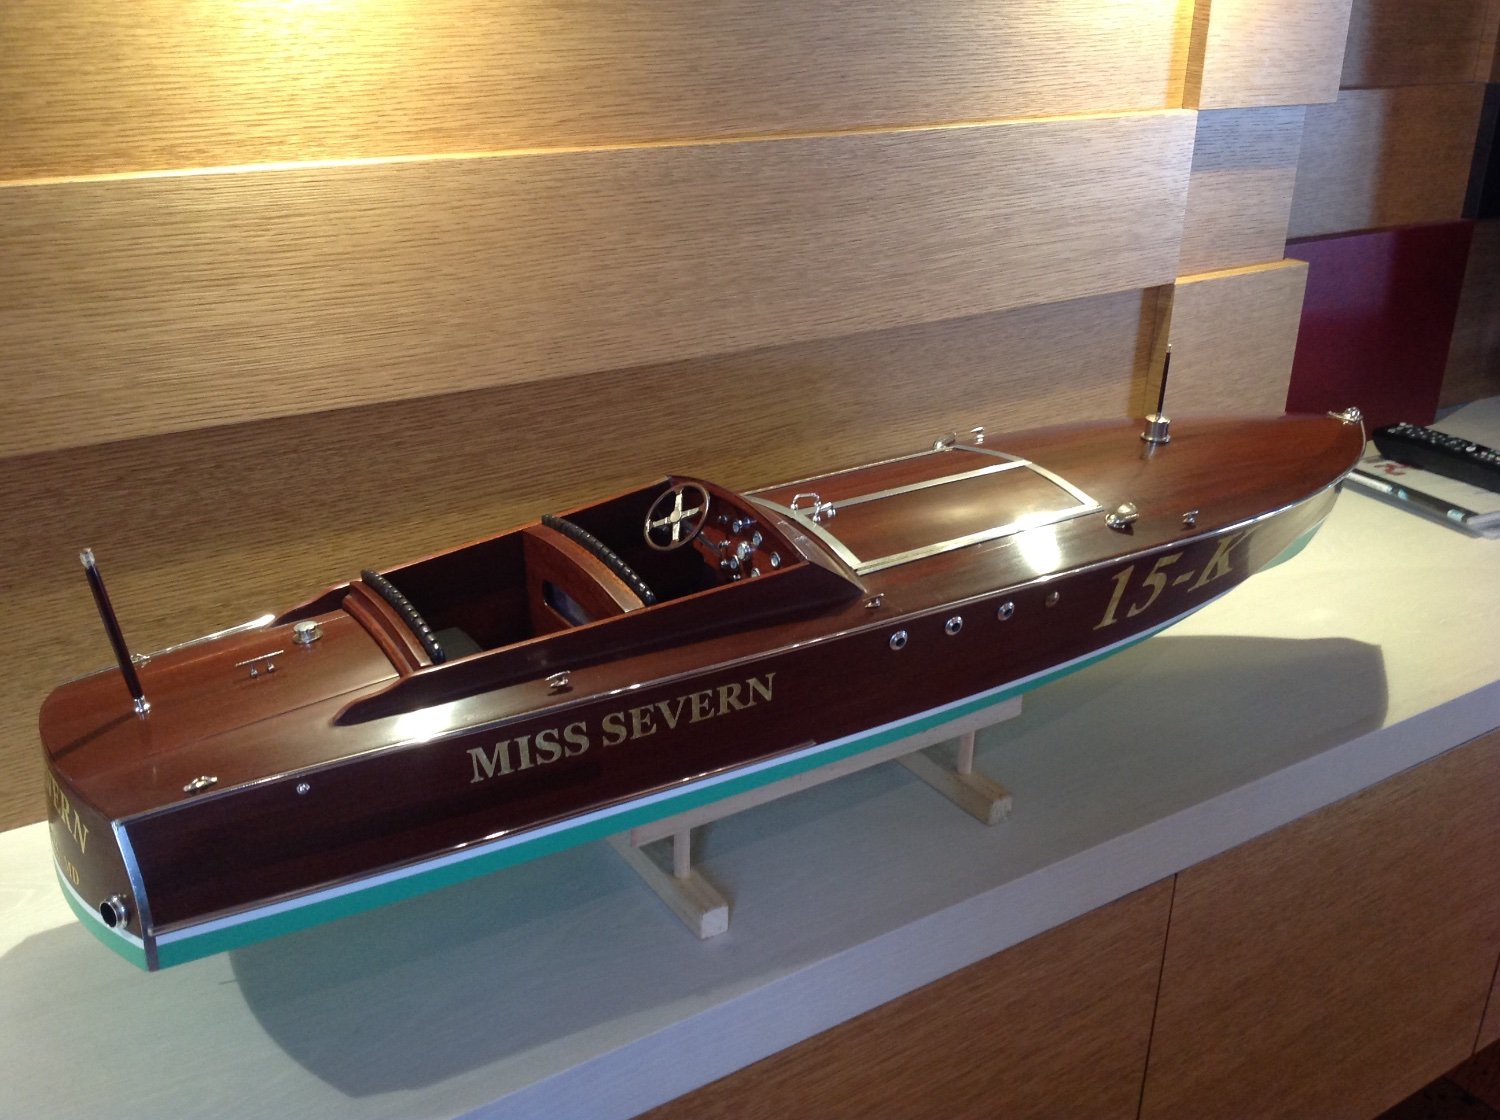
The finish process on my Miss Severn was a bit involved. It first had several coats of finish-cure epoxy thinned with xylene to waterproof it as it is fully motorized for performance use in water. Not a suitable process for the dining room. You don’t need that step if it is a display model. The final finish was achieved by 4 coats of carefully brush applied Helmsman spar varnish, satin, using 400 paper for between coats and then 600 paper after last one. It is then left for at least a week to fully dry and off-gas. This is VERY important. After that it is wet sanded using 600 and 1200 paper. After leaving that to totally dry again for several days, I used a buffing wheel and guitar polish to give a final perfectly smooth mirror like finish. 5 years on it still looks perfect.
-
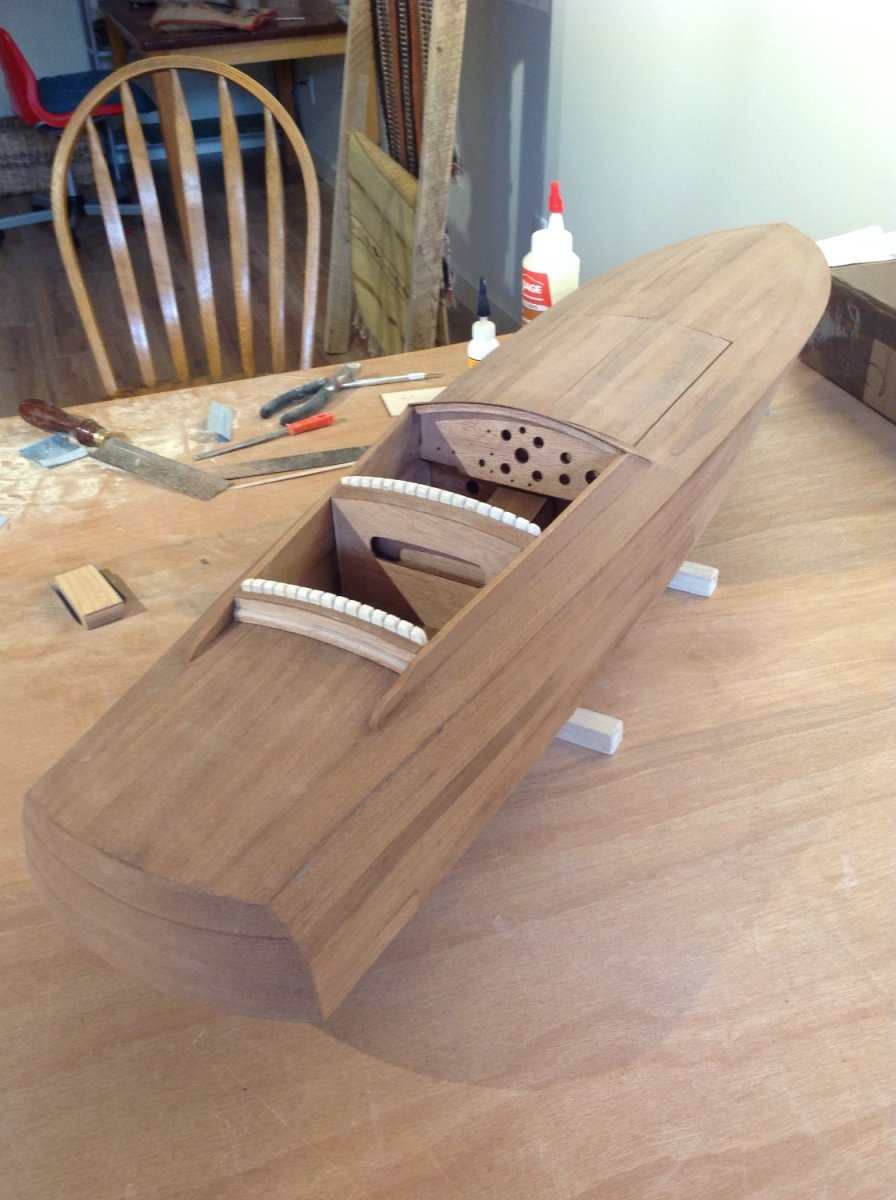
Hi Randy. I’ve built similar mahogany runabouts. This is how I would approach this. ideally, you would remove the side planking and redo it, starting by butting against the bottom planking and going up to the deck. Start at the stern and proceed gluing the planks forward from there. The last few planks will probably not run the full length to the bow, that is normal. Attached is a picture of one of my boats for reference. if you can’t remove the side planking, you can overplank the same way, starting from the bottom planking and going up. The top edge of the side planking at the deck can be covered with a chrome trim if you can’t get a perfect looking joint, since many of these boats have that detail anyway Good luck with the repair! Tim