
robert952
-
Posts
922 -
Joined
-
Last visited
Content Type
Profiles
Forums
Gallery
Events
Everything posted by robert952
-
 Super looking model. Great job. What's next?
- 32 replies
-
- 1
-

-
- Grand Banks Dory
- Model Shipways
- (and 2 more)
-
Thanks. Also interesting to learn about side related issues like lobster scales and lobster traps.
- 44 replies
-
- 3
-
-
- maine peapod
- peapod
- (and 4 more)
-
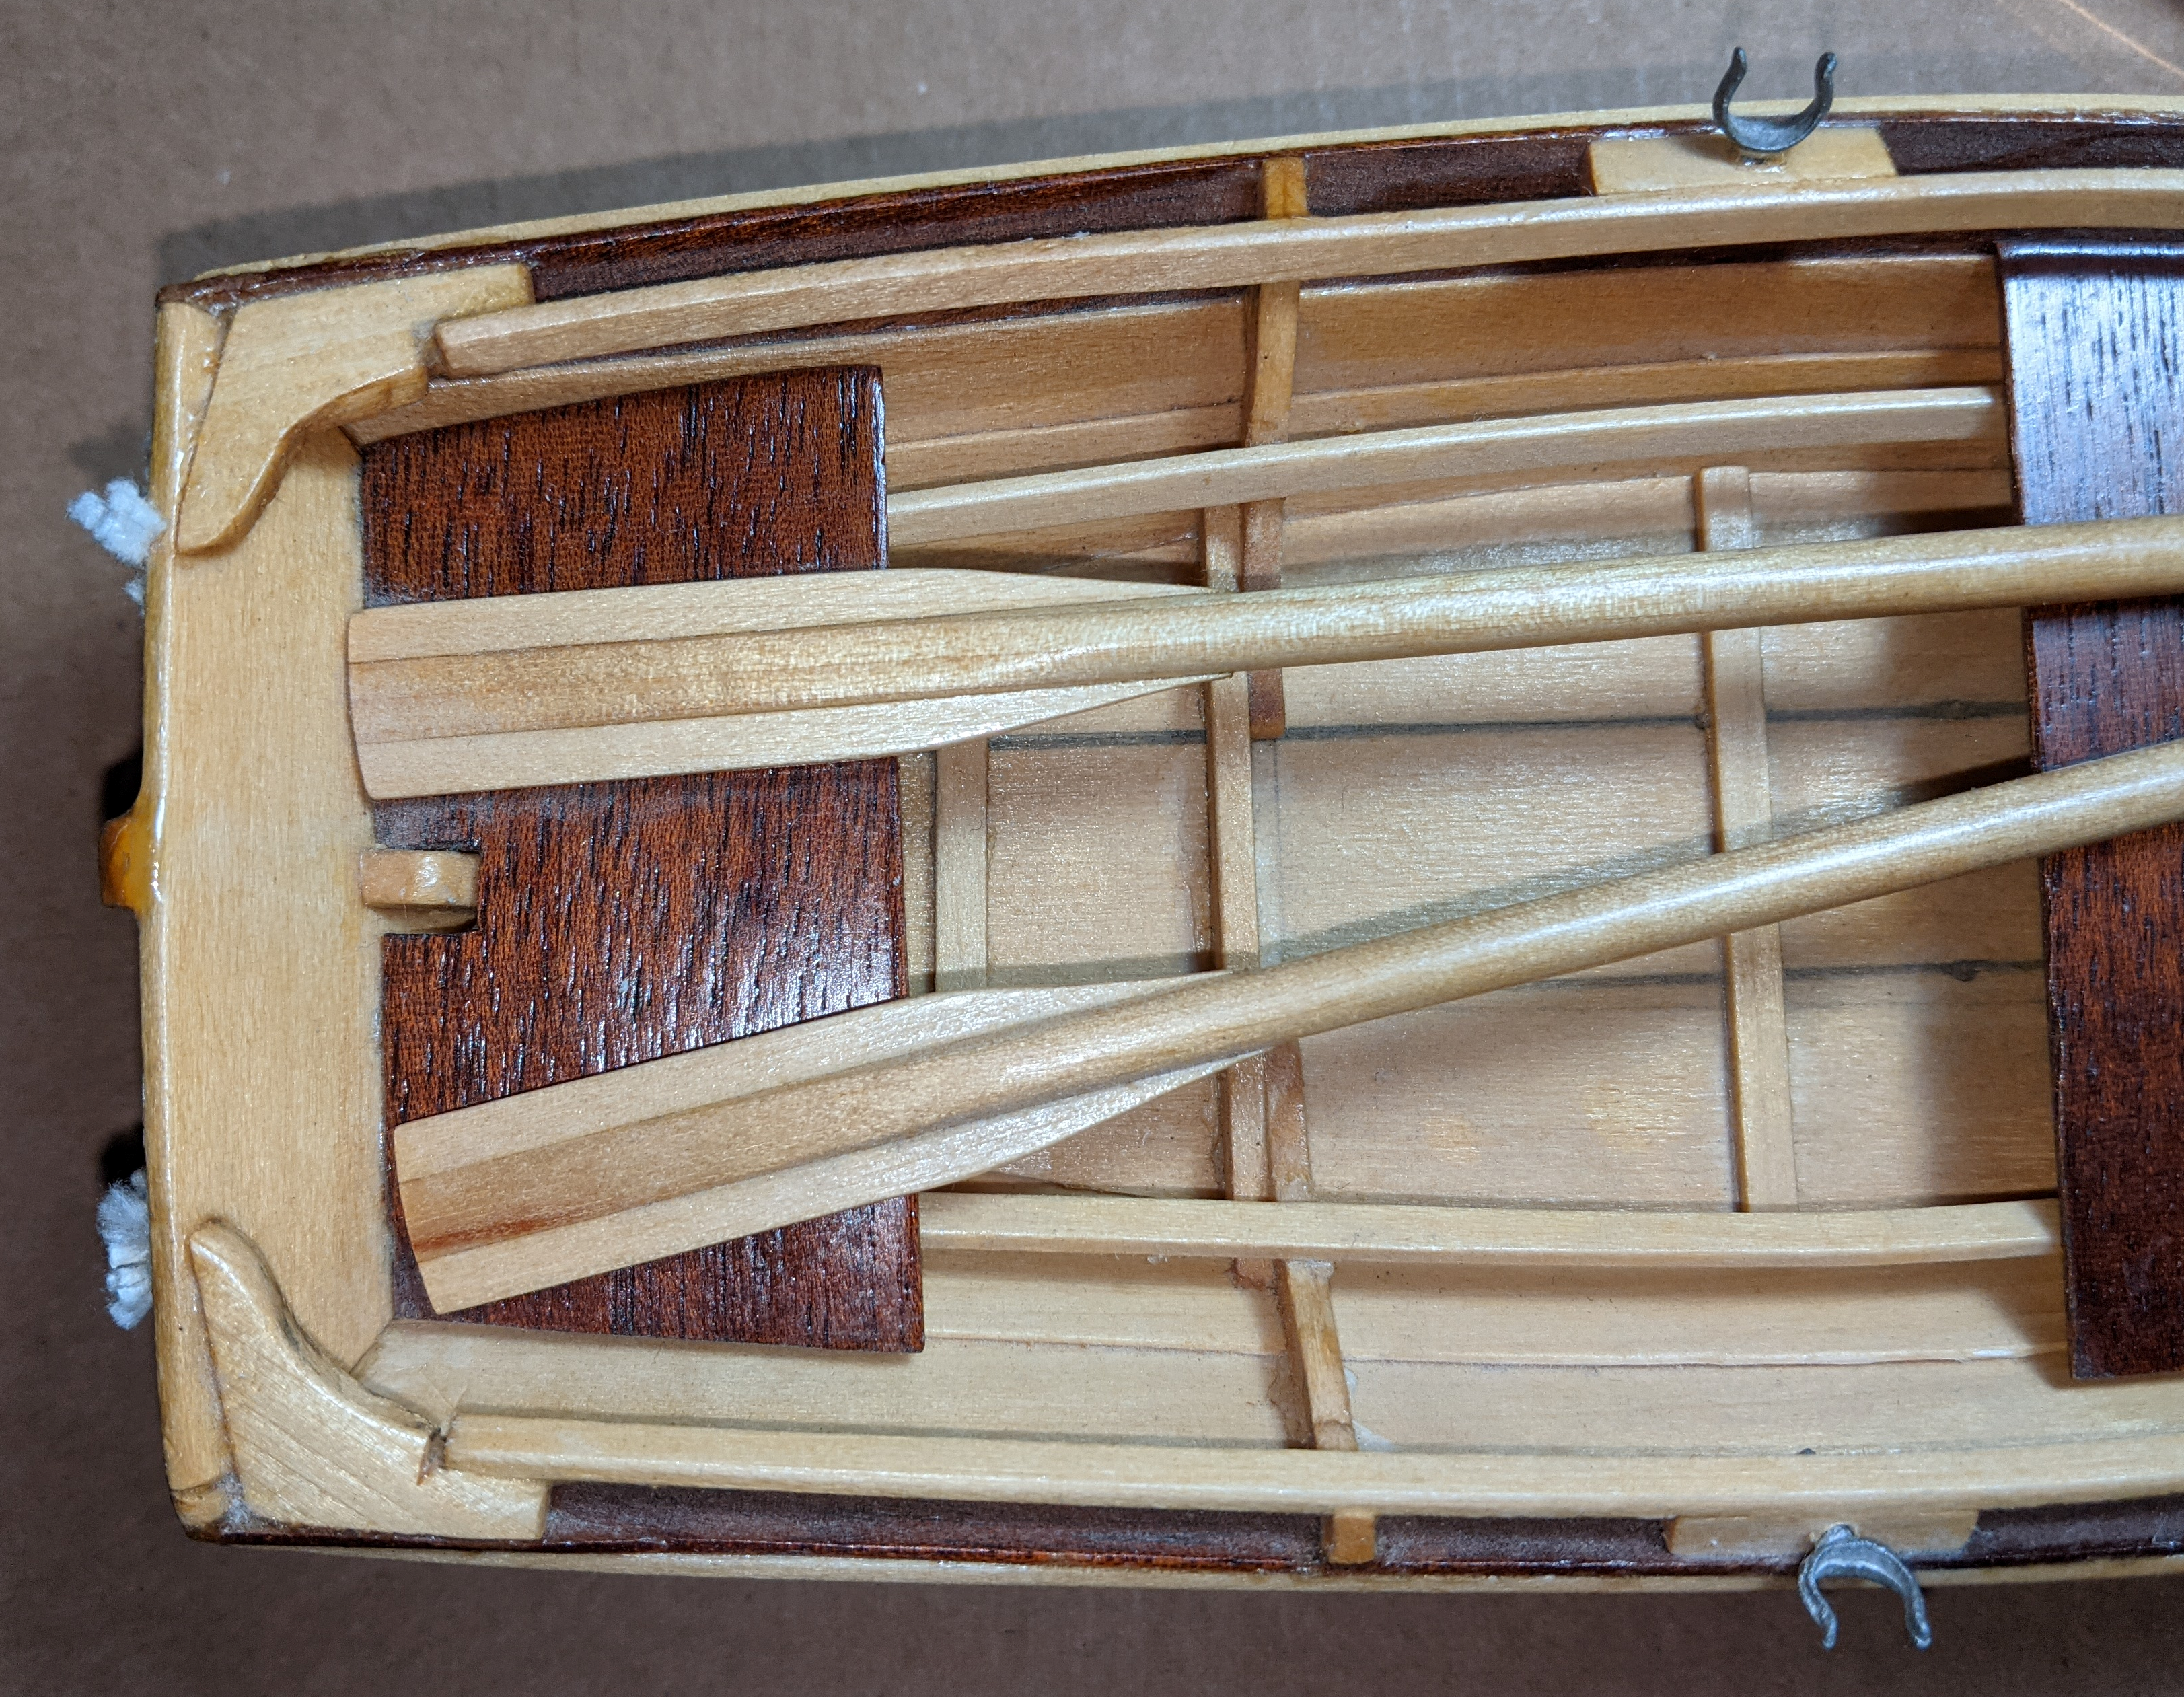
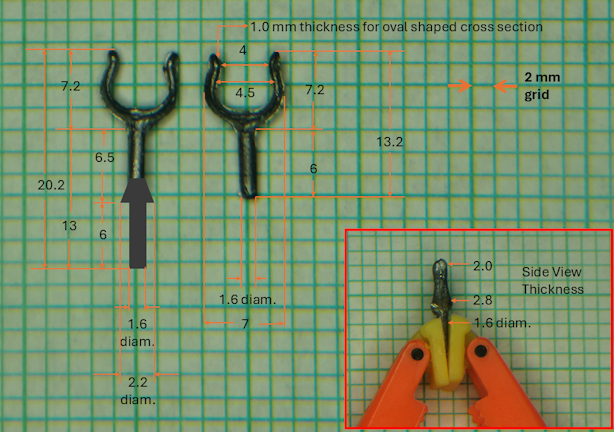
Risers and Inwales installed Once I got back to the bench (RL and all that) it didn't take long to install the risers (and inwales). I put a tick mark on each rib, soaked, shaped, and clamped the planks in place and waited for them to dry. A 'spot' of glue at each tick mark and clamped the planks in place. The instructions say to install the seats at this point. However, I plan on painting before the seats go in. I could be wrong but I think the task using an airbrush will be easier without the seats in the way. I went ahead and installed the inwales using the same process. I'll do some sanding to even up the inwales with the hull; only one small area is out of kilter. My painting plans are to do some cleanup at some of the corners, apply a sanding sealer and get the model ready for airbrushing. Of course, as I write this, winter storm warnings are out. So getting out to the garage may be a few days until we get back to normal temps (around 58 F this time of the year). However, I've other things I can work on. Like new seats and the rudder. And the lobster trap and the oars, too. If I make a custom color, I will likely paint the knees and seats before installing them to make sure the seats match. (Of course, it may be interesting if the seats were a different color.) Speaking of seats, I do have to make a new seat for the bow. Maybe a new bench seat, also. Here is a shot of the seats supplied in the kit 'dry fit' in place. When planning on the sail, I saw several images of small boats with a mast step similar to what I have in place. They use a deck or seat with a hole lined up over the step that helps support the mast. I will make a new seat to replace the kit supplied part to extend over the mast step. Using the original as a starting pattern, I will extend the bow seat to the red line below. This reduces the space to the first bench so I will probalby move that back a bit. Since the seat was die cut to fit snugly in place inside the hull, moving the seat means it doesn't sit on the risers. But, the shape is easy enough to duplicate a bit larger. As a side bar of this model... I have started thinking about a 'tool box' for the boat. After all, it's all in the details. I will likely make an 'orange crate' to put in the boat. Inside this box I will place the oarlocks, fashion a lobster guage - more on that when I get to that modeling that; a knife and maybe another doodad or two. The type of things anyone who has been fishing would have on their boat. Also, I will make a gaff hook that would be used to pull traps out of the water. Regarding oarlocks, peapods were often rowed standing. To make that task easier, a taller oarlock was used. The drawing I use as my reference indicates both sizes of oarlocks. I figure it would be a nice detail to add. I asked my son to see if he can print a 3D model of these. To that end, I took photos of the oarlocks supplied in the kit; used my calipers to measure what I could and give an idea of what the extended oarlock would look like. Using the graph paper as my background provides a 'sanity check' as I put the measurements on the drawing. A couple of the measurements are an average between the two pieces. Well, enough rambling for this post.
- 44 replies
-
- 7
-
-
- maine peapod
- peapod
- (and 4 more)
-
Great looking model. Congrats on finishing it. I'm looking forward to following the sailing pram build.
- 28 replies
-
- 1
-
-
- Lowell Grand Banks Dory
- Model Shipways
- (and 1 more)
-
Thanks for the heads up. I am not sure if this comes into play. It likely will. So I thought I'd add my 2 kbytes worth. Several websites now require much stronger (hence longer) PWs. Many sites require ten characters (the recommmended shortest PW you should use). One website I go to requires 12 characters! The longer the better. Usually all require the obligatory lower case, capital letter, number, and symbol (ampersand, dollar sign, etc.). As I change passwords, I am switching to the longer ones. I do feel good when the computer tells me: "Very Strong Password." (We have to grab the little victories when they come.) For the other 'veteran' subscribers...and we know who we are... I got this idea from reading a novel: Use a phrase, saying, or favorite passage. Put in the required characters and other minor changes to fit requiirements. Examples: TwoBeorNot2B! (Thirteen characters.) Other variations: 2B_or_notTwoBe ; 2BeDoBeDoo! (OK, the last one is an out of box variation. Which is why something like this is not a bad password.) Another might be referencing a Bible verse: Gen#1_27 or 1_27Genesis! (Make sure it's not guessable by your friends or relatives - or on a bumper sticker on your car.) Still another: Complete sentences: Itwas-thebestoftimes-Itwas-theworstoftimes_345! (a whopping 46 character password! Think how impressed your friends will be when they see you type in THAT long of a password. They'll not question your memory again. (OK, you do have to remember which words you capitalized and the actual numbers you used, but you have a fighting chance. ) CallMeIshmael#1 just popped into my head...easier to remember? Or Maryhad1LittleLamb! Poems also make for good lines to consider. Whatever you can remember that has a lot of characters. And for the record, I just made these up as I typed this. I don't use any of the above. But one time I did use: ThisismyPassword_therearemanylikeIt_butthis1_ismine! (52 characters. Note cap I in the middle - a good thing to do is put a capital letter somewhere within the password.) And there are some websites where I do not let my browser keep my PW 'on file.' I am just paranoid enough to do that. But the ones I use are more easily remembered passwords. I hope all this helps simplify the remembery of PWs for you and inspires you to come up with a unique password.
-
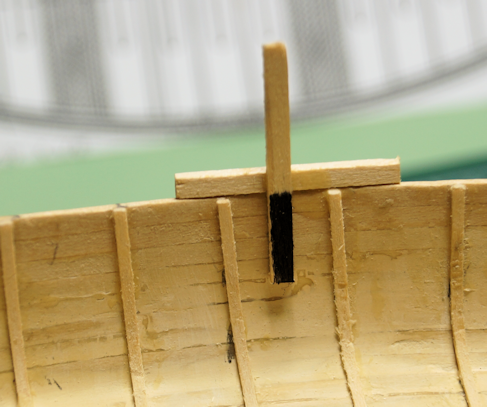
Floor Boards and Mast Step in place. Short post tonight. I put the floor boards in place. It wasn't until I took the photo that I saw how far off I laid the boards. I lined them up with each other and didn't check their alignment with the center line. Live and learn. I also made and installed the mast step. Not part of the original model. It took me a couple of rounds to get one that I was happy with. Did a lot of sanding to get it to fit into place Because of error on the floor boards, I made sure the step is more inline with the stem. Next up in the instructions: installing the risers. The instructions say they go 1/2 inch below the top of the hull. I made a quick measuring tool so that I can mark position. I can set the horizontal piece, on the hull and mark at the bottom black section. That may give me a fighting chance at keeping it in proper position. As with other planking, I'll soak the wood and bend it in place. Once they dry, they will get glued in place. I will probably do the inwales at this point.

- 44 replies
-
- 7
-
-
- maine peapod
- peapod
- (and 4 more)
-
A guide to using MSW
robert952 replied to James H's topic in Using the MSW forum - **NO MODELING CONTENT IN THIS SUB-FORUM**
I agree with @palmerit. I always advised my colleagues to use Google and not our intranet web site to find stuff. Ironically, we were using the Google search engine in our public websites and intranet. -
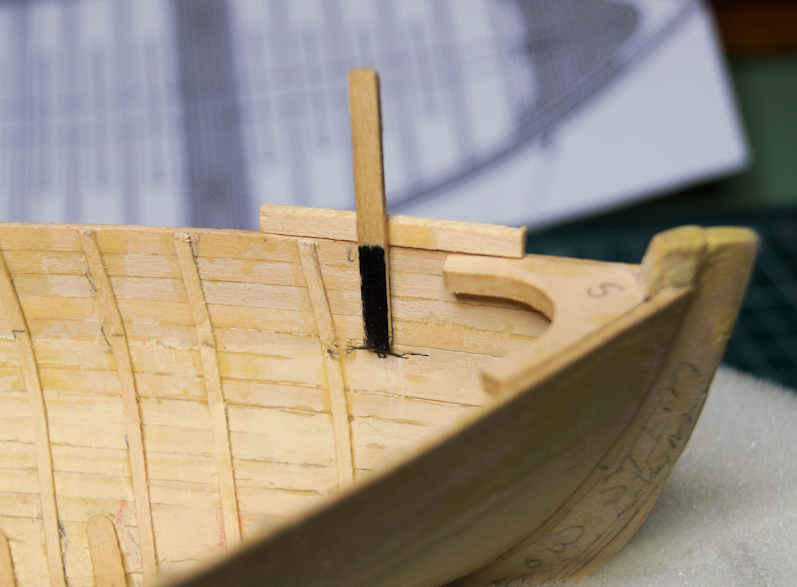
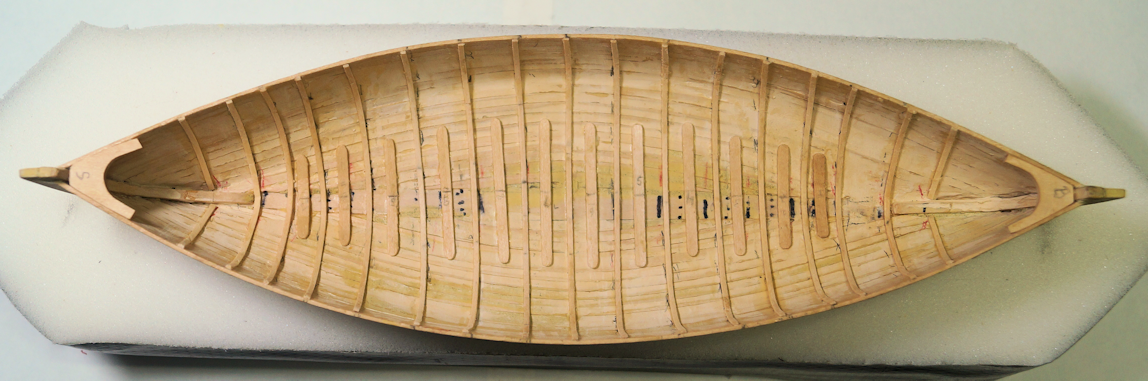
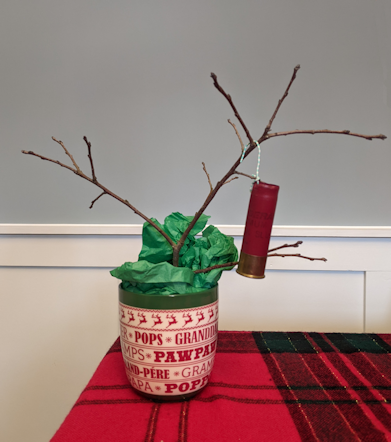
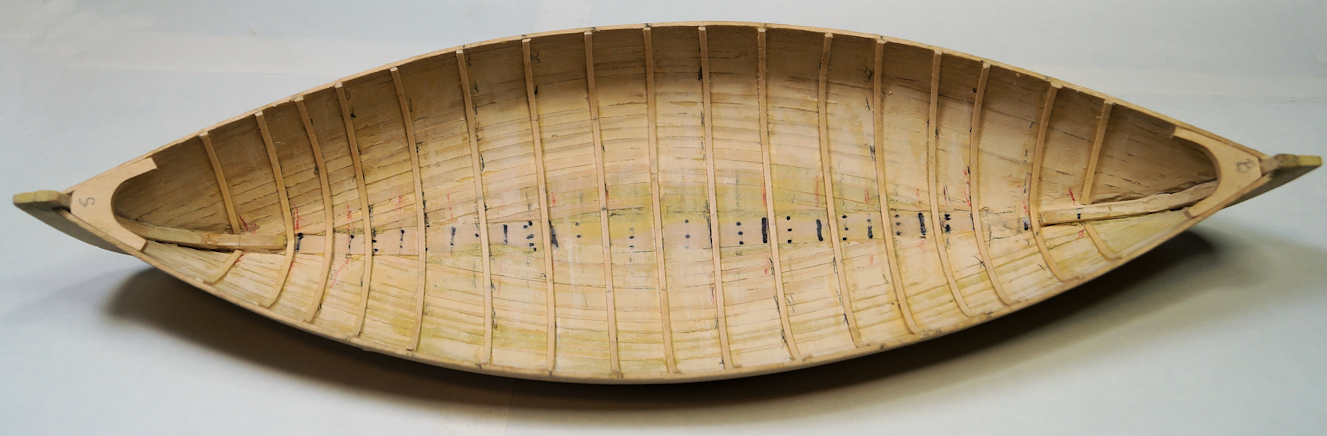
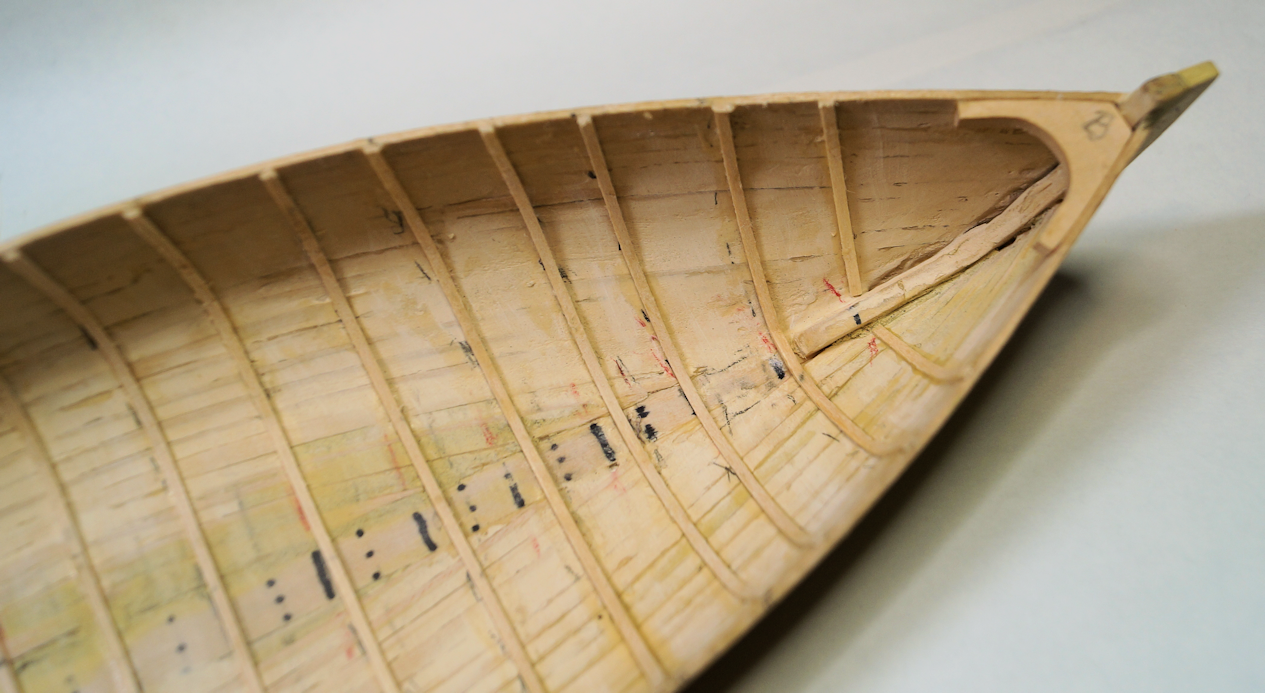
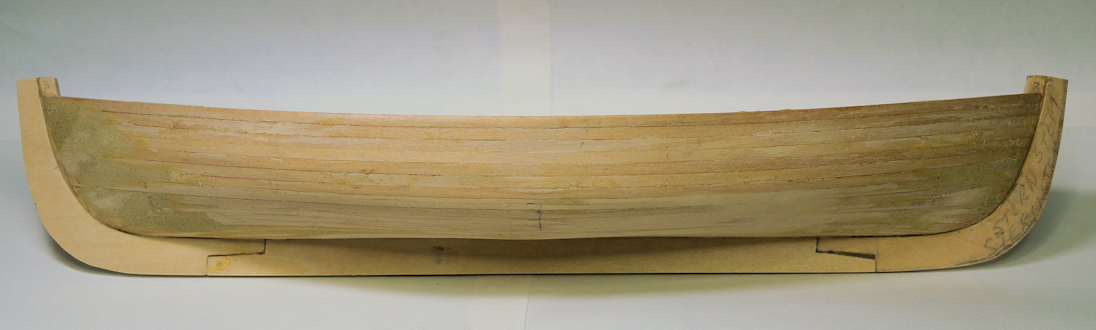
Breasthooks and Ribs in place In between putting up my Christmas decorations... (A cartridge in a bare tree) ...and celebrating Christmas with parents, sibs and in-laws, I have managed some time at the workbench. The breasthooks needed some sanding and beveling to fit; I did not have any problems with those. Here's the bow piece: (Note to self: Clean up that stem joint a bit more before you paint it.) The instructions show installing the ribs from one end to the other. I chose a different path. I found the midship line and started in the middle. I made several measurements to help insure the distance to the ends of that rib were the same distance from one stem. They still ended up ended up a bit of center but not too bad (about 1/16 off). I then used dividers and marked each of the other ribs' positions with a line parallel to the previous and worked towards the stems; one rib at a time. I used the same method as before on the planks: soaking the wood in hot water; clamp it in place; and after they dried, I glued them in place. Took a bit of time over several days to get them all installed. On other build logs for this model, I read that keeping the ribs parallel and straight proved to be challenging. I concur. The end product is off a bit on some of the ribs. However, as others have stated (and shown with their finished models) the seats and inwales can reduce the effect of those ribs. I am pleased with the results of my work. Below the ribs are in place, trimmed and sanded to the sheer. At the bow (right end in photo in above) I did 'fudge' the locations a bit. I will need to add the mast step between the second and third (from the bow) ribs. A bit closer look below. I just hope that paint will cover all my markings. Shouldn't take more than 20 or 30 coats. 😉 Maybe less. I plan on using a sanding filler to have a smooth surface for painting. So, it shouldn't take but a couple coats. 🤞 Next up (probably after Christmas) installing floorboards, mast step, and risers. I will likely cut a redesigned bow seat during this time, also. More on that when I get there. I have to decide to when to paint the hull: after the risers or after the inwales go in. Not sure which, but definitely before the seats get installed. Merry Christmas and Happy Holidays to all.
- 44 replies
-
- 5
-

-
-
- maine peapod
- peapod
- (and 4 more)
-
Back in Jan. 2022, Chuck Bauer was the speaker for an NRG Online Workshop titled 'Stategic Detailing.' At the start Chuck pointed out reasons for adding details to a model as: "Improving the visual appeal of the model, adding historic accuracy and differentiating it from others." Your observation confirms I am hitting his bullet points. I appreciate your comment and observation. Thank you.
- 44 replies
-
- 2
-
-
- maine peapod
- peapod
- (and 4 more)
-
I had a few spare minutes this afternoon. I trimmed and sanded the keel and stem pieces. Still have to fill the scarf joint and a few other areas. However, I wanted to post this quick update. It's starting to look more and more like a boat.
- 44 replies
-
- 3
-
-
- maine peapod
- peapod
- (and 4 more)
-
Congrats on finishing the model. Well done model.
- 18 replies
-
- 2
-
-
- grand banks dory
- BlueJacket Shipcrafters
- (and 1 more)
-
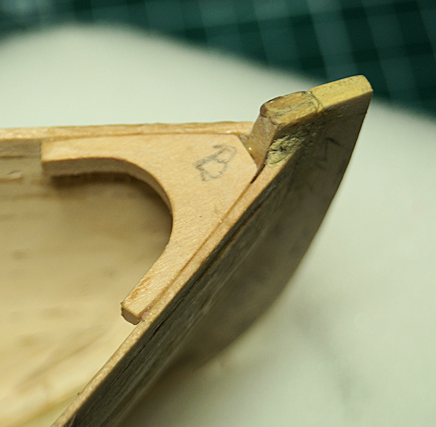
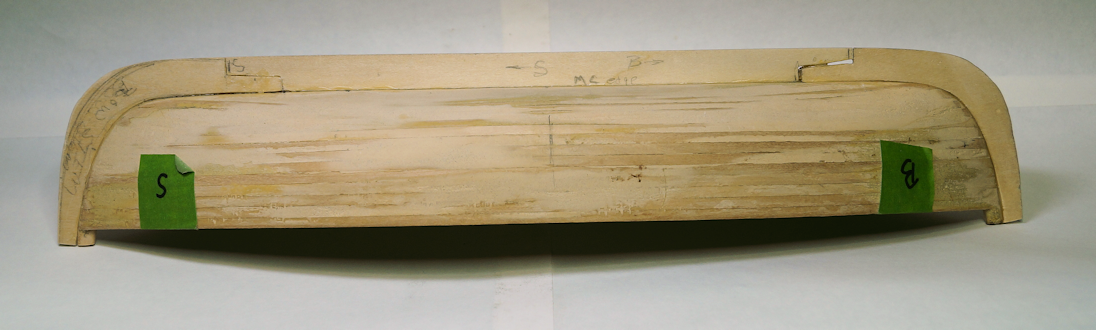
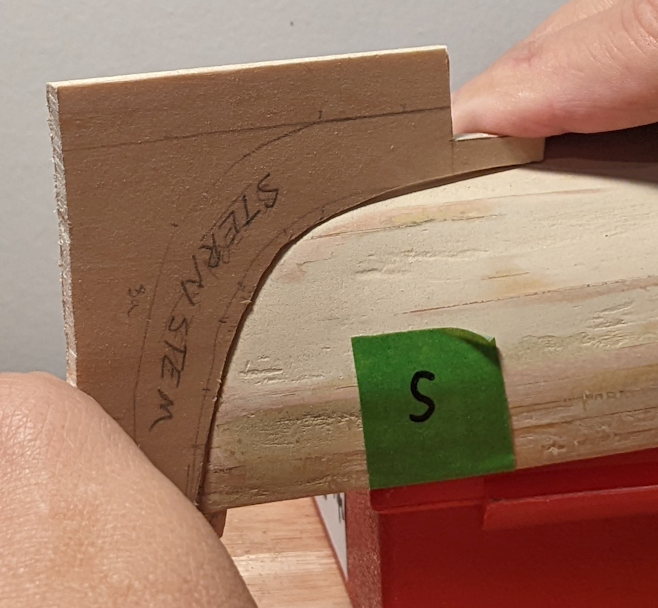
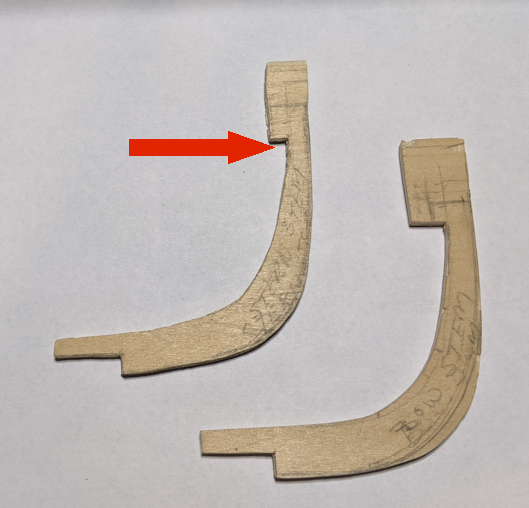
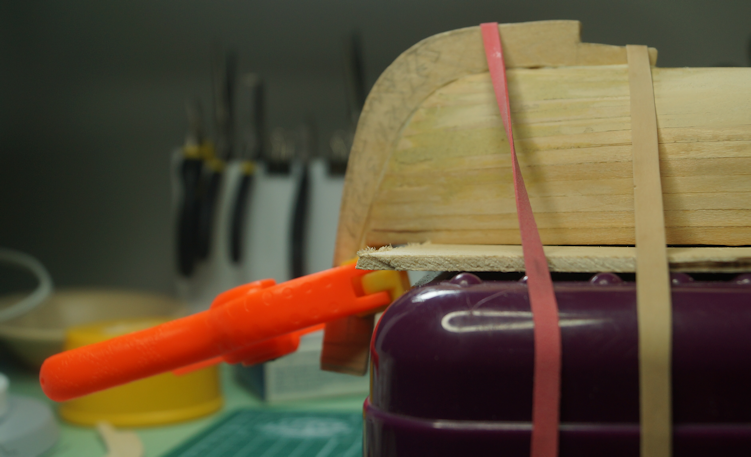
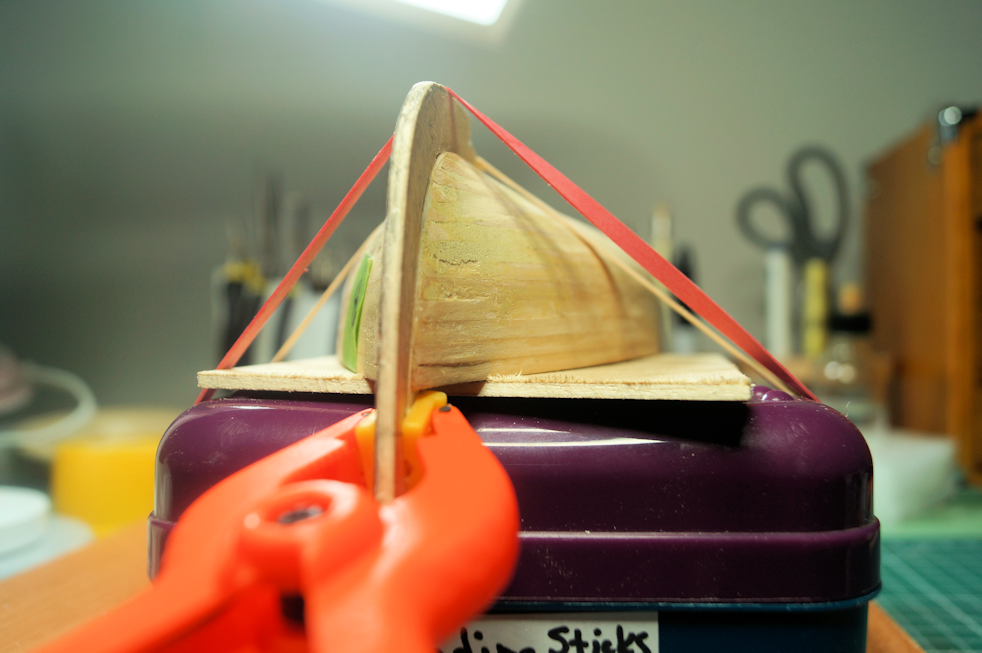
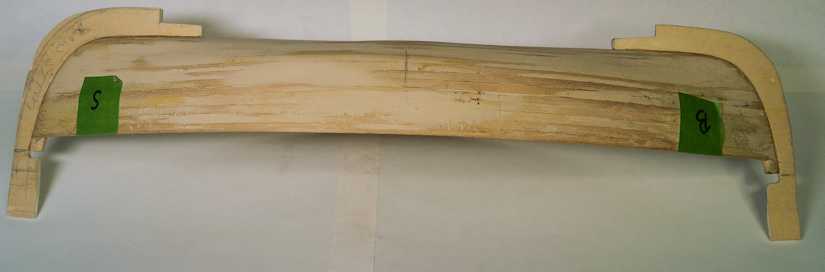
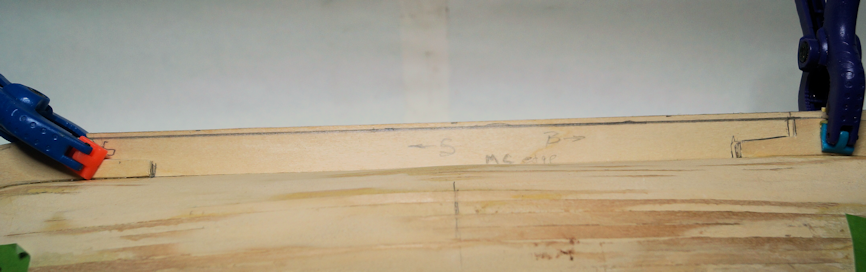
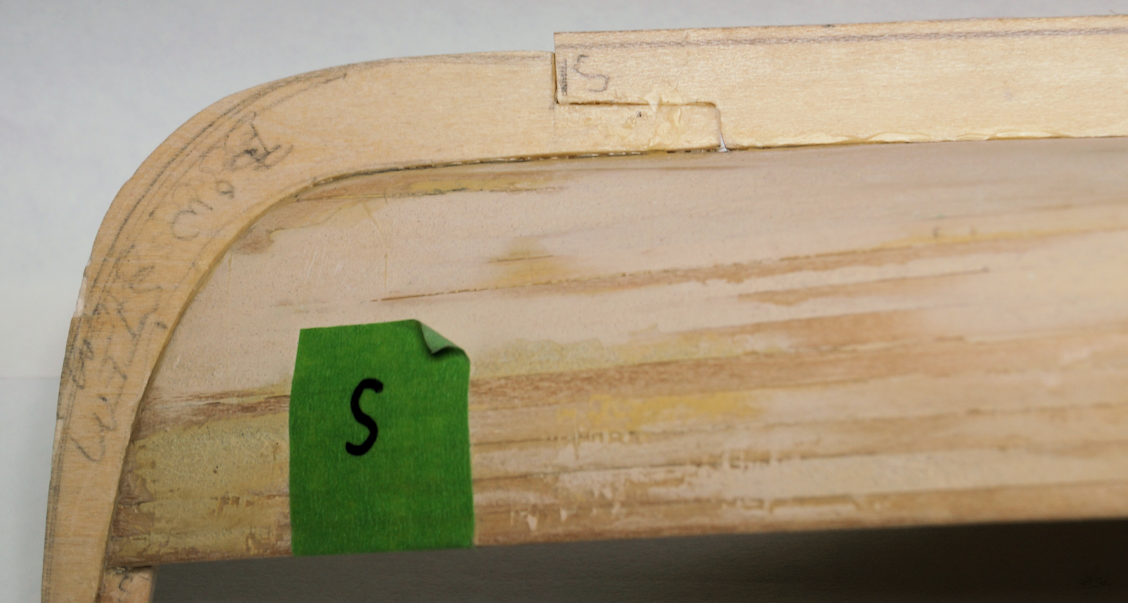
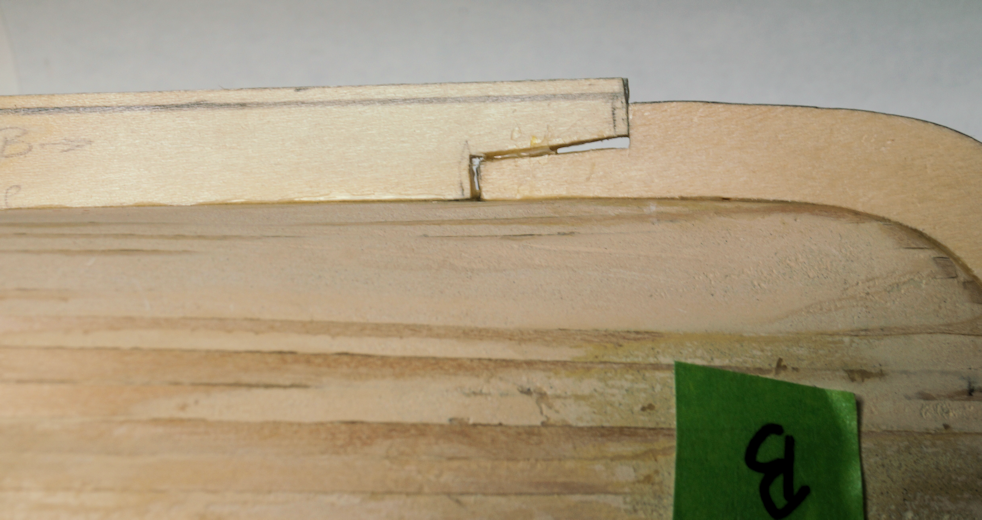
My Nov 14 post ended with my hope that I would have the keel installed. Spoiler alert: I installed the new keel. But, it had its interesting points. So, grab a cuppa and come along for the ride. My cardboard template showed that I was on the right track. But there were obvious problems with fit. While in the worse of cases the gap was around +/- 1/8 inch, I knew I needed a better fit. Before I started cutting the actual stems, I revisited the measurements, added some tick marks on the hull and template as measurement points. I then adjusted the curve when I transferred the template lines to the wood. The cut the bow piece. It fit better, but still off a bit. Considering this, I took greater care on the stern piece which did fit much better. Neither was perfect, but I figured I could do some filing and sanding to get it closer. I went ahead and cut the outer edges of the stems leaving a bit of wood to use as a handle for dry fitting and gluing. In the photo below, the red arrow indicates where I will cut for the top of the stem. I kept fiddling with the pieces with sanding and scraping. I got a much better fit on each piece. I then glued the pieces in place. I thought (always a dangerous situation) I'd use CA since holding and clamping the piece would be difficult to keep steady using PVA. But the CA started to cure before I got the piece in place. So, I scrapped that idea and went back to PVA (after scraping the hardened CA off). I practiced how I would set the pieces and 'clamp it' in place. I put some music; found a comfortable way to prop my arms as I held the piece in place; and settled in for a bit of a wait. With the help of a clamp and a couple of rubber bands, I held the stem long enough for the glue to set up. I left the bands and clamp in place overnight. The next day, repeated for the other piece. Success! The pieces stayed in place and the stems were installed. And they lined up with each other along lines I drew for the purpose. I had already cut a strip for the main keel. I made sure it was deeper than the stems. I will remove the extra material. In the end it, the keel will be (roughly) the same dimension along the hull. (I think we've covered my skills at measuring and cutting already.) The hull is flat from my work at fairing it up. When I cut the keel piece, knowing my skills (or lack thereof) at cutting a straight line, I made sure that I measured and cut from a machine cut edge of stock (the MC on the strip in this photo). The keel piece laid perfectly to the hull. I drew the guides for my scarf joints. And continued merrily along. I knew I could cut the scarf for one end to be a good fit. I hoped that I could cut the other end to fit decently. So, I went to work. I got a fairly good fit for the cut and fit of my scarf joint. (Full disclosure - this shot was after gluing the keel in place to both stems.) It was at this point (yes - after the glue had dried) I noticed an error. I was due for one, I guess. I ask you to take a few moments and look at the image and see if you can find my error. Go ahead. Take your time. I'll wait. See it yet? Yep, I had put my custom cut bow stem on the stern. "Bow" is on the piece; 'S' is on the hull. However, IT FIT! And as you can see below (overlook my sloppy scarf cut - I'll get to that momentarily), the stem piece fit well on the wrong end, too. I scratched my head and came to the conclusion my custom stems were closer to being symmetrical than I first thought. I trimmed the pieces to match the hull and did nothing to the hull in the way of sanding during this time. So, the stems fit on either end after I had fine tuned the fit of the stem pieces. Which makes sense because the peapod is a double-ender and should should be symmetrical. Therefore, I am either lucky or good. I'd like to think the latter. But, remember, even a blind squirrel bumps into a nut once in a while. More likely, I am just lucky. As to the sloppy scarf...I thought about doing the bottom piece over before I glue it in place. But, I know my ability to repeat a bad cut. It's my super power. I will clean out the glue visible in the above photo and putty the gap. It's only a bit over 1/16 inch. With everything covered in this lengthy post, the keel is installed. Despite my error and sloppiness, I am pleased. I usually build kits. I have cut pieces to replace a broken or misaligned pieces of a model. But those already have a pattern to follow. This is the first truly scratch built piece I have done from working with a drawing in a book. I did enjoy the learning adventure which is part of the process. And, this shows that you can take a relatively simple kit and make changes that provide some challenges. I will clean up the scarf, trim the keel to be (approximately) equal along the length of the boat. I am not sure what I will tackle next. The next steps can be independant of each other in many respects. I could continue and make the rudder (though assembly won't be for a while). I could go back to the manual and install the ribs and floorboards. Or I could build the lobster trap just to change things up a bit. (I got some netting at Hobby Lobby that looks close to scale. However, that's another tale.) But, that decision can wait. It's the Tuesday before Thanksging Day here in the US. And my weekend is full. I am in charge of the turkey. I carve turkey better than I carve wood. 😉
- 44 replies
-
- 3
-
-
- maine peapod
- peapod
- (and 4 more)
-
I'd recommend: try the Dory again. There's several build logs hereon MSW that will help you with building that specific model. (Just search Grand Banks Dory. You'll find many on the Model Shipways model. (Also a couple other companies that follow similar procedures for building.) If you start a build log, you will get some followers (and lurkers) who can give advise and tell their experience if you run into something you don't know or understand. You can ask for advise there. If you have a specific questionpn some aspect of modeling (paint, glue, etc), search those items. If you don't find a thread, start a new thread in the appropriate sub-forum. If you mess up on something (all of has 'been there, done that') we can likely give some advise and tips on how to correct the error. Take your time. Building models is ALWAYS a learning process. Welcome aboard.
-
This is why we read these logs. This was an ah-ha! moment for me. I have a similar structure on a mast that has an iron hook at the top of the mast for the block that lifts a spar. I was wondering how to do that. Now I know. Thanks for taking the time to provide the details. It's much appreciated.
- 201 replies
-
- 4
-
-

-
- Oyster Sharpie
- first scratch build
- (and 1 more)
-
Yep. Your build is why I looked at the interior, too. I agree. On the good side, as you pointed out, the seats will hide some of the issues particularly on the ends.
- 44 replies
-
- 2
-
-
- maine peapod
- peapod
- (and 4 more)
-
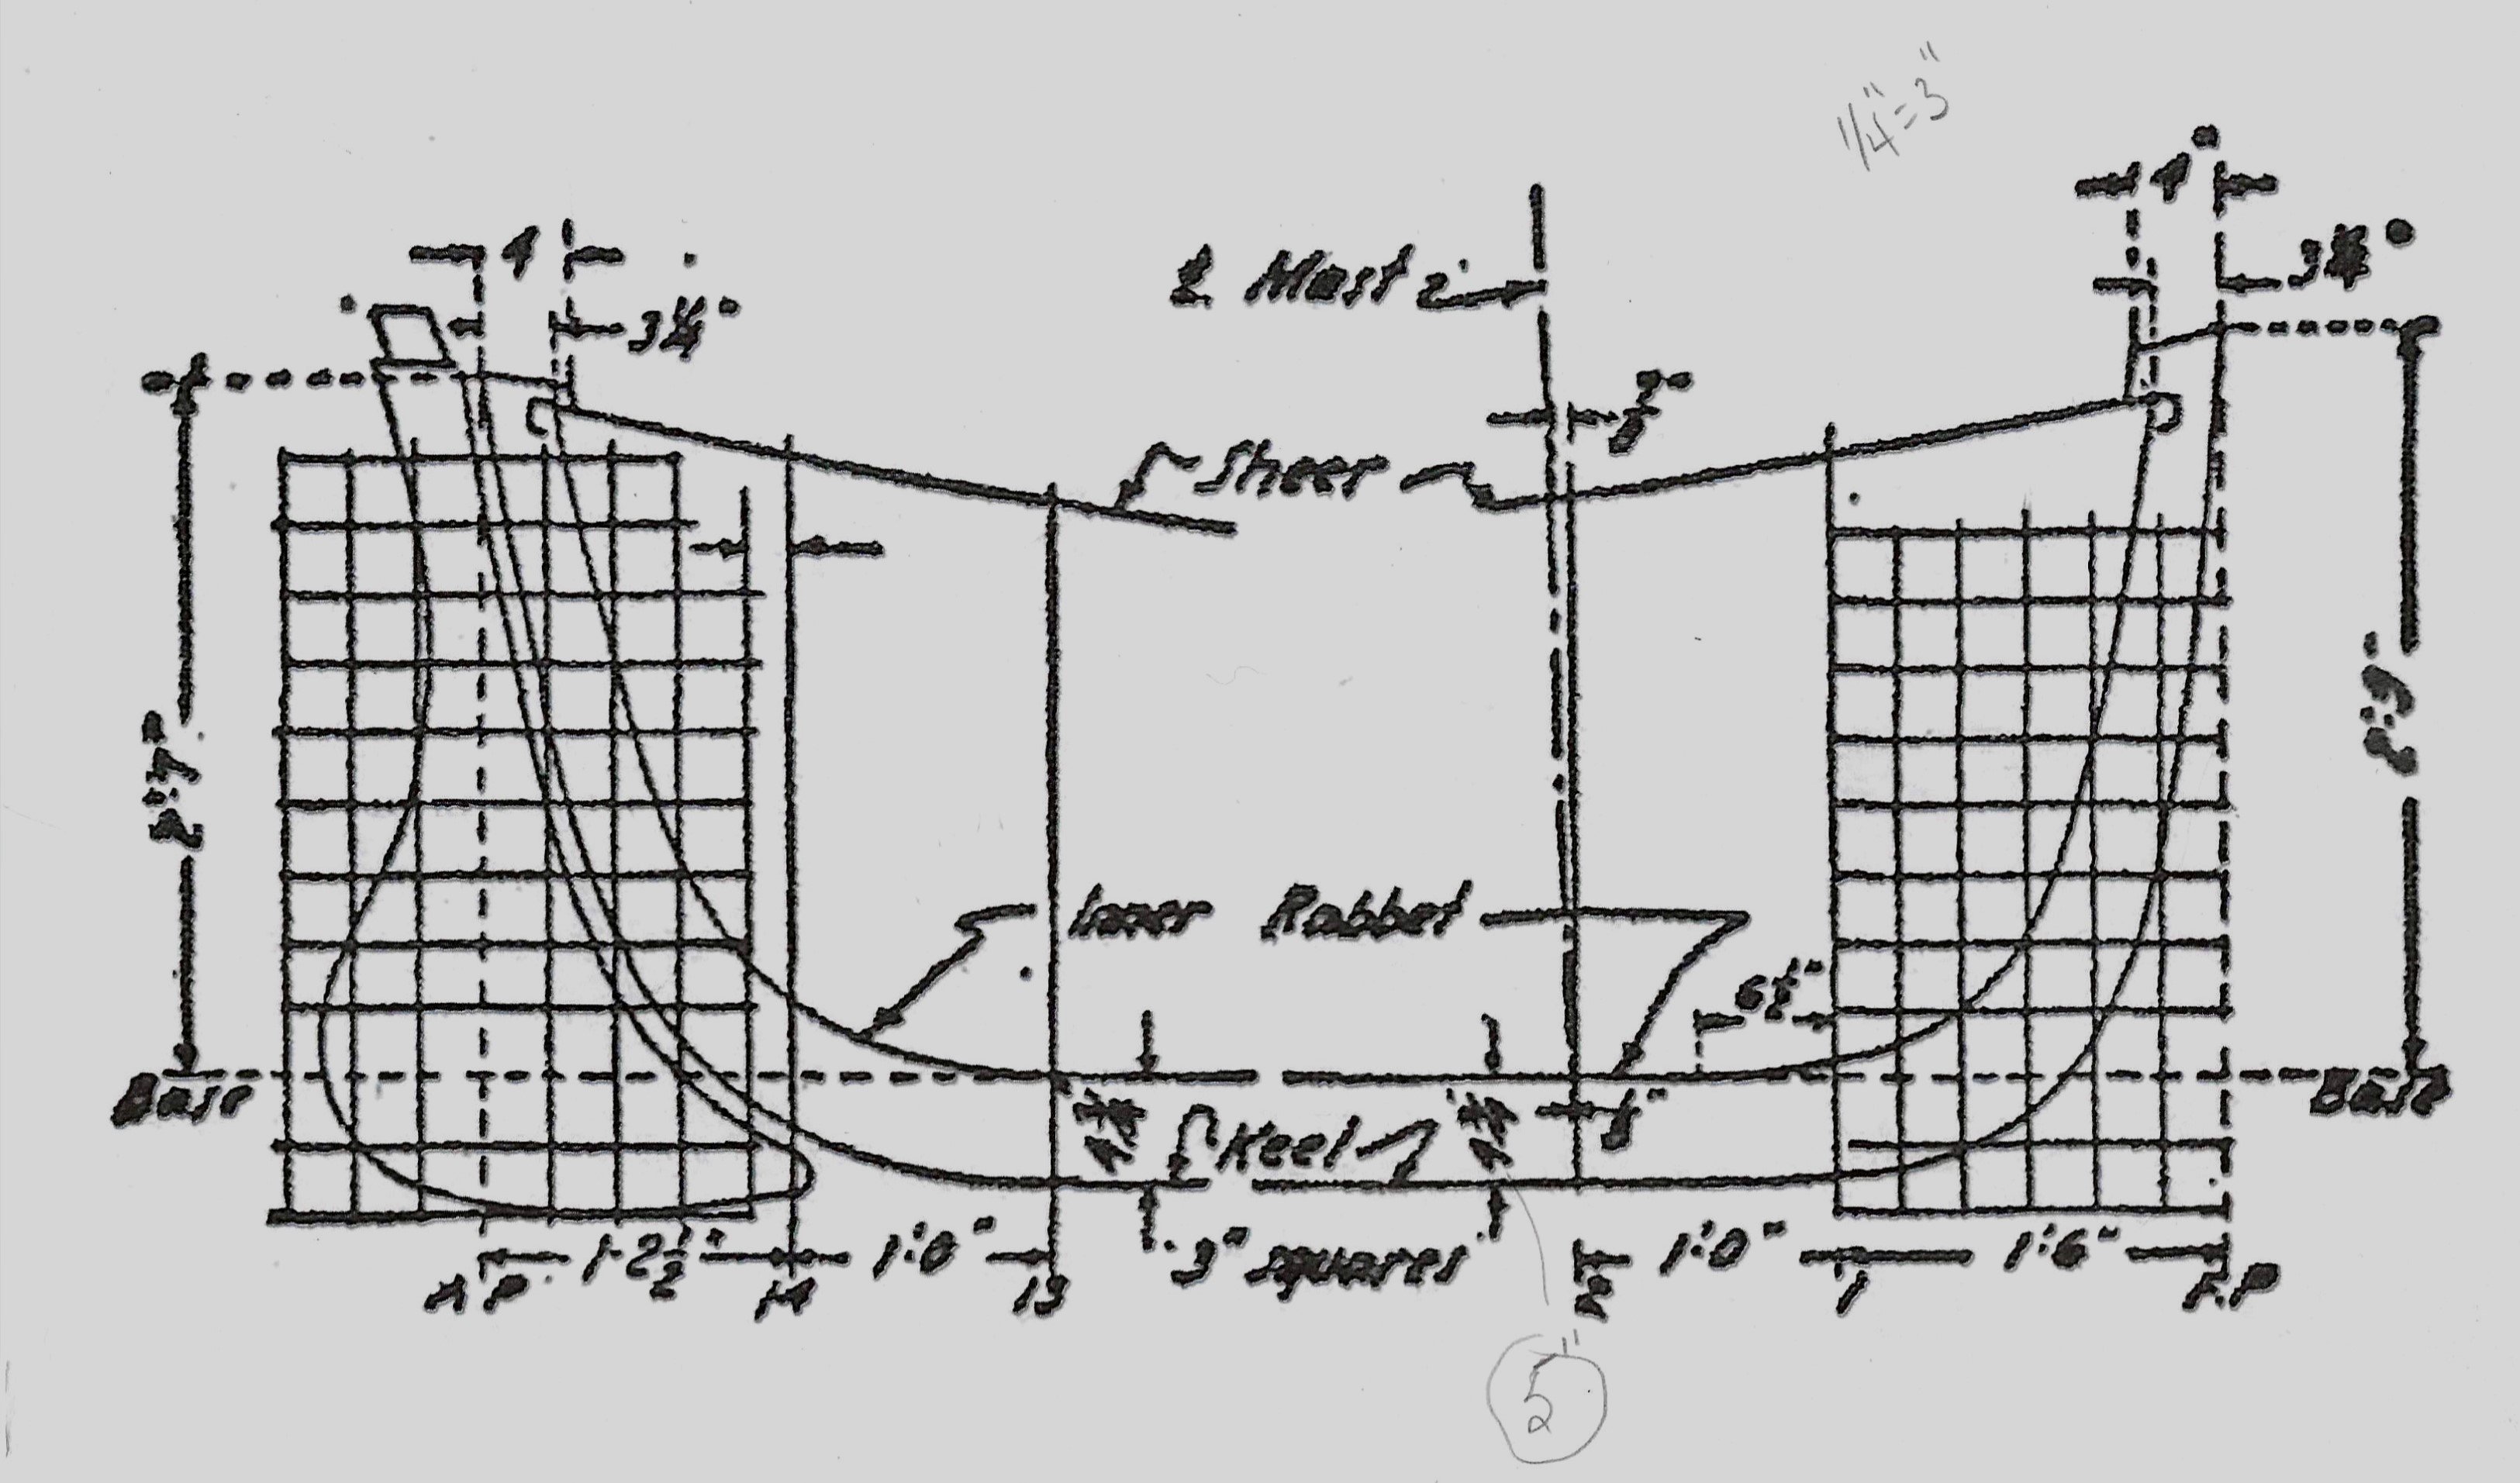
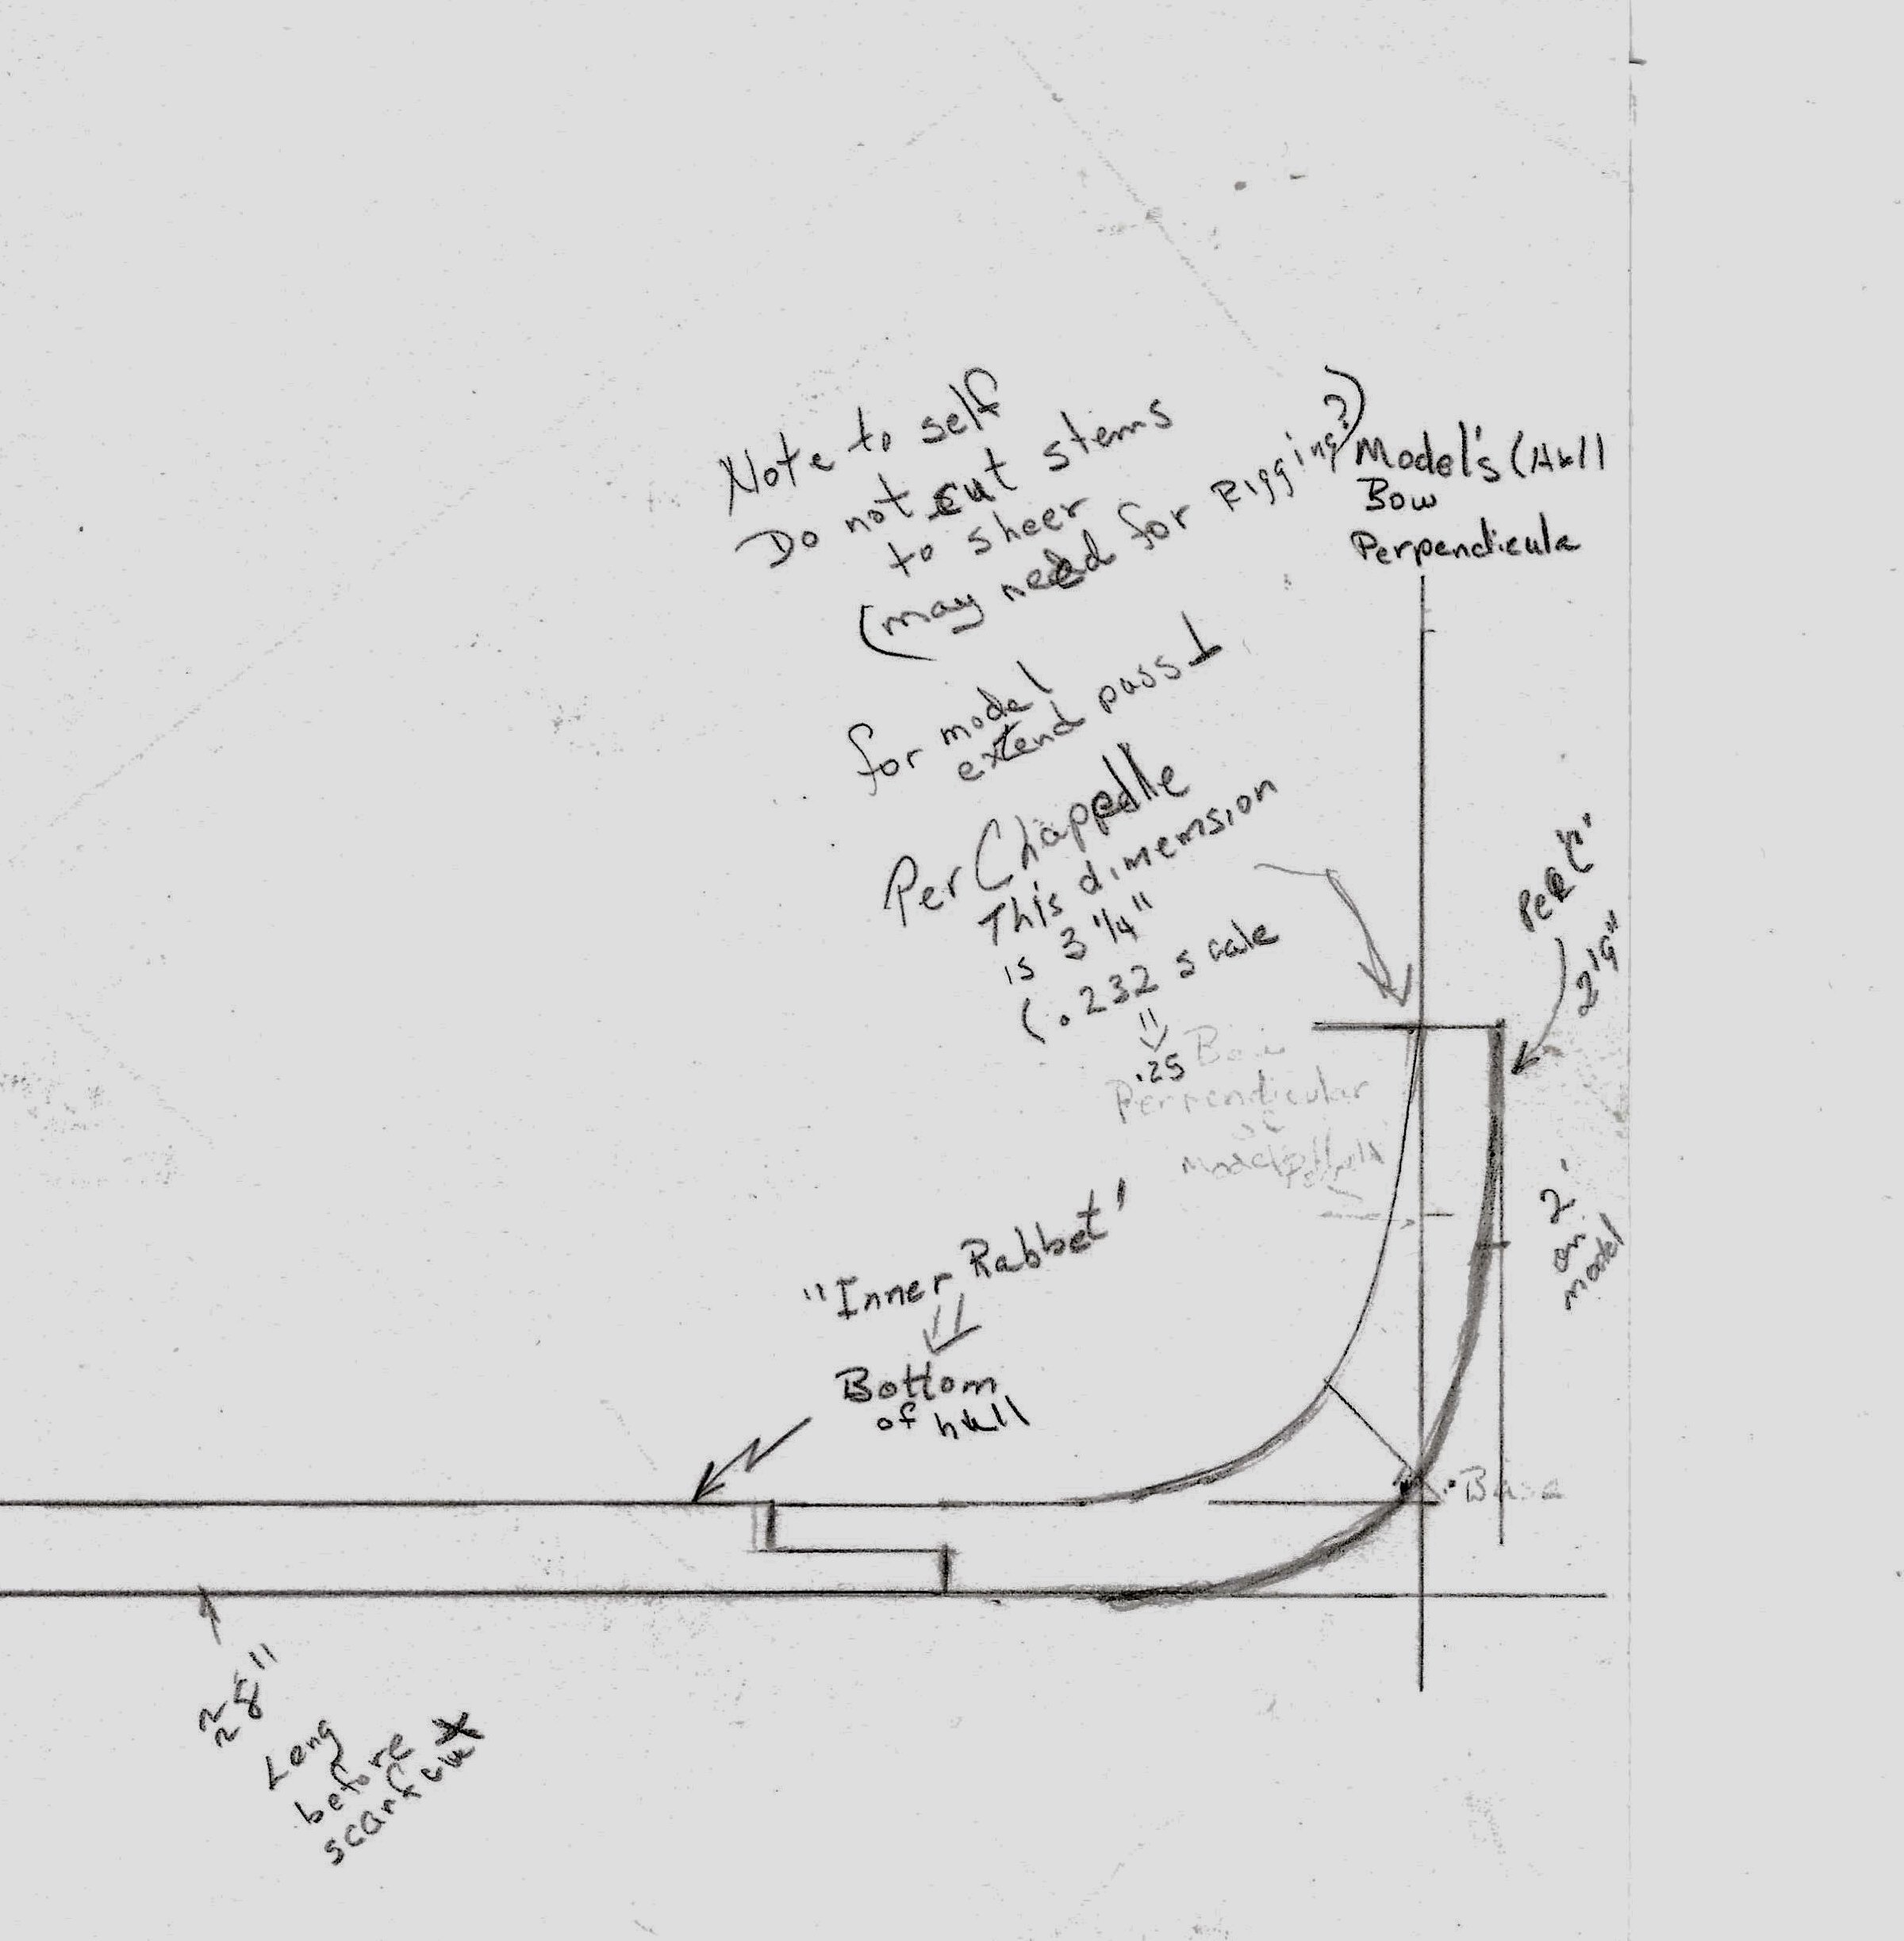
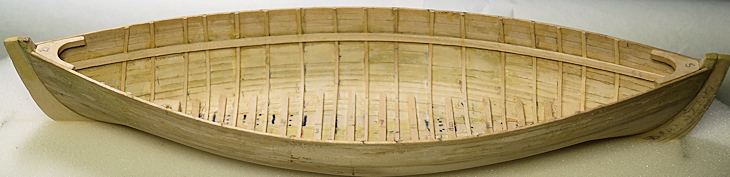
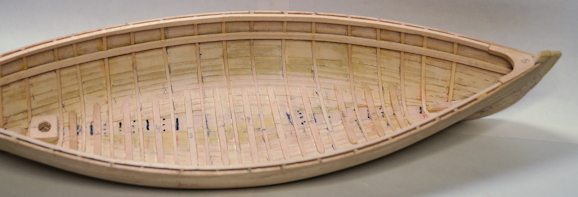
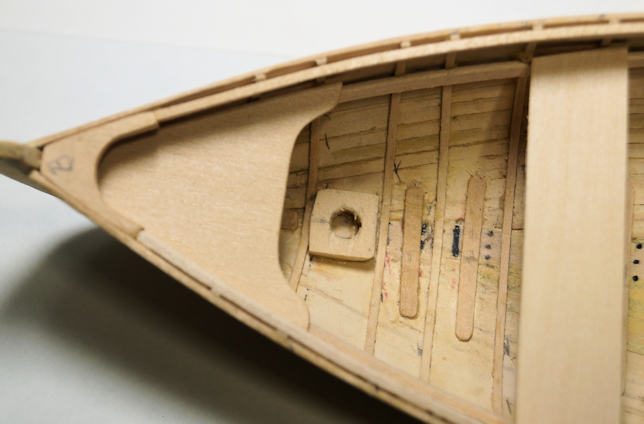
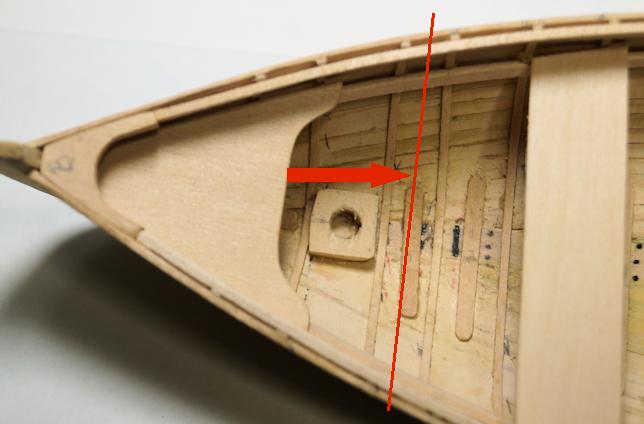
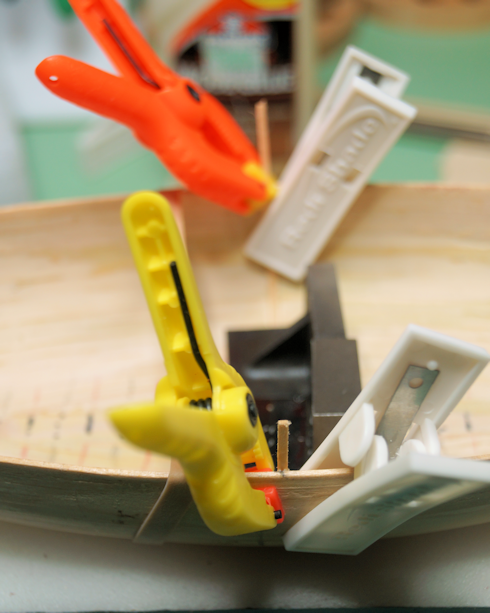
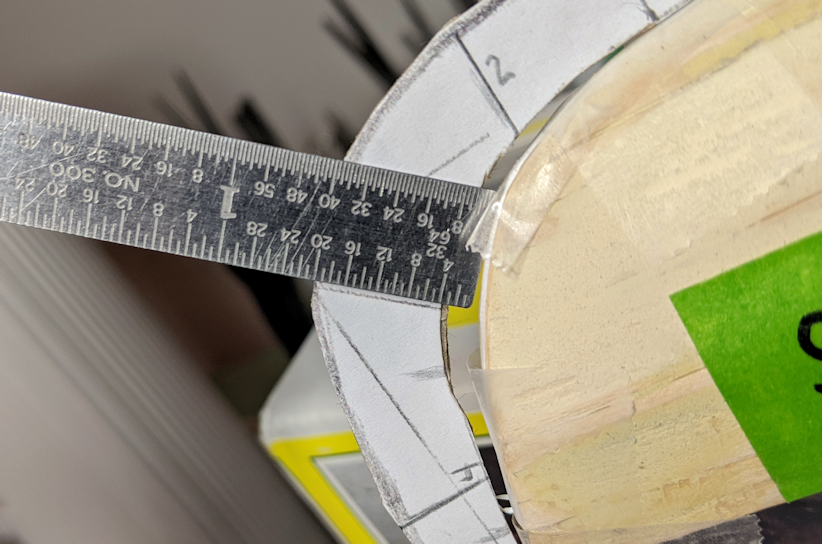
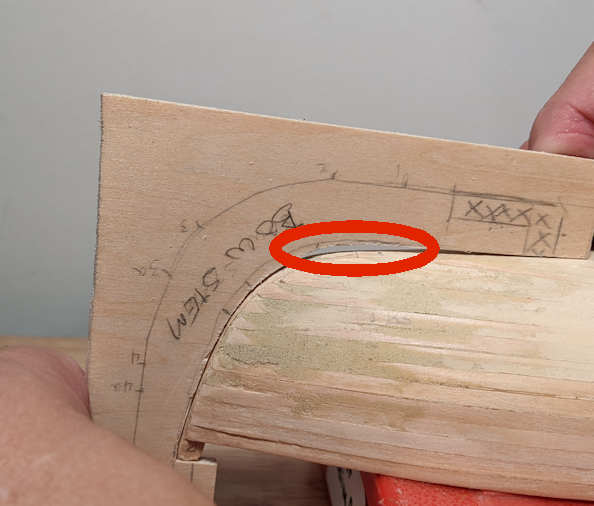
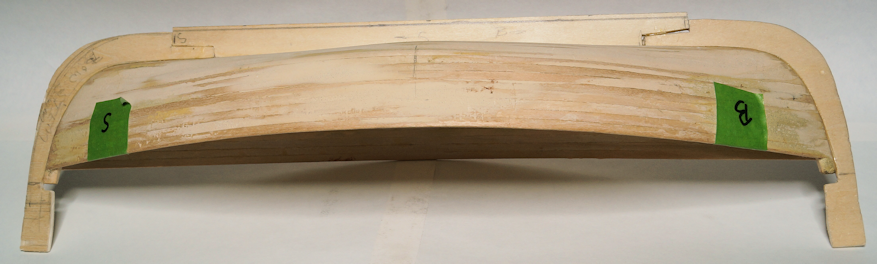
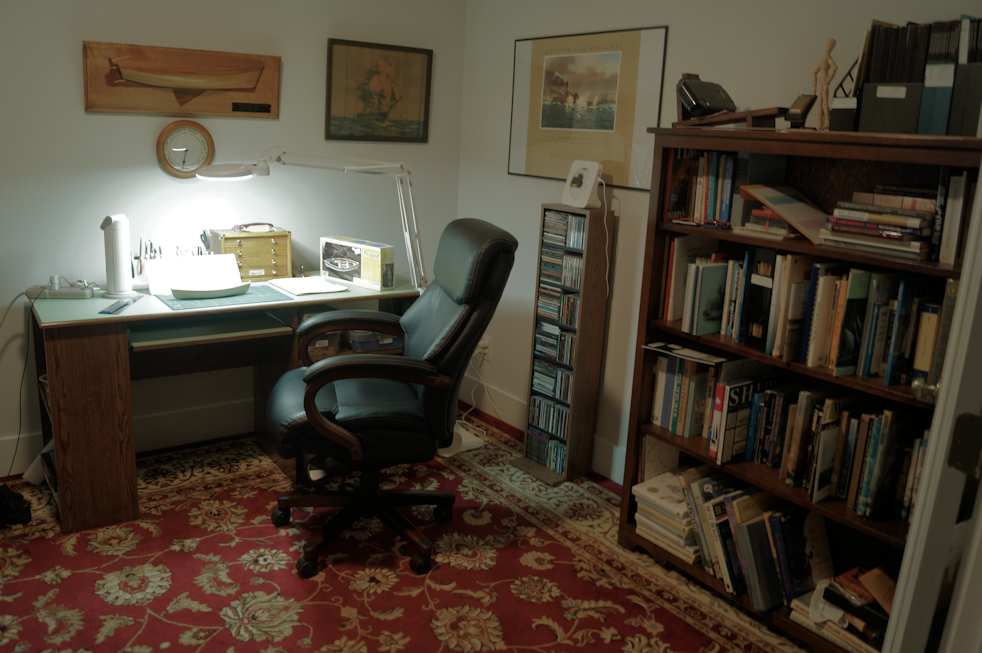
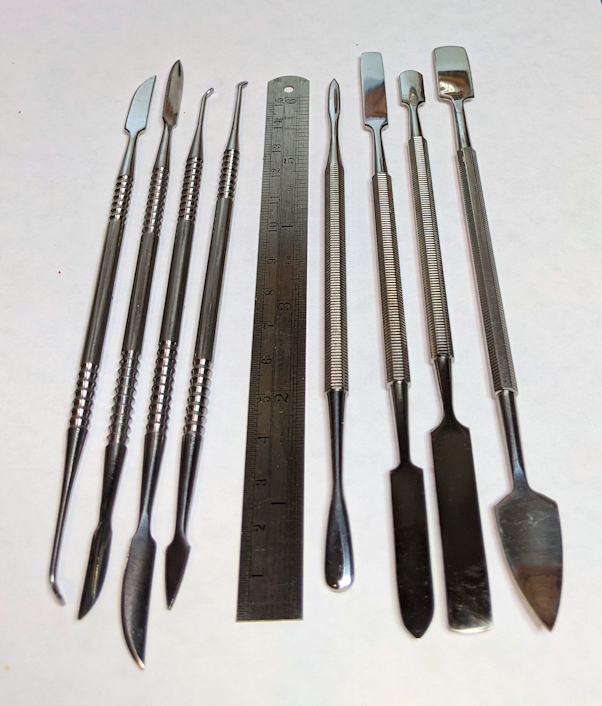
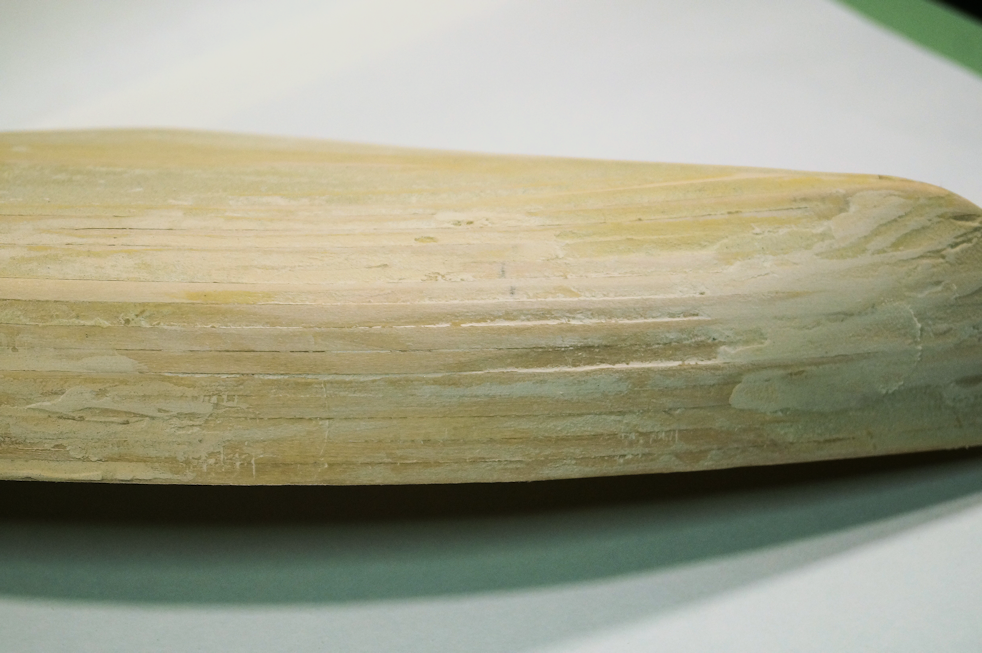
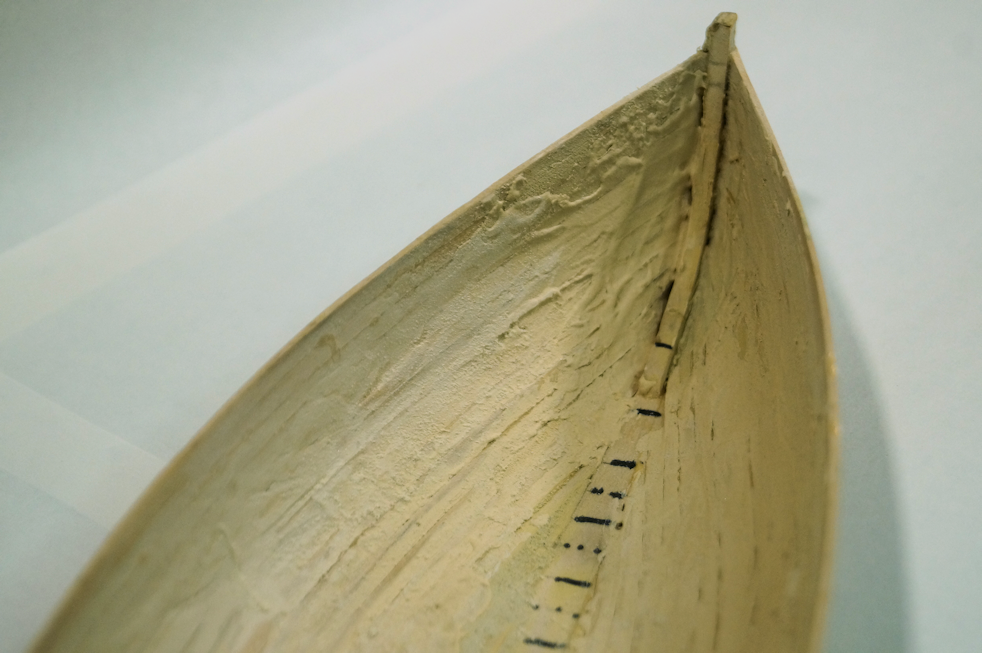
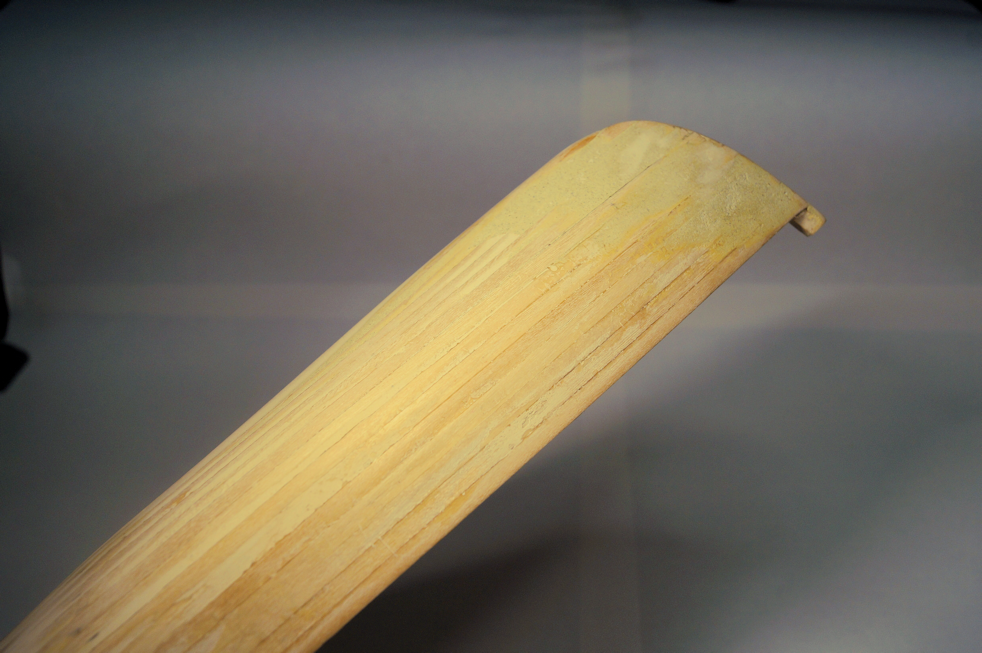
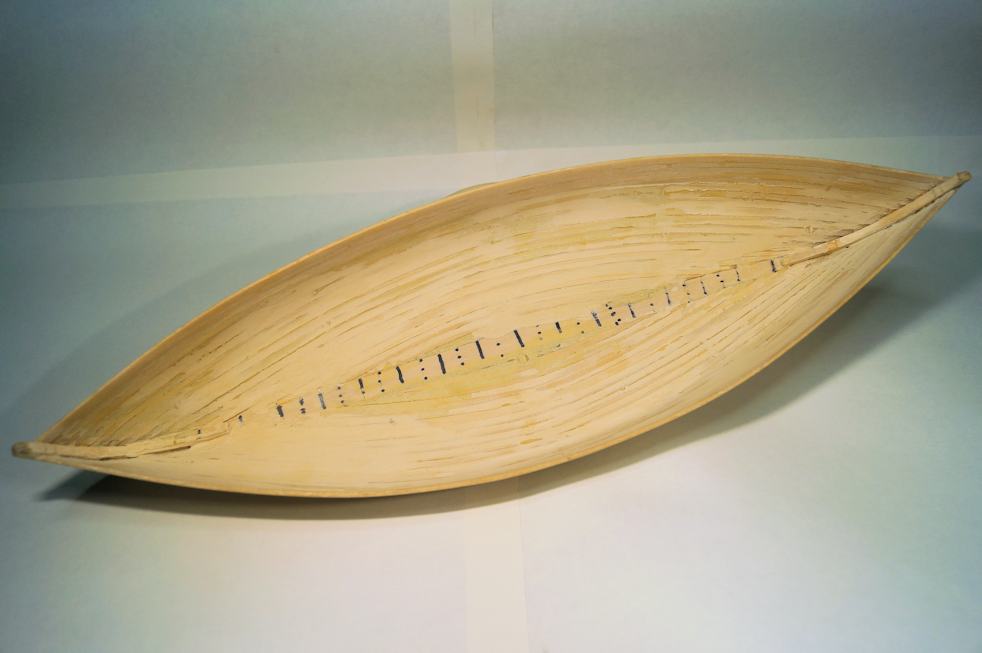
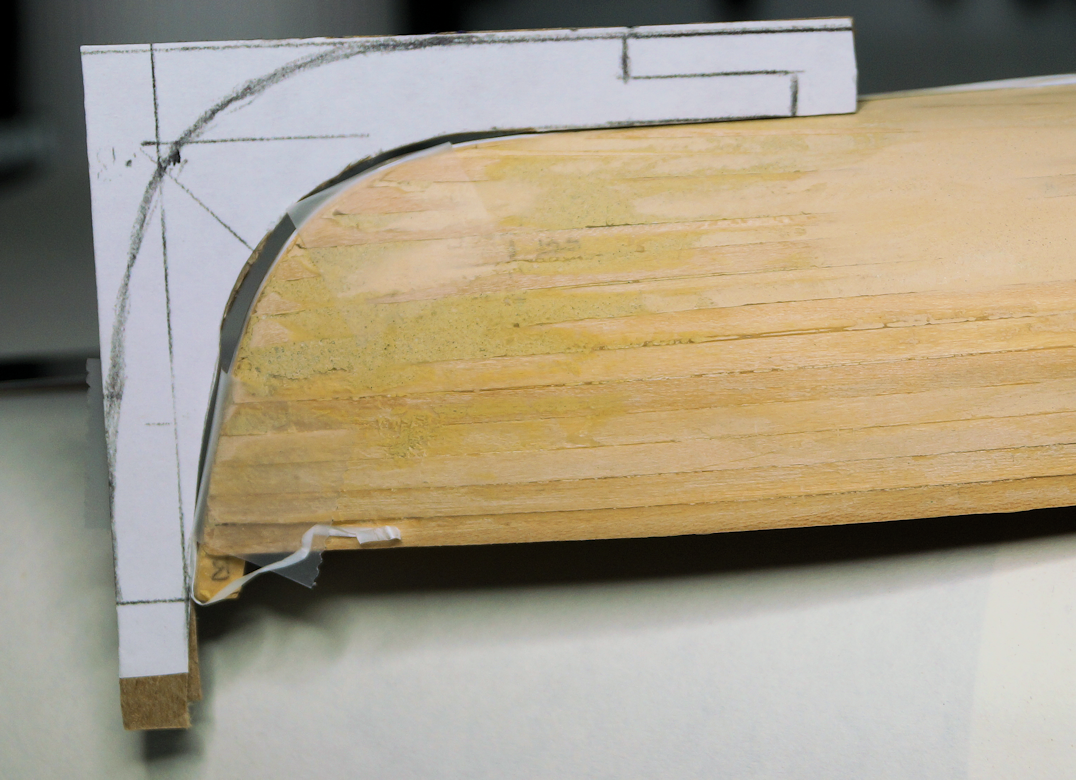
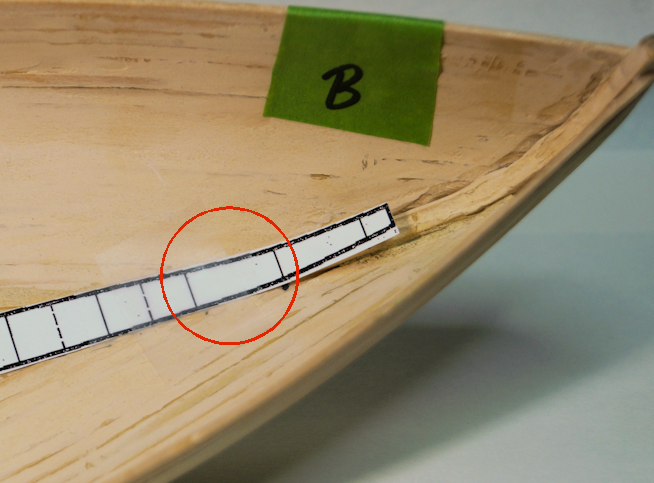
Preface for this post For those who are following this build, thanks for your patience. I hope you haven't lost interest in continuing your read of my log. I finally feel I have done enough of the projects needed to turn our new house into a home. At least to the point where I don't feel guilty working on this build instead of some other home project. Just to show off my new digs, here's my model assembly area. Out of frame to the left is my computer desk. Any 'dirty tasks' like sanding or heavy cutting I do in the garage. The Admiral doesn't like the idea of sawdust in the rug. (Well, I agree with her. I do keep a vacuum cleaner in the room. And I use it regularly during my work sessions. But still, we all know the mess we can make.) My last true entry build was September 8, 2023. Hard to believe (in some respects) it's been over thirteen months. Yet, with all that went since then, I feel accomplished at what I have done in RL. There's still a lot to do at home. But they are longer term items. Like the yard/gardening work which I have as a three to four year plan. Enough jabbering on to the build. Filling and sanding With the nearly 14 month lapse since the last time I look seriously at this build, at the end of October, 2024 I reviewed this log, looked at my build so far, and reviewed my plans for the model. Per the check boxes in the instruction manual, the hull gets sanded at this point. I started on the outside as that's easy enough. I revitalized my filler and had read somewhere over past year that thinning the filler helps get it into small gaps. Since I plan on painting the hull, that seems a good idea. While looking at the inside of the hull I saw a lot of sharp corners which will be hard to fill and sand. I wanted to find a way to do that task a bit easier. I went to my local Hobby Lobby and found these two kits of stainless steel tools. On the left of the 6" ruler you'll see a shaping set of tools some with sharp(ish) blades. The spatulas on the right have many shapes, a few of which were quite useful. At $11 US each, I thought them to be a good investment. They proved helpful with the tasks like mixing and spreading the filler. I repeated the process three or four times and things didn't go as smoothly (pun intended) as I thought. My guess is that I wasn't consistent in mixing up the filler which caused air pockets or something. I am not sure what went awry. But I got to a point to where I called the hull 'faired enough' for now. I'll do a bit more filling and sanding and seal it before painting. I will likely paint the hull after installing floorboards and ribs and before the seats and risers go in so I can cover all the nooks and crannies inside. For now, I'll work on the next part of the my building plans. New Keel The original model puts a false keel on the hull. However, I planned from the beginning to add a sail and rudder per the 1937 version in Chapelle's book. (See post #1 above for details and the plan lines for that boat.) The book also has details for this boat on the keel, rudder and mast step. I considered three factors at this point. A. How to create a template(s) that fits. I started out with the model's diecut opening for the stem pieces (see log entry #16). The outside edge of that hole is my starting point for the new stem and keel assemblies. The above drawing covers a boat of 15 ft, 8-1/2 in. The kit models a 14 ft. vessel. I will have to fudge the numbers a bit. However, the results will be close and proportional. I also can tweak a few other things and adjust on the fly as (and if) needed. For example, the keel is 4-3/4 in. deep per the drawing. I will start as if it's 5 inches and can shave/sand down to the dimension. Also, I will not cut the wood right to the line of the template and can shape and fit the pieces as needed. More on this in a bit. So, literally, I went back to the drawing board. I had done a 'proof of concept' early on (post #16 above) and had an idea of what I wanted to do. I needed to be more accurate on the template and determine how much adjustment I would need. Knowing my ability to mess up things, I keep the concept of having to do something over foremost. That leads me to a three piece solution: two stems and a keel piece. The stems will extend far enough to reach the flat bottom of the hull. Then I can cut the keel to fit between the stems using a straight cut plank and no need for any curve. A scarf joint will help fit the pieces together. Now a moment of truth. How close will it fit? I know that with the bending, sanding, and other aspects of assembly, I won't have a perfect fit. I also figure that the two stems won't be symmetrical on the model. I glued a copy of the template to some thick cardboard, cut the template, and placed it on the model. Bow fit Stern fit I was surprised at how close the fit was based on the drawing compared to the model. Not surprised of the lack of symmetry. But no catostrphic issues. (I'll have to work on symetry in future builds. As we all know, it's always a learning process.) The fit, as expected, is not perfect. Since I plan on being generous when I cut the actual wood pieces, I can get by with the same template for both. Each stem will be custom fit. By the way, I used some dental floss (which really isn't floss but a very thin strip of plastic) to lay on the hull and stems to determine the hull's center line. (I don't know why I had dental floss in my tool box. But, it works.) While the drawing shows the rudder details, I will worry about creating a pattern template for that at some point after the keel assembly and I can custom cut the inboard side of the piece. B. Where will mast step go. The keel detail drawing has information on the location of the mast (including the rake), So, I decided to work on that aspect. I determined where the the mast step will be. I figured that now was a good time to set which end will be the bow. The peapod is a double-ender and in principle still is. However, with the addition of a rudder, the boat really is not an operational double-ender. I started out cutting a copy of the bottom plank from the model's drawing for two reasons. 1) When I marked the bottom plank, I used a permanent marker which bled into the wood. The locations aren't sharply defined. My filling and sanding also coveed up some of those original markings. 2) I figure the location of the ribs would provide a convenient locator for the mast step. Even if I end up adjusting the location or cuts when laying the ribs and floor boards, this test will give me an idea of how much. My intuition proved to be accurate. The line furthest right (edge of the template) shows where the bottom plank overlaps into the stem. Log entry #2 shows this detail. The next line shows the interior end of the stem. And the third line shows the first full width rib though it's short being located near the bow. The dotted lines show where floor boards fit. The area circled shows where I will fit the mast step - conveneintly between ribs and with no extra cutting. And it comes close to matching the original prototype boat dimensionally or at least close enough proportionately. (As a preview, I will have to 'redesign' the bow seat. The seat will be larger than the pieces in the kit. Further there is a hole in the bow seat to support the mast.) C. What are future challenges. The last aspect to consider which are all related... - Doing the shaping and sizing of the three pieces for the final fit will have it's inherent though not tremendous challenges. - Making sure the keel is perpendicular to the hull and on the center line. Again, thanks to my dental floss, I have a fighting chance at getting the keel straight. Using machinist squares should allow me to install it perpendicular. - Making sure I don't break the keel off as I progess with the build. I will come up with a rig or cut some foam to protect it. As with the above, nothing that should prove too difficult. (All famous last words I am sure.) I hope in the next entry to have cut and installed the keel.


- 44 replies
-
- 4
-
-
- maine peapod
- peapod
- (and 4 more)
-
Nice looking model. Congrats on finishing it.
- 24 replies
-
- 2
-
-
- Indian Girl canoe
- Midwest Products
- (and 1 more)
-
Looks good to me. Keep up the work and it will come together nicely.
- 24 replies
-
- 1
-
-
- Indian Girl canoe
- Midwest Products
- (and 1 more)
-
Welcome to the 'dark side.' Nice looking build. Maybe you should start a build log on the Terror.
-
Watching this build with interest. This canoe (and the Petersboro) sits in my stash. I am thinking one of those may be my next build. Good start. Building these is a lot of trial and learn process.
- 24 replies
-
- 2
-
-
- Indian Girl canoe
- Midwest Products
- (and 1 more)
-
Nicely done! Love the lobster trap. Great detail on it. I think my muse is now calling me to finish my build. Congrats on finishing your build. I'lll be looking forward to your next build.
- 65 replies
-
- 2
-
-
-
- Maine Peapod
- Midwest Products
- (and 1 more)
-
Thanks. Now in my Nook library.
-
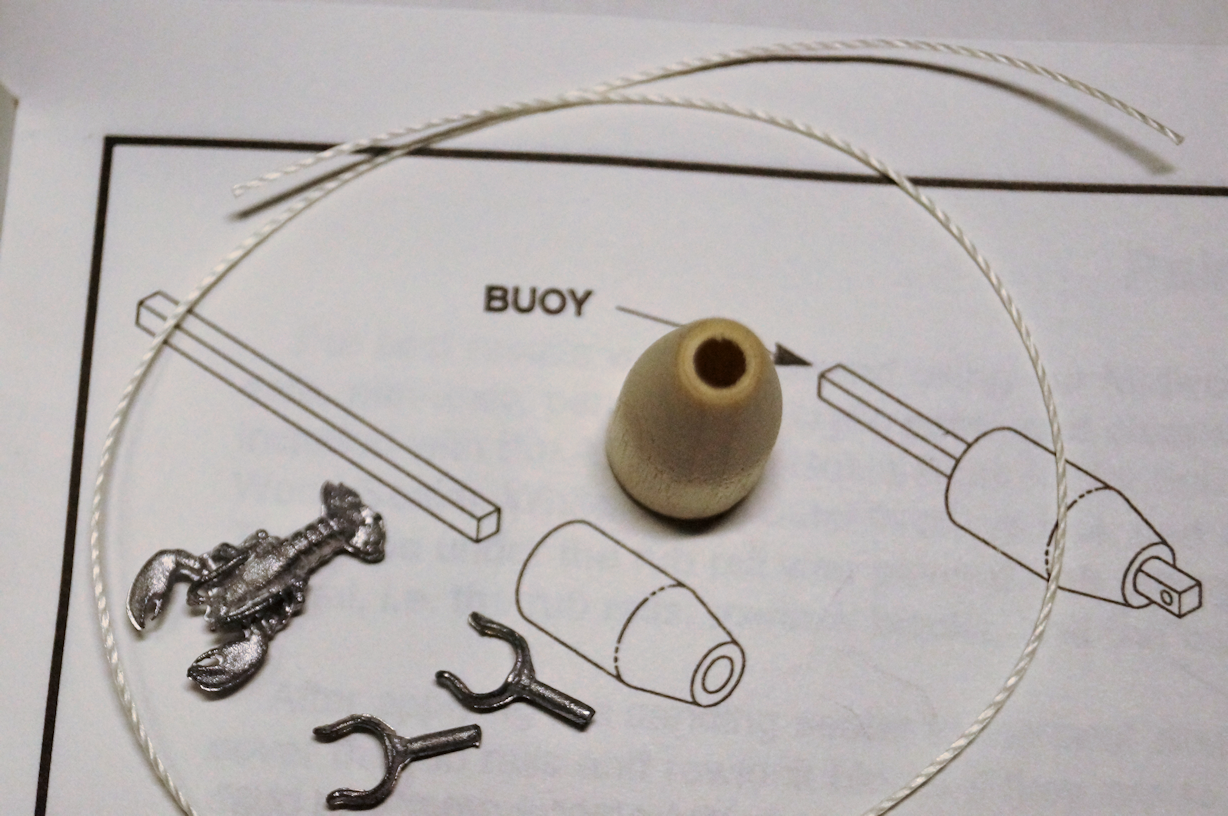
A couple of items on the buoys. Lobster buoys have unique color schemes created by the owners to differntiate their buoys and traps. Today, the traps have to be marked with permit number of the owner. I found this article on lobster buoys an interesting read from "Lobsters Anywhere" website. Several references listed at the end of the article. The 1981 patent (in above article) indicates metal rods for the center. But wood (spruce and cedar) had been used until the use of plastic and stryofoam. (At least per my notes. I'll have to verify sources.) I am sure wooden buoys were used for a long time before those other materials came along. I saw the 'square peg - round hole' problem when I started my build. An interesting obervation: there's obviously an evolution of the kit. My buoy is not cast but preshaped basswood. (This pic also shows the 'shiny' lobster - from my build log.)
- 65 replies
-
- 1
-
-
- Maine Peapod
- Midwest Products
- (and 1 more)
-
Thanks for the reply. No problems with delay. Family life is important, too. As to your question, the kit is one produced by Midwest Models. Model Expo has re-released the kits. From what I glean here on MSW, it appears they did not change the models. (Maybe laser cut instead of stamped?) The peapod is the second Midwest kit I've built. (I have 3 or 4 more MW models in my stash.) You might get a better sense of the kit from my build log (link in my signature). I think it's a good beginner's model (shown as Skill Level 2 of 4 levels). I would also suggest this kit for modifications. The kit is as a rowing craft. To push my skill set a bit I am adding gaff rig and sail which requires making a bit more of a keel (scratch built). 'Furled sail' is in the plans, too. This is in line with a plan as a lighthouse tender in Chapman's book book on small craft. My feeling is a bit opposite of yours. Based on Chapman's drawing, the mast is 3" diameter. At 1:14 scale that works out to be 0.214 inch. While 1/4 inch is a bit large it could be my starting point. However, aesthetically, to me that size looks small so I am considering 3/8" (therefore closer to a 5" mast). Still have time to consider and I have to figure what size the rigging lines should be. Thanks for your input. It helped me with my sanity check. Your photos on the step gives me a model to follow also. Those kind of details in build logs helps. (I over thought the process in my head.) So, also thanks for the build log in general.
- 56 replies
-
- 1
-
-
- grand banks dory
- Midwest Products
- (and 2 more)
-
Thanks for taking time on the step by step log. That's very helpful to see how you do things. Model is looking good. I was reviewing your work on the mast and stay. What is the original diameter of the dowels for those pieces. Also, the diameter of the hole for the step? I plan to add a sail/mast to my 1:14 scale peapod and want to be close to scale at least. I want to use what supplied here as a sanity check to my own calculations. Thanks in advance for information.