HOLIDAY DONATION DRIVE - SUPPORT MSW - DO YOUR PART TO KEEP THIS GREAT FORUM GOING! (83 donations so far out of 49,000 members - C'mon guys!)
×


Capt. Kelso
-
Posts
164 -
Joined
-
Last visited
Content Type
Profiles
Forums
Gallery
Events
Everything posted by Capt. Kelso
-
 Impressive work!
 -
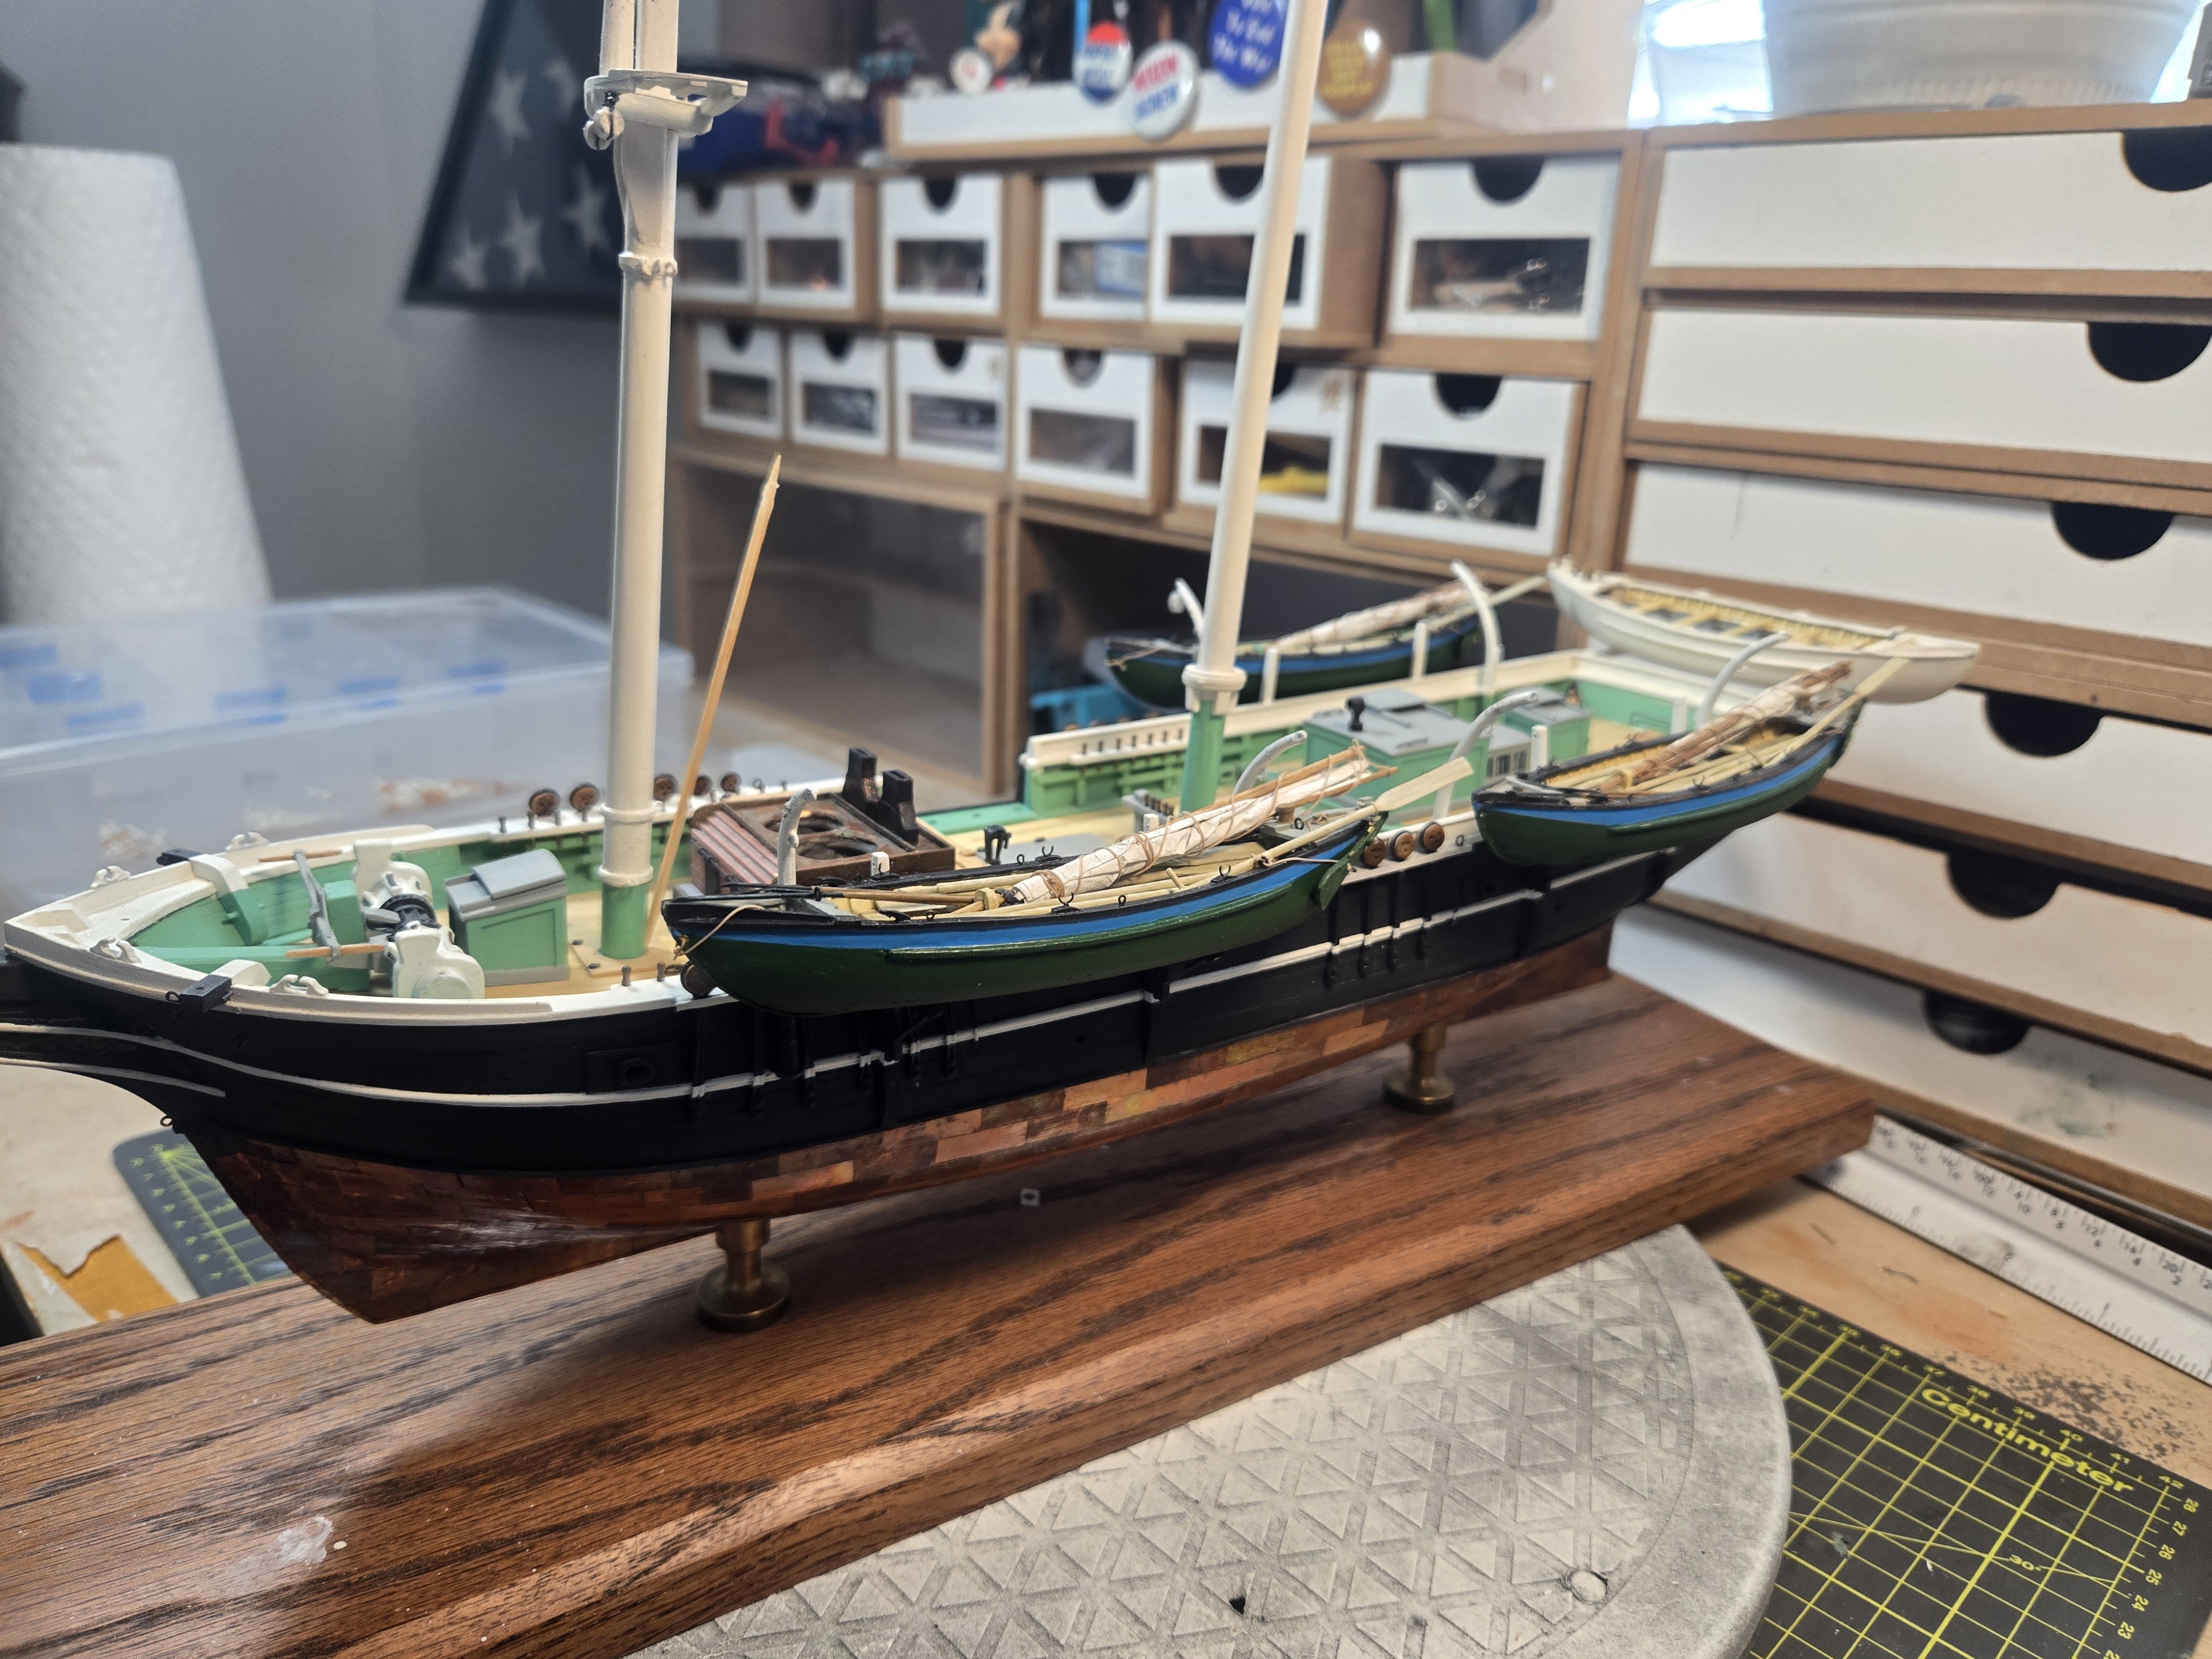
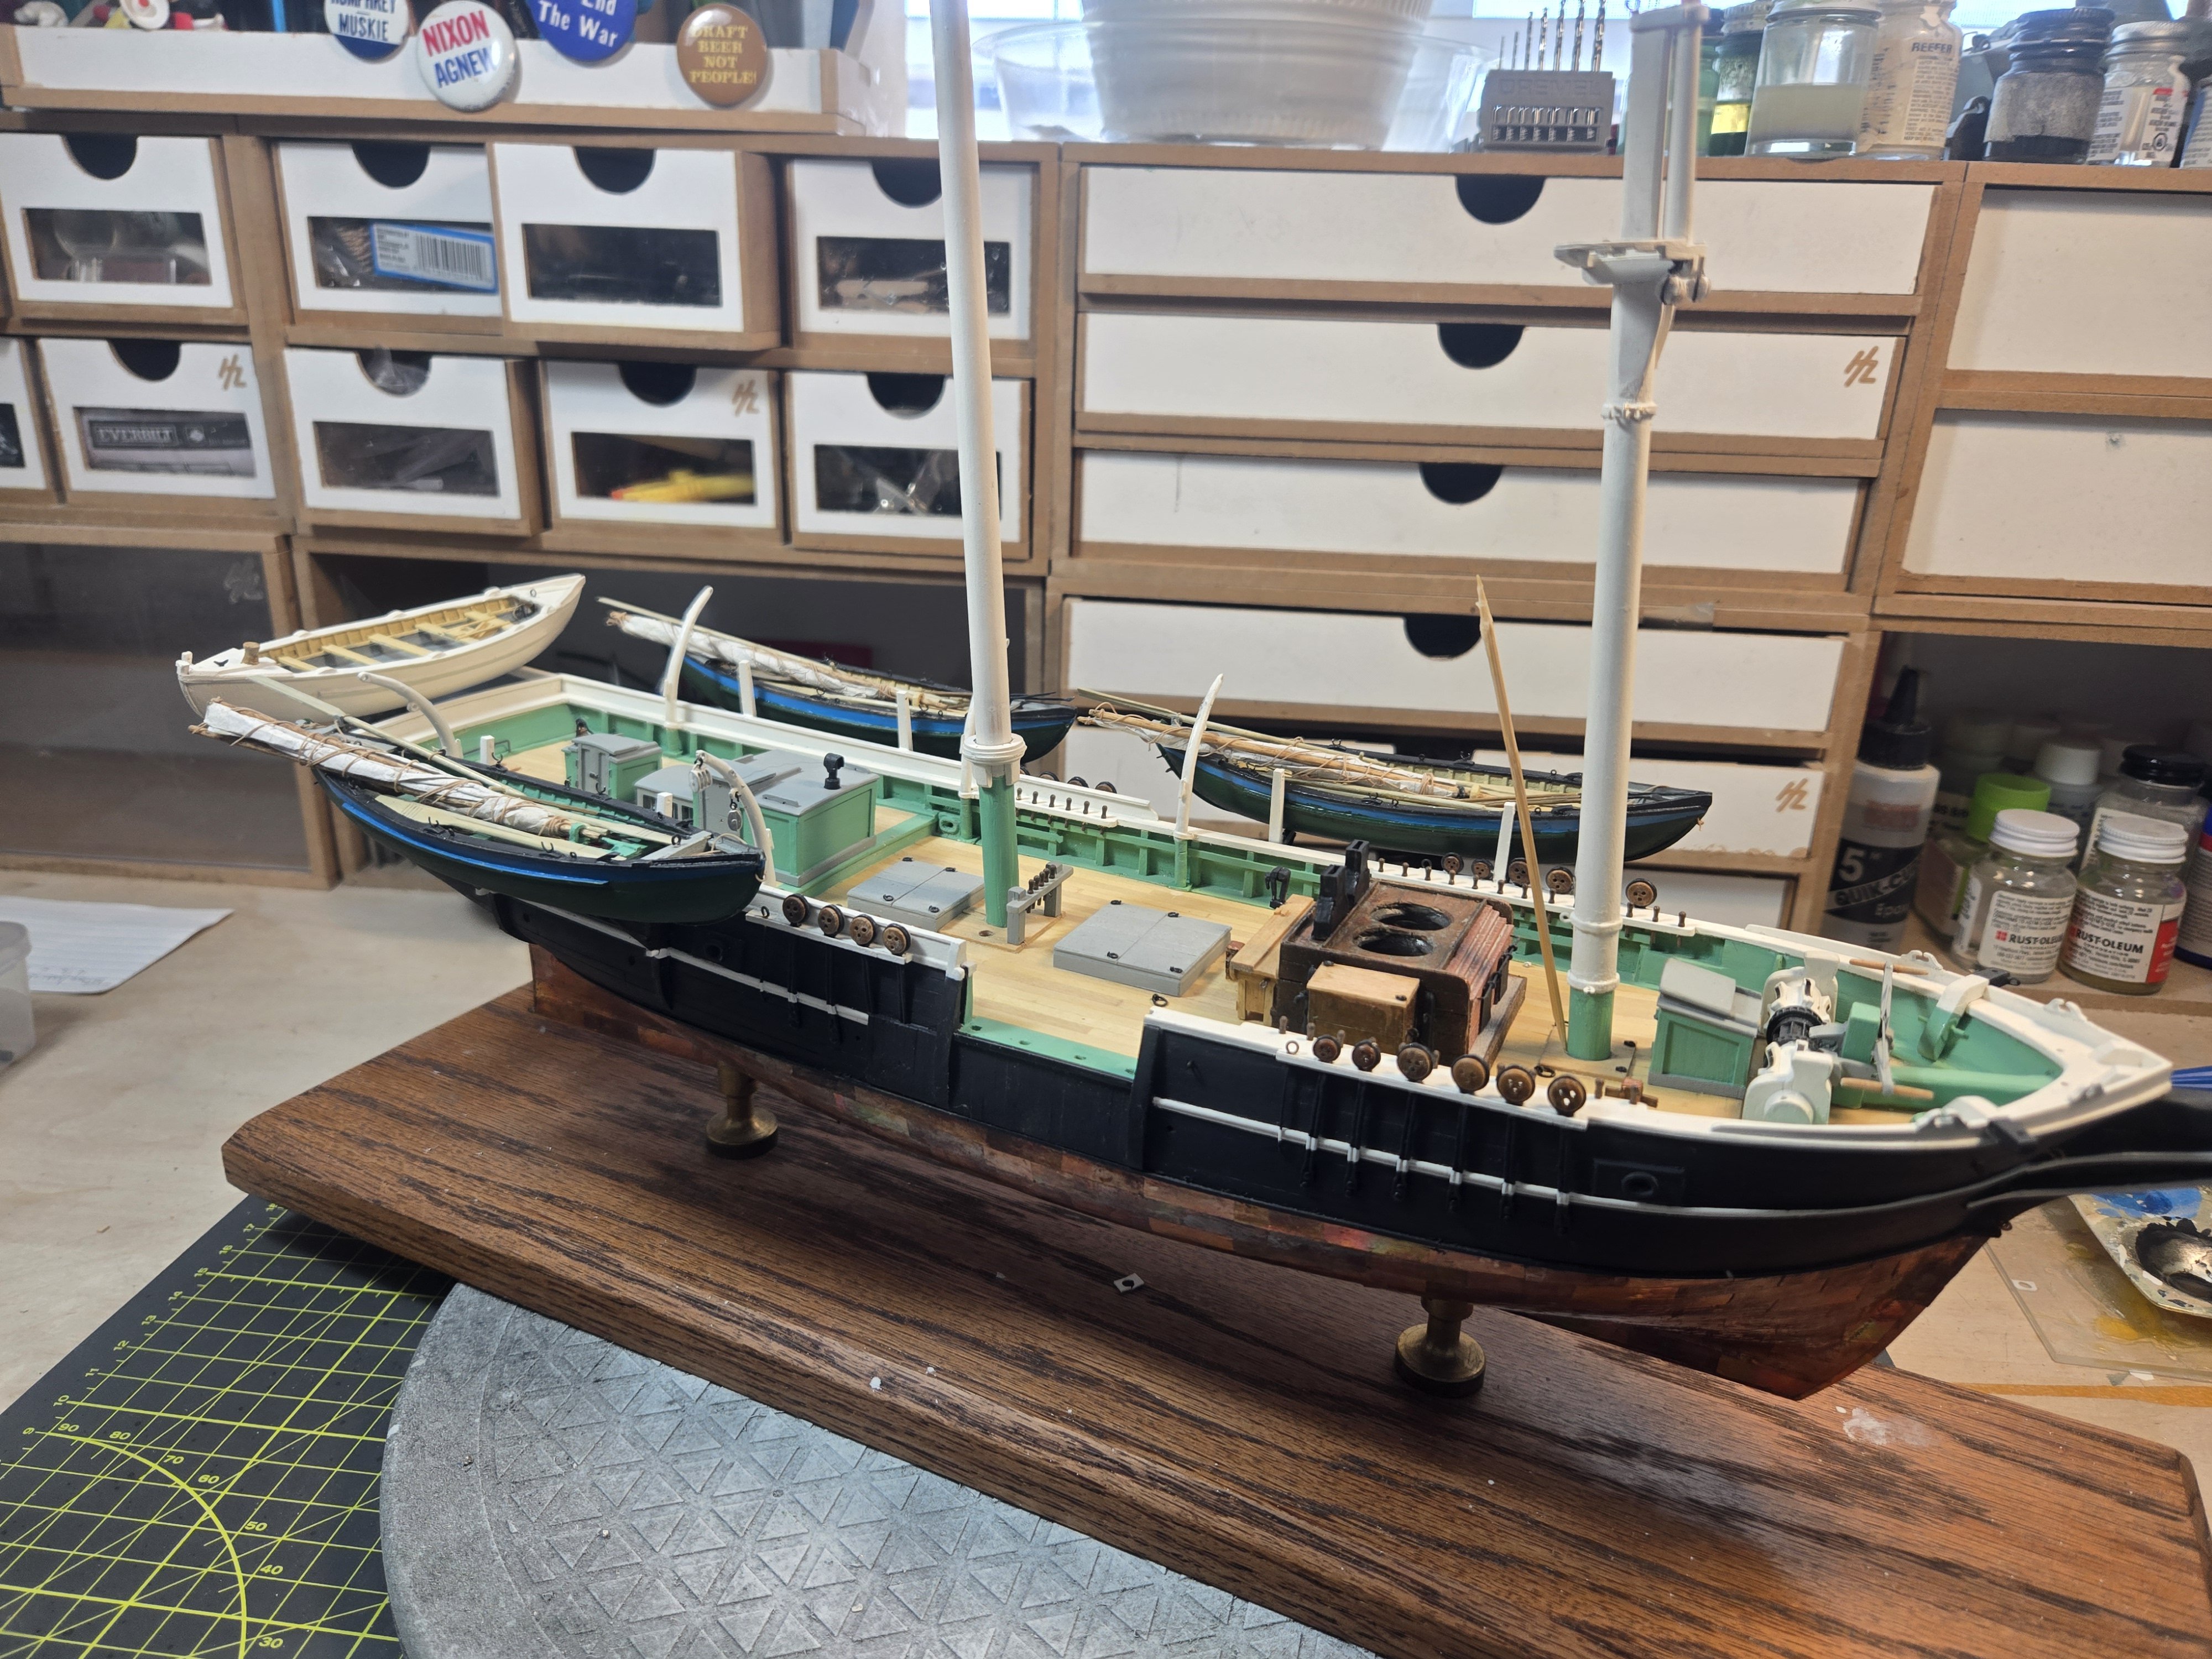
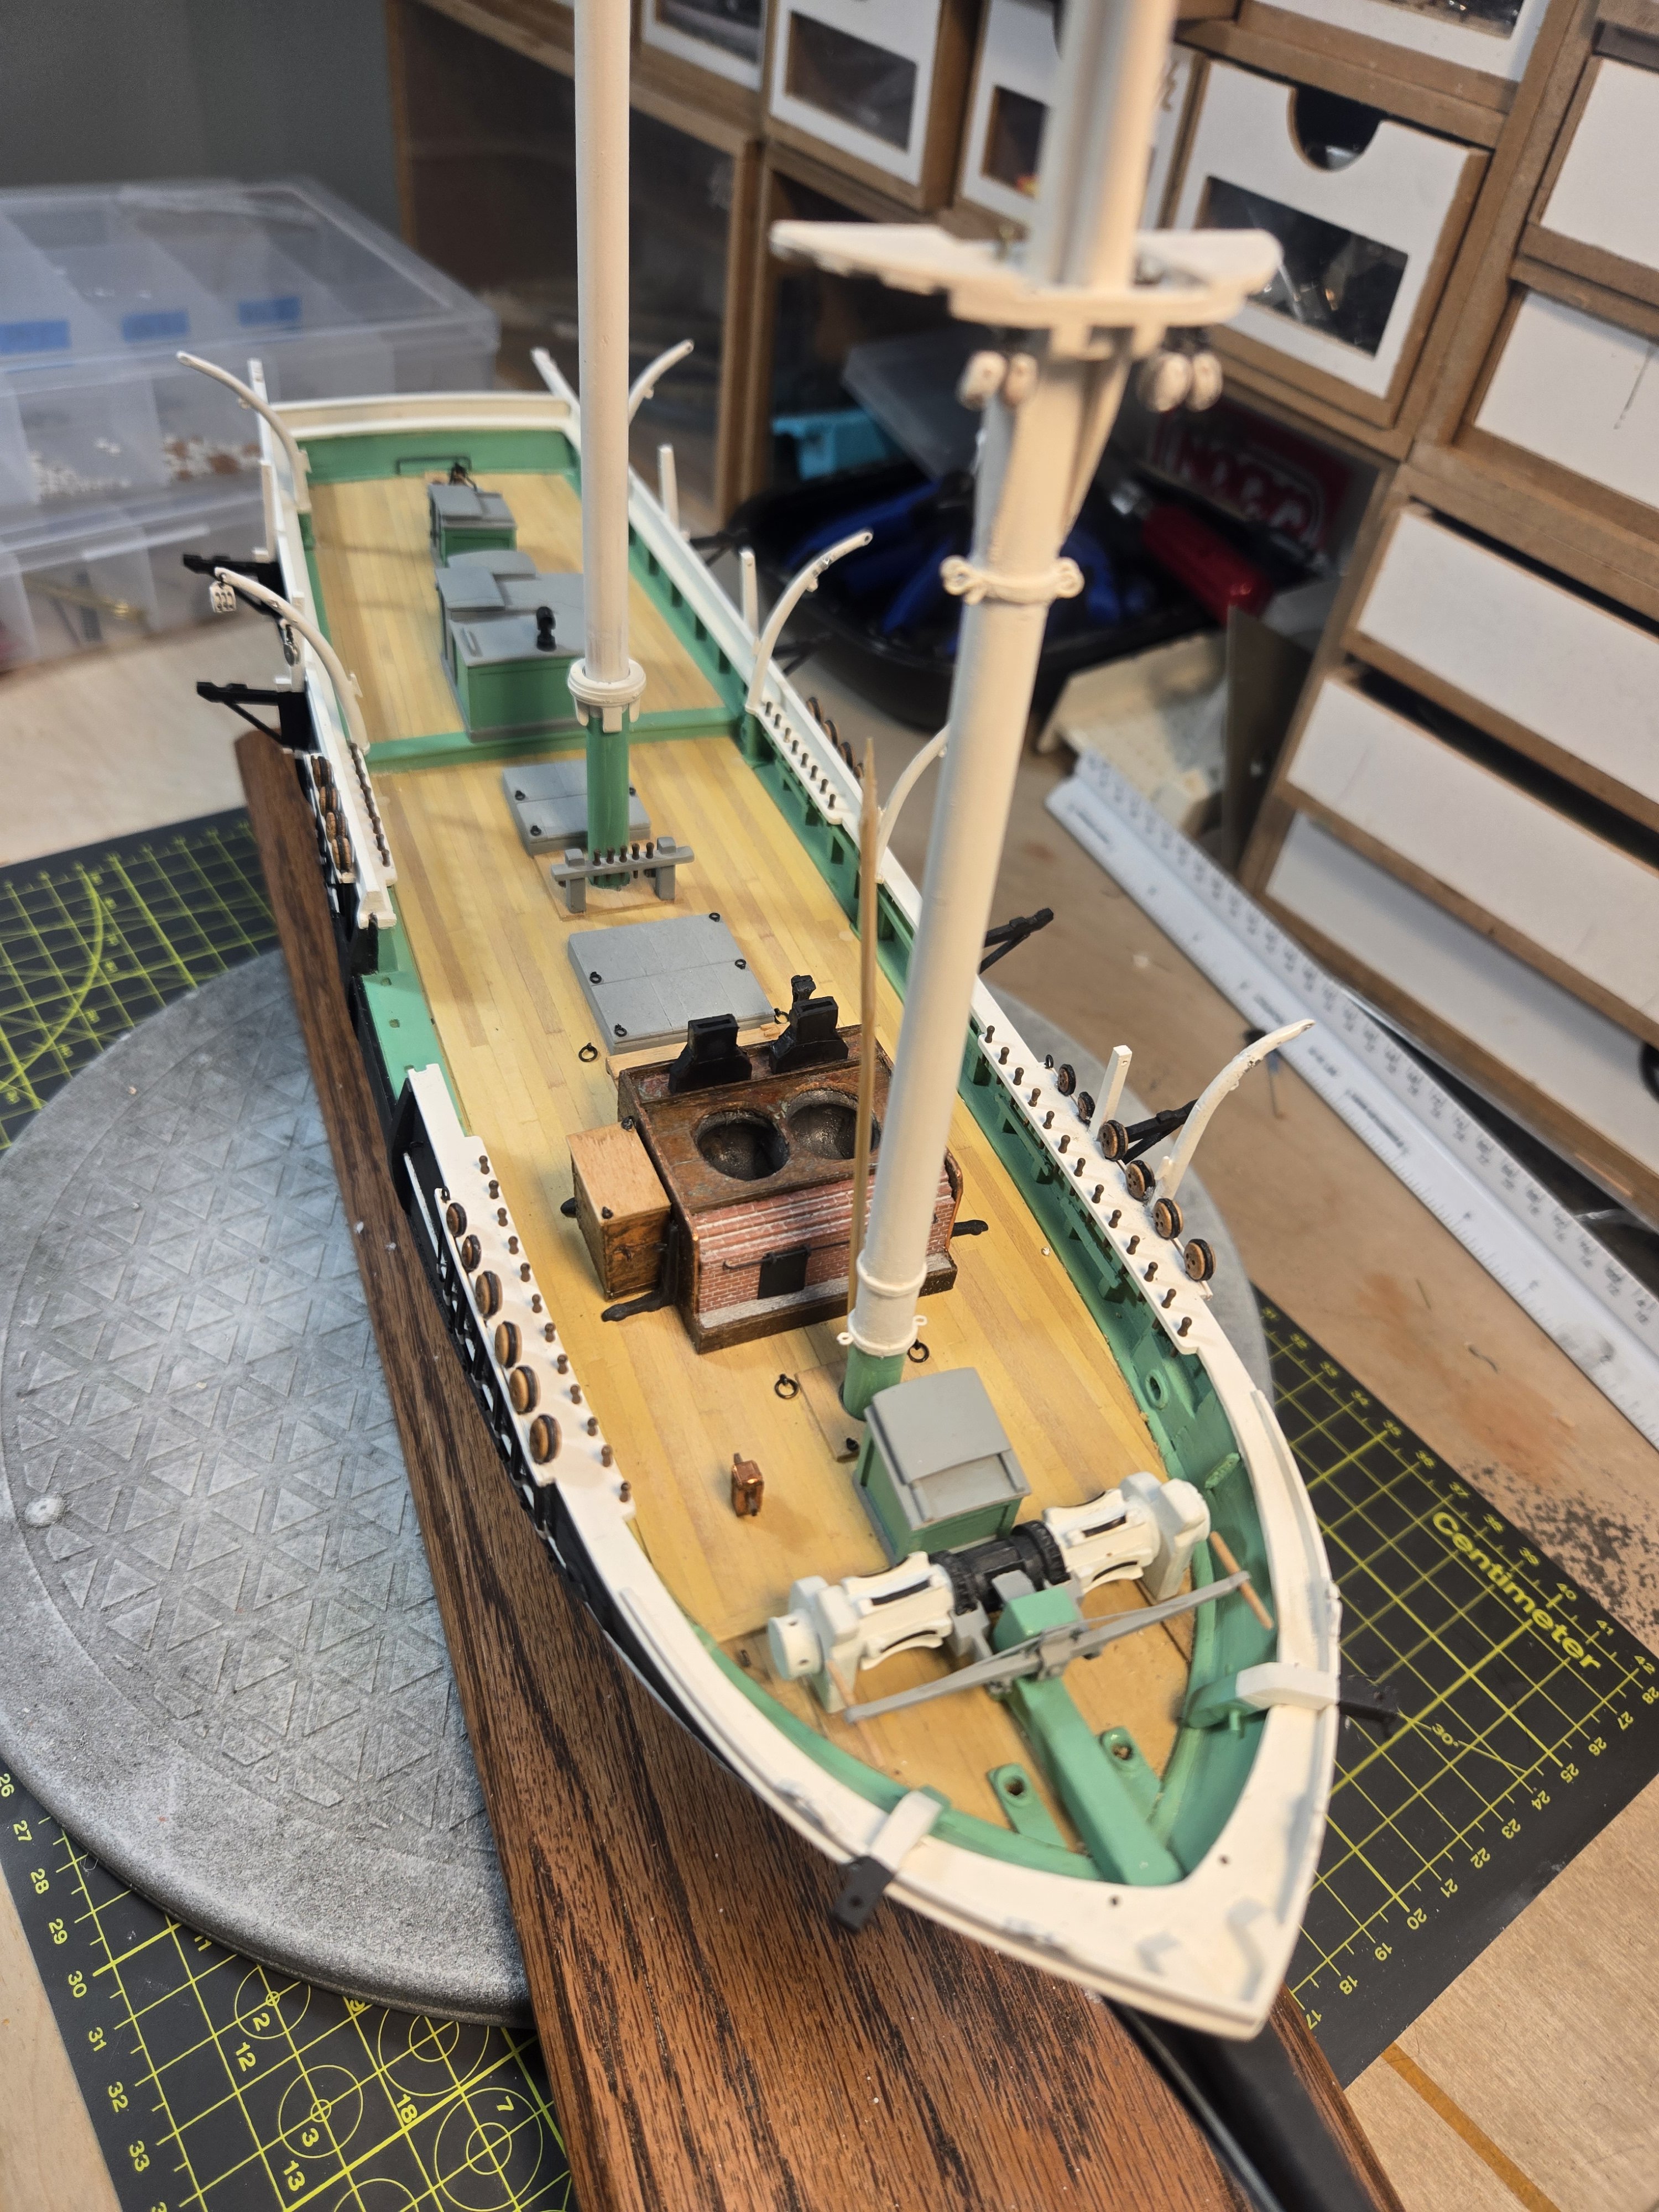
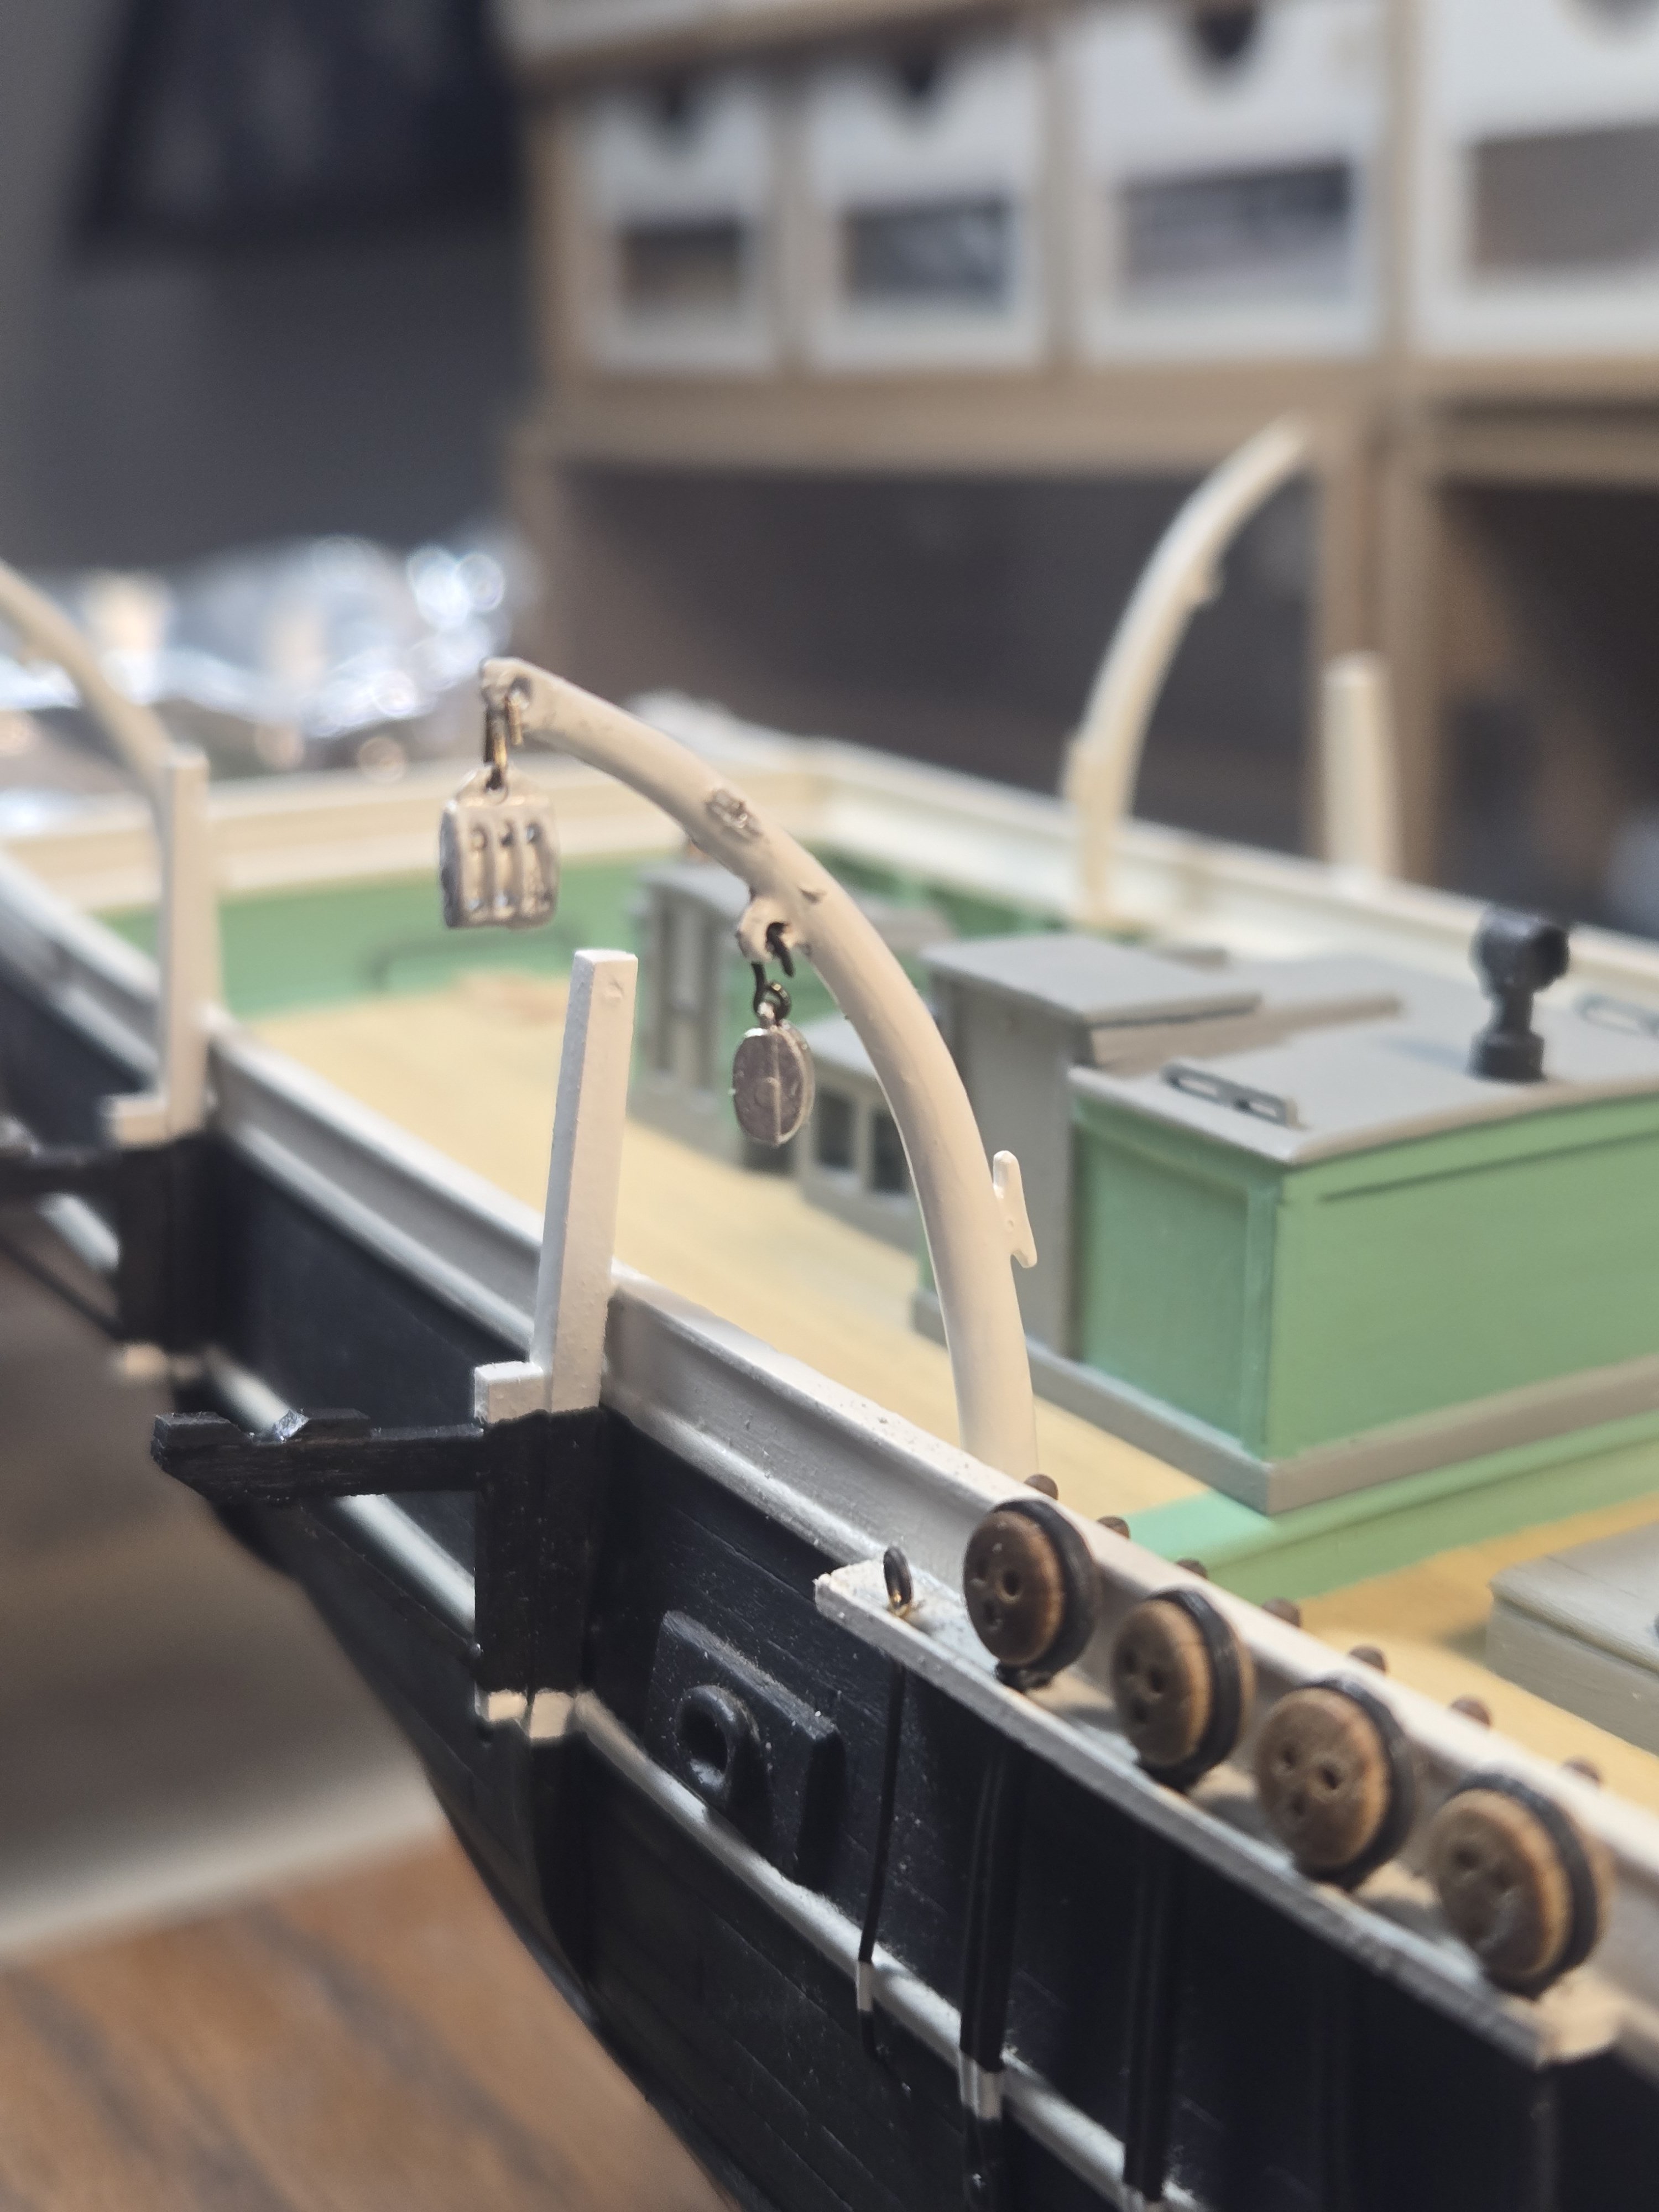
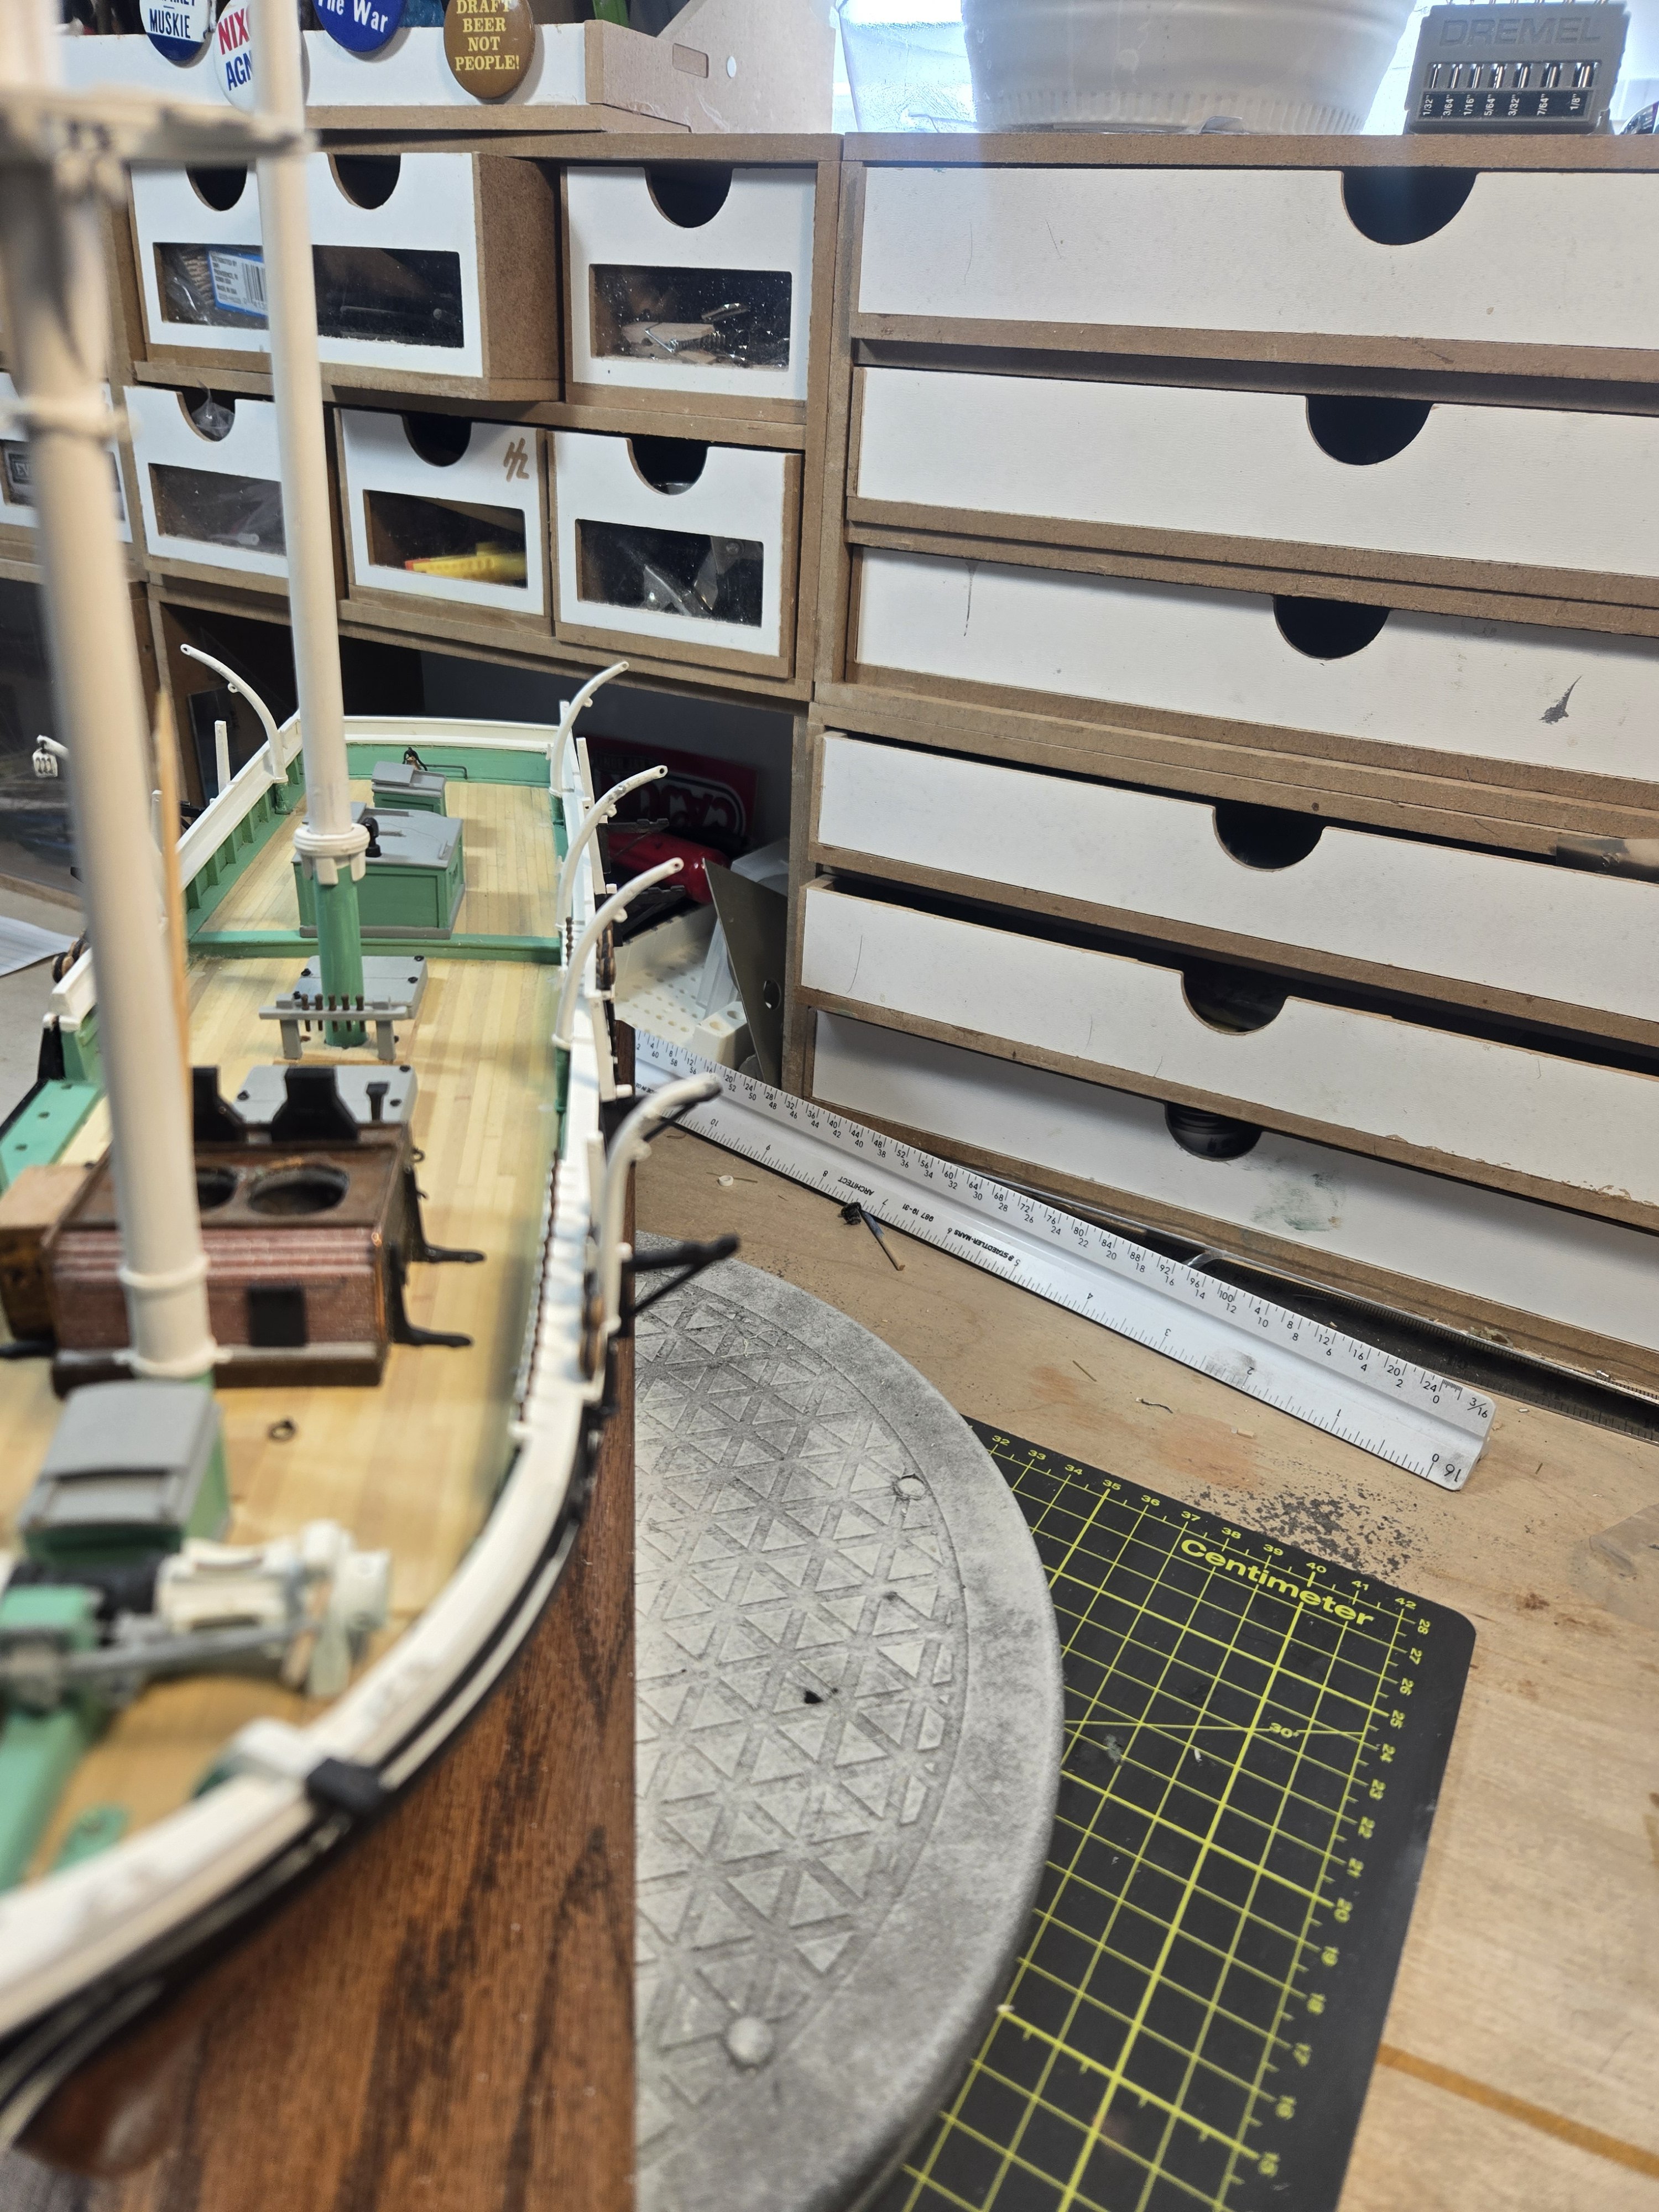
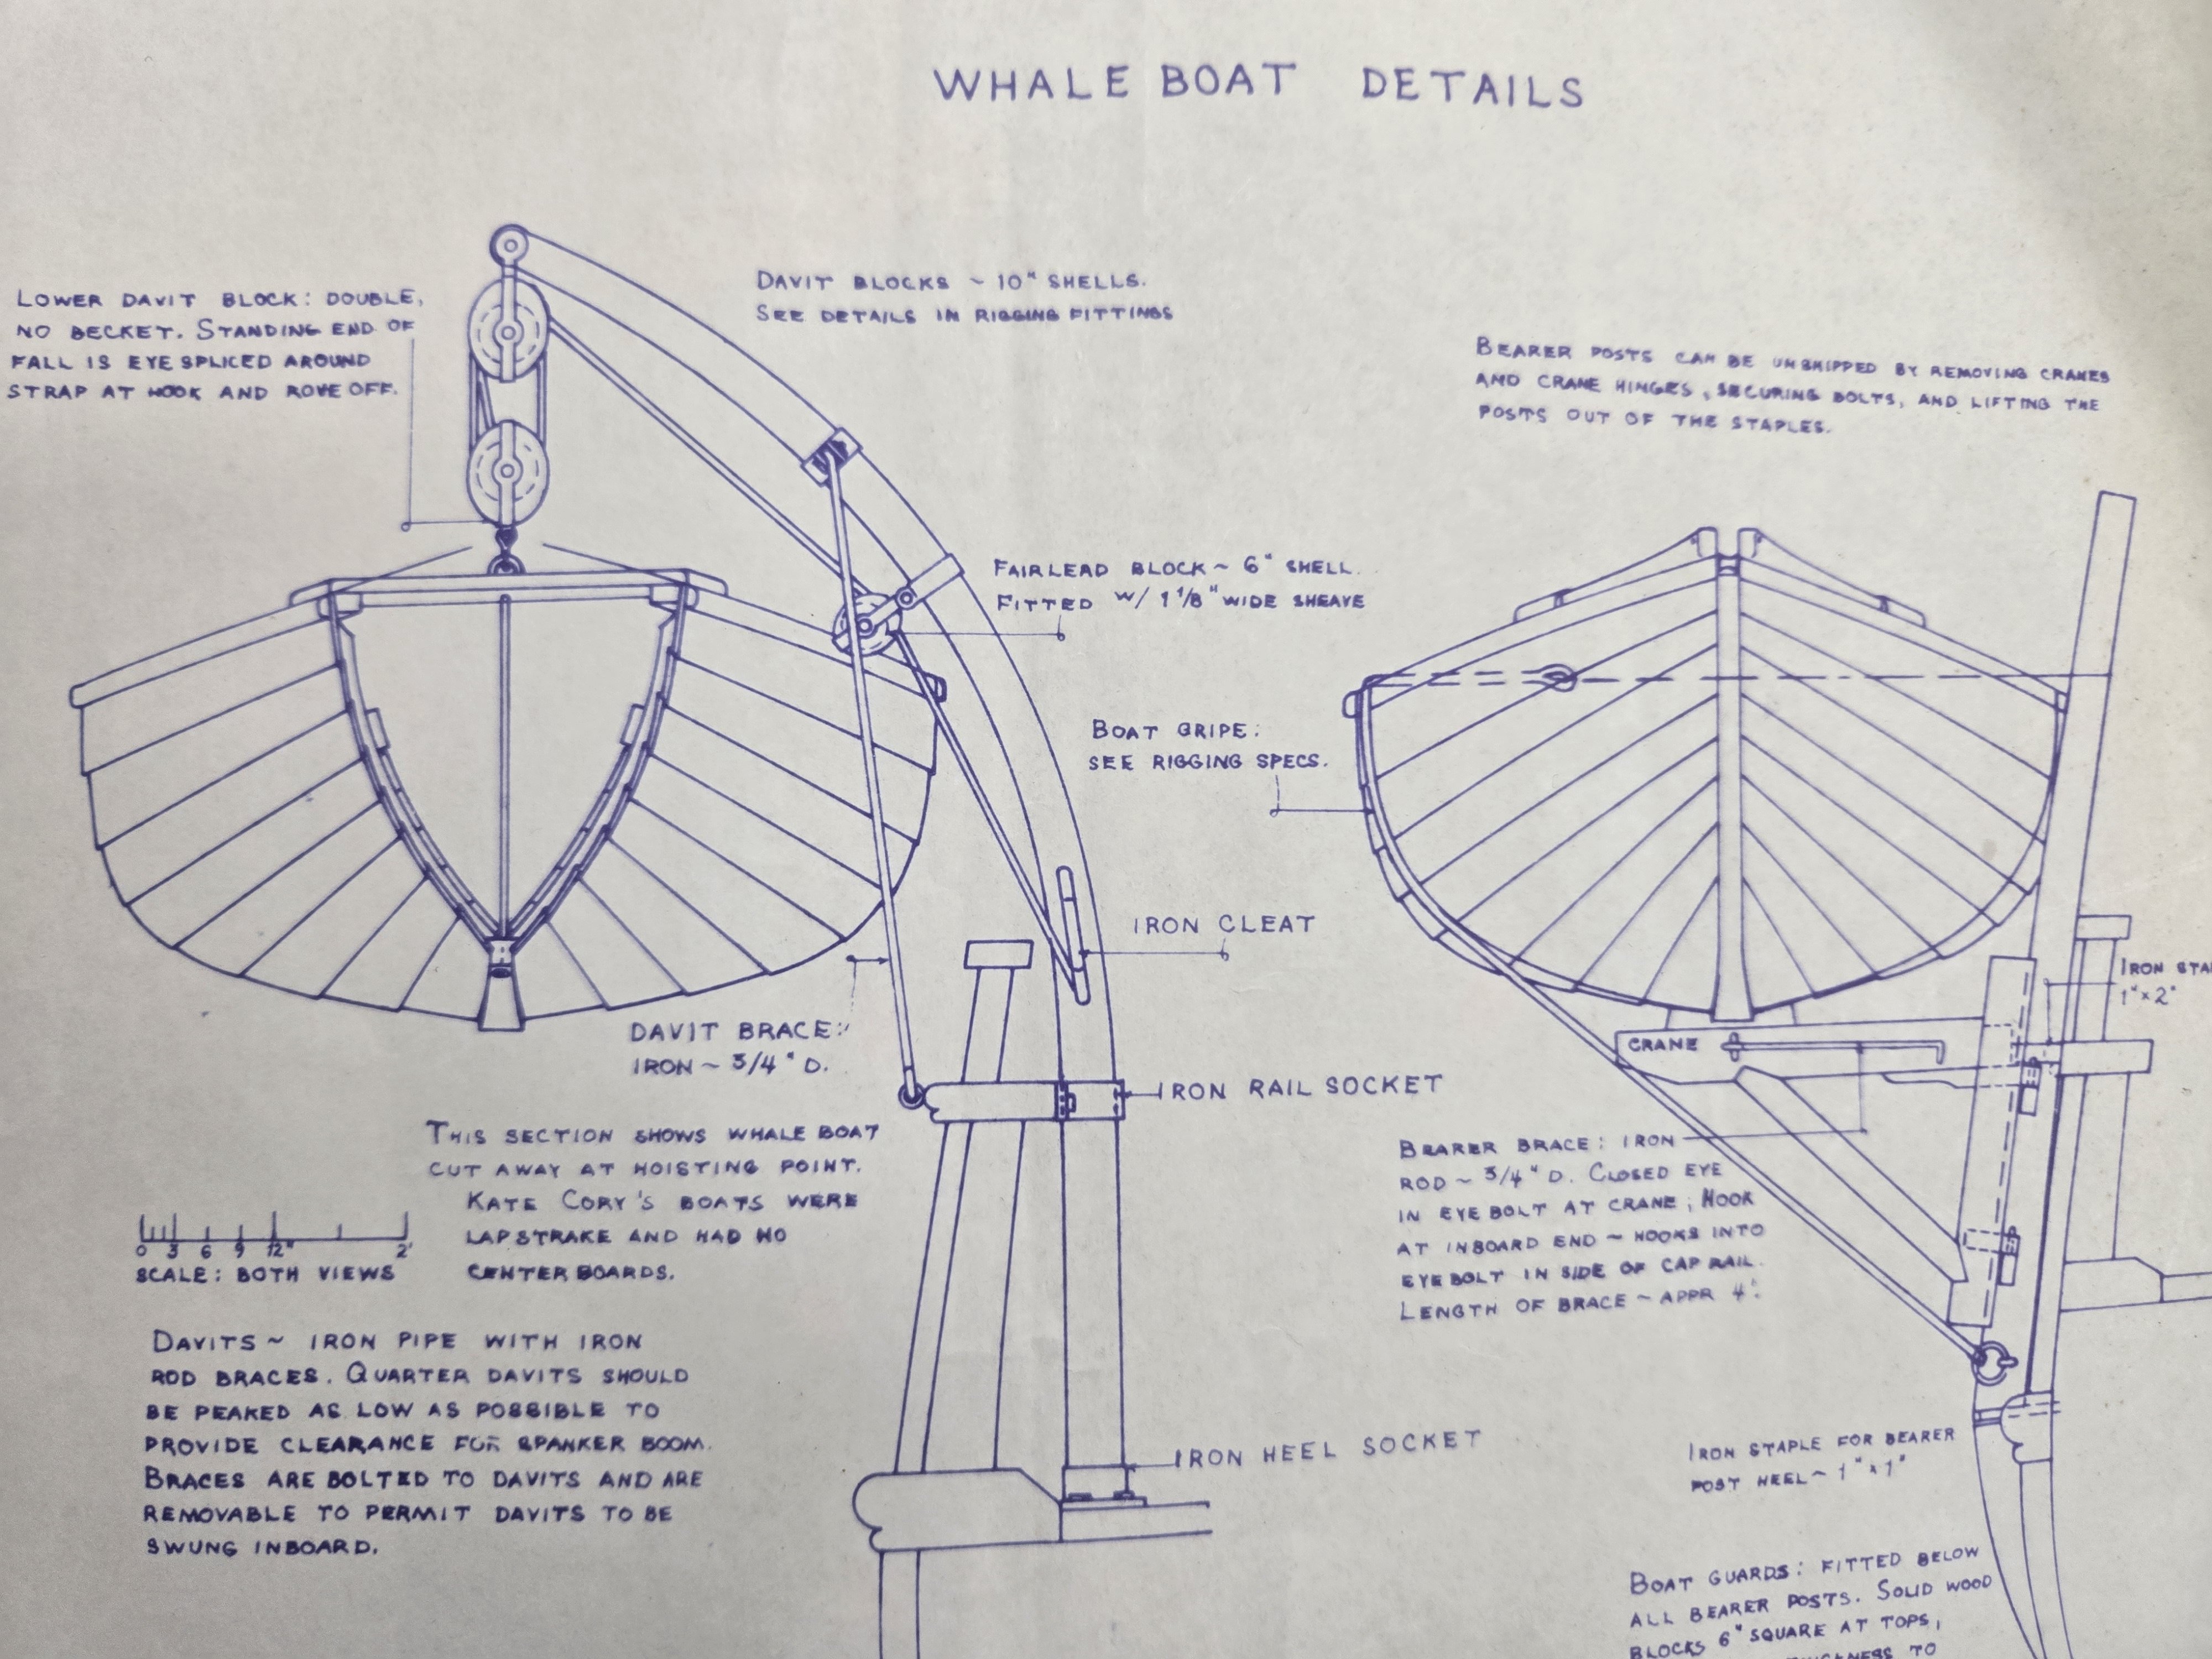
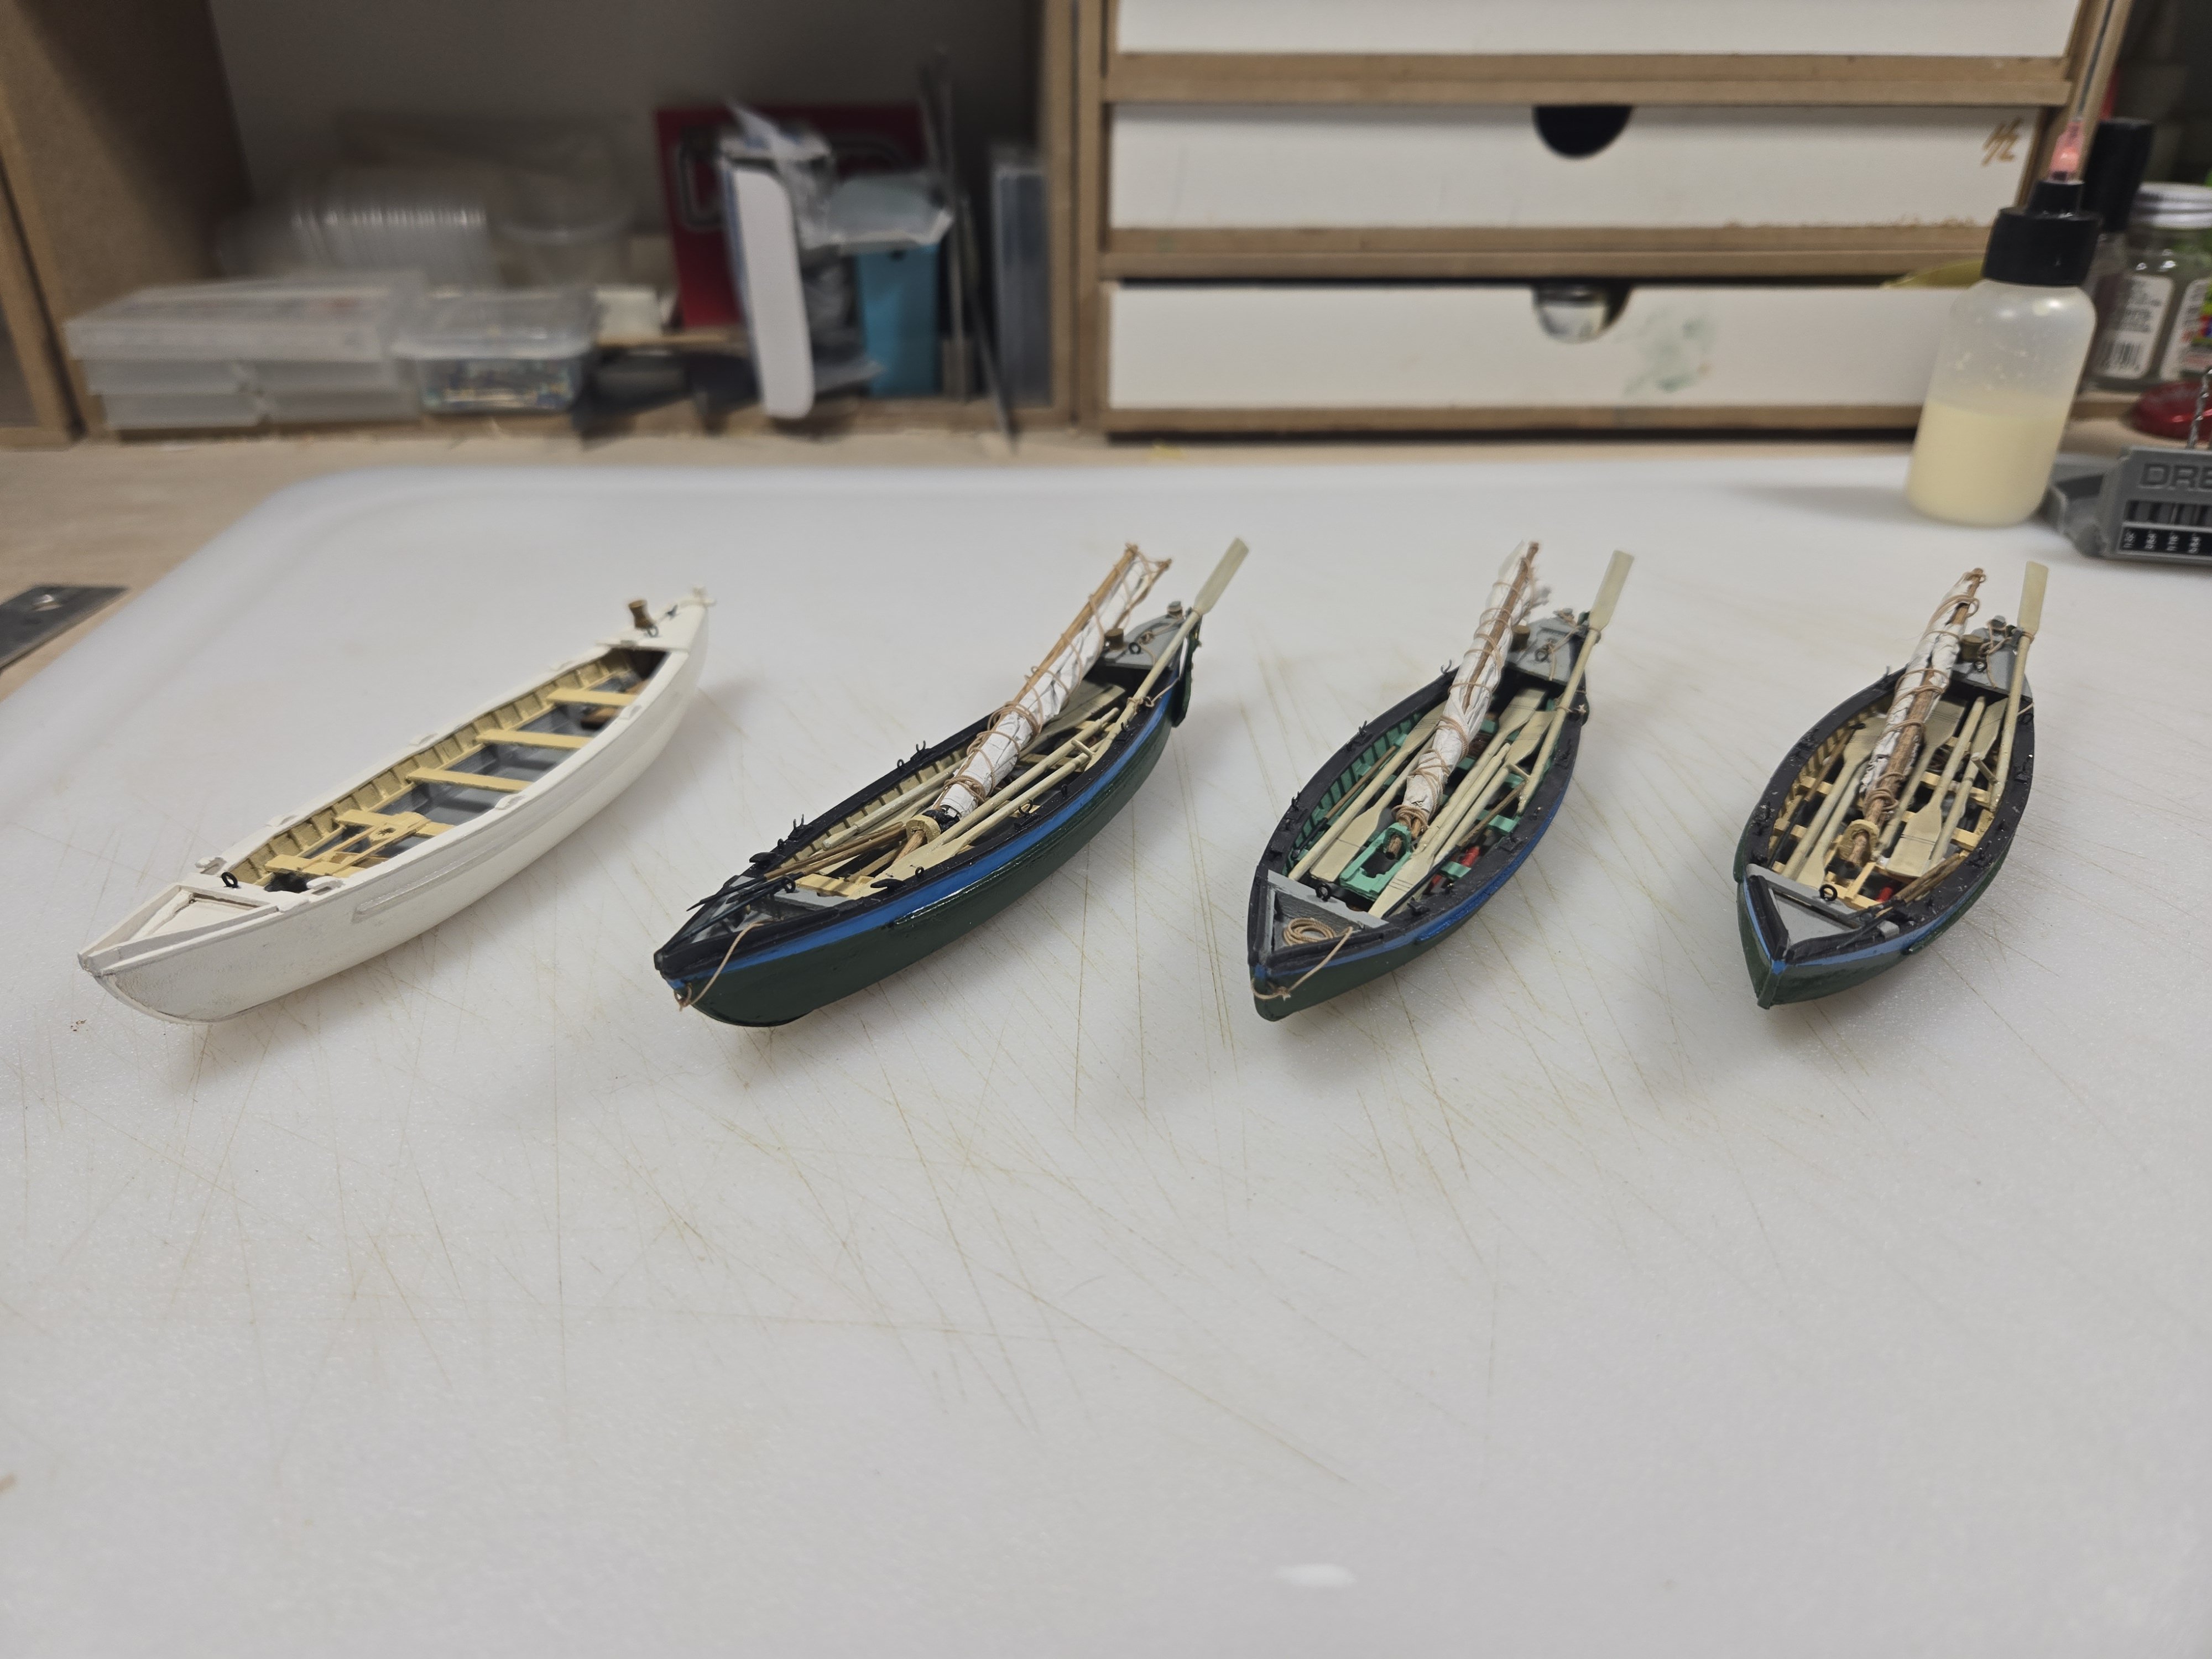
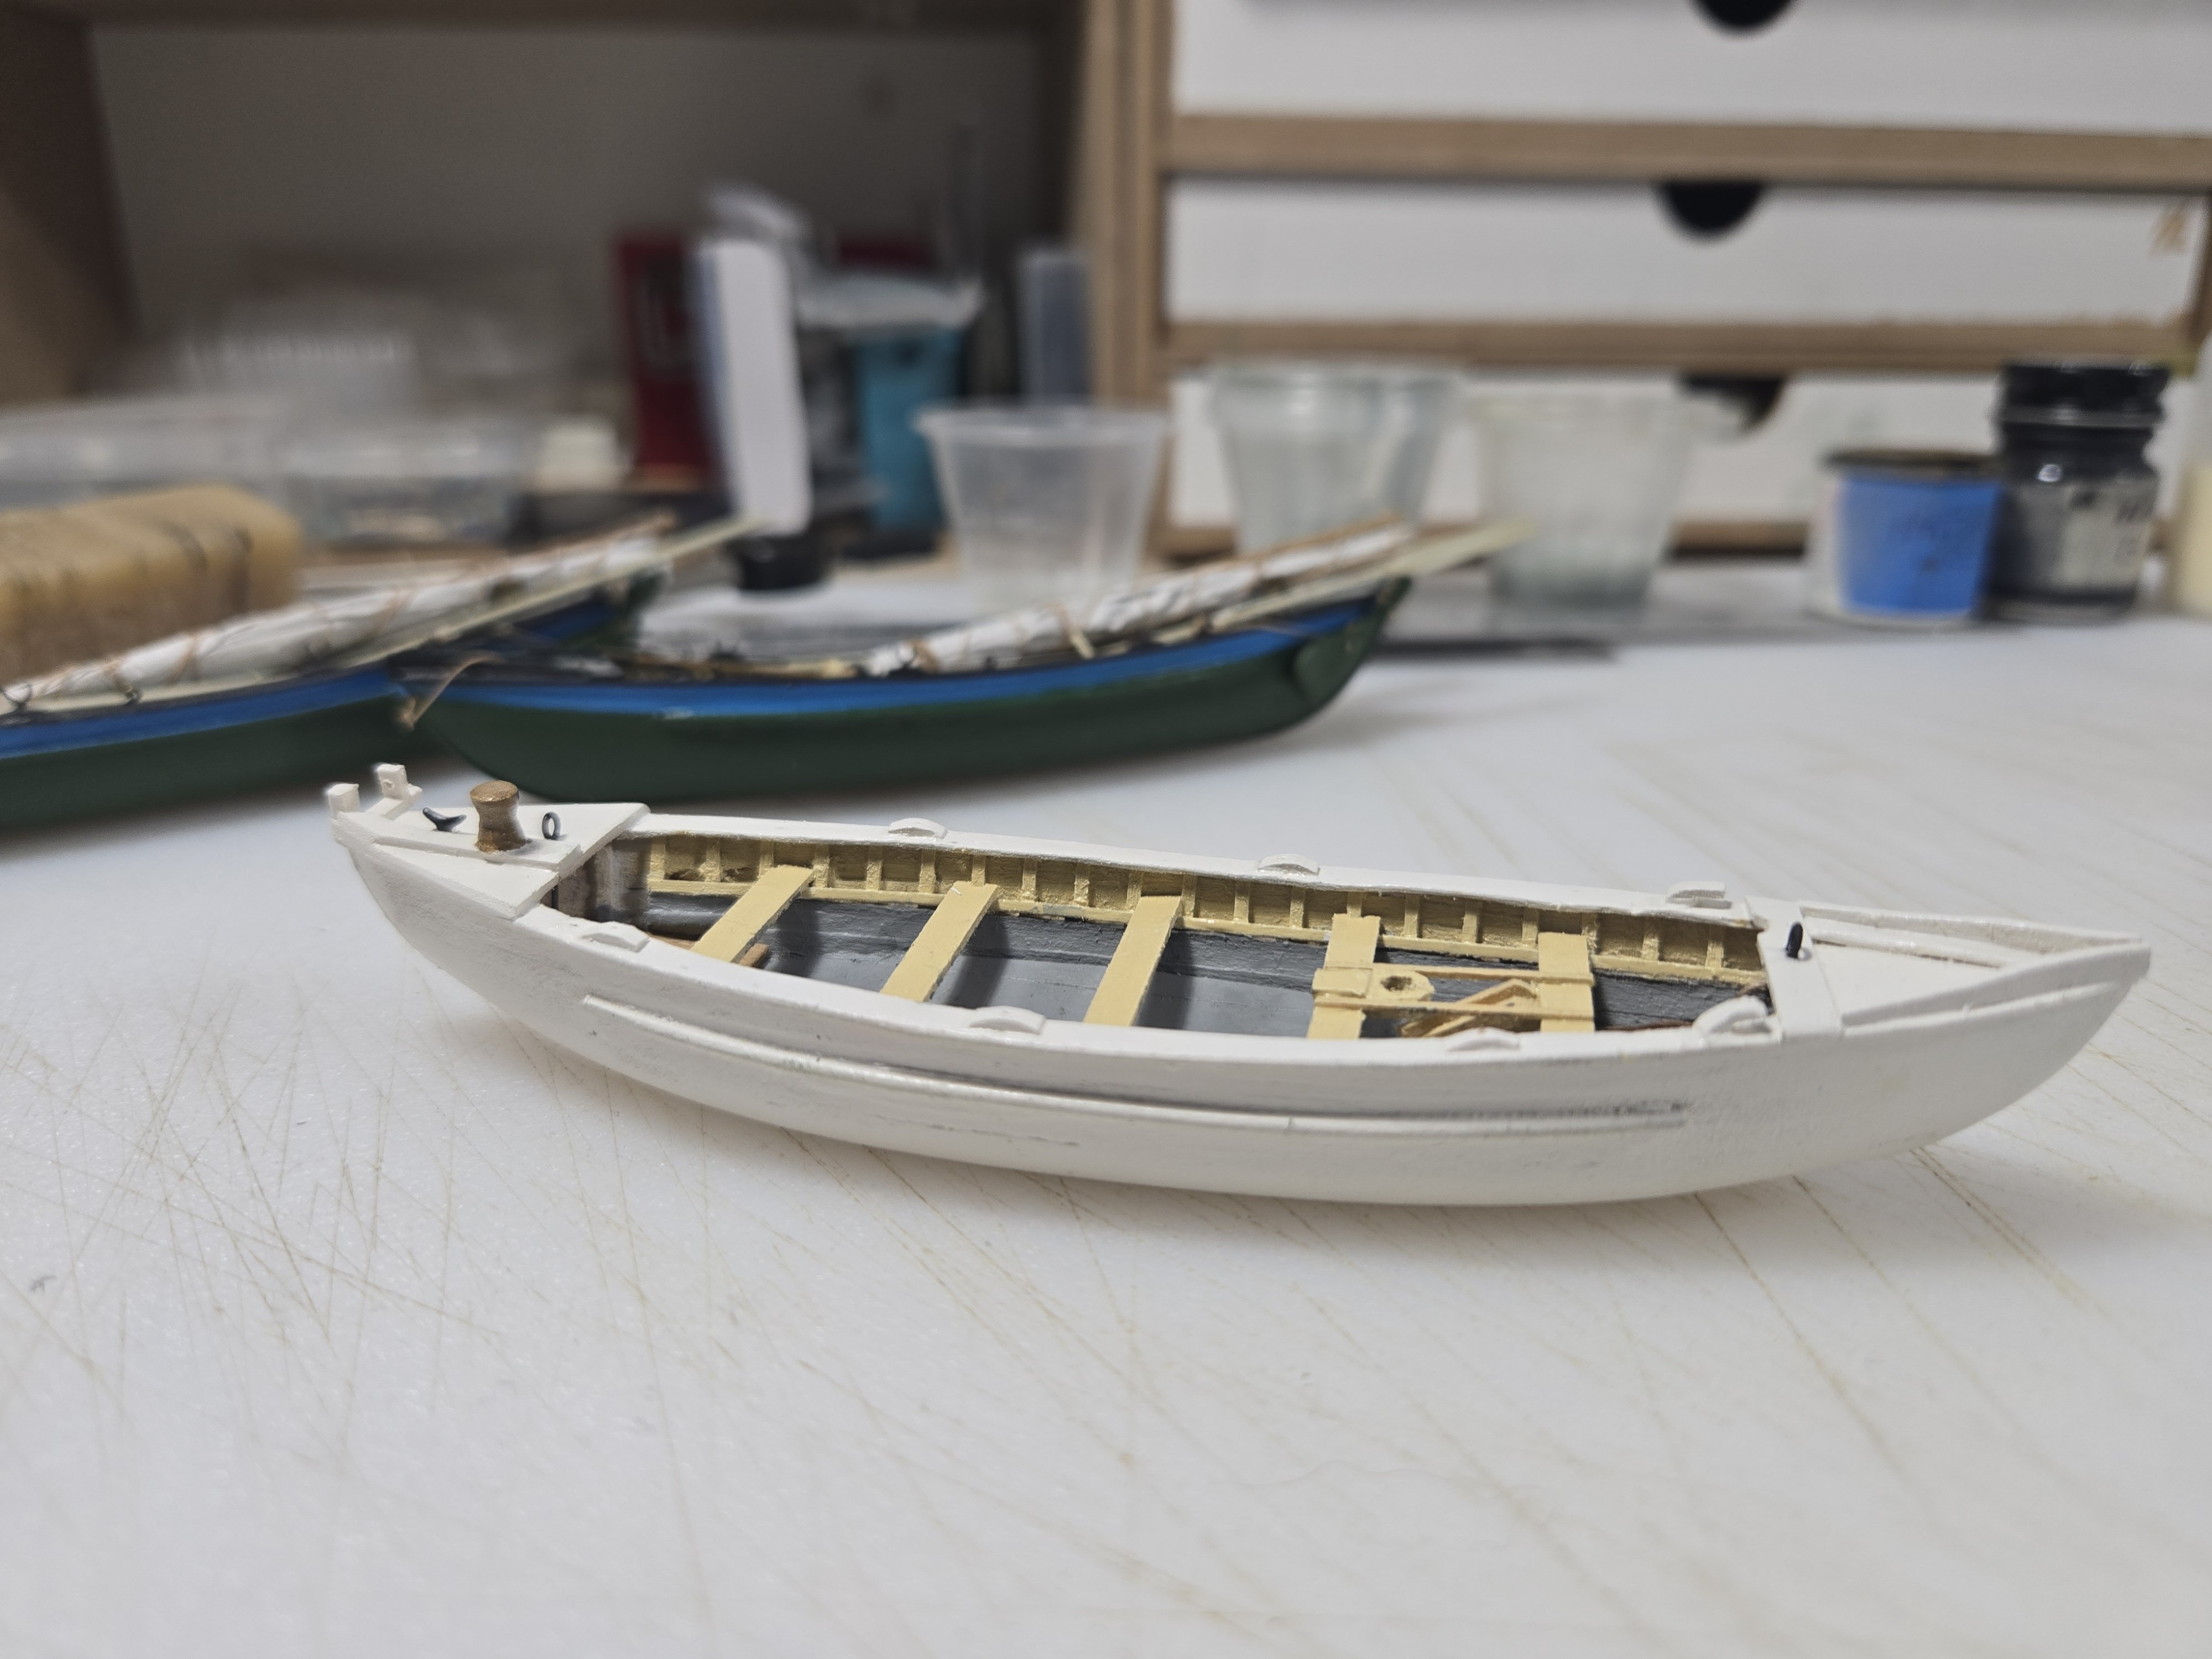
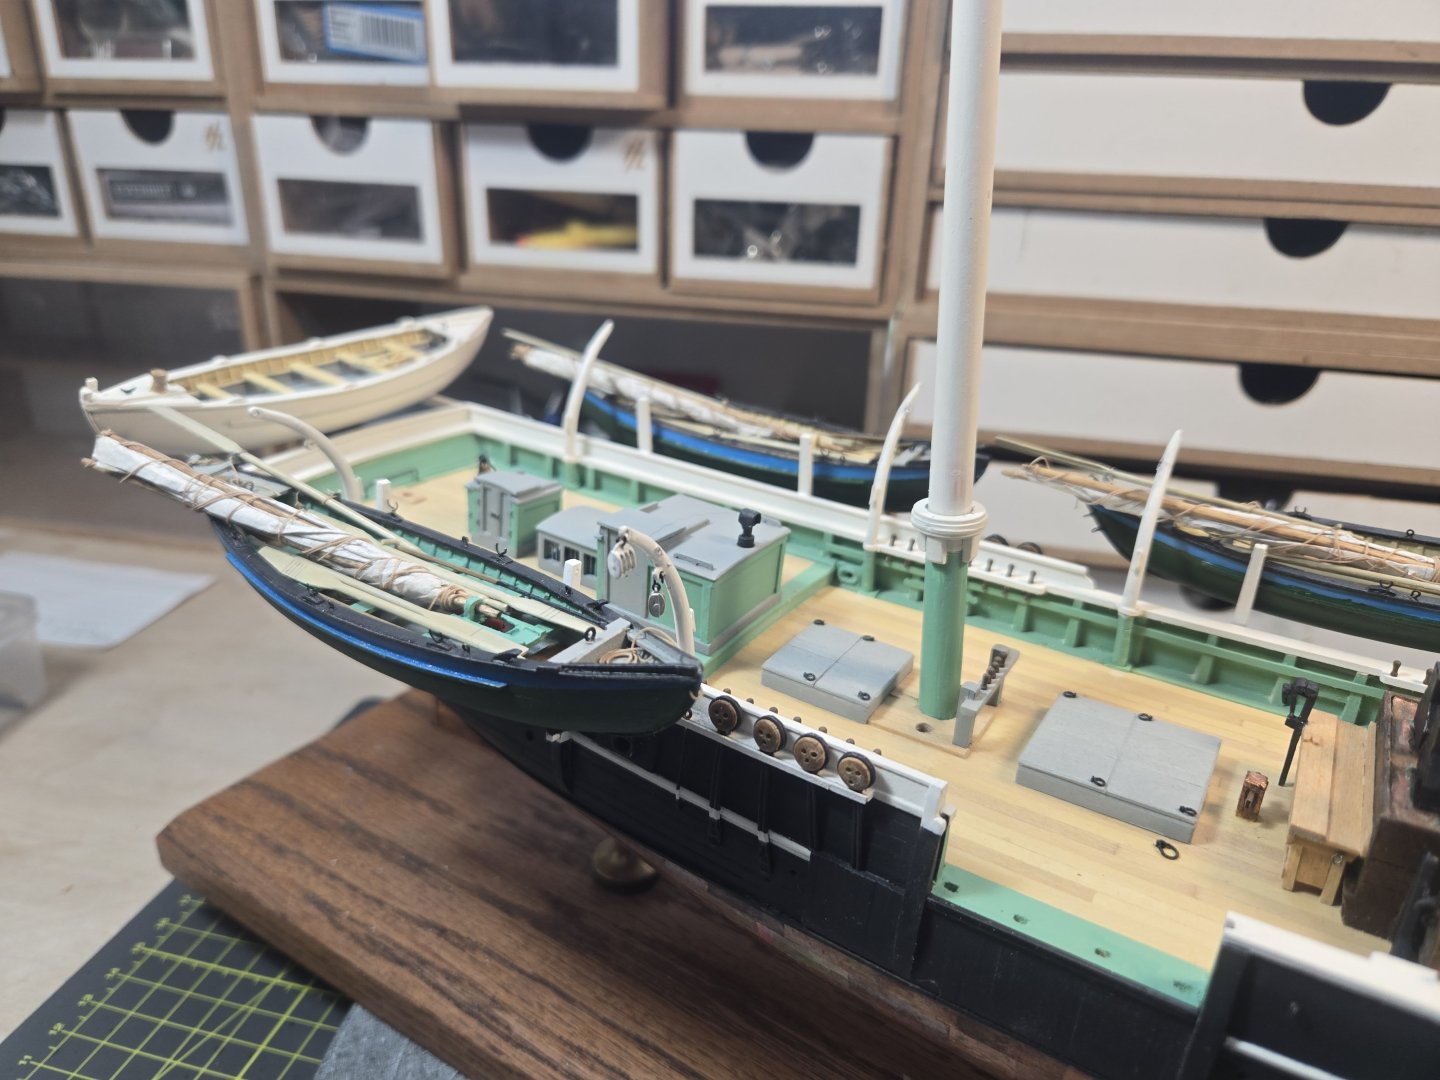
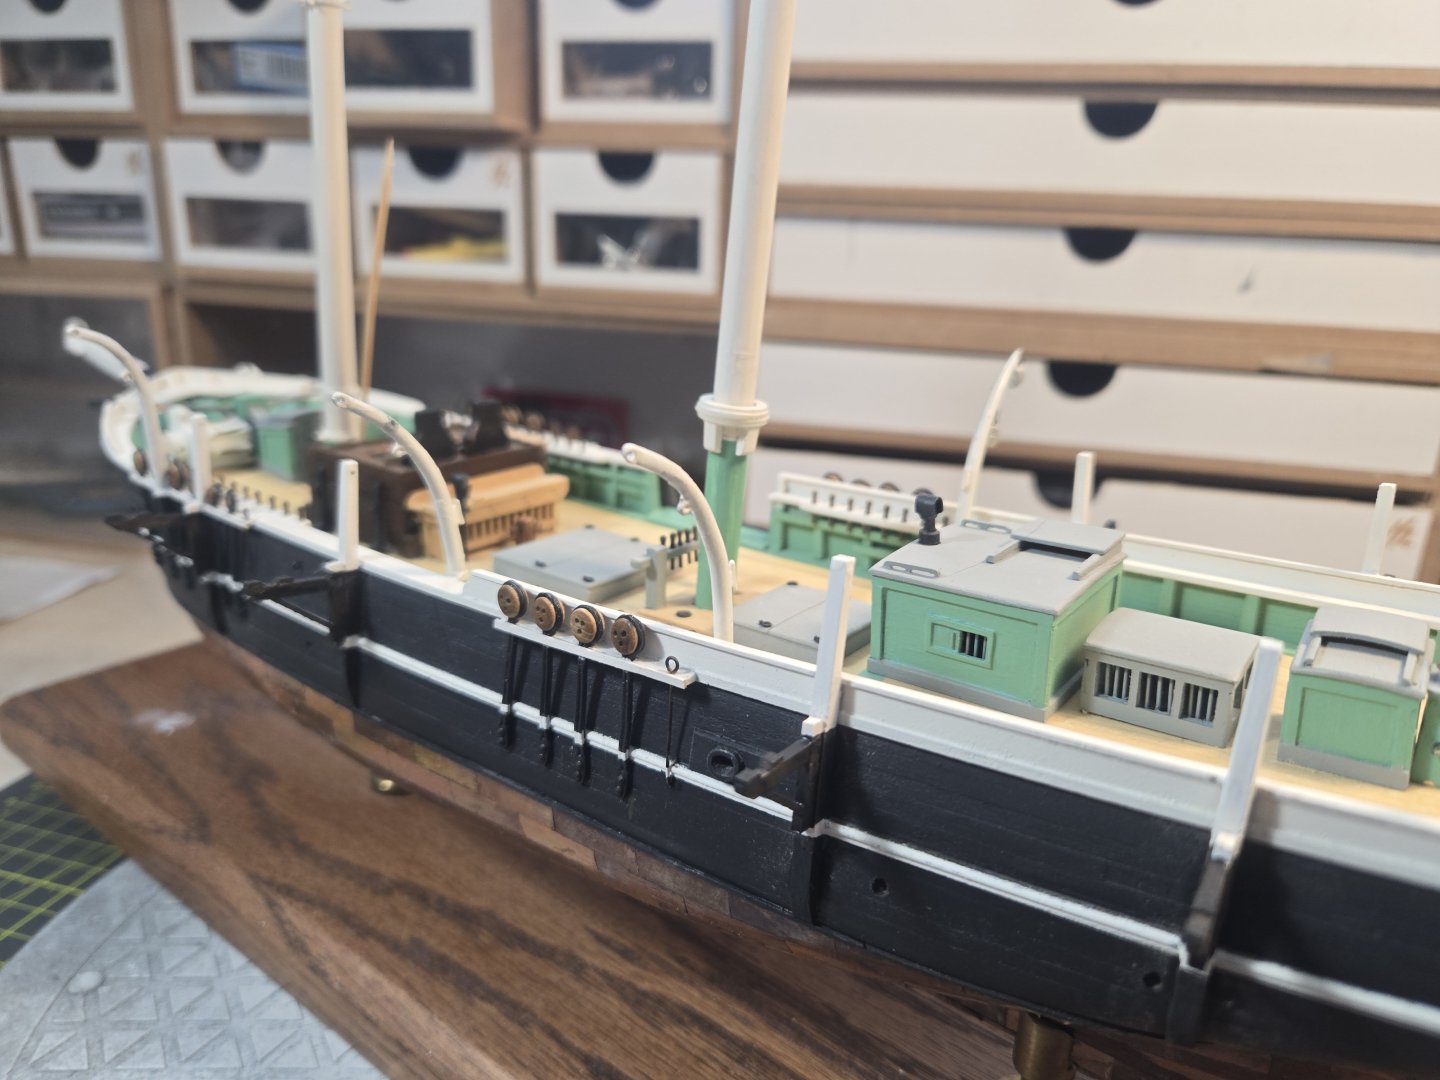
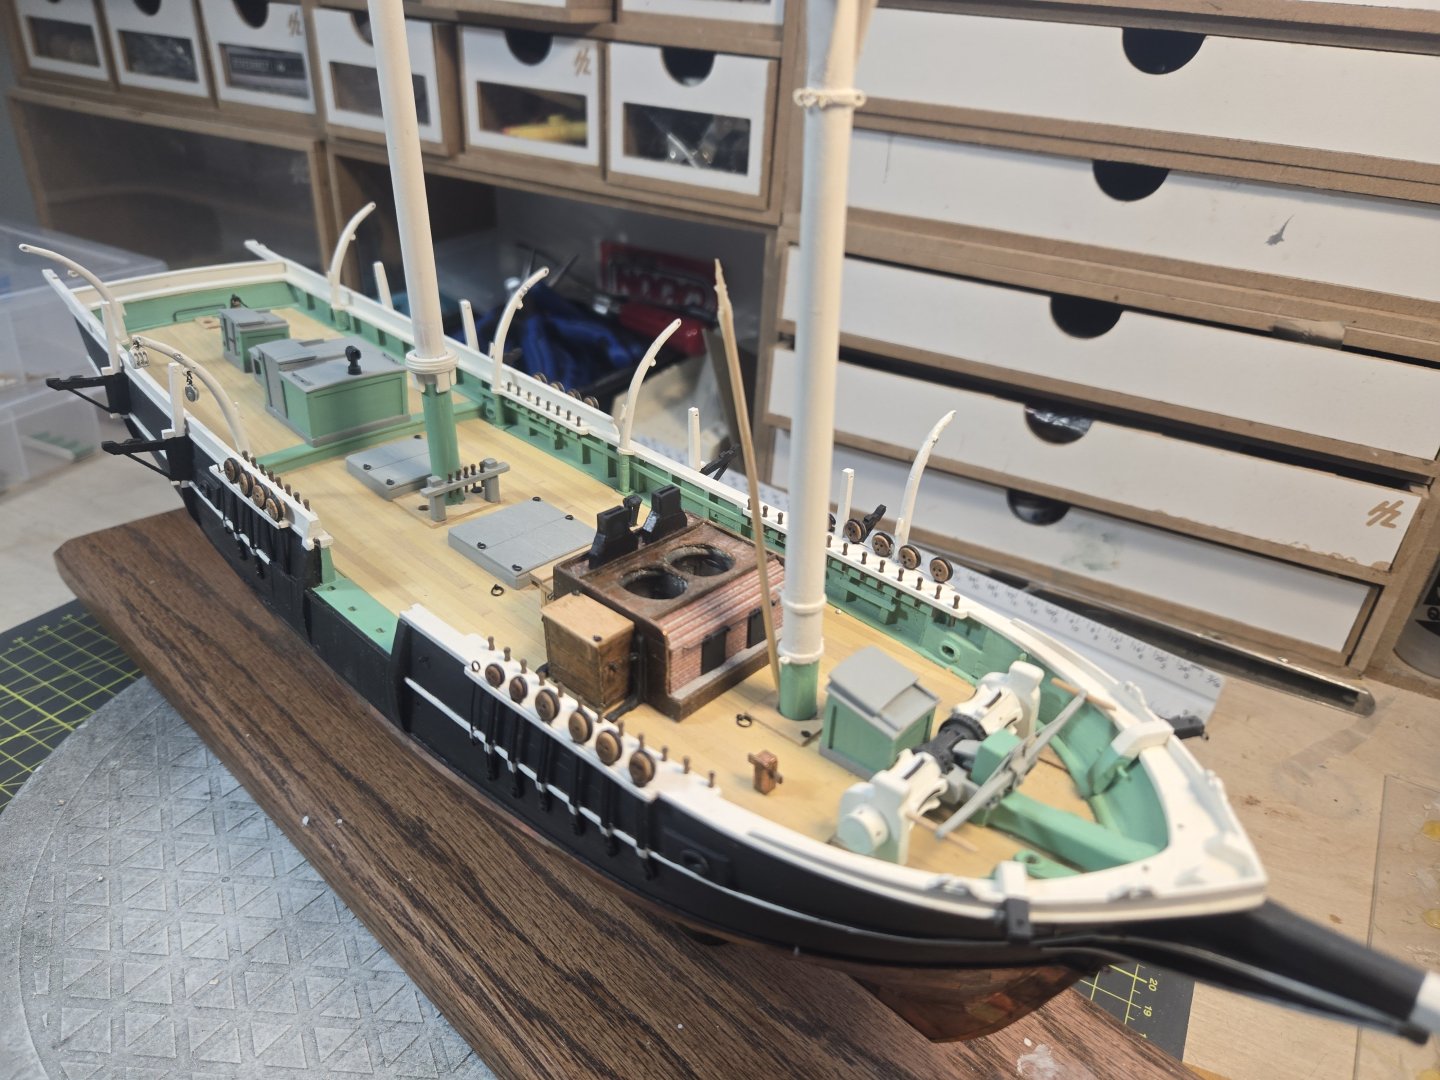
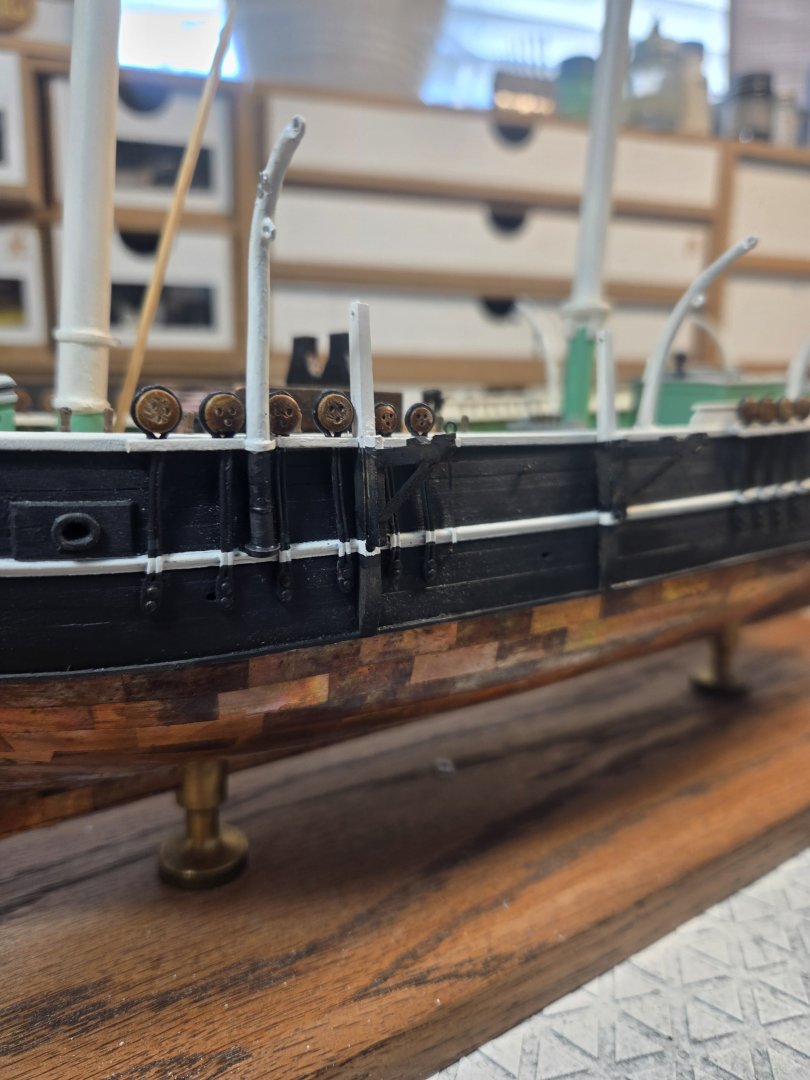
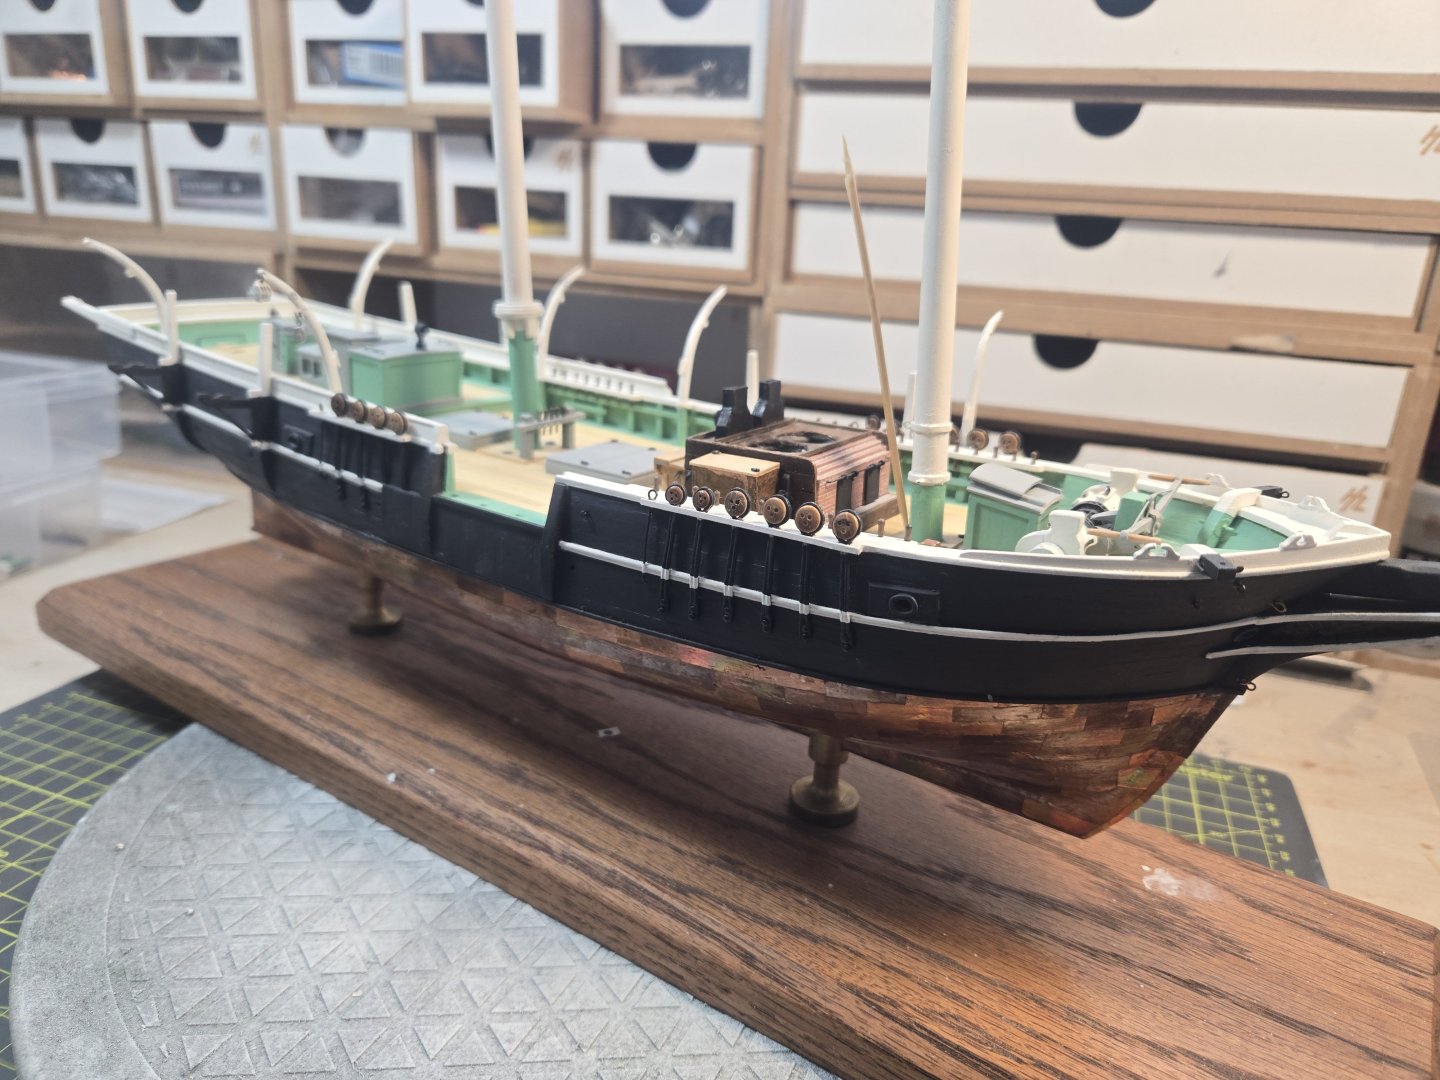
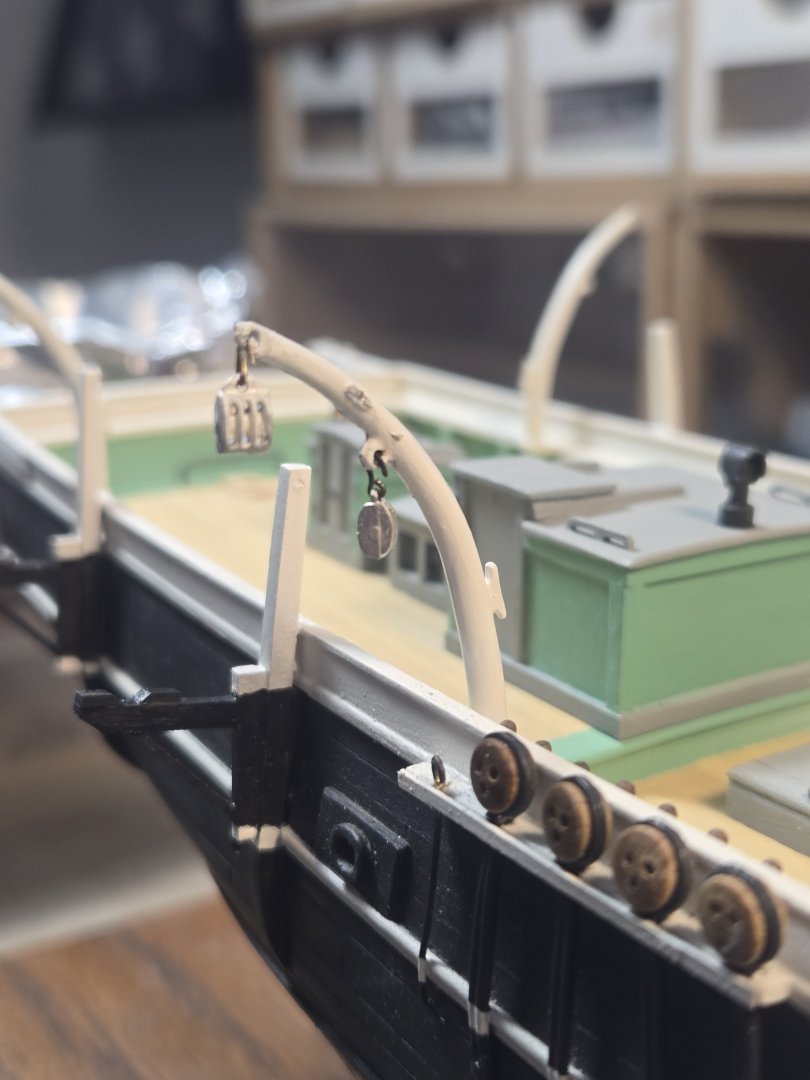
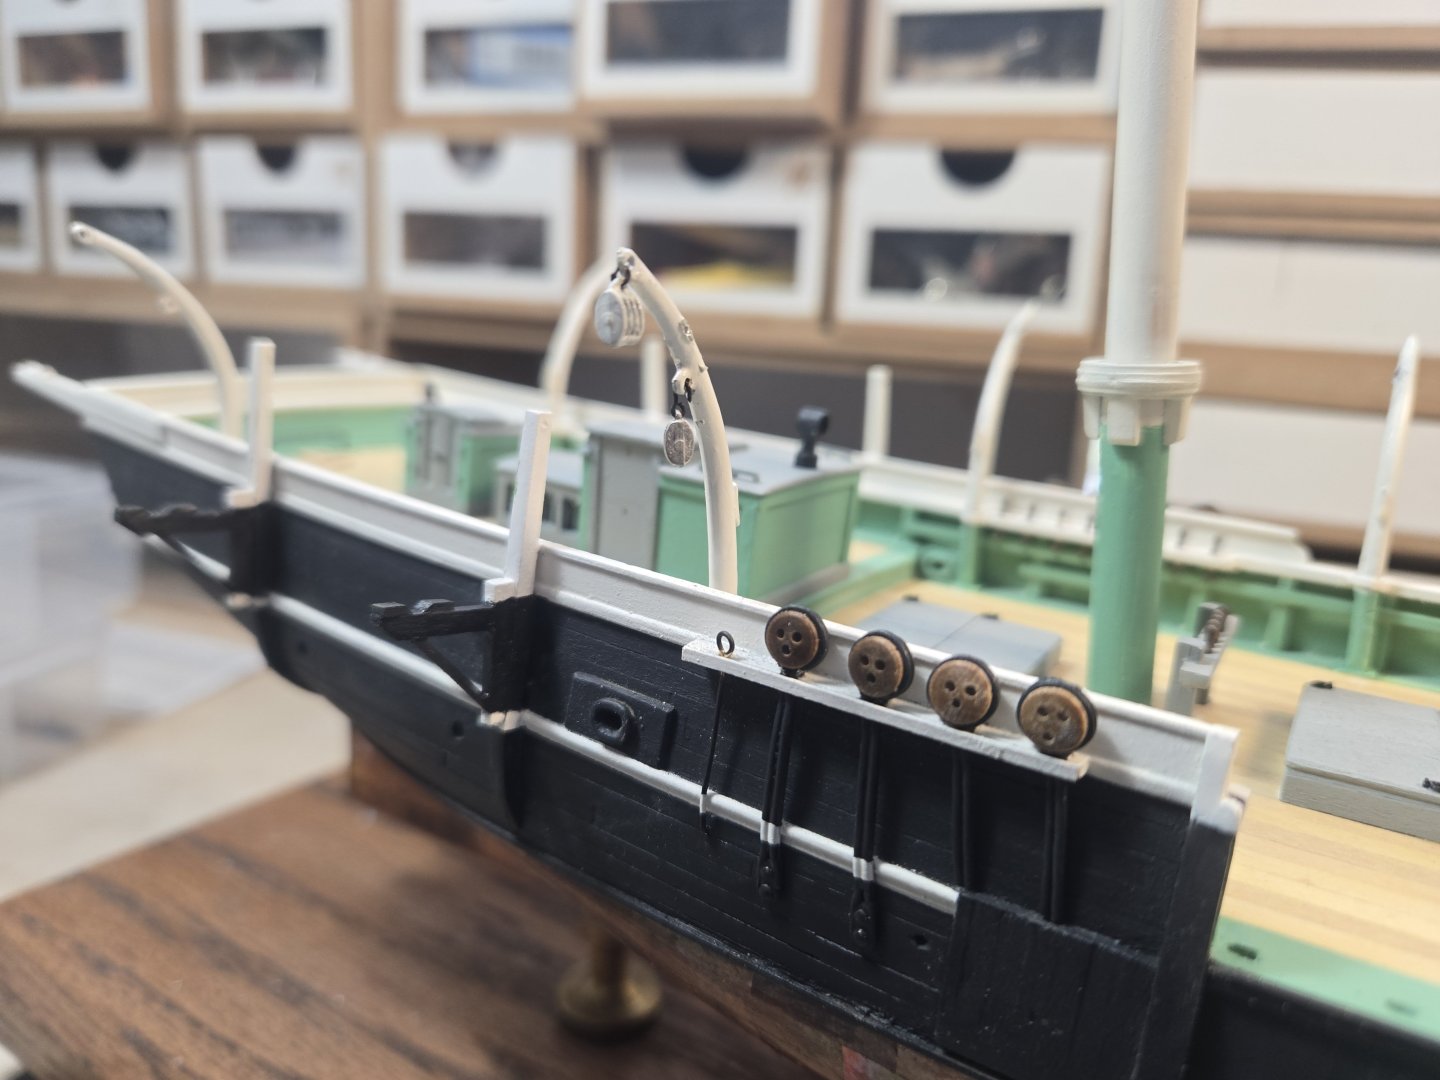
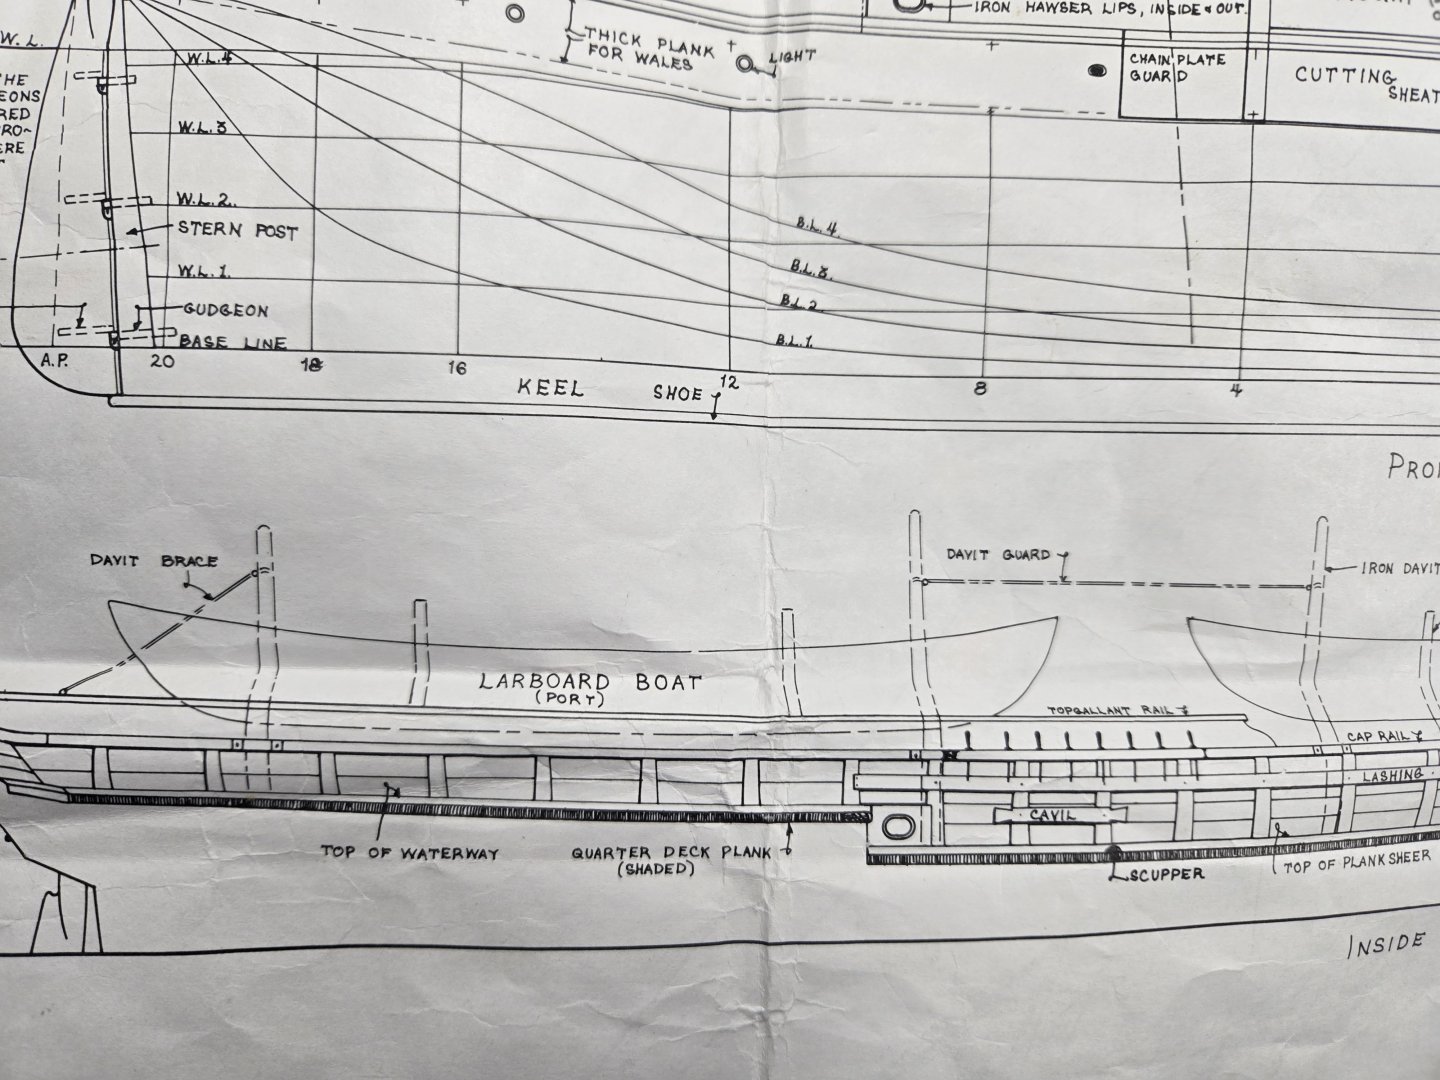
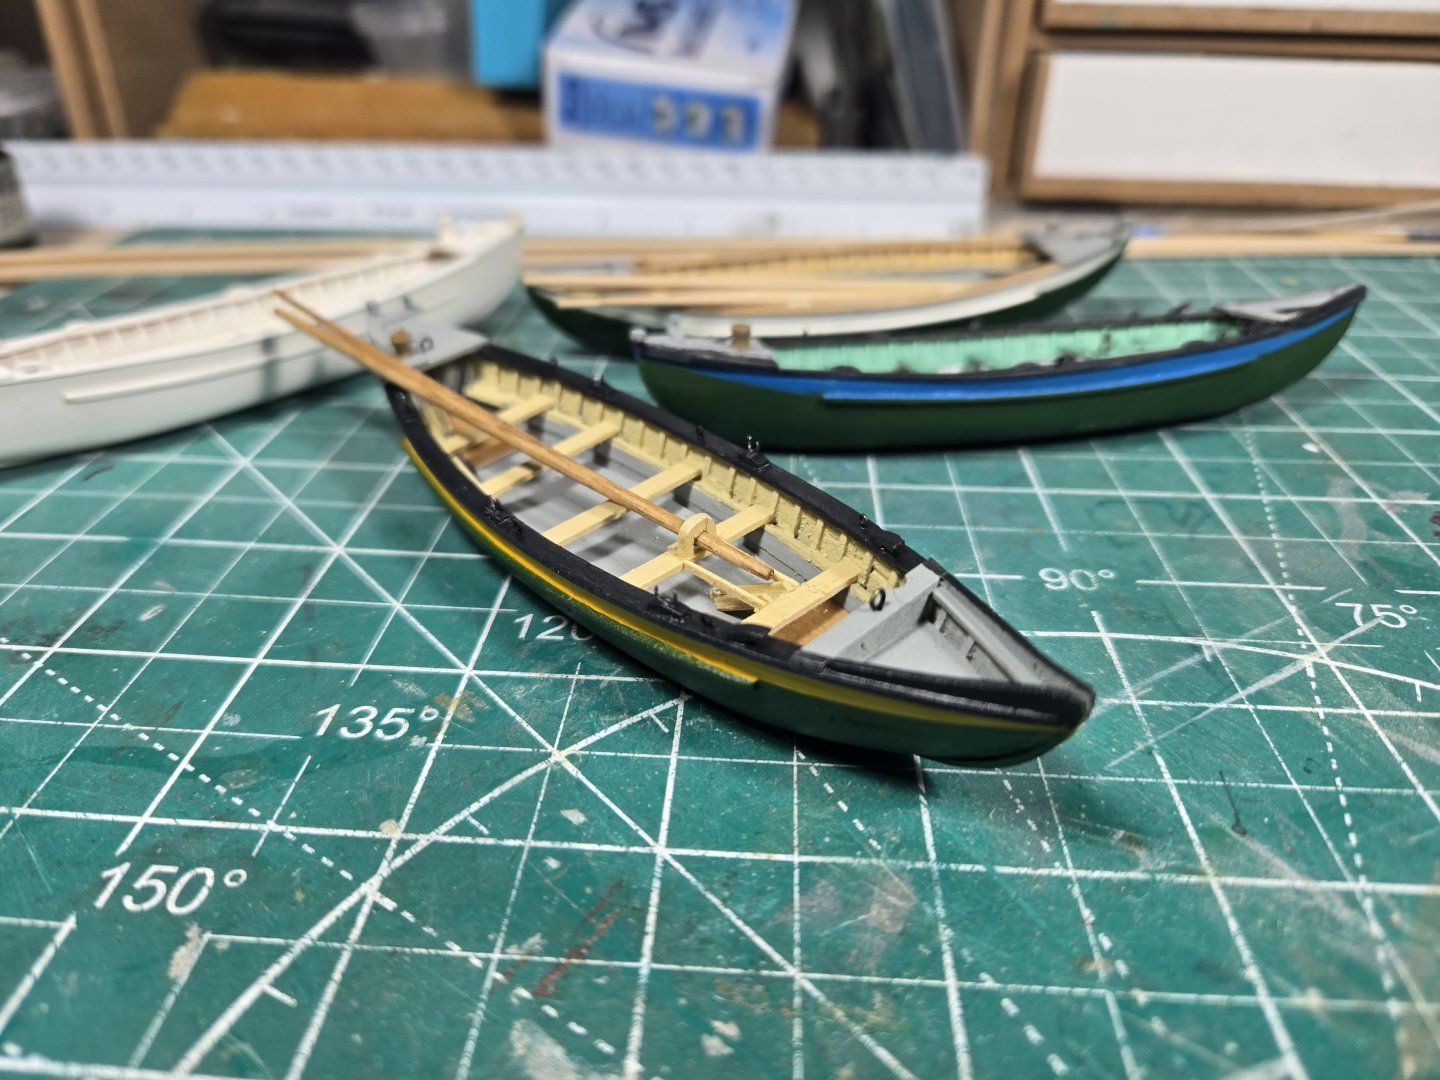
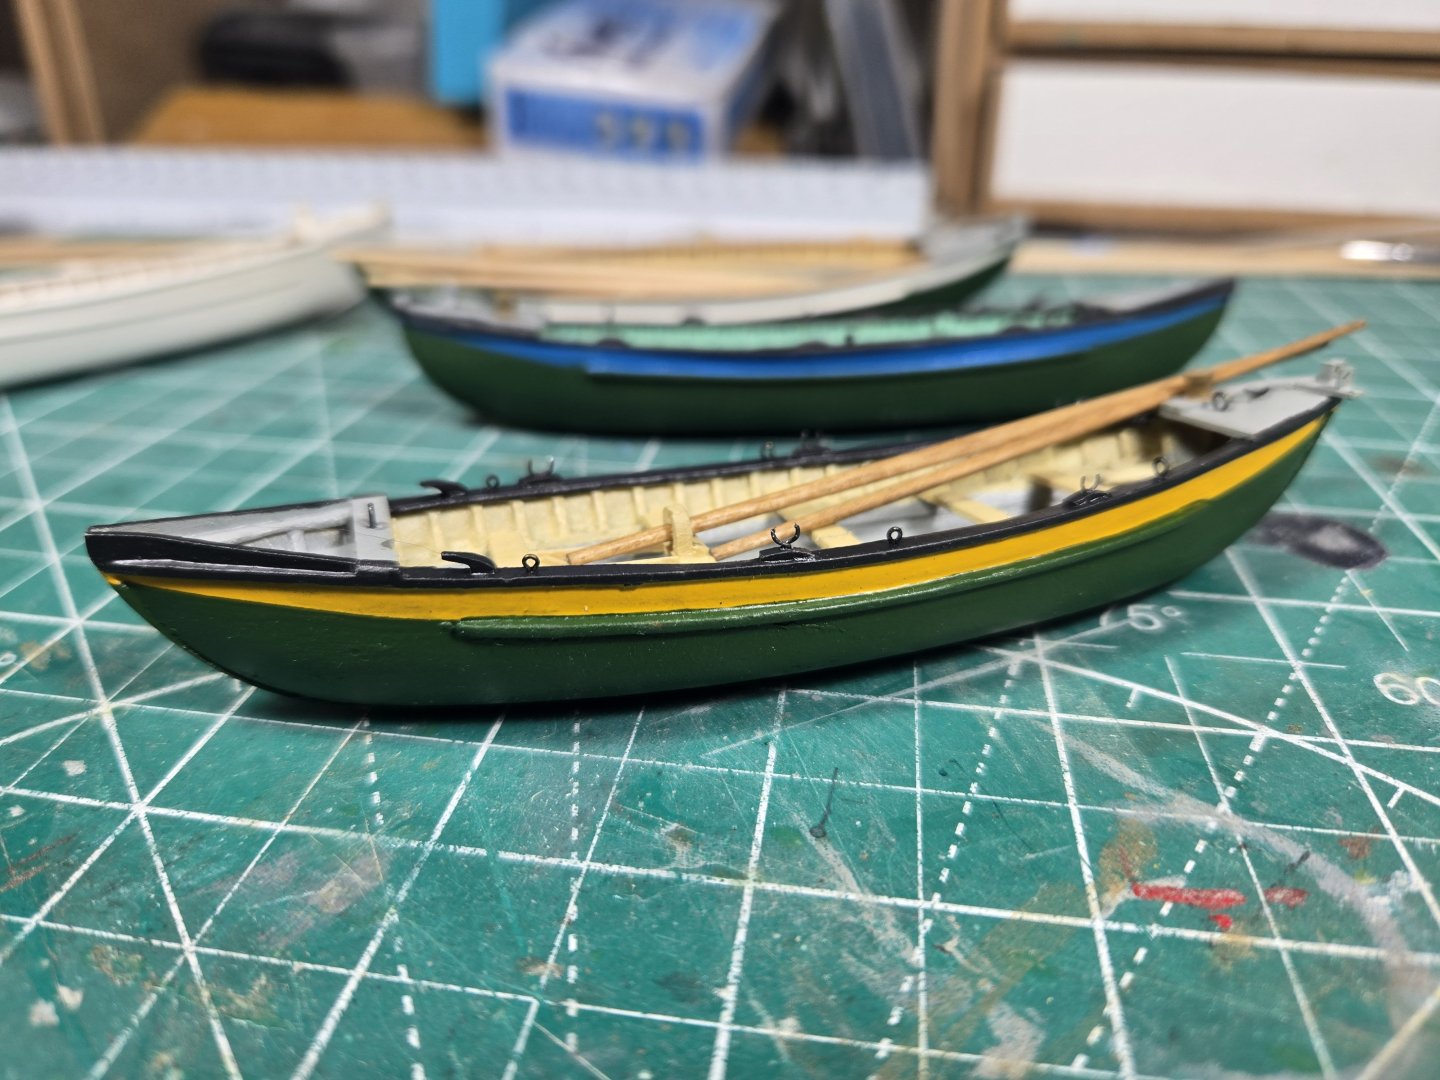
Have been finishing detail on the hull and deck. Temporarily set the masts to install the deadeyes, used the kit supplied chain plates which came out better than I expected. Almost finished with the Whaleboat Davits, Cranes and Bearer posts, a number of details still need to be added. Aligning the Davits and setting the Cranes to the correct height turned into a major task! Fortunately, I had finished the whaleboats in advance so I could use them as templates to set the height of the Davits and Cranes. Also, I needed to make sure there was enough clearance for the Davit Blocks. Seemingly endless adjustments! Oh, important point, the forward port davit for the waist whaleboat is on the outside of the bulwark. Regarding the Davit Blocks. Actually, all the blocks. According to the Museum plans Kate used wooden and iron stropped blocks, iron stropped were used as Davit Blocks. OK, I may be a little anal about details at times. But I think they add a nice detail. I trashed all the kit supplied blocks and replaced them with "wood" blocks from Styrene and iron stropped from Bluejacket. I'm pleased with the painting, still needs some touchup. I mixed my own enamel-based paints, scaled down.


-
The NRG office is back open
Capt. Kelso replied to ferretmary1's topic in NAUTICAL RESEARCH GUILD - News & Information
I feel your pain! No pun intended. Have had both hips done and currently recovering from left knee joint replacement (7/18). Actually, recovery is going well, tossed the cane away! Fortunately, right knee is in good shape. Good luck. -
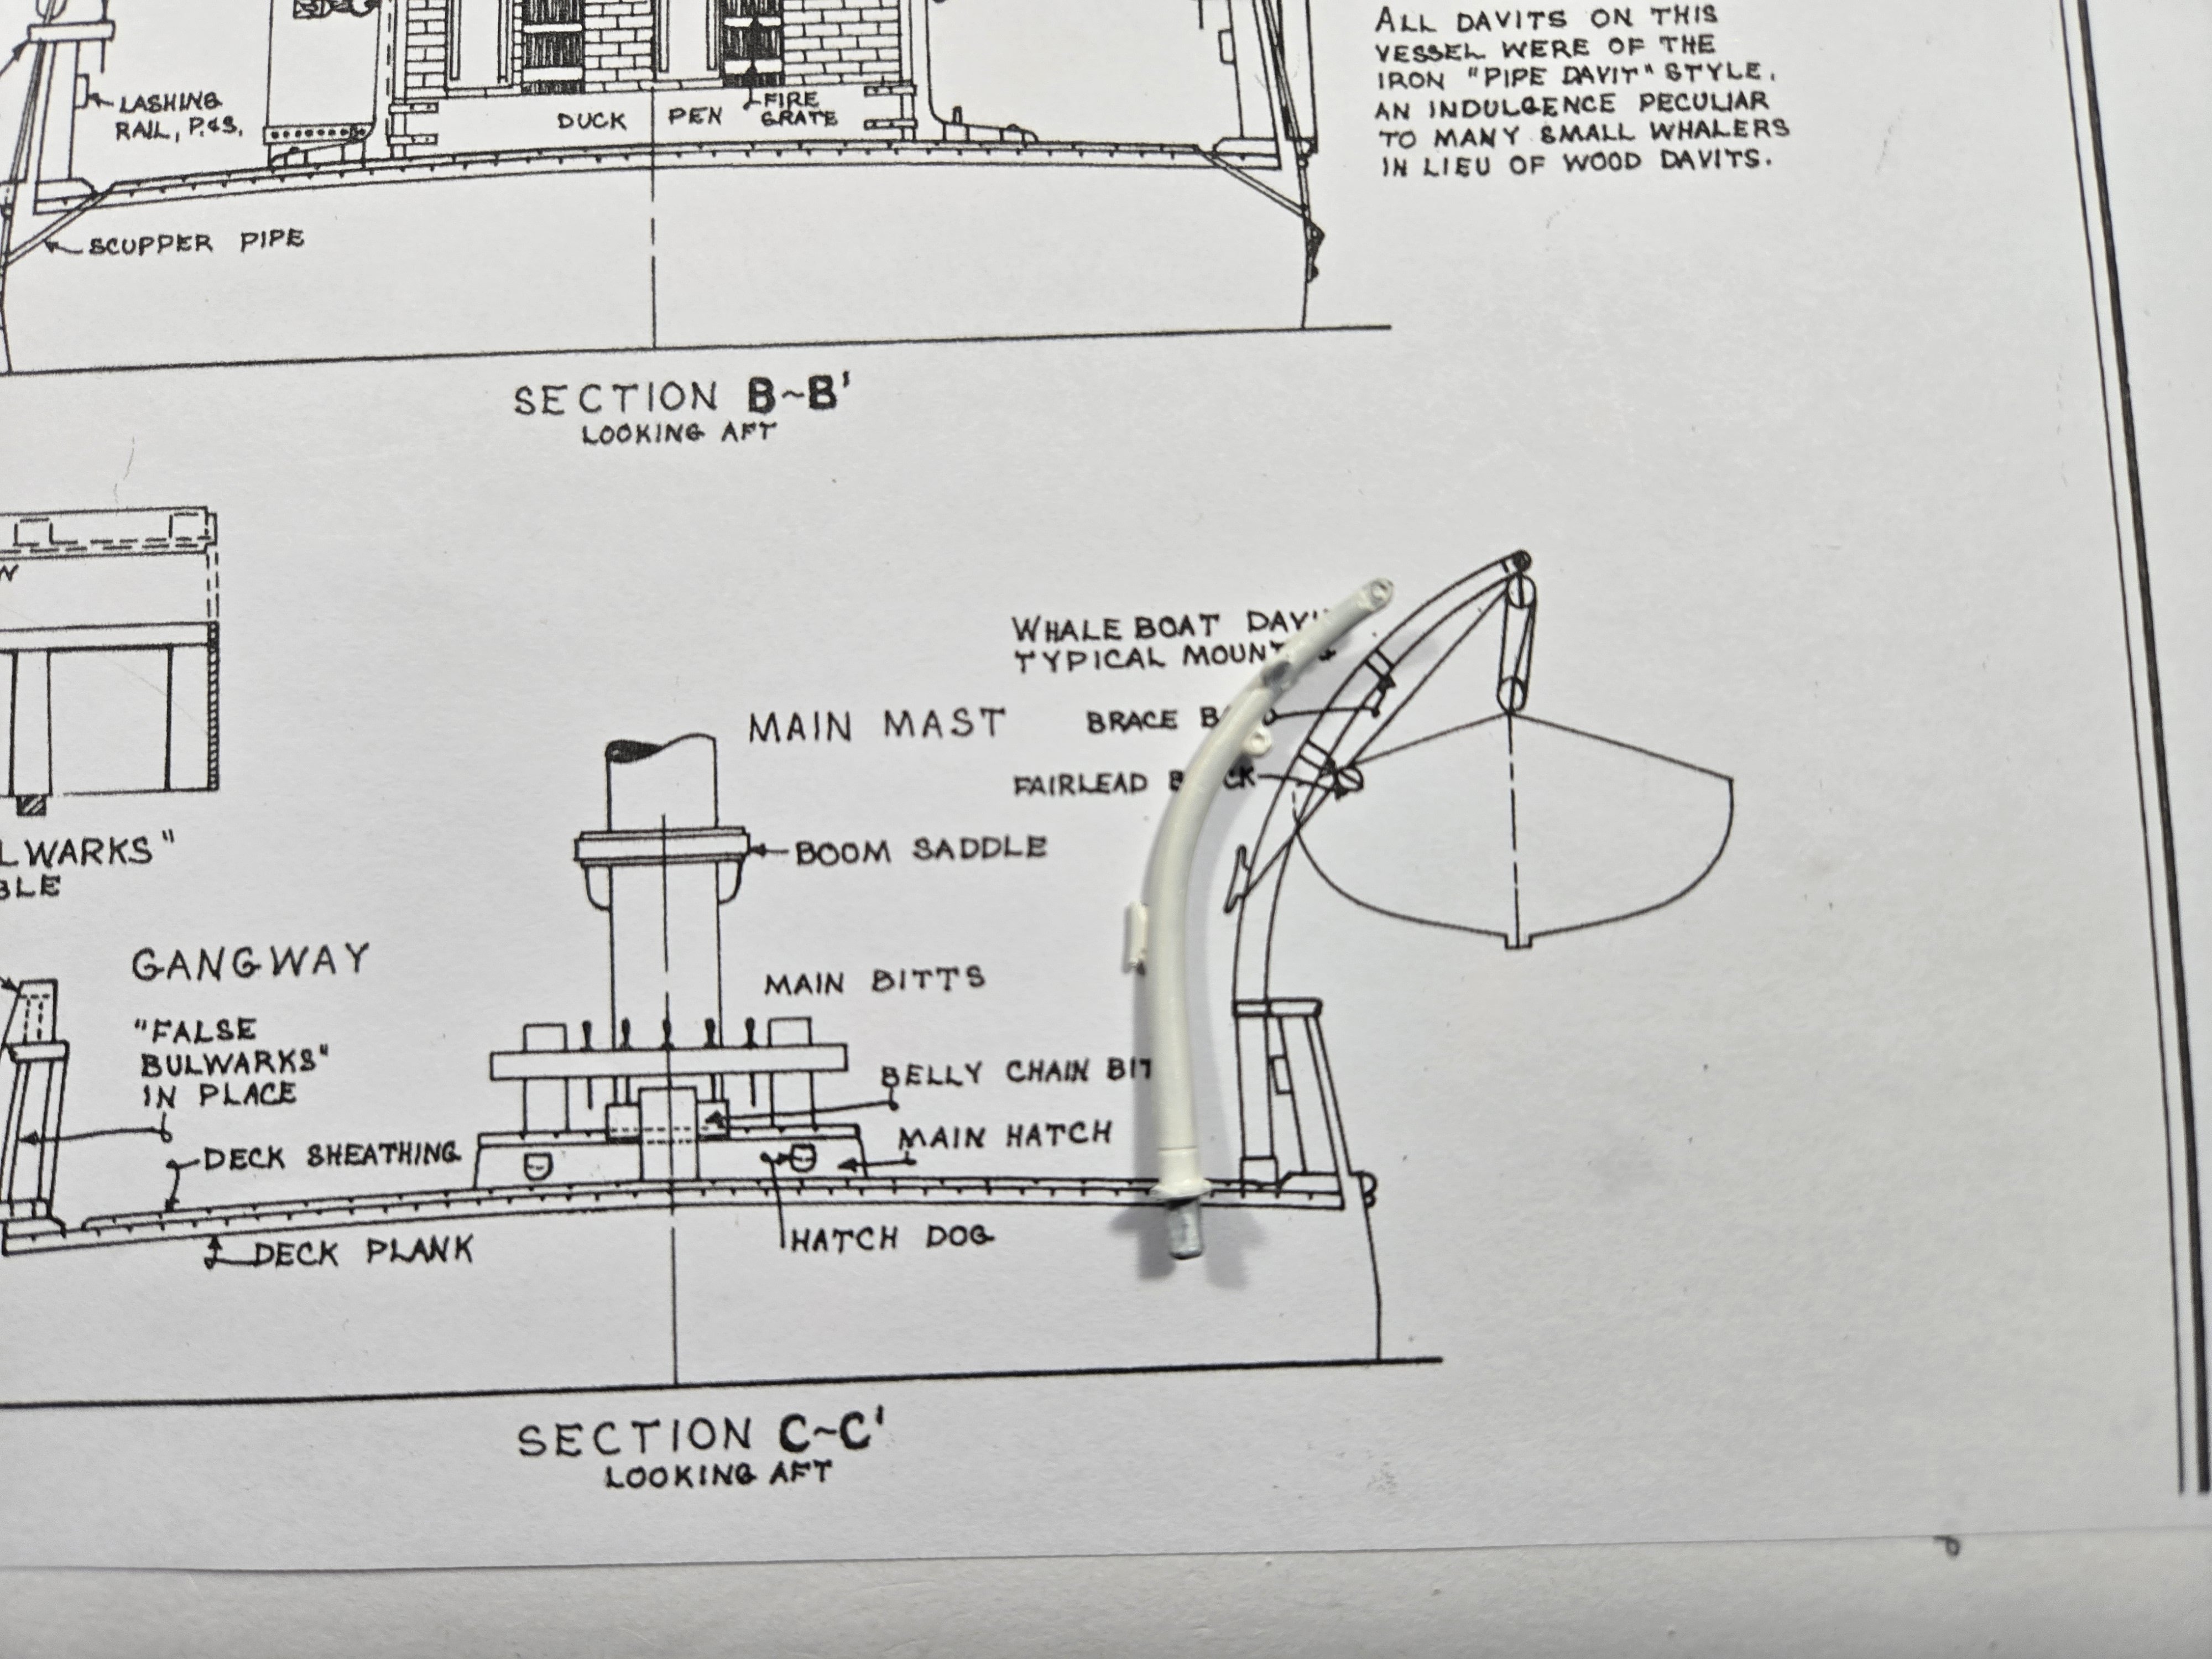
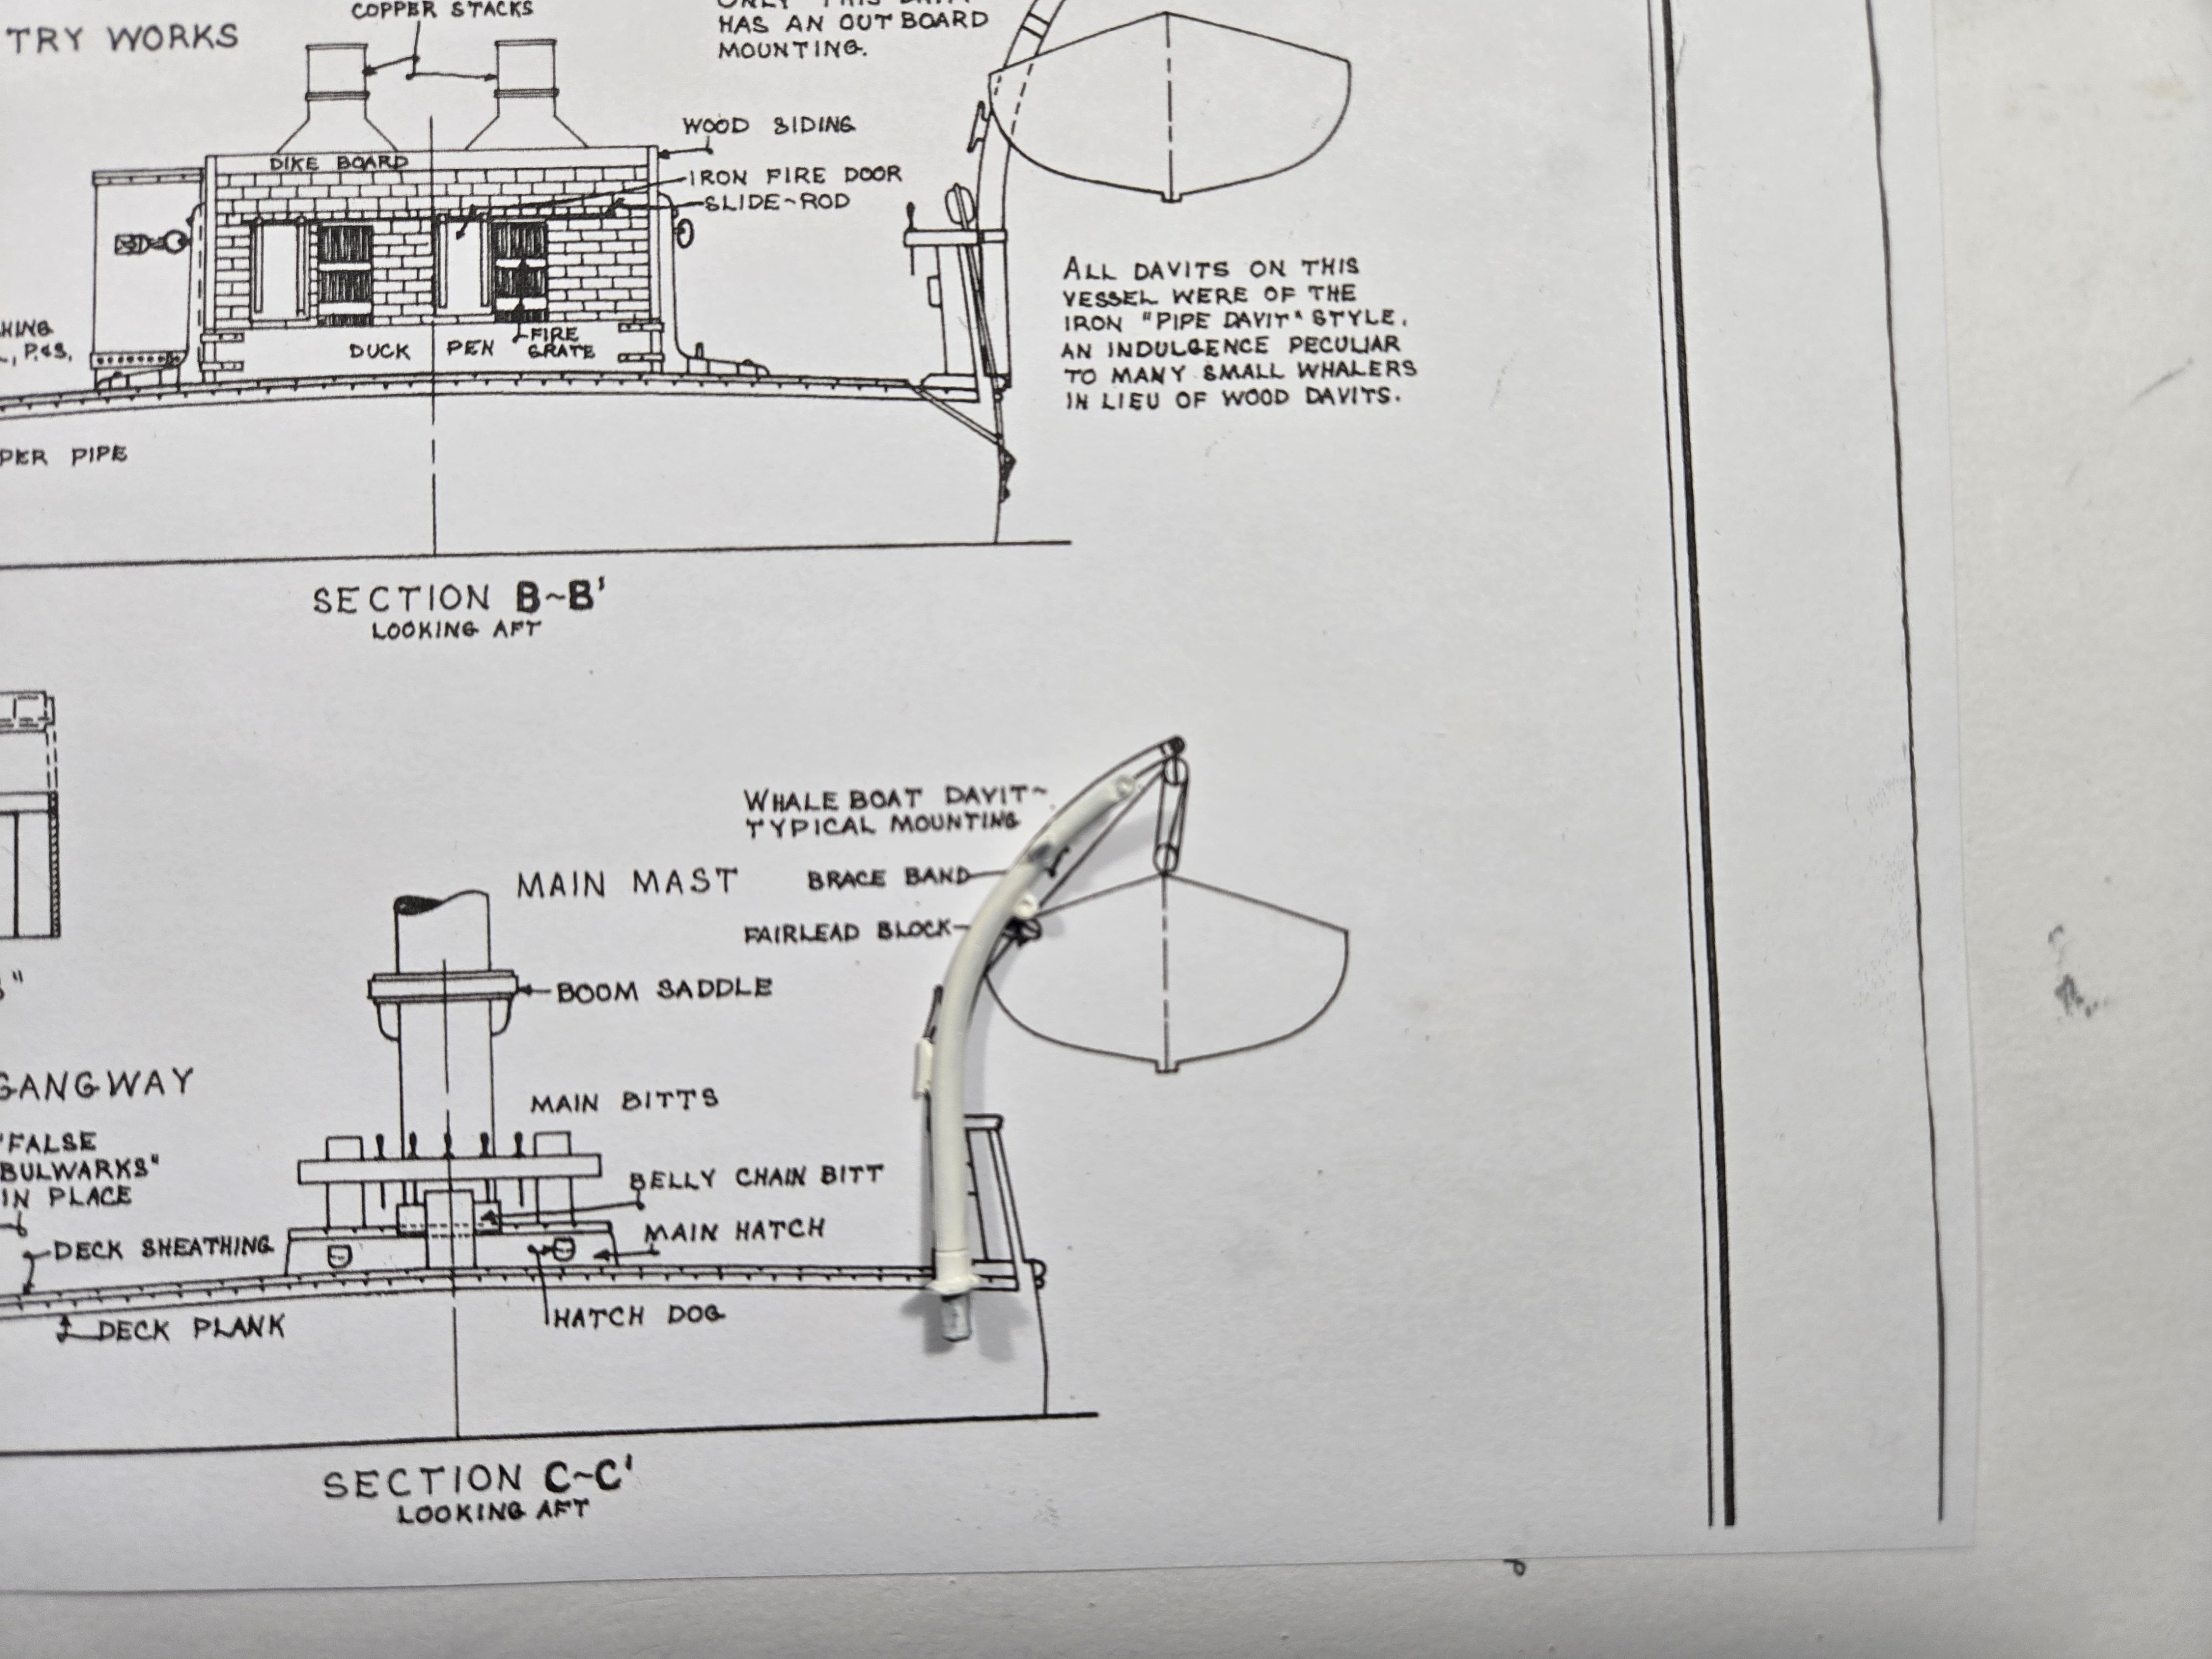
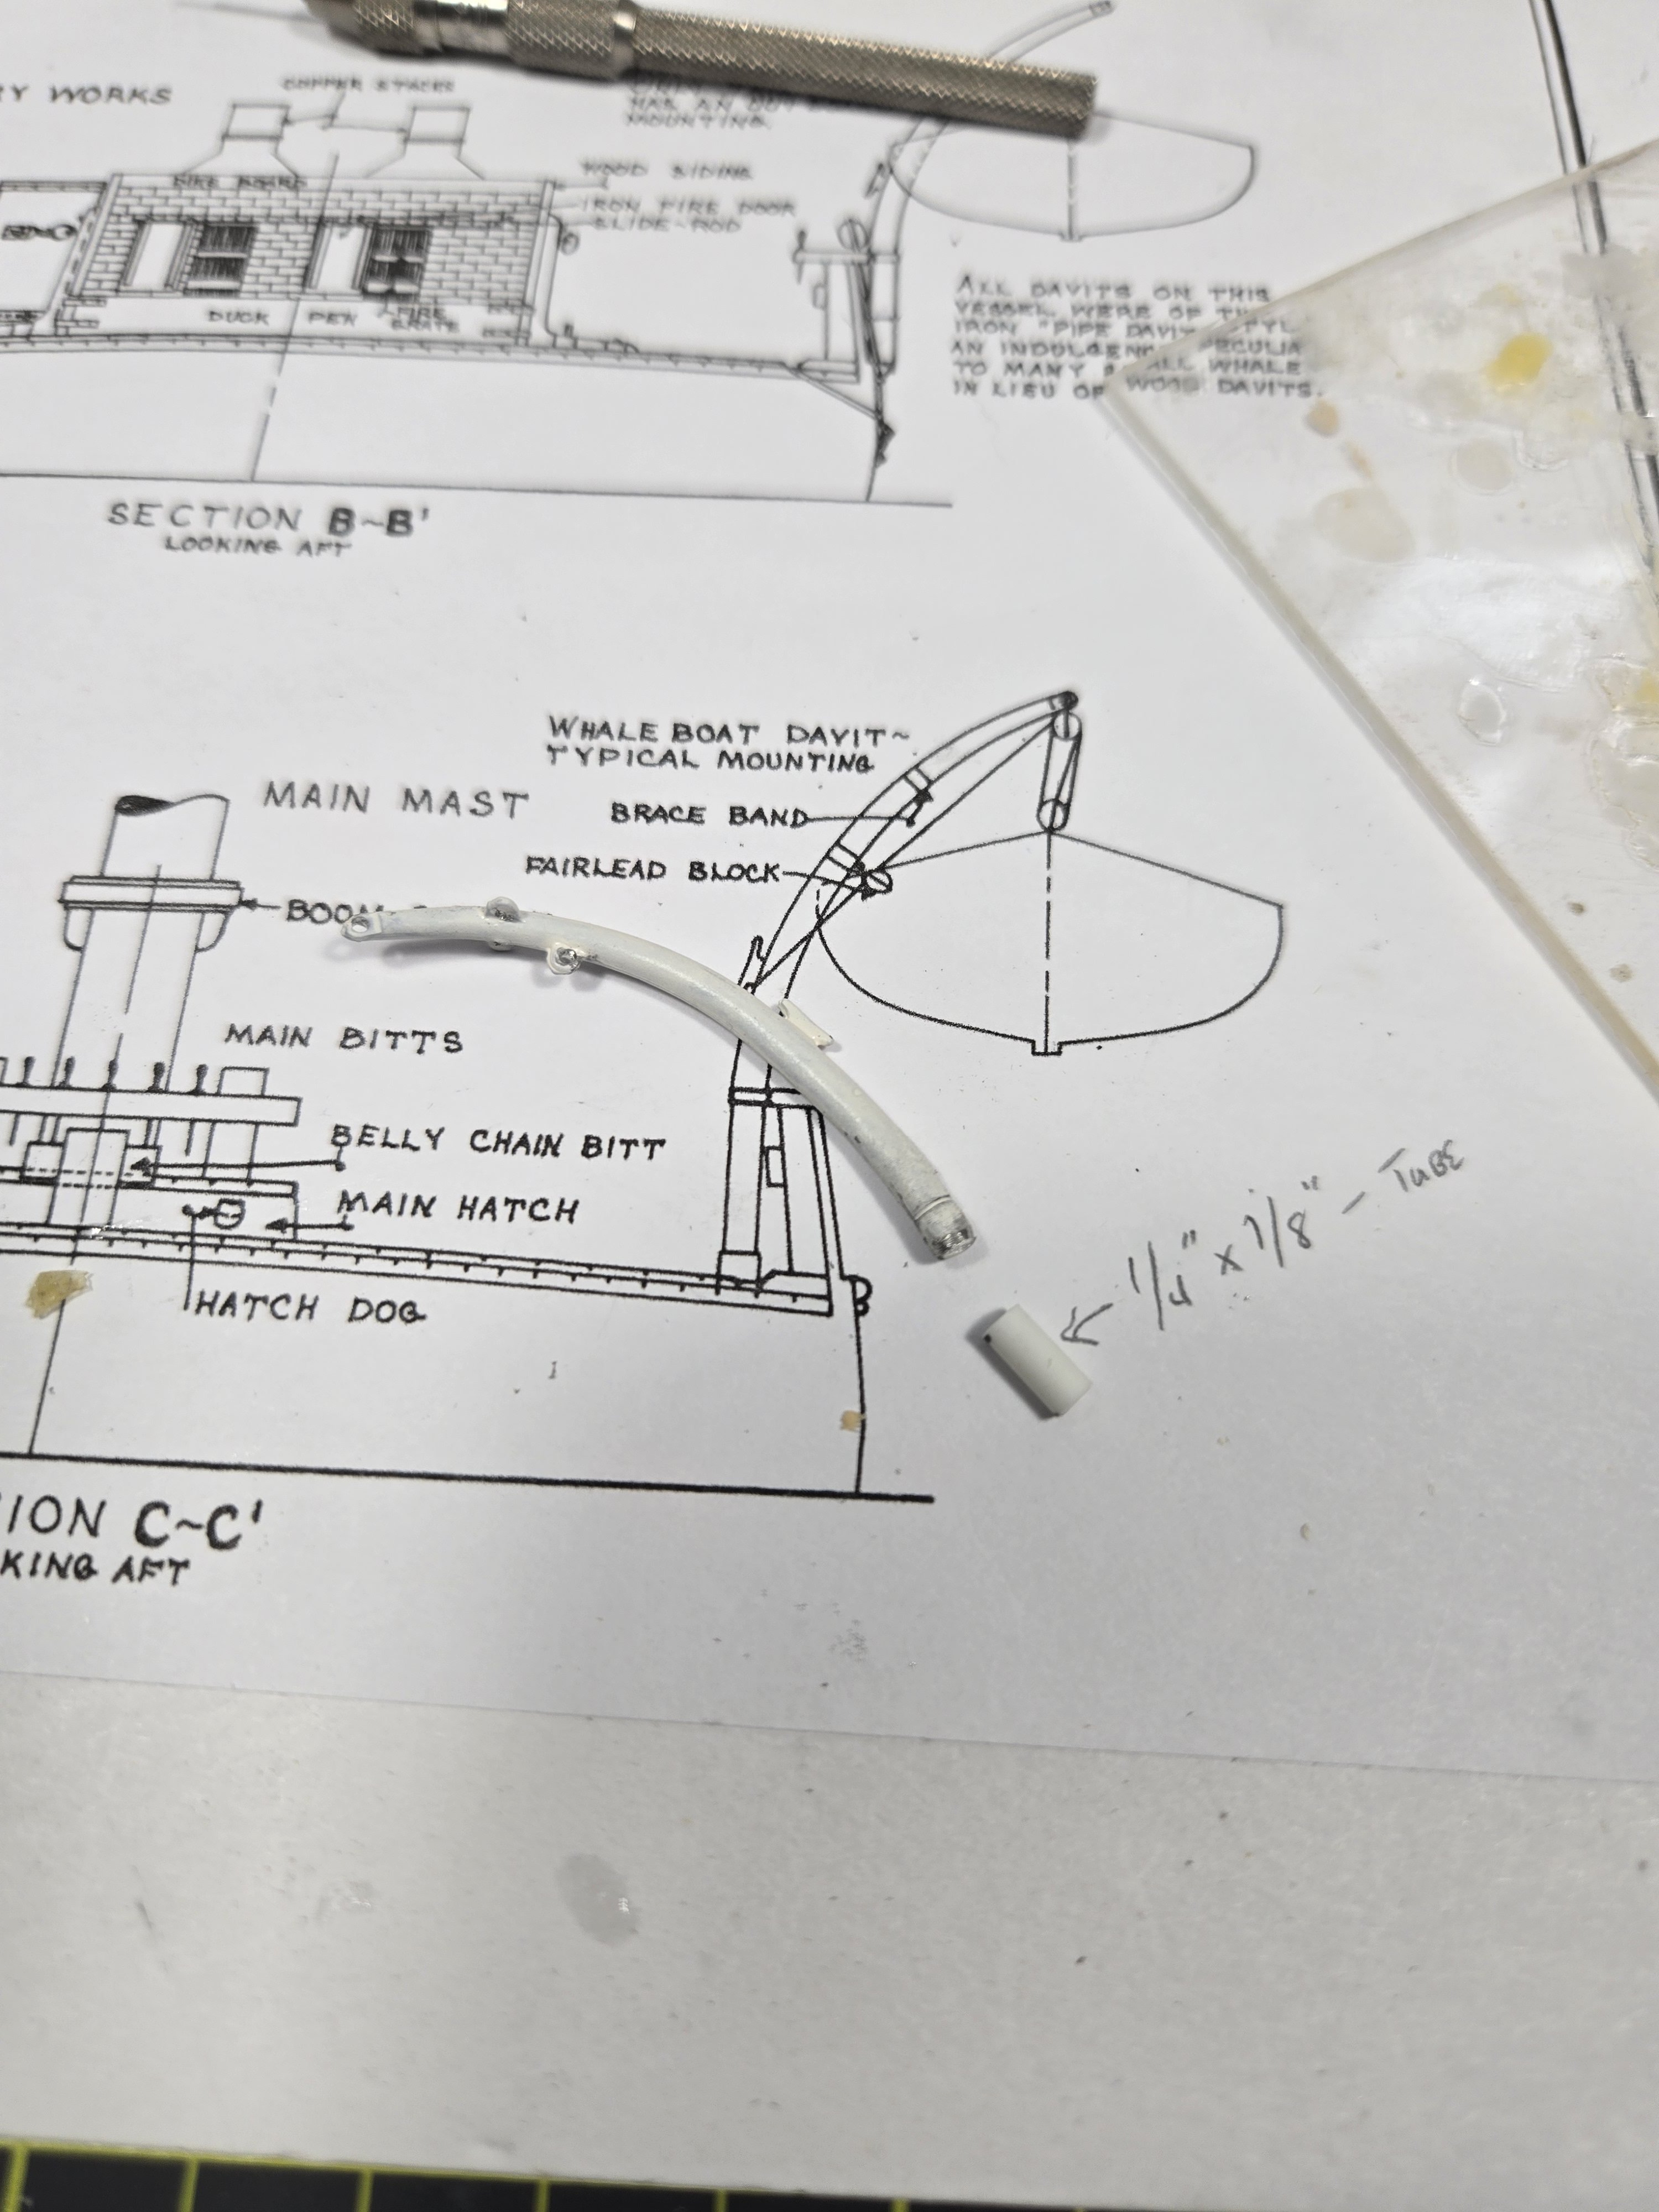
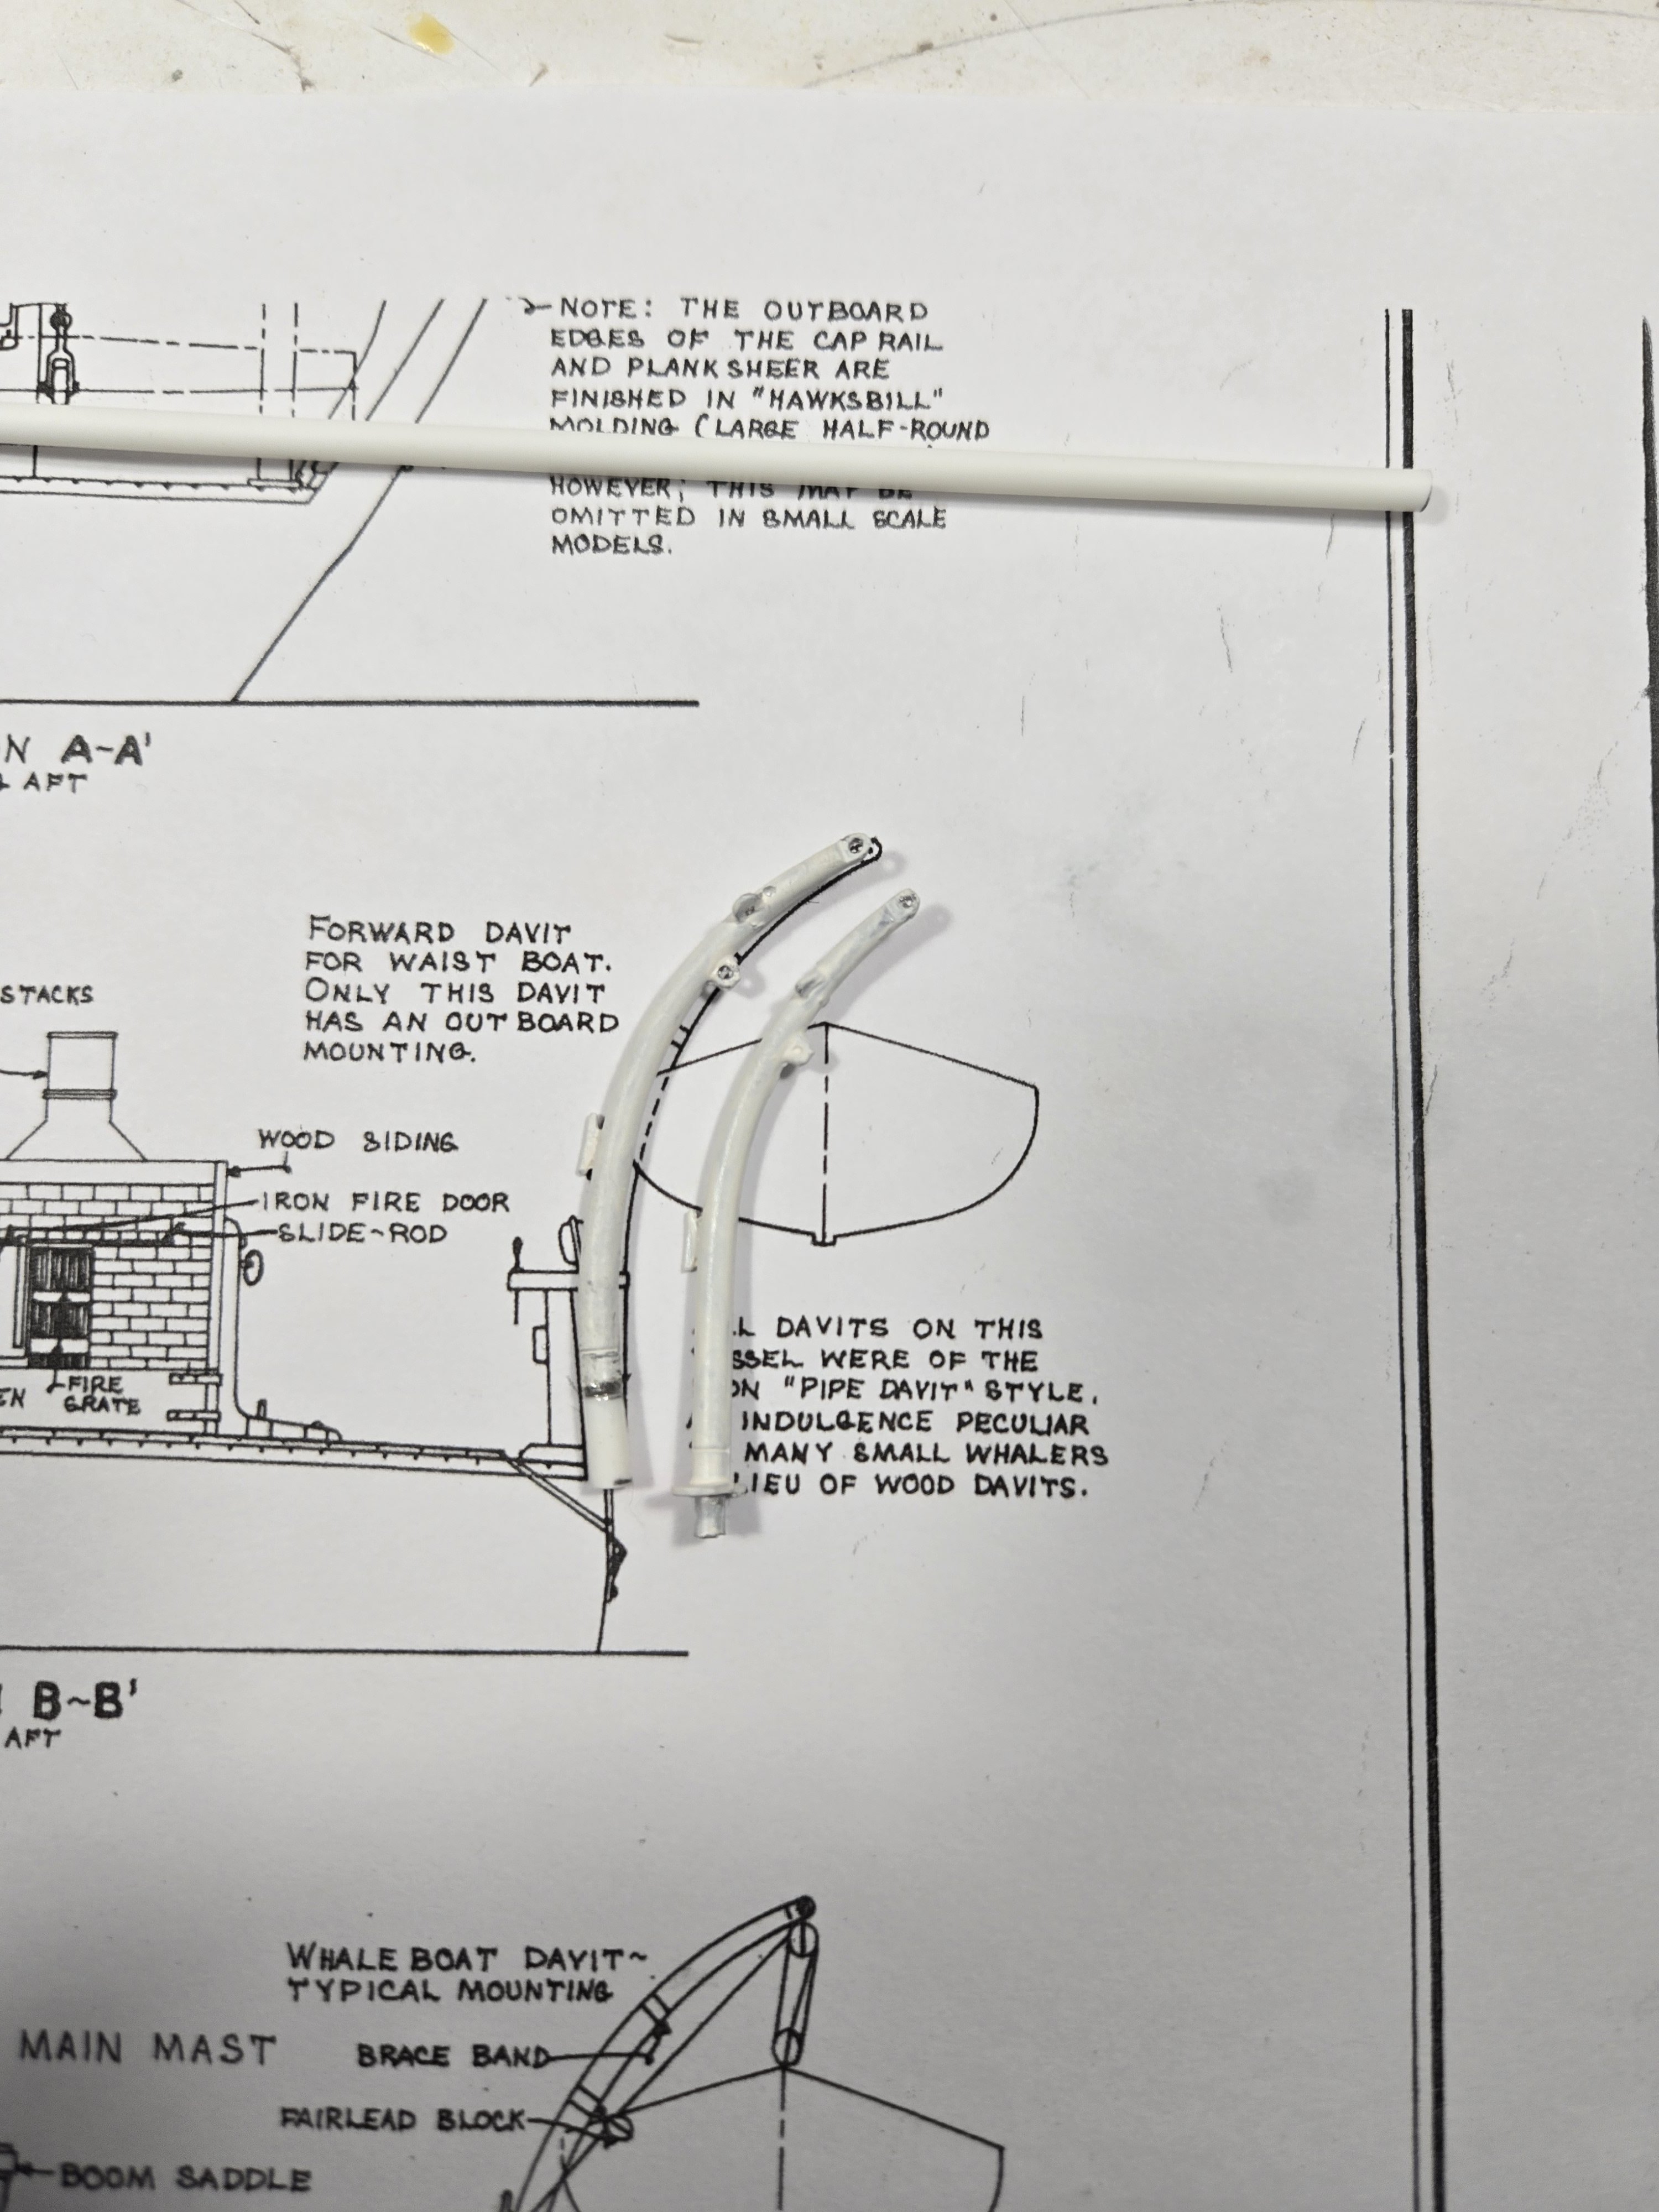
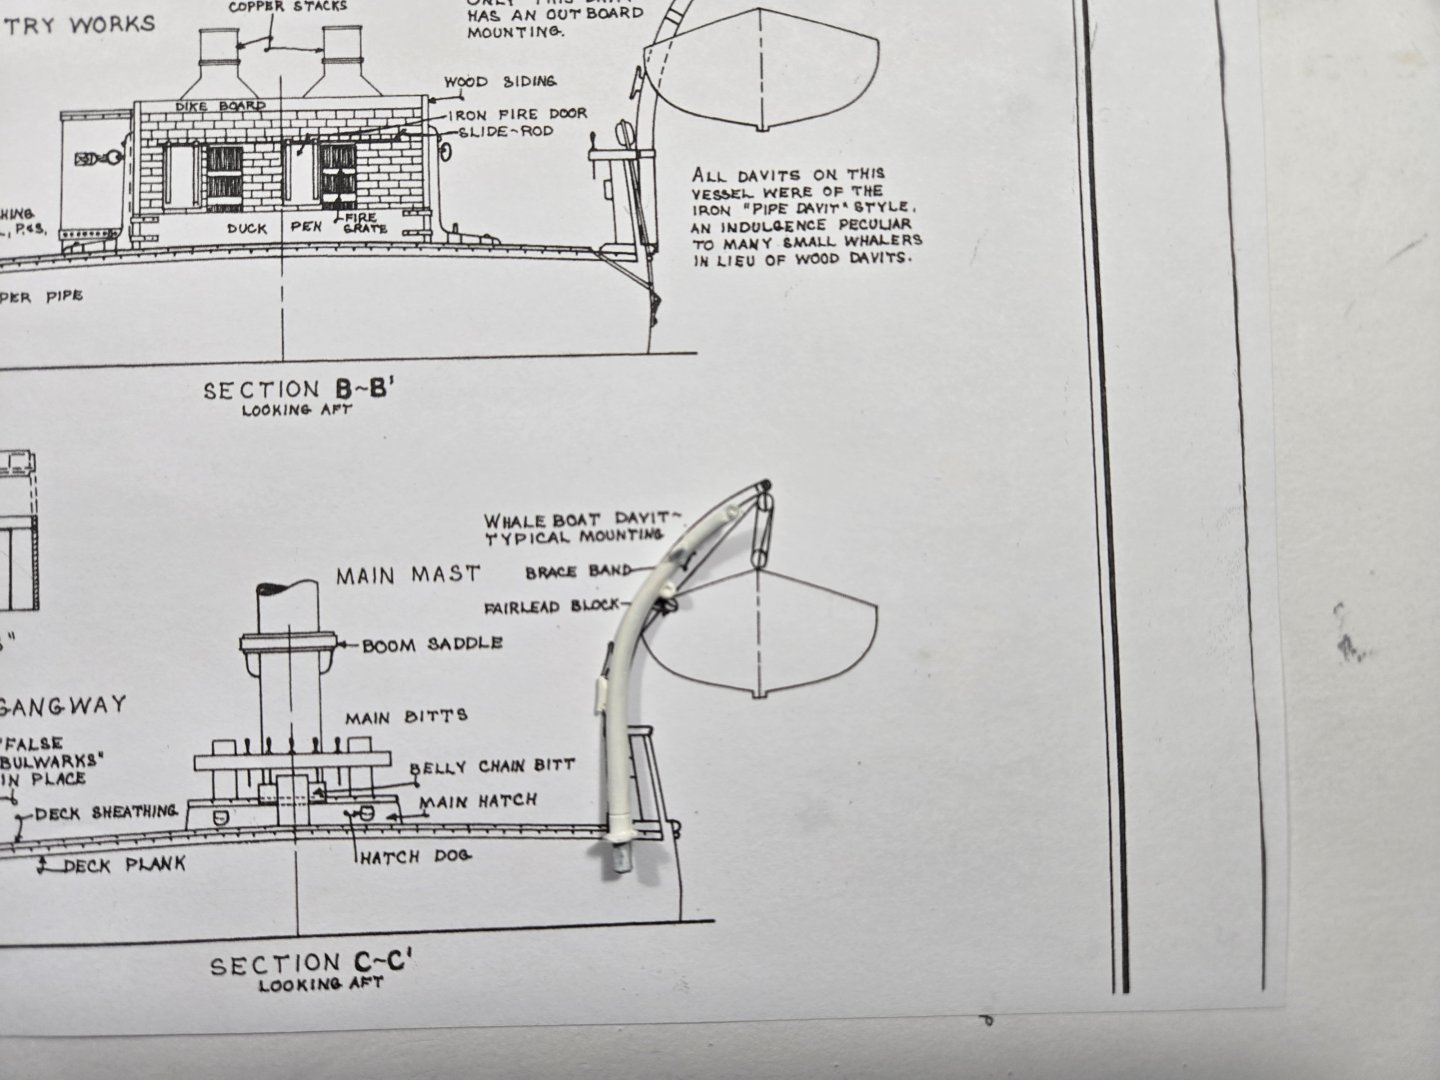
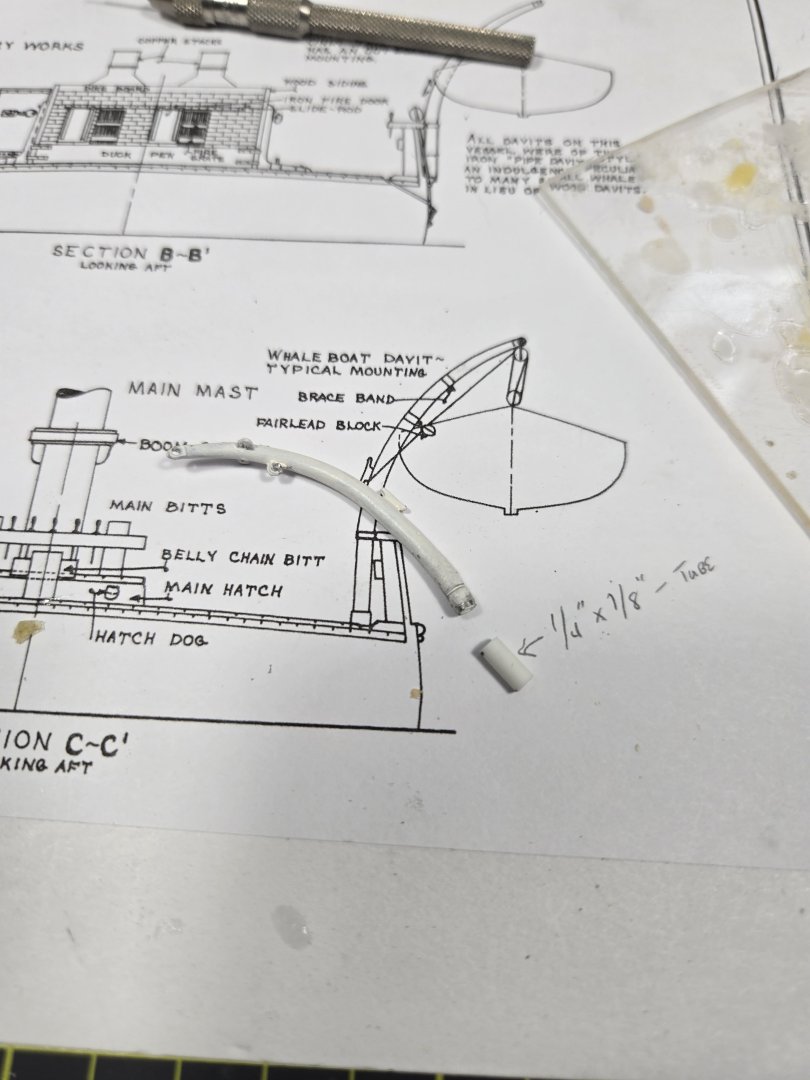
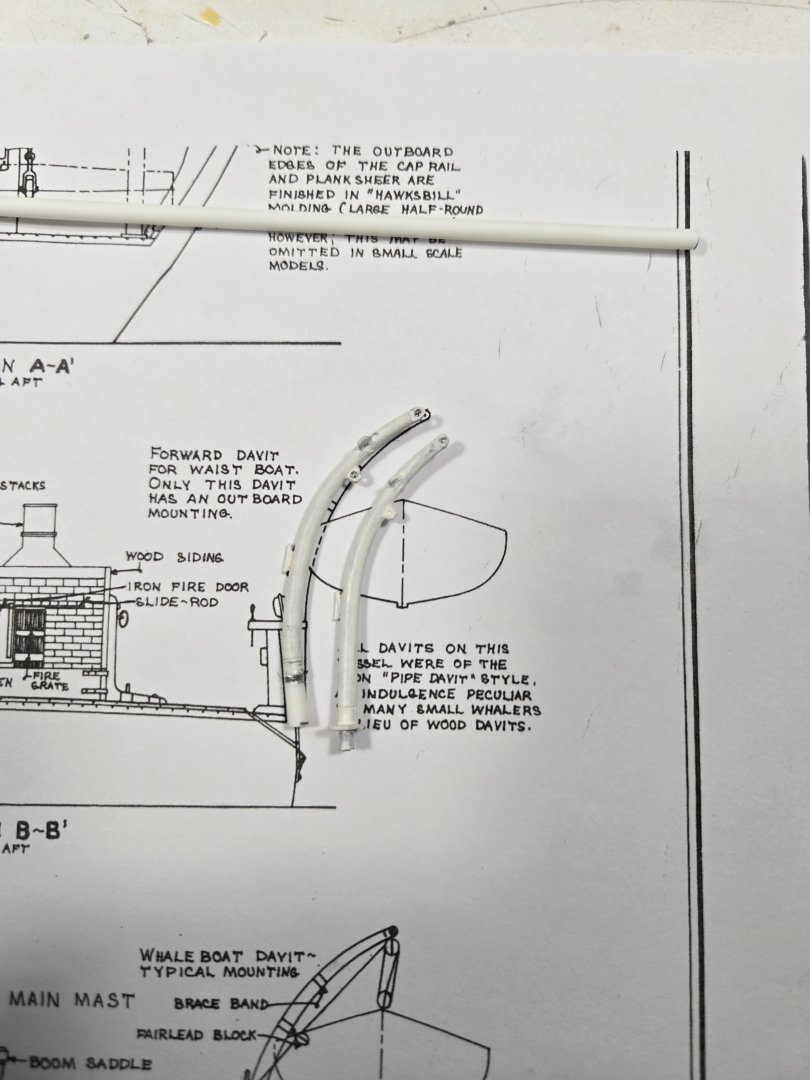
Haven't posted any updates for a couple of months. Had knee joint replacement surgery which made sitting and concentrating on ship modeling difficult. Gradually getting back into the build. I did manage to finish most of the masts and yards, added the deadeyes and decided to start working on the whale boat stations. Finished the crane, boat guards and bearer posts. Next began working on the Davits and after studying the plans noted the kit supplied davits are out of scale. The plans show the quarter deck davits are approximately 8' tall, while the remaining davits are 10' tall. The quarter deck davits "should be peaked as low as possible to provide clearance for spanker boom", hence they are shorter. The kit davits are 9' and do not match the plan profile. Correcting the profile is fairly easy, the davits are soft metal and can be bent to shape. That leaves four davits to be lengthened. After considering a few options I found a scrape piece of 1/8" polystyrene rod that matched the diameter of the lower portion the davits, applied some 5-minute epoxy and the davit is now close to scale. After I finish correcting and detailing the davits the next step is the true test, mounting them!


-
Thanks for posting the pic's of your trip. Lot's of good reference detail. Agree, the brass strops look better.
- 23 replies
-
- 2
-

-
- Speedwell
- battle station
- (and 1 more)
-
Excellent job!
-
Iron Stropped Blocks - Kate Cory Whaling Brig
Capt. Kelso replied to Capt. Kelso's topic in Masting, rigging and sails
Thanks Pat. I did search Syren when I ordered some rope stropped blocks but found nothing in the scale I needed. Ordered some from Bluejacket. -
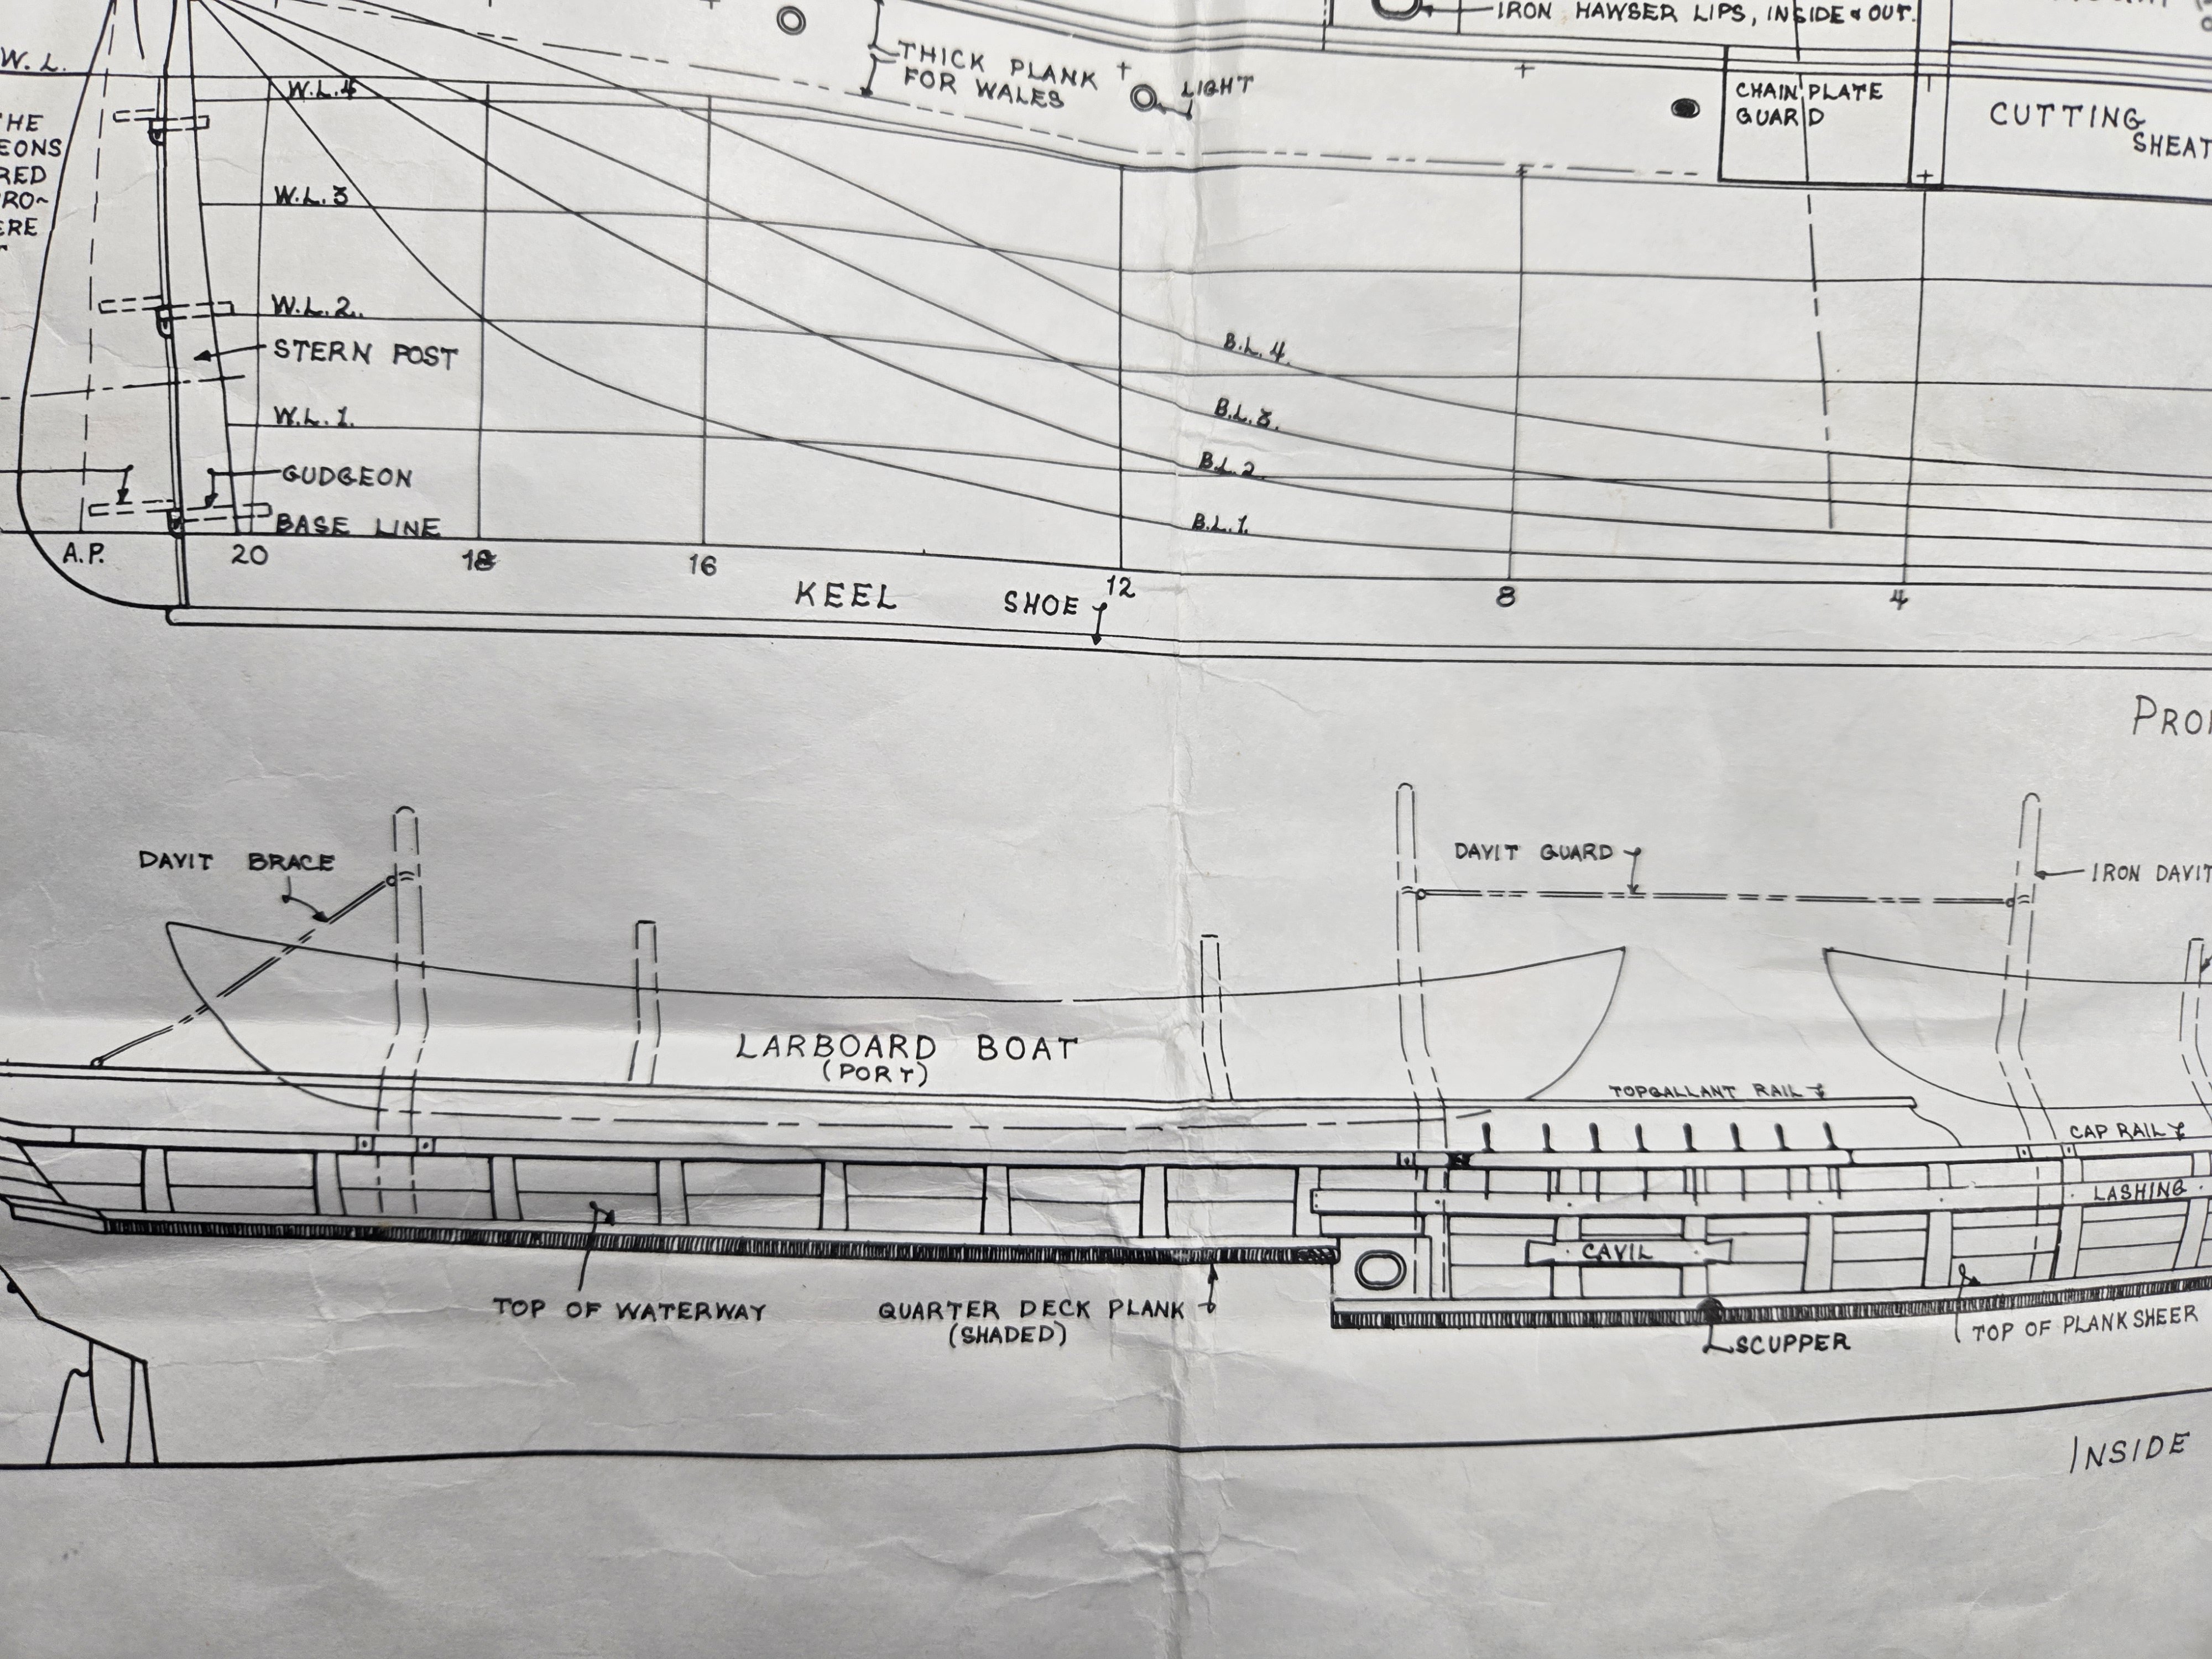
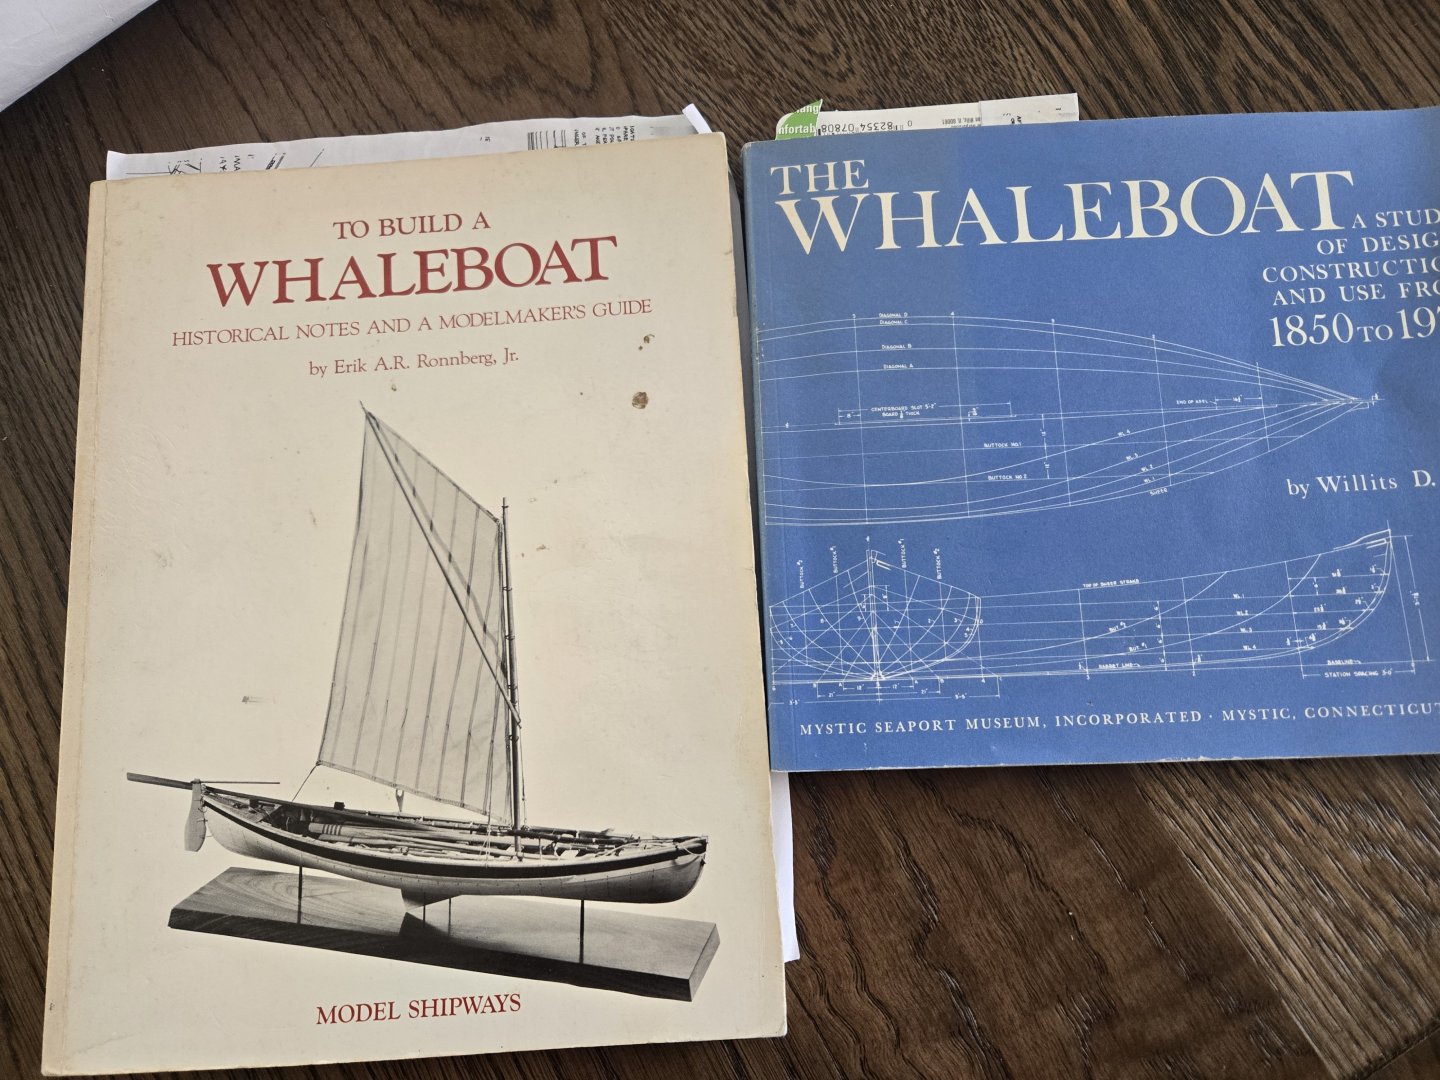
My current build is an old Model Shipways (yellow box) Kate Cory 3/16" whaling brig, built 1856. I have just begun the masts and have been researching rigging. When I bought the kit, I also purchased a set of comprehensive plans developed by Erik Ronnberg from the New Bedford Whaling Museum. The kit plans make no reference to the application of Iron Stropped Blocks whereas the Whaling Museum Plans contain details regarding the use of both rope and iron stropped blocks. I made the decision to stick with historical accuracy and plan to use iron stropped blocks. However, I found only one supplier that sells them. Fortunately, they have the sizes I need and placed my order. It appears the use of iron stropped blocks became fairly common in the 19th Century, yet I find little specific information regarding them and I'm not aware of any manufacturers aside of Bluejacket that includes them in their kits. I thought maybe I could just make my own, unfortunately, I could not find any "how to" posts on any modeling forums. Our hobby in many respects prides itself on detail and accuracy yet I can find almost no information on the application of iron stropped blocks. Am I overthinking this?
-
Good progress with the build! I recently decided to buy some of the Syrene blocks to compare with the old Model Shipways kit blocks. I am impressed with the blocks, no additional drilling and shaping needed. The holes are all centered, and blocks are consistent shape and size.
-
I posted on here last November about getting a Club going down here but didn't get any response! Tried for three months hosting a meeting in Rehoboth Community Center, no interest either.
- 23 replies
-
- 2
-
-
- Speedwell
- battle station
- (and 1 more)
-
There aren't any down this way. I moved from Ct last year, belonged to Mystic Seaport Ship Modelers. Tried to get something going in Rehoboth, no interest. Clubs in Maryland and Pa. are too far away.
- 23 replies
-
- 3
-
-

-
- Speedwell
- battle station
- (and 1 more)
-
I've tried a number of methods including heat and now just soak the wood in ammonia.
-
Welcome!
-
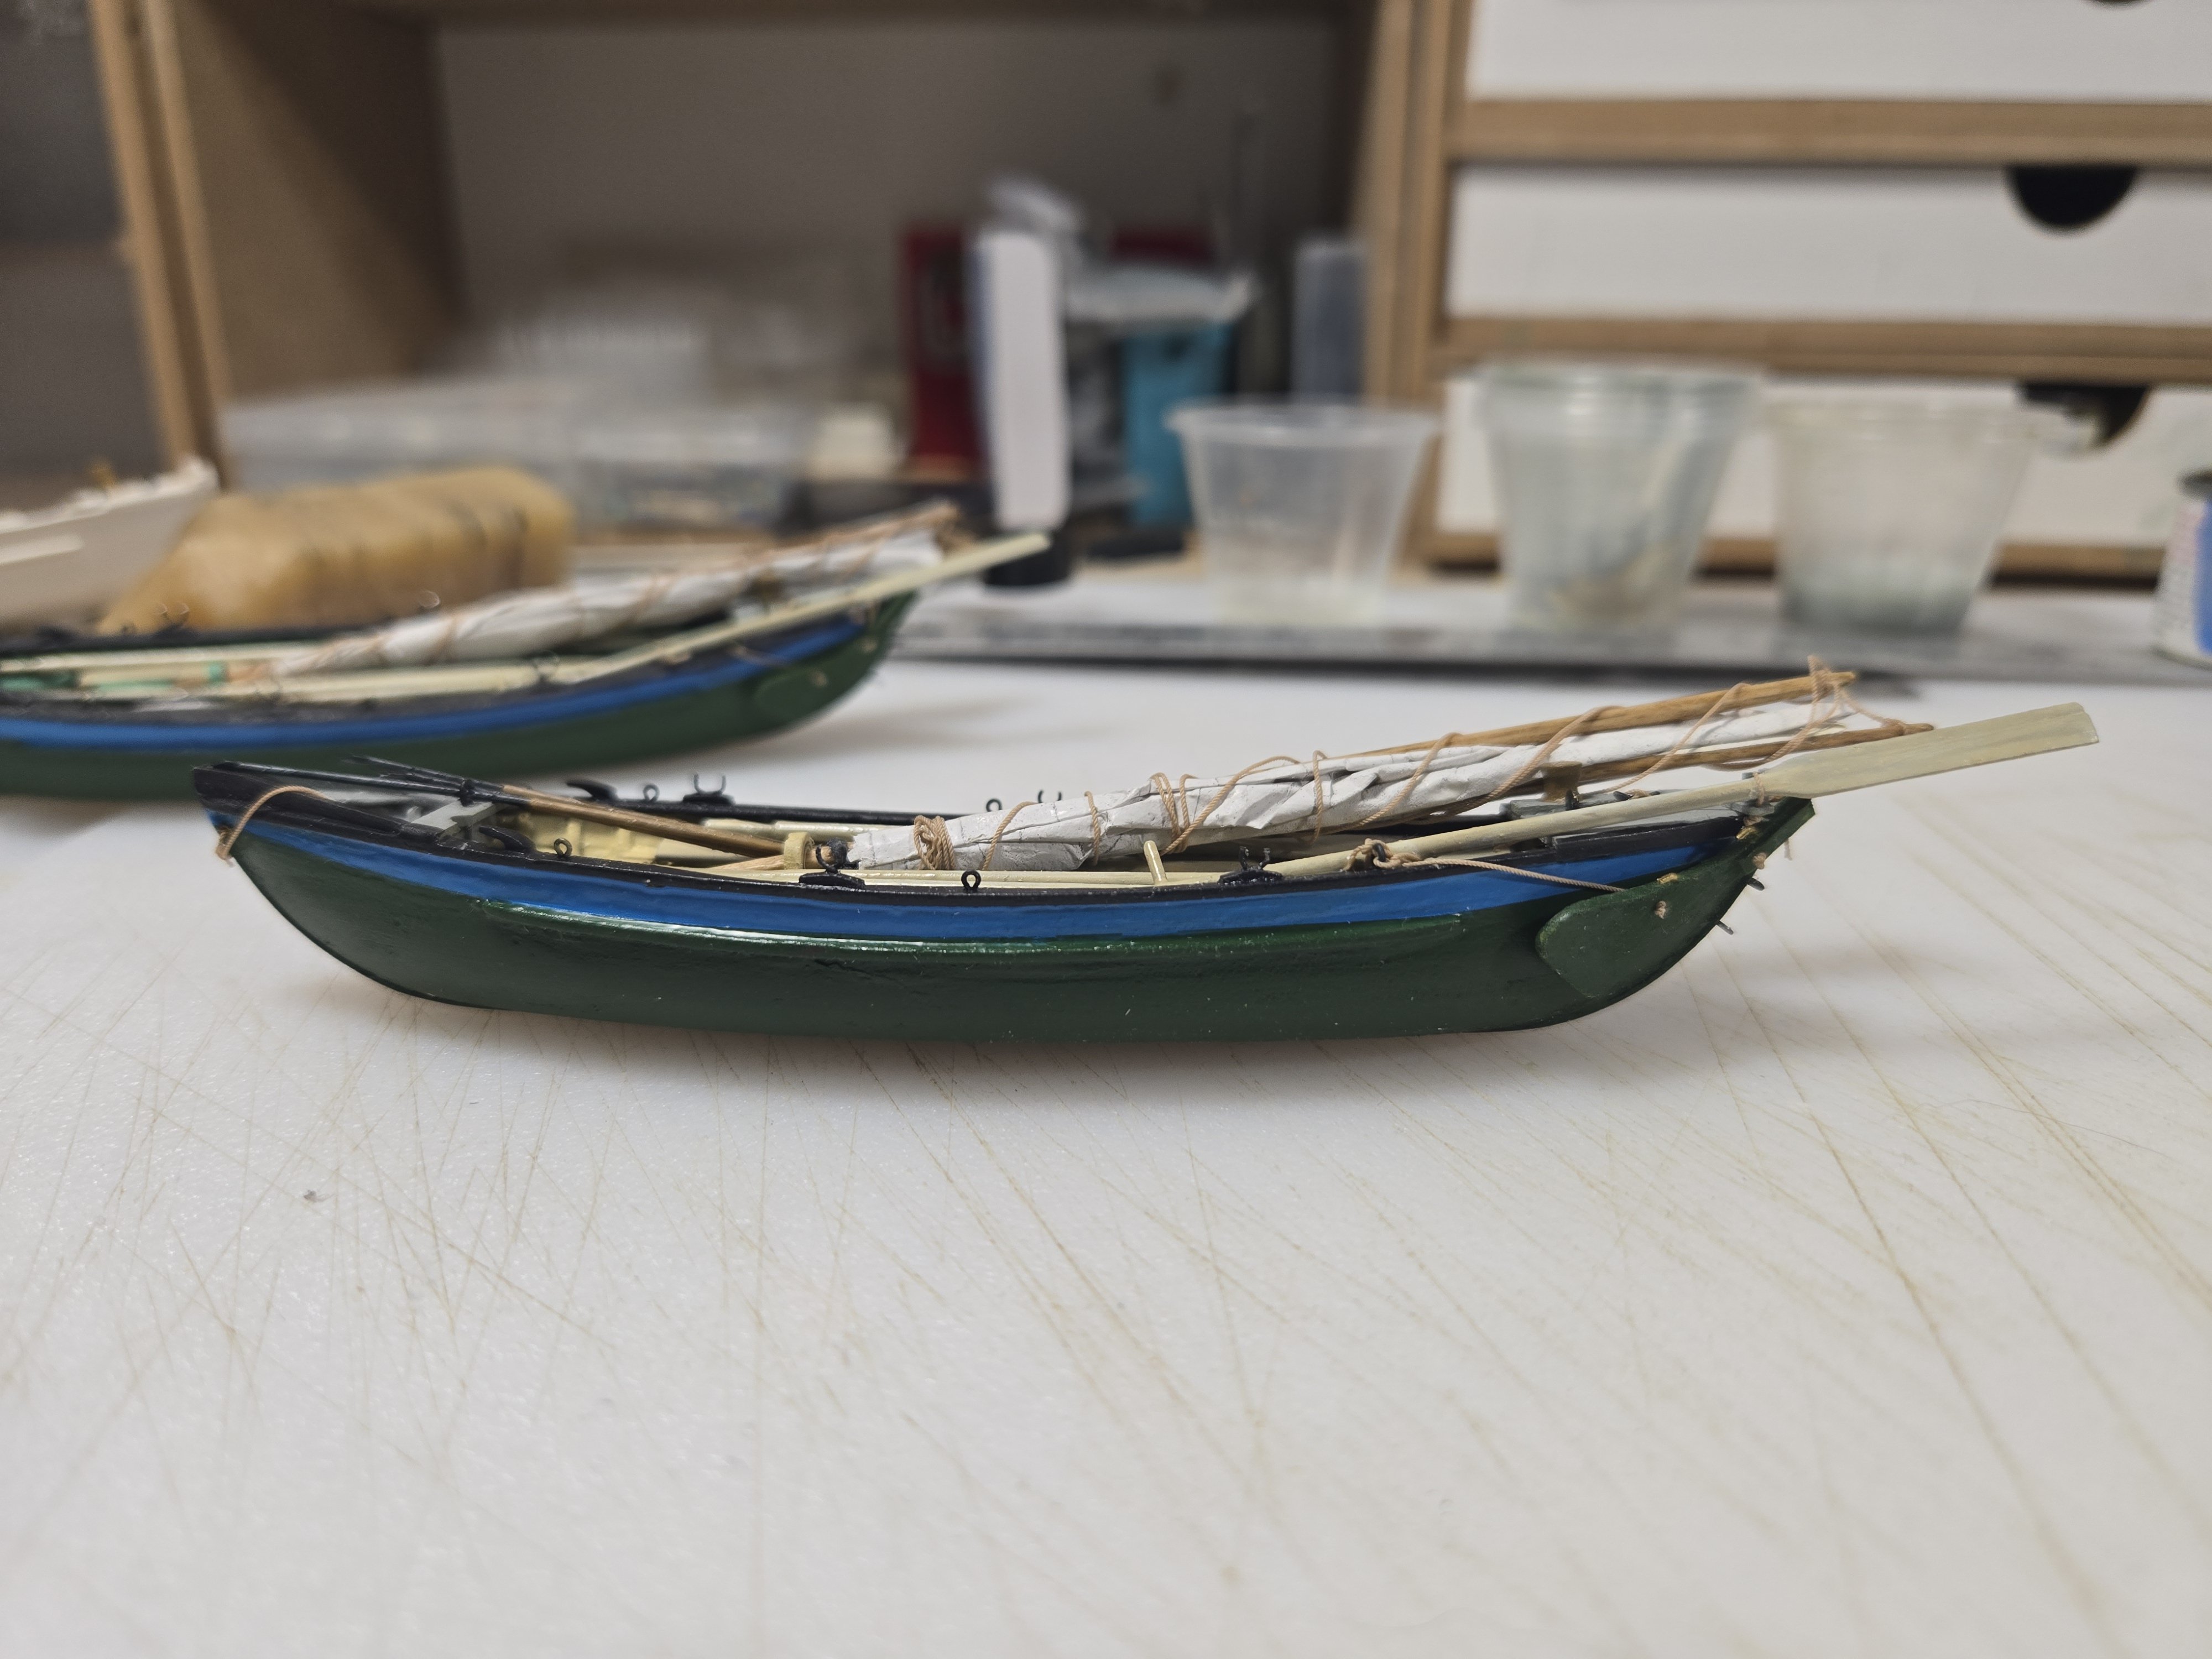
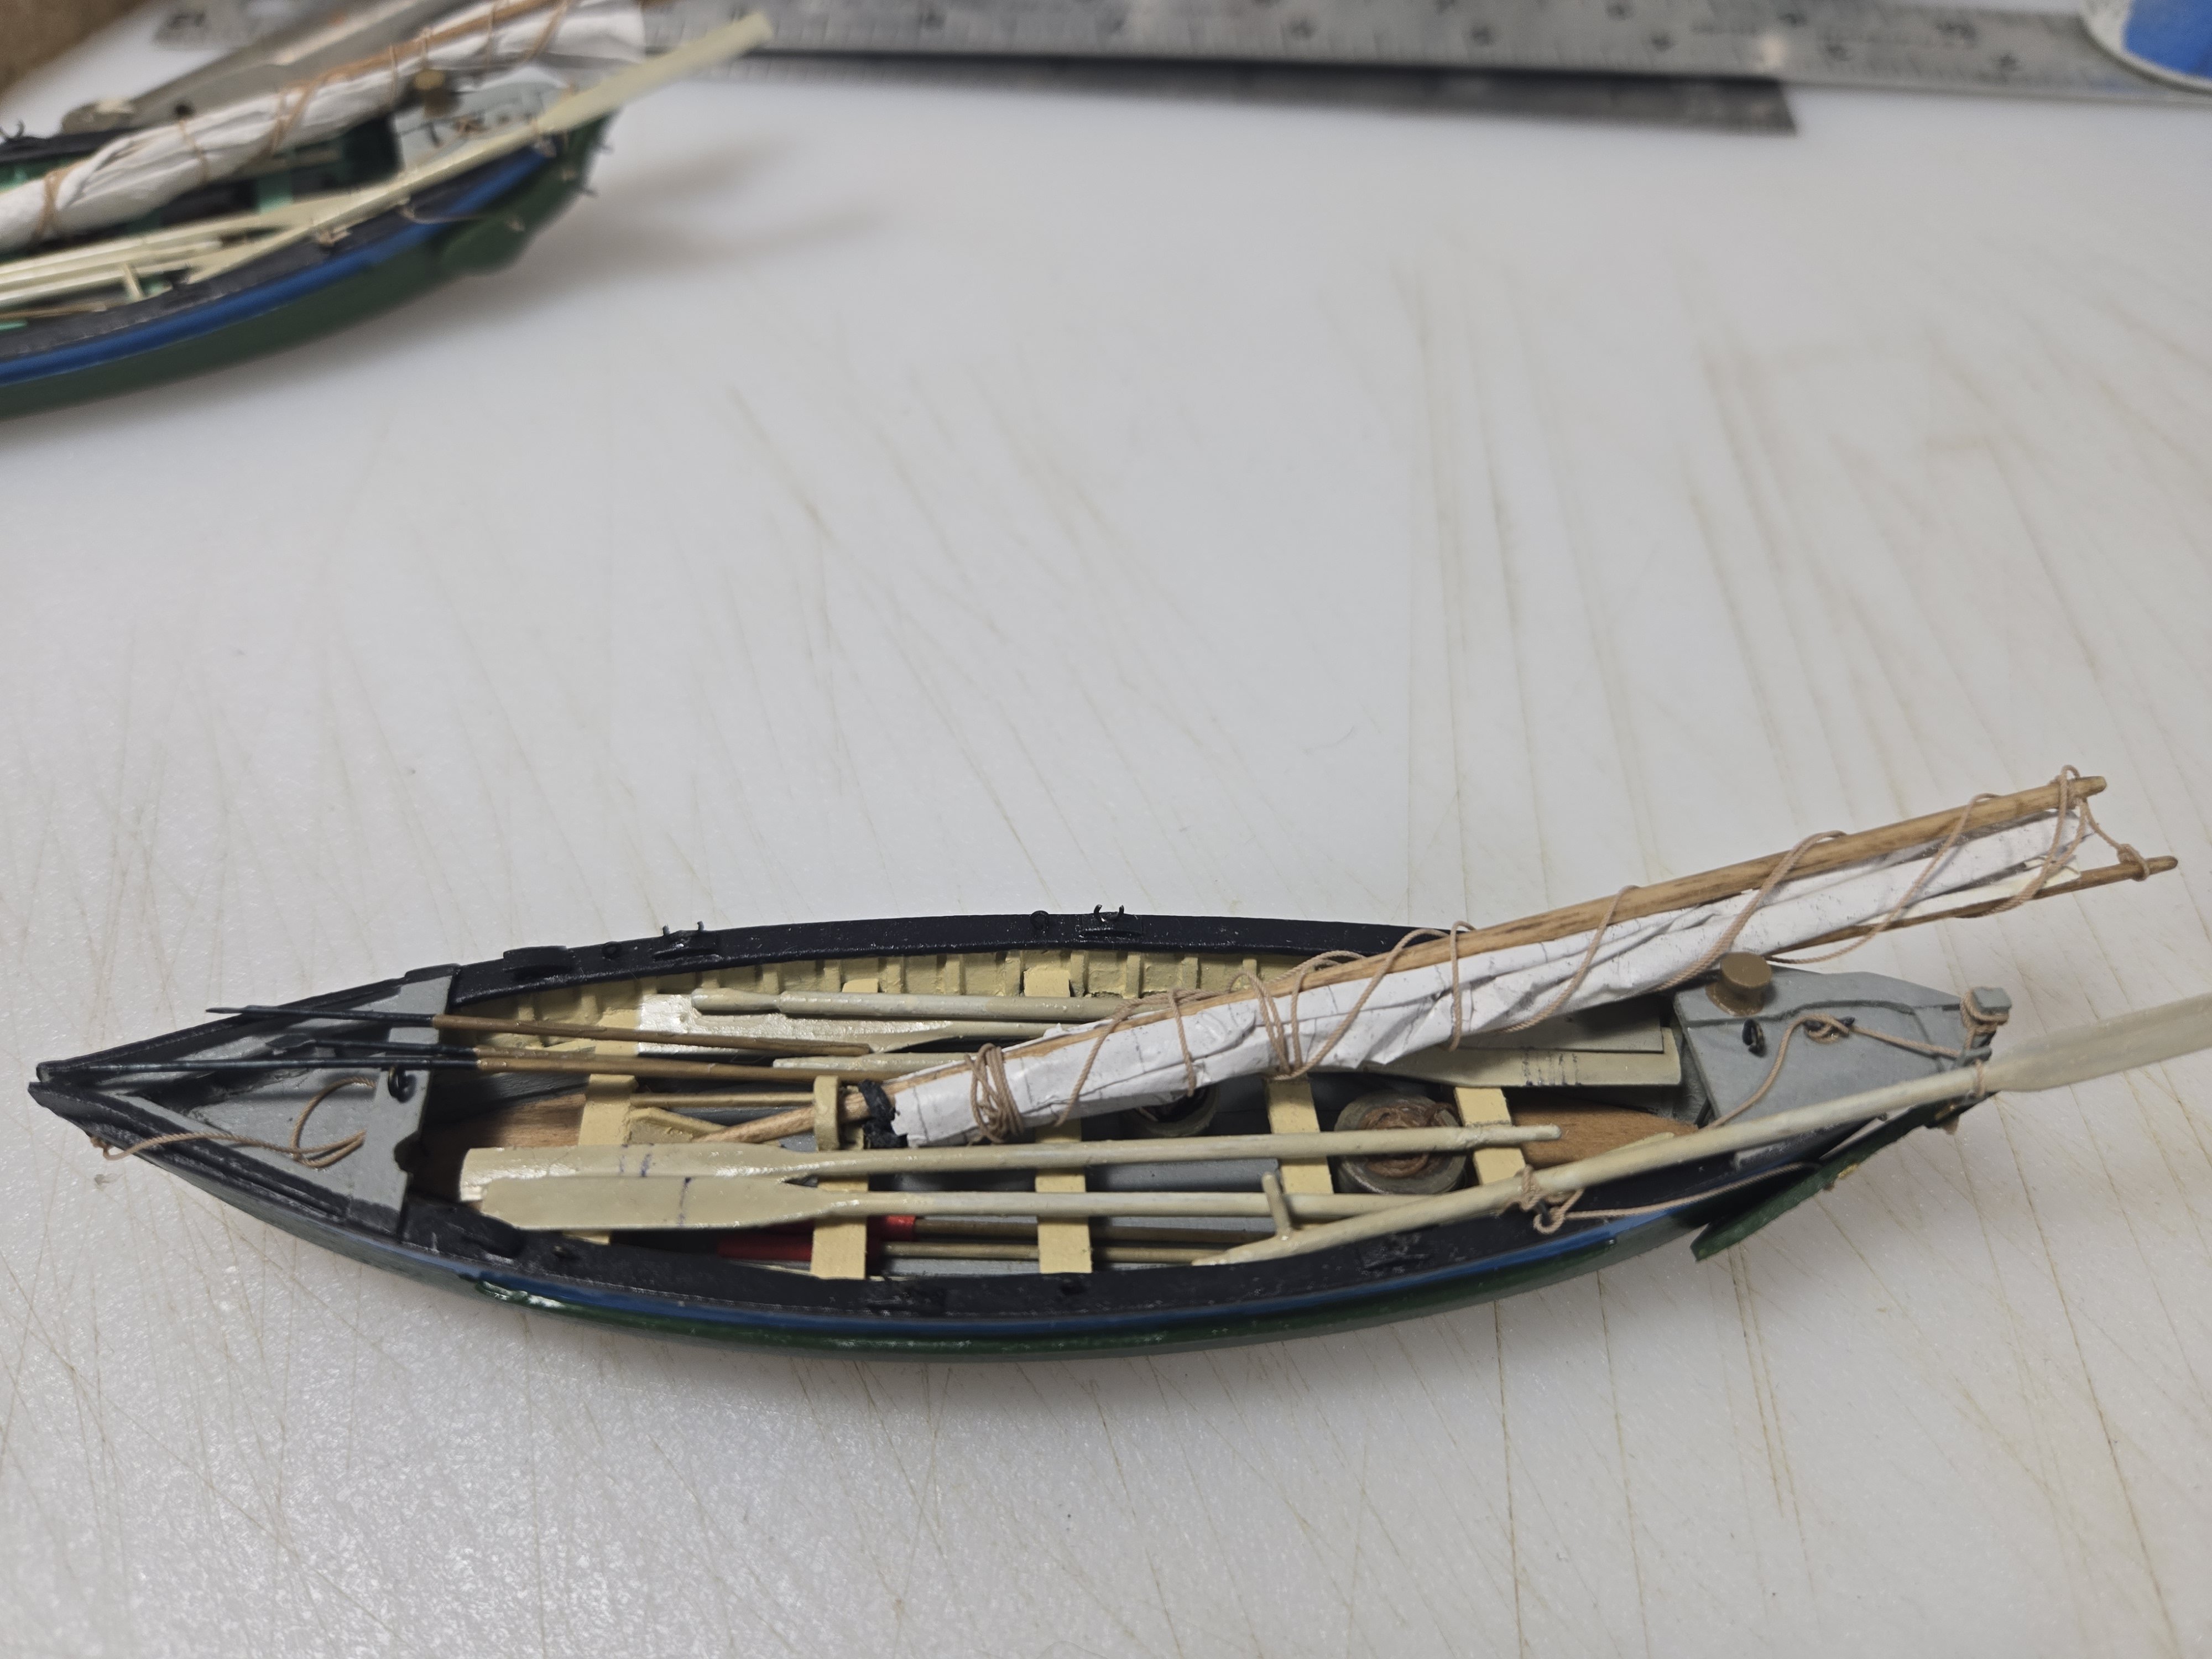
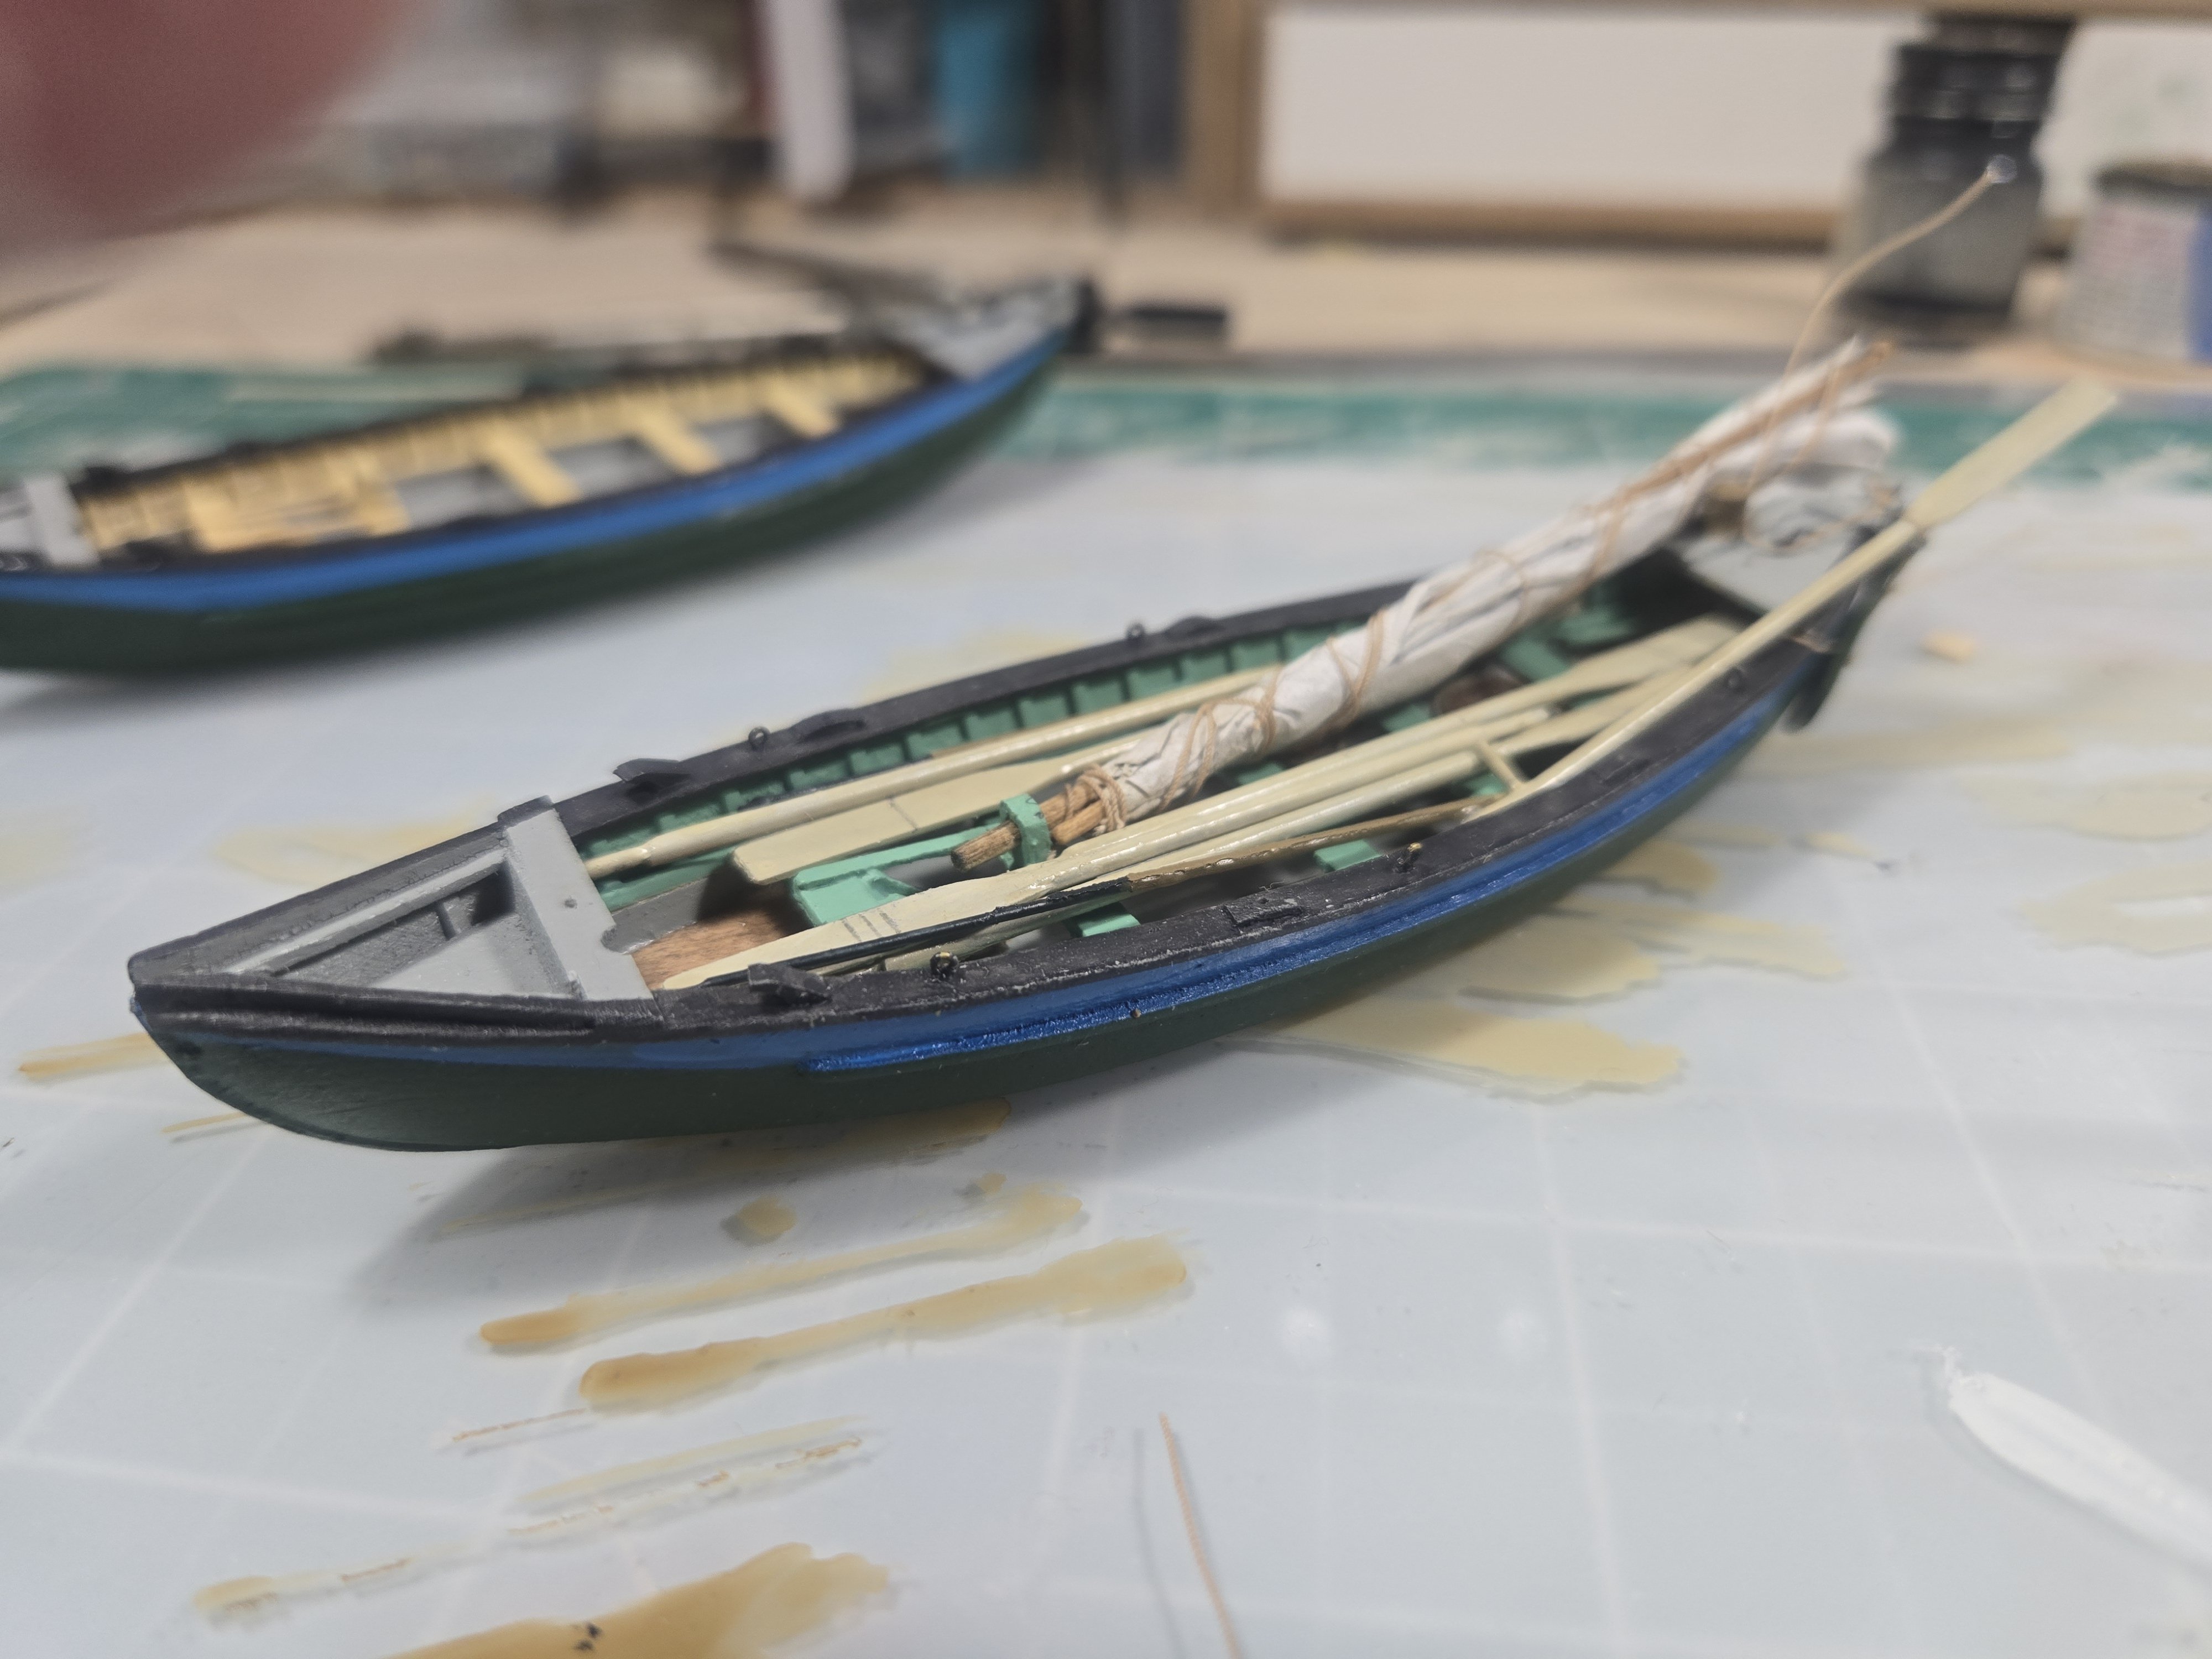
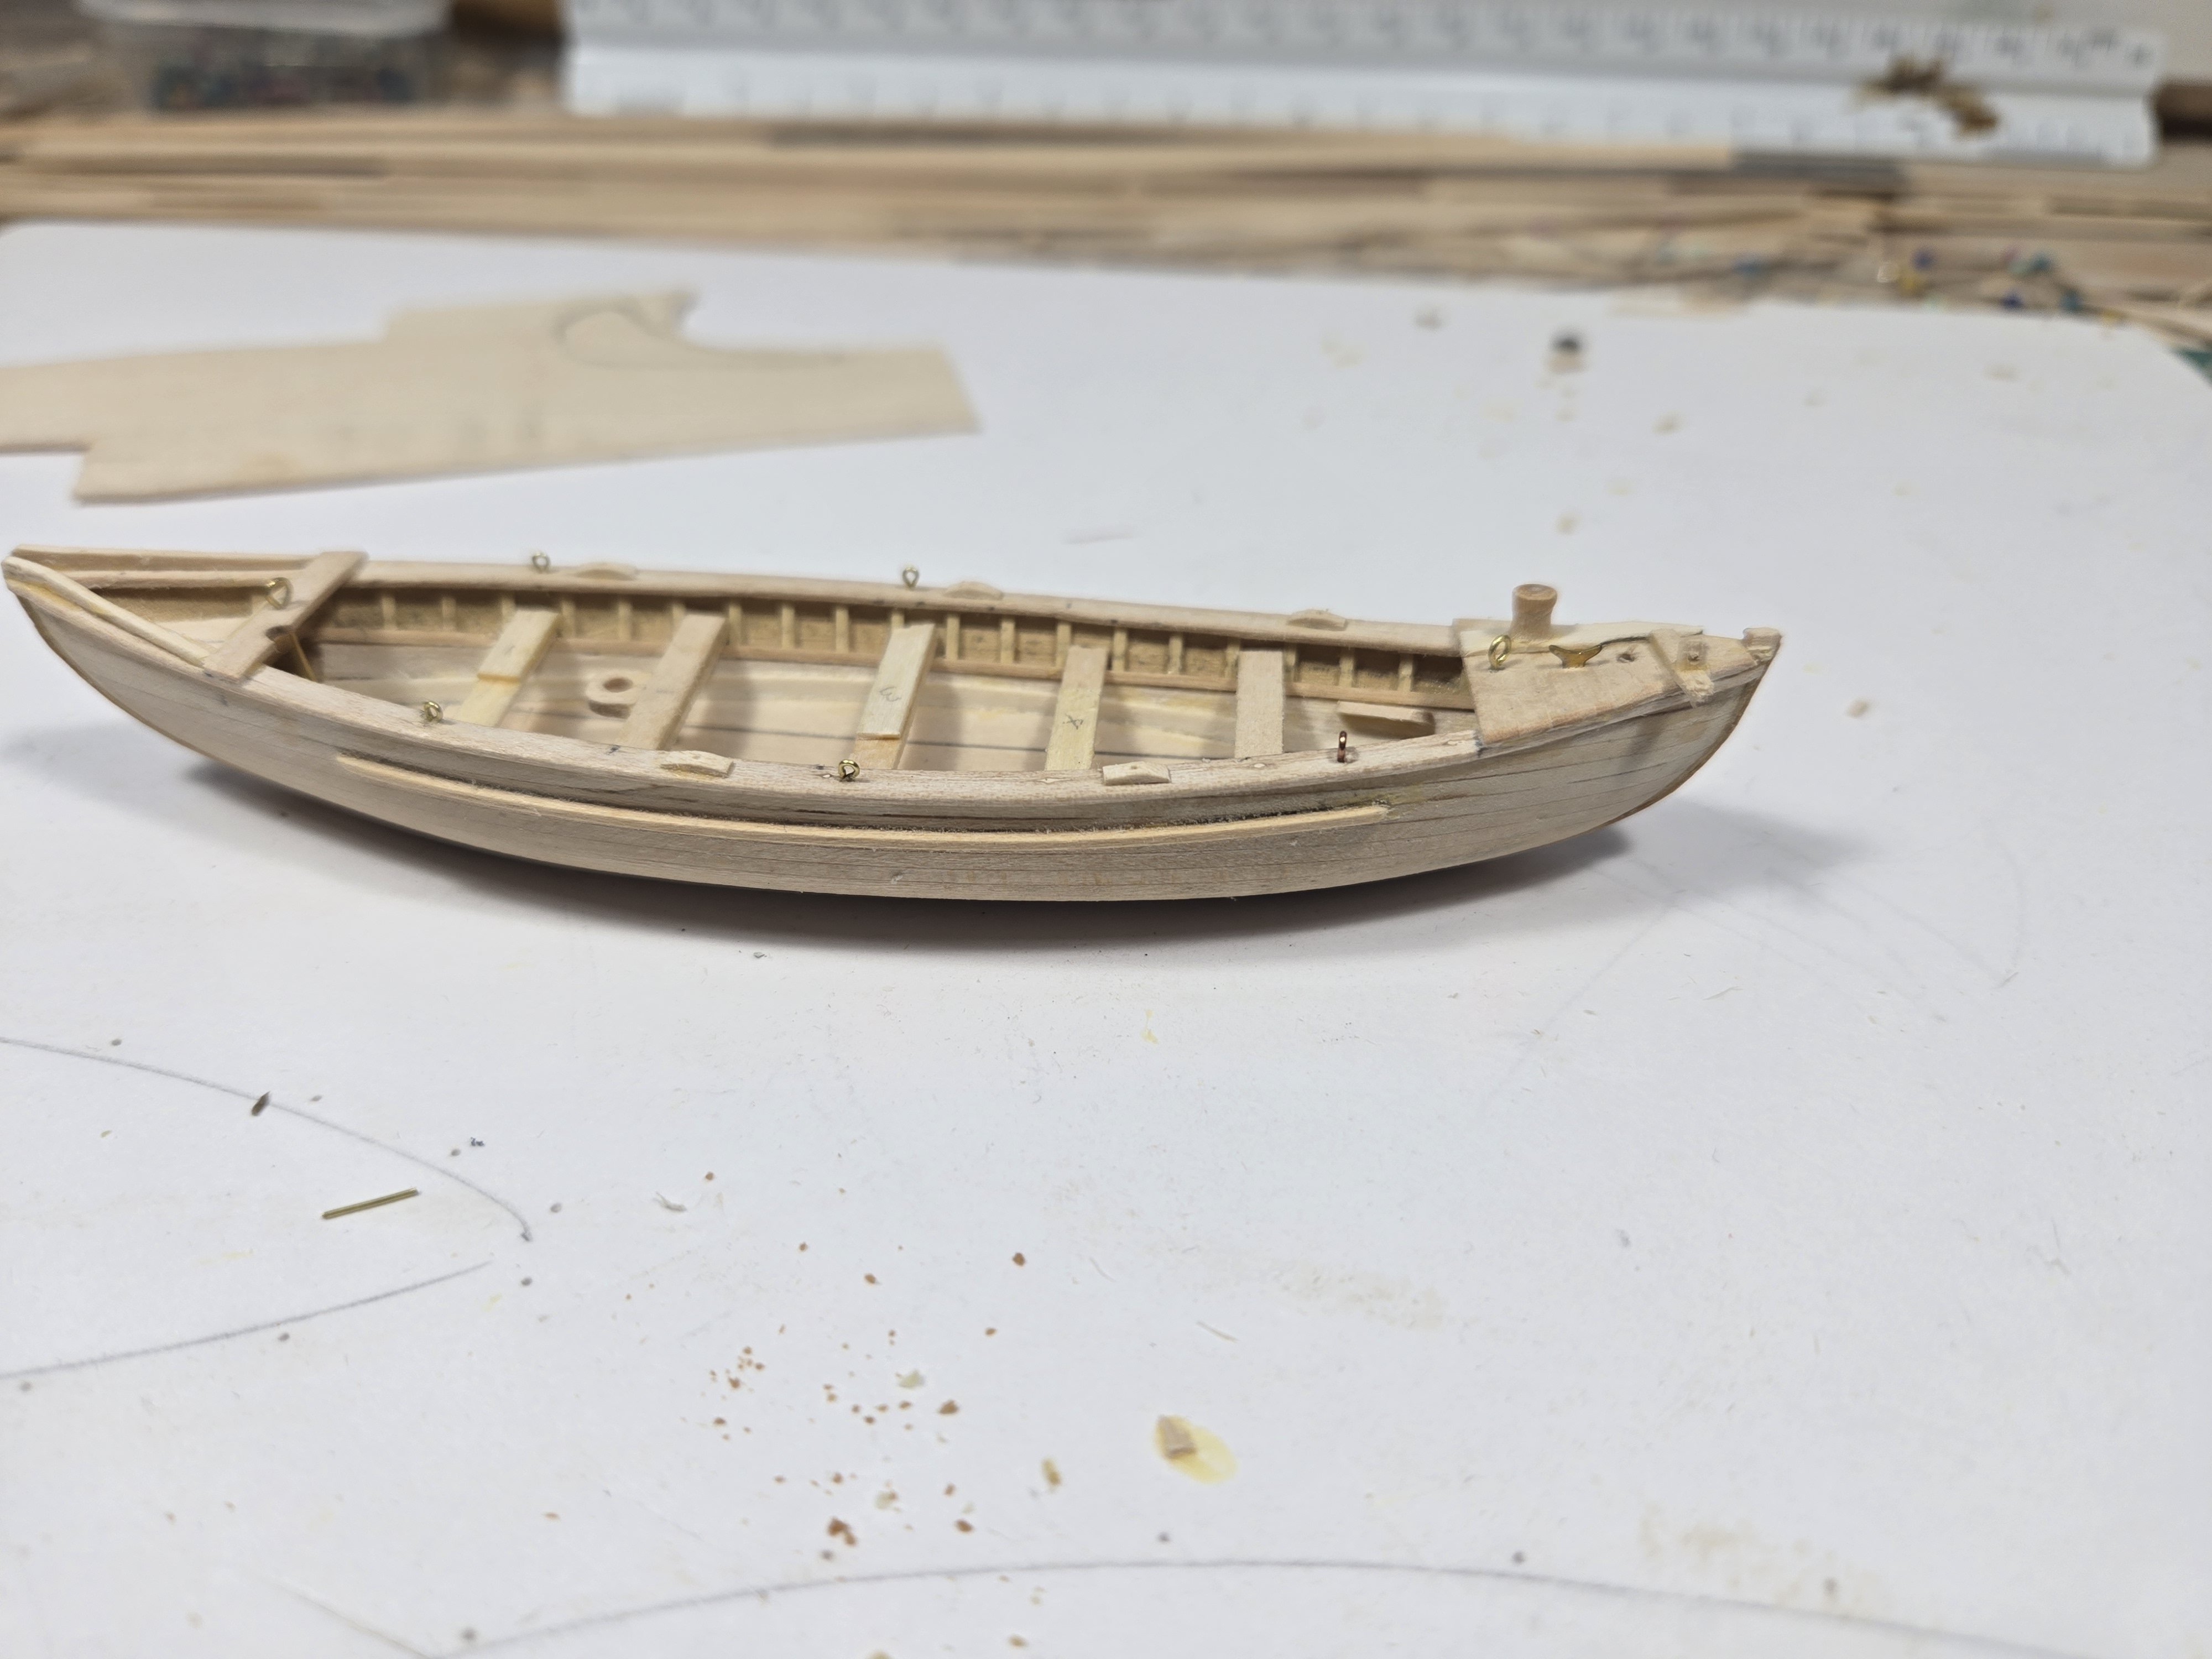
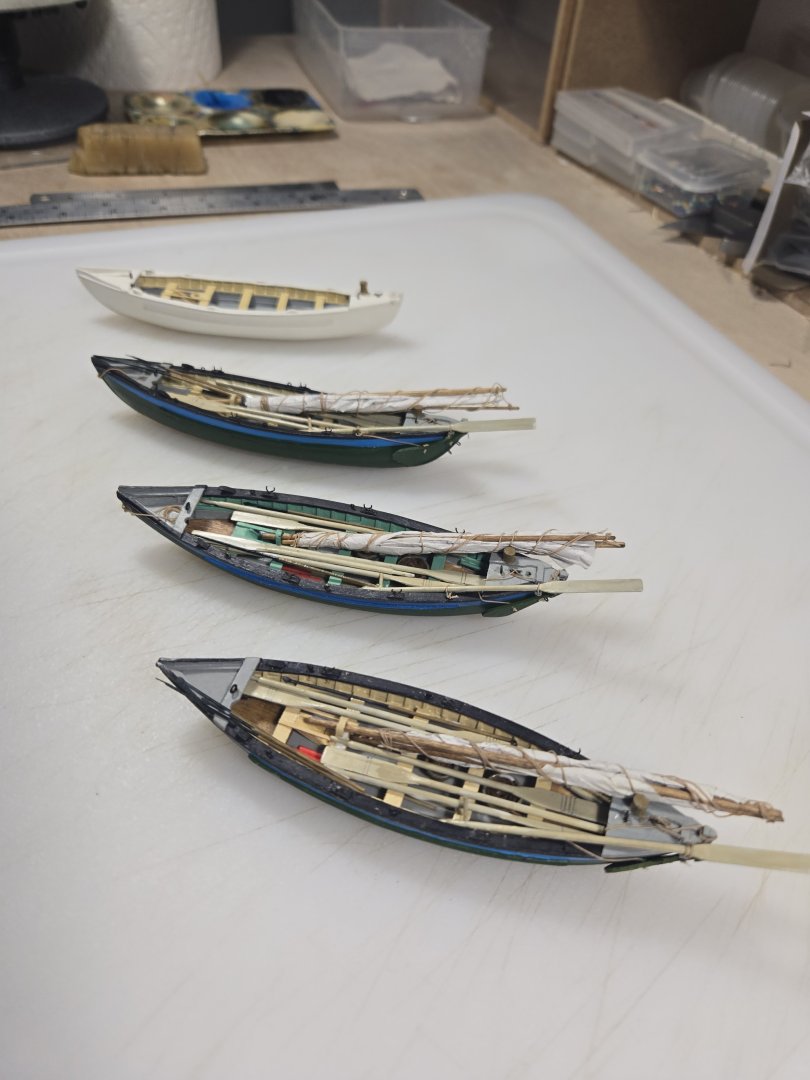
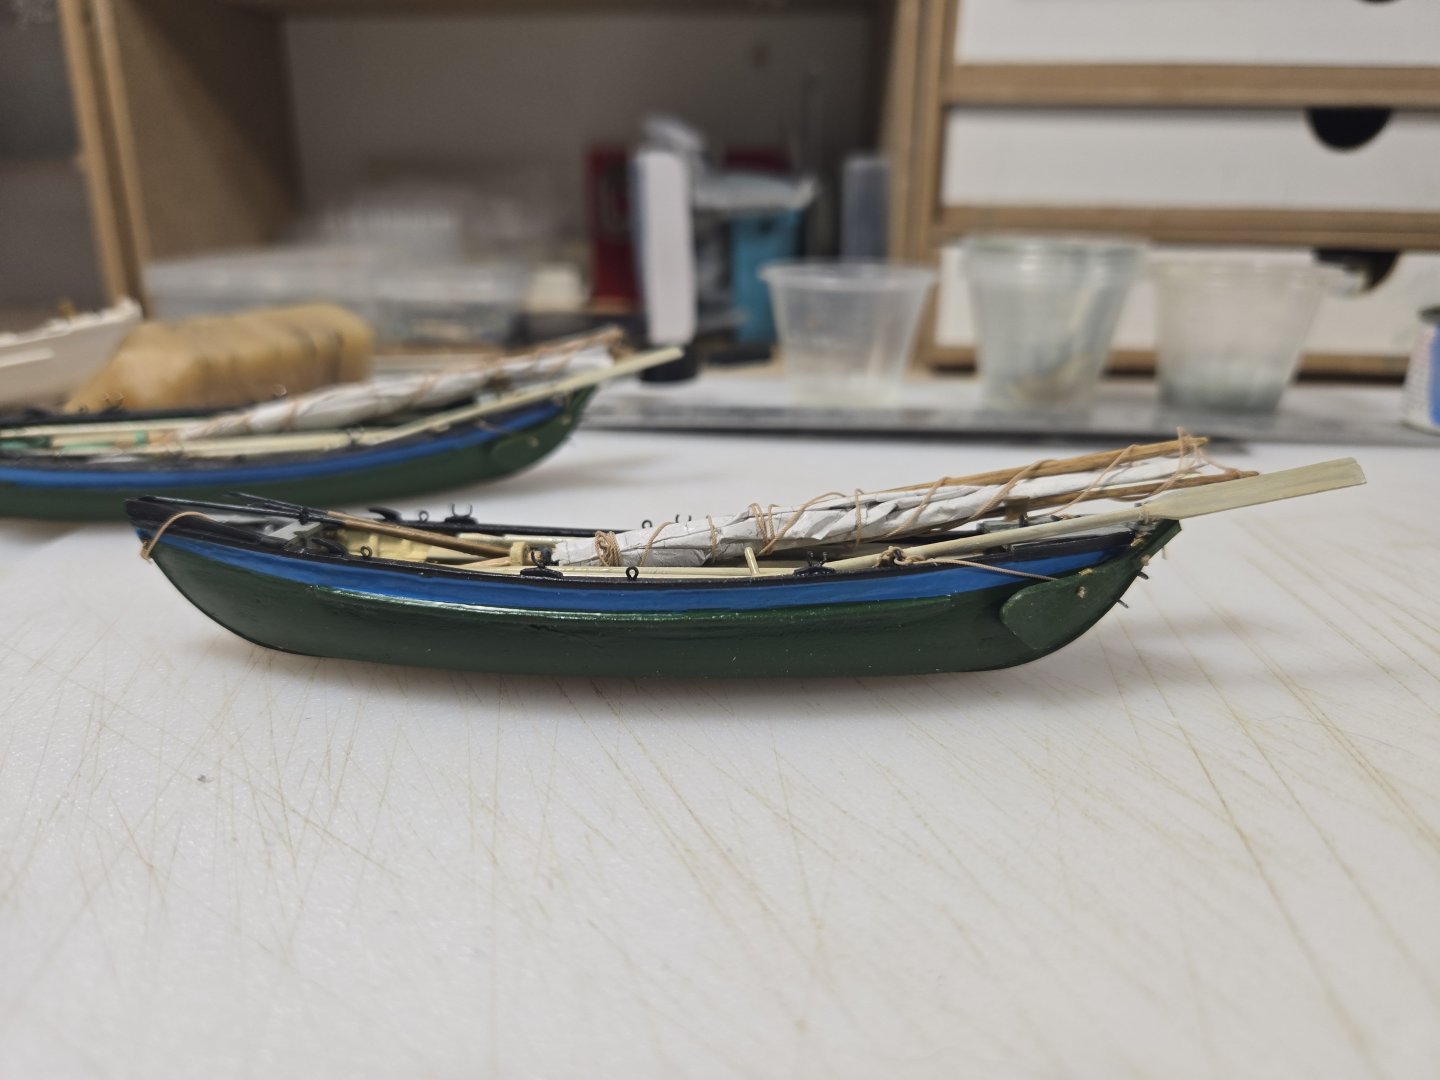
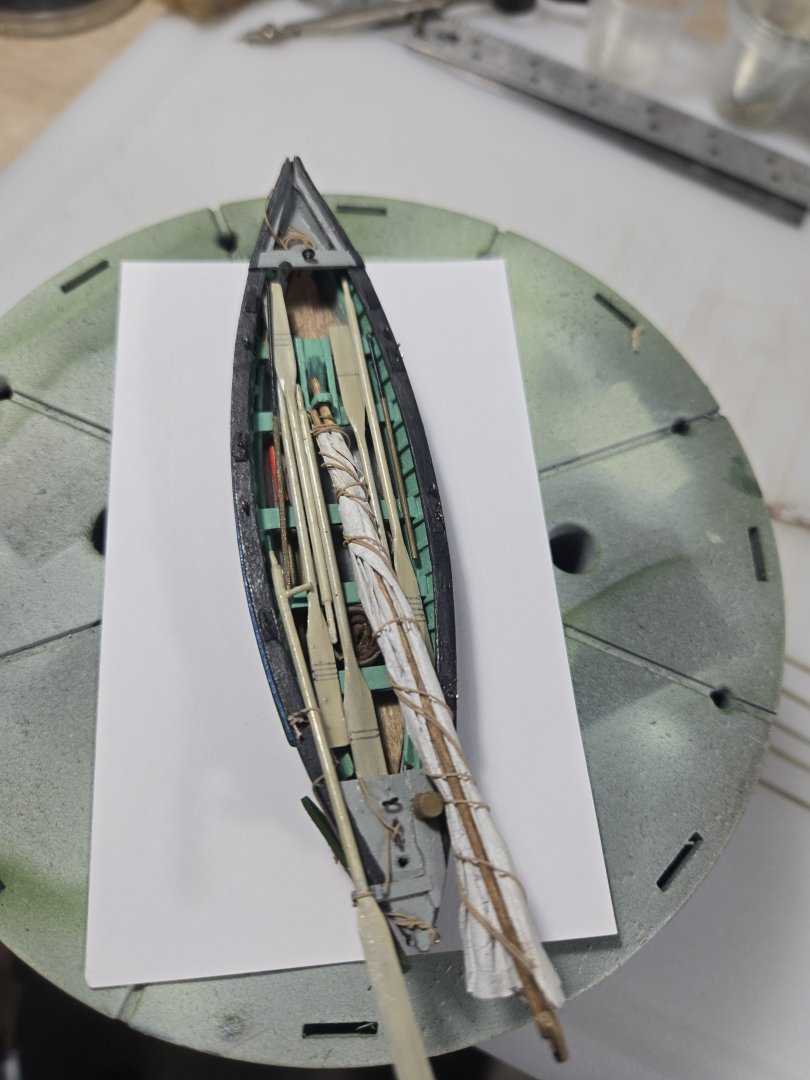
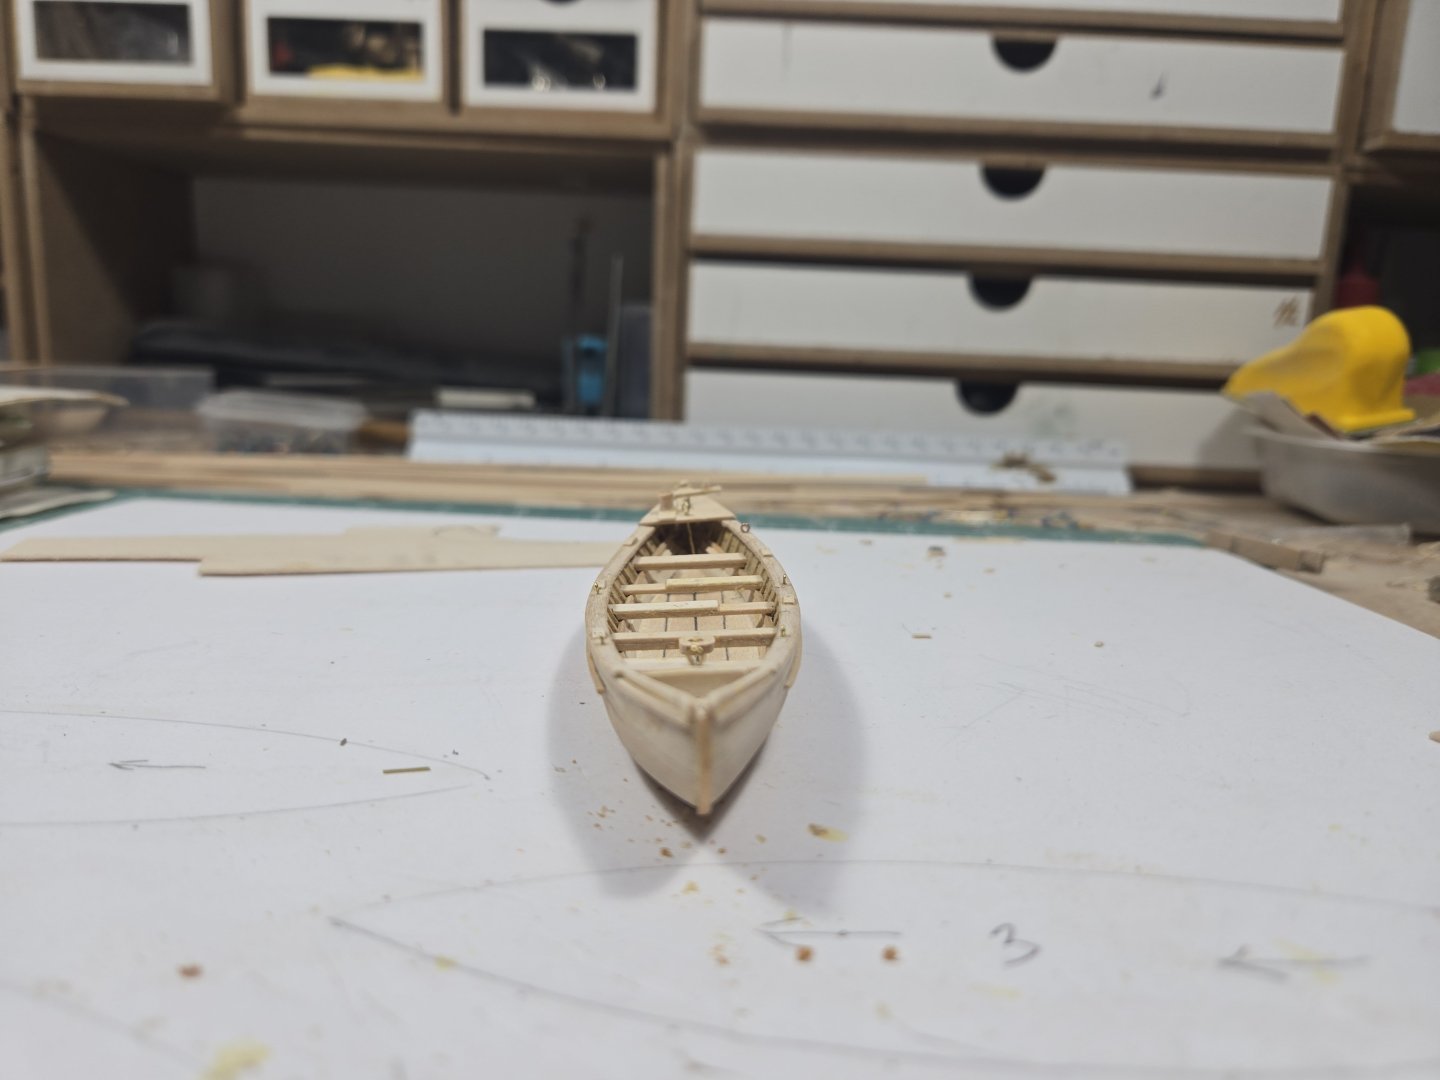
At last, whaleboats are about 98% finished. A number of revisions along the way. Oars and harpoons/lances were made from strip styrene and rod. After much research I decided to add a medium blue strip along the strake to the outfitted boats. Some whalers used different colors for each whaleboat (it appears this practice applied to larger boats primarily to identify the station on the ship) while others used the same color to identify the boats for their particular whaleship. Kate Cory has only three boats. I made the sails from Silk span painted with acrylic paint. Overall, I'm happy with the results and feel it was important to finish these early in the project, so I have them as reference points for various stages.


-
Mobile Phone Repair Clamps
Capt. Kelso replied to Paul Le Wol's topic in Modeling tools and Workshop Equipment
Just checked them out, also listed as "phone screen clamp", think I'll get a set of 8 ($21 US). Thanks for the tip! -
Lots of very useful suggestions. No right or wrong answers, my only suggestion would be to do a number of test samples on scarp wood. I like to make a piece of decking or use some scrap scribed decking to test various finishes. I found just using a small piece of wood wasn't always that representative, a large section gives a better reference. Also, do you apply an overall spray finish to your completed model, Dullcote or matt spray? If so, this could obviously impact your deck finish.
-
Rope serving machine
Capt. Kelso replied to Capt. Kelso's topic in Modeling tools and Workshop Equipment
Thanks everyone for the feedback and recommendations. I'm going to order the Serv-o-matic. -
I'm considering buying a rope serving machine. I've never used one but don't think I need anything elaborate. Anyone have experience with the Syren Serv-o-matic rope serving machine. It looks well-made and easy to use. Other options?
-
Highly recommend an Architect Scale Ruler. Easy to use, can be used for many different scales common to wood ship modelling. Imperial Scale: 1-1/2, 1, 3/4, 3/8, 3/16, 3/32, 1/2, 1/4, 1/8, 3, 16 https://images-na.ssl-images-amazon.com/images/I/81iAxJg8tqL._AC_UL232_SR232,232_.jpg
-
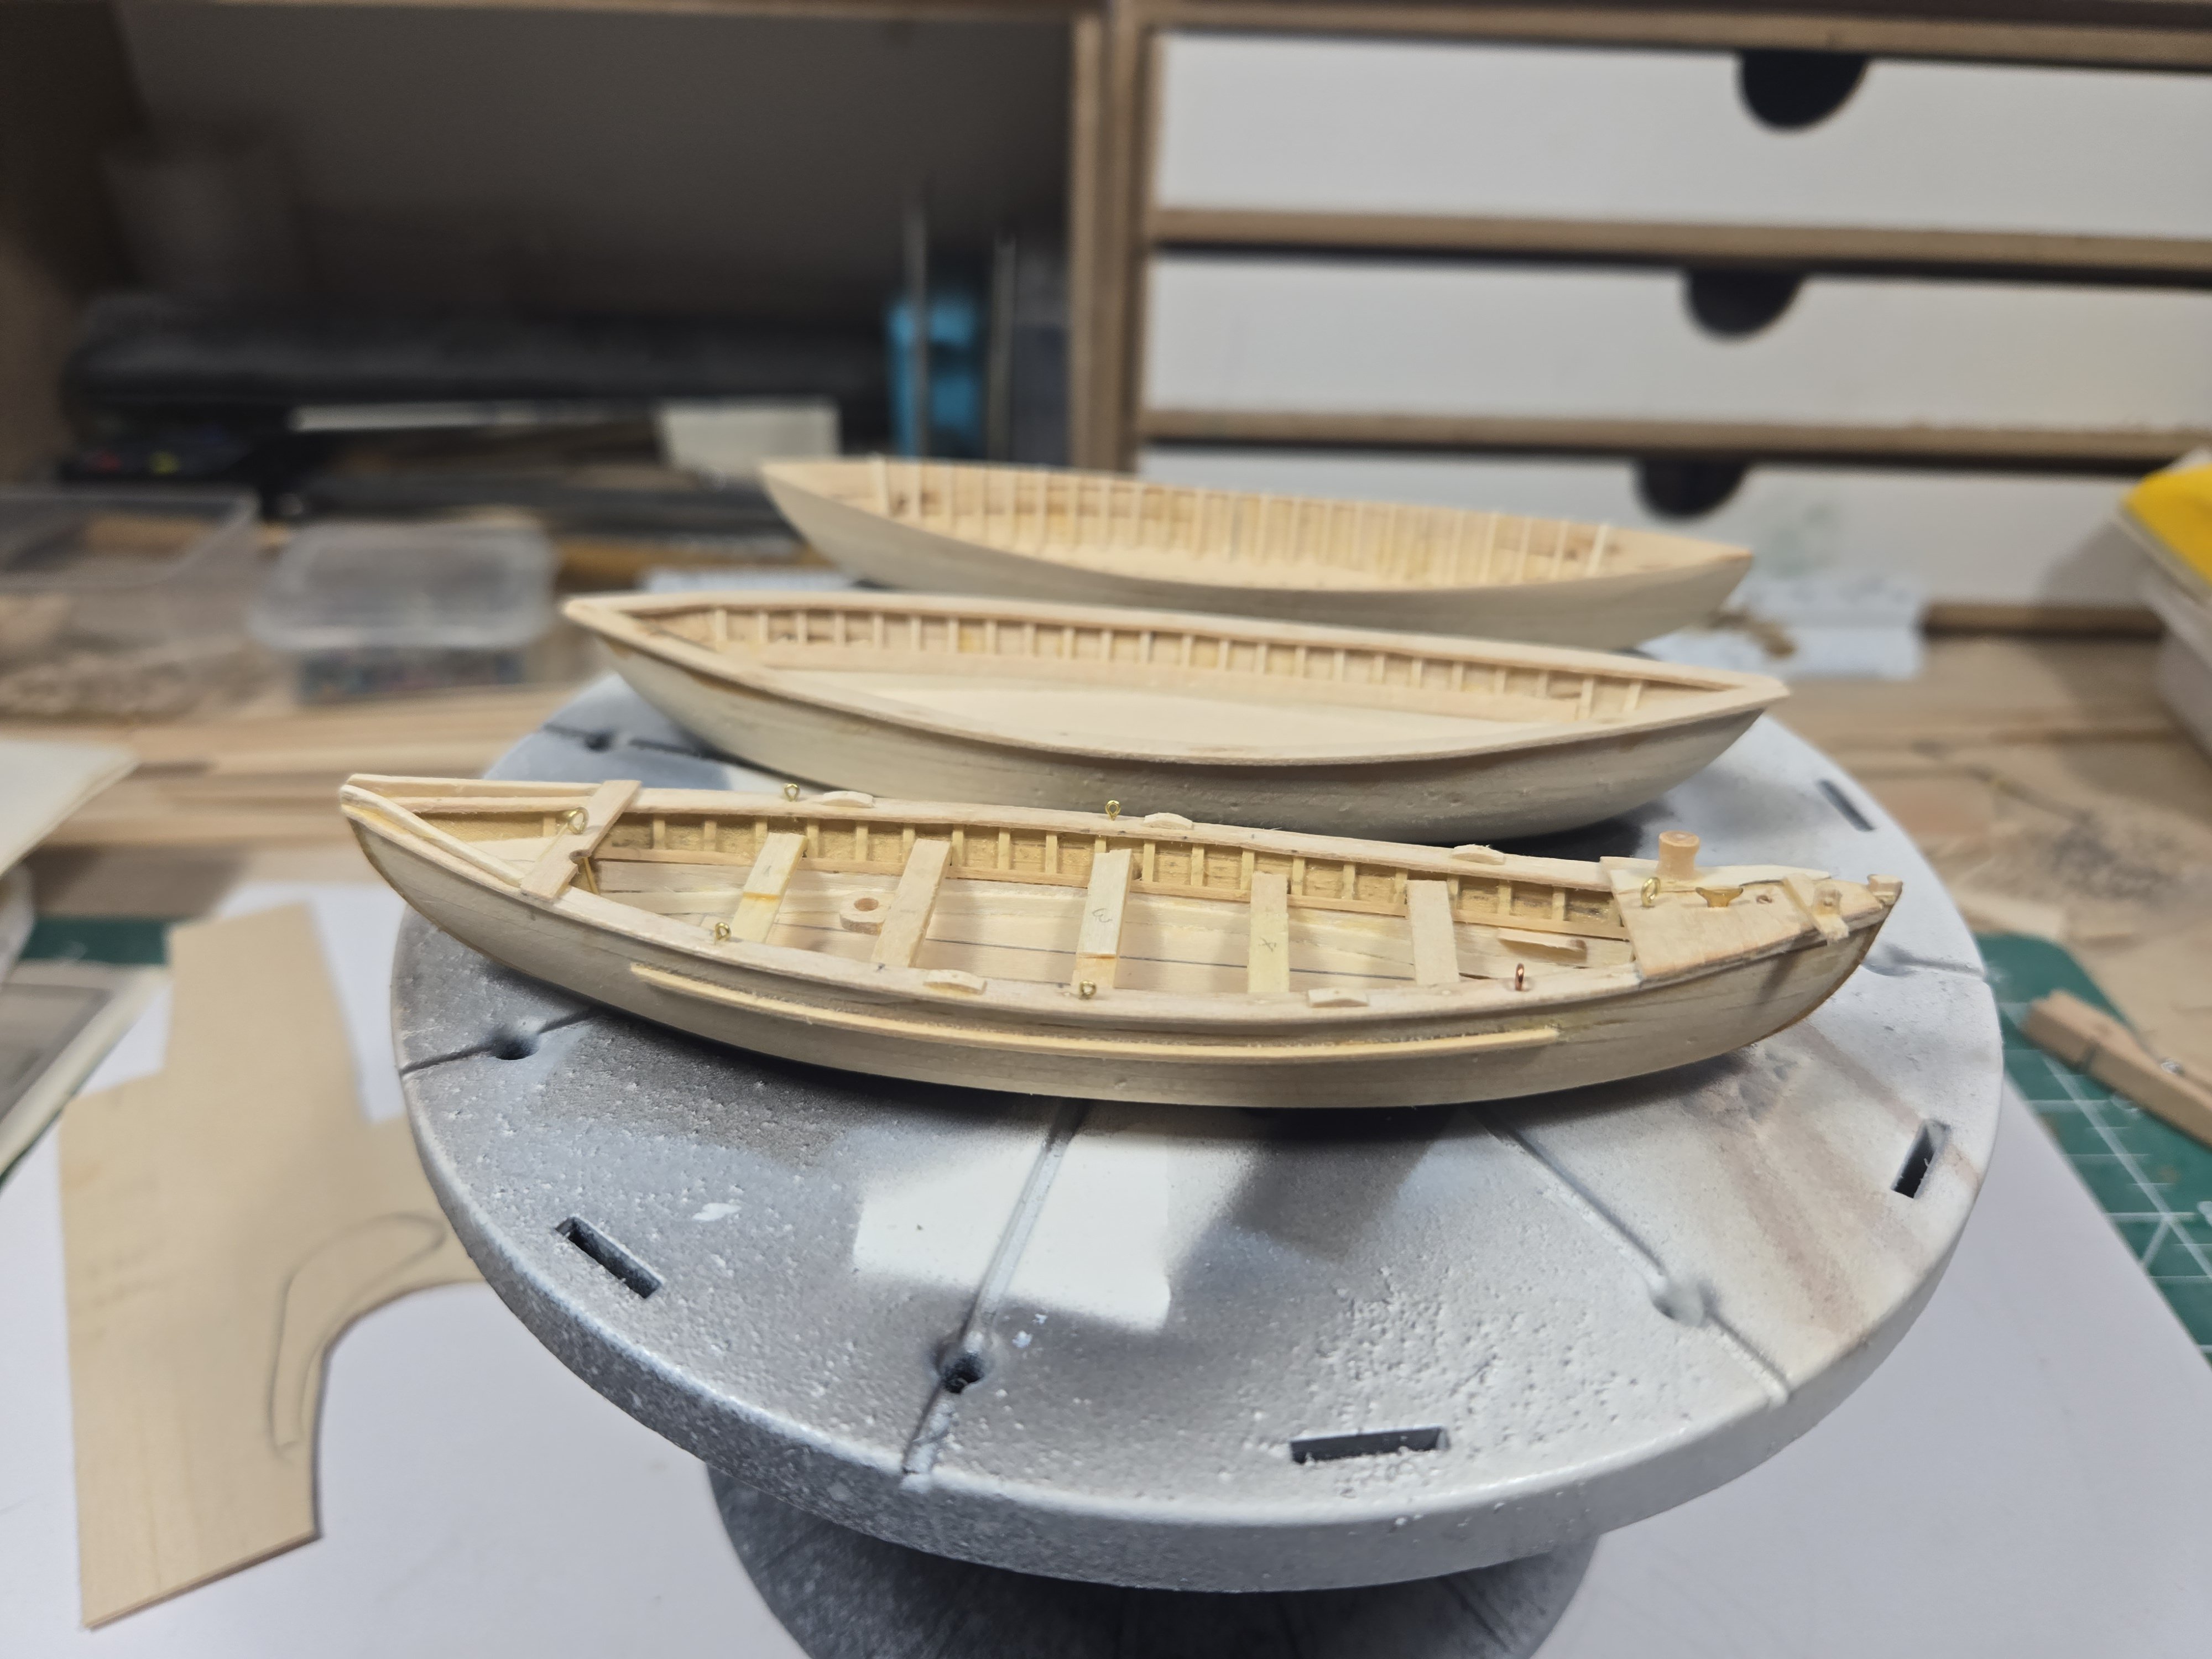
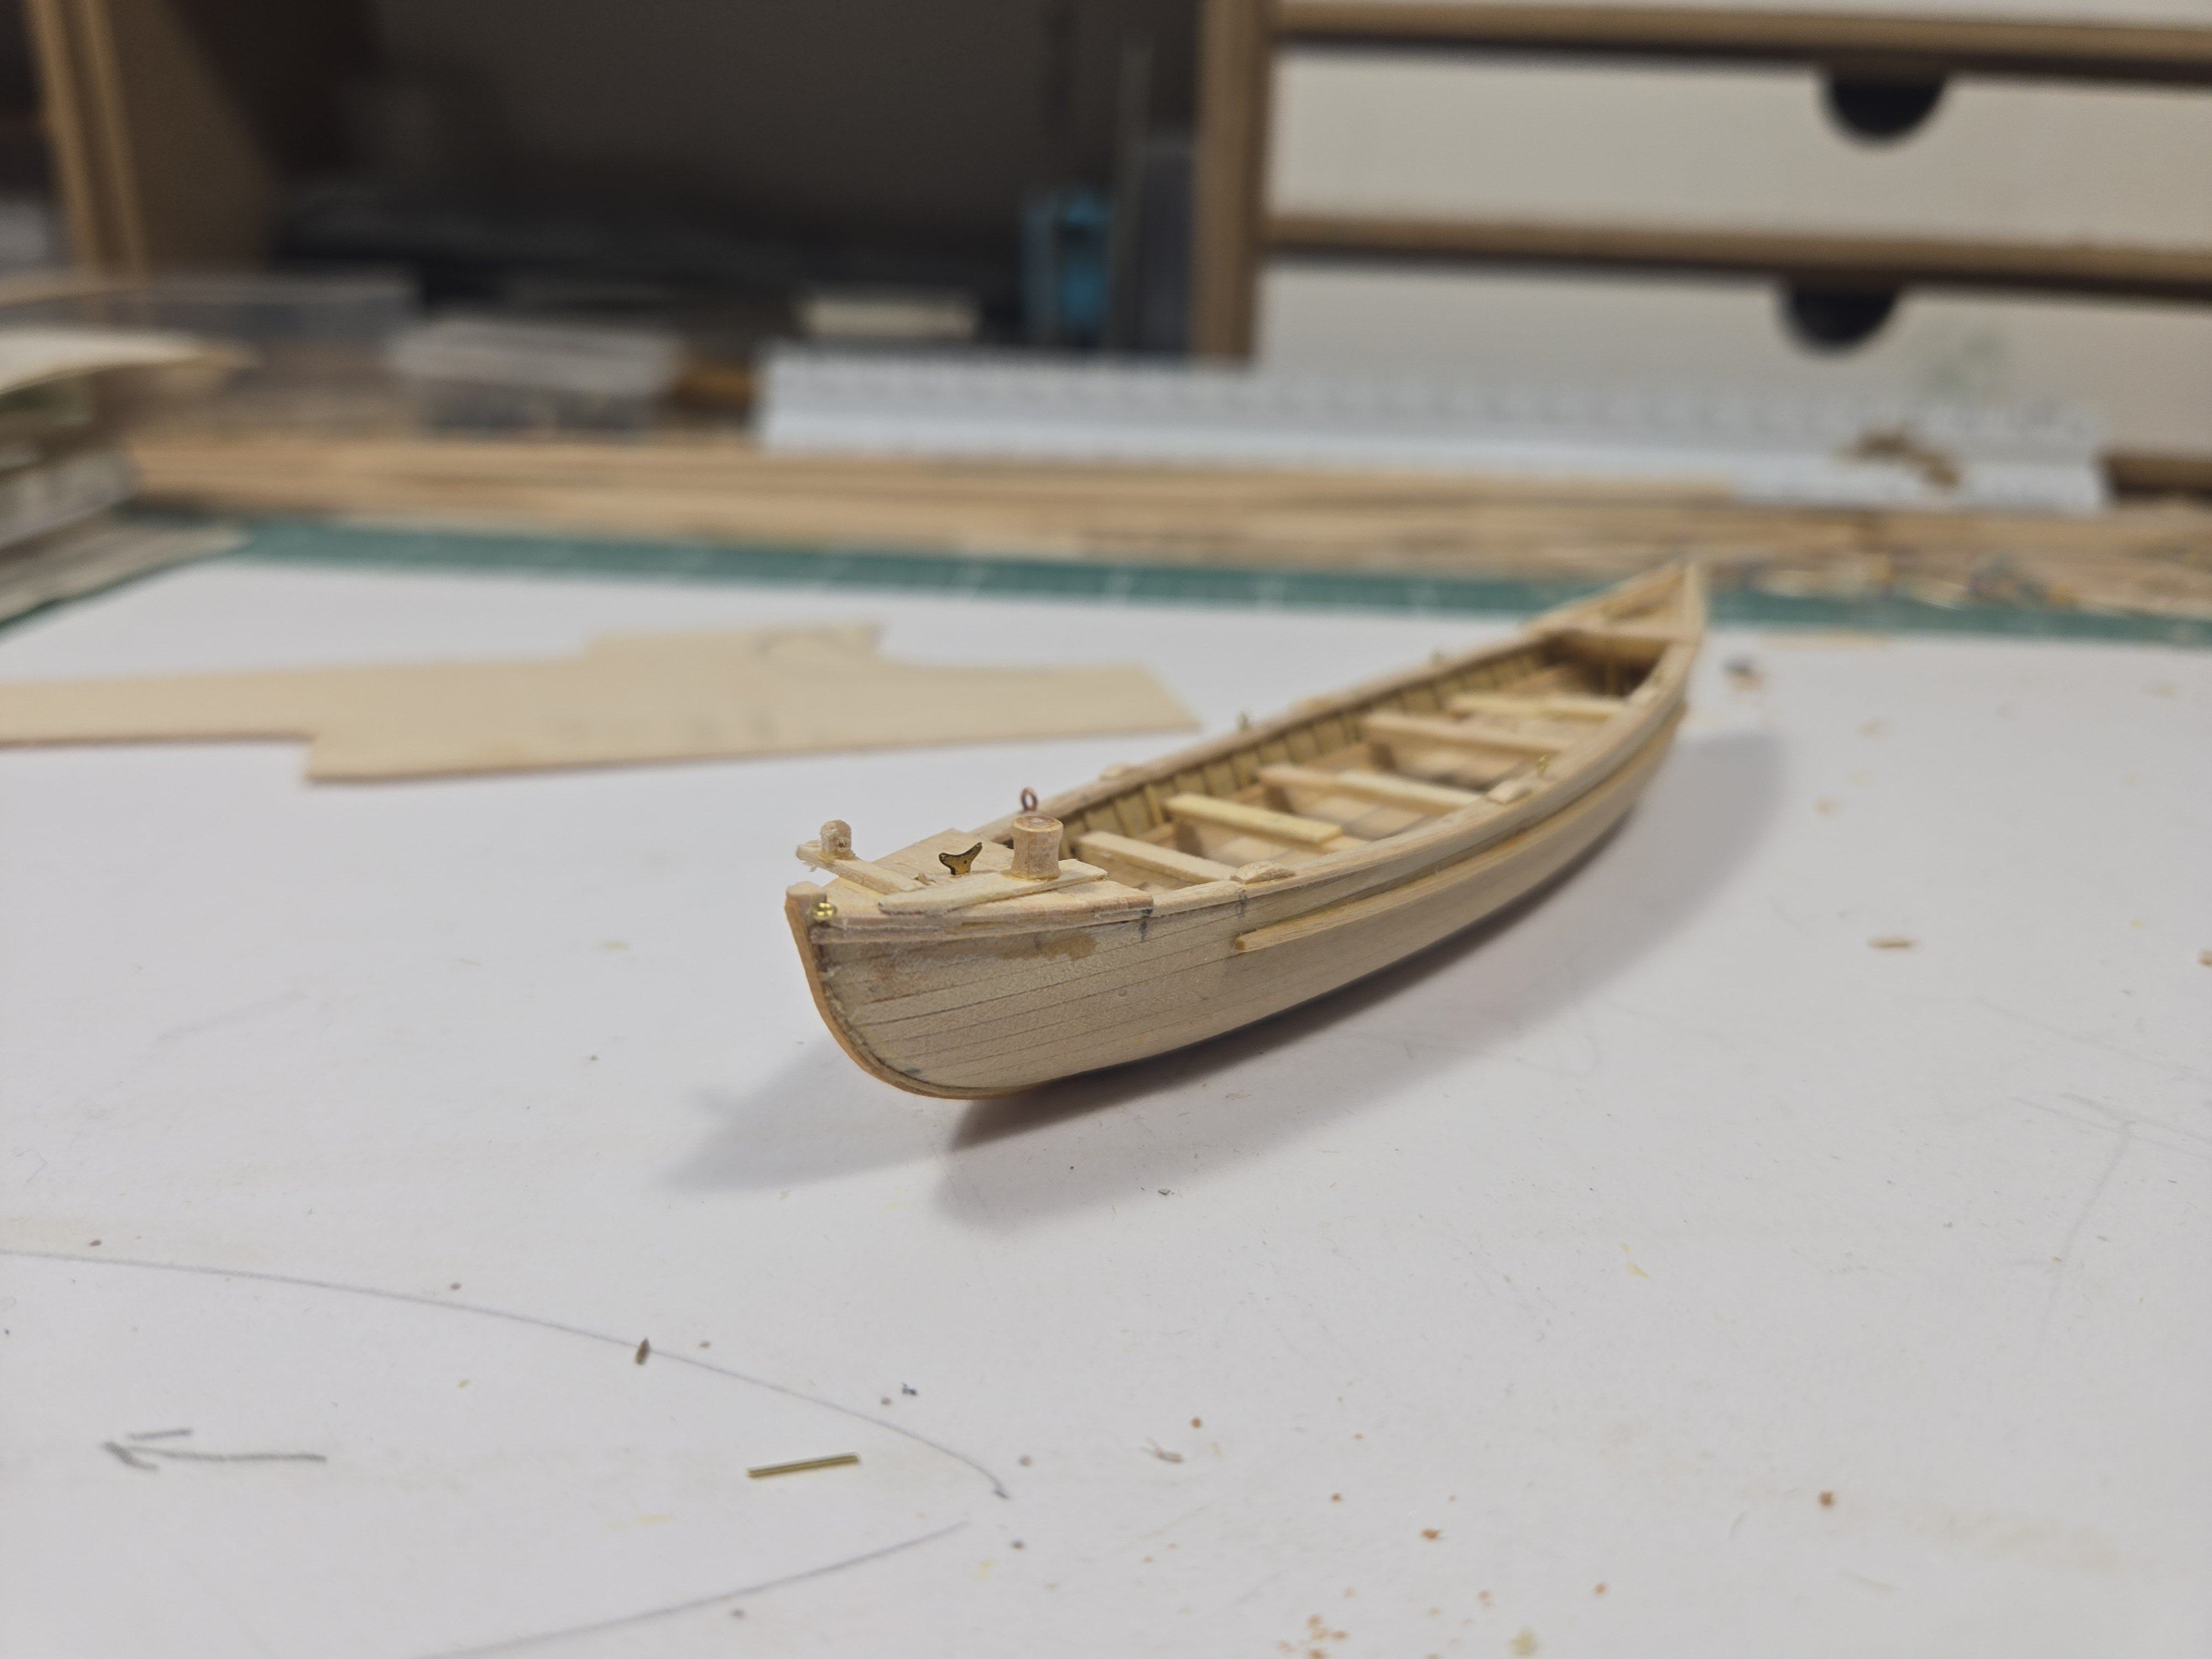
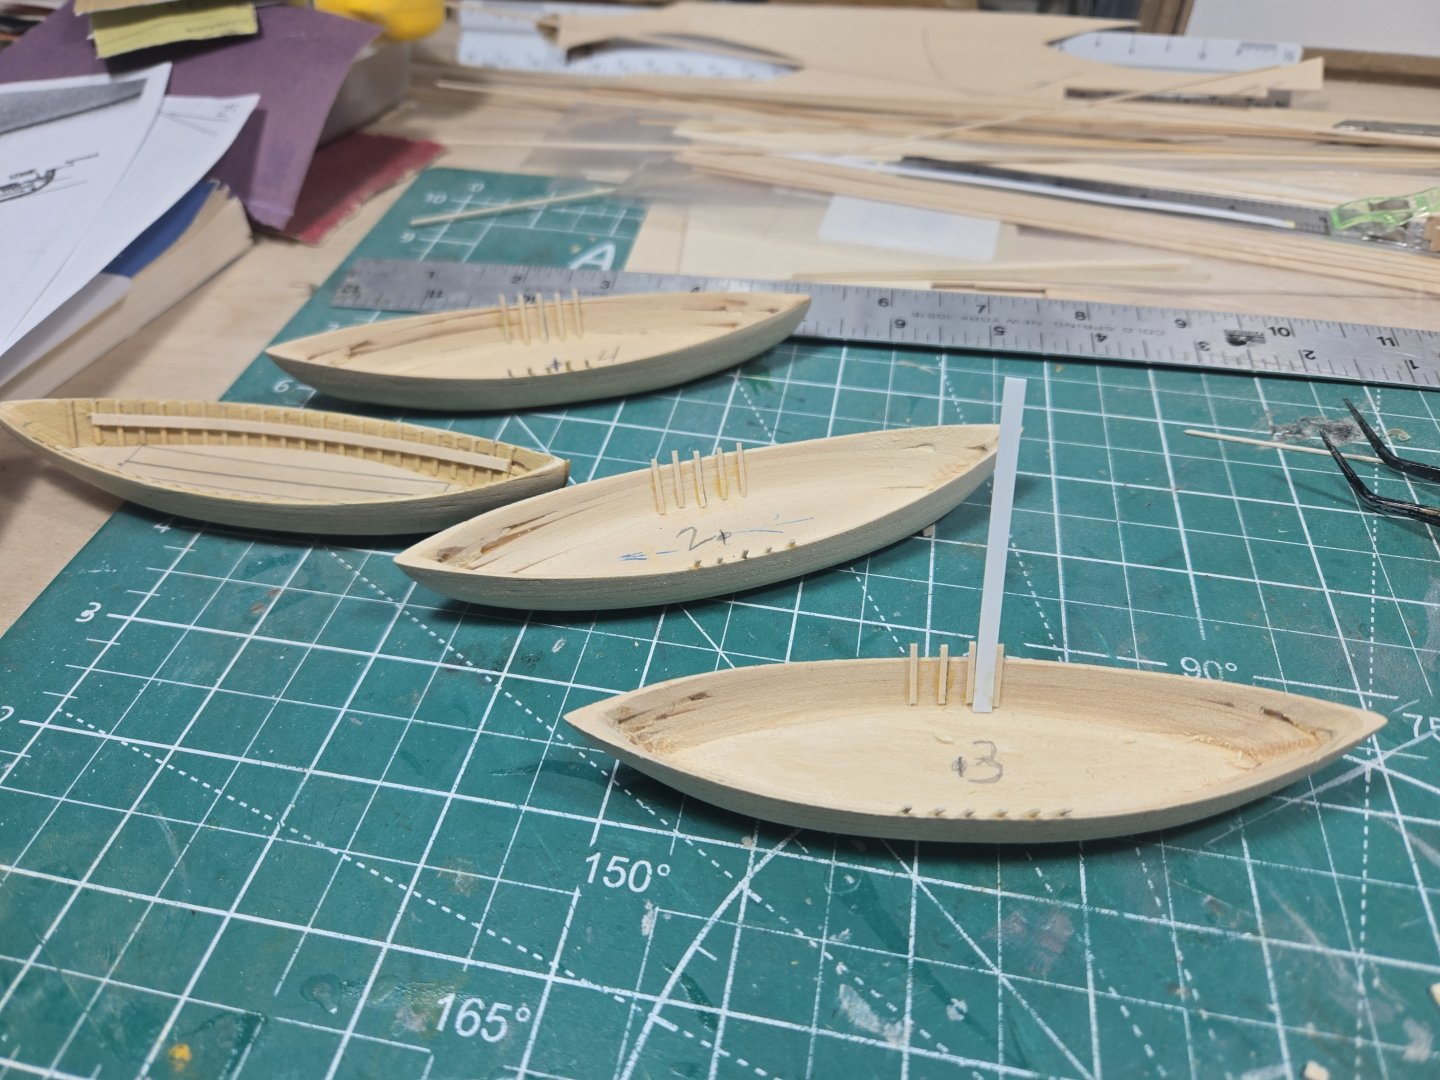
Some progress on the whaleboats. Initially I tried to build these in an "assembly line" process. However, these are essentially scratch built and required research to determine which version to build. I found I couldn't simply make four pieces of each part without knowing how a completed one would look. Also, I started going down the detail "rabbit hole"! The more you add, the more you need to add. There's a lot going on with these little boats. After much trial and error, I finally completed a prototype and feel confident that I have as much knowledge and detail to finish the rest. One issue I am struggling with is whether to add furled sail or not? The completed ship will not have sails and I'm wondering if adding the sails to the whaleboats will look out of sync? Anyway, regarding the paint color. My research noted black and dark green were commonly used during this timeframe. Other information regarding a band of color along the gunwale I found in the previously noted reference material. I have found that Tom Lauria's series on Building a Whaleboat has been an endless source of information, inspiration and motivation. The series covers modeling techniques that can be applied to builds beyond whaleboats. There are references to building the tabernacle and its position which I was not familiar with. But are a key detail. While going through the series I learned how to make the oar locks which I feel add needed detail. There is also a "How To" regarding sail making I intend to try. Once I finish the basic boats, time to add the gear!
-
There are a number of posts regarding the use of a proportional divider for calculating the number of planks. You might find the information helpful.
-
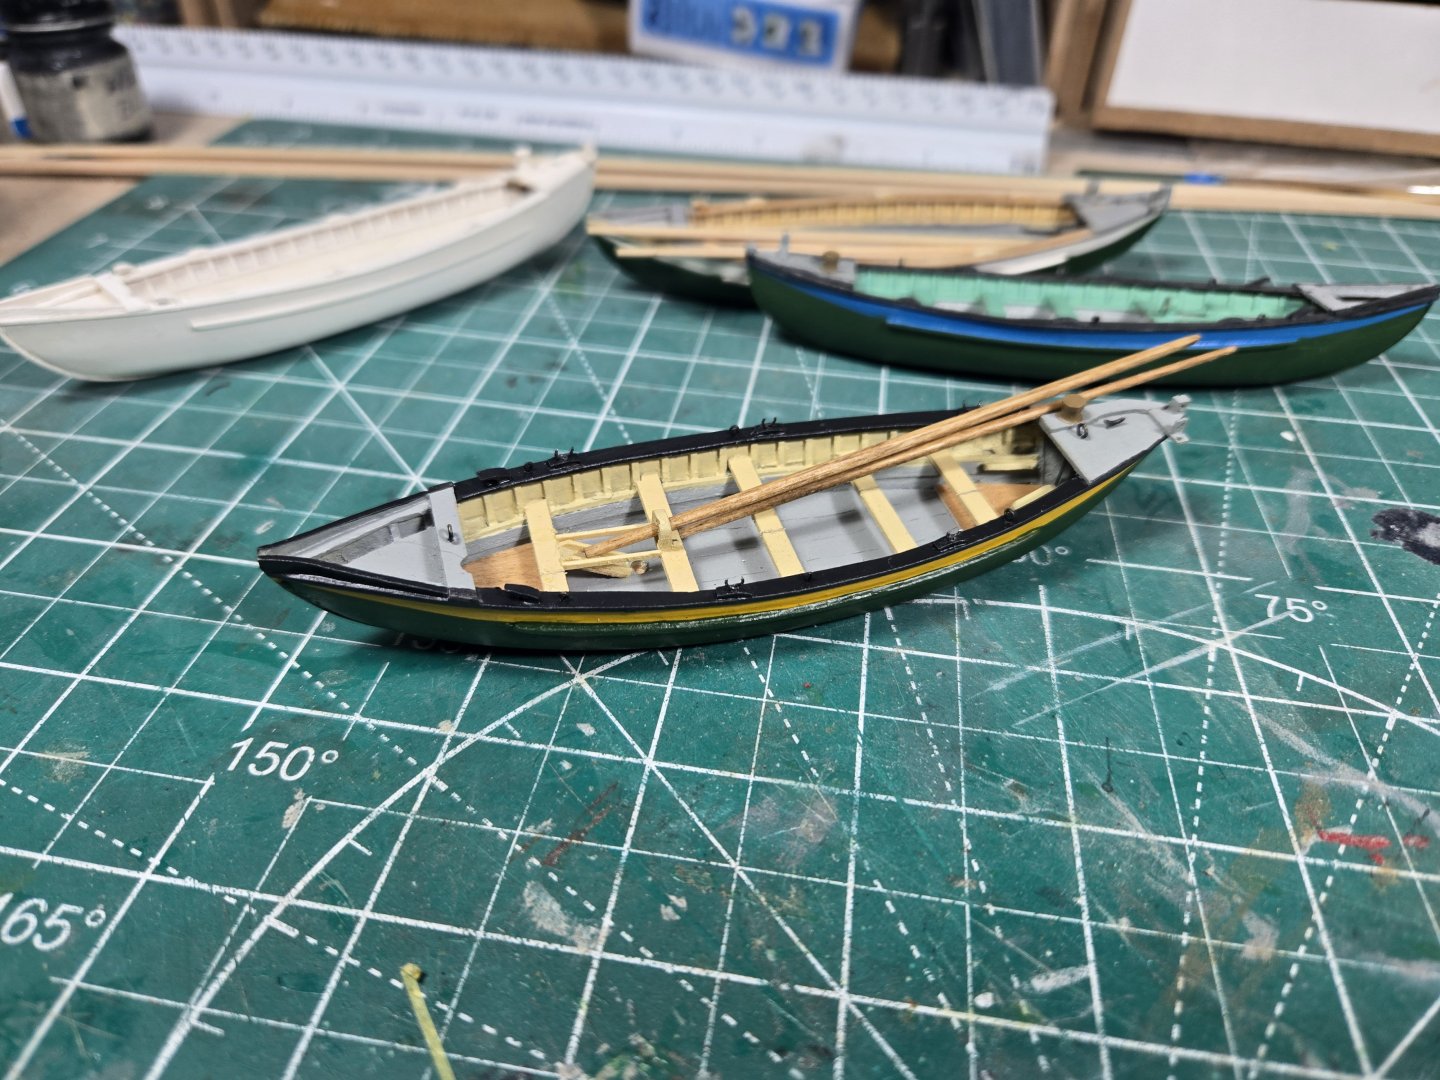
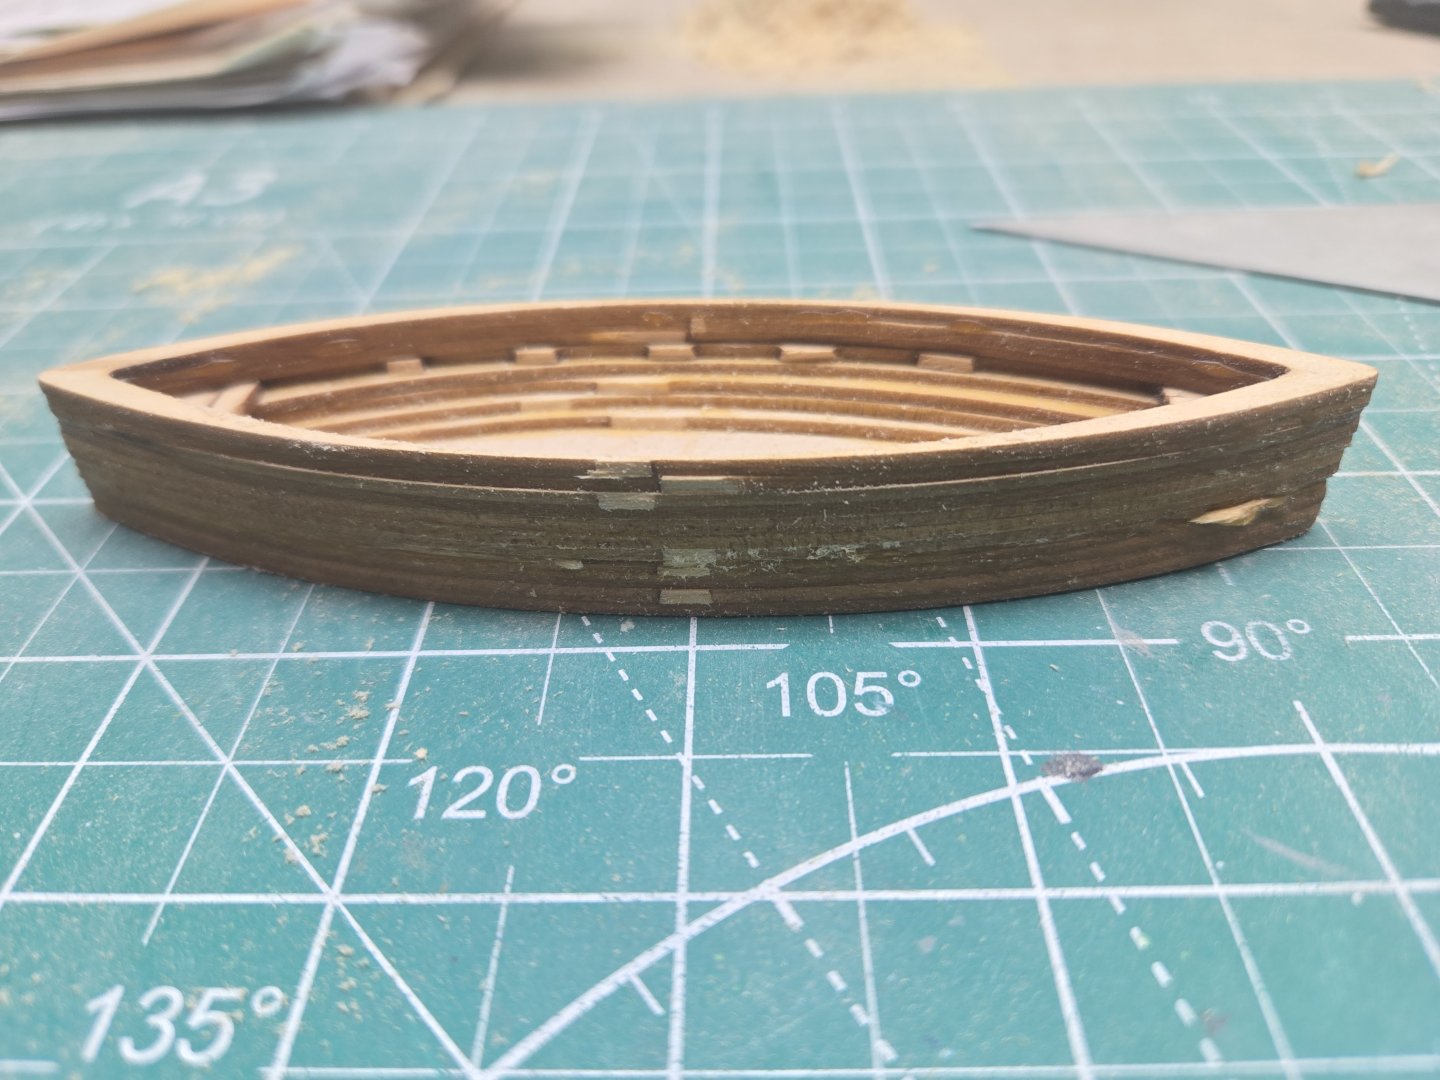
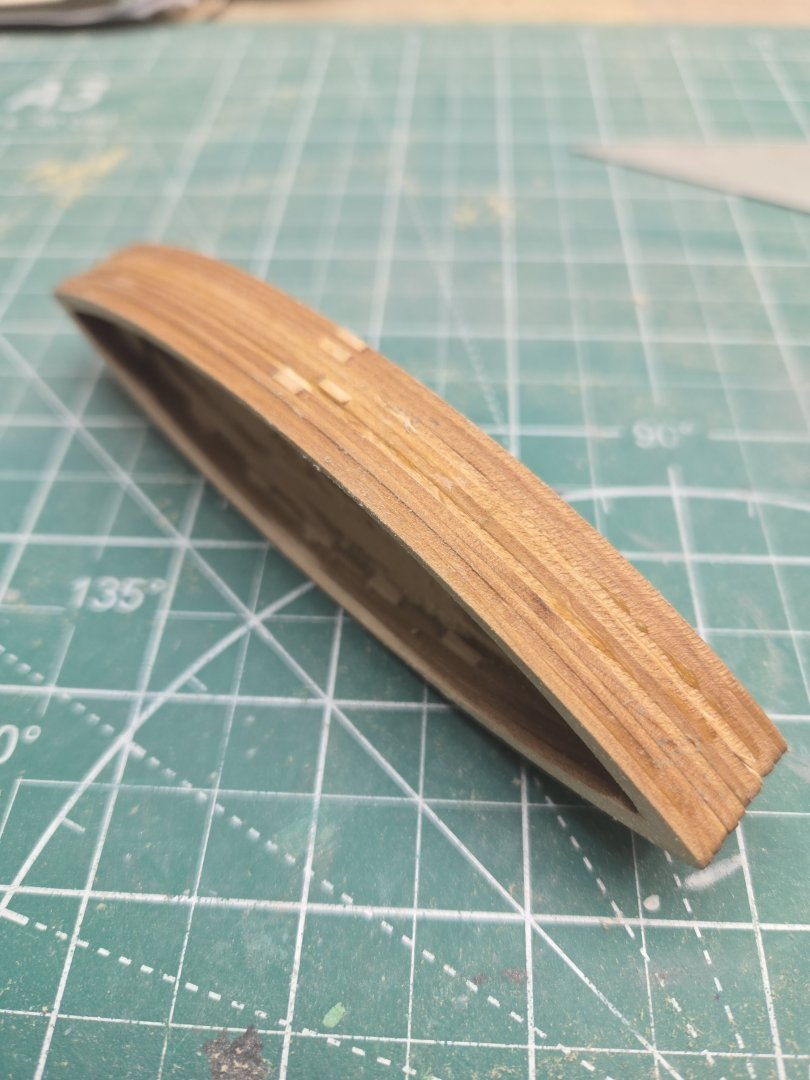
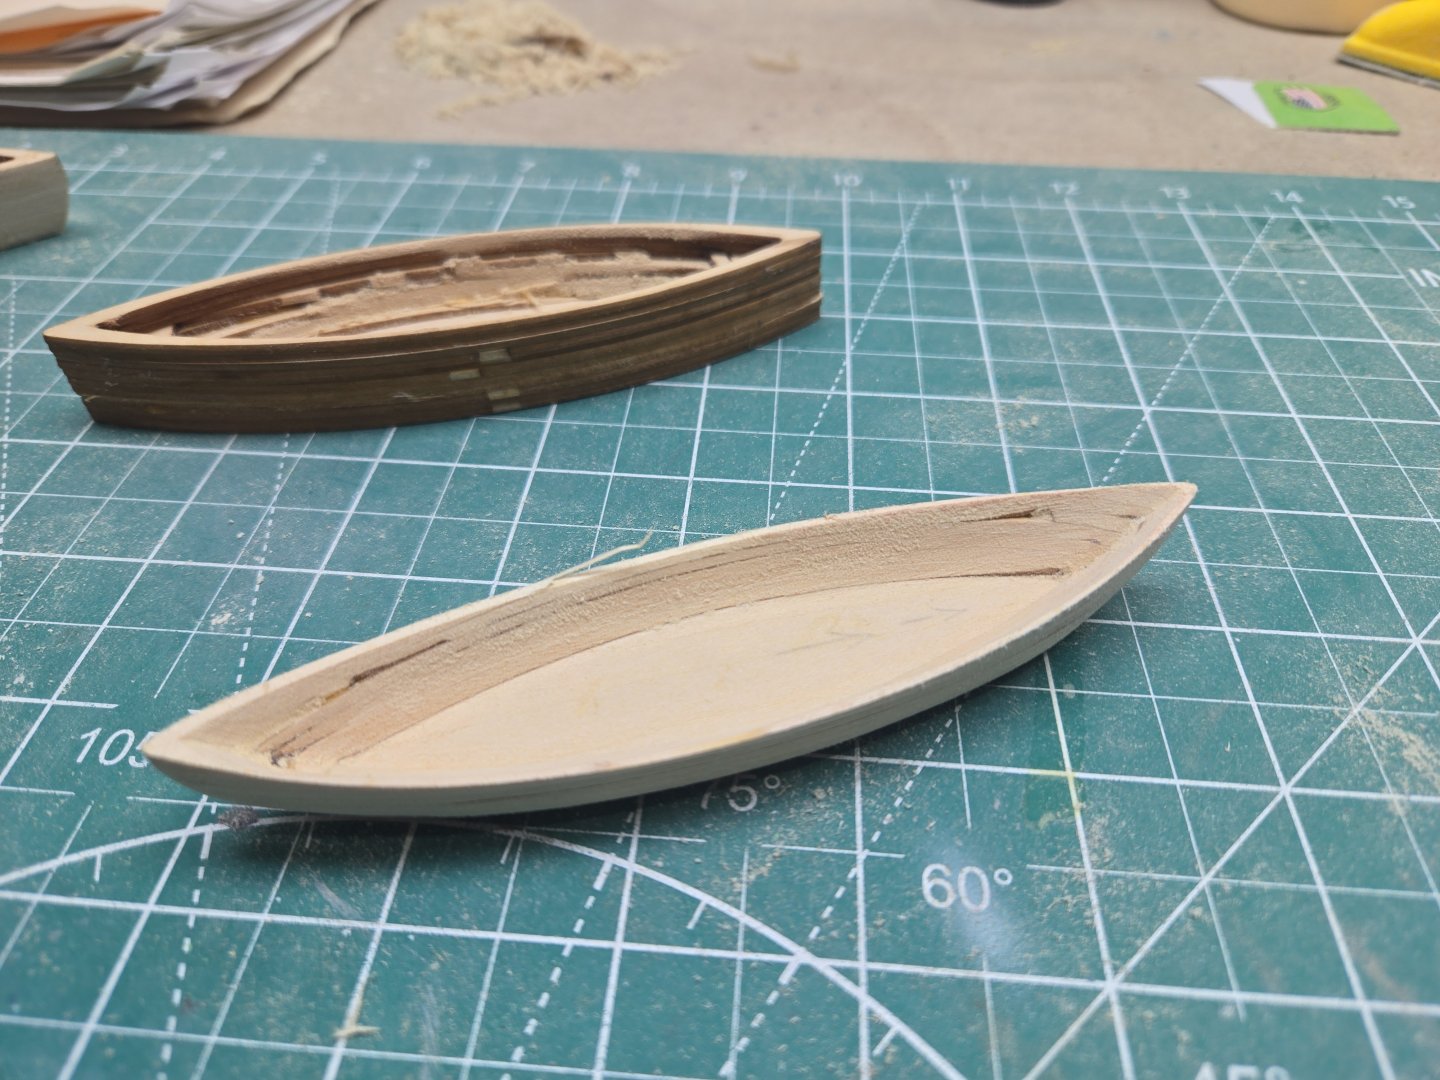
The original set of whaleboats that come with the kit are rough shaped solid wood similar to the hull. The revised Model Shipways Kate Cory kit includes laser cut pieces you glue up and shape (similar to their C. W. Morgan). I decided to try the new version as it looked like it would be easier to shape. If that didn't work out, I still had the original set. So, I was fortunate to get a new set and used my Rotary tool to shape the inside. Thanks for the feedback!
-
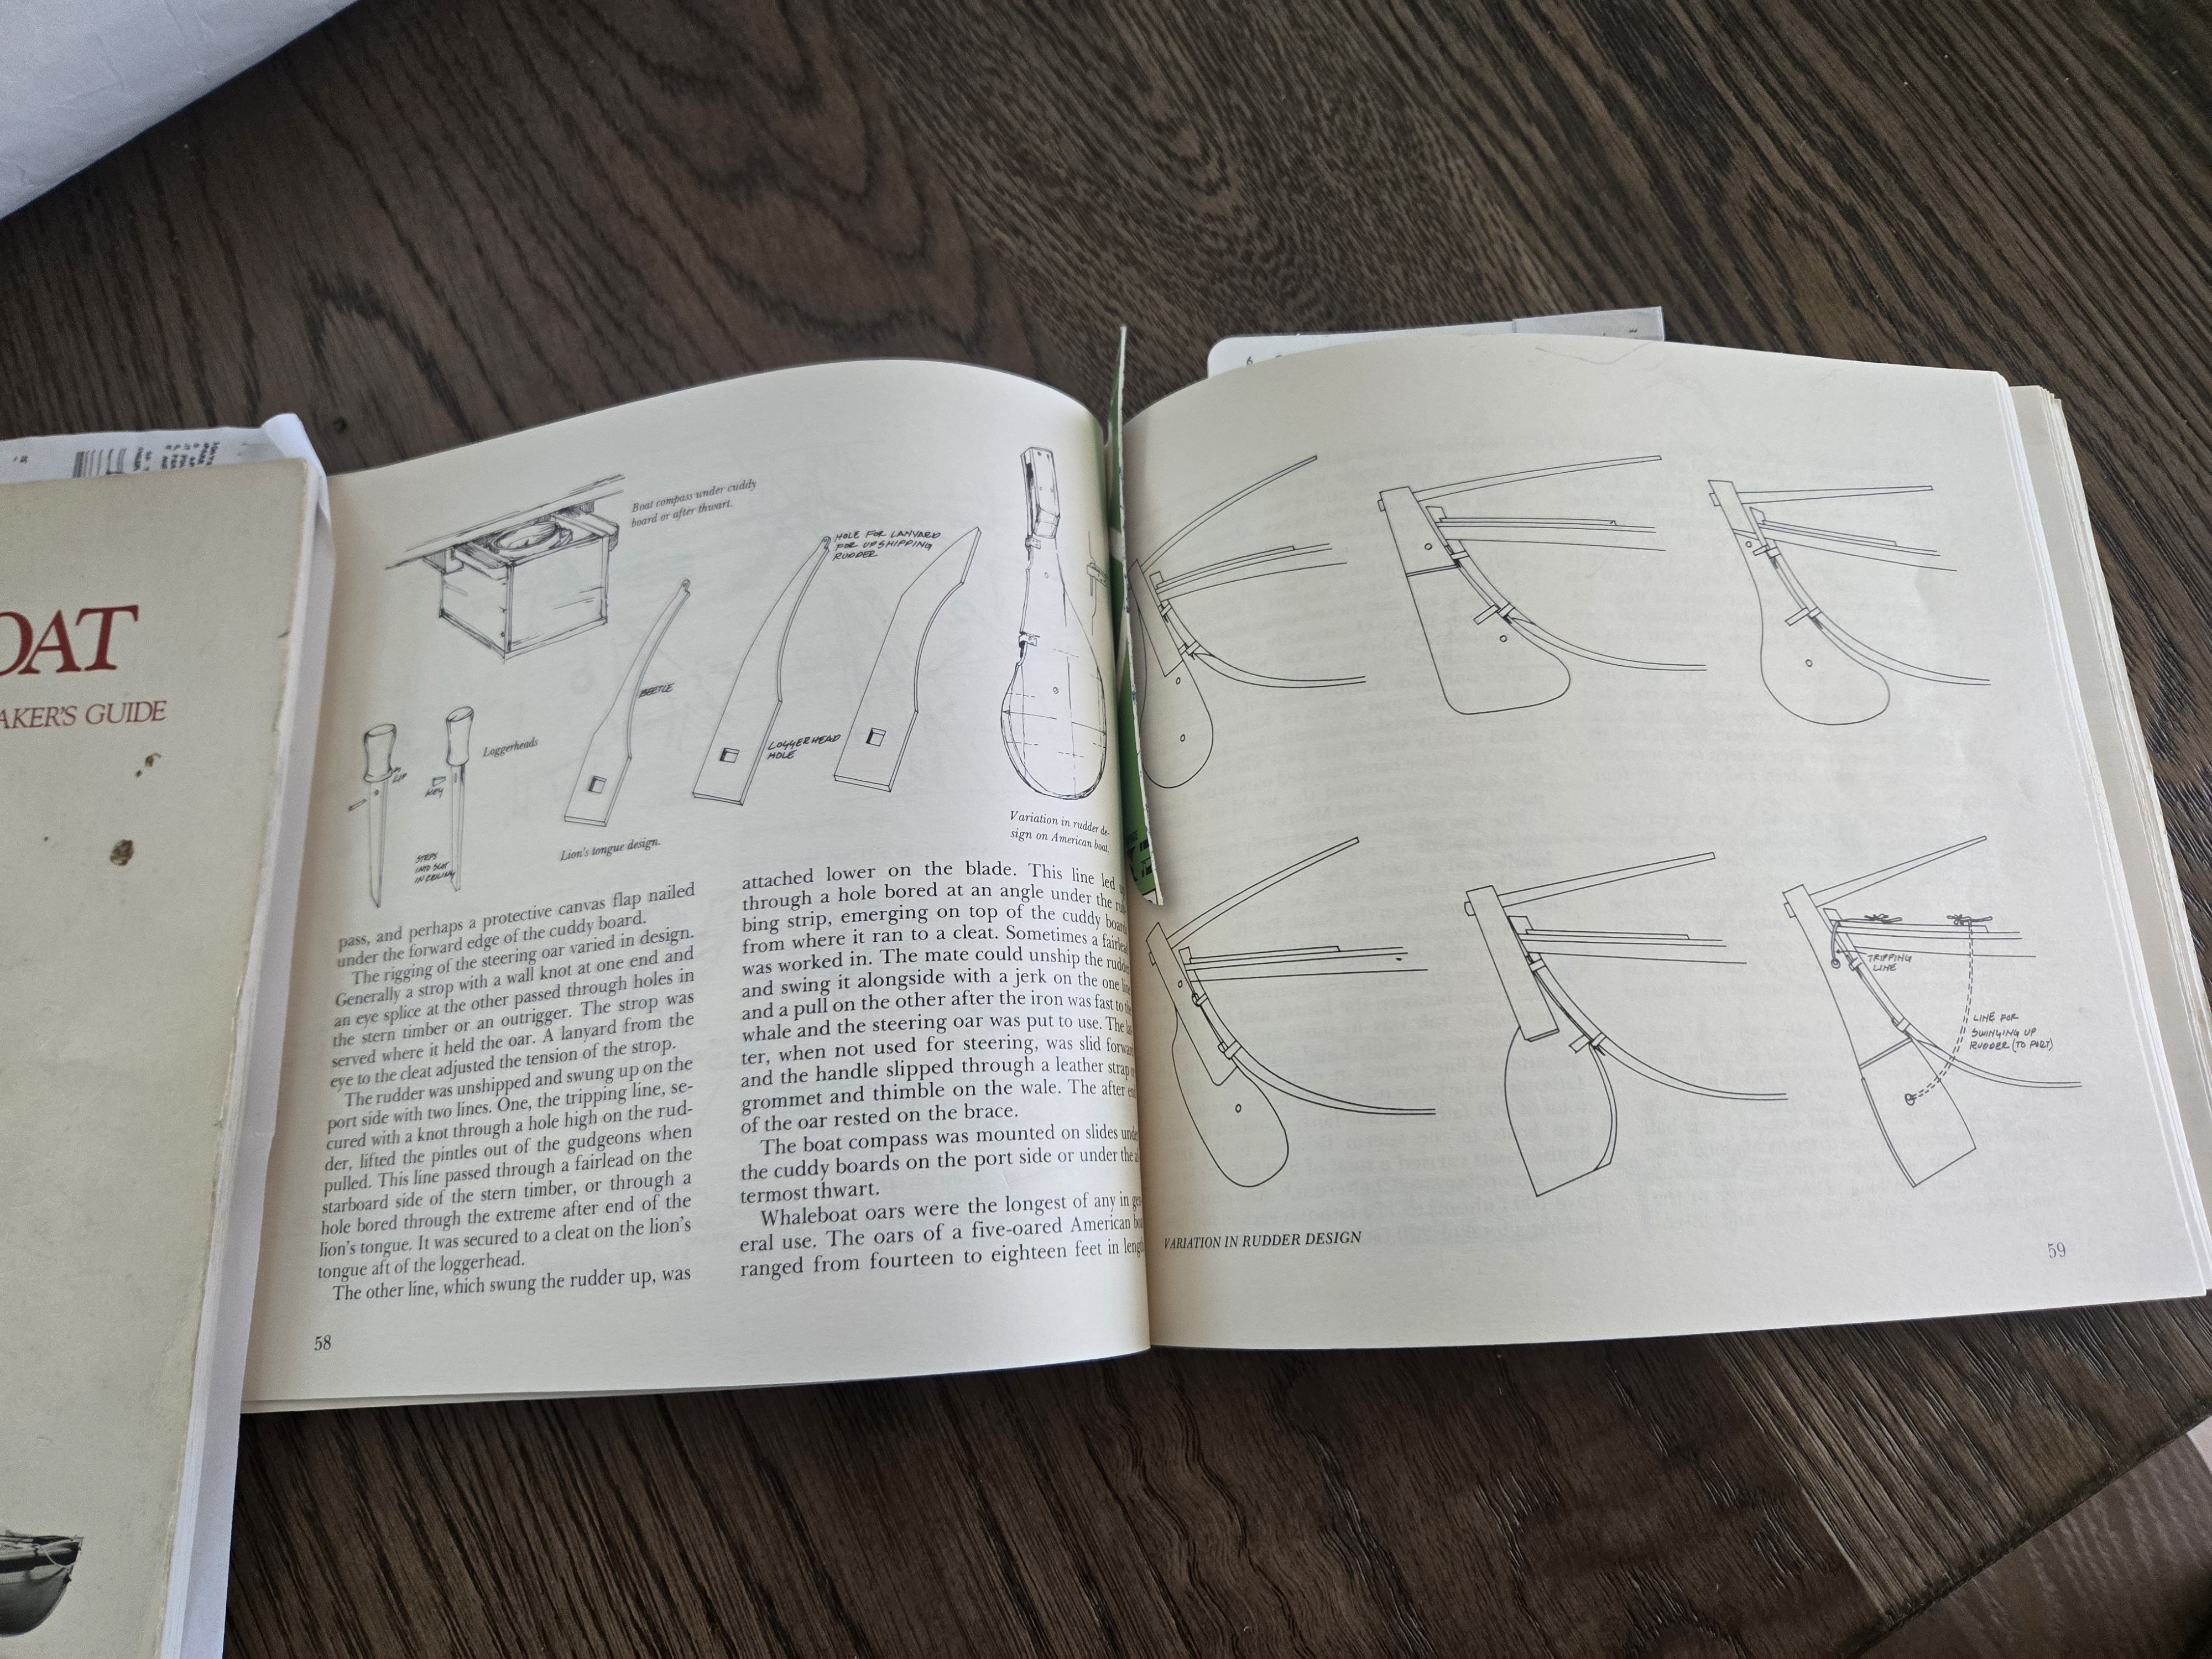
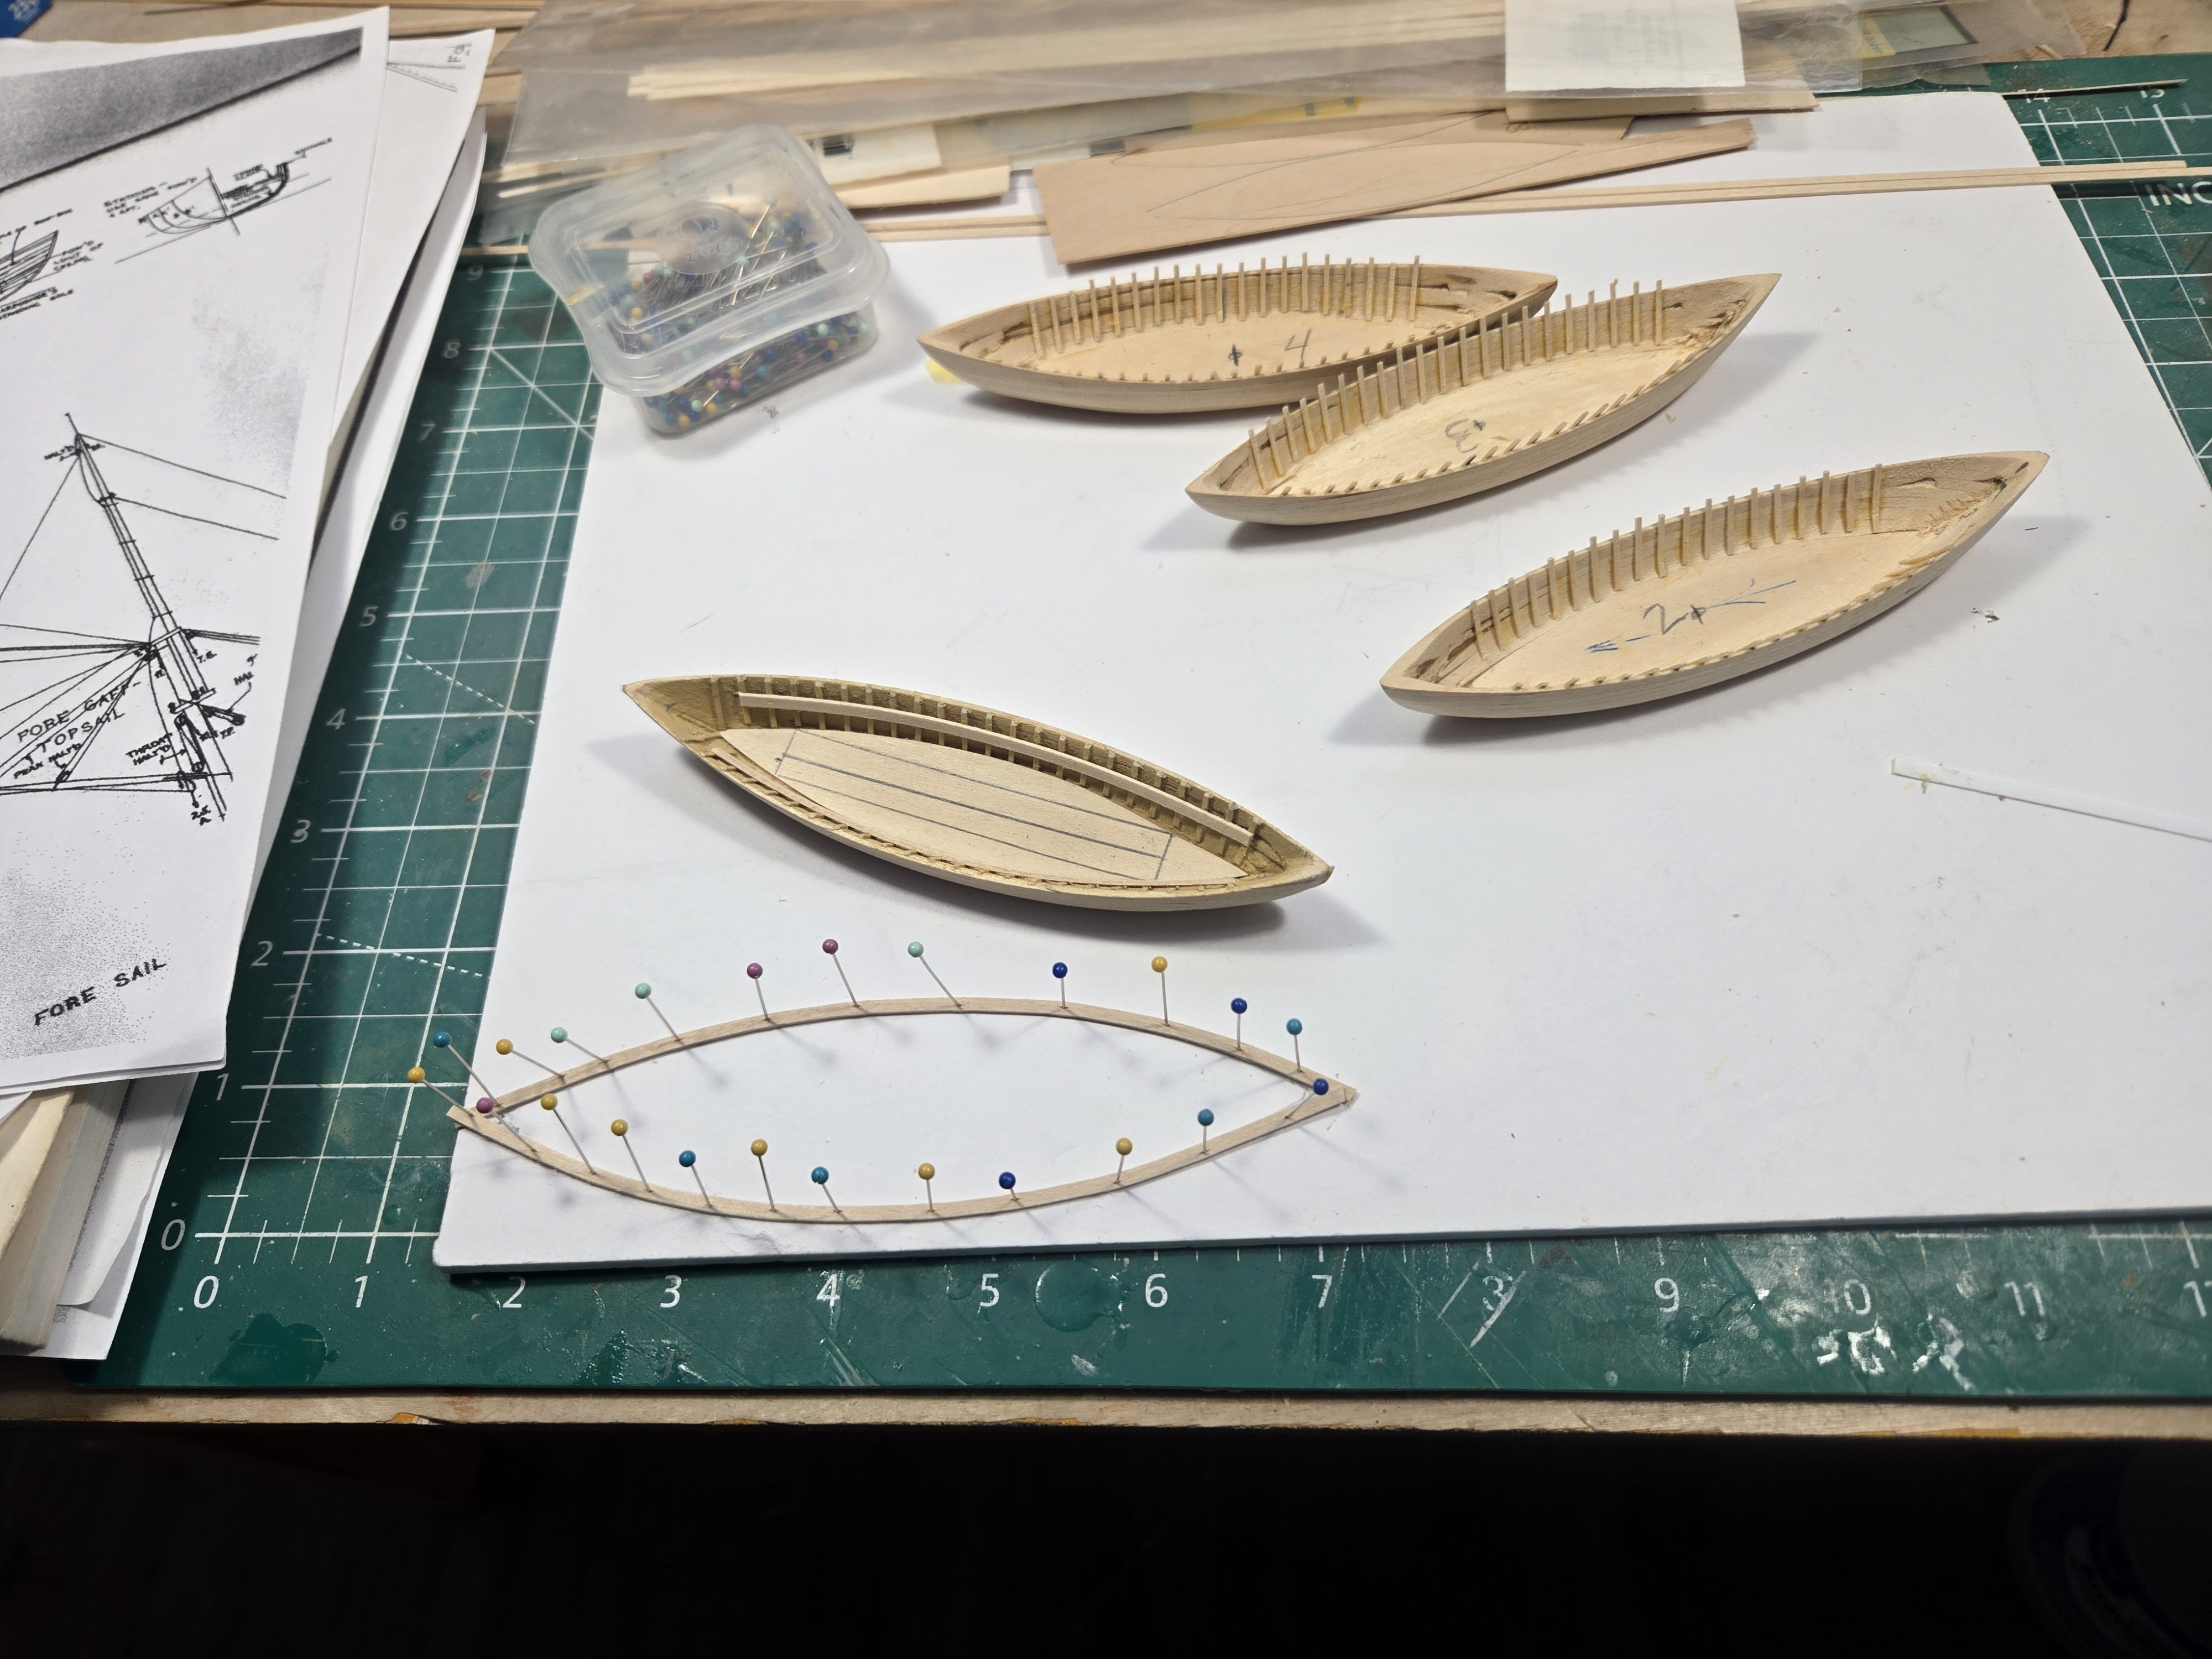
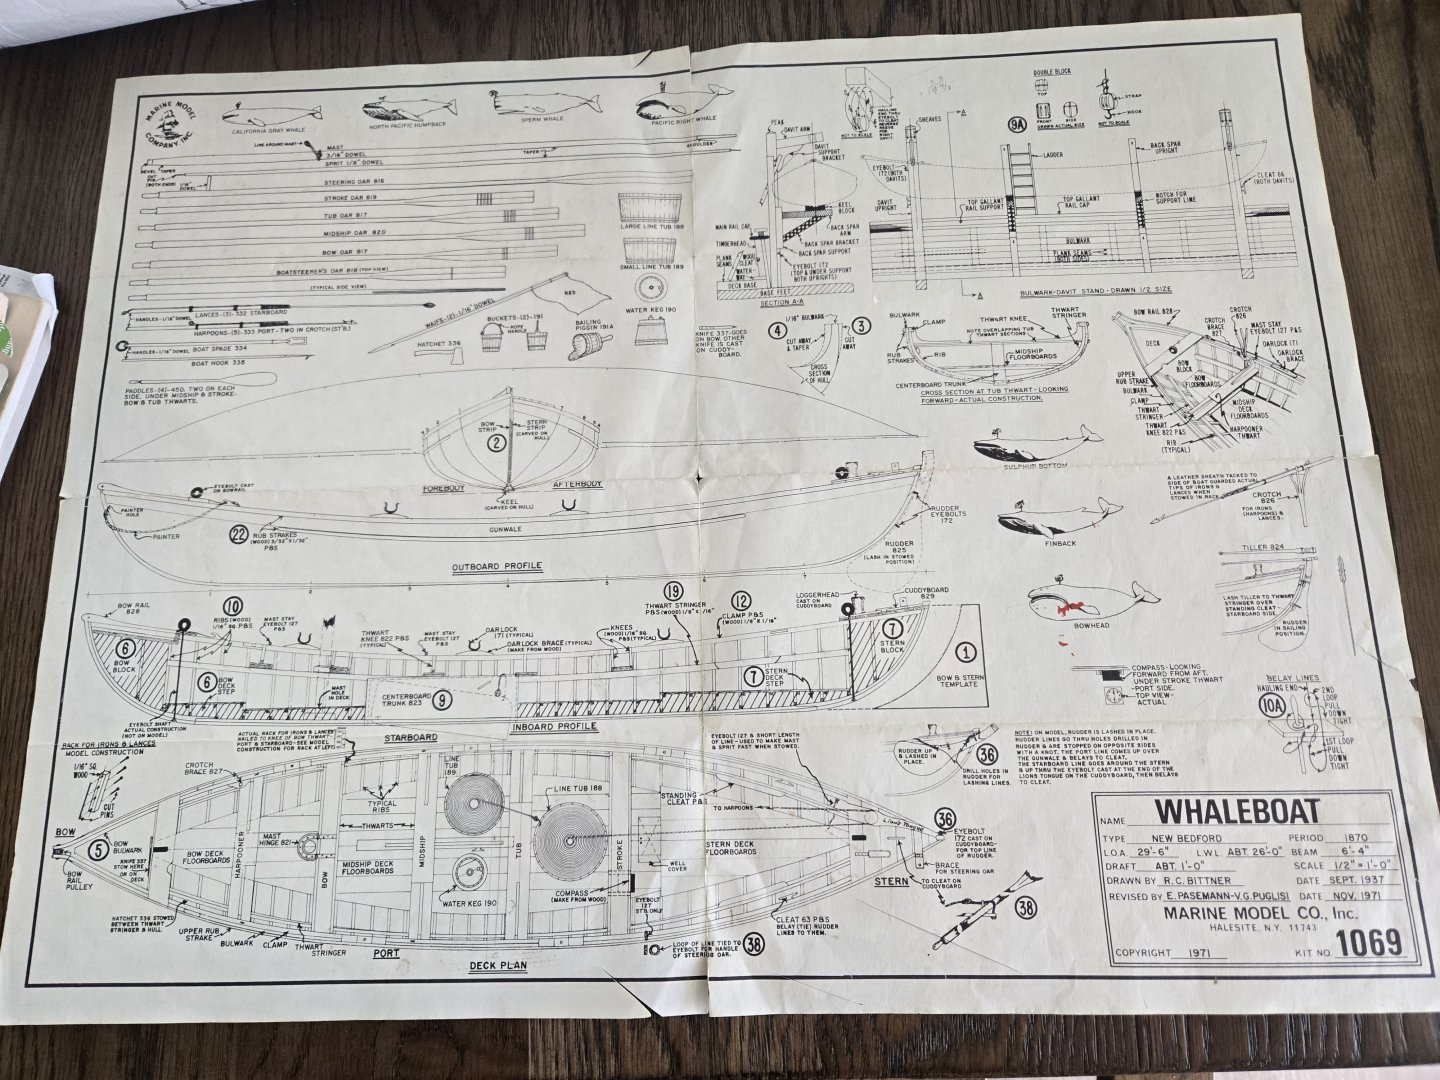
After approximately seven months I decided to start working on my Kate Cory build again. I had put it on hold as a result of relocating and struggled with getting motivated to continue. It was hard to figure where I stopped and then, how to begin again. So, I decided to start with the whaleboats. I consider the whaleboats along with the tryworks as focal points of the model. The kit plans offer little detail regarding the whaleboats and notes they did not have a centerboard. Nor do they show any detail regarding a rudder. When I researched whaleboats with no centerboard surprisingly, I found there was a whaleboat, the "Edwards Boat" that had neither centerboard or rudder. You may be thinking, why go through all this research, just build a whaleboat! Sure, but which version. Kate Cory was built in 1856; I need to build boats consistent with that time period. As I went through my research material it became increasingly confusing and difficult to pick "one" design. The book "The Whaleboat by Ansel" contains a great amount of detail and options, for example note the variations in rudder and lions tongue designs in the photo. The book also notes that whaleboat design was constantly evolving, earlier versions did not contain items like "peak cleats", there are numerous mast head design variations, etc. So, obviously, there is no one design. Consequently, I zoned in on an old set of Marine Model New Bedford Whaleboat plans and used these a basis to build a prototype. My strategy is to build one complete boat, and assuming I'm happy with it, use it as a model to build the others. After shaping the hulls, I added the ribs using a strip of styrene as a spacer. The rest of the build is basically trial and error using different size wood. I have a couple of minor details to add and then paint. Don't underestimate the time involved in building these boats. They're small but have a lot of detail!


-
Welcome!