


src
-
Posts
2,300 -
Joined
-
Last visited
Content Type
Profiles
Forums
Gallery
Events
Posts posted by src
-
-
Dafi, Great job!! I think you need a bigger challenge next time!
You can buy micro drill bits here, very pricey but they have 'em.
http://www.kyoceramicrotools.com/?gclid=COCqsLrqiZoCFSMSagodpRhJFg
There is also Otto Frei in Oakland, CA. Its Micro Mark for watch and jewelry makers.
Sam
-
Robbyn, Rich Thank you! I have really enjoyed the last couple of days off. Other than my "Nine Pounds of Frolicking Feline Fury" (aka Lorcan) knocking over my kit box....twice, its been a very enjoyable and productive break from work.
Port hinges will have to wait till the weekend, I discovered my "crack" torch is out of butane. No time to get more as the Future Admiral will be home soon and expects dinner on the table promptly at six. Sheeesh! Women!

Now a question concerning my handrails if somebody knows. On a real ship, would the tenon have been a through tenon or a stop tenon like I did? Thought anybody?
Sam
-
Quick update on todays progress.
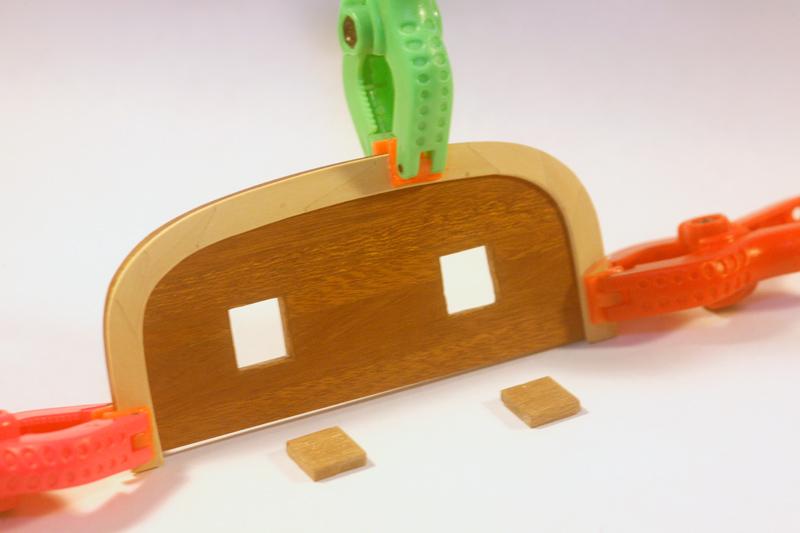
I got the Transom stained and fit up the stern ring. That will get glued up tonight. Gun ports are next, making the hinges may be a bit of a challenge.
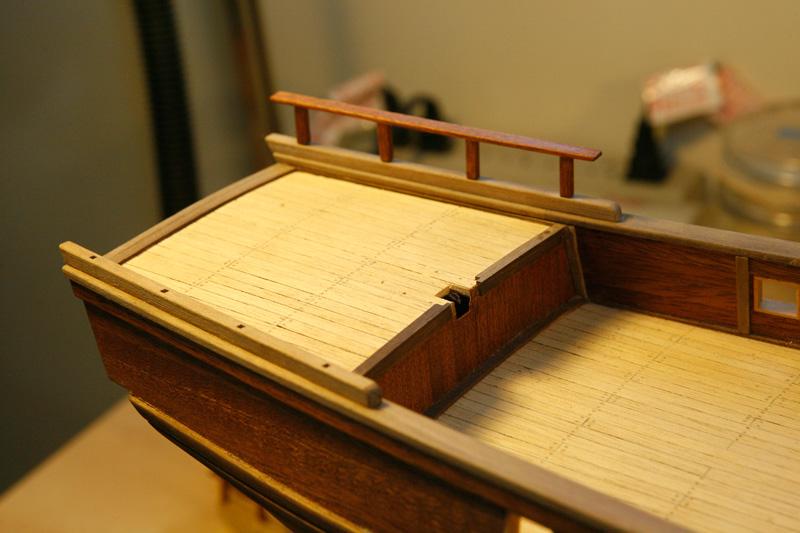
Last night I glued up the upper parts of the waist deck hand rails and this morning I finished staining them.

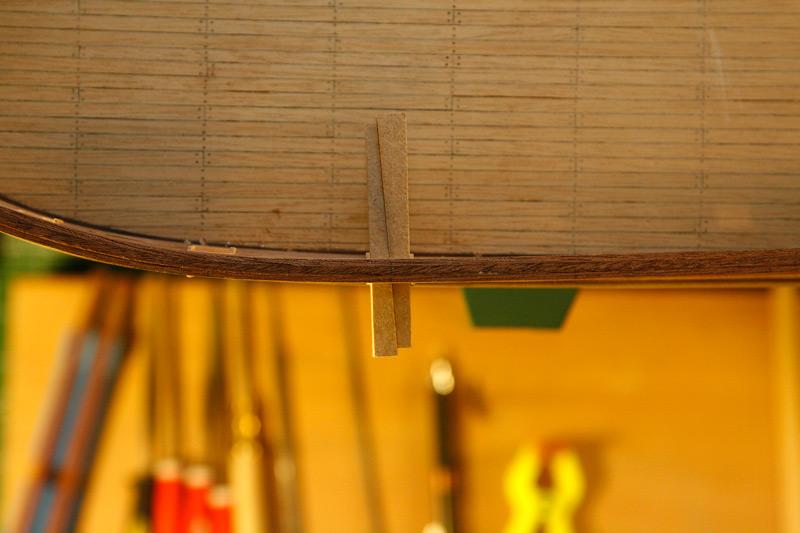
I glued the poop rails on. The hand rail is set in place, I want to stain the cap rail and poop rail before I glue these down. Easier than masking. I didnt stain the tenon on the hand rail and I will cut a small square of masking around the mortice so I get a good glue joint.
Thats it for now.
Sam
comments, criticisms and questions always welcome.
-
Wow! Its been since mid January since I have been able to sit down and really work on my build. I have a couple of days off so now I get to "play" a bit.
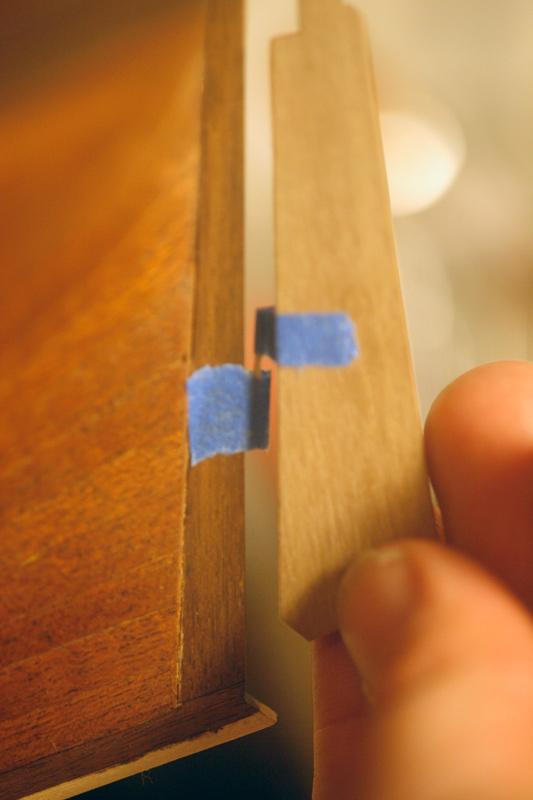
My firts attempt at a mortice and tenon joint was disappointing. The mortices were fairly easy to chop out but cutting scale tenon in mahogany was just not working for me. The wood is just to splintery at this size in my opinion. I went out several weeks ago an bought a router table for my dremmel tool. While not perfect it was hands down better. I was able to get the tenons real close and then use a file to clean them up.
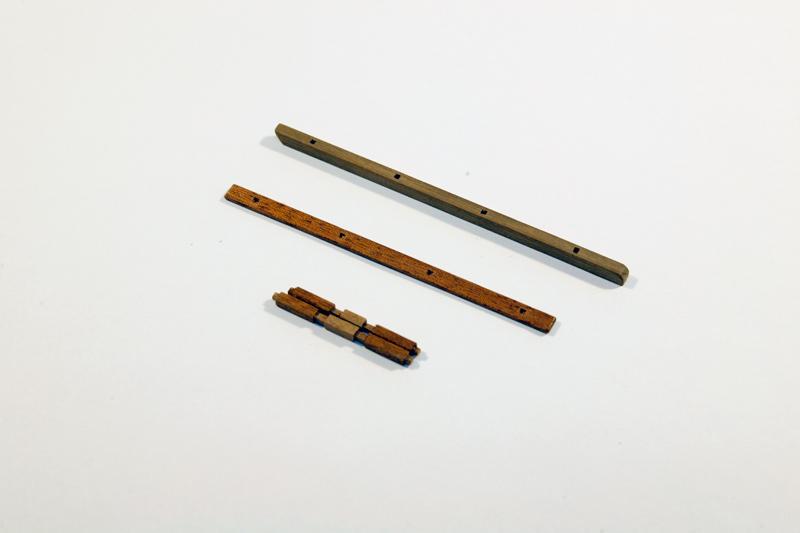
Then I dry fit them. most of them fit well enough that I could turn the rail upside down and they would not fall out. I have done a wash coat of shellac and filled the grain with grain filler. they are outside drying right now. I might even get tehm glued up tonight.

While they dry I am going to see what I can do about making some gun port hinges.
Thats it for now.
Sam
-
Rich,
What are the drill bits for?? As for my build, stagnating.... work has been keeping me pretty busy since mid January. 10-12 hour days 7 days a week. We are supposed to finish tonight, then I can start building again.
Sam
-
JP
That sample does not look bad at all.
There are a lot of things that can cause your stain to be uneven.
Sanding technique is one. Make sure you follow the same sanding schedule for everything. Virtually all of the stains you get in the local paint/hardware store are a combination of pigments and dye in a carrier. The pigments lodge in the pores and tiny scratches left behind when you sand. If you sand part of your hull to 220 and another part to 320 for instance the area you sanded to 320 will be lighter. How MUCH you sand with a particular grit affects it also. If you REALLY sand one area you run the risk of burnishing the wood and the stain wont penetrate. Also, as I am sure you are aware, sanding cross grain is not recommended, those scratches pick up the stain and leap right out at you. Its posable to break that rule if youre carefull. I sanded my hull to 400 because there were several places where it was very difficult to sand with the grain, at 400 you really have to look to see the scratches. Keep in mind though on dense fine grained woods sanding to that grit can make it so you get very little color.
Some woods just have a structure that makes them difficult to stain. Birch and cherry are two of the biggest offenders. In the ship modeling world it is starting to become apparent to me that many of the preferred woods for modeling are difficult to stain. I would agree with the others about the prestain conditioner. As others mentioned it very easy to use and you get very nice results. If for some reason you (or others) cant find it or are too far away from a paint store, you can make your own with nothing more than 1 part linseed oil and 10 parts turpentine or paint thinner.
You can also use a technique called washcoating. It is very similar to stain conditioner. I use a 1lb cut of blond shellac. That is 1 pound of shellac flakes to 1 gallon of denatured alcohol, more than you will use in your life probably. You can scale it down to whatever amount seems appropriate to you. I make a pint at a time, so you scale down to 1/8. (8 pints in a US gallon) and 2 oz of flakes. Easier is to buy your shellac and thin it down. Buy the smallest can you can find and pour out about 2 oz in a sealable container then add about 4-6 oz of alcohol to that and you will be good to go. Brush on a coat, let it dry, scuff sand to 320 and stain on top of that. You can do the same thing with water based clears but I dont know how much to thin them since I dont use water based finishes as a rule. As a guess three or four to one should be about right.
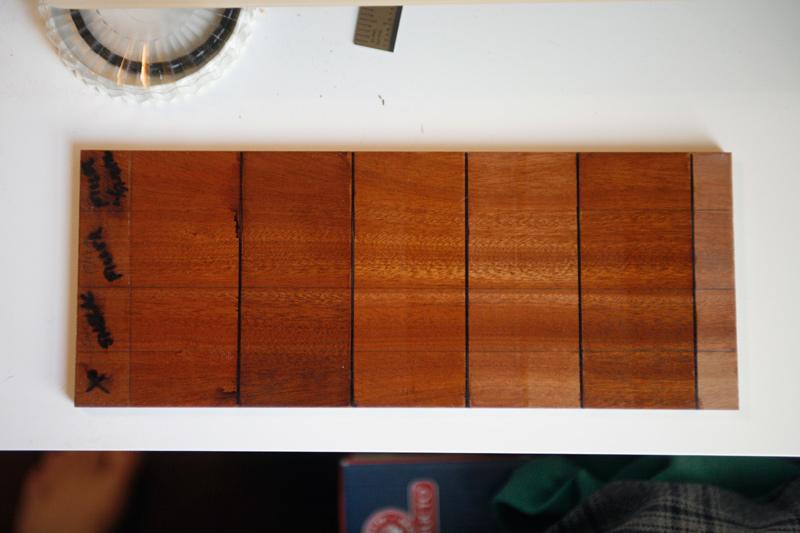
Always make a test board first. I would strongly recomend you make a board at least 4x6" or larger with your planking material and experiment. You really wnat to try to use the same material you're in your project. That way you can find out in advance if your going to have any problems with staining.
This is the test board for my build. I used the display base that came with the kit since I will be building another display board. Ideally you want to use some of your planking to make your board, I was practically out. Left to right is Varathane Chestnut, Brown Mahogany, Traditional Pecan, no stain and then Gold Mahogany. From top to bottom is a washcoat, grain filler and stain. Second row is grain filler and stain, no wash coat. Third row is washcoat and stain, no grain filler. Bottom row is stain on raw sanded wood. It is kind of hard to see in the picture, but the biggest color change was with the wash coat, it blocked a lot of the pigments from settling in the pores.
There are a lot of other ways to combat splotch prone woods, gel stains, dyes, glazing, chemical staining (hazardous if your dont take the required precautions) but require many more steps to get a finish.
Looks like you are well on your way. I have most likely given you more information than you needed. I am generous like that!

Have fun!
Sam
-
Nice progress Rich.
Those pins look like they are a challenge.
I wish I could sit in front of the TV and work like that. We have a nine month old kitten who gets into everything and a 55 pound German Pointer who thinks he is a lap dog. Working away from my desk is right out.
Sam
-
Anytime Robbyn, copy away!!!
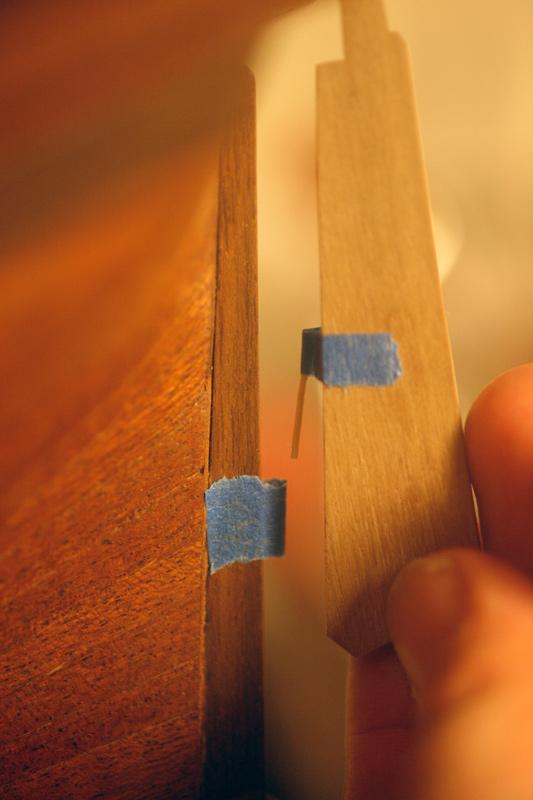
I didnt actually miter the corners of the port linings. If you look closely at the picture you will see the horizontal pieces, what I called the rails are full width and the vertical pieces, what I call stiles butt into the stiles. I am not sure, but I doubt this type of construction, if it was even used on a real ship, would have been mitered. Unreinforced a miter is one of the weakest joints you can choose. Too much end grain to end grain. My best guess is these would have been a rabbeted joint or even dovetailed. Dovetails would have held up better to the stresses of sailing before failing. Like you I questioned my ability to do that small a joint by hand. Regardless how you go, I am sure you will do a great job.
Sam
-
]Robbyn, Thank you!!
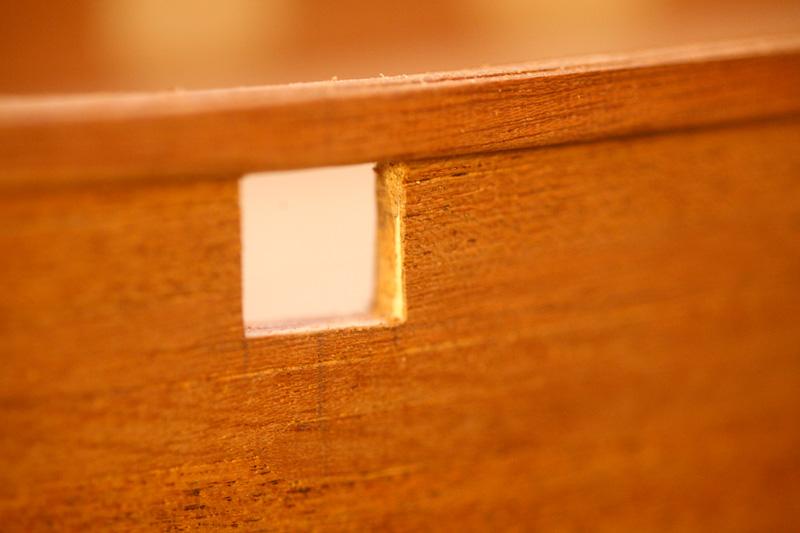
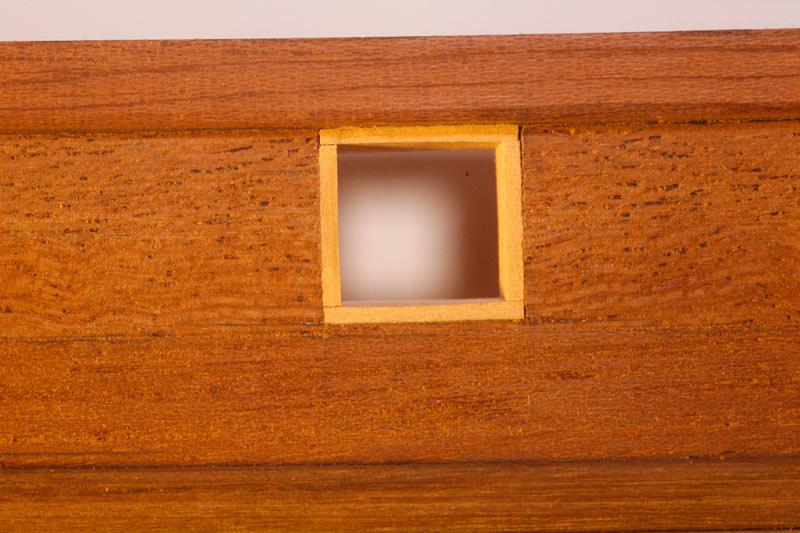
I lined the gun ports with Box wood. I did the stiles; the vertical pieces firs,t and then the rails second. I am not sure if the cabinet terms for the parts follow ship building or not but that is what I called them. I was having trouble keeping them paralell and tight to the hull sides so I "stole" a trick I learned at work: two apposing wedges. If you have access to a miter saw and a 2-3" wide piece of wood or MDF which is what I used, several inches long (like 12" or more, gotta be safe ya know) Set your miter to 2-3 degrees, the actual angle is not important. Cut a sliver off and discard it. Then flip you pice over and cut another sliver of and save that piece. Continue flipping and cutting till you have a dozen or so pieces. You can appose these wedges to use as a clamp.
Hope this helps.
Sam
-
Robbyn,
I know how you feel. I made a pretty good screw up on my build too. Got some of the planking wrong. Bothered me so much I got up at 4 A.M. and ripped them off before going to work. Its frustrating, but as many have pointed out you will have a much better model in the long run.
I also agree with Russ, your rudder looks good!.
Sam
-
Wow Rich! Your just cruising right along!!! No that I am following you, what was "fiddley" about the rudder?
-
Jp,
I am liking your planking. Your attention to detail is going to pay of nicely.
Have you decided about bleaching the entire hull yet?
Sam
-
Will do. Just have to finish the "Job From He!!" We were supposed to be done two weeks ago. Feel free to PM me if you dont see anything in the next two to three weeks.
Sam
-
One other thing to watch out for. If you use ammonia on a wood with a high tannic acid content like oak, cherry, mahogany or even walnut, the ammonia will stain the wood. It can be a nice stain, especially on oak, but if your not aware of it, and just dab it in places you could be in for a nasty surprise. It was one of the reasons I brought up the oxalic acid in the first place.
A lot of furniture makers, especially those who specialize in Mission or Arts and Crafts style furniture use a process called ammonia fuming to stain the wood. In my experience it is most effective in oak, cherry, and mahogany. I dont imagine to many of us will build a scale model out of oak, but I see a lot of mahogany and some cherry here. Always test on a sample first. JP, I should have warned you about the ammonia first. Sorry. I have been working 12 plus hour days seven days a week for four weeks and my head is not screwed on right at the moment. Fortunately no harm, this time.
Ron, I have some wood finish books here that delve into the bleaching and stian removal on woods. I will try to look them up and post them here. If the Admins feel the information is worth it I would be more than happy to have it posted in the data base
Sam
-
JP,
Sorry, didnt mean to give you a heart attack with the "G" word. I promise I will never use it in that context again. Well I may just whisper it just to watch you twitch from time to time.........
It is usually a good idea to neutralize any chemical you apply to a project. In this case a mild vinegar solution would work. Even though you washed it with water there can still be traces of bleach in the wood.
As far as doing the whole ship, you could make a small sample board and do part with bleach and part with out, then stain and see what happens.
I would agree with Richard, bleach worked so no need to try anything stronger. As far as the Oxalic Acid, you absolutely need to take the proper precautions; eye and skin protection for sure, a dust mask when mixing is not a bad idea either since it comes in a crystal form. In the world of chemicals its not as bad as nitric acid or lye, both of which have applications in staining woods btw, but you should always take precautions.
Sam
-
JP.
Are these the spots you point out on your build? or are they different? In the picture I am referring to, Pg 2, planking 11.jpg, they almost look like glue spots in the picture. That is always tricky to remove completely.
Do you recall if anything was pressed/clamped down in those spots?
Can you recreate it on some scrap wood? That I think might be your first step.
If it is something else entirely can you post a picture? If they are grey or bluish black spots, sometimes that is either iron/mineral deposits in the water you used to wipe your glue off reacting with the tannic acid the wood or even a metal clamp or pin coming into contact with the wood. This is fairly common on woods like oak and cherry. I am not sure though if bass wood has much tannic acid. IF that is the what happend, you can try Oxalic Acid in a water solution.
Sam
-
Pasi,
nice to see you back. looking forward to seeing more. I have learned a tremendous amount looking over your shoulder.
Sam
-
Sarah,
Nice work on the smoke stack. I love how we all gravitate to what is familiar. I would never have thought of nail polish for model building. Making a trip into the girlfriends makeup box this weekend......"I am going in boys cover me...."
Will somebody please pass the popcorn?
Sam
-
Brian,
I will be following along here. This is a ship I would like to build next. Just dont know which kit I will buy.
Sam
-
I did notice that the water way would be covered before i moved the Lower wales, But now they show again, Whats best to try and hide them?
Rich,
Not following you on this one. What are you trying to hide?
Sam
-
Dominik,
I too am curious how you will handle the wires as I will have the same issue on my build. Love all the details your adding. Even if you cant see it its nice to know they are in there.
On your smoke generator, dont those RC generators create an oily residue? What will that do to your finish?
Sam
-
Robbyn,
I did a down and dirty mock up of what I was trying to explain. I believe this is the correct way. It is possable that the pin goes pointing UP and the rudder drops over. On the old MSW there was a tip in the building tips forum that showed this as well as a cool little tool to make the crimp, its gone for now. Good luck, hope this helps.
Sam


-
Robbyn,
Just discovered your build. Its coming along nicely. Looks like you got your stain problem fixed?
What!?!?! your not watching the Oscars?
As far as your hinge question about the hinges. THink about your hinges on your house or cabinet doors. the hinge knuckle which would be the brass strips need something to pivot around. That would be the hinge pin or your wire bits. I have not had to do this yet on my build, but I think you will need to glue, epoxy or solder your pins to one half of the knuckle and then drop it into the other half so gravity hold it in place.
I hope this helps I know I am not explaining it as well as I should. I can see it in my minds eye, but am having trouble converting that to words.
Sam
-
Sarah,
Really nice work, I like all the details you put in. I missed this build on the old MSW somehow.
Nice little soft boxes your using, what are you using for diffuser material?
I know what you mean about pets, the FA (Future Admiral) came home home from a shoot with a "Squeaking-Ball-O-Fur" last July. She has grown into close to 9 pounds of Frolicking Feline Fury. Anything on my work bench is a toy.
Looking forward to more builds form you.
Sam

Enterprise 1799 by Archicar - FINISHED - Constructo - 1:51
in - Kit build logs for subjects built from 1751 - 1800
Posted
Rich,
I am right behind you. Looks like you got it worked out. Looks good.
sam