


Mahuna
-
Posts
1,500 -
Joined
-
Last visited
Content Type
Profiles
Forums
Gallery
Events
Posts posted by Mahuna
-
-
Hi Grant:
Here's a link to a good article on files for the modeler.
http://www.2mm.org.uk/mag2000/files.htm
Frank
-
Hi Randy:
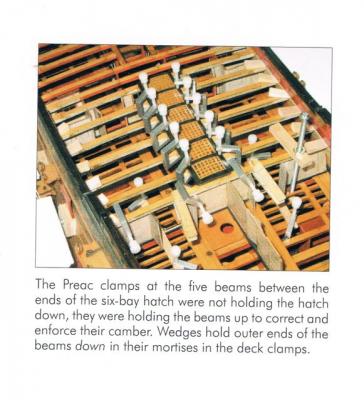
Here's a photo scanned from the book.
Frank
-
In the "Legacy of a Ship Model" Rob Napier refers several times to using Preac clamps for clamping small pieces. In the photos they look like "c" clamps with a knurled knob for tightening. I've tried searching the web for these, but can't find any reference to them. Has anyone used these, and can you tell me where I might find them?
Thanks
Frank
-
No - not the same. Wax paper is coated on both sides, so you would not be able to write on it or to use it in a printer.
The coating may also be different - I'm not sure on that - but you couldn't use wax paper in the way I'm using freezer paper.
Frank
-
Hi all;
An update on using freezer paper.
I left the freezer paper cutouts of the bulkheads on the plywood since I posted the photo (4 days ago) because I had to leave on a business trip. When I picked them up today I could see the paper was separating from the wood and not adhering very well. This isn't a surprise, since I expect that the wax will revert to its normal consistency after a short while.
The lesson learned is simple - for best results, cut the wood as soon as possible after applying the freezer paper template. Still better than messing with glue!
Frank
-
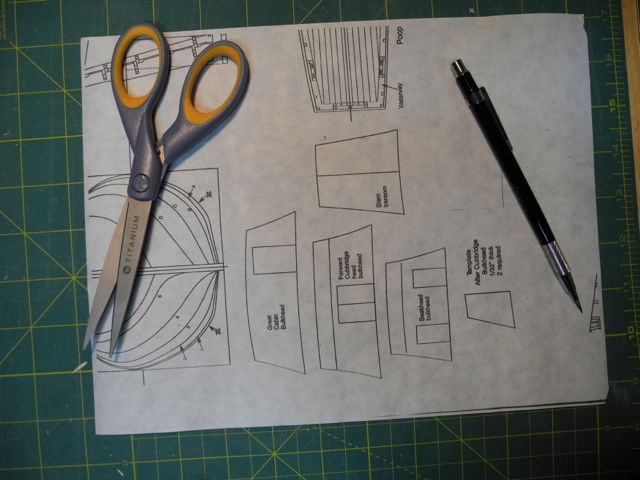
Here are some photos of the Freezer Paper in use.
First, I cut out some freezer paper in 8x11.5 sheets, and flattened them by wrapping them around a piece of pvc a few times. When the curl wasn't so pronounced I loaded it into the printer and then copied part of a plan sheet (Mayflower by Chuck, purchased from Model Expo) and printed it to the freezer paper.
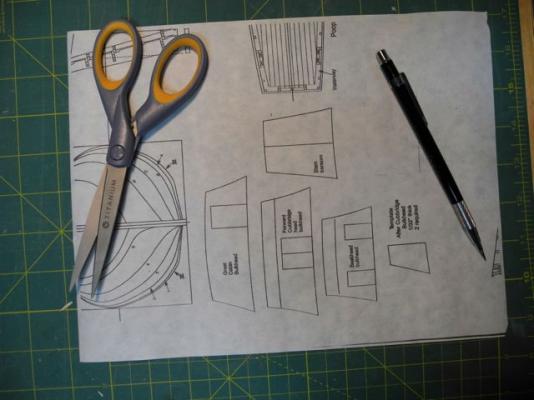
Then I cut out the bulkheads I was interested in, positioned them on a sheet of 1/32 plywood, and laid a medium-hot iron on top of them for about ten seconds - done. I can now cut out the bulkheads on my scroll saw. The freezer paper is adhered well enough that the saw doesn't pull it off the wood.
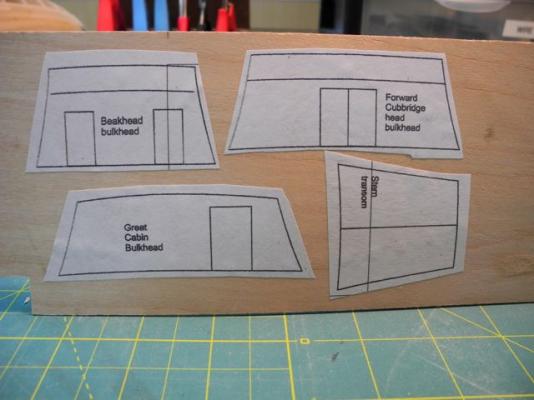
Hope this helps.
Frank
- Mirabell61, ZyXuz, Ryland Craze and 2 others
-
 4
4
-
 1
1
-
Looking good Pete!
Frank
-
Hi Mark:
Not a hobby supply, but a KITCHEN supply. You'll find it in the supermarket section that has foil, baggies, saran, etc.
Frank
-
I'm relatively new to ship modeling, and lately have been cutting some pieces out from patterns for spiling, etc. I started by using rubber cement to adhere the pattern to the wood, but didn't like the amount of mess and the residue left on the wood. I've tried a few other glues, but they basically gave me the same issues.
My wife is a quilter, and suggested using freezer paper (she calls it the quilter's best friend): draw the pattern on the plain side of the paper, put the waxy side down on the wood, and iron it onto the wood with a low-temperature iron. It worked great! Adheres to the wood and doesn't move around while working with it, then easily peals off with no residue on the wood. A side benefit is that the pattern can be reused if desired, since the wax on the back doesn't come off on the wood.
Since this worked, I wondered how the paper would work in a printer. I cut a piece to 8.5X11, flattened it by rolling it around a piece of pvc pipe a few times, then printed a test pattern on it in my inkjet printer (I don't think this would work in a laser printer because of the heat). It worked great. Now when I learn to use CAD and learn to loft frames using CAD, I'll be able to print out self-adhering patterns.
Frank
-
Thanks all. The author used gravers to clean up some small ivory components, and to cut fluting in some replacement pilasters. I guess he used gravers instead of gouges because of the material he was working with.
-
In reading the "Legacy of a Ship Model" by Rob Napier (a great book, by the way), the author mentions his use of gravers to do some parts of the cleanup and in shaping some replacement parts. I was wondering whether anyone on the forum uses gravers, and what they have found them useful for.
Gravers seem to be cutting tools made in various shapes, primarily used by engravers. I'm wondering whether they have any advantages over the normal carving gouges and chisels.
The book is a recounting of the work in restoring (actually saving) the HMS Princess Royal (1773), one of the dockyard models on display at the Naval Academy Museum in Annapolis. I had the pleasure of visiting the museum in late April, and picked up the book in the museum store. If you have an opportunity to either visit the museum or to read the book, I highly recommend either or both.
Frank
-
They have an app for the iPhone that I find really useful.
Frank
-
I have the 16 inch Excaliber, and am very happy with it.
-
Looking good Pete. Can't wait to see how it turns out.
-
Great idea - thanks!
Frank
-
Thanks Jeff - the link is excellent and answers lots of questions.
Frank
-
Great information - just what I've been looking for. Thanks to all!!
Frank
-
Hi Pete:
Send me the PDF and I'll try to help. Send me a PM and I'll reply with my email address. I'm pretty much a rookie, but I enjoy a little challenge.
Frank
-
Hi Gregory
Thanks for sharing your tools with us - gives me lots of ideas. With the quality you are able to put into tool-building, I'd love to see the results of your model ship building.
Frank
-
Very informative post - thanks all. I've been looking for this type of information.
Nice push stick idea, Mark. I've been using a similar approach, but didn't think of constructing it so that it would fit over the fence. Thanks!
Frank
-
I use Liquitex acrylic in the airbrush, thinned with their airbrush thinner. I've used the Liquitex for years on bird carvings - the only problem I've had is that the paint can develop a low sheen after several coats. This can be fixed by mixing in a little Flat Medium.
Another good acrylic is Jo Sonja.
-
I would suggest a double-action for control.
Gravity feed, for several reasons: 1) needs less air pressure, 2) generally holds less paint, so less waste, 3) easier clean-up.
Internal Mix is easier to learn and use.
Compressor needs to output at least 30 psi.
A friend purchased a compressor/airbrush combo from Model Expo that was well within your price and was an excellent value. You won't need a higher-level airbrush (Badger, Iwata) to start out. ME has a sale on right now (code MAD13), and is offering a nice compressor/airbrush combo for $115.
http://www.modelexpo-online.com/product.asp?ITEMNO=AS176K
Here's a link to a site that gives good airbrush lessons:
http://howtoairbrush.com/airbrush-lessons/
Frank
-
Hi Meredith:
For cutting the zero tolerance insert:
Here's the process I sent to Jim:
1. lower the saw blade, 2.mount the blank insert, 3. turn on the saw, 4. raise the saw blade until it cuts through the insert?
His answer:
You're right on the insert. When the blade breaks through put a little candle wax on the blade to help it along.
It worked fine, and after the blade cut through to the extent I wanted, I removed the insert and cleaned it up a little.
I'm playing around with making miniature "push blocks" for cutting very thin planks (1/32" or even less). When I get one that I'm comfortable with I'll post a photo. I'm hoping some of the more experienced modelers will also give us some helpful advice.
Frank
-
Just wanted to make a comment on the service I've received from Jim Byrnes:
A few months ago I purchased Jim's table saw - I see why this is the most sought-after saw for modelers. Being new to the use of table saws in general, I've been proceeding slowly. I've been using the standard blade, and wanted to start using a slitting blade, but wasn't sure how to cut a zero-tolerance insert for the blade. I also had a few questions on the process for cutting very thin planks (1/32).
I sent Jim an email via the Model Machines website, and received a personal email from Jim within a couple of hours. Jim answered all of my questions and was very supportive. Contrast this to some other sites where it took days for any answer, if one was received at all.
Jim's quality machines and workmanship are matched by his commitment to customer service, and he's a pleasure to deal with.
Thank you Jim!!
Frank
- fnkershner, SkerryAmp, lb0190 and 7 others
-
10


Files
in Modeling tools and Workshop Equipment
Posted
Grant:
In addition to the shapes that John recommends, I would add escapement files (flat files with teeth on edges as well as front and back). They really help get corners clean. I would also consider having both double-cut and single cut.
Double Cut— Diagonal rows of teeth run across the width of the file in opposite directions. Use with heavier pressure than single-cut style for faster, rougher-finish cutting and more rapid material removal.
Single Cut— A single set of parallel teeth runs diagonally across the width of the file. Use with light pressure for smooth finishes and to sharpen tool cutting surfaces.