


tmj
-
Posts
773 -
Joined
-
Last visited
Content Type
Profiles
Forums
Gallery
Events
Everything posted by tmj
-
 Nice work!
 -
"Holy Cow, Kieth!" "You are the 'Stairmaster' for sure!" That is gorgeous! Extremely fine detail and precise work, without a doubt! "Very impressive", I 'love' it! Now I know why it's taken you so long to post any updates to your build! 😮
-
A quick IP search produced the following results. 🌐 IP Address & Hosting Location for artesanlalatlna.com The domain we need to analyze is: artesanlalatlna.com ❗ First important note The search results did not return any direct IP address or hosting information for this domain. That usually means one of the following: • The domain may be very new, mis-typed, or not widely indexed. • It may be using CDN protection (Cloudflare, Akamai, etc.), which hides the origin server. • It may be a clone site or scam storefront, which often use masked hosting.
-
Not much that I can add to this beyond what Chris and others have said. You 'must' be cautious these days! Know what you are buying, know what it is actually worth, and always carefully read the web address! Scammers are getting really clever these days.
-
"Capt. Flay's Nautical 'necessaries'... and grog whilst ye wait!" Pier #13 *Ballast by the tons burthen! *Salted Rations by the sized Cask, Barrel, Hogshead, or Butt! *Able Bodied Crew Members Auctioned Nightly! Shop me first, shop me last... either way, "Come see Flay!"
-
Makes sense, good sense, however. What about general merchant vessels, their needs regarding ballast, etc. Desirable properties of stones, or not... "ballast is ballast to those who need it." For those with an entrepreneurial mindset (probably everyone) ... I'm sure that offloaded, unwanted 'simple' ballast was a commodity often 're-sold' to those effectively needing to 'onload' such 'simple' ballast! A fee would surely be charged for the labor required to off-load that undesirable ballast, from one ship... then when 'another' ship was actually 'needing' ballast... 'that' captain would not only be charged for the labor to load the ballast onto his ship, but probably 'also' be charged for the ballast material itself! "One man's junk = 'another' man's bankroll X2!" I can see 'useful' ballast being used in the form of 'goods' being transported, but what if there was no market for those heavy and specific goods at a needful ship's destination. Junk ballast would need to be used, would it not? Would this type of ballast have been traded back and forth, for a profit, at ports? I'm just guessing here. Sounds like it would have been a good way to make some easy money back then! (Easy for the proprietor, not so much for those unloading and re-loading the ballast stones) 🤔
-
What type of gaps are you looking to fill, and just how big are those gaps?
-
That's a very clever idea! I like it! 🙂
-
Buy from 'known' reputable sources and support the folks who actually go through the motions of designing that stuff with hopes of maybe earning a dollar or two for their long, tiring efforts. Don't support the Chinese pirates that simply 'steal' hard earned intellectual property, make inferior copies and effectively drive the cost of the truly good stuff up much higher than it really 'should' be, via the basic laws of marketing, supply and demand. I might ruffle some feathers here, but I honestly don't care. "I hate 'thieves'!" As soon as I see country of manufacture being 'China', I quickly walk the other way! As tempting as the price 'always' is, I also know that the product is either stolen or extremely inferior in manufacturing quality! "Just say 'NO' and pay a few dollars more!" You'll be supporting legitimate, hardworking inventors and craftsmen, as well as preserving the integrity of great quality in the needful products being sold to us hobbyists! "Don't buy ill-gotten 'crap' just because it's cheap!" "Buy the good, legitimate stuff instead!"
-
There's a lot of truth in what wefalk states! While in Florida, I occasionally did metal fabrication and repair work for a 'salvage company'. I was told that the origin of a wreck was oft times determined long before the actual wreck itself was located, if located at all, due to the type of ballast stones found trailing along the bottom. Proper types of stones let them know they were on the right track. Improper stones meant a new, uncertain 'something' worth noting... but nothing to usually get excited about!
-
Tool to Take Measurement Inside of a Hull
tmj replied to ChrisLBren's topic in Modeling tools and Workshop Equipment
Bonus Tip! If you need to duplicate complex geometric shapes, get one of 'these'! They're called 'contour-gauges'. Shove the needles into, or upon the said curious shape, lock it down, then trace that projected shape onto paper, with a pencil, and you have a template to replicate whatever complex geometry was measured. 😉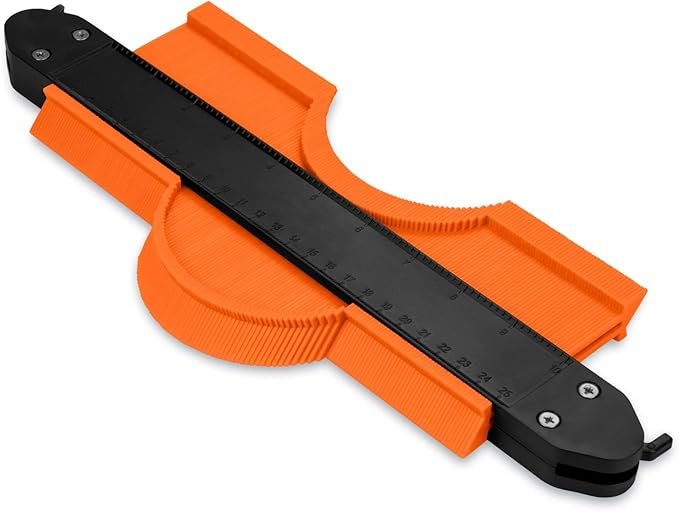
-
Tool to Take Measurement Inside of a Hull
tmj replied to ChrisLBren's topic in Modeling tools and Workshop Equipment
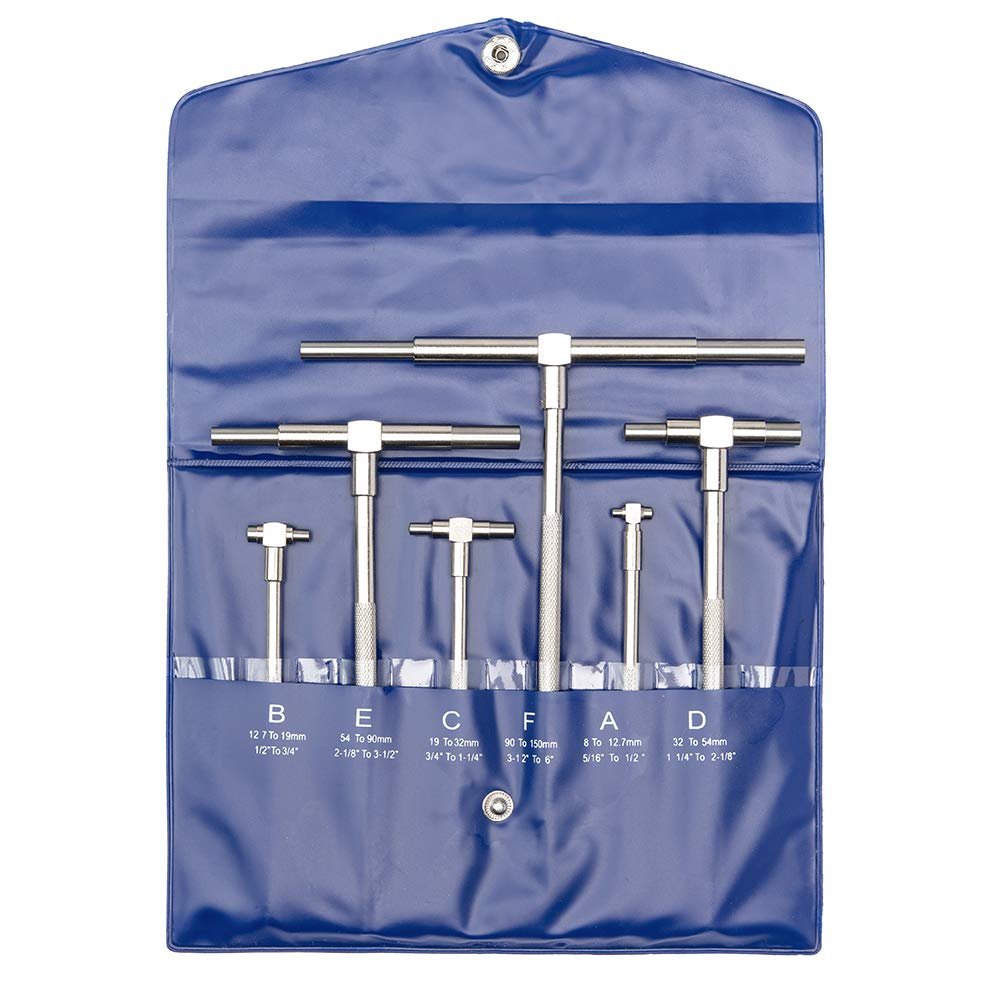
Dial, or 'digital' calipers are always your best friend! They can measure 'anything', almost. Sometimes you'll need a telescopic 'I.D' gauge for difficult to measure areas, but you'll also need the caliper to measure what the I'D. gauge fits into. Caliper is good for 'this'. Note the inside measuring jaws, the outside measuring jaws, and the 'depth Blade'! Telescopic 'I,D.' gauges look like this. You put them 'inside' whatever you're trying to measure, rotate a screw to extend or retract the ends, then put your calipers on the ends of the I.D. gauge to get an exact measurement. These are really handy when certain things get in the way of simply using your calipers alone. With these two gadgets in your toolbox... there are very few things that you'll ever struggle to successfully and accurately measure!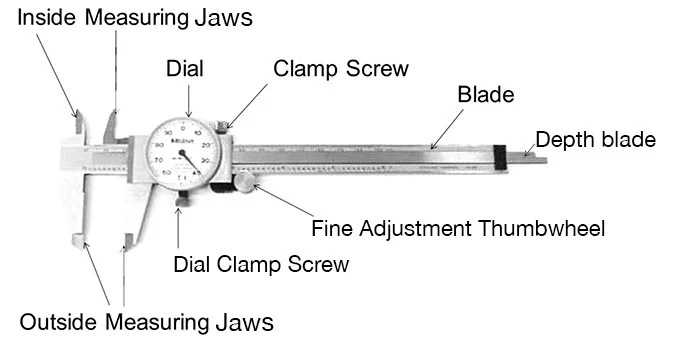
-
Looks really 'GRAND' Keith! I don't think that even alcohol and fire could have produced finer results than that! 😏
-
V6.0 looks really, really good! The scale is there, font looks proper, it's sooo dang close! Looks can be deceiving. I think you are there! simply darken the interior of your letters and if you want to get 'real' picky crisp up the outer edges of those letters just a teeny-tiny bit (don't clean up the edges so much that it looks professional) and you'll be spot on, just like the photo!
-
I typically don't paint. I try to get my joints fitting tightly, butttttt, I'm also not perfect. If I get something a bit loose, I like to dilute Titebond II (dark) with water and add it to the gap then sand with 220 grit paper to mix the sawdust with the wet glue. I use the dark Titebond as that is what I use between planks to simulate caulking. It dries super dark brown, like chocolate. Works really well for me. I do this while things are still in the rough, before final sanding and finishing. I'm sure it would work quite well for filling gaps that will be painted also, provided the gaps are not too large to fill with sawdust and glue.
-
La Renommee 1744 by ChrisLBren - 1/48 - 2025
tmj replied to ChrisLBren's topic in - Build logs for subjects built 1501 - 1750
Truly a work of art, in progress! -
You're making this little boat look 'really' sweet! Great work, great progress!
- 45 replies
-
- 1
-

-
- Fischkutter
- Laser Creation World
- (and 1 more)
-
Good 'Hobby Quality' Metal Lathes
tmj replied to tmj's topic in Modeling tools and Workshop Equipment
This is quite true, however. Proper grinding/sharpening procedures of the tooling can typically level the playing field with all alloys. This is something that a body needs to learn how to do, manually, via trial and error. 'Off the shelf', mass produced HSS and Carbide cutters/tooling are merely a generalization of a wide range of 'typical' reliefs and standards. They're great, for the most part, however. If a tool is not cutting as well as you'd like, it is typically due to the grind of the tool along with improper feeds and speeds. I learned on steel(s), however. When I started messing with other alloys (brass comes to mind) things didn't work right, anymore. I was following the 'Machinery's Handbook' for Feeds and Speeds but not liking the results at all. I was befuddled, until an old-timer told me just how important the actual grind 'geometry' of the tooling was. One size, per se, does 'not' fit all. You can do everything right, but if your tool isn't properly shaped for the specific material you are cutting, you'll 'never' be satisfied with the finished results! Mass-produced, quick-change carbide cutters are fantastic for general work. I use them religiously! I also keep a good supply of HSS blanks on hand, at work, for those curious times when things just don't want to go right. I'll then break out a HSS blank, grind a little and turn a little... yadda, yadda, yadda on setup material. Once a good grind produces nice chips/shavings at a given feed/speed... it's time to get back to work and start making money again! 😏 You'll never find any traditional references to my custom grinds, as there are none. It's truly 100% trial and error via asking the metal 'and' your machine what it is that 'they' actually want via the current project at hand! Every project has the potential to be quite different! You need to be willing to adapt. -
Good 'Hobby Quality' Metal Lathes
tmj replied to tmj's topic in Modeling tools and Workshop Equipment
Have you tried 'hammering' your soft brass to work-harden it prior to turning? I do this with both copper and brass prior to machining. It works quite well. If you need to soften it up again, just heat it with a torch. I've never tried turning anything as small as .3mm. That's 'tiny! -
Brass stock in small sections....?
tmj replied to Mark Pearse's topic in Metal Work, Soldering and Metal Fittings
Ken, you can use 2-sided tape for this. The wood is only used as a backing to help keep the saw blade from distorting the edges of the brass along the cut edge. You don't need any 'adhesive'. That might make it difficult to easily remove the brass from the wood. FWIW, the hardness of the brass is kind of important to. You want something semi-hard to hard. Dead soft brass will likely roll its edges along the cut even if backed by wood. -
Good 'Hobby Quality' Metal Lathes
tmj replied to tmj's topic in Modeling tools and Workshop Equipment
As for belts... that's the least of my concerns. I'm used to running machines with gears that will 'never slip' if you make a mistake! 😮 Besides. It's also good to 'crash a tool' now and then. It keeps you on your toes and really gets the ol' heart a pumping, which is very good for cardiovascular health! 😁 -
Good 'Hobby Quality' Metal Lathes
tmj replied to tmj's topic in Modeling tools and Workshop Equipment
The SL is indeed 12 X 1. As for getting too close to the chuck, I have split shaft collars to deal with that. If needing to get dangerously close, I'll simply move my cutter to within a few thousands of the jaws and lock the shaft collar to the way, up against the cross-cut slide. It might 'look' scary while turning up to the chuck, but it will be impossible for my tool to actually go too far, where nobody truly wants their tool to ever go! Hmm. Maybe I should rephrase that! LOL 🫤 -
There is actually no right, nor wrong way to do things here! Build the model to suit what looks good to 'you'! Nothing else matters... unless you are striving for 100% historical accuracy. You'll never get that straight out of 'any' kit. With a kit you want to develop skills and build something that will look very nice when displayed in your living room! With Billing, just use your eye and fill in the gaps with whatever looks appealing to your eye!
-
Good 'Hobby Quality' Metal Lathes
tmj replied to tmj's topic in Modeling tools and Workshop Equipment
Thanks David! I have plenty of shim stock at work. Can't live without it even on the big machines. It's also nice to know that the motor will probably be fine, however. If it 'is'... that's one less fun project that I'll get to tinker with! 😔 LOL -
Good 'Hobby Quality' Metal Lathes
tmj replied to tmj's topic in Modeling tools and Workshop Equipment
I doubt that I'll ever have that problem. I don't intend to turn anything but small diameter stock.


