desalgu
-
Posts
363 -
Joined
-
Last visited
Content Type
Profiles
Forums
Gallery
Events
Everything posted by desalgu
-
Hi Allan, I know they have the waxed thread in a bunch of colors on amazon, because I just looked it up. The beige looks like tan. There's also a brown and a dark brown. A lot of other places sell it besides amazon.
-
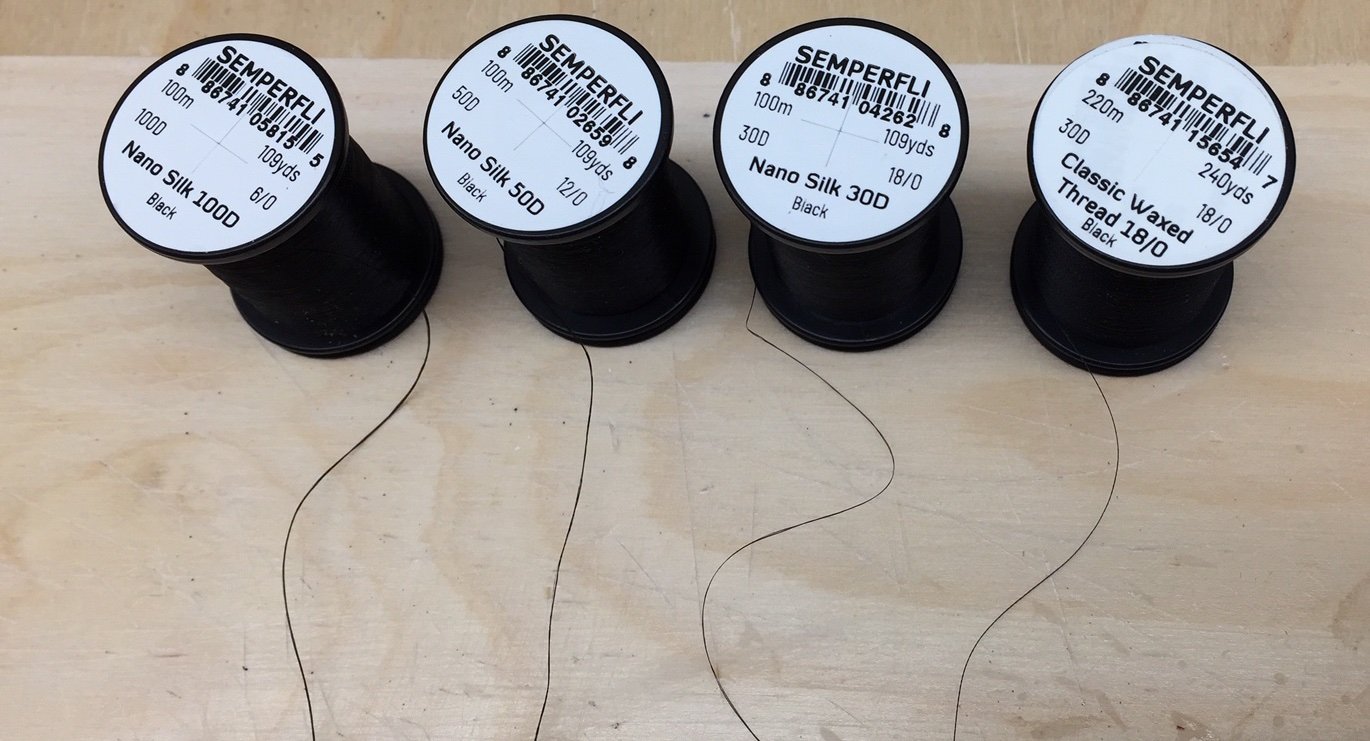
I ordered some fly tying thread in several sizes and received them recently. I thought people might be interested in what I discovered. I found there really isn't much difference between the sizes I ordered. I've been using the Nano Silk 30/0 which is extremely fine thread (for some reason I can't find the spool despite my work area supposedly being neat and organized 😅). Here are the new ones. I could not visually see any difference between the 30/0 and 18/0 sizes. They appeared to me the same. I don't have a micrometer to measure the diameters, so am going by visual appearance. The 12/0 size is ever so slightly thicker, and the 8/0 size is obviously thicker but would still work. I did discover the Nano Silk thread in larger sizes tends to unwind, come apart, or "fuzz" when handled. I didn't have this problem with the tiny 30/0 size. I also got a spool of 18/0 classic waxed thread and it stays together and doesn't easily unwind. I'm thinking I'll use it for seizing blocks and see how it goes. If it works, I may order the same thread in larger sizes so I have some choices on what to use.
-
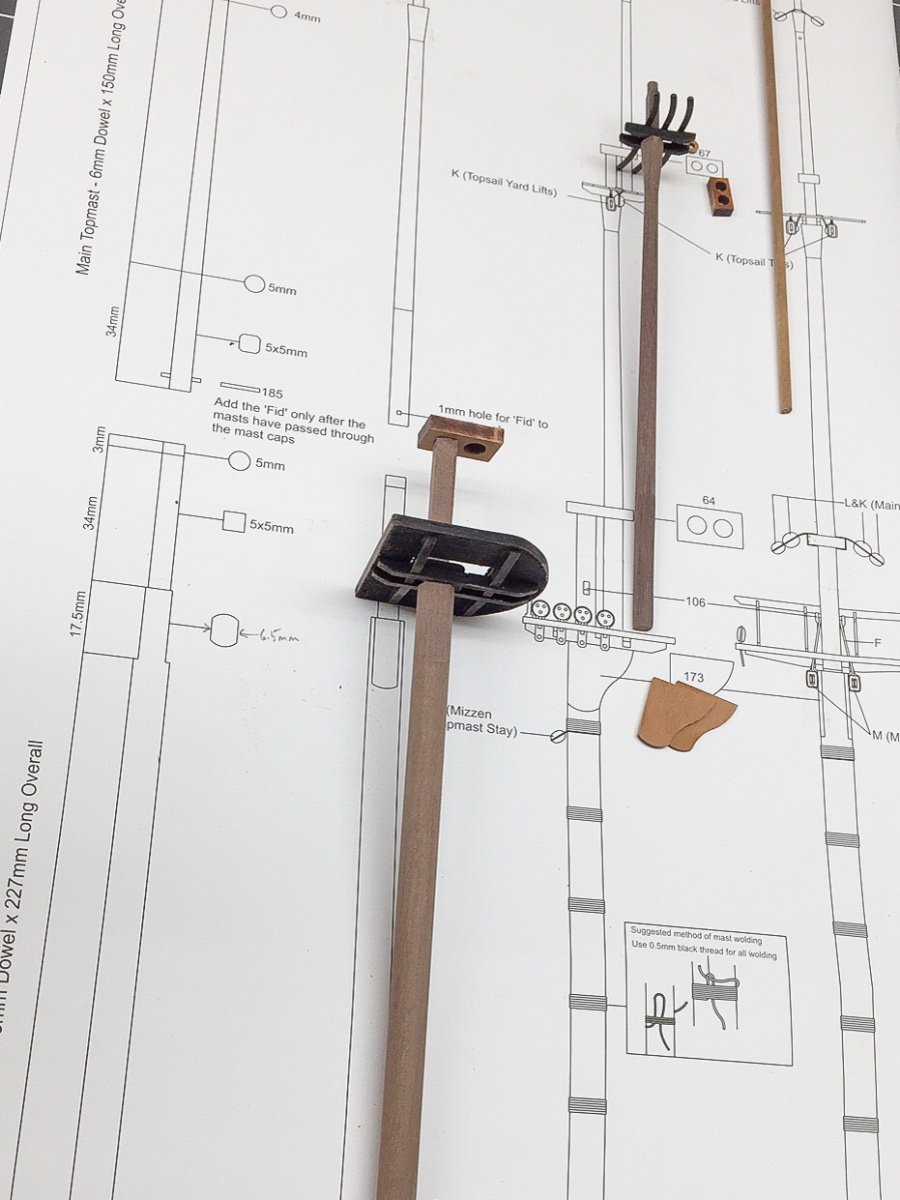
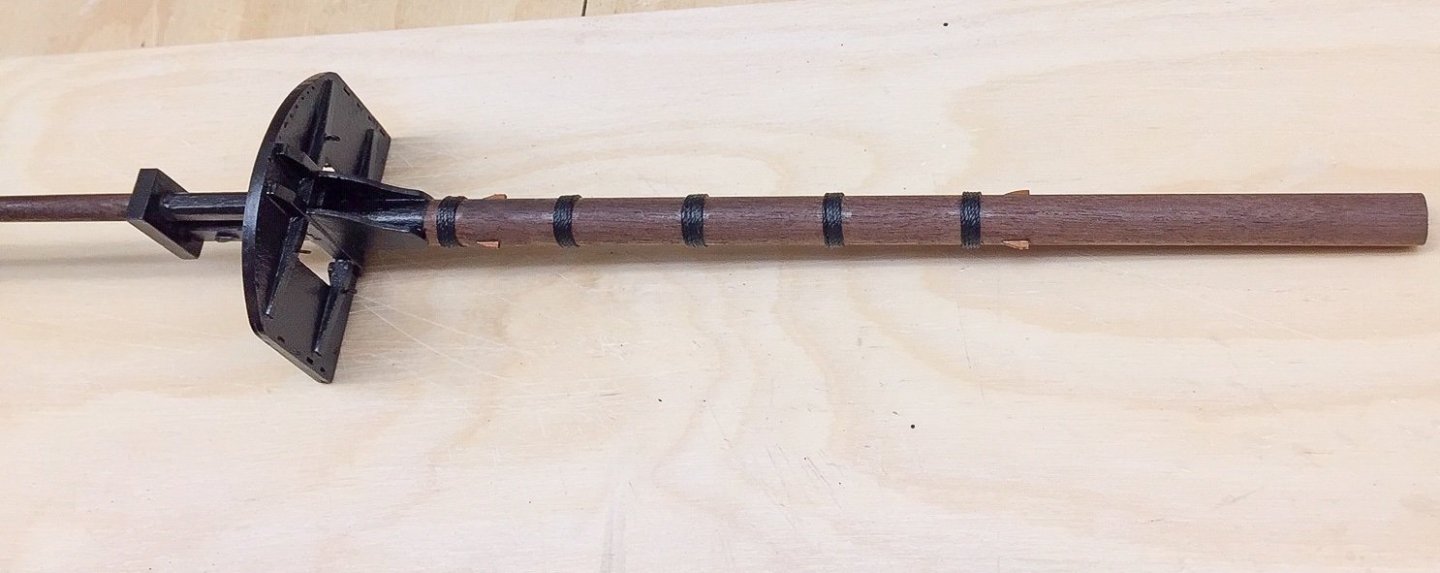
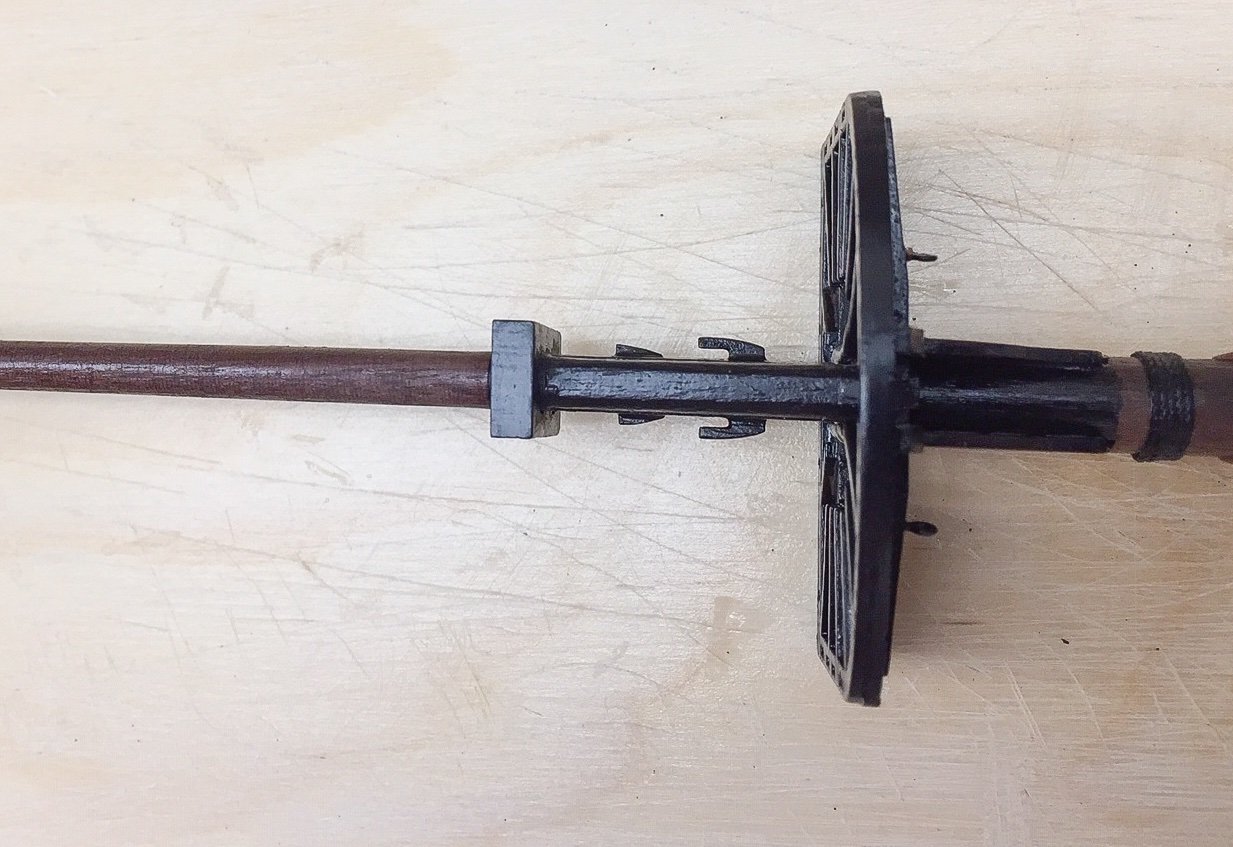
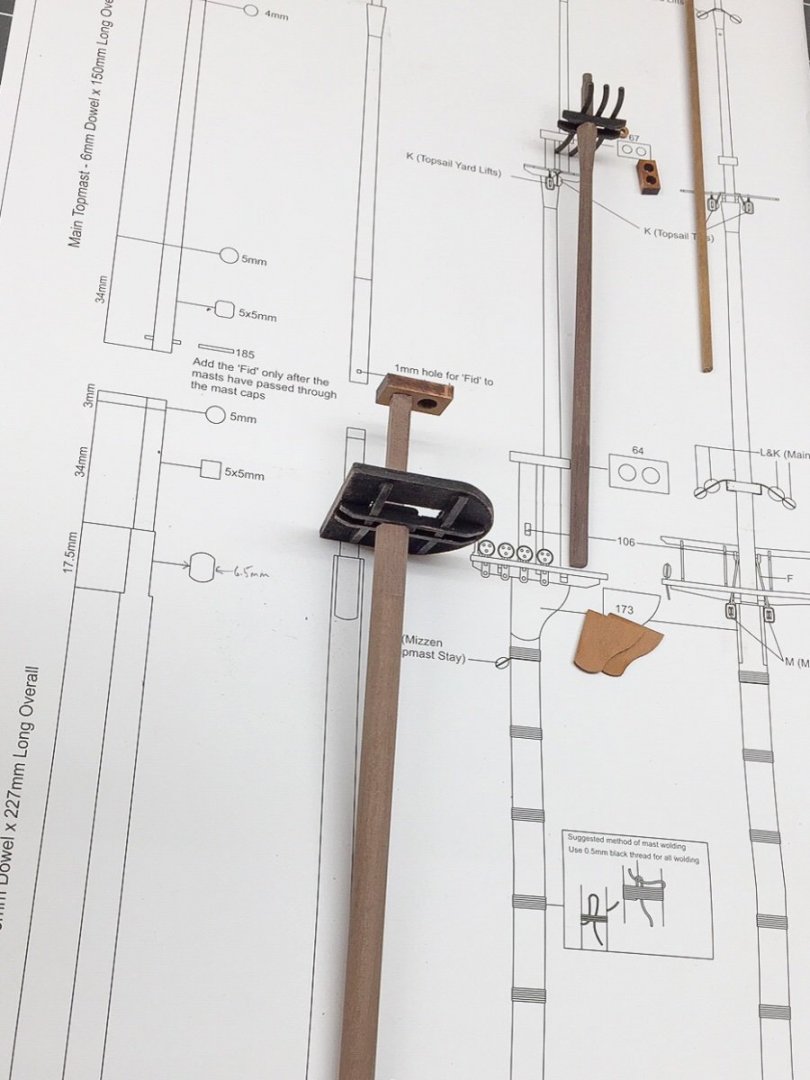
I've finally got around to posting a few more pictures. I haven't been doing much on model ship lately. There were too many other distractions this week, doctor appointments, yard stuff, and most important a new Byrnes table saw. The topgallant yard lift blocks went on the foremast like I thought, pulling thread thru the eye to tighten as shown previously. For the topsail yard lift blocks and topsail ties, I seized a block to the end of some thread, put thread thru the gap between the two masts, and then seized another block on the other side. I had to do this on the mast, so it was difficult to get it seized at about the right distance so the blocks would hang right (or what I thought was "right"). It took 2 tries on the first one. I didn't loop the thread around the masts. This would have made it easier, but not as clean looking. It was unclear to me how this was done on a real ship. They may have looped each block around the mast, I wasn't sure. I put the tie blocks between the first two crosstrees, and the lift blocks between the last two crosstrees. This positioned the tie block forward of the lift blocks which is how I interpreted the plans. I used a little CA to keep them there and hanging like I wanted. There's sure a big difference doing this away from the mast versus on the mast, and it would be even more difficult if the mast was on the ship. The manual for the Duchess is very detailed with lots of photos when building the hull. But there's fewer photos and descriptions for masts and rigging. You have to rely on the plans and other information, and sometimes just decide how to do something yourself, what looks "good" to you.
-
Interesting discussion about ratlines and a problem I'll run into at some point (got distracted & I'm progressing very slowly). Seems like it would look odd having ratlines not evenly spaced, but since full scale the span is less than 4 ft, they might have done it that way. Might have been easier to rig with one line all the way across. But I agree that the sailors probably went up and down one side or the other, and the middle wasn't ever used. Might be easier to keep them aligned going all the way across, but getting thread to hang like rope across the longer span seems like it would be difficult. Just me, but I'm not a fan of leaving off the middle ratlines only on the lower part. It will be something to think about before I get to that point. Might be best to experiment and see what it looks like. I'm sure it will look good whichever way you decide to do it. I'm constantly amazed at how you do rigging, for example, how you seize the shrouds and the knots involved. I reviewed your Speedy log, and all I can say is "Wow!" I will probably opt for a slightly simpler method that will look somewhat right. Otherwise, I'm not sure I'd live long enough to finish! 😅
- 345 replies
-
- 2
-

-

-
- Duchess Of Kingston
- Vanguard Models
- (and 1 more)
-
I notice only one hand 😂
-
My basement work area isn't as neat as it might appear in the photo. It's too far away from the camera to show all the little clutter. I'll have to look into making rope and serving. Serving is something I knew absolutely nothing about until seeing it in build logs. (At first I was very confused, thinking serving in volleyball or tennis?!) It makes sense why they do it on a real ship, but I've wondered if it really shows at model scale. Your photos and others shows that it does. Maybe I'll give it a try on the next model...and more "toys" to buy 😅 I too love the look of boxwood on your Duchess, and I think you made the right choice leaving the wood to show on the hull versus paint. If you had a choice between boxwood and alaskan cedar, which would you choose? Is one easier to work with than the other? They both have a similar color which I like. Your boxwood looks fantastic and @glbarlow 's alaskan cedar on Cheerful looks fantastic (of course, along with his super precise building). It's unclear which is "best" and maybe there's no real answer to that.
-
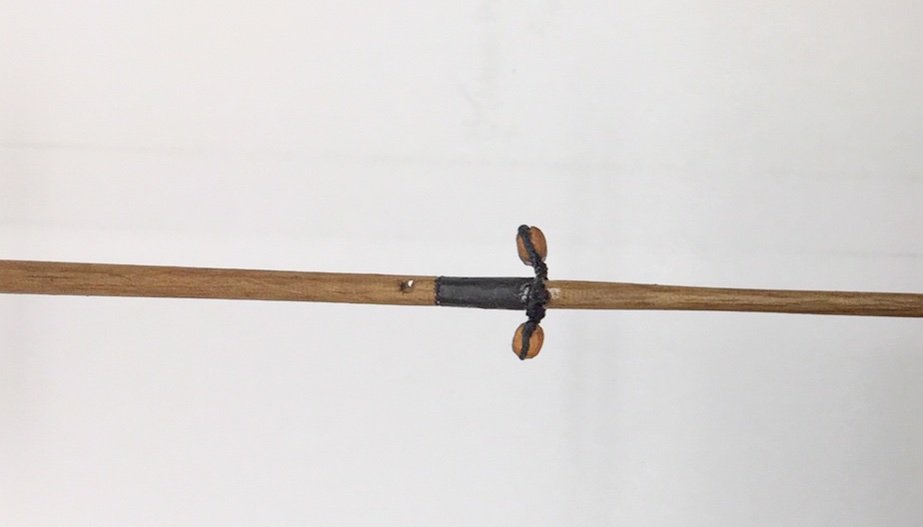
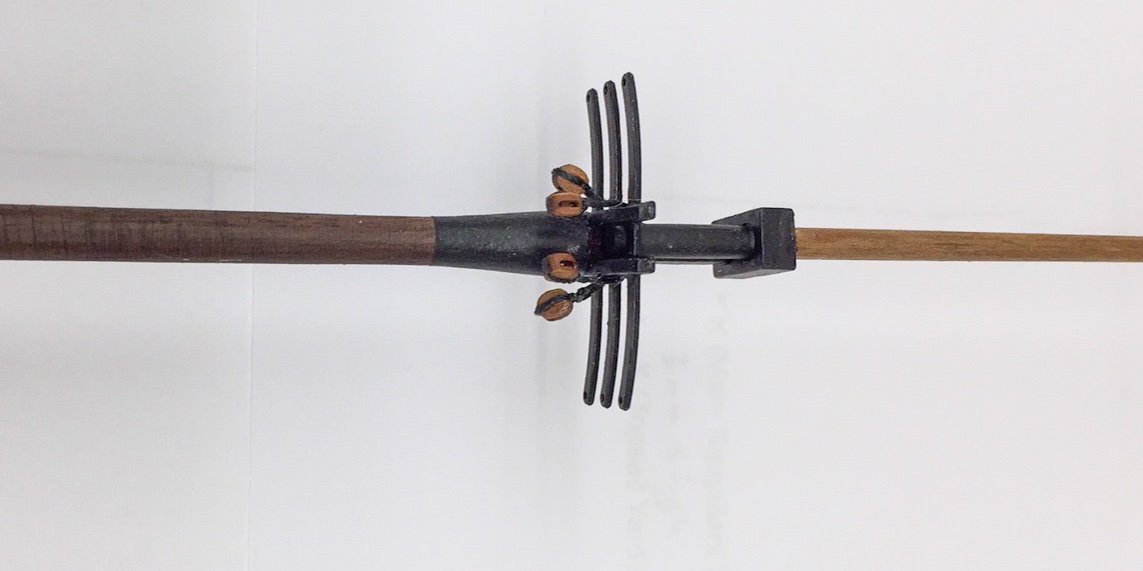
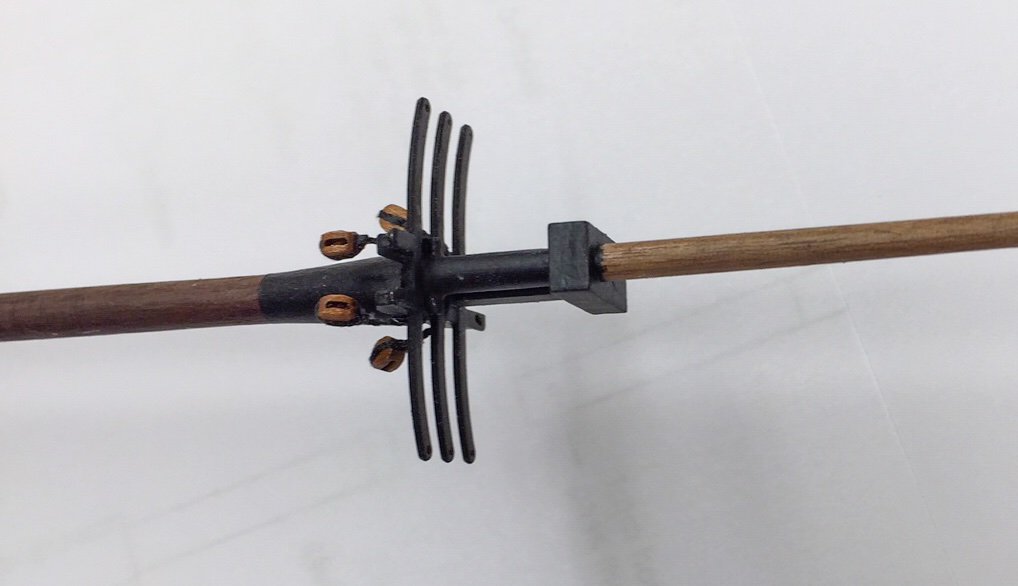
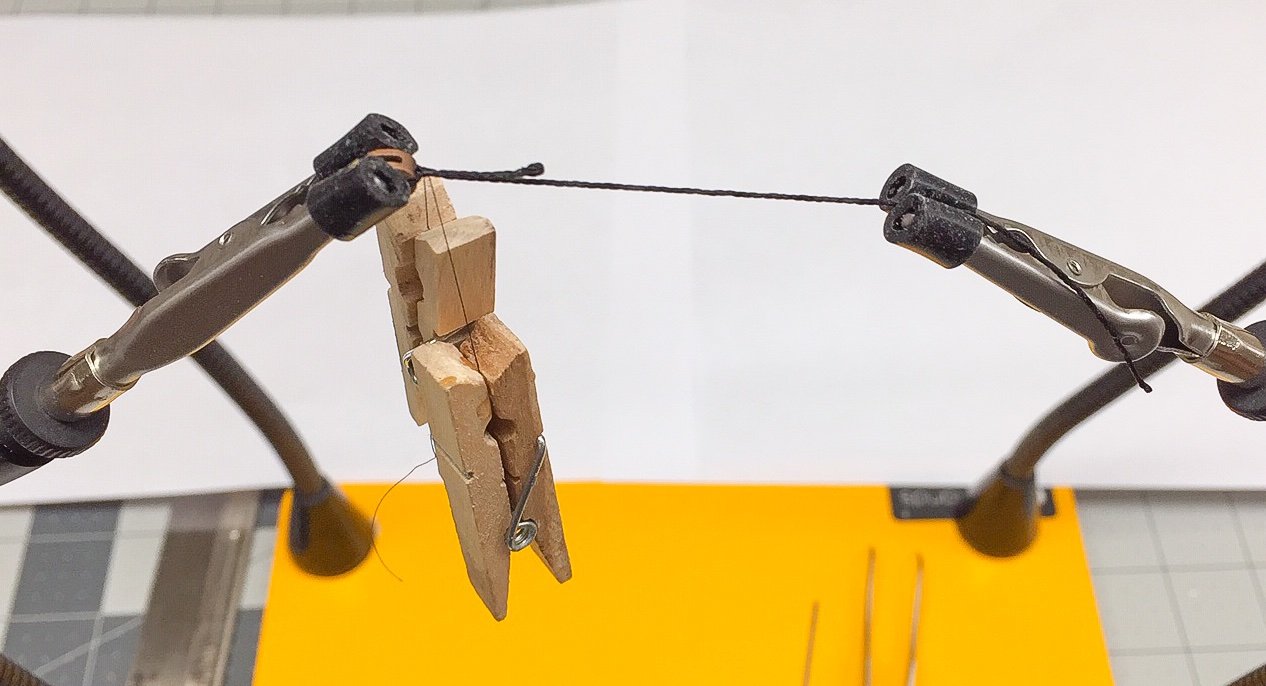
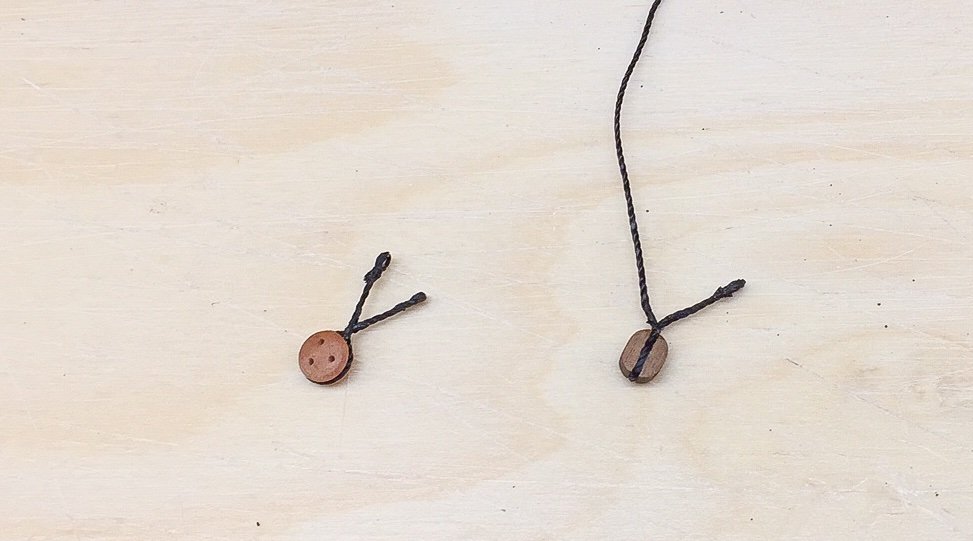
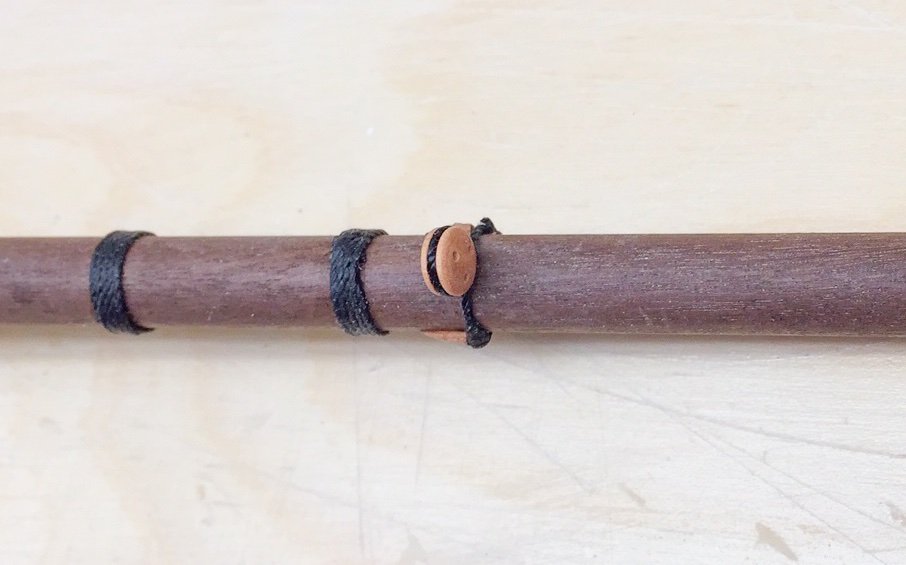
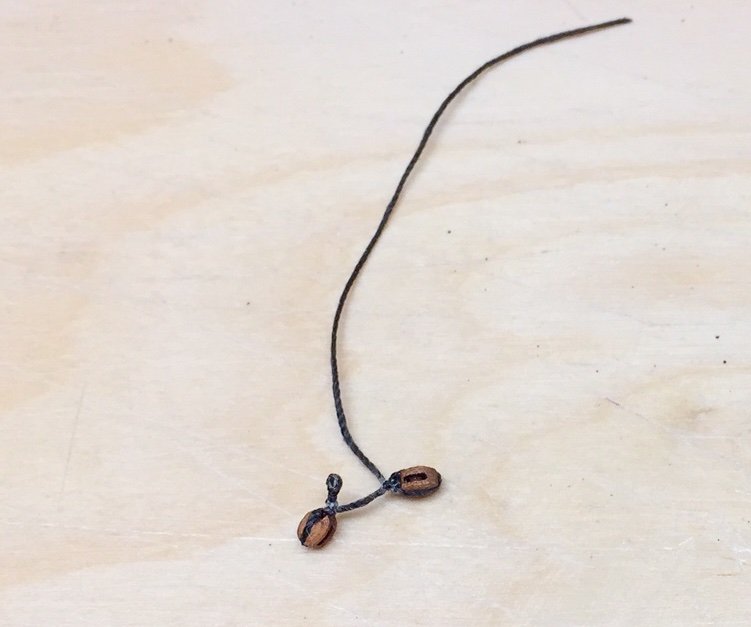
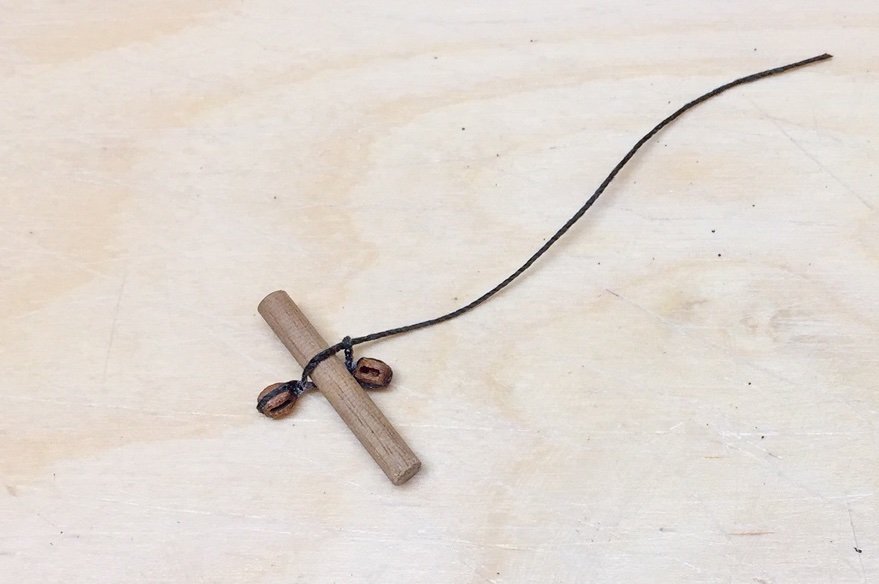
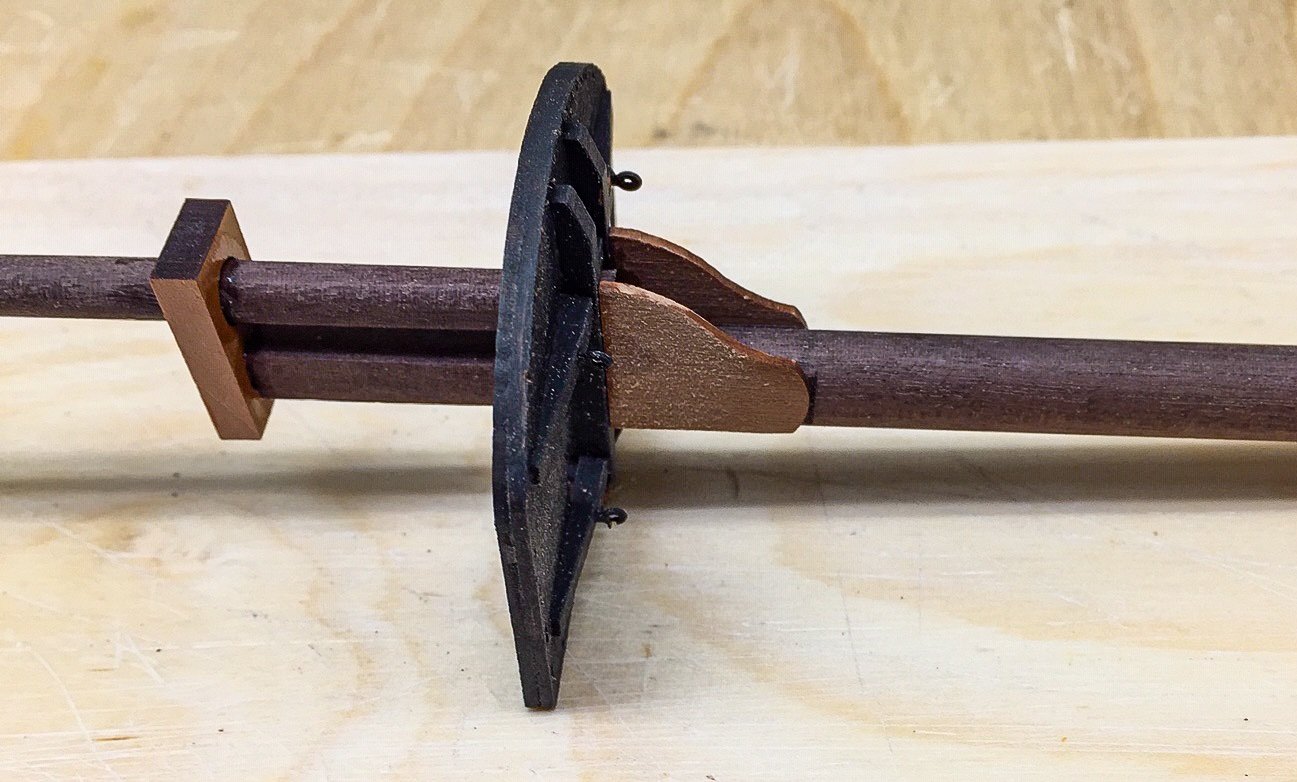
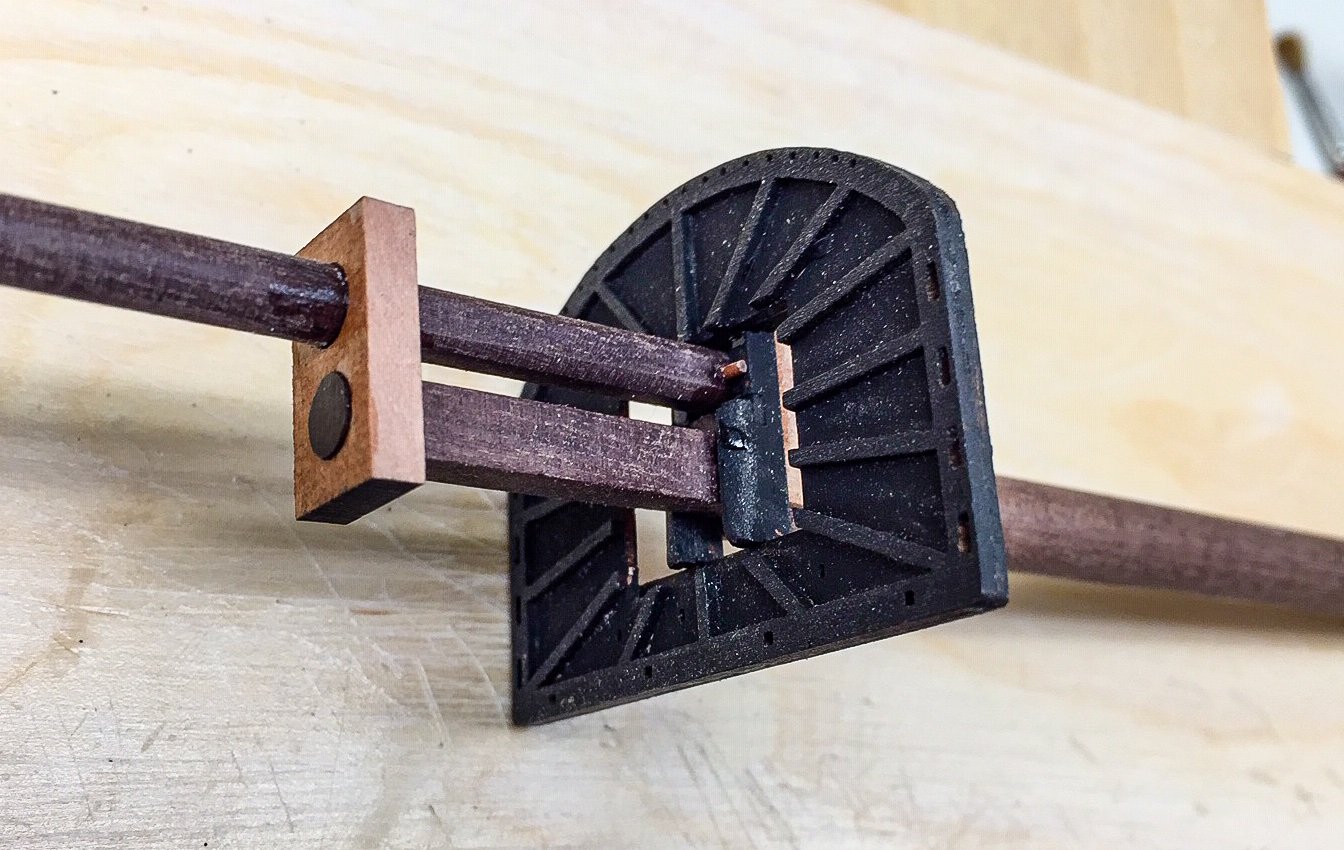
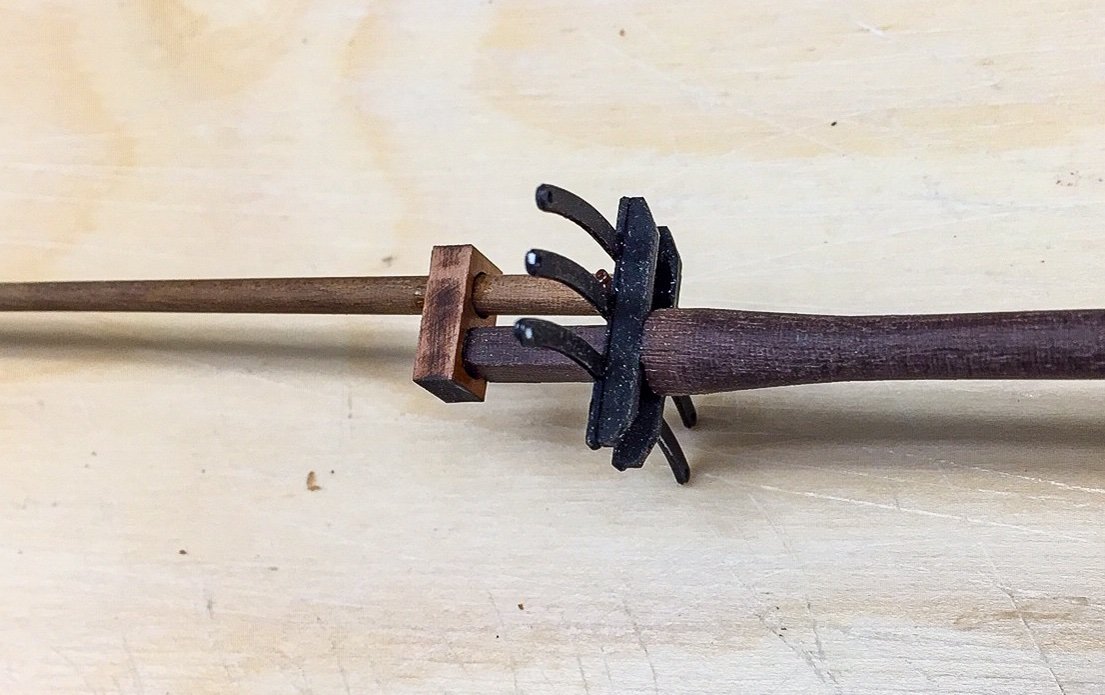
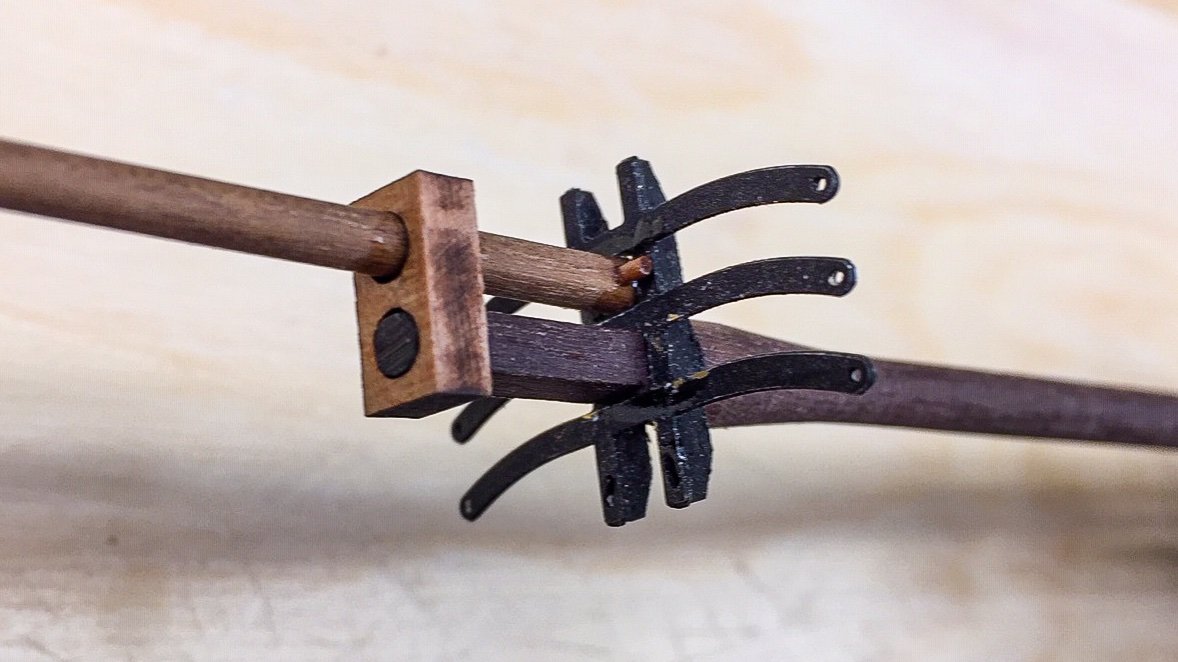
I've started stropping blocks and placing them on the foremast. I used some techniques from @DelF and some from a book "Rigging Period Ship Models" by Petersson. The Speedy build log by @DelF has some great details showing how he does it. His build logs and those by @glbarlow are wonderful. The foremast has a 5mm single block attached just below the platform. I used 0.5mm thread from the kit and seized it with some very fine Semperfli fly tying thread (30/0). This thread is about like a hair and I've found it pretty difficult tor work with, and I feel like it's too small for seizing. I ordered some 18/0 thread, which I plan to use in the future, and I think it will be about right. I used Quadhands to hold the block and main thread. I start by tying a simple overhand knot with the fine thread around the two main threads and put a small drop of CA on it with a straight pin. Then I grab both ends of the fine thread, tighten, and try to work the knot as close as possible to the block. It takes a good 15+ seconds for the CA to set, so there is plenty of time to try to get the knot close to the block. I attach a small clothespin to each end of the fine thread to provide some tension and let it dry a little while. Then I take one end of the fine thread and wrap it around the two main threads 5-10 times, and add another drop of CA, put the clothespins back on and let it dry. It looks like: In the above photo, you can see I created a small eye on one end of the main threads. I used the method shown by @DelF and I think I used a #68 drill bit to seize the thread around and create the eye. I tried a larger wire at first, but it was too big. Using drill bits, you can choose whatever size works best. His ideas are always clever! I used the eye and loose end of thread to attach the block to the foremast. It's a little hard to see in the photo, but the loose end and eye are wrapped around the mast, and the loose end is placed thru the eye and pulled tight. I should seize it, but instead put a drop of CA on it to secure it. At that point it was too tight to try to get fine thread or needle under the larger thread to wrap and seize, so I decided it was good as is. There is a deadeye attached to the foremast at the lower end of the mast. In this case, I made eyes on both loose ends of thread as shown on the left: I placed the deadeye on the mast and put lashing thru the eyes to secure it. This is where I realized that I really needed larger diameter fine thread than the 30/0 size. The small thread kept falling out of the needle I was using to lash! Plus it took a lot of loops and it was hard to keep them all tight. Took me 2 tries to get it somewhat acceptable. At the top of the foremast, there are 2 blocks attached on opposite sides of the mast. I wasn't sure how to handle this, so decided on this approach: I created an eye on one loose end of thread and stropped a block very close to the eye. I stropped the 2nd block to the remaining loose end, and tried to make sure the distance between the two blocks was 4-5mm. This should put the blocks on opposite sides of the mast if I measured everything correctly. It's very hard for me to strop the 2nd block at a precise distance from the first, so I settled for getting it close. When I first looked at the photo, I thought I'd messed up, because it looks like the block nearest the eye isn't stropped correctly. But I checked and it's correct, so it's just the photo that makes it look wrong, some kind of optical illusion. I try to remember to touch up the CA with black paint before attaching to the mast. The eye and loose end will go around the mast, the loose end going thru the eye. This photo shows how it works. The dowel is a little larger than the mast diameter, but it gives you the idea. I'll pull the loose end tight and use CA to secure it. It should give a fairly clean attachment and be somewhat like I think they do on real ships (landlubber's opinion). It's certainly less clutter than having two threads wrapped around the same location on the mast. I'm making progress on the main mast. It's almost the same as the foremast, so no need for additional photos. The only difference is I tried putting on a coat of WOP right after I assembled the mast, before I added cleats and painted areas black. This worked much better than what I did on the foremast, so I'll use this method for the rest of the masts and spars. If rain and wind (gusts 40+ mph) continue, I'll continue to get a lot of work done on the ship!

-
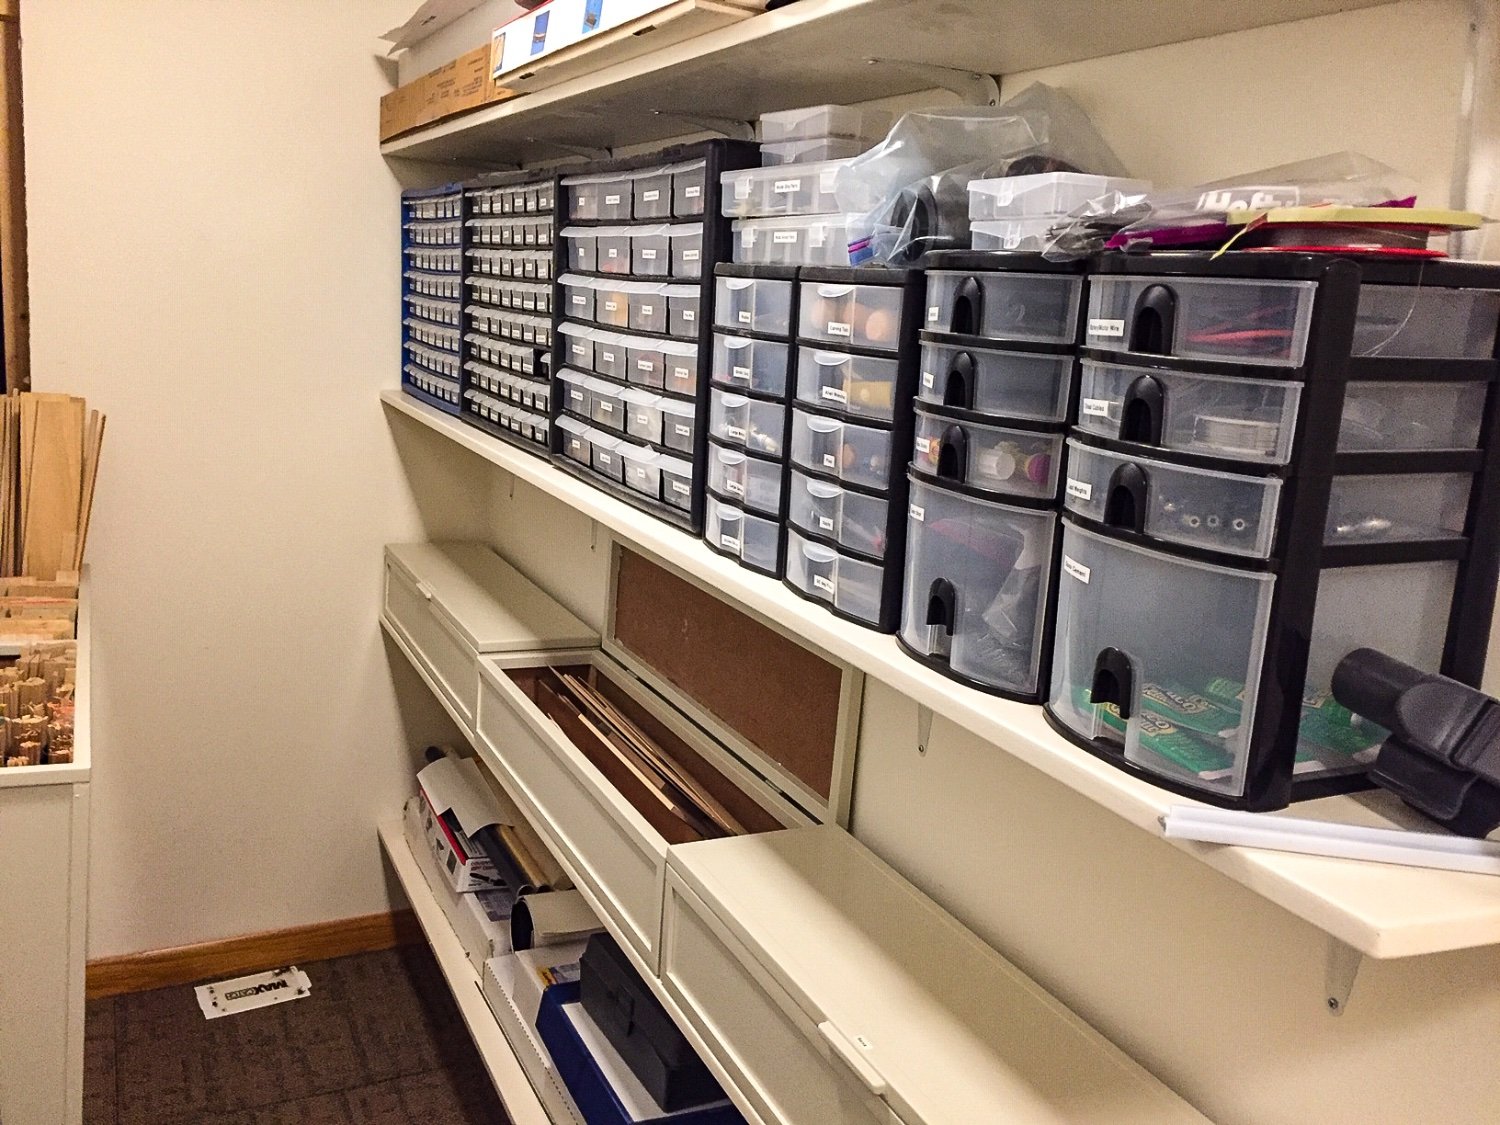
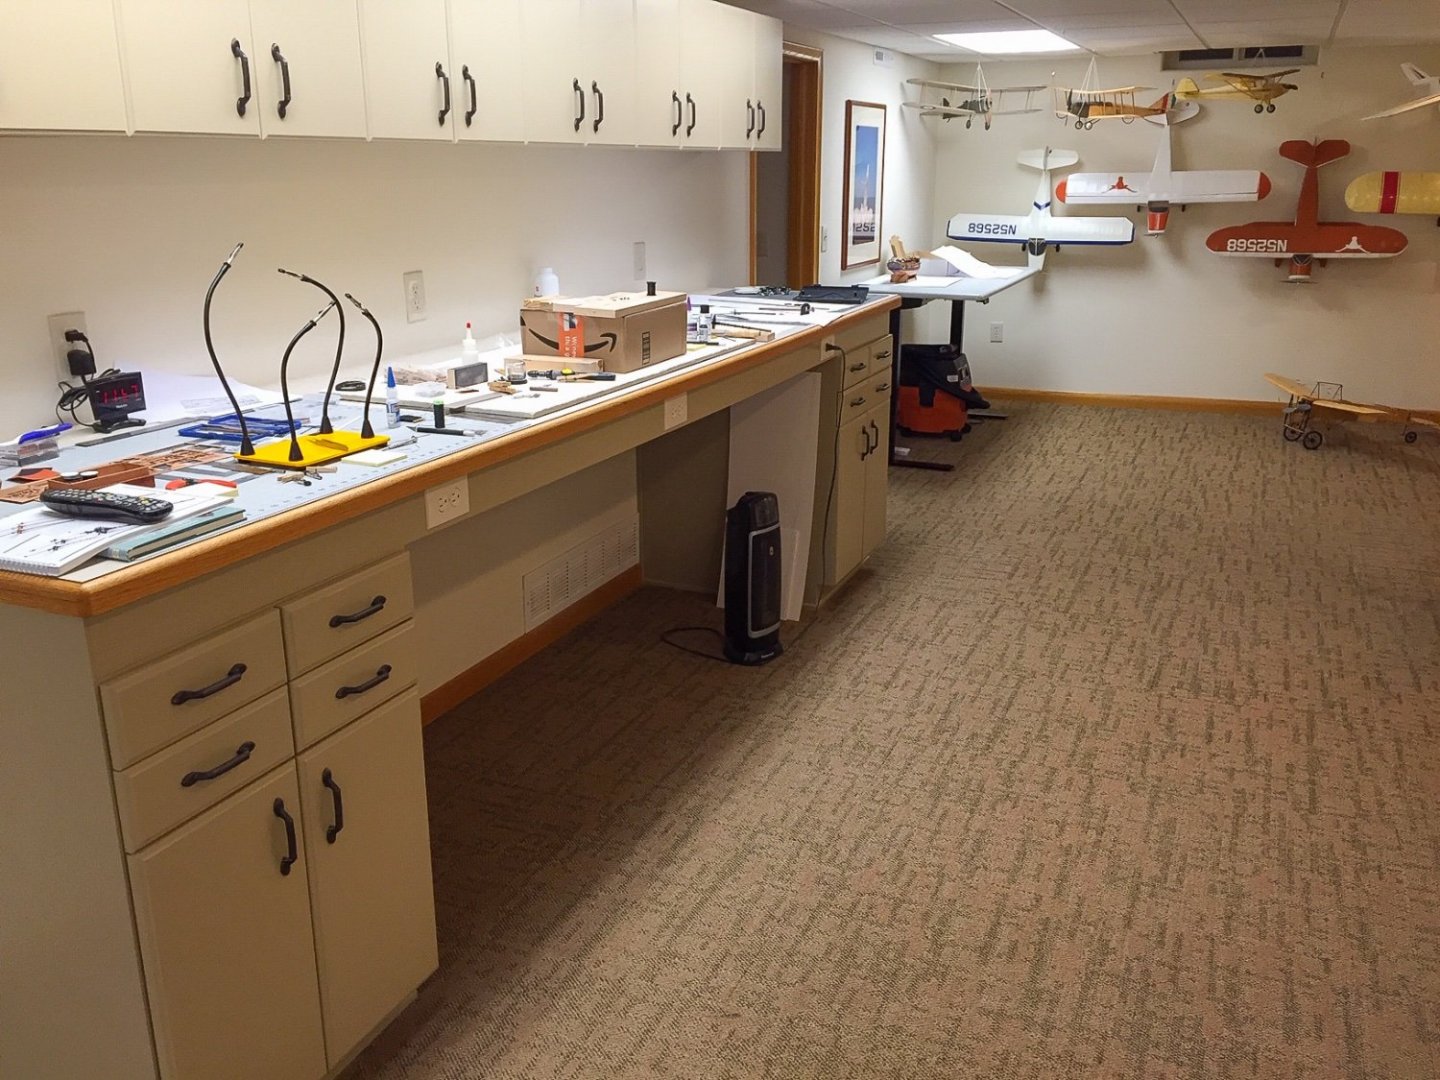
I'm amazed at how many make their own rope and serve it. It looks awesome, but not sure I'll reach that level. I enjoy seeing everyone's work areas! Hope this isn't too much distraction in Derek's build log. I love following his builds with all his creativity and detail. I have a large room in the basement as a hobby room, so I'm jealous when I see large windows and natural light! But I'm sure others would love to have the space. I was very cramped in my previous house, so having this room has me spoiled. I too am way behind in tools, but recently I did order a Byrnes table saw. It's going to be hard to catch up to Glenn and Derek! Here's my basement room taken from about the middle. One picture faces one direction and then I turned around for the other photo. I also have a closet area for supplies. Obviously I was into model airplanes before switching to ships. Carpet squares were not the best choice for floor, because if I drop something, most of the time it literally disappears.


- 345 replies
-
- 10
-
-

-
- Duchess Of Kingston
- Vanguard Models
- (and 1 more)
-
I never would have guessed wooldings, and it's kind of funny, the spell checker doesn't even know about it! I looked up mast binding and mast bands, but didn't find anything. Thanks to Gregory and Derick for educating me (once again 😅)! This one is so unusual, I might actually be able to remember it. Learning the ropes isn't something an old landlubber like me is good at!
-
Superb work as always! Now I'm wondering how the bowsprit will fit on my boat with the knight's plume. It will be a while before I get to that point though. You're way ahead of me now. Based on how you attach blocks, I'm going to try to improve on what I've done previously. I'm very impressed with all the extra little details you add.
- 345 replies
-
- 1
-
-
- Duchess Of Kingston
- Vanguard Models
- (and 1 more)
-
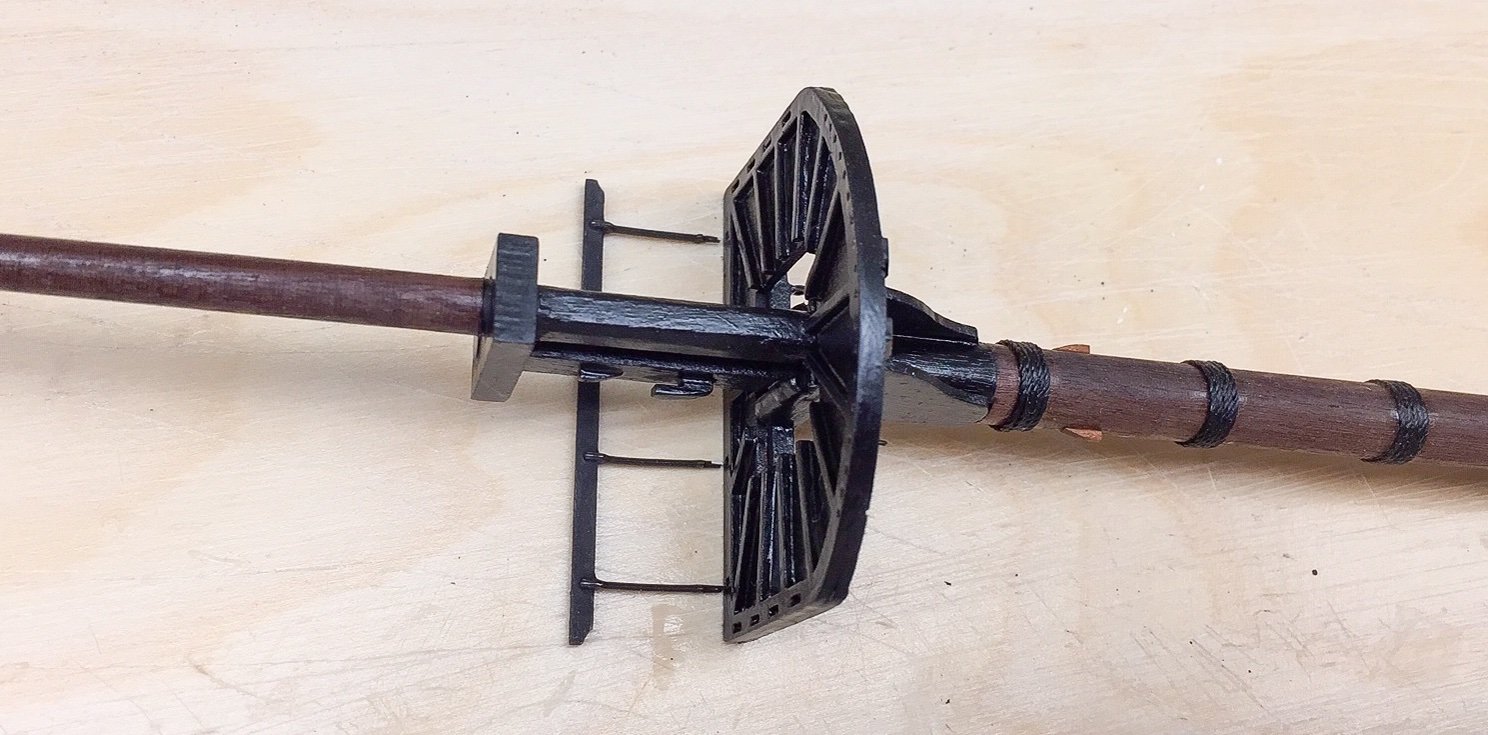
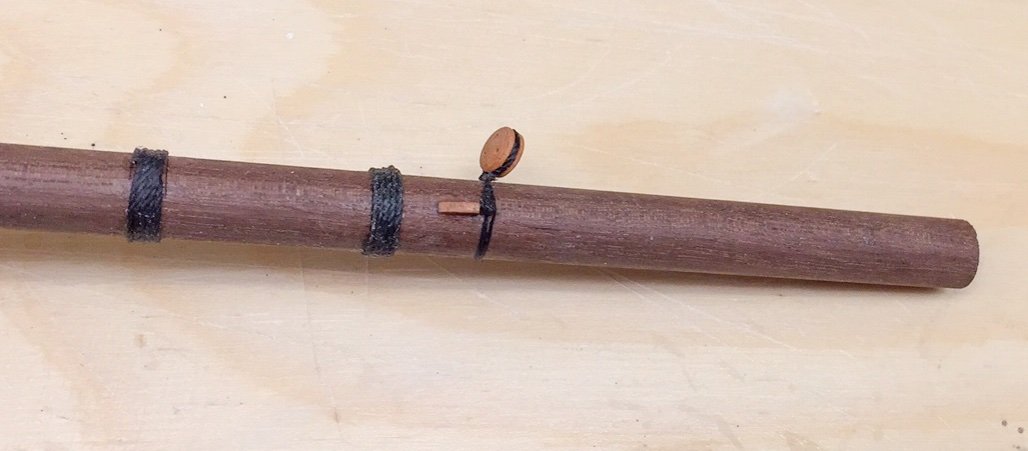
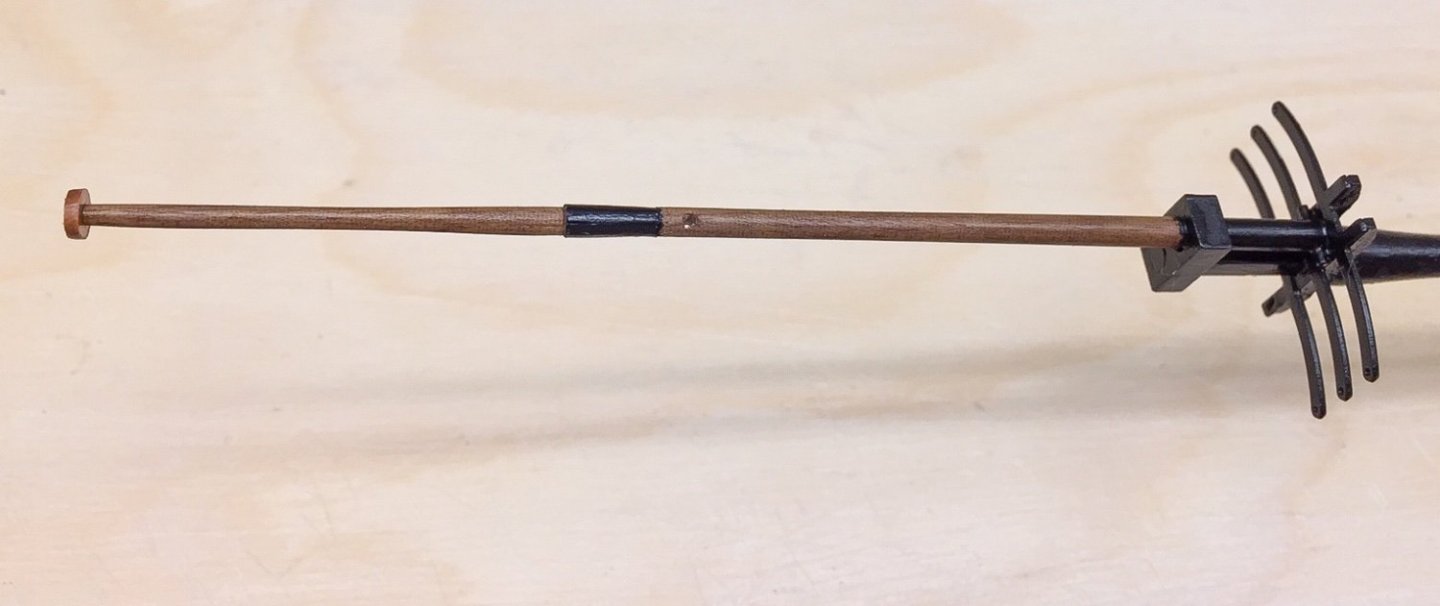
I've been making slow progress on the masts. On foremast I wrapped thread around the lower mast for the mast bands or bindings (not sure of the correct term). I wasn't that happy with how they turned out. It was hard to get them straight and where the threads begin and end are not as clean as I'd like (but I'm not patient enough to redo). I put a coat of satin WOP on, and usually I like it, but it has too much sheen on the masts. I'm going to put a coat of matte acrylic over it to reduce or eliminate the shine. So far I've focused on the foremast. Here are the cleats just above the mast platform. I've made the platform rail and test fit it, but decided not to glue it in until later. Here's kind of what it will look like And here's the crosstrees and upper part of the mast I've started shaping the mainmast parts and will be assembling it before too long.

-
Thank you Yves, Dave_E, and Stephen! I really appreciate the nice comments. You all have no idea how much it helps to keep me going. I still haven't met anyone in town that builds model ships. I've been going slow on the foremast. We had a week or more of nice weather for a change, so spent quite a bit of time outside. I have the basic parts of the foremast assembled, but there's still a lot of work to do. It will look nicer after I clean it up and paint, but I thought I'd post some pictures anyway. I didn't run into any major difficulties. Shaping the masts took time, but it only took some slight tweaking to get parts to slide together. Here's the mast platform as it stands right now: Here's the next level up and the crosstrees And finally, here is the top
-
Derek, you're advice on anything about building model ships is invaluable! I've had the Byrnes table saw on my list, but haven't felt a need for it while building the Duchess since I used the kit wood. Thinking ahead I have my eyes on the Cheerful, thinking that would be a good next step, and that would involve cutting more wood myself, perhaps a lot of it. For larger projects I have my father's old (from mid 1950's) 7" table saw, but it's too large for models except for cutting alignment or fill blocks. I've also used it for things like display cases. I've also got a Dremel rotary and an old jigsaw that I've had for years and used a lot on model airplanes. But I have little that can deal with the small, detailed parts of model ships. I'm still clueless how Vanguard and Syren make their tiny blocks! But when starting to shape the masts, the proxxon mill came to mind along with a lathe. I've not used a milling machine, so there would be a learning curve and it's a little intimidating, but I've been very impressed with what you and others can do with it. I like how you cut the wood for yards into an octagonal shape and then could easily round it where needed. I'd think you could round it without a lathe by just sanding and get good results. I was also real impressed with how you cut the little grooves to represent sheaves. I don't know how you could do this any other way. I knew the part that you worked on and how small those grooves were. Assuming I'll need to make more parts from scratch, like ladders and no telling what else, I can certainly see the value of a tool like this. Thanks so much, David
- 345 replies
-
- 1
-
-
- Duchess Of Kingston
- Vanguard Models
- (and 1 more)
-
Incredible!! I've got a long way to go to reach anywhere close to your level. Amazing detail stropping the deadeyes! I'll be happy if I get anywhere close to what you've done. Seeing your masts and yards, I think I'm going to have to invest in some tools. Between table saw, sanding disk, lathe, milling machine, and perhaps something else I haven't thought of, what do you end up using the most? in other words, what would you buy first?
-
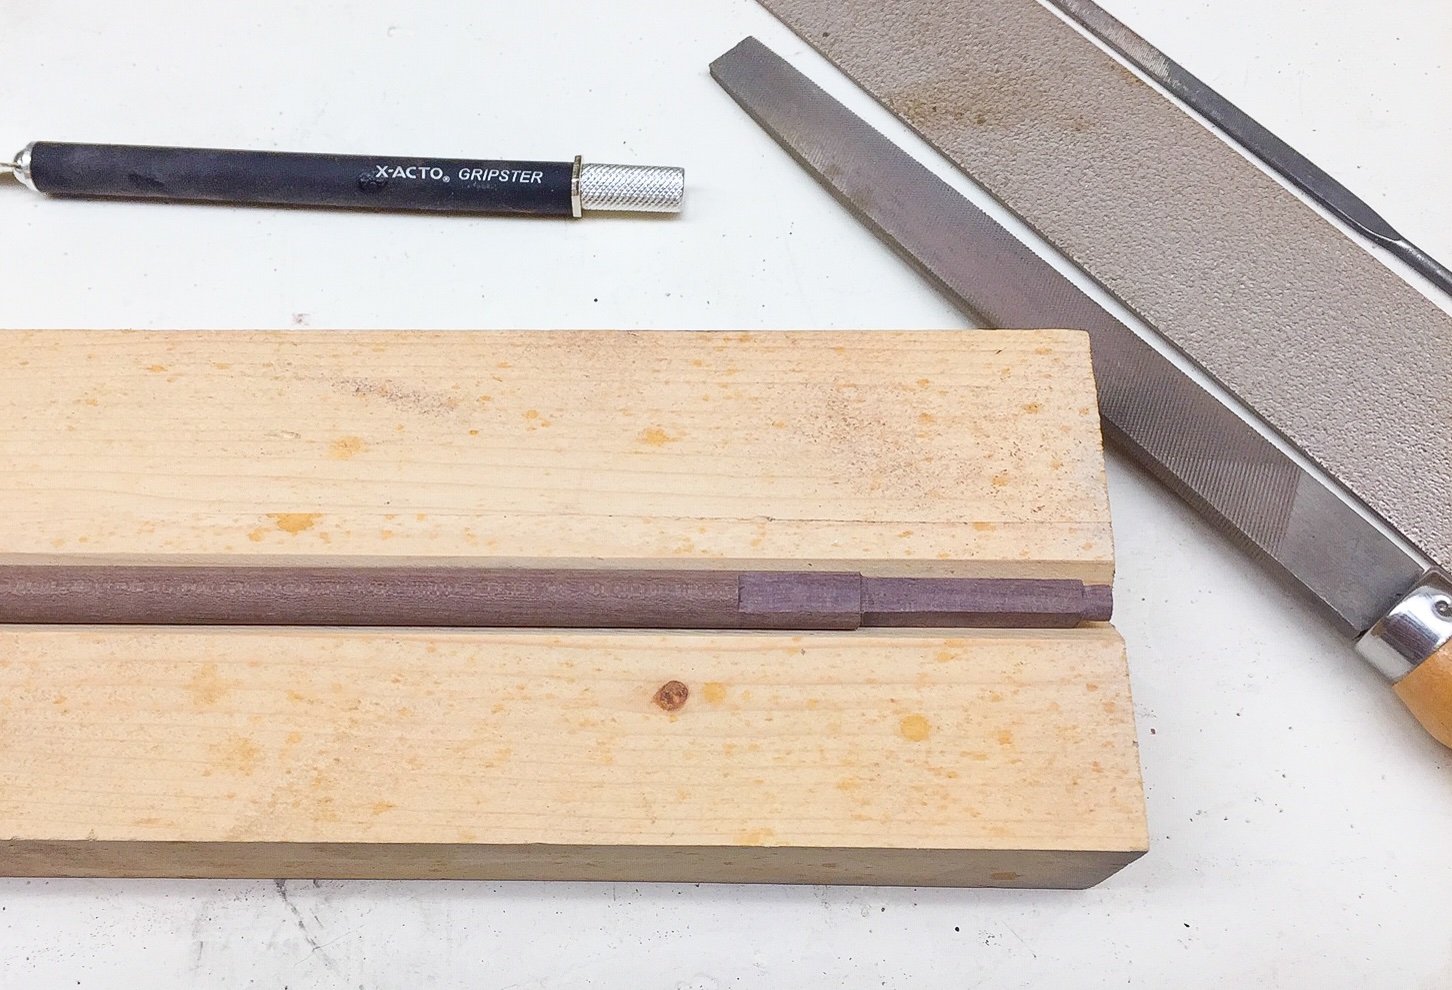
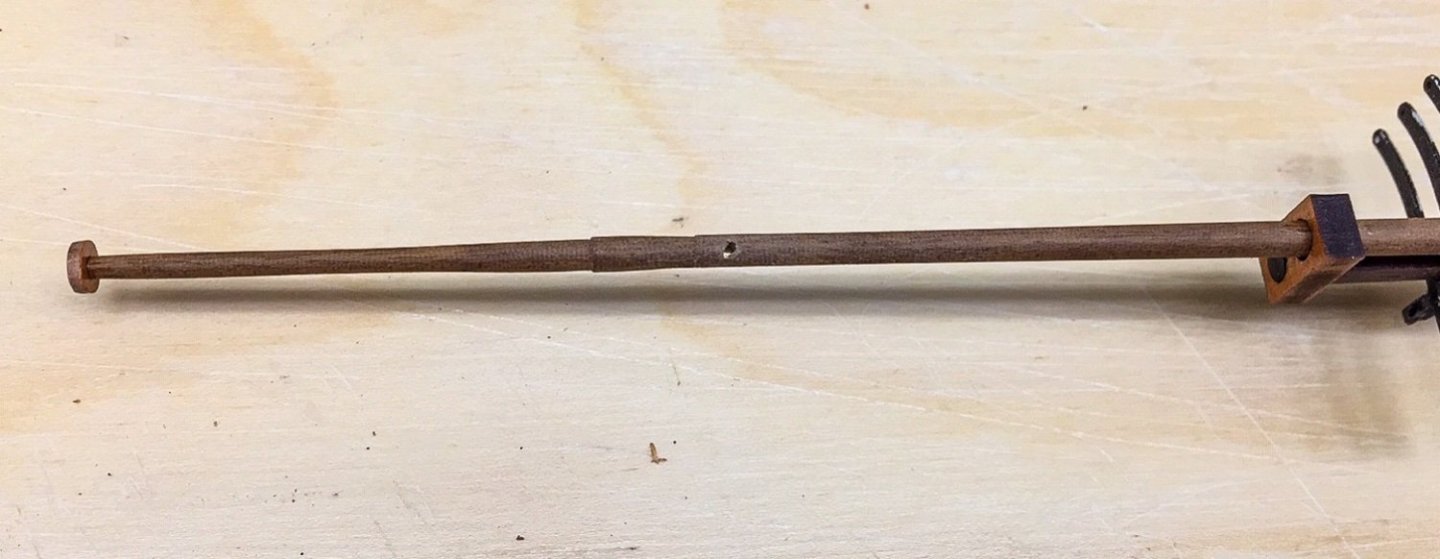
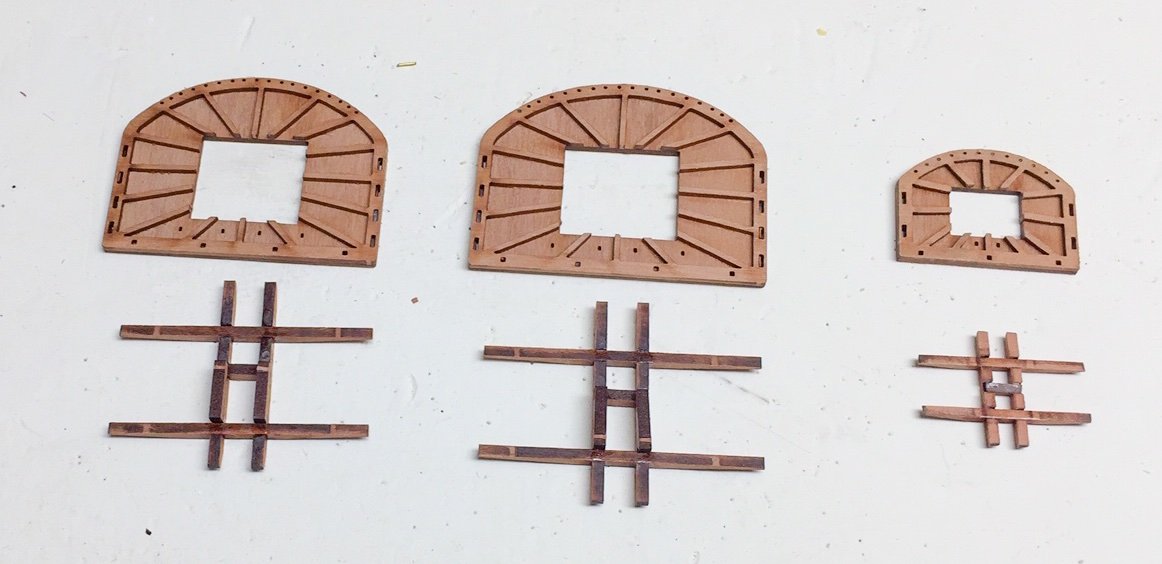
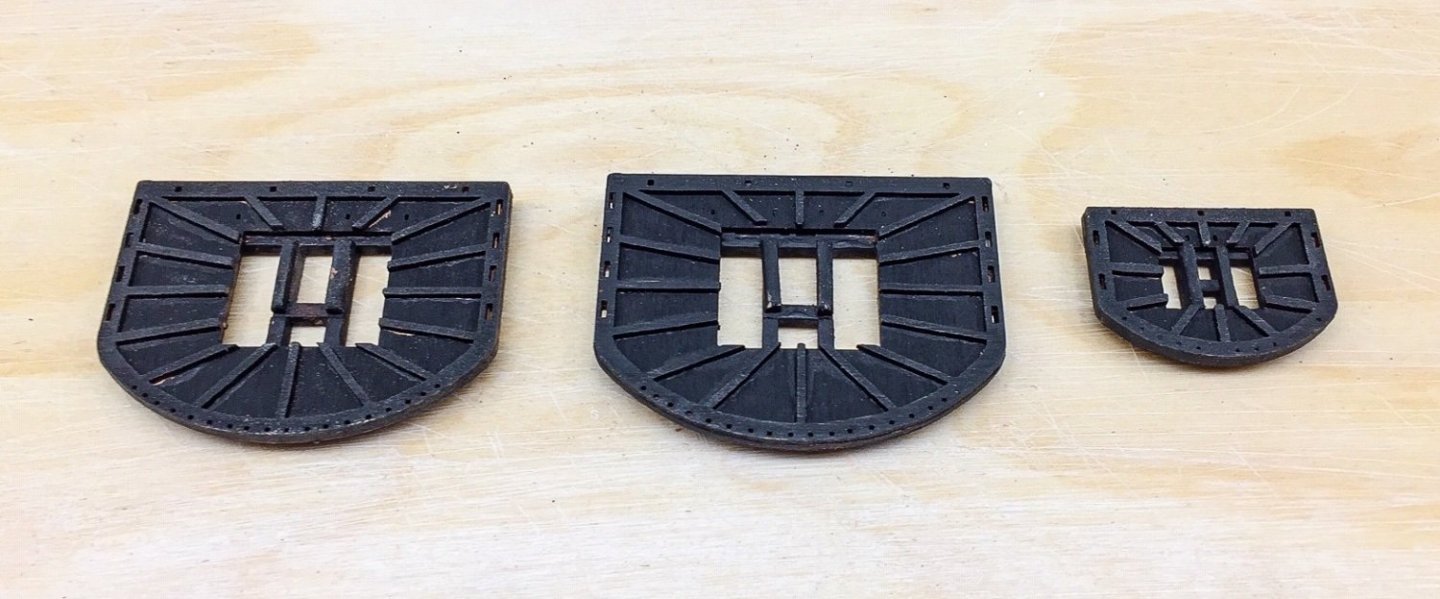
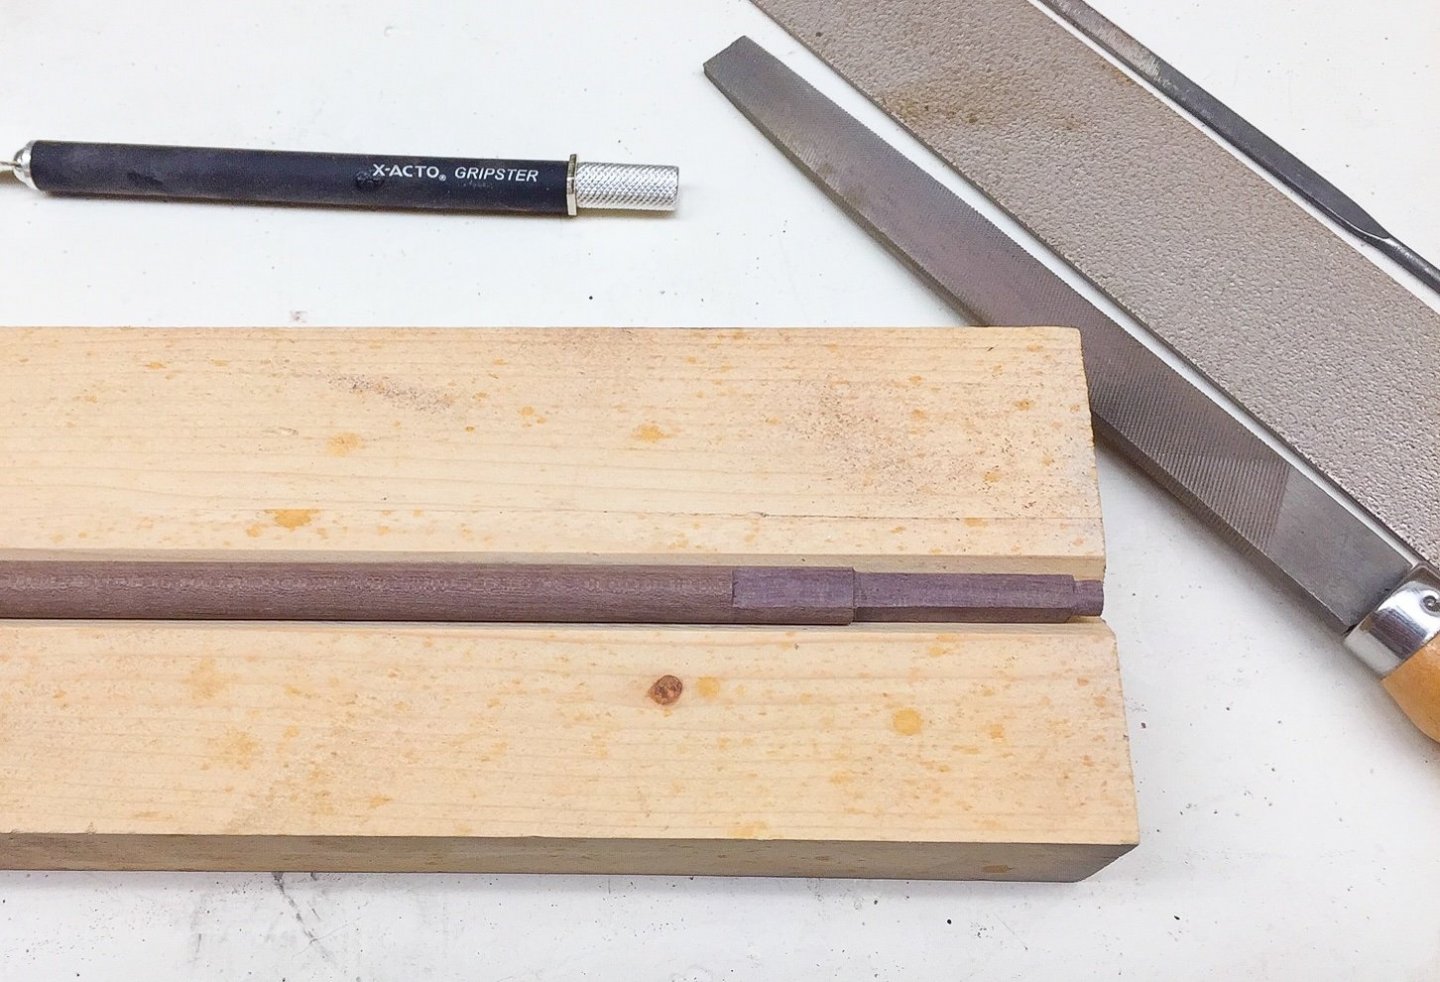
I started on the mast platforms and put on one thin coat of black. The laser cut parts made this fairly easy. And then I started shaping the masts. Started with the foremast. Since I mostly have hand tools, I'm shaping it by hand with files. I made a little block with a v-groove in it to hold the dowel and give me a surface that I could file parallel to.
-
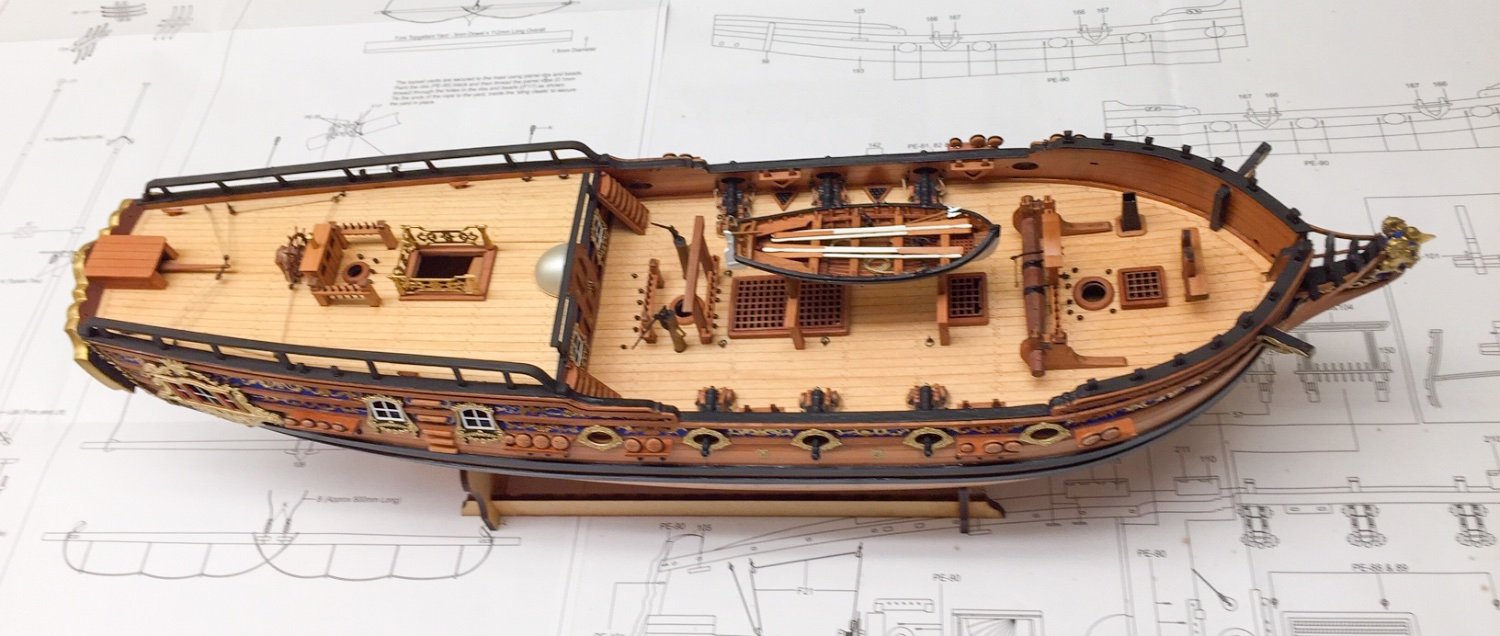
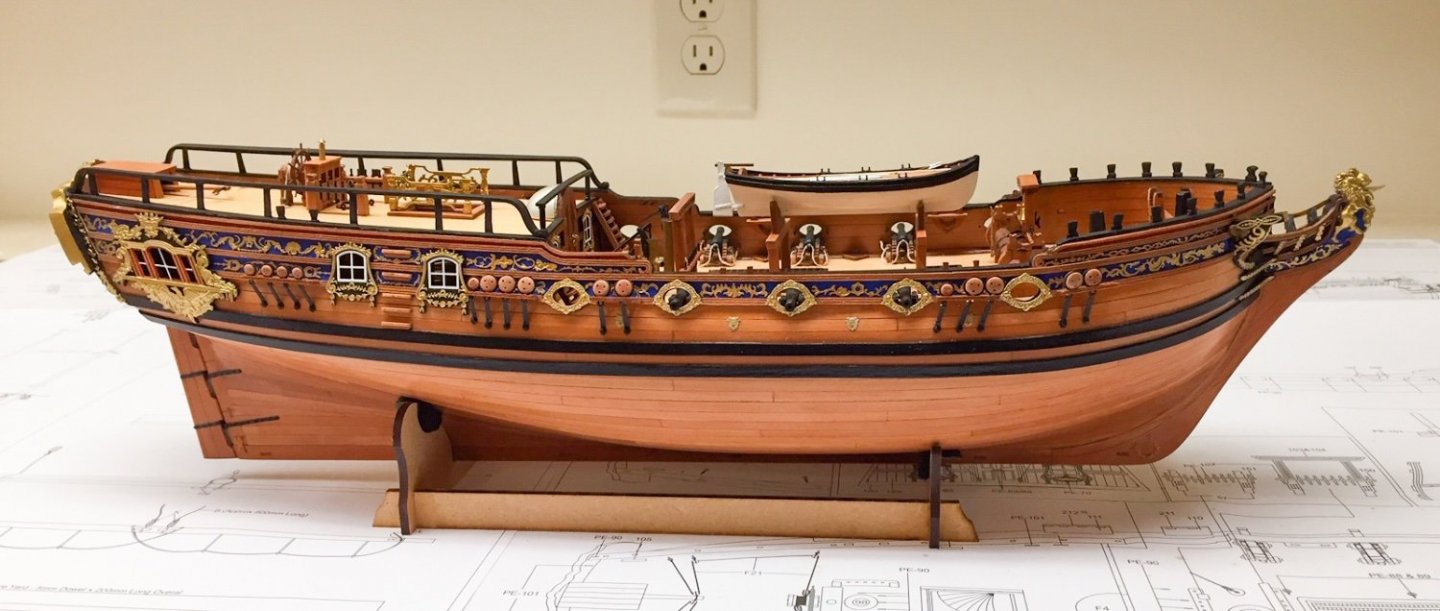
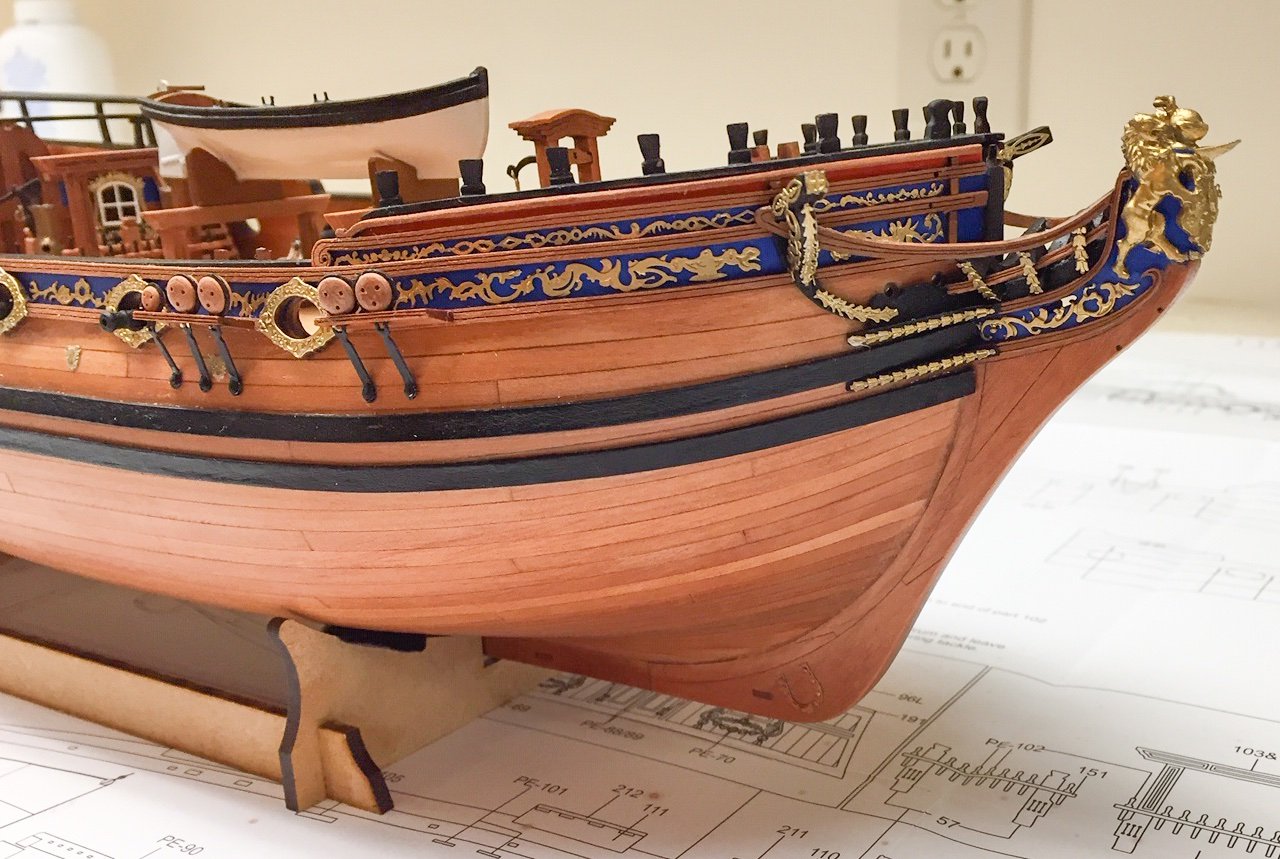
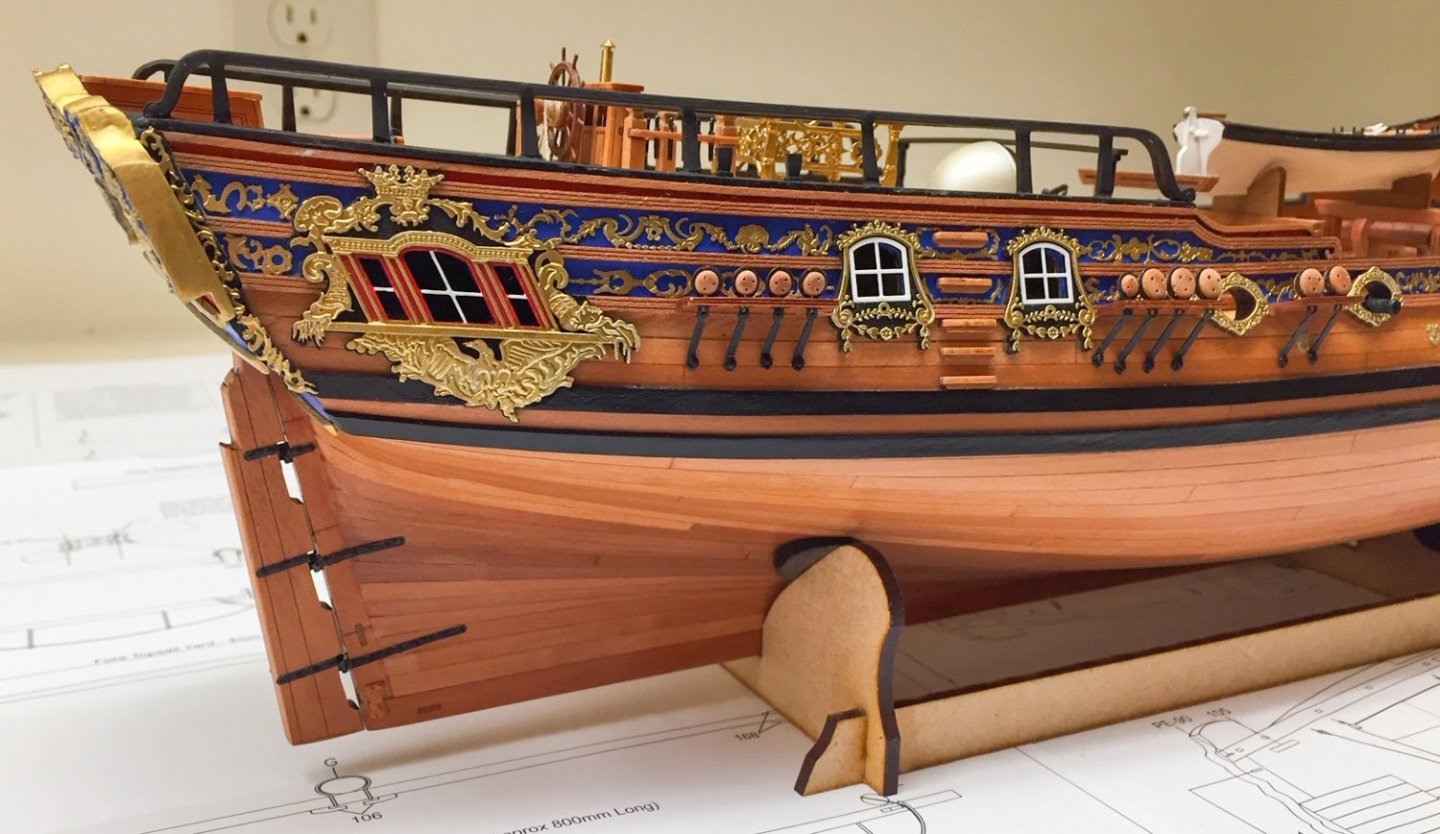
Since I'm at a good stopping point on the hull, I took some snapshots of it.


-
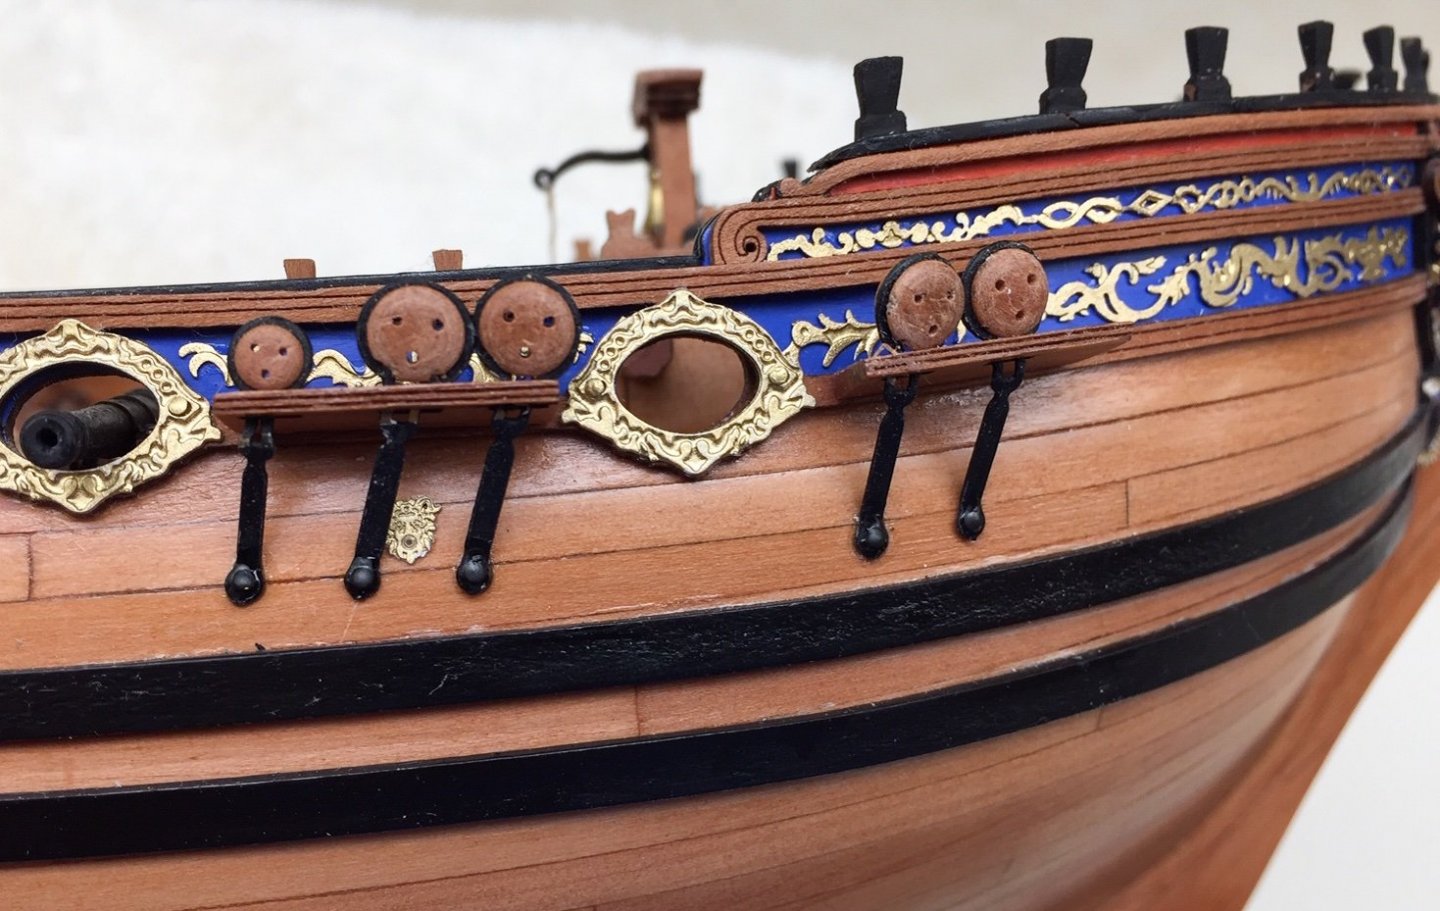
Thank you Yves, and thanks for all the "likes" by everyone else! It keeps me going. I just finished up adding the chains and deadeyes. No real problems doing this other than hoping I got them angled correctly. Here's a photo showing the first few that I installed. The masts and yards are next, so the hull will be set aside while I work on those. It looks like shaping the masts will be a bit of a challenge. It makes me think about buying some more tools.
-
I'm just getting caught up and echo all the previous comments. Unbelievable work!! It helps to see how the bow and especially the stern counter should be planked. I'll never get anywhere close to this good, but it gives me something to shoot for. I absolutely love the look of Alaskan Cedar.
- 840 replies
-
- 3
-
-
- winchelsea
- Syren Ship Model Company
- (and 1 more)
-
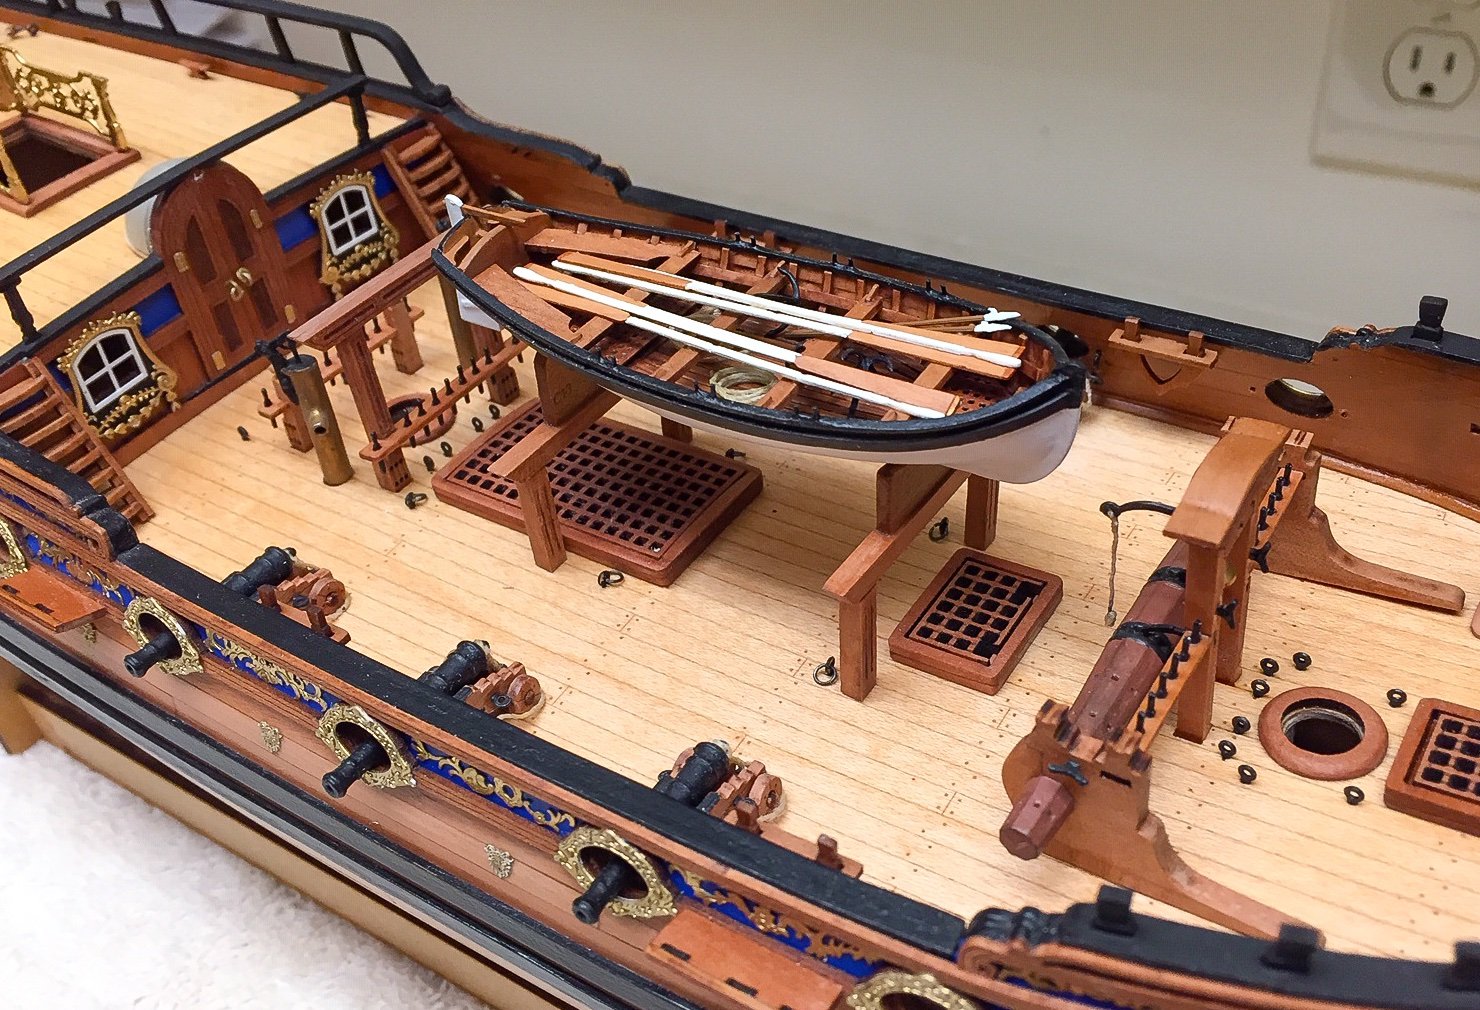
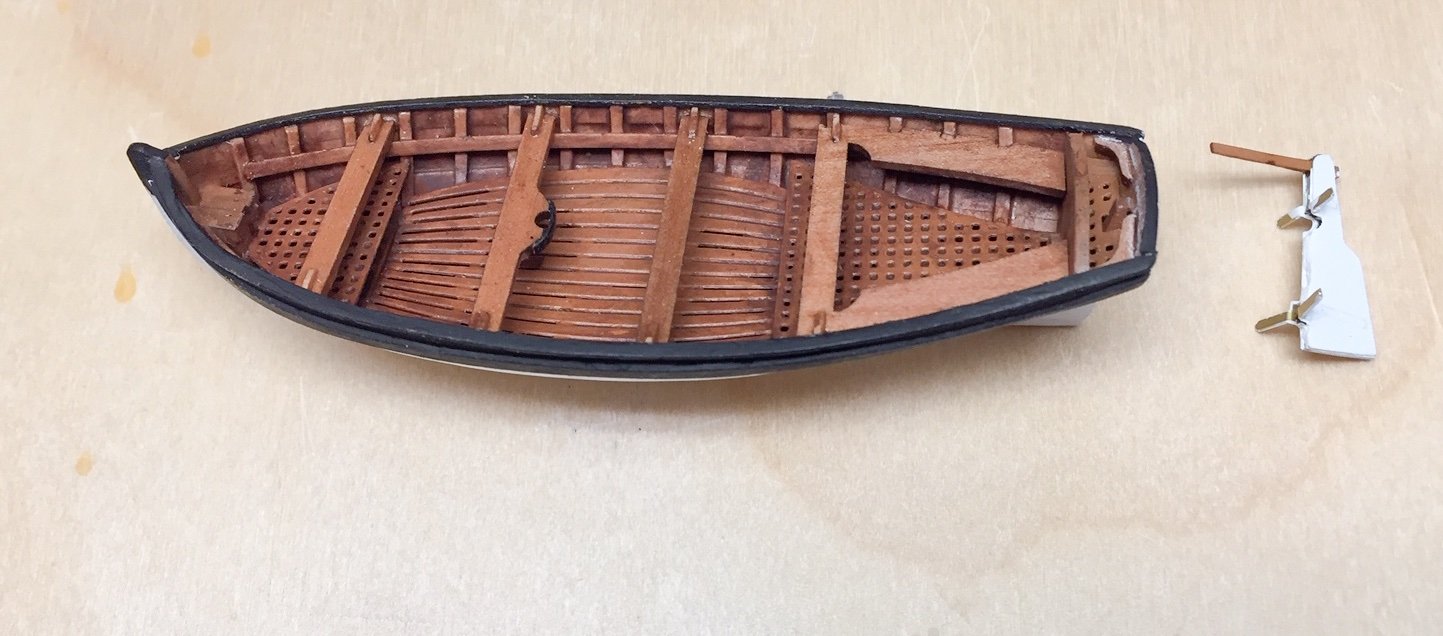
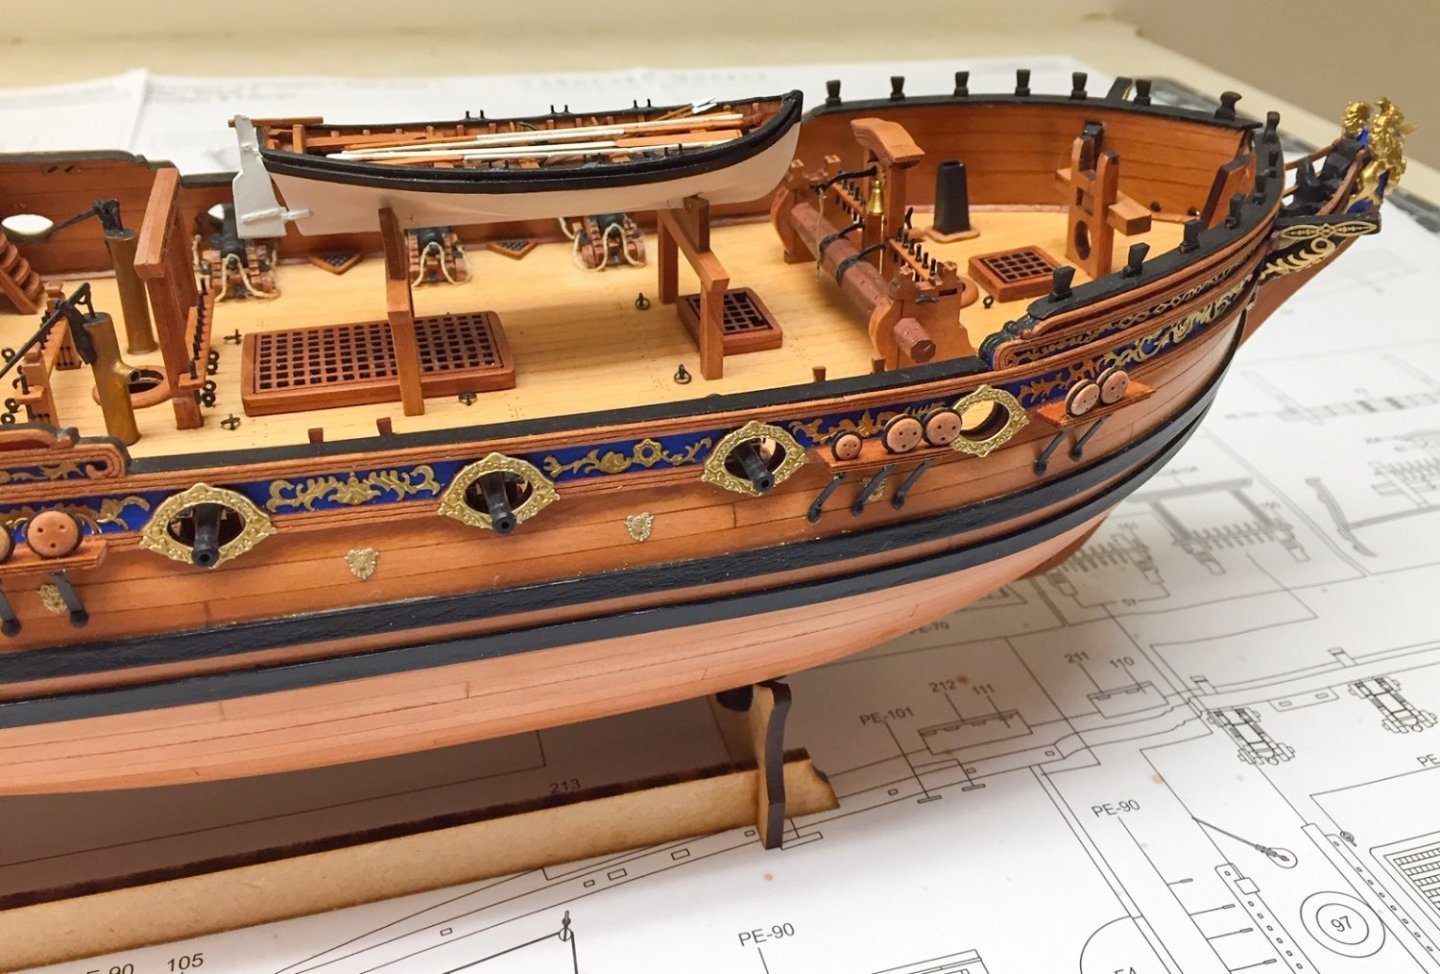
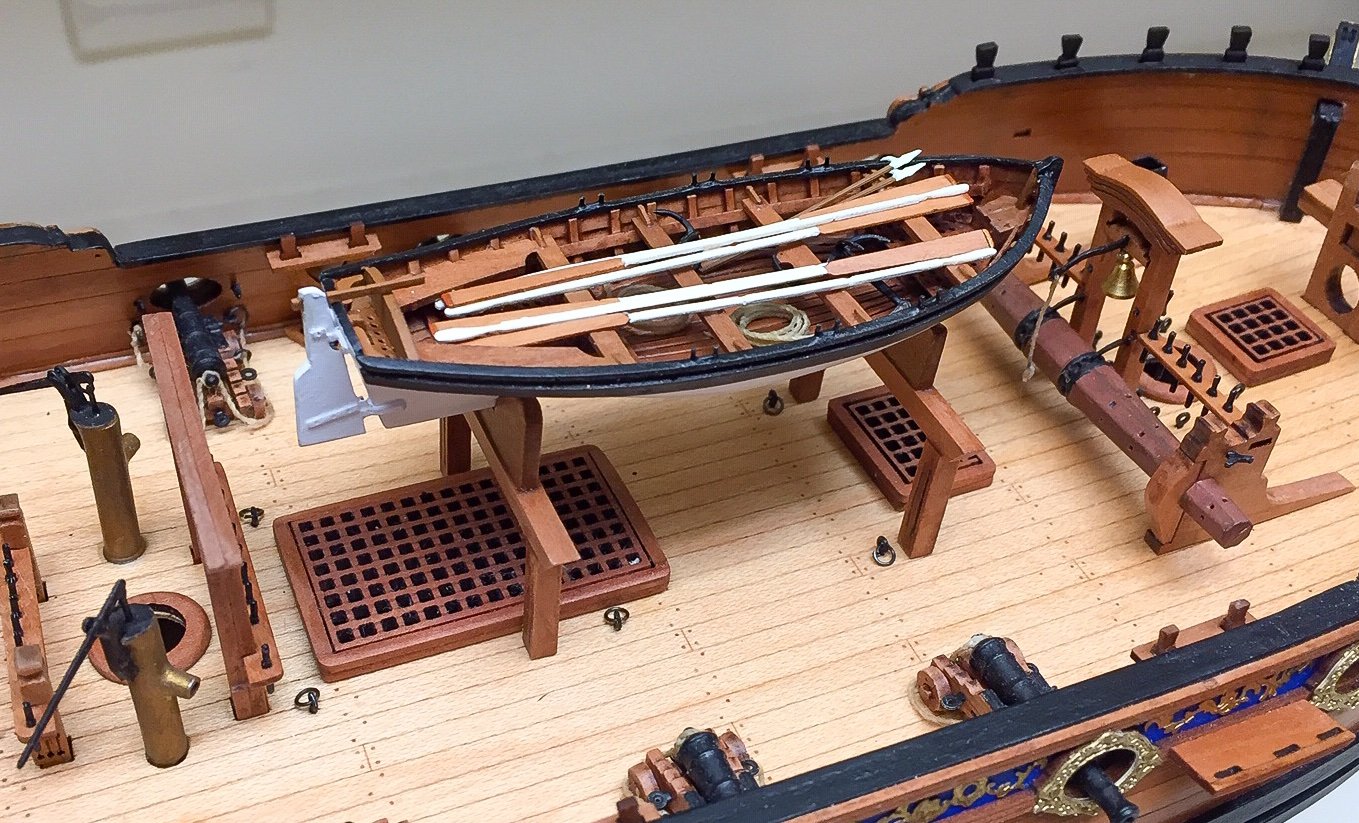
Here's a test fit of the ship's boat on the deck

-
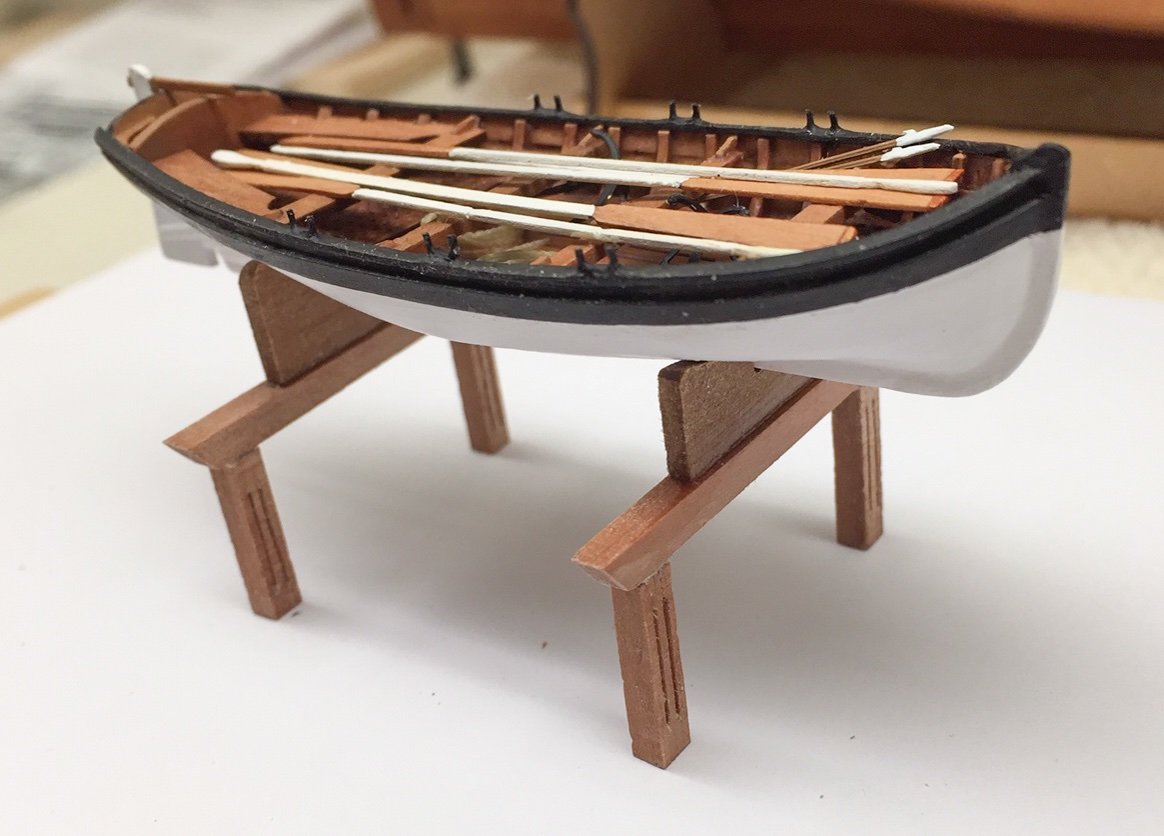
Thanks Glenn. This little boat has been a struggle. I think I'm done and have made some supports to hold it a little above the deck. I put all the accessories in the boat that were included in the kit, but started to get concerned it was too much. I won't glue it to deck for a quite a while, because it will be in the way. Now I'll be able to return to work on the Duchess. Here are some snapshots.

-
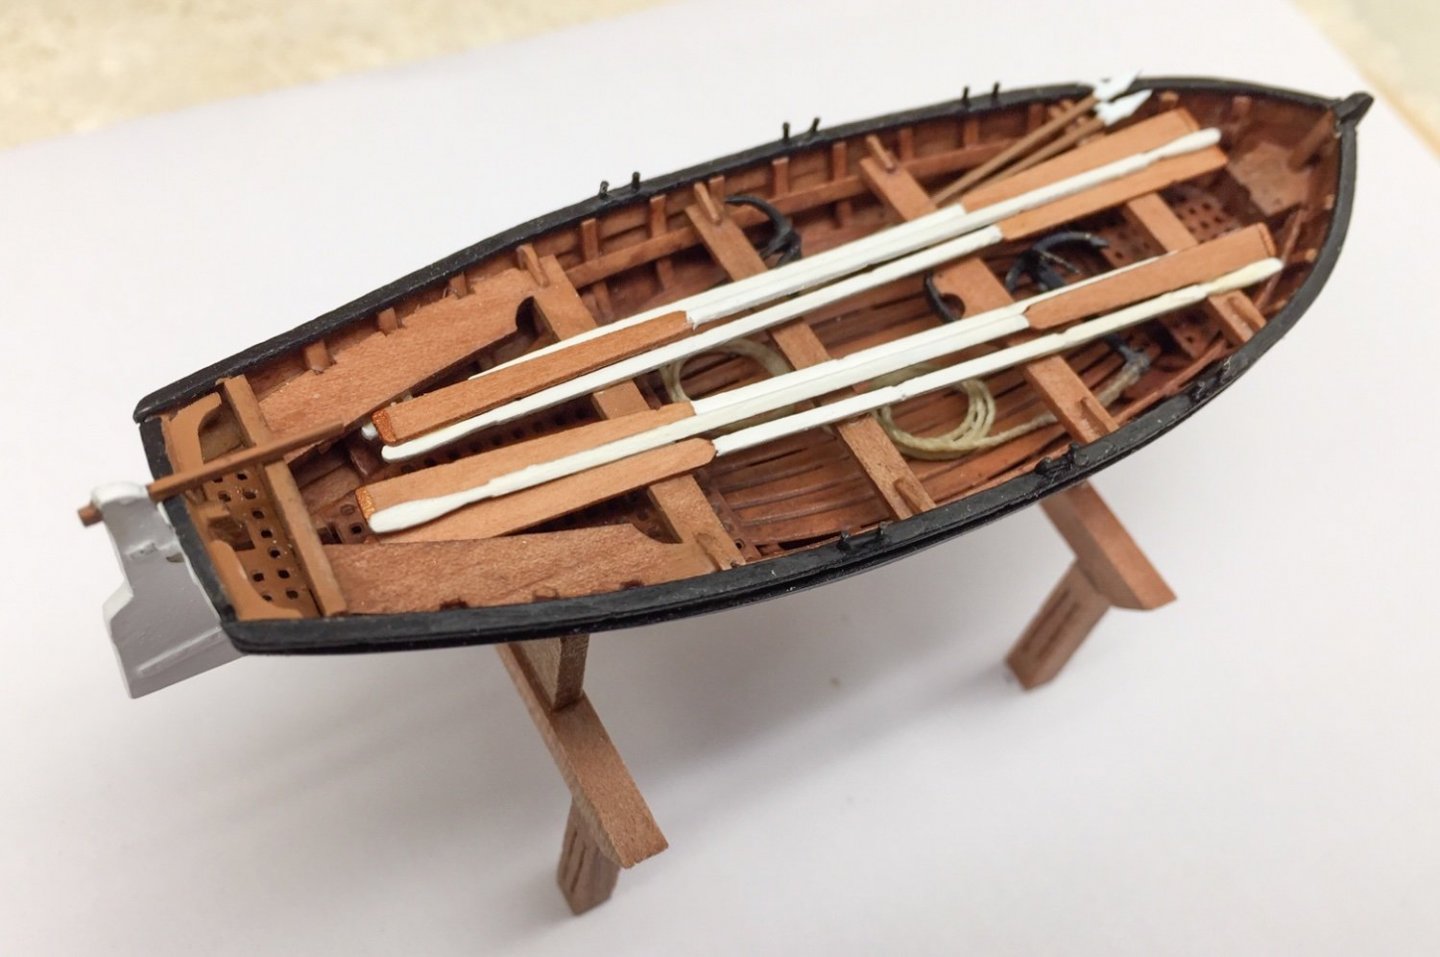
More progress on ship's boat. It's almost finished, so I'll be able to return to working on the Duchess. I'll add oars and a couple of grappling hooks. Plus there's some touchup and one oar lock needs straightening.

-
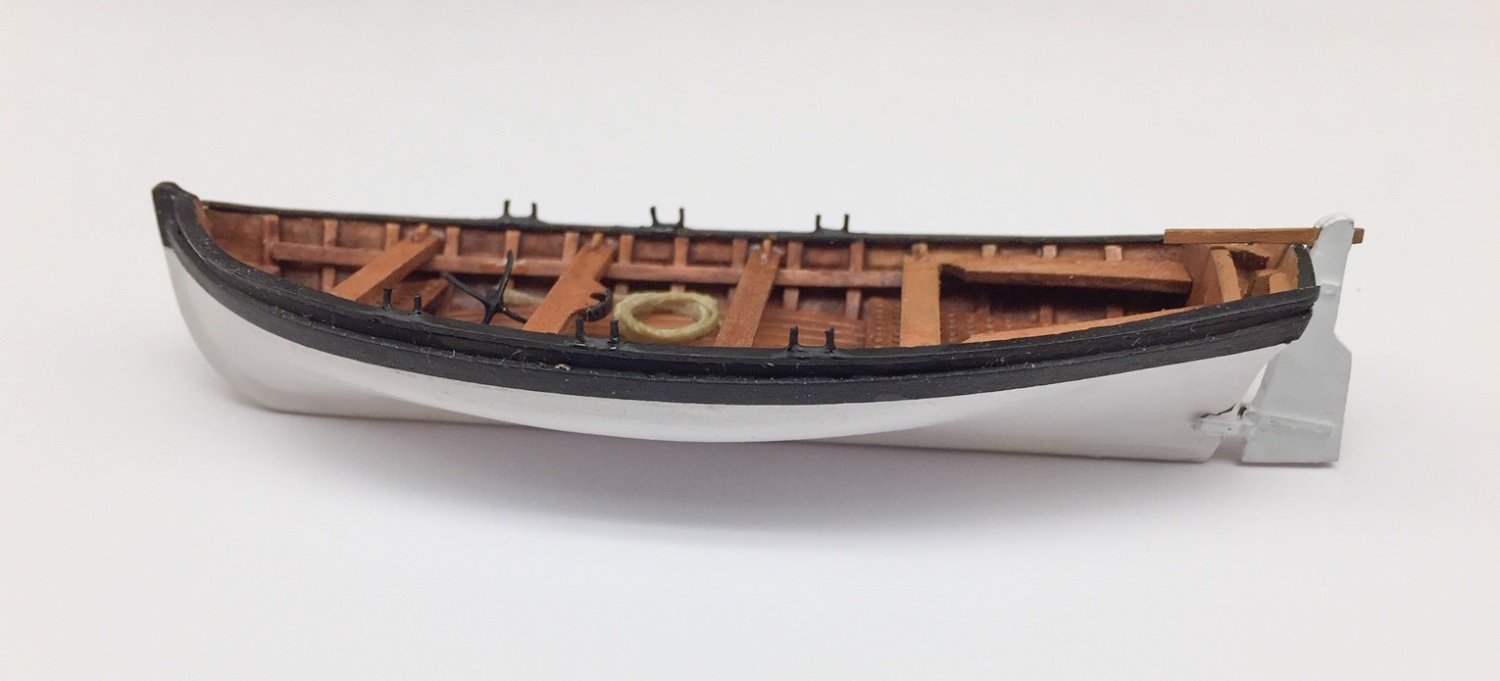
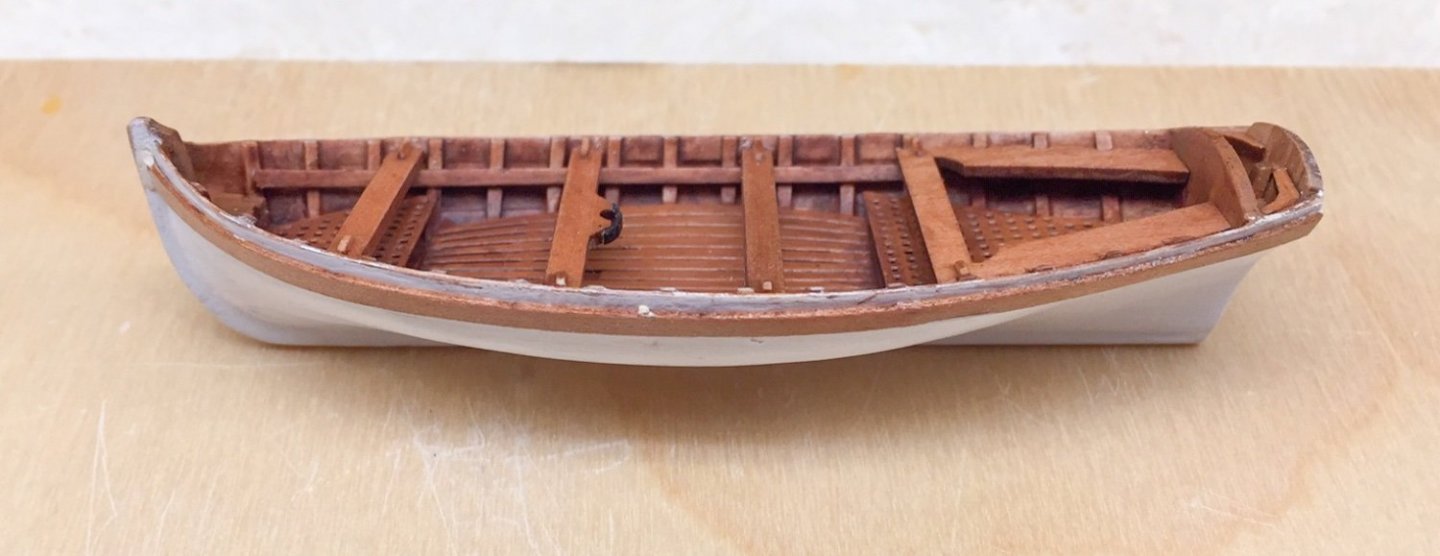
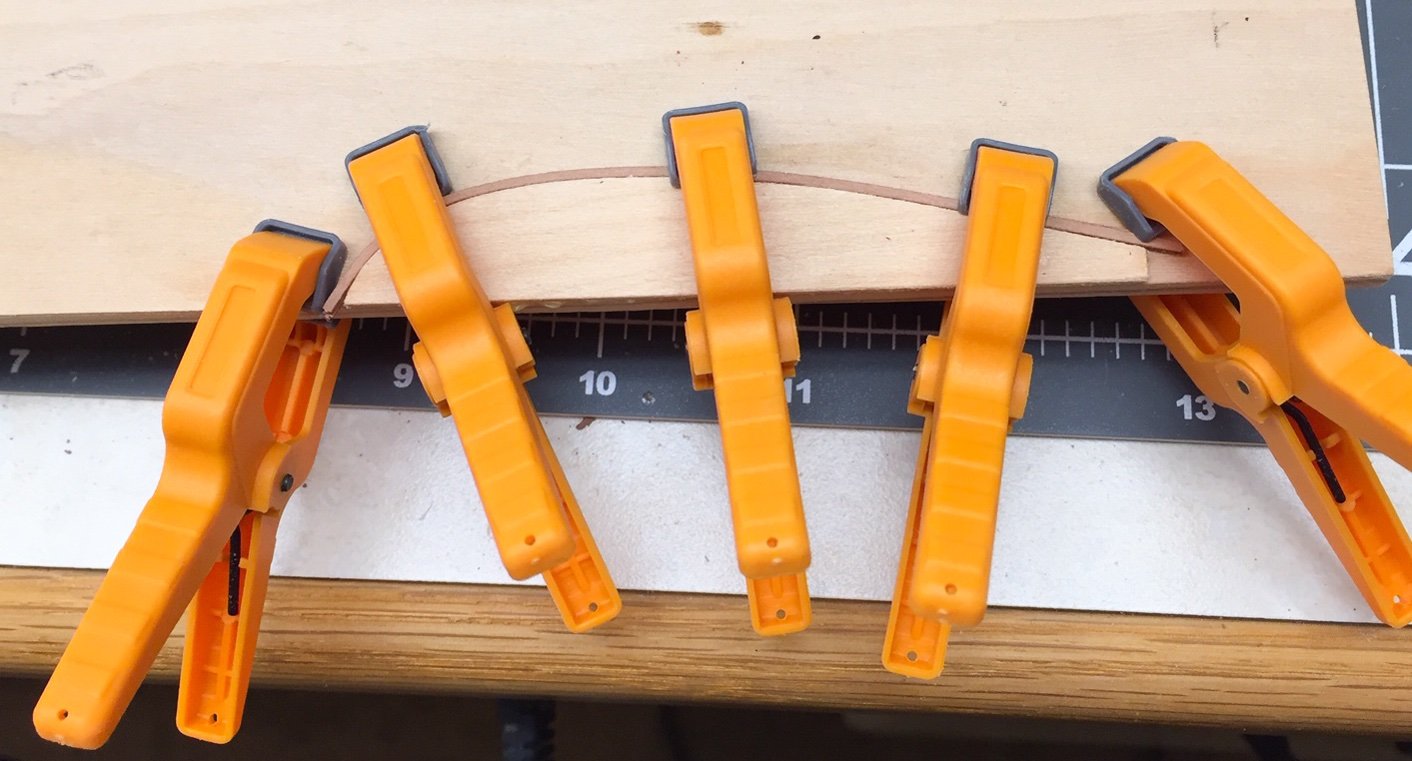
I've made some more progress on the ship's boat. Here are the seats installed: An extra plank is added to the hull for the wales. It will be painted black later on. As mentioned, I decided to add a cap strip or rail, so I took extra planks and edge bent them to fit the top of the hull planking. These were glued to the top edge of the hull and painted black. I also painted the top of the hull and wales black. At this point the ship's boat is finished except for the rudder and accessories (oars, anchors, etc.)


-
Awesome photos by both of you!! I do a little photography, but am very much an amateur. Have not tried much at night. Since I moved to Kansas, it's been mostly the zoo and gardens. It seems we have some common interests besides model ships. Thanks for sharing!
- 345 replies
-
- 3
-
-
-
- Duchess Of Kingston
- Vanguard Models
- (and 1 more)
-
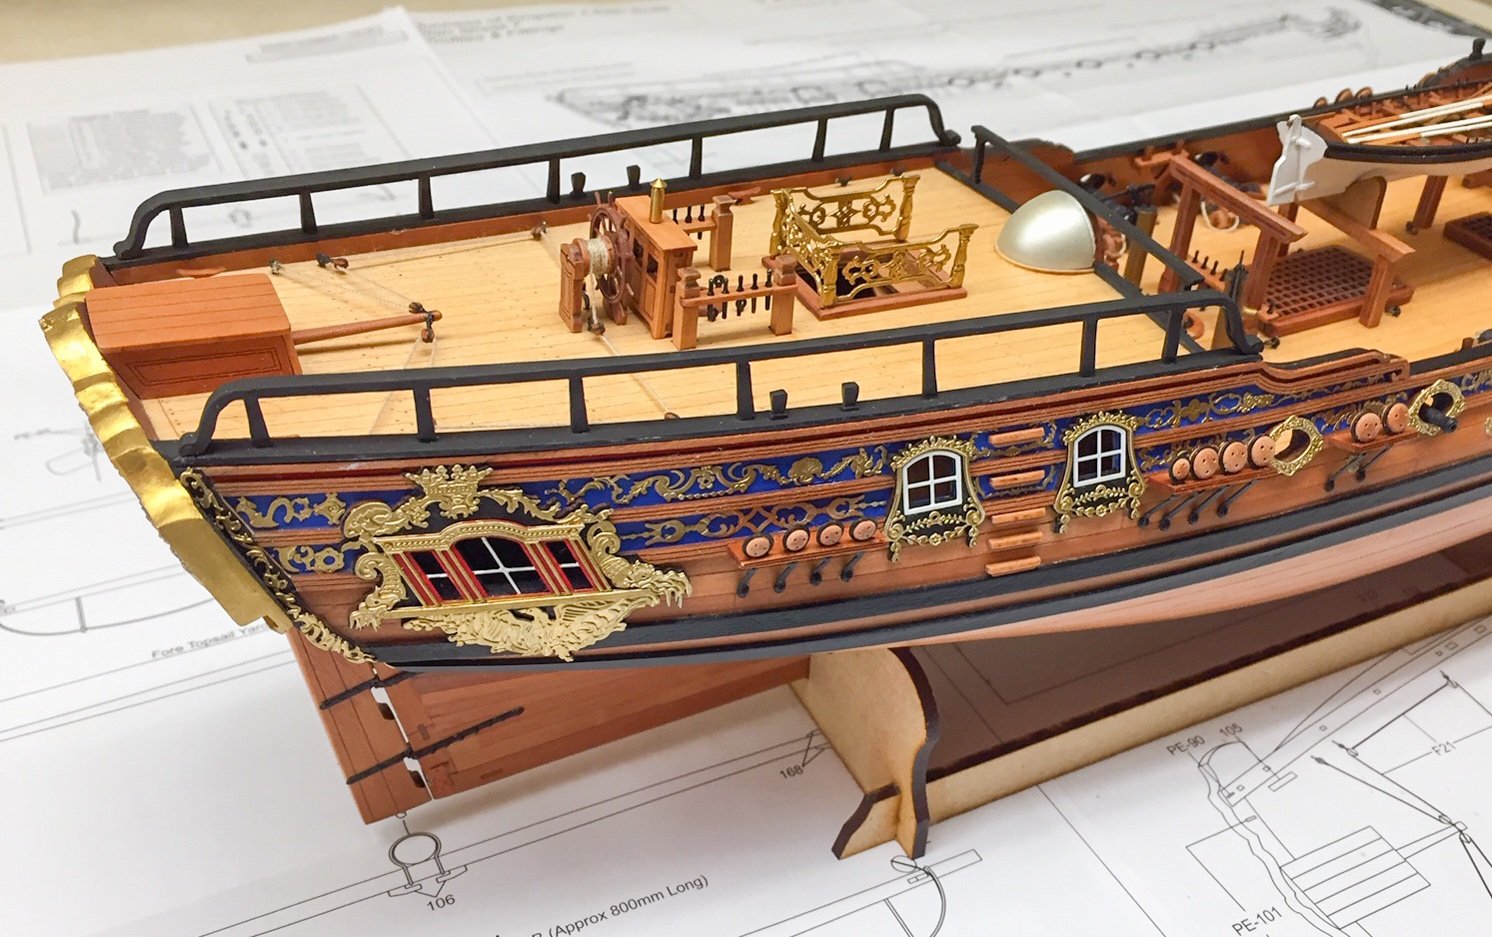
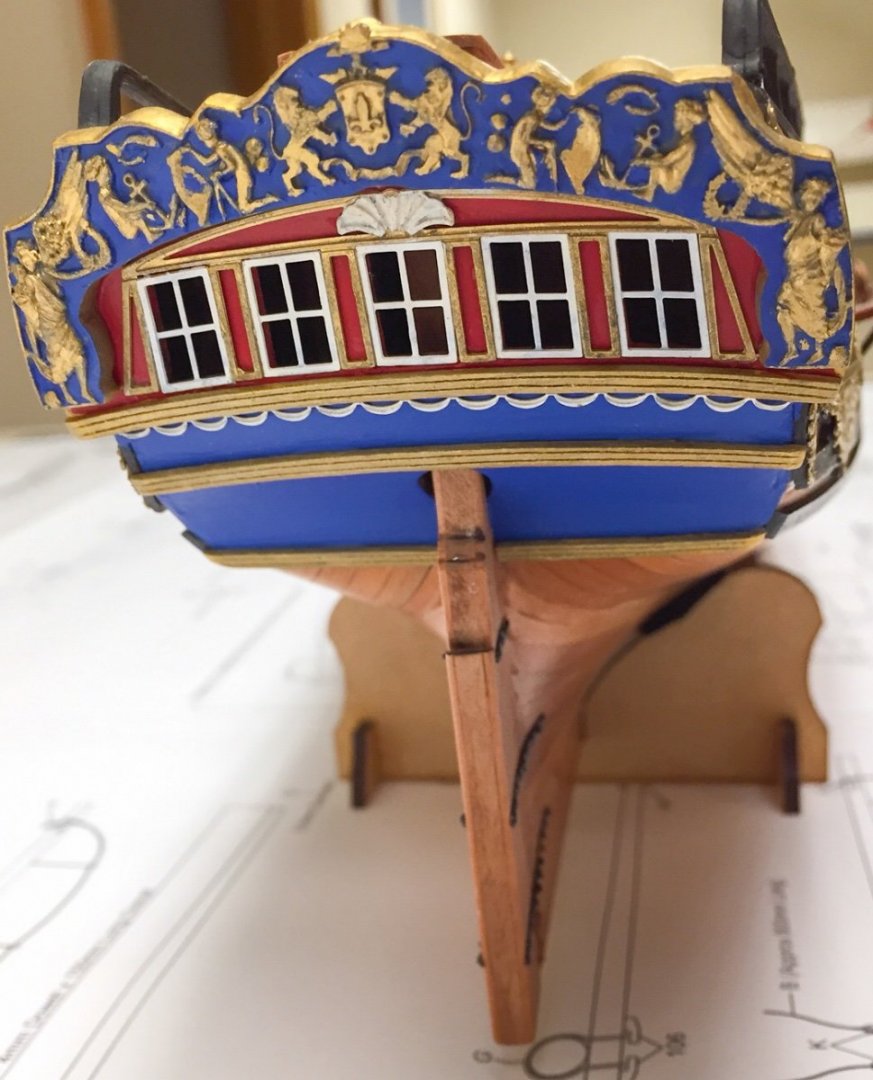
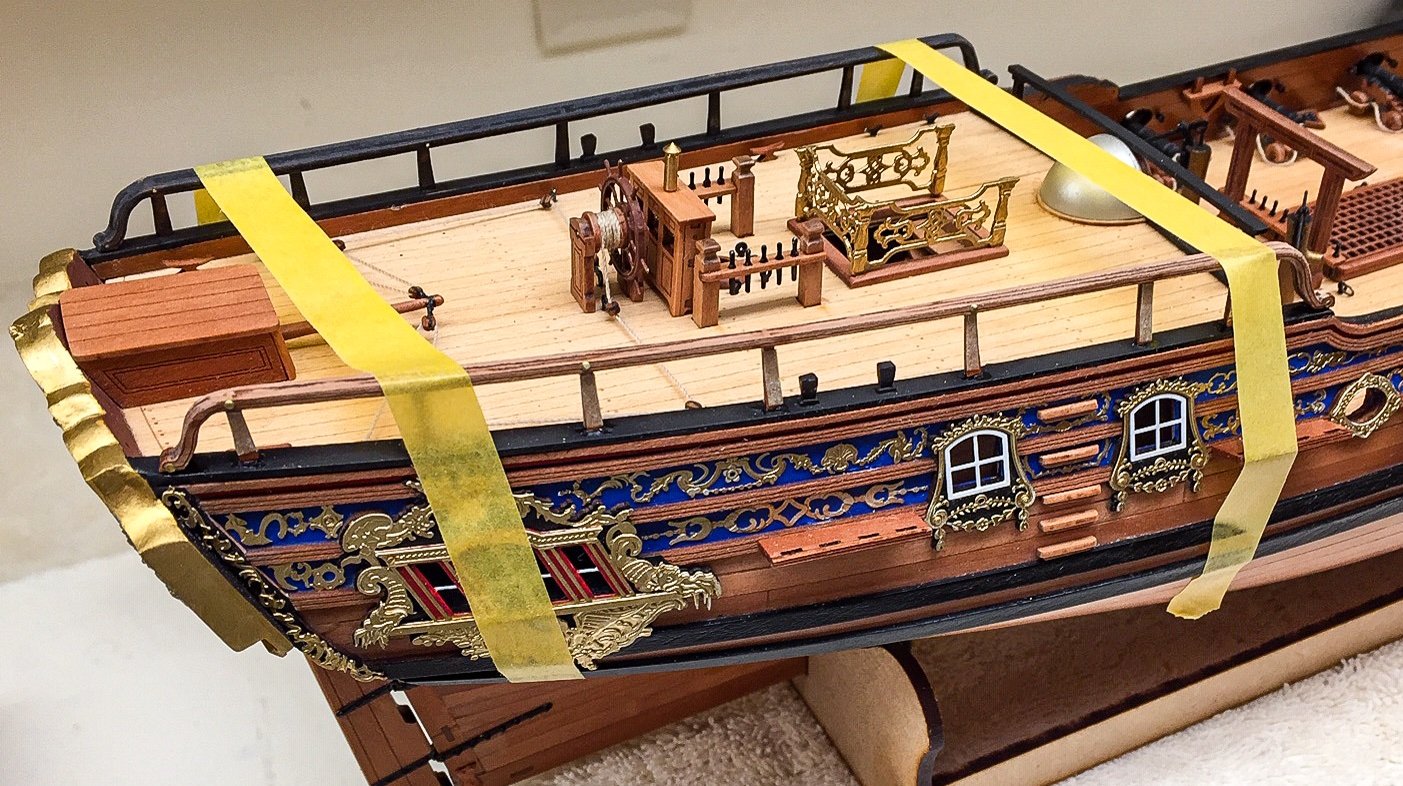
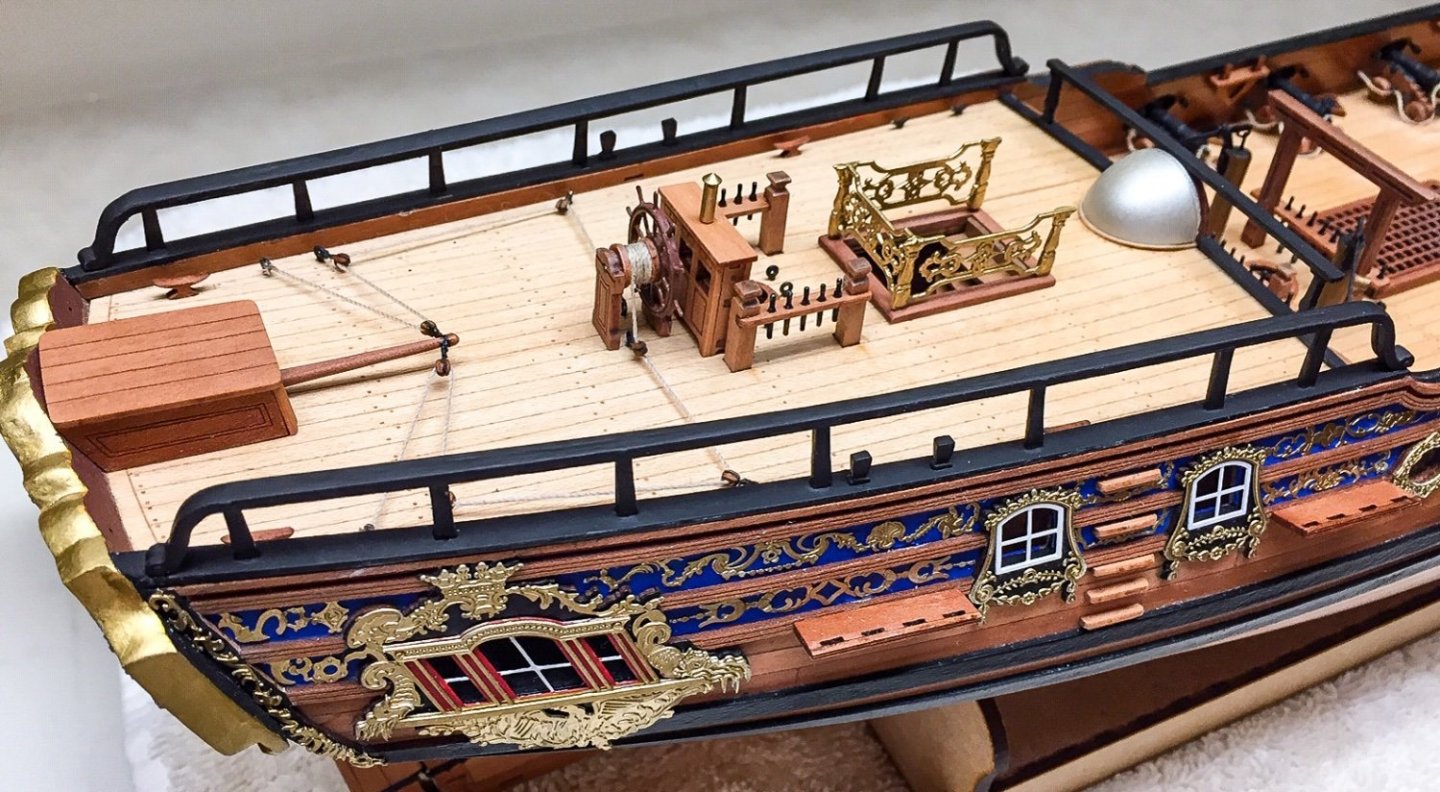
I finally got the quarterdeck side railings installed on the Duchess. This completes the basic hull construction other than the adding the ship's cutter. The rails were a struggle, mostly because the posts are extremely fragile. I broke several off even while trying to be very careful handing them. The wood grain runs the wrong direction on the posts, so there's all but zero strength. I tried adding thin paper to one side of the posts, but it really didn't help much, because they still broke at the joint with the horizontal rail. I ended up having to glue things back together a number of times. It might have been better to redo the posts with wood grain going vertical and slot them into the horizontal railing. I had to put a slight curvature into the rail to match curvature of the cap rail and get it to fit. I used the hot air gun approach and let it cool overnight which worked ok. I fit the rails so the posts were parallel to the side of the hull, which means they are canted inward a little. This seemed the natural way to install them. If installed vertical, they looked odd and didn't fit right. Once I got one of the rails fitting, I glued it before anything moved. As you can see, I used tape to hold it in place. There is a post or two missing. I fit those back in after the glue dried. I was constantly breaking them off. Here's the other side rail installed. It went a little easier because of my experience with the first side. And here they are installed and painted.

-
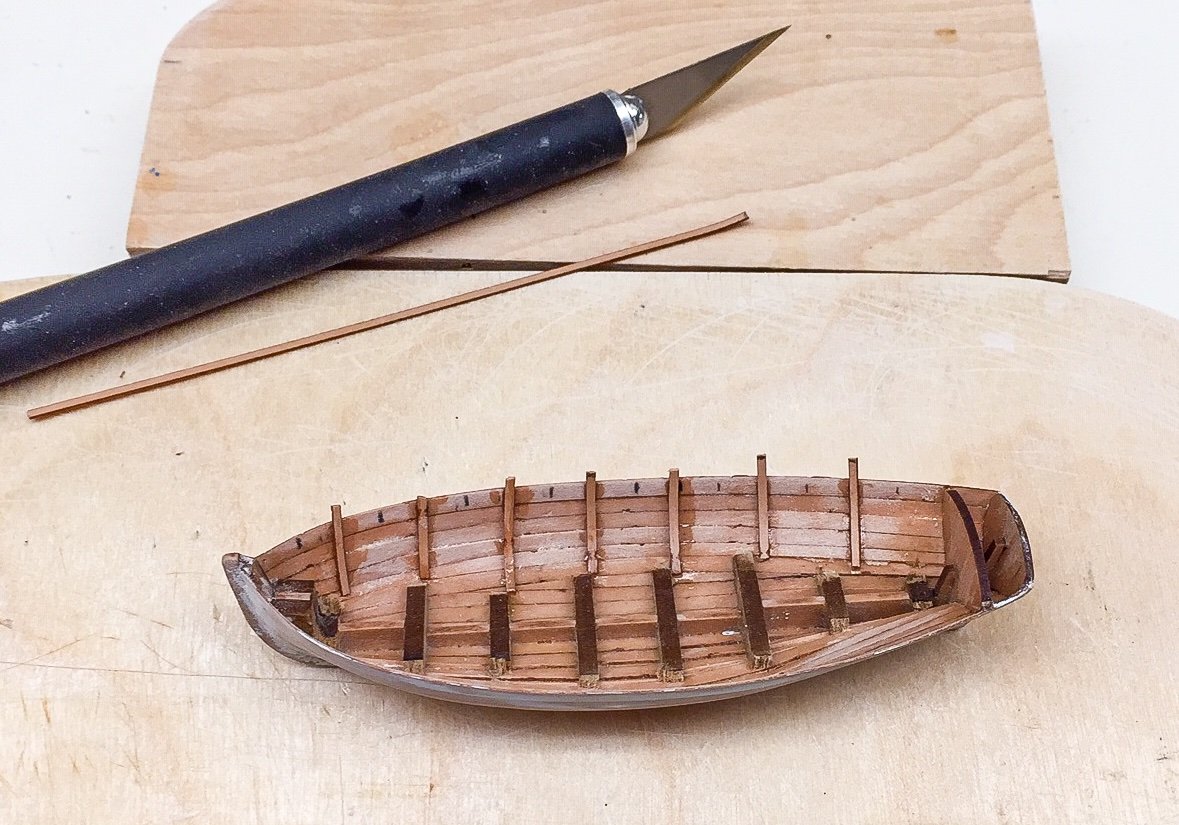
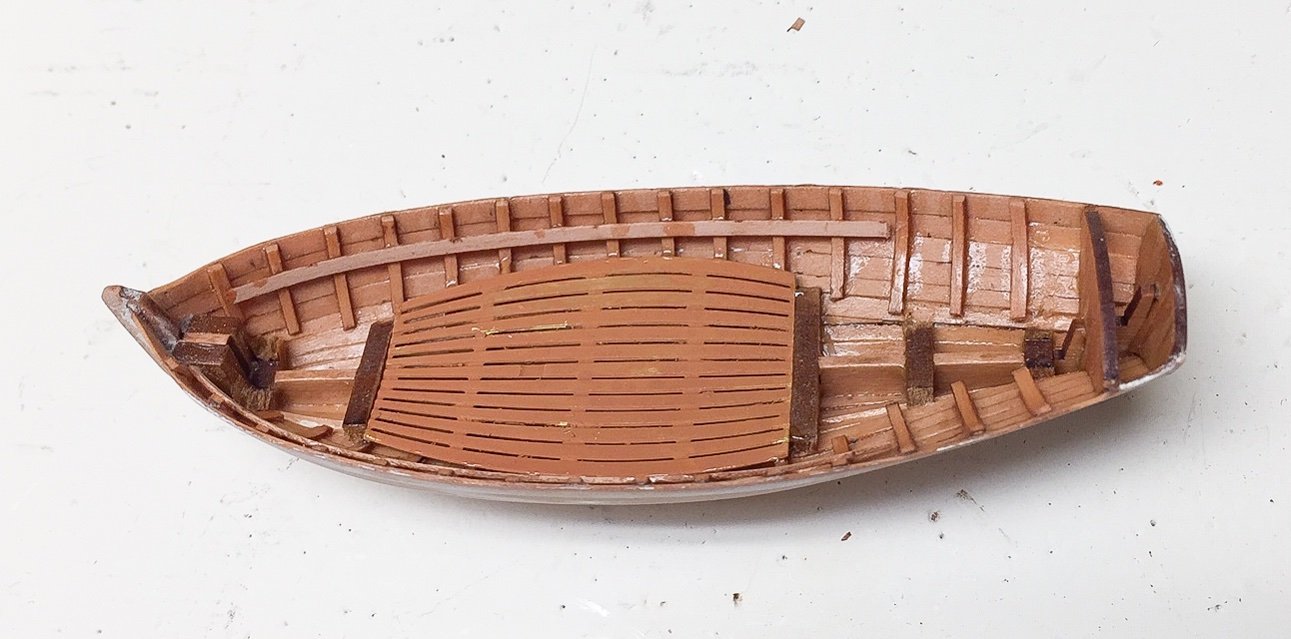
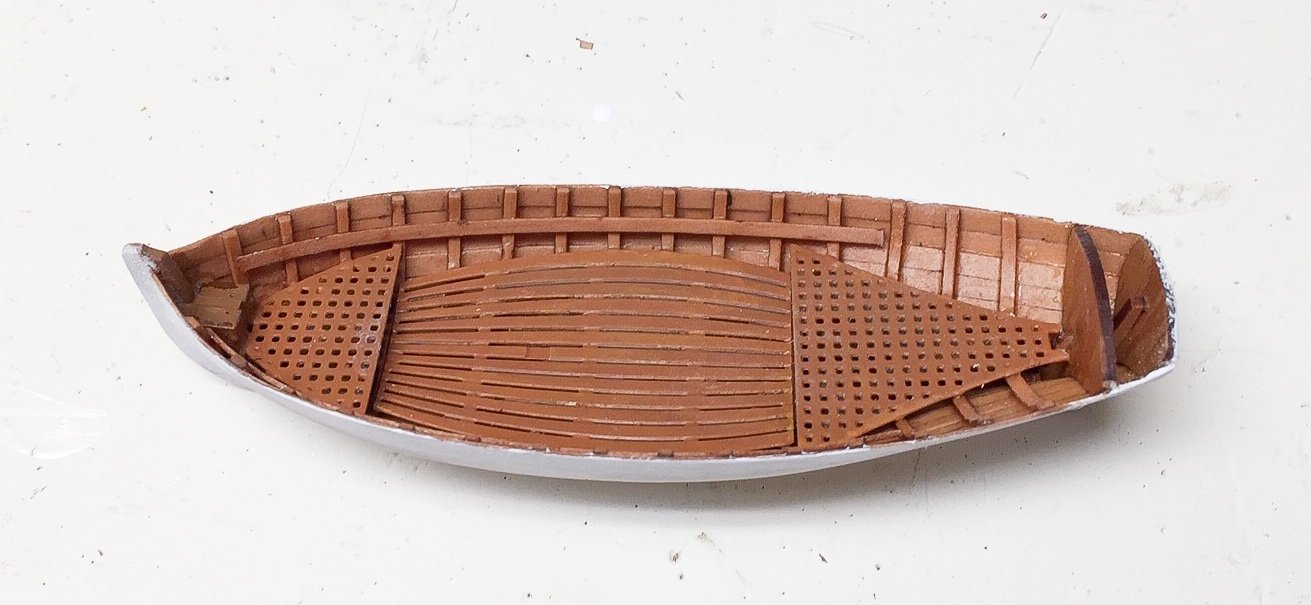
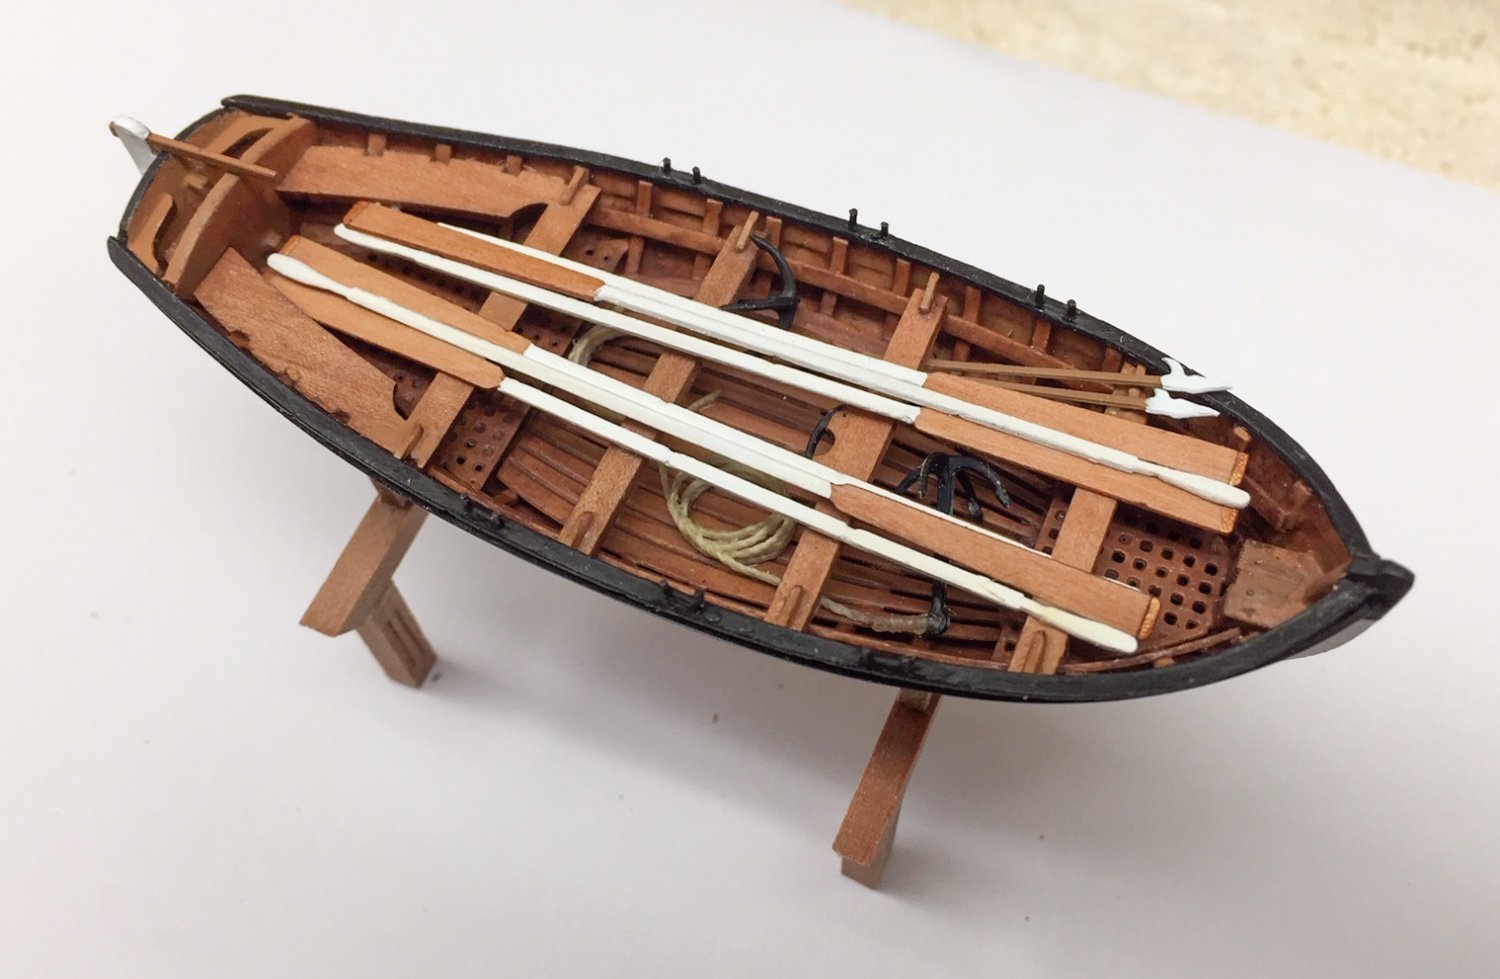
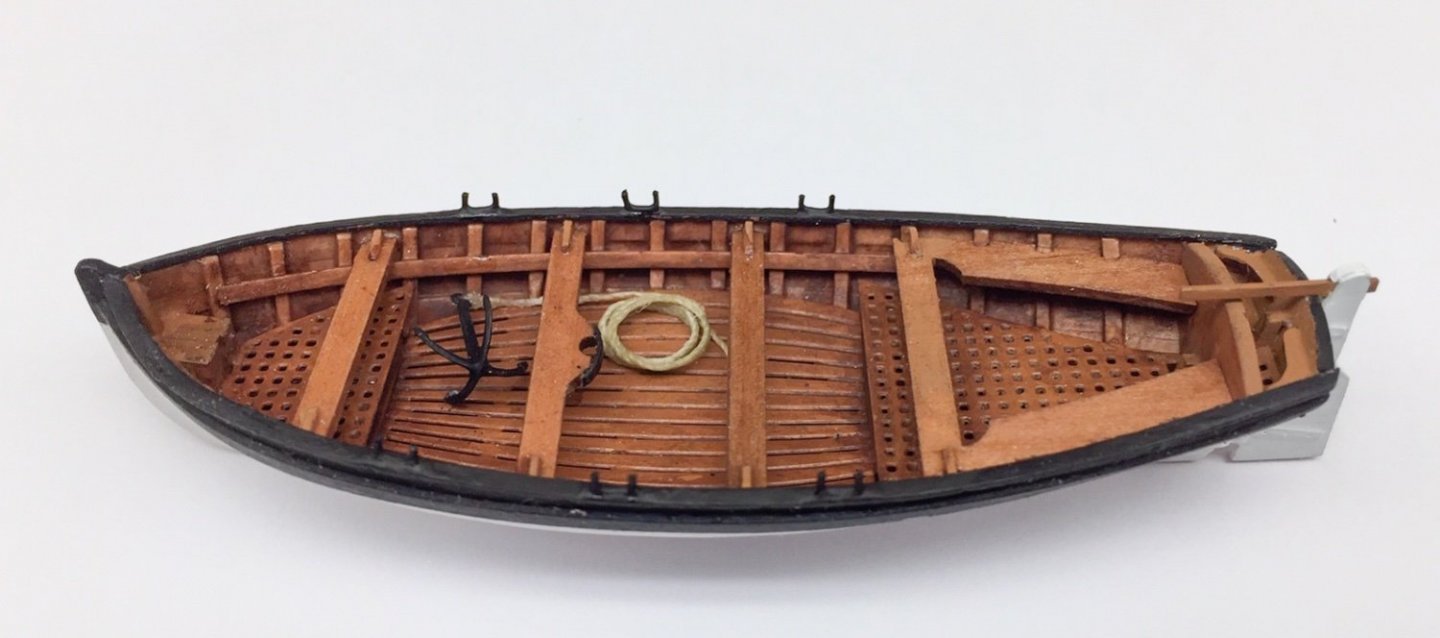
I took a few weeks break. The past week I got going again, mostly working on the ship's cutter that I'm adding to the Duchess. I've mostly been struggling with the small size. The next step was to add simulated frames or ribs to the inside of the hull planking. The only problem was to get them straight, parallel to each other, and spaced evenly. I measured where they should go at the top, and then did the rest "by eyeball". The result is they are not perfect, but good enough for government work as they say. Here's the first few glued in. I put in every other rib at first, and then added the ones in between. Here's some more added. I didn't worry about the CA glue marks because I planned to put on a coat clear matt acrylic. After all the ribs are in place, seat support "rails" and the floor planks are added. The floor planks are photo-etched, so you have to paint them to look like wood. I used Vallejo acrylic and mixed a color close to what the hull planking was. It was mostly "light brown" with a dab of "red leather" and a dab of "brown leather". At some point I may add some weathering powder to make it look somewhat used, and perhaps more wood-like. The photo-etched floor boards are easy to install, much easier than putting in your own planking, especially at this size. If it was a little larger and easier to work on, I probably would have opted to plank the center section with wood. Here is photo showing the seat support rails and the center floor board piece glued in. In the next picture, bow and stern floor gratings have been added, and everything has been given a coat of clear acrylic. The clear coat cleaned up all the excess CA that makes the other photos look messy. One thing I should note is that the instructions do not include drawings of the boat. They have a lot of photos, but there have been times when I wasn't quite sure where things went. A side view and top view would have helped clarify matters. I used the photos and where parts seem to fit best, and I think I figured it out ok.