HOLIDAY DONATION DRIVE - SUPPORT MSW - DO YOUR PART TO KEEP THIS GREAT FORUM GOING! (Only 20 donations so far - C'mon guys!)
×


desalgu
-
Posts
363 -
Joined
-
Last visited
Content Type
Profiles
Forums
Gallery
Events
Everything posted by desalgu
-
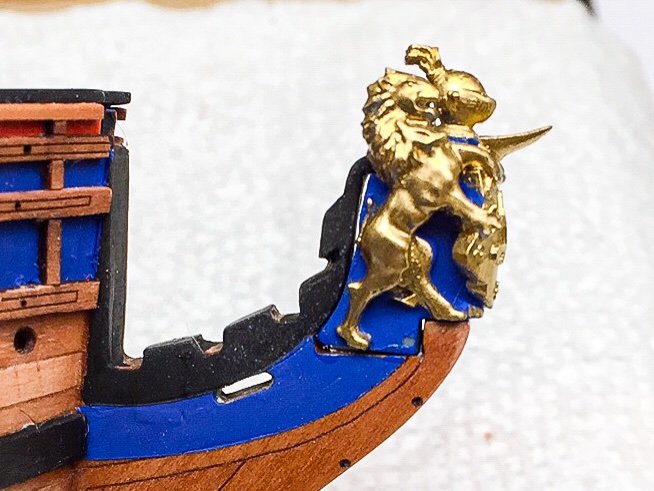
Glued the figurehead into the stem. It fit ok, but there are small gaps I'll have to fill in which you can see in photo. I'll do this before proceeding with rails and other bow structure.
-
I decided to drill a small hole in base of figurehead and glue in part of a toothpick to act as a handle while I painted. It worked real well, so I'd recommend it. After painting I could clip it in a clothespin and set it on the bench to dry. Here's photo of figurehead after painting. I went thru quite a few iterations touching up, and finally felt like I wasn't really improving anything. Closeup photos aways showed a problem of some sort. Often I fixed one problem and created another. After getting tired of this, I decided I'd done the best I can. I have what I think are very small brushes, but needed even smaller ones for the touchup work.
-
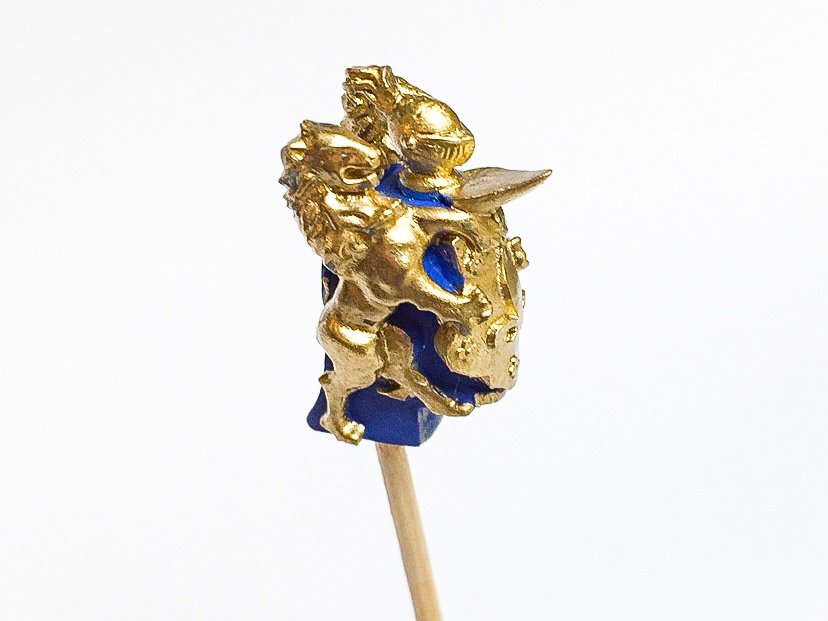
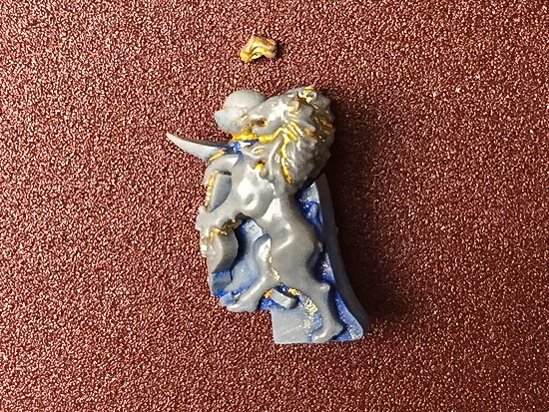
I've been fighting the figurehead a little bit. A suggestion for others...the figurehead consists of two pieces that you glue together. I'd recommend test fitting the main part of the figurehead on the bow before you glue the top piece on. The top piece is a helmet and plume, and the plume breaks off real easy as I discovered. I was test fitting the figurehead, and it didn't fit very good. In the process of handling and filing, I managed to break off the tiny plume. Fortunately it came off in my hand. A 2nd suggestion is to test fit the figurehead before you paint it. I tried painting it first, but after handling it a lot during fitting, a lot of paint rubbed off, so I ended up cleaning it off best I could and starting over. A month or two ago I broke off the thin wood prow and glued it back on. I thought I got it back in the same location, but must not have, because the figurehead doesn't fit quite right. I did some filing and got it sliding in ok, but I'll have to fill in some gaps after I glue it in. Here's photo of figurehead with plume broken off. It's tiny, but I was able to glue it back on ok with CA. I've done basic painting, and I'm in the endless touchup mode. Almost done, and I'll include a photo when finished painting. The detail on figurehead is amazing. Did Chris carve this to make the mold? or did he do it in CAD software? I'm impressed either way. This would be way, way beyond my abilities.
-
I remember reading about the problem with the figurehead a couple of months ago, and of course, forgot about it. So once again, thank you Derek, for reminding me! I would have fallen into the same trap. I also broke off the small piece on the prow, but was lucky and didn't lose the piece, so was able to glue it back on and be a more careful. I'm coming to the same conclusion as others on using heat to bend wood. On strips I dip my finger in water and run it over the wood before applying heat (I've been using travel iron). I think the same would work for pieces like stern, and I probably don't even need to put a very small amount of water on the wood. Heat alone does the trick. You're a lot braver than I am experimenting with stern windows! I just painted the structure inside the stern black. I've been thinking about what to use to glue all the decorative PE. The matte finish acrylic was an idea I had, so glad to hear it works. I couldn't find the same floor wax others used, and when I found what they said replaced it, it was glossy. I think the matte paint will work great. I've used it in the past as an overcoat to dull shiny finishes or dull a mixture of shiny and flat finishes. I used CA on the stern, but the pieces are so hard to handle, that I was thinking something else would work better. I was already attempting to sand laser char from the bow rails (and broke two of them along the grain), so now I'll wait and start fitting and painting the figurehead.
-
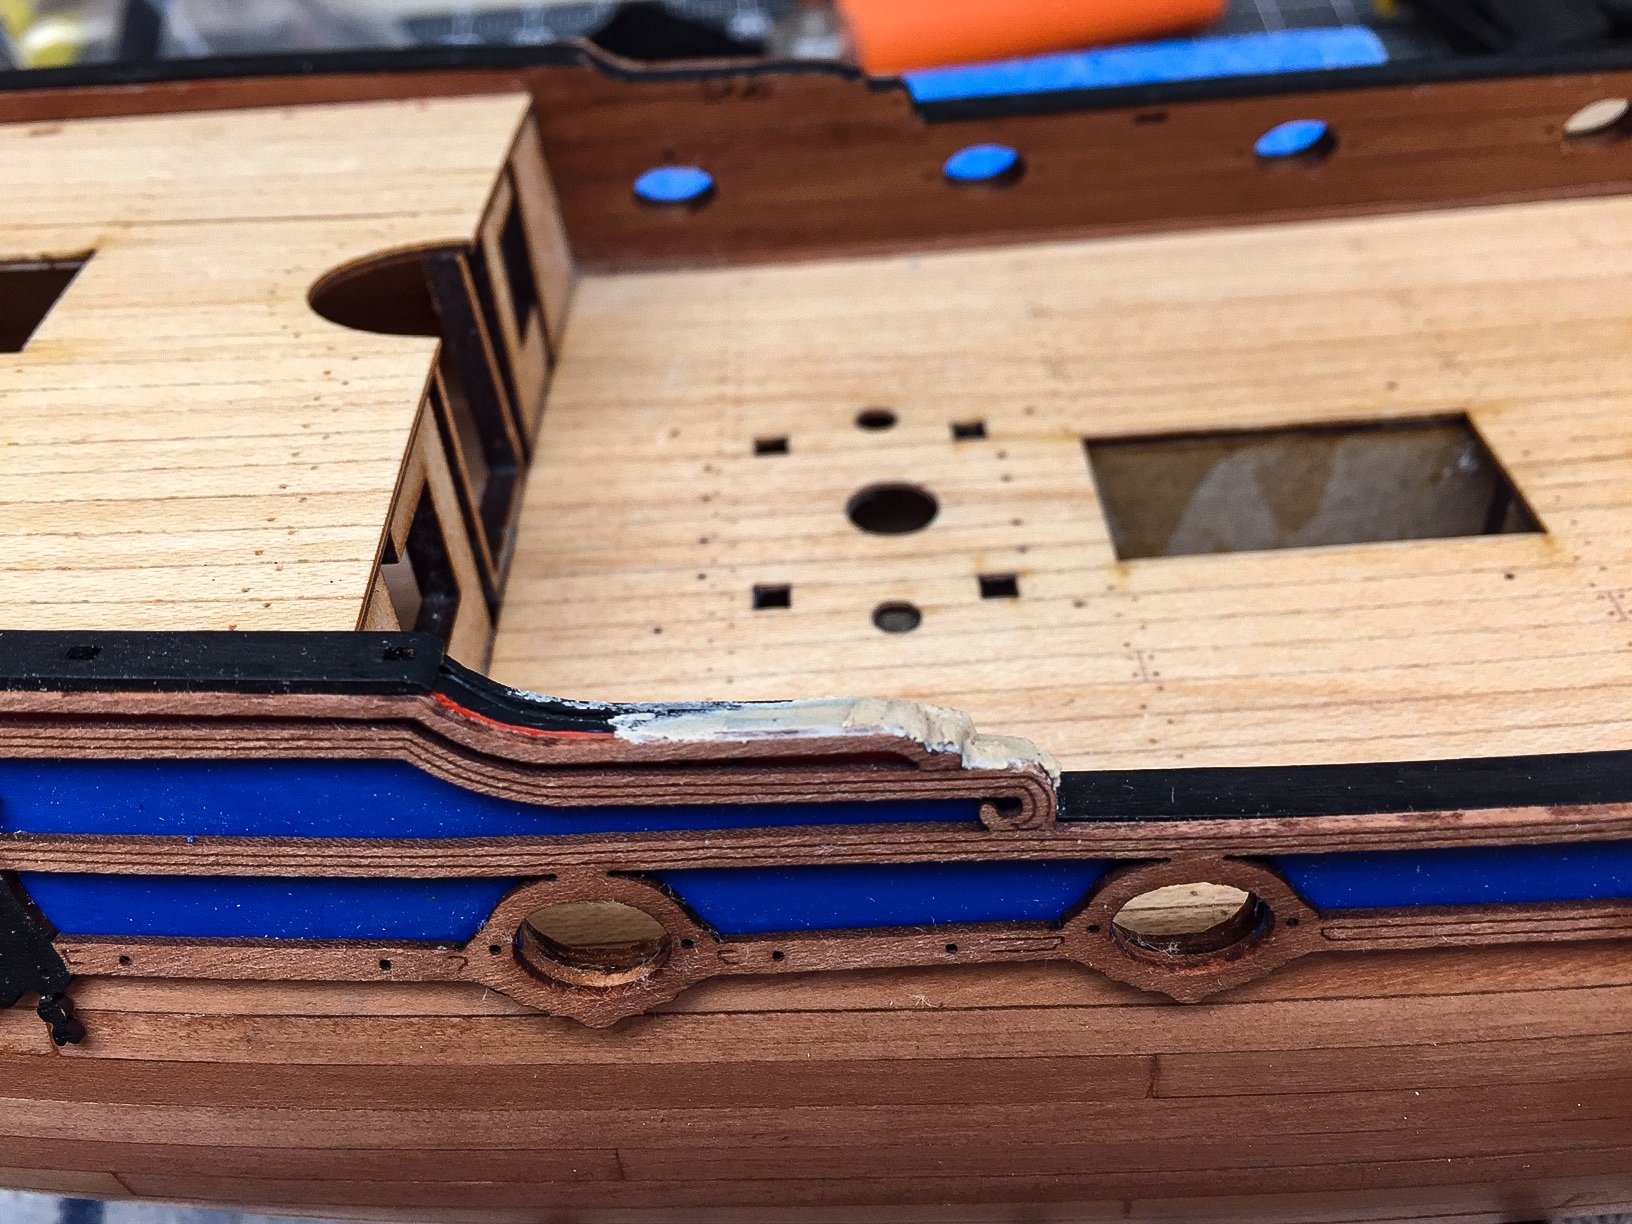
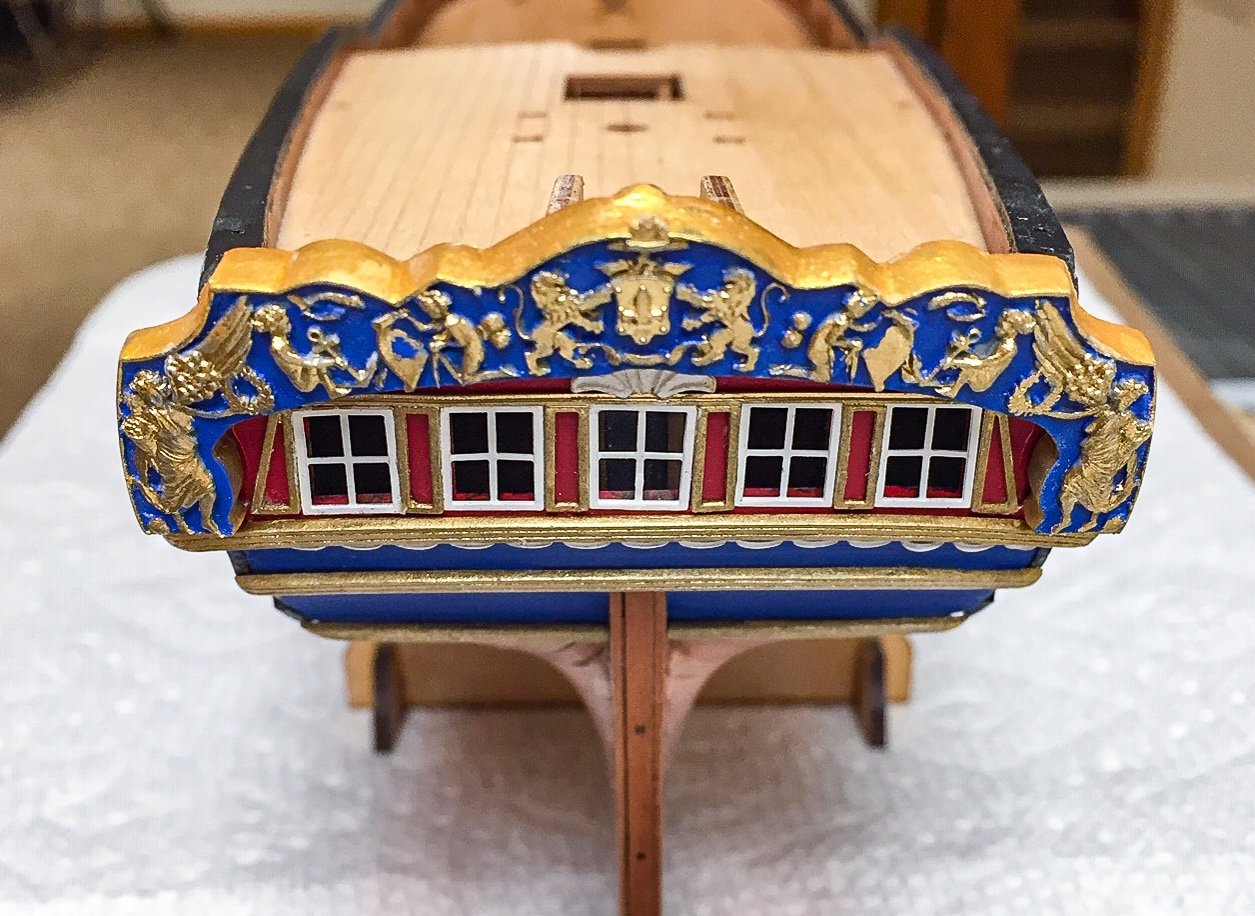
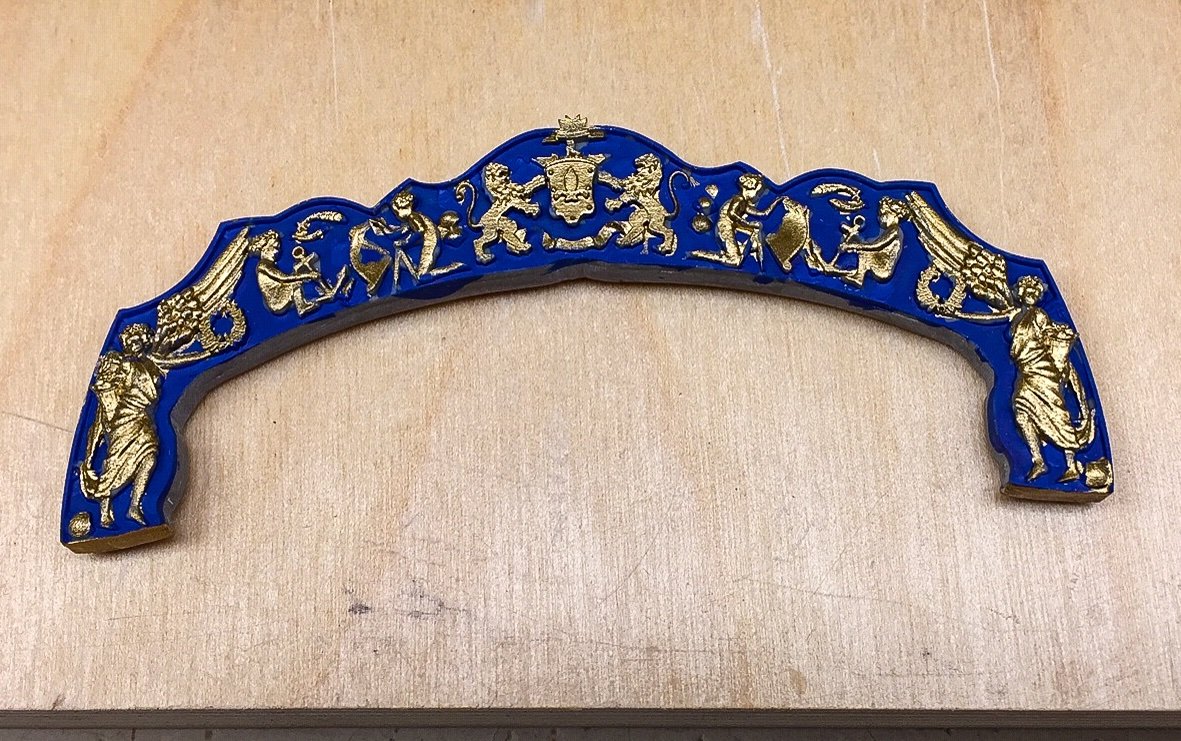
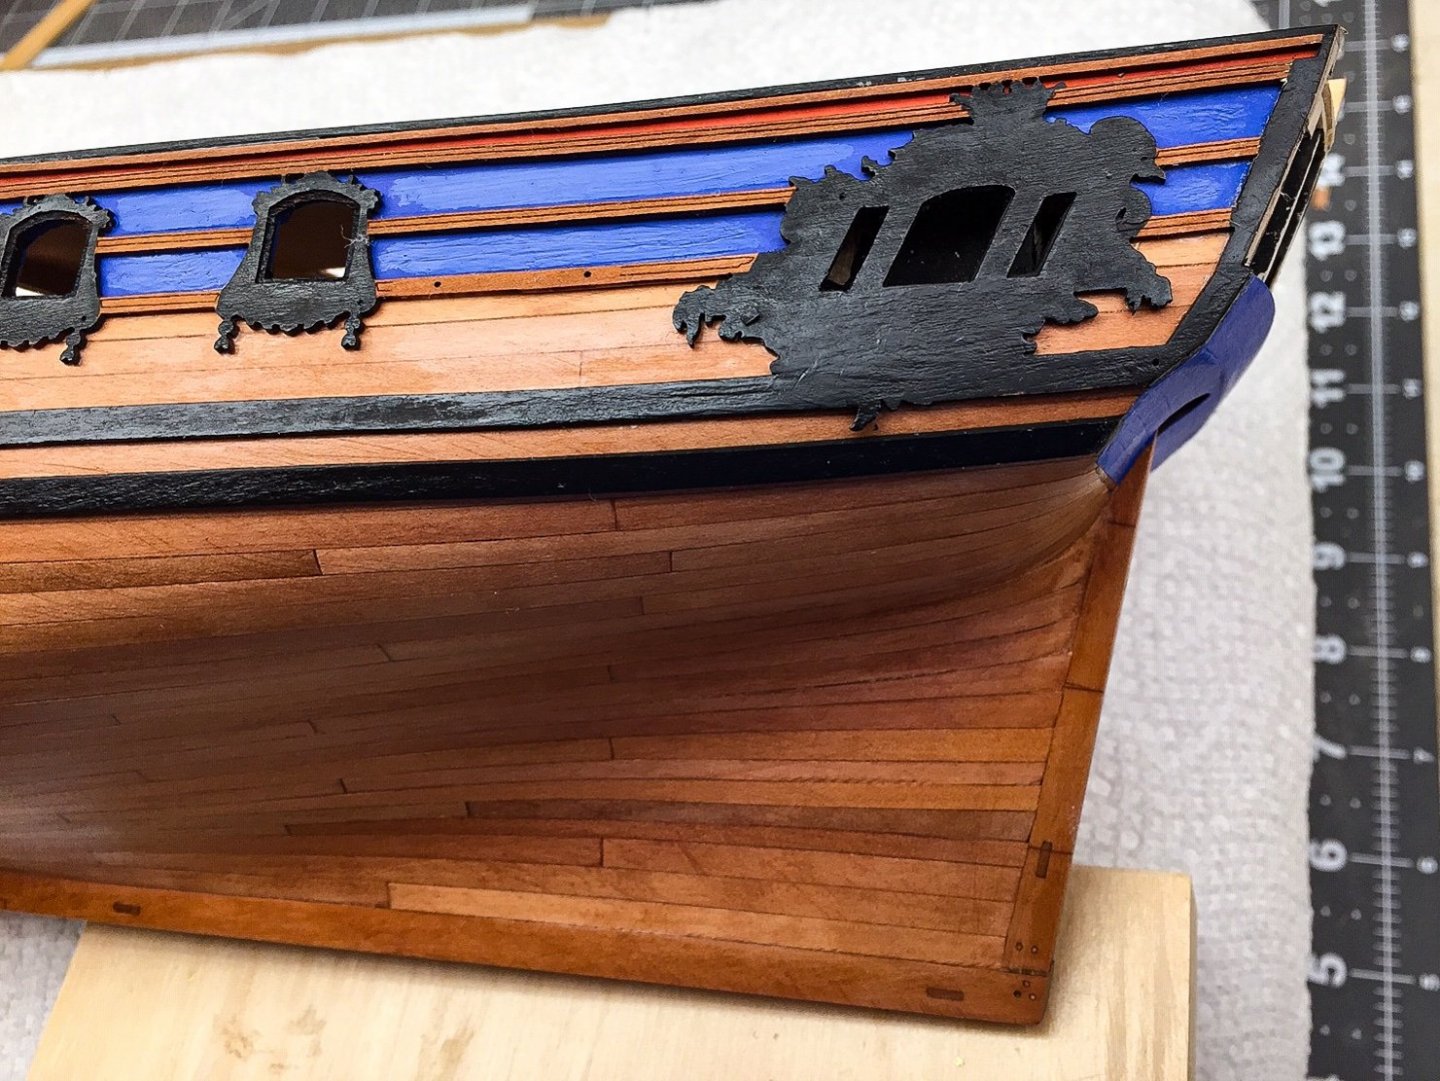
I glued on the decorative molding piece along with couple of other decorative strips. Apparently I didn't get the molded piece fitting exactly right. I probably didn't get it soft enough in the boiling water to form along the stern contours. I thought I did, but when it came time to glue it on, I needed to clamp it or hold it in place with a little pressure. I tried tape, and I thought it worked. But after glue set, there was a small gap. Since it's painted, I used filler to hide it and smooth transition from the wood stern piece to the resin molding. I painted the top and side edges gold, and found out how difficult gold paint can be. The surface has to be real smooth. I kept after it, but finally got tired of touching up with filler and light sanding, and decided it was good enough. It seemed like I wasn't improving anything by additional work. At this point, I think the stern is finished, and I'm ready to proceed to other steps.

-
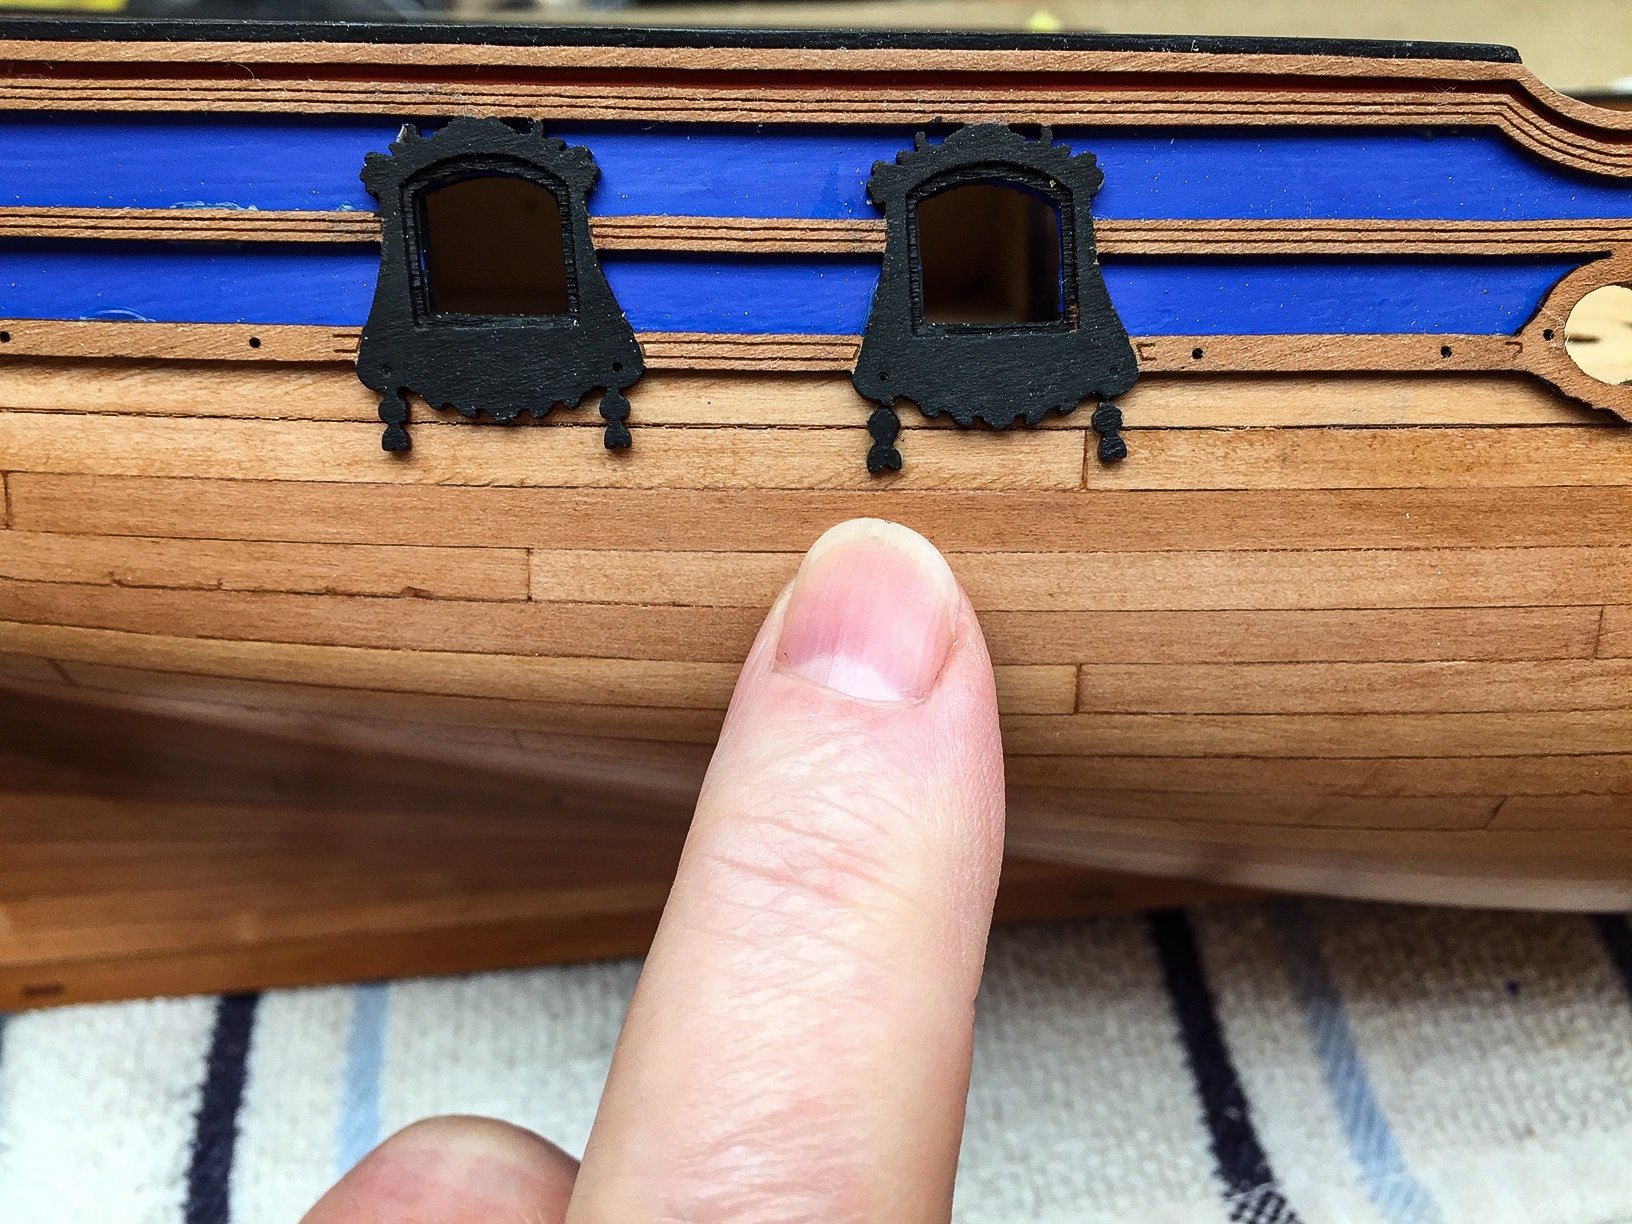
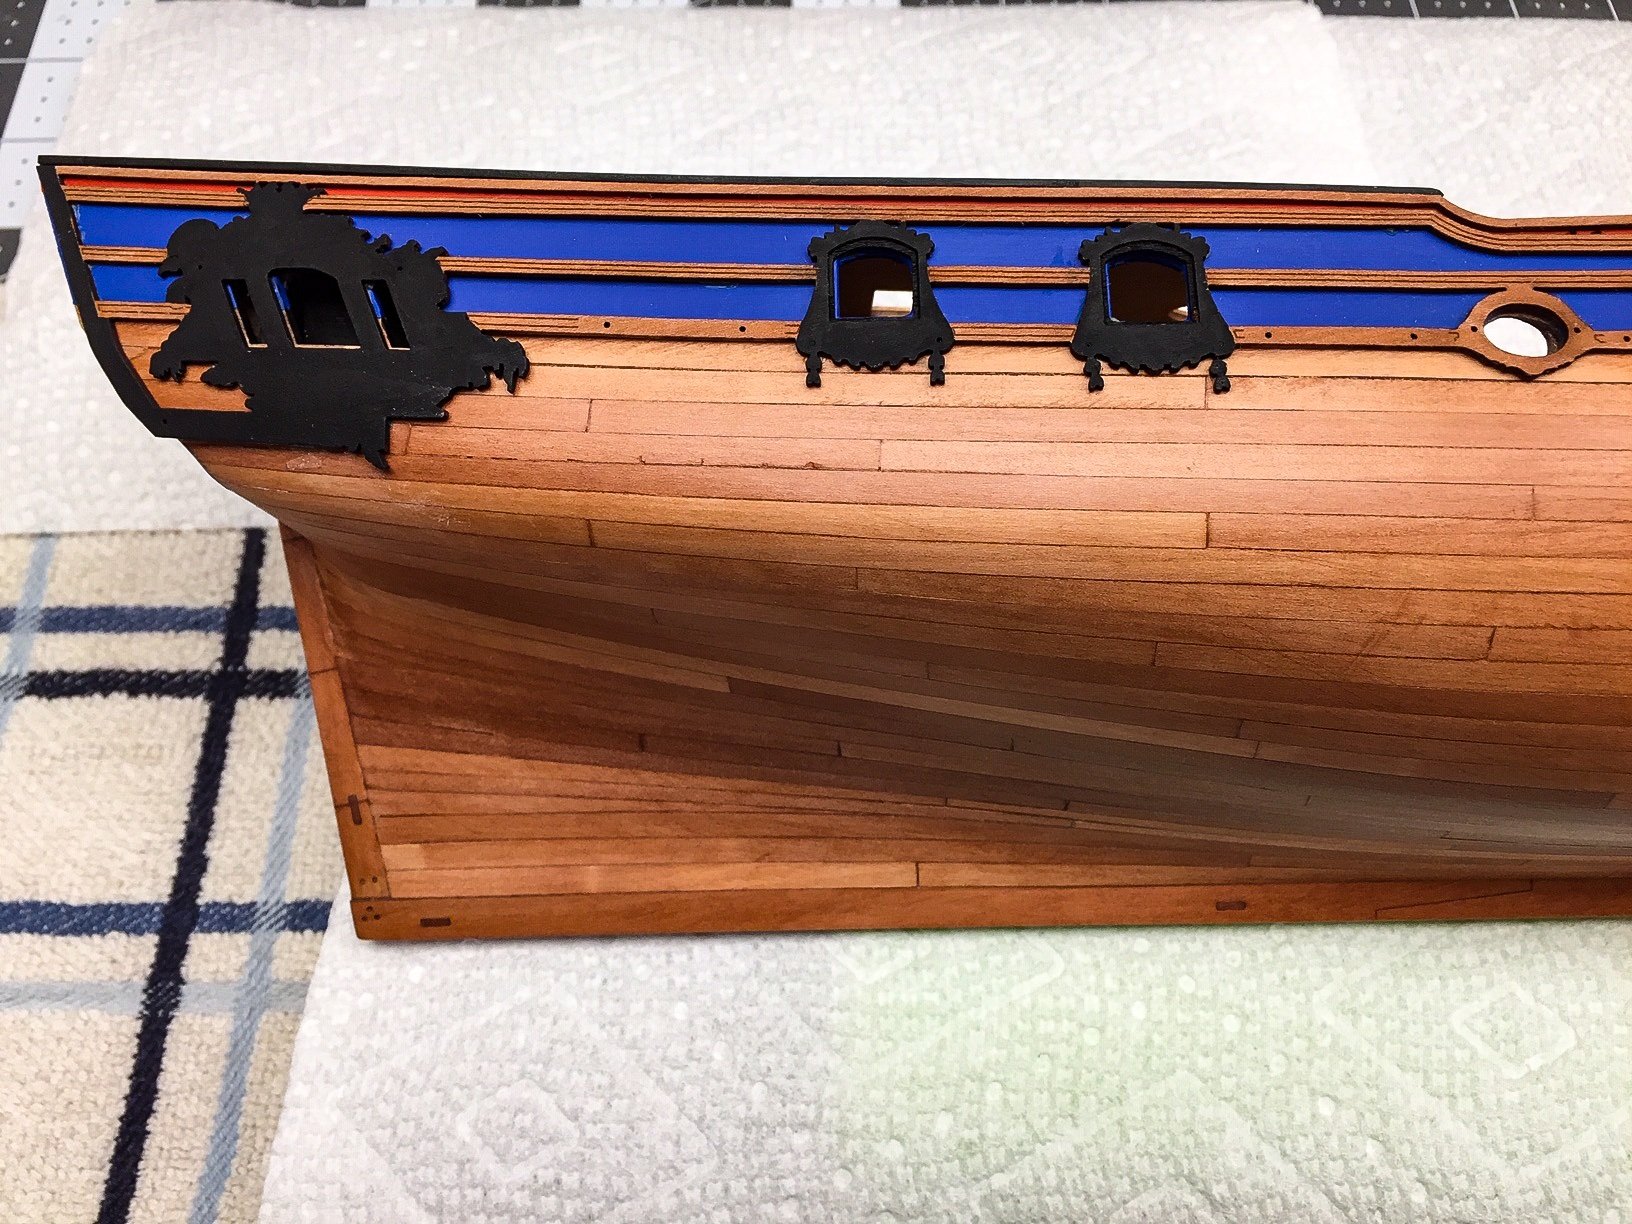
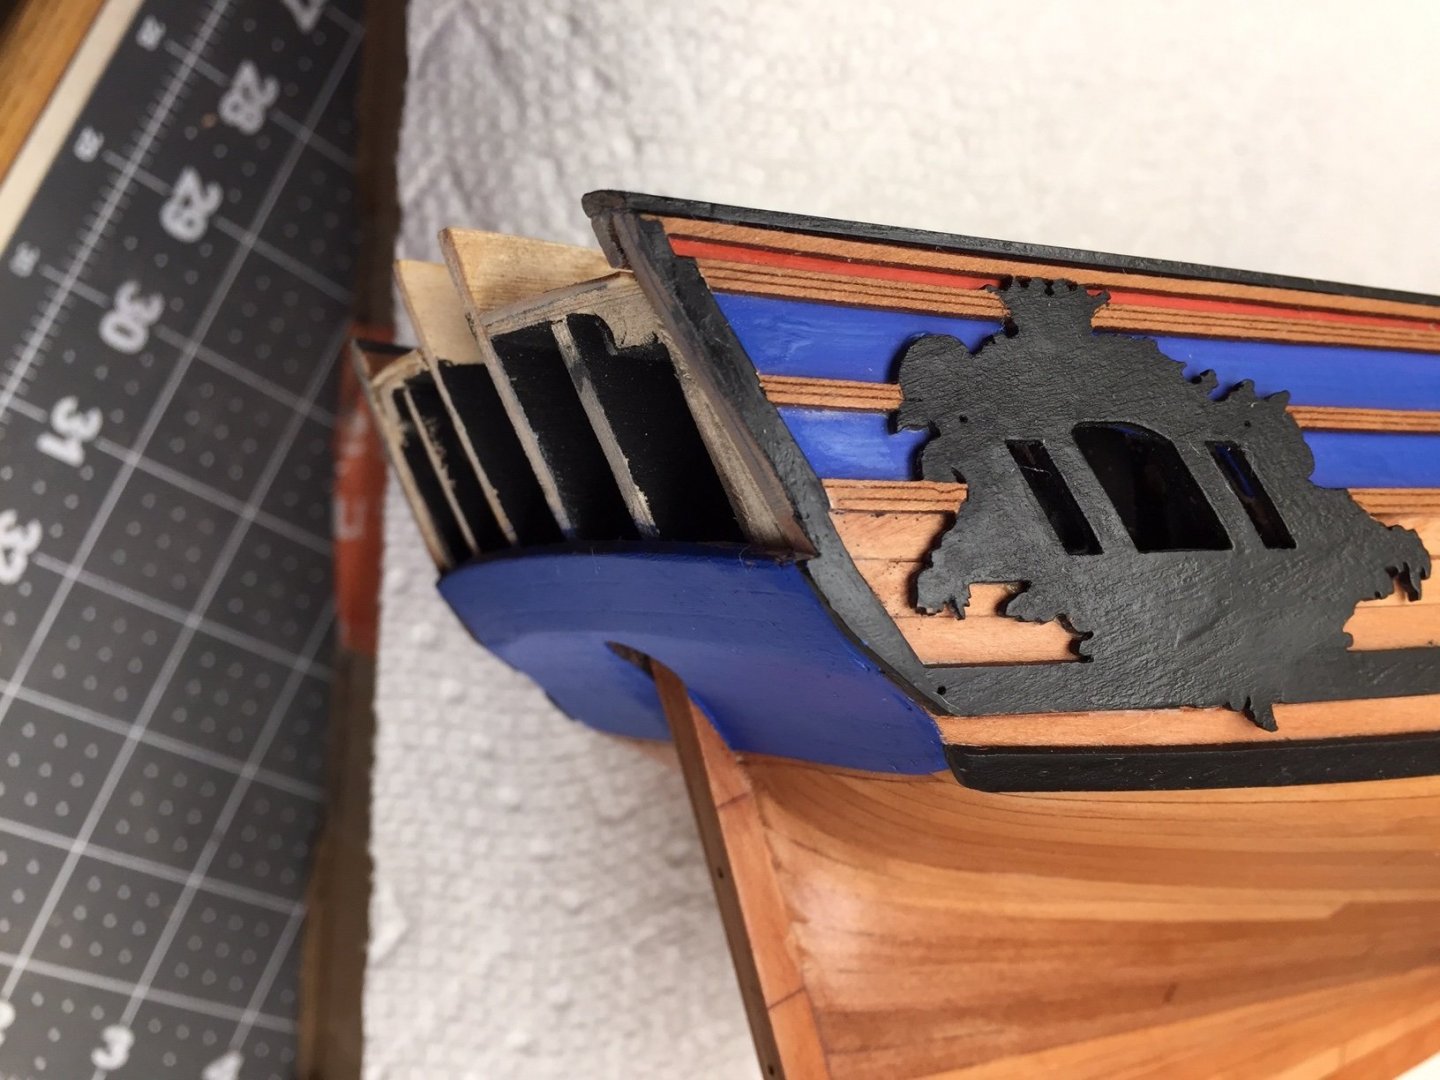
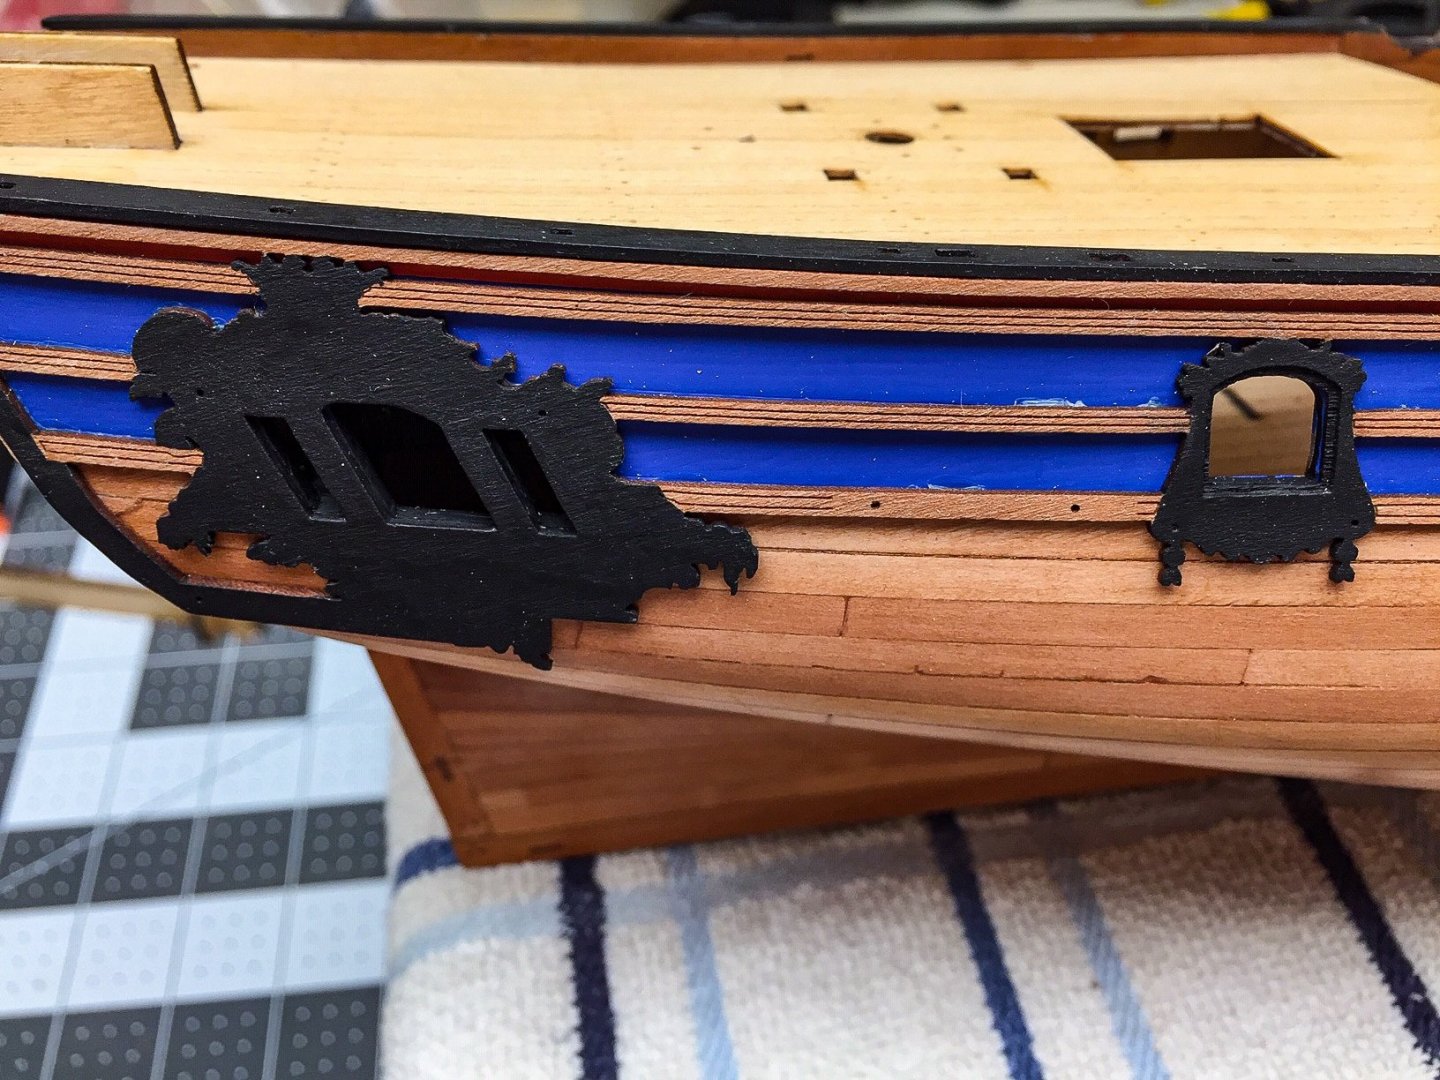
You caught another one, but I caught it first! You've become "Chief Inspector Derek", LOL! I really appreciate your comments. I've been watching your build and am so impressed with your attention to details and all the little extras. It's something I'll keep working on. When I tried to fit the next PE piece, the one that fits around the windows, it didn't fit. One window in particular, the one you mentioned, wasn't even close. So I popped off most of the windows without too much trouble. I was surprised at how tight the tolerances were between windows and the piece that fits around them. I used that piece as an alignment aid to get the windows positioned better. Even off the boat, the windows fit very tight in the surrounding piece. I thought about filing it slightly, but it looked fragile, so I chickened out. Using it as alignment, I glued windows back in, and then glued the surrounding piece on. It still didn't fit as good as I'd like, but I decided it was good enough. Photo shows the two pieces. Windows are glued, and the surrounding piece is used for alignment.

-
I've been painting the decorative stern molding. Quite a challenge for me. I need younger eyes and steadier hand. I'm getting there, but will take another iteration or two doing touchup. I'd be further along, but managed to tip over liquid gold and it went all over work area. Fortunately none on model or parts, and none on the floor. It took a while to clean up the mess, but now basement smells like rubbing alcohol. Reminds me of how hospitals used to smell.
-
I glued in first PE parts, the stern windows. Previously I had painted the inside structure in this area black, so it would be black looking thru windows. The detail on the PE parts is very impressive. It's my first experience with them and used CA glue.

-
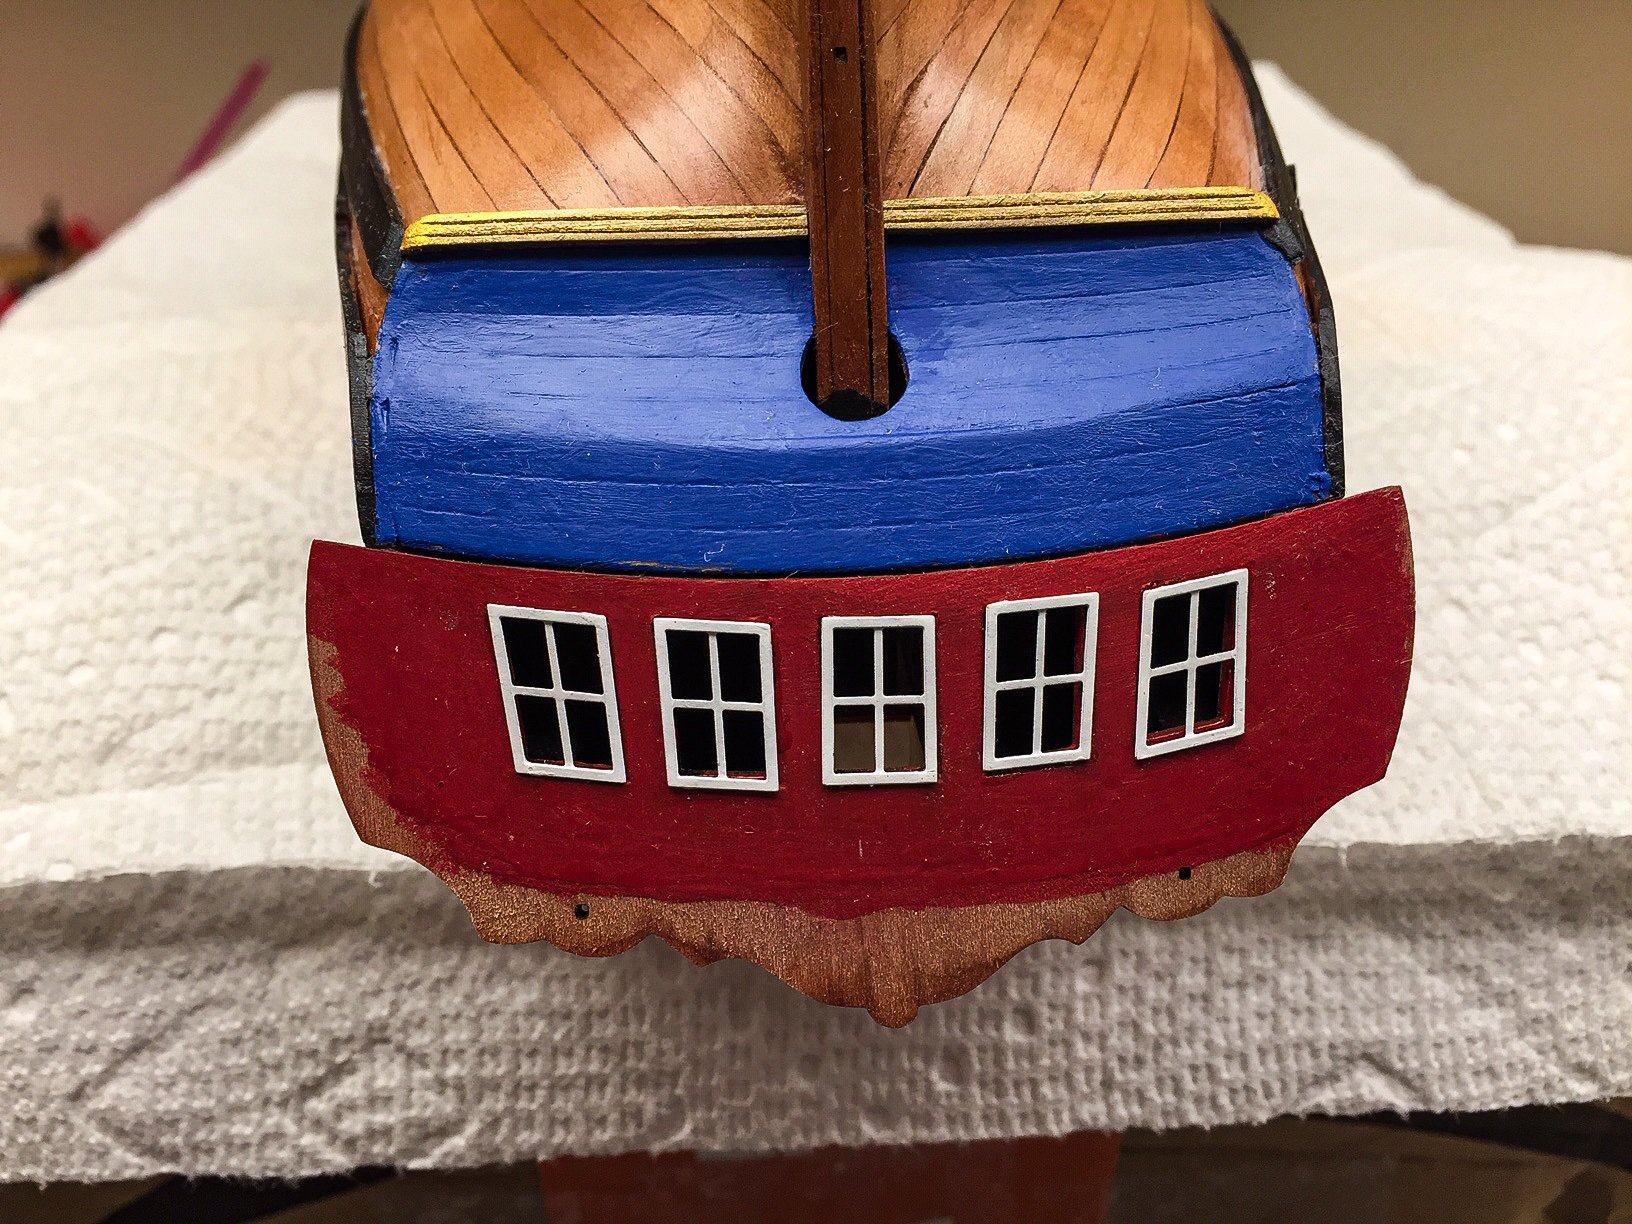
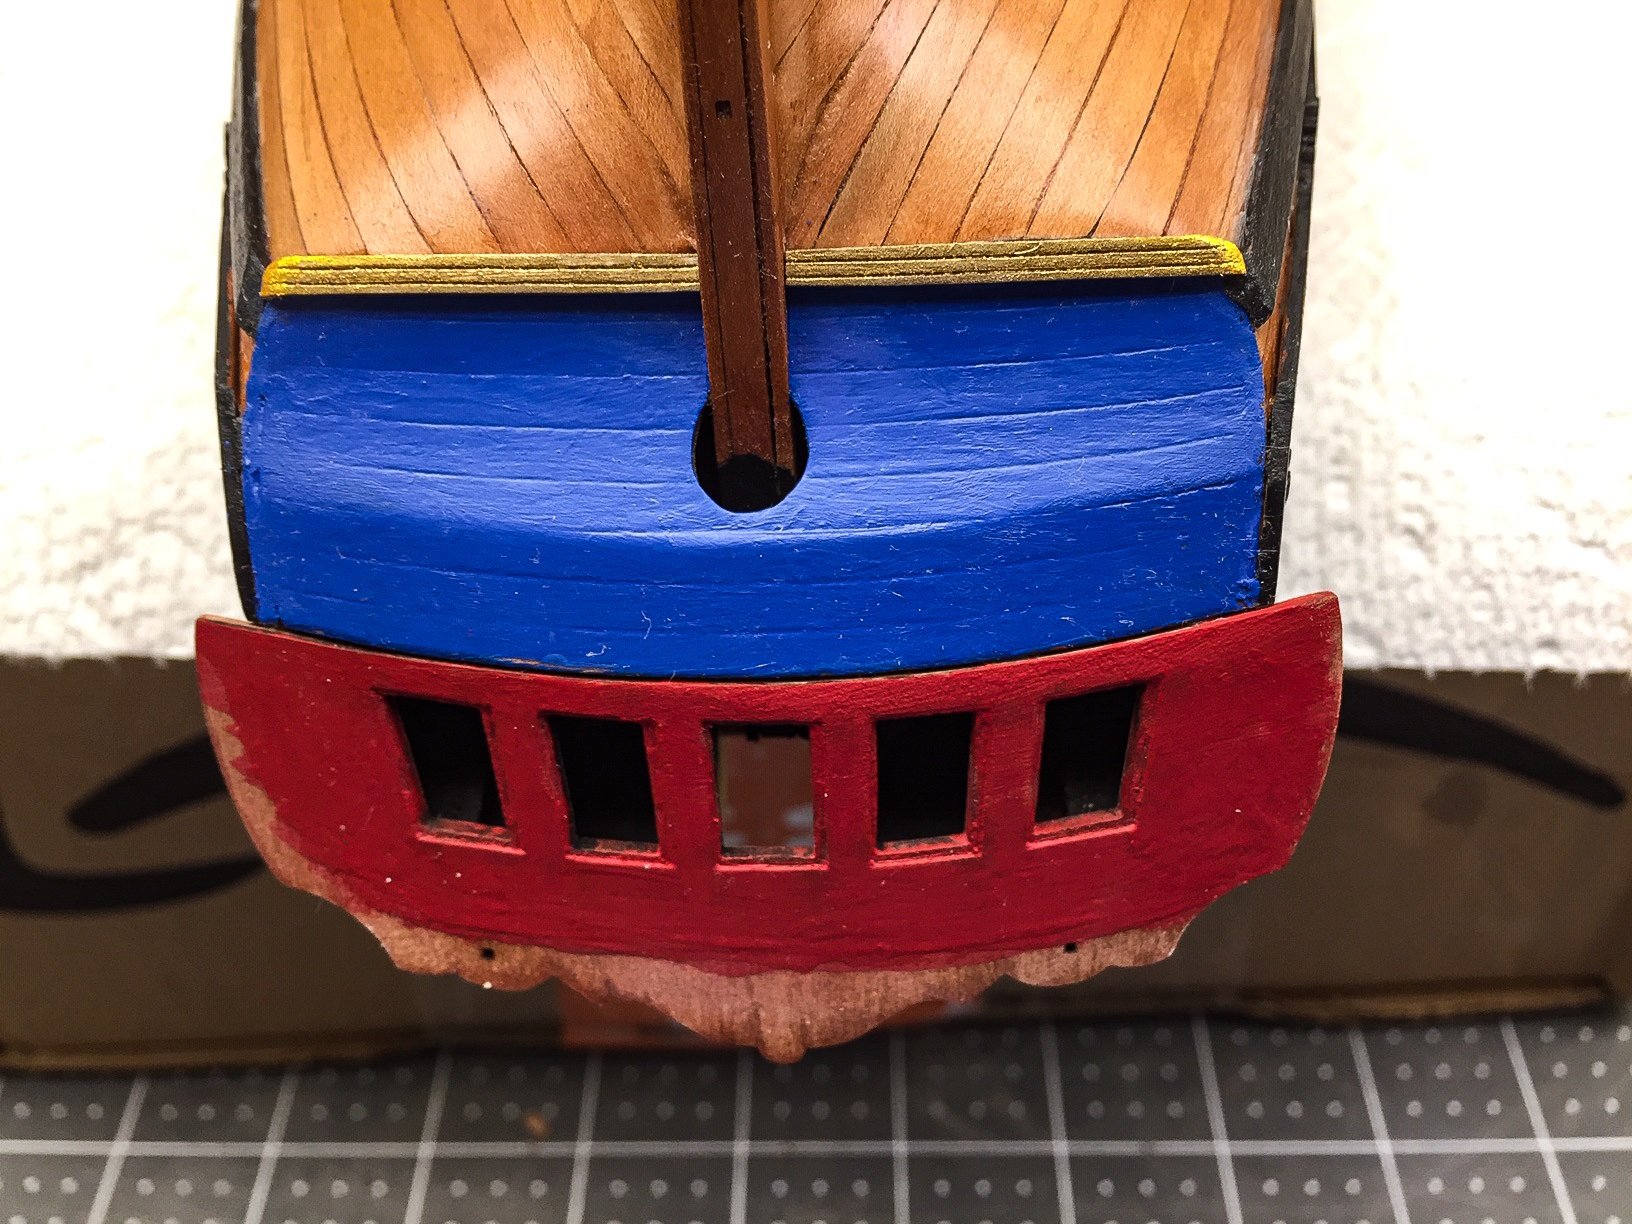
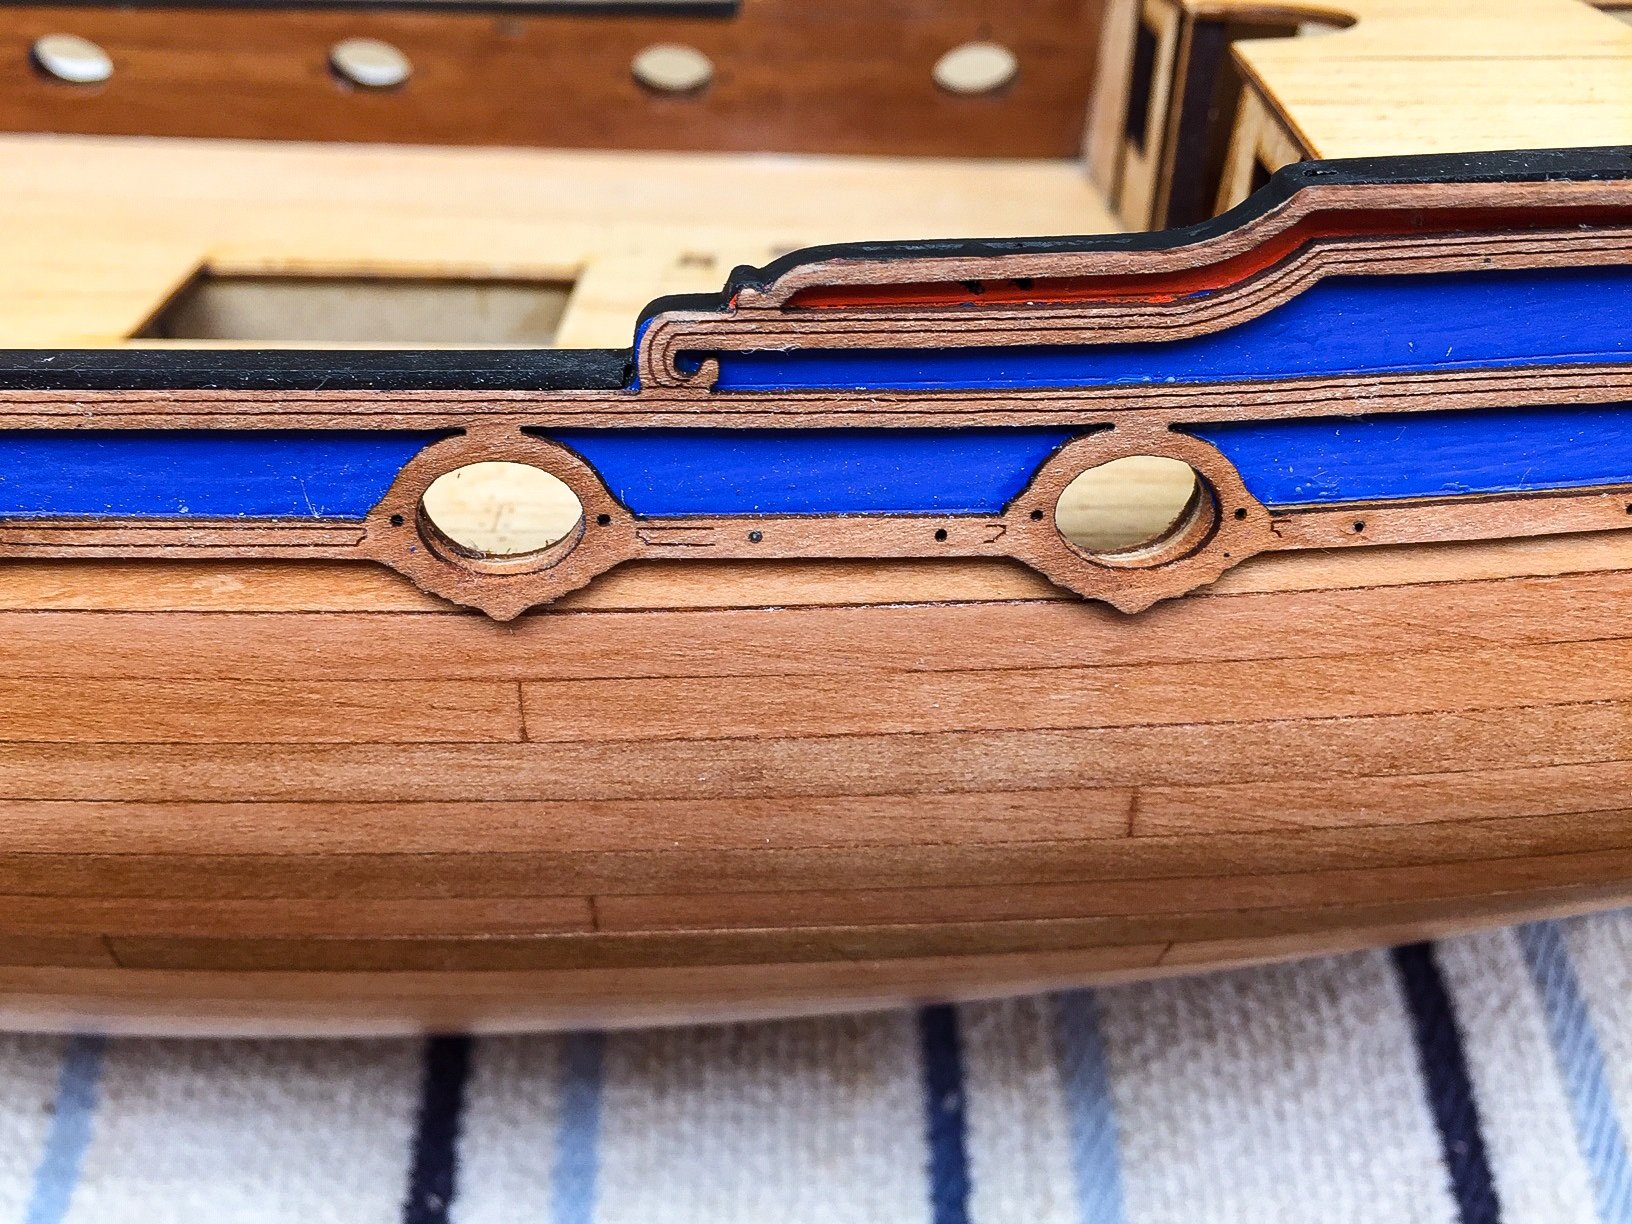
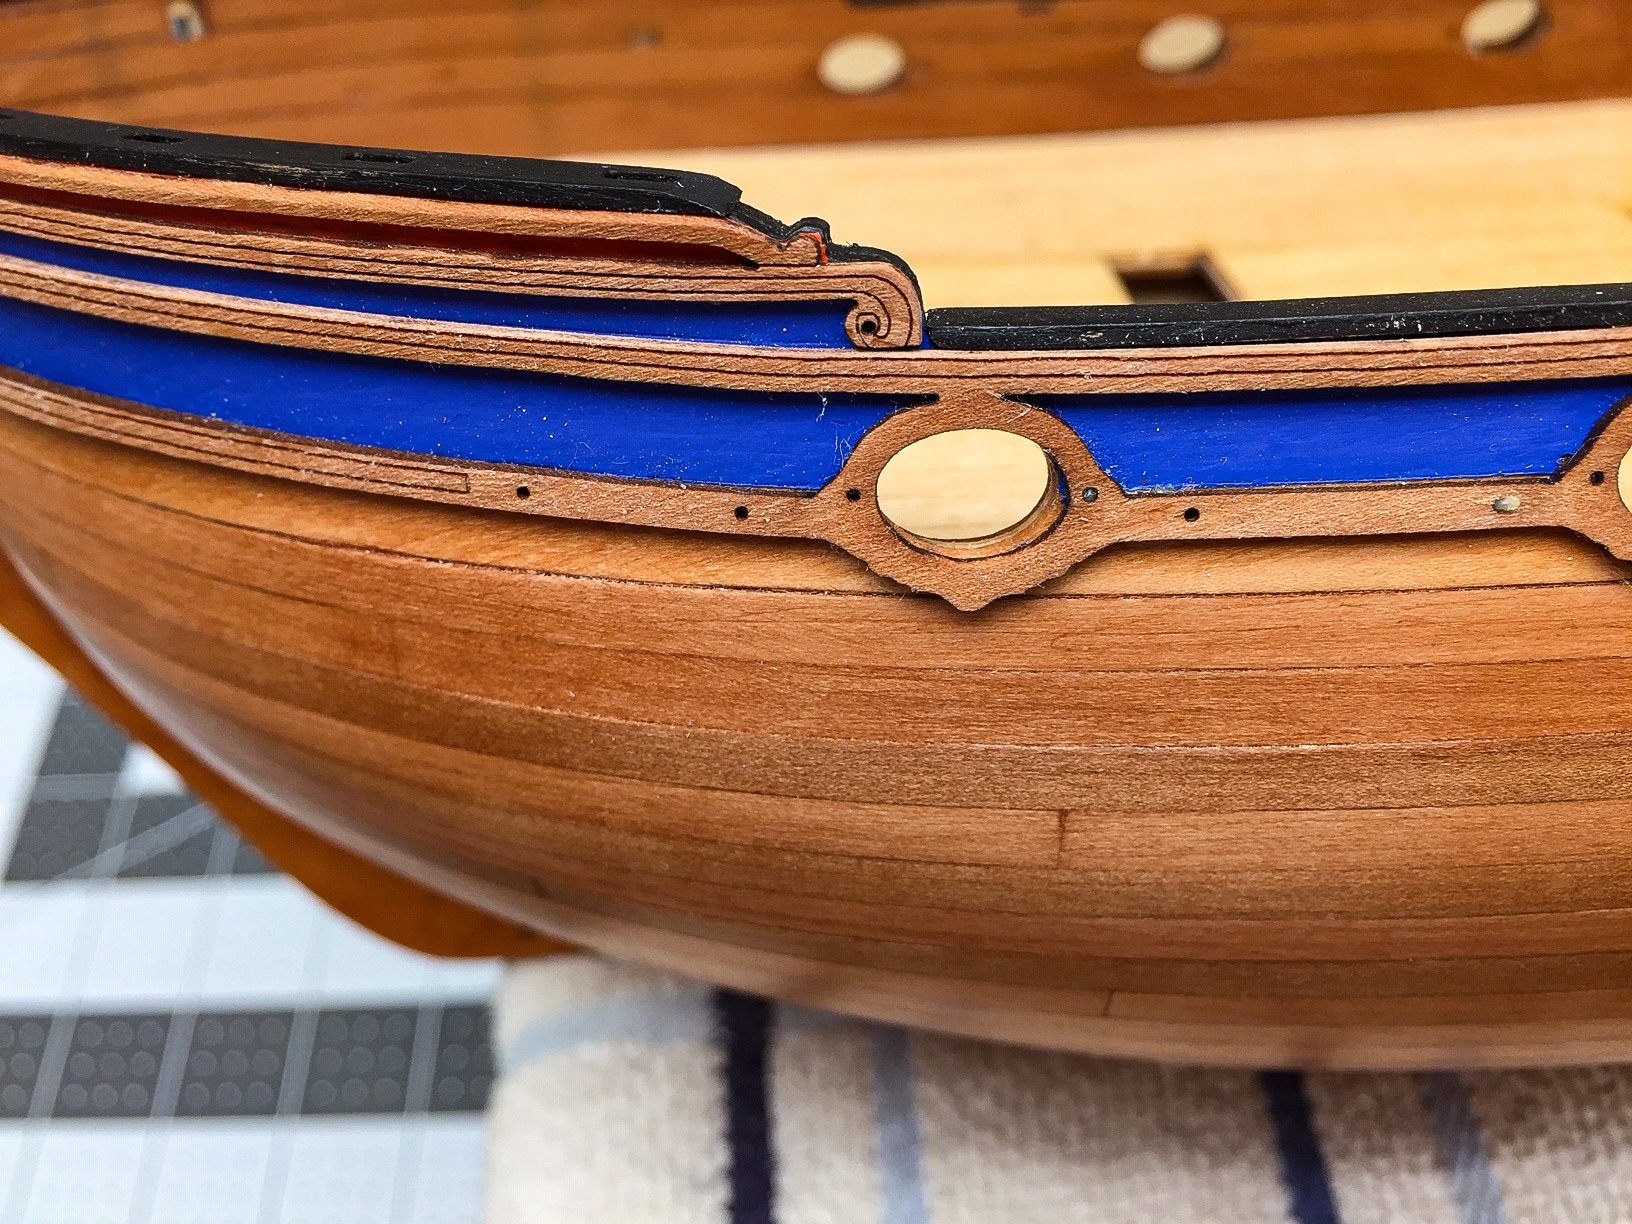
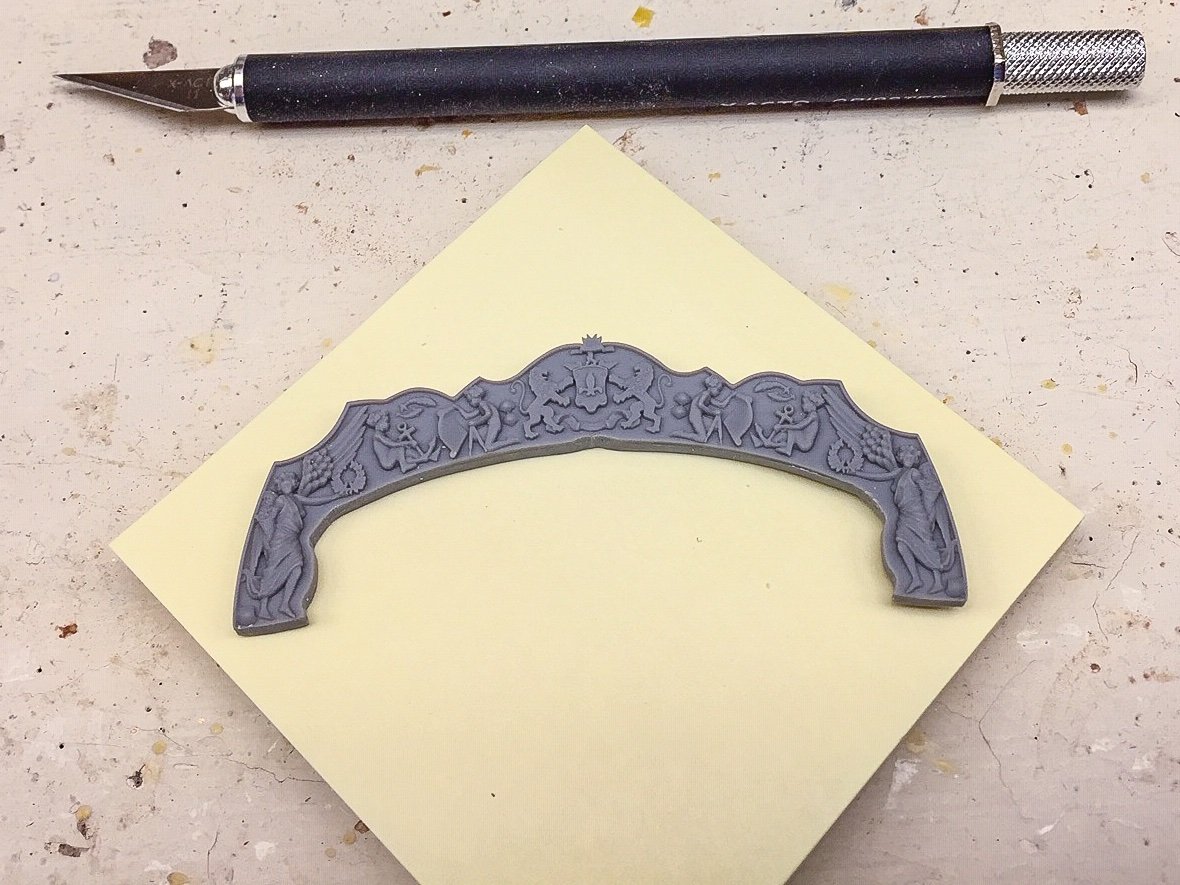
Here's a question for everyone that knows more about ships than a landlubber like me. The stern facia and decorations stick out beyond the hull, on the model about 1/4". Was this typical? And is it just to make the stern decorations larger, so people notice it more when you sail into harbor and see how rich and famous you are? It looks odd to me to have the stern facia sticking out away from the hull/bulwarks. I cut out the decorative stern molding and did some cleanup with file. I was rather nervous about dipping it in boiling water to bend it slightly to follow shape of stern facia, but it worked fine. Being cautious, I only dipped it around 6-7 sec. I figured if it wasn't flexible enough, I could dip it again. It's a very shallow bend, so the short time worked, but 10 sec would have worked also. I'm now starting to paint. My brush is small, but I need a smaller one!! I put blue on first in the low spots, the same blue I used on bulwarks & stern. I'm using liquid gold, as shown in manual, and it's super thin out of the bottle. It flows a bit too much for me, I have a bunch of tiny places to touchup. I suspect this will be an iterative procedure, touchup blue, touchup gold, touchup blue, etc.
-
I didn't get your message in time Derek, but I didn't soak it either, so I think I'm ok. Appreciate letting me and others know though. I noticed grain on facia was in a direction that would make it easy to bend enough to fit on stern. I glued and held it in place with tape, and it worked ok. In my case, no need to heat or soak. Test fit one of the stern windows and it fit ok, but I need to clean up the red paint from the rabbits the windows sit in. I globbed on too much red paint.

-
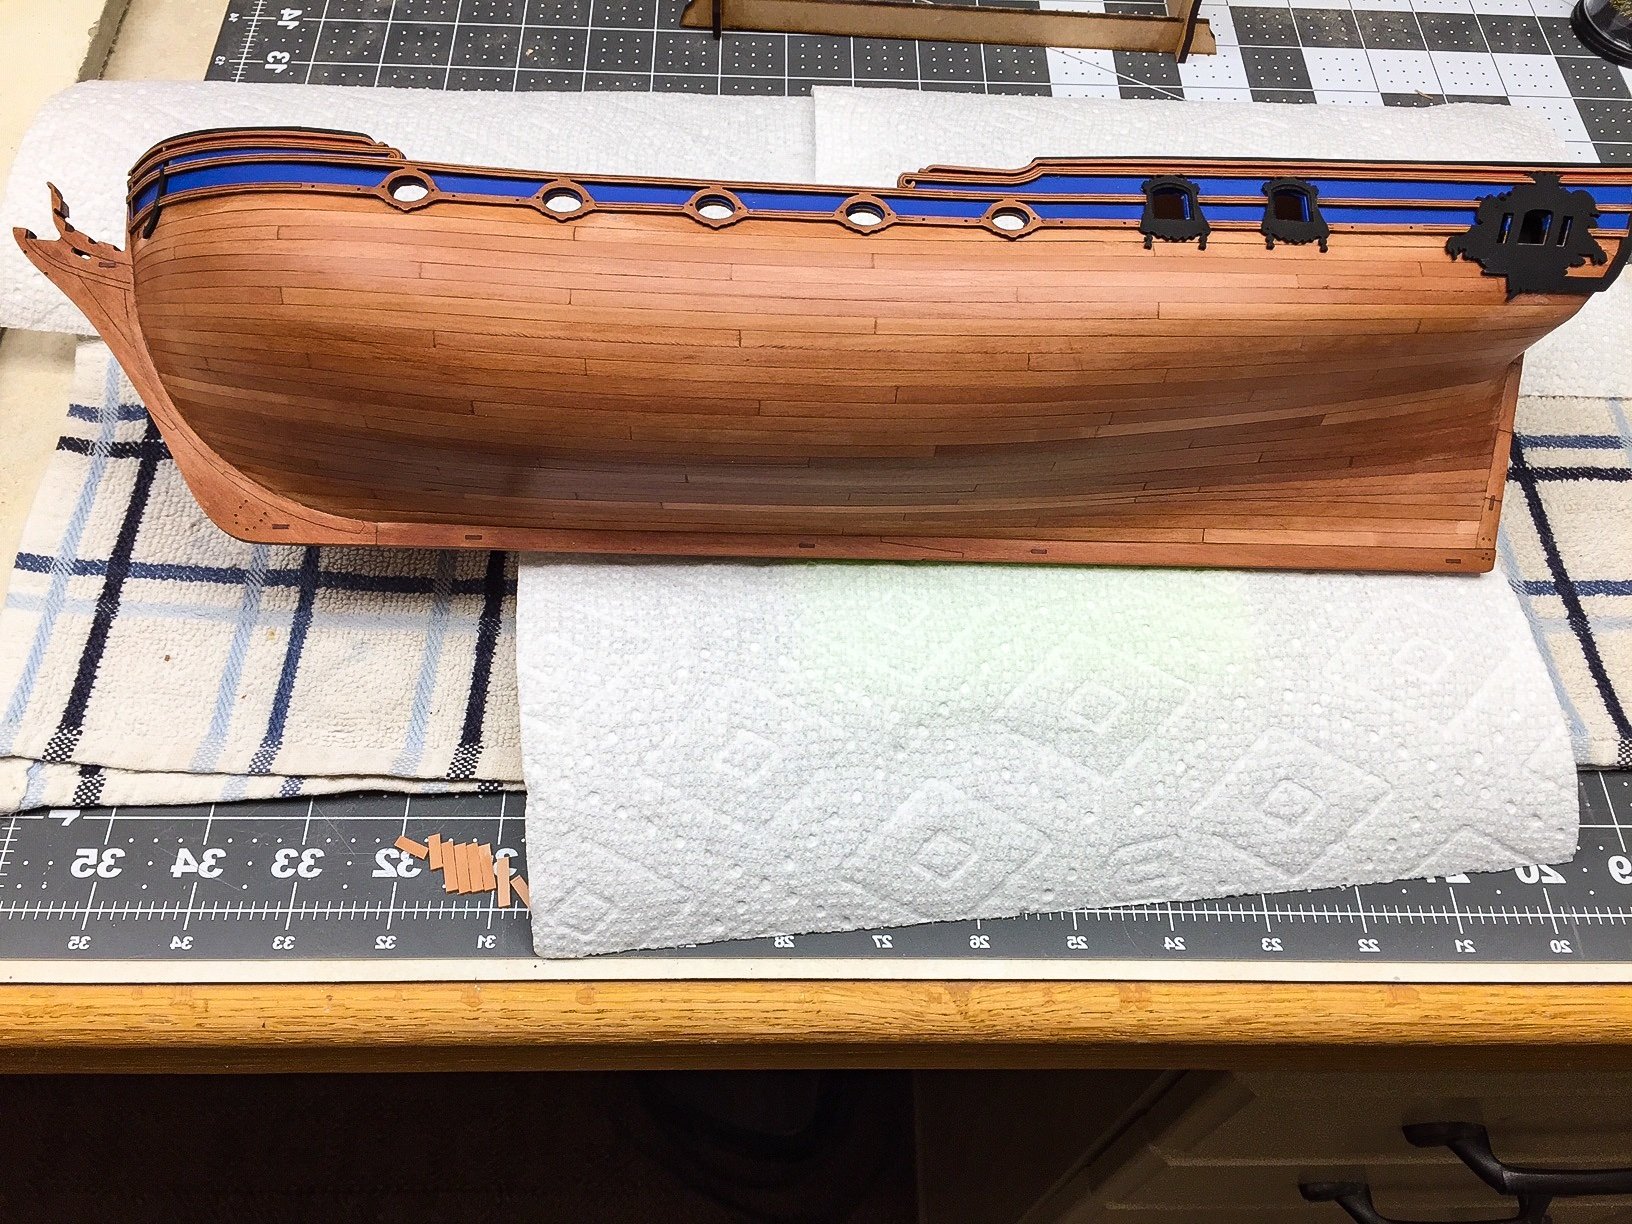
One of the next steps is to glue on a stern piece with window cutouts. It curves slightly to follow the curvature in the aft deck planking and stern formers. But in my case, it didn't fit very good. The hull and bulwarks stuck out too far and needed to be trimmed. This was no problem, but I had to trim about 1/16" or so and it ate into the last part of the hull decoration, a little black strip on the end of the bulwarks. so I added little strips to the front of the part of the decoration I'd trimmed off, so it would be about the same width as it originally was. A little filler and black paint, and it looks about like it did before trimming. And now the stern piece will fit much better. I didn't take any photo's while trimming and sanding, but here's what it looks like now.
-
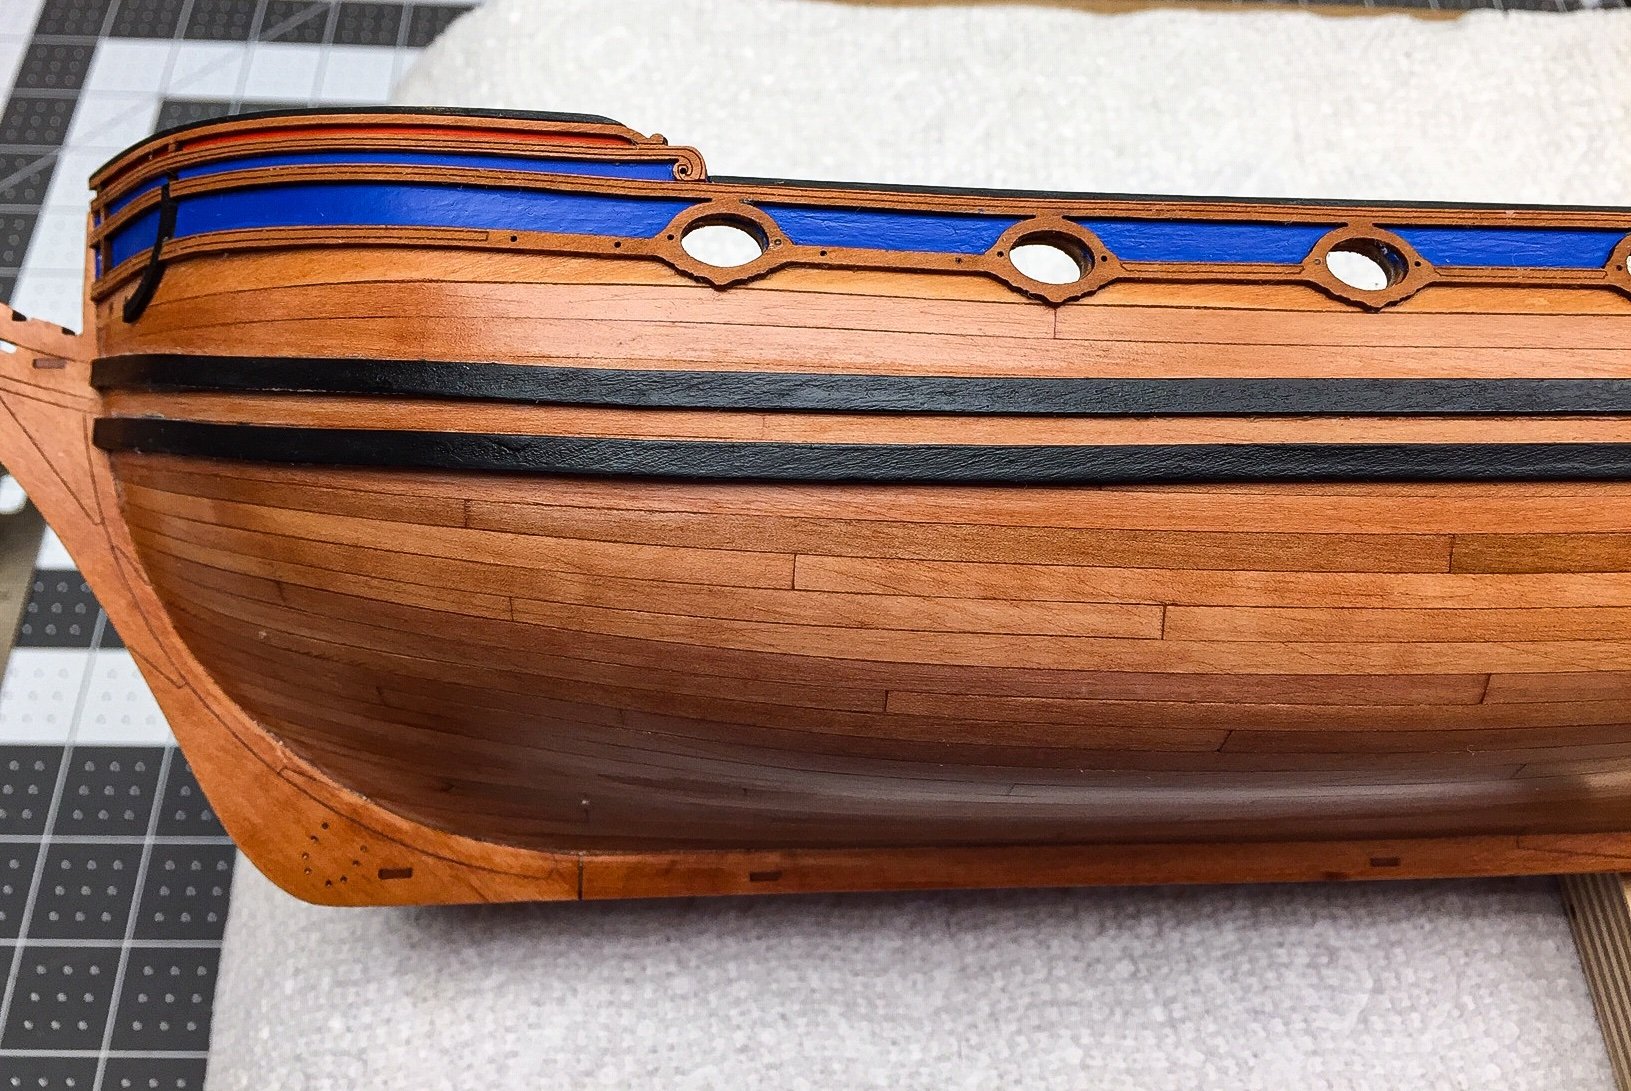
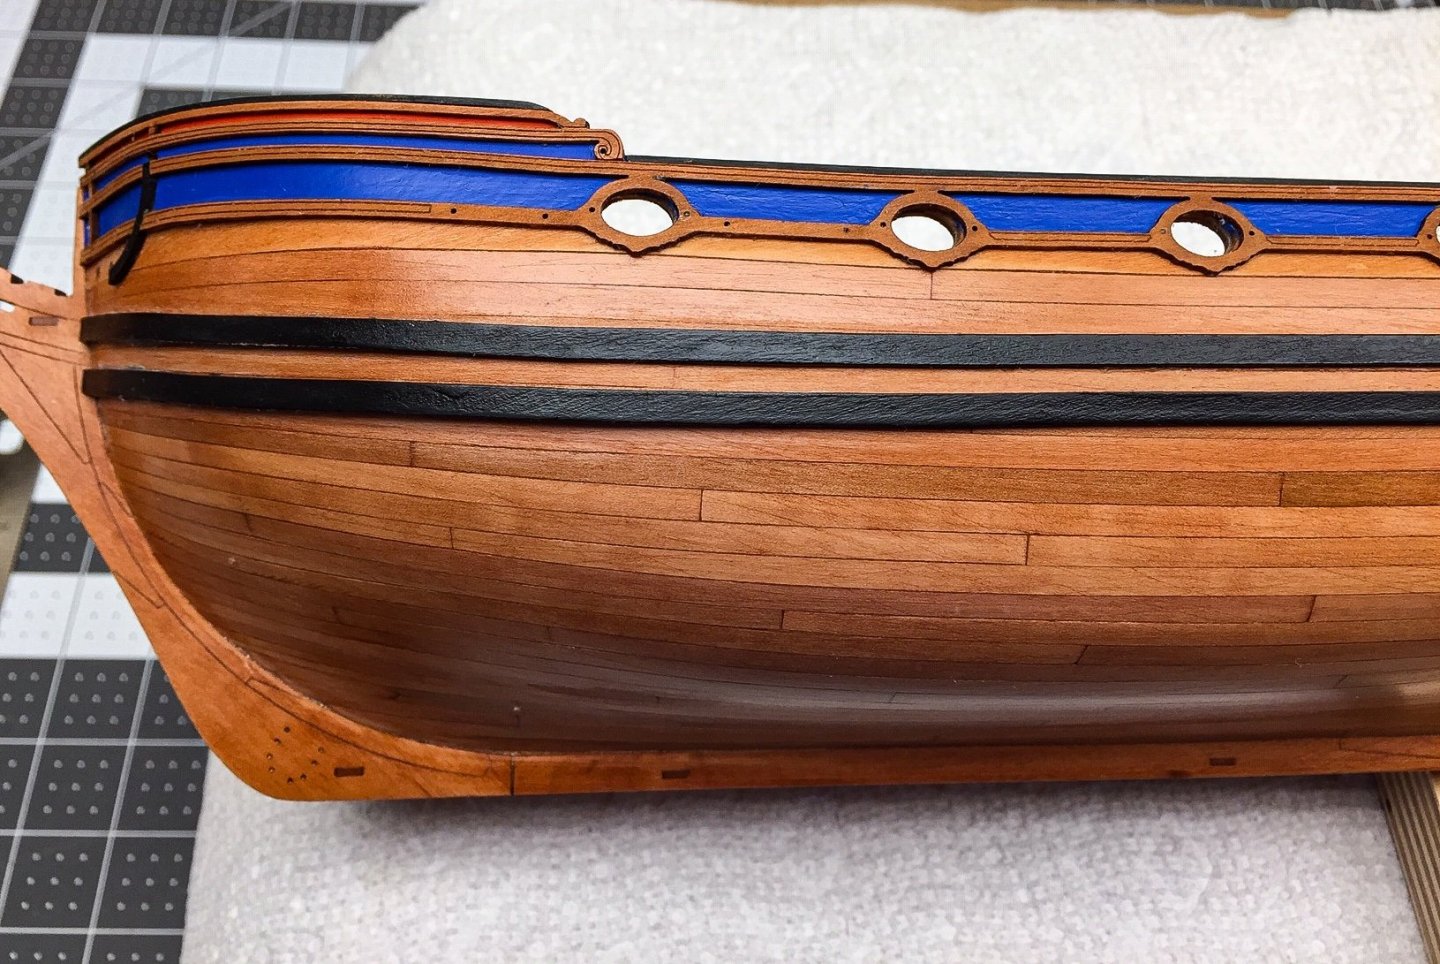
I had a little bit of trouble gluing wales on hull. I had put a couple coats of wipe-on poly on hull, so I wasn't gluing to bare wood. I had used steel wool on hull to dull the wipe-on poly a little more and thought that would be enough for titebond to stick. It kind of stuck, but not around bow area. I had soaked and formed the wales to the hull shape, and painted them black afterward. I suspect some of the shape was lost by painting couple of coats and lightly sanding. Anyhow, they fit reasonable well, but needed tape to hold in place. And I guess I didn't get in a little twist near the bow when forming them. There was some stress there, and after glue dried the wales popped off pretty easily around the bow. I used CA the 2nd time and it worked fine. My hesitation to use it the 1st time was lack of working time. Even the CA medium doesn't have that much working time, and I felt like I needed 2-3 min to get wales located. Plus water based glues I can wipe up excess with damp towel. I finally got them glued on ok, but once again what I thought would be "easy" wasn't. You'd think by now, I'd have learned to not expect anything to be easy. But I'm a slow learner, ha! The upper wales fit into notch in the stern decoration, and I used plans to locate the bow position. Then I followed a planking line in between. On the lower wales I used small spacers cut from scrap to make the lower one parallel to the upper one.
-
I should have thought of this technique! It dawned on me a couple of days afterward that I could have done just what you suggested and it would have been easier. Now the problem will be remembering it the next time I need to do something similar! I didn't think of that, but that might have worked. I did consider cutting the long decorative piece roughly in half to make it easier to glue, but thought the joint might show. I'm inexperienced with ships, so I'm hesitant to make tweaks to the parts. I really appreciate everyone following along and giving suggestions. My first build was so long ago, it doesn't really count. So this is only my 2nd go at building a model ship, and I've got so much to learn. All the comments and the other build logs keep me going!
-
Forgot to mention one other problem I had with the decorative pieces, and this seems to be a common one. There are small "tabs" or decorations hanging below the aft windows. These are very small and fragile. Of course a couple broke off when soaking the pieces to do the bow curve. I probably should have only soaked the bow part, but of course, soaked the entire piece. I don't recall touching these, but 2 of them broke off. Fortunately I saw what happened, retrieved them, and glued them back on (after I glued the decorative piece to the hull). I didn't consider this to be a problem, just typical of building any model. But then, with the decorative pieces "glued" to the hull, apparently the little pieces hanging below the windows were not glued securely to the hull. I know when gluing, I felt like I didn't have enough working time with the glue for such a long piece. By the time I got glue all over it, I had already used up much of the working time. Anyhow, when I was done, it all appeared to be glued on ok. However, while handling the hull to fix some of the other problems, I knocked off one of the little tabs. I didn't discover it until well after it happened, so there was no chance to recover the tiny piece. I ended up making one from scrap pear (an extra piece of planking). This was a real challenge because the piece is so small. I don't recall ever shaping anything this small before. It was very hard to hold to file or sand (I was handholding). I managed, but my piece is slightly larger than the original, and I had to give up making it any smaller. The size difference shows up in the closeup photo, but it's not very noticeable when viewed from about a foot away. It was quite an experience. I have no idea how people carve scrollwork and other tiny parts. Holding them in place to work on them is a real problem, besides being so tiny it's hard to see what you're doing.

-
Some touchup paint, and although not perfect, it looks a lot better.


-
There's some scrollwork in the middle of the hull where bulwarks transition in height. One side the decorative piece was low compared to the hull, and the other side was high. It was only 1/64 or maybe slightly more, but it showed. So I filed bulwarks down on one side to match the decorative scrollwork, and used some filler to raise the bulwarks on the other side to match (along with some gentle filing and sanding).

-
I didn't consider this to be too much of a problem, and trimmed the inside of the windows and gun ports slightly to match the cutouts in the decorative pieces. In these closeups, looks like I need a little more touchup paint.

-
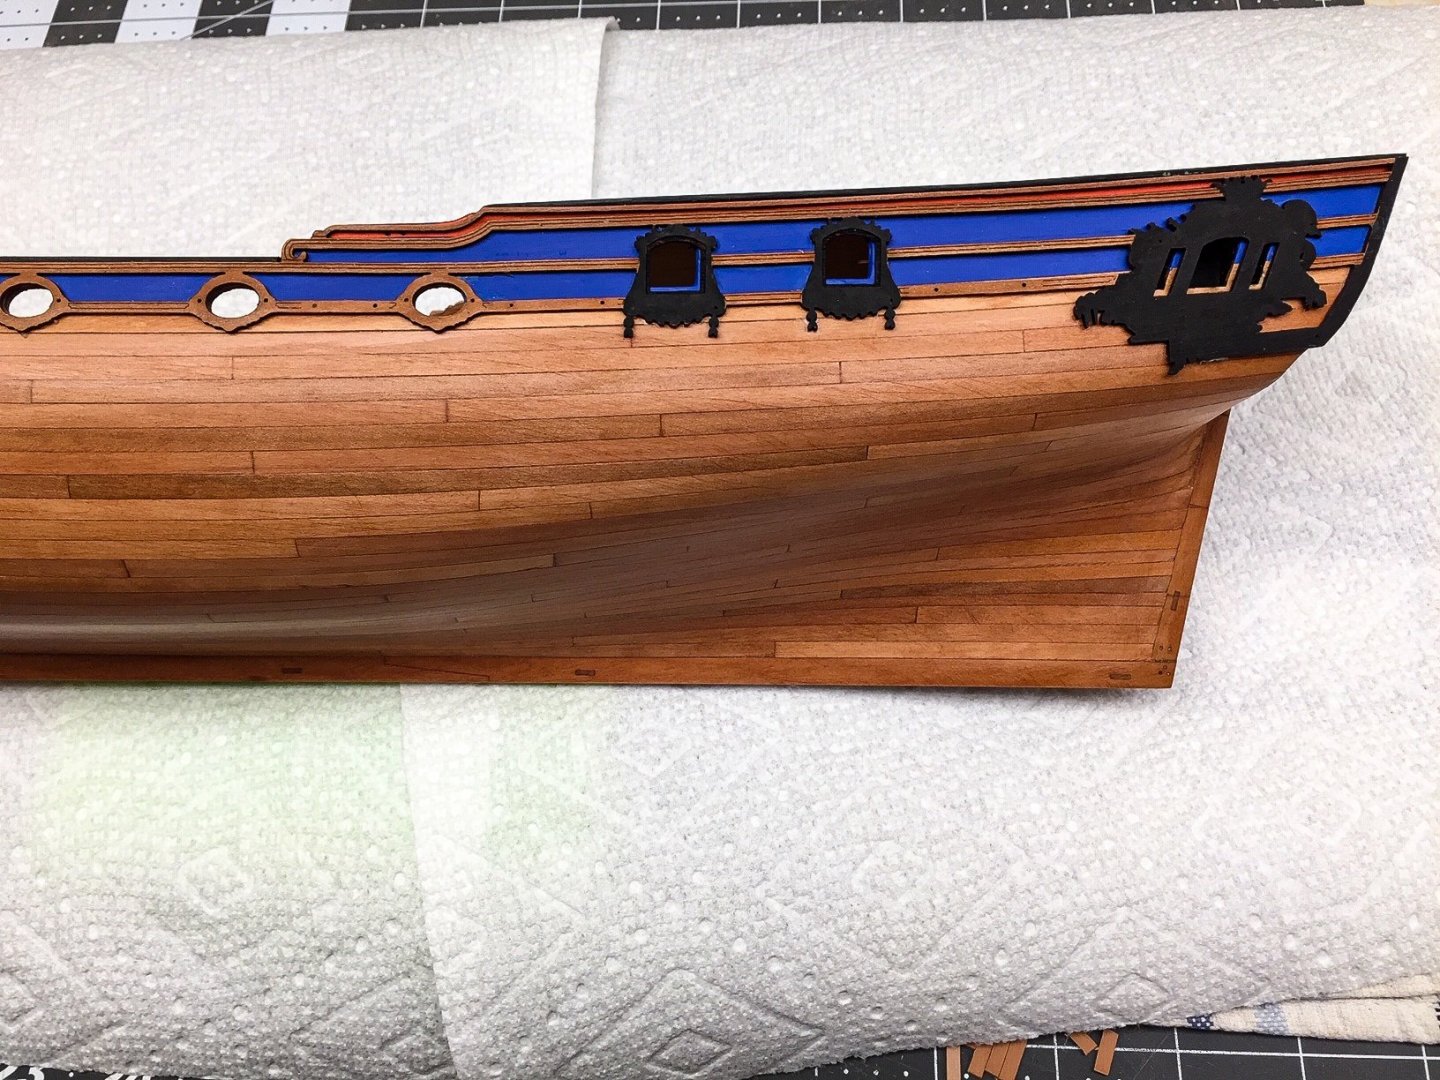
The other side was much better.

-
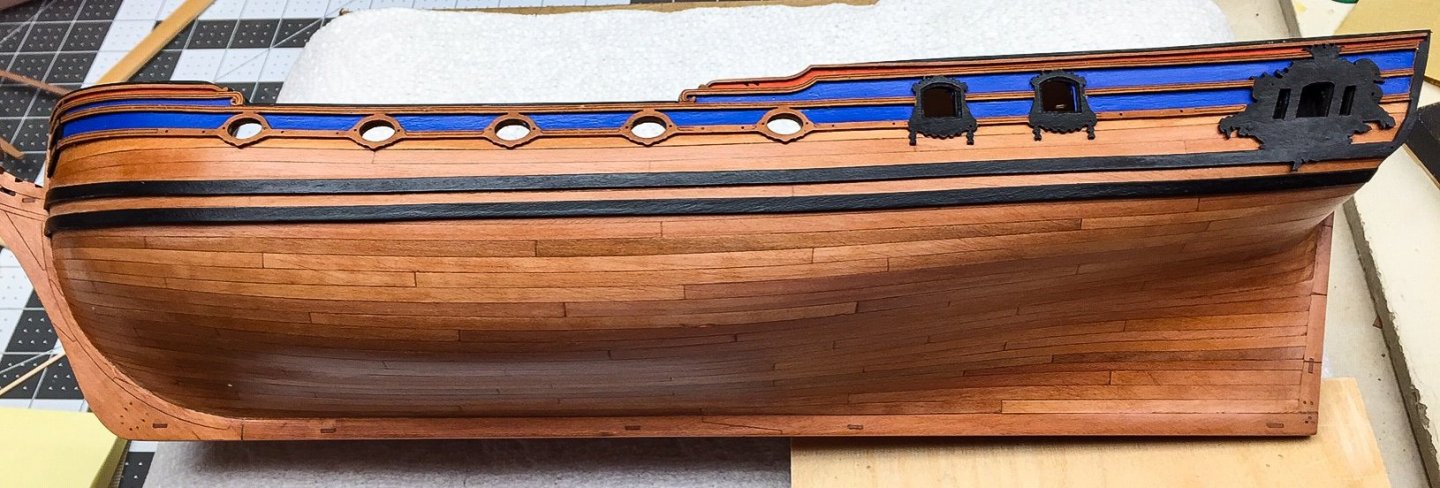
When I put the hull decorative pieces on, I could get them aligned with bulwarks ok in some places, but not all. One side fit pretty good, but the other didn't. It was off about 1/32" at the stern windows. I had a choice, and could have gotten it perfect at the stern windows, but not near the bow. But I chose to have it aligned good most of the way, and accept the problem at the aft end. Here's photo of aft windows on the side that was off a little, and you can see the window cutouts in the decorative piece (the black piece) don't quite match the cutouts in the hull.
-
It's been a while, I took a break from building ship. Weather has been too nice, so wanted to take advantage and do a few things outside. I had some problems putting on the hull decorative wood pieces. I found it awkward handling them because they run the length of the hull, all in one piece and are rather fragile. I think the problem I had getting them to fit was because I didn't get the two plywood bulwarks pieces placed exactly right. Pretty sure I got one side a little higher or lower than the other side. Anyhow they are slightly different.

-
Just wanted to let you know I'll be following your log, hoping someday to build Cheerful or perhaps this one. Your workshop is beautiful and so neat looking! Just like your models! But mine's bigger, haha! (it just allows me to make a bigger mess!) I really enjoy your logs and thank you for taking time to do photos and describe your methods. Flirt and Cheerful are incredible. You and others have me very curious about alaskan cedar.
- 840 replies
-
- 4
-

-
- winchelsea
- Syren Ship Model Company
- (and 1 more)
-
I didn't prime first, I just painted directly on wood. Depending on color and how much I thin, it takes 2-4 coats. I always have to sand fuzz off first coat, and sometimes after 2nd coat. I prefer painting with it fairly thin, but if too thin it drips or accumulates on edges. I have airbrush, but for small things like this, I use brush. I've noticed everyone puts coat of primer on PE parts, so I plan to do the same when the time comes. I have little experience working with PE parts. Thanks for suggestion about Vallejo metal colours and liquid gold. I've seen those listed, but didn't know the differences. I think I'll get some and try it. If I need to paint something metallic, I've found it's best to put on a white undercoat first, and then the metallic paint over that. I keep forgetting to thank everyone for the "likes"!
-
PS...I'm super impressed with your treenailing!!
-
I agree that main difference between Chuck and Antscherl methods are edge bending each plank versus cutting each plank to fit the required edge curvature. I've worked with basswood a lot and it's soft and easily shaped. It edge bends easily and I had no trouble on the small long boat. I thought I would, but turns out there were no problems. It certainly splits along the grain when cutting (like for taper), but no problem steaming an edge bend. I'm guessing you'll have more problems with basswood splitting when cutting the curved pieces. I know from experience basswood splits super easy when cutting small parts or details. It will also split easily when bending unless you heat/steam it. Carving would be very difficult. On bulkheads or similar parts with notches, slots or sharp curves, I've had to laminate two thinner sheets of basswood together cross grain, and then cut the parts from that to avoid splitting. I suspect it's one of those choices that's up to the modeler. Cutting each plank to fit is probably the way they did it on full sized ships so might be more "accurate", but we have a choice on models since we are working with small strips of wood. I tend to be impatient, and edge bending seems easier to me, but that's just me. Others may find cutting each piece to fit easier. One thing about cutting each piece to fit, you would be able to minimize drop planks and stealers, and seems like it would make fitting the last plank easier.
-
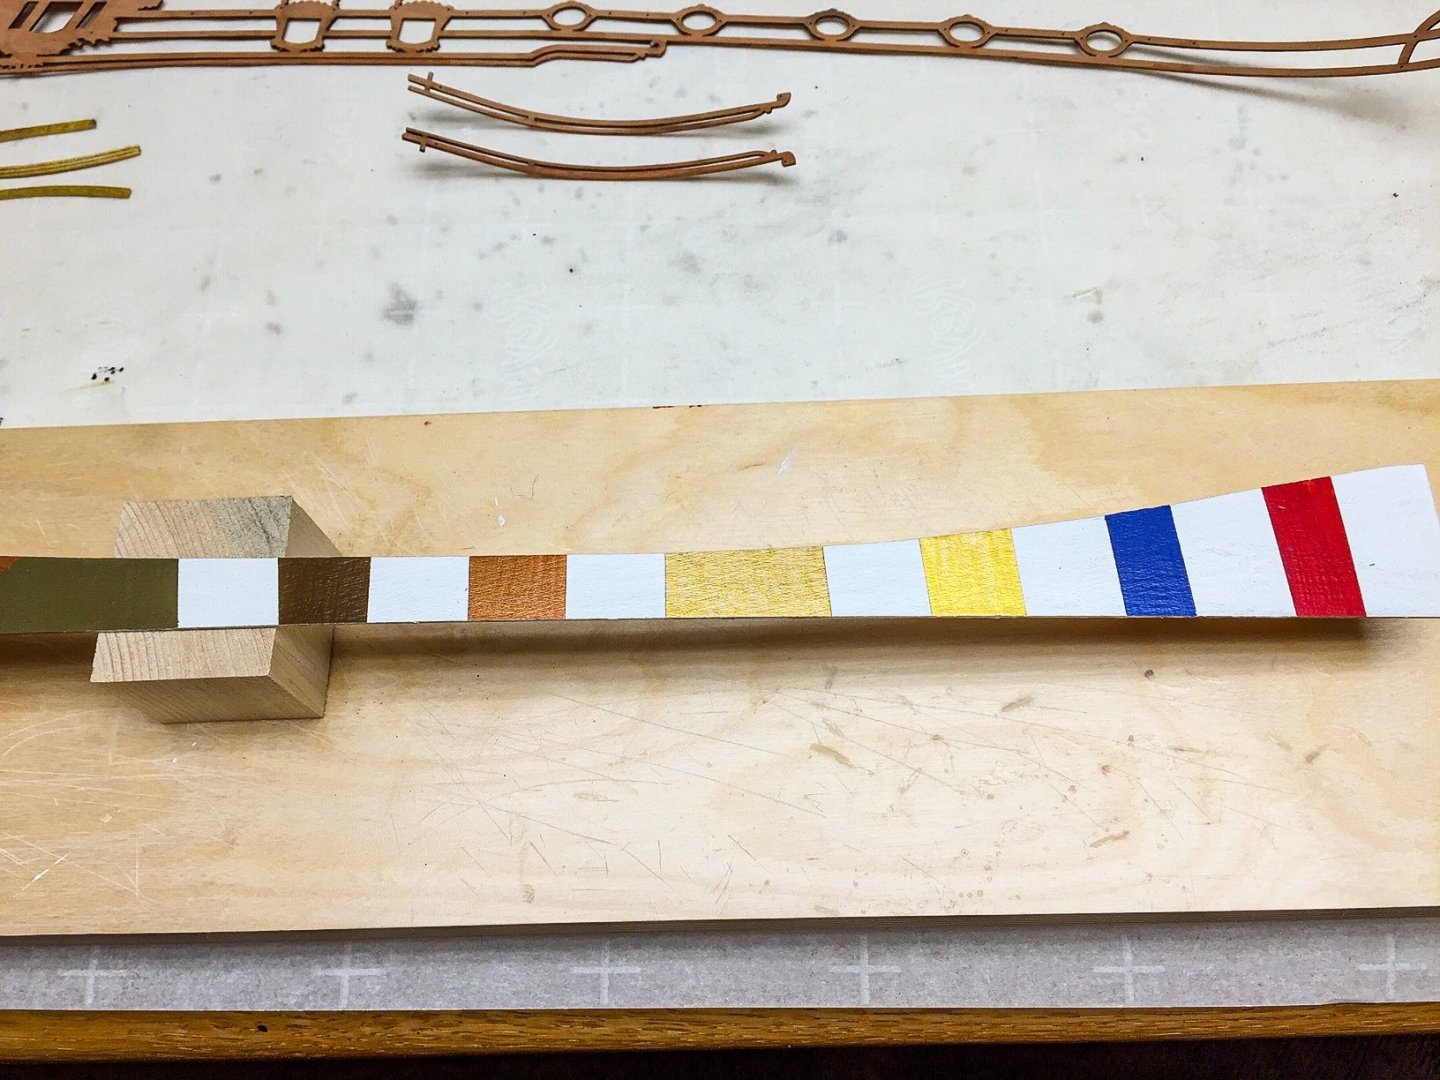
Hi Bob, I finally finished test using oil based wipe-on poly over Vallejo acrylic paint and it worked fine. I painted some scrap pear wood with flat white, and then added stripes of colors. Colors in photo from left to right are khaki (looks closer to olive drab than what I'd call khaki), flat earth (dark brown), copper, model-air gold, model-color gold, royal blue, and flat red. Except for gold, all are "Model colors". I brushed on the Vallejo paint and didn't bother to thin it a little or sand between the 2 coats, so you can see brush strokes. I usually thin Vallejo model color paints a little even when brushing, and lightly sand between coats. I let Vallejo paints dry overnight and then wiped on a coat of poly. I wiped both directions to see if it smeared the colors and it didn't. It worked great. I put on a 2nd coat and no problems. The model-air gold and model-color gold are different shades and it has nothing to do with one being thinned for air brushing. The photo doesn't capture the gold colors very well. The model-air gold looks brighter in photo than for real, and the model-color gold doesn't look as yellow as in the photo. If you want more of a muted gold color or darker gold color, that's model-air gold. If you want a brighter gold or more yellow gold, that's model-color gold. Lighting affects how the two gold paints look. In photo I have direct overhead light, so both look brighter than they would on the side of a hull. If I was choosing gold based on this photo, I'd choose model-air gold. But in reality they look quite a bit different. Usually I'd prefer the muted gold color, but I think the Duchess wanted to be noticed when she sailed into port, so I think I'll use the brighter gold on my model. I bet the crew was out polishing all the gold before entering a harbor.