HOLIDAY DONATION DRIVE - SUPPORT MSW - DO YOUR PART TO KEEP THIS GREAT FORUM GOING! (Only 75 donations so far out of 49,000 members - C'mon guys!)
×


desalgu
-
Posts
363 -
Joined
-
Last visited
Content Type
Profiles
Forums
Gallery
Events
Everything posted by desalgu
-
Beautiful work, as always! Strips of basswood will have some color variation in them when finished. On the hull planking, you've got similar color differences and it adds to the look. But I agree it would look better to get the side cap rails to match the top piece and the moldings. Perhaps when you make new ones, you can put finish on them before gluing them on to ensure you get a good match with the top piece. I'm real curious how the carvings go. Based on what I've seen of your work, I bet they'll be awesome!
-
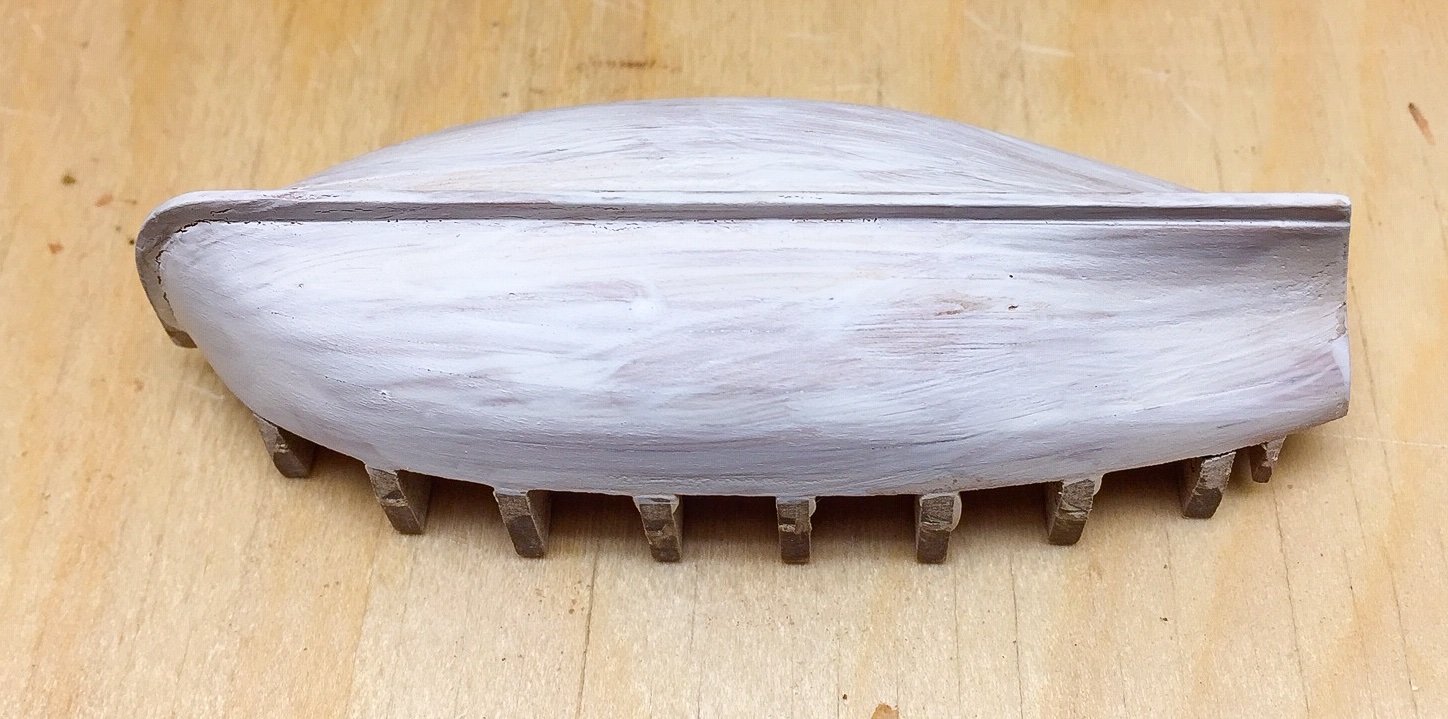
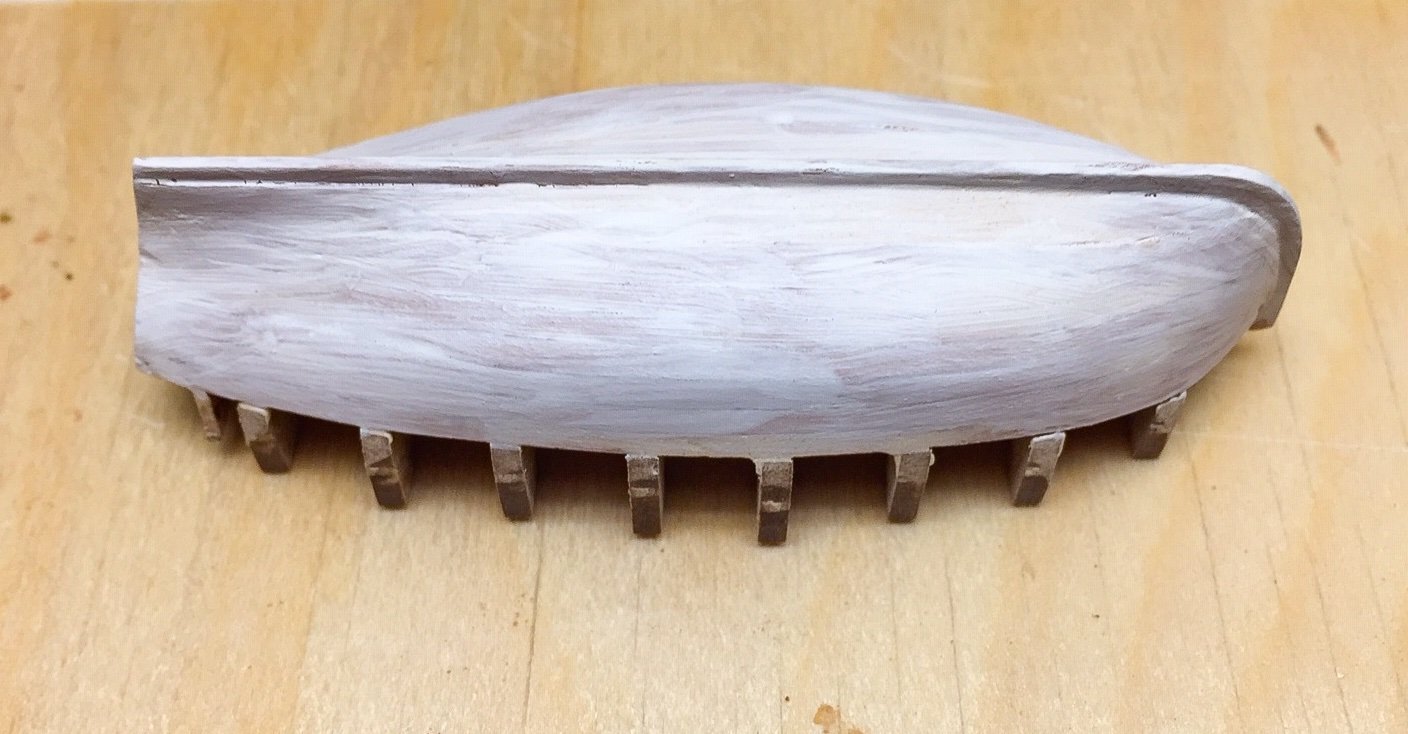
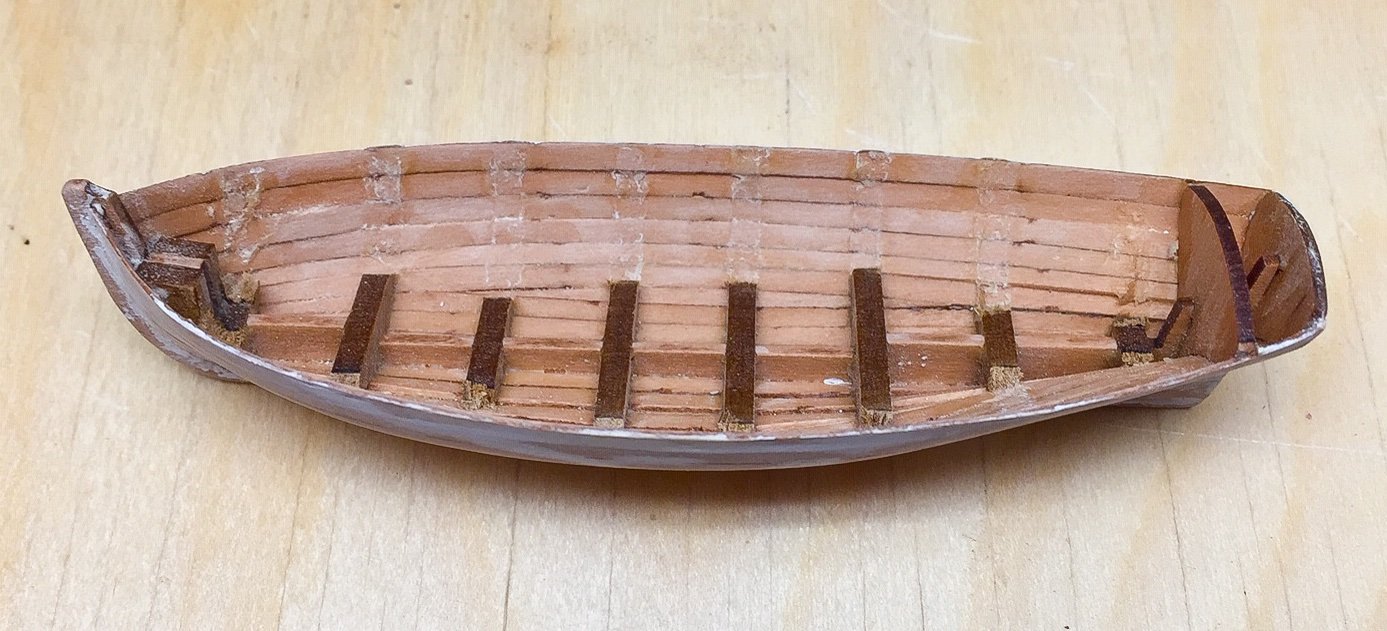
Ships cutter progress: I finished planking a few days ago and added some filler. It wasn't the best planking job I've done. The small size gave me fits. But I plan to paint the hull white, so I can use as much filler as I need. I put on a coat of primer (sanded off today) just to see what it looked like with a coat of white. I've been nervous about removing the temporary bulkheads used for planking. But it turned out, most of them popped out fairly easily. I had a couple that took a lot of slight back and forth with the pliers to remove. I was starting to wonder and then they popped out. Glue marks show where the bulkheads were. I've very lightly sanded them and will continue. They are hard to sand because the little boat is fragile and hard to hold. The planking is very thin. You can see my struggles planking when looking at the inside of the boat.

-
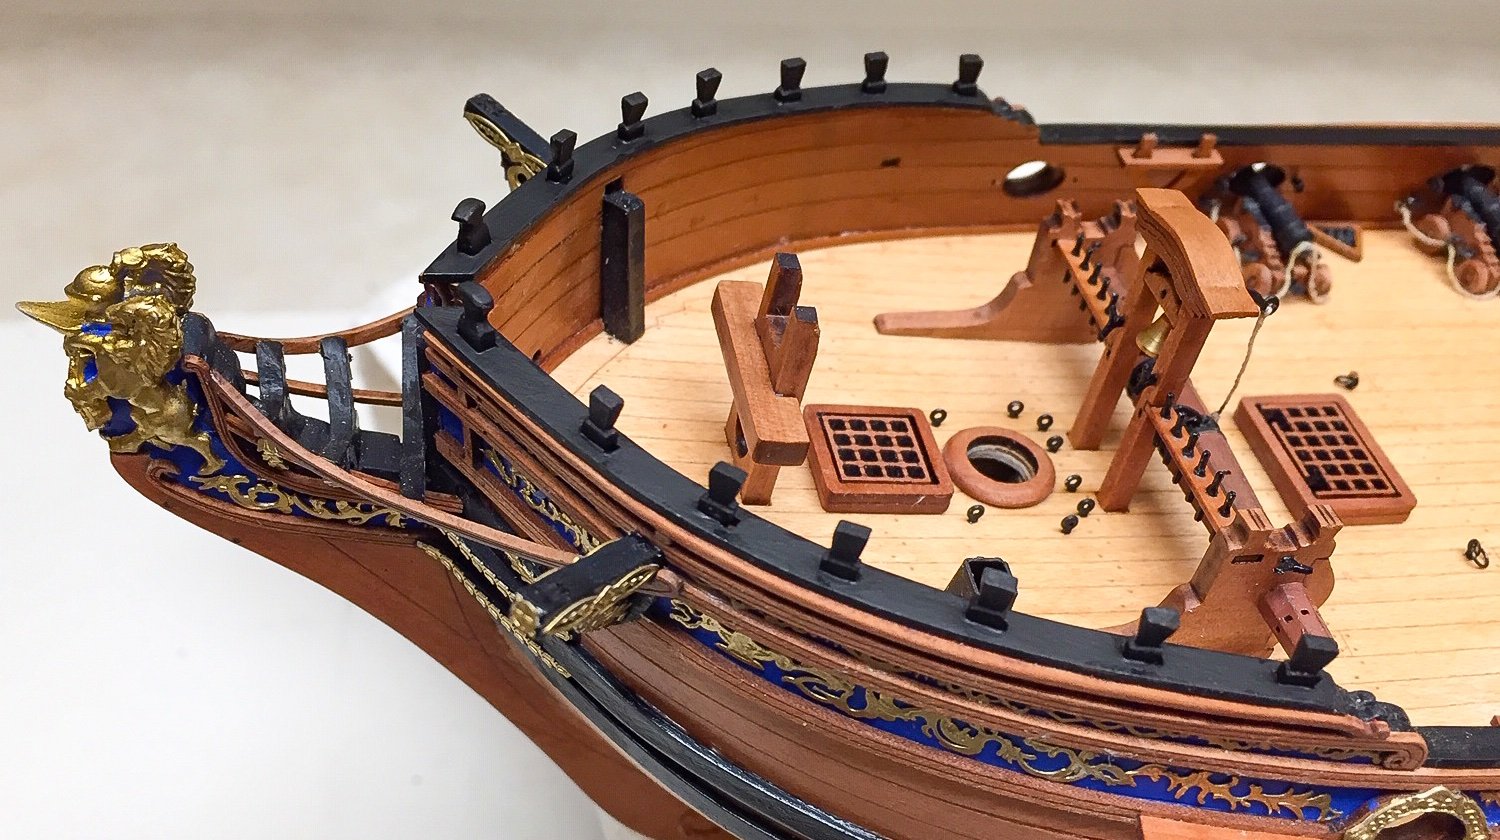
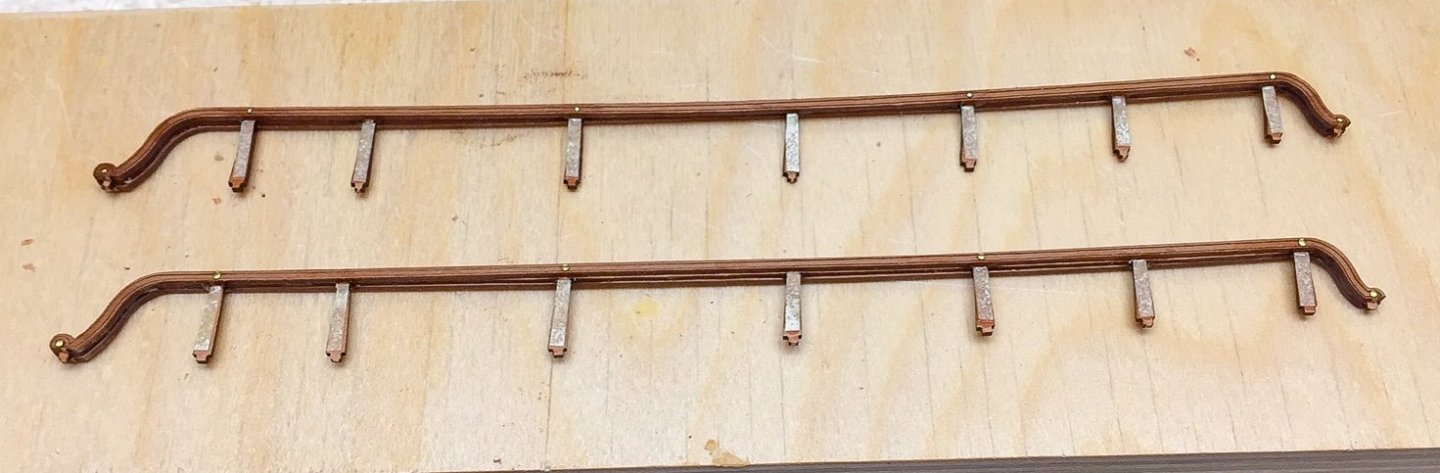
I got the bow timberheads shaped and glued on. The main problem shaping them is holding them. I used xacto, files, and a little sanding to shape. Doing them by hand, I know they aren't that consistent, but it was the best I could do. I decided to glue paper to the posts of the quarterdeck side rails for added strength. These are painted black, so it won't show after it gets painted. I'm adding a slight bend with dry heat to the rails to match slight curvature of stern cap rail. I'm thinking I'll just get them fitting and then wait to glue them until a little later. The rails will stick up some and with my luck, I'd break them off handling the model. I'll see how strong they are when test fitting and then decide what to do.

-
I always enjoy seeing your work. It's always so neat and clean looking. I'm not building this one, but I agree with you to plank the inner bulwarks now. Planking and sanding them will be easier now with less stuff in the way. You're moving closer and closer to scratch building by redoing the quarter gallery parts. That's fantastic, and I bet yours will look a lot better than the kit versions!
-
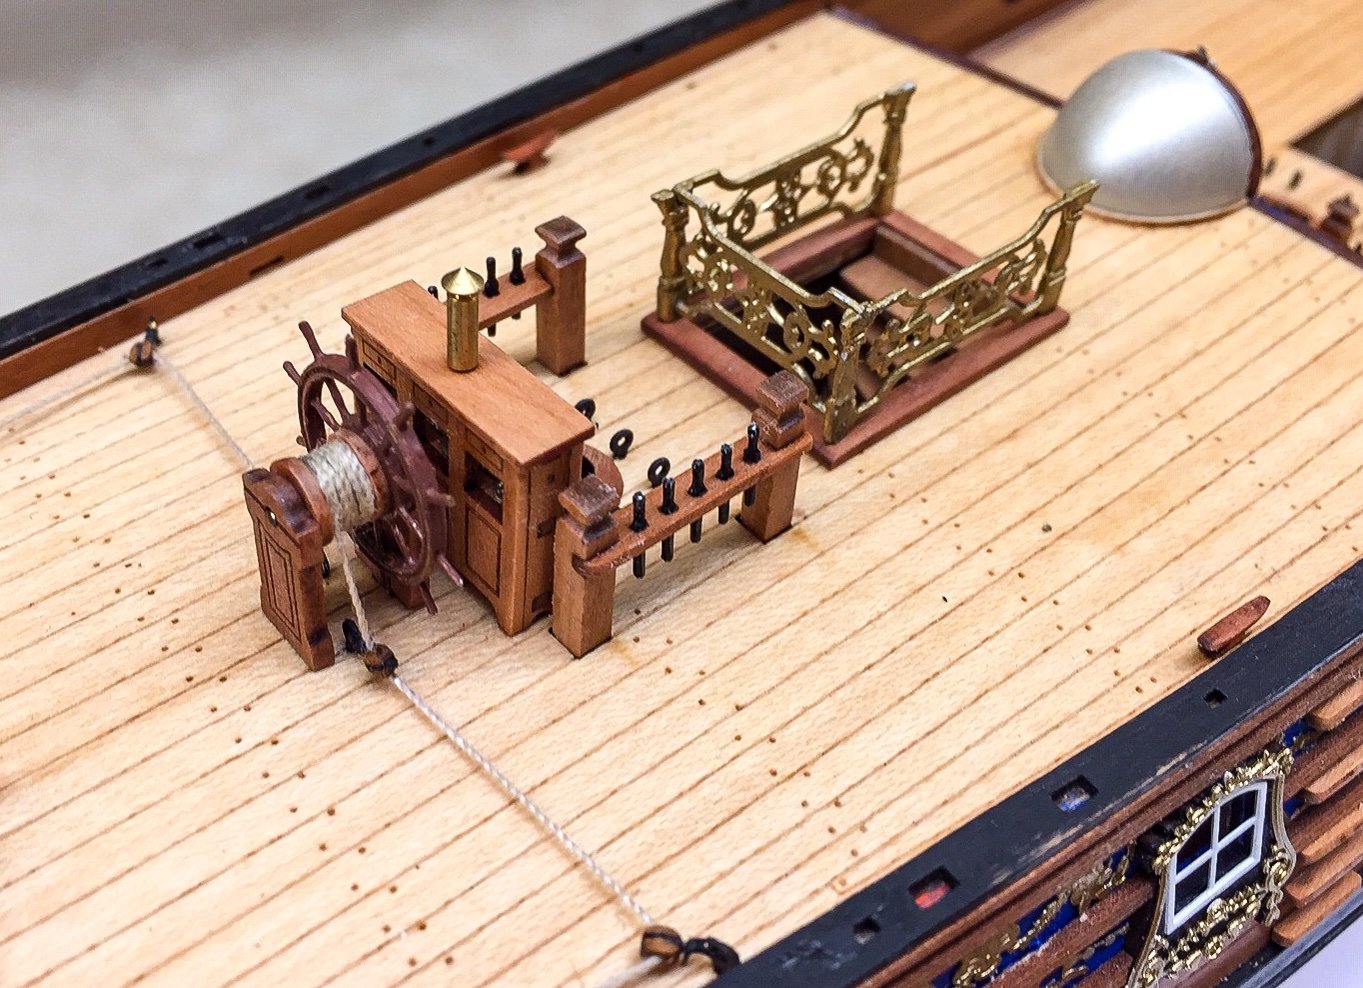
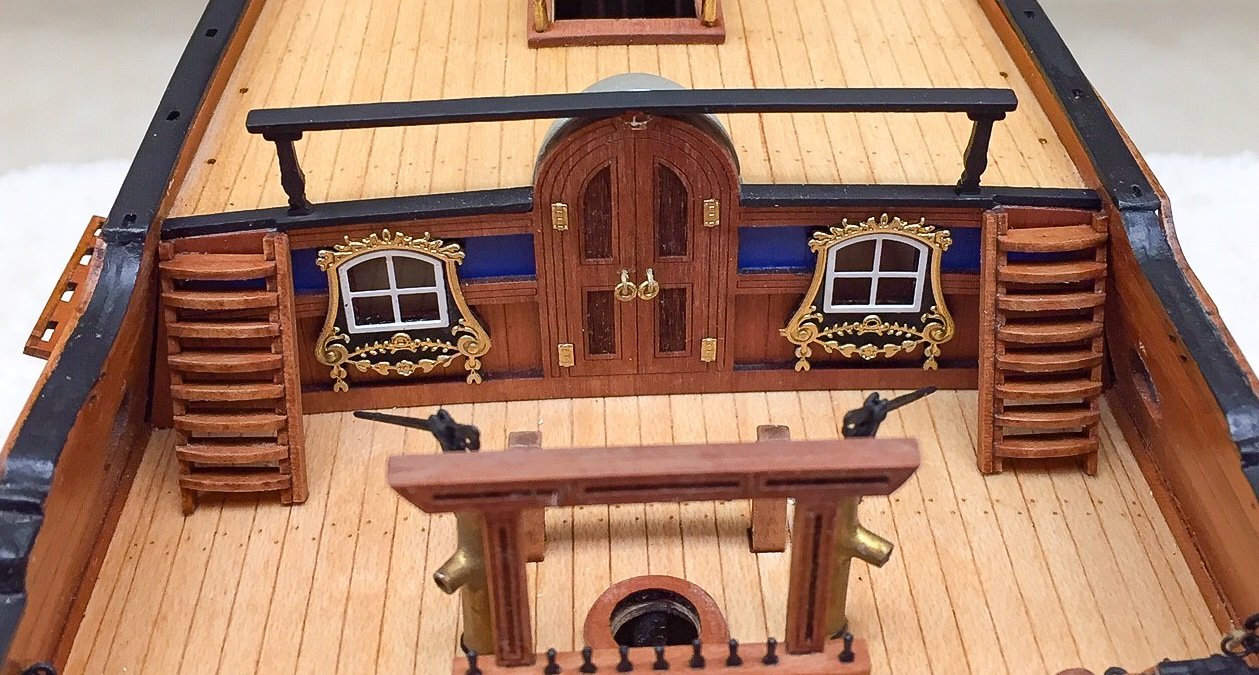
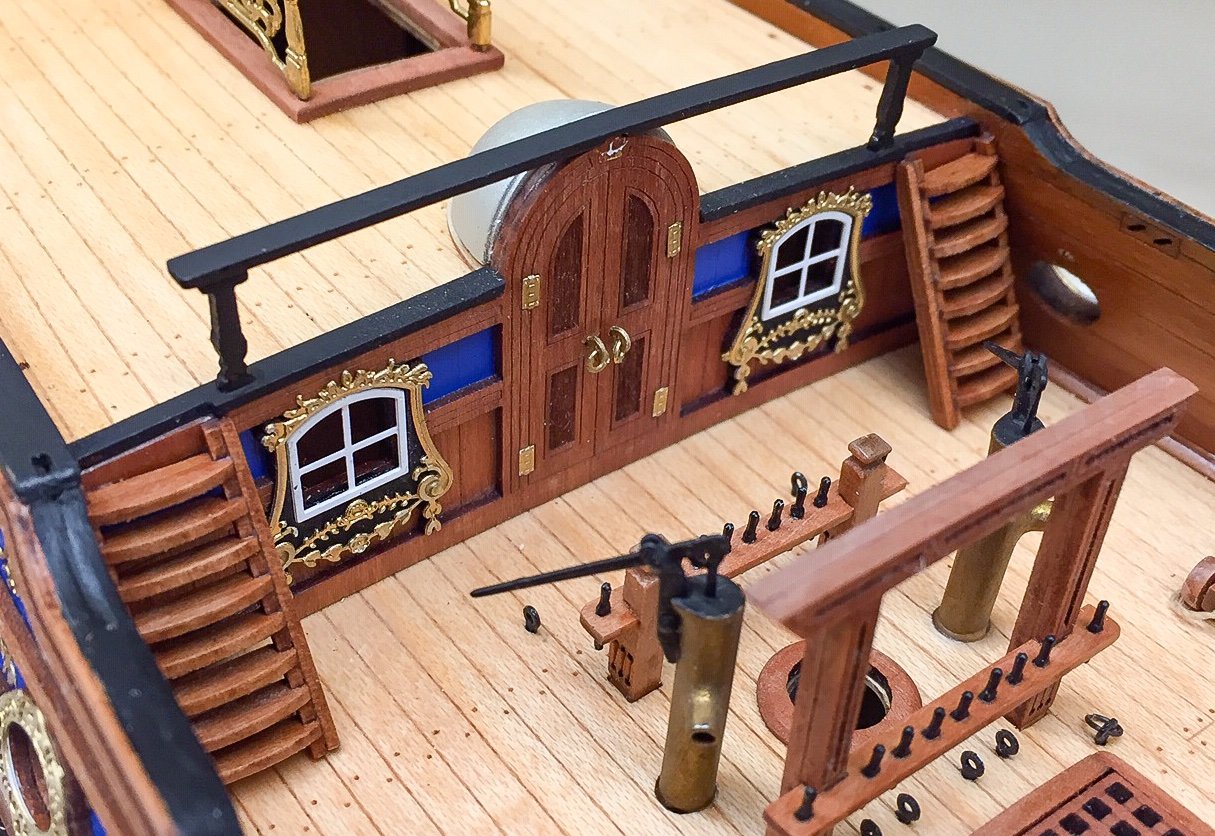
I was looking ahead in the manual, and the handle and rope on the ship's bell is in there, but much later at step 232. I'm guessing he waited thinking it might get in the way when doing the anchor cables. I started working on the side quarterdeck rails and discovered the posts are very fragile. The part with the posts is all one piece, so the wood grain in the posts runs the wrong direction for strength. One post broke off, and I was being very careful. Easy to glue back on, but a warning that these have little strength. I'm thinking I should add thin strips to the posts with the grain running the other direction to add some strength. I added the ladders and quarterdeck railing that goes over the door frame. The ladders were quite easy to make because of the way they are designed. The only hard part is making sure there are left and right versions. But the quarterdeck railing gave me problems. I decided not to glue the posts to the railing first, because both ends have to fit into slots and I didn't think I could get it all aligned without doing it on the deck. There is a left and right post, but the differences are subtle, just enough to account for the deck and rail curvature. Once painted black, I couldn't see the laser etching, so I didn't worry about keeping it facing the bow. There is a little tab on top of the door frame. Part of the little crown decoration is glued to this extra tab. From the plans and manual it looks like the railing sits on top of this tab. But the tab is small and it's hard to hold the railing on top of it, and keep it all aligned, even with tape. Somewhere along the way, doing a lot of test fits, the crown decoration came off. I didn't notice until it was gone, and of course, it's lost. With the crown not there, I thought it made more sense to cut a little depression in the railing for the tab above the door frame. The tab would fit into this depression which would give the railing a lot more strength and would hold it in alignment. I proceeded and it worked and looks good to me. There's a gold smudge where the crown used to be. If Chris can find an extra PE sheet or scrap crown, I'll glue it on the door frame just below the railing. Or if he can't find an extra one, there's a spare small PE decoration I can use.
-
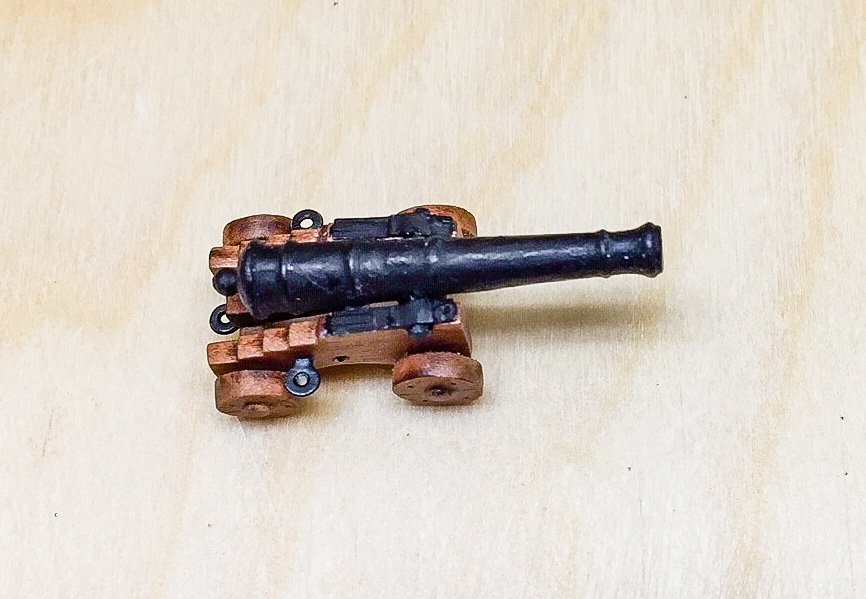
I love seeing all the little tricks and solutions you use. Looks like you added a little "iron" piece on the back of the cannons that I don't remember being in the kit. Or maybe I missed it which would be something I'd do. Looks like it might have been used to adjust elevation of barrel on a real cannon. I really like the boxwood carriages and the contrast with the black iron parts. After fighting tiny cannon balls rolling all over the place and finally getting them inside the triangles, I thought maybe I should have used tape. But I never would have thought of double-sided tape like what you did. Very clever!
- 345 replies
-
- 2
-

-

-
- Duchess Of Kingston
- Vanguard Models
- (and 1 more)
-
I've also been planking the ship's boat, Vanguard's 18-ft cutter - new version, that I'm adding to the Duchess. This has been a challenge because of its small size. The planking strips are also considerably smaller than I've used before, and I'm using PVA glue instead of CA. They bend easily, but being small, are hard to shape. I didn't try to line off the hull as it didn't seem practical at this size. I've been hand holding each plank until thinned PVA dries to hold it, usually about 5 min or a little longer. I forgot to taper the first 4 planks. I should have started tapering at bow and stern after the first plank (top one). I also could have tapered the garland plank more than I did. About this point the planks needed edge bending at the bow. Here's where I'm at so far. There's only a few more planks to fit in. I'm thinking I will paint the hull white as shown in the manual, so I'll be able to sand and fill the hull much smoother than it is now.


-
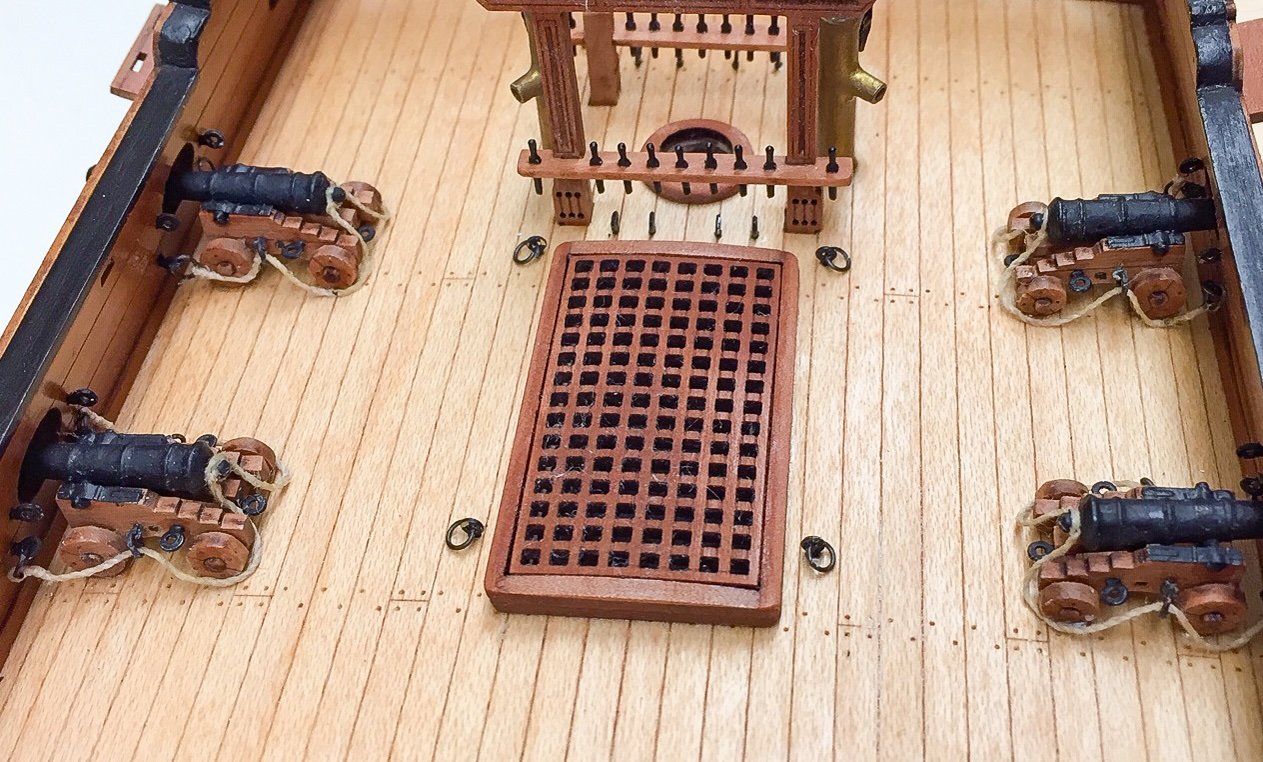
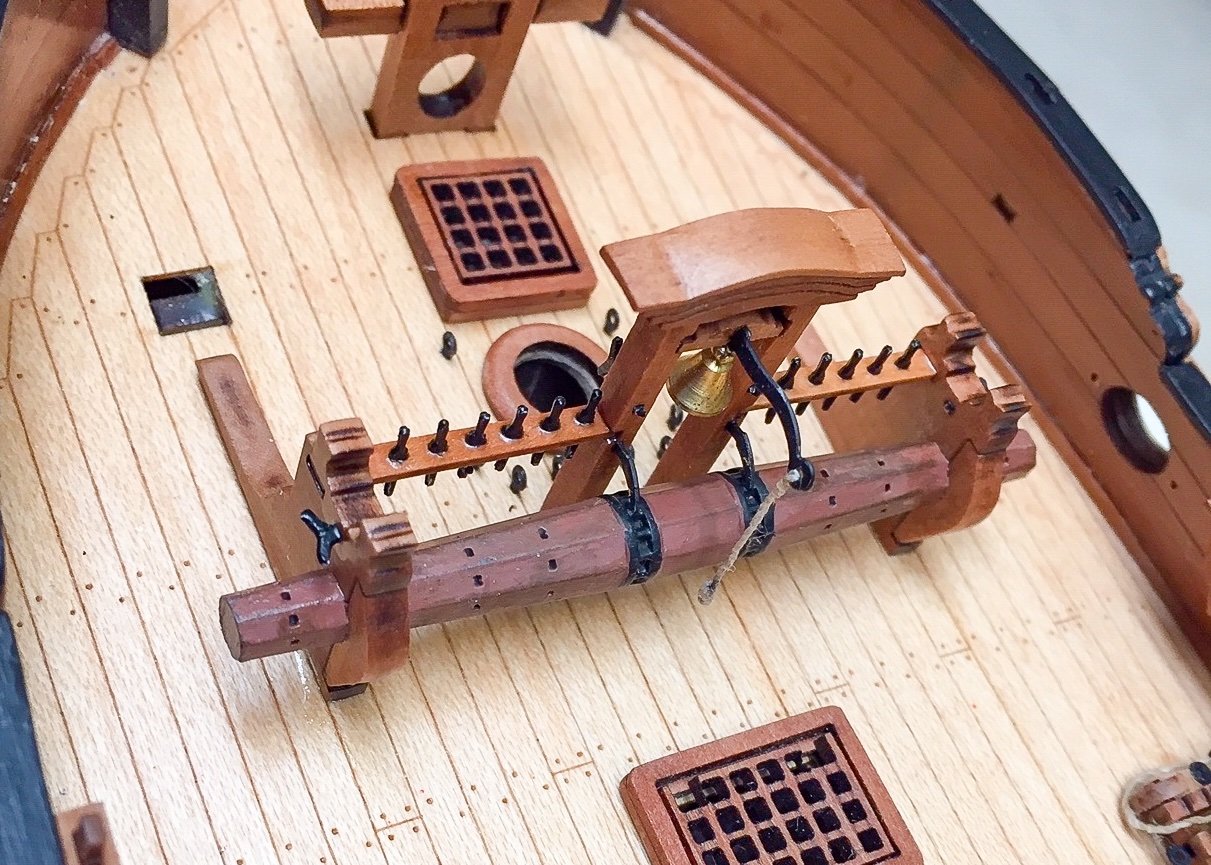
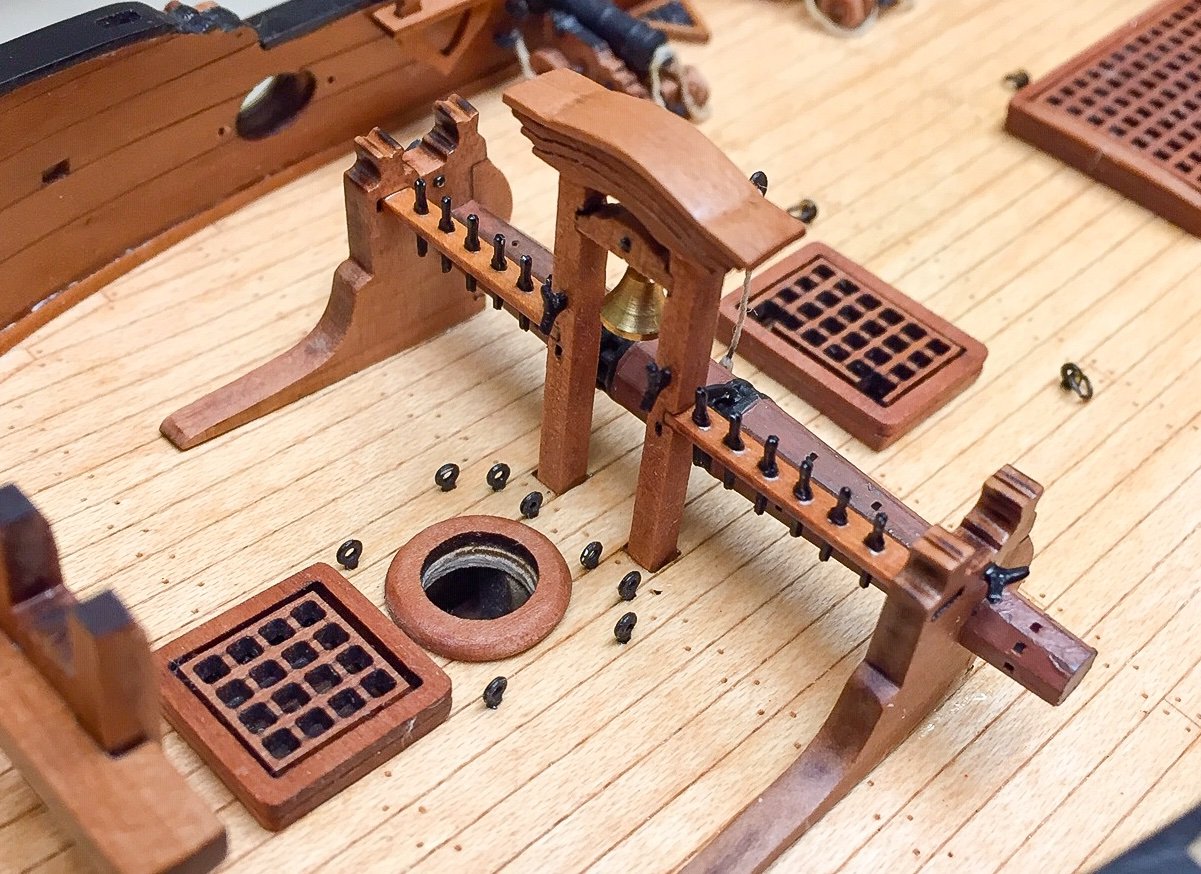
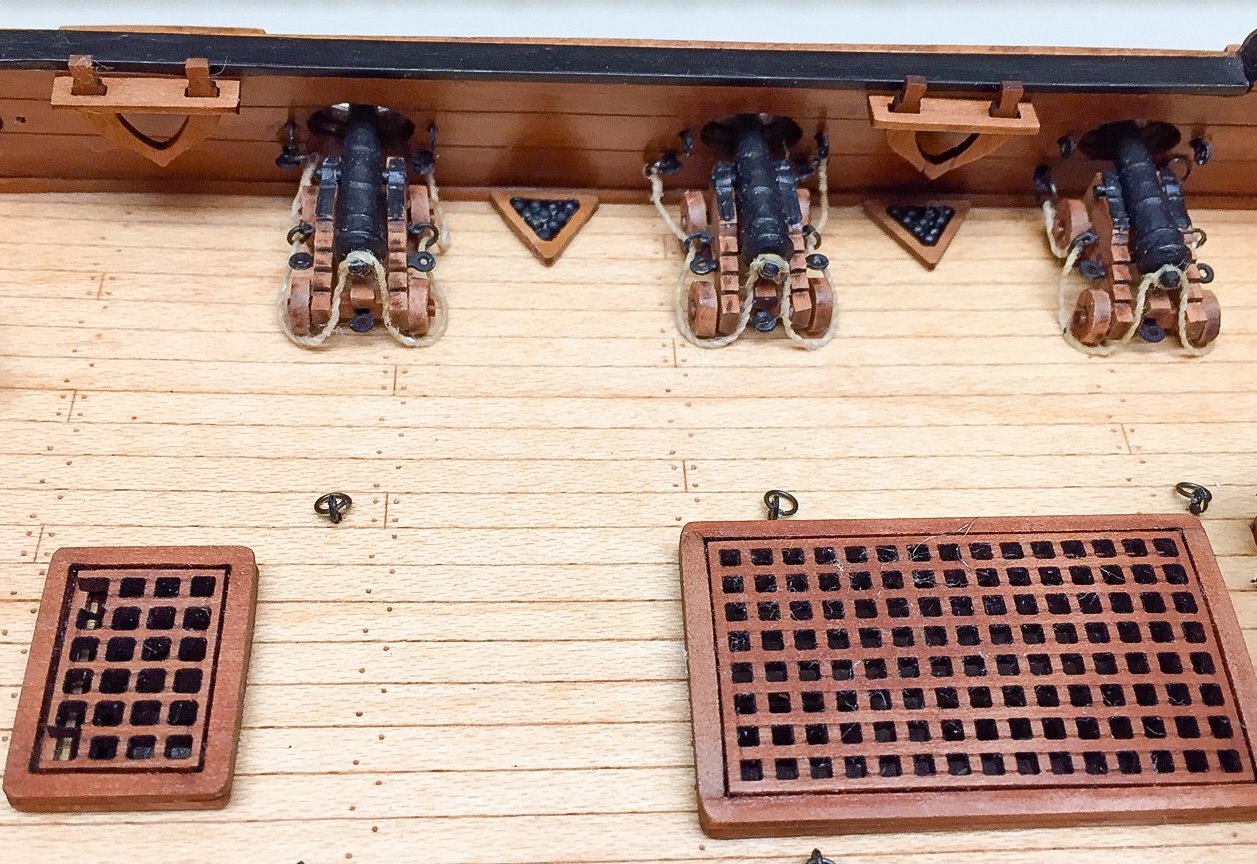
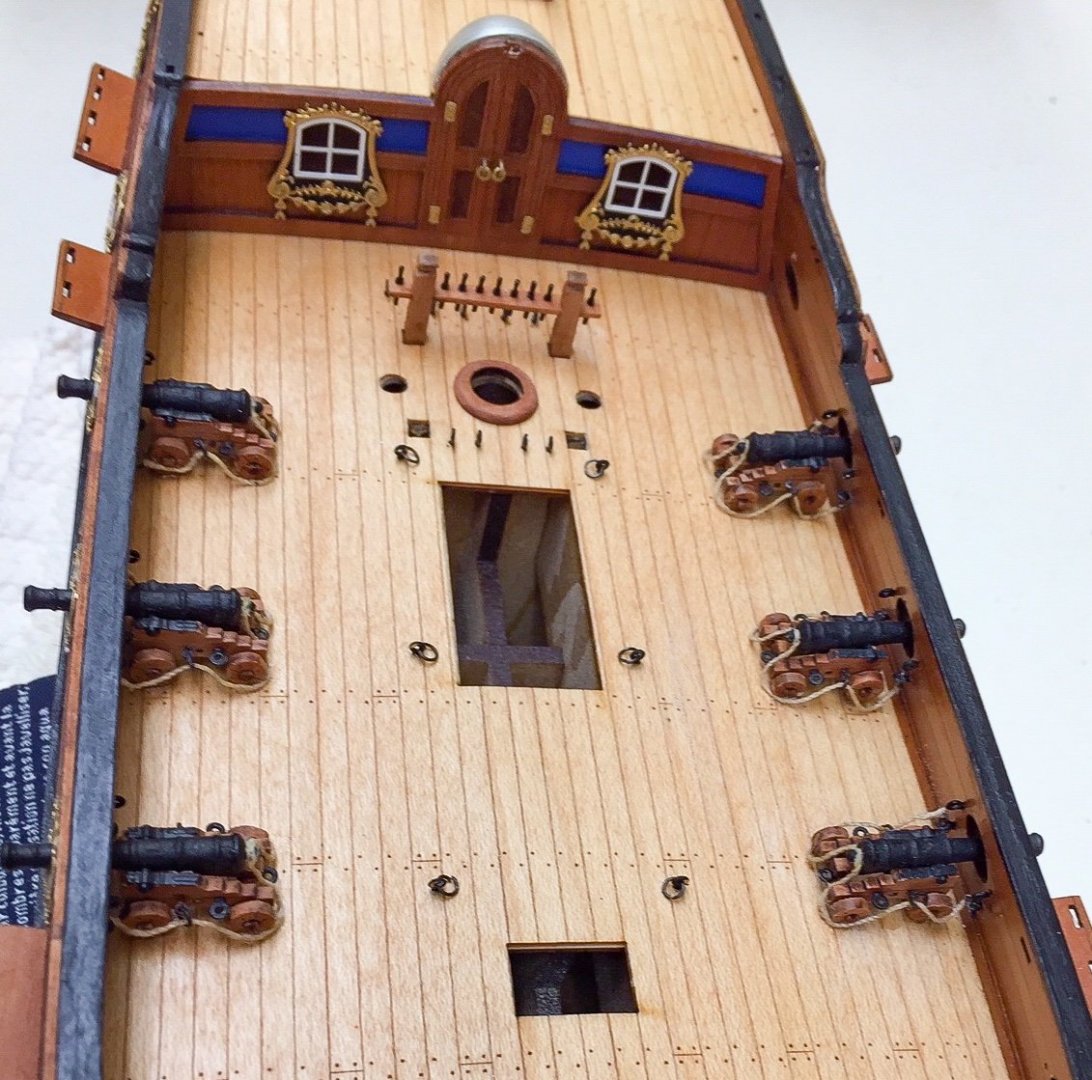
I've been continuing work on deck fixtures, which is kind of fun. This is probably my favorite part of building model ships. I didn't run into any major problems. I copied @DelF and added a slight curvature to the main hatch grating. I couldn't find a can laying around to use for bending the grating, so used a plastic cover or lid. It didn't work as well as a can would have, so I didn't get much curvature and it didn't seem as even as what @DelF did. Otherwise, I followed the procedure in his excellent build log. I left the other two hatch gratings flat. I felt like they were too small to try to curve, and not worth it at this scale. I also copied @DelF on the belfry by adding a "roof" or extra piece on top to hide the glue joints. I thought what he did really dressed up the belfry. I used scrap 1mm wood and sanded it thinner, but should have sanded it thinner than I did. It still worked though. I also added the bell handle and pull rope like he did. As he said, this was not shown in the manual, and you have to look real close at the plans to notice it. The windlass and belfry are tied together in the same structure. I had some weathering powder, so gave it a try on the windlass. Not sure whether it helped or not, but it does look like it's been used before. I had to fiddle a lot getting all the parts lined up. I ended up gluing the belfry piece first and tried to get its height correct so the belay racks would be level with the deck. I needed something locked down to get the rest of the structure aligned. It took multiple efforts and I finally decided it was good enough and glued everything. The bowsprit bits and the anchor grating show in the pictures, but are not glued in yet. And finally, I added the staghorn cleats and shot garlands. The staghorn cleats are very fragile, so you have to be very careful removing laser char. I broke one, but was able to glue it back together. The triangular shot garlands are also very fragile, and I broke one of those also. But there were a couple of spares in the kit, so it was not a problem. Spares of small, fragile parts are most welcome!! The cannon balls are very small and hard to handle. I got them inside the shot garlands, but it was more difficult than I expected. I ended up using thin PVA and a brush. I'd stick one or two cannon balls to the brush and then try to get them off the brush with a straight pin and my fingers into the triangle. It worked, but surely there's a better and easier way. I'm guessing @DelF will come up with a clever and simple solution, and I'll look like a beginner (which I am!).
-
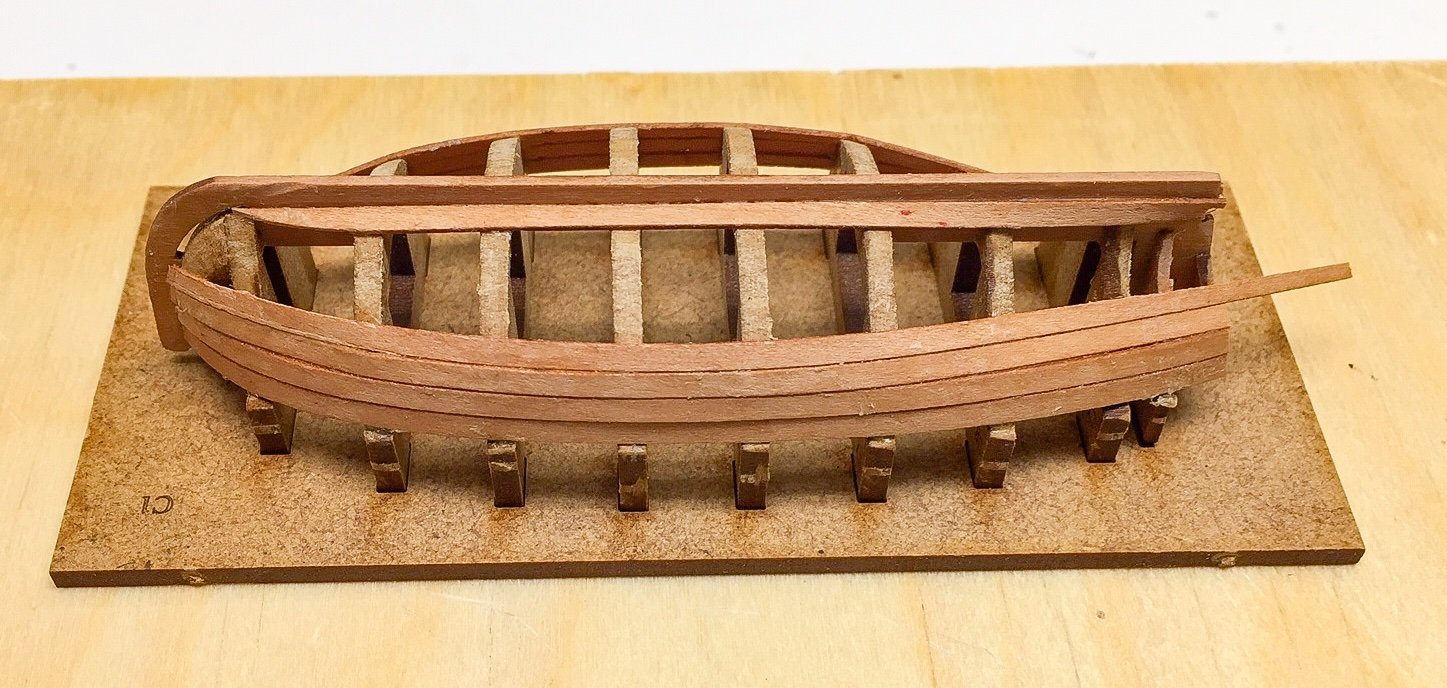
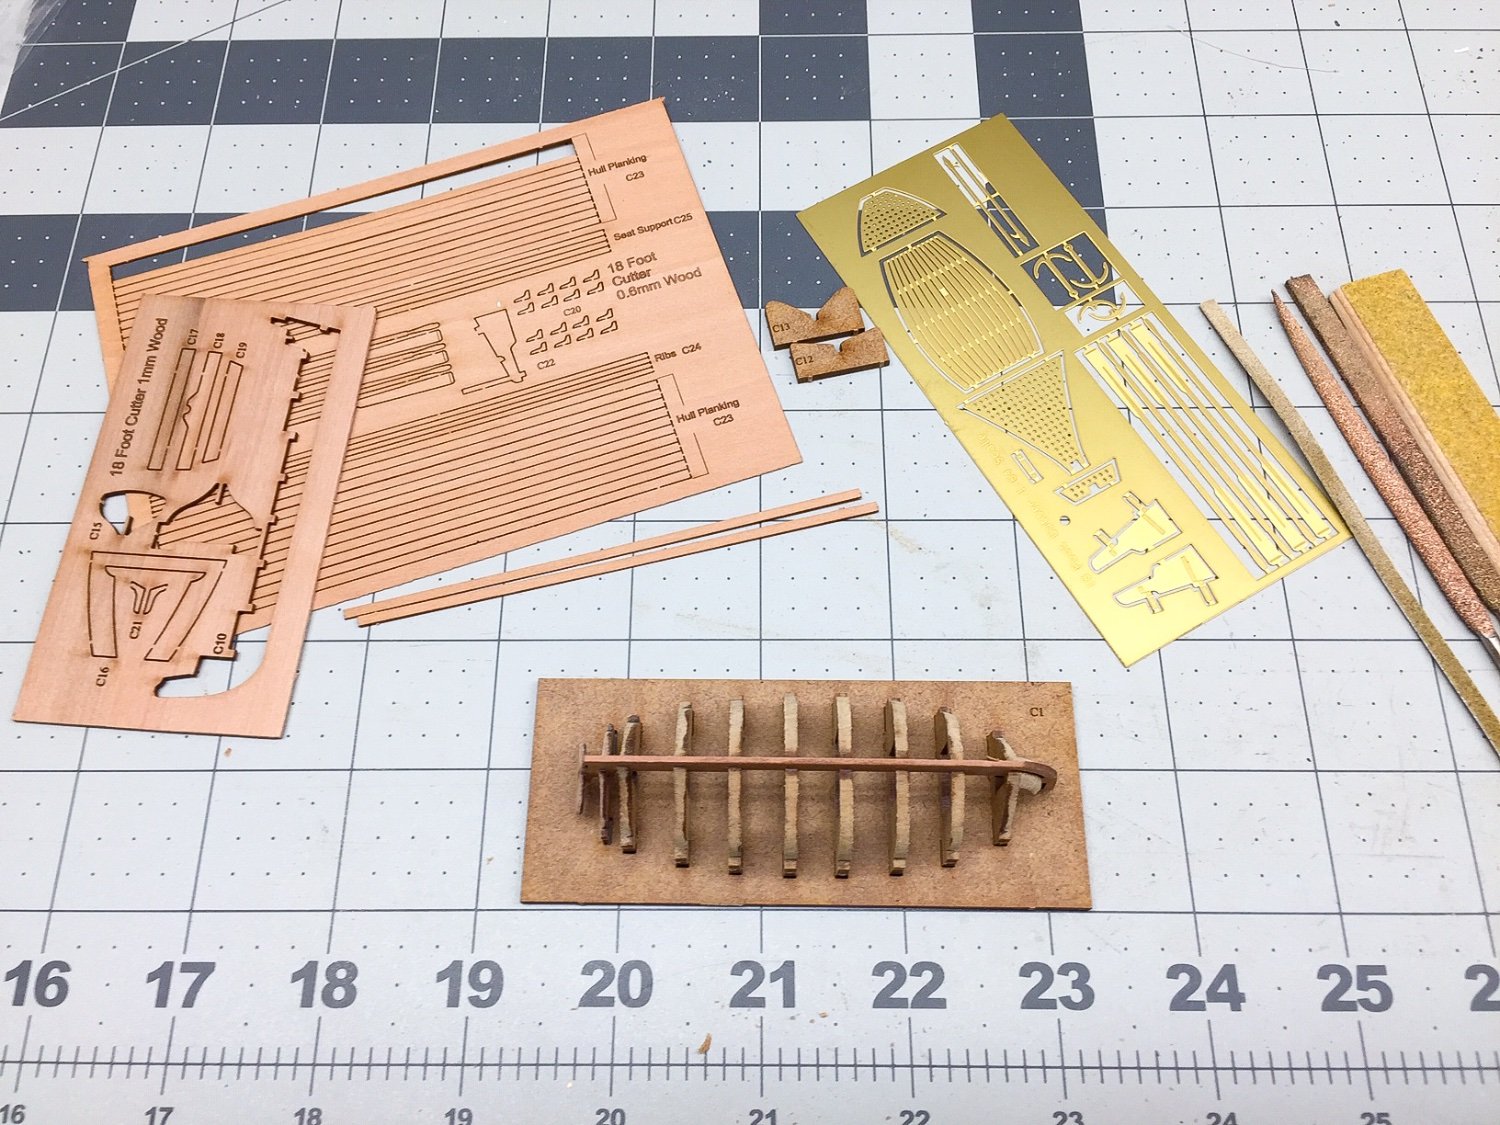
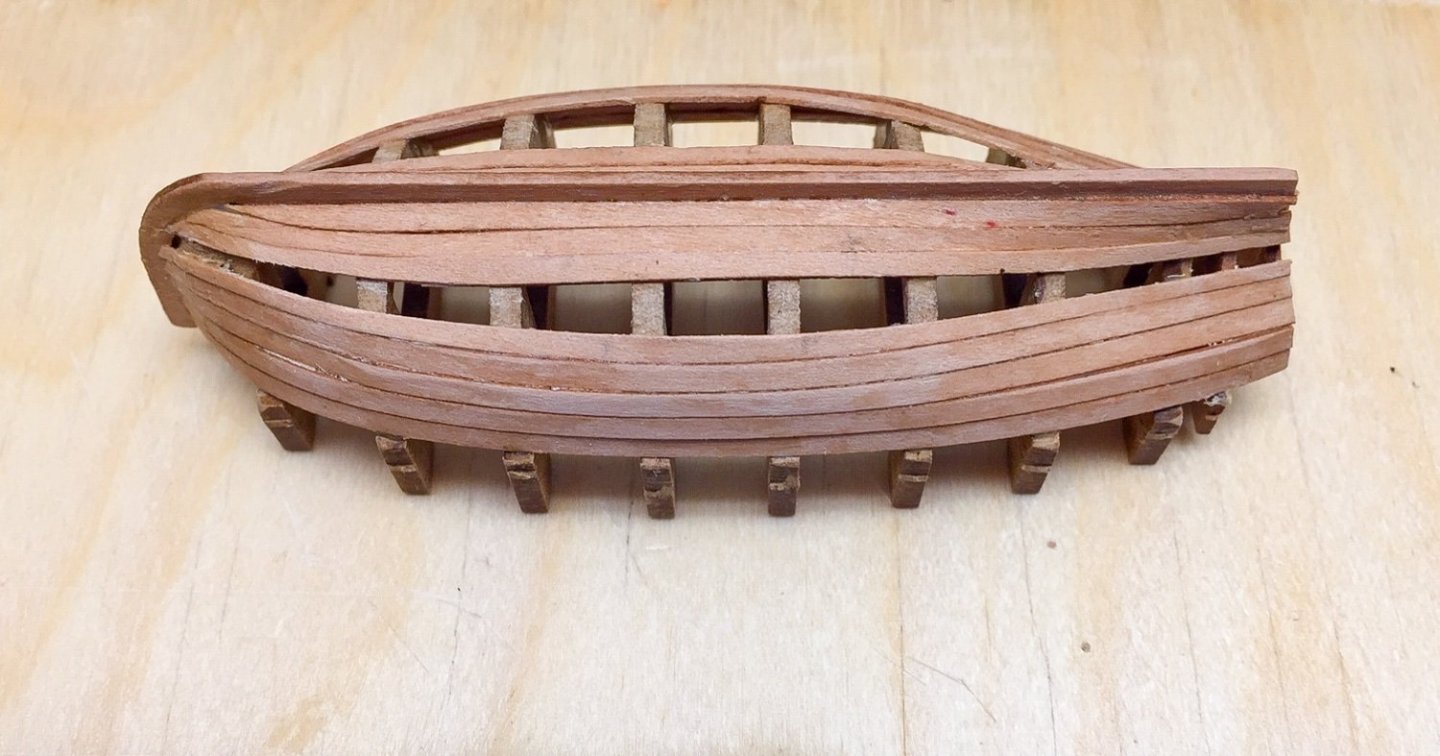
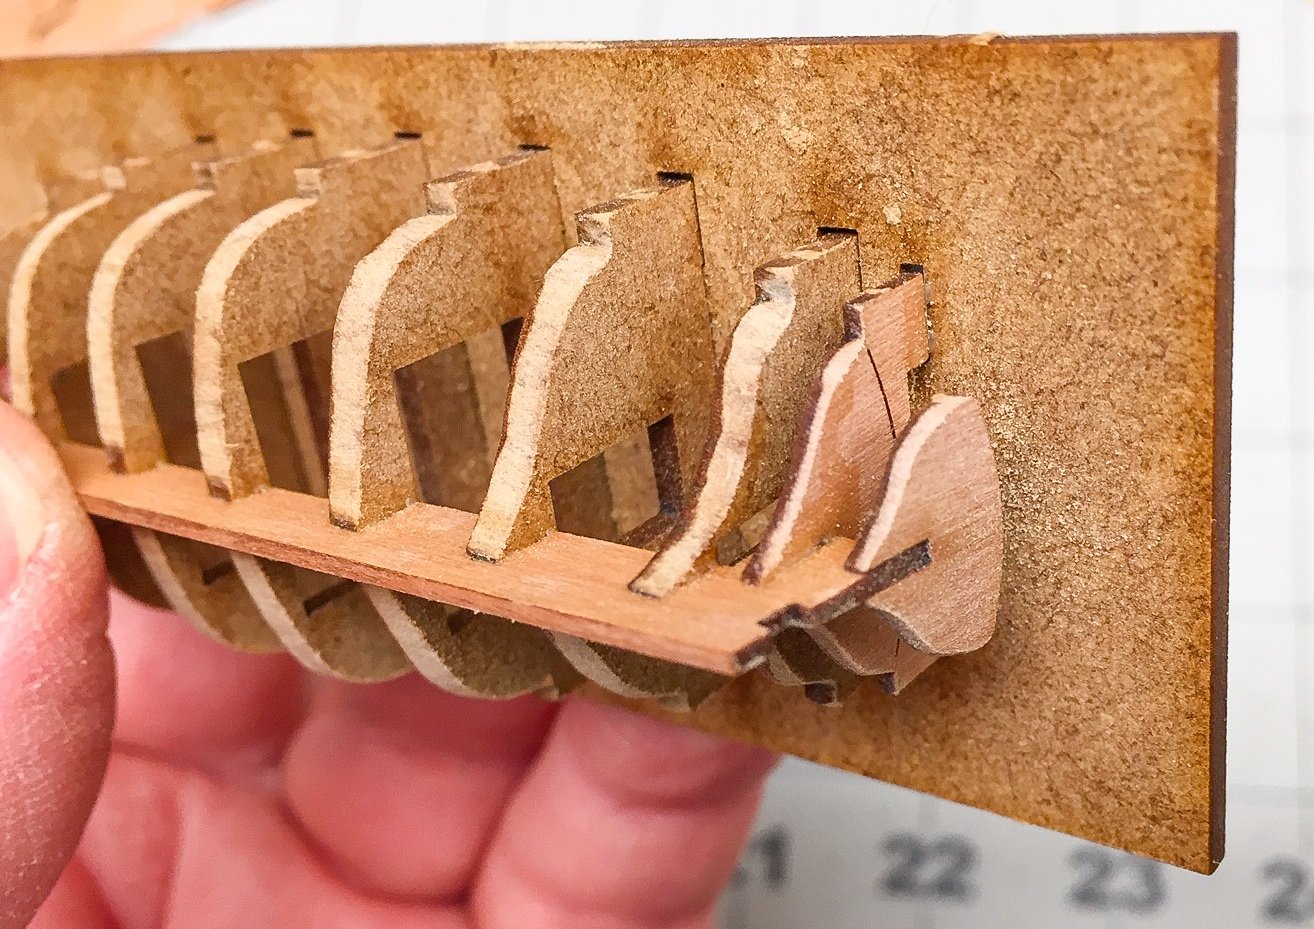
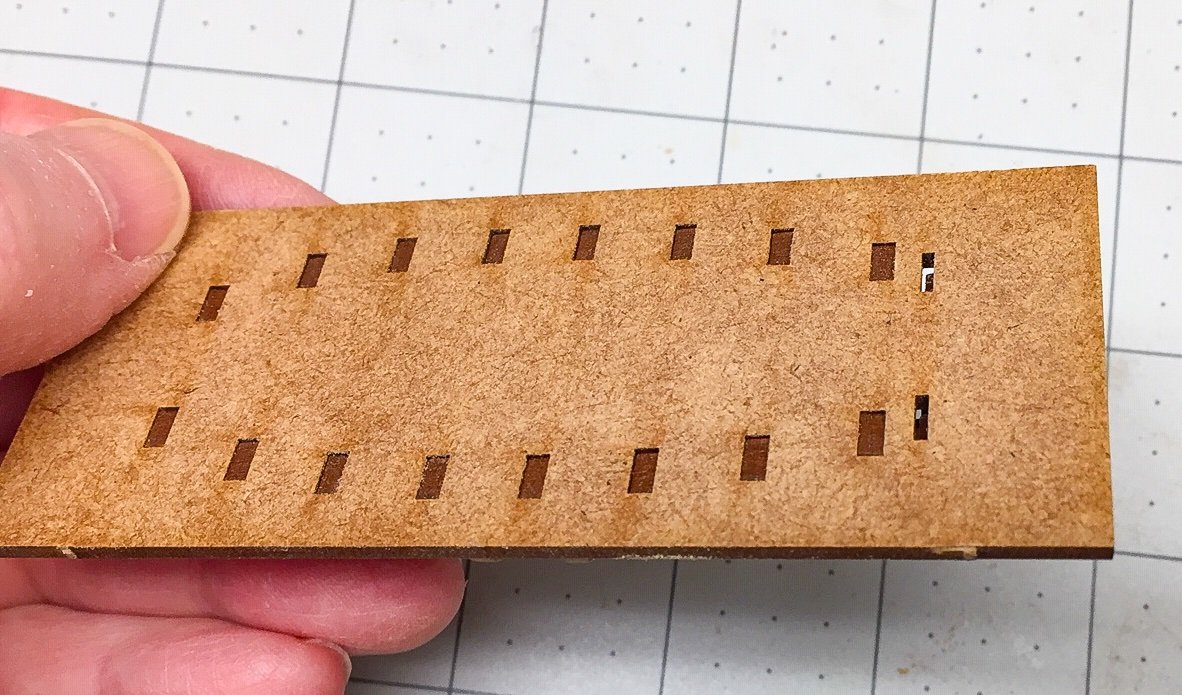
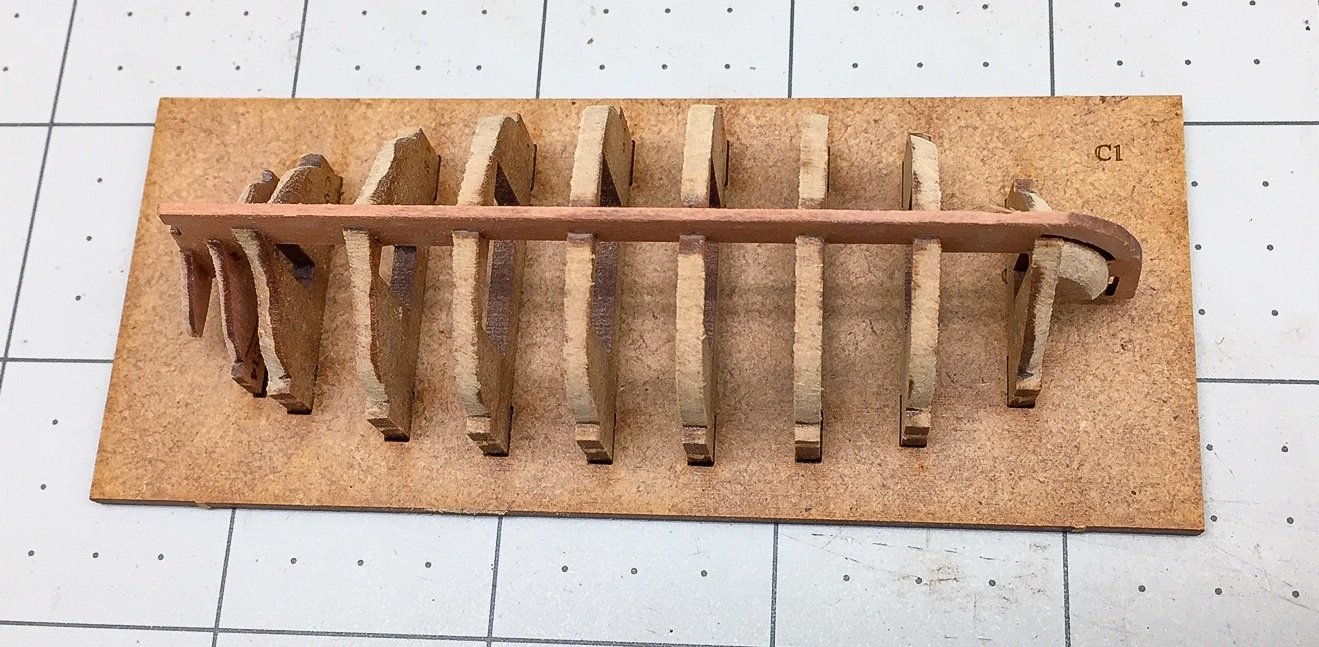
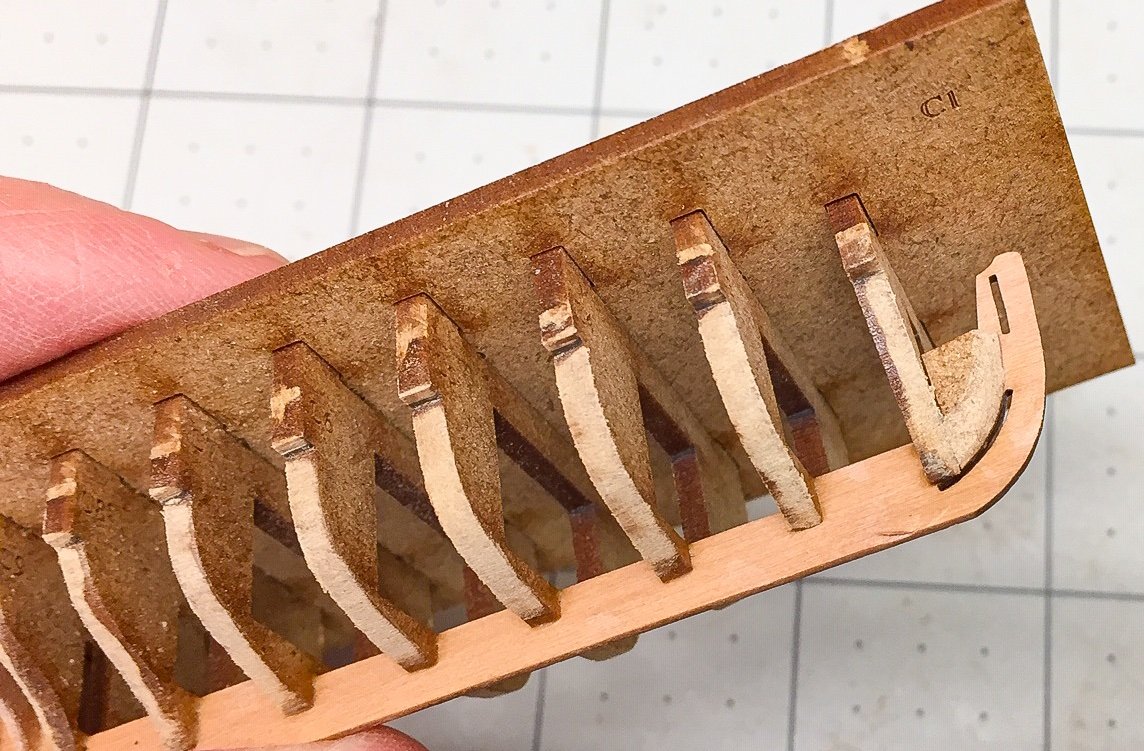
18-ft Cutter Ship's Boat A while back I ordered the 18-ft cutter ships boat from Vanguard Models. It arrived quickly and I'm just now getting around to building it. I plan to put it in between the fore and main masts on a platform raised above the deck about 1/2" to 3/4". The Duchess needs a boat to get to her parties on shore! It builds upside down on a MDF jig. The jig holds temporary bulkheads used for planking. After planking, they are removed. The first few steps are to place the bulkheads in the jig and glue them to the keel. This was very straightforward, and here is picture of what it looks like along with the remainder of kit. The next step is to fair the bulkheads before planking. The sanding sticks and files on the right side of the photo are what I used. This boat is small, about 3.5" in length, so I mostly used the small files and sanding stick. However, it was quickly obvious I had a problem with the 2nd from aft bulkhead C-14. It has tabs to fit into the jig, and I had used those and slid it into the keel piece. But it didn't fair into the other bulkheads. Then I noticed that I hadn't pushed it all the way into the slot on the keel. I loosened the bulkhead with alcohol (I'd glued bulkheads with PVA as recommended), and slid it all the way into the keel slot. Now it faired into the other bulkheads and looked right. But the tabs for the jig didn't fit. They are even with the top surface of the jig. I may have found an error in one of Chris' parts, which is extremely unusual. Here's a closeup showing the bulkhead after I got it in the right position, and another photo showing the backside of the jig. You can see the tabs for all the other bulkheads fit into slots, except for the last one, C-14. Once I realized the problem, it was a simple fix, and I proceeded to fair the bulkheads without any problem. At this point I'm ready to start planking. The planks are small strips, smaller than I've used in the past. And the manual says to use PVA for planking, which I've never done, so this should be interesting. I'm guessing PVA will make it easier to remove the temporary bulkheads later on, compared to using CA. I'll post pictures of both the cutter and the Duchess as I make progress.

-
Thanks Bob! And I really appreciate all the "likes" from everyone. I added the gallows bits and bilge pumps to the deck. I liked the way Glenn (@glbarlow) added an outlet to the pumps on his Flirt, so I did the same on these pumps with small pieces of scrap aluminum tubing. I also tried to paint the dowel to look like brass instead of leaving it wood as in manual.


-
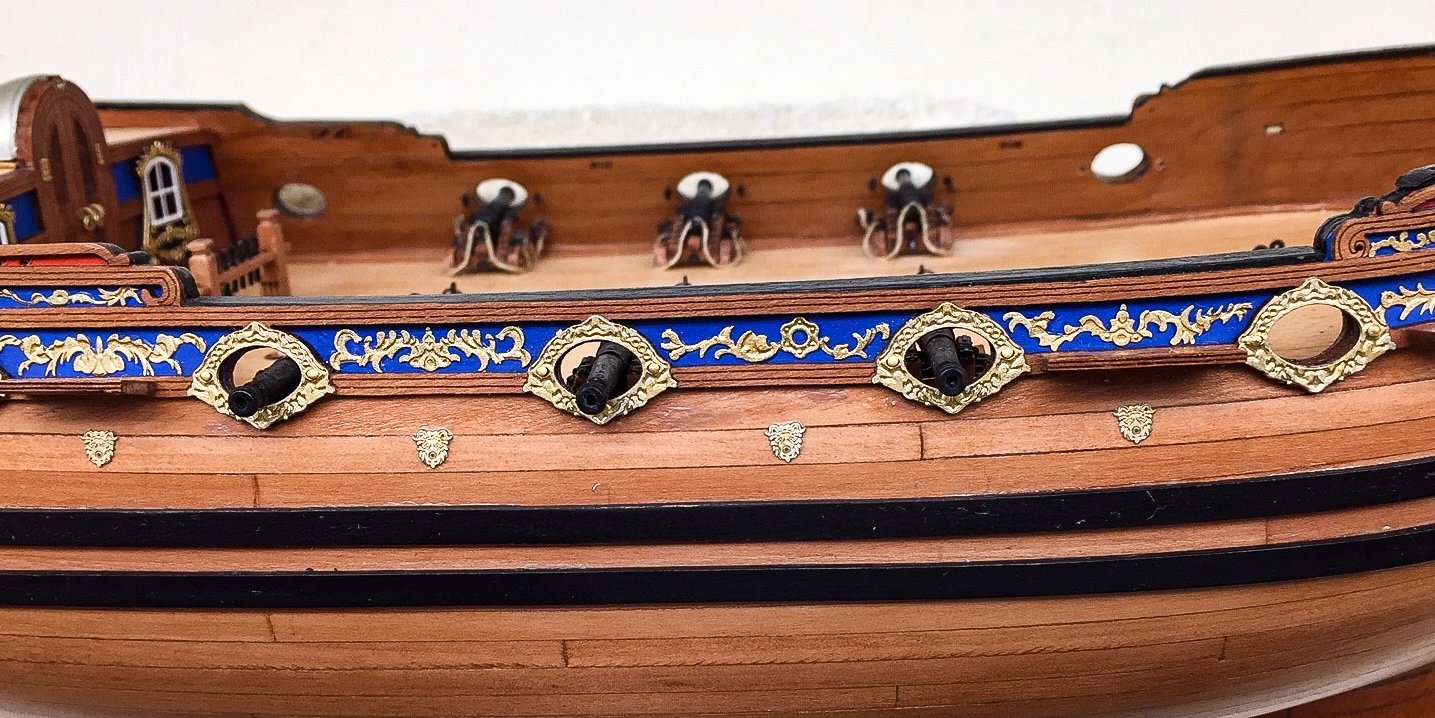
I also glued in the staircase railing And repaired the little hole in the bulwarks. This photo shows that side of the ship and cannons I ended up using a tiny bit of filler and tried to match paint color with the wood plank. That particular plank has a wide variation of colors because of the grain, so did the best I could. From any normal viewing distance, it doesn't show. I have the two pumps about finished and have started working on hatch gratings.
-
And here is view from forward
-
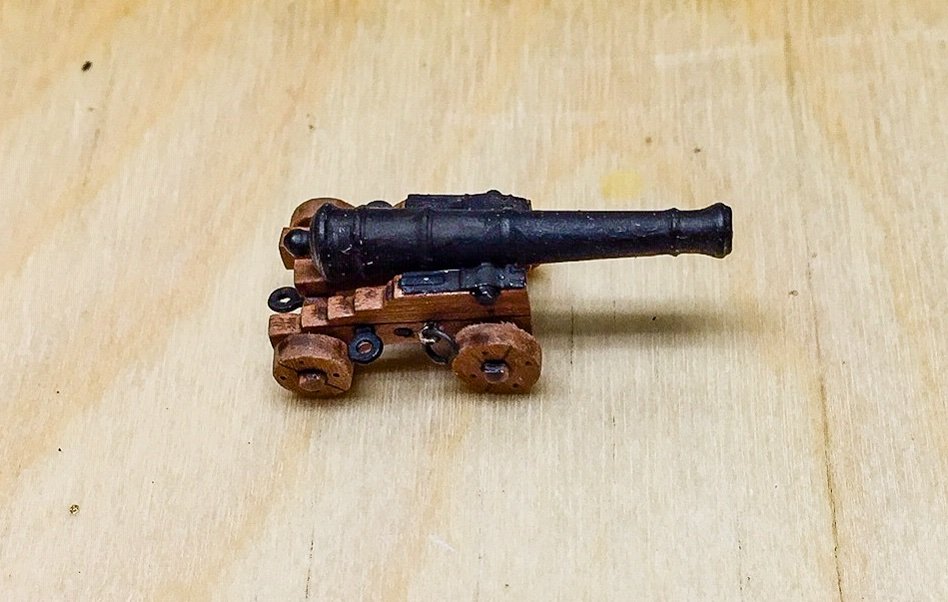
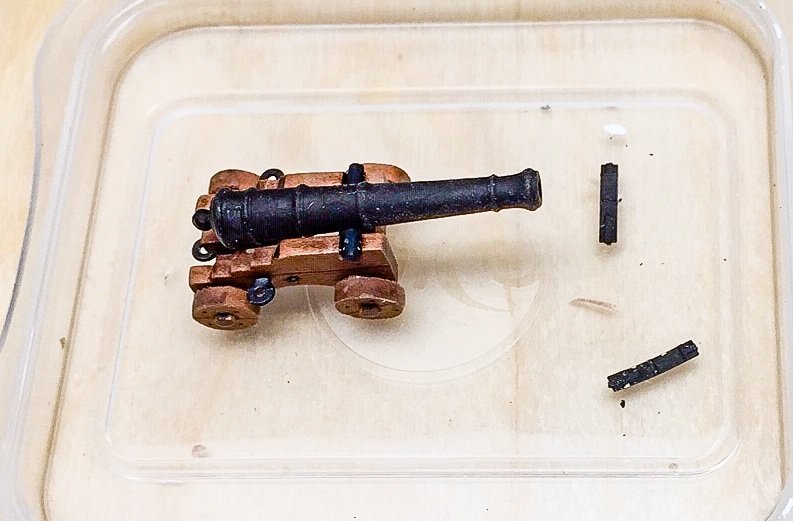
Finished the cannons and here are some pictures of each side

-
Looking very, very nice!
-
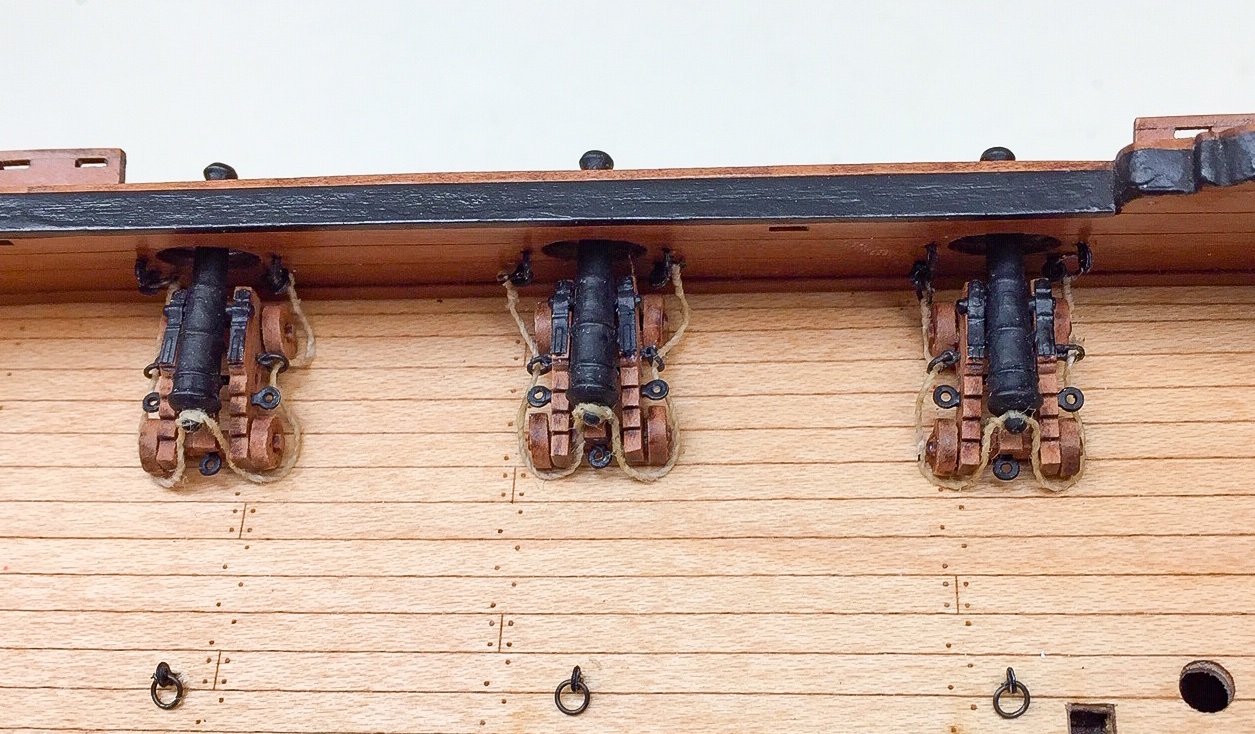
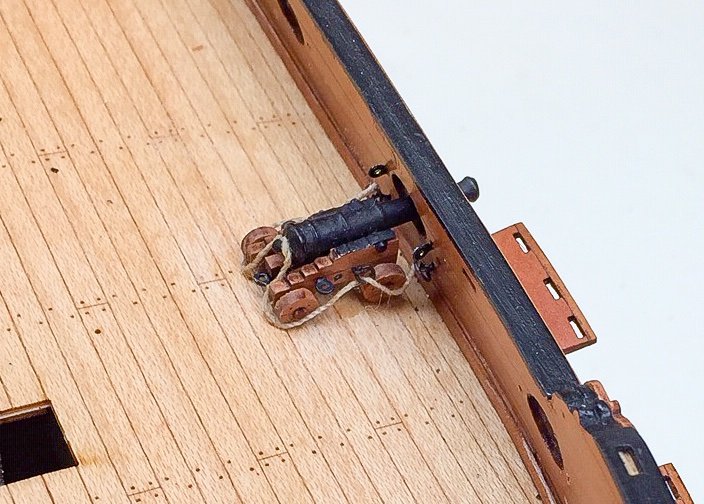
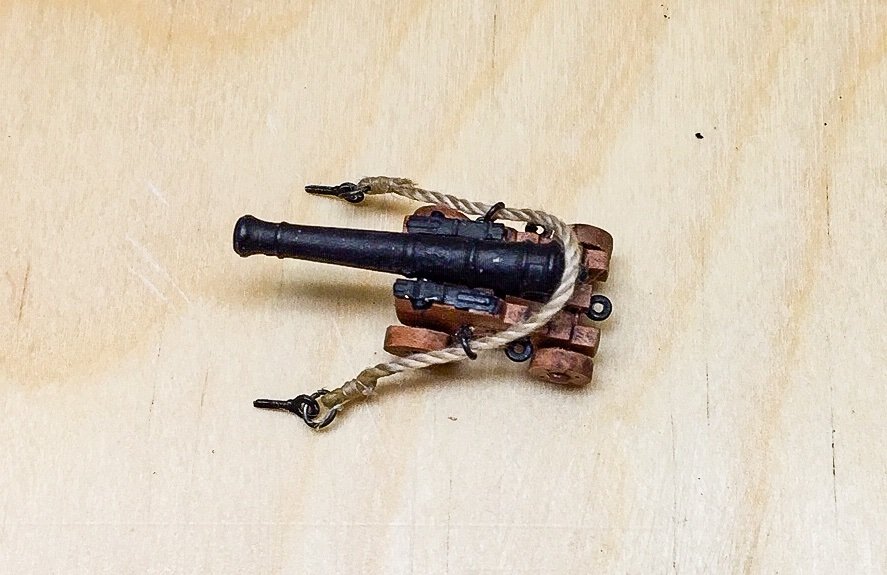
I've been fighting with the little cannons and sometimes feel like the cannons are winning. I've made a couple of mistakes, one being really dumb. First mistake was I violated one of my rules when building models. For some reason when building the cannons I failed to test fit. Didn't test fit the first one or any of them, and I always try to test fit everything as much as possible. So when I finally got them all ready to put on the deck, I found one or two barrels barely fit thru the ports and the others touched the bottom of the port. I could live with them if they barely cleared the ports, and they weren't off my much, so decided the best fix was to sand a little off the rear wheels of the carriages. I sanded them off flat at first and then rounded them so you won't notice. The carriages and wheels are small enough, no one will notice, but it was annoying because I knew I should have test fit as I was making them. It would have been easy to adjust elevation of the barrel before I glued it to the carriages and installed the trunnion caps. The barrels barely clear the lower edge of the ports, but that will have to do. Hopefully, it's lesson learned....if I don't forget! 😁 Instead of using the eyebolt locations in the kit for the breech ropes, I wanted to add eyebolts just below them. But this turned out to be very awkward at this stage. It would have been trivial if I'd drilled holes in the inner bulwark pieces before I put them in, but at that time I wasn't thinking about cannons. I used my little battery powered screwdriver and had trouble, because of the bulwark and drill bit angles, the drill bit wanted to slip even though I'd punched a starting hole (it wasn't big enough). So some of the holes aren't exactly where I'd like them. Again I doubt anyone will notice, but the process was a lot trickier than I expected, and result wasn't very good. Of course, while doing this you have to be careful not to drill all the way thru. And of course, that was the dumb mistake I made. I was trying to be careful and still did it. So now I have a small hole, less than 1/32" dia, on the outside of the bulwarks to repair. Haven't started on that yet, but it will be tricky. I've got one cannon installed on the deck and the rest are ready to go. It's helped that I stopped doing deck fixtures to install the cannons. It's easier to get my fingers and tools in there with having to work around other stuff on deck. I used 70mm for length of breech ropes and that's been plenty long enough. I tried to shape it like what I've seen in online photos of cannons on Victory and other museum ships. They are all a little different, so this is my version. I used diluted PVA to get it to hold the shape. Now that I've done one, the others should be straightforward.
-
I think your painted letters look real good. Getting spacing and curvature right is very difficult. It might be worth trying printing them out and seeing what it looks like to glue the entire strip on all at once. Chuck does this for friezes on the long boat I made. I had my doubts about how well it would work, but it worked much better than I expected. Just make sure and spray on some fixative before handling printout. I also liked the idea of 3D printed letters, but like PE or metal lettering in kits, you still have the problem of gluing them along curvature, aligned and spaced correctly. I have a feeling 3D printed parts will begin to replace PE in kits. They don't have to be one-sided. If I can tease you a bit, you might as well go all out, and carve letters out of boxwood!! 😂
-
Thank you Professor's Derek and Glenn for suggestions! I saw the same picture of Victory's cannons along with some others. The 3x length of barrel is an excellent rule of thumb. I test fitted the one gun, and the rope length I used works ok. But I agree with Glenn that a smaller diameter would look better. The kit has 0.75mm and 0.50mm threads and I opted for the larger size. But now that I see it, I think the smaller one would look better and look more like pictures I've seen. I've only made breech rope for one cannon, so it's not too late to change. I think I'll do another with 0.50mm and use the 3x barrel length to see what it looks like. I'm guessing it will look a little better. The gun port eyebolt locations on the bulwarks look too high to me for the breech rope. They look like where the tackle would be hooked. I'm thinking I should add a 2nd eyebolt below it for the breech rope like on Derek's (@DelF) Speedy. The upper eyebolt would be left unused, but I think that's ok. Derek's rigging of cannon's on Speedy is amazing when you realize how small everything is.
-
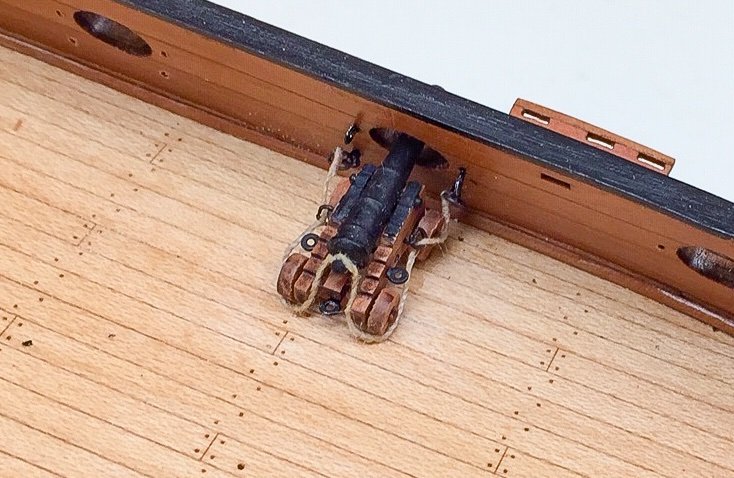
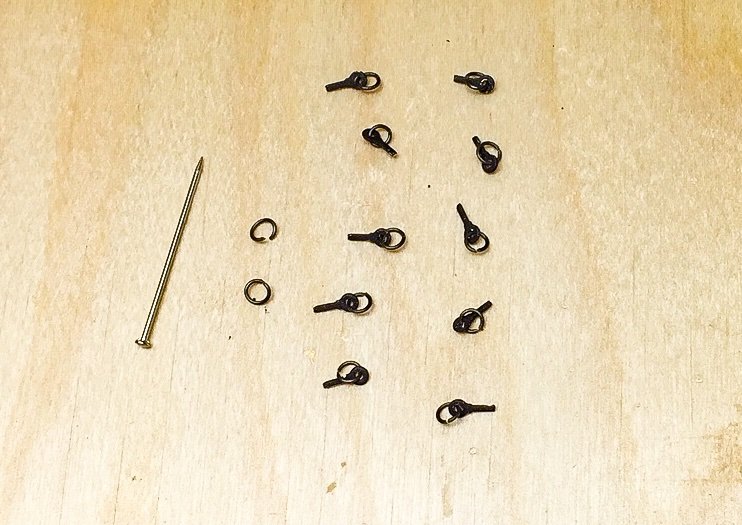
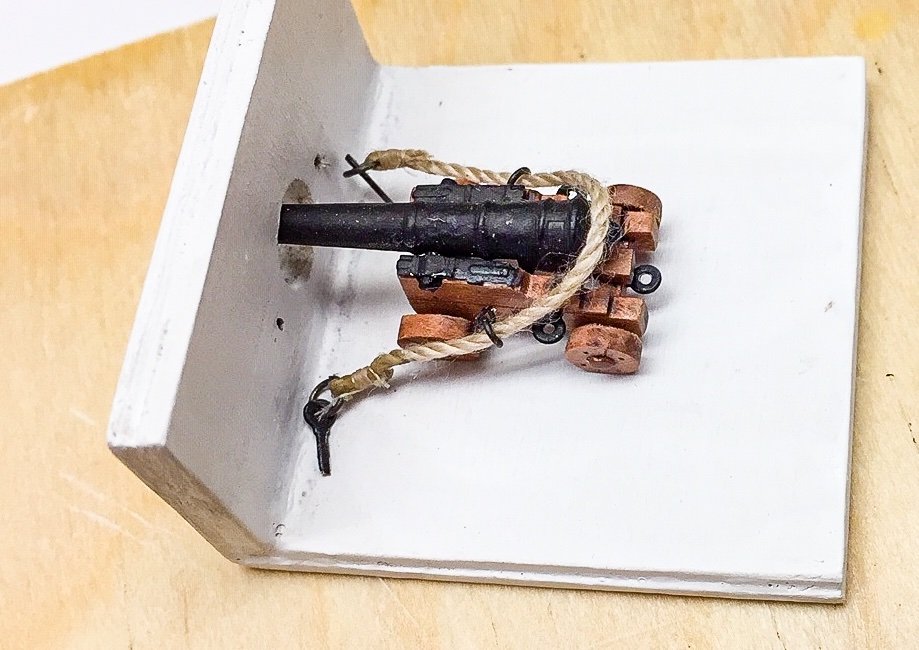
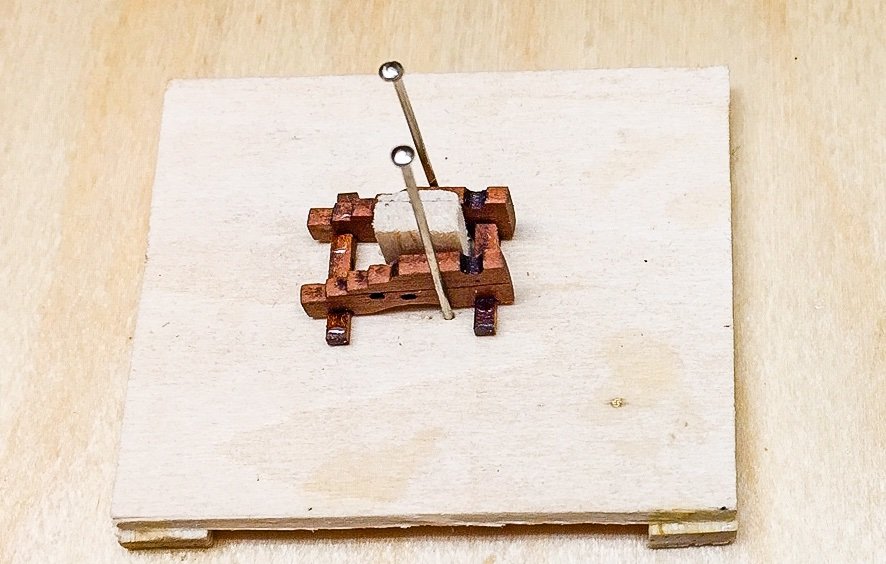
Then I realized I needed a way to determine the length of the breech rope, plus I was going to need more rings for the eyebolts attached to the bulwarks. I had some black wire (jewelry supply) that I think was 28 gauge. It looked the right size, so I made some wire rings, again following Professor Derek's @DelF excellent description. This turned out to be easy and before long I had a lot of eyebolts with rings. I like these rings better than the PE rings provided in the kit, plus I was going to need more of them anyway. The wire I used is pretty easy to bend, so these rings are not strong, but once installed there won't be any load on them. I guess I could have determined the length of the breech rope using the Duchess, but it was easy enough to make a simulated gun port. Here's a gun carriage and breech rope sitting on my simulated deck and bulwarks. I took the photo after I removed the eyebolts from the simulated bulwarks. I really only used this to get a length for the breech rope, and it was still a bit of a guess. This is the first gun, and I haven't tried installing it on the Duchess to verify the fit. I'll do that tomorrow. I seized the breech rope around the rings offline using Quadhands as an aid for holding things, and small clothespins for weight on thread when I needed it. This sure makes it easier to do, but I can tell it takes practice, and I'll probably figure out a better way as I do more of them. As I was seizing the line, I put a little thinned PVA glue on ropes to keep everything in place. Only 5 more to go, plus making sure they look ok on the Duchess. Since I haven't confirmed that yet, I may have to redo .
-
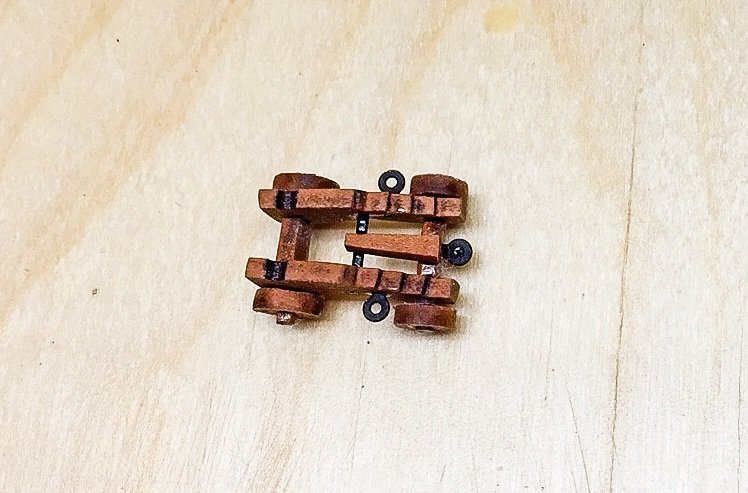
Because of the small size and what I read in other build logs, I decided to just add a breech rope for rigging. For this I needed an eyebolt and ring on the carriage in front of the eyebolt provided in the kit. I had some very small wire eyebolts and rings left over from previous build, so decided to use them. They were brass wire, so I tried brass blackener using a procedure similar to what Derrick @DelF used. Instead of jeweler's pickling solution (citrus acid) for cleaning, I used some descaler powder which is also citrus acid. I tried acetone for the final clean, but found out it started dissolving the plastic container! So I started over with a small glass jar, and switched to isopropyl alcohol. I was doing very tiny parts, and I believe I didn't keep them separated by stirring enough while blackening. Some blackened fine and others not so good. I did it a couple of times. The rings blackened pretty good and that's what will show, so it was good enough. I think it just takes a little practice. Based on some photos online of cannon rigging, I put the eyebolts and rings just behind the front wheels. The eyebolt on this one was one that didn't blacken, but was easily touched up with black paint.
-
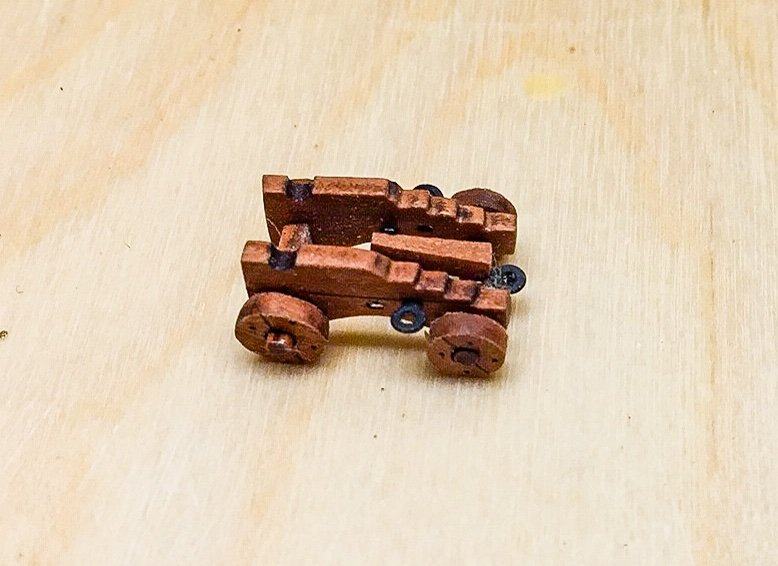
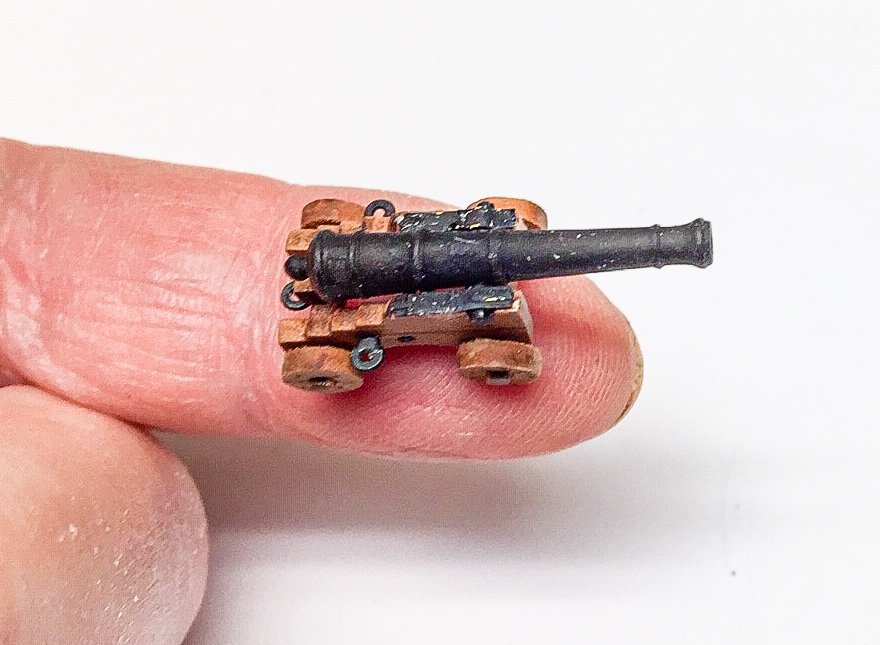
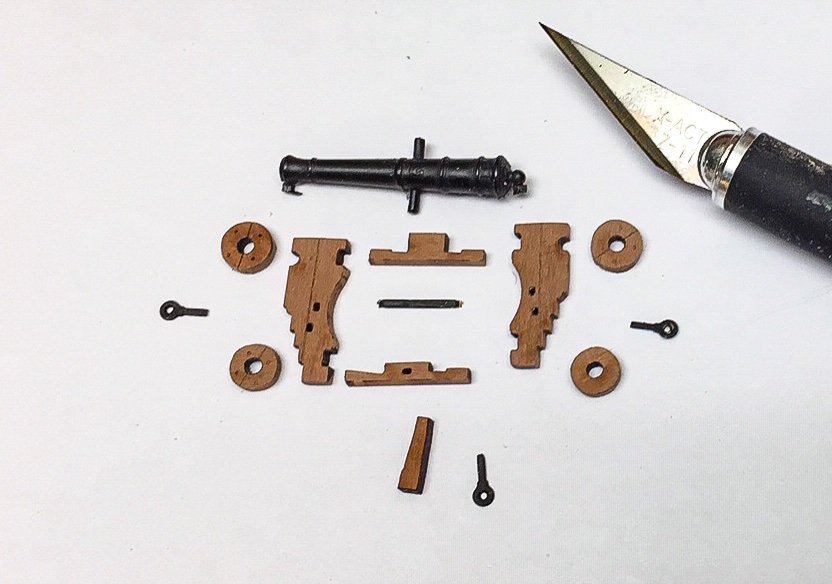
I've been working on the little cannons, and I feel fortunate there are only 6 on the Duchess. I've had no problems assembling the gun carriages other than they are small. I made a very simple jig to make it easier to glue the first 4 pieces together. Once these pieces are glued together, it's easy to add the remaining carriage parts. I used 400 grit sand paper to round off the axles for the wheels. Gun barrel is makes it look like a small cannon. The two black strips are the trunnion caps which are PE parts. I glued the back side of the trunnion cap to the carriage, and used a small punch tool or awl to hold down the cap just before it goes over the trunnion. This bends the forward end of the cap upward. After the CA glue set, I used the same small tool to bend the cap over the trunnion and flatten it on the carriage. A touch of CA and it's done. Every time I see a closeup, I see places to touch up. I can't see them with my own eyes. These cannons are small as every has mentioned. After touching up I've been putting a coat of clear flat acrylic on the carriage to hide excess CA glue.
-
Nicely done!! I agree, you're ready for scratch builds any time you want try it.
-
Even with pear, I spend a lot of time sanding laser char. I'm doing gun carriages with 400 grit sandpaper and it's rather tedious. Pear is the same way, end grain is the most difficult to remove char, although being darker wood, I've gotten away with just removing the worst of it. Beautiful work, and as always, I learn a lot. I didn't realize gratings had slight curvature, although it certainly makes sense and looks great. Previously, I've had trouble blackening brass, so resorted to painting. The problem with painting is it flakes off easily, so lots of touch up. After seeing what you do, I'll have to try blackening again sometime. Love your "roof" on the belfry and the bell handle. I probably would have missed the handle without your build log!
- 345 replies
-
- 2
-
-
-
- Duchess Of Kingston
- Vanguard Models
- (and 1 more)
-
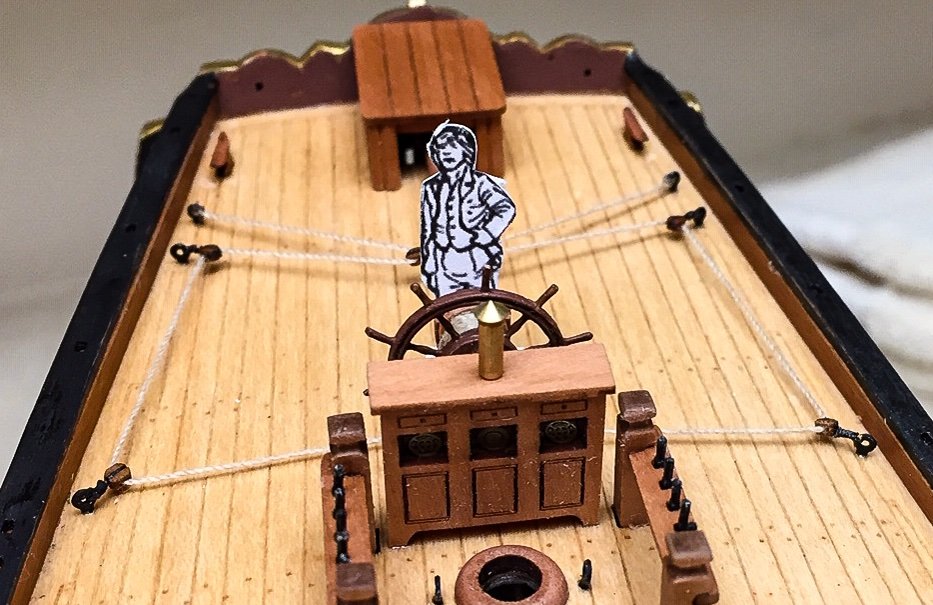
I've been having a hard time visualizing the scale, so made a simple cardboard cutout of a sailor and put him on deck by the wheel. Everything looks sized correctly with a "sailor" standing there. I removed parts for one of the 4-lb cannons, and I'll echo what others have said. Wow, are they small!
-
I also finished bitts around main mast and glued eyebolts and the shorter bitts with belay pins to the deck. Before going further, I started thinking about remaining deck fixtures and cannons. As recommended by many others, it's easier to rig cannons away from the deck and then install them, even if rigging is just a breech rope. I decided I'd better do cannons next, and then finish up remaining deck fixtures.

-
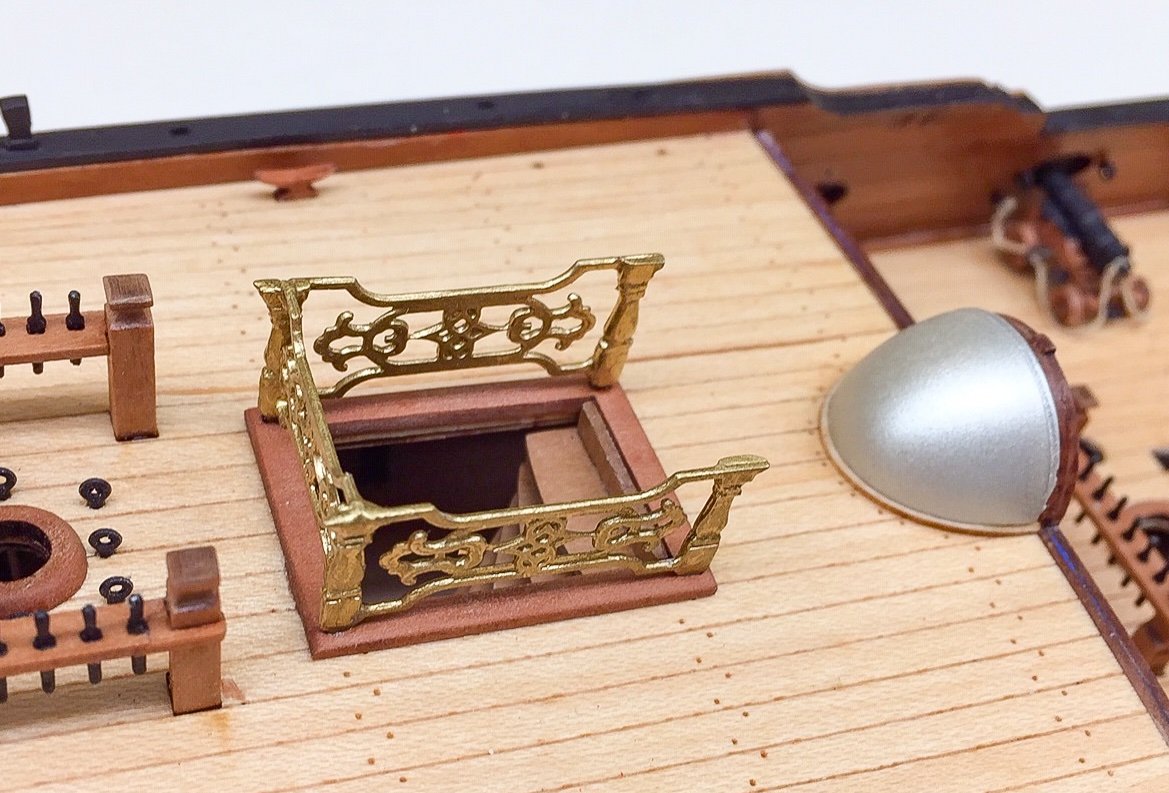
I've been working on deck fixtures, starting on upper aft deck as per manual. Here's pictures showing the binnacle cabinet, the mizzen mast belay racks, eyebolts, and mast collar. I had no trouble making these pieces. Photos in the manual are excellent and pieces fit together easily. It's a slow process only because it takes time to sand off laser char and because I'm staining parts. I was a little surprised at how crowded it is around the mizzen mast. The staircase railing is a test fit and hasn't been glued yet. I had a little trouble fitting it because of my modification making the inside dimension of the posts a little larger. I had to trim out a little more than I thought where the railing pieces fit together. In the process, I rubbed off some of the gold paint, so need to do another coat before gluing staircase in.