KrisWood
-
Posts
314 -
Joined
-
Last visited
Content Type
Profiles
Forums
Gallery
Events
Everything posted by KrisWood
-
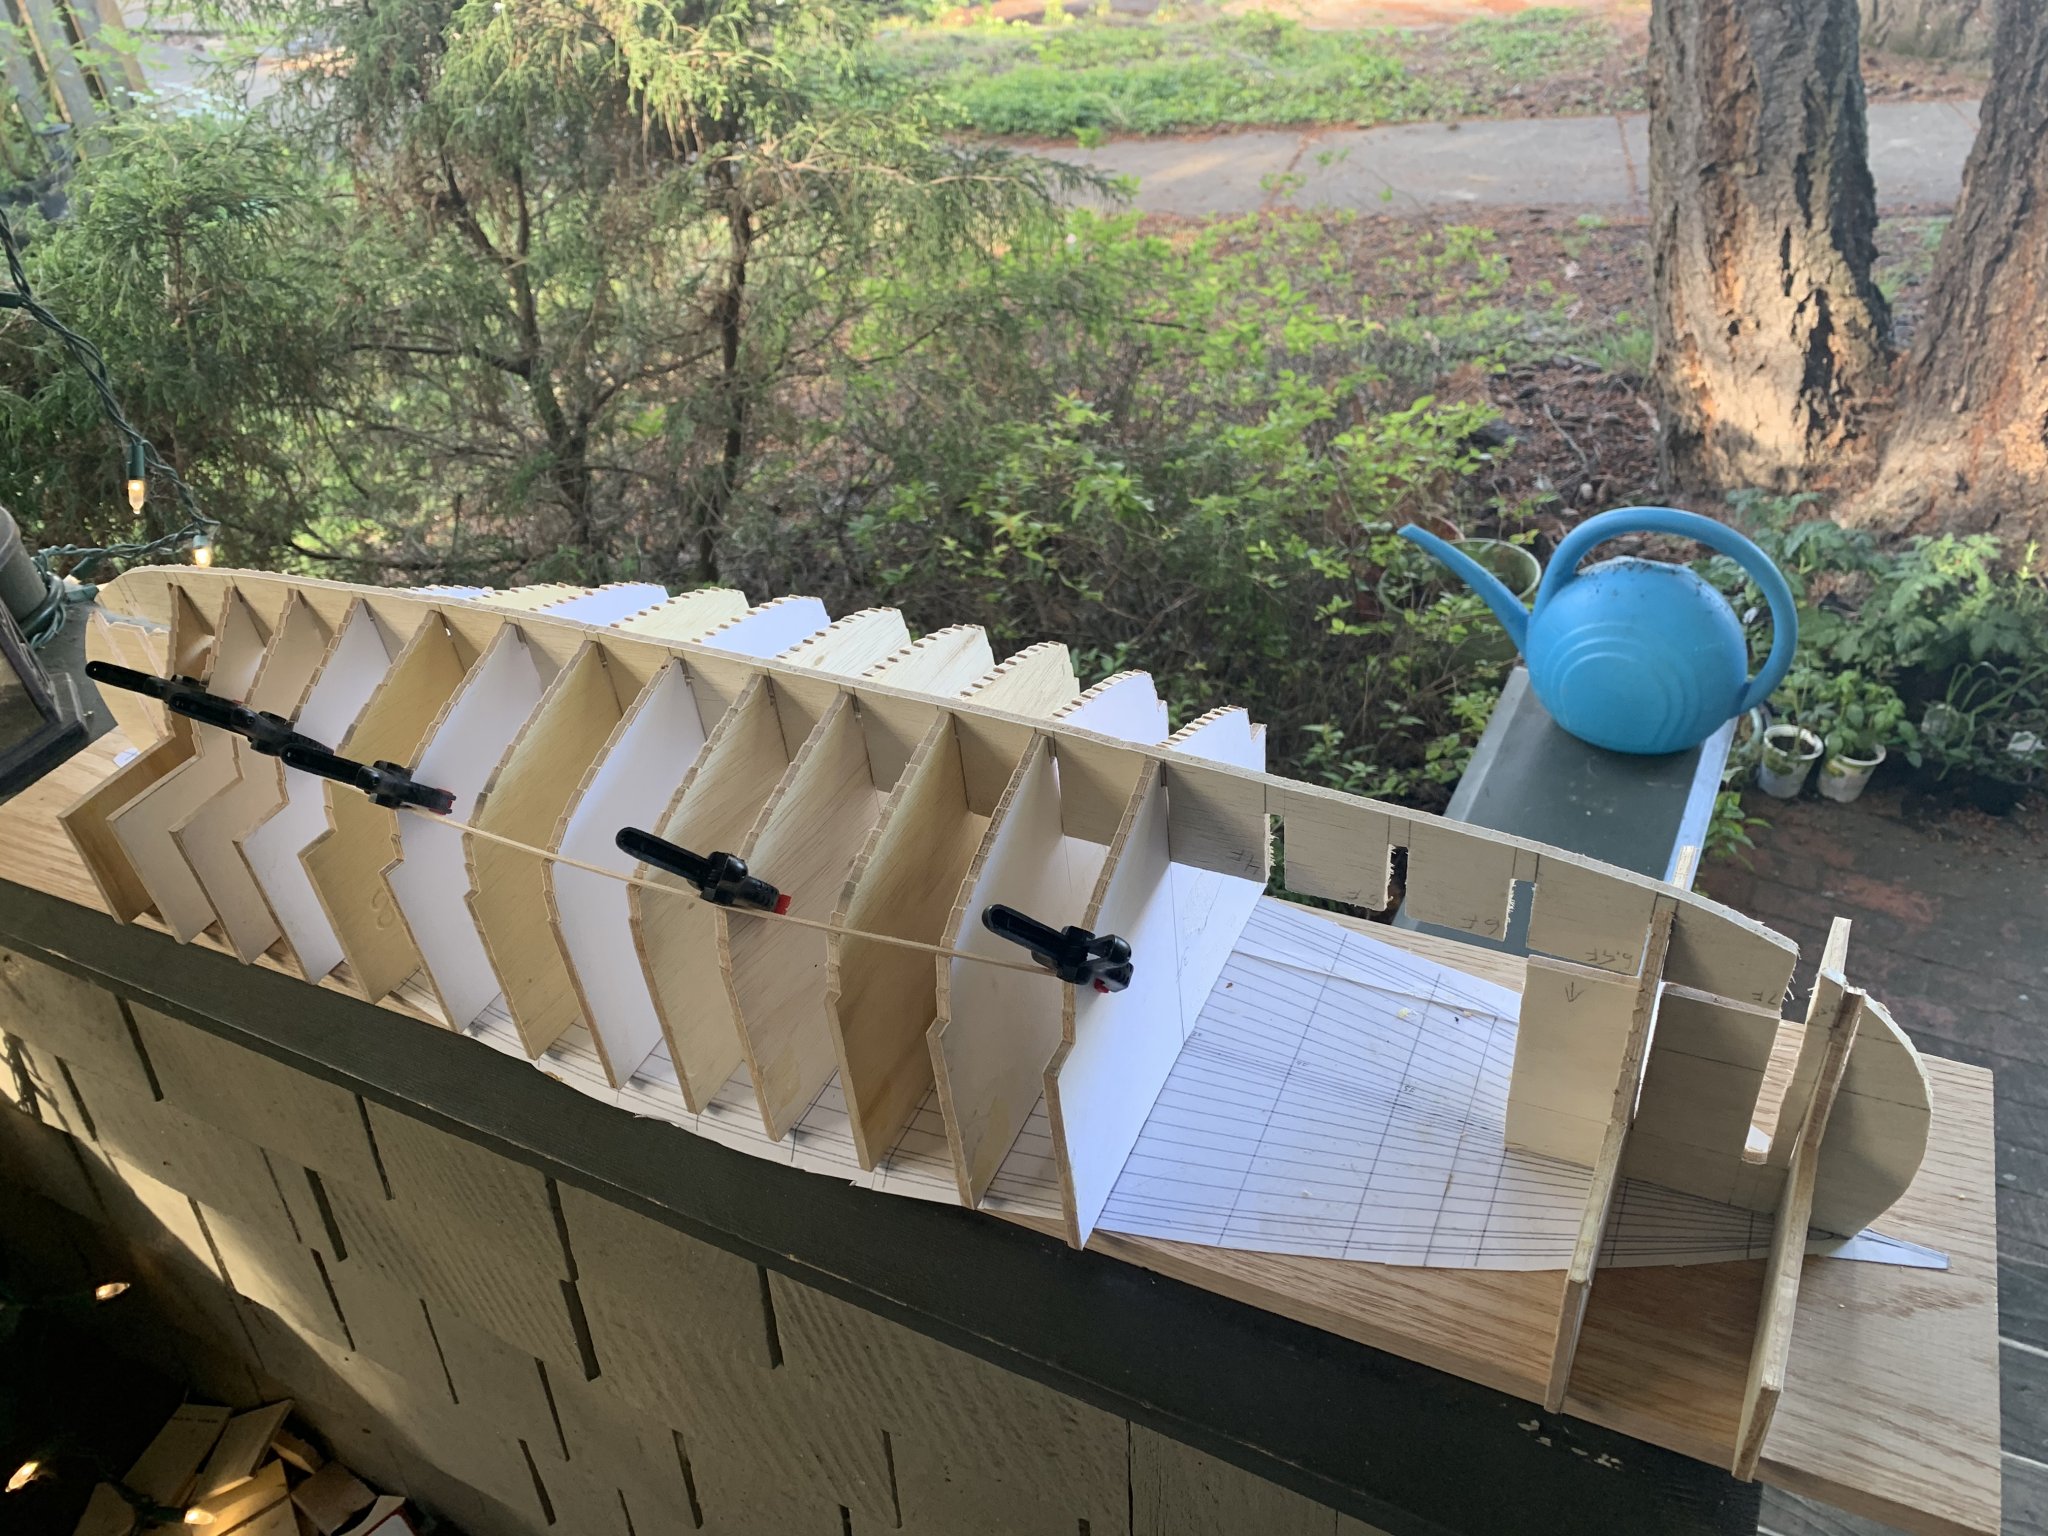
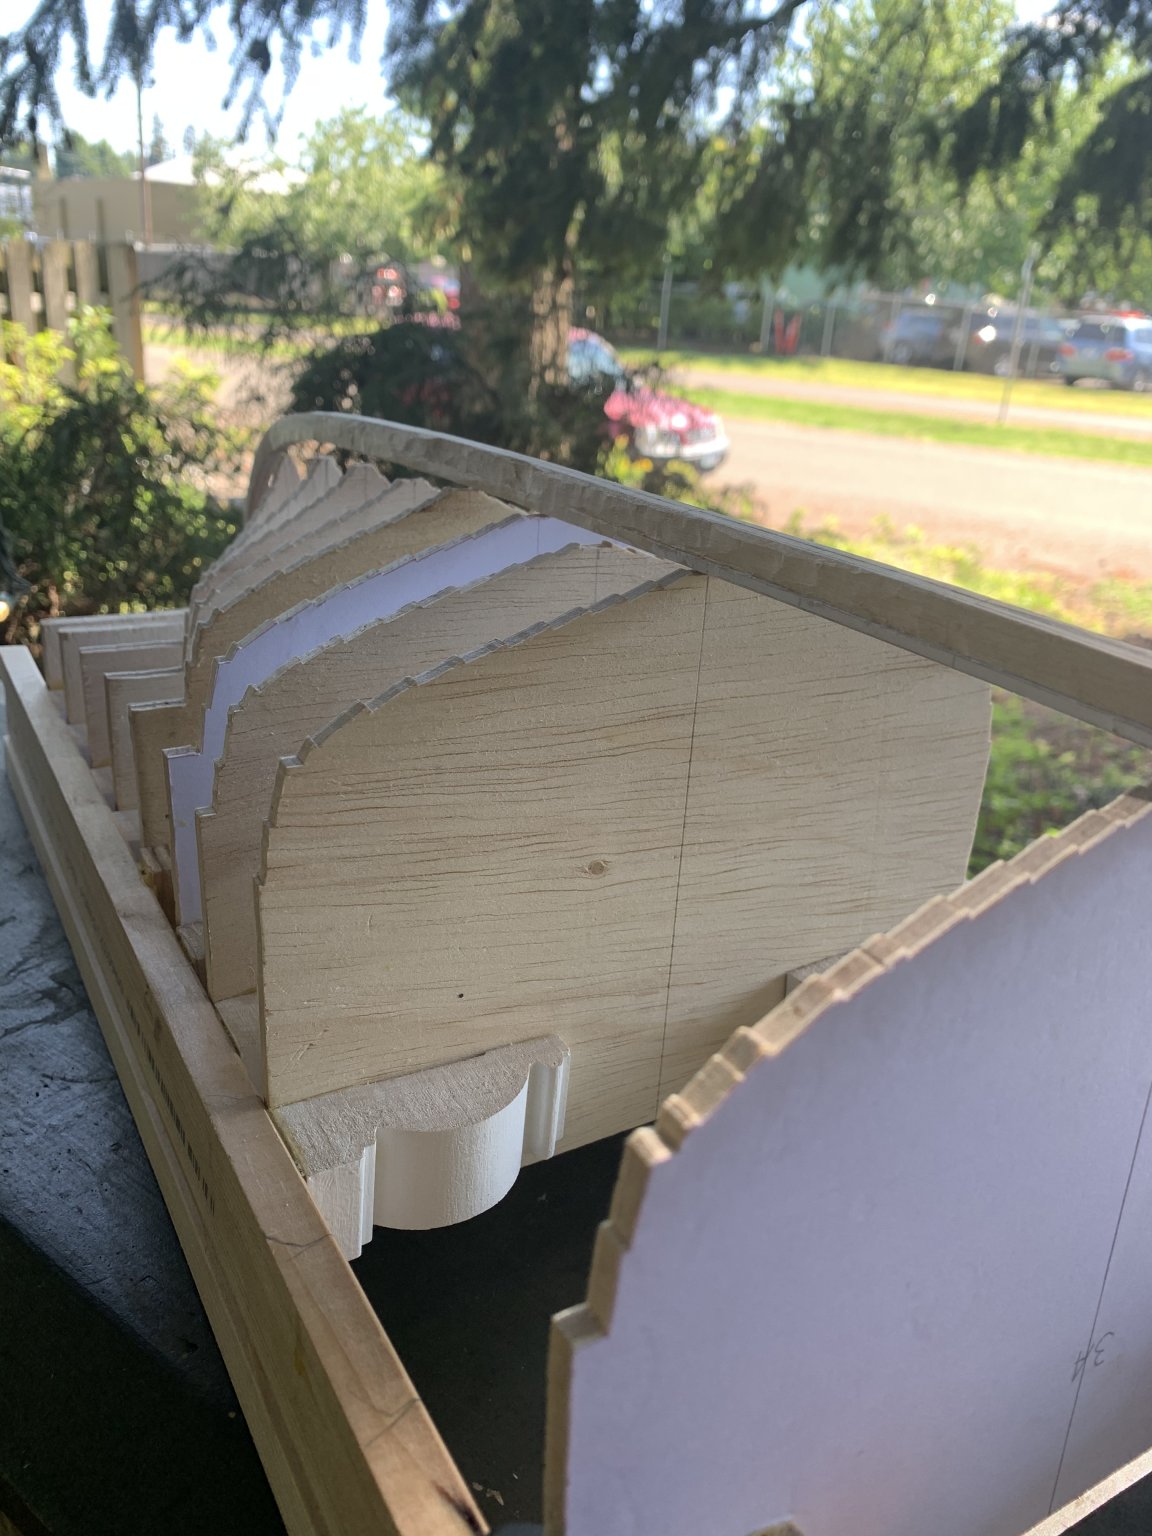
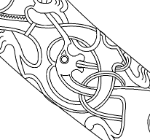
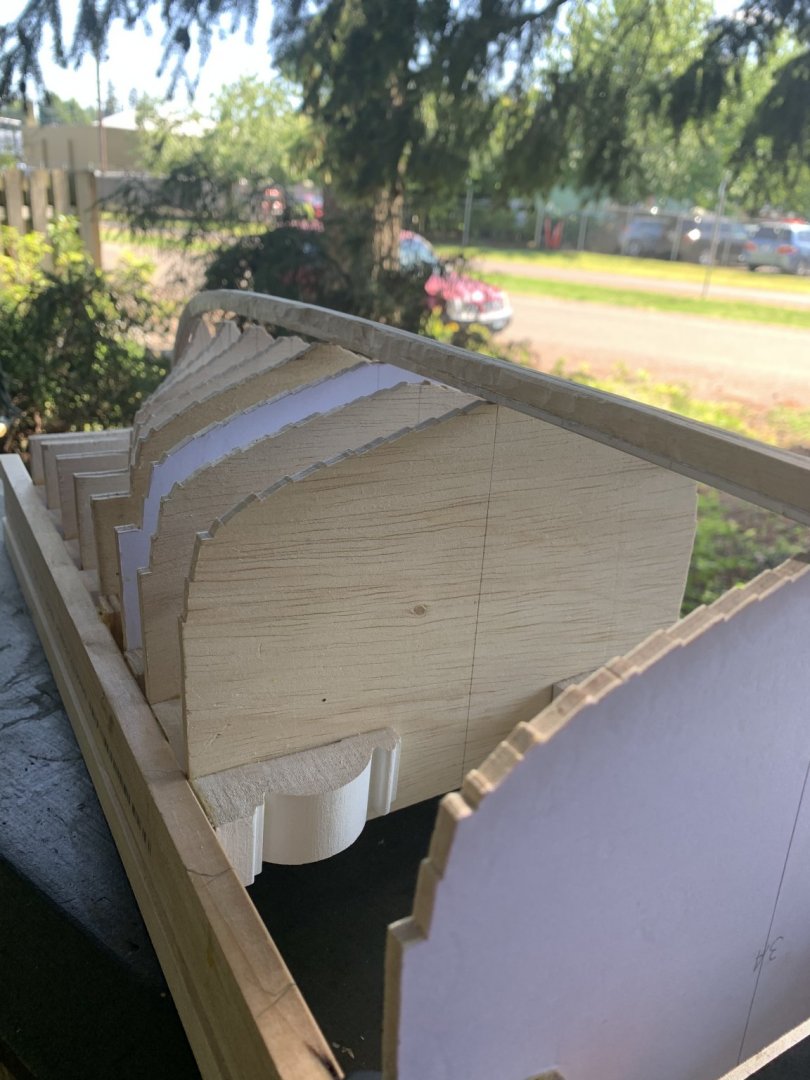
 Status update: I started gluing blocks to both strips of wood and the bulkheads and was two bulkheads in when I realized this solution was not going to work. My planking jig is built in three sections because the stems curve back over themselves at the top, so there'll be no way to remove it once the planking is in place if it's all one piece. I quickly removed the strips of wood and wiped the glue off before it dried. Instead I used clamps to hold the blocks in place on the strips and to hold the bulkheads against the blocks while gluing them to the false keel. This way I was able to remove the strips of wood from the bottom when all the bulkheads were nicely squared up and glued in place. I also ended up using L shaped corner moldings left over from a home remodeling project to keep the bulkheads lined up with the false keel instead of filler blocks. This saved me a lot of time and still got the job done. I'd share a photo but it really doesn't look much different from my last photo except the bulkheads are properly aligned now and there's no more clamps holding them together except the fore and aft portions to the middle portion. I also started cutting out planks! Because the planking diagram in the book is unscaled, it took a lot of trial and error printing out the 10th strake on card stock, lining it up with my bulkheads, and scaling it up or down using a ruler to find the difference between what I printed and what was needed. I eventually found a scale that seemed correct, made it 1% larger so I can trim planks to the correct size/shape while fitting them to the bulkheads, and started cutting them out of 1/16" basswood. So far I've cut out all the planks of my garboard strake. I think it's probably ok to share this image because I drew it by hand from a very very pixelated source so a lot of it is my own conjecture and not the actual copyrighted material. Next step will be filing down the false keel in a few places and shaping the rest of the actual keel and stems to fit the garboard strake. In some places the 1/4" plywood of the false keel is wider than the width of my bulkheads (mainly where the garboard meets the rabbets in the keel). In other places my jigsawing wasn't perfect and I left too much material where the false keel meets the actual keel, so I'll have to file those down. Lastly I never finished filing my keel to its actual width, carving the rabbets, and carving the T shaped cross section. My plan is to mark in pencil where the keel is too big to fit the false keel/bulkheads, and where there is too much material still on the keel to fit the garboard to the bulkheads. I figure once everything fits I'll know this next step is done. So far this is the most exciting part of this project, as I'm starting to see all these disparate pieces come together into something resembling a ship. Pictures to follow once I get to a step that's photo worthy.
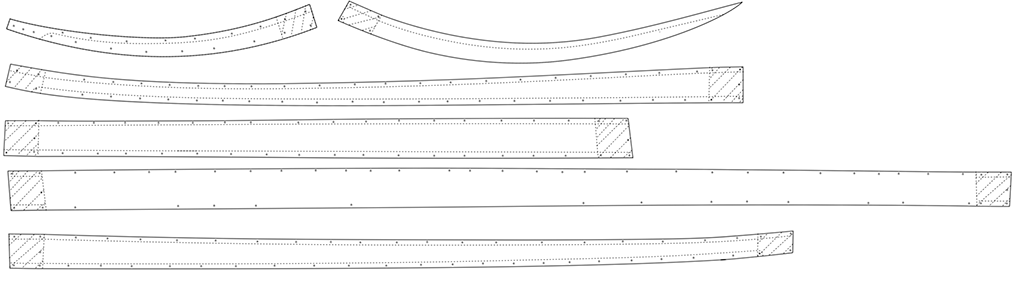
-
I started gluing my planking bulkheads to the false keel last night and found that in the time between when I'd cut it and when I'd started gluing it, the plywood of false keel had warped a bit and the slots for the bulkheads no longer line up with the stations on my plans. Does anyone have any tips for fixing this? The best I've come up with so far is to take two strips of wood along the bottom, mark where the bulkheads SHOULD go, and glue bits of wood to it to sandwich the bottoms of the bulkheads into. Edit: I should clarify that I say two strips along the bottom because I still need to be able to align the centerlines of my bulkheads with the centerline in my plans, so I still need to be able to see it through the bottom.
-
The hobby shop near my home was open so I got all stocked up on thin strips of wood. I'm ready to do some serious building! 😁
-
@Cathead, that's a brilliant solution that I hadn't even thought of! I will absolutely try that. 😁 I'd read the planking tutorials on MSW but didn't really understand them until I tried pinning cardboard planks onto my bulkheads. I wonder if the model shops are reopened yet. I'm going to need more thin strips of wood!
-
Minor update: I printed the planks out on heavy card stock last night and pinned them to my bulkheads. I was ~1 5/8" long on my guesstimate. I rescaled it and printed it again. I'll just keep adjusting until they fit properly on my model. Edit: In the process of pinning the planks to the bulkheads I experienced first hand something I'd read here on MSW but hadn't fully appreciated until now: Cutting planking bulkheads exactly to the line results in a 90 degree angle along the edge of the bulkhead, while the planks themselves are curved by nature, meaning the planks only touch the bulkheads at the very corner of the wood. This results in a very weak connection with the bulkhead that's supposed to be shaping the flow of the planks, and a tendency for the plank, at least in card stock, to push inward where the pin presses into the bulkhead. I'm thinking about using some wood fill left over from painting rooms in my house to add some substance to the empty space. We'll see if that even works... Next time I'll cut my bulkheads larger, or put them on the other side of the station lines so that they just need to be filed down on the side that's too large.
-
Random tangent, my 9yr old daughter is watching a kids history TV show that is currently going over the Vikings and they've got Erik the Red sailing on the Oseberg ship as their generic Viking ship. "Daddy! He's got your boat!!!"
-
The rib shapes are the part I want to make sure are aligned correctly. In Viking ships, the shape of the ribs are defined by the planks, not the other way around. Therefore I need to make absolutely certain my planking bulkheads are aligned to create the correct hull shape before I can make any frame timbers.
-
@Cathead, I am 99% certain I'm burning it, but I'll probably build a second model that I don't burn just to have one to keep displayed in my home (and maybe take sailing on the river nearby with the kids).
-
You understood correctly. The project is my meditation on my processing of grief. My family doesn't want me to burn it though because it's going to be so pretty once it's done, so I'm very seriously considering building a second one afterward that I keep.
-
I just remembered also that the garboard strake is near horizontal amidships, so I scaled the lines drawing just a hair smaller and now it lines up perfectly with the widths of both the top strake and the garboard strake just inside the lands of the planks. I think I'm ready to try a few cardboard planks.
-
Hi @Cathead, Sort of. On my first attempt at this planking jig, I'd glued all the pieces to two parallel piece of scrap wood left over from when I redid the moldings in my living room. I ended up having to tear the whole thing apart when I realized things weren't lined up correctly. I don't want to repeat that process if at all possible. Remember, I'm a total newbie at model ship building and my goal, however unrealistic it may be, is to make a floating model that doesn't sink right away. To that end, I want to adhere as closely as possible to the Saga Oseberg reconstruction plans. Therefore it is very important that the planks match the reconstruction lines as closely as possible. I think I found a solution though. I remembered that the top two strakes are nearly vertical amidships, so I scaled the lines drawing to line up with the plank diagram for those two strakes. Because the plank diagram is "drawn flat", and the ship's lines are curved, they do not match exactly, nor should they, but by lining up the fore and aft ends of the strakes with the lines drawings I was able to get in the general ballpark. Then I lined up the midship station vertically with the portion of the plank it intersected and scaled it until the plank in the diagram for that strake was the same height as the strake in the lines plan. I think this should get me close enough that I can print out a few cardboard planks and see if they fit the height of the planks in my bulkheads, then fine tune it from there. Does that sound like it should work? As for the flexible material, I have a thin strip of basswood I've been using for that purpose and it looks like it curves nicely to me, so that if this model were only for display I'd be happy with where it's at right now. I'm just worried that if I make a nice looking curve that isn't the curve of the actual Saga Oseberg reconstruction, it'll sink as soon as I put it in the water.
-
As I'm lining up the bulkheads it occurs to me that this would be a lot easier to fair if I had some planks to line it up with. I don't want to glue it in place before fairing it if possible. The Saga Oseberg book by Thomas Finderup has a diagram of the planks drawn flat, but it doesn't have a scale. How would you go about figuring out the correct scale? You can see the diagram in a lecture by the author in this video at 37:51 https://webtv.vikingeskibsmuseet.dk/?poditemid=40145&tagsid=121&soegeord= The image in the book is higher resolution and I've aligned my scan of it with the version in his lecture to correct any distortion from the scanning near the binding of the book. Now I just need to figure out the size at which to cut out the planks....
-
Next step will be adding filler blocks to keep the bulkheads squared and at the right height. 🙂
-
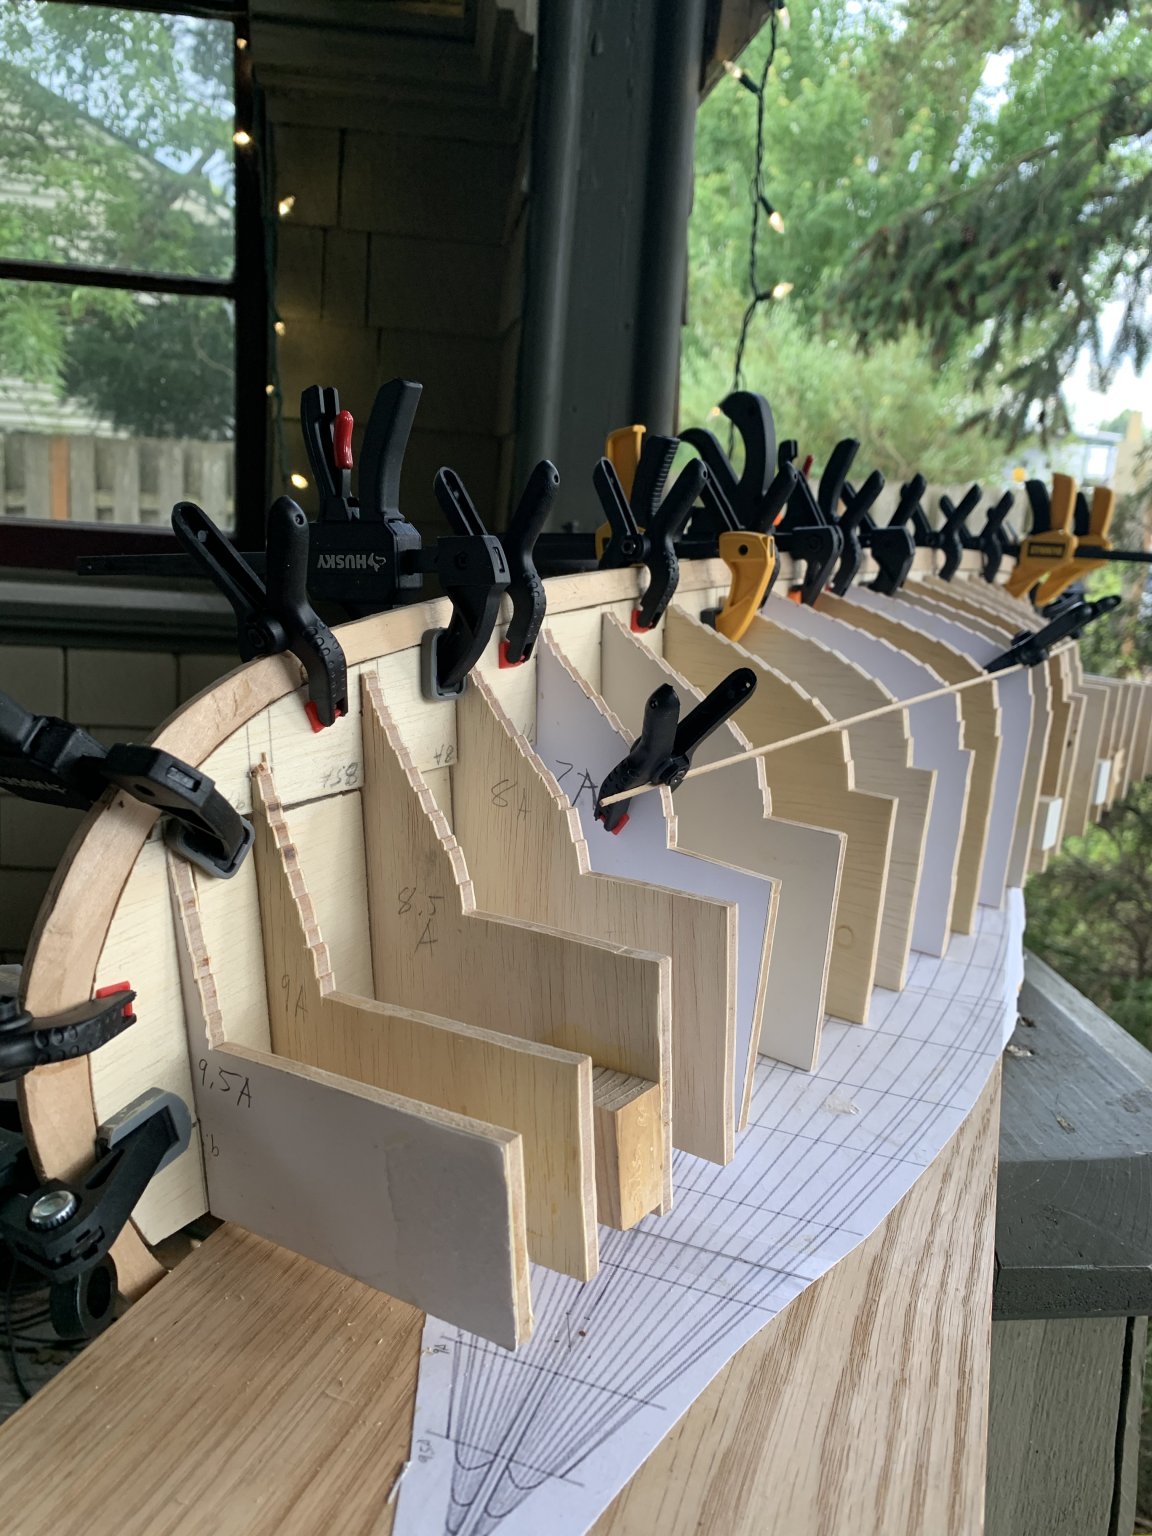
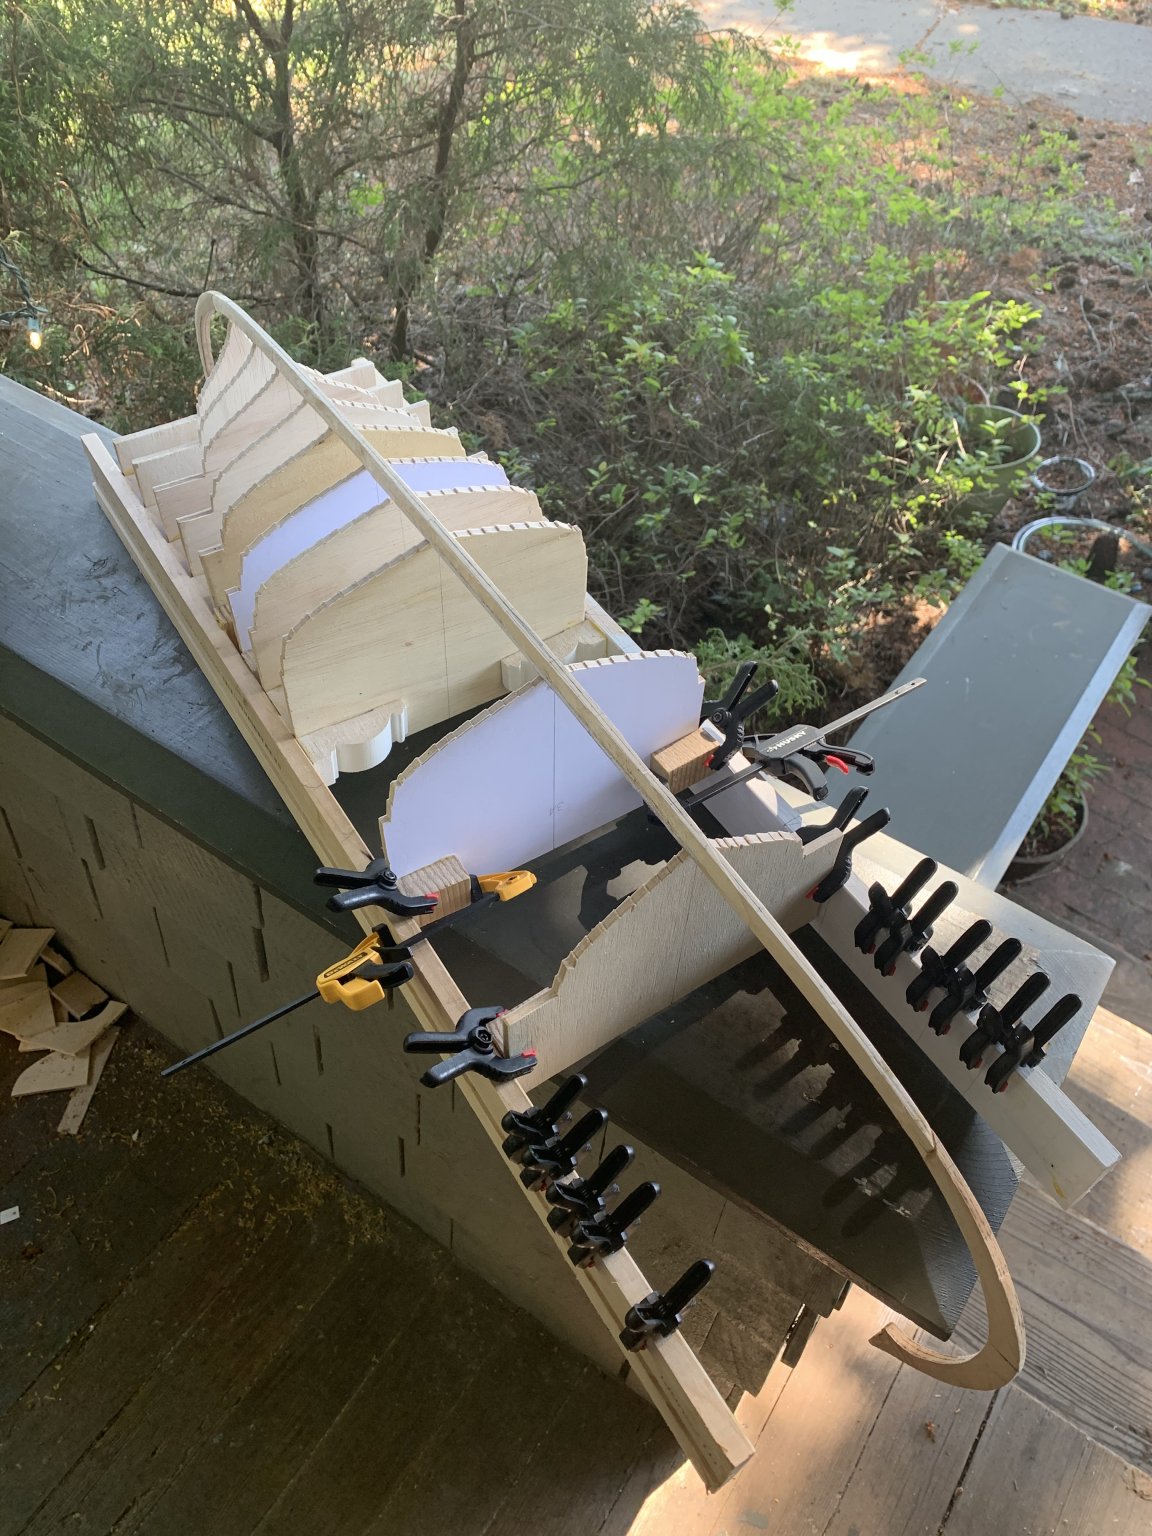
Finally found time to finish the notches in the bulkheads to fit them on to the false keel. 😁 All the clamps are because nothing is glued yet, but I'm excited that it's starting to look ship shaped!


-
I ran out of time to finish all the bulkheads last night, but it's already soooo much better!

-
Ok here's the before photos. There's an increasing gap between my keel and bulkheads with every bulkhead I add. You can't really see it in the photos but some frames are off of center by as much as a millimeter as well. I'm going to take this thing apart, add a false keel, and put it back together again.

-
I did some searching on the forums here and this build gave me an idea: I'll cut a notch in each bulkhead for a "false keel" to fit my actual keel on top of. Then there's no way they can get out of alignment.
-
Edit: Sorry, commented on the wrong Oseberg thread! >.< Lovely build, keep up the great work!
-
I've run into a roadblock on my project. I've cut out all my planking bulkheads and started building the jig. By the time I got a quarter of the way through gluing it together I realized the problem... When I'd cut out my bulkheads I made two assumptions: That my table mounted jigsaw would cut straight lines That as long as I glued my templates to the plywood along these straight lines, all I'd have to do is stand my bulkheads up on the baseboard and everything would line up It turns out both of these are false. At various points in cutting my bulkheads out I strayed to either side of the lines, meaning my bulkheads vary in height by up to a millimeter or so (2.5 scale centimeters). This means that many of my bulkheads do not reach the keel, rendering them effectively useless because that means they'll also never touch the planks, or if they do the planks will be out of fair (it'll result in dimples in the hull if I plank it as it is right now). I figured if most of my bulkheads are as close as possible, I could correct it with some careful filing on the ones that stand the highest, to bring them all to the same level, so I kept on gluing bulkheads to the jig. That's when I made my second mistake. I started gluing bulkheads higher up when they didn't reach the keel while standing on the baseboard. This meant I was no longer using the baseboard as a reference. As I approached amidships with my bulkheads they gradually climbed higher and higher, and because I lack depth perception (my left eye cannot focus) I misjudged how the bulkheads lined up with the centerline. The higher the bulkheads got, the further to the port side they crept from the centerline. I need a better way to build a jig.... Can anyone please share example images or links to jigs using planking bulkheads for lapstrake hulls? I'm going to need to take this whole thing apart and re-glue it and I'd like to do it right on my second try.
-
Last night I attempted cutting the keel as one piece of plywood. I right away encountered many many problems with it. The table mounted jigsaw has a guard arm that gets in the way of cutting anything larger than the table. The keel is far longer than the table so this means it's near impossible to cut out this way. The process involved dozens of progressively larger arcing cuts, with the first few being very shallow and having to back the work piece off the blade and cutting from the other side whenever I hit the guard arm. I ended up cutting out 2/3 of it before giving up on it completely because I ran out of time for the day / couldn't cut the midship portion at all because it's impossible to cut within a few degrees of 180º. Once I got the aft stem cut completely cut out, it was apparent why no one builds this way, not even the kit manufacturers. The 1/4 ply was VERY flimsy. It was far lighter and more flexible than my solid basswood parts, and almost as bad as balsa. When I felt it flex I realized that every kit I've seen uses a tall bulkhead-like keel to fit the frames into. I could draw a new keel in this way but really a tat point I may as well build a kit instead of a scratchbuild. A few days ago, when buying the wire for my rivets, I also picked up some more wood glue. As soon as I got home I noticed that the label clearly says not to use it on parts that can get wet. DUH! It's water based glue! I've known that since I was a kid. This should have occurred to me sooner. Even if my current basswood keel didn't have terrible scarfs, it's still held together by wood glue and would come apart eventually in water. That lead me to researching marine plywood. The regular plywood I'd bought from the hardware store would delaminate if submerged for too long. I'd decided to try making a keel out of it anyway since I'm planning on burning it, but problems 1 and 2 above were too much to make it worthwhile. I hereby speak from personal experience: A plywood keel isn't worth the time, effort, or material it takes to cut out the part! I'm going to have to get some more printer ink so I can reprint my keel templates and make a new basswood version. At least I won't have to chisel it out this time, and I learned a lot along the way. Edit/PS: Can anyone recommend an easy-to-use-for-beginners marine epoxy? I imagine the RC boat building folks must have something.
-
What a great build! It's inspirational to see such quick progress. What glue are you using to join your wood to wood pieces? I'm looking to sail my Oseberg model when it's done and am researching which waterproof glues are used in RC boats at the moment (though my Oseberg won't be RC, just needs to float).
- 90 replies
-
- 3
-

-
- billing boats
- colin archer
- (and 1 more)
-
By a bad idea, I meant catastrophically bad, as in would fall apart completely at the first stress.
-
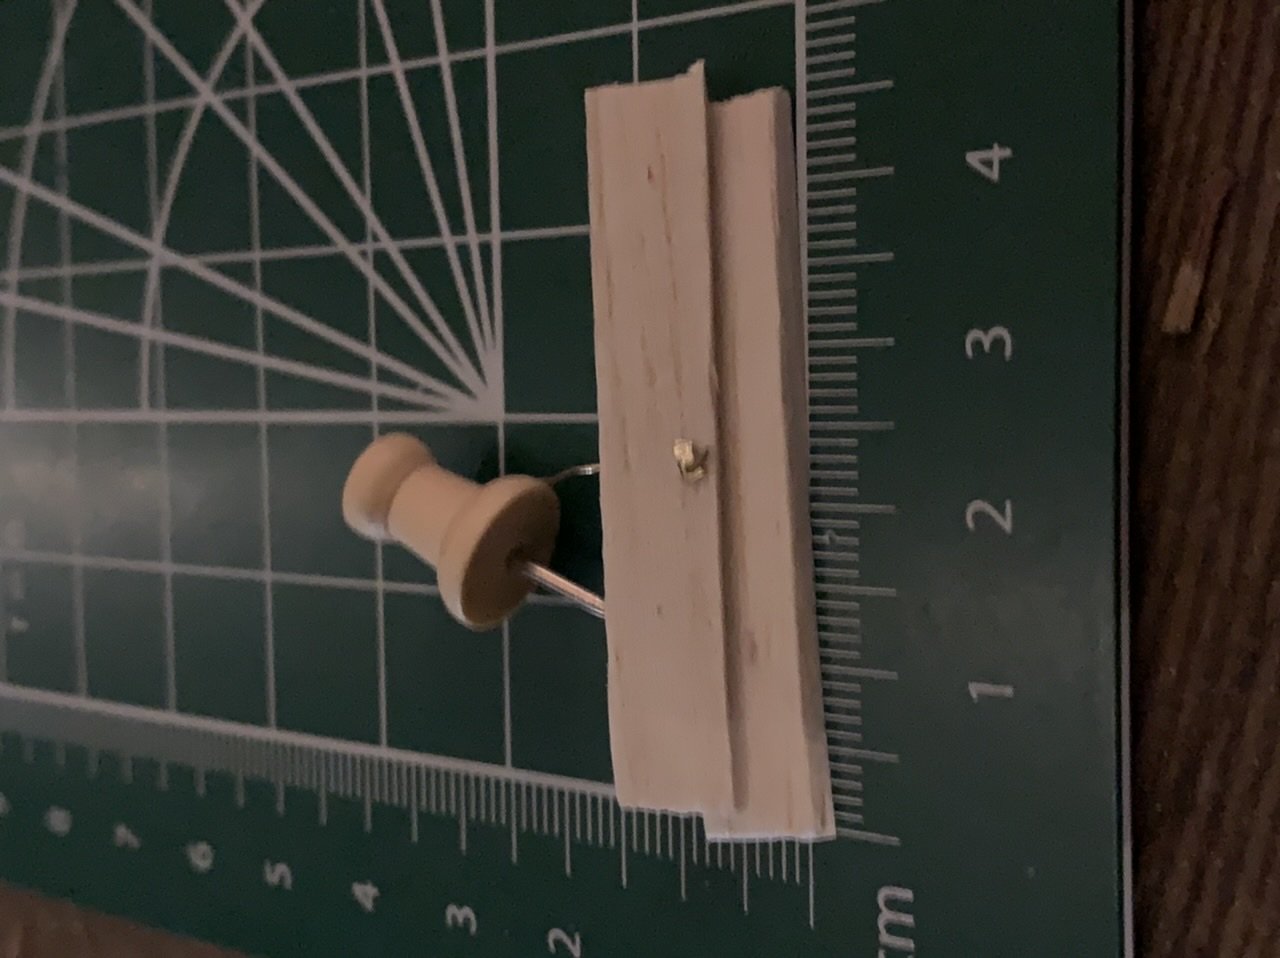
Just for fun I attempted a tiny rivet at scale today. It didn't come out very pretty but it is functional. I'm not sure it's worth it to make hundreds of these... My gas stove turned out to be hot enough to anneal the wire but not hot enough to melt it into a ball at the end. Also I did the drilling and cutting of the clink plate in the dark and cut it with wire cutters. If I do this again it'll be in the light with a chisel. 😆