Mirabell61
-
Posts
7,410 -
Joined
-
Last visited
Content Type
Profiles
Forums
Gallery
Events
Everything posted by Mirabell61
-
 Thank you Hermann, It shall be great when you start that project. Your offer for possible support is very much appreciated very kind of you and I may come back to it when my own build is further on, and I get to details Nils
- 299 replies
-
- 3
-

-
- lightship
- Feuerschiff Elbe 1
- (and 1 more)
-
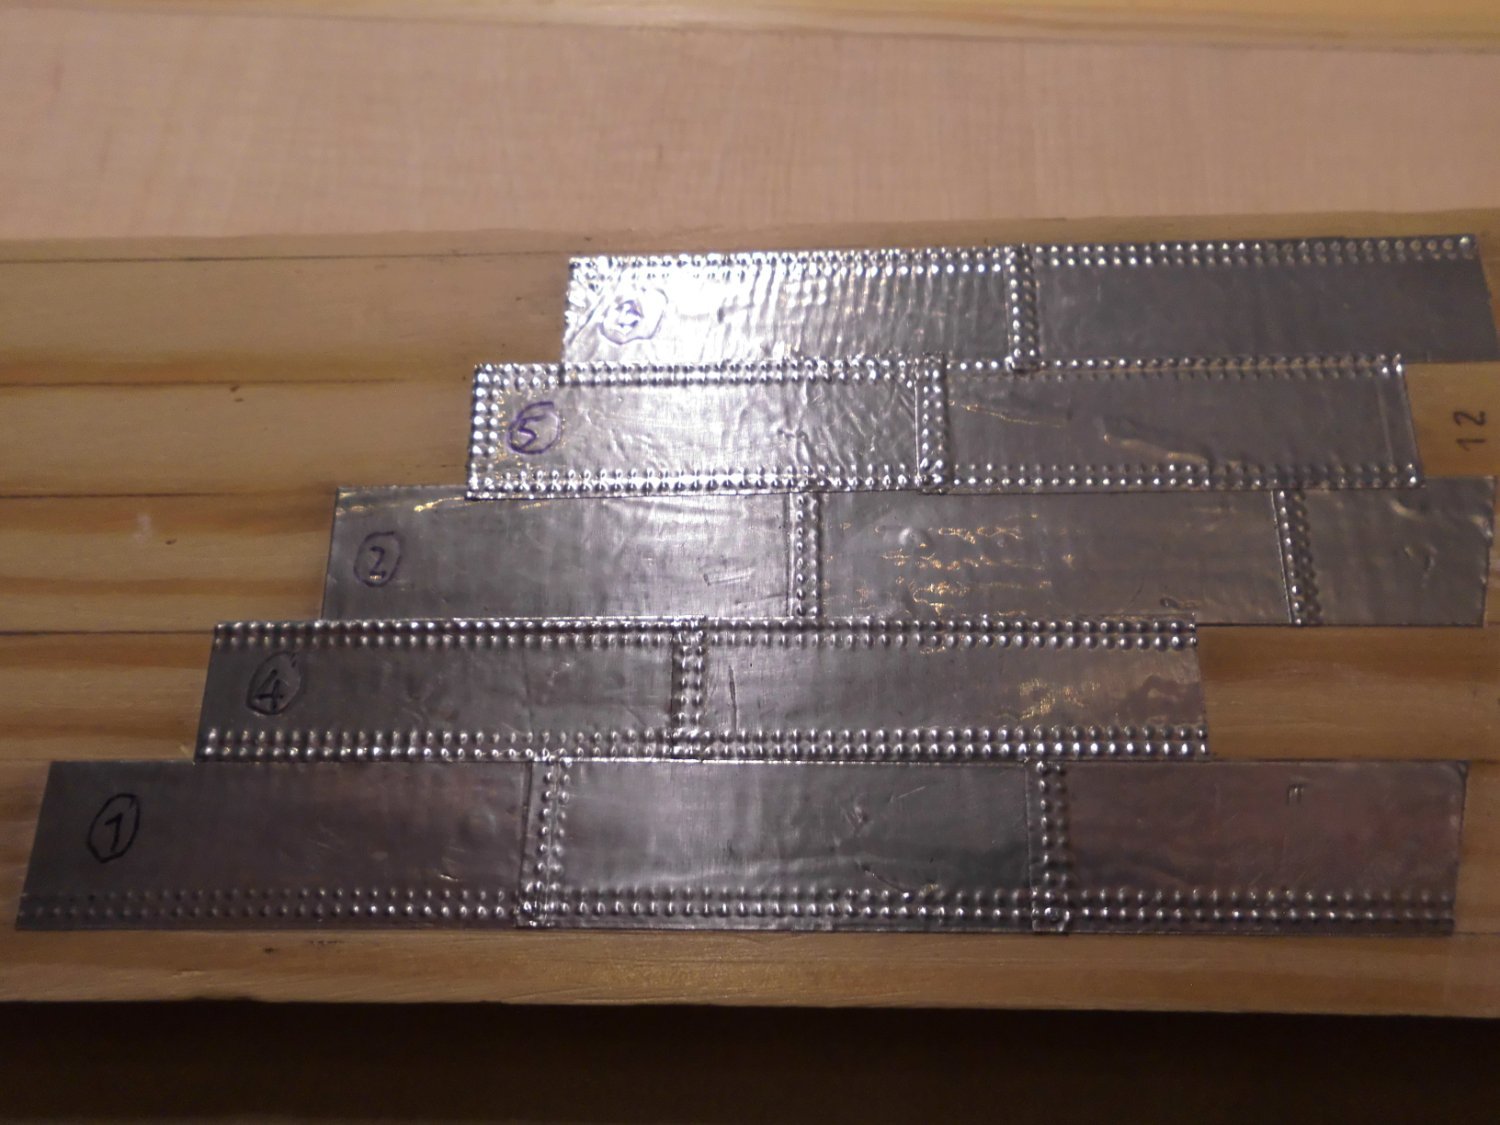
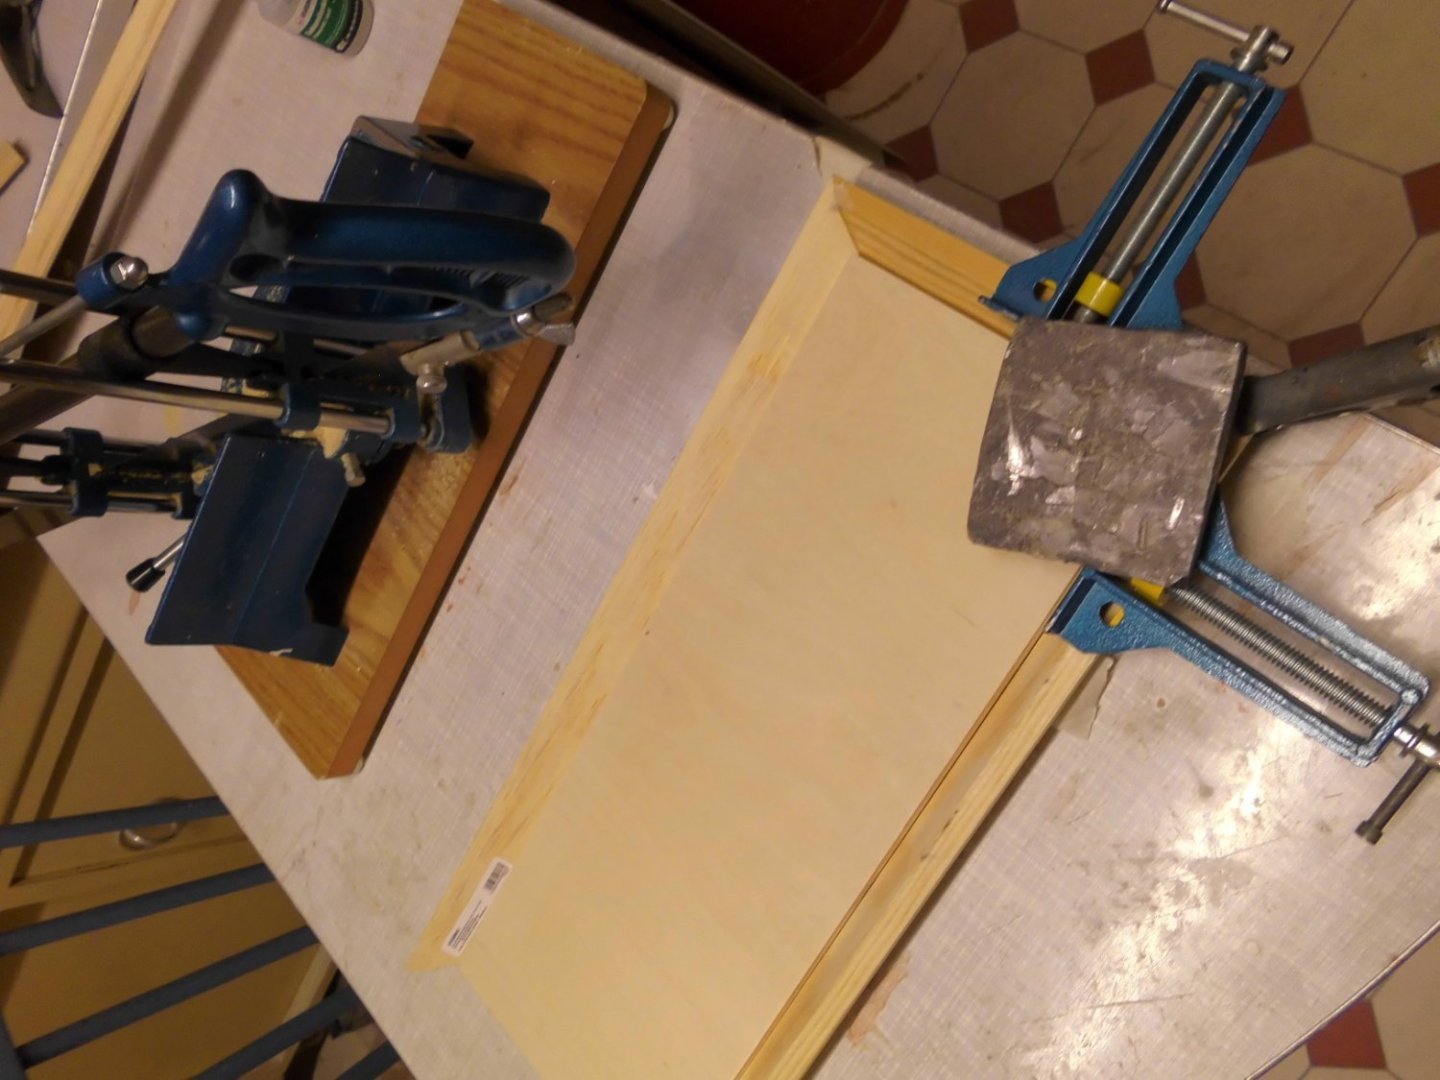
first update I got started with the standplate (without staining yet) and the pedestals. Probably the base mounting plate for fixing the framing is next. Allthough there is no hull yet, There are fist evaluations for the later metal plating. As usual for my builds I intend to fix a "backbone" 13 mm beechwood square-liner, (also counterhold for the press-in-nuts for the pedestal spindels) just above the keel, to provide a strong and sturdy setup, as well as stringers appr. 5 per side lengthwise The later has proven to ease the planking afterwards, and to keep the hull in shape, because there will be only one planking layer Nils this is basic for lofting the 16 frames starting with the base plate raw baseplate and pedestals done. Fastening with spindles and press in counter-nuts within the hull made a dummy plating arrangement in order to see if the single plates 15 x 50mm will be OK. Rivets in 2 row lines I think it looks OK with the stagered arrangement. The horizontal line 1,2,3 are put on first with gaps inbetween and then lines 3 and 4 are added by overlapping at the gap. The lines 3 and 4 act like a belt I know that some fellow model builders will comment the "too large" and dominant rivet heads, but these will be at least 50% covered by metal contact agent, the primer- and the final paint coating


- 299 replies
-
- 10
-
-
- lightship
- Feuerschiff Elbe 1
- (and 1 more)
-
Thank you very much Hermann, yes I know that and also saw that it is quite expensive, about twice the cost of the first issue many years ago. Helmut Thomas is taking reference to exactly that plan in his publication (but only 2 plan pages instead of 6) shown there, but many pictures in color and a build log as well). I scaled down the drawings I have to 1:87 instead of 1:50 Without the original plan it will not be easy to build the mid-lightmast and its lenses as well as the foremast and its many signal details. I`ll try to do these from pictures I have, and am still gathering information on those. Perhaps at some degree of building I may regret not to have bought the plan as you have. Are you still intending to build her, or is it she in progress by you already ? Nils
- 299 replies
-
- 3
-
-
- lightship
- Feuerschiff Elbe 1
- (and 1 more)
-
Thank you Yves, I`ll do the best I can get out of it .... Nils
- 299 replies
-
- 3
-
-
- lightship
- Feuerschiff Elbe 1
- (and 1 more)
-
Many thanks to Keith, Ken, Andy, John and Denis, and keep tuned .... Keith, yes, I found it interesting as well, as I remembered that there was also a very nice description with pics, plan and build-log in my possesion already, and ready to be kissed awake. Ken, I am pleased you like it and that you shall be following along Andy, well actualy, no, I only swaped a place for my Bohuslän, which is now in my attic office, and the Ergenstrasse took it`s place in my hobby office instead. The lightship, when done, has no final mooring place yet. John, Most of the German lightships have this clipper bow. Maybe thats the reason that quite few, when taken out of service, have been converted to 3-mast barque sailing vessels ( like the "Alexander von Humbold 1," well known threemast-barque, with the green sails) Denis, I only know that there must have been a Billing Boat Elbe 1 lightship kit as well as the fabulous fittings-kit thereto, and very long ago. One must be a lucky guy to find an unbuilt kit like that somewhere . I found some information for that on U-tube channelI. My drawings are from the 80 page "Modelwerft, special" eddition 1994/1, like described in my log intoduction. By the way, I have`nt heard from you for a long time, thanks for looking in again, its good to hear from you. Nils
- 299 replies
-
- 2
-
-
- lightship
- Feuerschiff Elbe 1
- (and 1 more)
-
Thank you Veszett, yes, probably Mike Maynard Nils
- 299 replies
-
- 4
-
-
- lightship
- Feuerschiff Elbe 1
- (and 1 more)
-
Thanks Roel, for looking in and stay tuned... Nils
- 299 replies
-
- 4
-
-
- lightship
- Feuerschiff Elbe 1
- (and 1 more)
-
Hello Veszett, that is a great model in an excellent diarama, thanks for sharing the pics and the story of the author (within the logs reading), do you know who the name of the model builder in that forum ? Nils
- 299 replies
-
- 5
-
-
- lightship
- Feuerschiff Elbe 1
- (and 1 more)
-
Hi Veszett, Nils I wish you success, much fun and good luck, whenever you get started. It will be an interesting project Nils
- 299 replies
-
- 5
-
-
- lightship
- Feuerschiff Elbe 1
- (and 1 more)
-
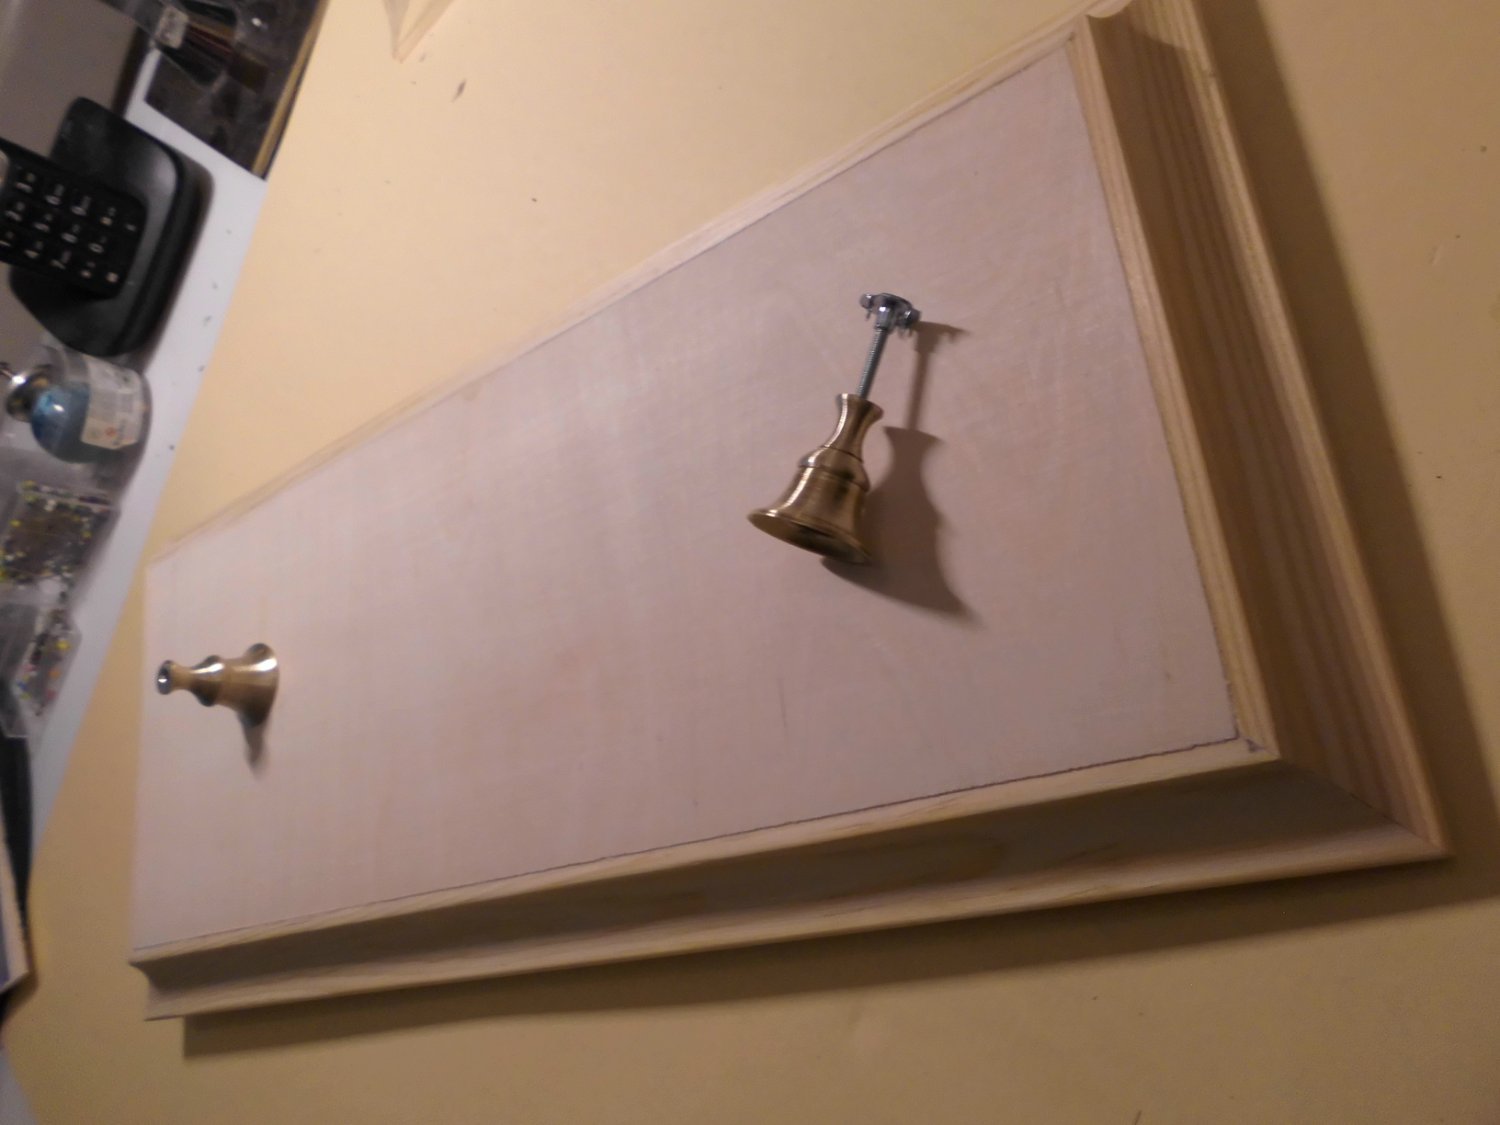
Many thanks Uwe, Chris and B.E. I`m happy to see you on board already ! Uwe, yes, thats right, an interesting way-point and the bright red color is clear visable at day from afar, The light per night. Chris, thanks for your input, but I would prefer a wood built ship rather than a card model in this case. Thanks B.E. well I`m realy still at the kick off point. This time I`ll be starting with the stand, before I go for the frames. I still have the wood and two pedestals over from the prevous builds. Nils
- 299 replies
-
- 3
-
-
- lightship
- Feuerschiff Elbe 1
- (and 1 more)
-
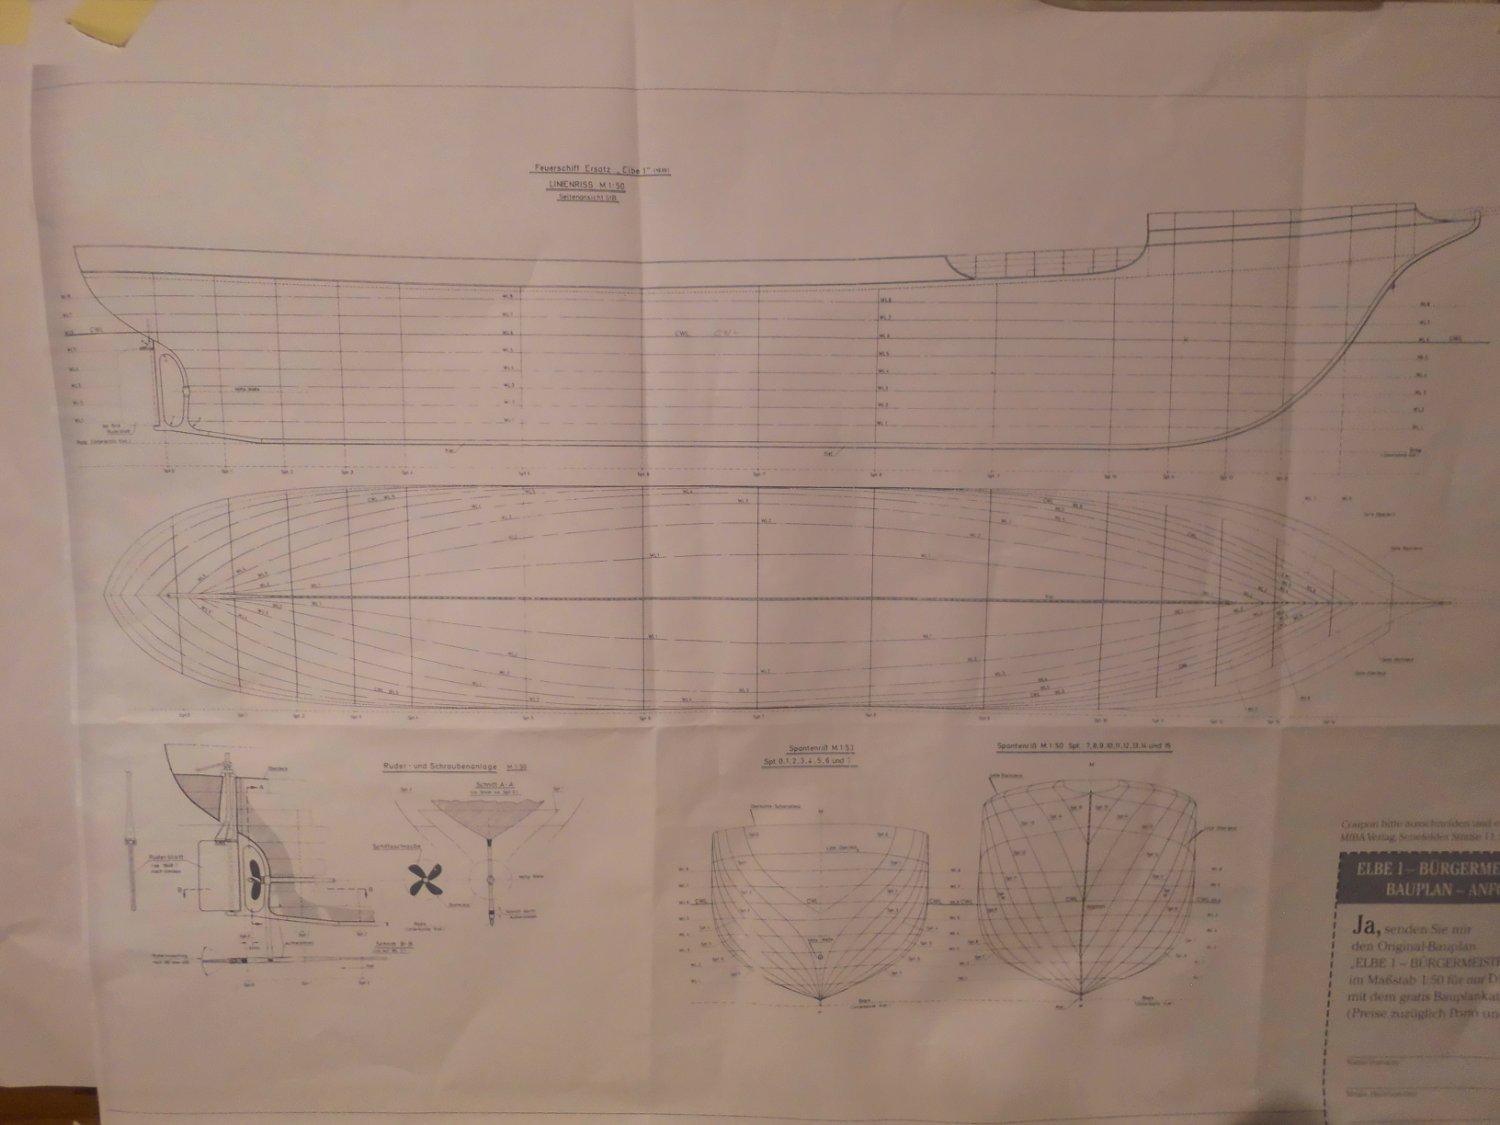
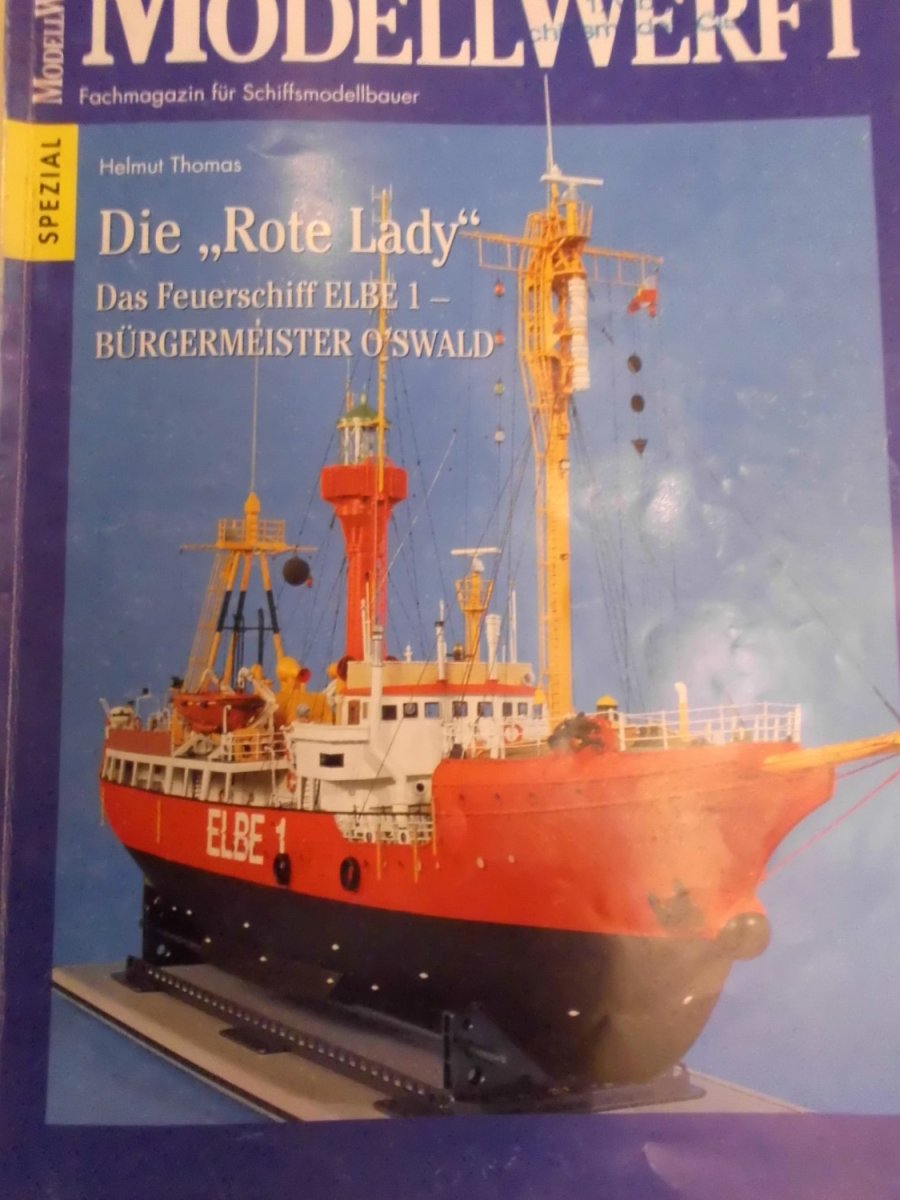
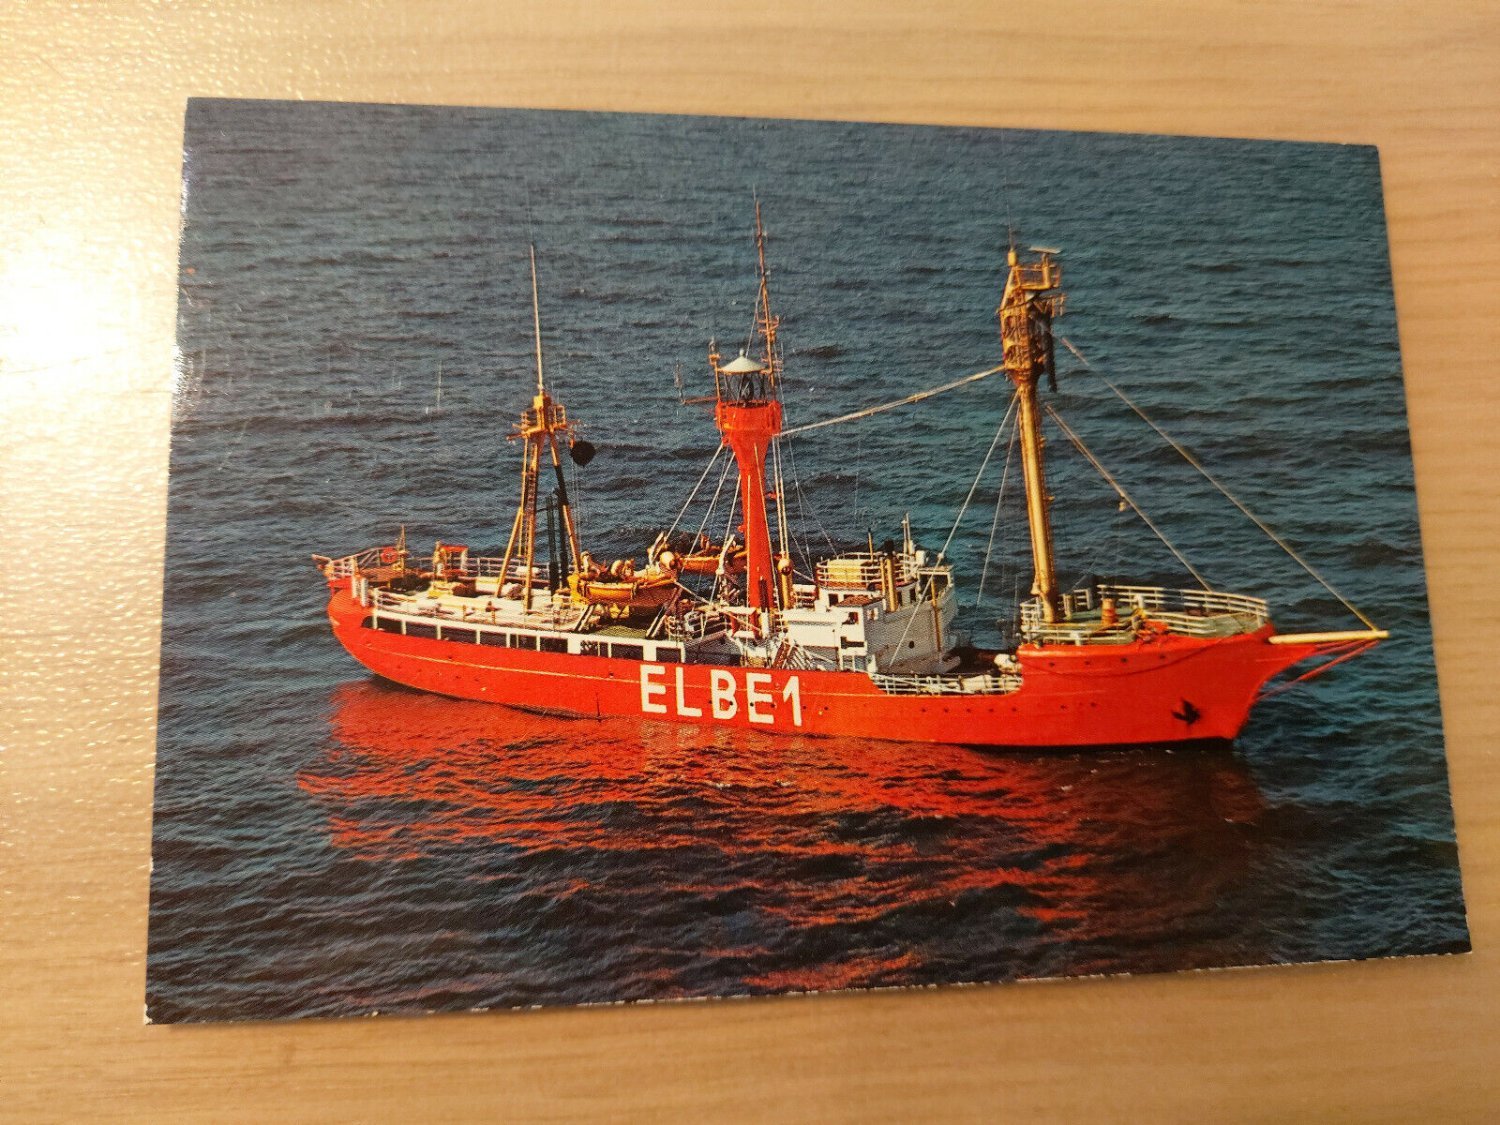
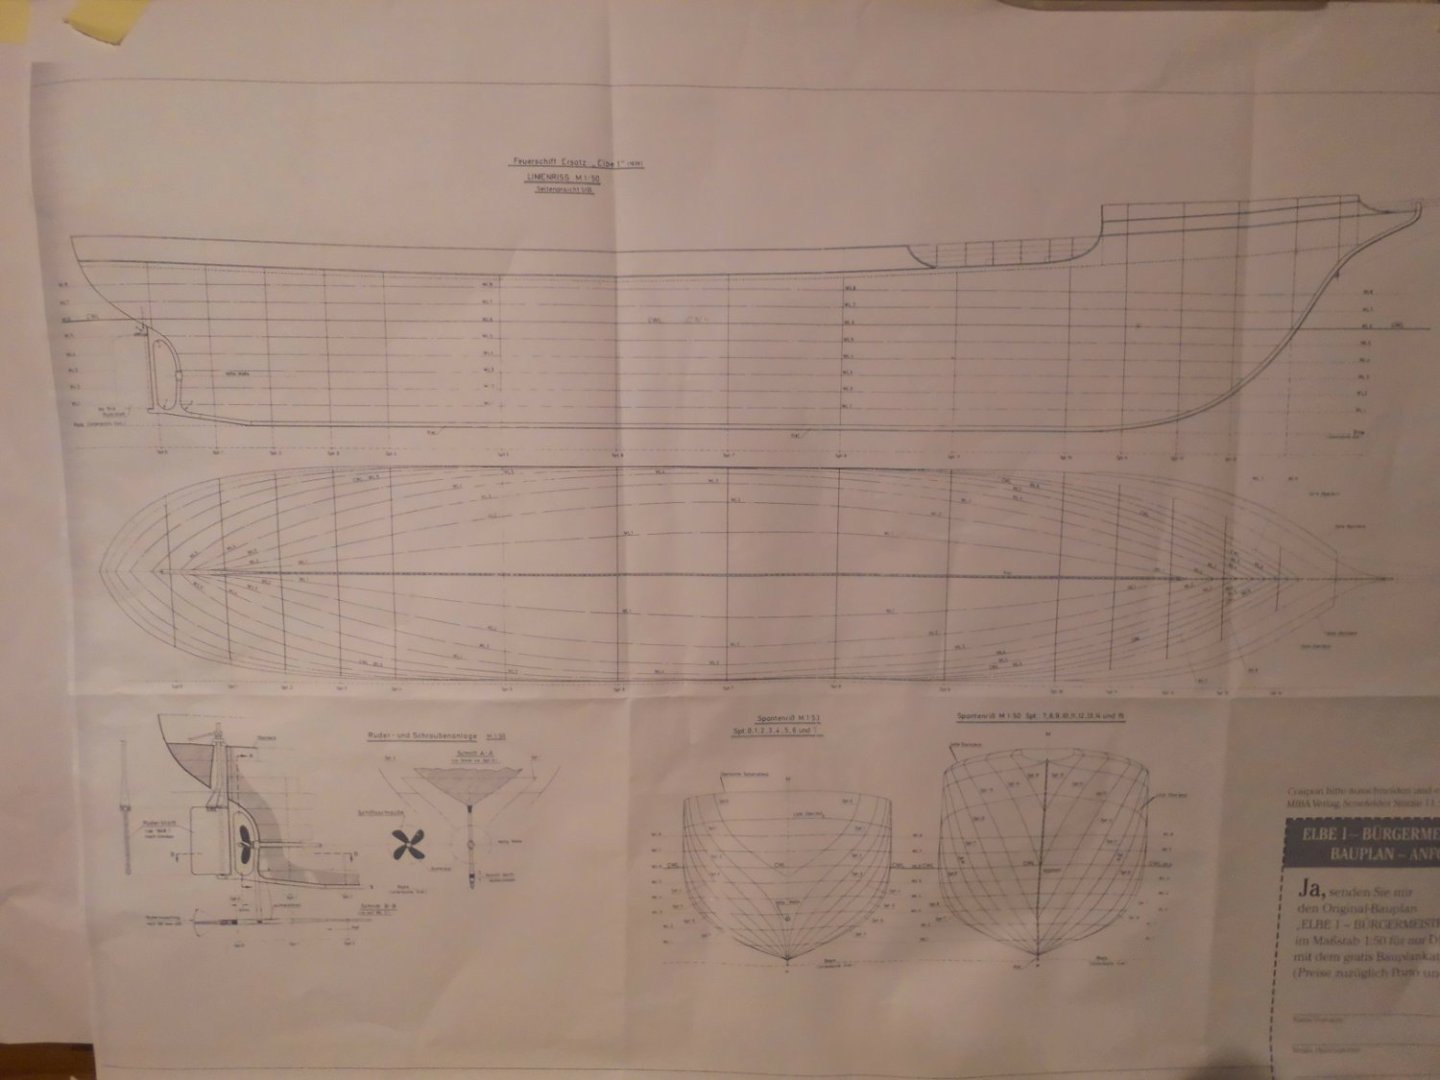
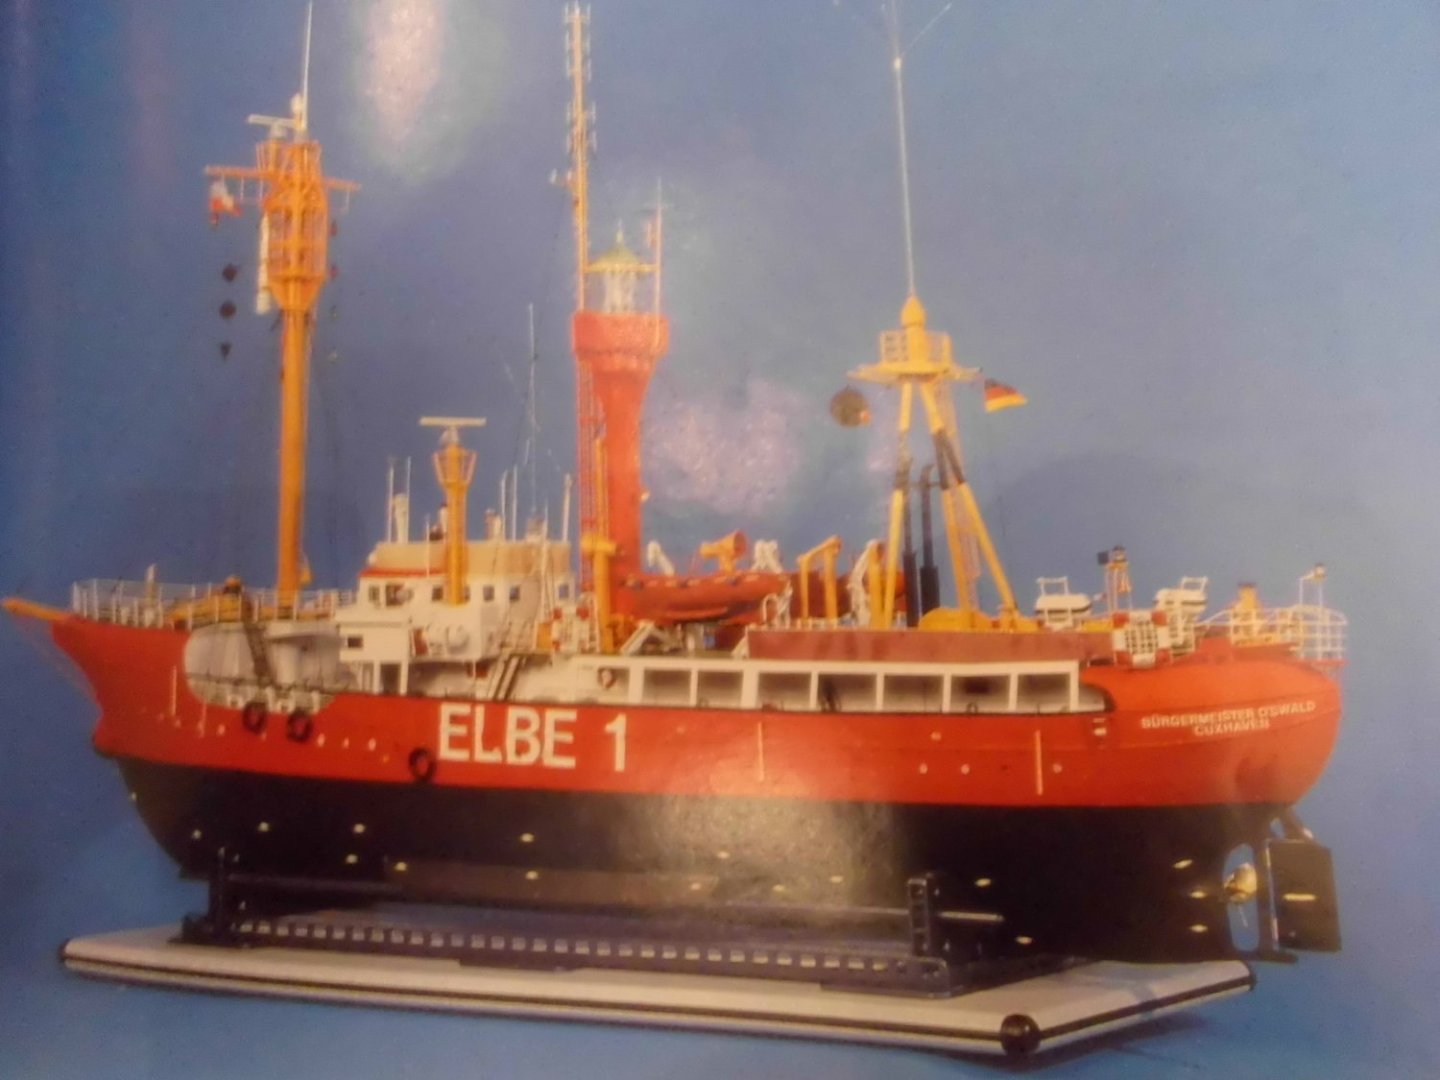
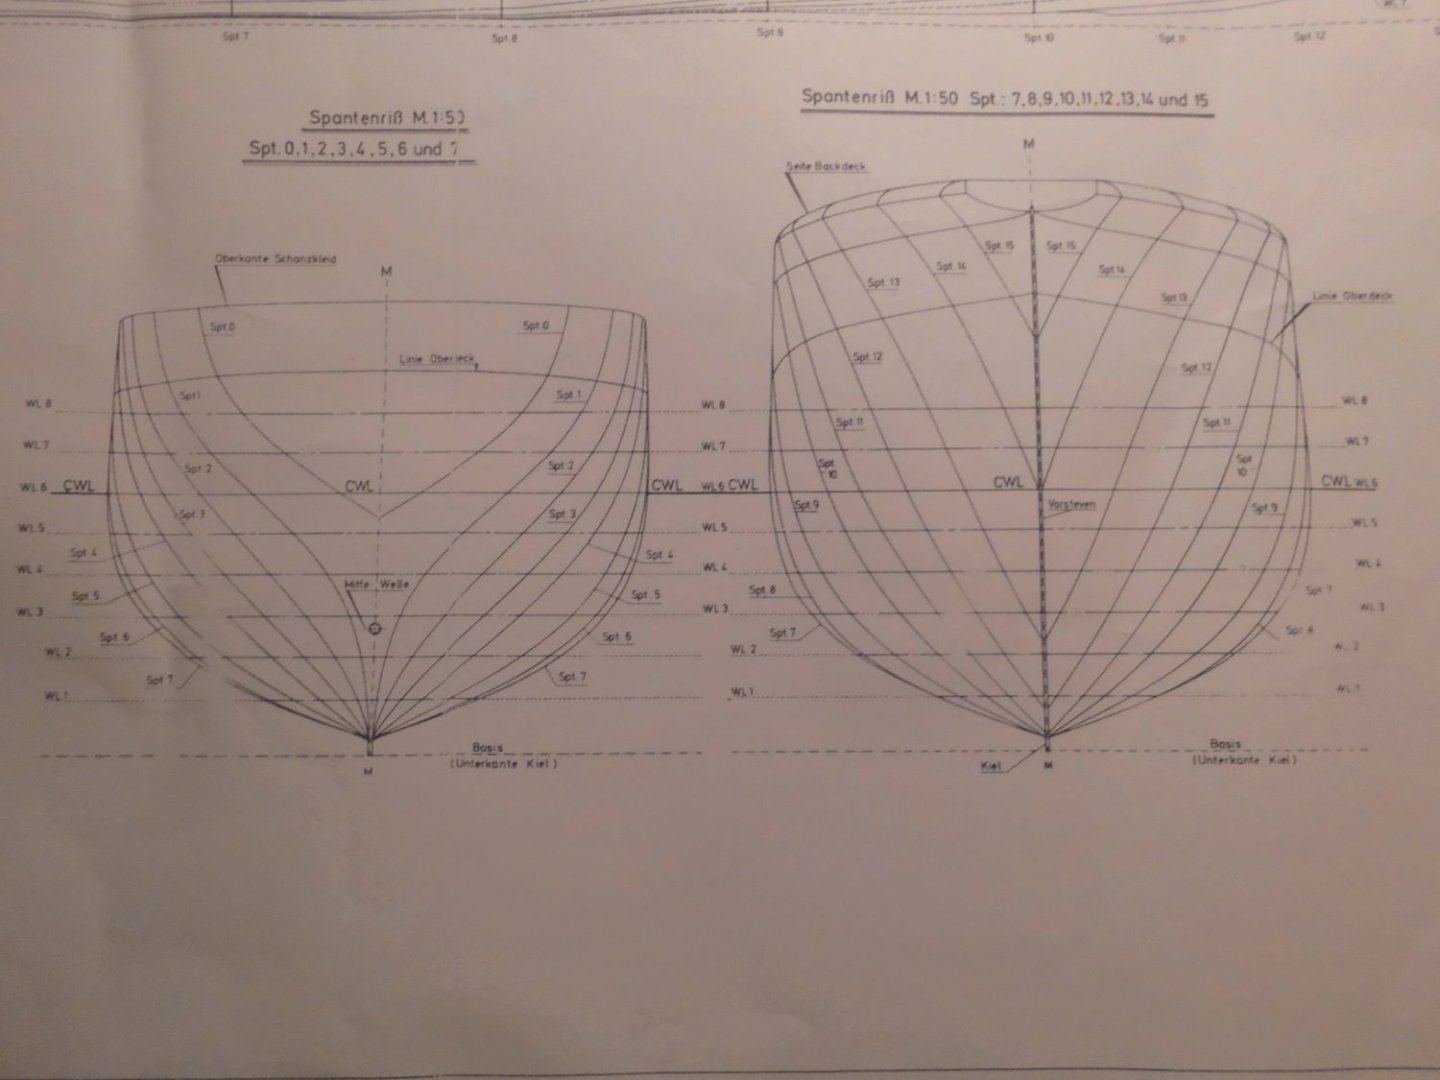
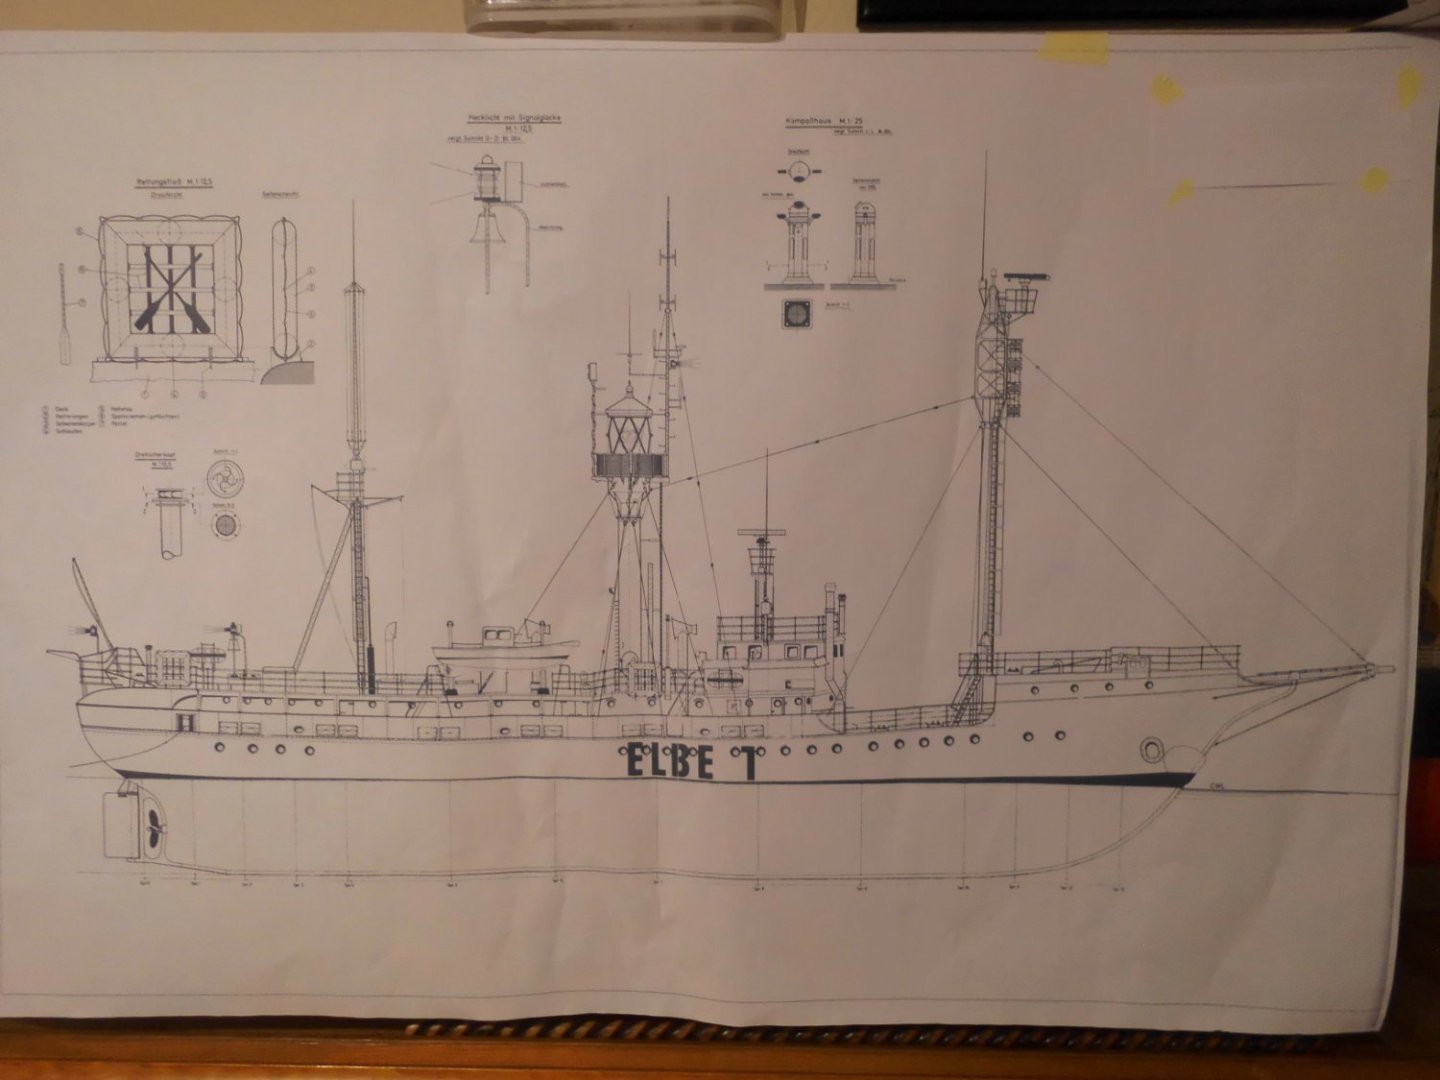
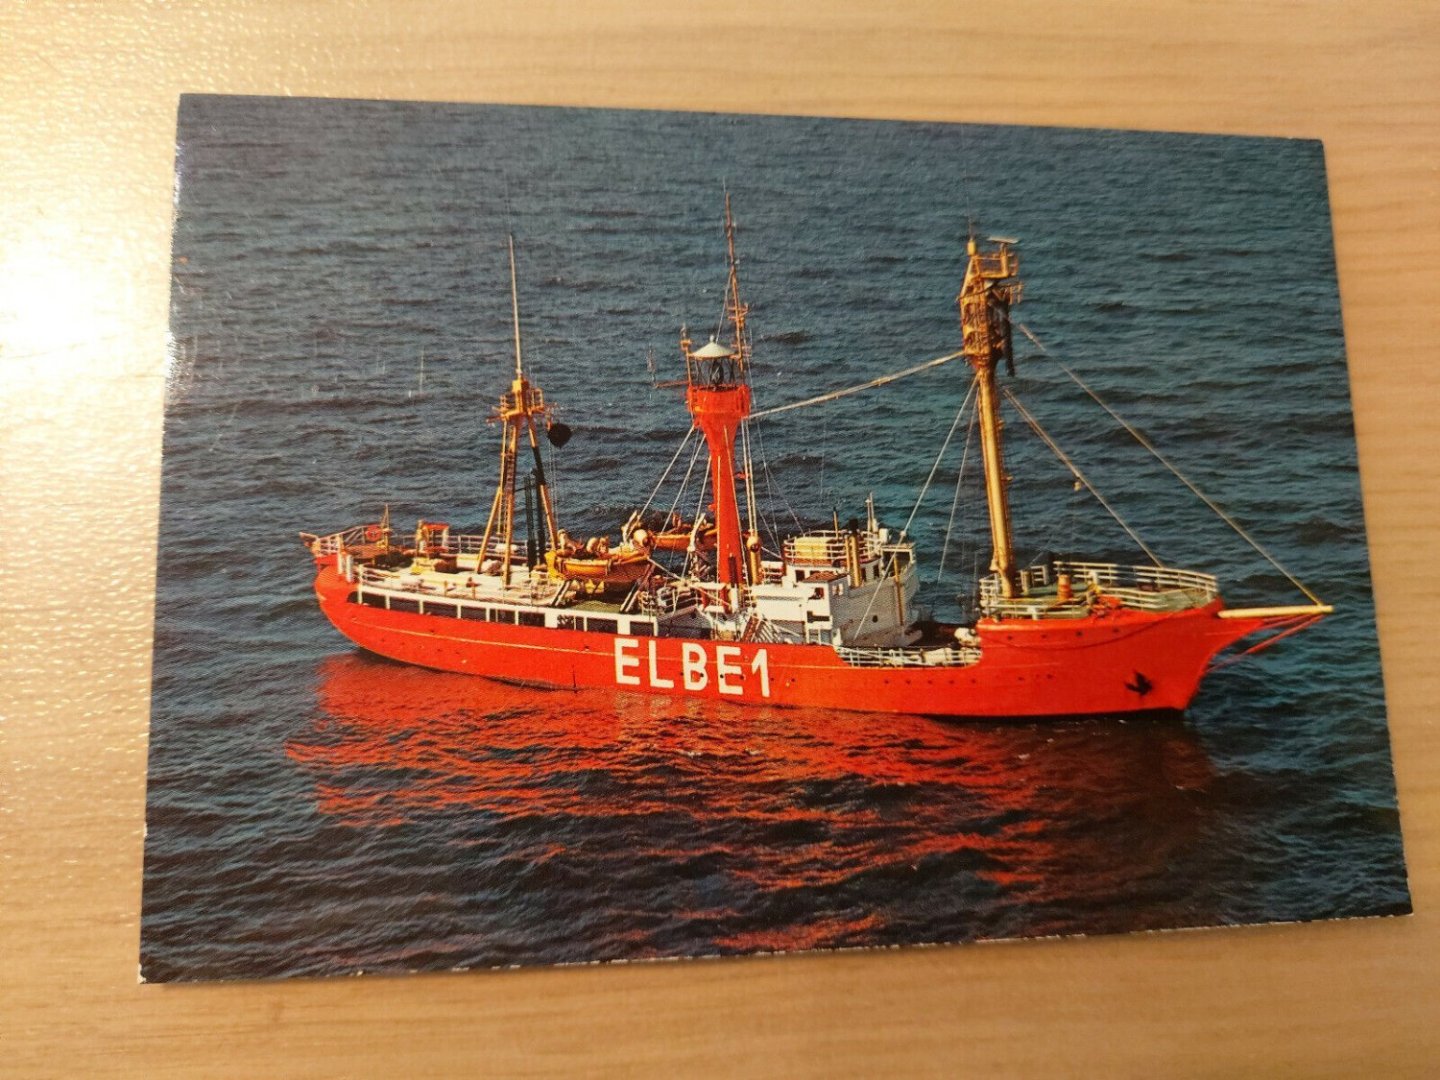
Today I would like to introduce my new chosen-out project : It will be the well known lightship Elbe 1 ( named Bürgermeister Oswald), the "red Lady", since then being appointed as an German lightship and on duty in the German Bay, mouth Elbe river, Northsea. After serving for 50 years it was directly replaced 1989 by an unmaned lightvessel-robot on the former position of Elbe 1. Several years ago my attention was drawn to this lightship, and to keep in mind for building a model of it someday. At that time I had purchased a special edition of the rare 1994 MODELWERFT magazine, related exclusingly to the Elbe 1 Lightship an kept it since then somewhere in my hobby office. A few days ago I remembered it and went looking for that magazine, and it seemed to be lost. After a days search I finaly found it sticking somewhere between my maritime books on a shelf. This publication was issued by author Helmut Thomas, a very talented and skilled senior modelist. The incredable model he had created of the Elbe 1, the fine pics and detailed build log description shown therein was very inspiring for me and it was my "benchmark" if I ever were to build it myself, knowing that I would be pleased to get at least somewhere near to that benchmark. The 80 page publication was comprising also 2 outfold double pages of a buildplan including lines and frameplan. I let these build plan pages magnified to scale 1:87 in my local copy-shop, and started to study all about the ship, and if I could possibly build it, ot try to do so. In comparation to Helmut`s model that would have been too large (length 114 cm) I decided to downscale it to an overall length of 66 cm. An apprropriate glas-case for that size would also be whithin my capability afterwards. I remembered that once Billing Boats had brought out a model in scale 1:50 of this model, but it was the predecessor of this lightship with several differences, Unfortunately today there was neigther an unbuilt Billing-Kit perhaps even with fine fittings-detail-kit (lightmasts, etc, ) to be found anymore, so a scratch build would be the solution. So this is what came out : ......... Nils The beginning The rare "Modellwerft special" magazine of 1994 / 1 Model of Helmut Thomas a postcard side view overall frameplan

- 299 replies
-
- 18
-
-

-
- lightship
- Feuerschiff Elbe 1
- (and 1 more)
-
good brass and soldering work Valeriy Nils
-
Very nice Eberhard, I like your arrangement with the boats. Especialy that with the open dinghi without cover Nils
-
Many thanks Rick, your comment is much appreciated. I am in the moment thinking about a new project and am gathering information about it Nils
-
wunderbar Keith ! an excellent set up of the frames Nils
-
Very nice work Eberhard, and a smart Idea with that repare-tape, thanks for sharing, a few weeks ago I was looking for something alike to strap down a boat on the Ergenstrasse Nils
-
Thank you very much John, I am pleased with the result, but had some trouble with the nameplates attached to the ships own stand plate on both sides. These are of printed paper ( black lettering on yellowish colored background ) glued small plates and fixed to the nameplate`s brackets. After glueing the paper on, all was OK, but then after varnishing them with polyurethane "protection" they looked all wet and soaked through, and even with a hot air dryer I could´nt get them to look as before. Will have replace the printed paper nameplates in the next days, and leave away the varnish. I should have used photo paper for printing. Nils