modeller_masa
-
Posts
950 -
Joined
-
Last visited
Content Type
Profiles
Forums
Gallery
Events
Everything posted by modeller_masa
-
Making a Silk-fabric(?) Sail
modeller_masa replied to modeller_masa's topic in Masting, rigging and sails
Hello, Dziadeczek. Unfortunately, I can't see additional useful information from the guide. I'll buy the complete bundle for future scratch building when the publisher sells the brochure again. // I mean, it is out of stock now. I definitely wanted the book and was disapointed that the little brochure didn't receive an ISBN, which means that it isn't on Amazon or Abebooks. -
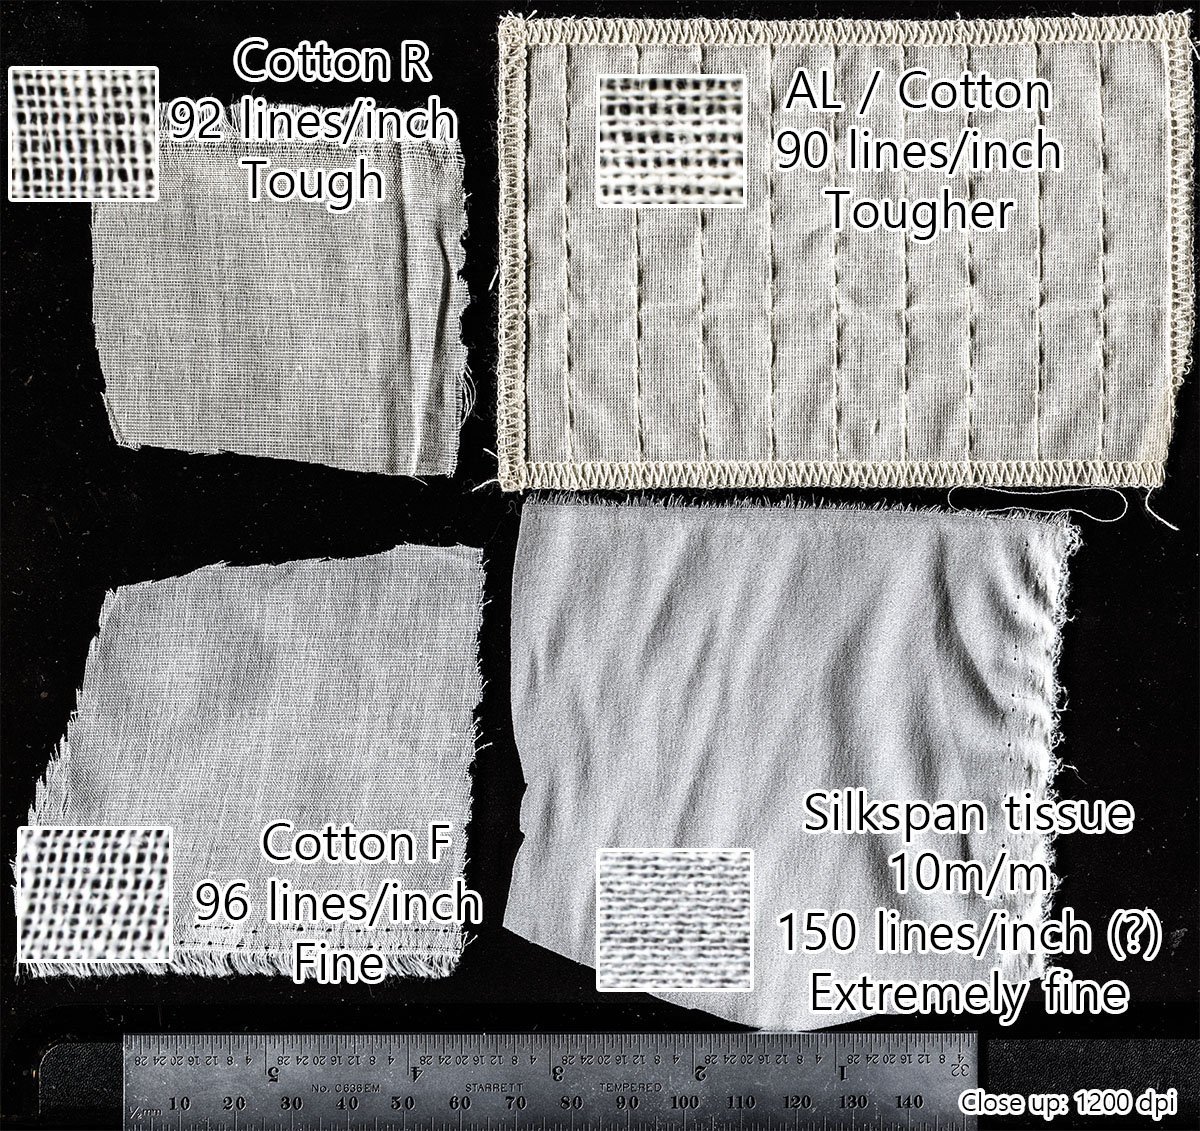
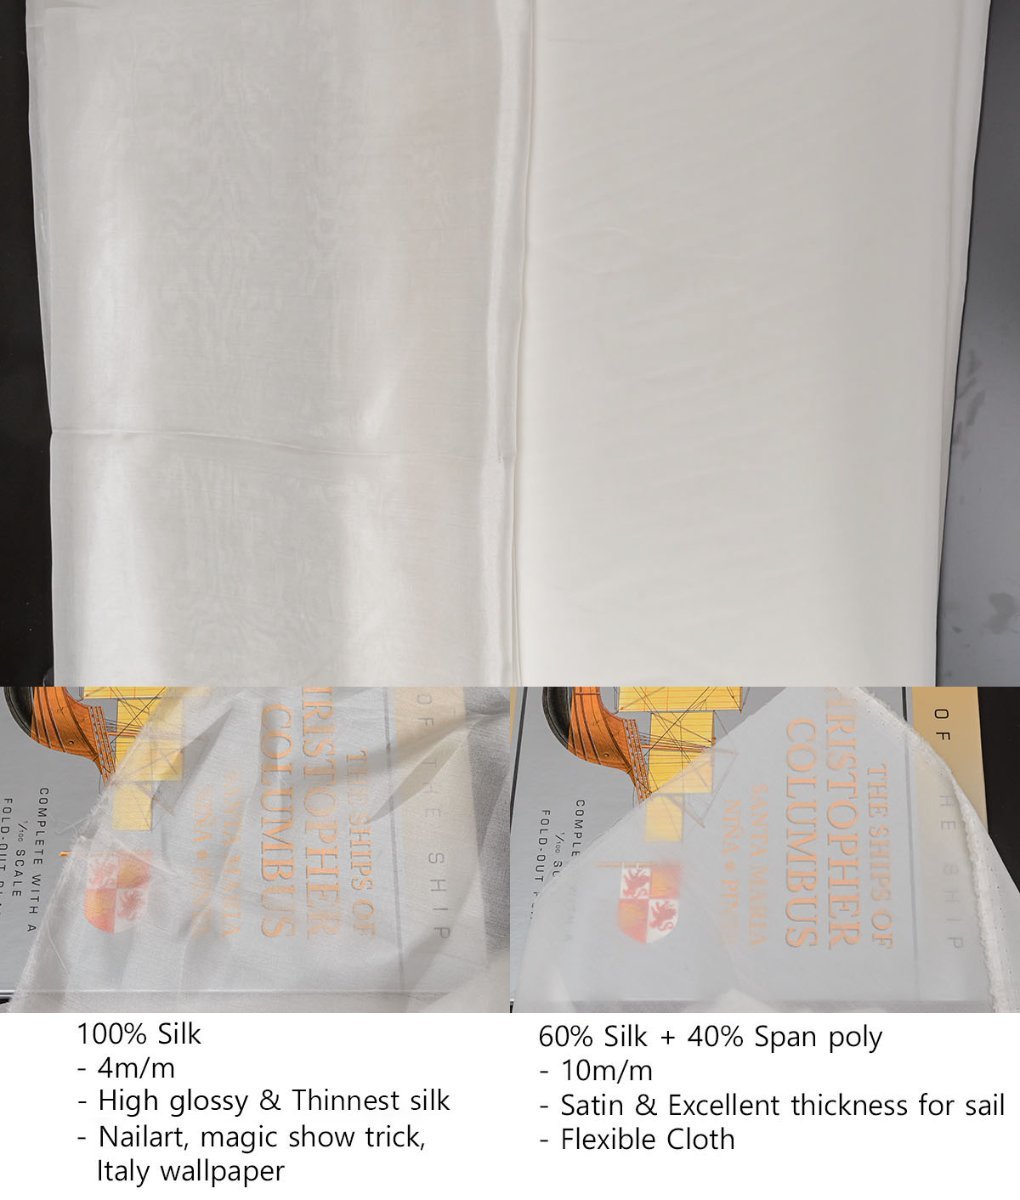
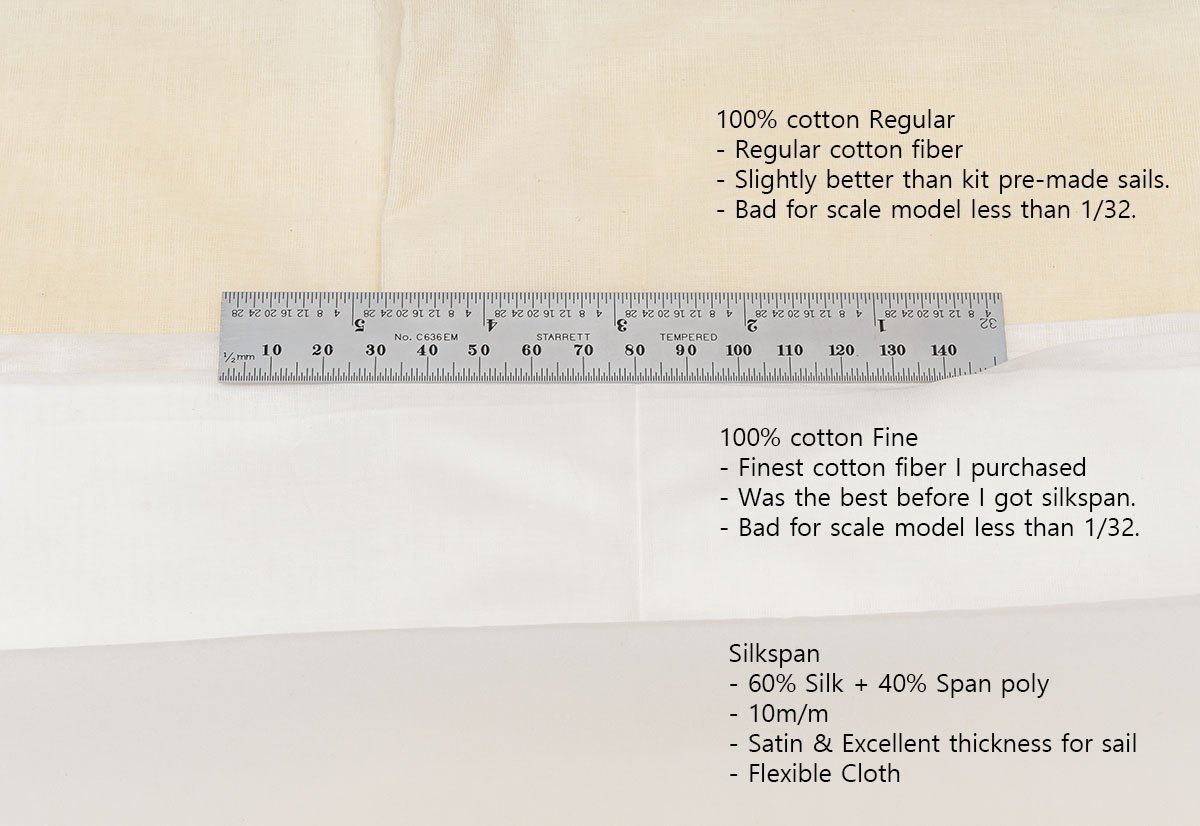
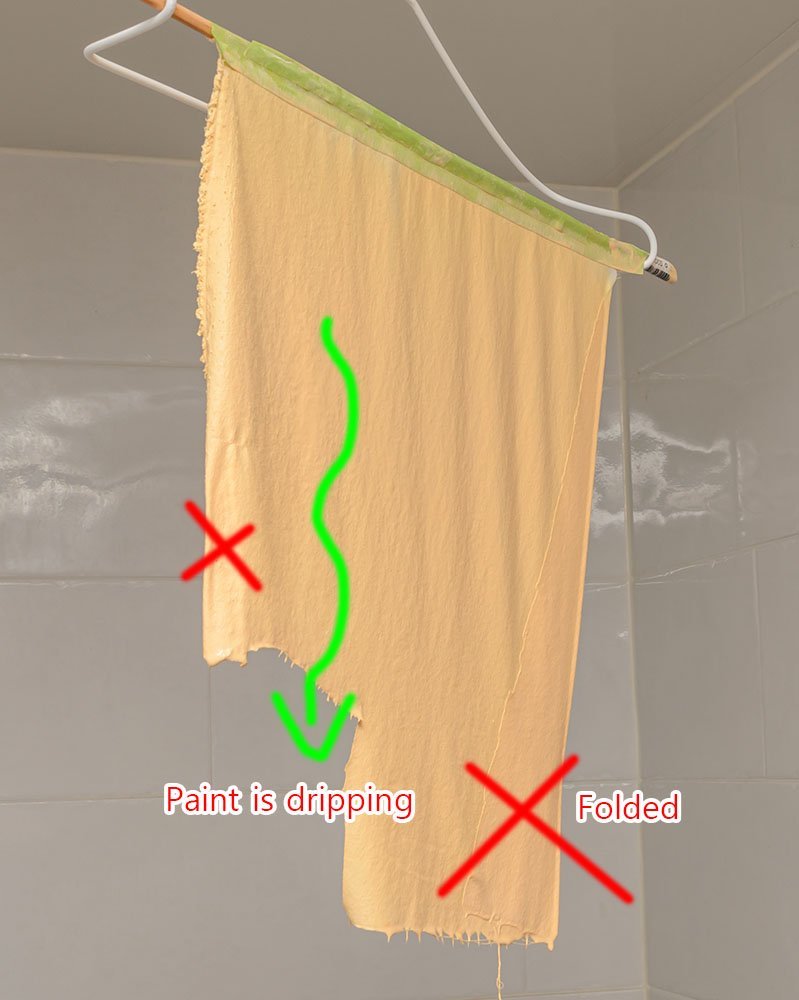
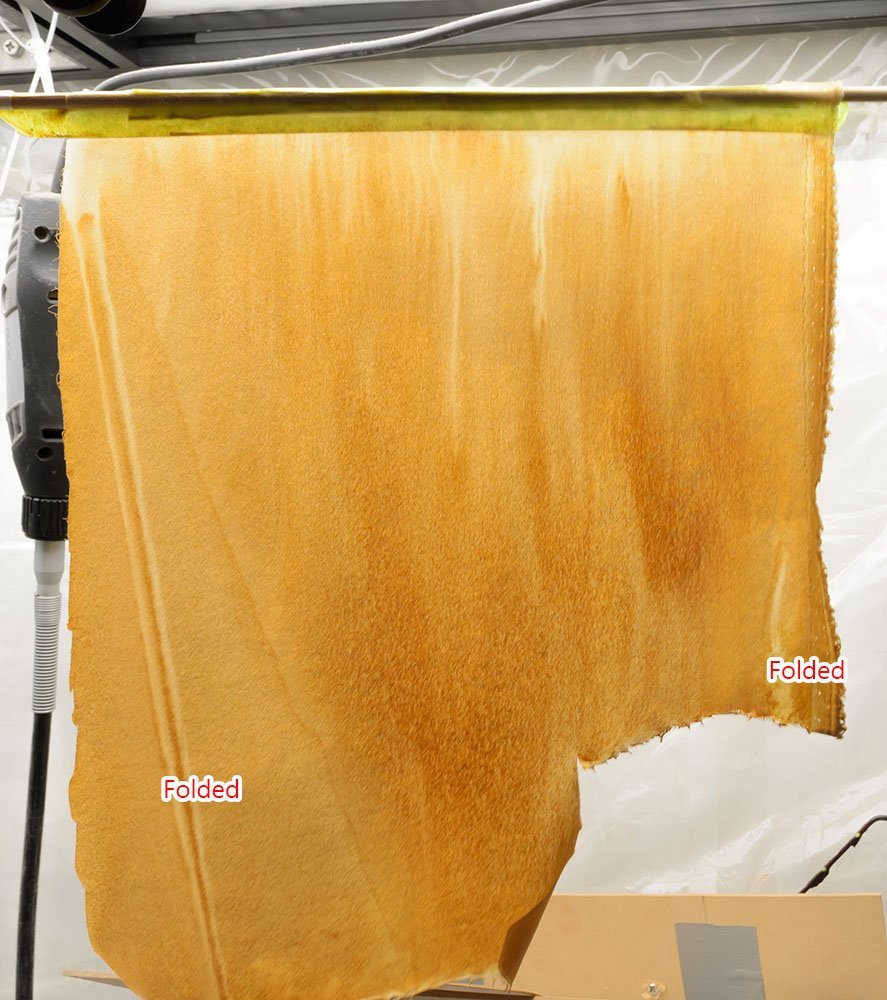
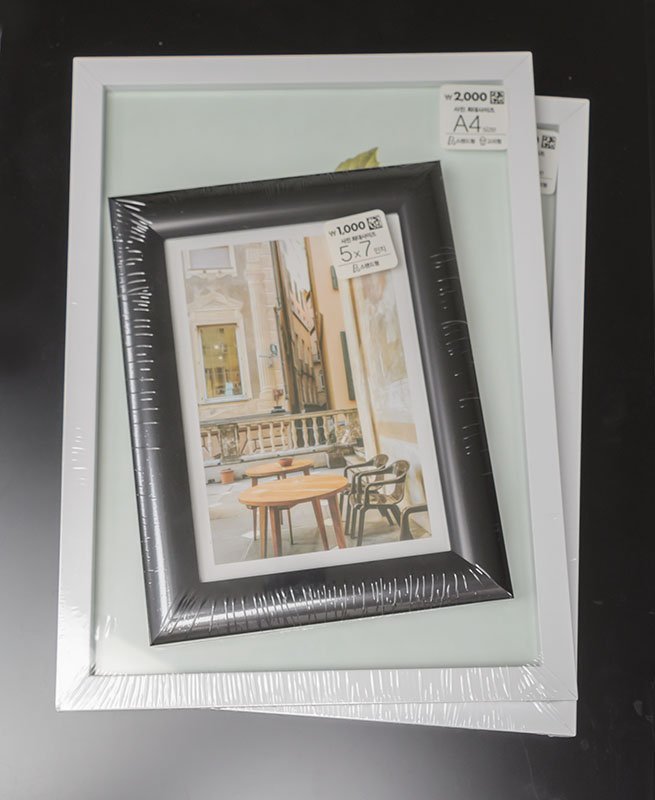
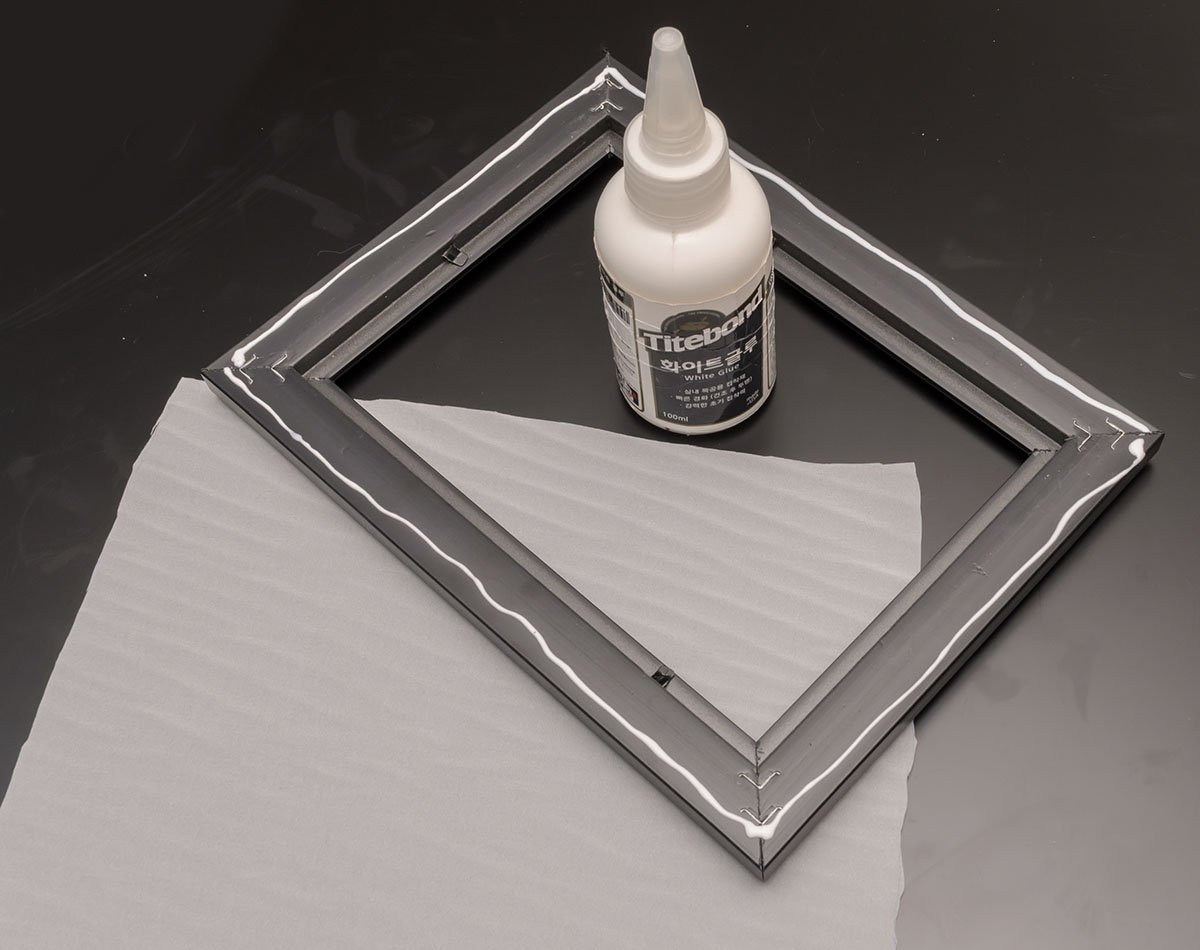
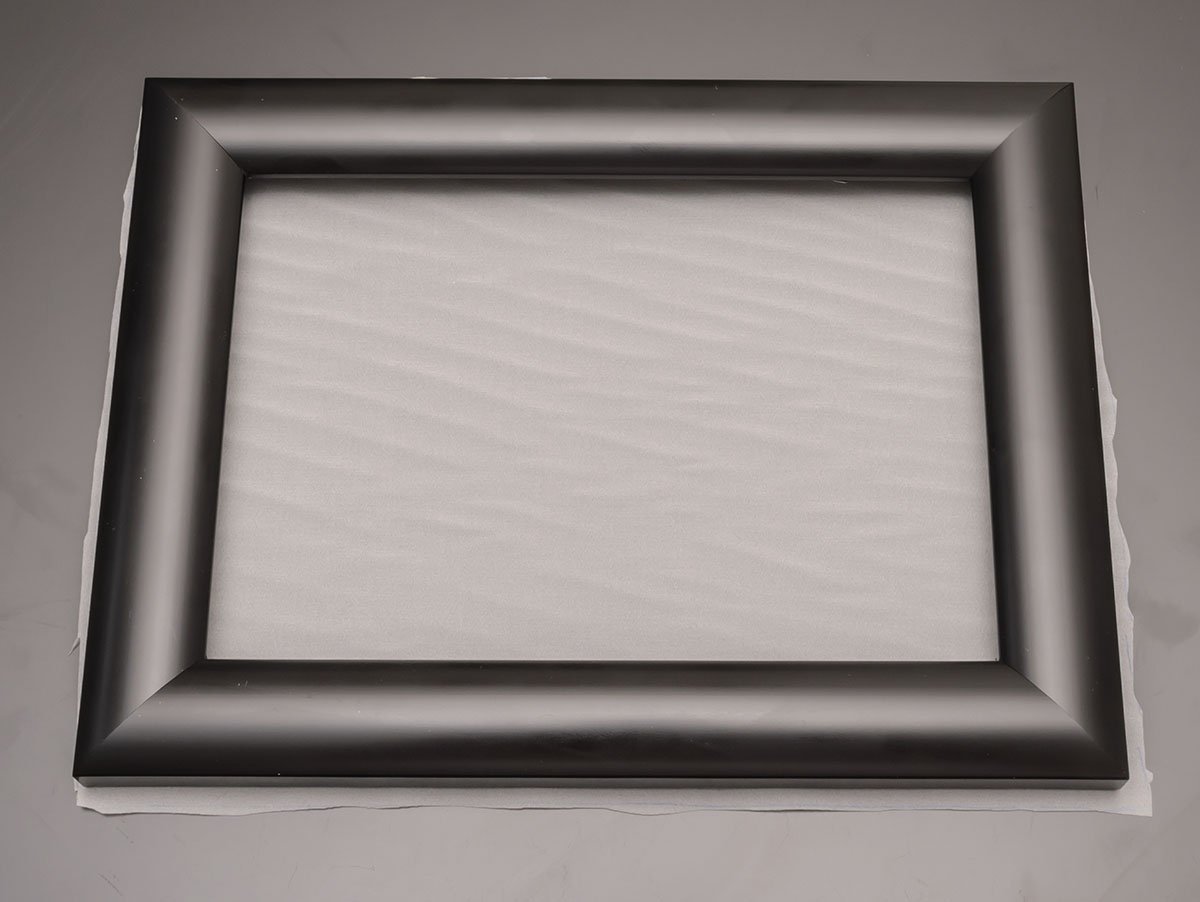
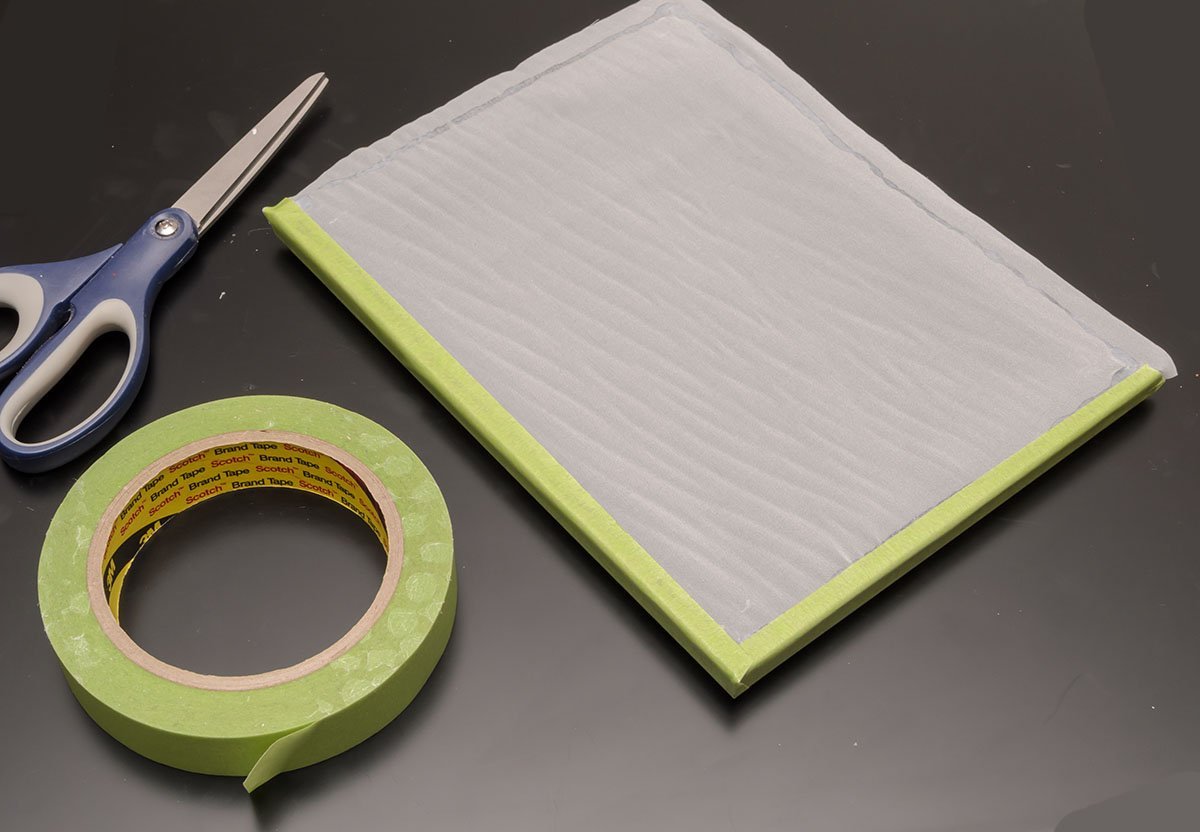
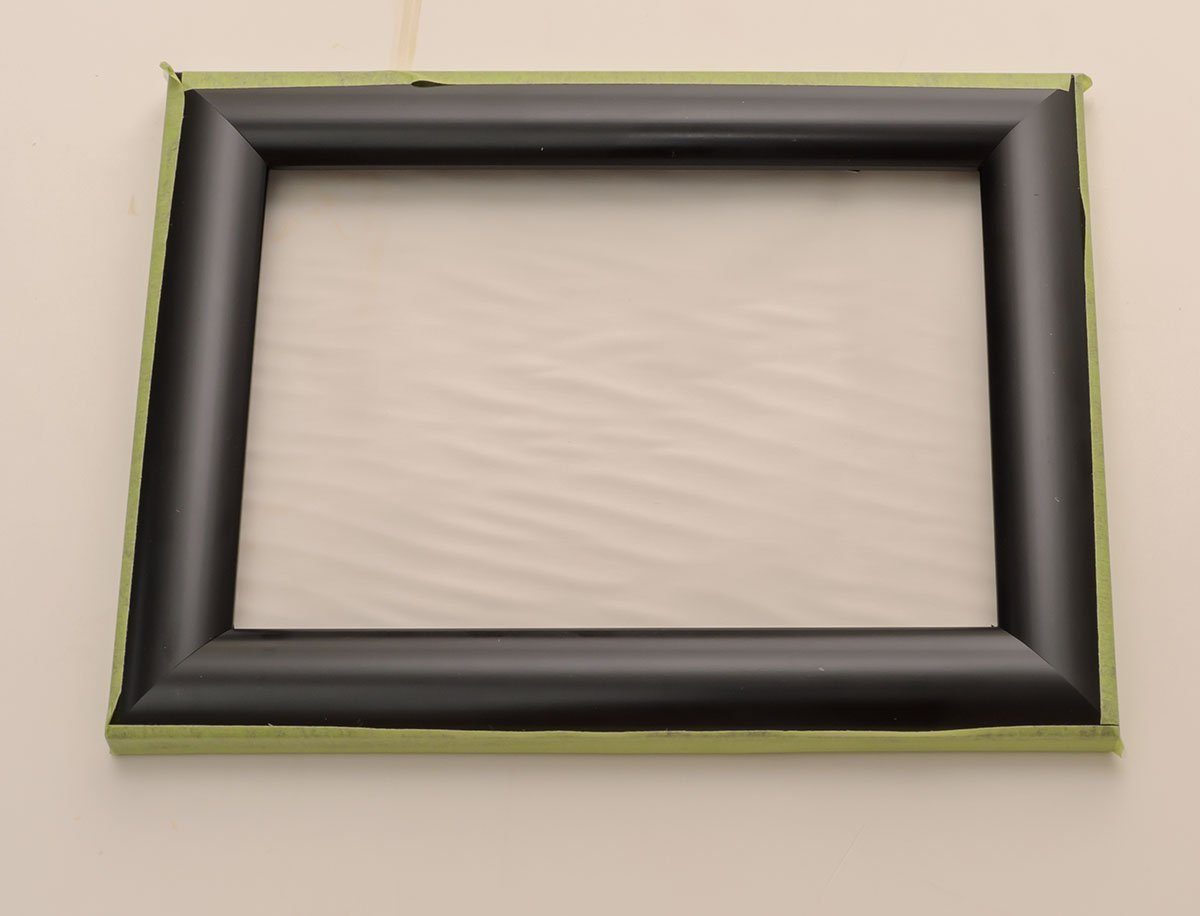
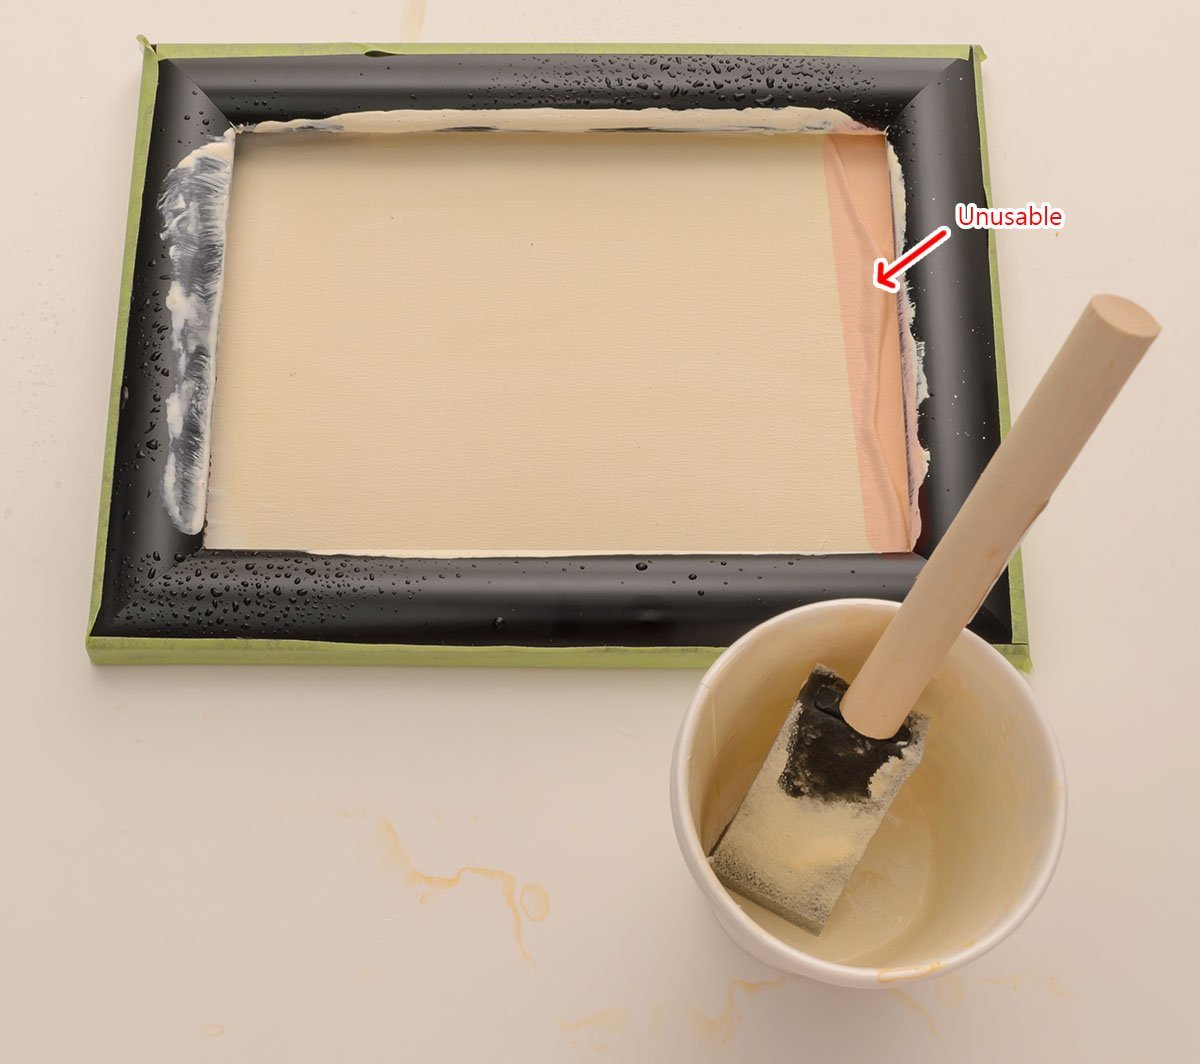
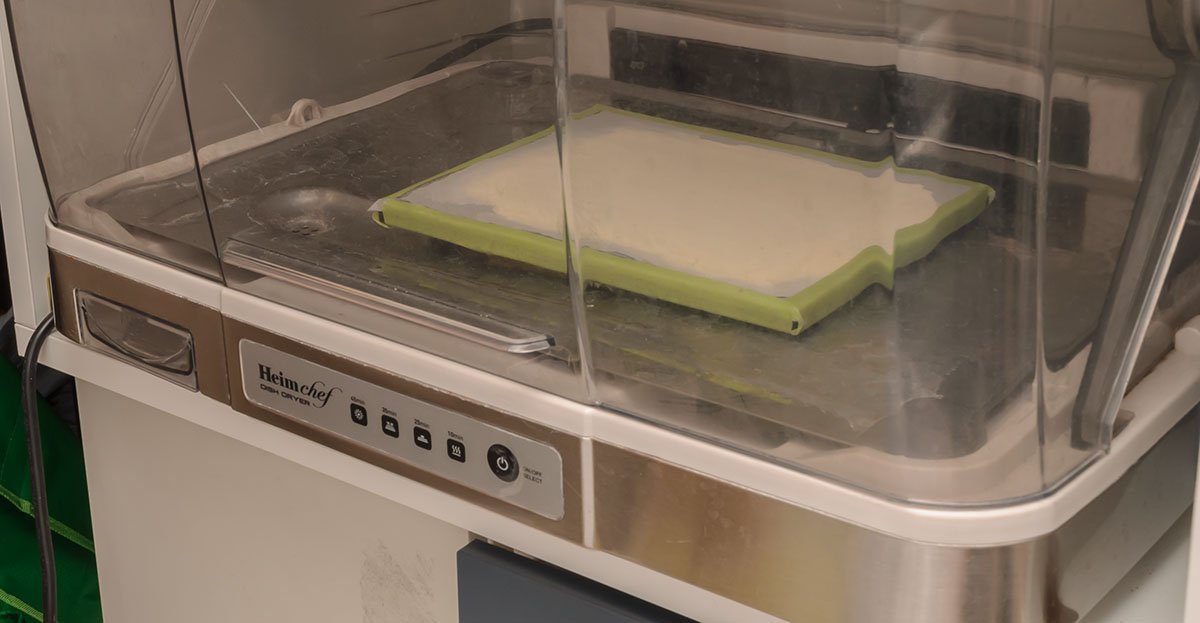
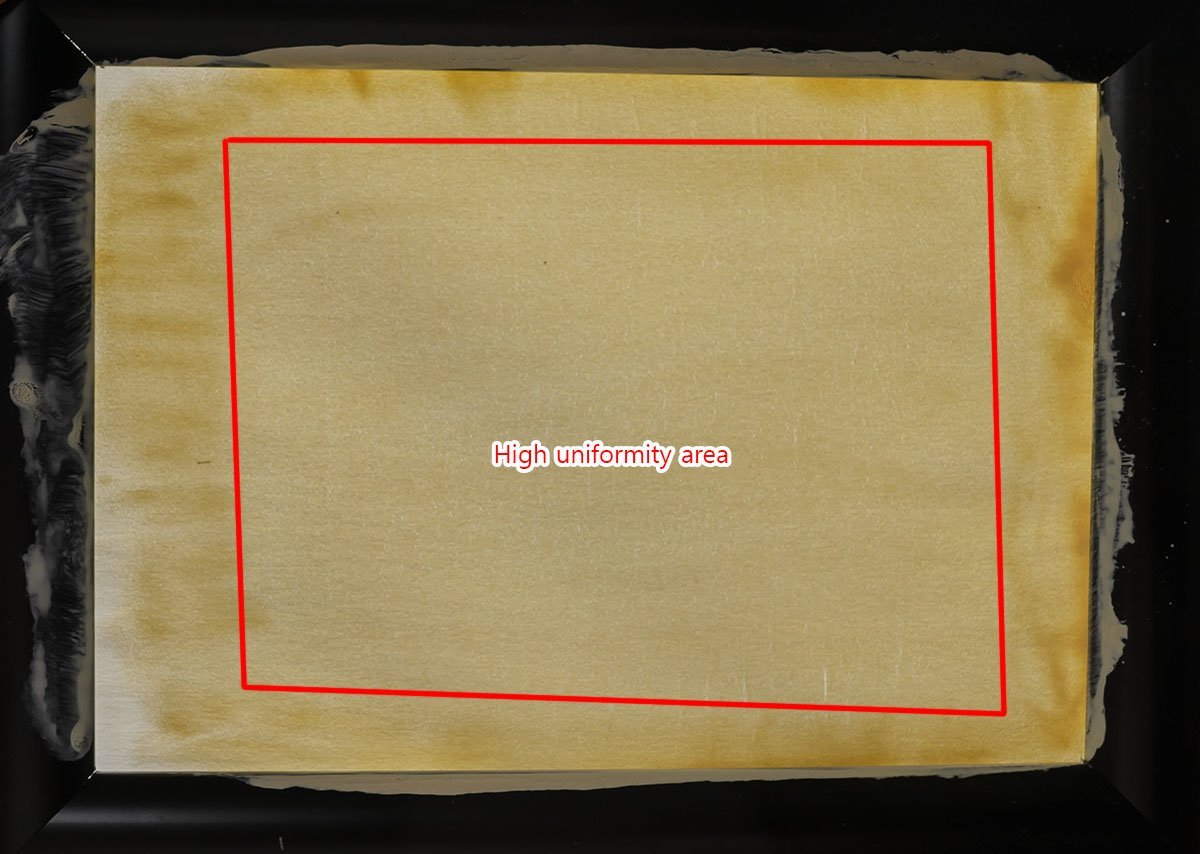
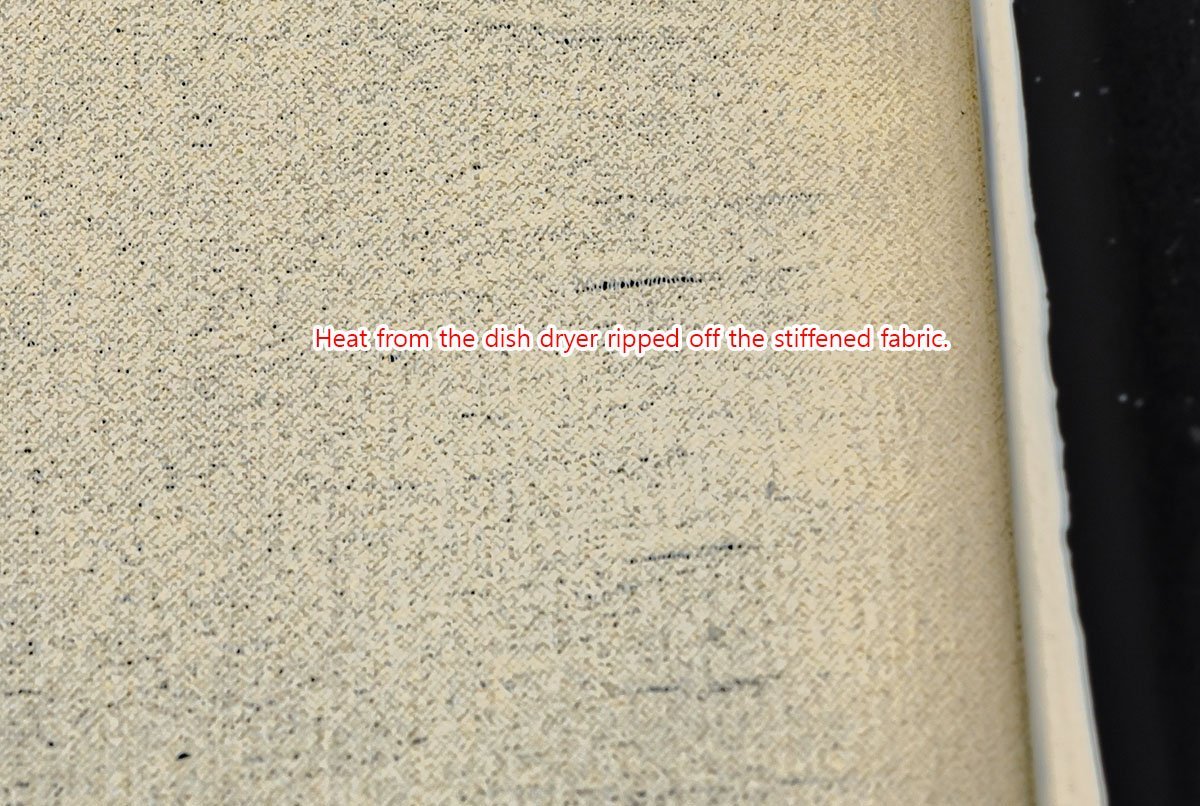
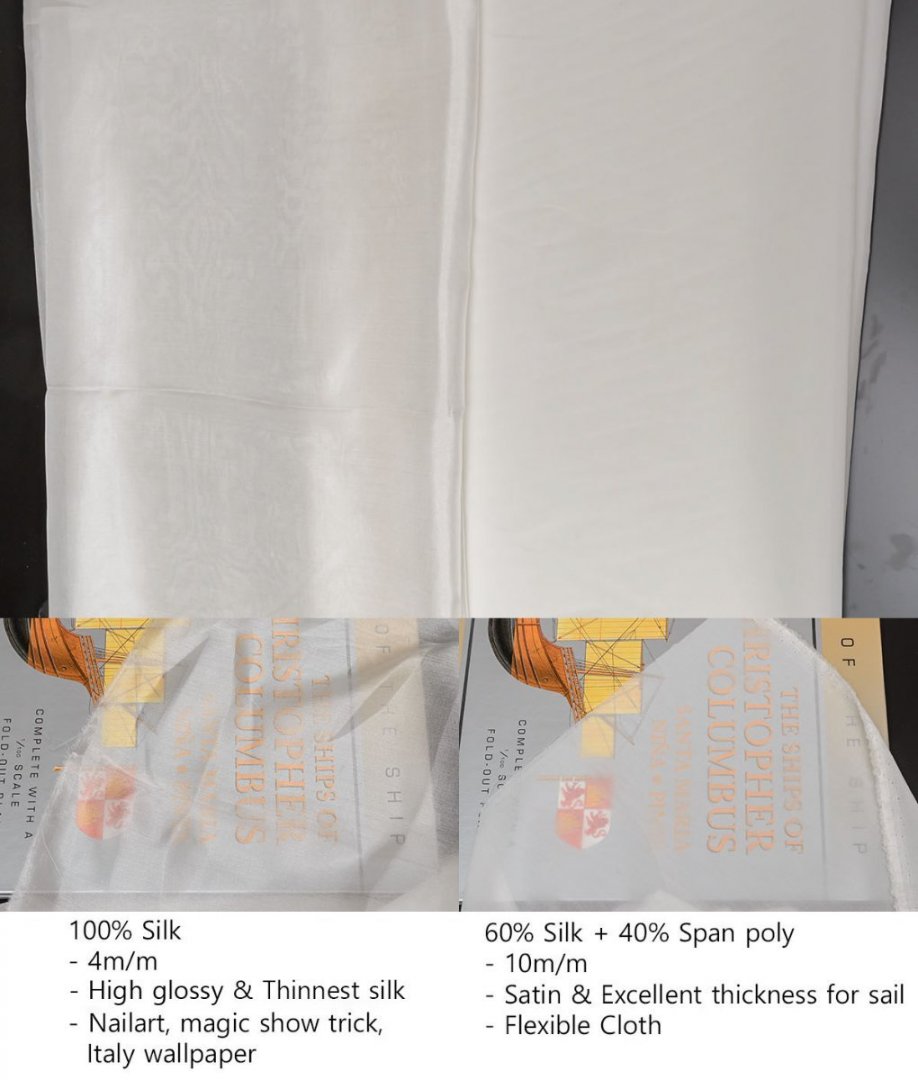
*** I received a reply that the material I used for sail making isn't the silkspan tissue paper made from wood fiber, but silk from silkworm. I temporarily changed the main title, and I may fix contents later when I find and confirm the wooden silkspan. ------------------------ Hello, I made the first successful silkspan sail. 😆 I would like to share my knowhow. I followed below lectures. Many thanks to Tom Lauria and John Tilley. http://modelshipworldforum.com/ship-model-rigging-and-sails.php I found a hundred species of silk fabrics at the local cloth market. Fortunately, my hunt finished at once. The silk "span" is a half-flexible fabric. I guess I can use other pure silk fabrics if I don't need furled sails. I also compared the silkspan with my stock of cotton fabrics. The cotton regular and fine are my favorites and I planned to use them for my current project. I believe that everyone'll fall in love with the silkspan, but it is hard to sew with a sewing machine. Here is another comparison. There are many factors that define characteristics of fabric: thickness of threads, weaving method, density, etcs. I'm not an expert on the area, so I'm just showing what I can diagnose. The silkspan is just outstanding. I can't count the threads of it. I guess it is a kind of napkin. OK, let's dye it. I followed the video instruction. I found a color uniformity issue. When I dried the dyed silkspan, the wet acrylic paint ran down and made thin area. I didn't want the side effect, so I decided to make a frame. Actually, I purchased photo frames at $1. I reinforced it with masking tape. The PVA bond isn't enough to hold the silkspan because acrylic paint is water based paint. Ready. Because original silkspan is a flexible fabric, wrinkles are unavoidable. I tried to force them out. At this time, I dried it horizontally. The result is just what I wanted. 😎 I'll cut out the edges and use only uniformed area. I found a side effect of the dish dryer drying. Don't use a dish dryer and let the frame naturally dry. Don't forget that all sails must have the same color! Because I mixed acrylic paints, I prepared two big size frames for one pass work. Summary * Requirements - Cheap photoframes - Acrylic paints (White+yellow?) - Water spray - Silkspan (It depends on your country's market conditions.) Have a good sail.
-
Poly rope - Which adhesive product?
modeller_masa replied to LyleK1's topic in Masting, rigging and sails
Here comes the new challenger! After I purchased neutral ph PVA bond by Lineco, which produces professional recovery tools for librarians and museums, I researched the ph values of adhesives that potentially damage cotton threads. Polyester threads are fine with an acidic ph. All commercial PVA bonds except the Lineco's : ph 2~4 Zinsser shellac : ph 2~4 (Misunderstood) Rustins shellac sanding sealer : ph 7.0 Most acrylic paints and mediums : ph 5~6.5 CA glue : Tailors never use the glue. Polyurethane varnish : ph 6.0~7.5 This is a reason I changed all the rigging threads from DMC cordonnet special to Amann Serafil. My major isn't a chemical, so I don't know how exactly the high acidic adhesives change the conditions of cotton threads in the long term. I hope you add one more variable on the comparison table. 😆 // revised the shellac sanding sealer : I found a reliable ph value from MSDS. -
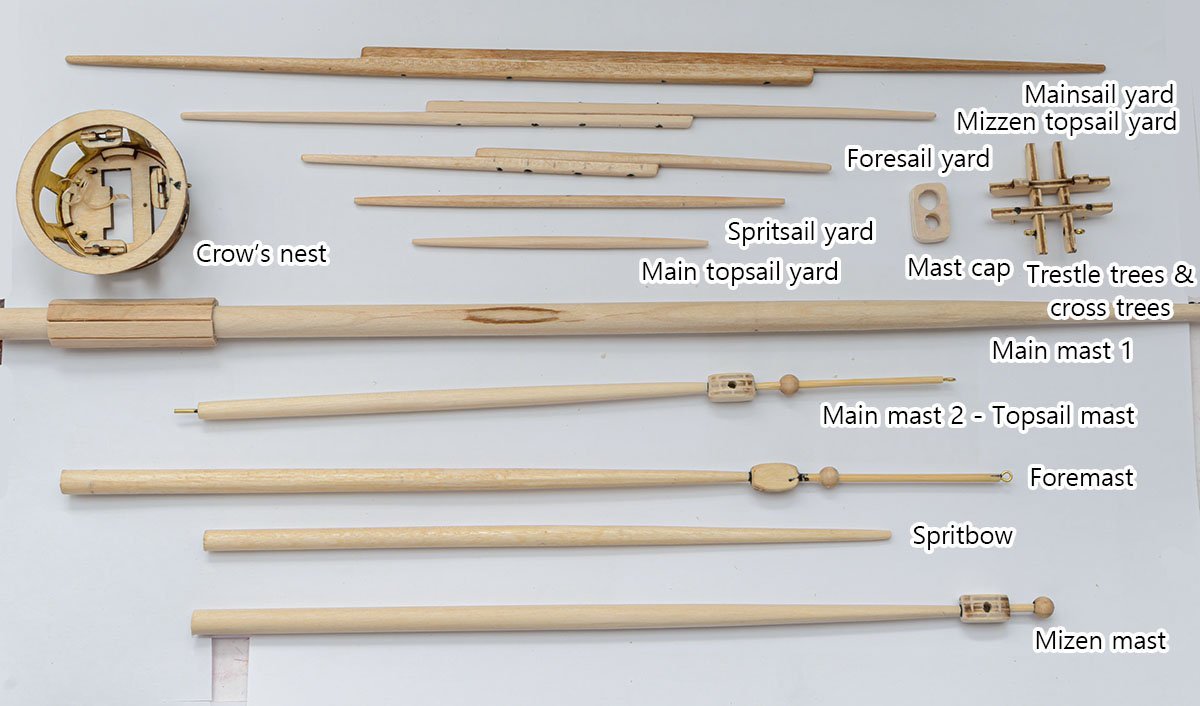
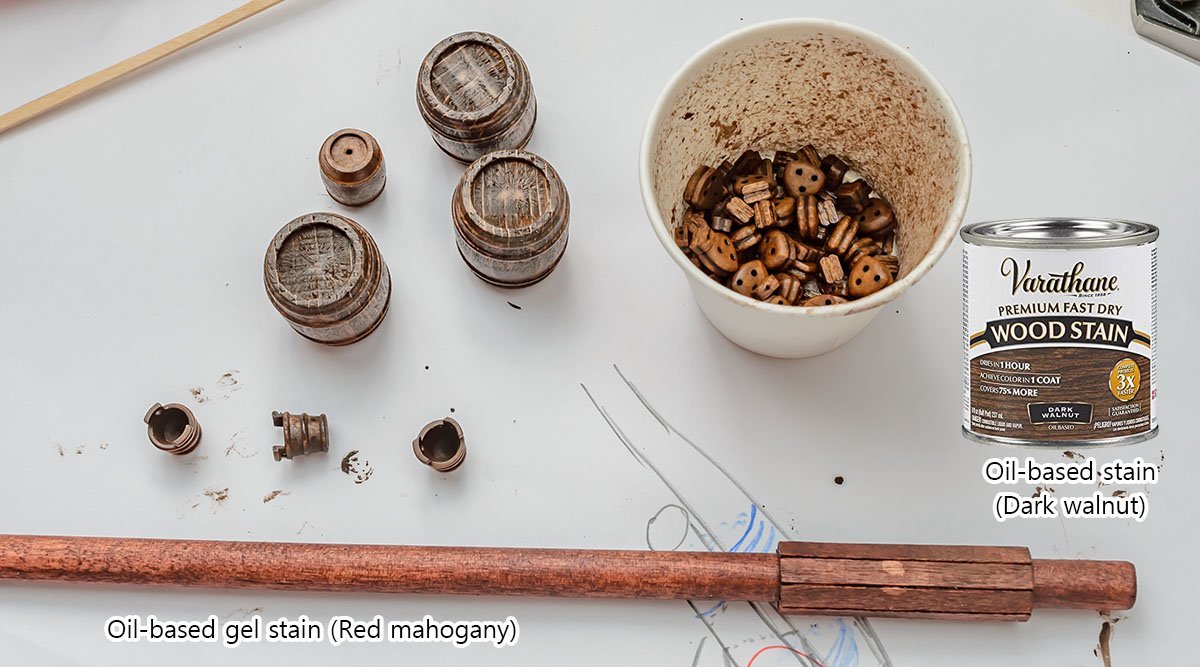
I finished masts and yards. I stained or painted them. I purchased a new oil based stain. Gel stains are not good for dyeing tiny parts, such as dead eyes. After that, I applied the oil based varnish. The result was terrible! The dark walnut color was thinned. I realized that I made an oil-based stain + varnish. There are some handy product like the Watco's oil based stain and varnish with various colors. When you stain dead eyes and blocks, I recommend to buy the mixed bottle only instead of separated bottles.

- 77 replies
-
- 2
-

-
- Santa Maria
- Artesania Latina
- (and 1 more)
-
Focus Stacking
modeller_masa replied to Dennis P Finegan's topic in Photographing your work. How to do this.
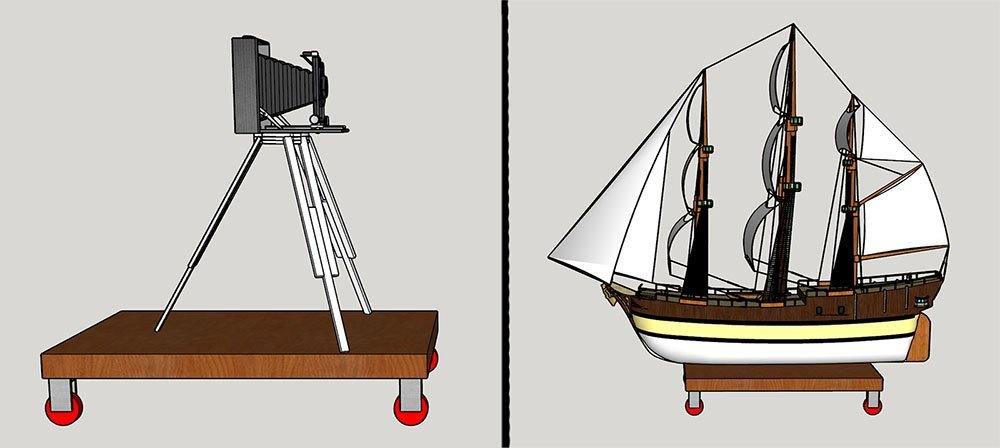
Hello, It is good to know that my old hobby helps my current hobby. I made cheaper gear for focus stacking - model photography. I bought 4 casters. 'Authentic' photo equipments including carbon fiber rail starts at $120, but these wheels are only 40 cents per each. The (wood) stand size depends on your choice. If you place it under the target model, you may save more plywood panel, but it is hard to take a full-shot because the model moves. The most challenging difficulties are chance of success and your patience. I used to take photos with a very high resolution camera and closed apertures, but this challenging method allows some unique angle of shot. 😎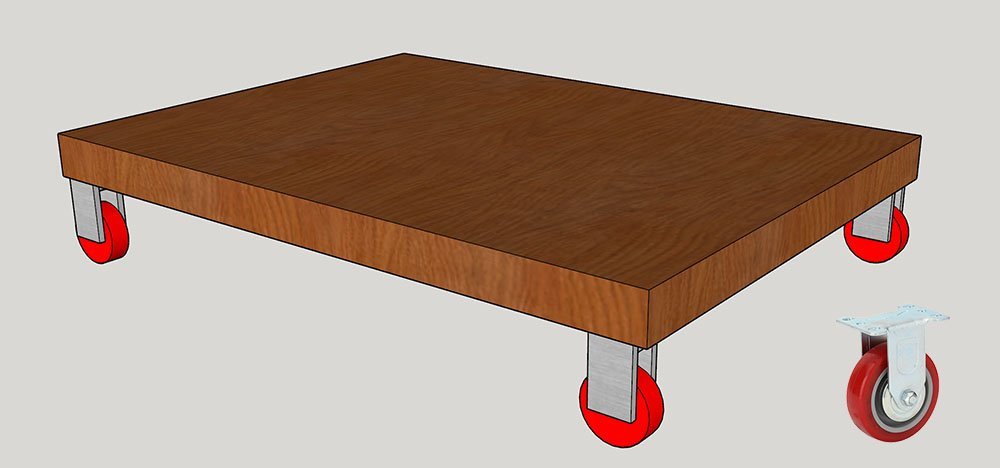
-
Congratulations on the launching ceremony! Thanks for the nice build log that shows your great skill and sense of beauty. I hope to see your next project soon.
- 74 replies
-
- 1
-

-
- Santa Maria
- Amati
- (and 1 more)
-
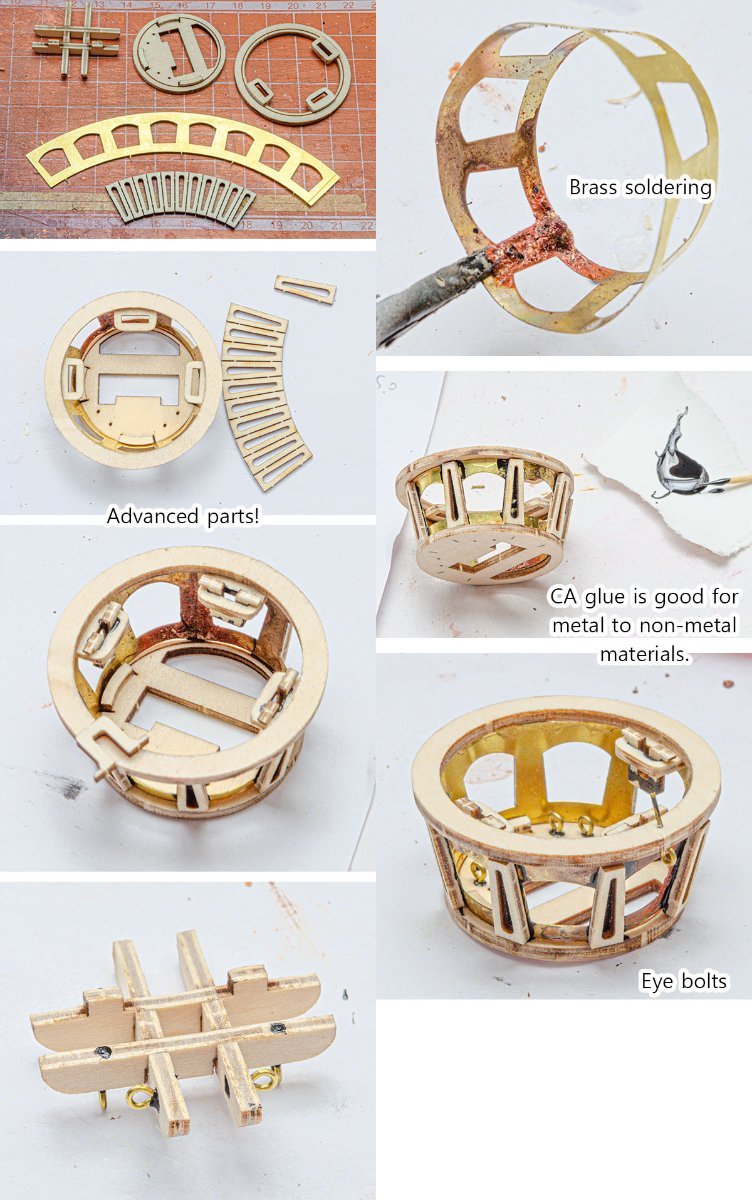
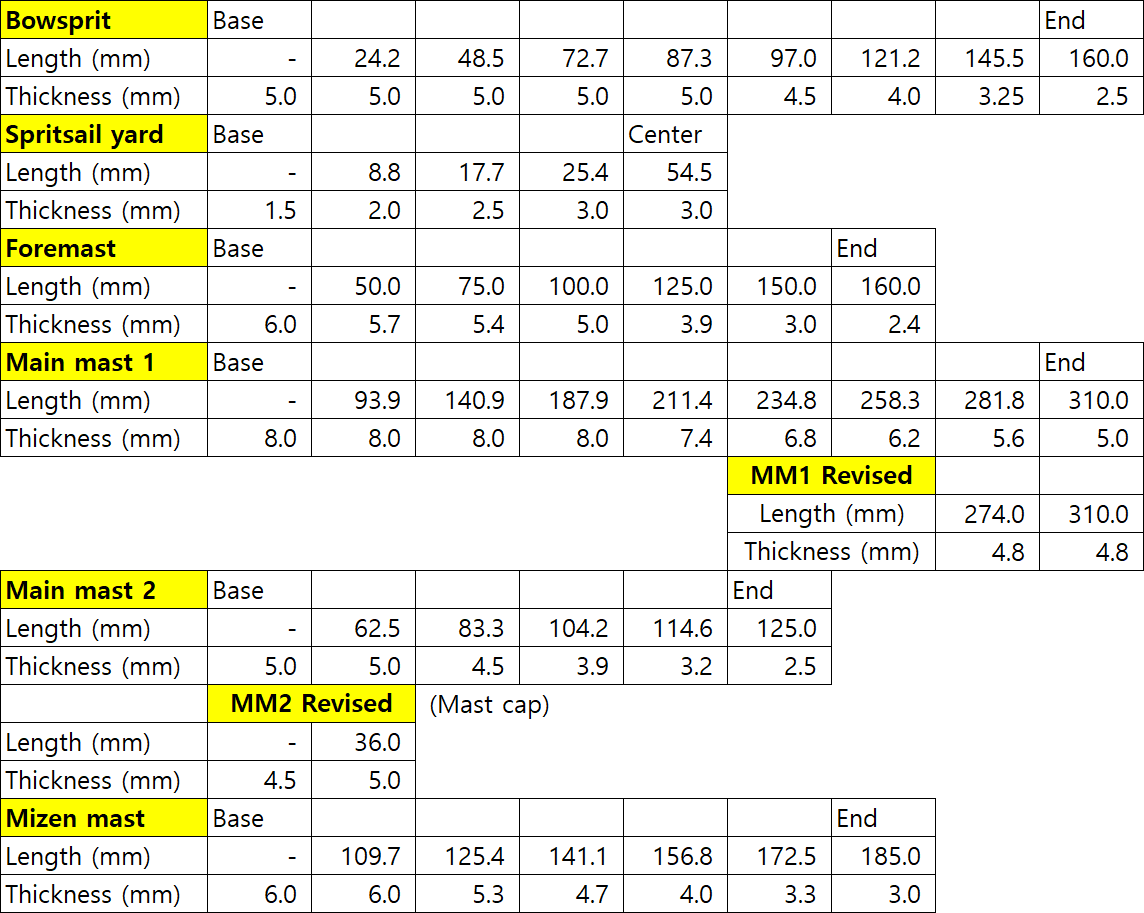
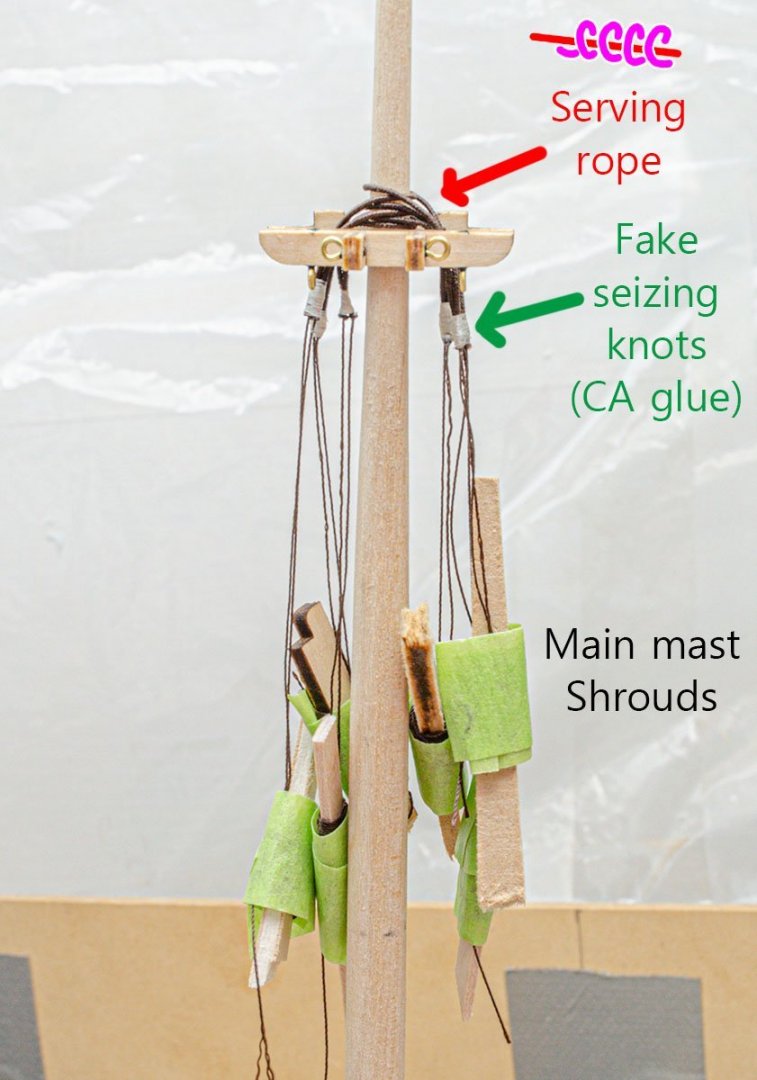
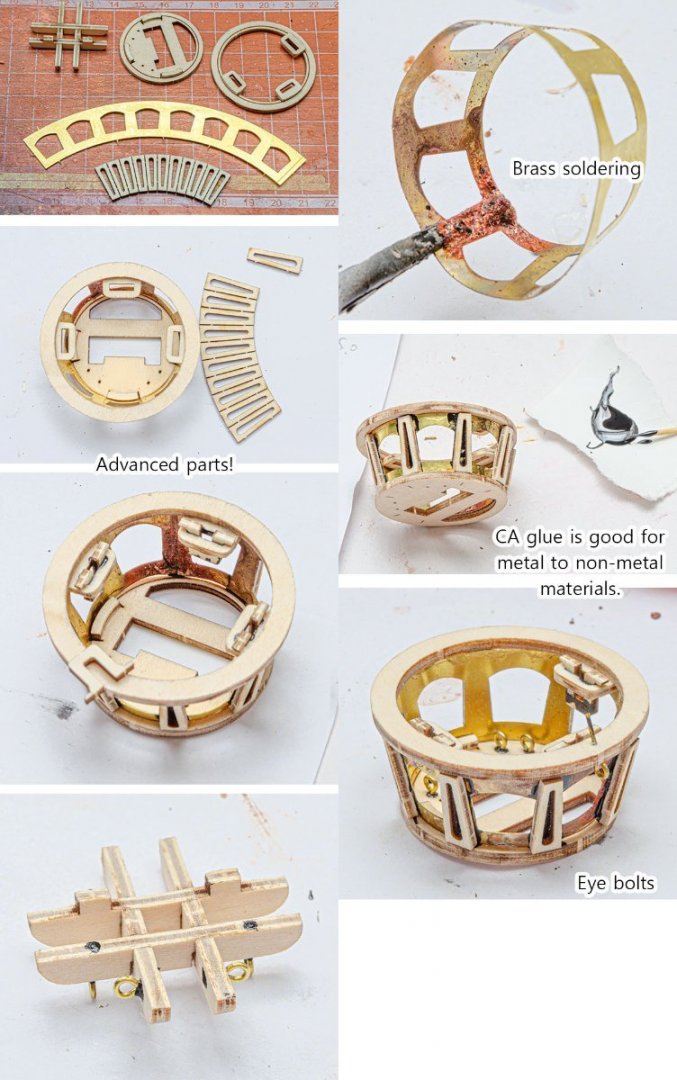
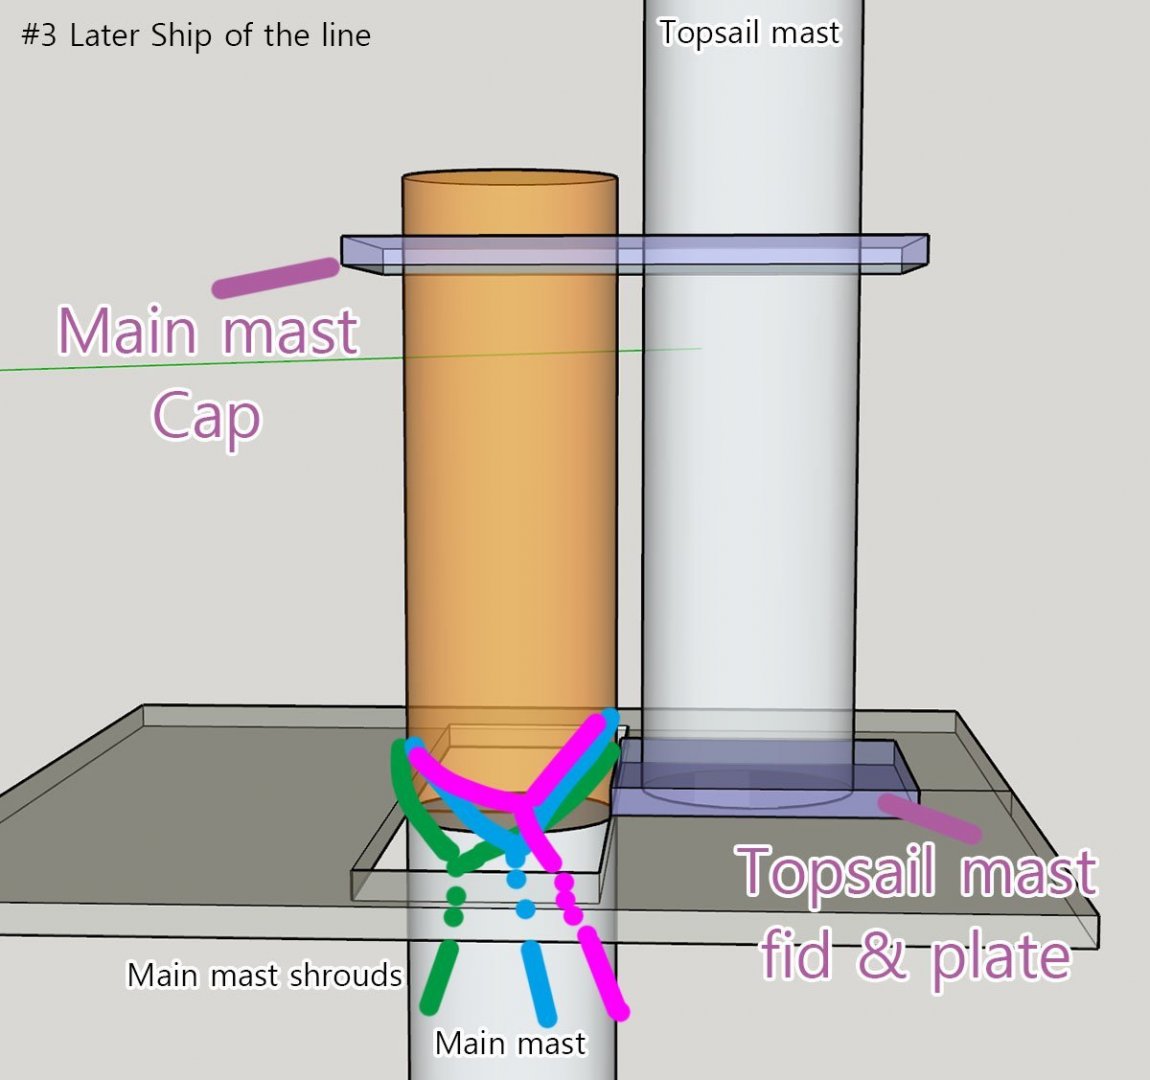
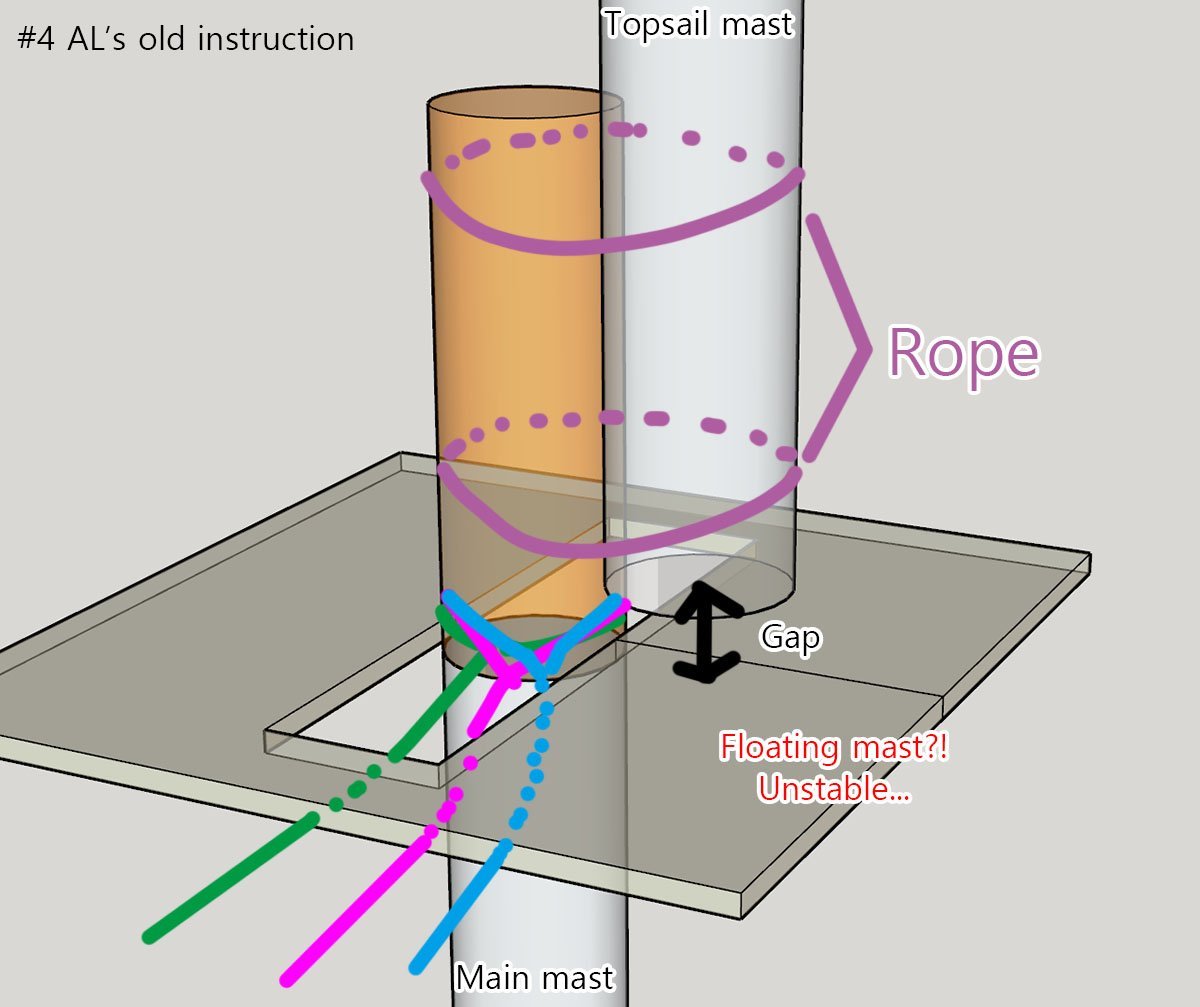
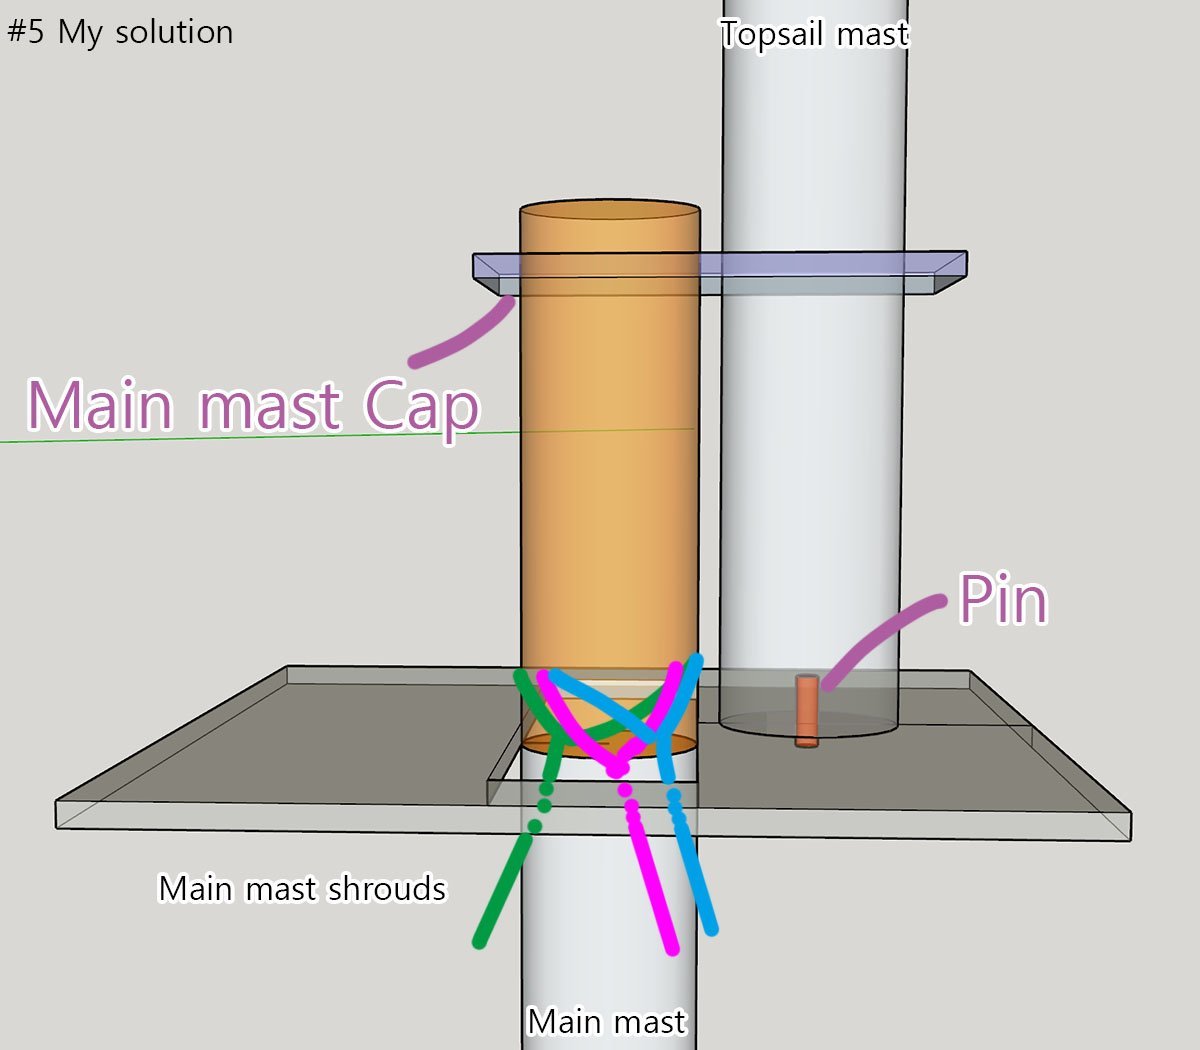
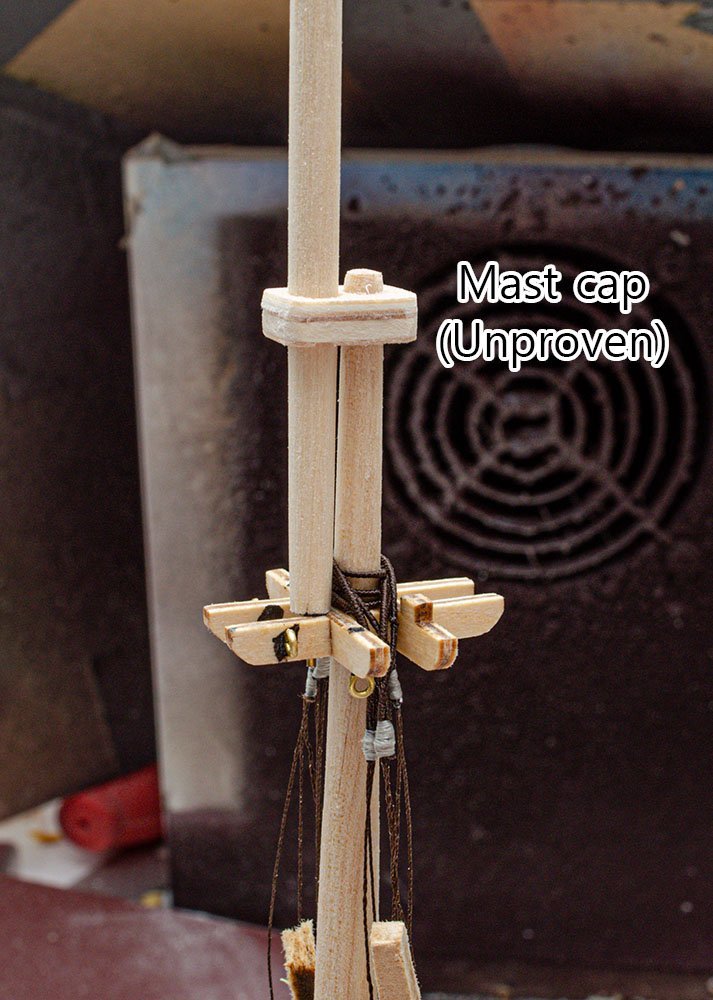
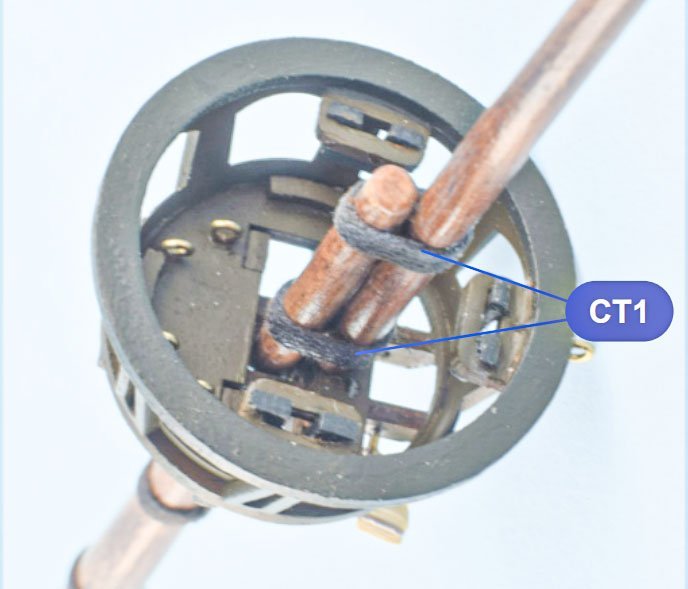
I made a cheat sheet for the new AL Santa Maria. The numbers are my assumptions. This is a mast castle. Yards. I added some details to the shroud threads. I use CA glue for temporary holding only. CA glue changes the color of threads, or breaks thickened thread. I'll use diluted PVA glue for hardening whole threads and knots. By the way, the connection between the main mast and the topsail mast in the instruction was weird in my opinion. If I follow the AL's instructions, I have to hook the shrouds to both masts. On the contrary, the reference book shows more general formation. However, I thought one tie of the topsail mast was unstable and unrealistic. Columbus wouldn't have reached the New world. In the 18th century, the most advanced ships of the line had metal brackets for multiple step masts. I'm not sure how many ships in the 15th century used this structure. After lots of research, I found an old plan for an old AL Santa Maria kit. The 1:1 plan shows the topsail mast is lifted! 🤪 Is it a ghost ship?! This is my compromise. If I can't solve something unrealistic and unproven, I'll find and overwrap an existing successful solution rather than do nothing or leave it unrealistic. I think it is a good way to approach audiences, and it is definitely better than showing a nonsense model. (+proper explanation about the modification) Final result. Whoa, Columbus's ship is upgraded! ( I found some scratch builds on this forum used the same mast caps. )

- 77 replies
-
- 5
-
-
- Santa Maria
- Artesania Latina
- (and 1 more)
-
Help with masthead and topsail pole
modeller_masa replied to modeller_masa's topic in Masting, rigging and sails
I gotcha. The old AL Santa Maria kit has 1:1 plan and it explains the point suspeciously. The plan shows that the topsail pole is slightly lifted. 😱 I guess the rest of the main mast shrouds should go under the base of the topsail pole. -
Help with masthead and topsail pole
modeller_masa replied to modeller_masa's topic in Masting, rigging and sails
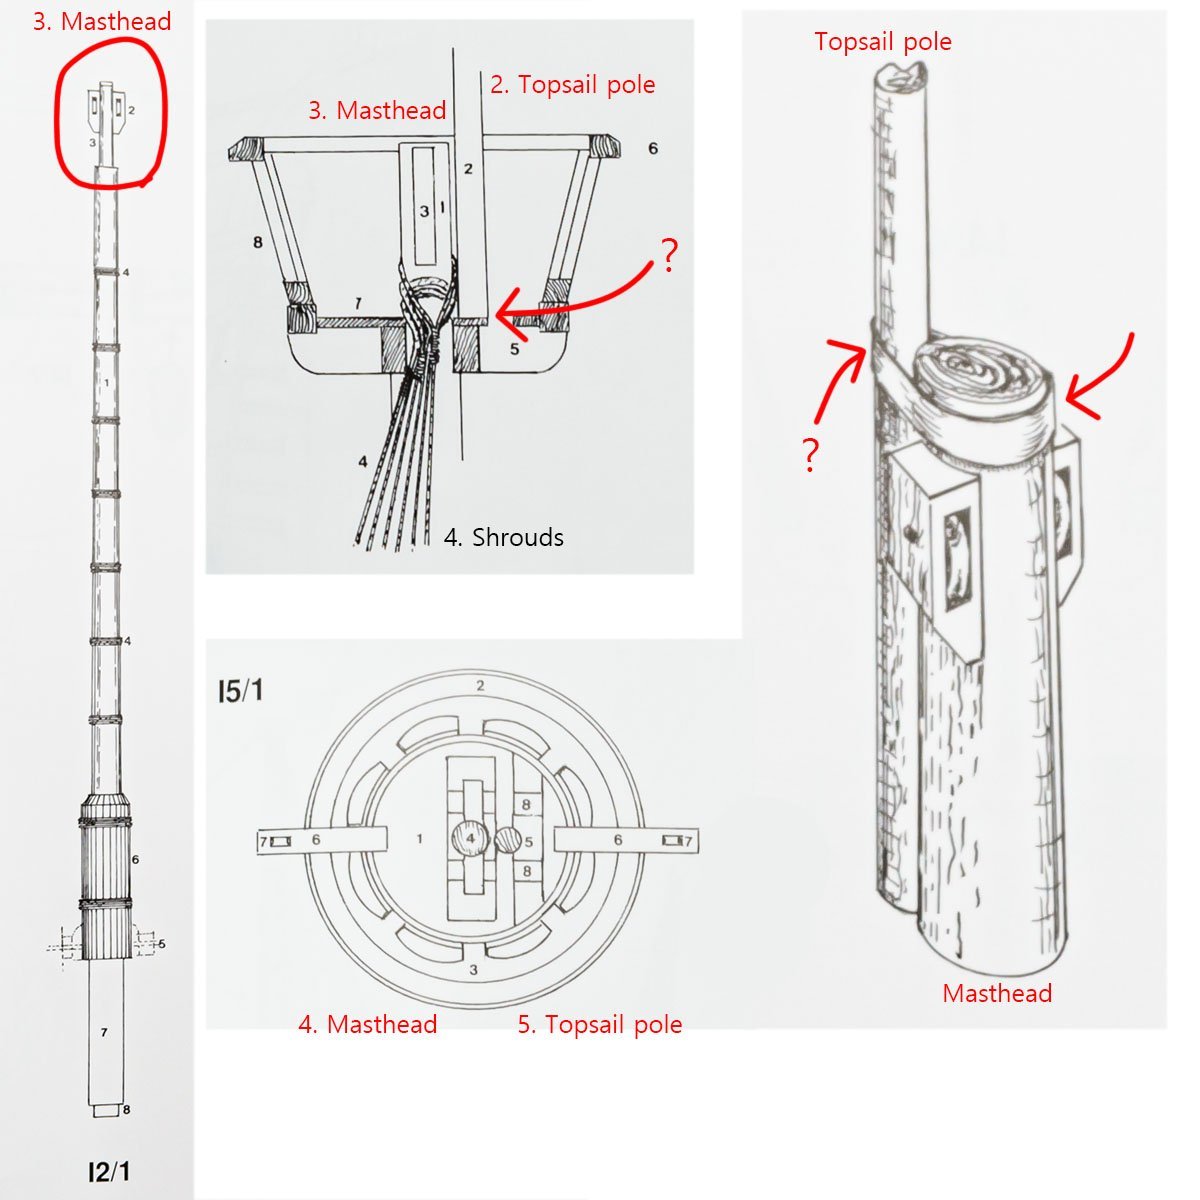
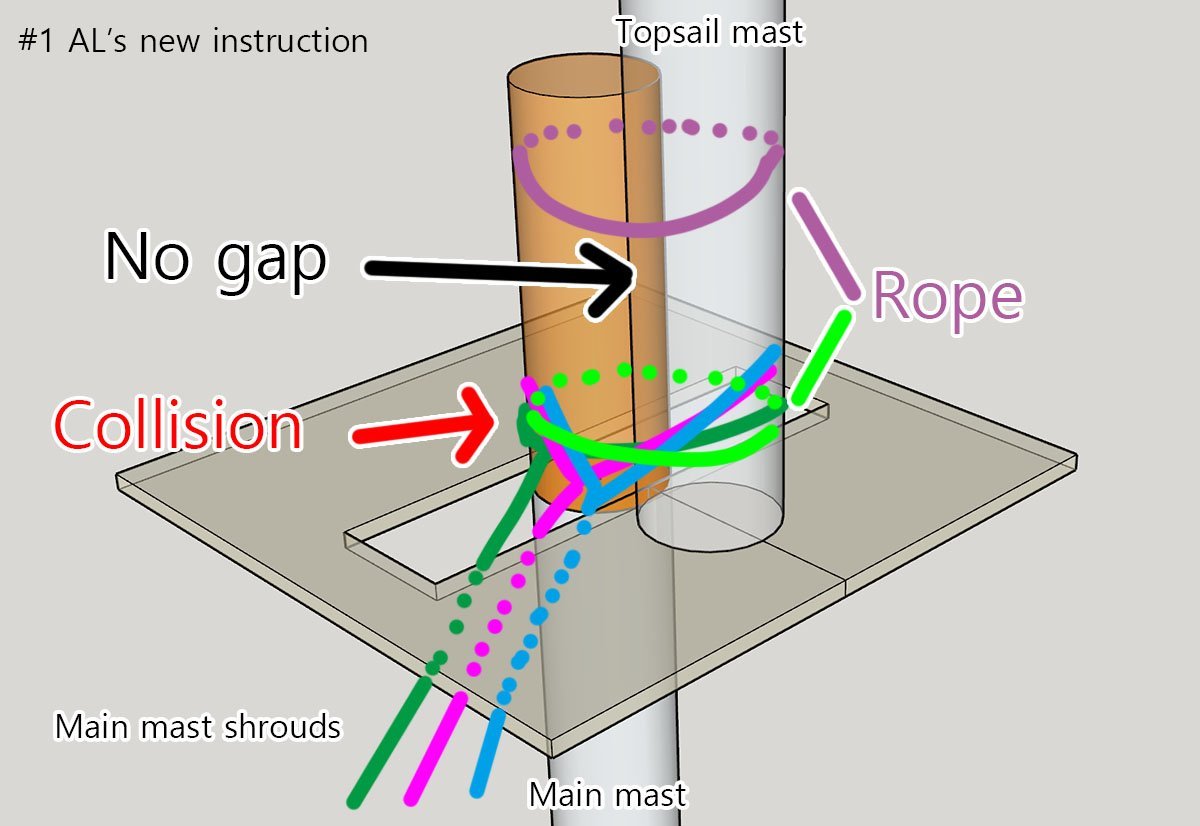
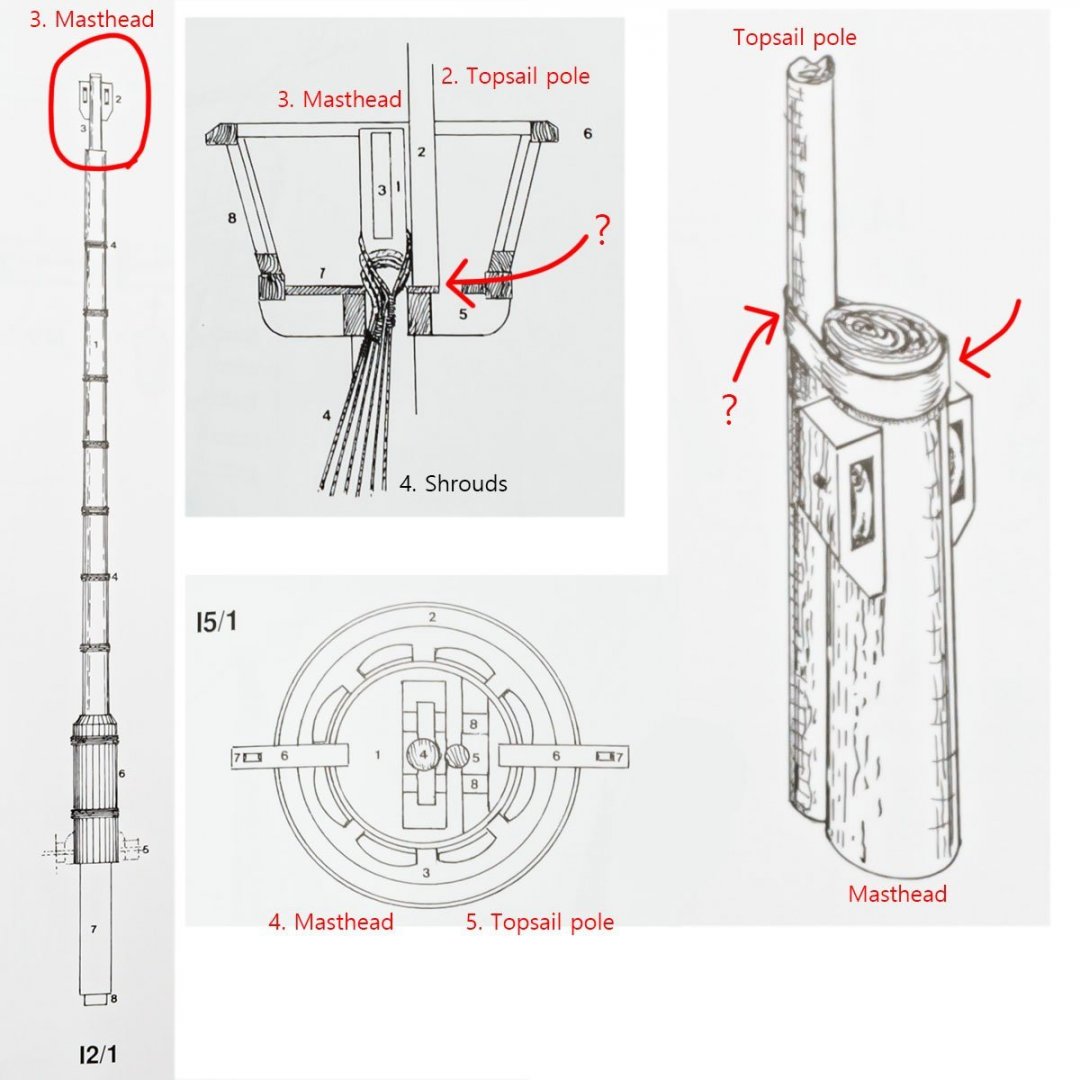
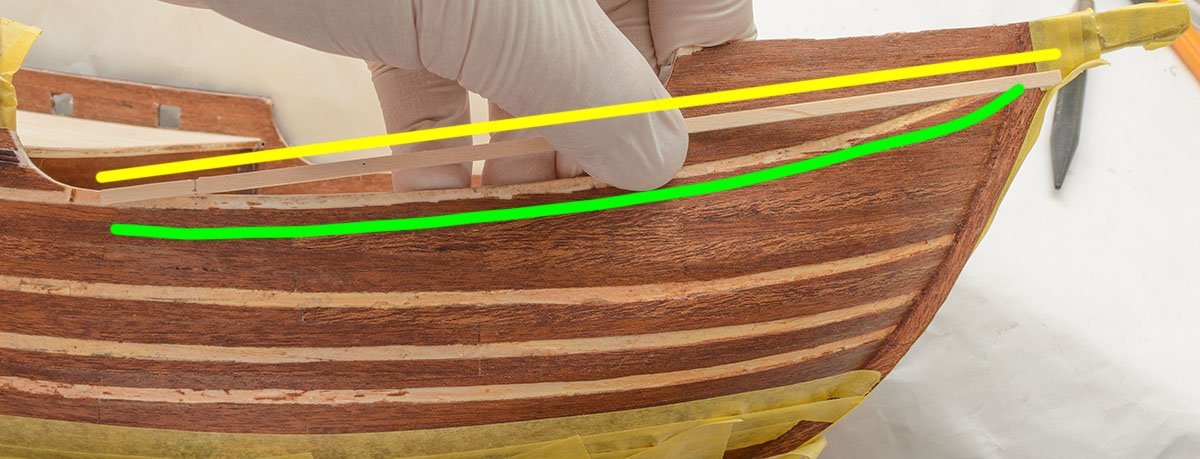
Hello, Jan. Thanks for the reply. I would like to clarify my question more simply. Xavier Pastors' book shows only the upper band (blue), and I thought it wasn't enough to tie the topsail pole with a small sail yard. The AL's manual instructs to tie two bands (green), and it is reasonably durable. However, it collides with the main mast shrouds (orange) if I follow the book. I would say that the AL is a simplified version that omits details, and the book also omits the hidden hook of the base of topsail pole.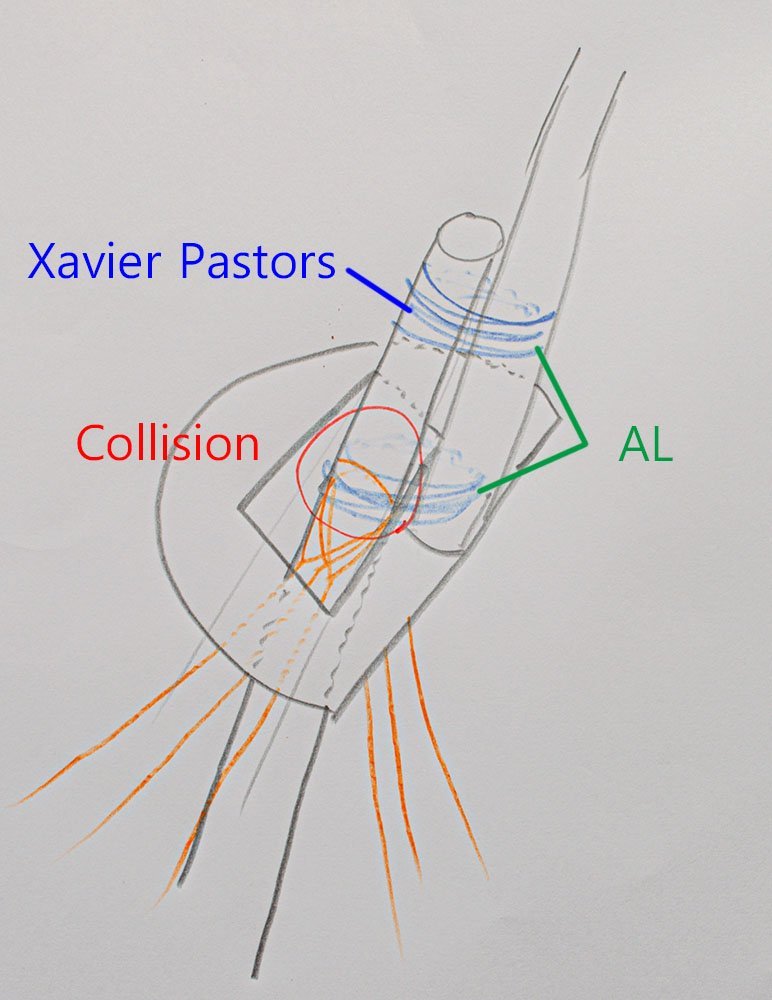
-
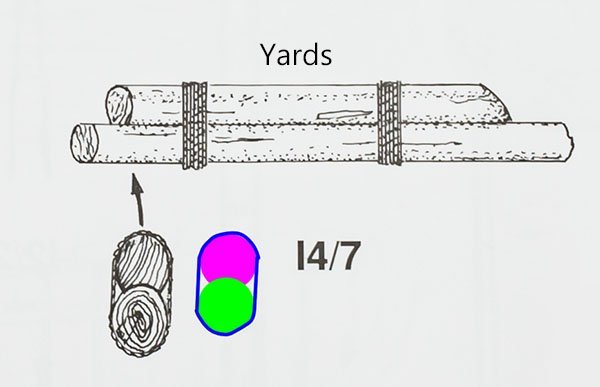
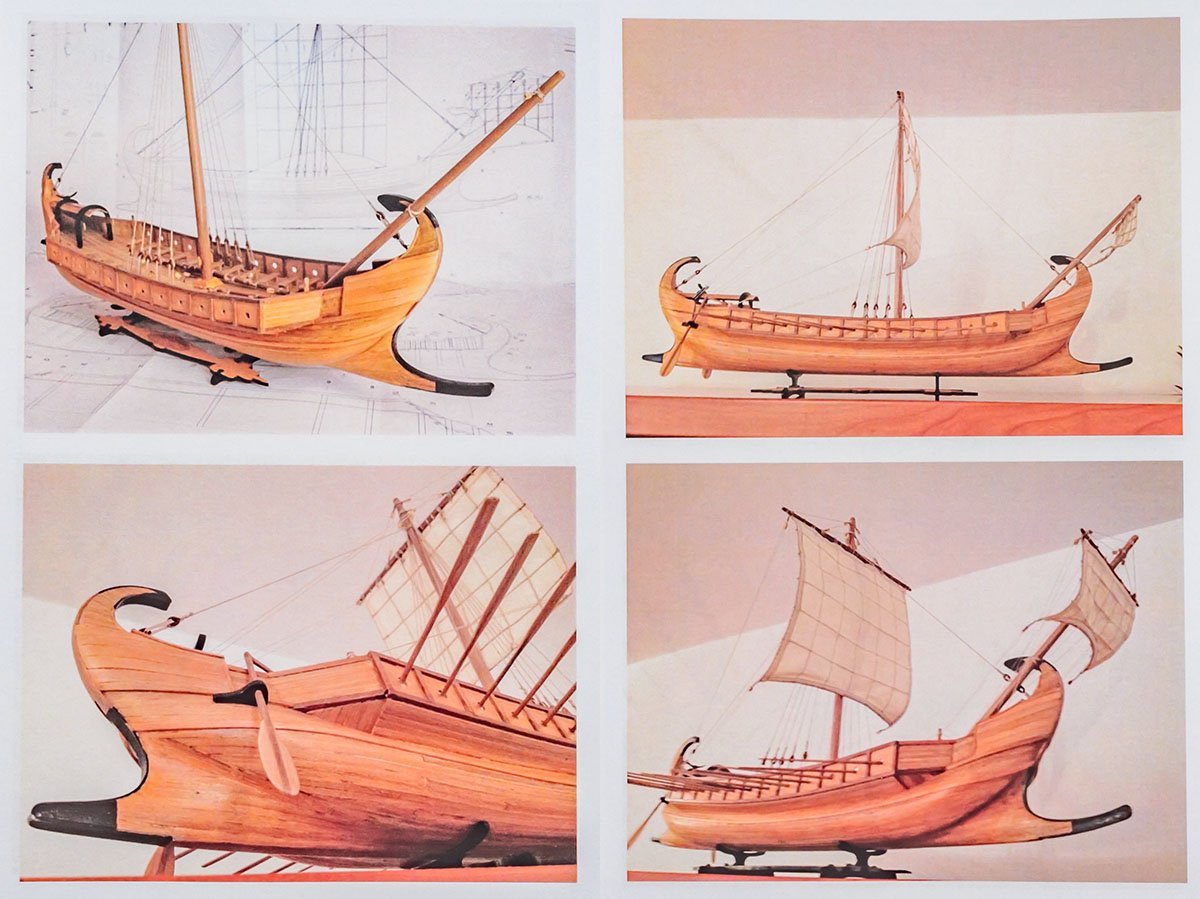
Hello, I need some help with connection method between the main mast and the topsail pole. This is a yard from Xavier's Santa Maria book. As you see, the connection seems to be very durable, and I have no questions. On the contrary, I don't understand how to connect the main mast and topsail pole of the Santa Maria. I can see the wide band only. It appears to be very vulnerable to wind force... More advanced England ships had sockets at the base of the topsail poles, but this old 15th centuries ship didn't. The AL manual omits some details, such as shrouds. I want to make it more realistic. Where can I find a clue to the connector?
-
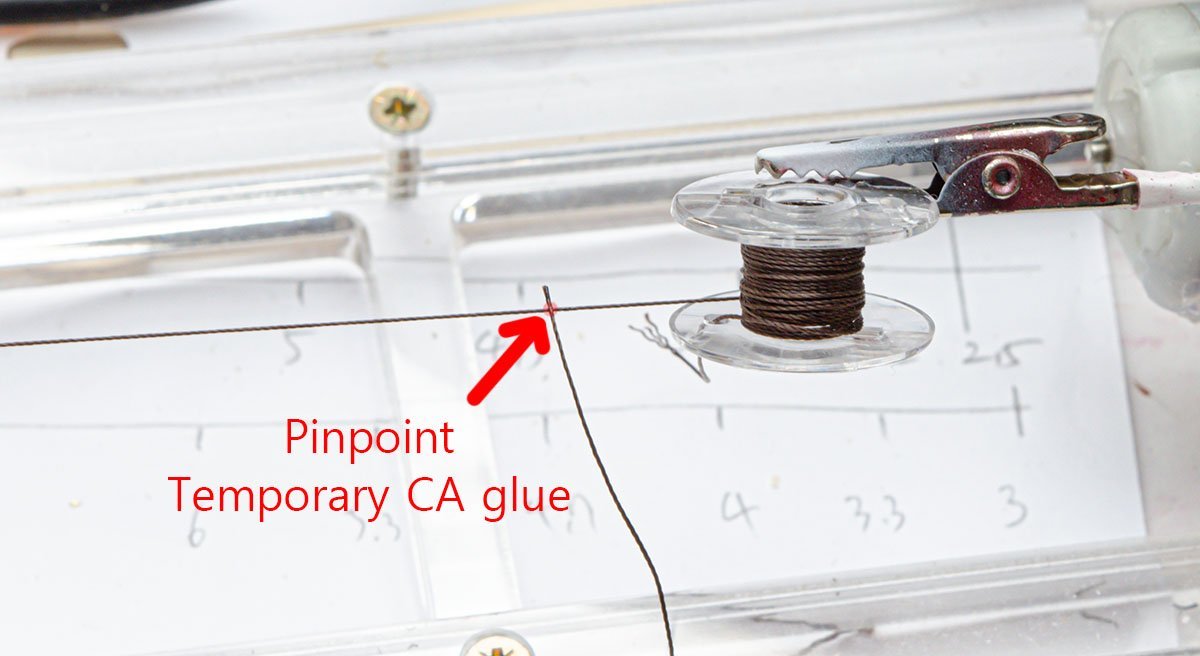
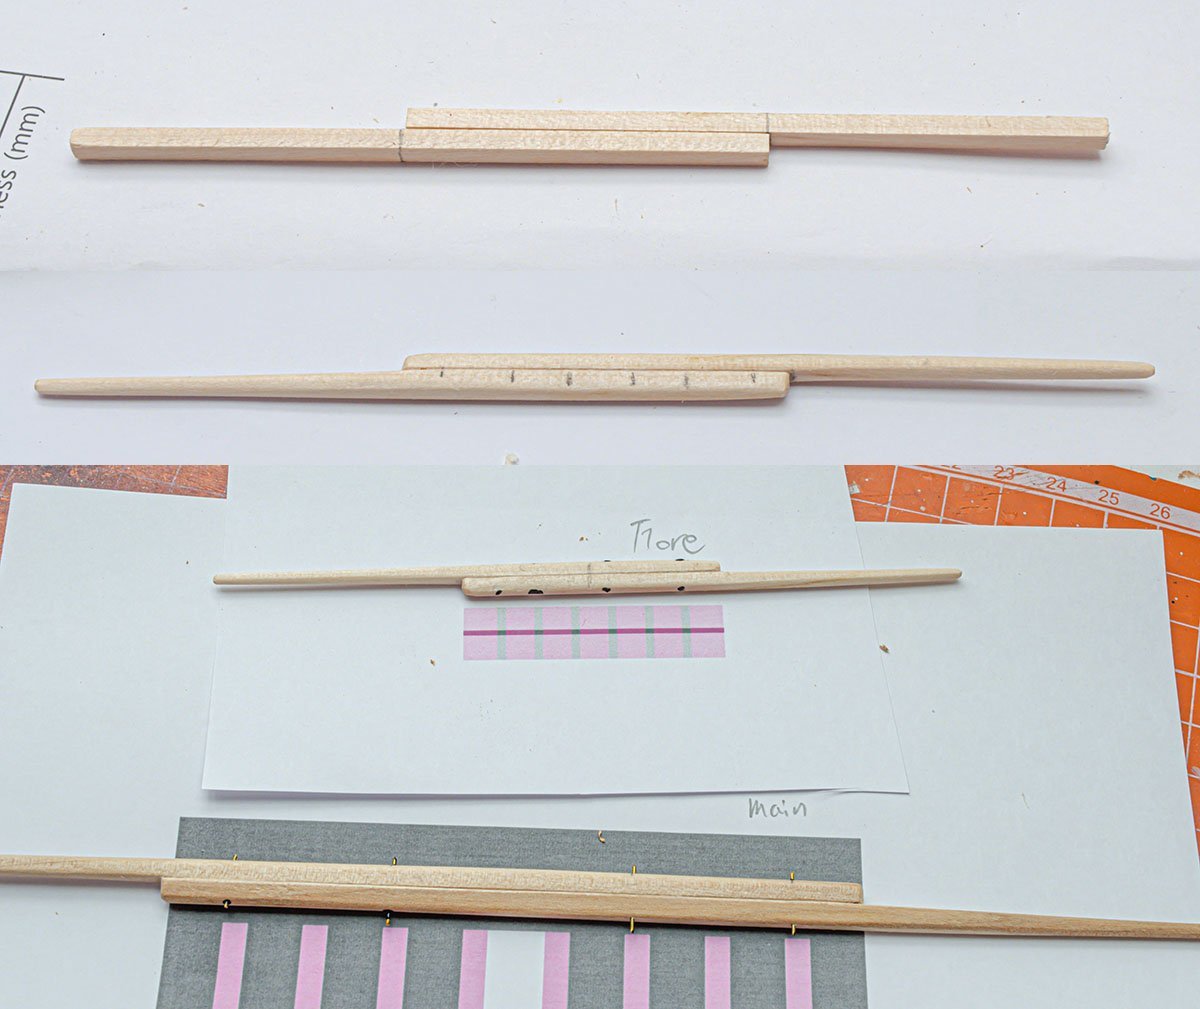
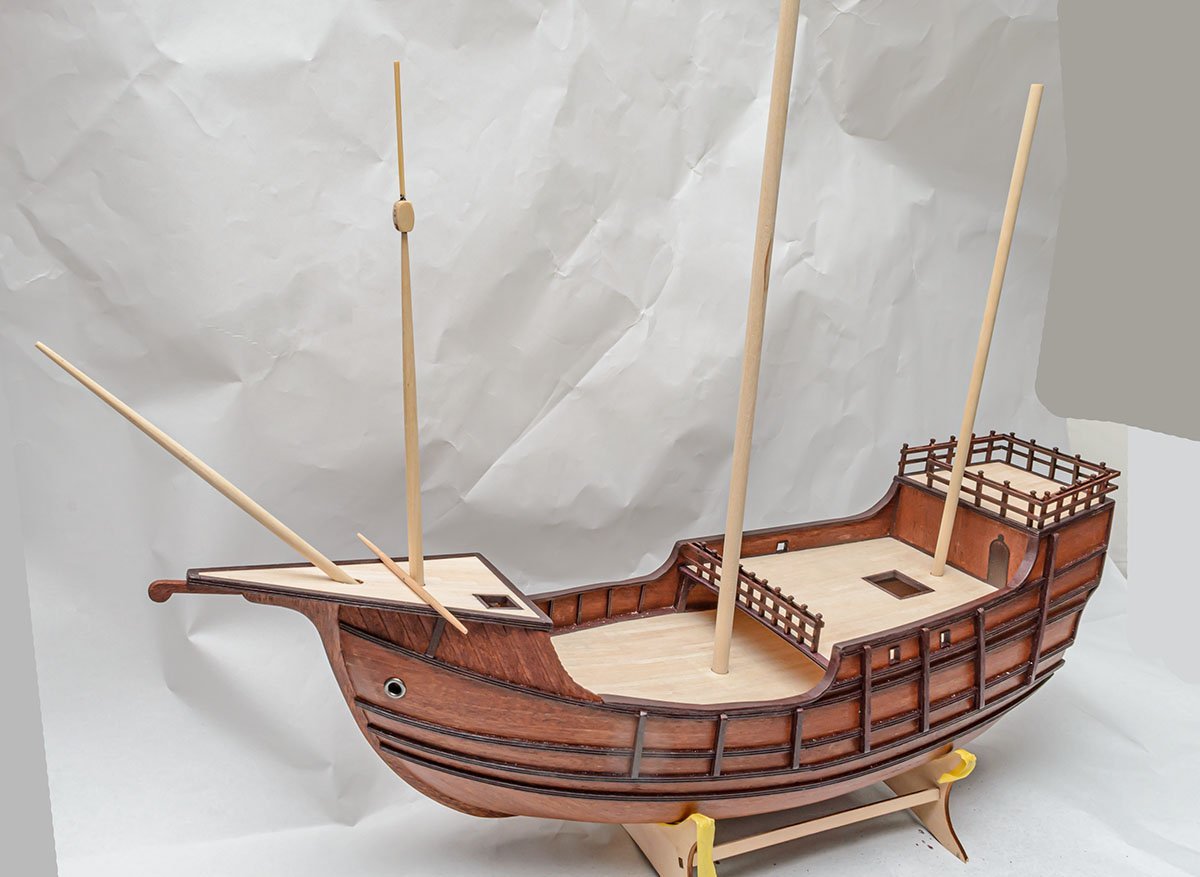
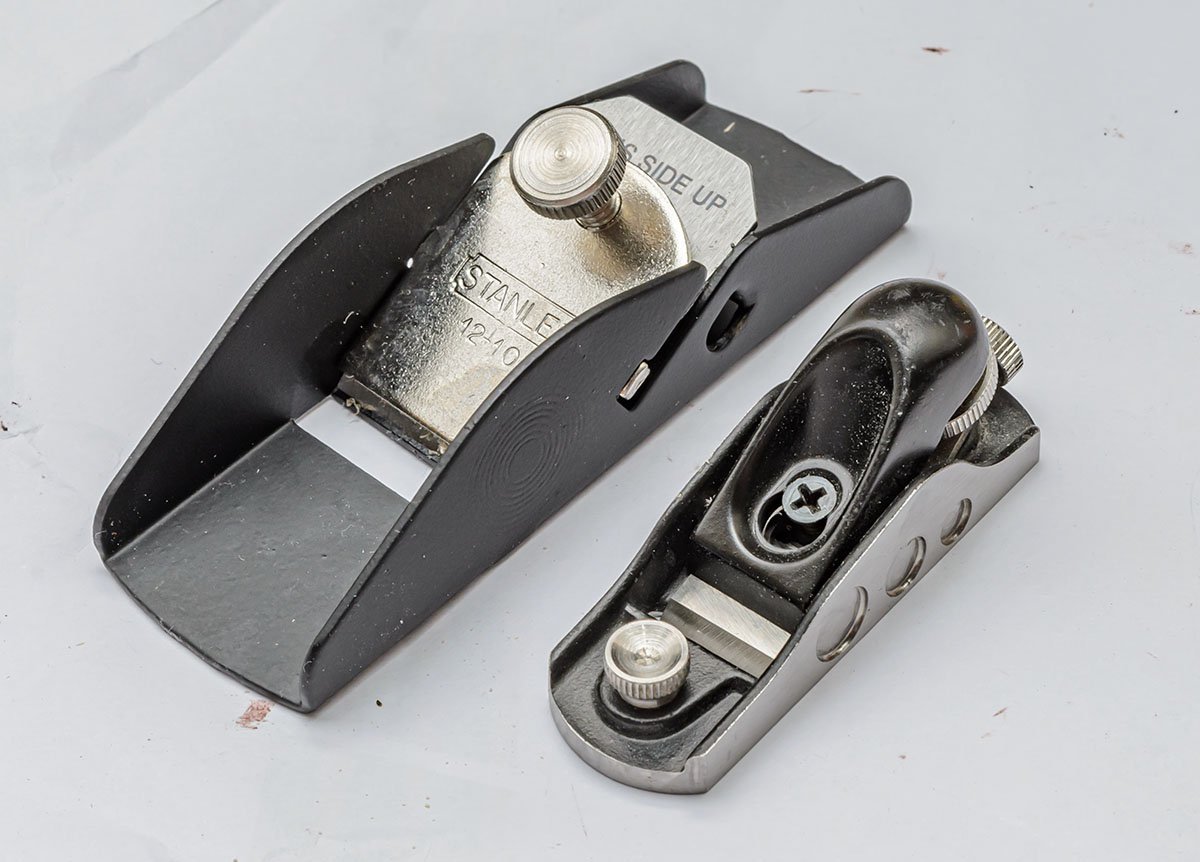
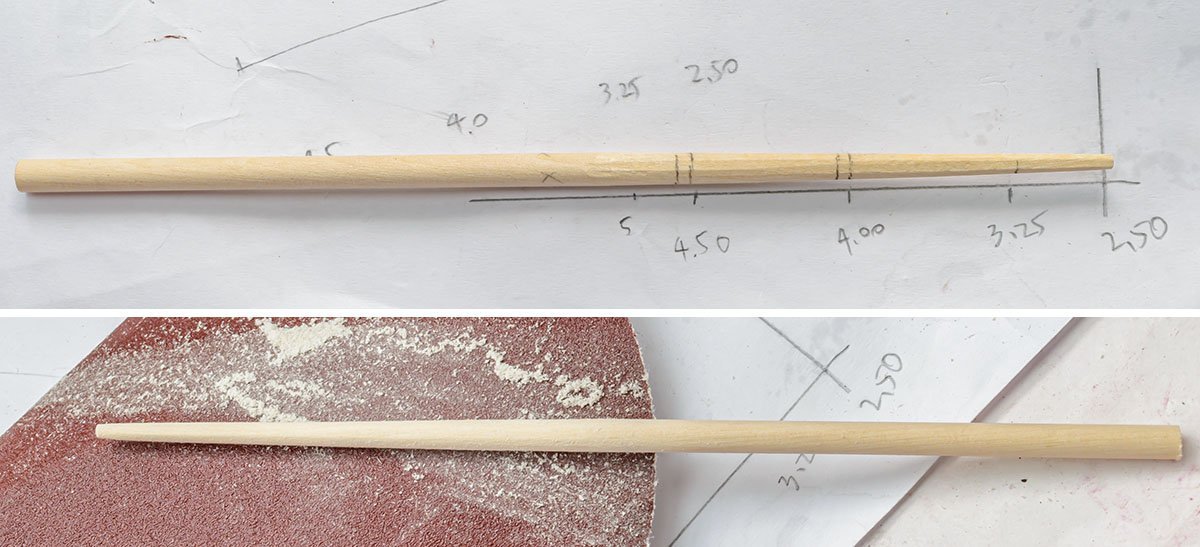
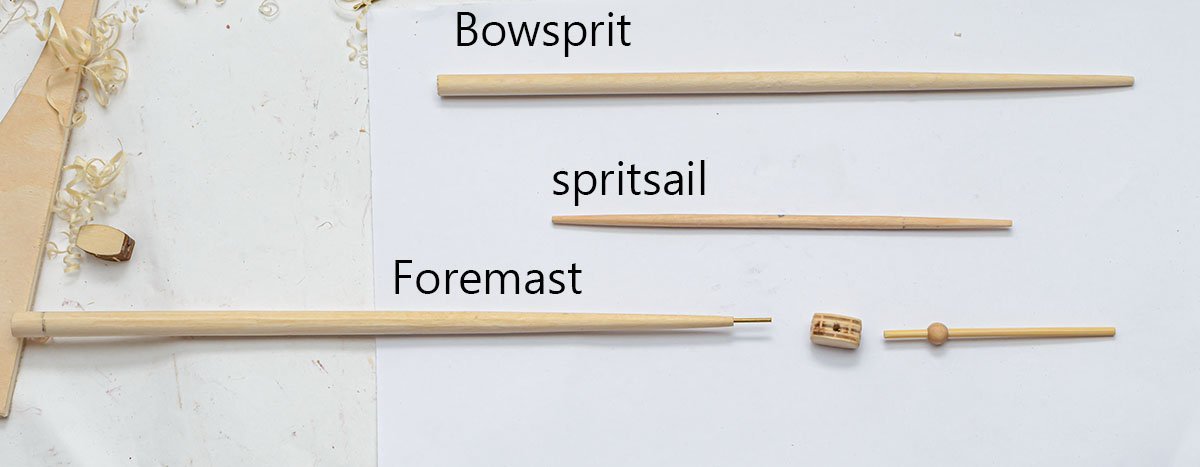
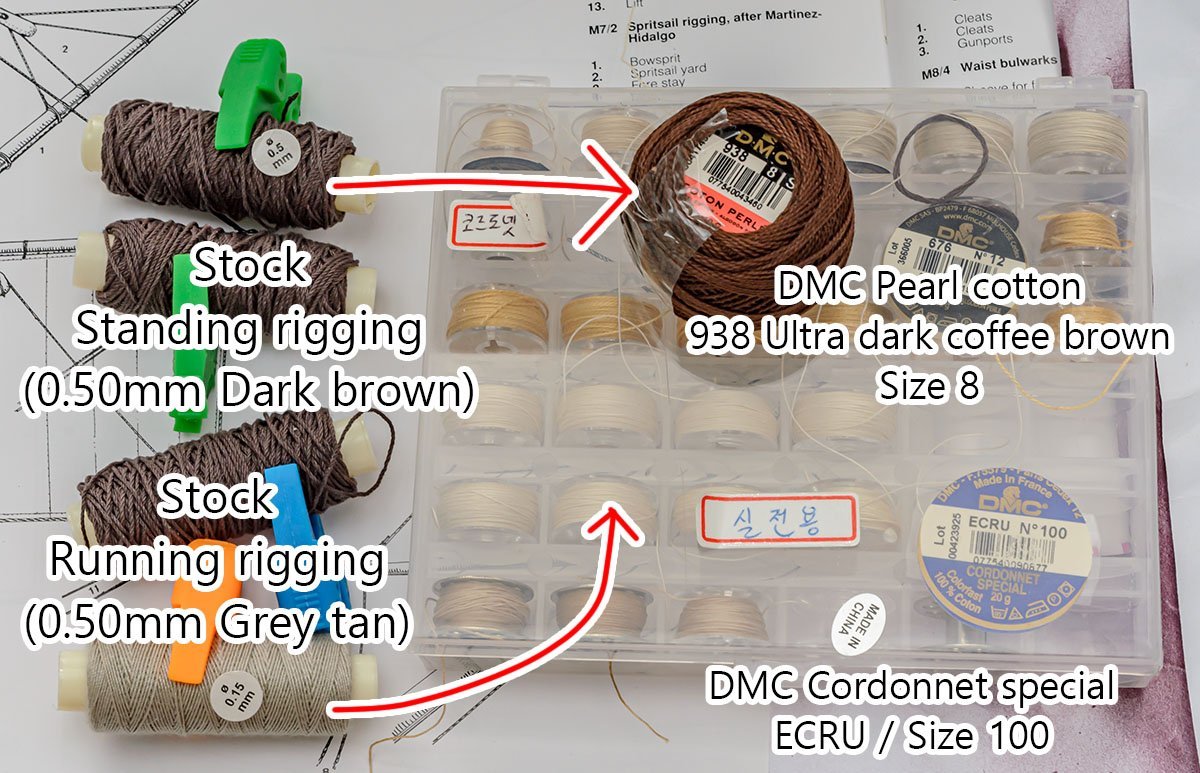
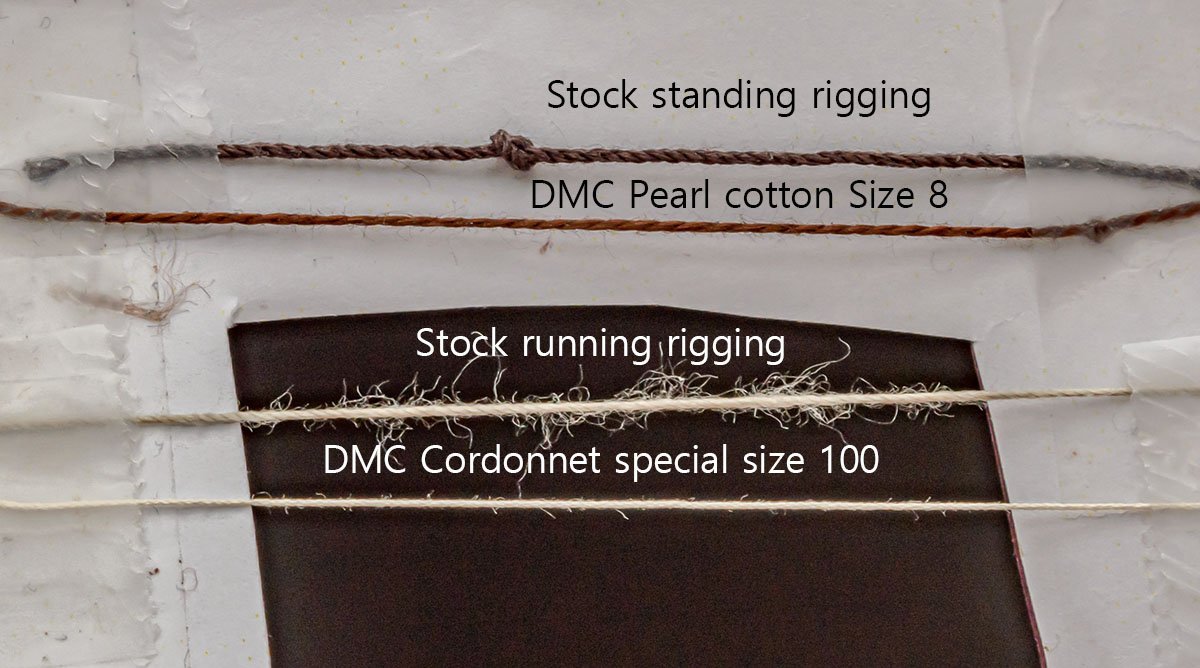
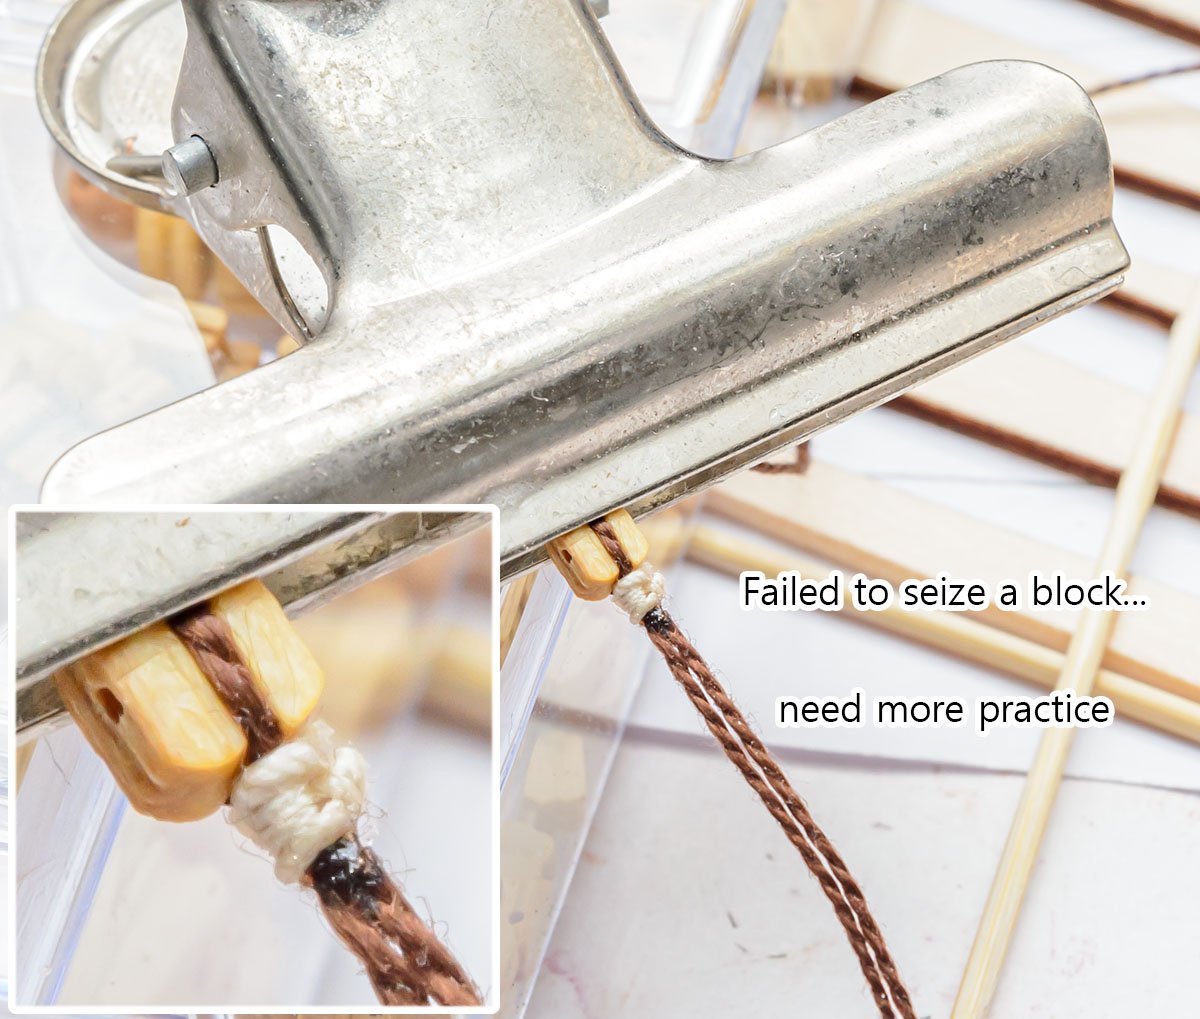
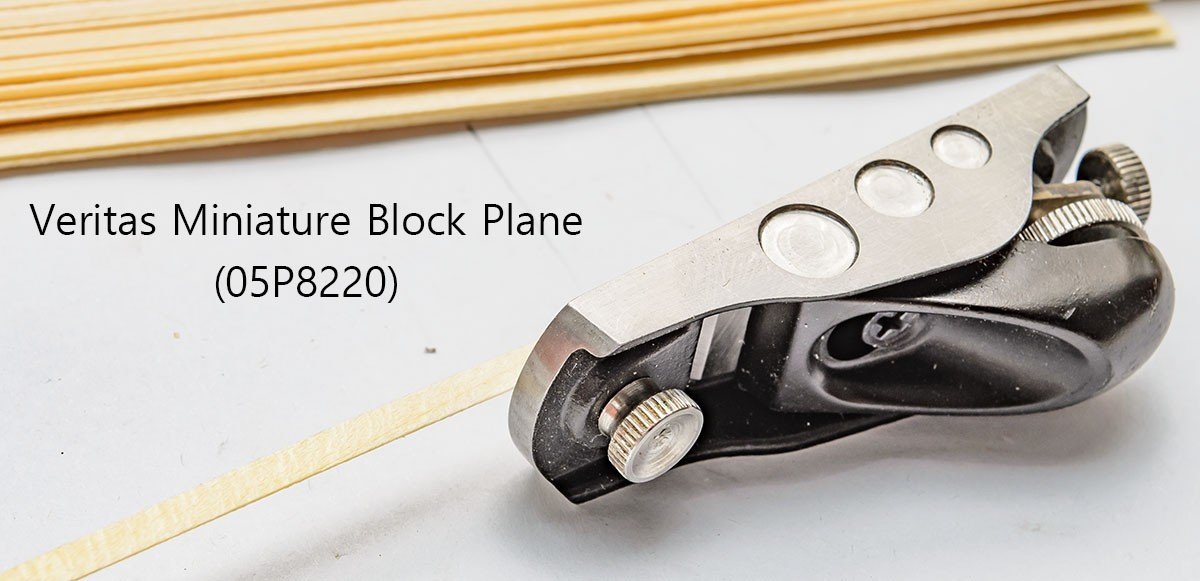
After I installed and reinforced guardrails, I started rigging and making masts. One of the downsides of the renewal kits of AL is that there is no 1:1 scale plan. Fortunately, the company offers high resolution PDF files, so I estimated the radius of masts from the pictures. I counted every pixels and reverse calculated the ratio. Interestingly, AL introduces a technique to grind masts with planes. I used to use a motor drill and sanding papers, and sometimes masts were concave. This method seems to prevent the accident. I purchased the plane(left) in the video, which costs only $10. It is very dangerous and hard to use compared with the Veritas miniature blockplane(right). Of course, the Veritas plane costs more than five times that. The Veritas plane is my best tool. I think this method works, but not precisely. Anyway, it is definitely better than no-words. It is a pretty fun process, and the result is durable. I would say that many people should like this method. Before I started rigging, I changed rigging threads. Thinner threads are more realistic. Here is a comparison. There are specific commercial threads that wooden ship modellers are in favor of. If you plan to purchase extra threads, good research will save time and hundreds of dollars. In this case, DMC Cordonnet special - ECRU color - Size 100 is my favorite. The best threads are only available from the DIY ropewalk machine. If you want quality pre-made ropes now, you may find them at hobby shops. You'll be amazed at how many rigging methods and variations are used to build a ship. It is natural that new builder can't make perfect rigging within several years. If you can't reproduce the seizing rigging on a scale model, avoid simple knots and just immitate the shape, and grab the shape by gluing CA glue. 🤪


- 77 replies
-
- 7
-
-
- Santa Maria
- Artesania Latina
- (and 1 more)
-
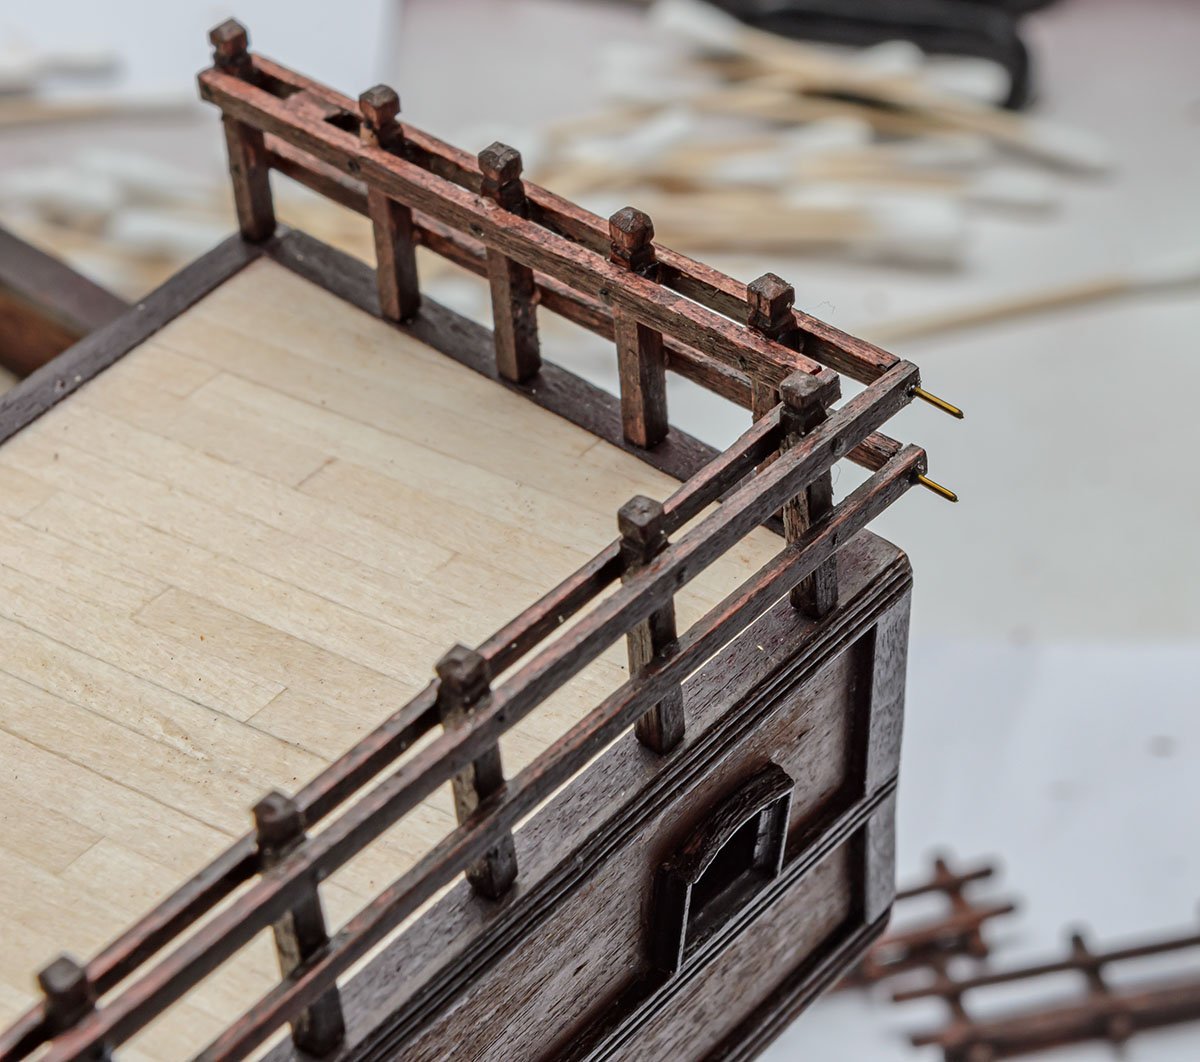
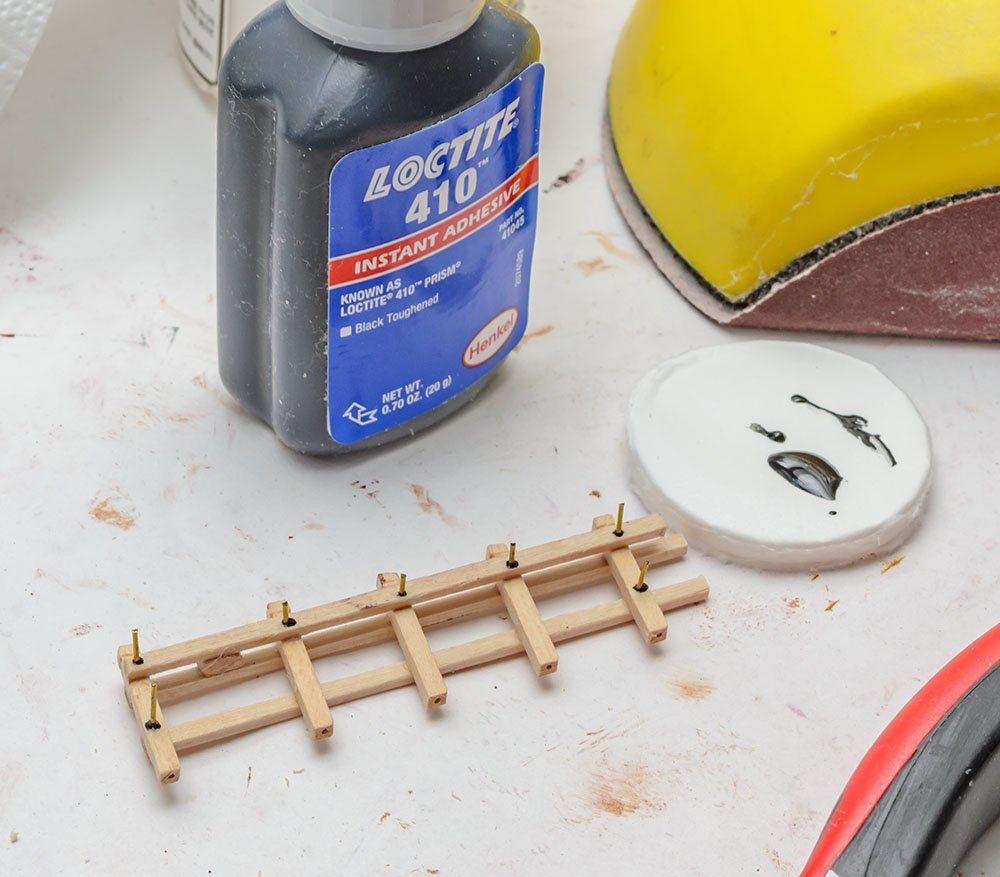
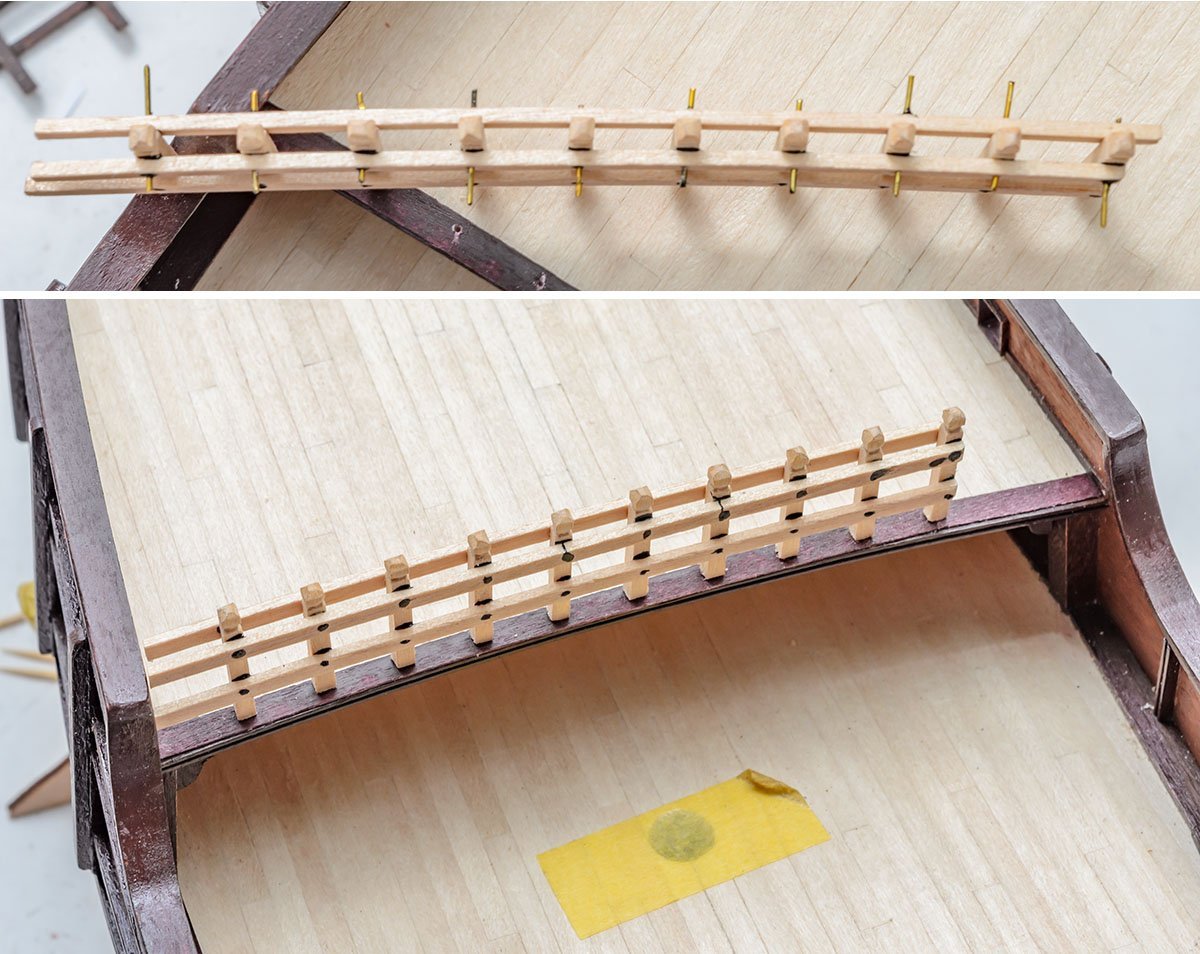
While I was staining guardrails with gel-stain, the parts were detached. I reinforced the joints by adding brass rods. The black CA glue is Loctite 410, which has a very high viscosity. The guardrail in the middle is curved. I finished staining the guardrails. The black CA glue mark seems to be a nail head.
- 77 replies
-
- 3
-
-
- Santa Maria
- Artesania Latina
- (and 1 more)
-
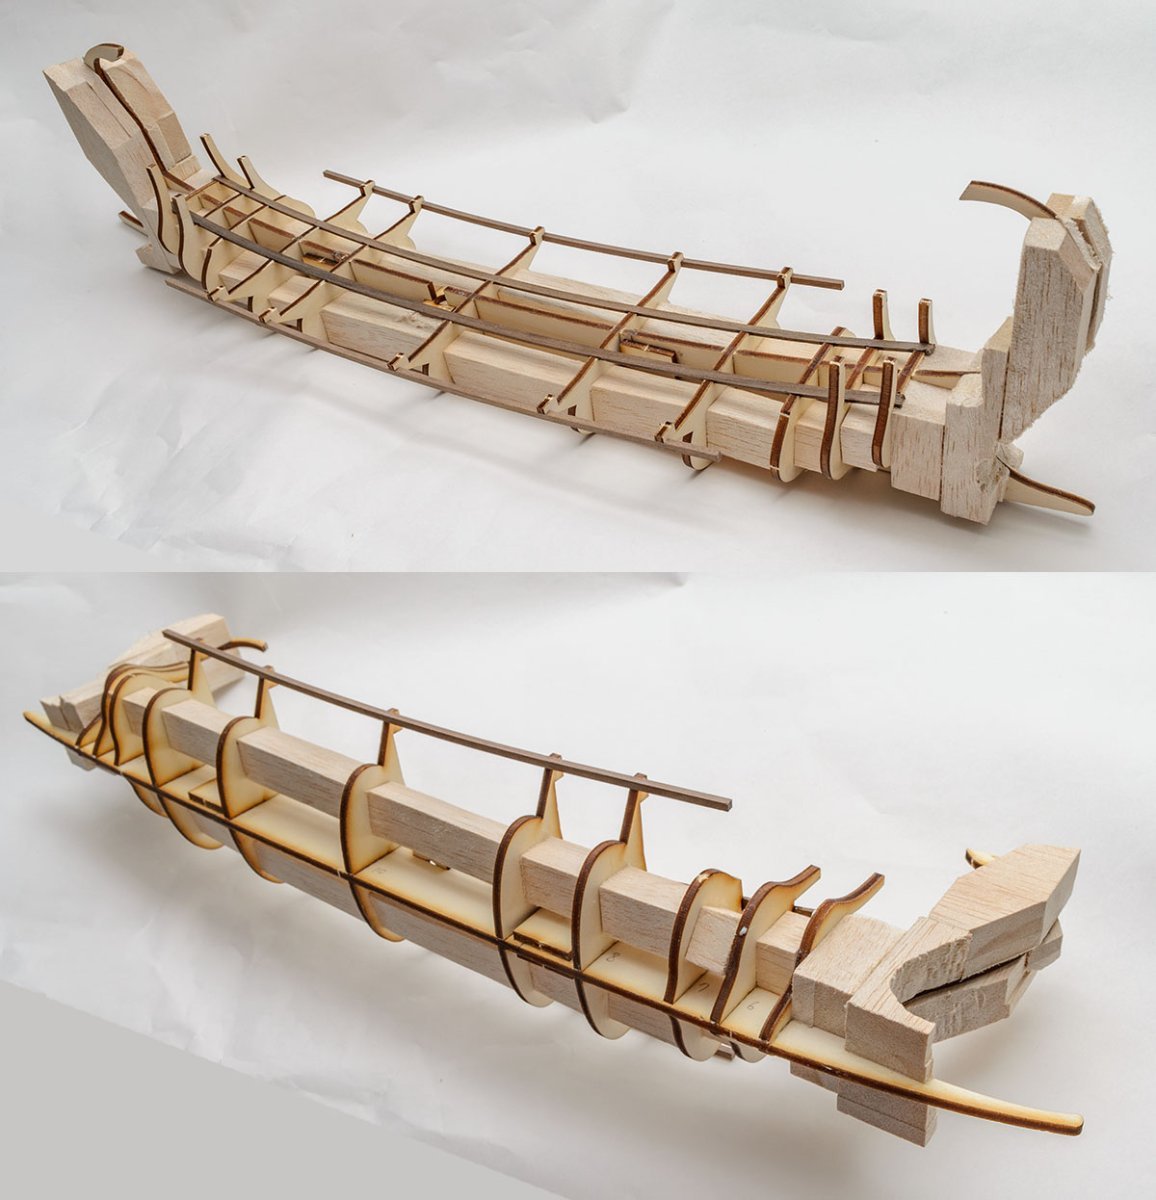
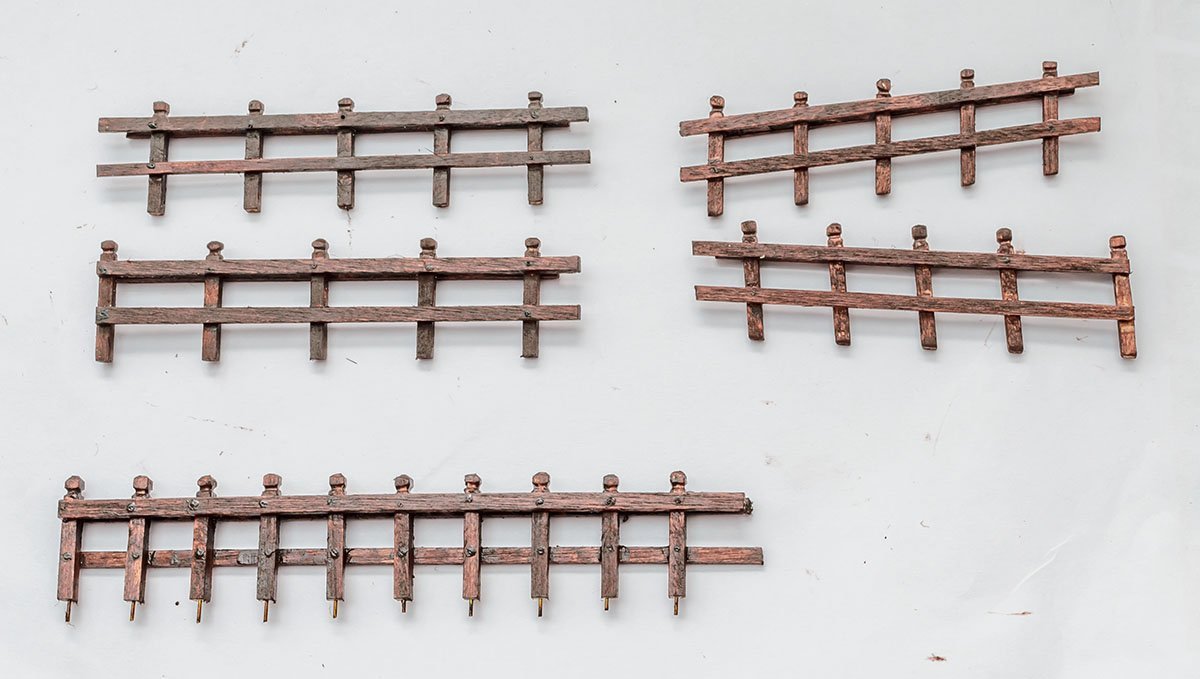
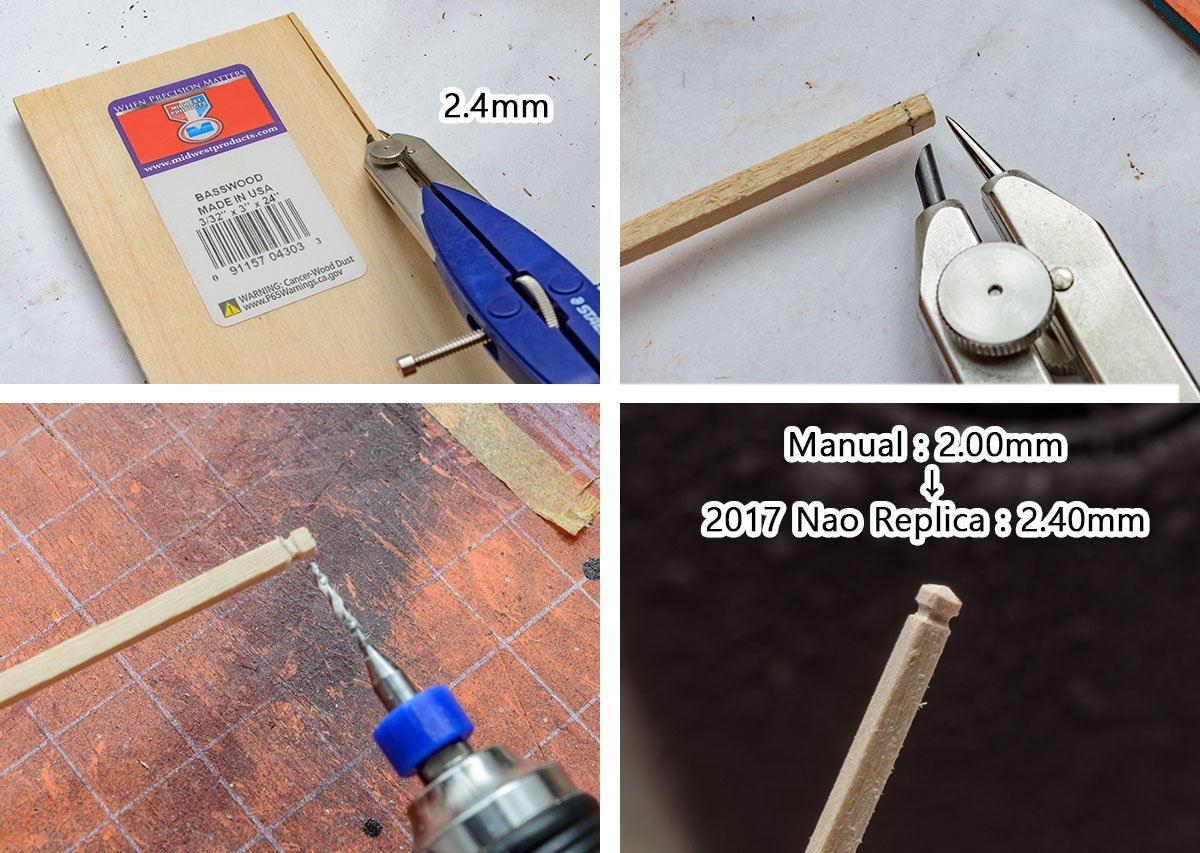
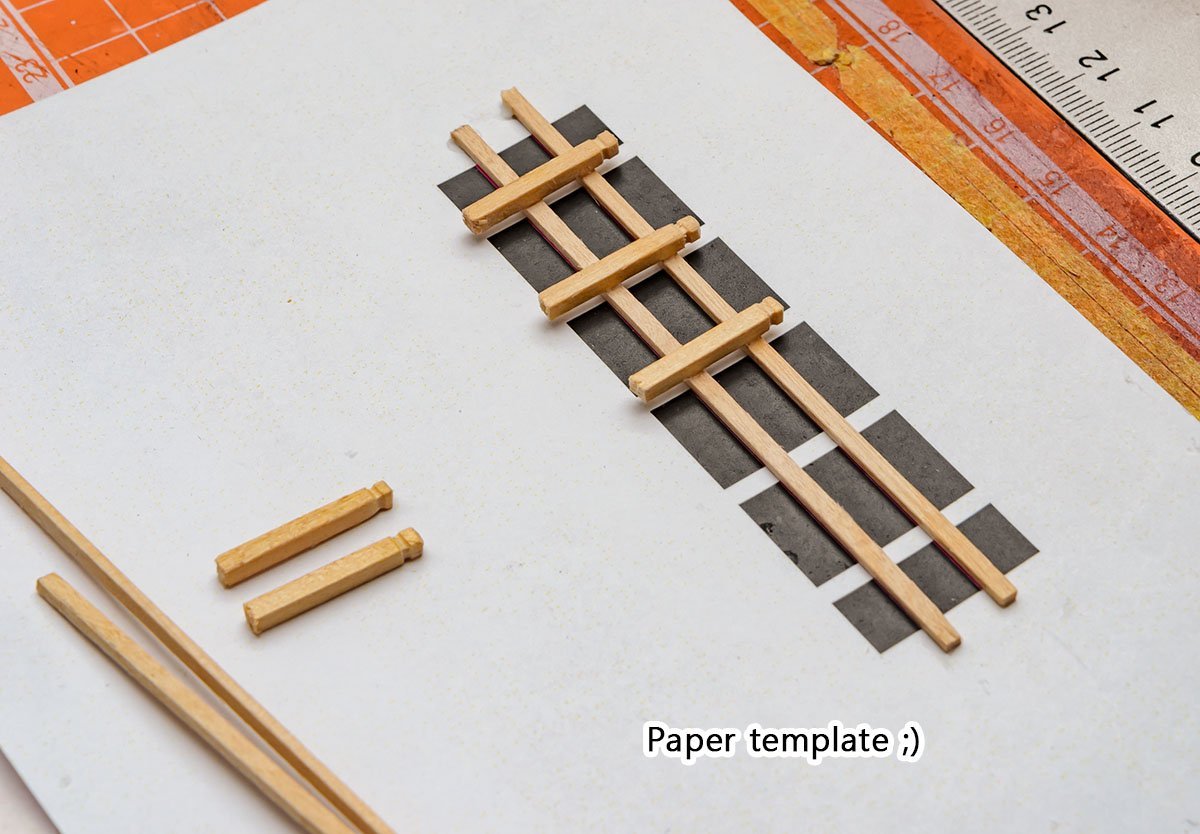
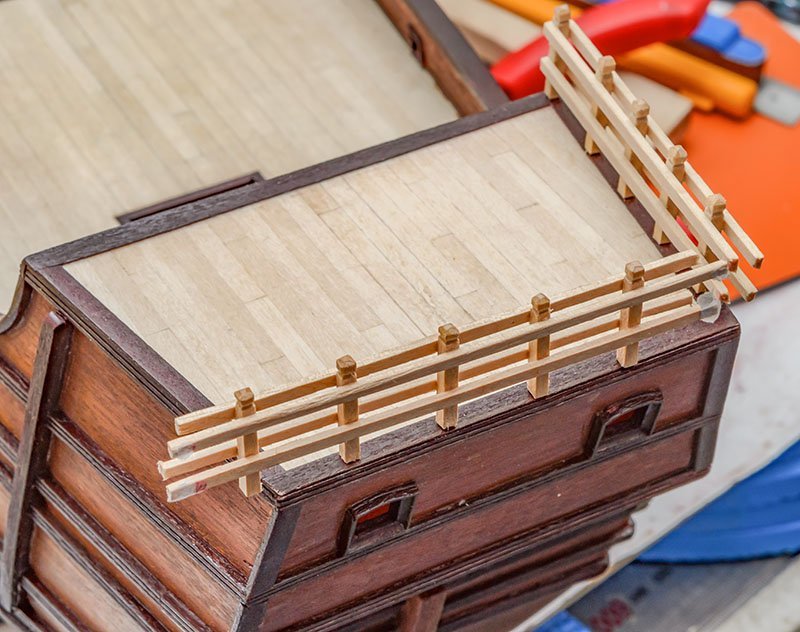
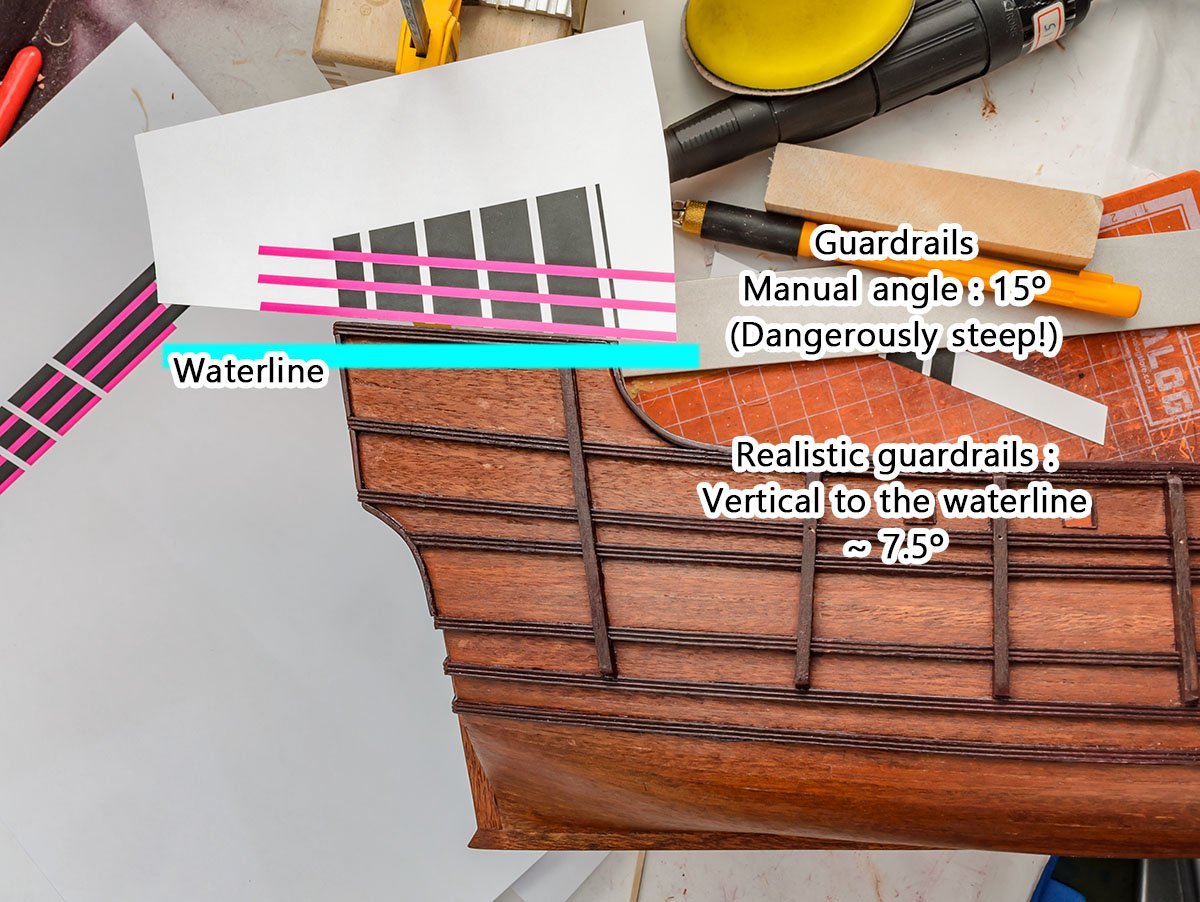
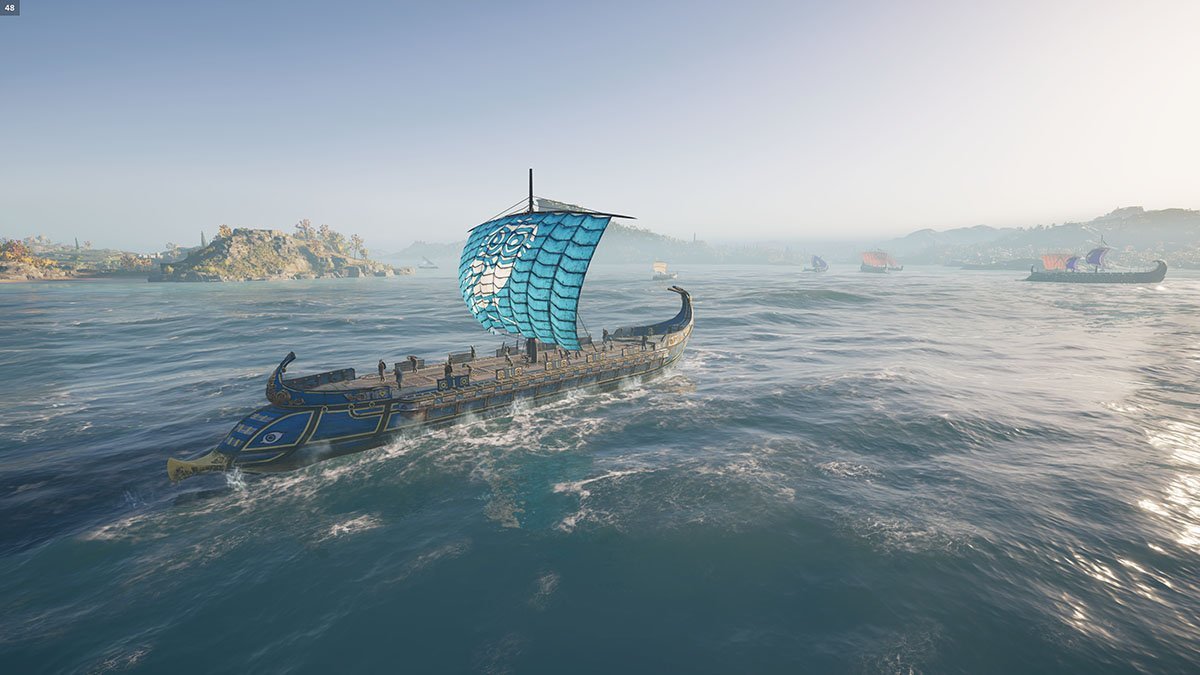
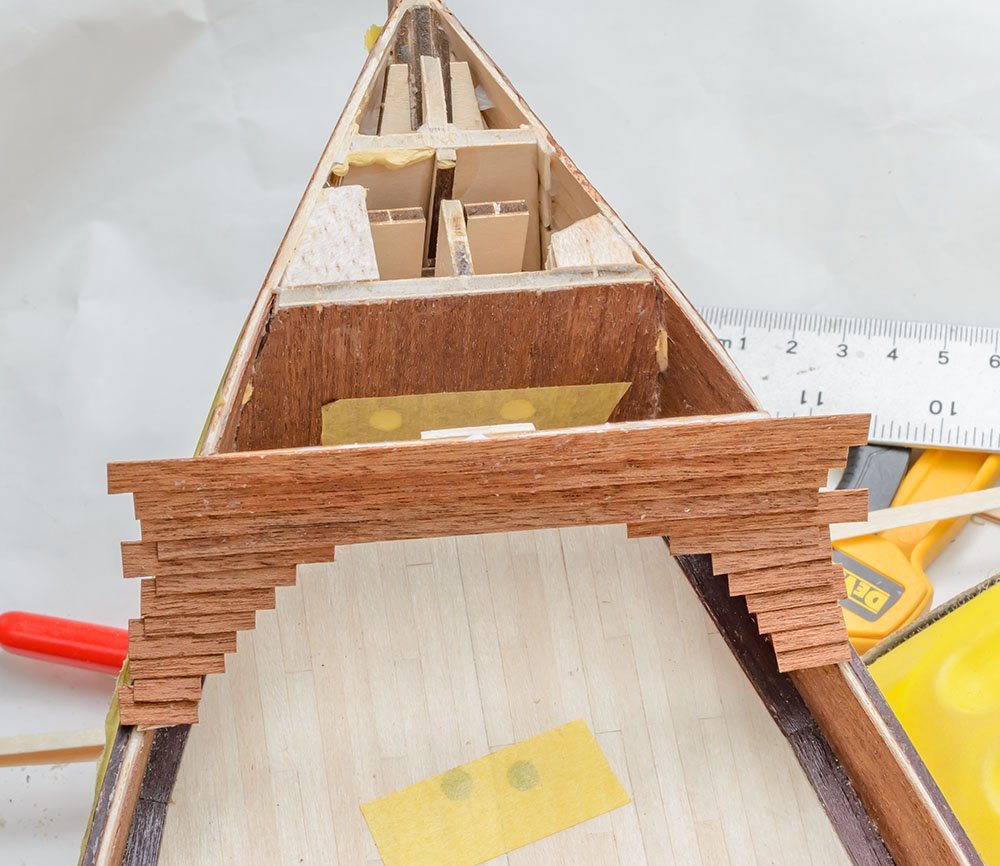
Oops, I forgot to post my last month's work. I started with the Maris stella's Greek Monoreme B.C.440. I stopped at the hull fairing, which requires tons of research hours. I'll make a new build log for this ship after I finish this build log. This is the final picture of the monoreme. The Olympias, reconstructed by Greek navy in 1980s, which is well known as Amati or Artesania's Greek bireme, wasn't in the game I played and this kit is only option. Let's go back to the Santa Maria. My first reference is the AL's manual, but when I feel something isn't realistic or wrong, I refer to the 2017 Nao replica as the second reference. There are tons of high definition youtube videos of the most recent Santa Maria. I thought the 2.00mm guardrails were thin, so I increased the thickness to 2.40mm. In addtion, I added the guardrail ornaments at the end of the stick just like the replica. The AL's beads and pin method is convenient but doesn't feel realistic. A printer always helps me. Another weird point. I fixed the angles of the guardrails. When I checked the numbers of the guardrail sticks, I found that the size(ratio) of the third floor of both the AL and the 2017 Nao replica were different. AL is wide and 2017 Nao is narrow which means total ship proportion is changed. It is interesting how many things about the 2017 Nao replica are different from the 1960 Nao replica in the Anatomy book.


- 77 replies
-
- 5
-
-
- Santa Maria
- Artesania Latina
- (and 1 more)
-
Hello, Allan. It is my pleasure that you remember the Korean name for the stir-fried octopus. I also miss one of the best BBQ restaurants in Syracuse, NY when I was an international student. I wish to get the special sauce...🤤 The photos of the Hobby fair will be posted on the general discussion board.
-
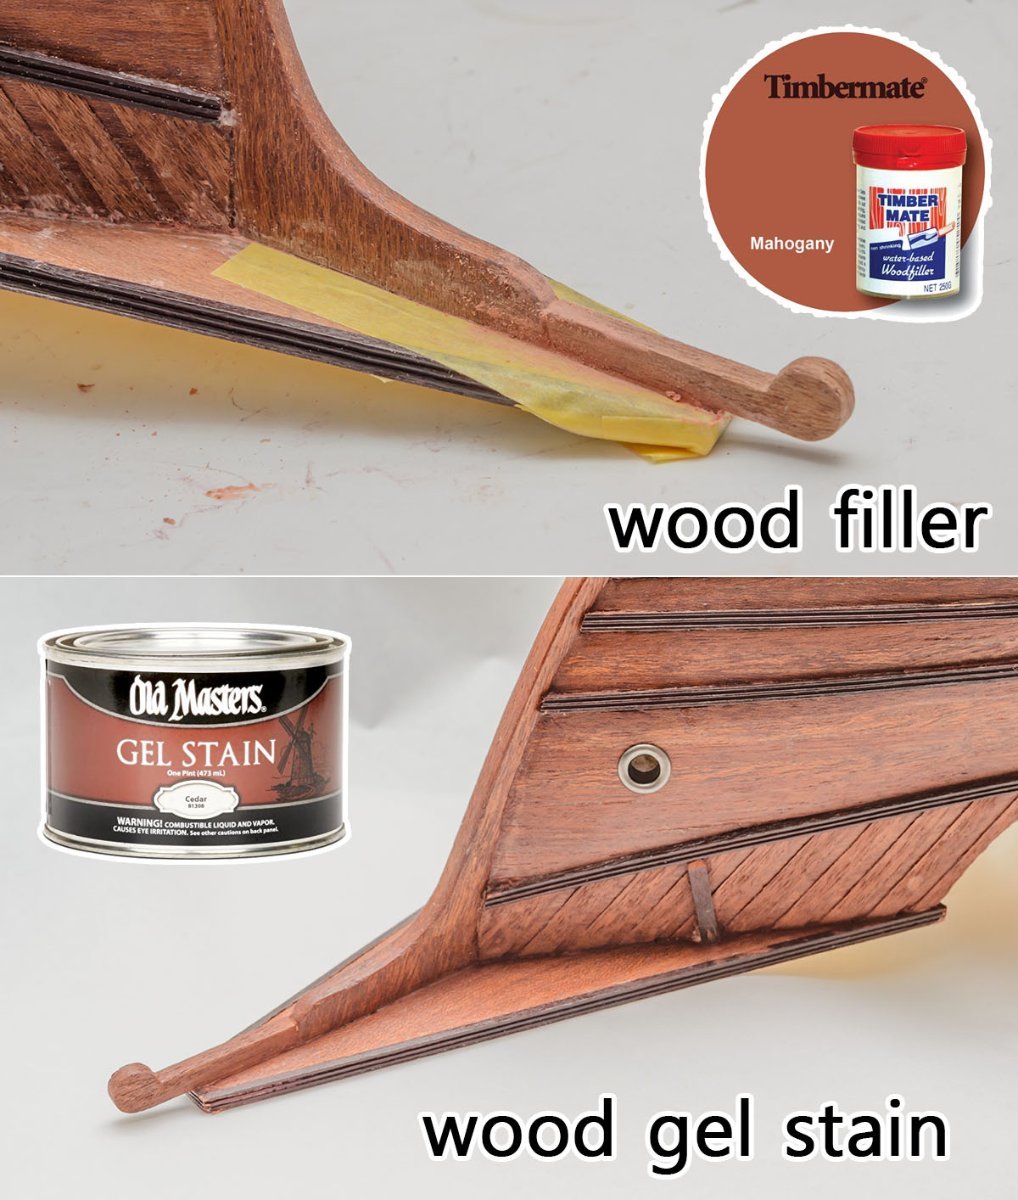
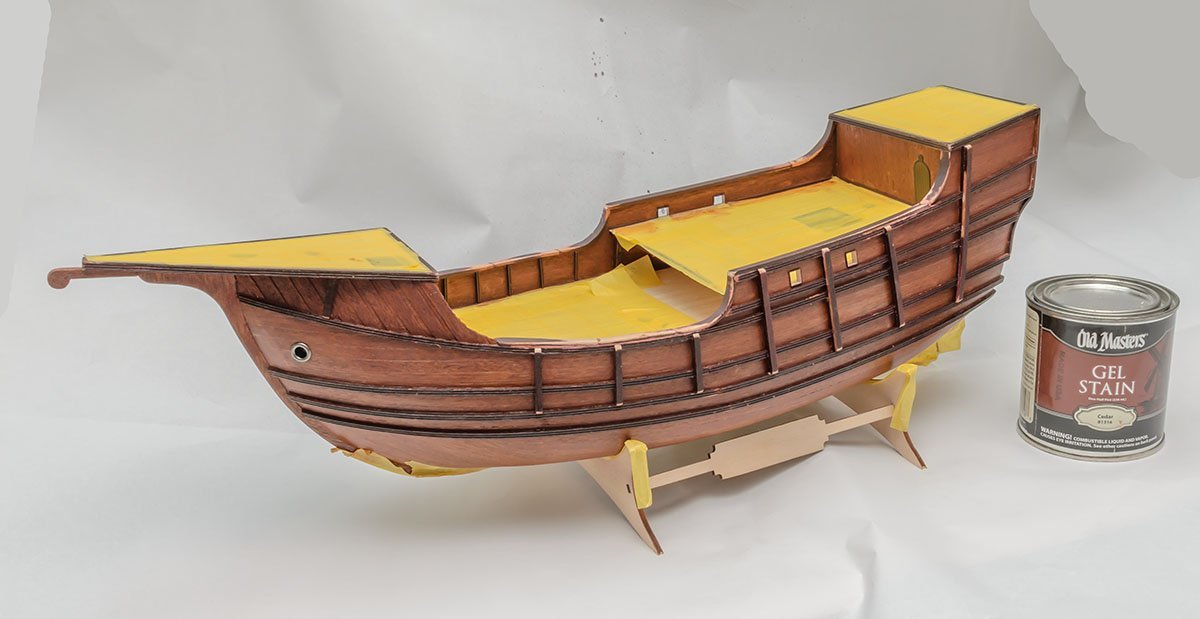
Sorry about the lazy delays. I had played another game for one hundred hours... 🤪 Hello, Kristyn. Thank you for the praise, and sorry about the long vacancy. The hobby fair is the biggest model festival in South Korea. I hoped to finish the Santa Maria before. 🤨 This is a relatively simple explanation that I can post in a short time. I'll catch all the explanations I passed after I finished the whole model. This is the time to run. I finished by applying wood filler to fill all the gaps and painting gel stain to cover the unmatched colors. After that, the darker wale bars were painted with lacquer paint and a brush. The next step is guardrails and masts. I hope see you again this week with lots of photos. 😉


- 77 replies
-
- 5
-
-
- Santa Maria
- Artesania Latina
- (and 1 more)
-
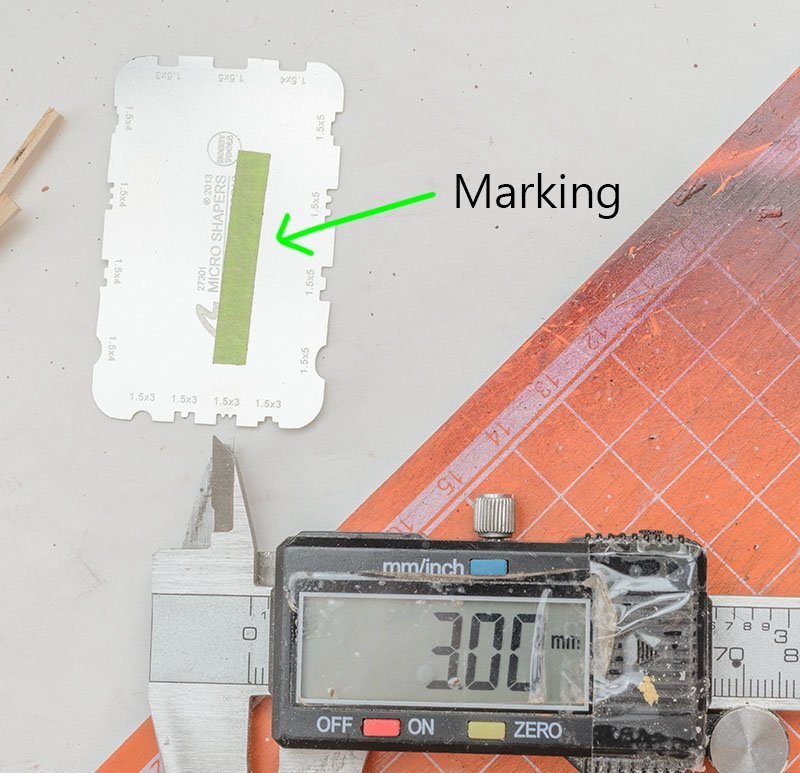
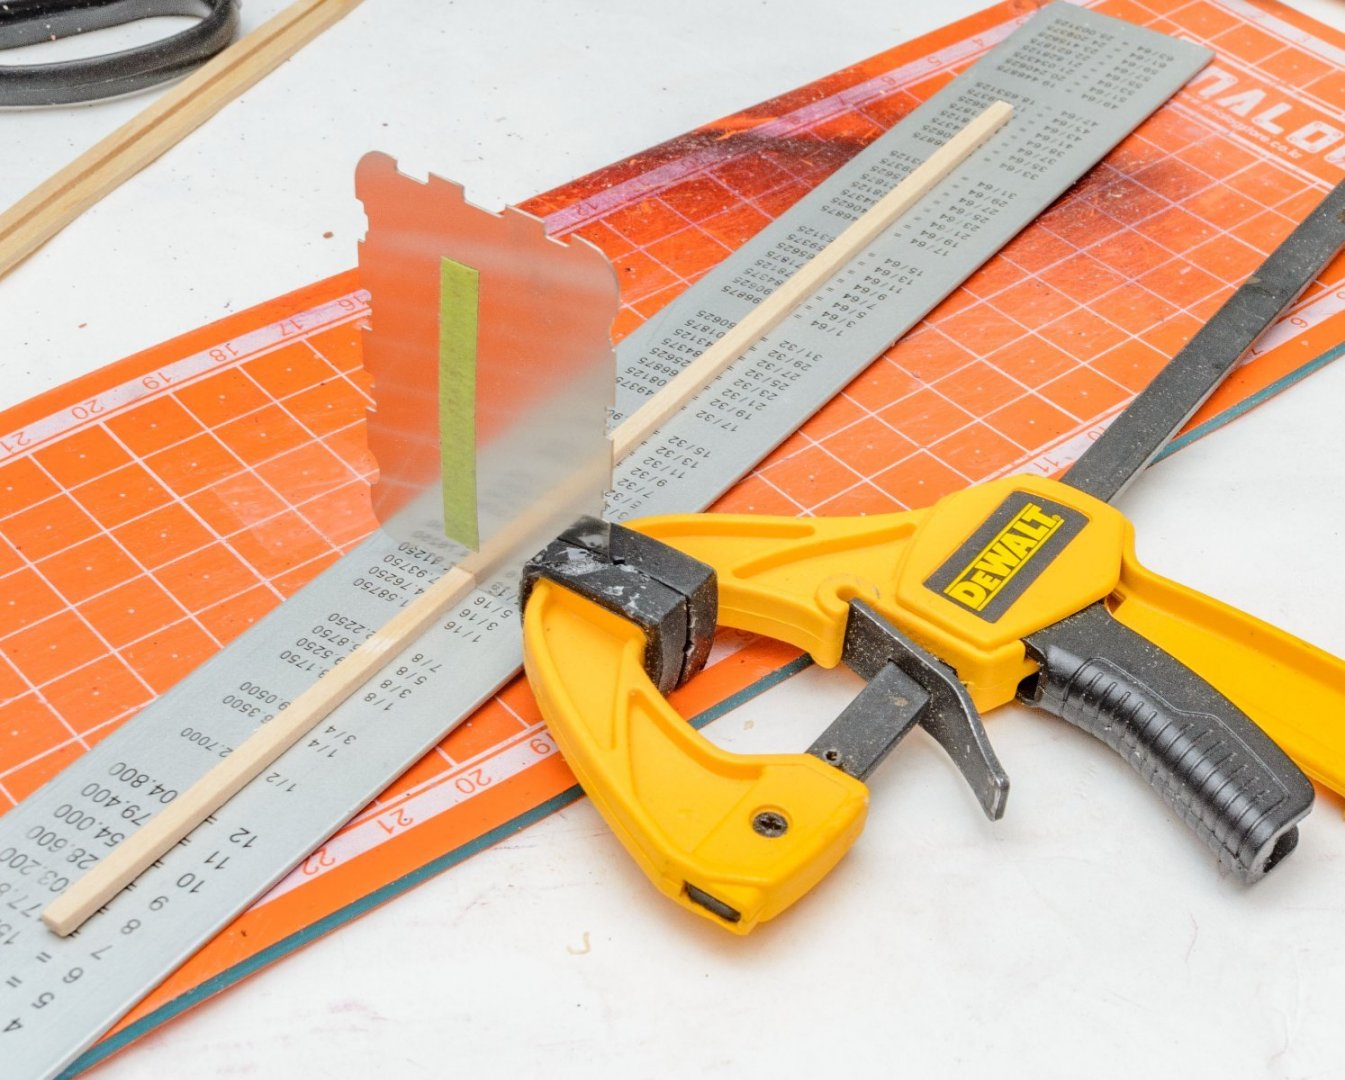
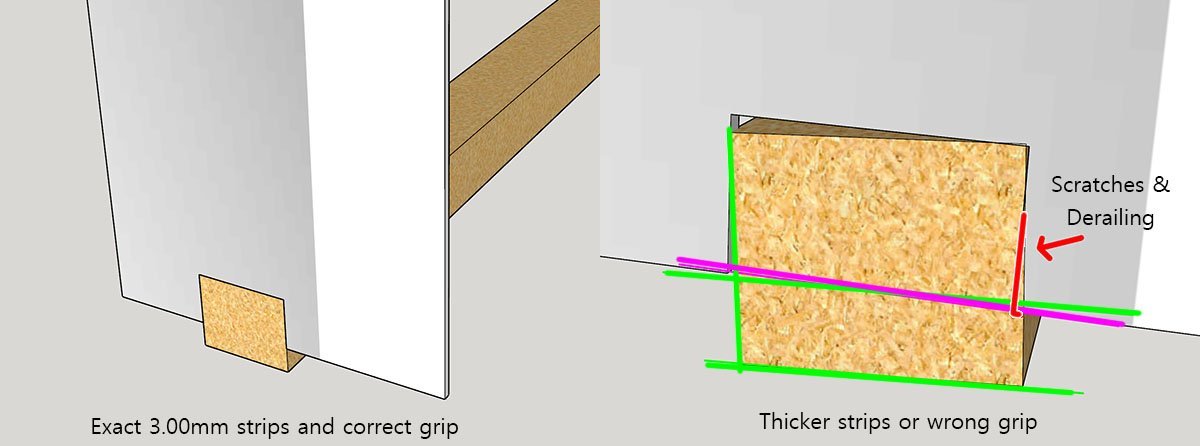
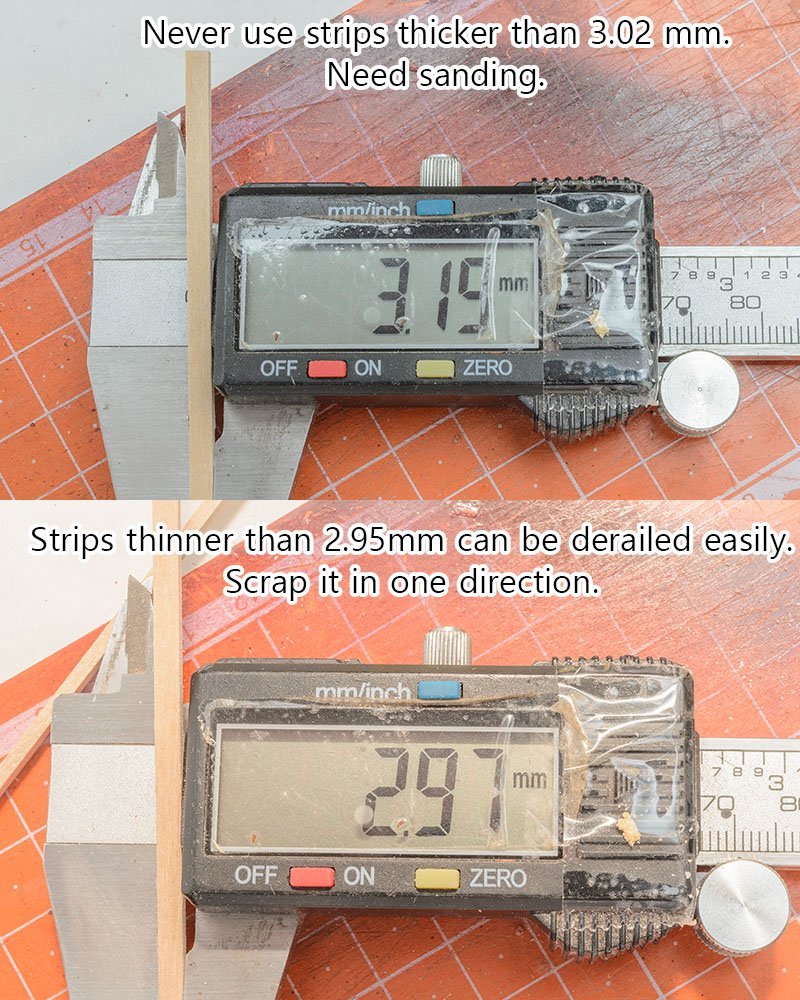
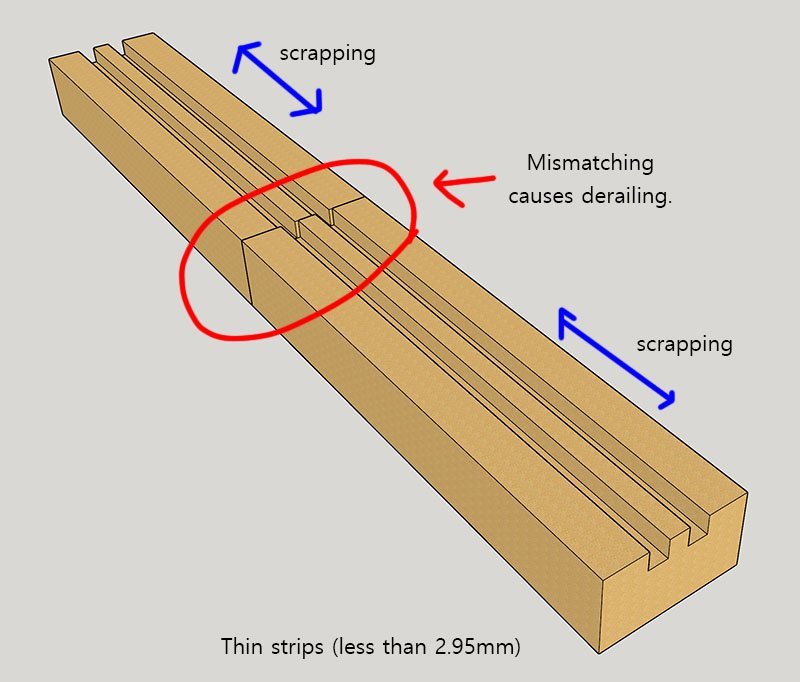
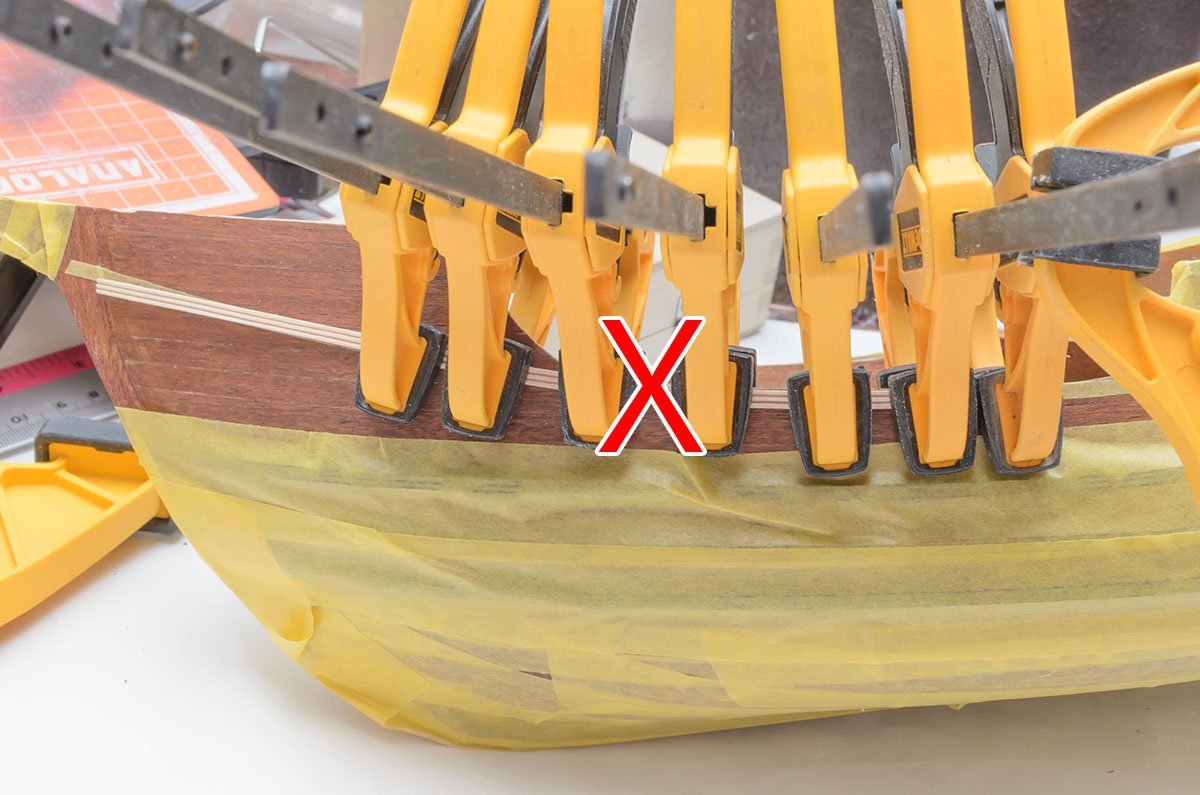
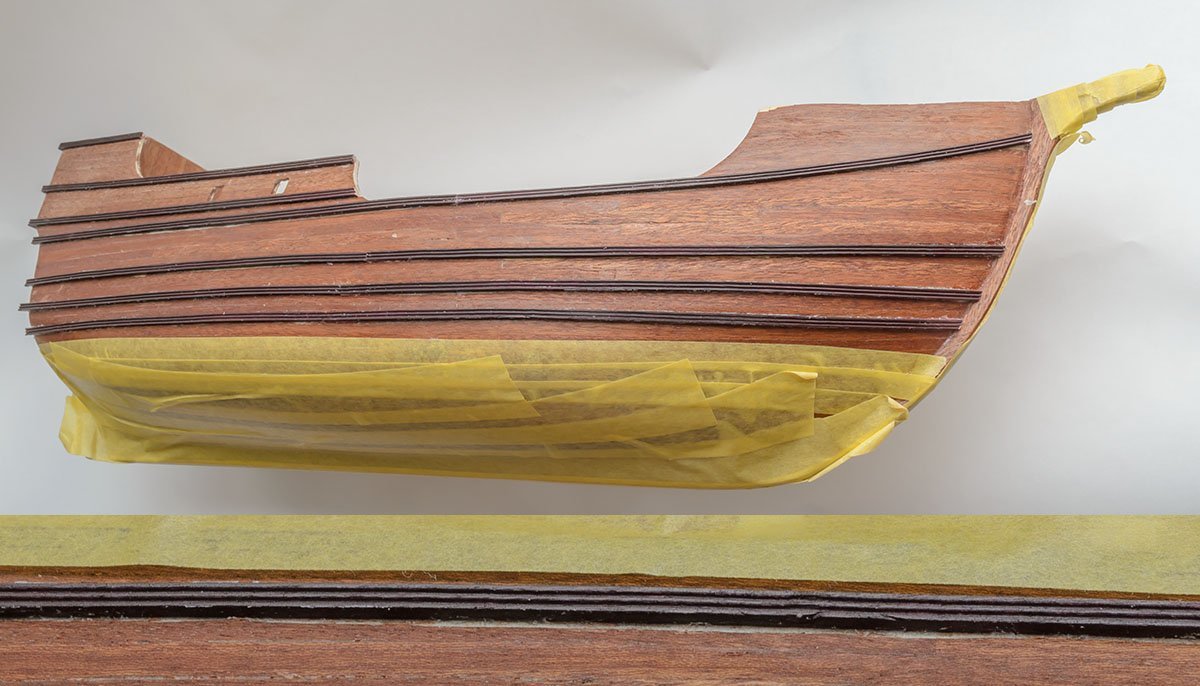
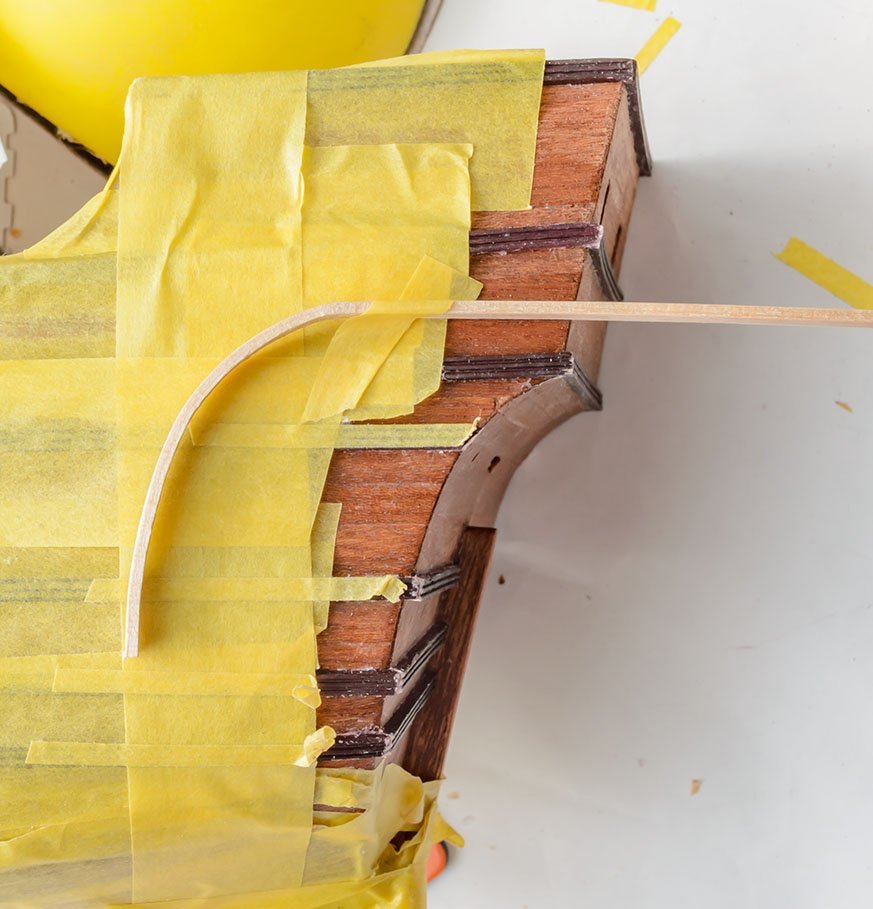
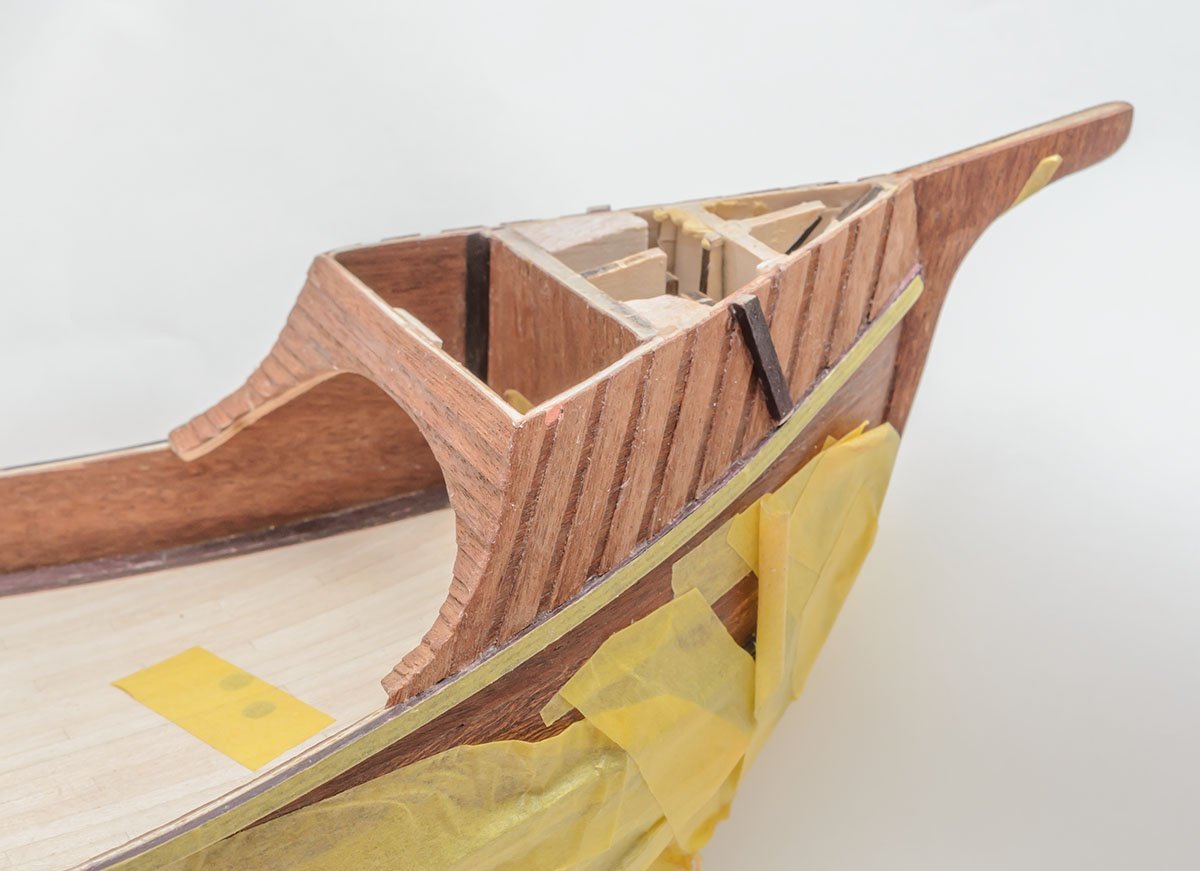
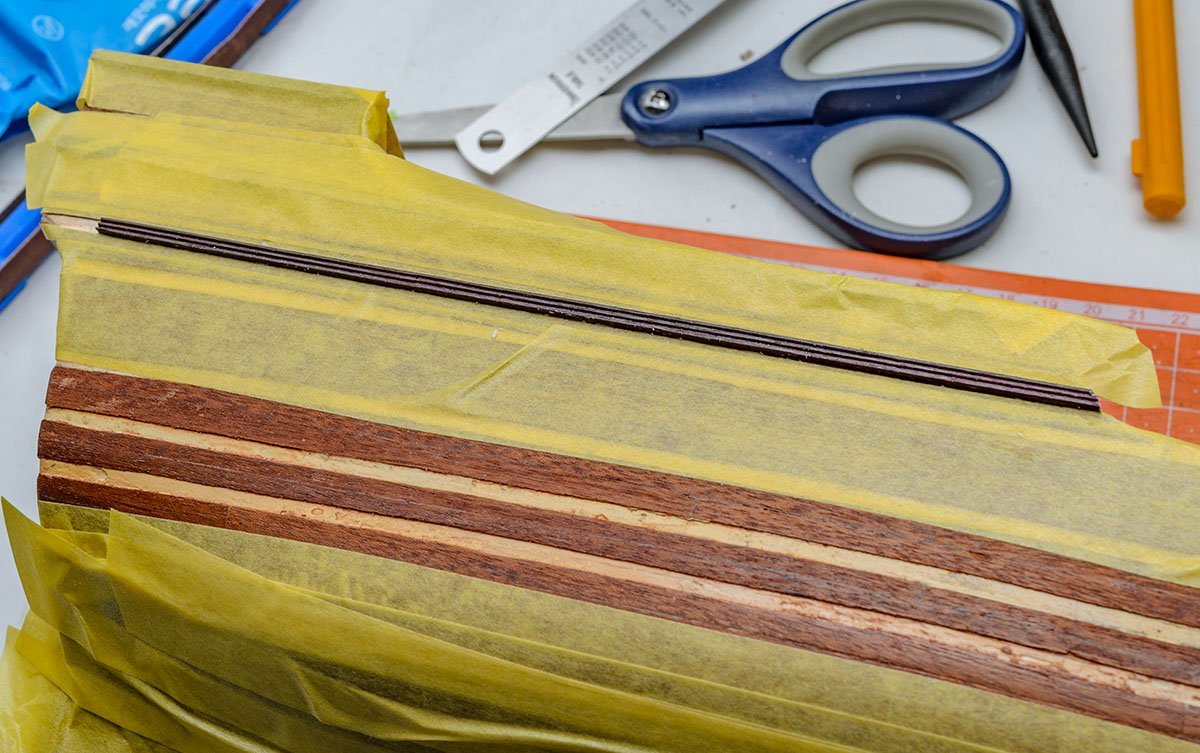
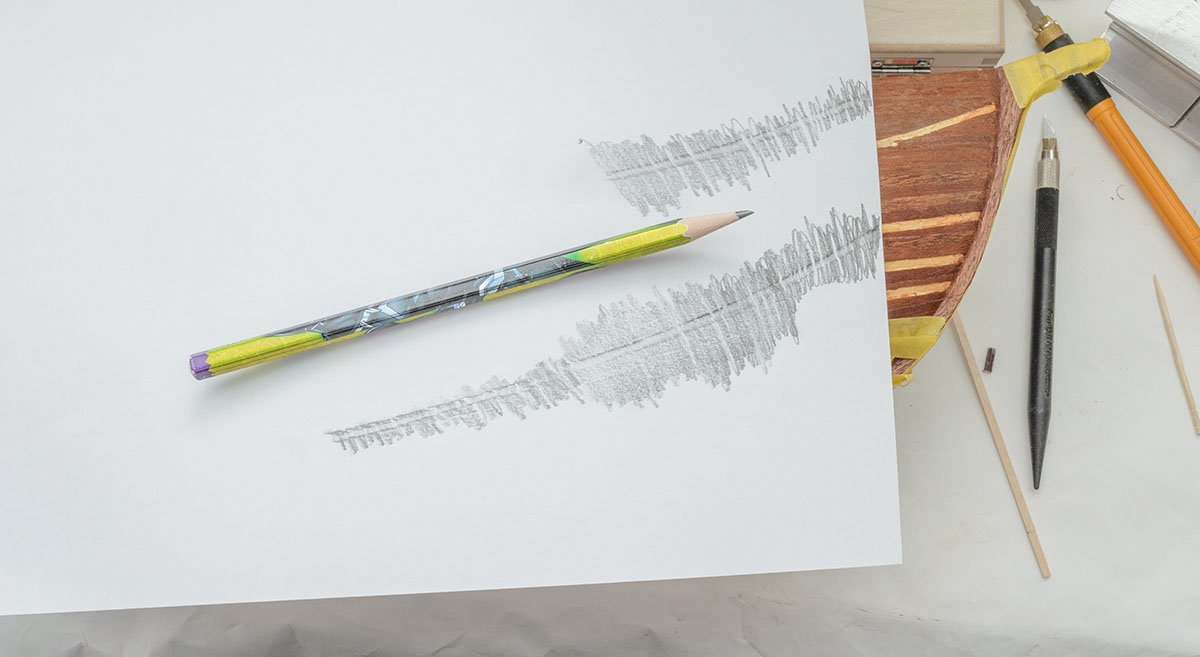
Hello, MateusPL. Sorry about delay. I've been busy playing some games. I upgraded my PC to edit movie, so I've played old games. 🤨 I ordered a Greek trireme from Maris Stella on April because it appears to be the most like the ships in the game. Unfortunately, the company may not have any stock, and I'm waiting for re-production. 😪 Back to Santa Maria, I found that a new feature of the SM N kit is quite difficult and delicate. I had several issues when I scrapped wale bars. It is important to keep an angled position. Without proper grab position or exact width of a strip, the microscrapper will bounce and make a deep scratch on the strip. This is the main reason the microscrapper is derailed. (1) The tool's side edges scratch side of the strip and force my hand to shake. The second reason for the derailing is the width of the strip. The strip must be exactly 2.95mm ~ 3.00mm wide. When I scrapped one narrow strip which had 2.90mm wide from both ends, the rail didn't match at the center and made it ugly. It is good to use the narrow strip for other places. Some wales need to be clamped due 3D complex curved hull. Don't scrap the wales before bending. The clamping made the moulding pattern dull. Finally, I attached 3mm wide masking tape to the polished wale bars. The grooves are weak and gather dust easily. There were lots of mistakes, and still lots of things to do. I have to fill some gaps with wooden filler and stain them. I used boiling water and a pyrography iron to bend them. Because of the twisted hull, I extended the curved wall at stem. A little trick to mark the curved wall. I used 3mm wide masking tapes. Sanding and polising. I don't remember when I last used a protractor. I just made a paper protractor. 😎 2.0mm masking tapes again. I added fake waterspouts to hide the dirty corners. 😎 The jobs at stem are almost done. Sanding, polishing, and staining.


- 77 replies
-
- 5
-

-
-
- Santa Maria
- Artesania Latina
- (and 1 more)
-
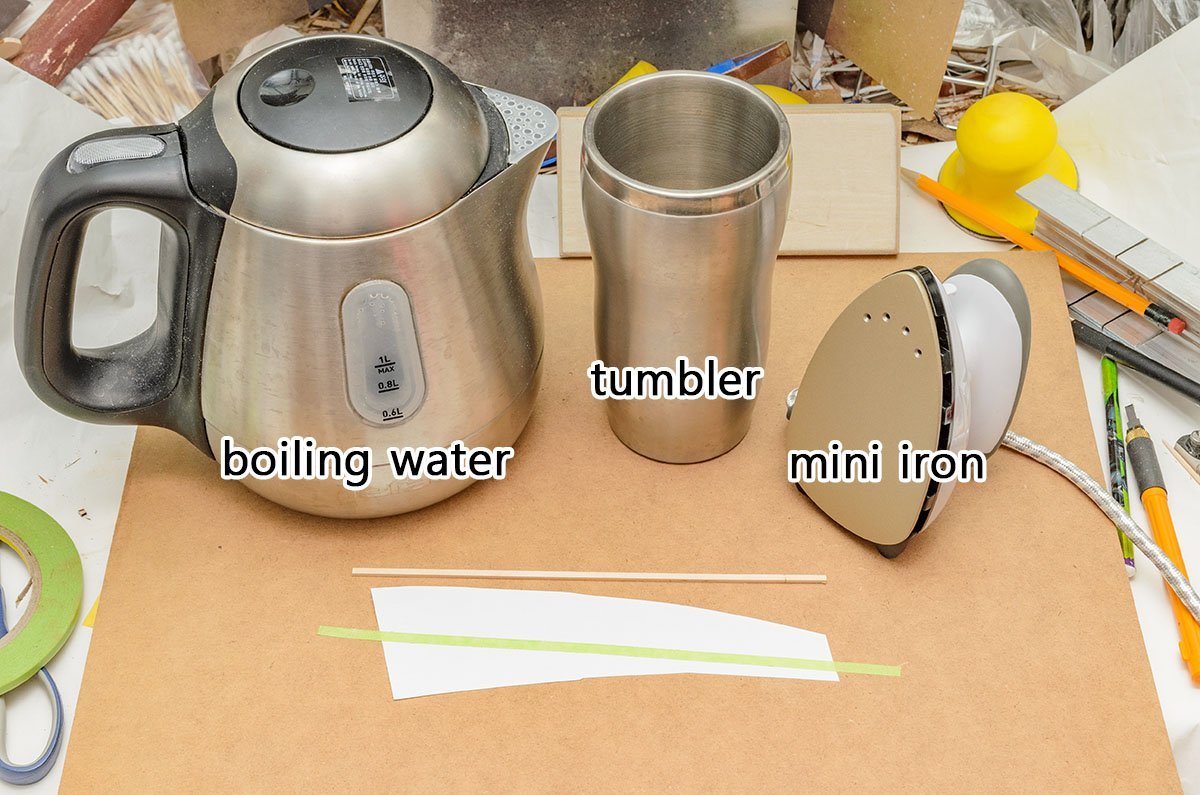
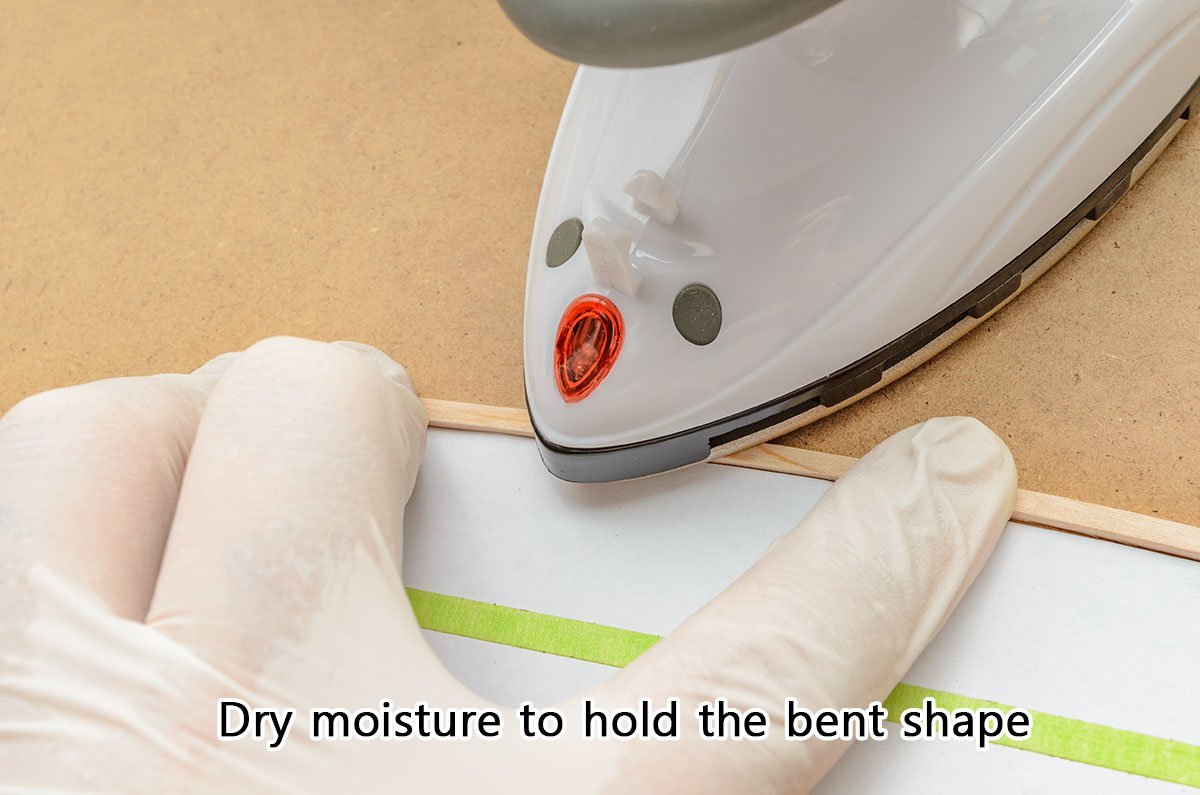
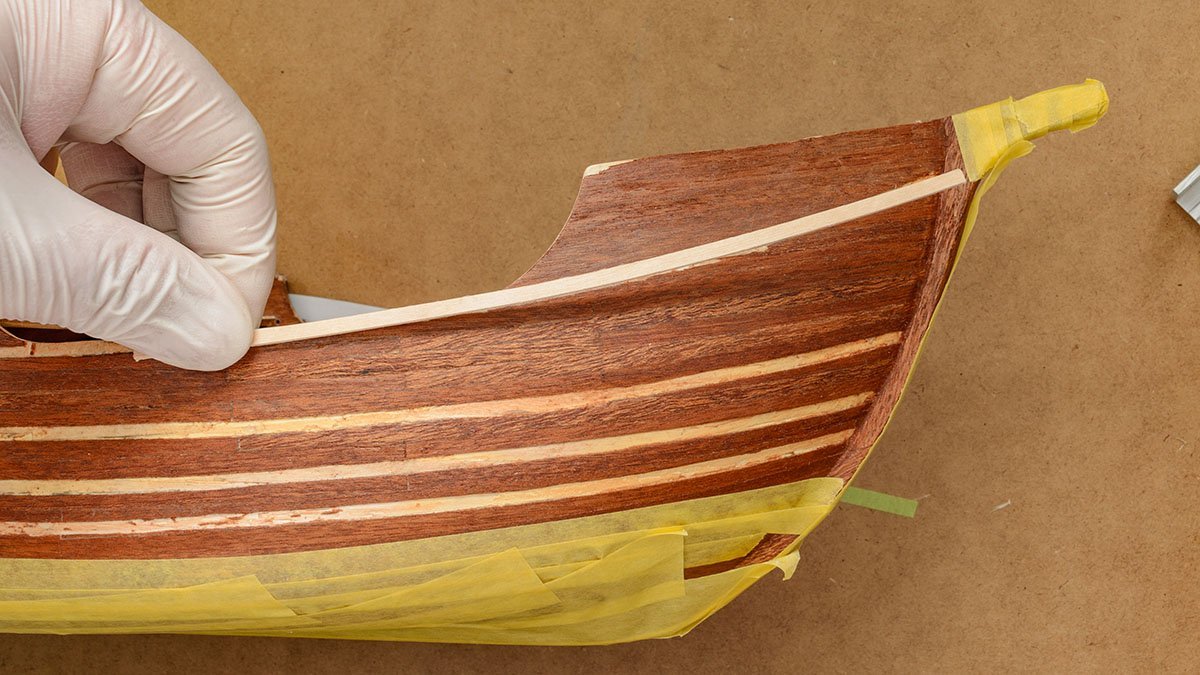
I'm sorry I didn't post continually. I had lots of trouble at the end of the hull planking, and I hadn't summarize my mind yet. Instead of neglecting a build log until I catch up on a backlog of homework, I would like to update the current status. I have a plan to re-summarize the entire planking process at the end.😘 I gave up trying to polish all the troubles from the hull planking, and advanced to the next stage. I'm installing wales. It is relatively easier than planking. I attached masking tapes to protect the stained planks from bonding. It is hard when the curve is drastic. We know how to deal with it. It is too wide to use 3M scotch tape. I simply used a paper. Even shipyards use water vapor and clamps. I simply put the strip in the boiling water for 5 minutes. d I used the mini iron to speed up the process. I set the temperature at 150℃ (300℉). 😄 I'll explain omitted processes later.


- 77 replies
-
- 2
-
-
- Santa Maria
- Artesania Latina
- (and 1 more)
-
I think my real question was "how to caulk the planks of the hull". In this case, I wanted to remove the caulking line by staining it in the same color. It seems like a higher cost and more time. 😱 I will try the black planking caulking next time.
-
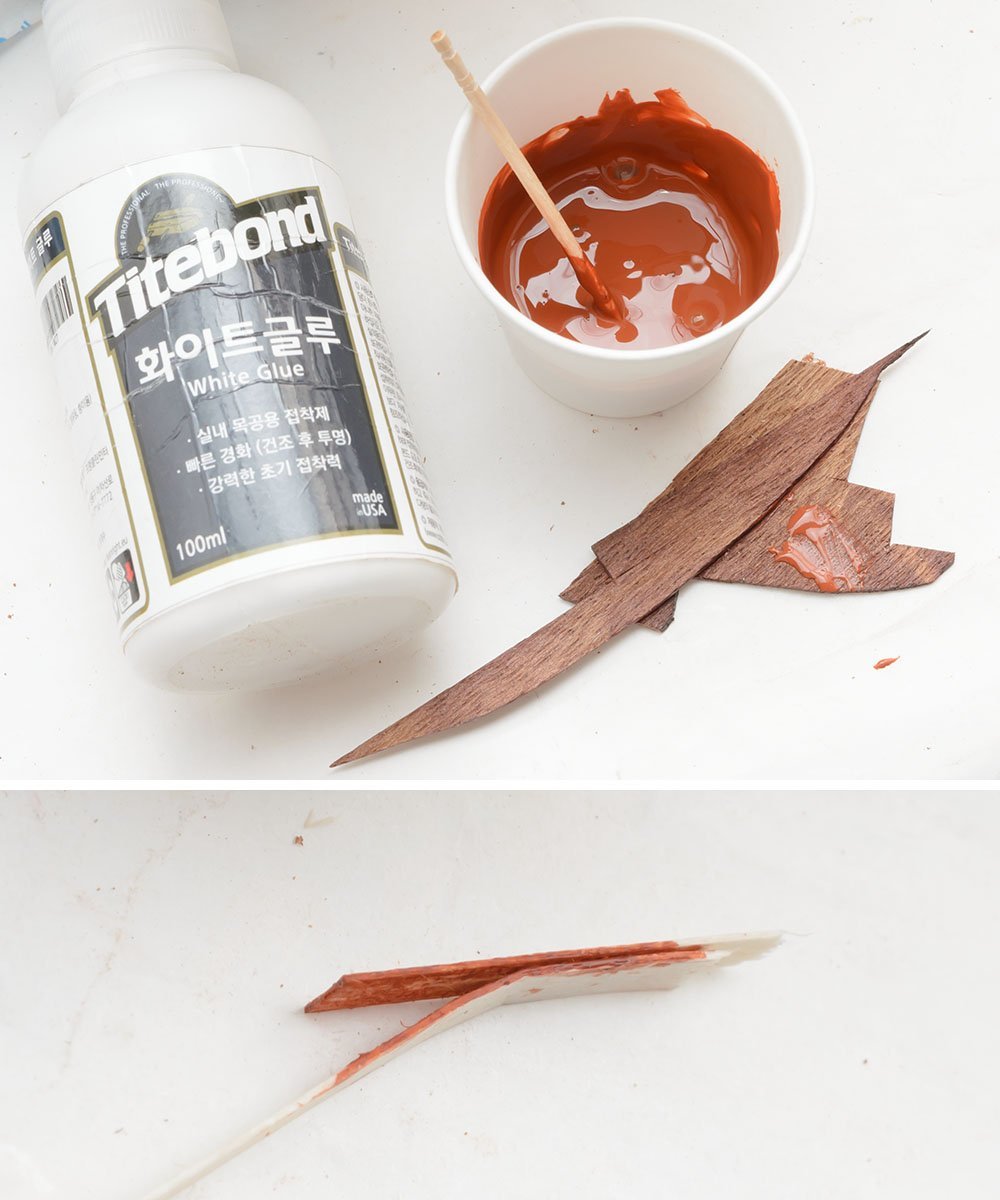
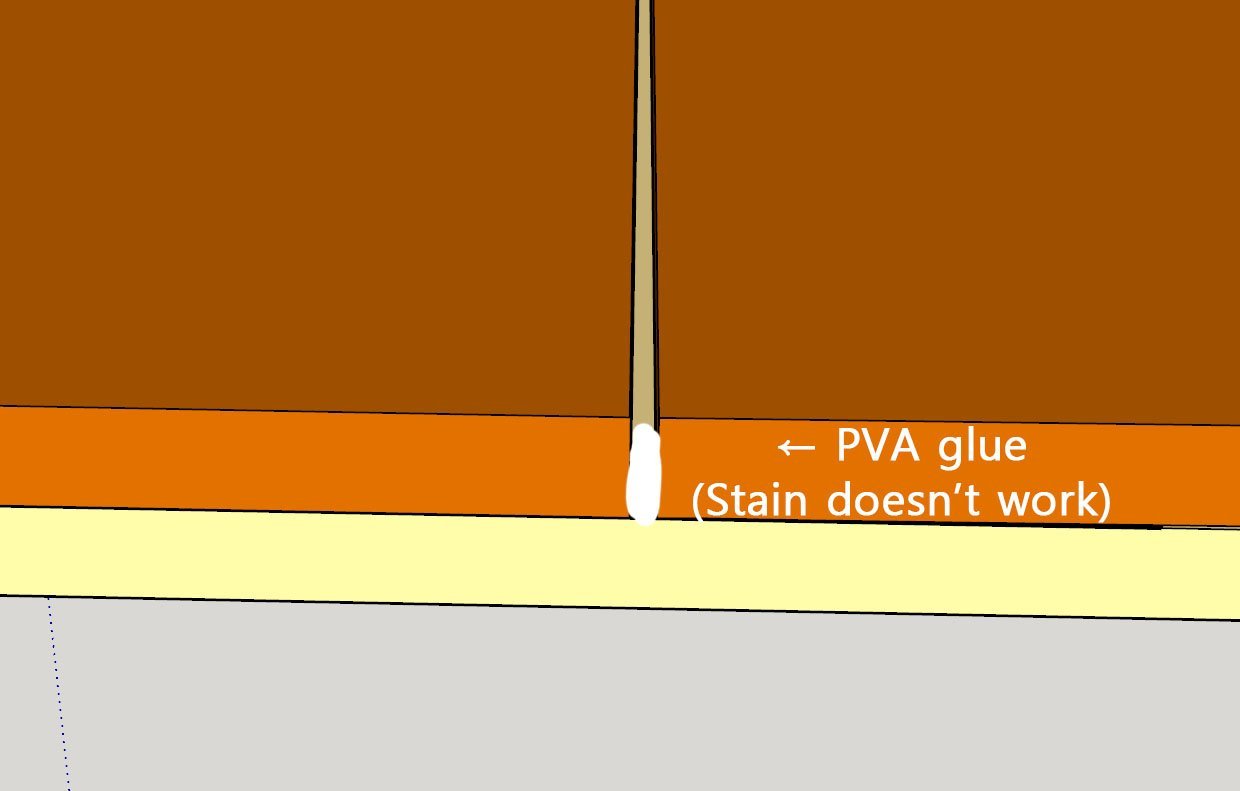
Thanks for the professional advice, Jaager. I have some oil - solvent-based paints such as enamel. I didn't know it works on PVA glue. By the way, does the dark walnut color of the hull imply that the model ship is on a voyage? I would say that a model ship on a stand is in dry dock, too. In addition, I tested the colored PVA glue. The adhesiveness became extremely low. Do not try this at home.

-
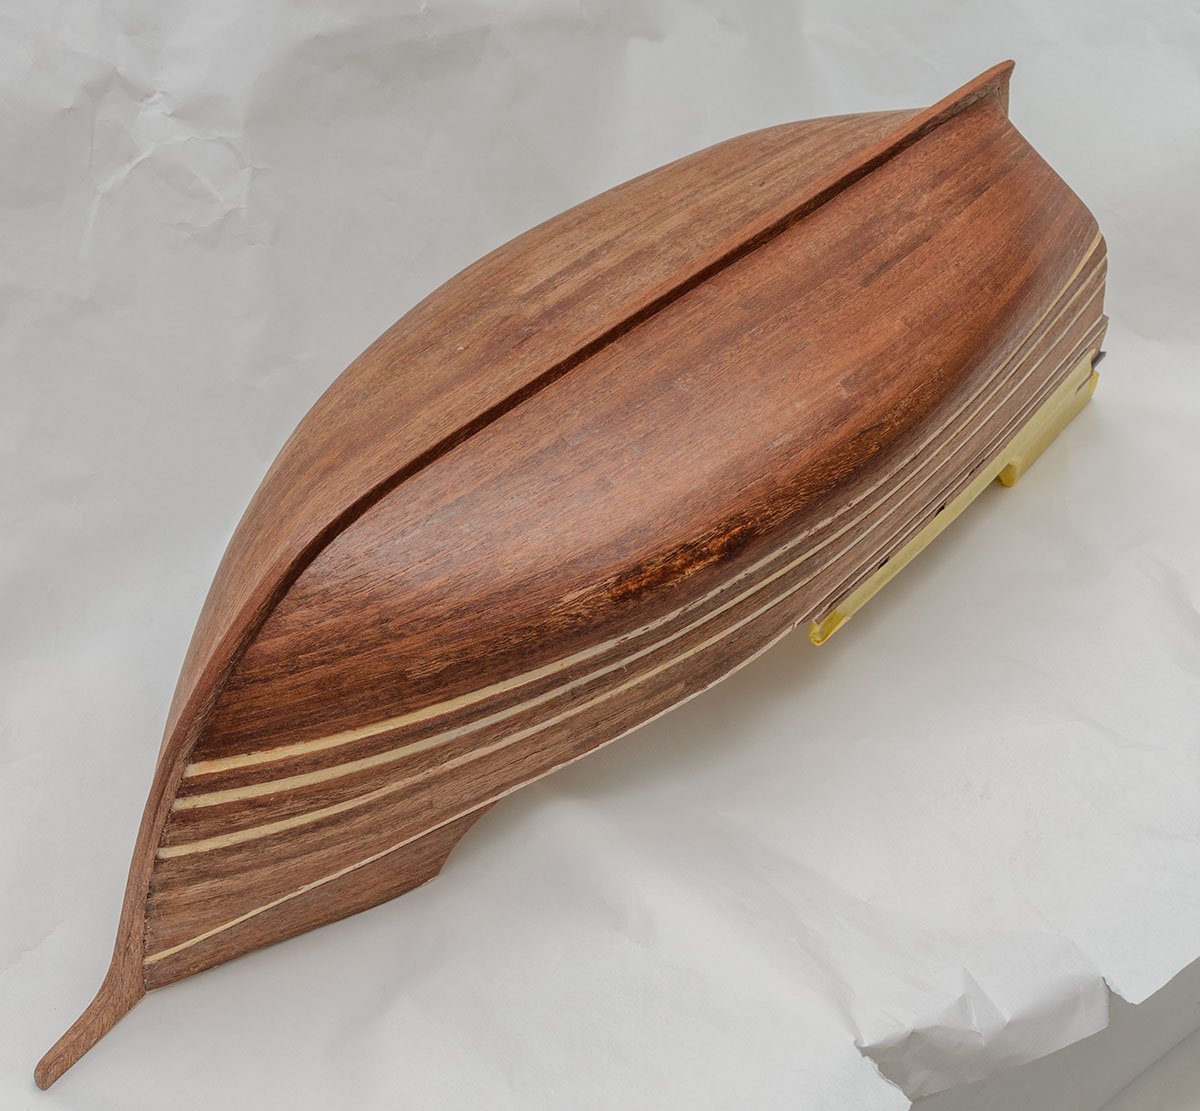
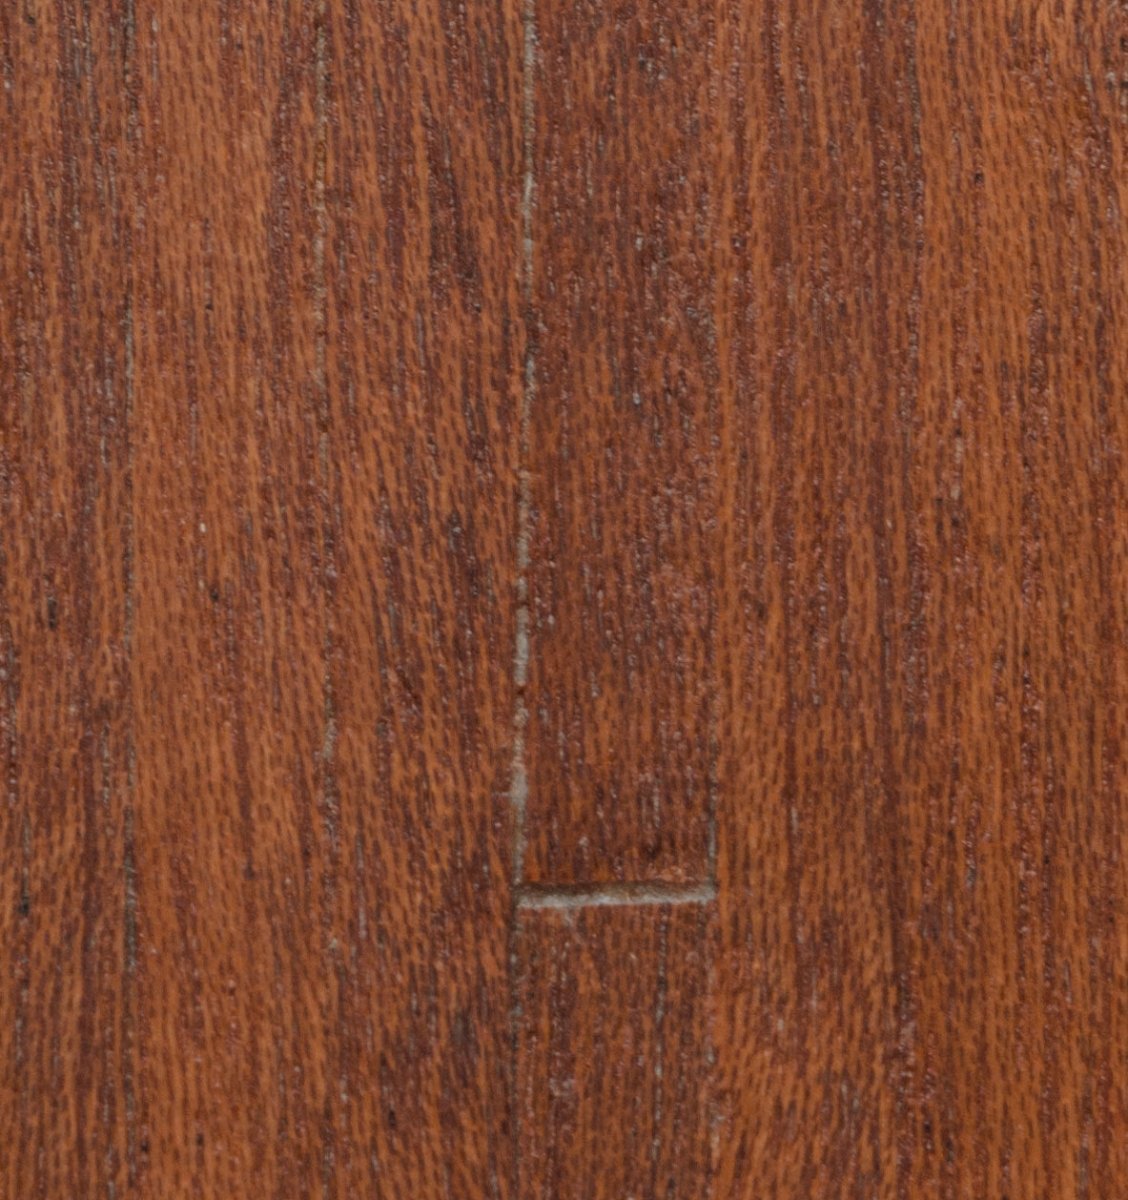
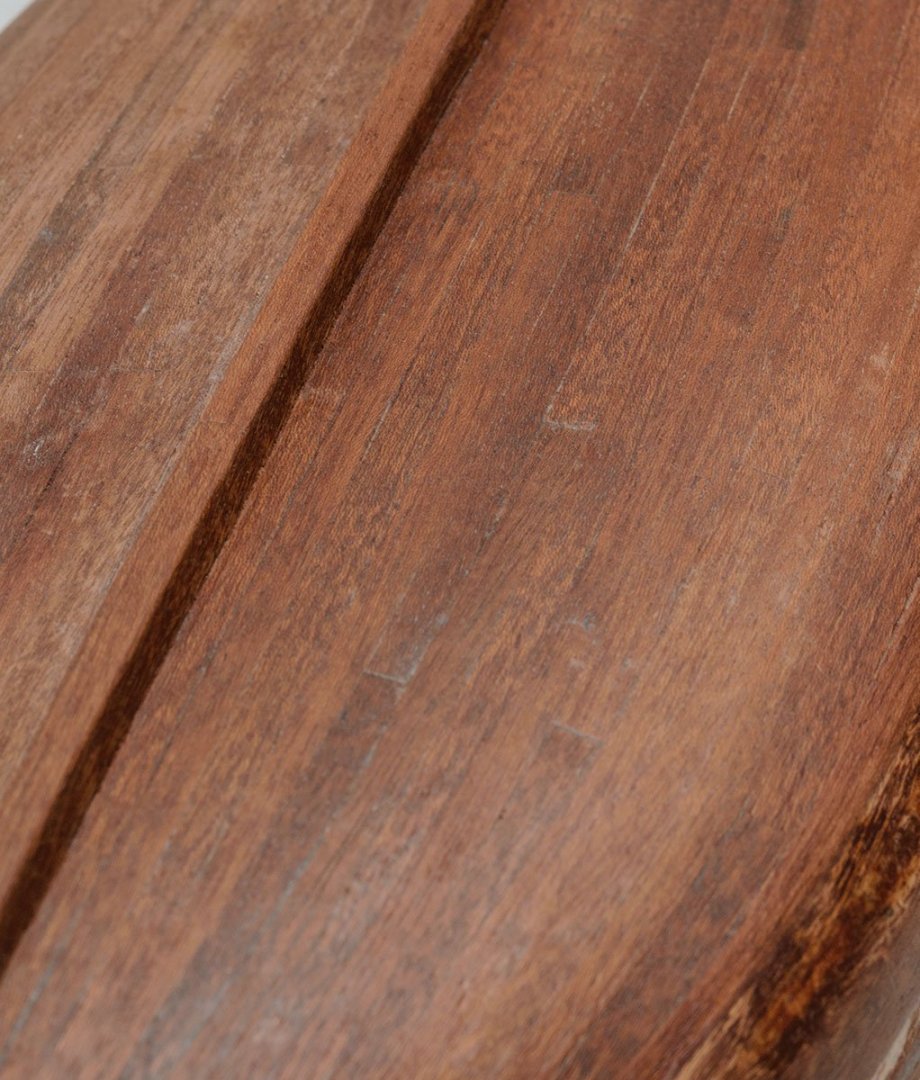
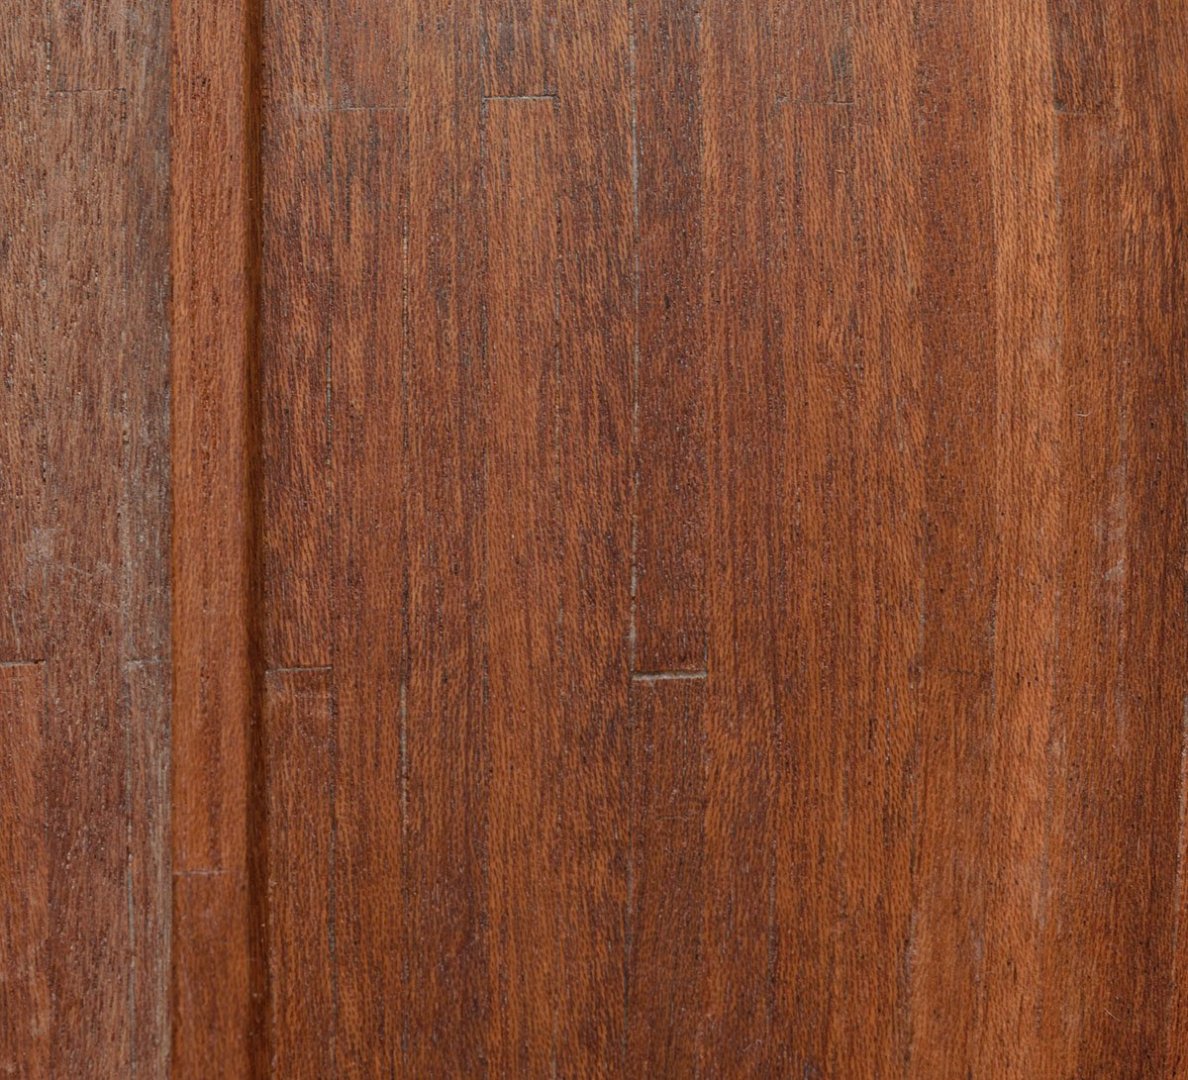
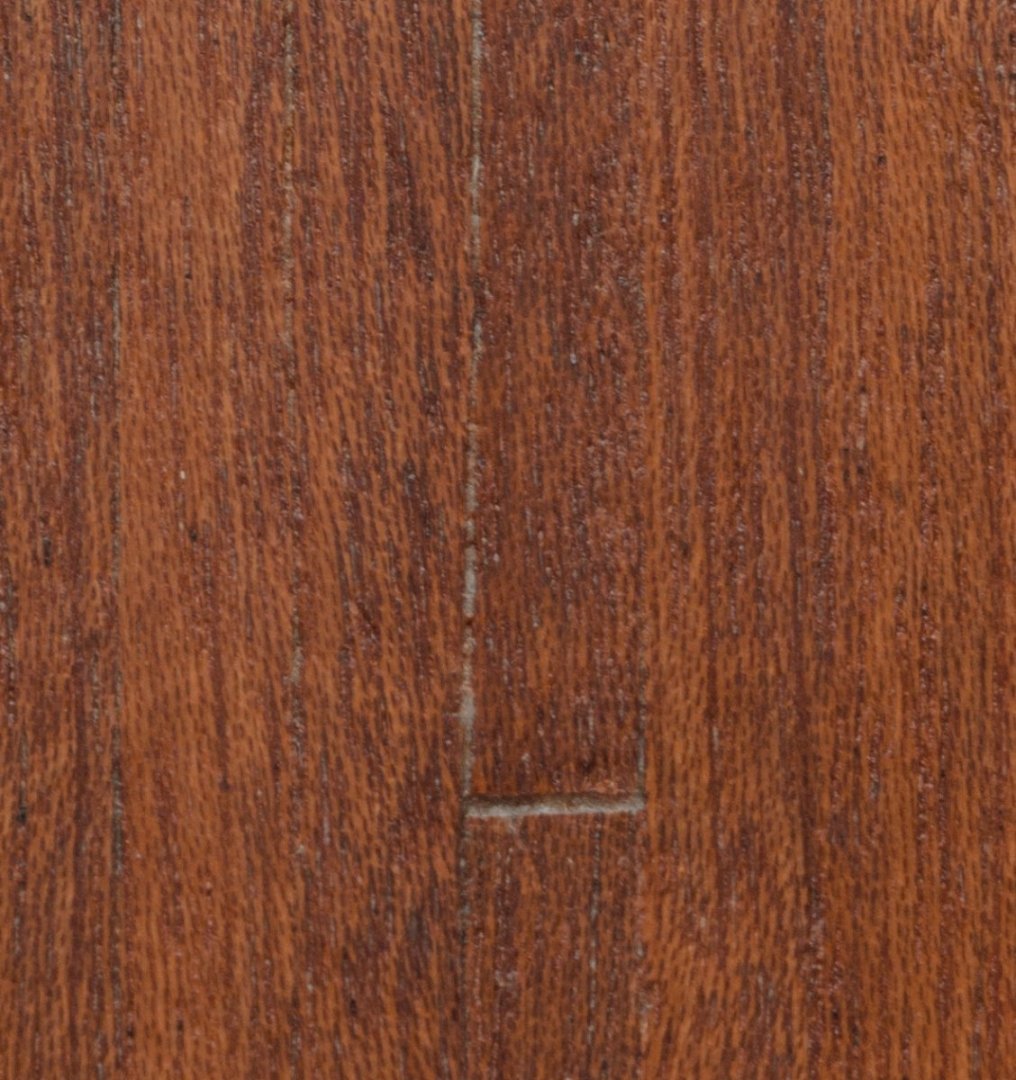
Hello, I have an issue with staining a hull. This is my current project. It looks OK... but when I zoom the camera lens in... Zoom in... Zoom in... I can see lots of white cracks between the planks like this. To cover the white cracks, I did everything I knew. I made DIY wood filler with extra strips and dewaxed shellac and filled any visible cracks, including cracks between keel and hull. I wiped the hull with wet tissue to remove any excess PVA glue. In addition, I stained the hull with oil gel stain. I tried to figure out what those white crack were and I guess that they are PVA glue between the planks. I would say that I can't remove them efficiently. If I use too strong chemicals such as alcohol, the entire planks may be detached. If I cut out each PVA crack and stain them again, it costs too much time... Should I have used less PVA glue when I attached the second planks? I don't want to make the same mistake again. /// Perhaps I will make a colored PVA glue next time... https://www.firstpalette.com/craft-recipe/colored-white-glue.html
-
I suddenly realized that a mini iron is better than a soldering iron for new builders. 🤪 Someone said that he got electrically shocked while he was using a soldering iron for planking.

-
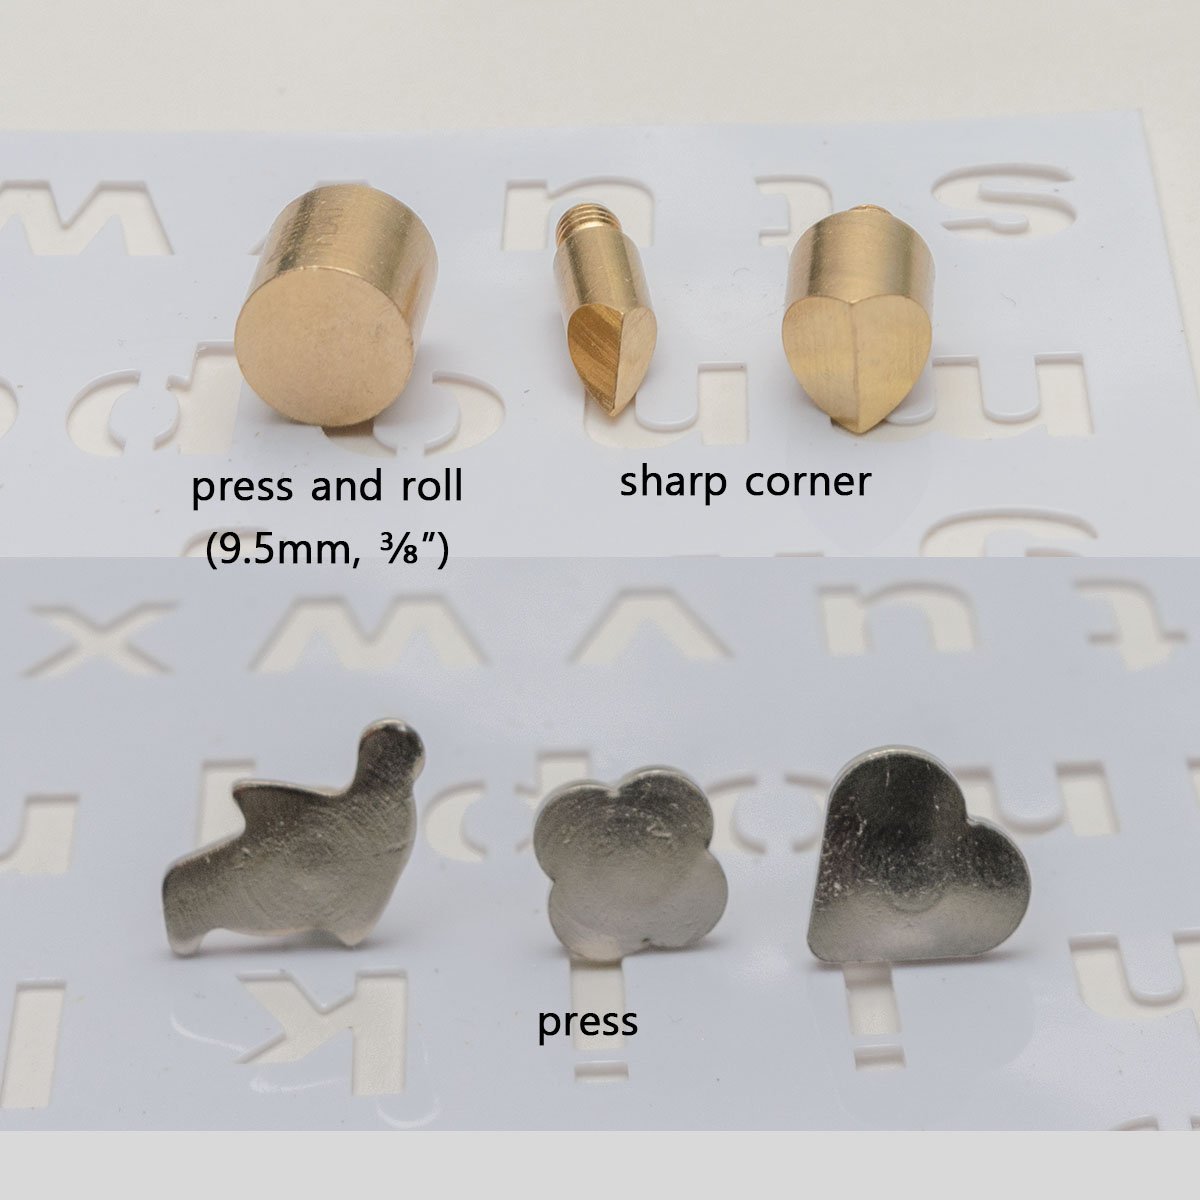
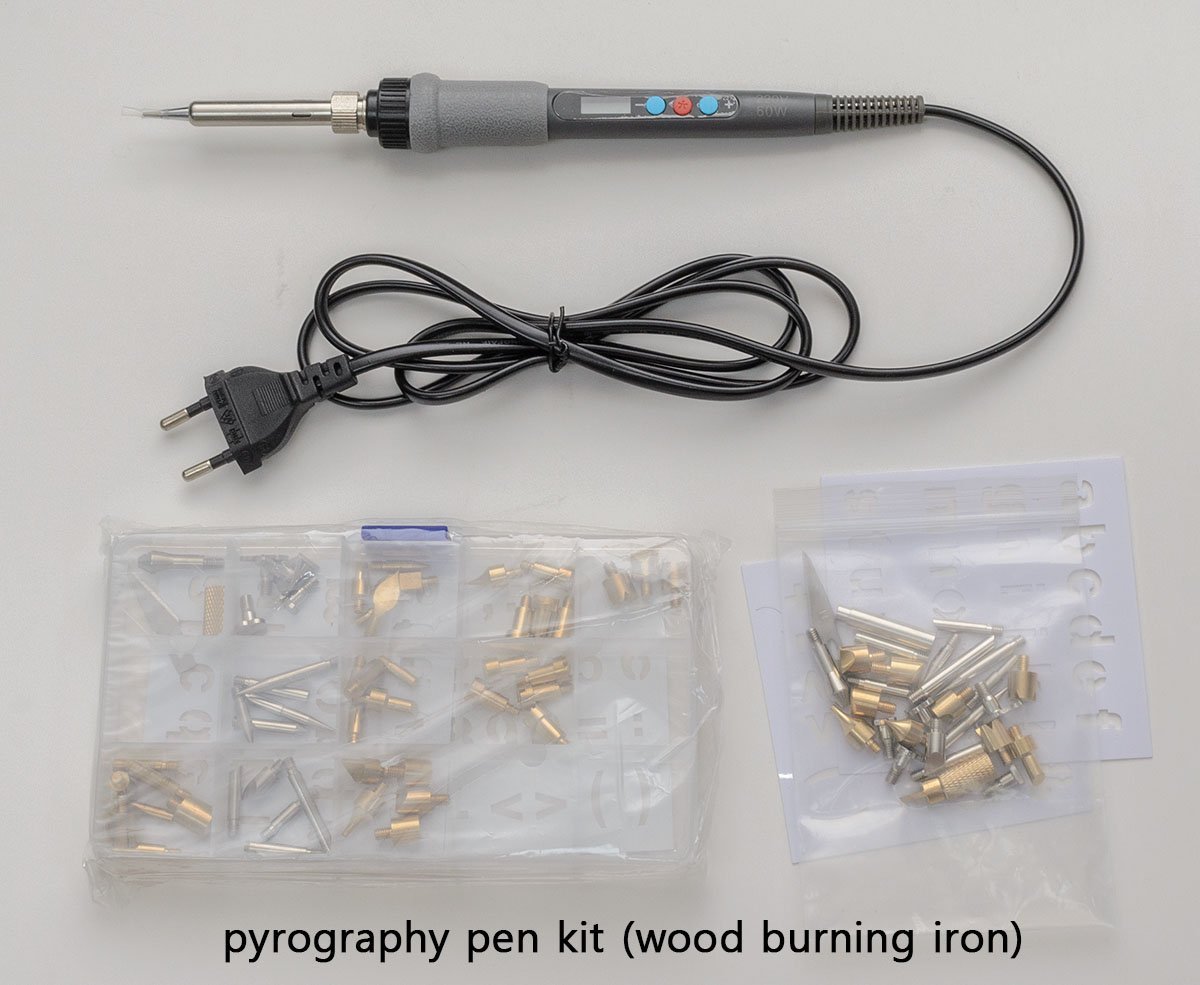
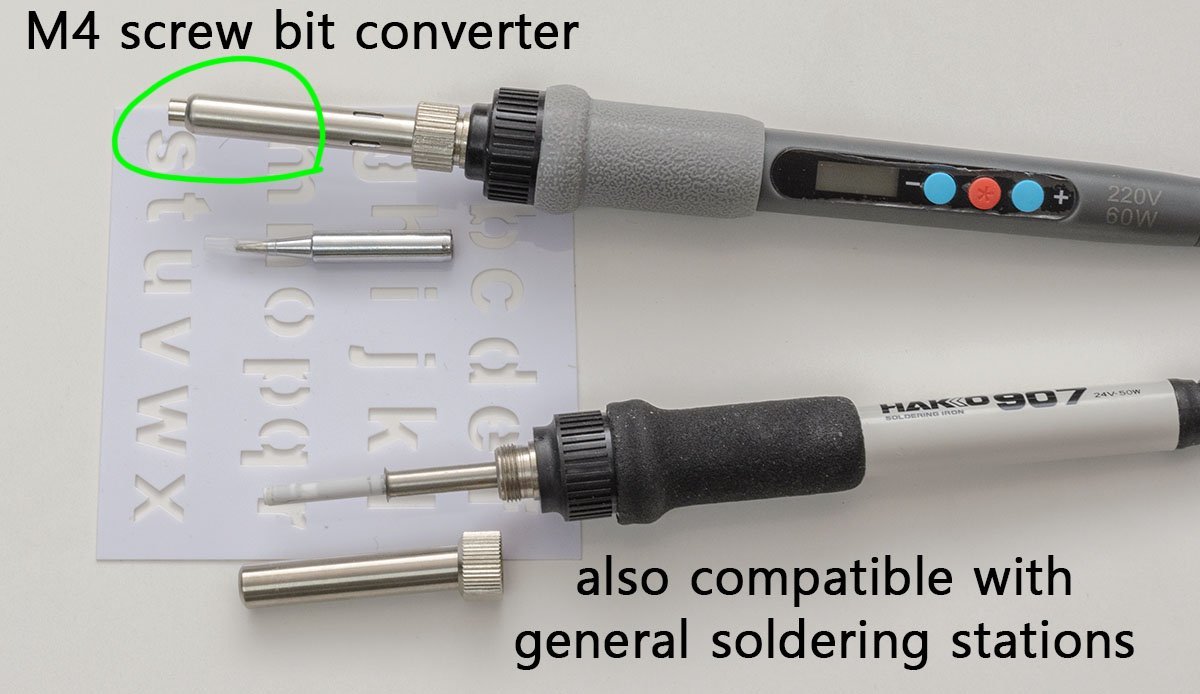
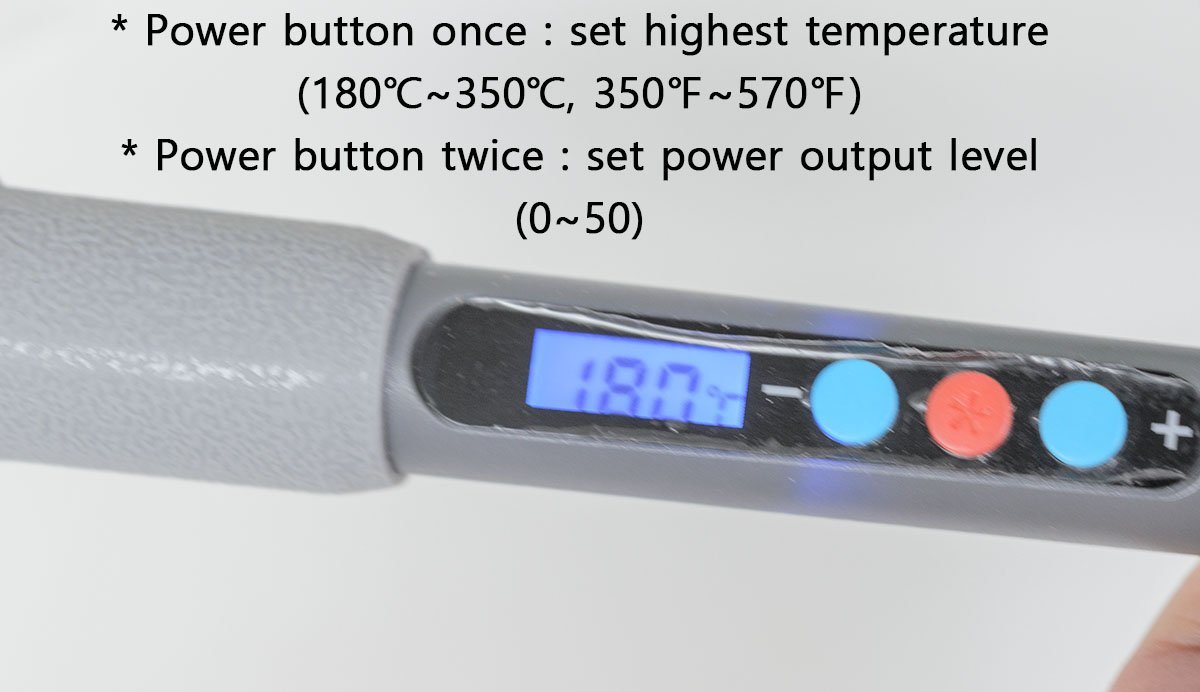
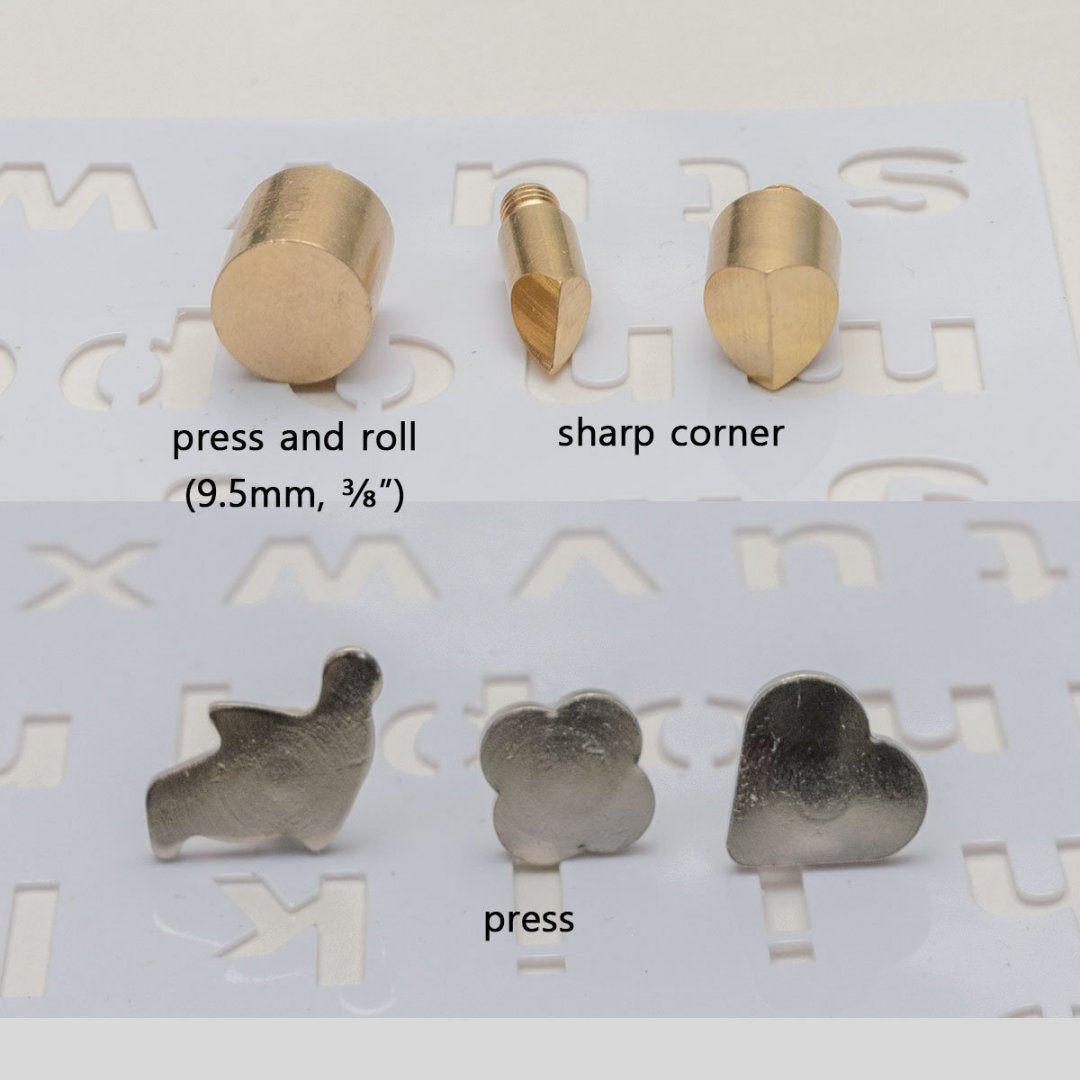
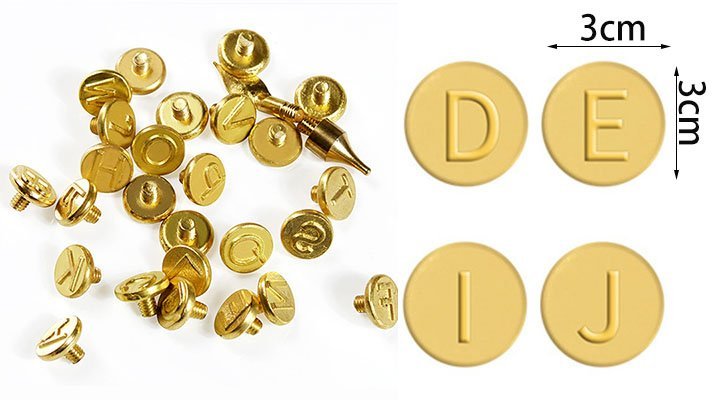
I received the pyrography pen kit. Its price was $15. I updated a tip because I considered the new iron good for new builders in general. The only difference between a wood-burning iron and a regular soldering iron is the M4 screw bit converter. Fortunately, I confirmed that the converter also fit well in an expensive soldering station gun. The downside of this iron is that the minimum temperature is 180 °C (350 °F), which causes scorched marks on a light-colored wood strip. I need 150 °C (300 °F). In real life, I got a fairly acceptable result. I would say that I can sand all of the scorched surface if I don't burn it for too long. If you need a very delicate result, I recommend using an expensive soldering station that can control the temperature down to 50 °C. I would say that these tips are the best for hull planking. I ordered larger tips. I'll sand the letter and make it flat. It may not satisfy enthusiastic experts, but I definitely say that the wood-burning kit lowers the huddle for new builders.

-
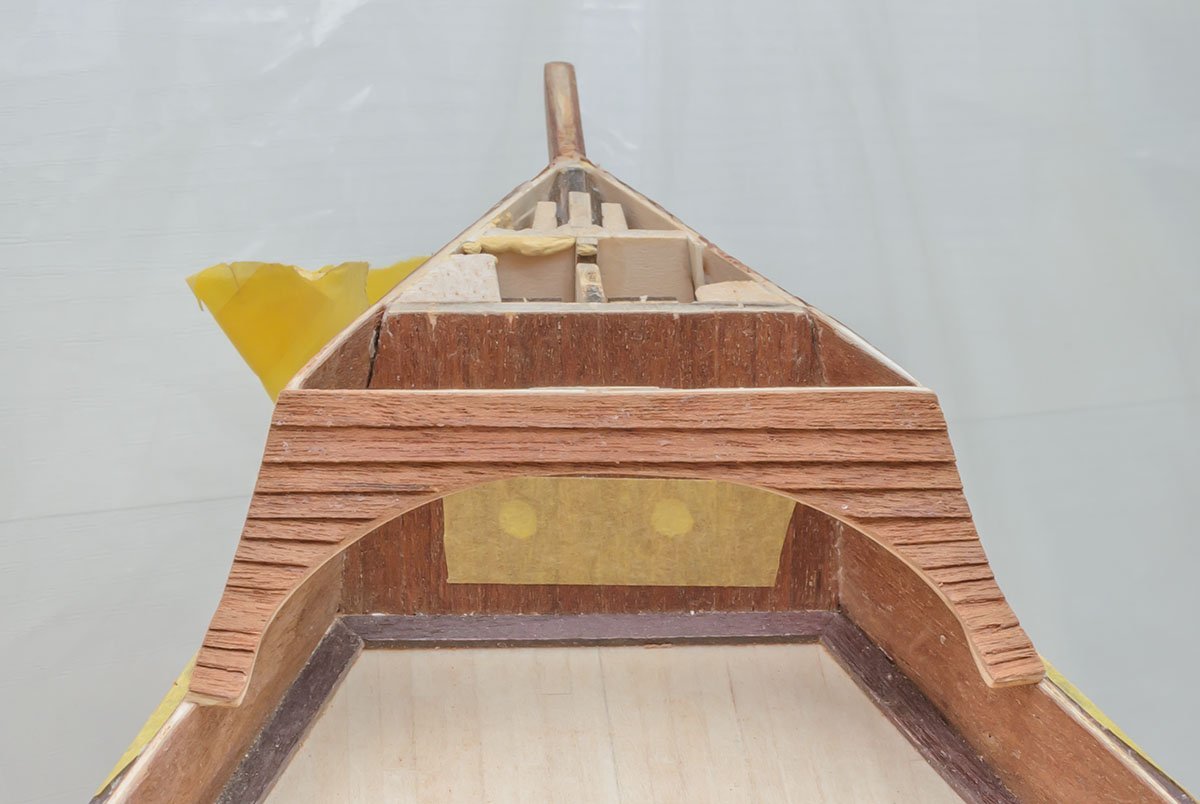
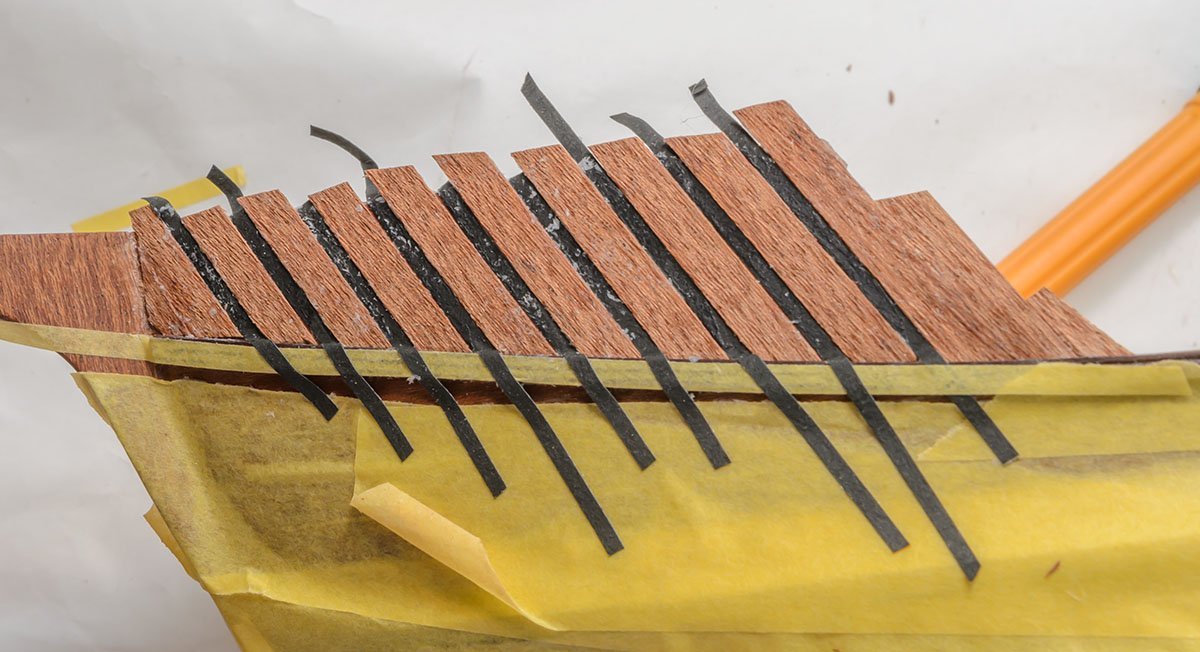
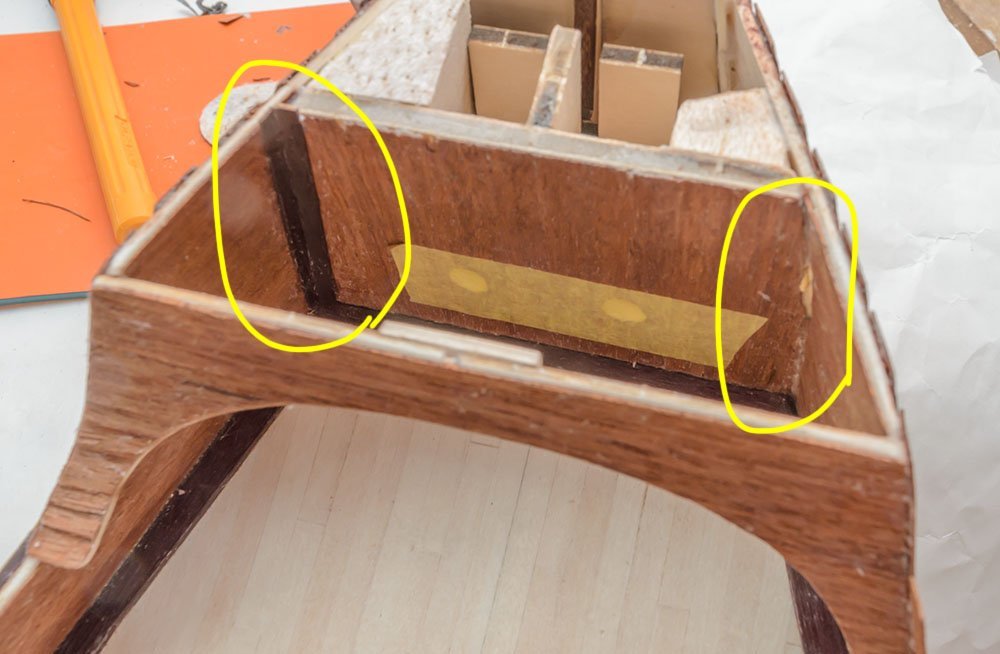
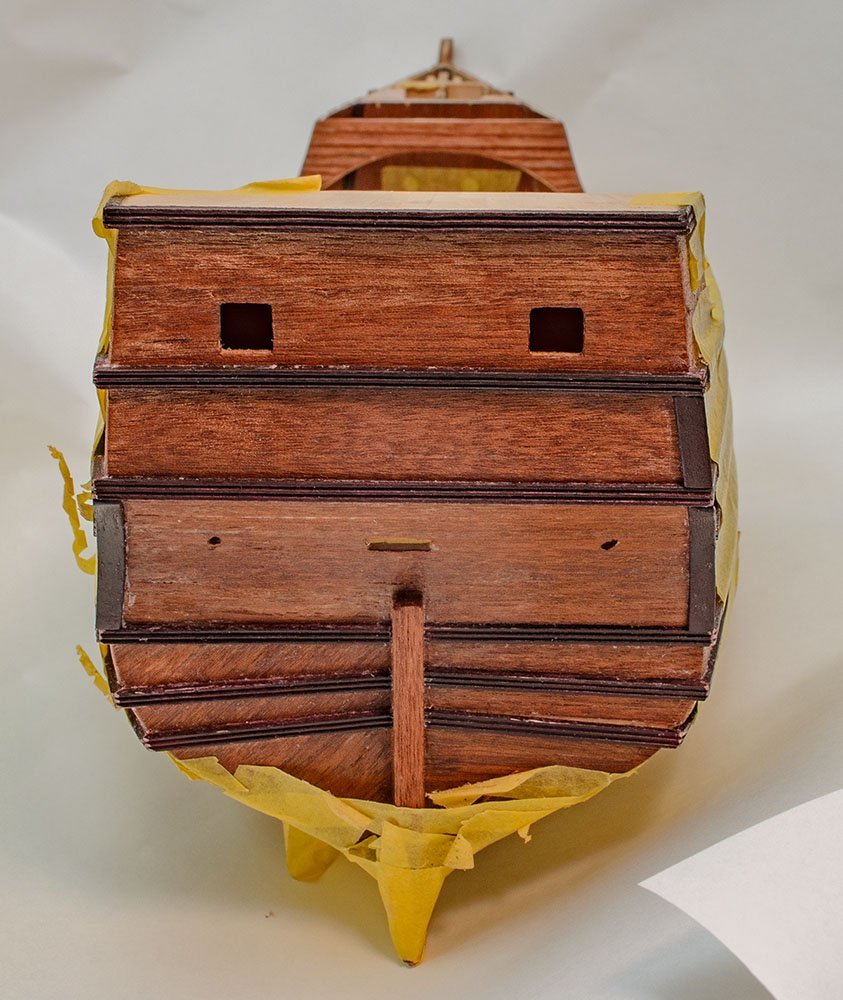
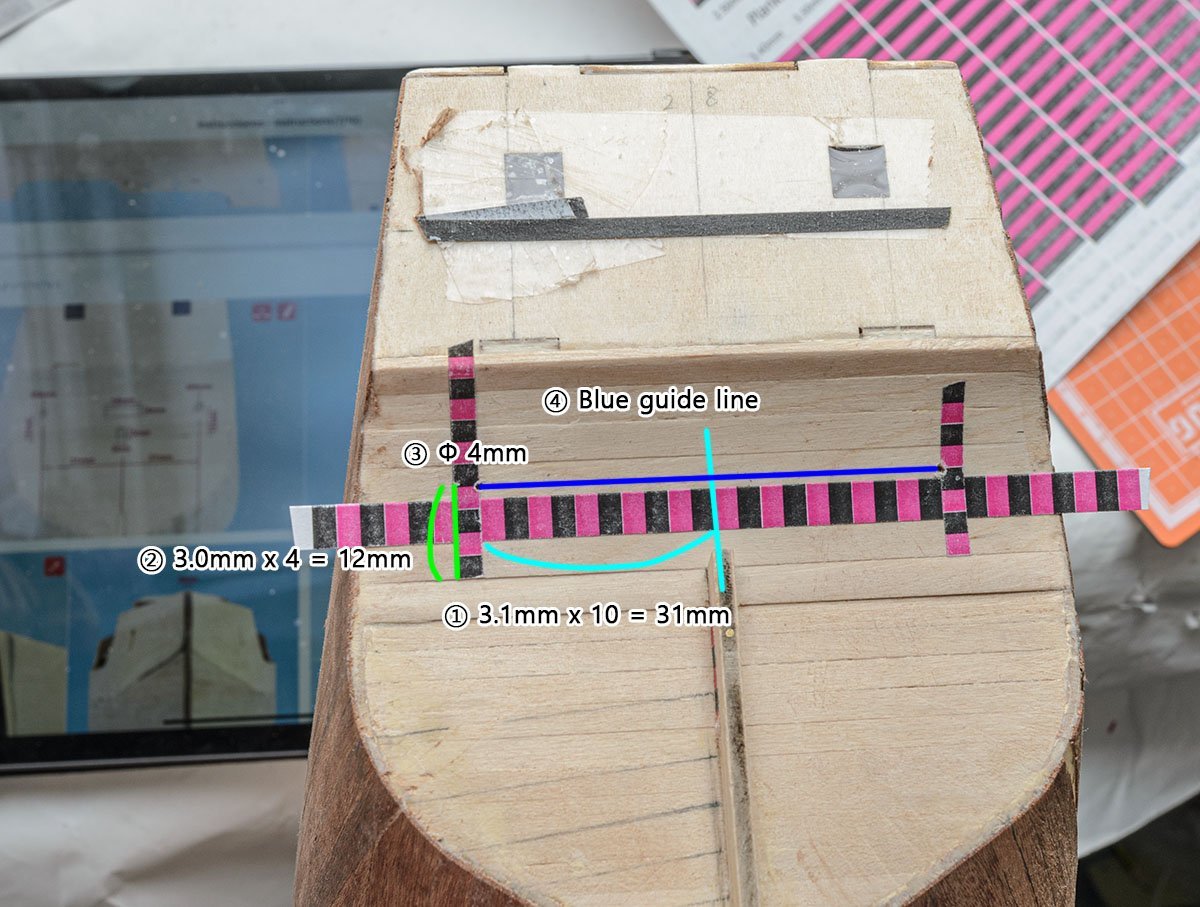
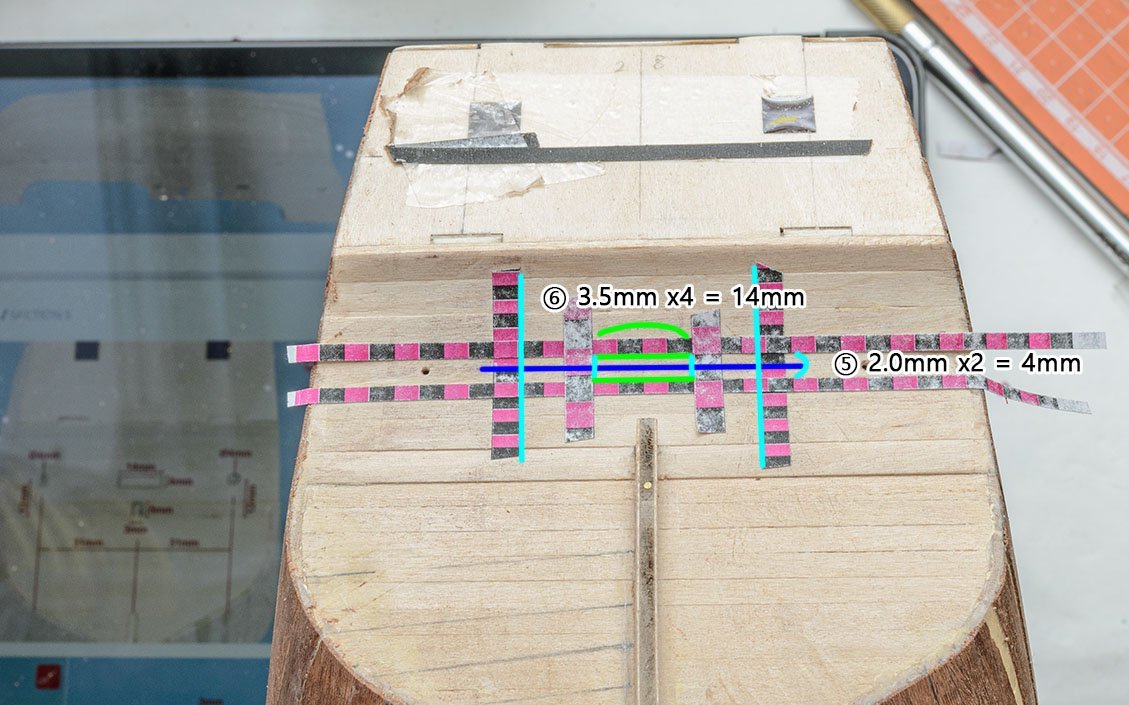
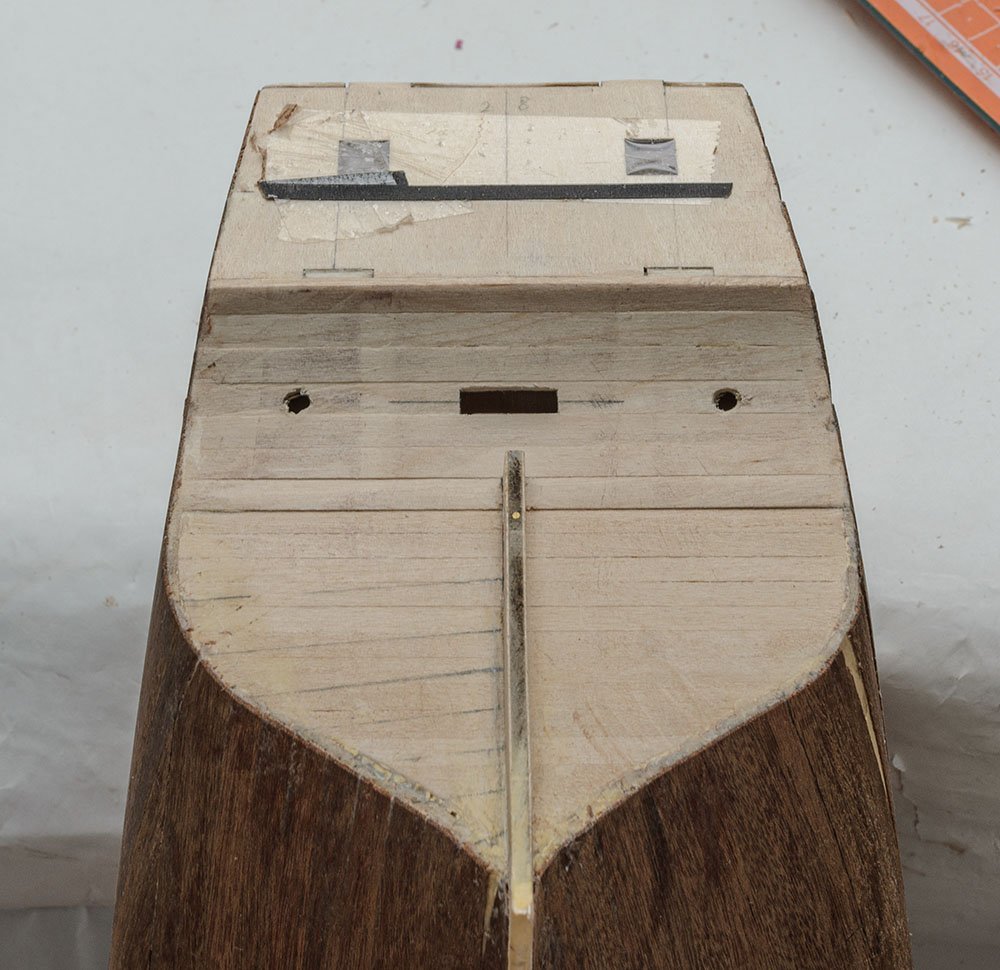
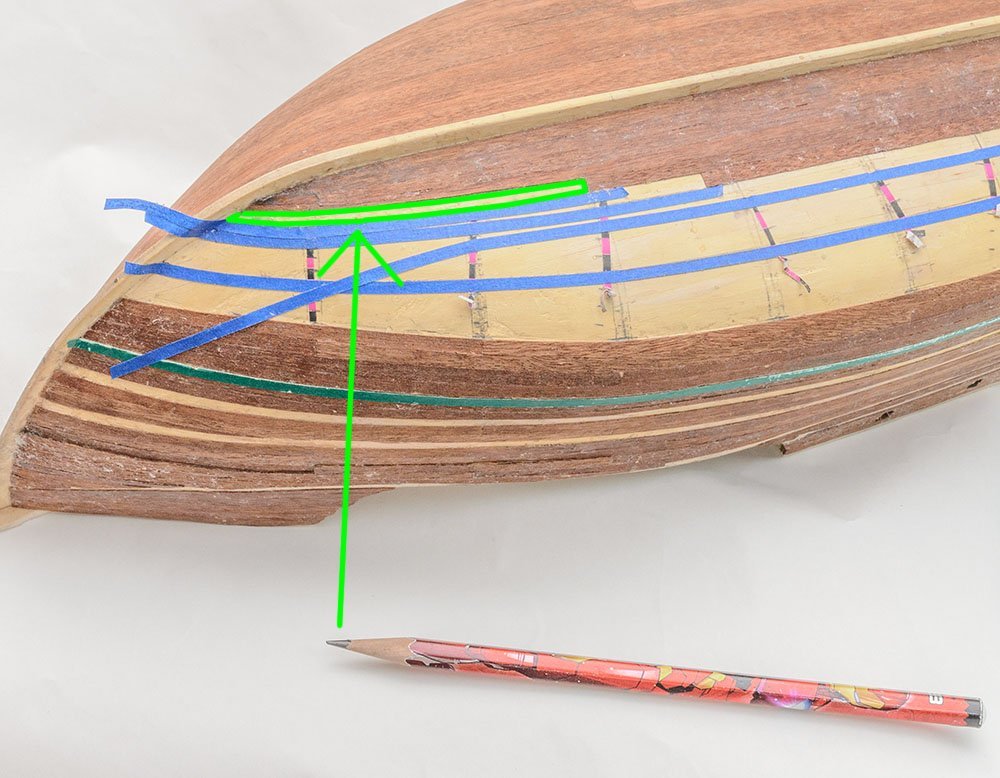
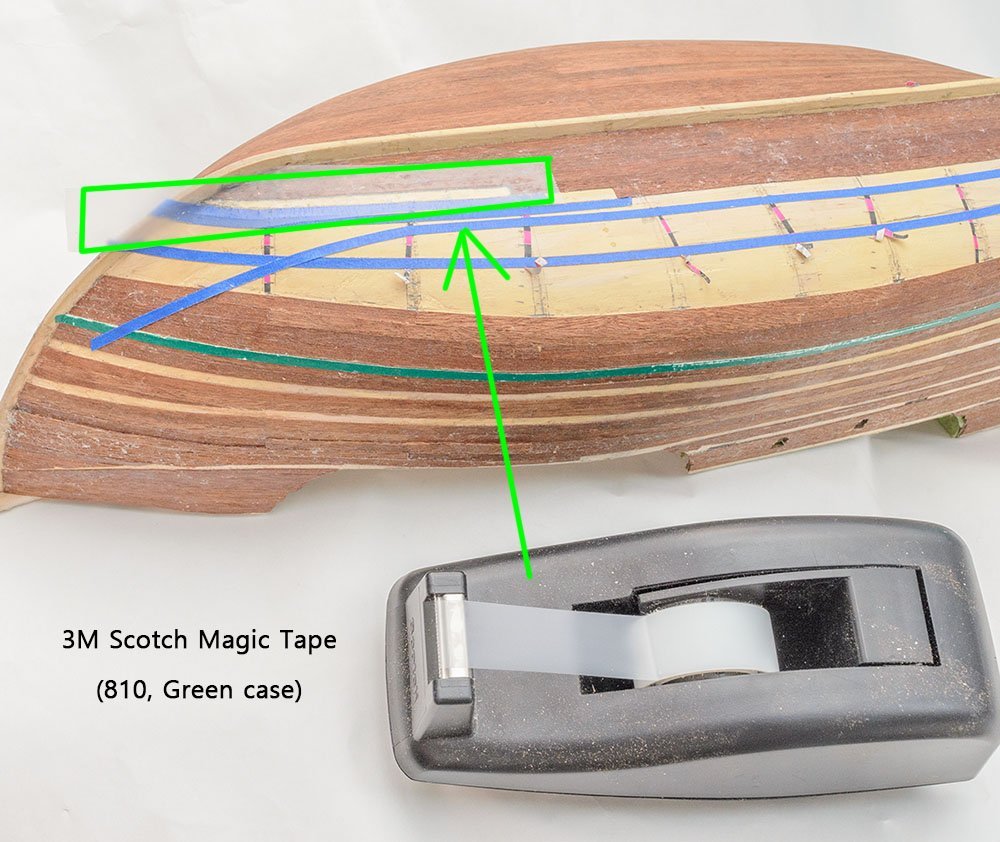
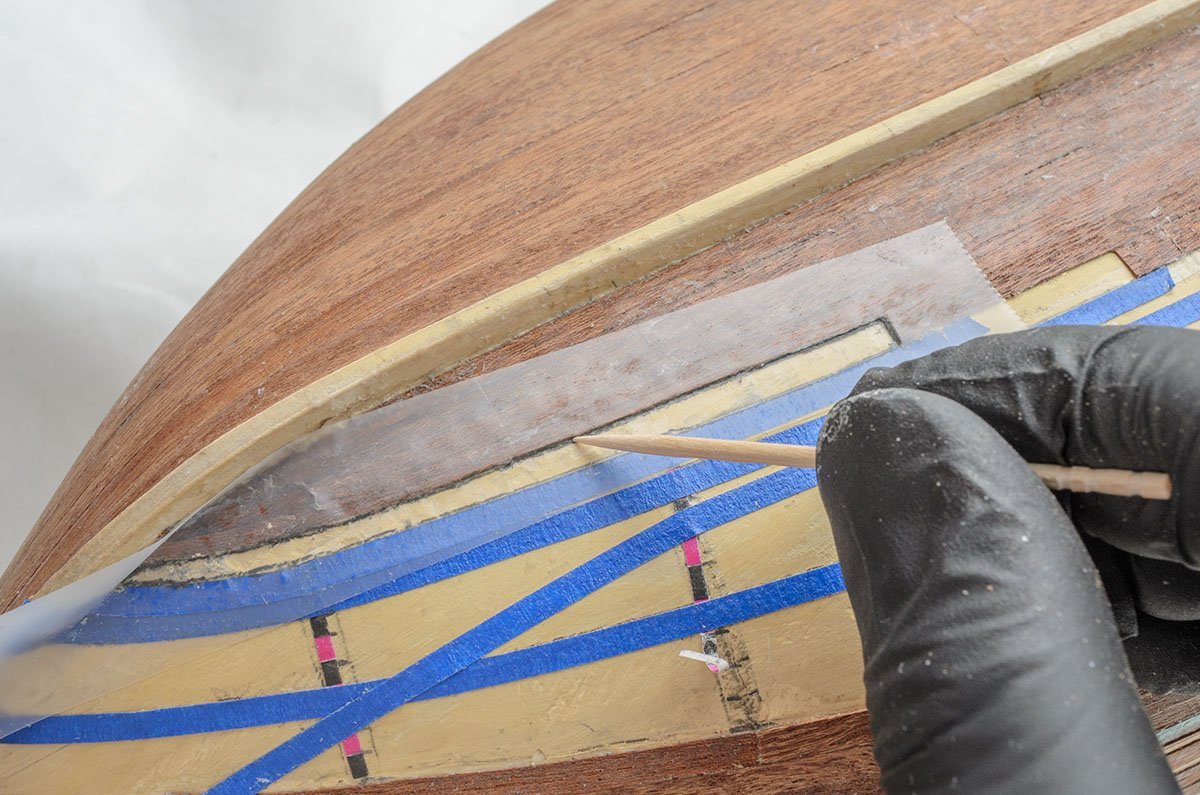
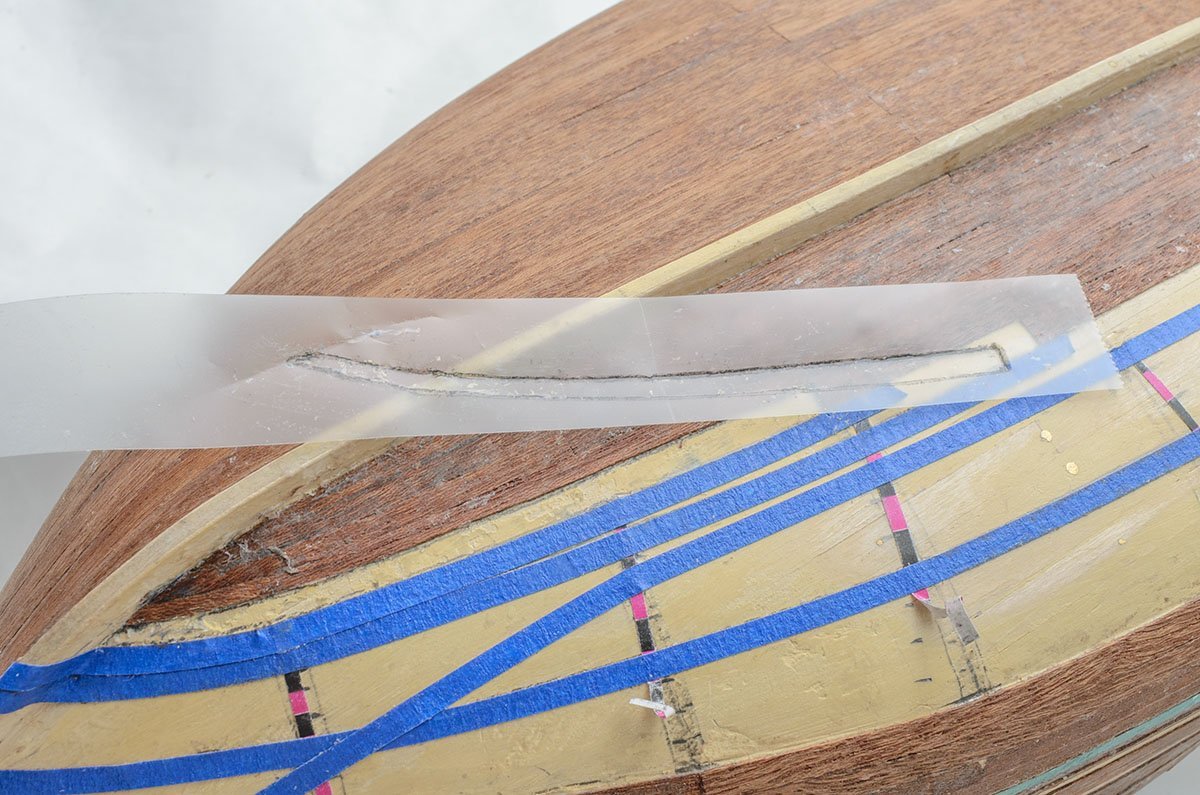
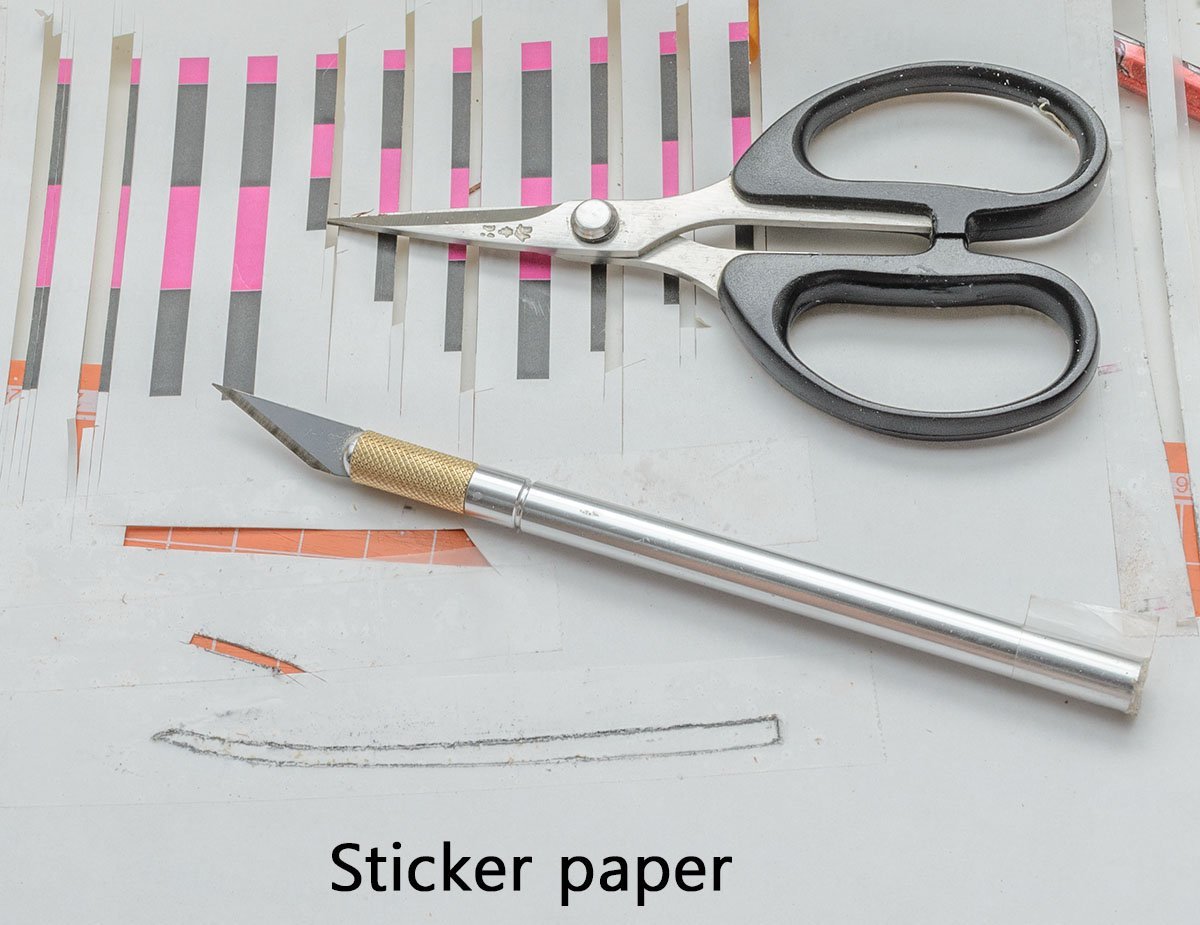
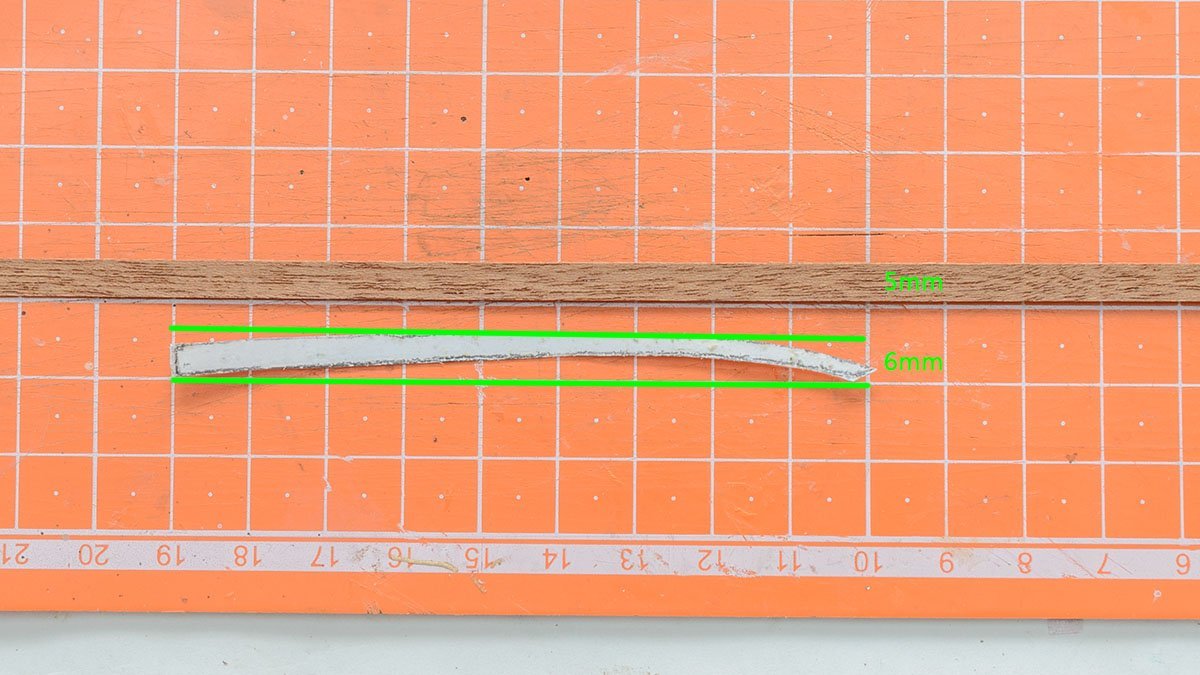
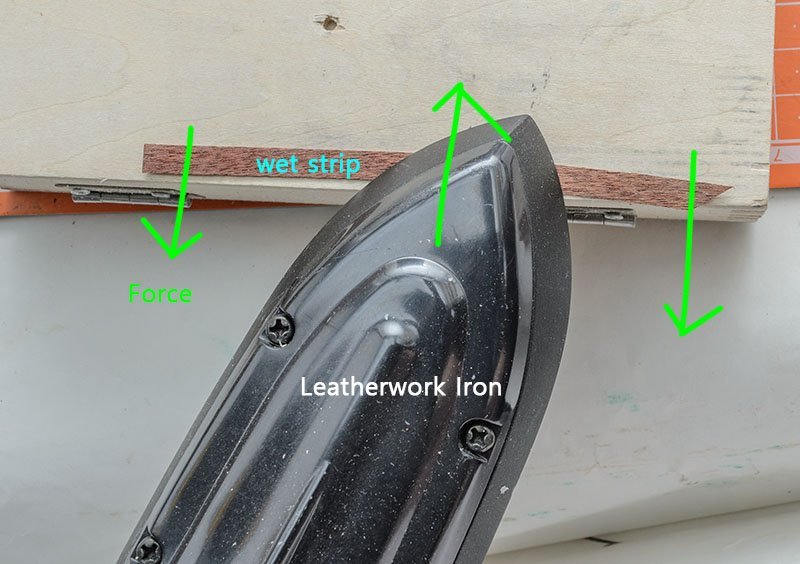
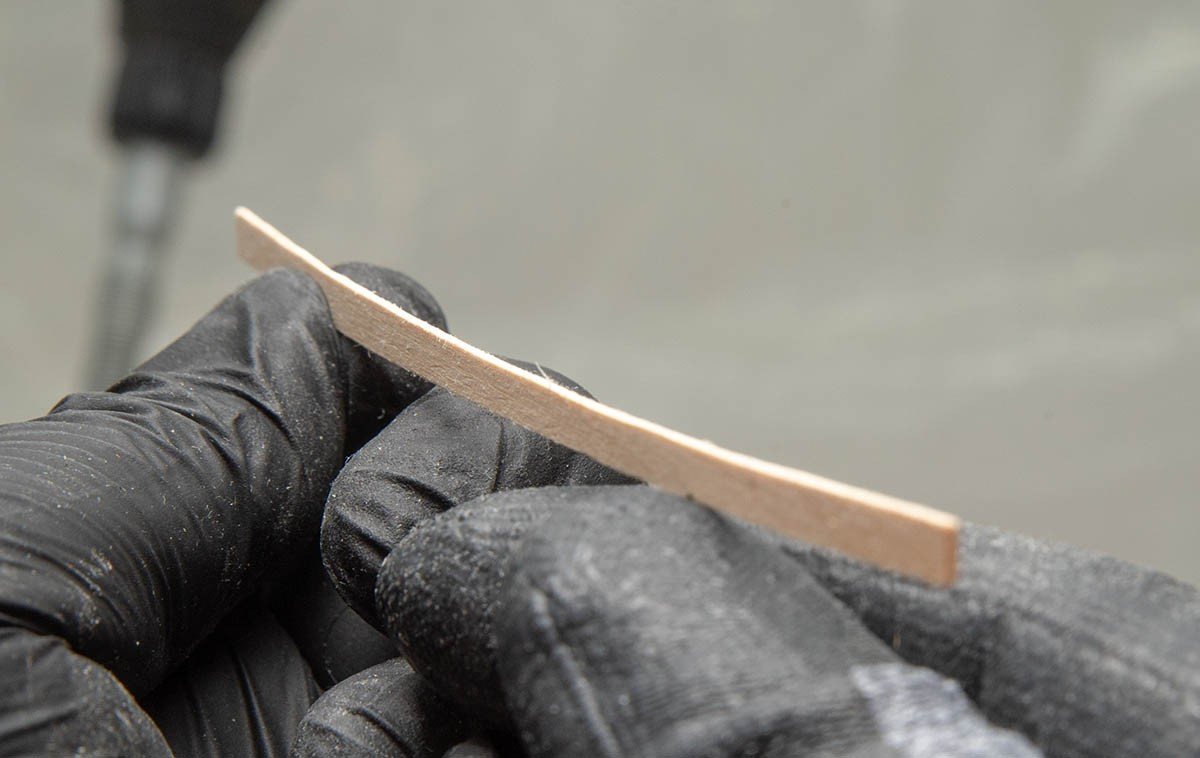
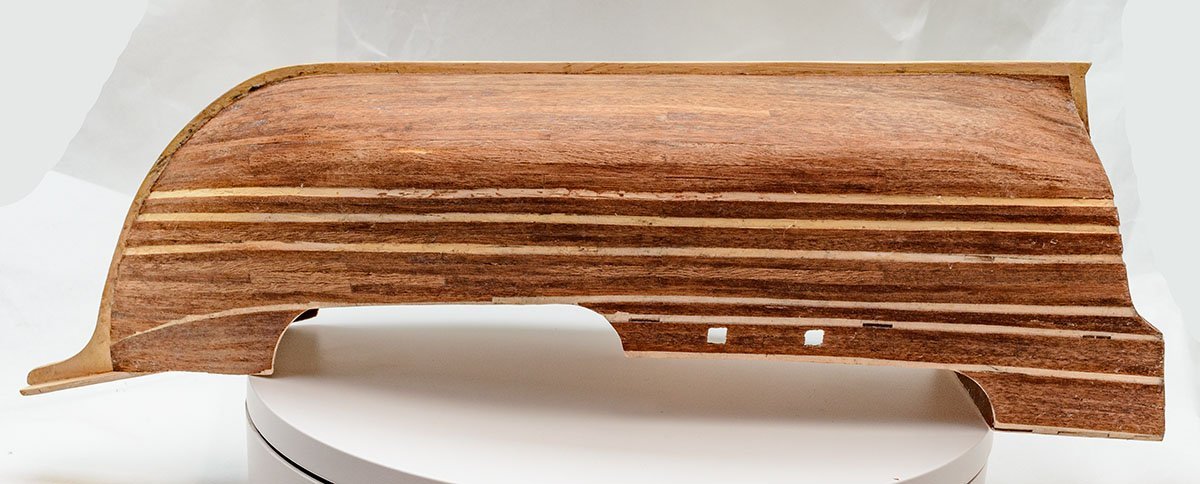
When I cut holes on the back before I planked, I used sticker paper to measure the positions that I had made before. I used the stripe stickers as a ruler. It was a kind of puzzle and quite fun. It's done. By the way, the plank between the holes and the square hole is very weak due to its construction. I had to pay attention to the place when I planked. It may be good to add support inside the place. I added one more tip to make a well-polished curved plank strip. The tip also reduces gaps between planks. One more tip! I use this tip when I do spiling planking. At first, I drew an outline of the desired place with a pencil. I used the 3M green tape. After I attached the tape, I traced the outline with a wood toothpick. metal tweezer may cut the tape. Pretty easy and fast. It is 3~4 times more accurate than marking on masking tape in my case. I used to use sticker paper to make a spiling plank. Unfortunately, the width of the paper plank is wider than the stock strips in a kit. I have to bend the strip with a special tool. I used water and a leathercraft iron. I placed the strips in a plant stand for more than an hour, and scorched them with the iron. Without the heat and steam, the strip wouldn't have bent. The result was successful. If you need a stronger curved strip, I recommend using boiled water. After 5~10 minutes, the hardwood strip will be like spaghetti with a lot of water. Mission accomplished.


- 77 replies
-
- 3
-
-
- Santa Maria
- Artesania Latina
- (and 1 more)
-
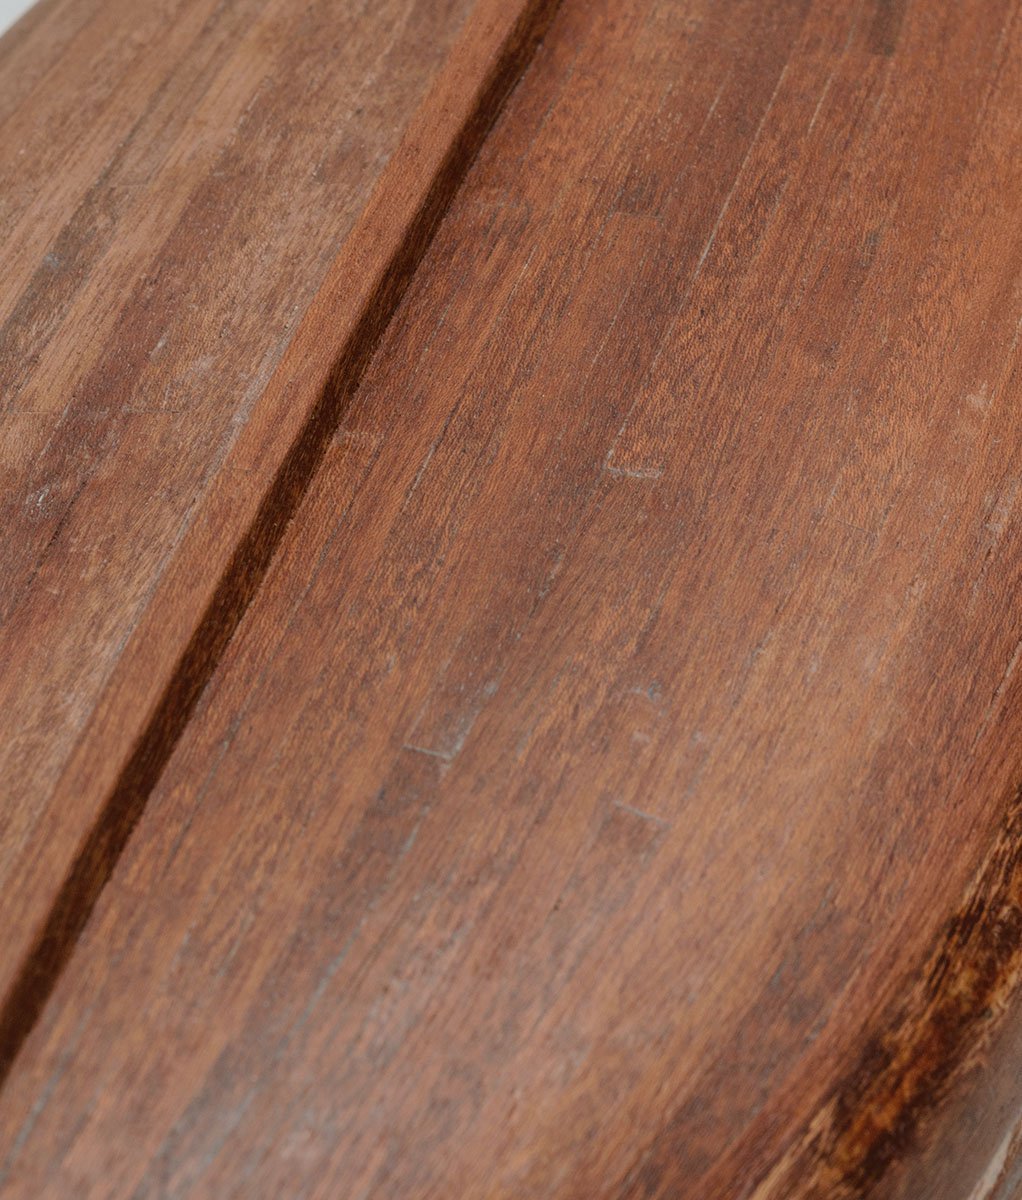
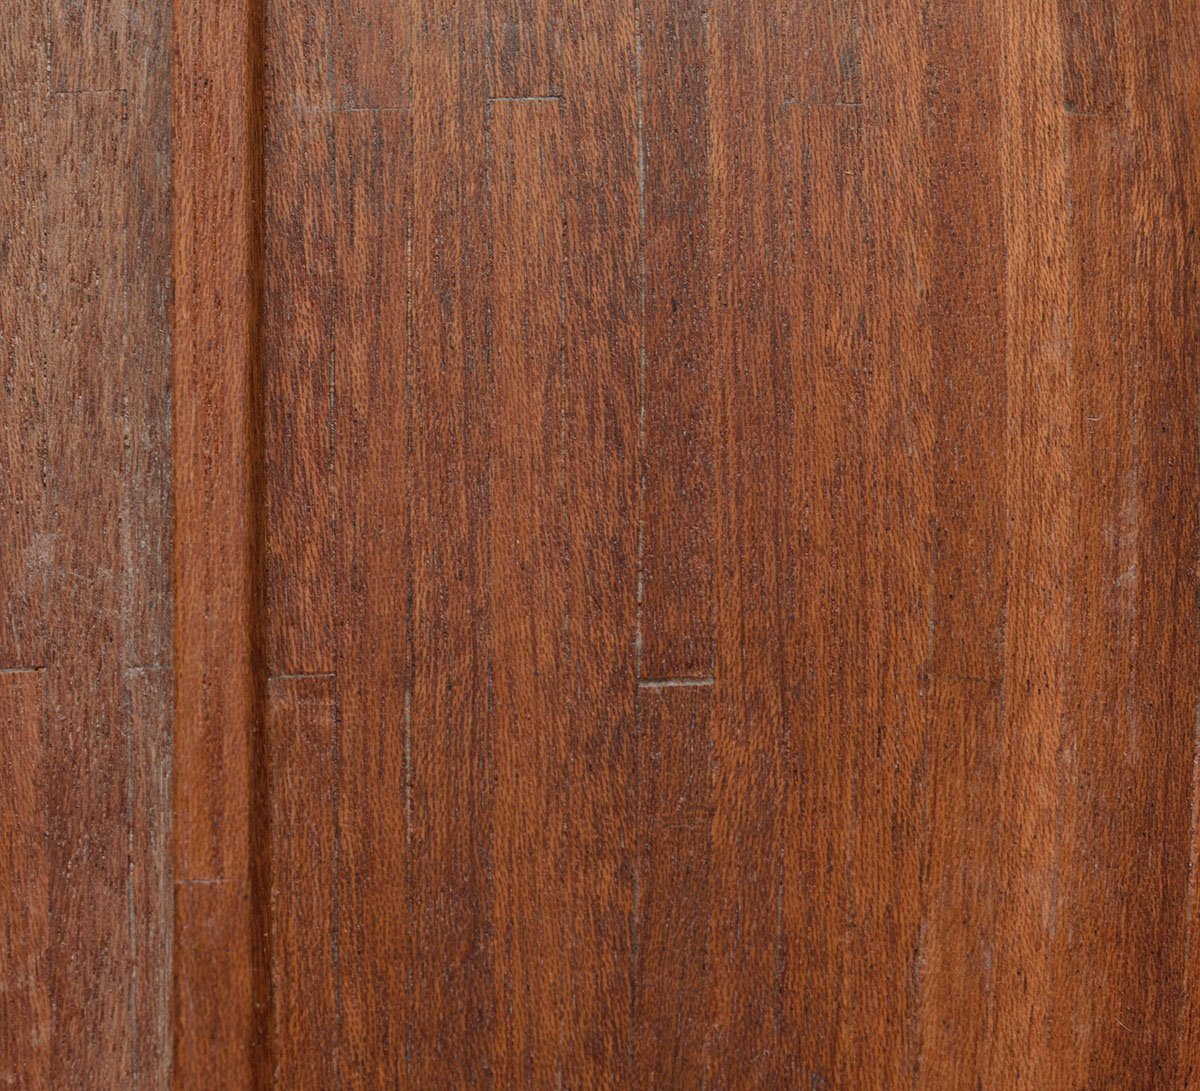
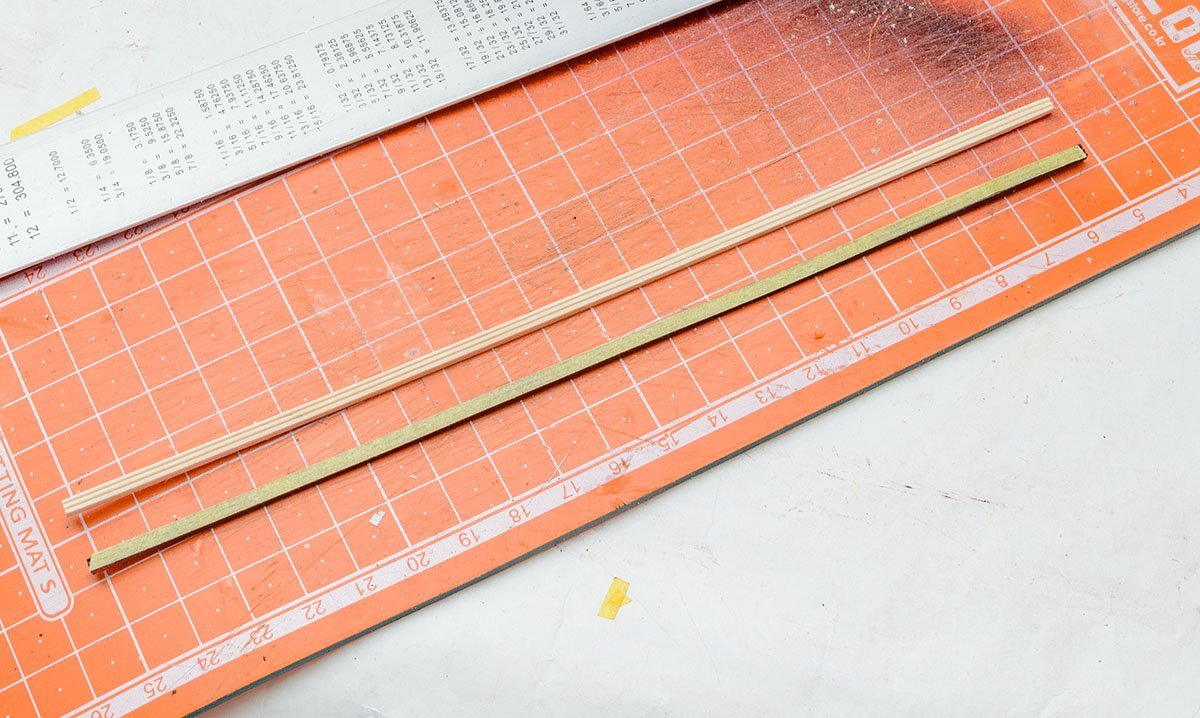
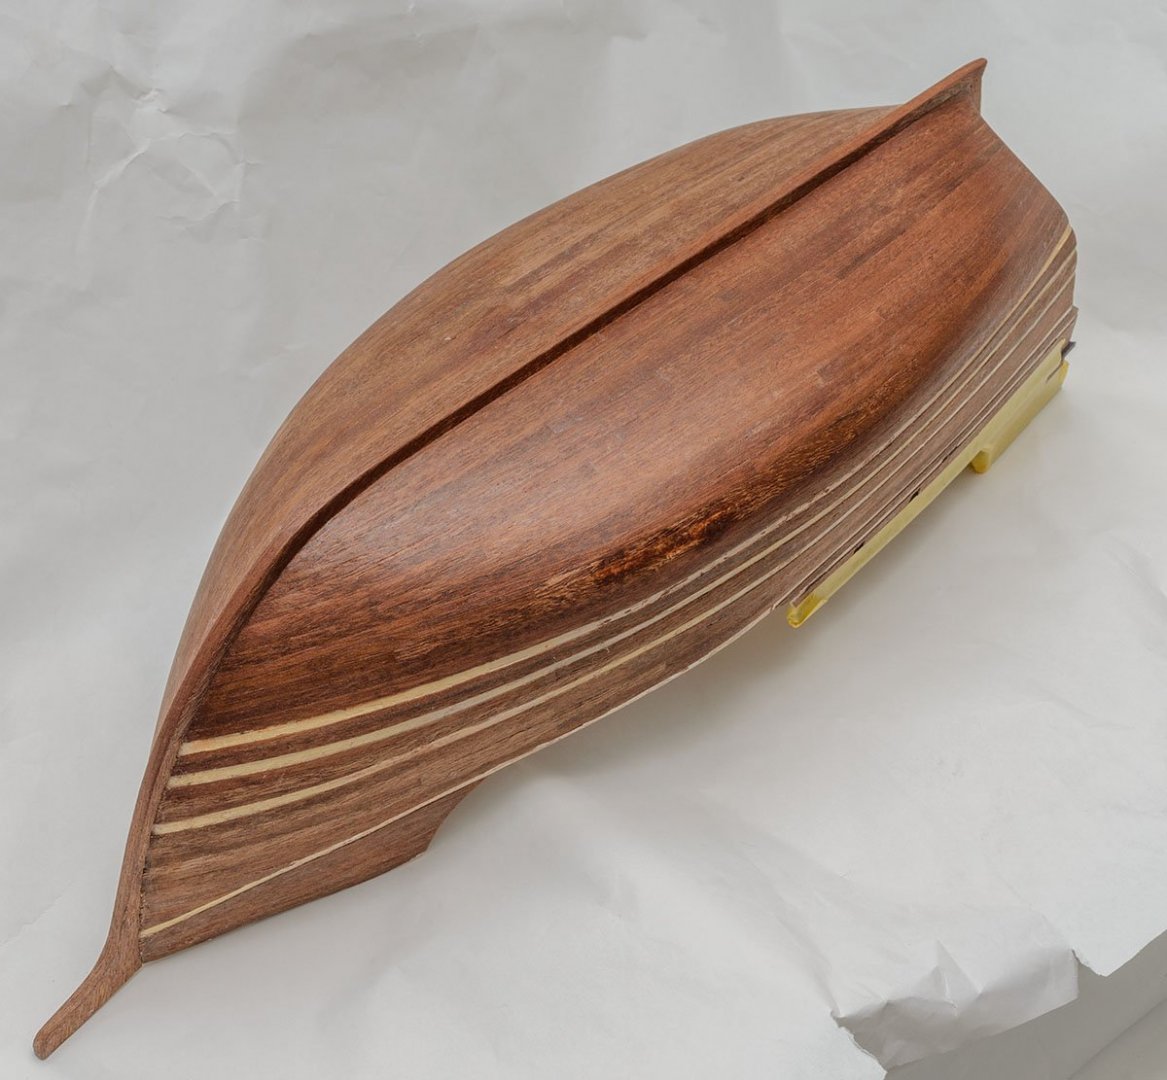
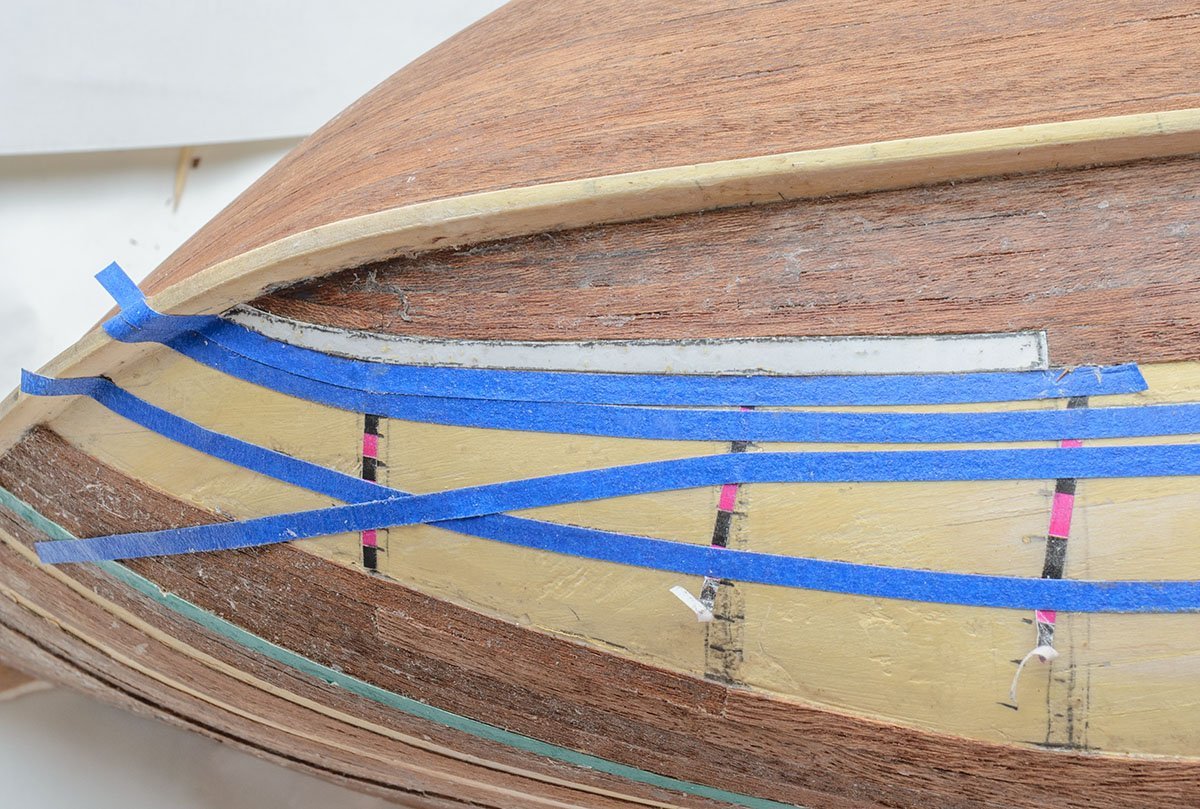
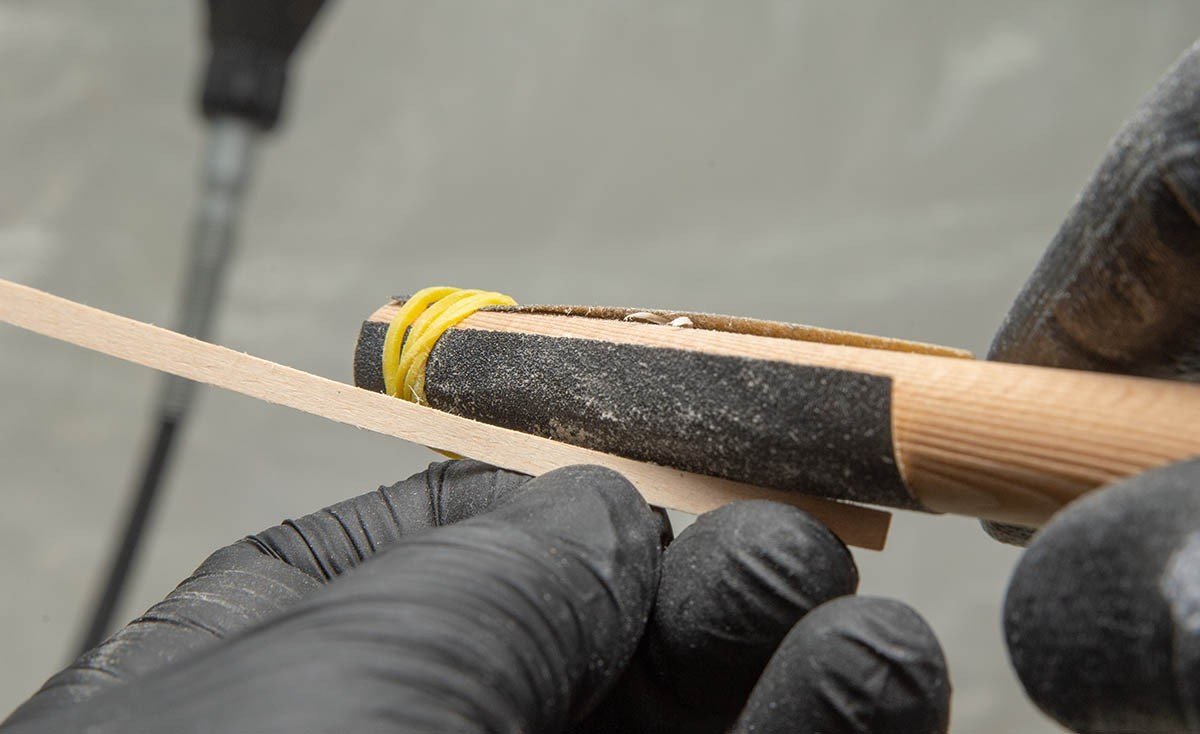
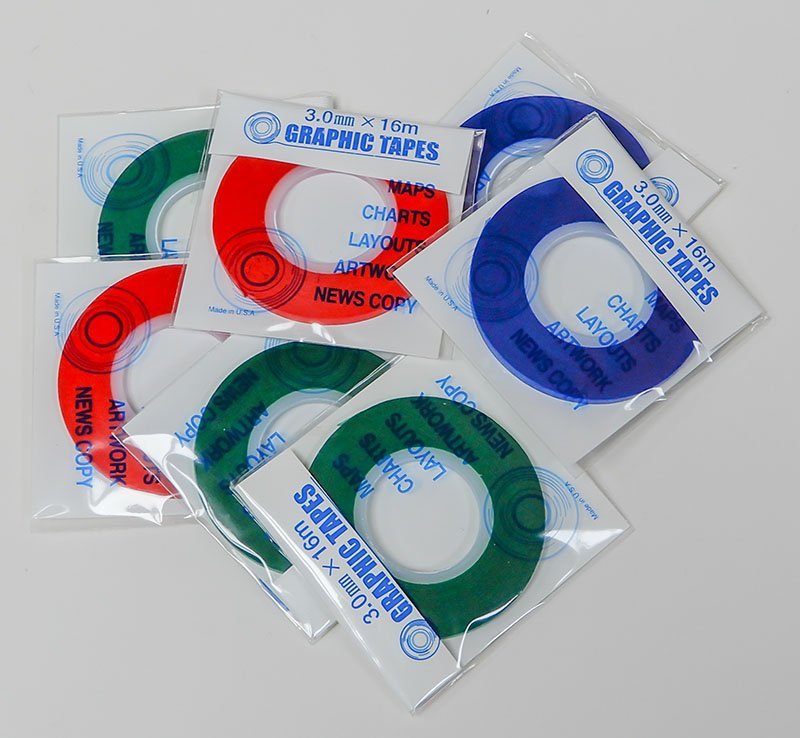
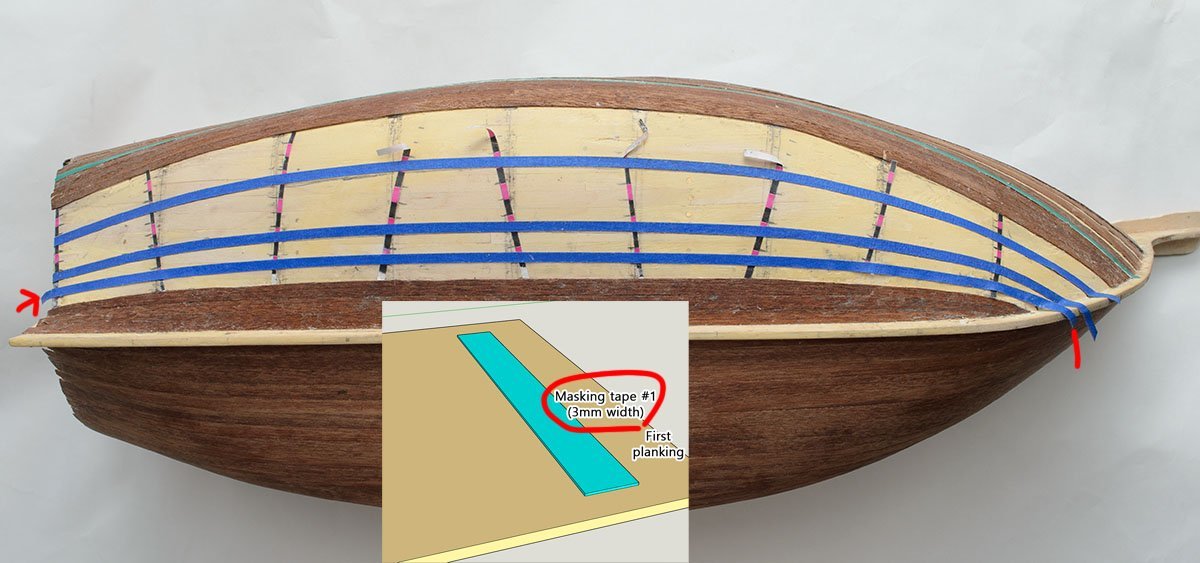
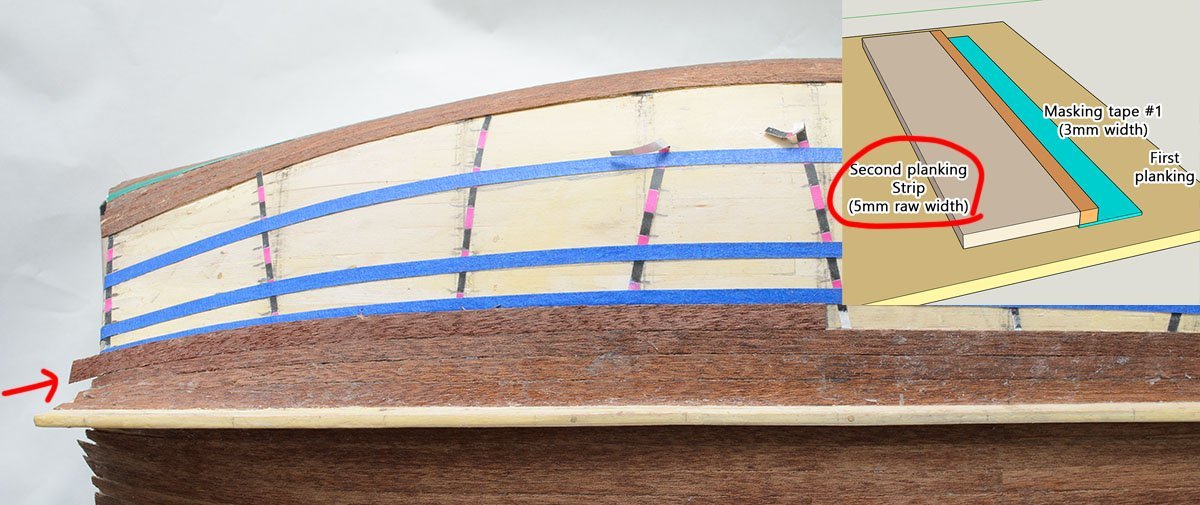
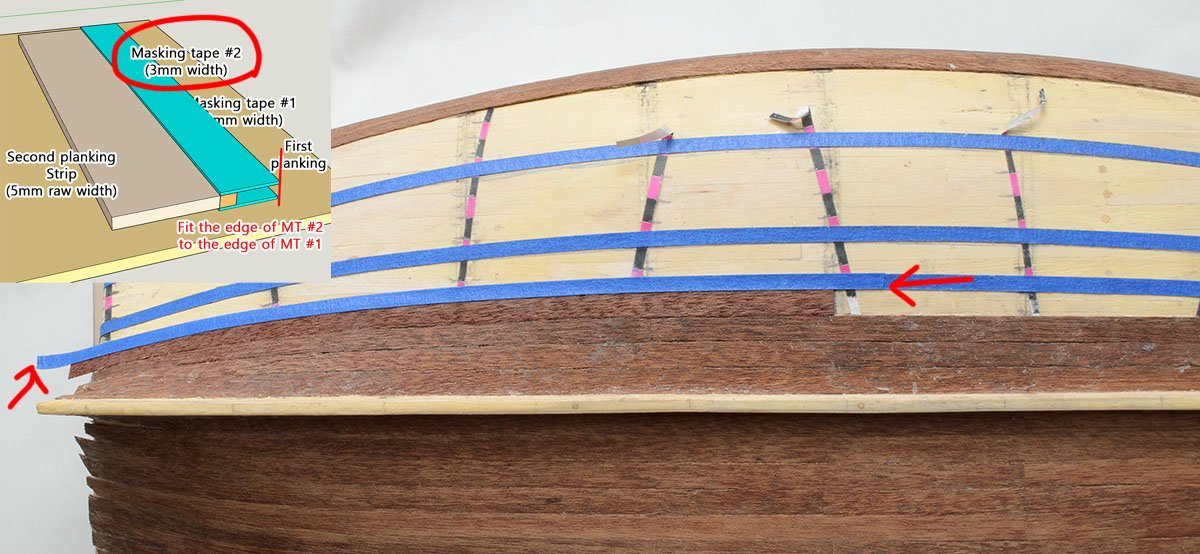
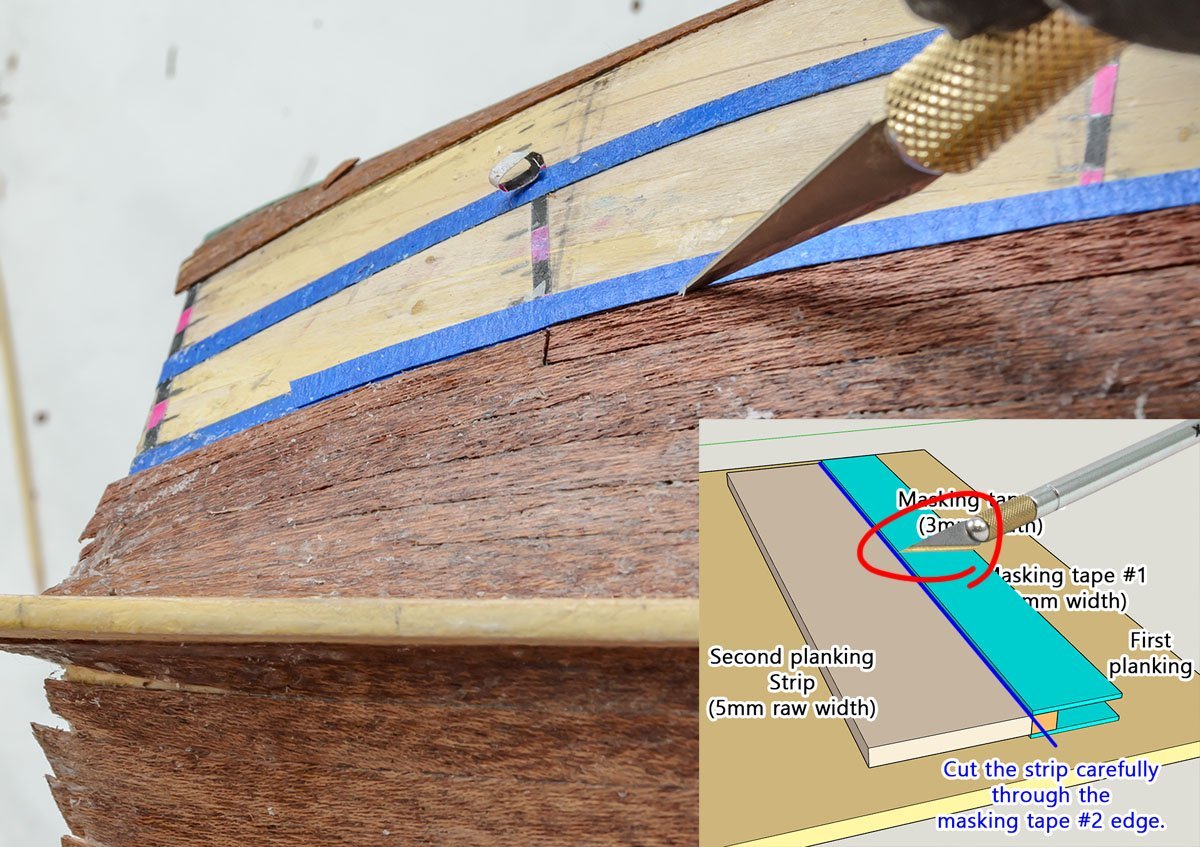
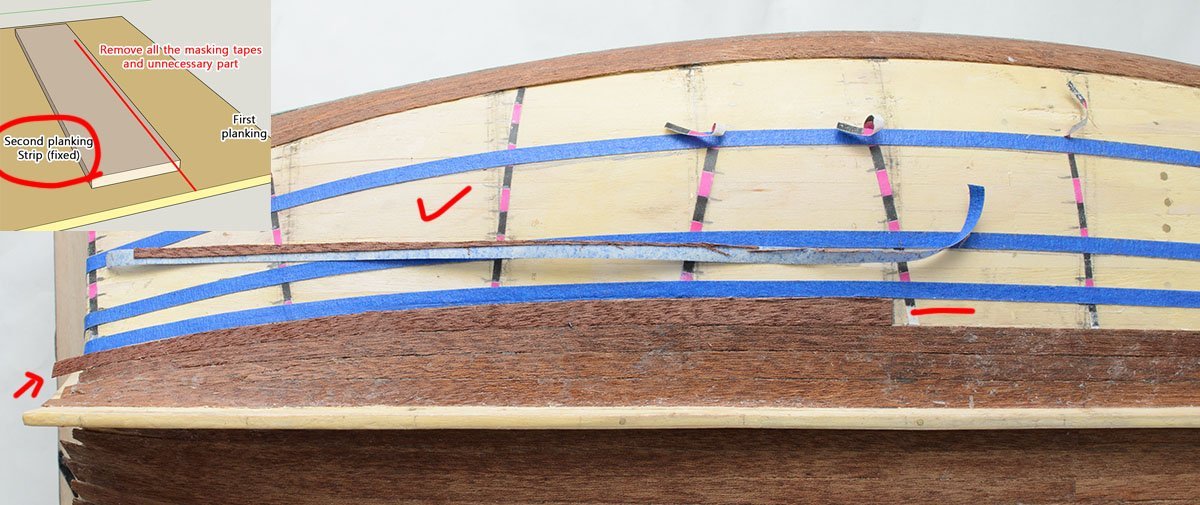
As a beginner modeller, I have been struggled with hull planking. One of my main issues was shaping a clear and sharp planking line like in the above picture. When I built a deck planking, I found that kits from some manufacturers or decades old kits had poor quality strips that had different wide. It is the main reason that the deck planking becomes ugly. Before I began a project, I selected same width and same color strips from a kit. Sanding paper or miniature plane were also good solutions to adjust the width of strips. The result was great, and I had no dissatisfaction with the deck planking. However, the 'curved' strips gave me a headache. I read some instructions and tried tools such as French curves, but they were time consuming or not effective in my opinion. I would say that I finally found a solution to the curved edge after years of contemplation. It is a very simple method. I used 3mm line tape. ( 1/8 inch whiteboard tape? ) The tape is thicker than the Tamiya or 3M 244 masking tape. I would say that 5mm or 1/4 inch wide tape isn't good for making a curved line, and 2mm or 1/16 inch tape is too narrow for this job. In addition, dark colors such as red or blue are better than lighter colors such as white and yellow. I attached the second plank strip. I used water and a digital temperature controlled leatherwork iron. This method consumes lots of line tape, but saves more time. I didn't push the blade hard. A weaker force made me control well against the wood grain. It was quite fun and fast to compare with my old process. Of course, the result was exceptional. I found almost no gaps between the planks. I use the same technique on the other models, such as the water slide decal on plastic kits. There should be a ton of ways to use masking tape beyond my imagination.


- 1 reply
-
- 6
-
-
-
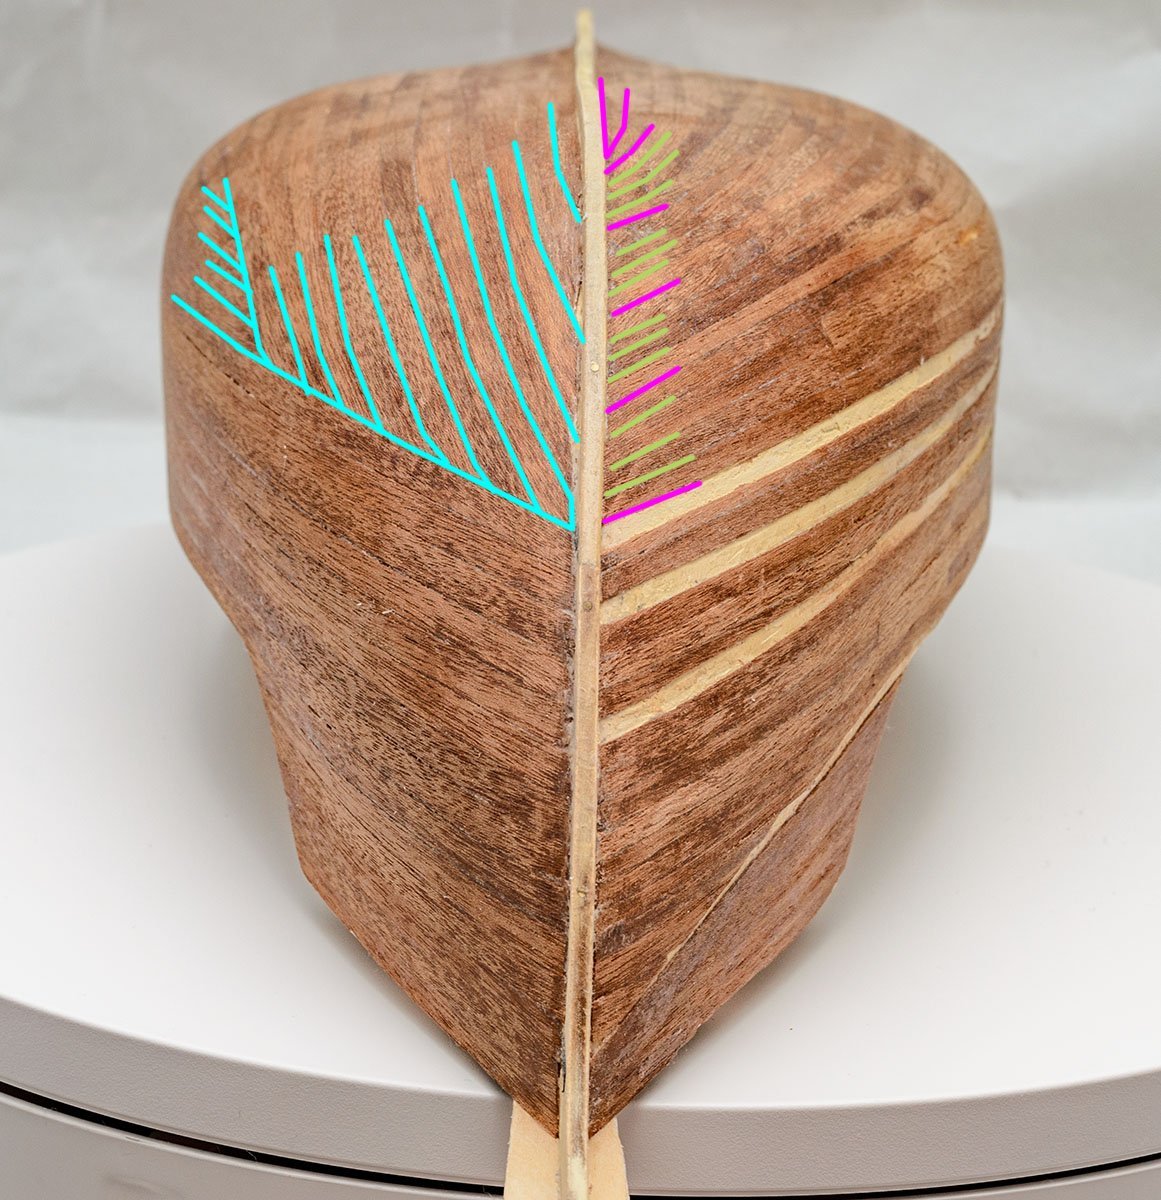
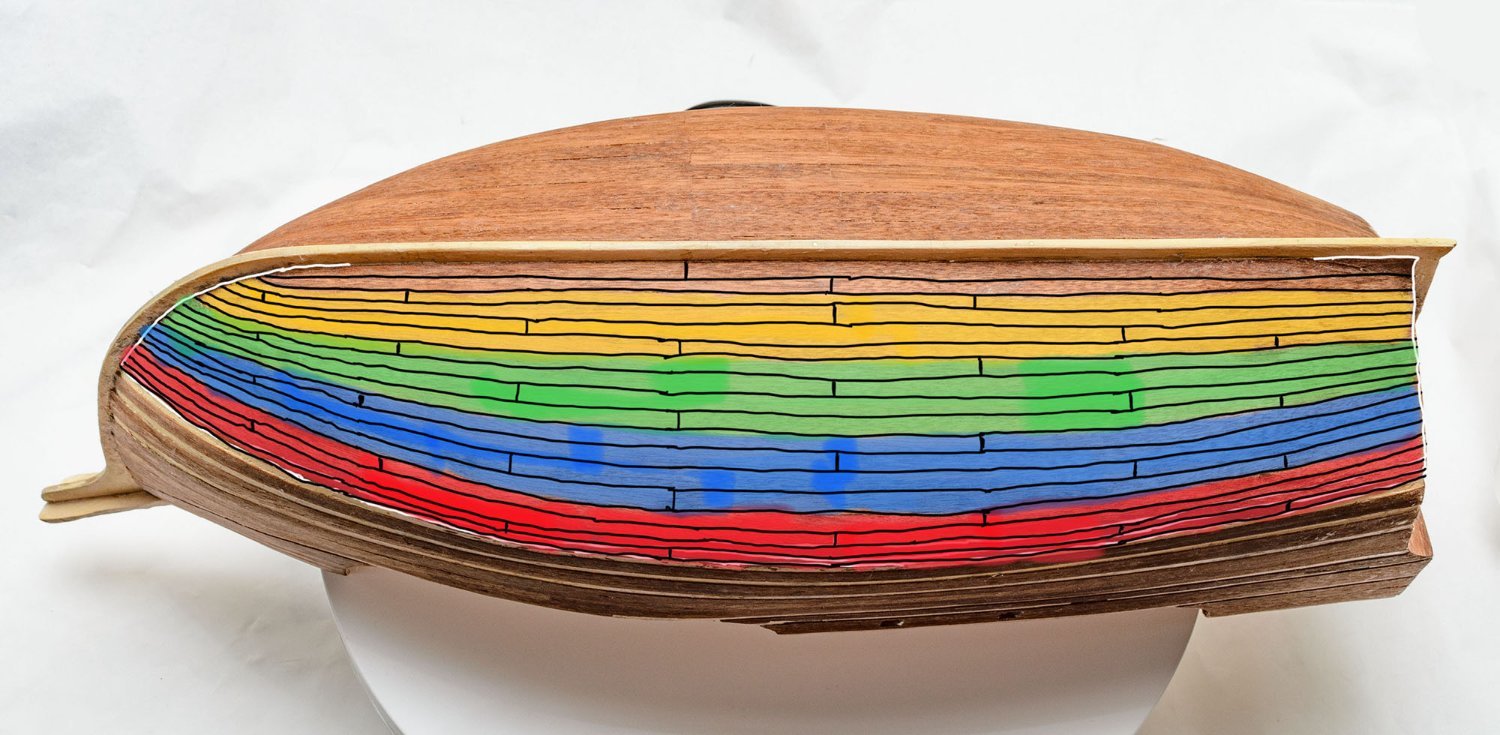
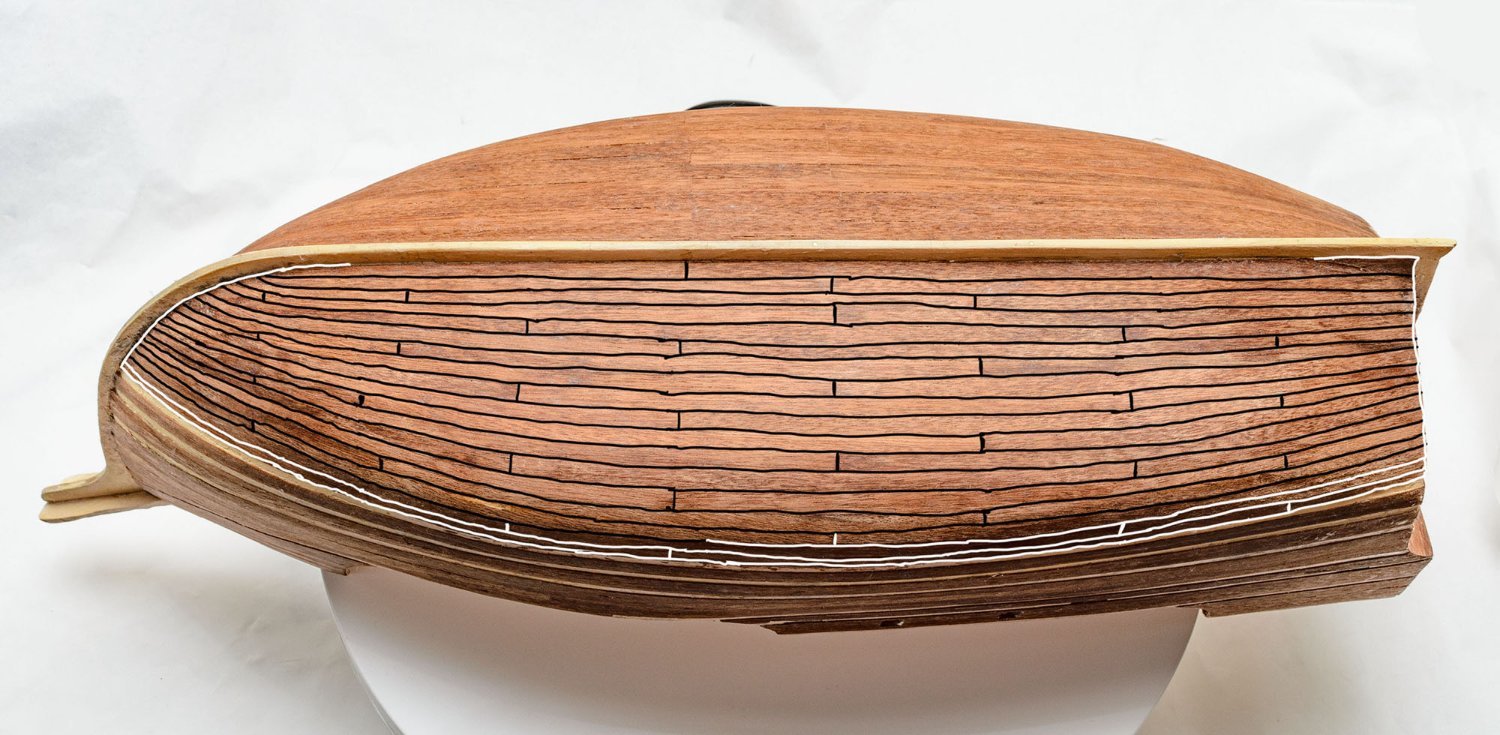
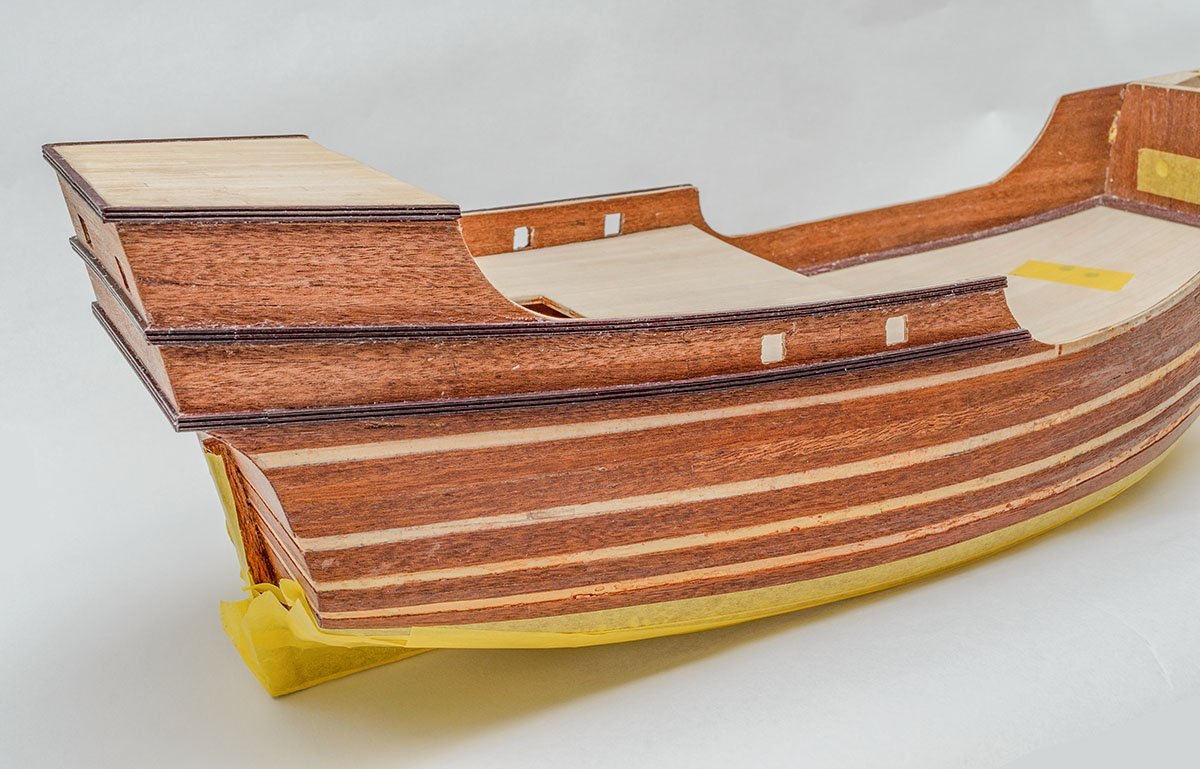
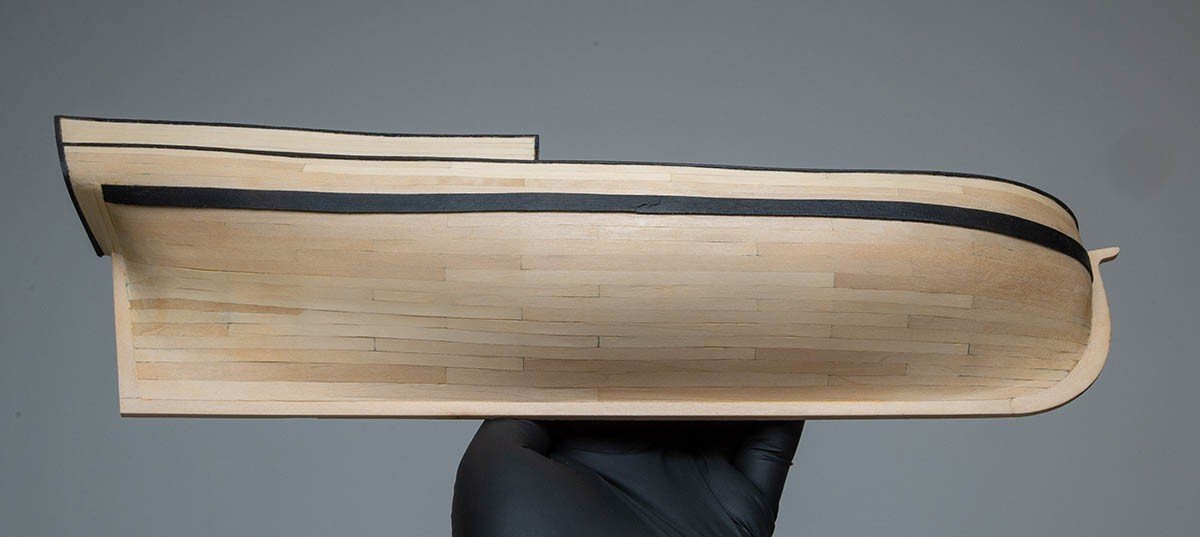
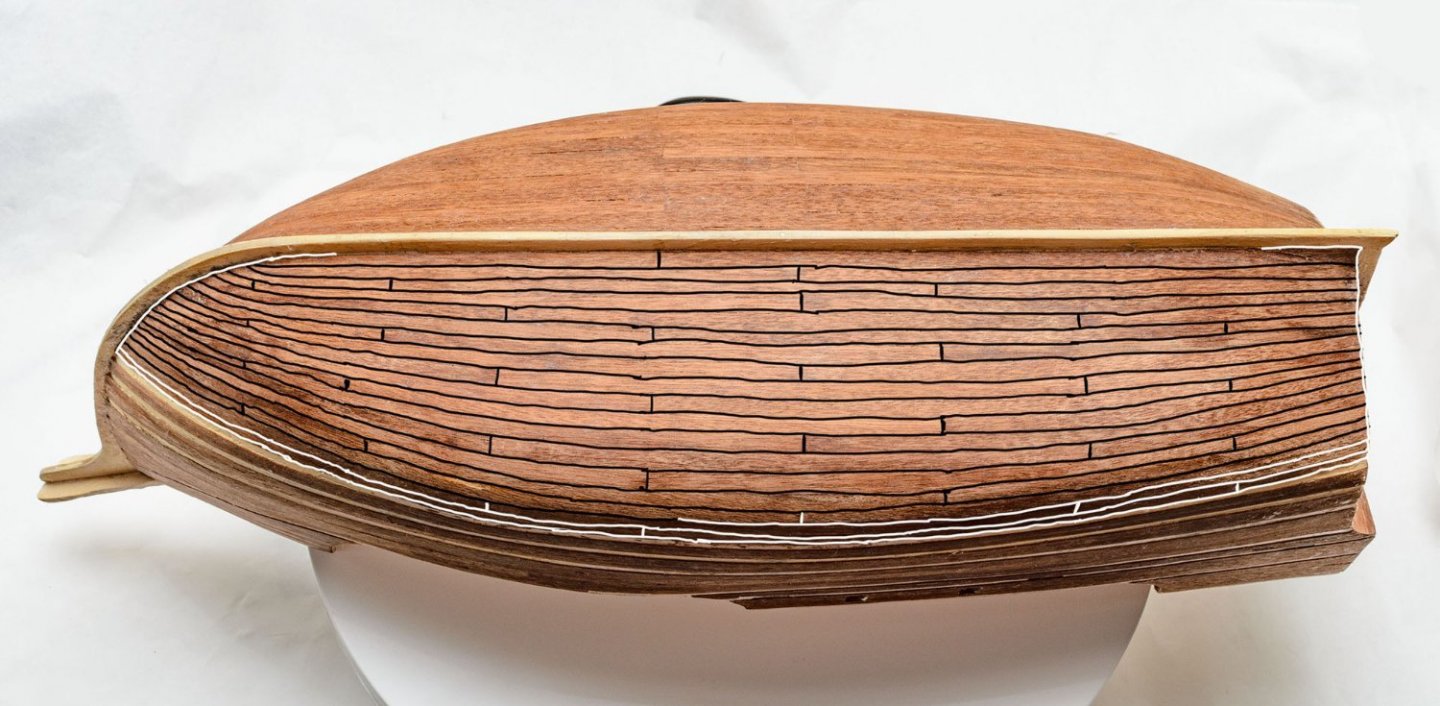
I finished the second planking with the third floor deck planking. I hoped to finish wales, keels, and the front deck, too. You can confirm that I lined off the lower hull between the wales and garboard in four sections. I used three butt planking patterns. I have some tips I learned and want to share them, but I spent several hours building this video... See you tomorrow. 😴


- 77 replies
-
- 1
-
-
- Santa Maria
- Artesania Latina
- (and 1 more)