modeller_masa
-
Posts
950 -
Joined
-
Last visited
Content Type
Profiles
Forums
Gallery
Events
Everything posted by modeller_masa
-
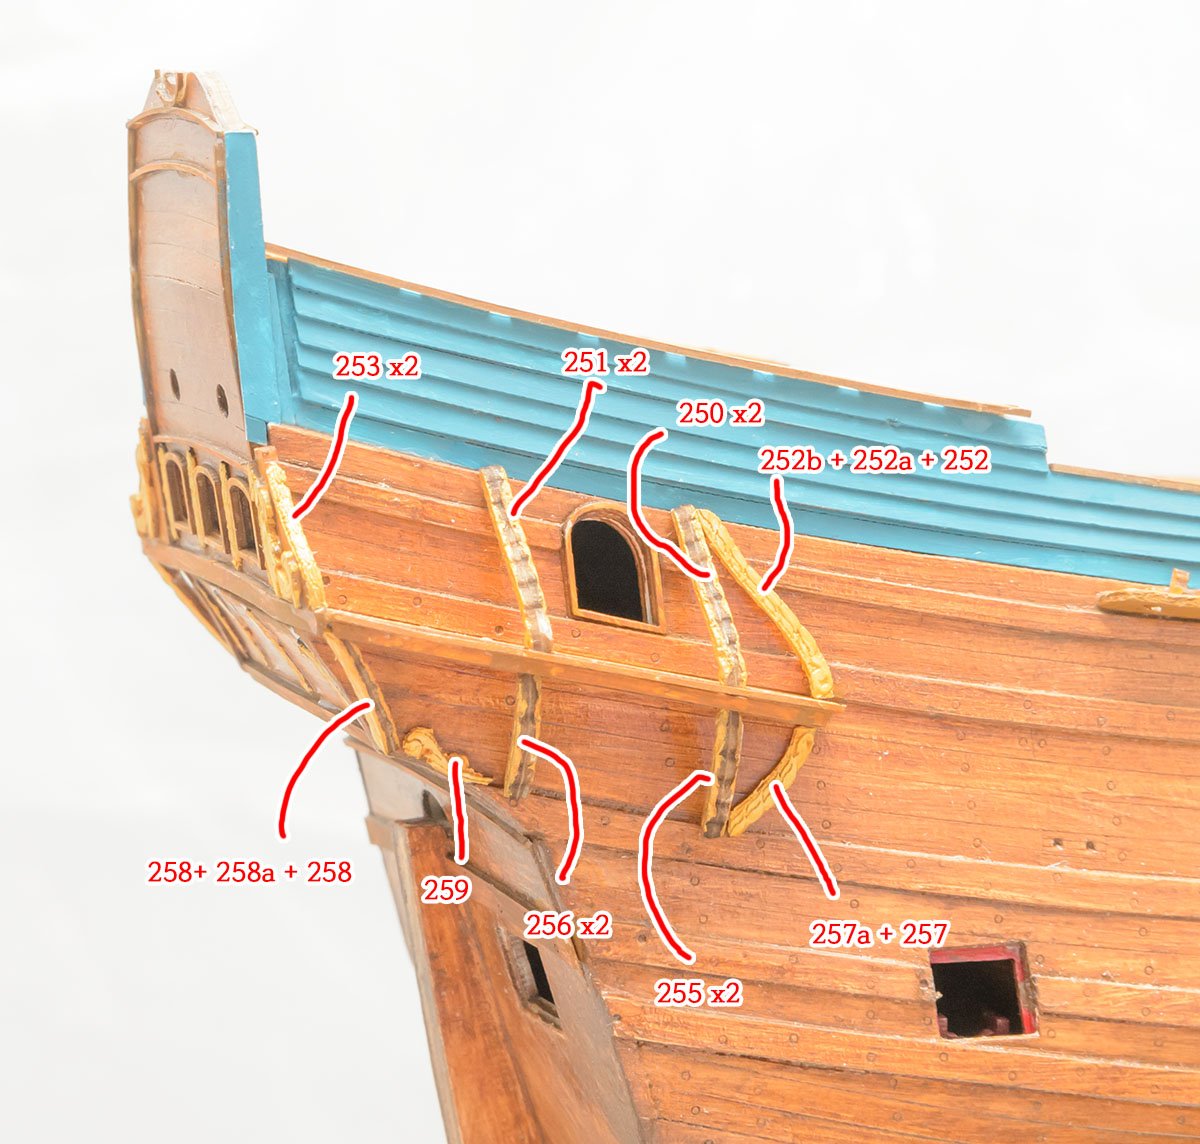
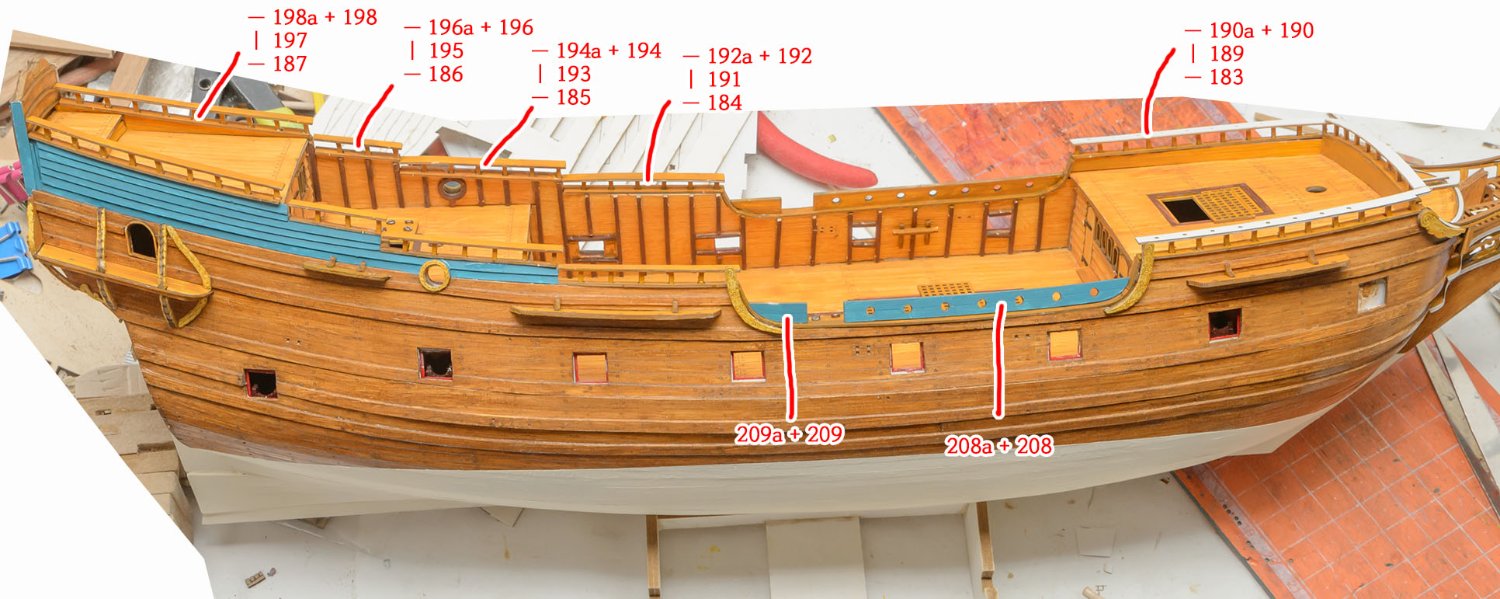
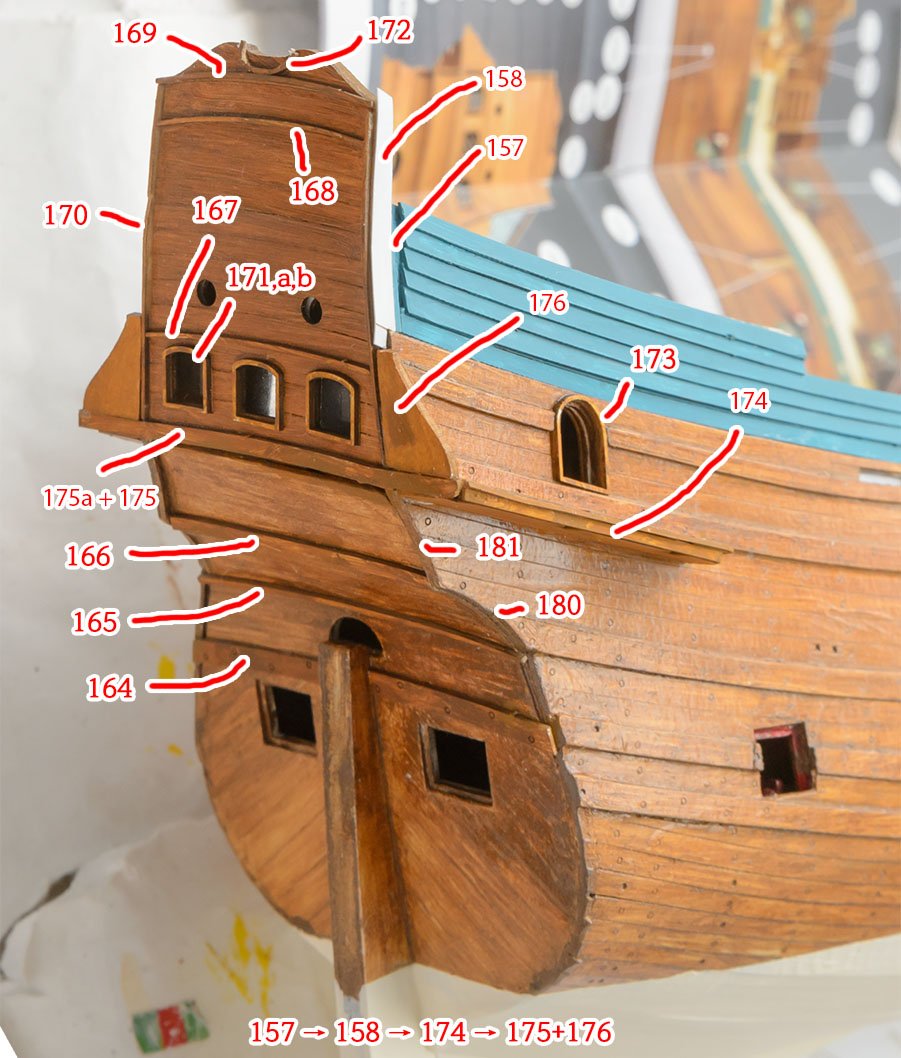
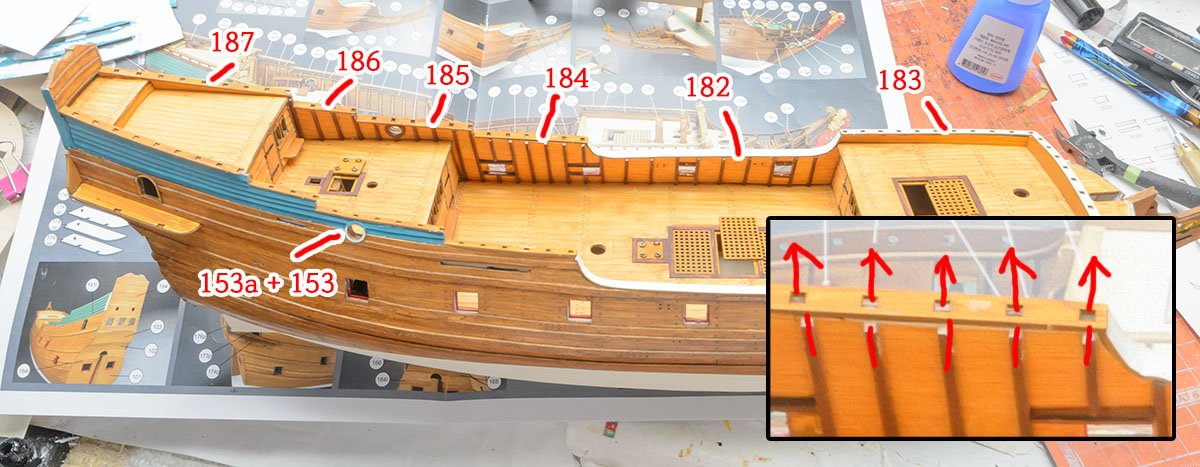
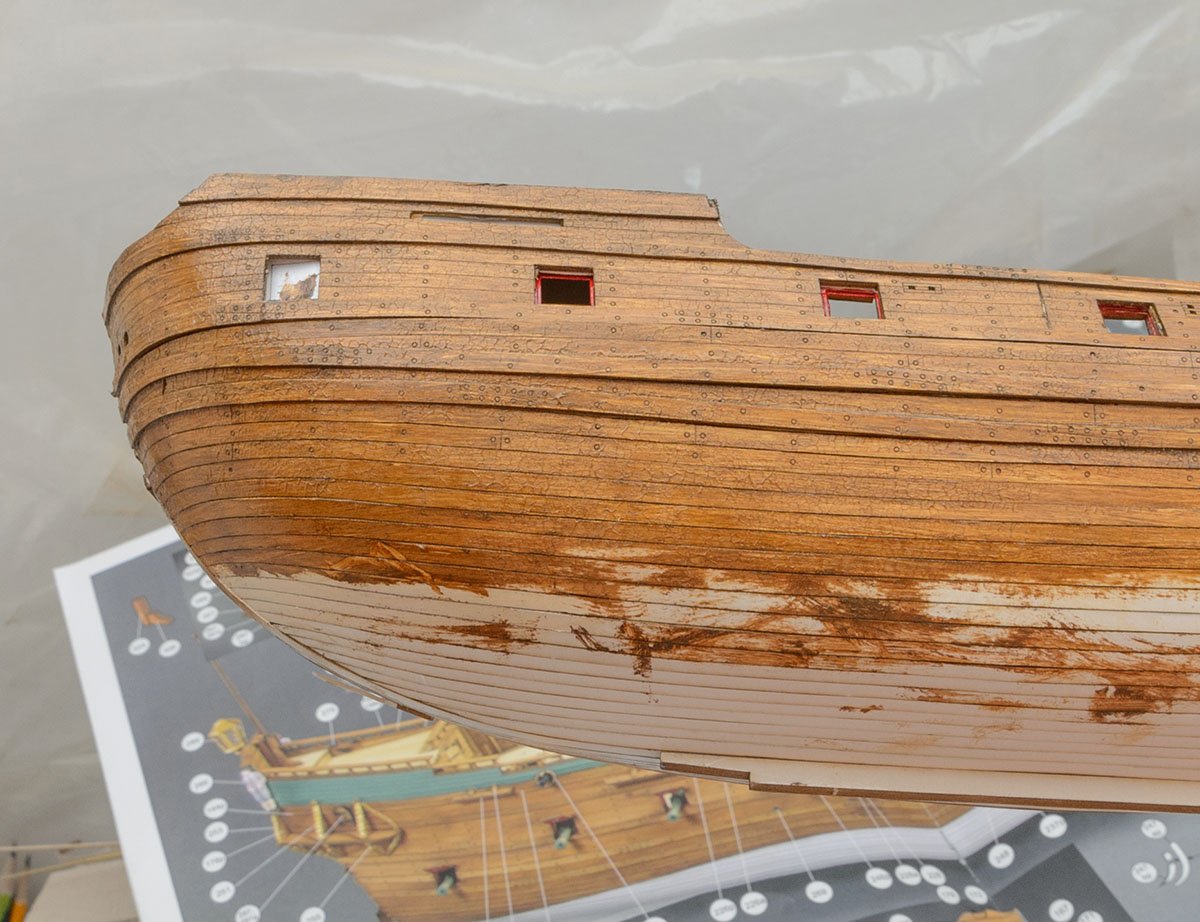
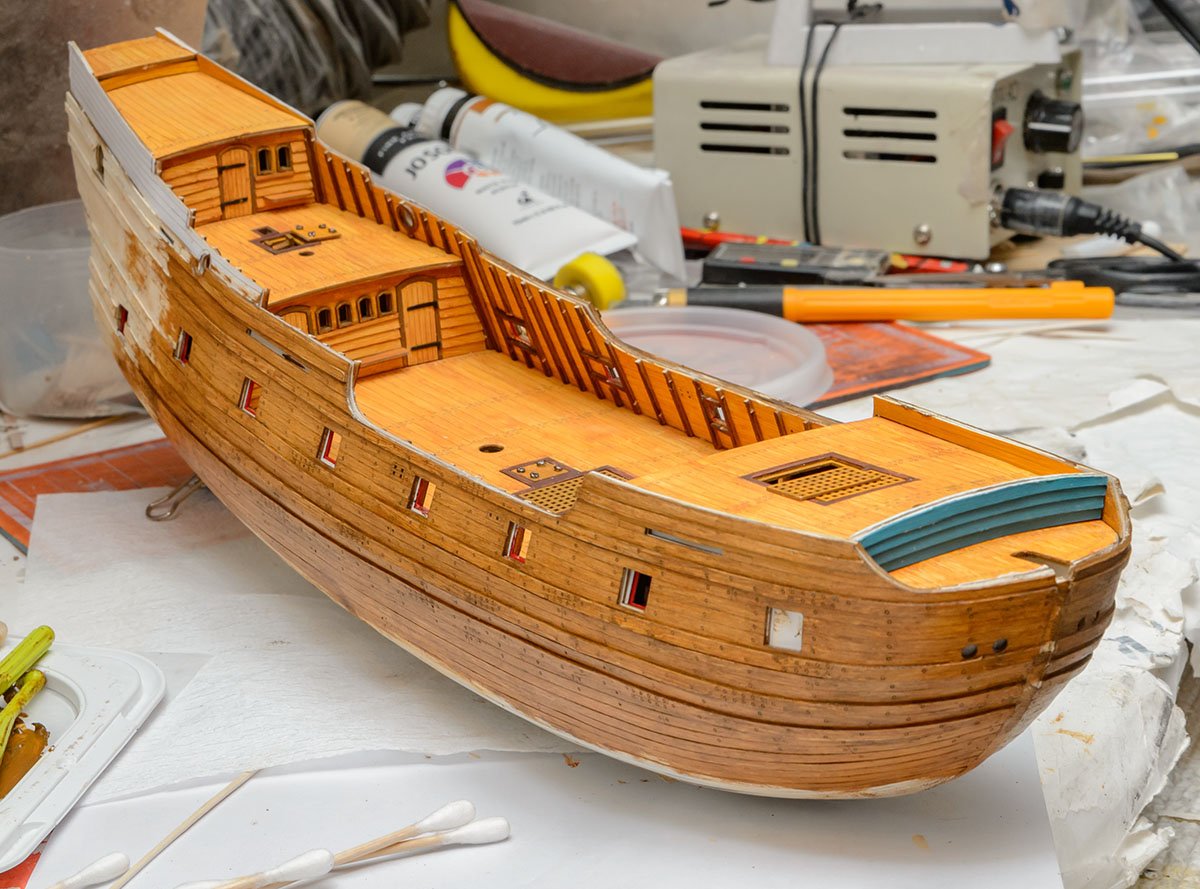
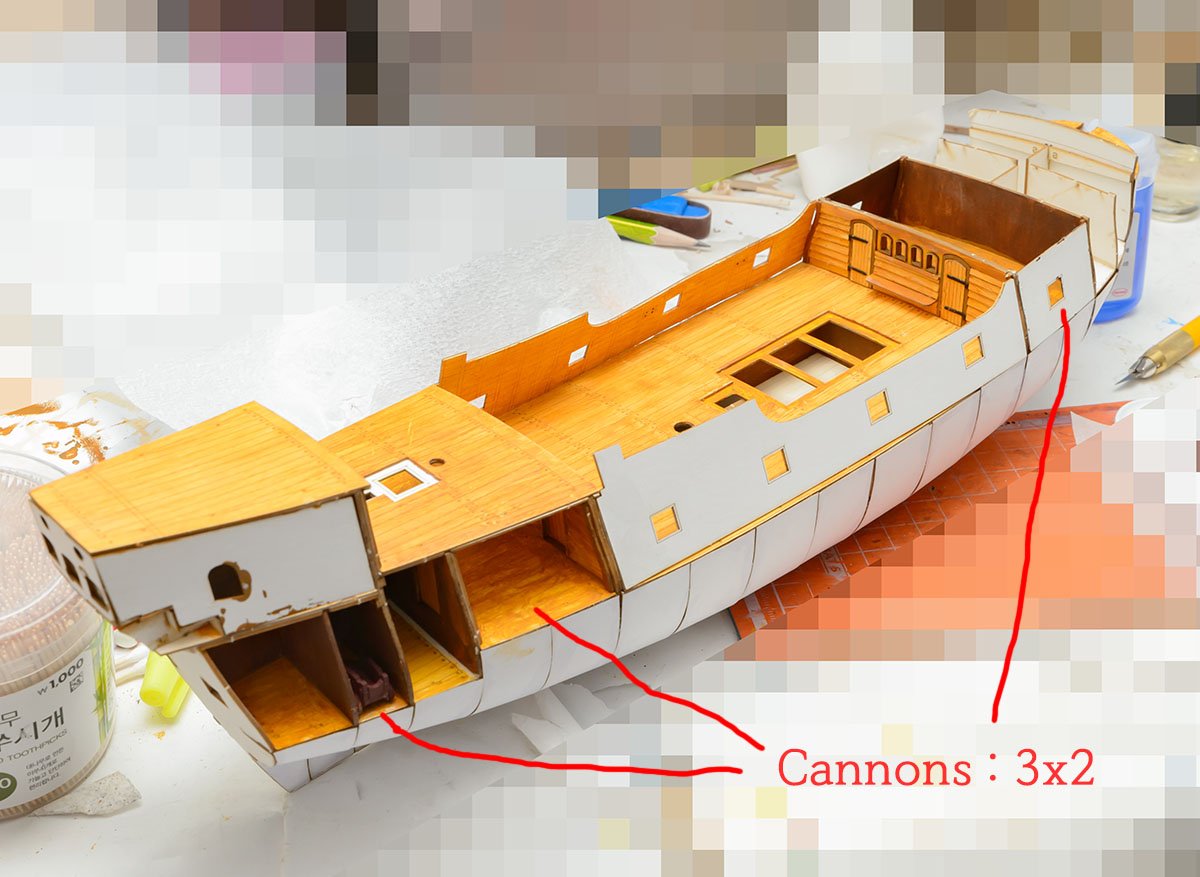
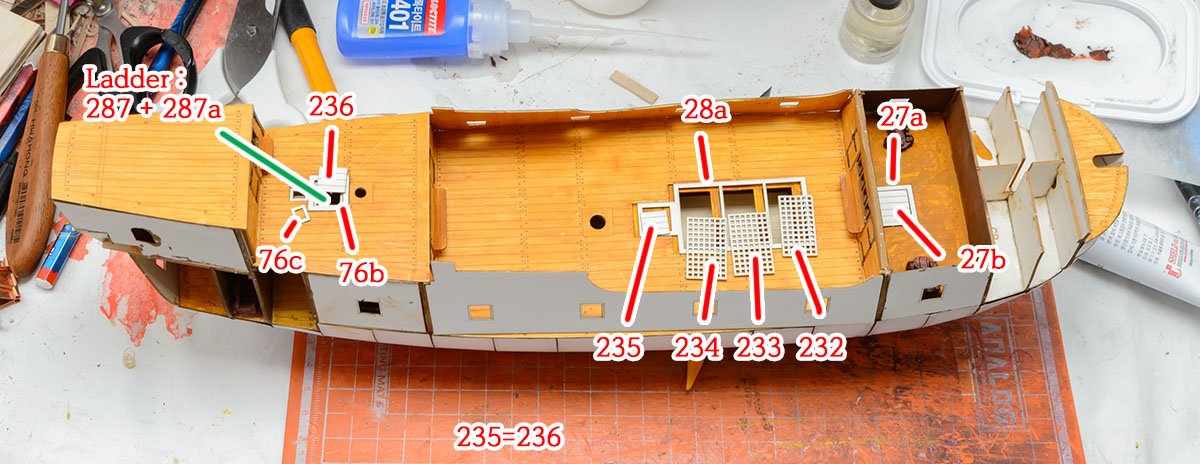
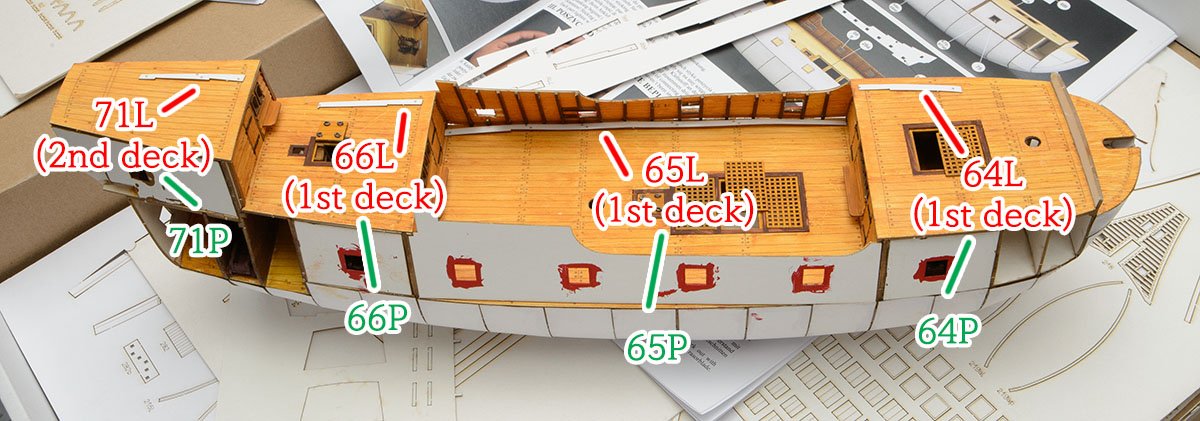
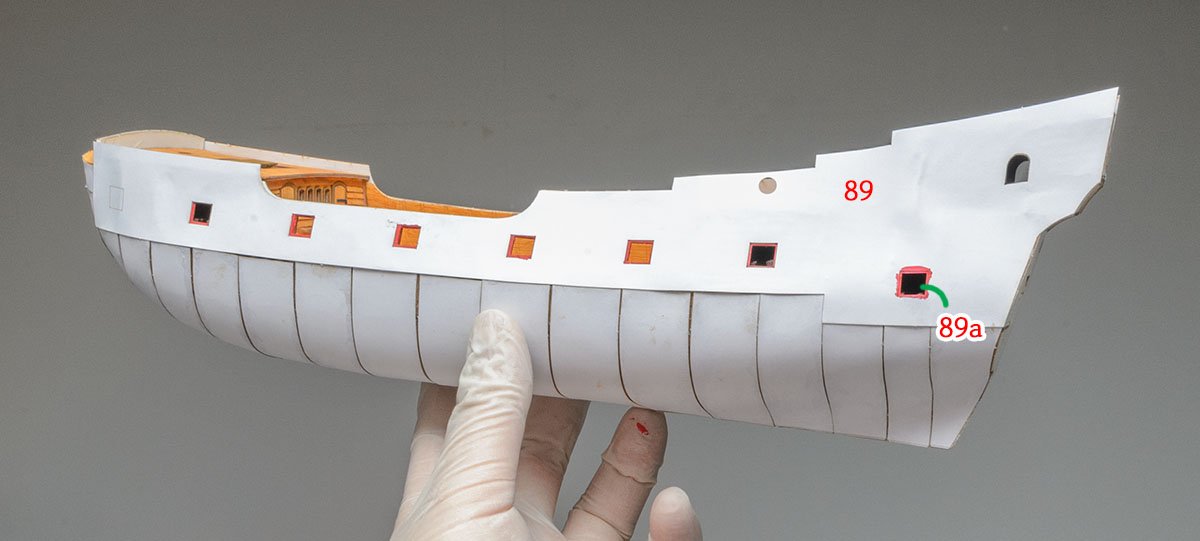
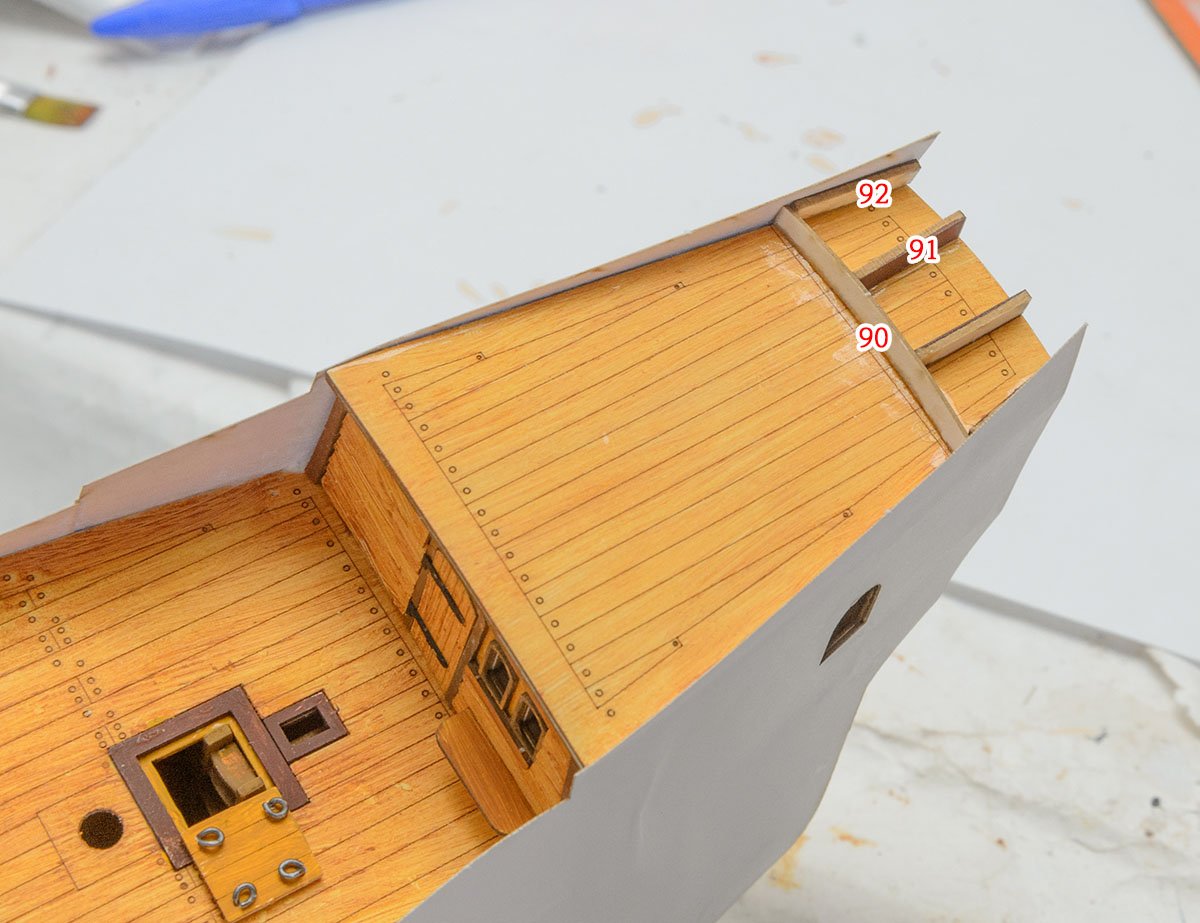
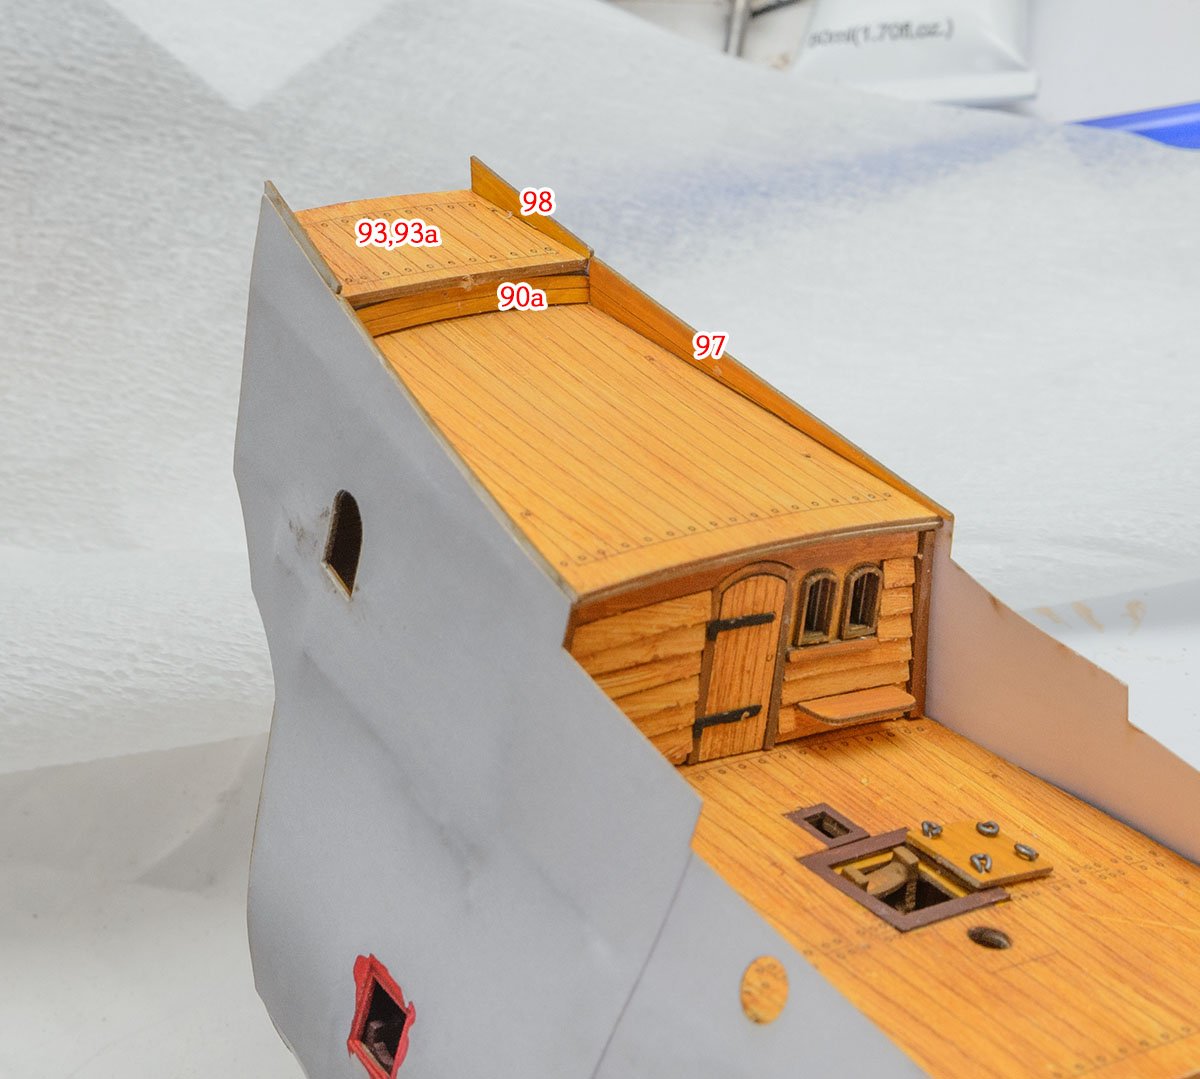
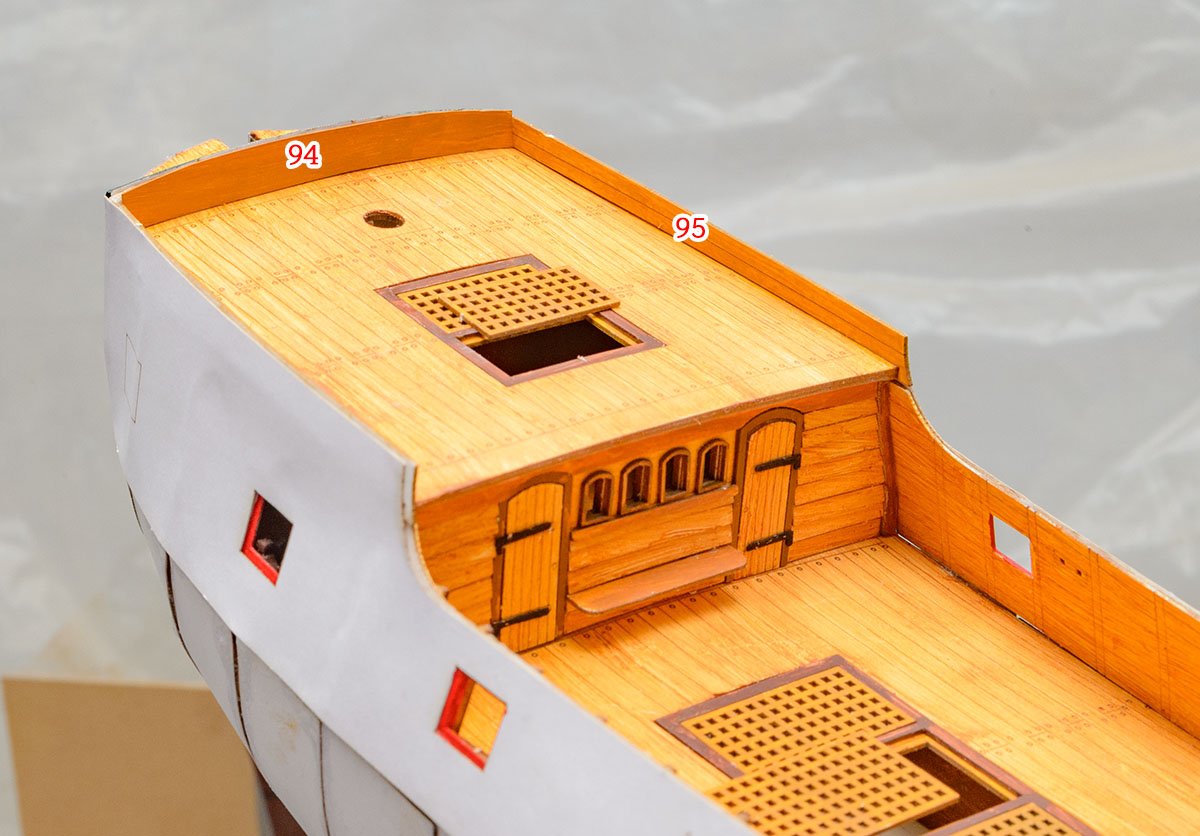
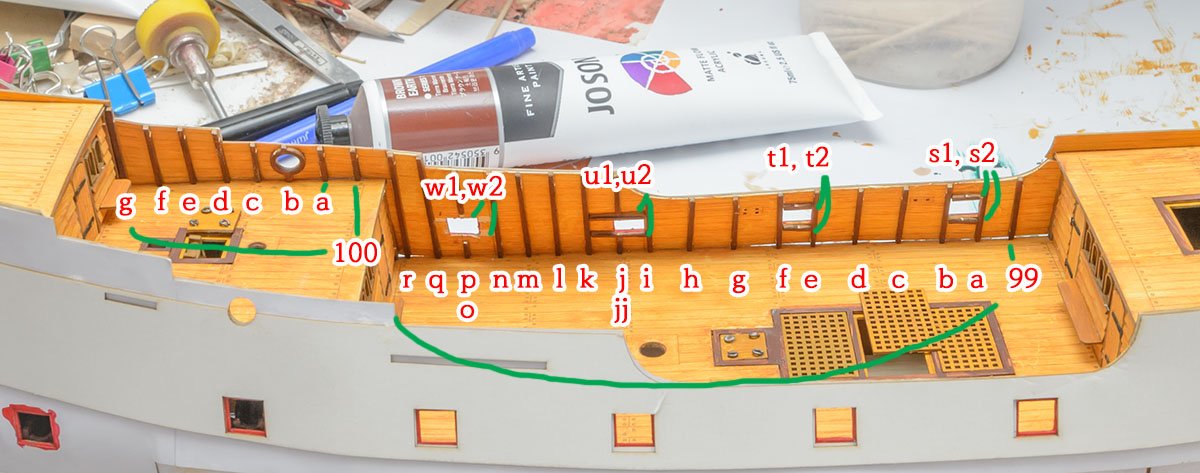
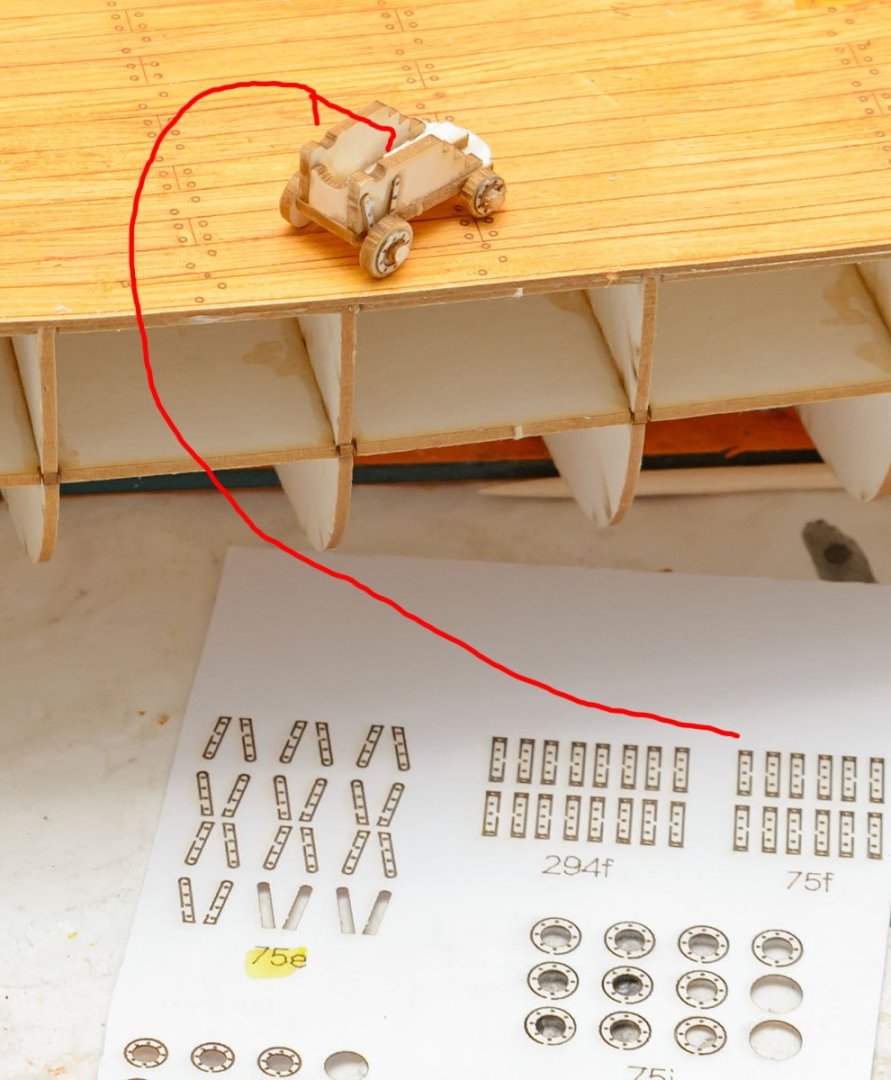
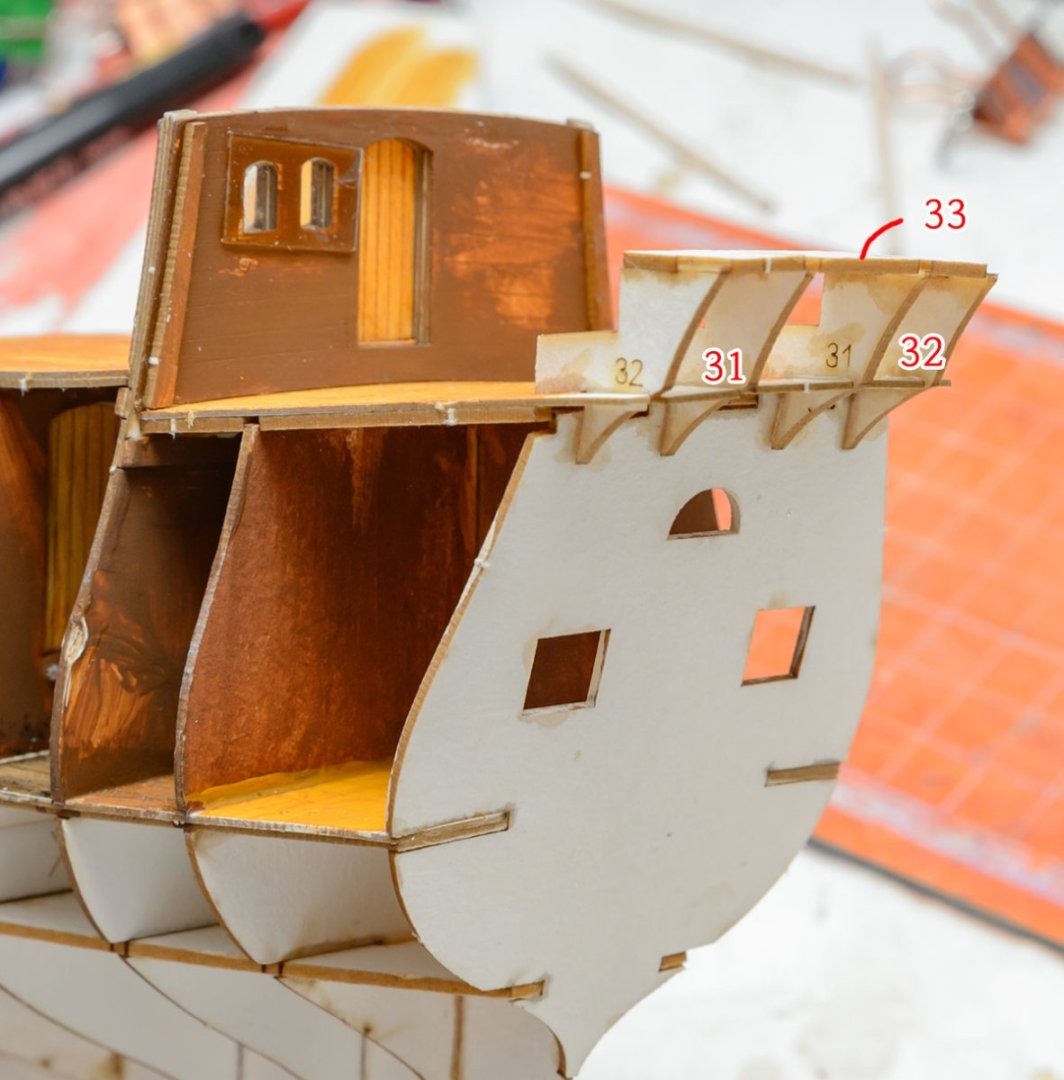
I had some serious issues because of the wrong varnishing. Thanks to many members' help, I removed all painting with lacquer thinner and repainted the hull. I made a painting lecture video, but it seems not to be as good as the original video I referred to. I'm attaching deck fittings. The instruction is so limited and confusing that I did several mistakes again. I think this kit is kind of an odd tetris game. The assembly method is very simple : attaching parts in order. However, one small mistake that I missed or attached in the wrong order has caused the errors to snowball. As long as I build and make more mistakes, the error increases and makes the remaining process difficult, like a game over. This is a very accurate and beautiful kit, thanks to modern IT technology, but it is fairly delicate to assemble because all parts are connected each other. Good and detailed instructions are necessary for this kind of structure, but Shipyard didn't provide them. If you don't know how to do it, the minimum guideline is the number of parts "in general". I attached part 176 before 158, and it messed up the next processes. I missed some parts because the the instructions didn't show all the digits. Well... I cut the tips of the part 99s several days ago... I think I finished two-thirds of the deck fittings. I'll wrap up the deck and go to masts and sails in the next post.


-
I thought about the reason that shellac melted an original oil paint. I guess the shellac might not be a major reason for the unsuccessful varnishing. Test condition : Without spraying or pouring, all my attempts to varnish over oil paint weren't successful. It includes rubbing the surface with cotton cloth. I rubbed oil paint with shellac or poured shellac when I applied it. Reinterpretation of the failure : 1) Physical contact : - Failed : Direct touch, such as rubbing or brushing. - Success : Indirect touch, such as spraying or pouring. 2) Chemical reaction : I don't know enough about chemicals to make a judgement. Shellac may not be a criminal. 😎
-
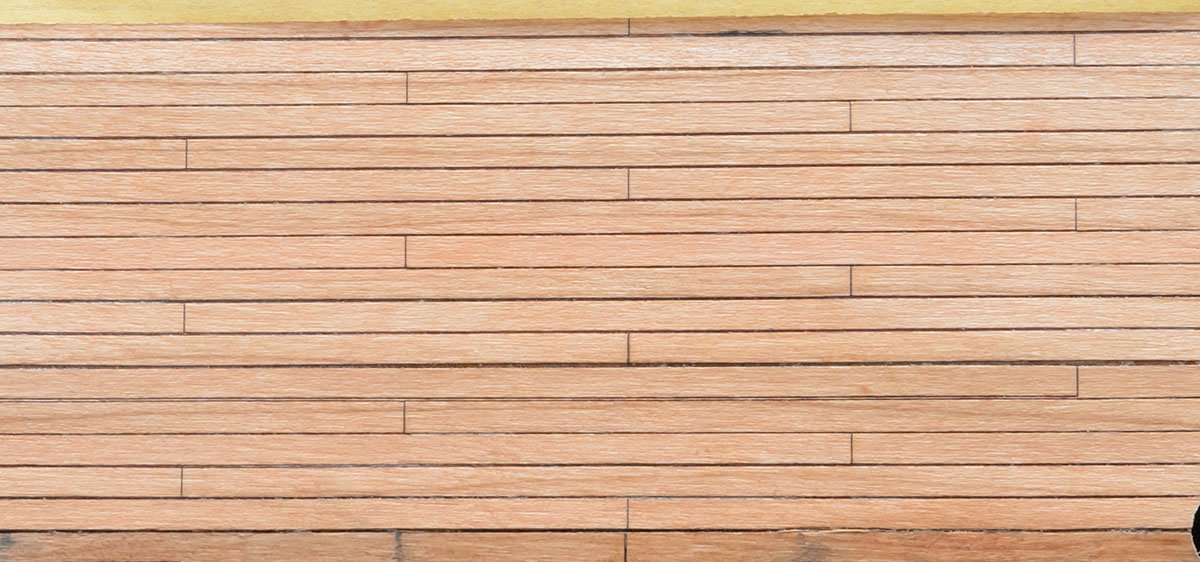
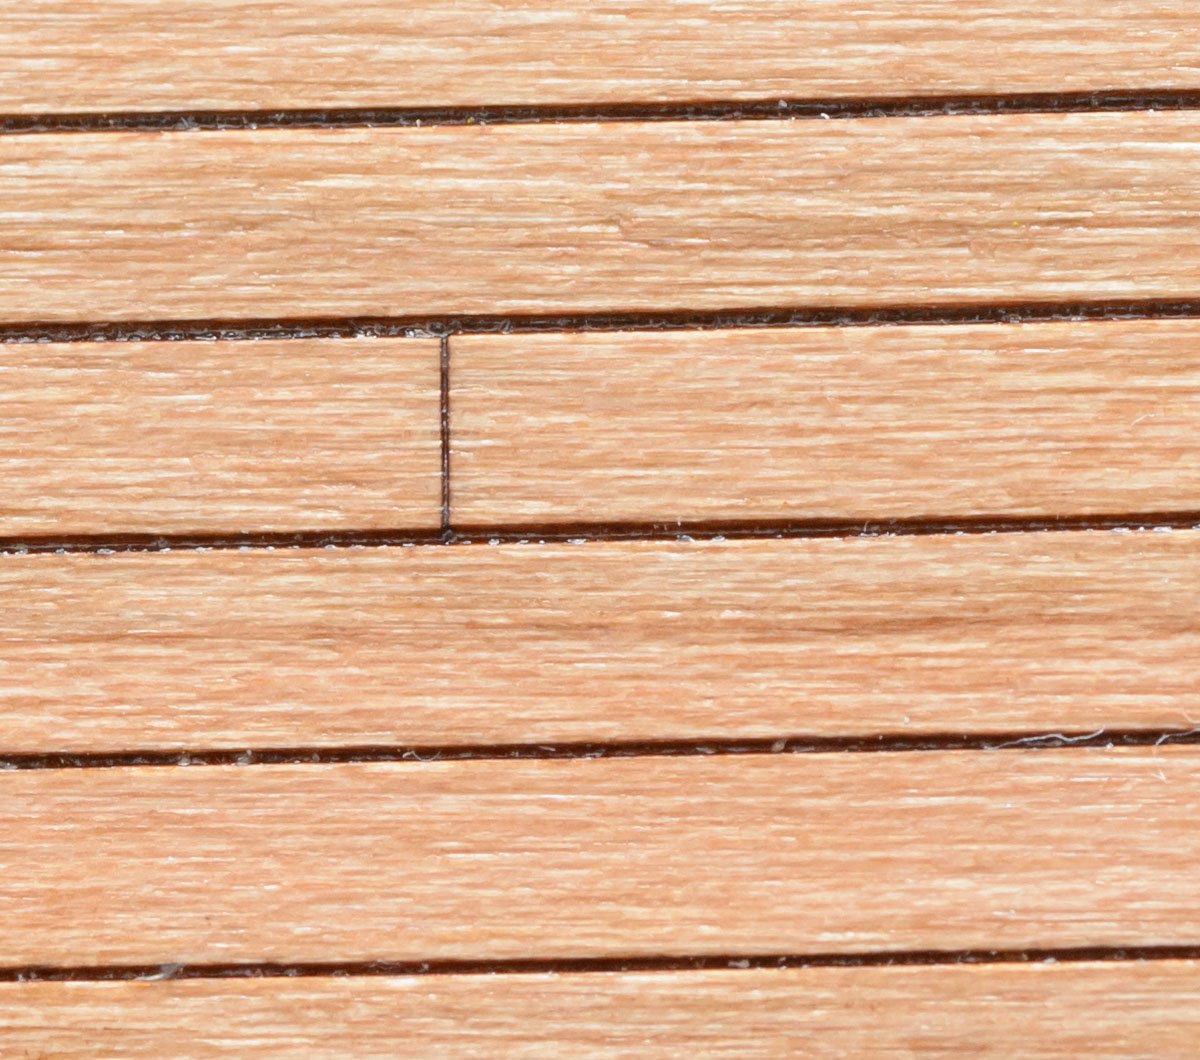
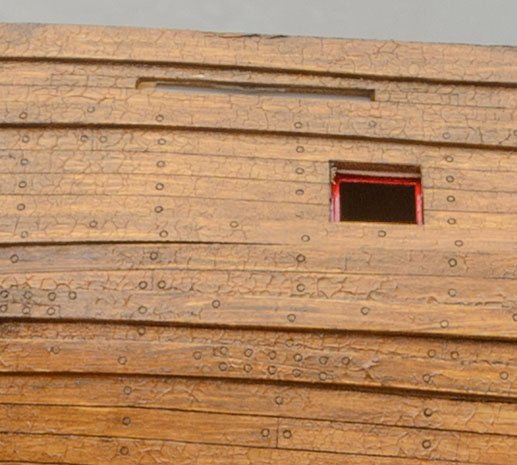
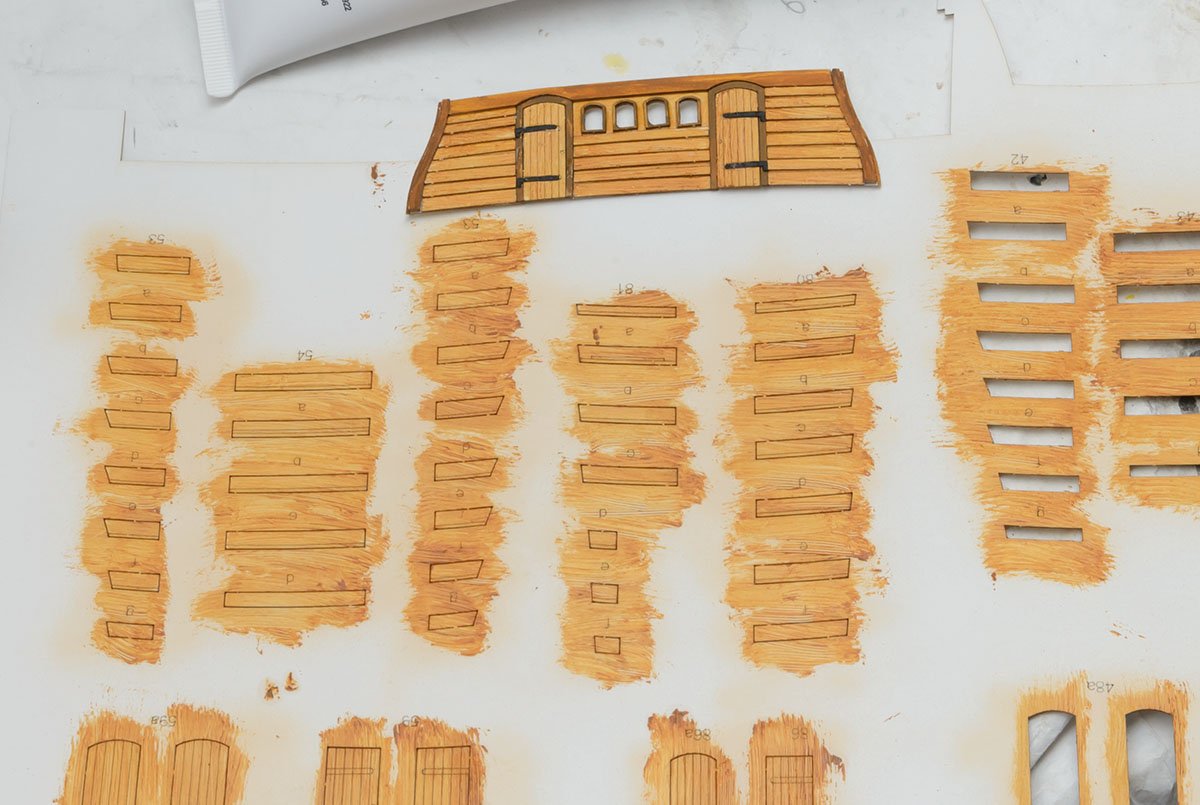
I believe I need to separate the definition of the term "wood grain" into two subfields. In this case, "Painting wooden texture" might be a bettern term to use. (Mantua, HMS Bounty, 1/60, wooden model) My goal is to paint a realistic "wooden texture" on a paper model or plastic model. The wooden texture doesn't need to have a rough surface like you said. Thanks to the micro scale stripe patterns of the oil painting technique, the result shows a realistic wooden texture, in my opinion. After thousands of repeated brushings, I have a very fine and flat surface with even stripe patterns. It seems to be very similar to 1/60 scale wooden model ships. I'm really satisfy the result. In contrast, "wood grain pattern" may imply more tiny details, such as a gnarl or crack. It can be easily observed in larger scales like 1/12 or 1/35 gunstock, but I agree that it isn't useful for 1/60 scale sailing ships. It is free to add wood grain patterns on the wooden texture, but I won't and can't because I don't have artistic talent. 😂 It's a kind of expedient technique for paper model kits and plastic model kits, which don't have the native "wooden texture". I don't need this technique for wooden model ships. On the other hand, I can't imagine that I would build paper or plastic model kits without this method.
-
Yes, definitely. The difference is that I used a lacquer can spray, which didn't touch the surface directly. If you thin the dewaxed shellac from Zinsser with isoprophanol (probably at a 1:1 ratio), you can spray shellac with an airbrush. I didn't write this description because this guide is for newcomers.
-
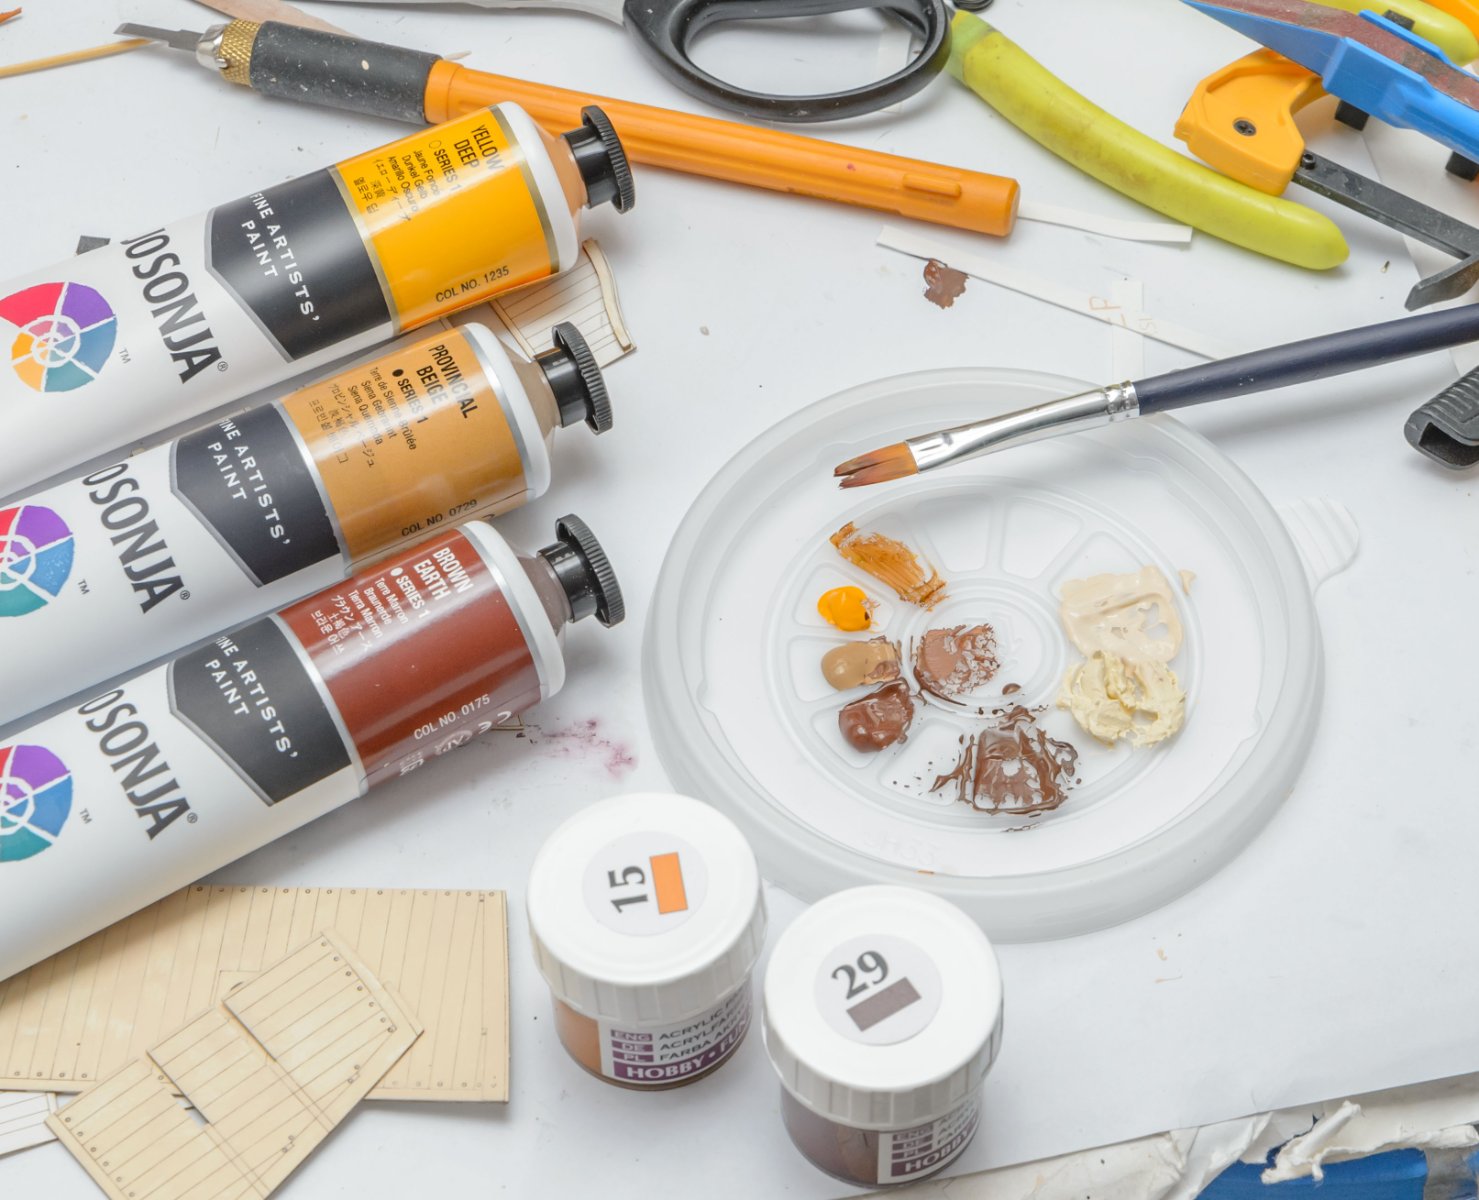
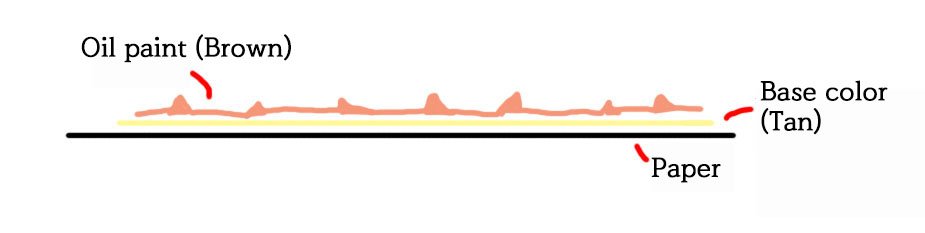
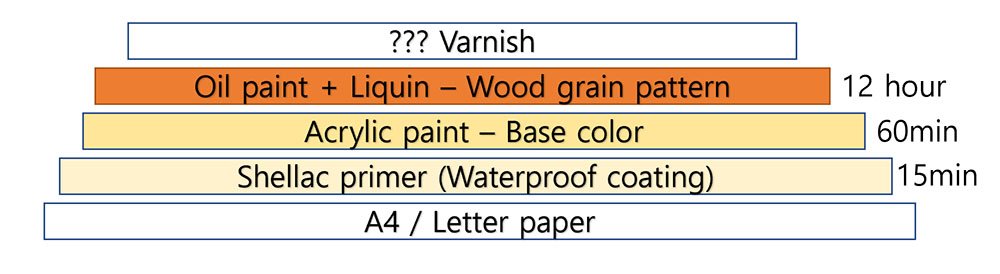
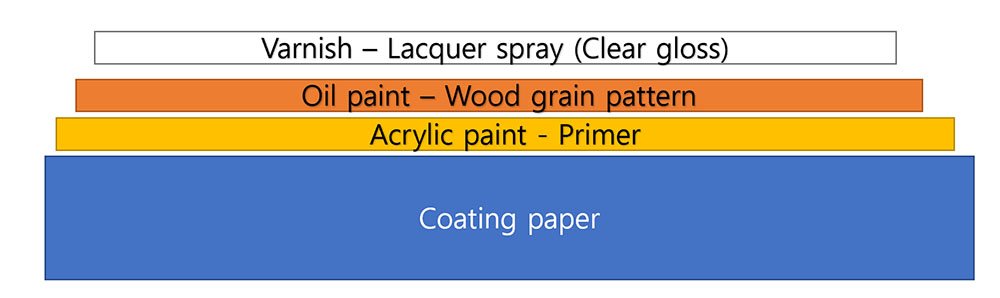
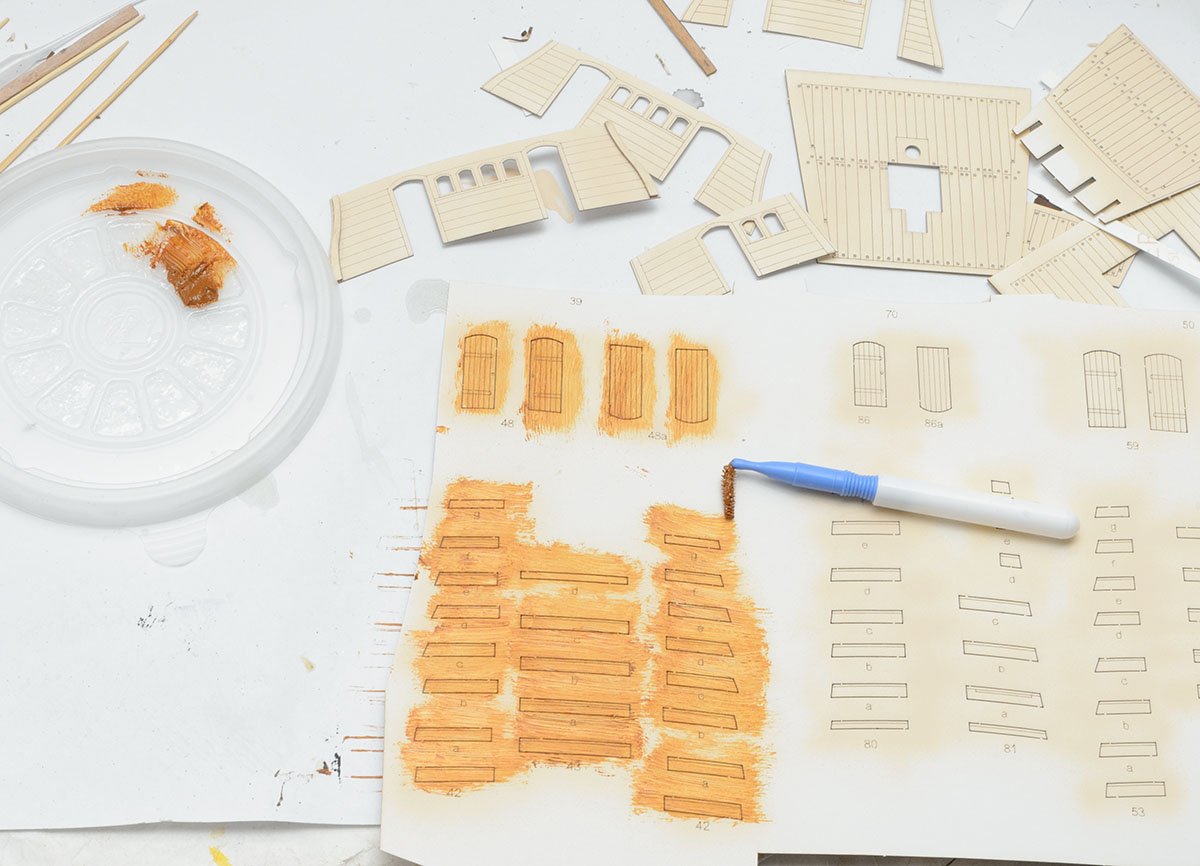
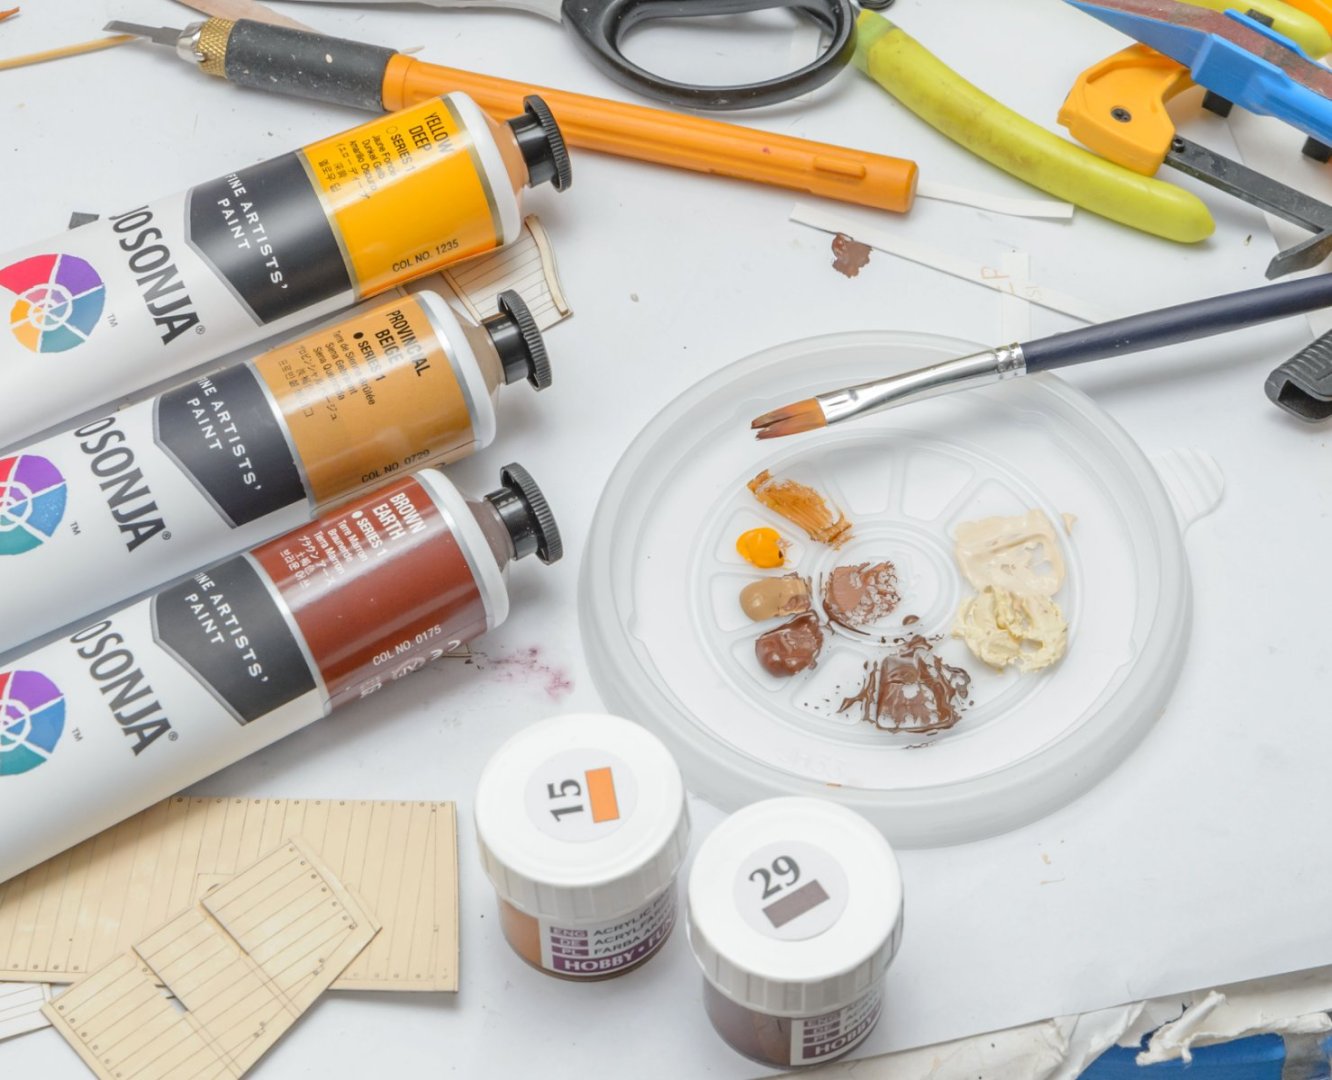
I learned the technique from other Youtube videos. If you think the hour video boring, please skip to the summary at 53:20. 😉 1. Primer The surface must be coated with any primer. If the surface absorb well, like raw paper, the oil painting won't leave successful wood grain patterns and will work like acrylic paint. Dewaxed shellac is enough to go, and acrylic paint primers, such as gesso or Vallejo primer, also work well. 2. Base color The base color should be brighter or different from the upper wood grain pattern layer. I used tan color acrylic paint. White color is also effective. 3. Cheap alternative brush The professional art brush for oil paint isn't common and is expensive. There are cheap alternatives, such as Q-tips and an interdental brush. Make sure the interdental brush isn't small size. 4. Oil paint tubes - Wood grain color I used the cheapest oil paint in my country. The color should be darker than the base color, like raw umber, burnt sienna, or mars yellow. 5. Oil paint drying accelerator The oil paint lasts longer than several months. The oil paint must be completely dry before the next coat. I used Winsor & Newton Liquin Light Gel to accelerate drying times from several months to 8 hours. 6. Oil paint varnish The oil paint system is different from the common modeling paint system. The varnish over oil paint must be compatible with it. Test it before use. If the varnish caused a significant issue, use lacquer thinner to reset everything. Due to a sensitive surface before varnishing, I recommend using spray varnishes. I used a Golden MSA Archive lacquer spray, which is a certified oil paint varnish. Shellac didn't work well becaused shellac melts oil paint. I learned this technique from this video. 😎

-
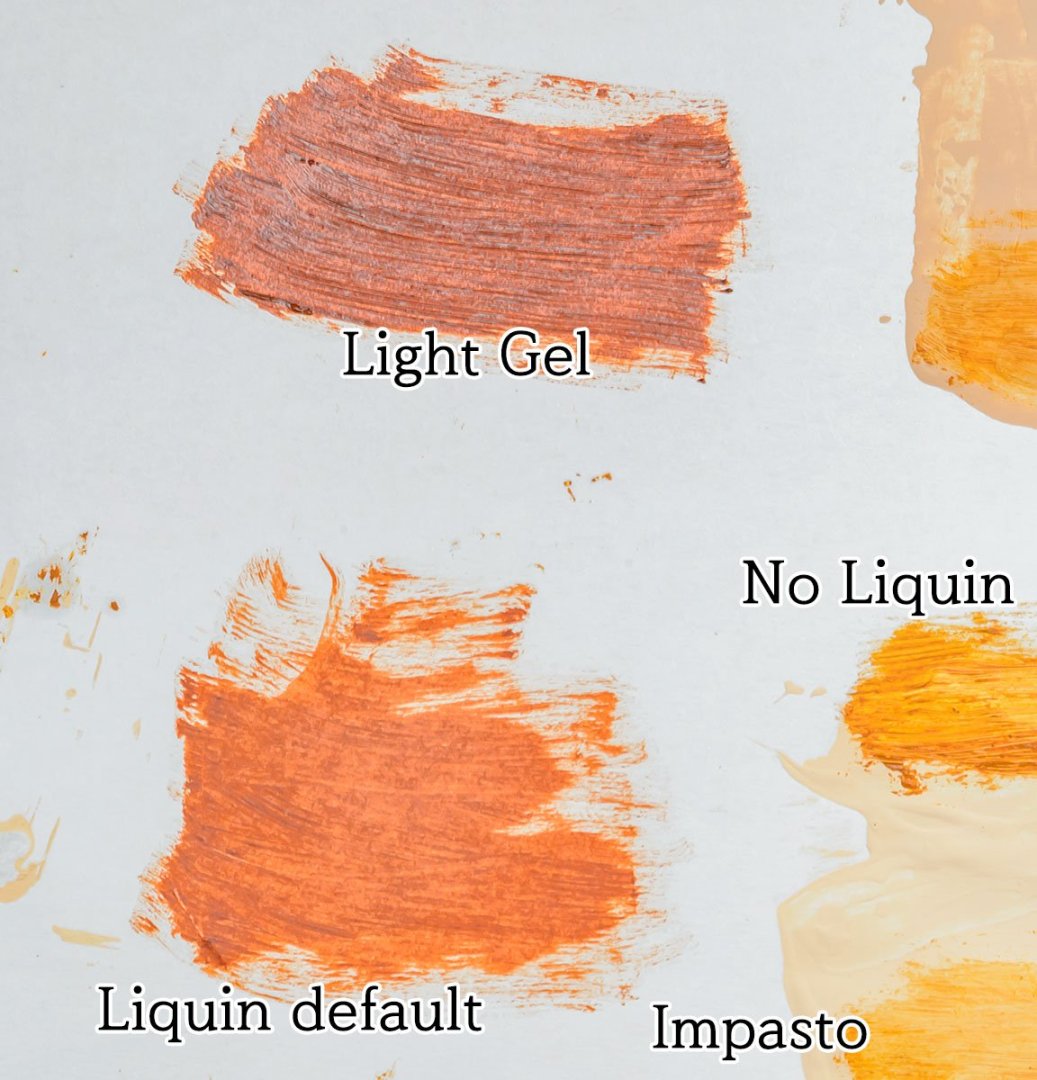
One of my goal is cheap and easy technique for newcomers. I'm using cheap and disposable brushes, such as Q-tips and an interdental brush. As we know, solvent based paints are hard to clean, and the thinners are very toxic. Newcomers, including me, may want a "brush and forget" disposable brush. Due to the limited painting tool, the Liquin impasto didn't work well with my interdental brush. The light gel made exactly the same viscosity of oil paint after mixing, and the other Liquin, Original and Fine detail, made tube oil paint wet, which blurs grain patterns. My explanation will be more clear when I post video guide. By the way, I don't care about the gloss finish in the middle of painting work. It can be turn into matte finish anytime with matte transparent lacquer spray. It is important to keep a glossy and clean surface between painting layers. According to Winson & Newton's description, Liquin isn't and can't be a varnish. An additional varnish coat is mandatory, and I prefer to use lacquer spray. UM... except for this case.
-
Thank you, Bob. I've never heard about the "Japan drier". The Japan drier is a dilute version of cobalt lineate, and the Liquin is alkyd. There is one more drier, "LEAD naphthanate". https://products.richesonart.com/products/copal http://langridgecolours.com/cobalt-driers/ When I tested the wood grain technique, I found that viscosity is an important factor to keep a clean grain pattern. I've tested several Liquin series, from fine detail to impasto, which have different viscosities, and concluded that the Liquin light gel is the best application for this case. The Japan drier seems to be a more legitimate speed drier for oil paint, but I may need additional gel medium to maintain high viscosity.
-
I've researched several wood grain techniques on Youtube and practiced them, and I've concluded that the oil paint-interdental brush is the easiest and cheapest one for everyone. None of the acrylic paint techniques were as simple as the oil paint technique. Even though I tried acrylic paint retarder to simulate the characteristic of oil paint, such as high viscosity and long drying time, I felt it is too delicate for every people like pasting water slide decals. I was making a tutorial video of the oil paint technique before I encountered this issue. 🤕 Yes. The worst feature of oil paint is that it takes months to dry. Too long drying time isn't good for scale model work, especially the plastic model kits. https://www.winsornewton.com/row/masterclass/exploring-liquin-mediums/ My solution is Winson & Newton Liquin, which speeds drying. It cuts drying time down to 8 hours - 3 days, which is incredible. Ok. I finished antifouling the hull. Thank to eveyone for providing such a valid solution and a wealth of interesting knowledge. I'll post the video of the super easy oil paint technique with an additional varnish guide.
-
Yeah, the third one in the picture is very smooth and dried well. The Golden MSA spray is easy but expensive. In addition, shellac is very good with lacquer spray. I'll apply matte transparent lacquer spray over the shellac layer at the very end of the building. I won't forget to test it before I apply the last spray. In addition, I've read some strict scoring standards regarding scale model contest. When judges of model contests grade scores, they also check the wood grain pattern because it sometimes makes an inappropriate scale effect. For example, large and complex wood grain patterns of the cherry wood POF model are a penalty. It is a reason senior modellers are looking for non-grain woods such as boxwood and pearwood. It might be too quick to be picky about my materials, but several inexpensive plywood based wooden model kits I've built frequently showed odd grain patterns that didn't look well. "The builder's model" scheme is my favorite. 😎
-
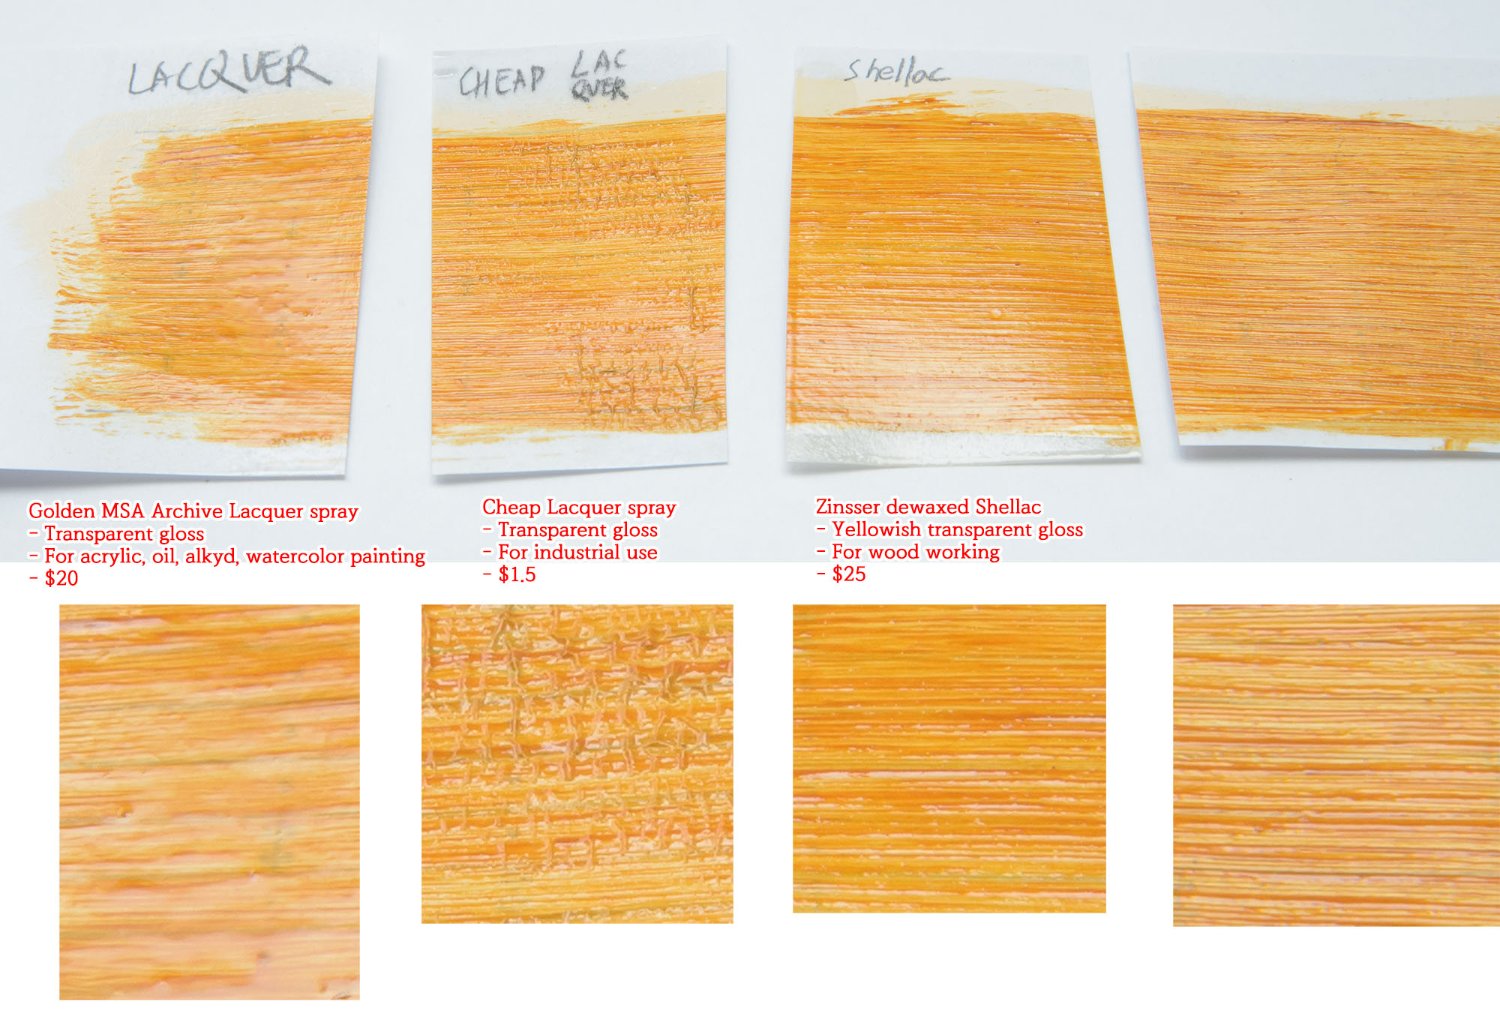
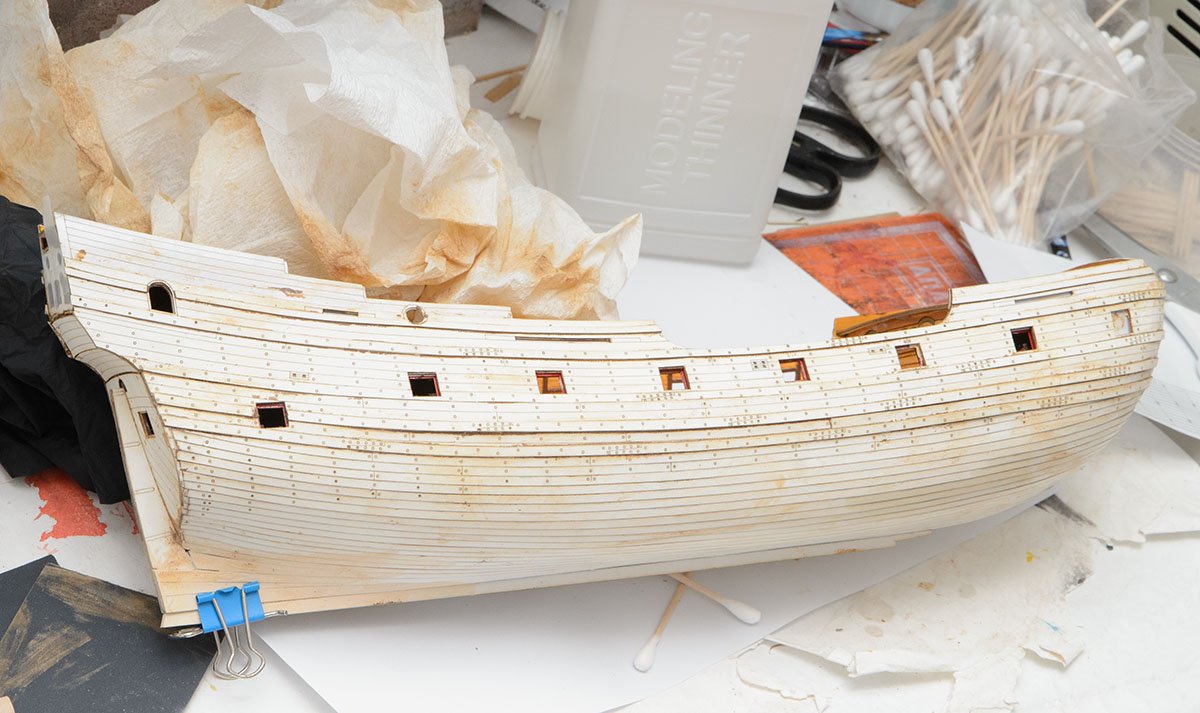
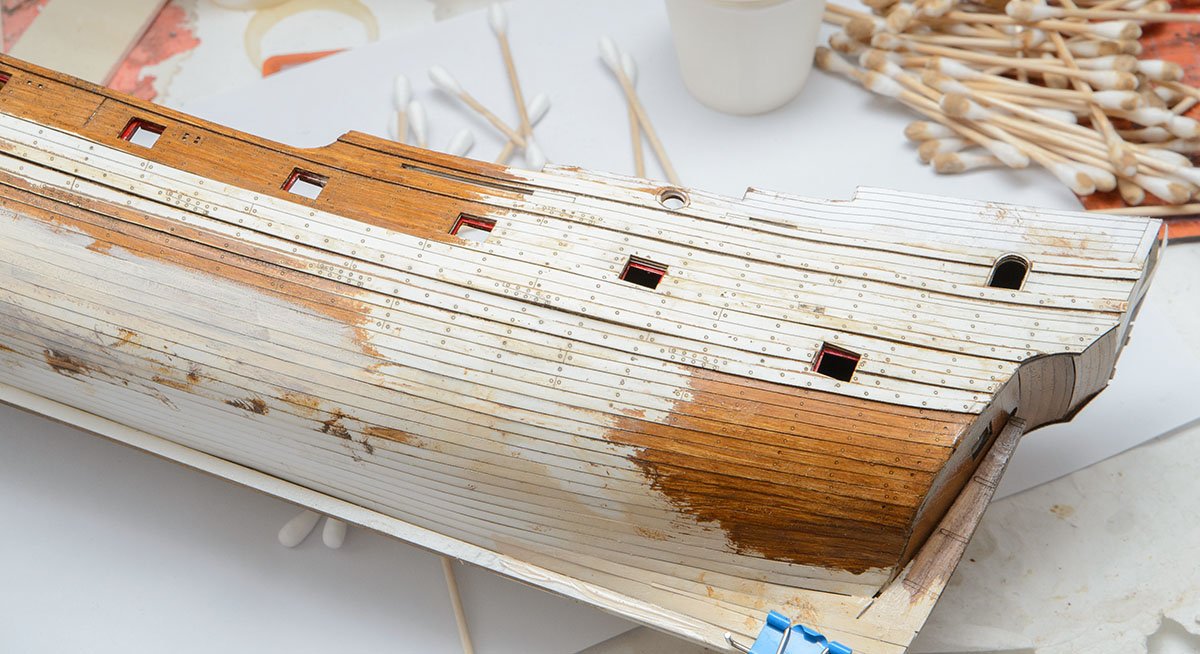
Thanks to Bob Cleek's idea, I began antifouling work. A mineral spirit, which is the best for enamel, didn't work, so I'm using lacquer thinner, which is stronger. The lacuquer thinner also removes acrylic paint base, but the coated paper hulls bear it well, fortunately. Also, thank you for your concern for health. I have a fan-ventilation paint booth and am wearing a big gas mask. It is the best way to protect myself in the given situation. I found appropriate oil varnishes. The second picture shows exactly same surface that happened to the hull. I bought a new cheap lacquer spray from a different company, and I guess a different ingredient caused the issue. The first picture is a Golden MSA lacquer spray, which is the most expensive one. It works just as well as my old, cheap lacquer spray can from different company. The third picture is a Zinsser dewaxed shellac liquid. It also made a durable surface with no issues. This is only 12 hour short term test. I'll be watching how they're changed. It is a bit off topic. I applied shellac to any wood parts before I applied an oil based gel stain. I believed that the wood conditioner would make surface more flat, so I could paint it more uniformly. In my opinion, the method of applying shellac is determined by the purpose of the painting. I want to remove the grain pattern on a wooden model, so I use shellac as a wood conditioner. If someone wants to show explicit grain patterns of raw wood, shellac isn't good choice. Making furniture is most likely the case in my thought.

-
@druxey Yes. I respect the water-oil paint rule, but I sometimes feel that I can use a water based paint at the first-primer layer. The Shipyard cardboard kit combines elements of both wooden and plastic model kits. Painting is essential to completing this kit, like a plastic sailing ship model kit. According to general painting guide for plastic kits, I used a clear gloss lacquer spray as a middle coatings between painting layers, which gives a protective surface and prevents blending each layers. The final coat of varnish will be a clear matte lacquer spray. The matte varnish tends to include stone dust, so it doesn't help in the middle of painting work. Uneven surfaces result in the additional painting layer with irregular staining. Of course, I'll apply another matte varnish because the lacquer spray made this accident... I can't tolerate it if this thing happens again at the very end of assembly. 😱
-
@Jaager Yes. It is a cardboard model from Shipyard. I didn't mention shellac before acrylic primer. I always use as much shellac as possible on all of the parts. The color of the acrylic primer was tan or flesh, and the color of the oil paint was brown. I needed two colors that contrasted each other to draw the wood grain pattern. The previous painting works were ok except for this entire hull. If I have to remove the acrylic primer, I need another tan-colored paint that doesn't interfere with oil paint or enamel. Previously, I had no problems with the lacquer spray for industrial. I used a lacquer coat to protect the oil paint surface from further assembly processes. My last works were fine, and the parts were smaller. I didn't try using shellac as a oil paint-varnish because the lacquer spray worked very well. I'm baking some oil painted test beds to try a new set of varnishes, and I'll add the shellac to the list!
-
Thank you so much, Bob! I gave up trying to repair the cracked surface and began sanding the entire surface with 800 grit sanding paper. 😂 One of your answers is very promising, so I'll remove all the oil-surface with lacquer thinner. It is definitely easier than sanding work!

-
I have a question about oil paint varnish. This is my first time using oil paint. I applied paint layers like this. I used Winsor & Newton Liquin medium to accelerate the drying of oil paint. The entire model went horribly wrong once I applied the lacquer spray. 😱 It didn't happen when I tested the oil paint and lacquer spray. How can I fix the cracked surface? which oil varnish should I use in this case?
-
It is super easy and only time-consuming trick. Even children can do better than me. Thanks to the newly learned skill, I'll try building plastic sailing ship kits in the near future. I'll upload tutorial video while I'm waiting for the oil paints to dry.
-
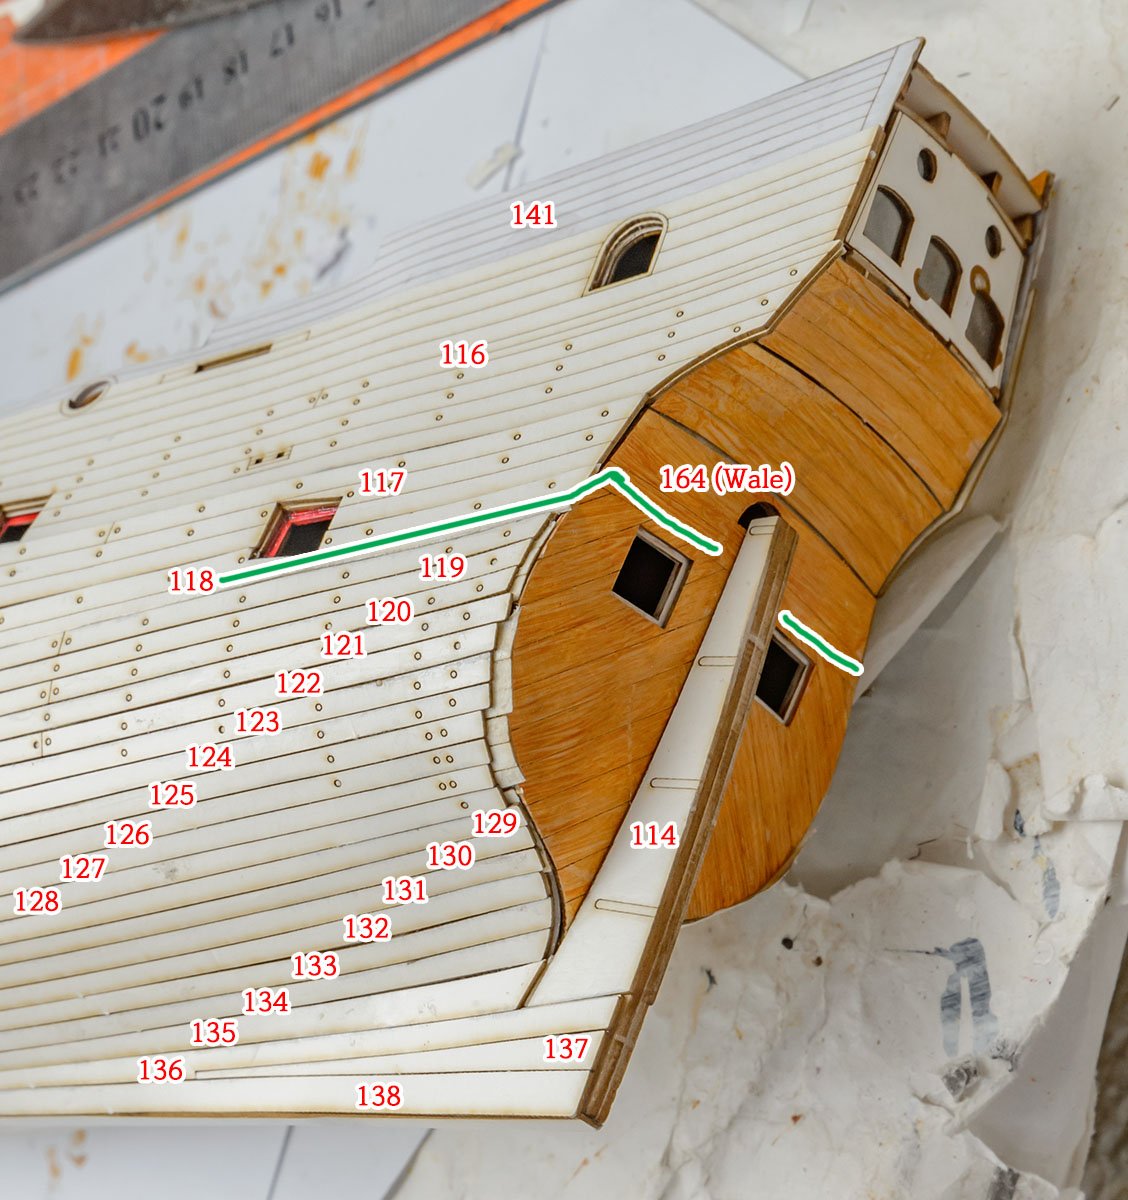
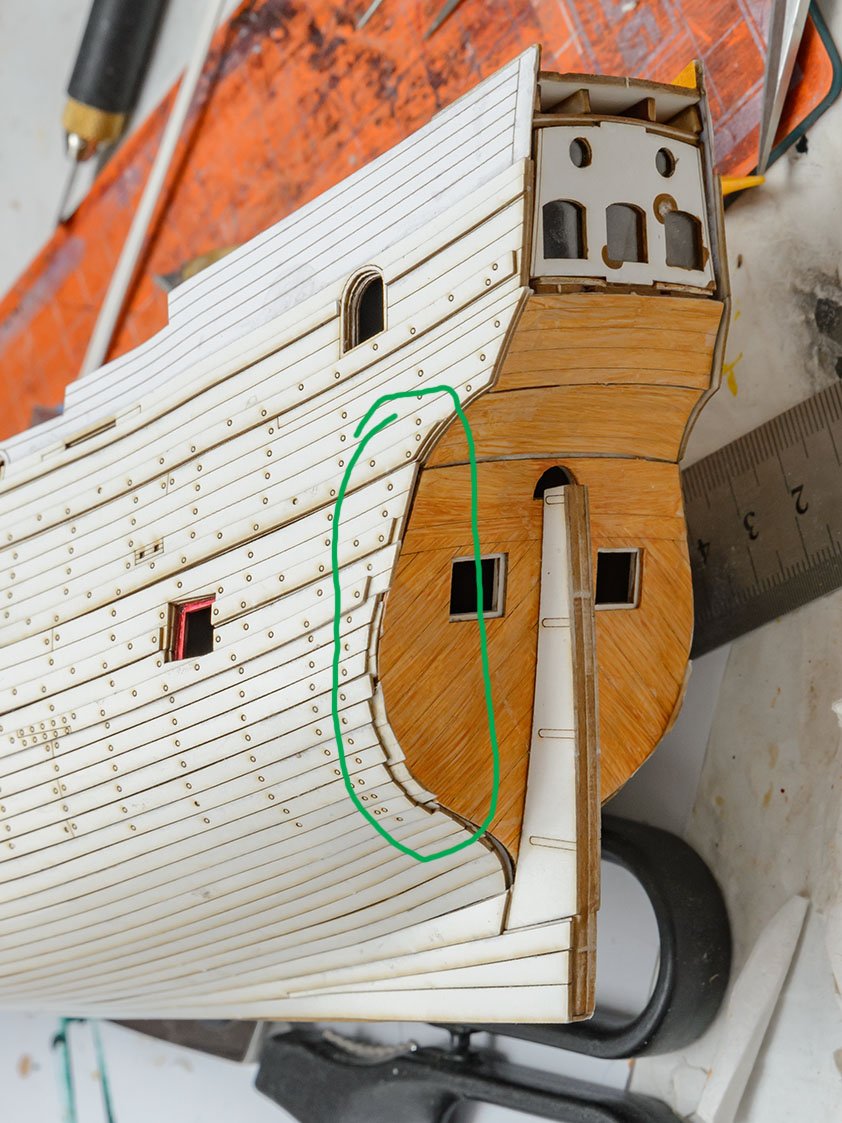
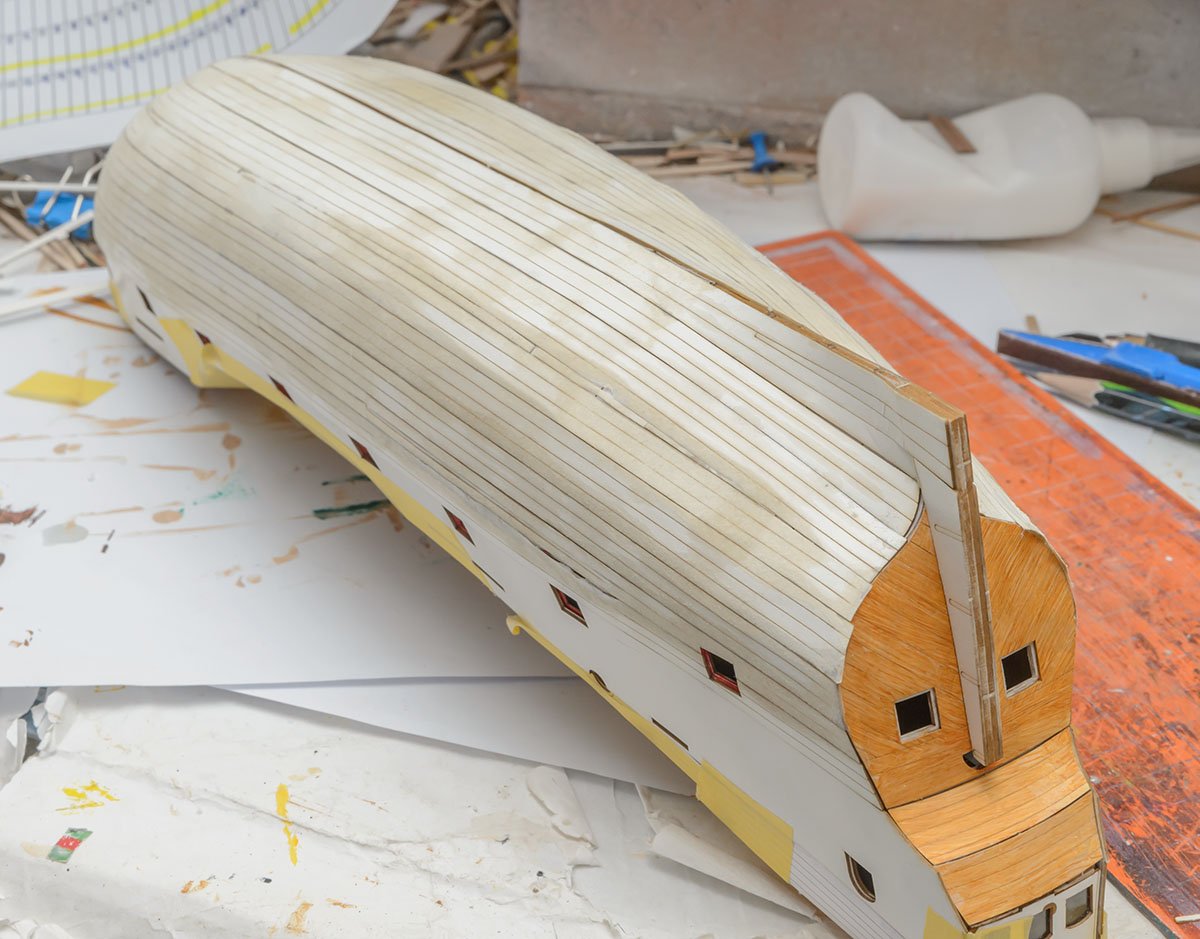
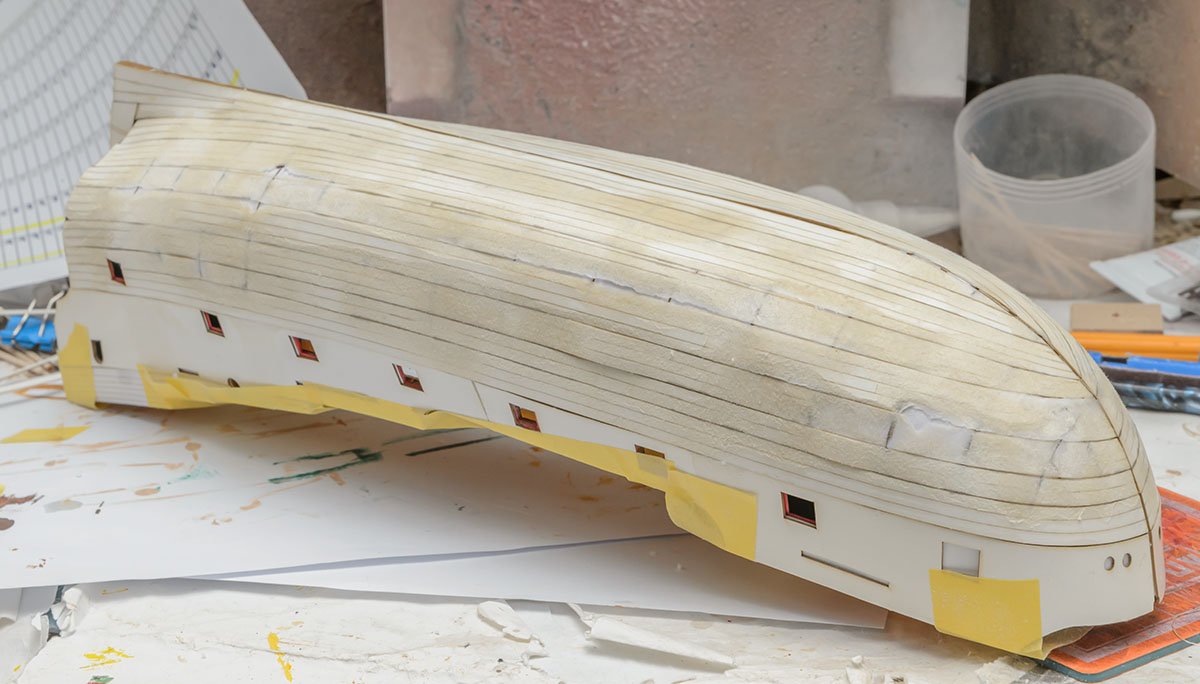
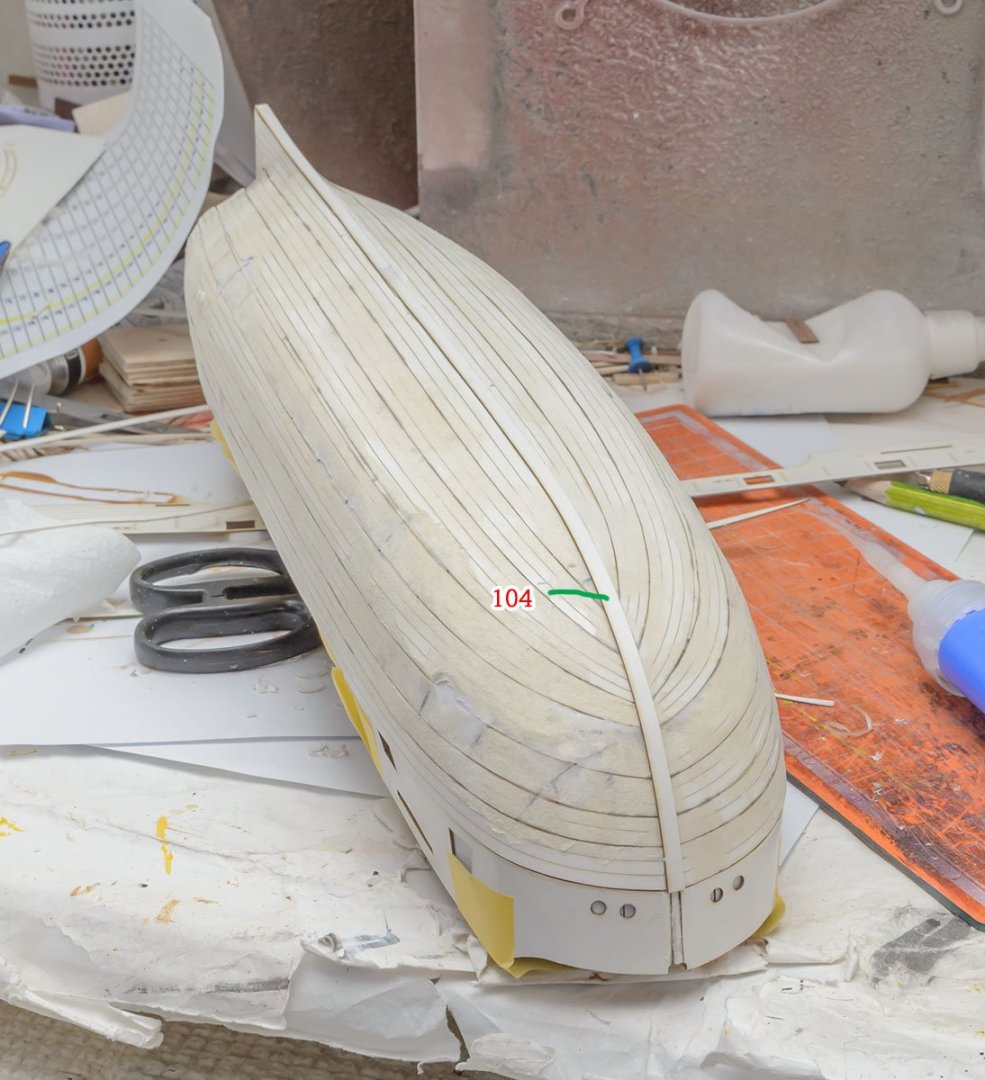
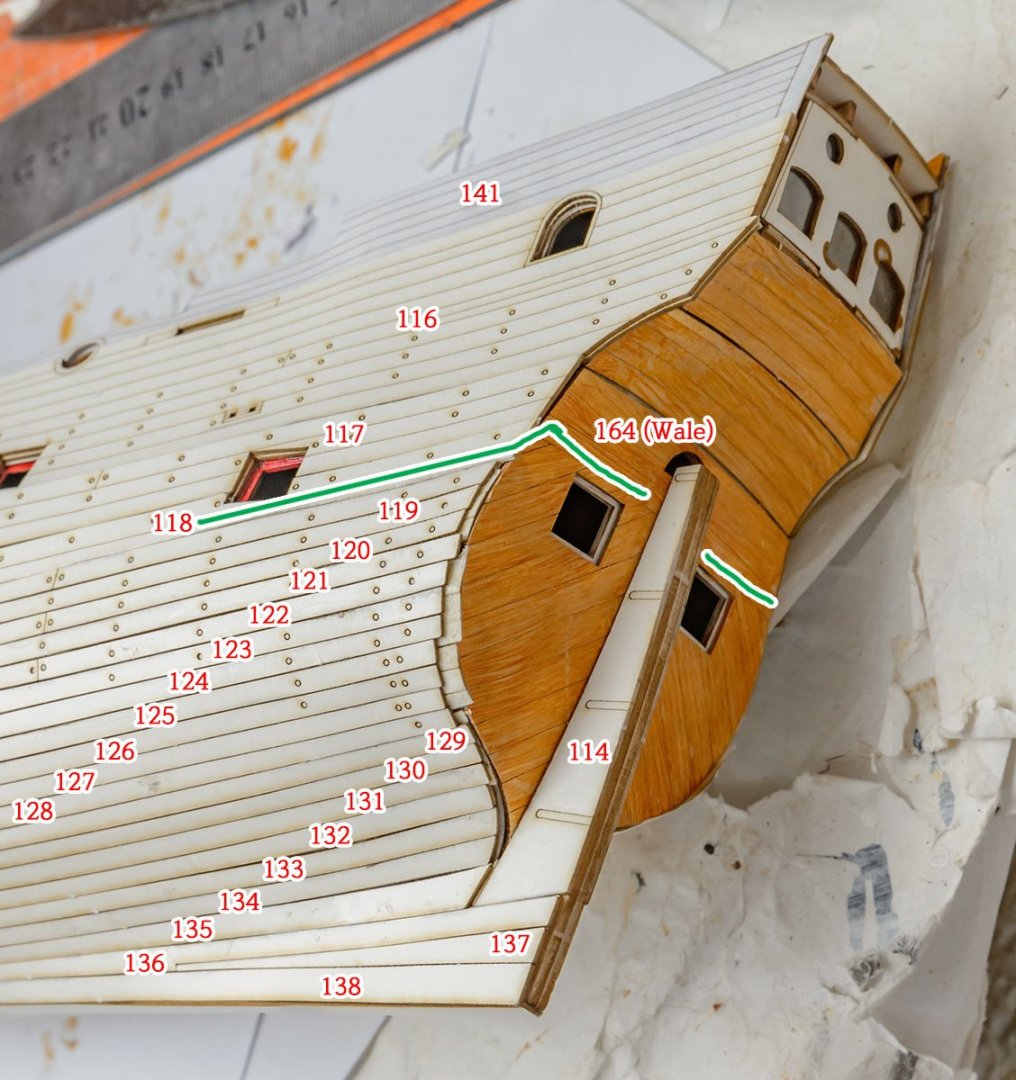
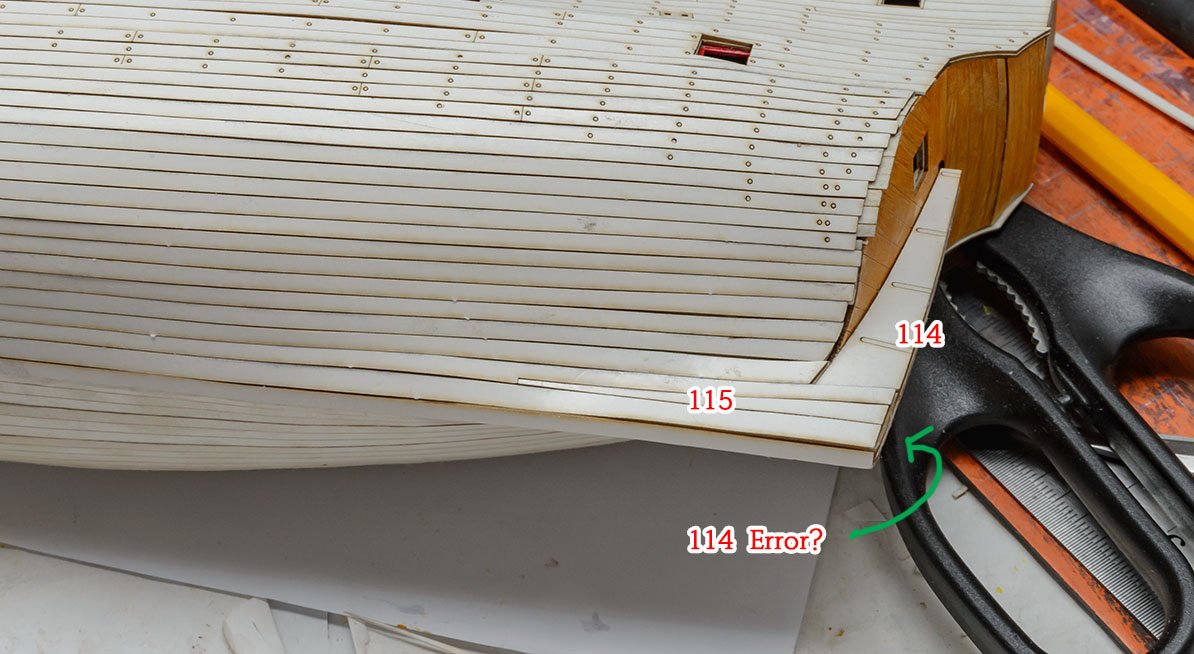
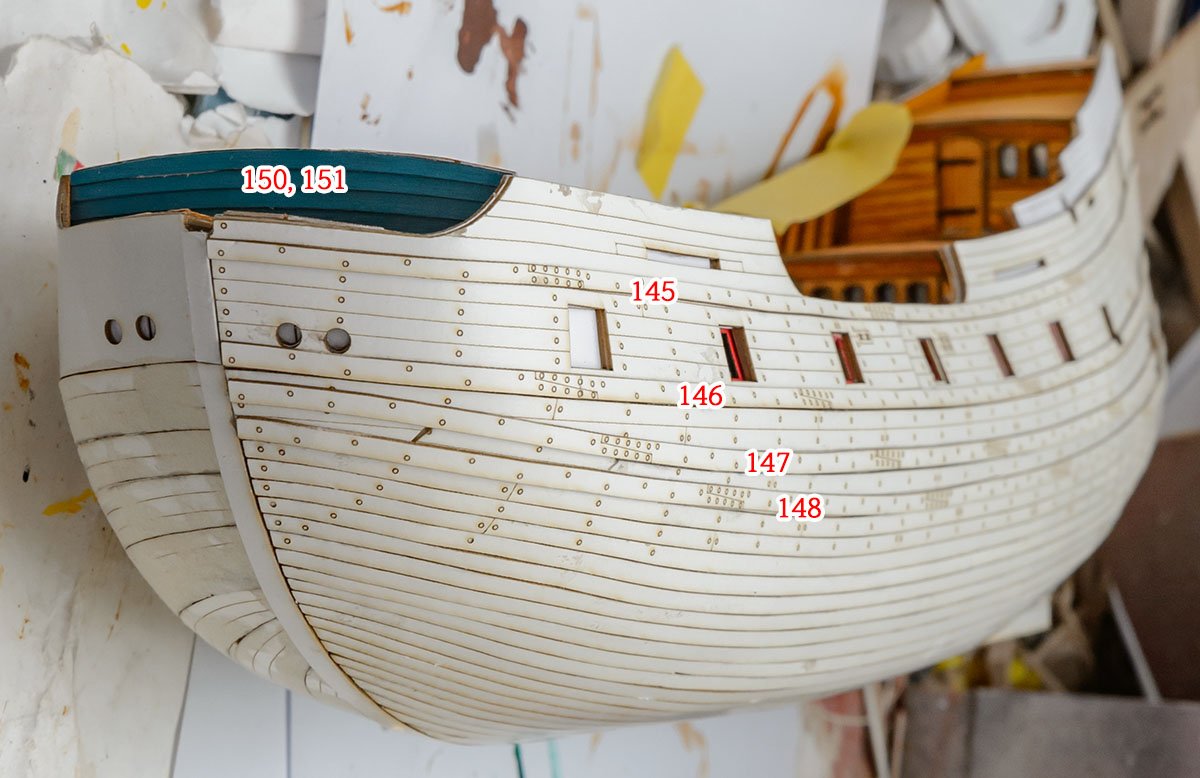
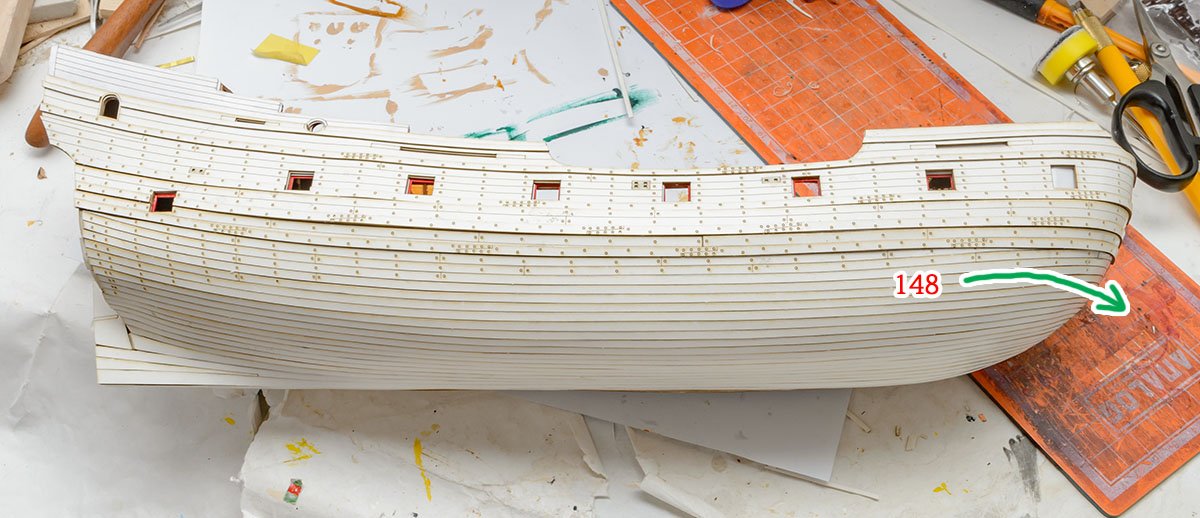
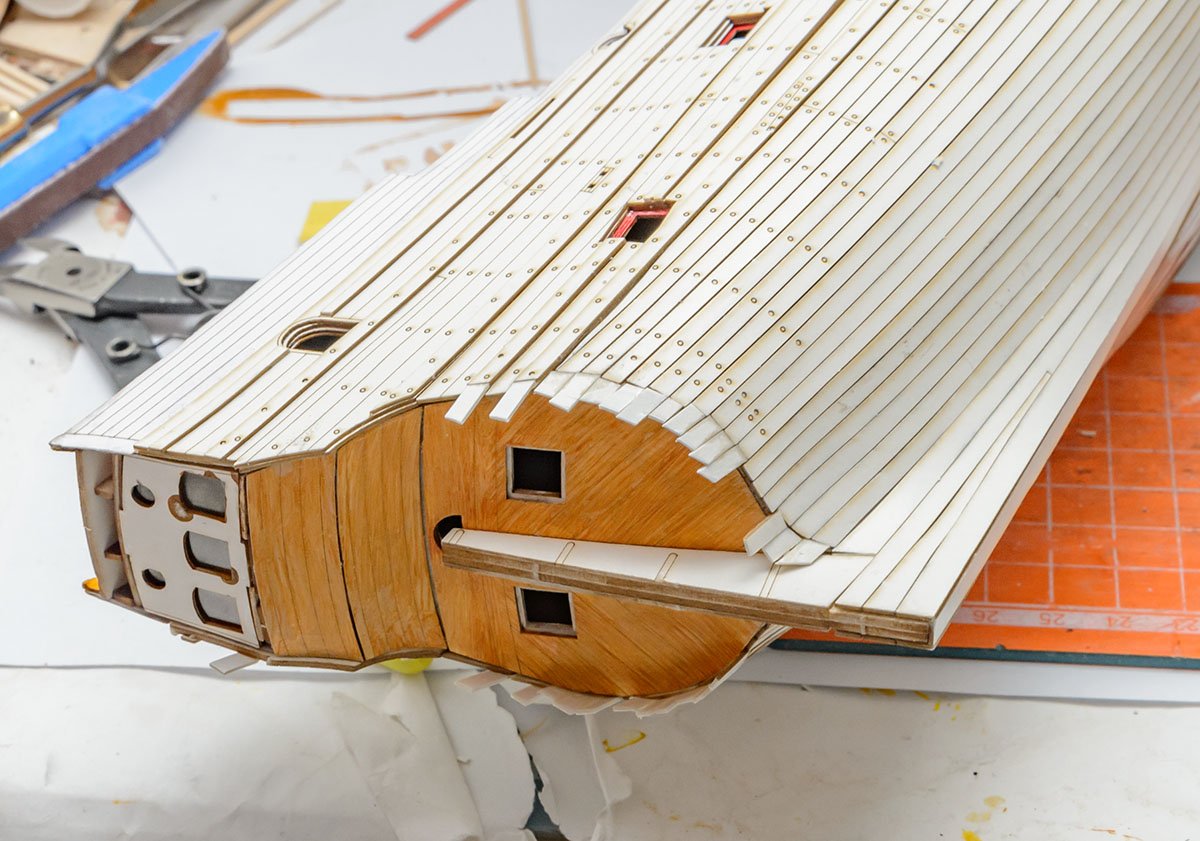
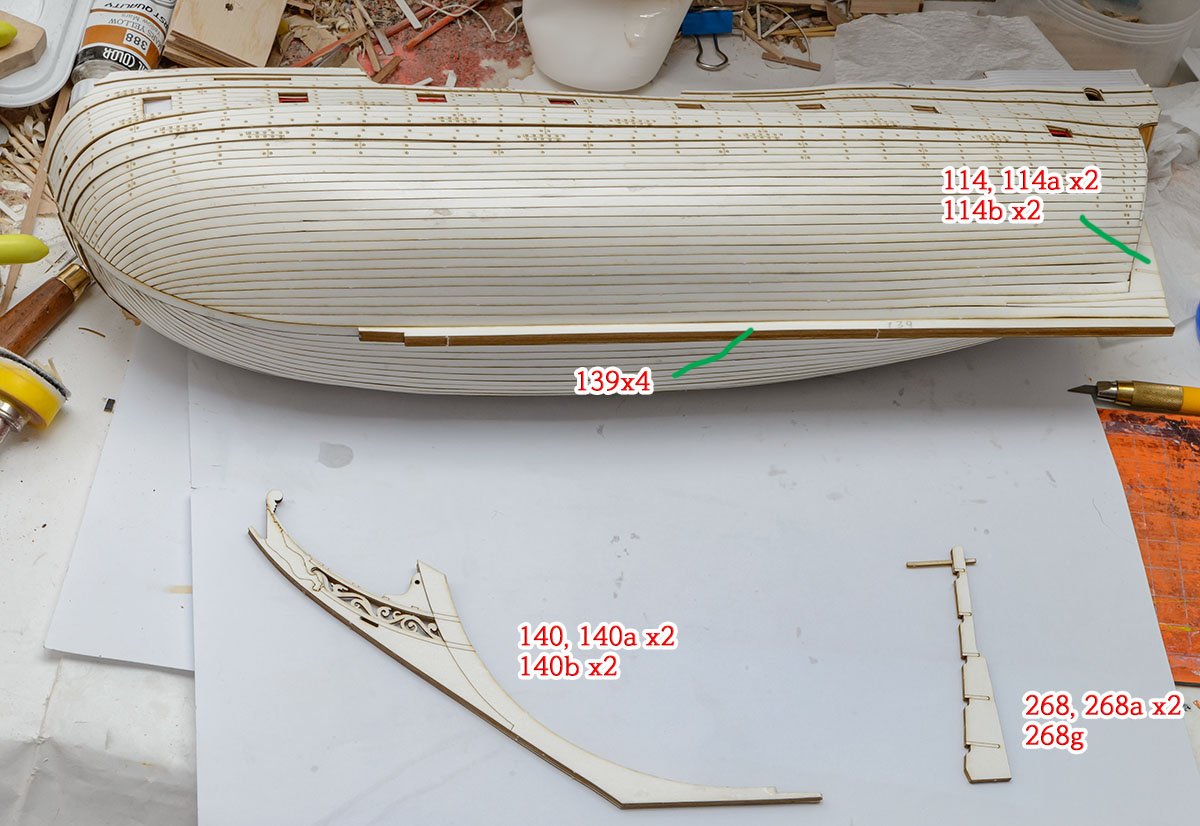
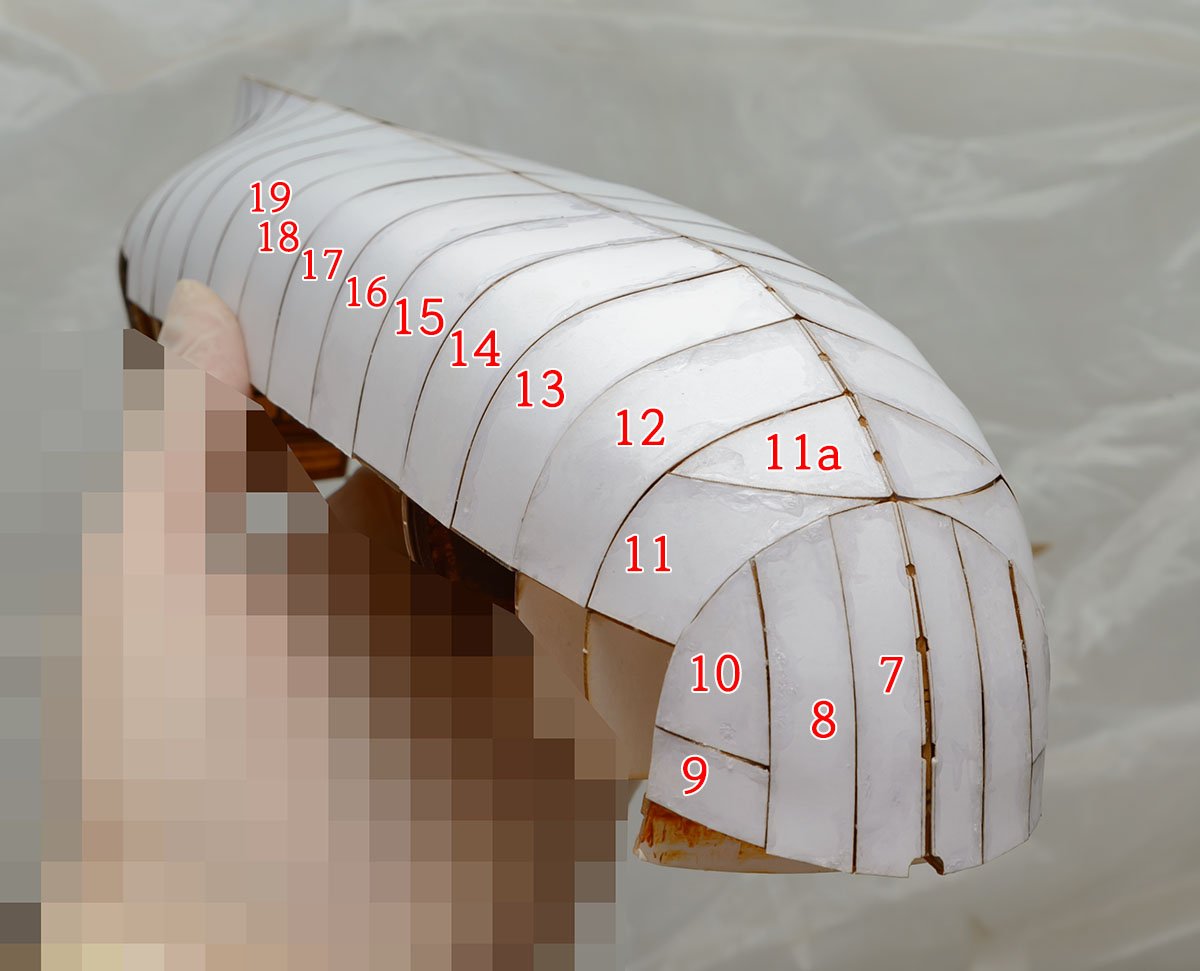
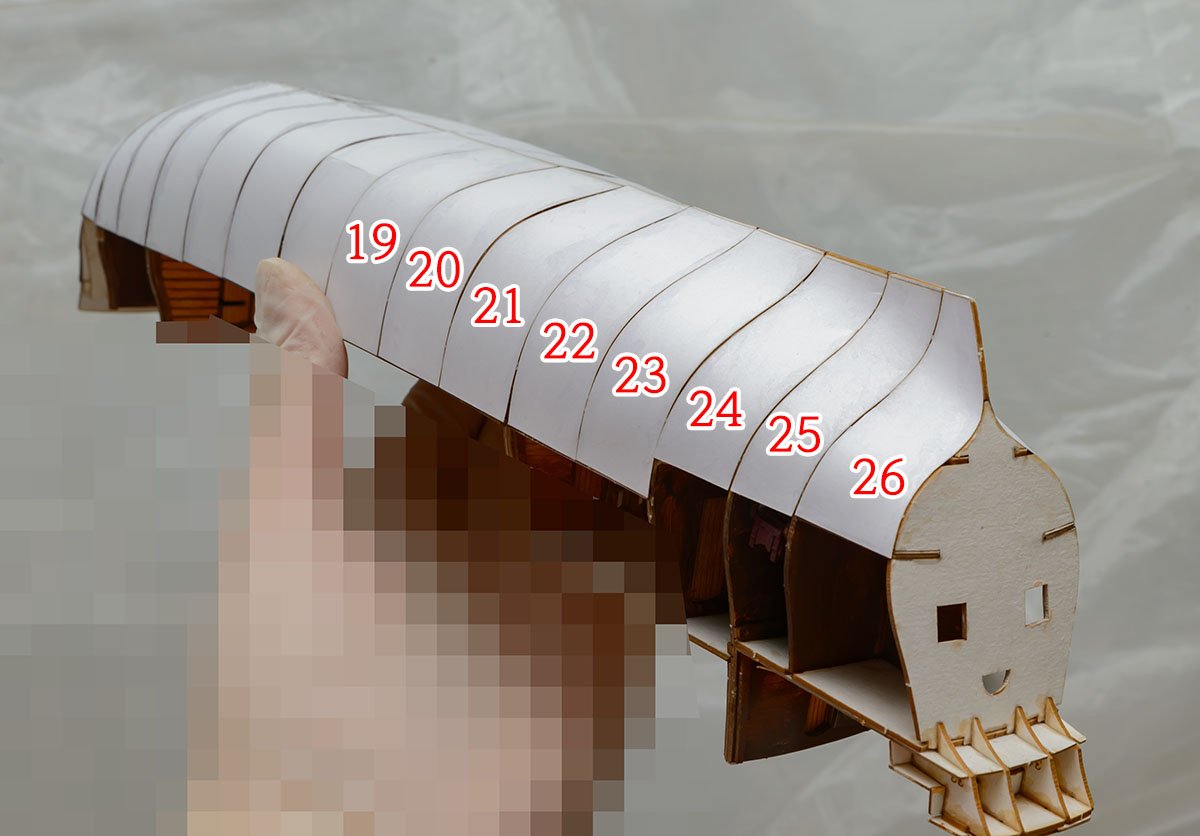
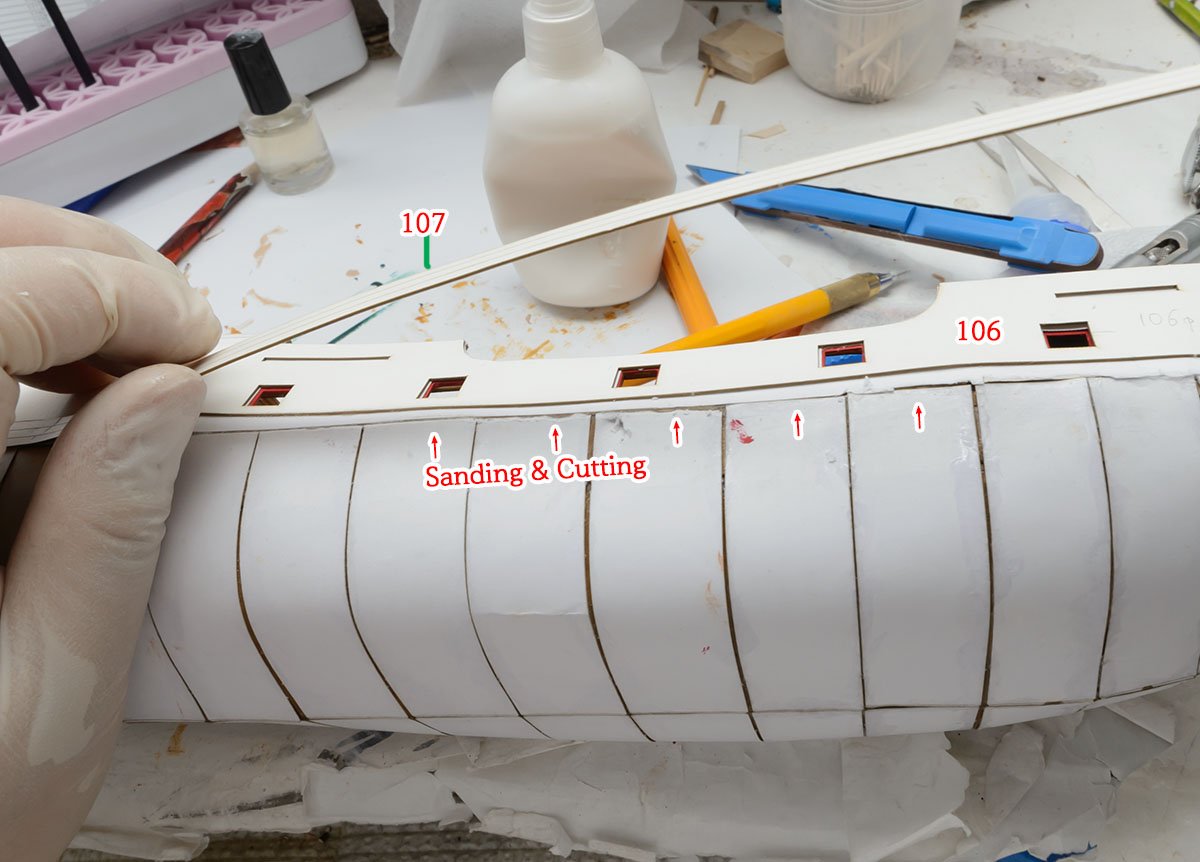
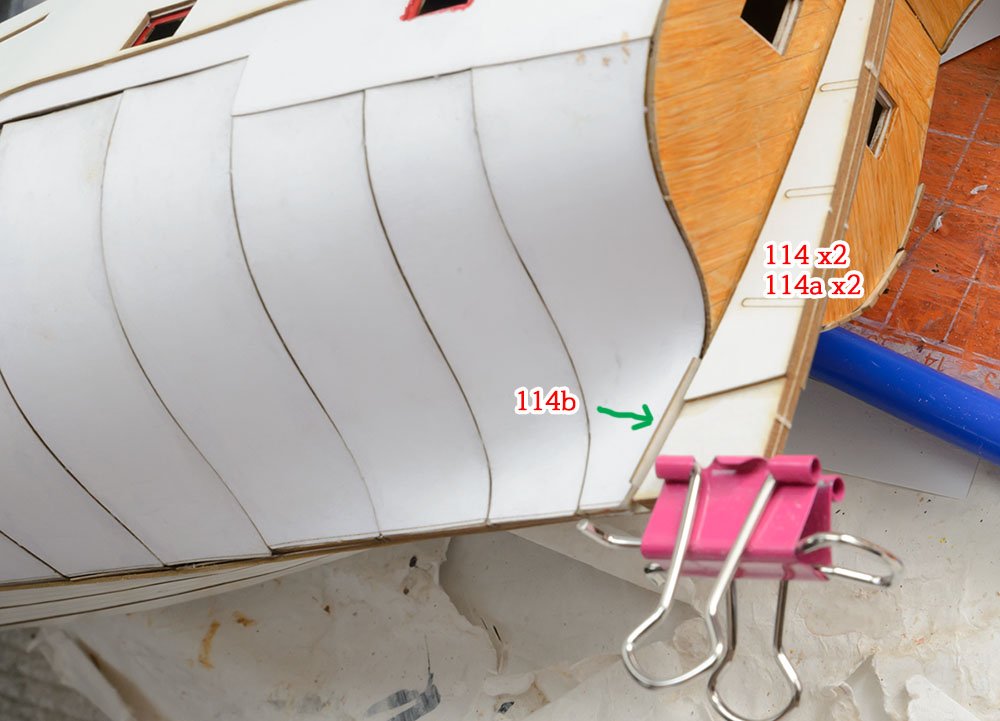
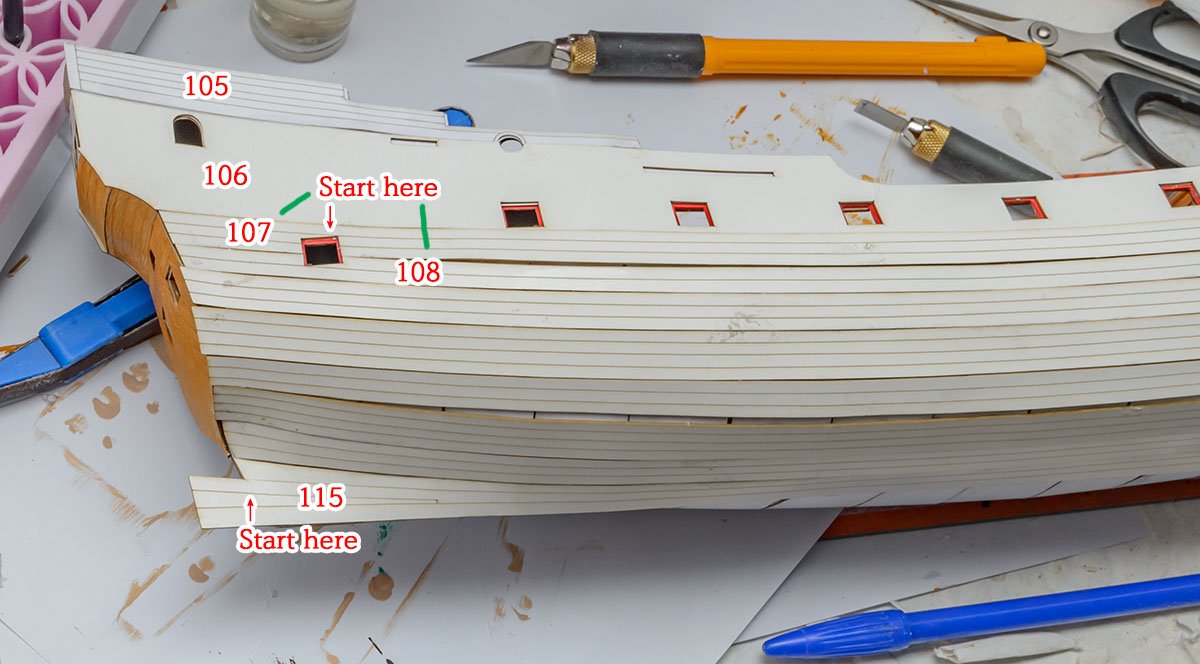
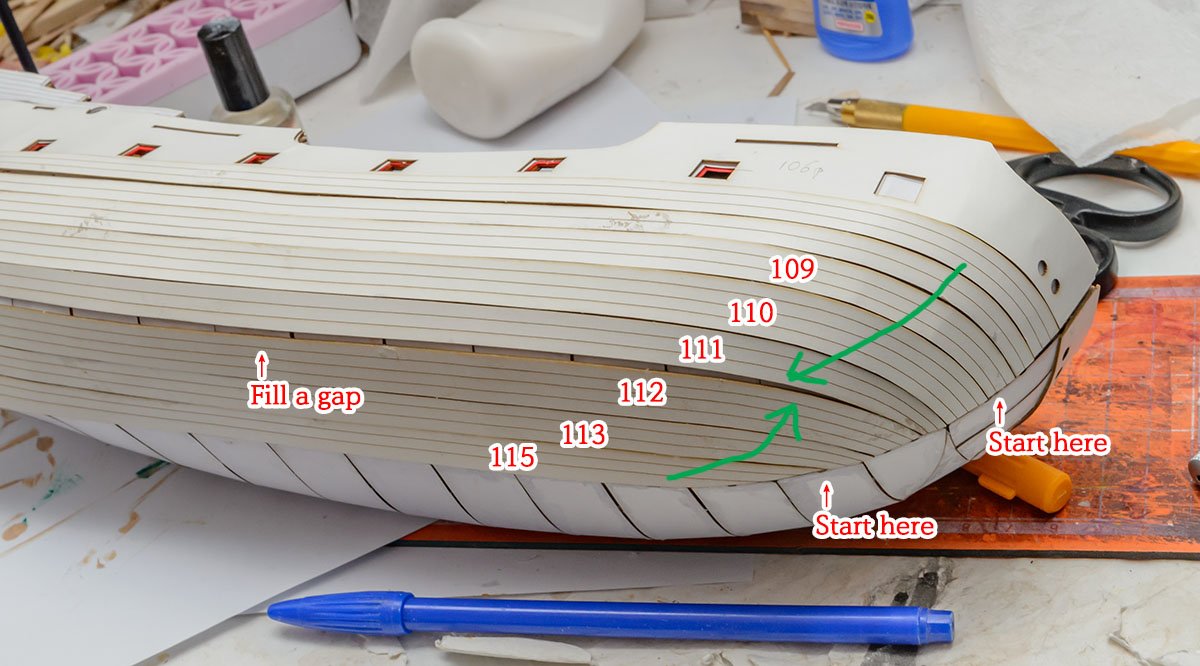
I carefully sanded the 1st planks. It is essential to successful hull planking. And then, I found my critical mistake. The 104 part should have been glued before the 105~116-1st planks. Because I glued the 1st planks in the wrong position, further hull planking and related parts were affected by the huge mistake. 😱 The second planking is done. As you can see, I couldn't use the guide lines on the 1st planking. The second plank was positioned incorrectly, resulting in an uneven wale lines. I guess the 114 parts are wrong. It is good to sand the bottom of the 114 to make the keel an even thickness. I added wales in the wrong place. This is the opposite side. 😭 Another wales. Patching before painting. It is the end of the second planking. I glued 139 to start painting. I'm using oil paints with Winsor & Newton Liquin light gel, so it will take a few days.


-
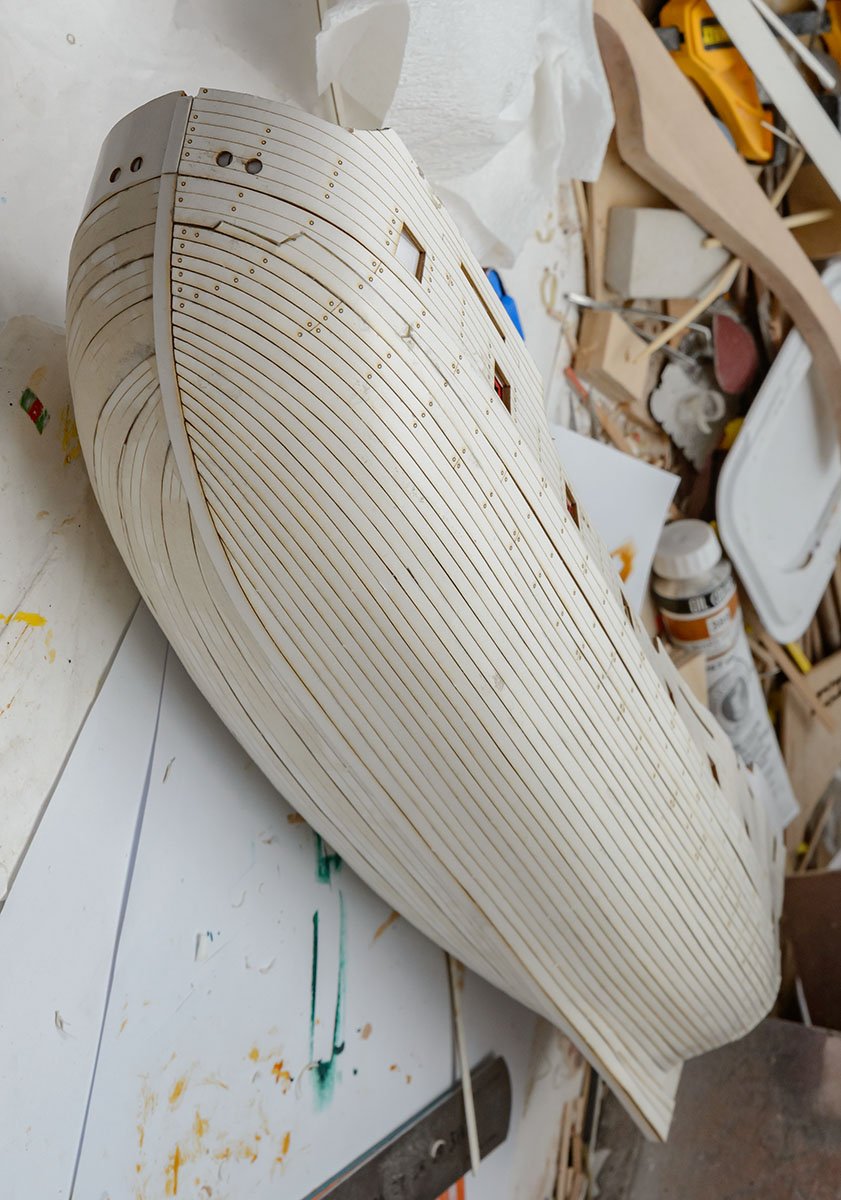
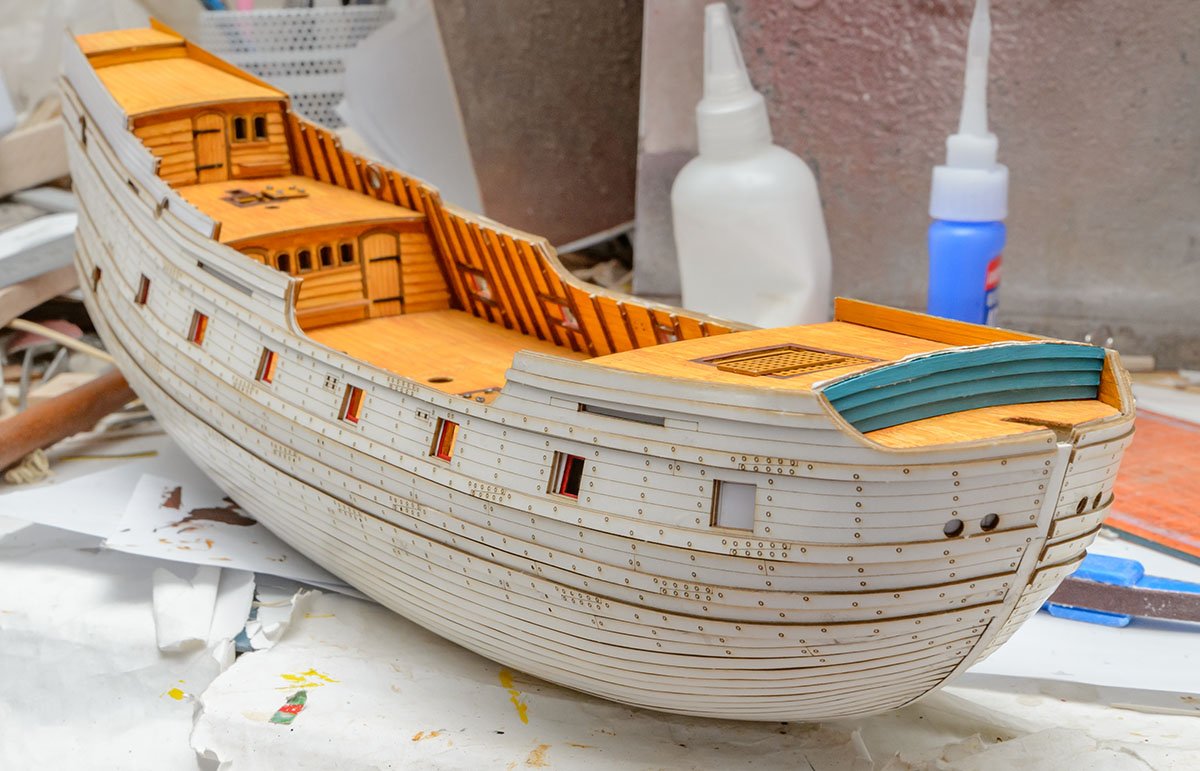
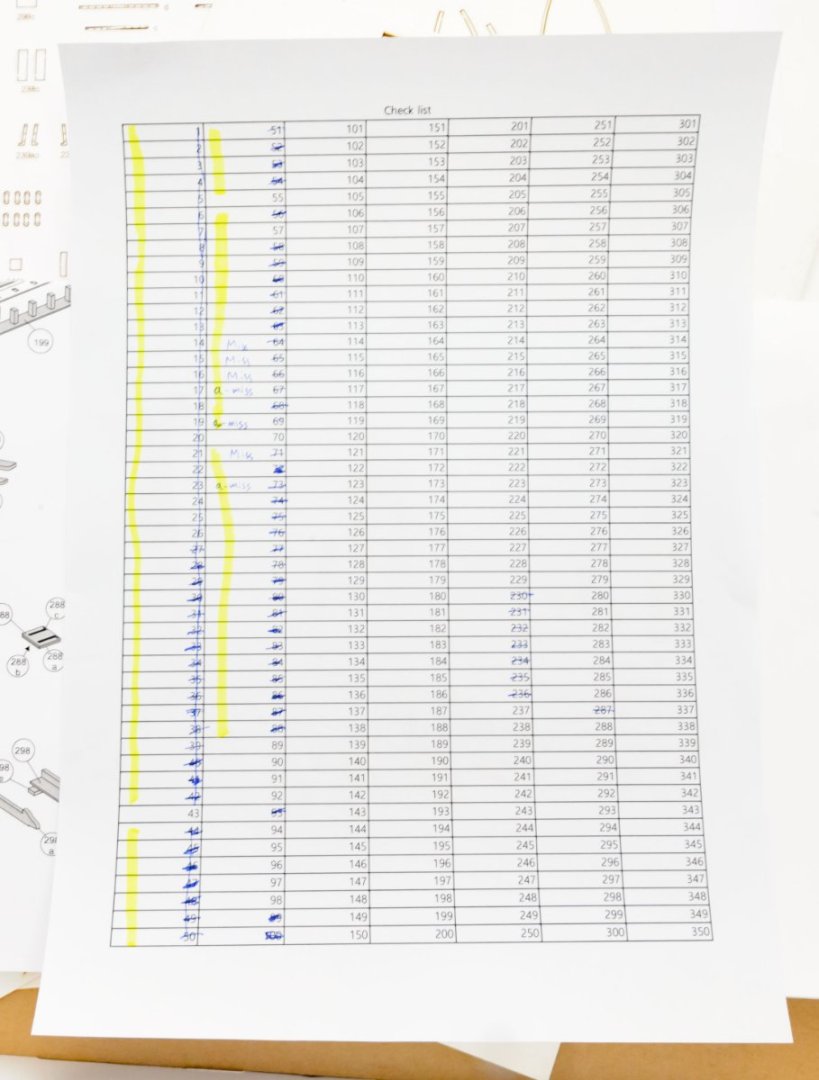
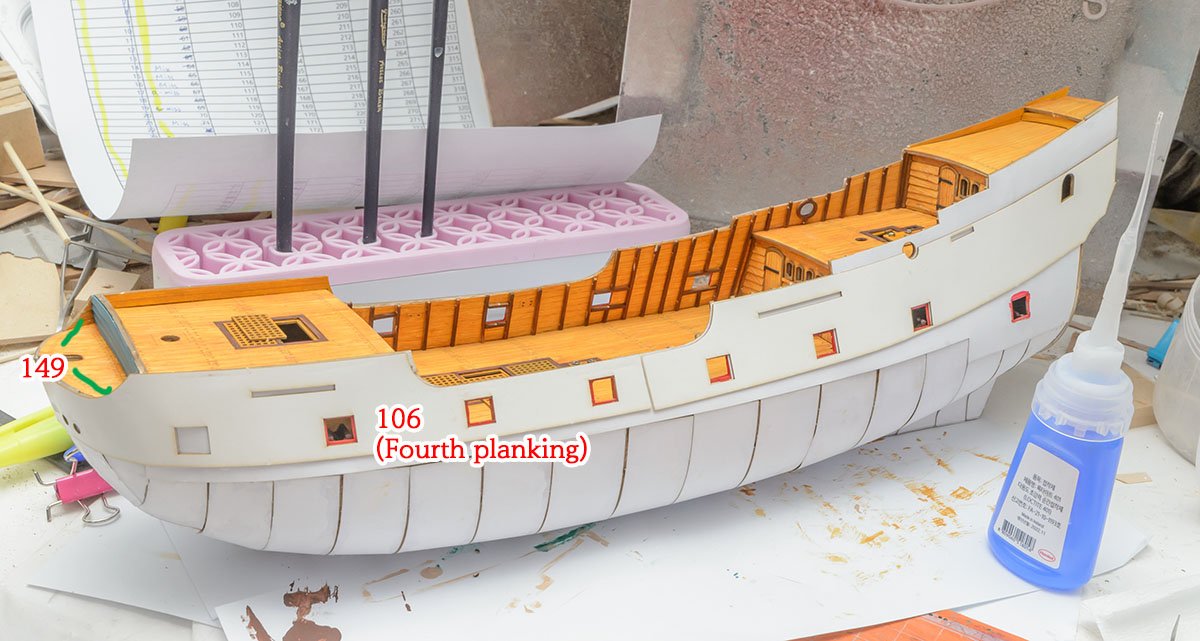
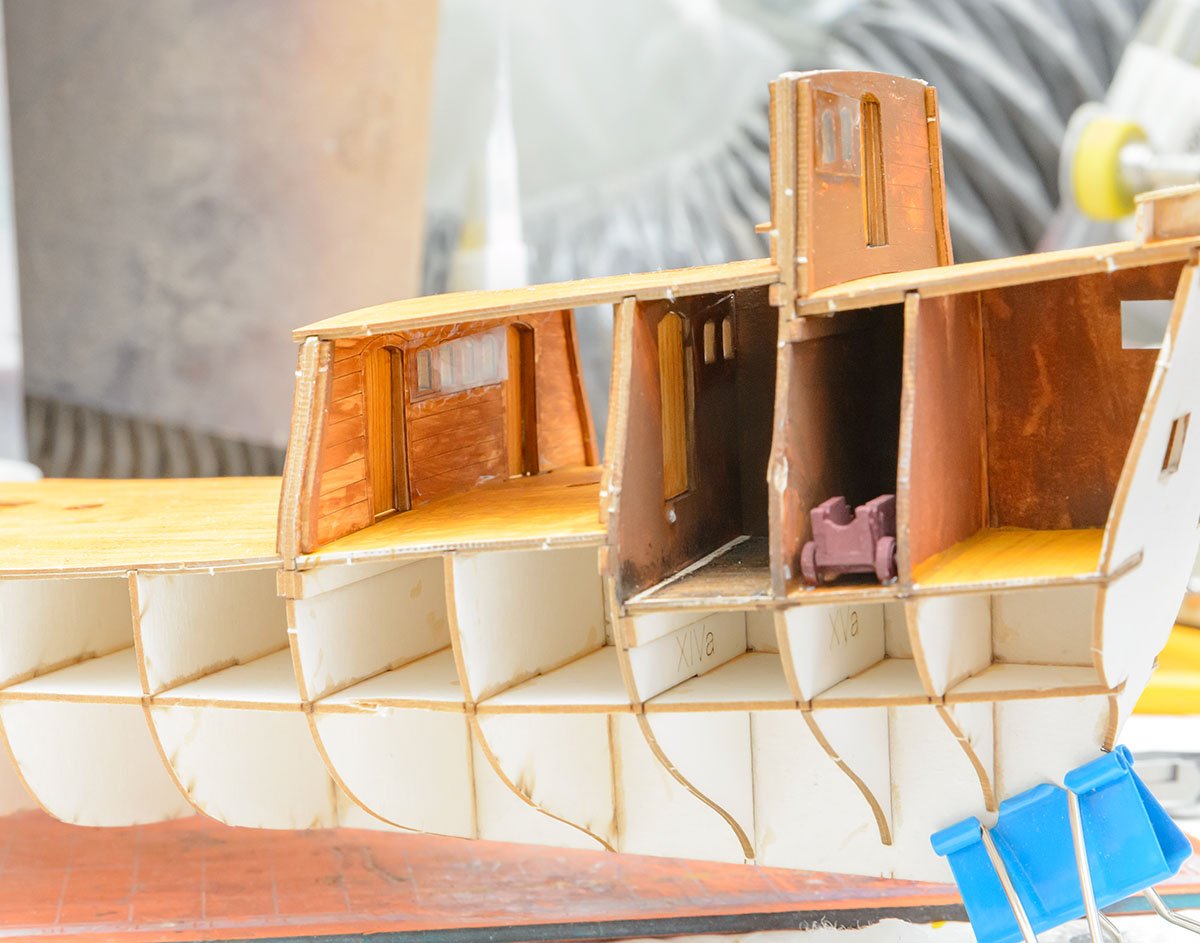
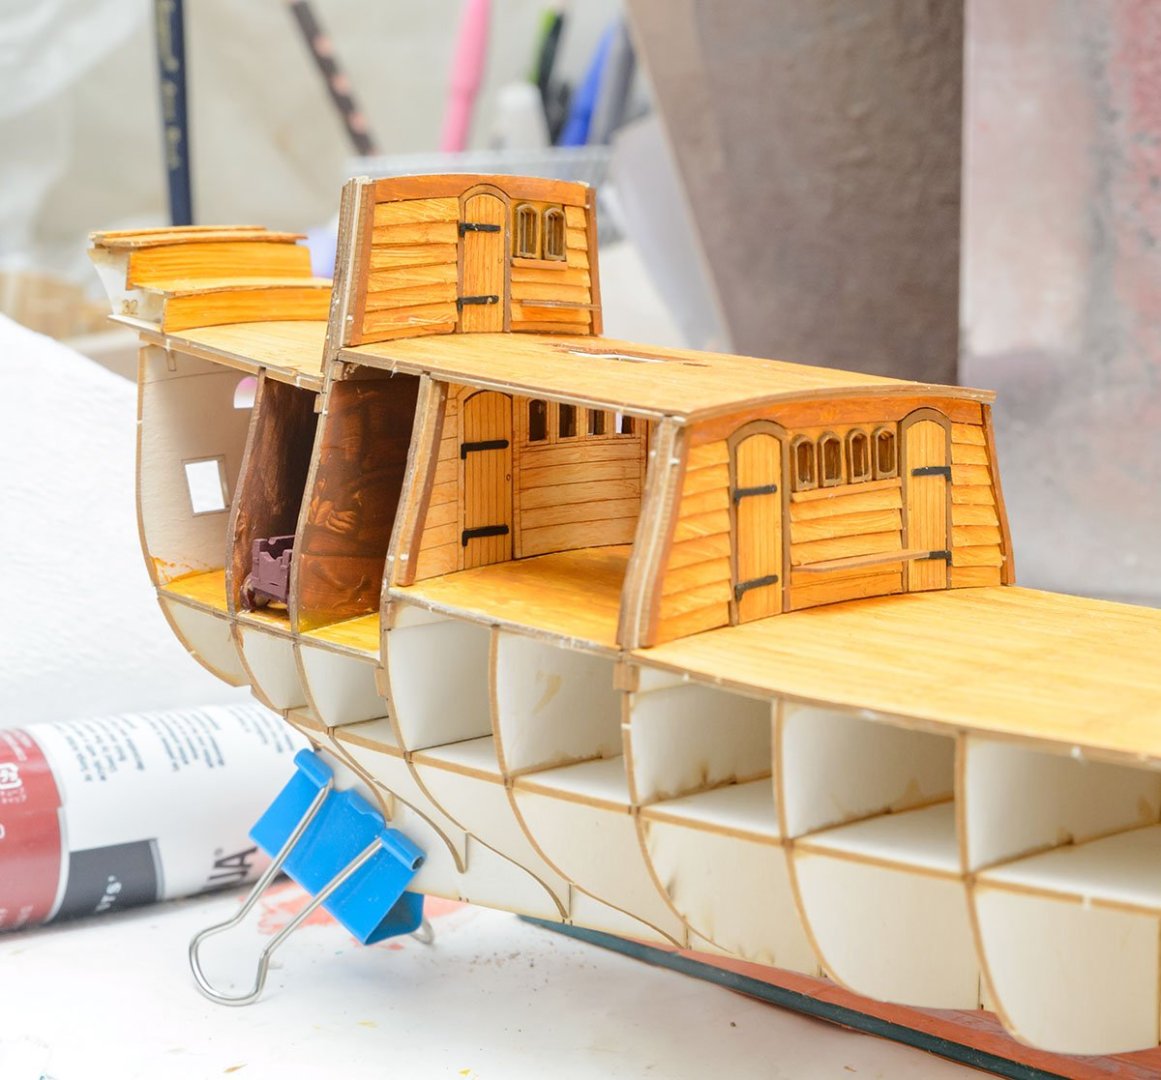
Welcome aboard, GrandpaPhil! Due to poor instructions and less readable part numbering system, I missed some parts in the previous build log. Fortunately, they are not important parts. I strongly advise new Shipyard kit builders to take pictures of all part sheets and print a parts check list. I missed these parts. 😱 😱 😱 😱 😱 😱😂😭🤪 The kit's instructions said that this kit has three planking layers. Actually, it has five planking layers. This picture shows the fourth planking, which is equivalent to the first planking layer of common wooden model kits, so I paid more attention to the fourth layers before I install the last-fifth layers. It's not the last process of the first planking... 😴
-
(Winsor & Newton Liquin Light Gel is the best to harden oil paint within a day.) I agree with Chris' idea. For young people, painting is difficult to learn and time consuming. Before I painted the wood grain patterns, I had to a lot of research, which took a lot of time and money. This kit is more than 10 years old, so it would be better to launch a new painted-laser-cut edition to attract newcomers. I'm ready to go hull planking. It was so much fun thanks to super accurate model, but the instructions were wrong or omitted important parts. Because the other things are nearly perfect, poor instruction is the only notable problem with this kit. The second issue is a painting.


-
https://www.amazon.com/Ships-Christopher-Columbus-Santa-Anatomy/dp/1557507554 https://www.abebooks.com/servlet/BookDetailsPL?bi=31405429196&searchurl=isbn%3D9781844860142%26n%3D100121503%26sortby%3D17&cm_sp=snippet-_-srp1-_-title1 Here is another link to the AotS book at $55. When you receive the book, your question about the forecastle will be solved. Oh, I can't wait to show you a cheat sheet. The AL Santa Maria is a type of Nao based 1990 replica, which is one of the three kinds of Santa Maria in the AotS book. The plan you bought before may be a galleon Santa Maria. They are very different ships. Good luck on your build!
- 59 replies
-
- 3
-

-
- Santa Maria
- Artesania Latina
- (and 1 more)
-
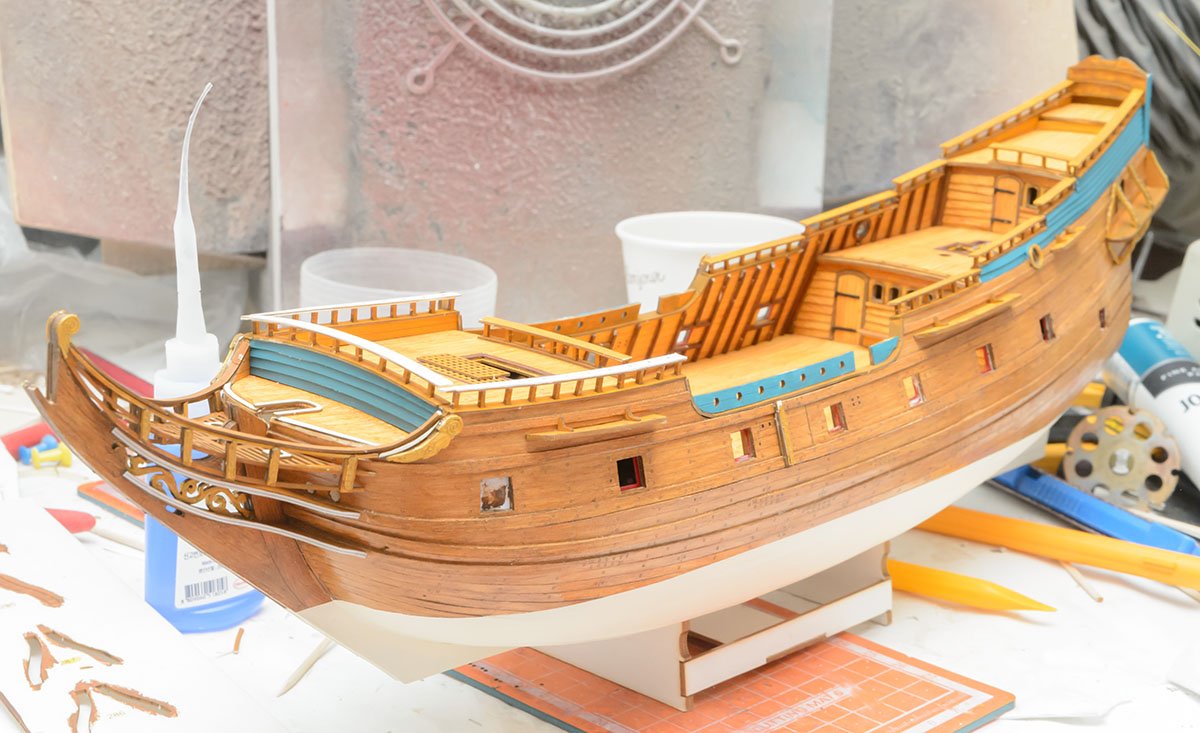
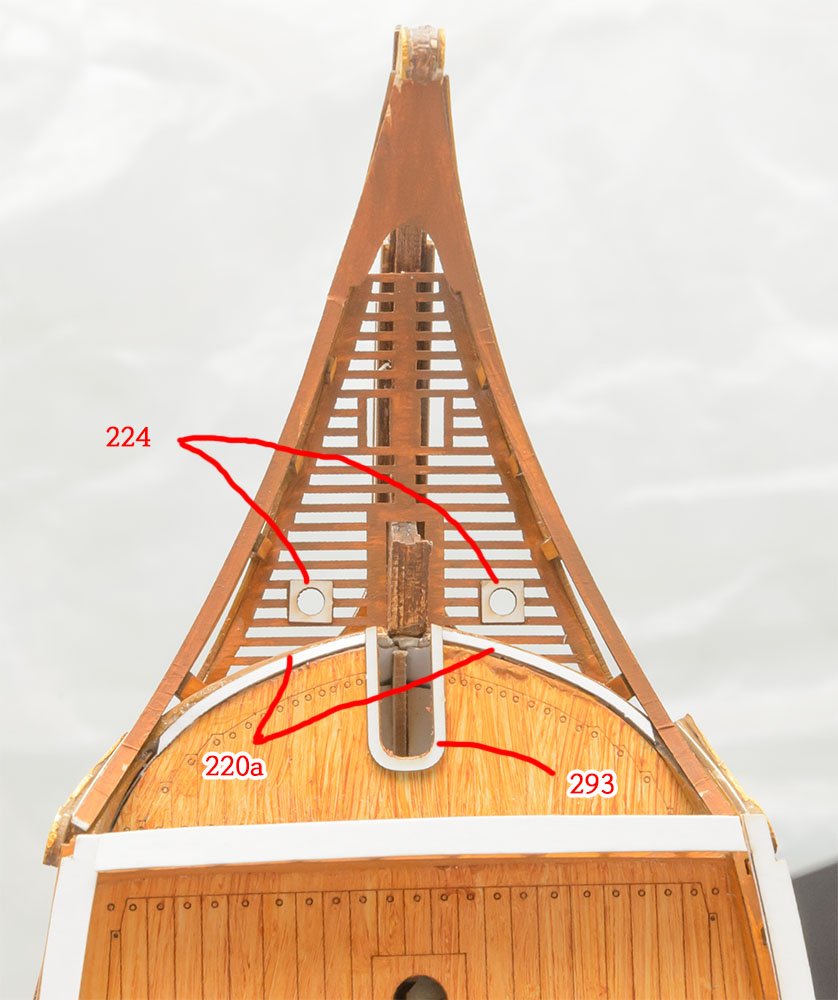
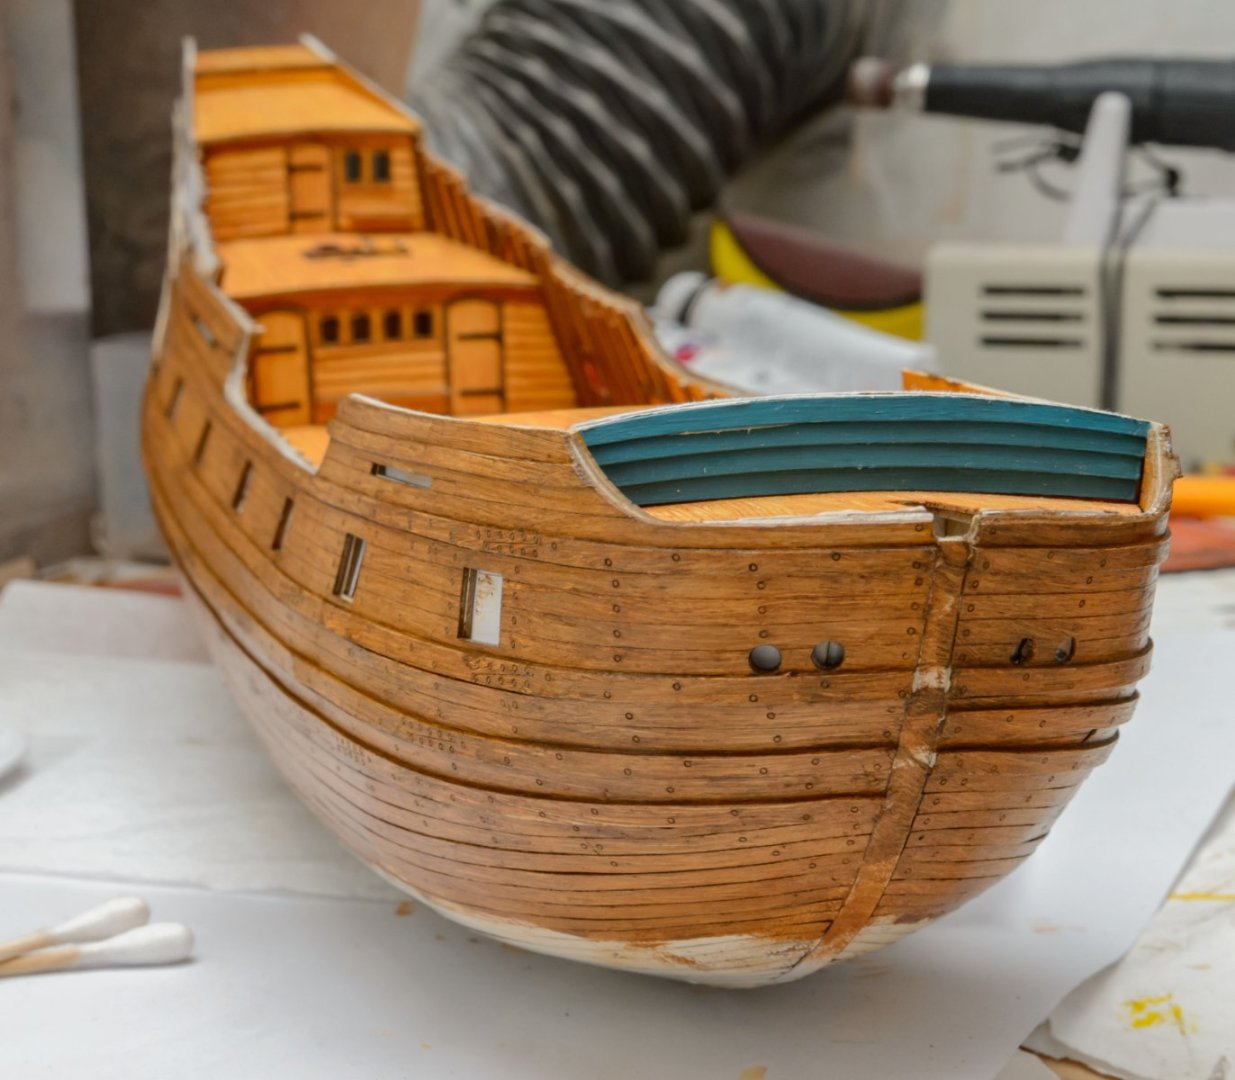
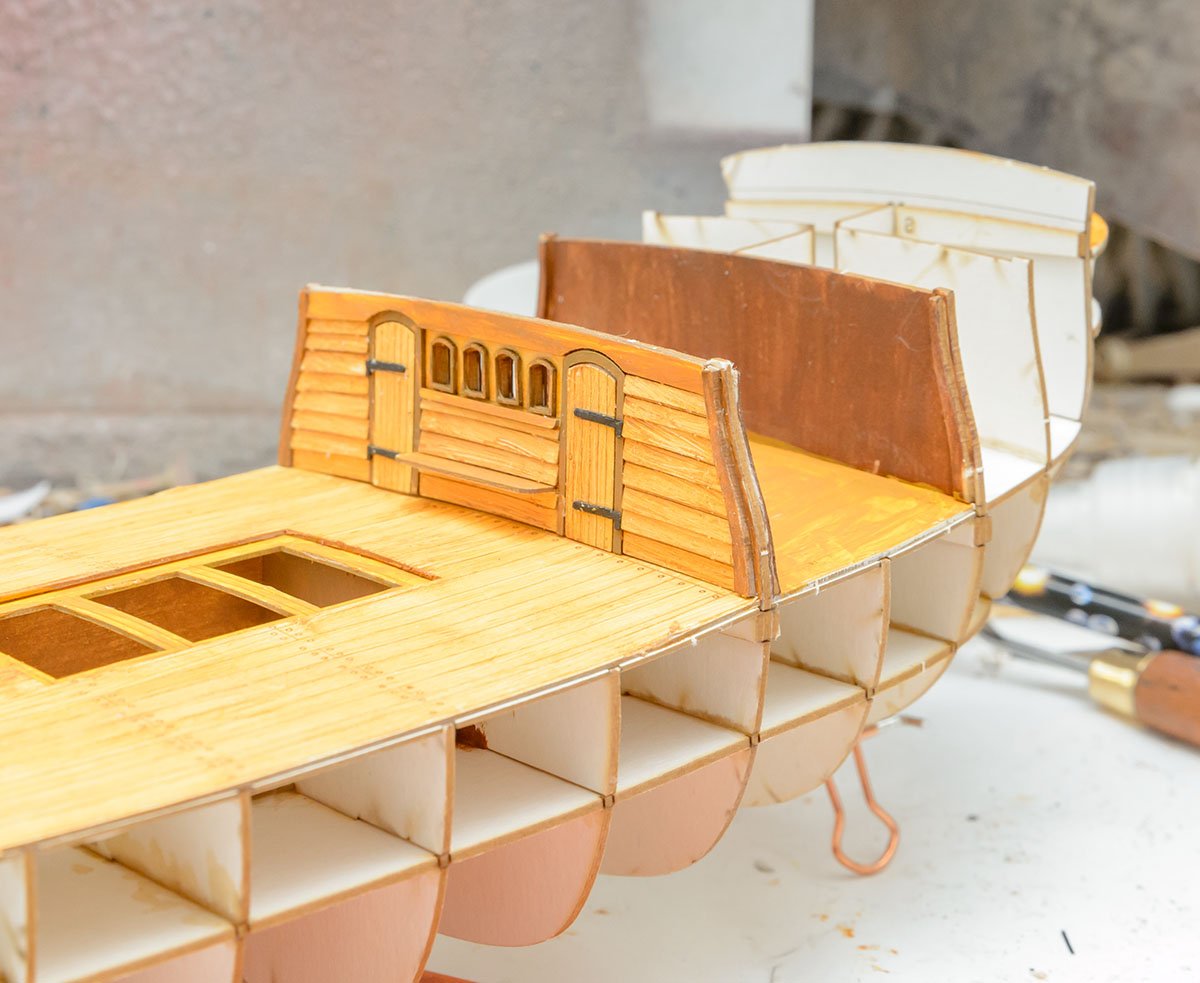
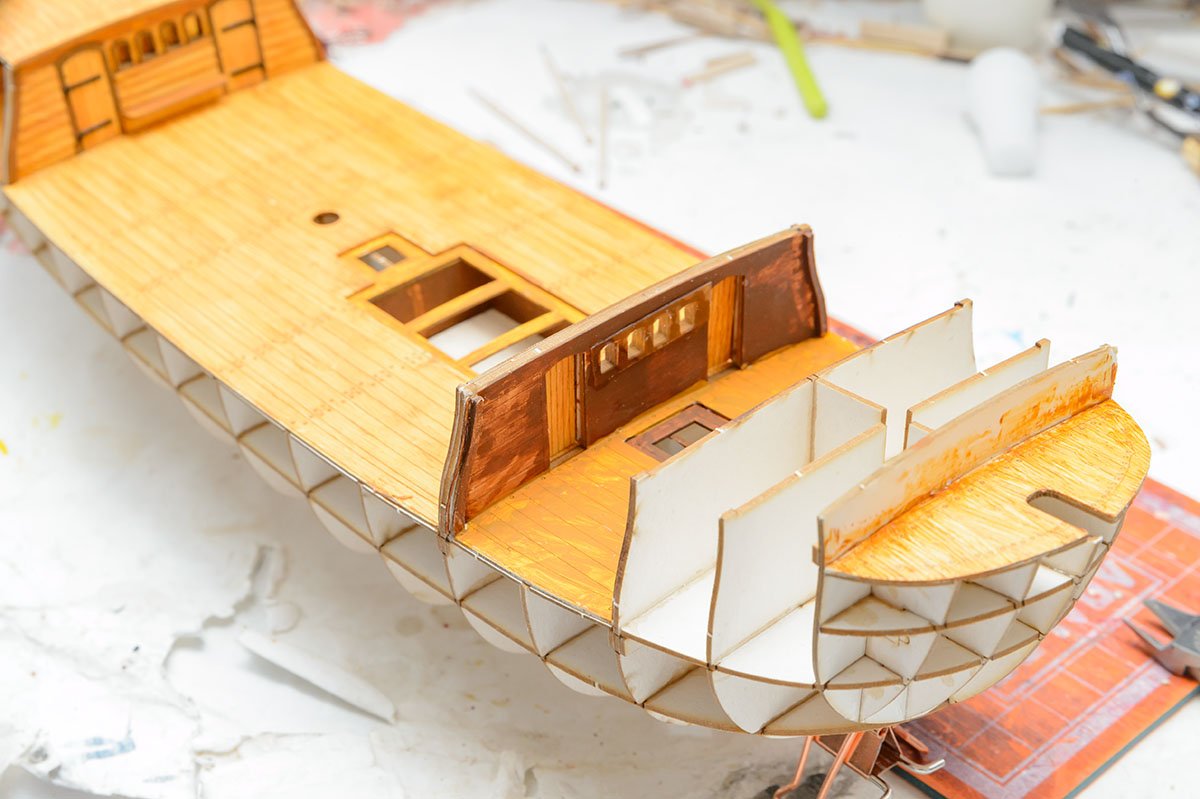
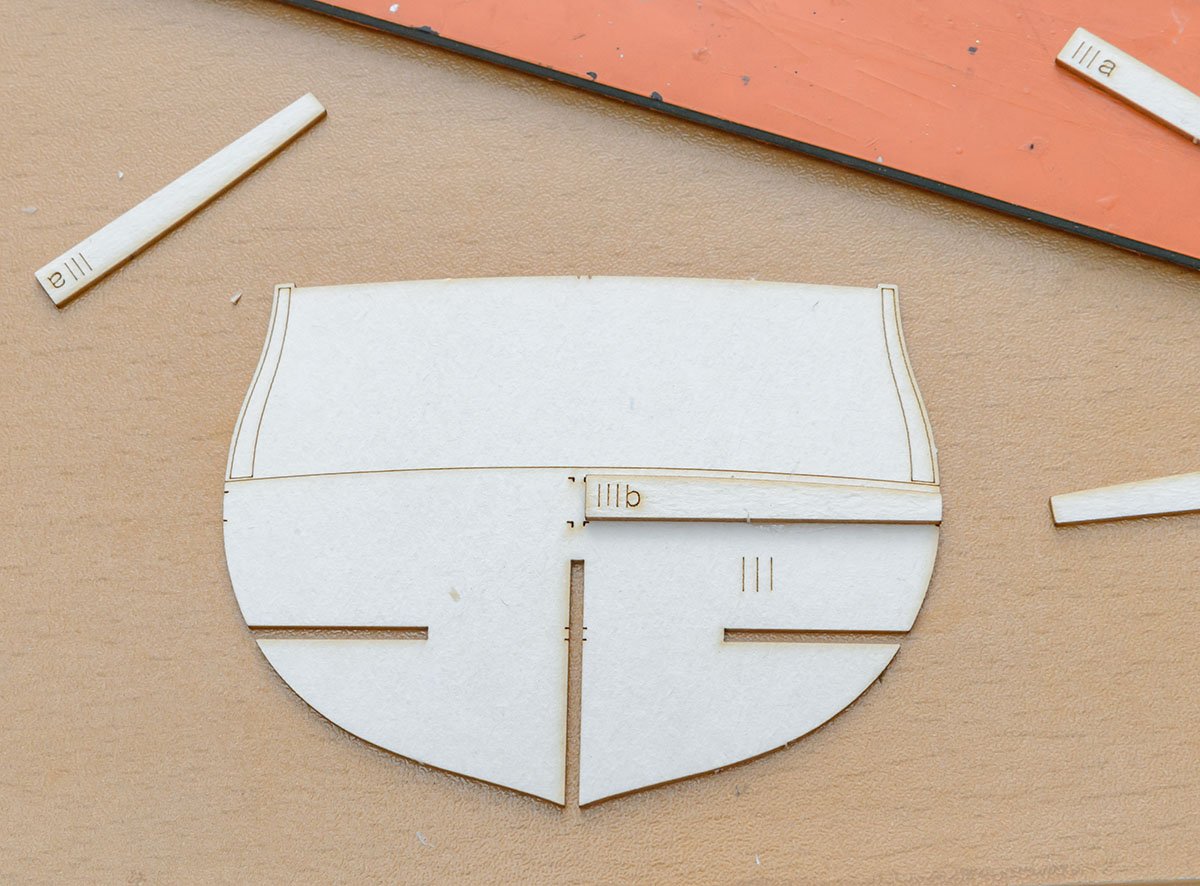
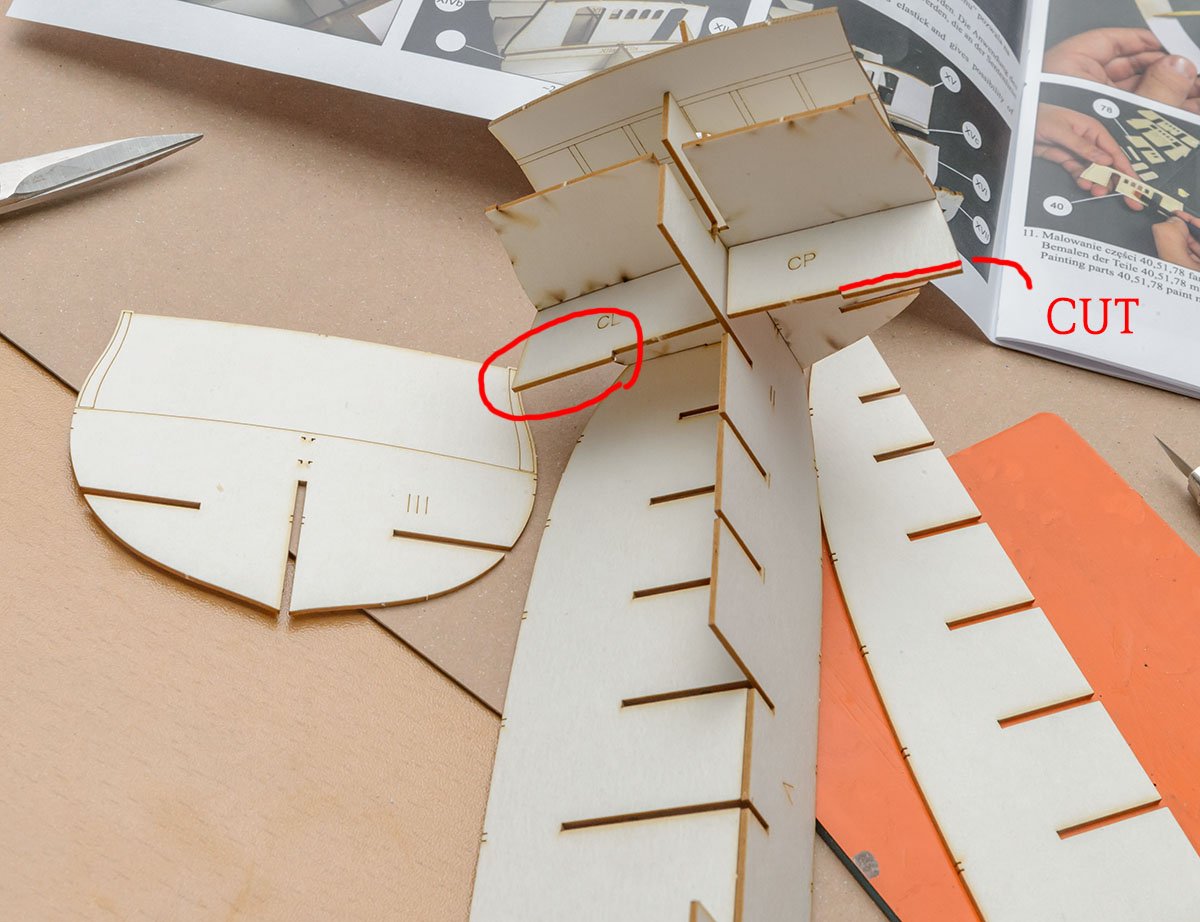
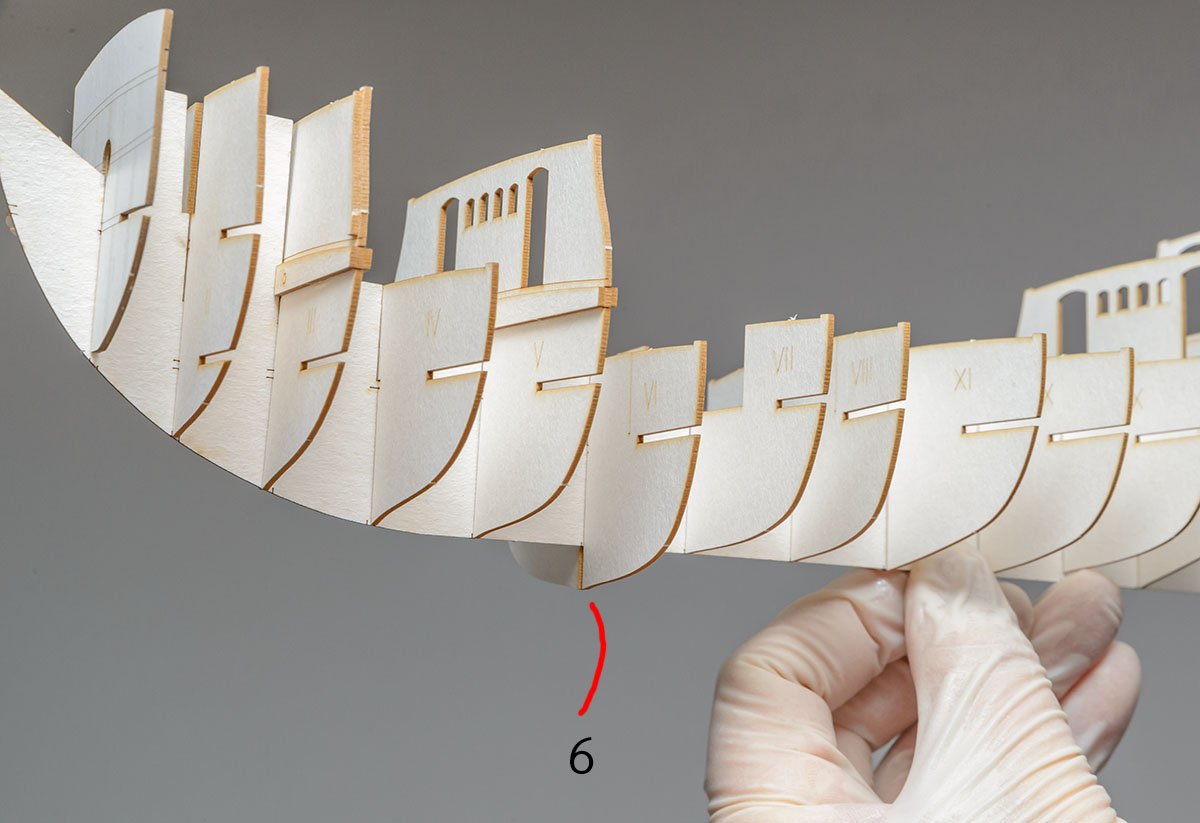
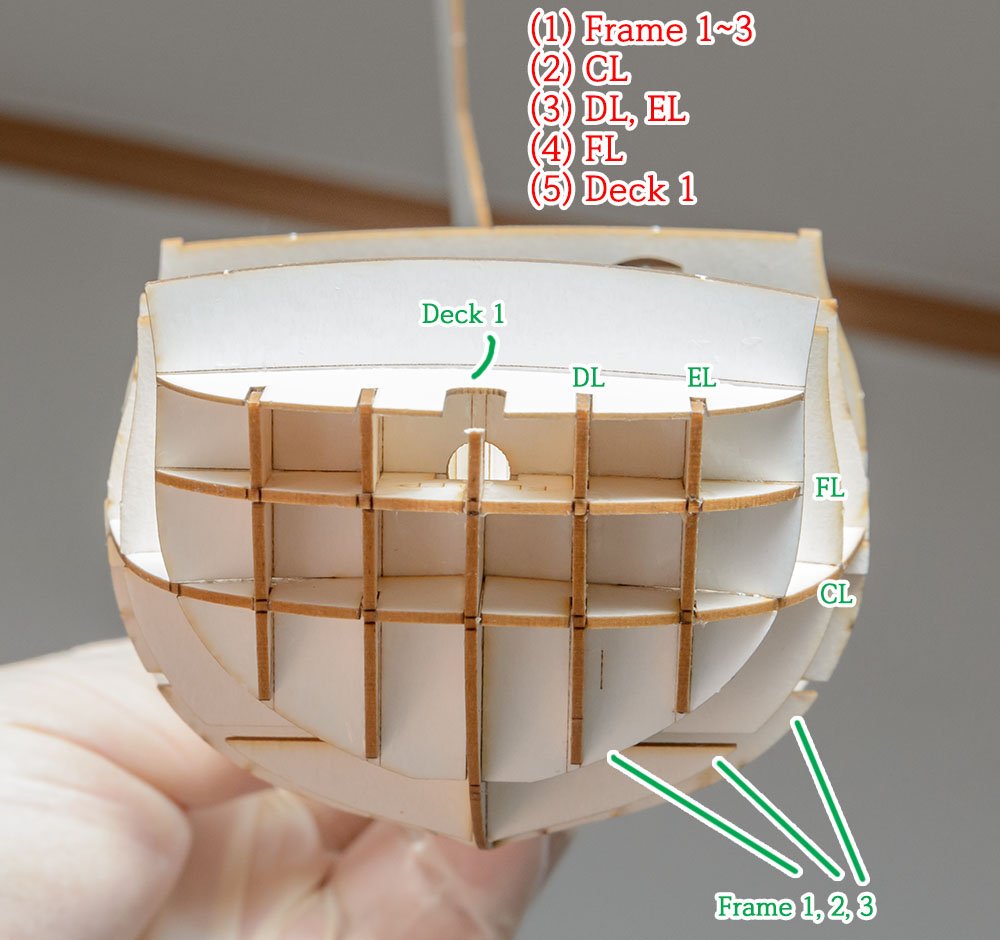
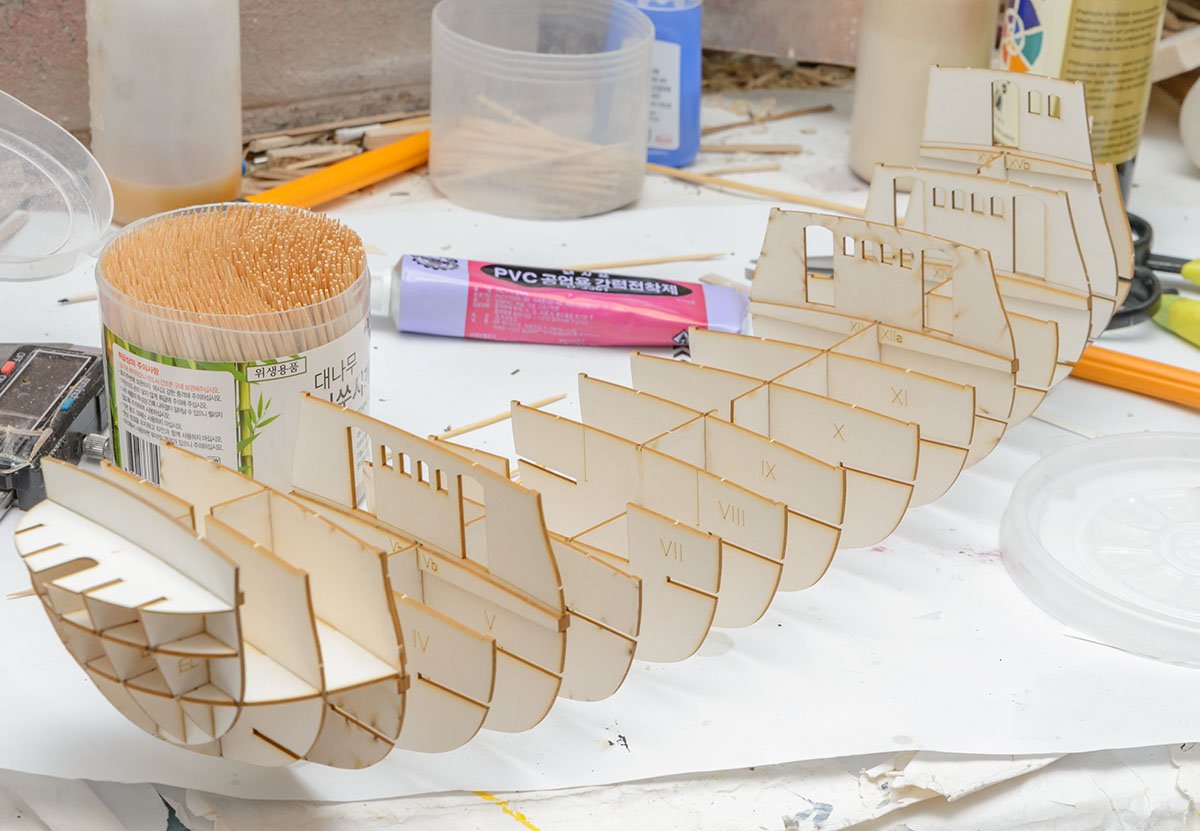
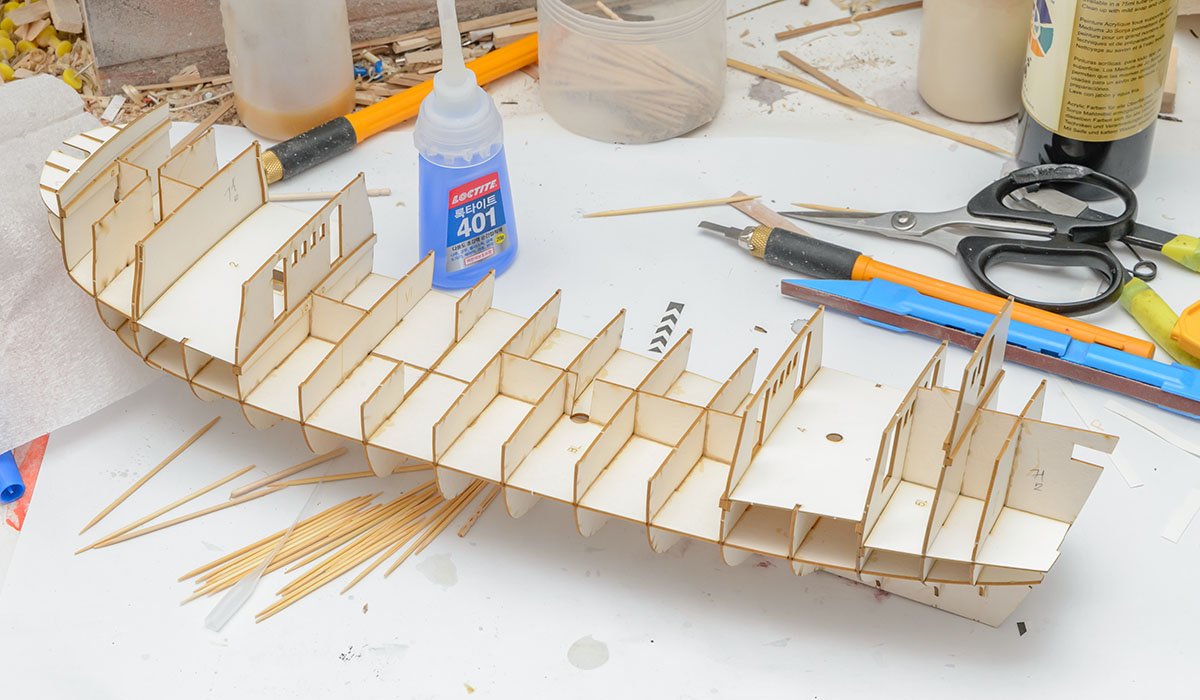
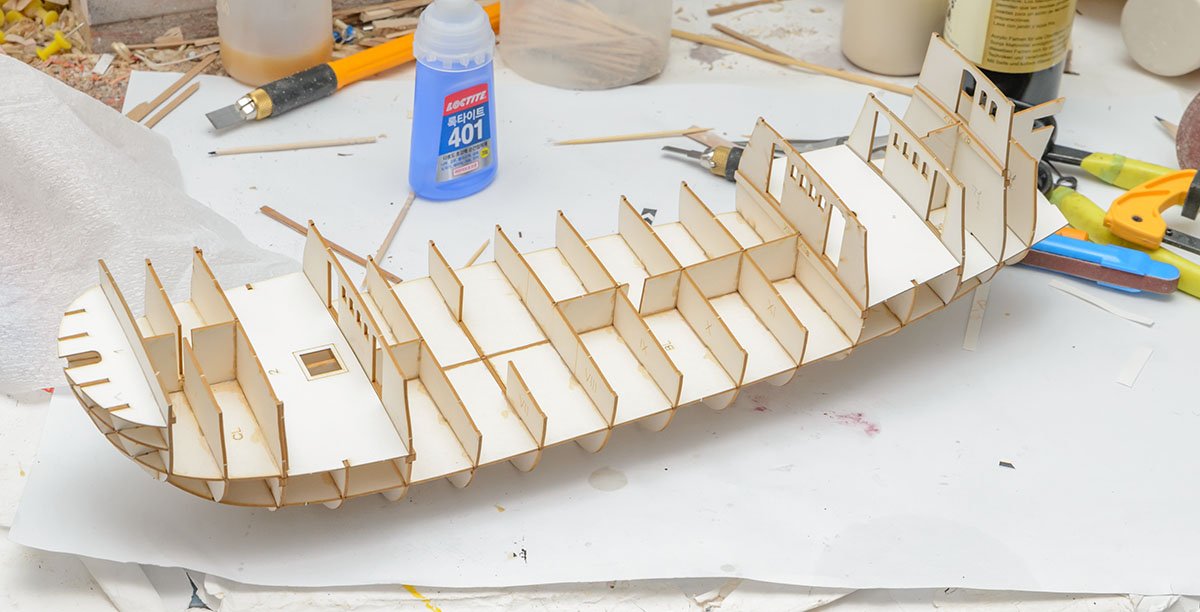
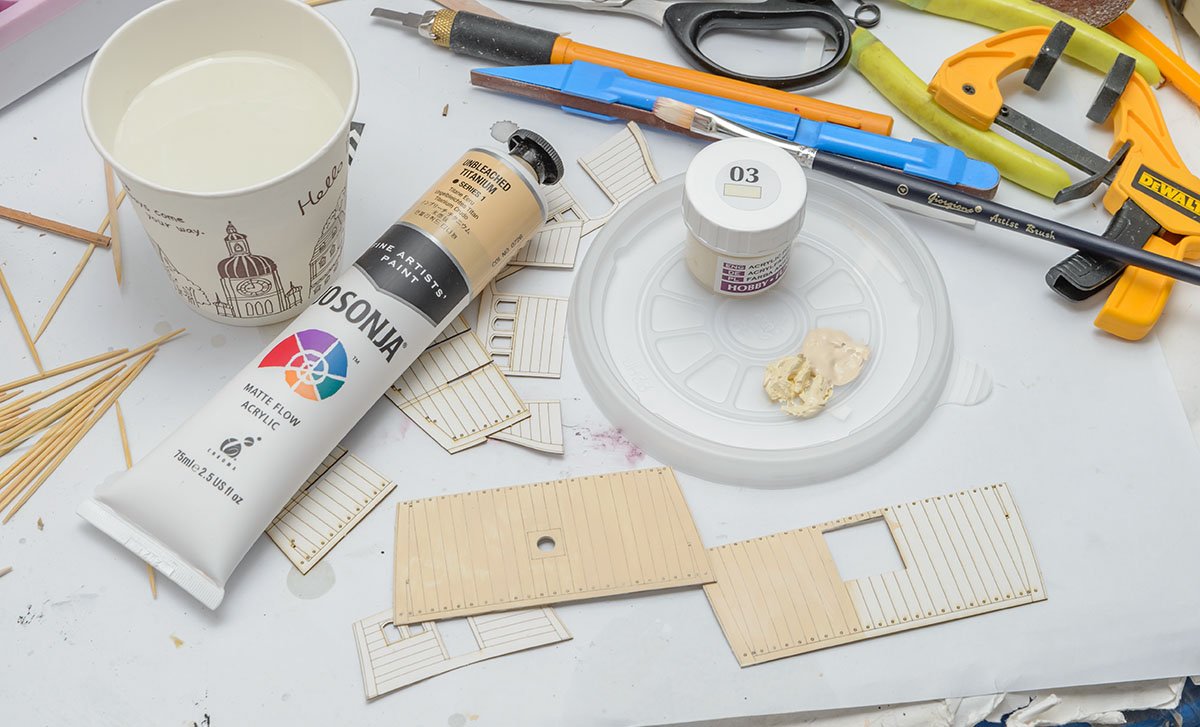
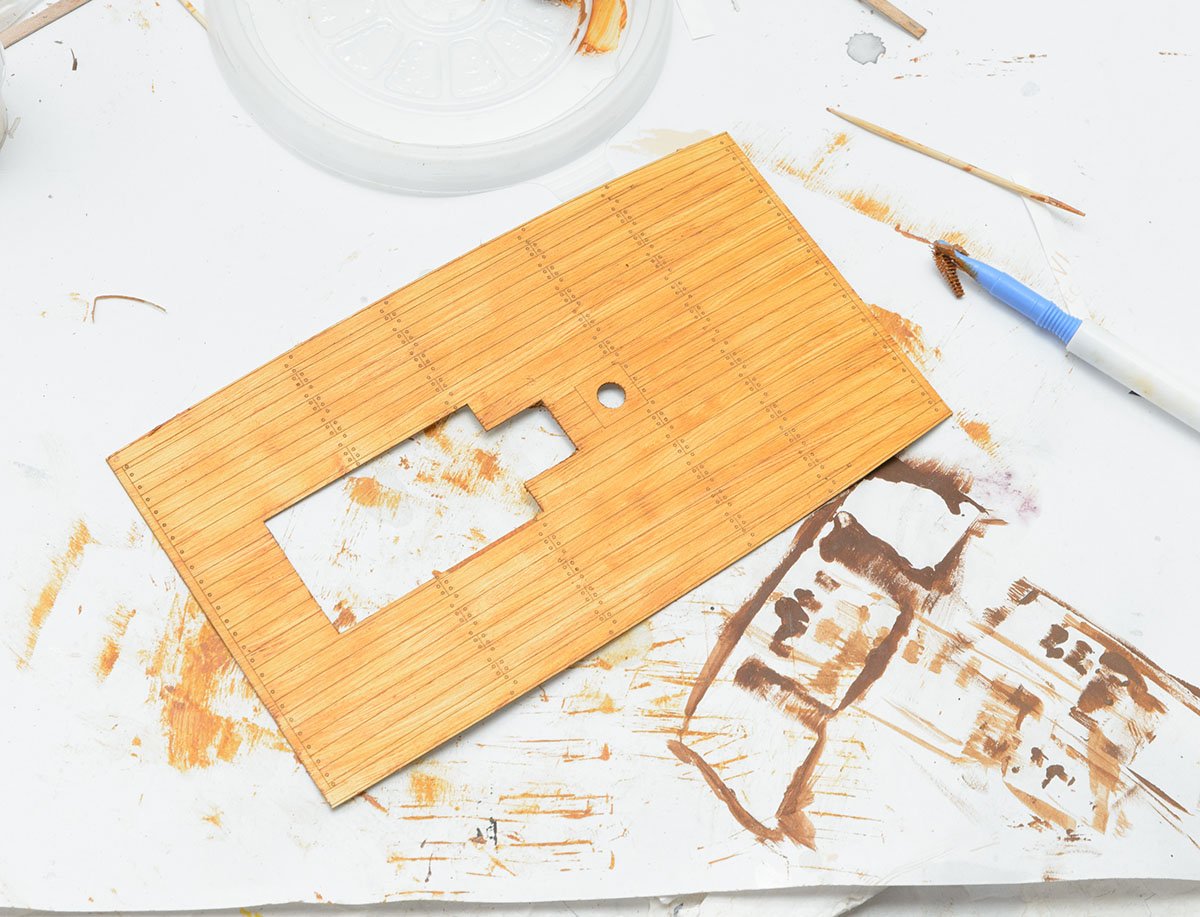
Hello, This is my new side project and the second cardboard model kit. The Shipyard makes the top premium sailing ship cardboard model kits. I have some words for their unfriendly manual, but the quality is better than the wooden model kits I've built. If you don't mind painting wooden patterns on paper planks, this is probably the best kit for building high quality model at a low cost and in a short amount of time. By the way, this year I'm not talking much, unlike the last year, and am focusing on experiencing as much as possible. I found the latest Papegojan build log in 2013, but the pictures were unfortunately gone. This build log will be mostly photos. If you have question about a specific part, feel free to participate in my build log. https://alexey.baldin.space/?p=1 If you are looking for a better build log, this site will help. Kit's error 1 Kit's error 2 The manual is hard to decipher... Make sure everything is in line. My ship is twisted again. 😭 Tan color base The kit's paint had dried like a stone. Oil paint and an interdental brush. Winsor & Newton Liquin medium helps reduce drying time. Yellow Deep 3 : Brown Earth 1
- 16 replies
-
- 13
-
-
Yes. I use the J Tech laser g-code plugin for Inkscape.
-
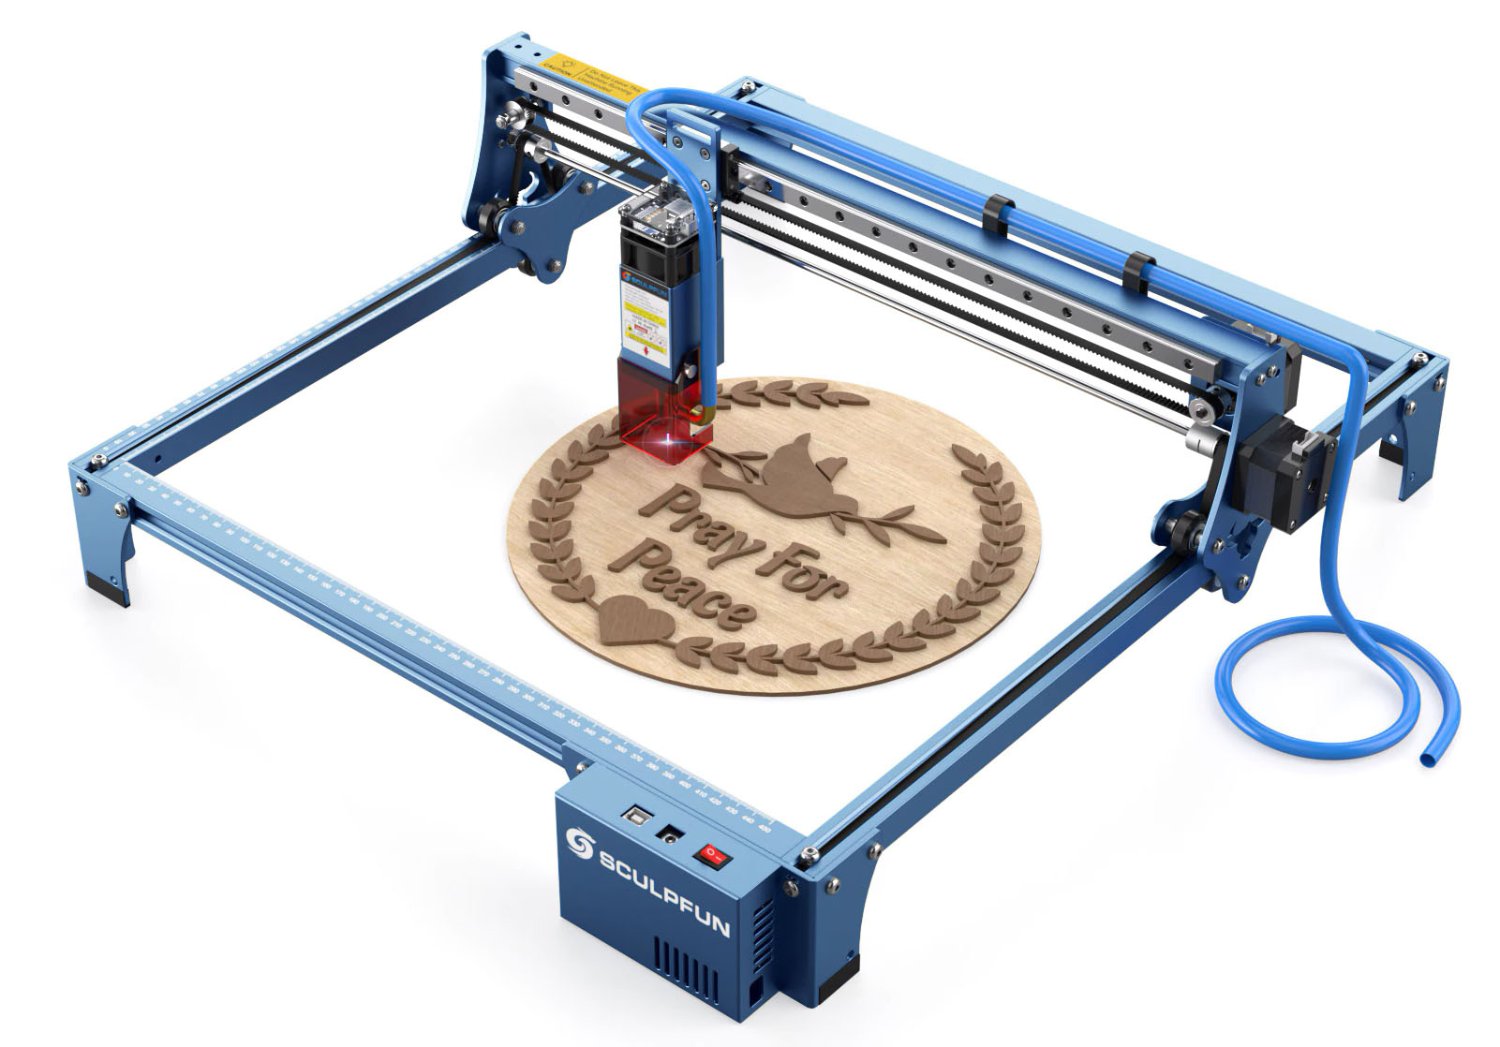
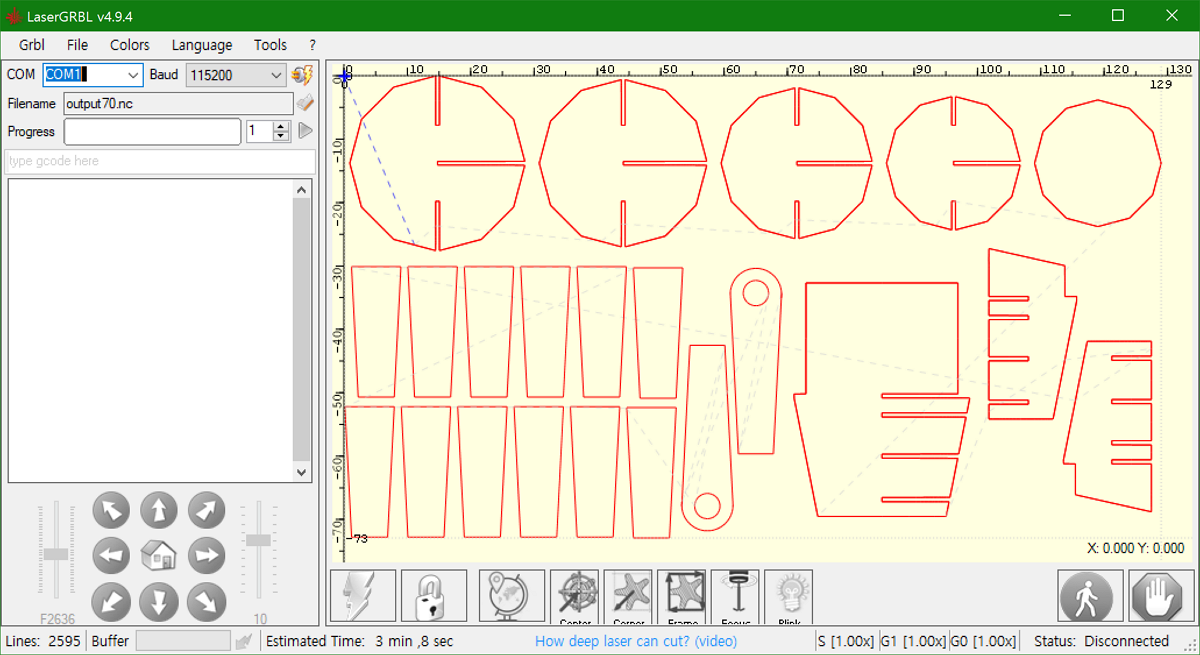
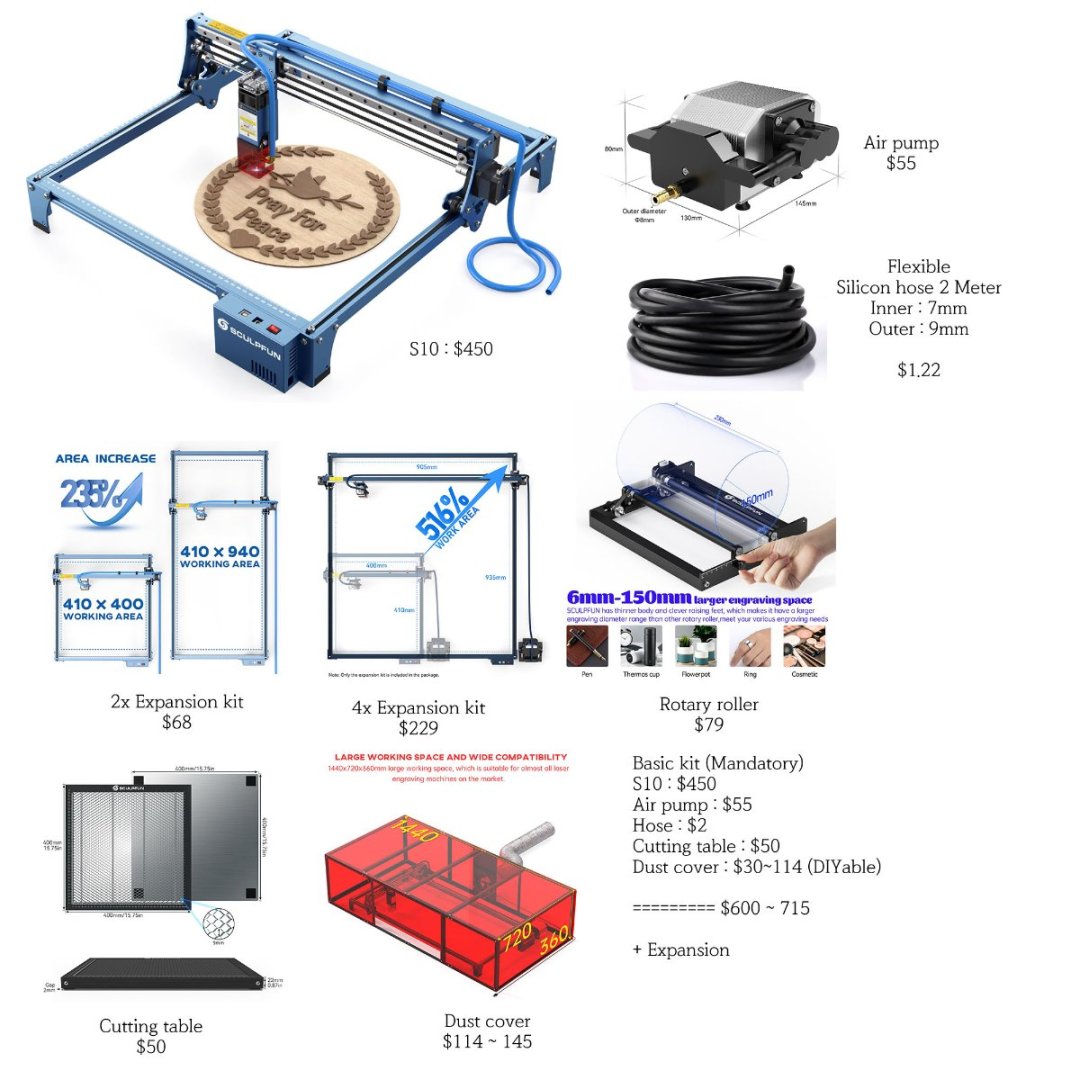
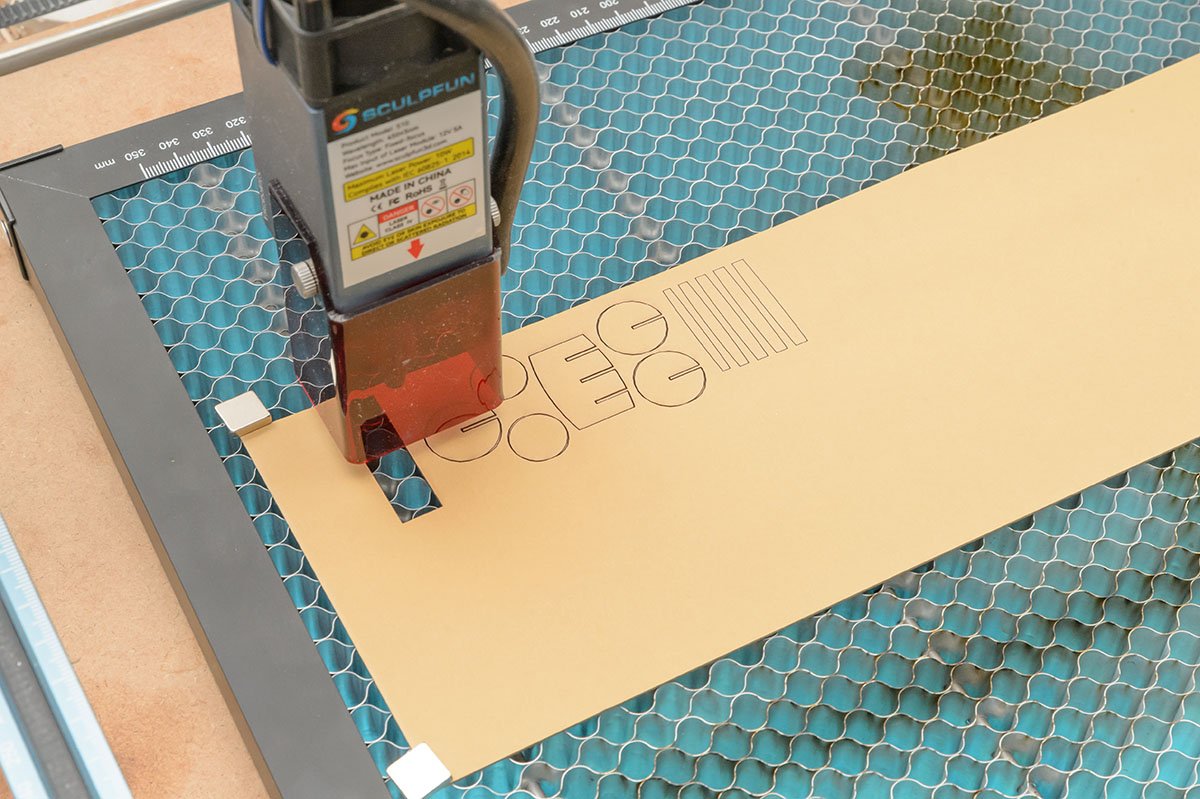
Exactly. An air compressor is mandatory to cut any material thicker than 0.8 mm. The Sculpfun brand offers all accessory options including the $55 air compressor, and it works pretty well. The assembly is a bit tricky, but it is definitely better than raw aluminium pipe cut models. These are options I purchased with the S10. Nevermind the software. The software isn't free. I'm using LaserGRBL, which is open source and free. The LaserGRBL does most of Laser CNC cut. I use an open source freeware Inkscape to make a vector gcode.
-
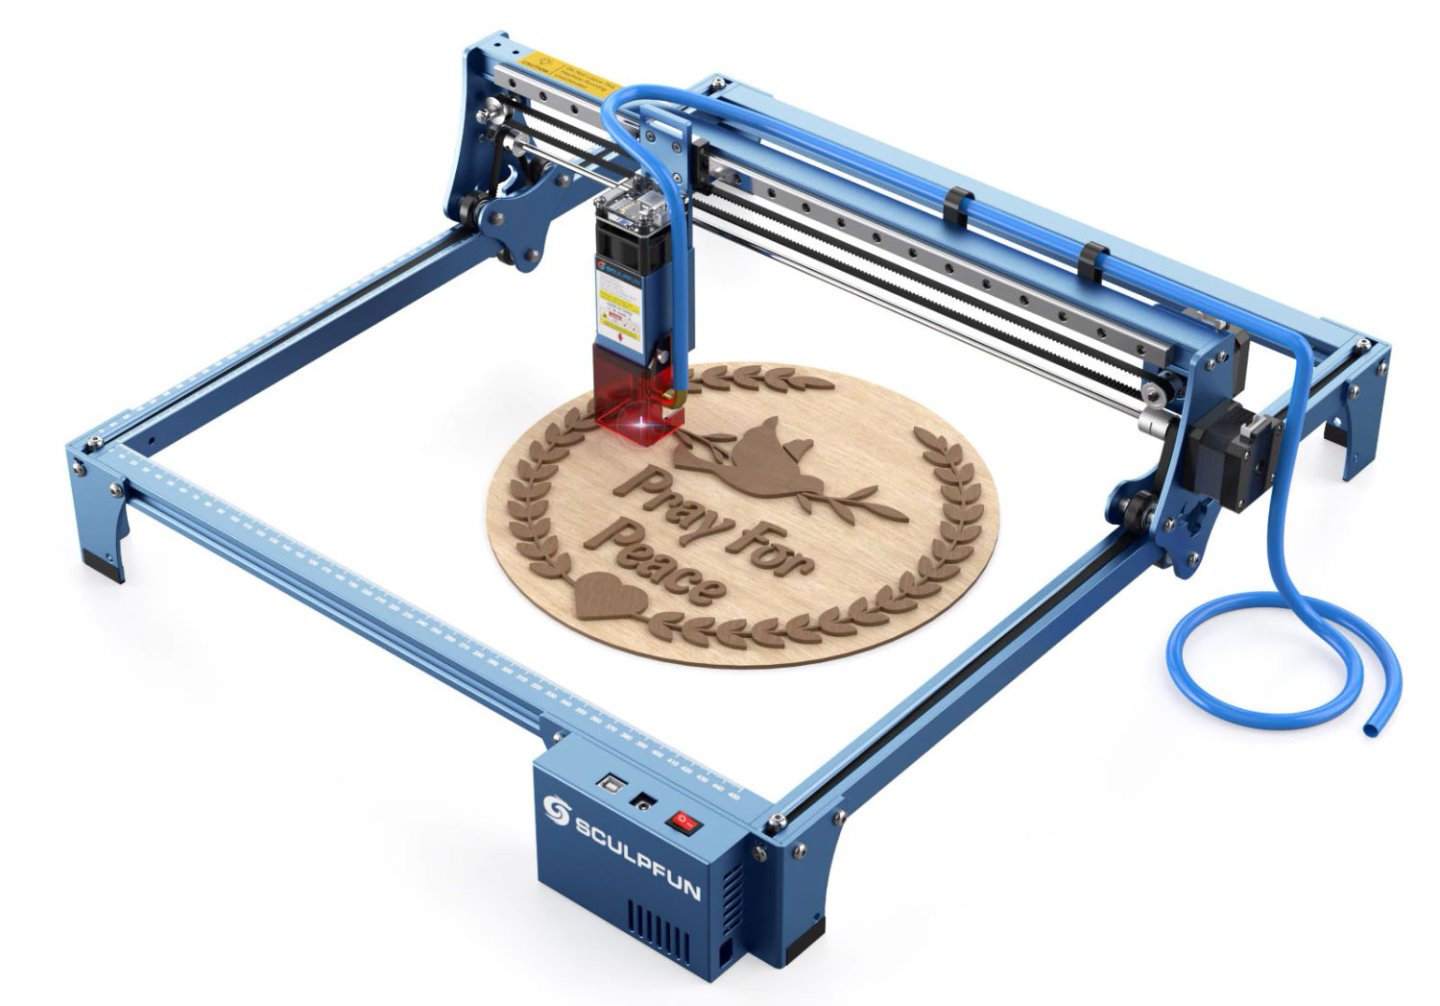
I bought a Sculpfun S10 laser cutter with some accessories at $500. It uses a 10W output fiber-laser module, which consumes more than 20W of electricity. The cutting performance is equivalent to commercial kit and more sharper.
-
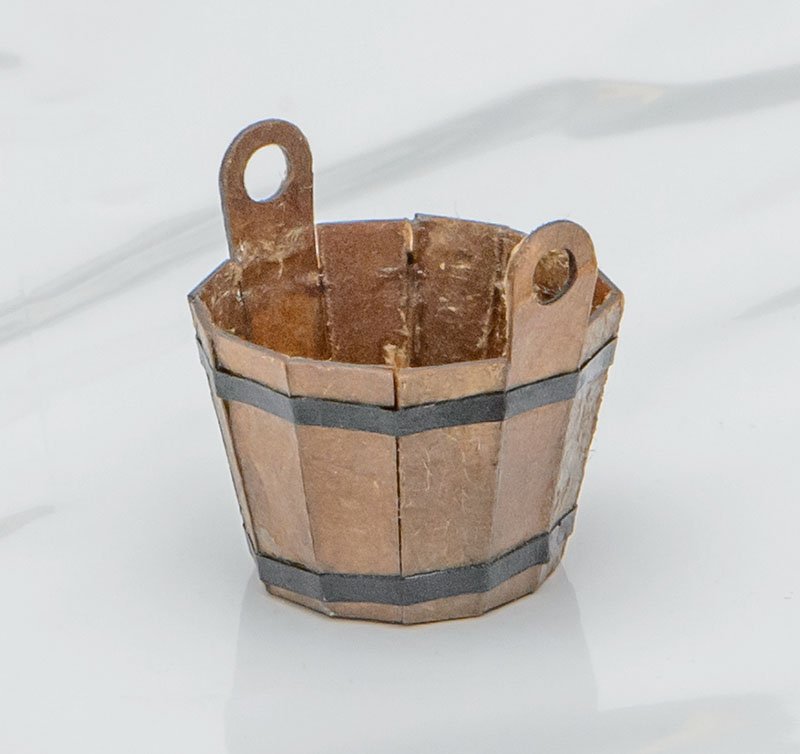
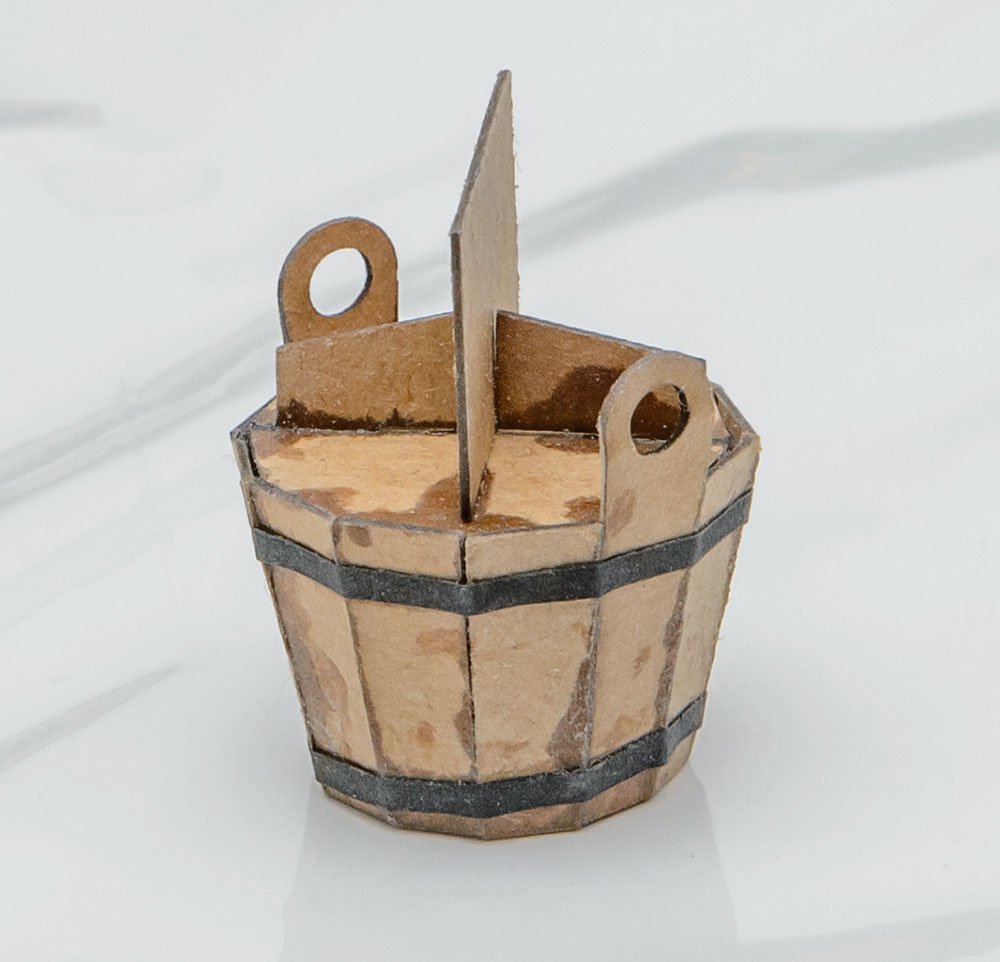
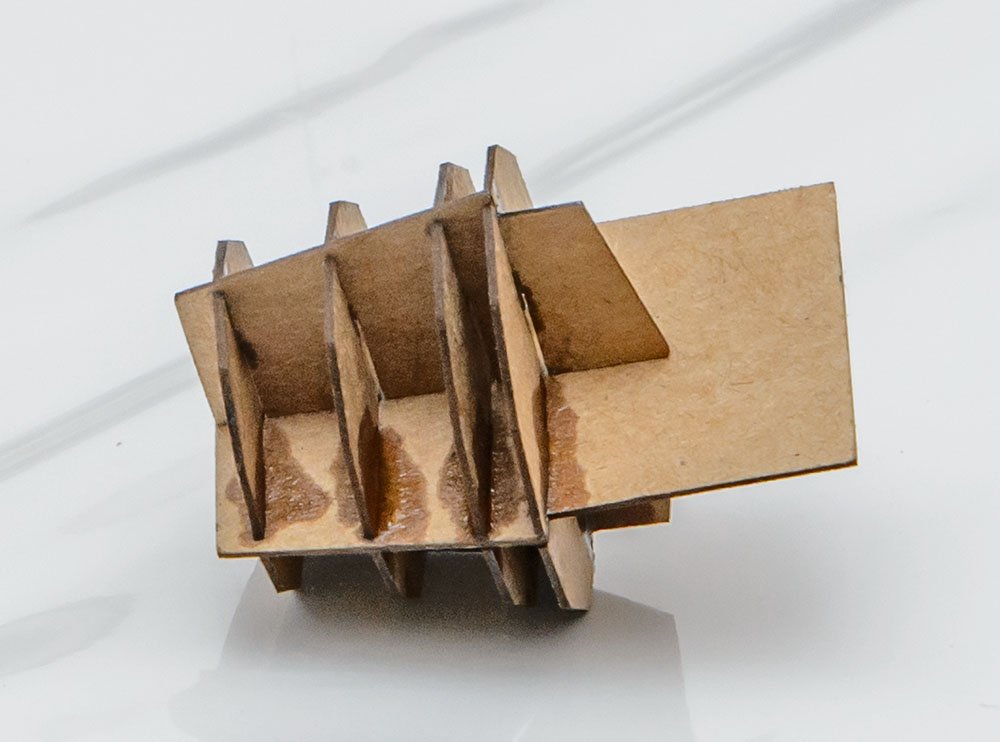
I made a bucket using the same method. I used a false-bucket structure.
-
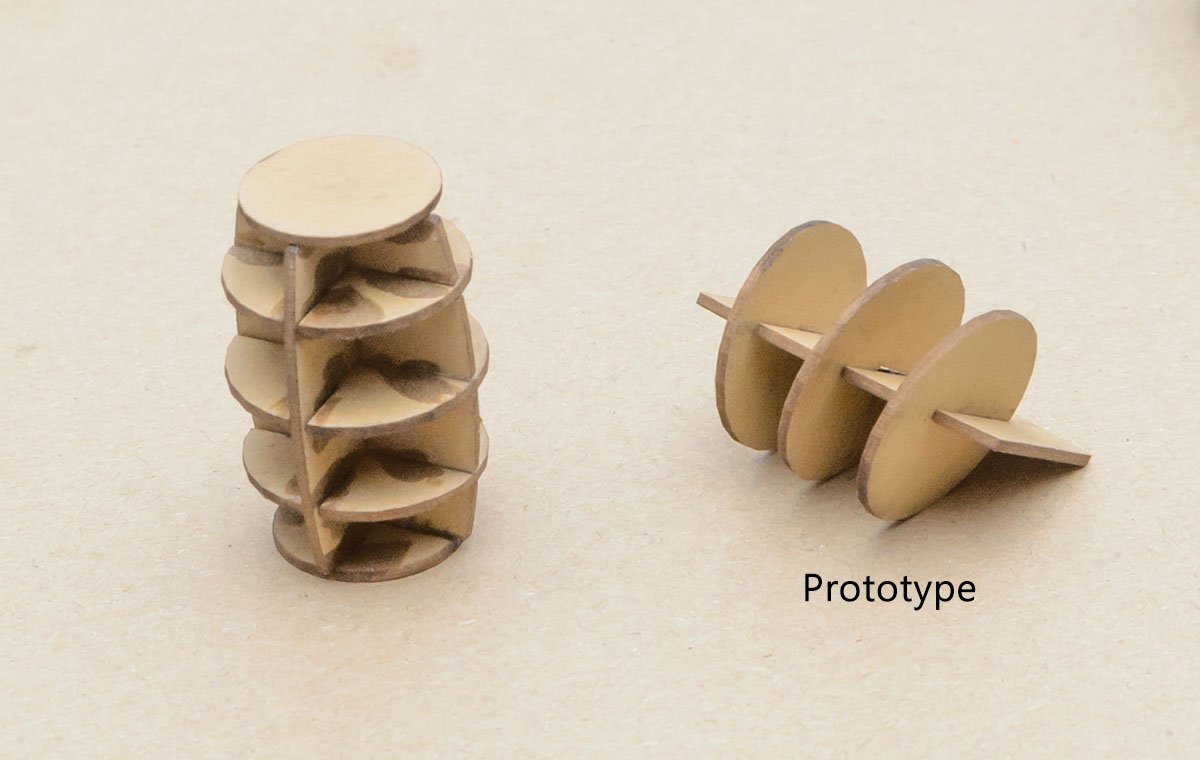
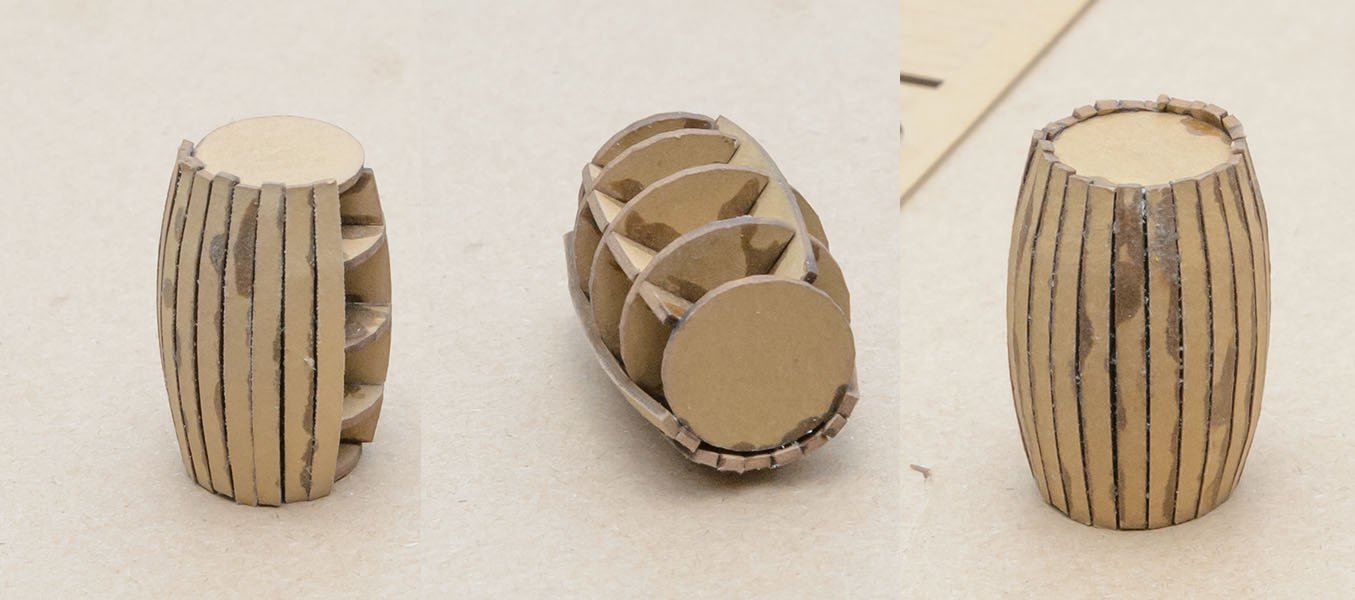
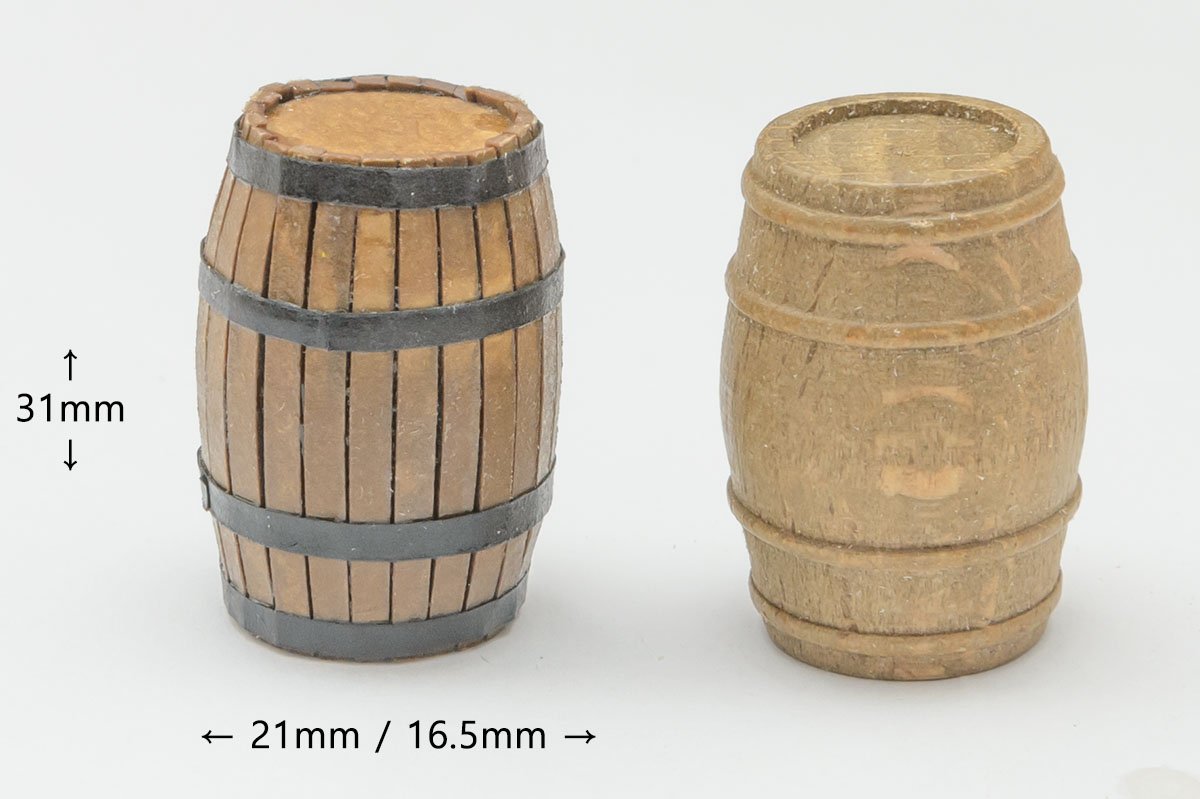
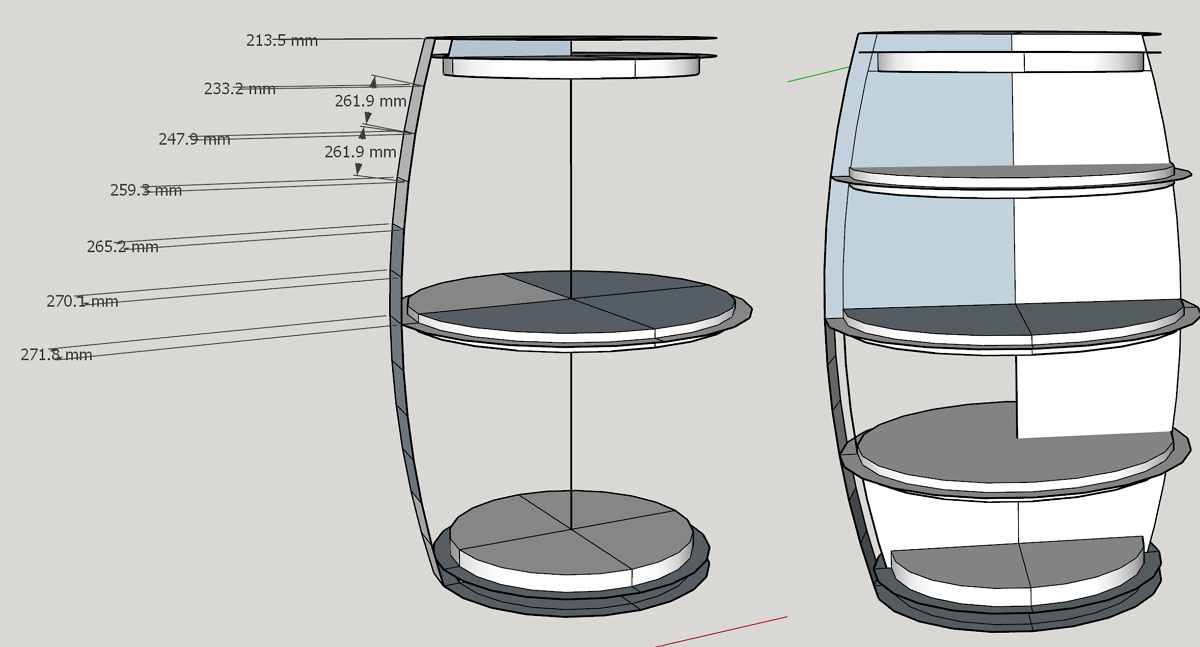
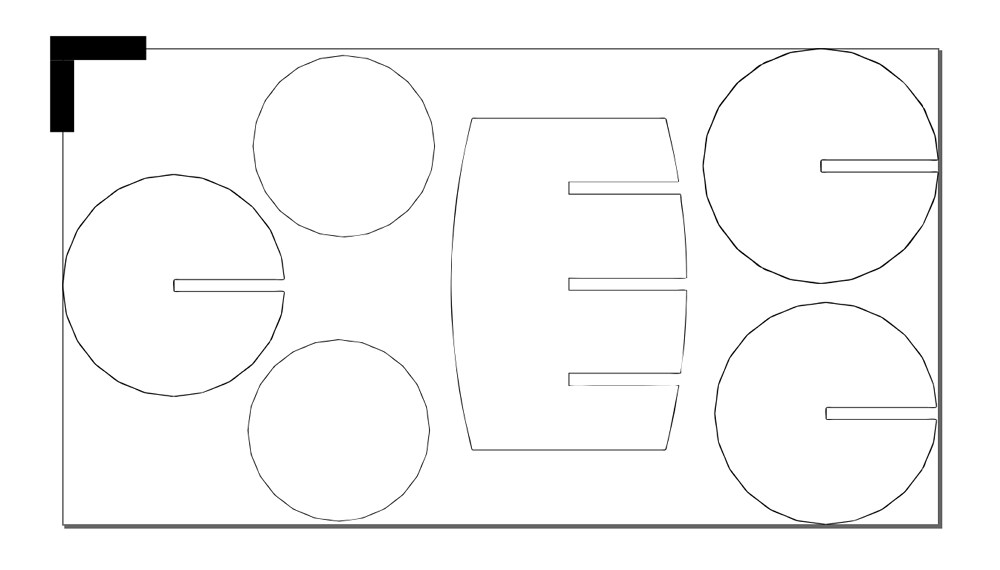
I don't like barrels in kits. It requires heavy paint work to make it fine. I have a fiber laser cutter, which can cut cherry wood up to 6mm. It is so useful that I already packed my Proxxon table saw. Also, I bought some thick cardboards for my next project. The brown paper on the picture is 1mm thick. I challenged to make a DIY cardboard cask to replace kits. I spent several hours for measuring, designing, and CAM. Now I only needed five minutes to print each cardboard cask sheet. The left design is final. It is very stable and easy to assemble. I used CA glue only. I spent about 15 minutes assembling each cask. After that, I glued a black paper strip and applied shellac as a varnish. I'll build another smaller cask in the same process. cask 31x21mm.zip These are my design files. It is free to use.
- 8 replies
-
- 11
-
-