modeller_masa
-
Posts
950 -
Joined
-
Last visited
Content Type
Profiles
Forums
Gallery
Events
Everything posted by modeller_masa
-
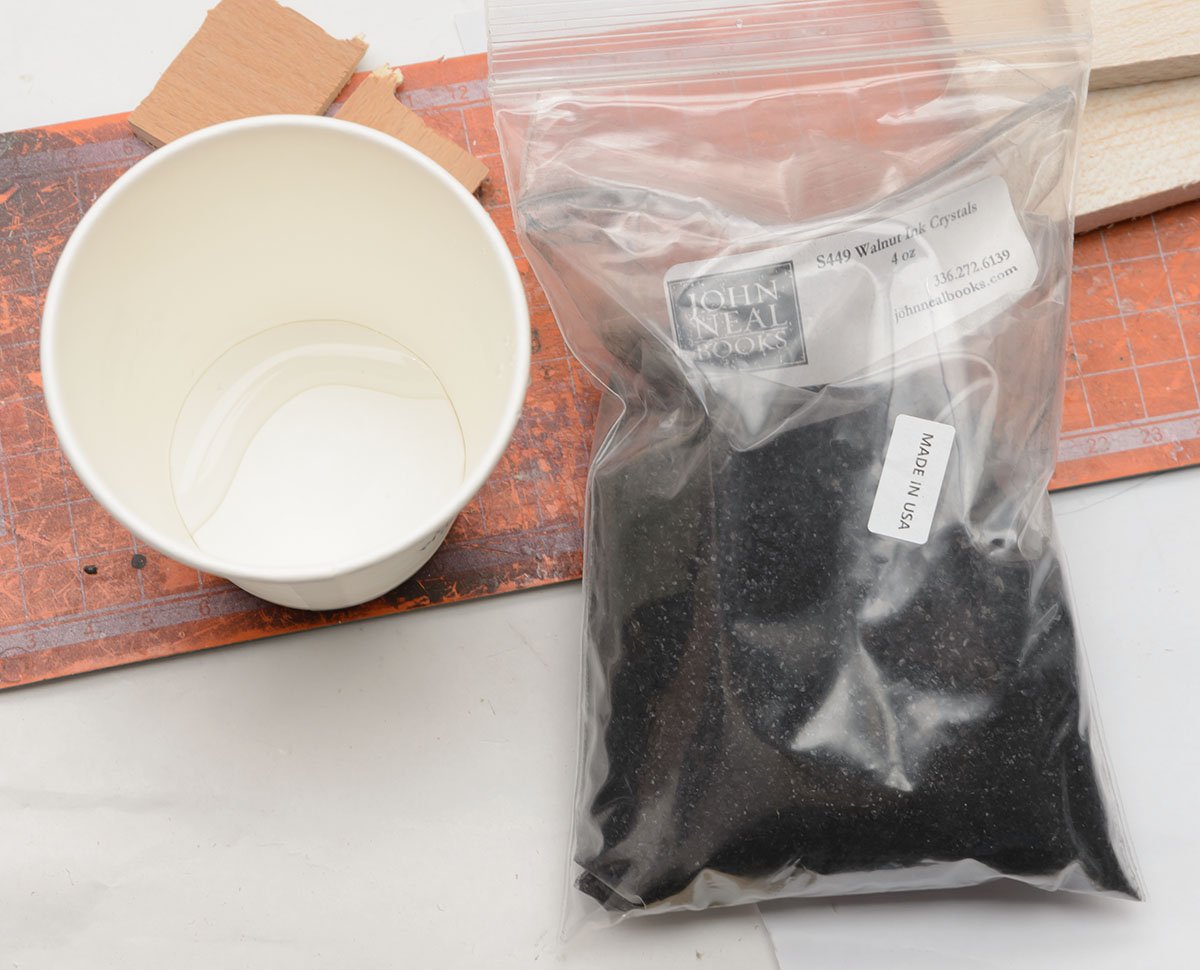
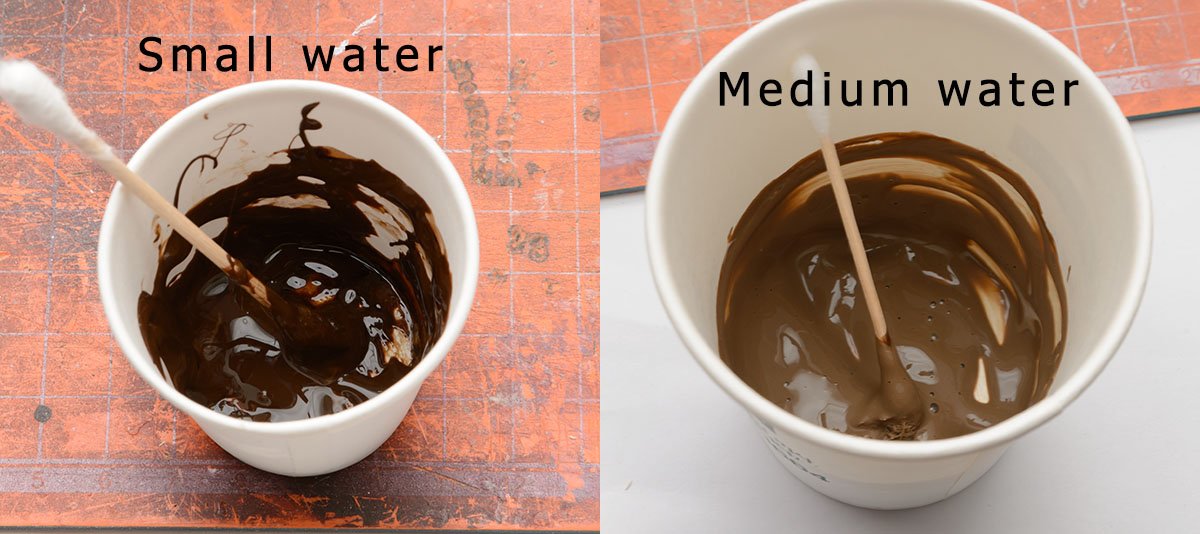
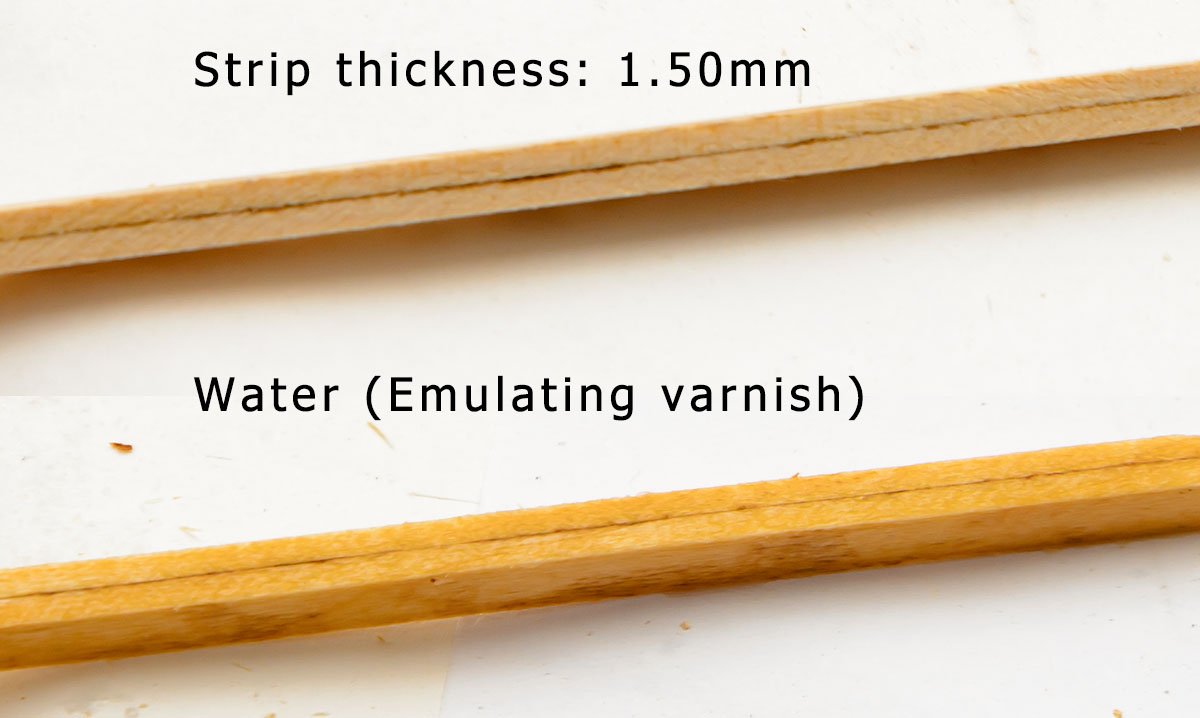
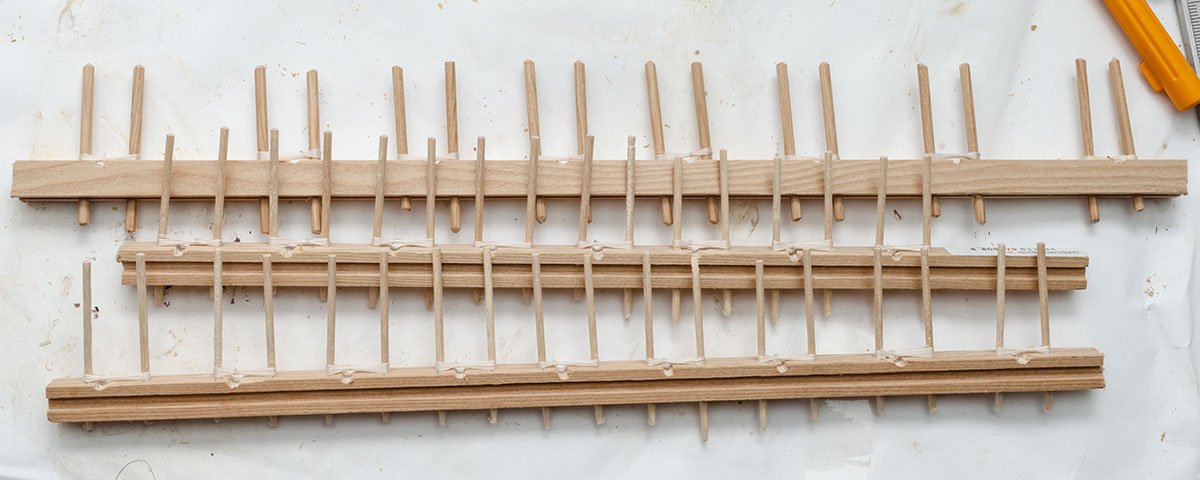
Hello, I got some walnut ink to use for caulking after I read some interesting topics about it. Hot tab water was enough, and the amount of water can control the color from black to sepia tone brown. At first, I mixed the prepared walnut ink with a fast drying Titebond PVA bond. It hardened quickly, and became a solid rubber. (Left picture) I used regular PVA glue, and it worked perfectly. (Right picture) I guess the walnut ink particles accelerate the PVA's hardening speed. I've tested dyed PVA bonds in the past. I used black acrylic paint, but it decreased adhesion strength critically. The walnut ink that is mixed with regular PVA bond works like white PVA bond. However, the thickness wasn't for me. The thickness of the PVA bond layer between basswood planks is 0.02~0.03mm. In general, the width of caulking in reality is between 3.0mm (1/8") and 13.0mm (1/2"). I'm making 1/60 HMS Bounty, so I need at least 0.05mm of black layer between planks for realistic caulking. The 0.02mm may be good for 1/144 or smaller scale ships. The thickness of regular black paper, which has 90 gsm, is about 0.90mm, and black rice paper, which is 26 gsm, is about half that thickness. Therefore, the black rice paper is the best for me. Don't forget to wear gloves when you use walnut ink.

-
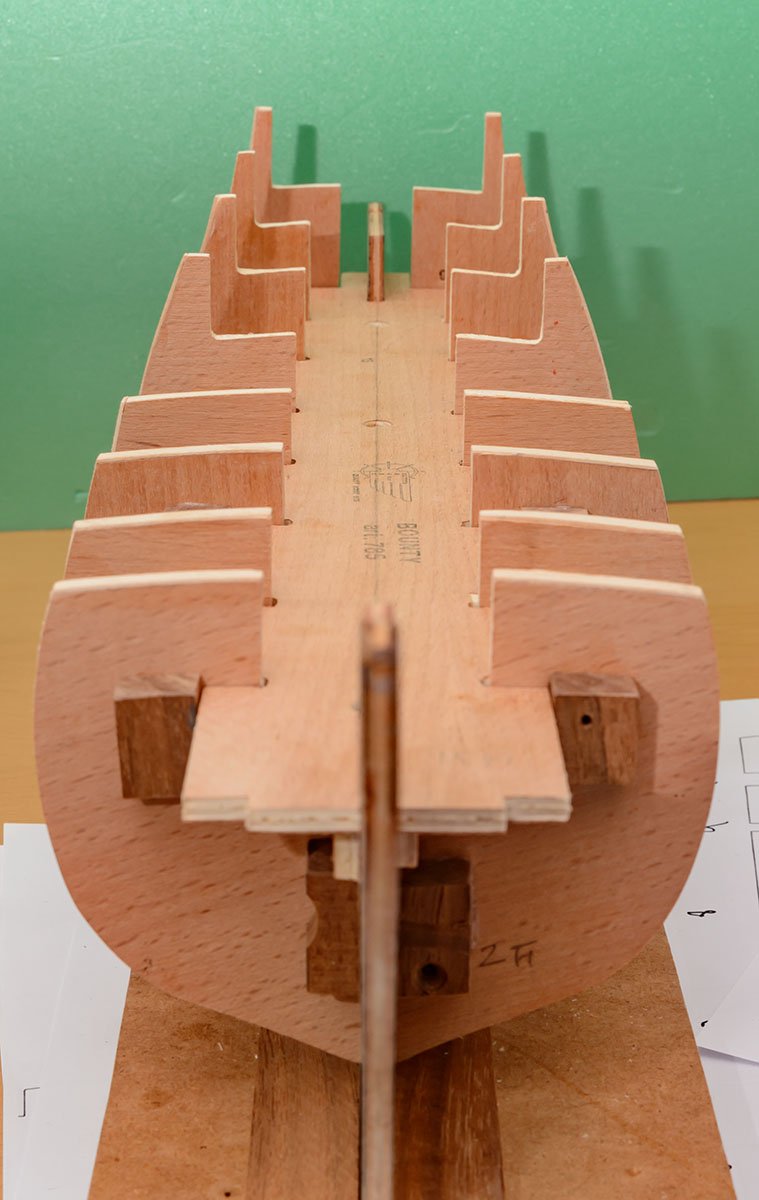
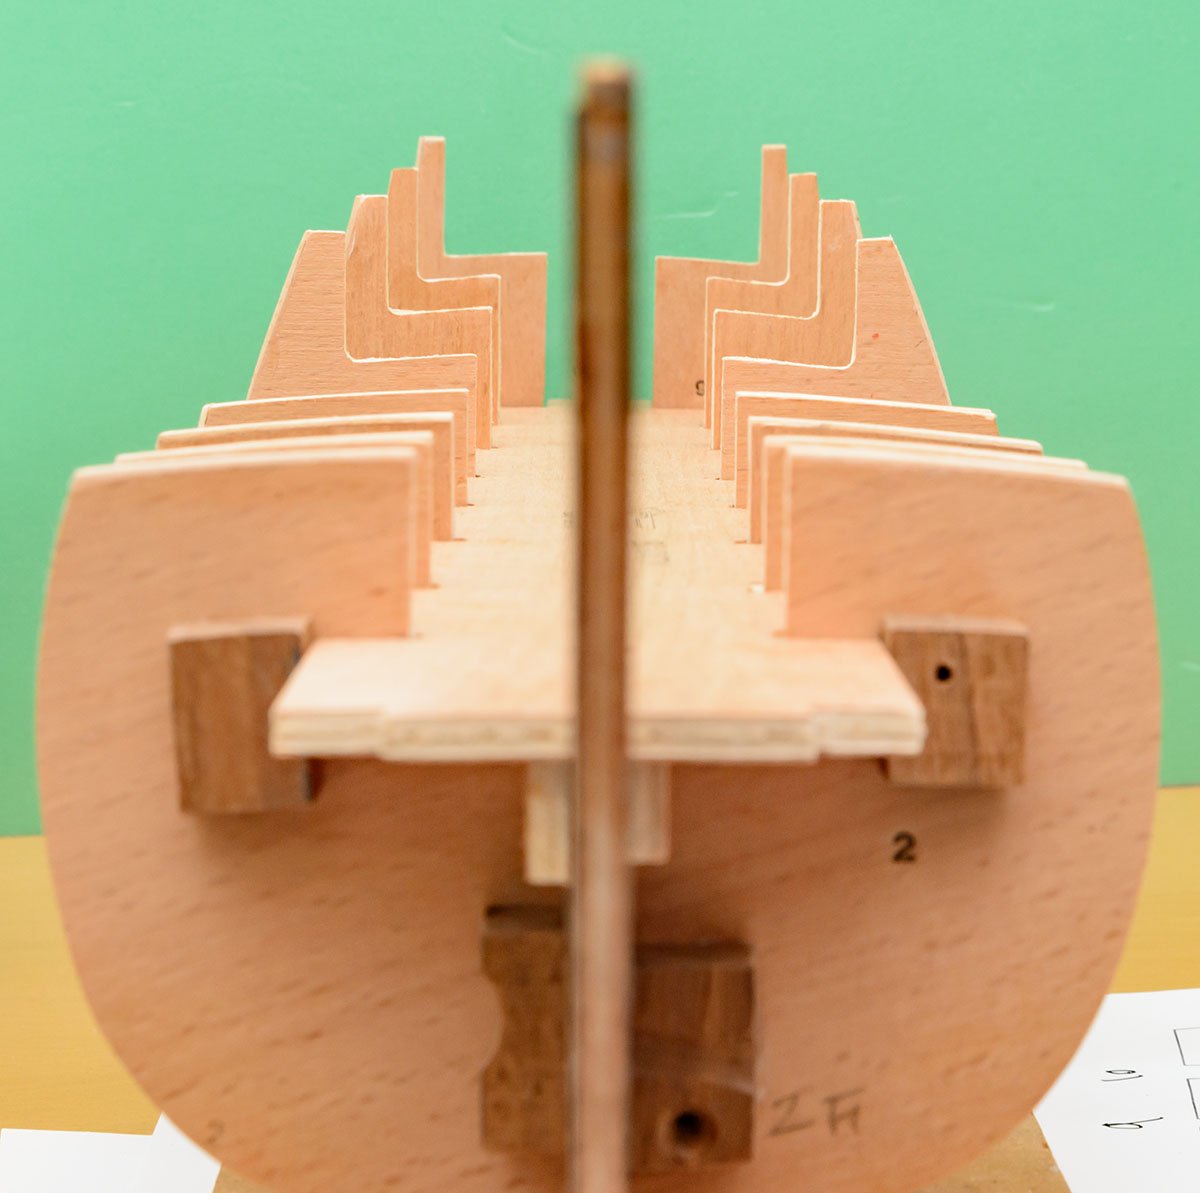
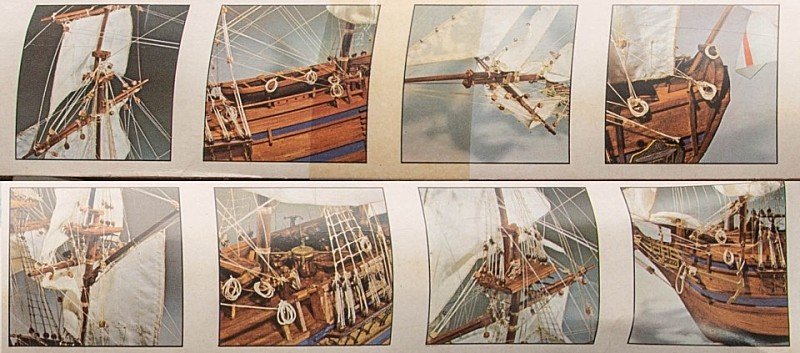
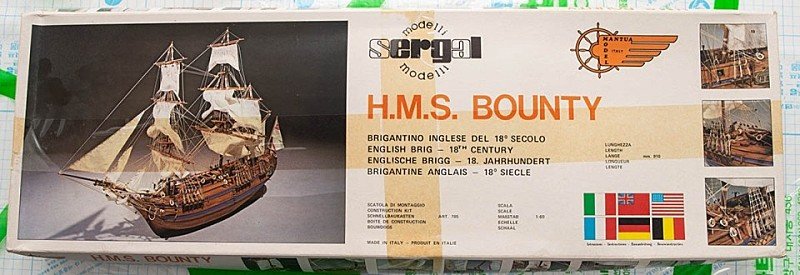
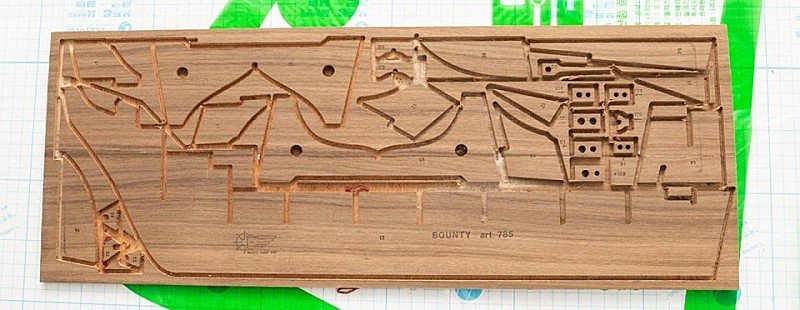
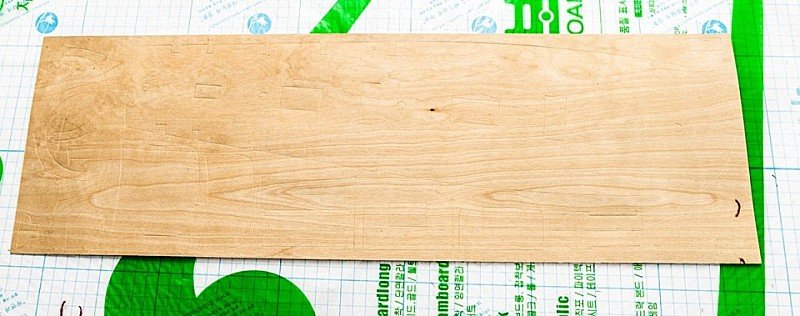
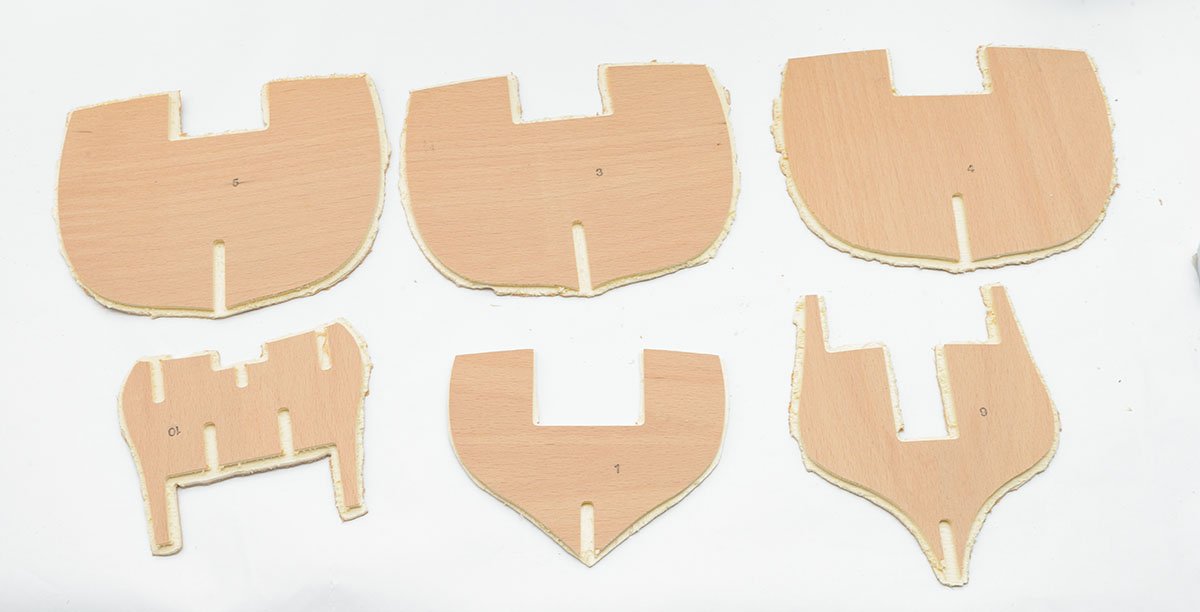
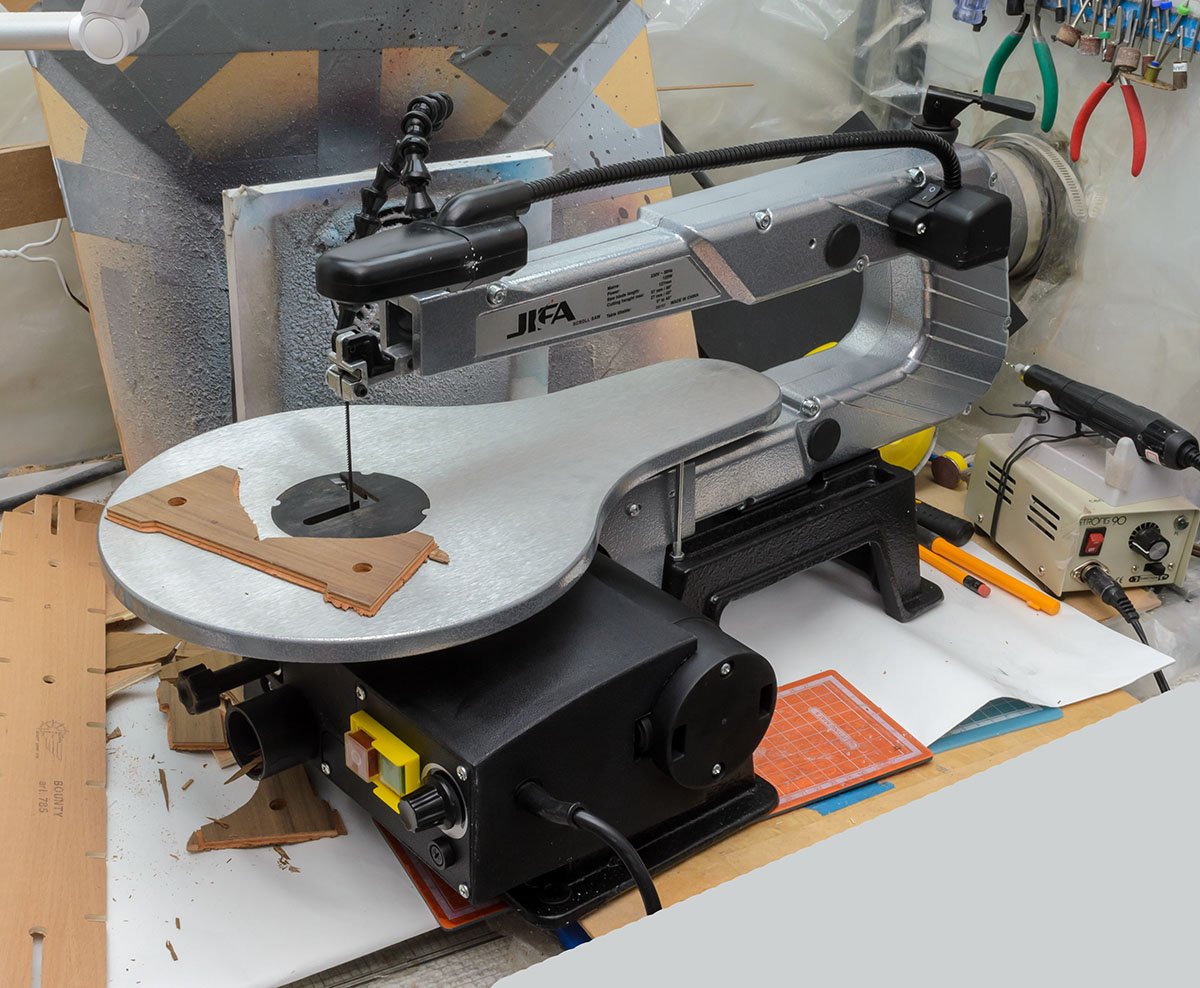
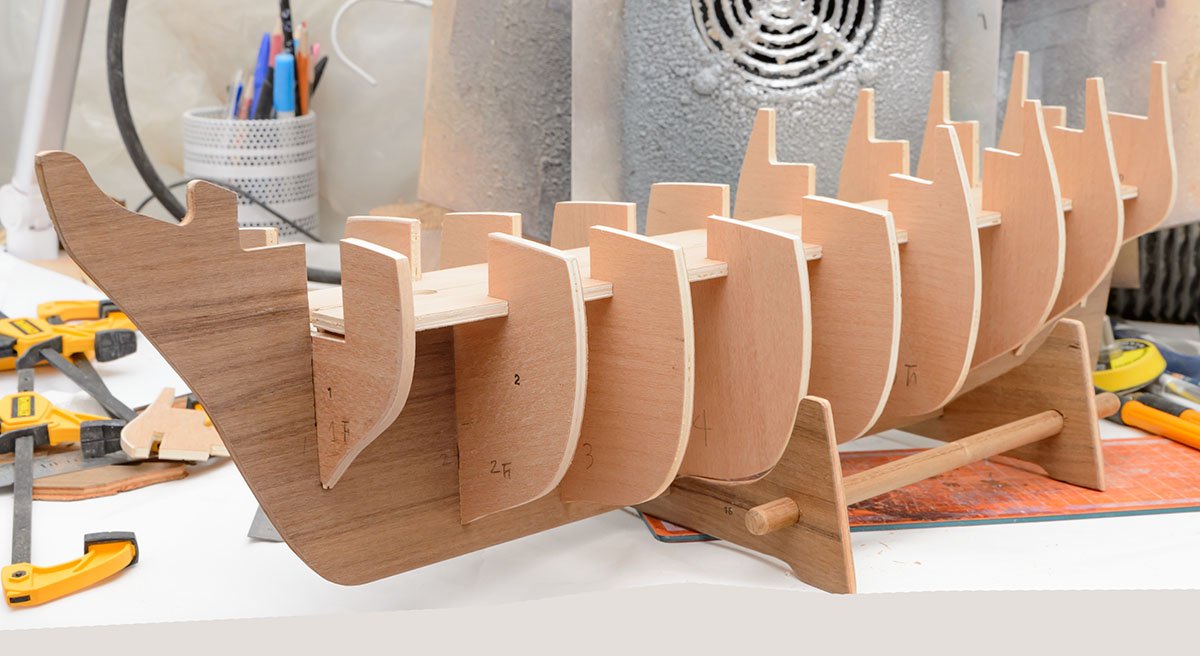
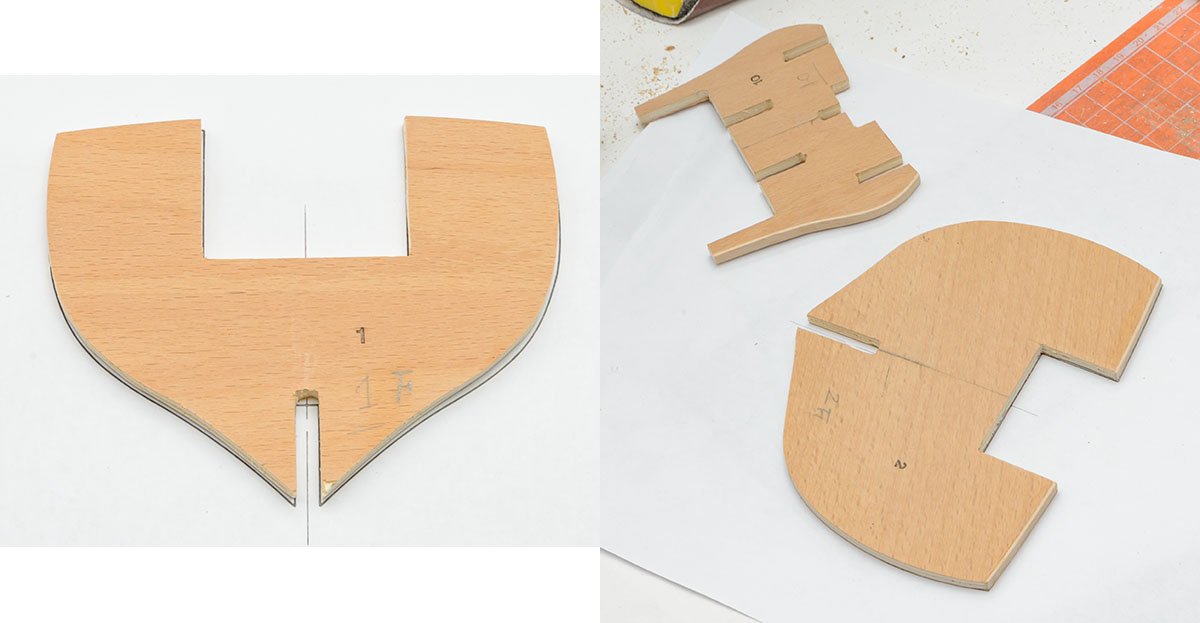
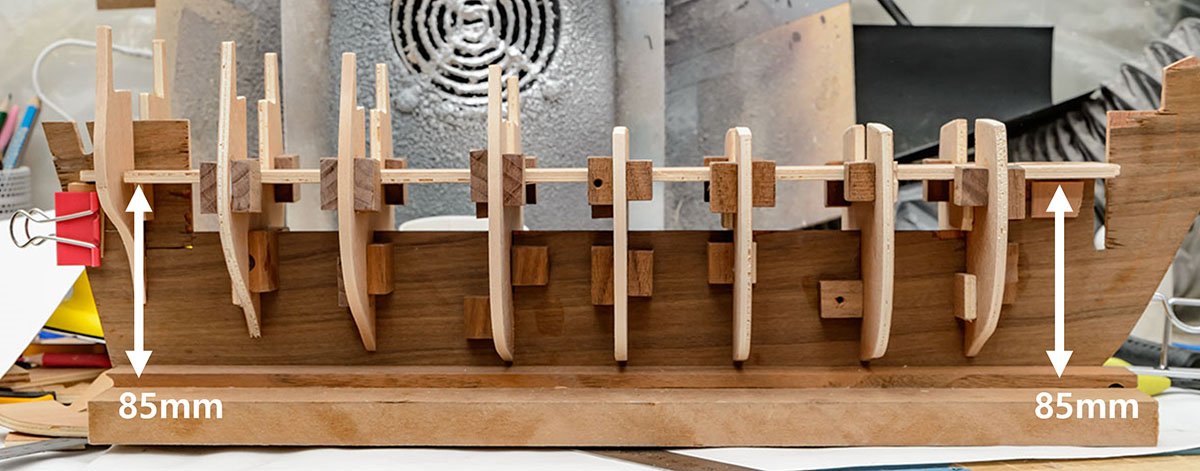
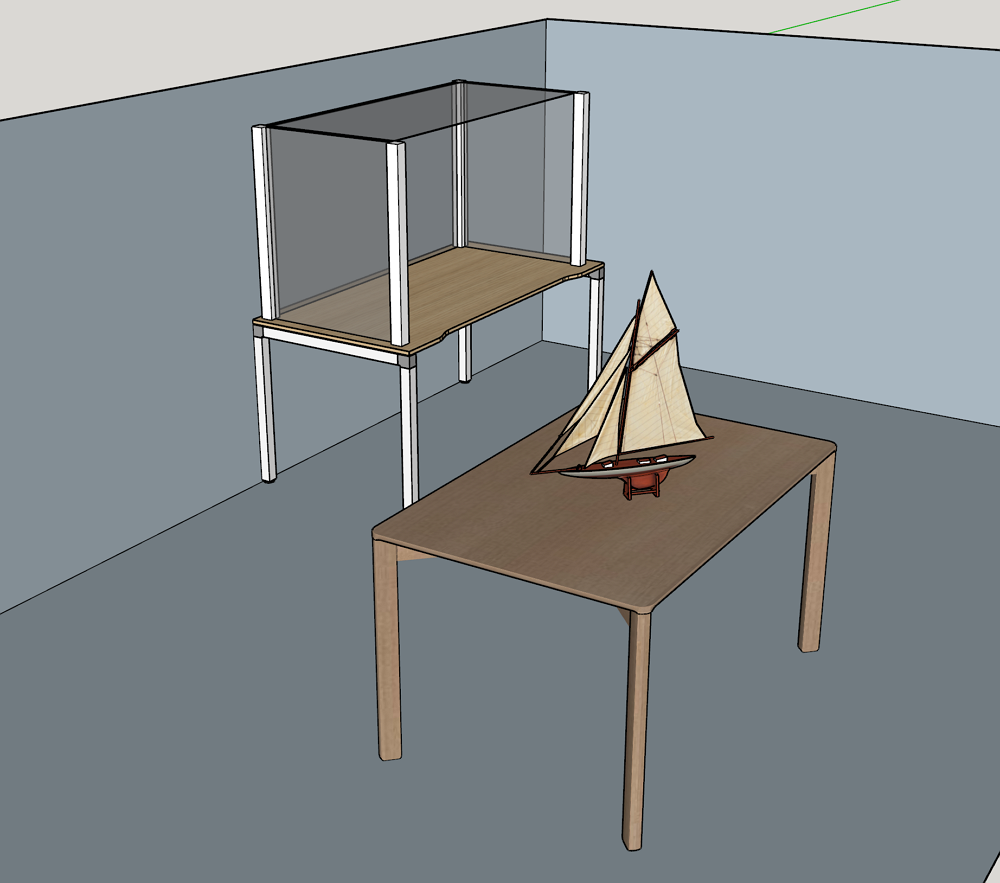
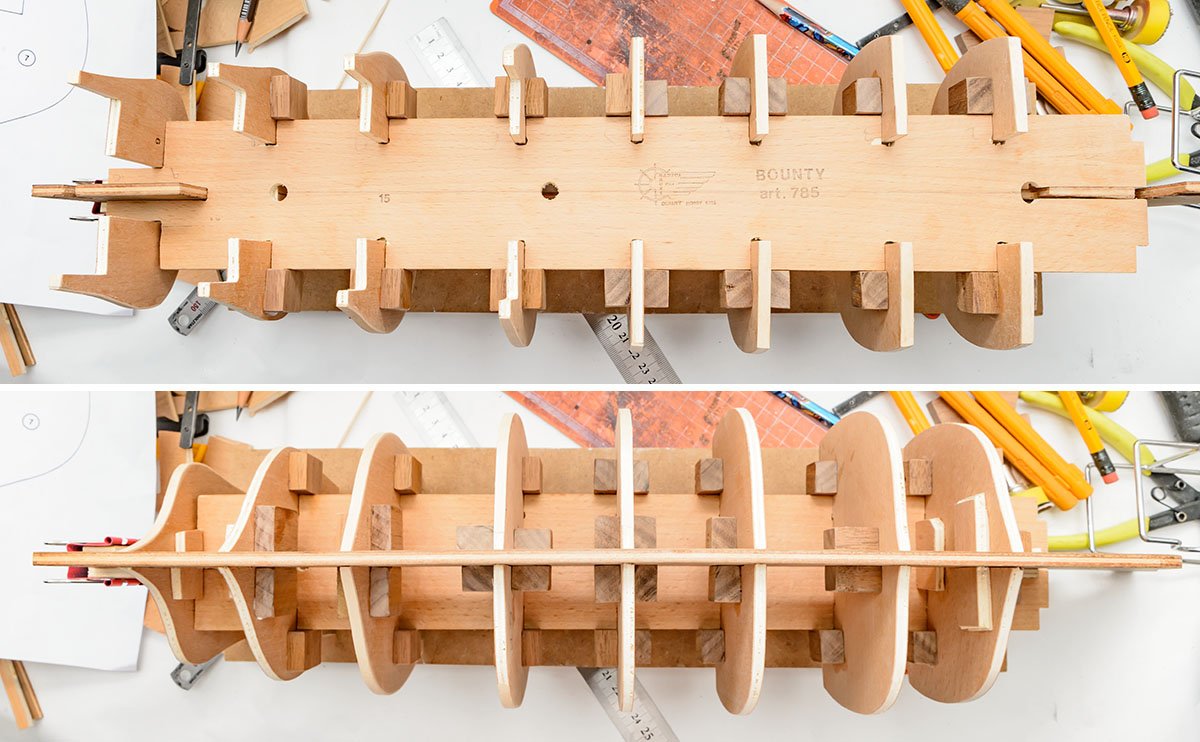
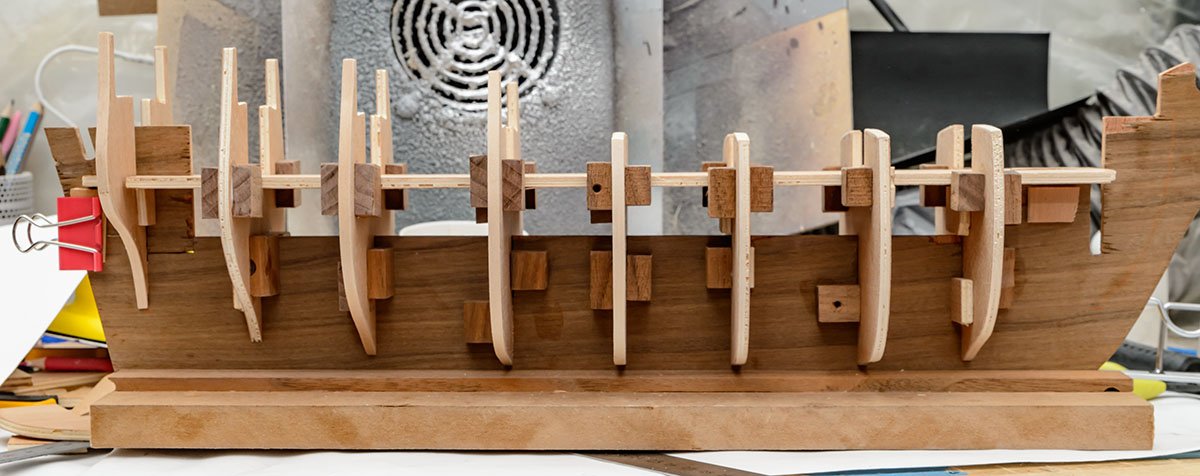
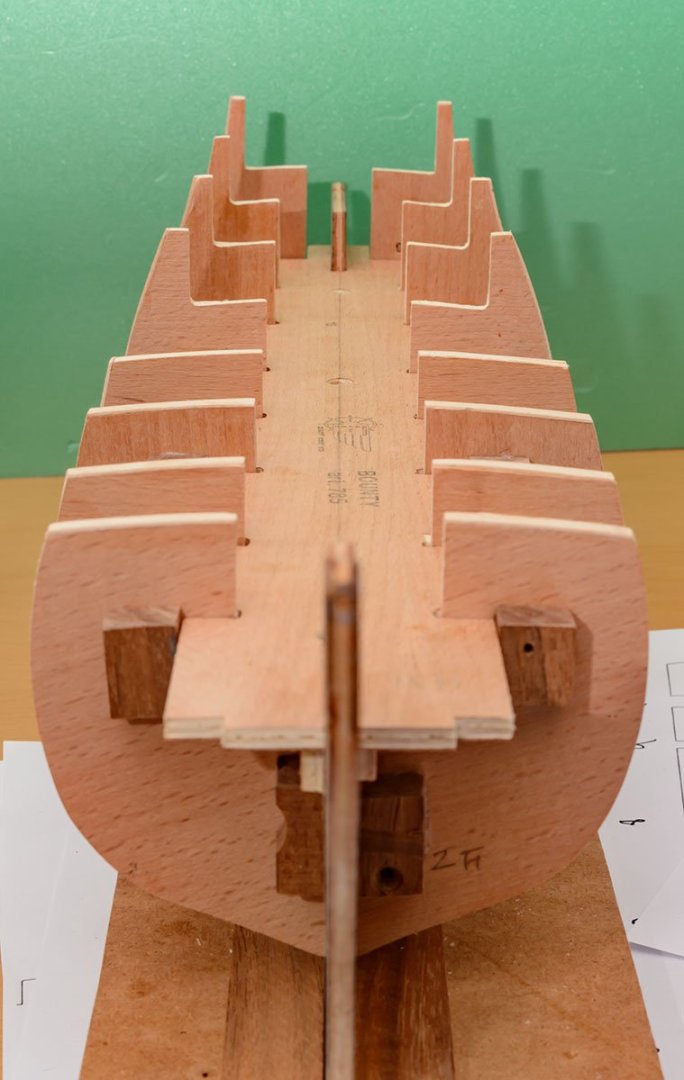
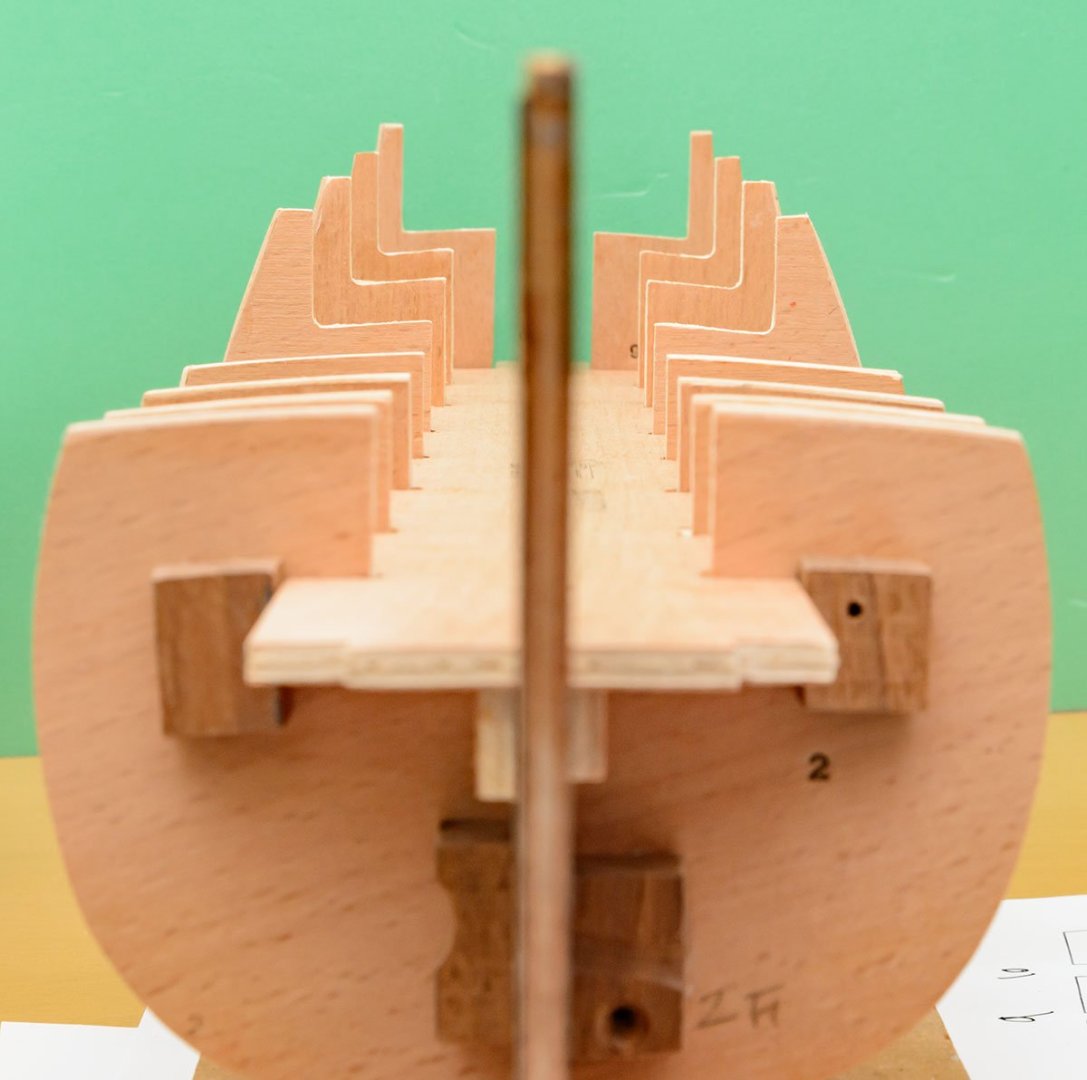
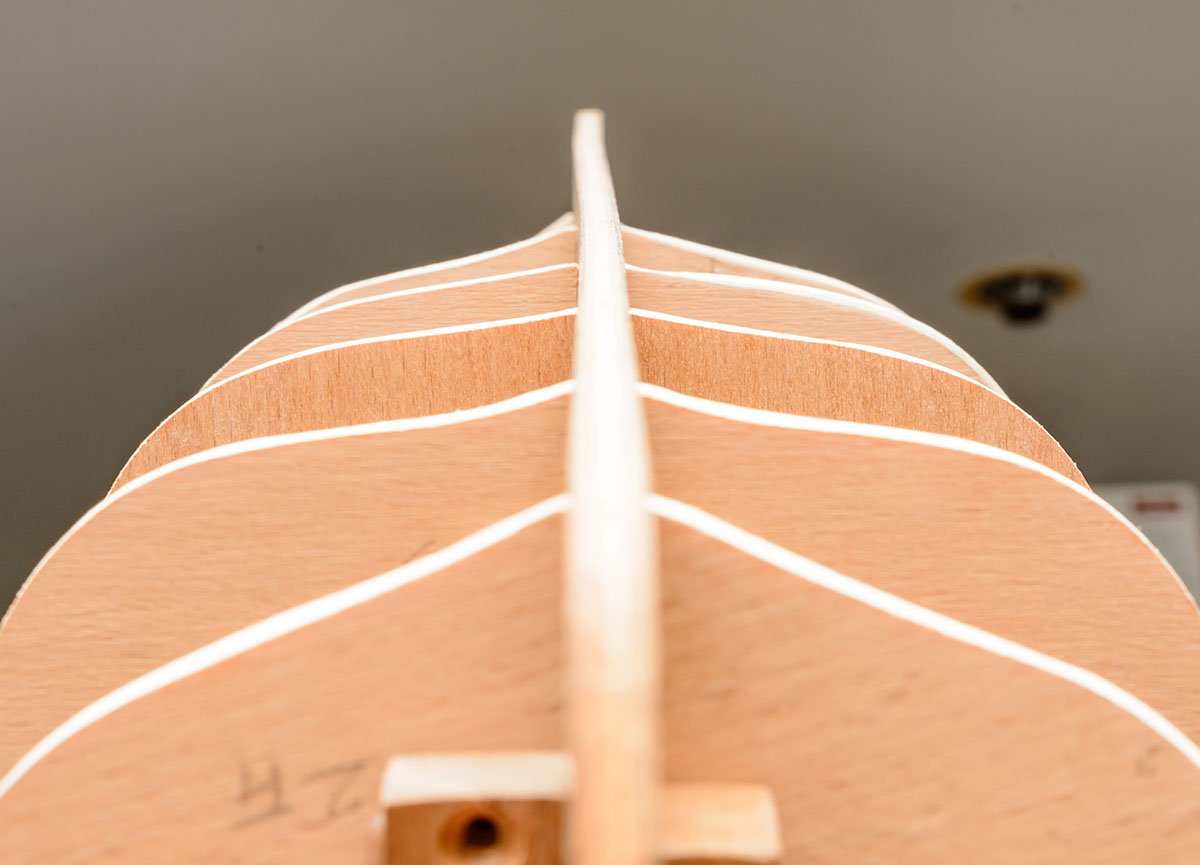
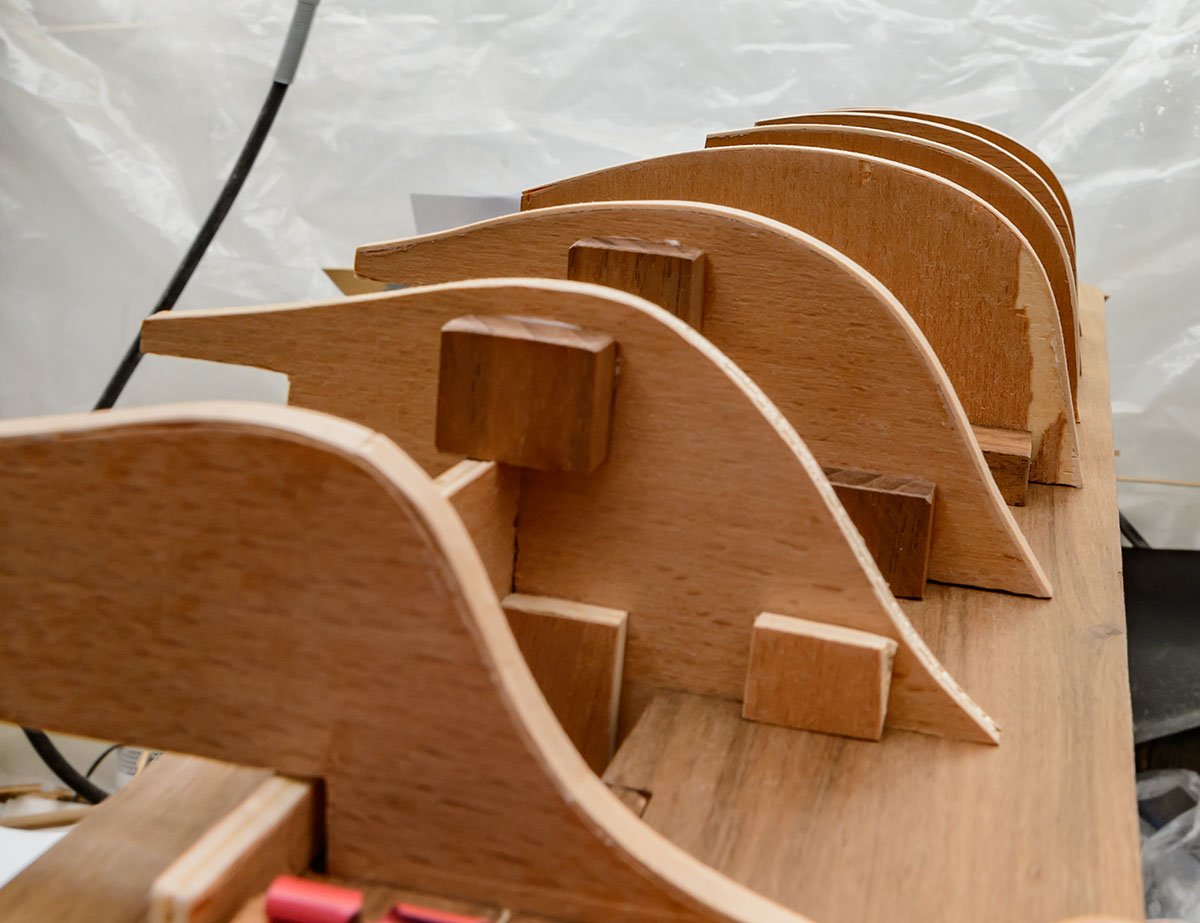
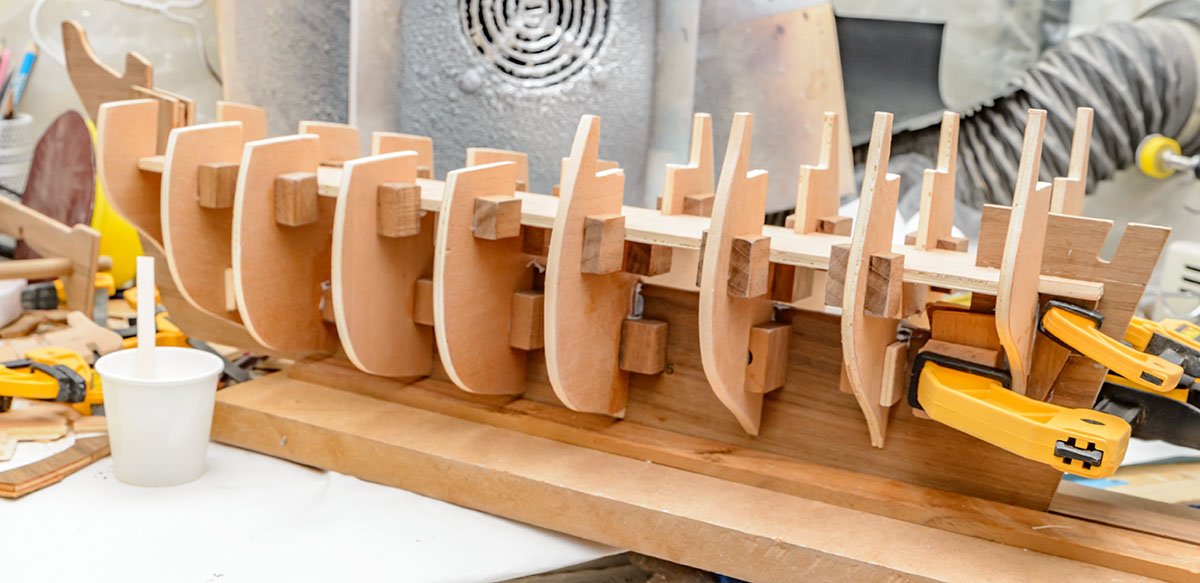
Hello, This kit is my last project of the year. This is one of the under $100 kits I purchased on Ebay a few years ago. According to the plans, the kit was designed in 1973, and parts weren't cut by laser. It led me to sawing hell, and made me buy a scroll saw ASAP. I really respect senior wooden ship modelers who didn't use any machines in the 1970s. The experience was so horrible that I won't buy any classic kits again... Not all the problems are solved yet. every part is incorrect due to inaccurate CNC cutting. The center line and mast holes of the decks aren't exceptions. Some sections are difficult to assemble, and most parts, including the frames, don't have specific guidelines, such as distance from the lower keel. They would be enough reason for a member who was a new builder to give up the recent laser cut version of this kit. I didn't stop becaused I knew how to deal with it. I fixed every frame using part plans. I set some guidelines, which weren't in the plan or instructions of the kit. By the way, I guess the proper height of the lower deck may be 85.7mm (or 3.375 inches). I purchased the Amati Bounty 1/60 plan a year ago for scratch build. The Amati's plan is much better than Mantua's in every respects, and gives all the hints for planking that weren't in this kit. In addition, Amati's plan is more similar to the AOTS reference book. If you are newcomer who wants to build a Bounty, I highly recommend Amati kits. There have been some more improvements since the last project. I expanded my workshop to measure and check every aspect of the ship. When I measured planks on the old workbench, I had to carry the ship and measure it by hand. I added a broad table. Now I can measure every height and position of each plank. Finally, I attached walnut blocks to every frame. The frames are not glued until I set them in the proper position, and the walnut blocks forced the frames to the last position I set when I checked and assembled the frames hundreds times. This is it. All the frames are almost perfectly fitted and symmetical. Each frame has an error of less than 0.50mm. This is my best result ever. The keel was bent before I started, but it was stretched as I set each frame properly. At least the paper plans didn't lie. The error of the keel is also less than 0.50mm, which can be easily removed by sanding. With satisfying results, I glued the frames. I'm ready for hull fairing. 😎


-
You can purchase the original plans and the changed plans at the Bristol SS GB site. I ordered digital high-resolution copies and am waiting for a response.
-
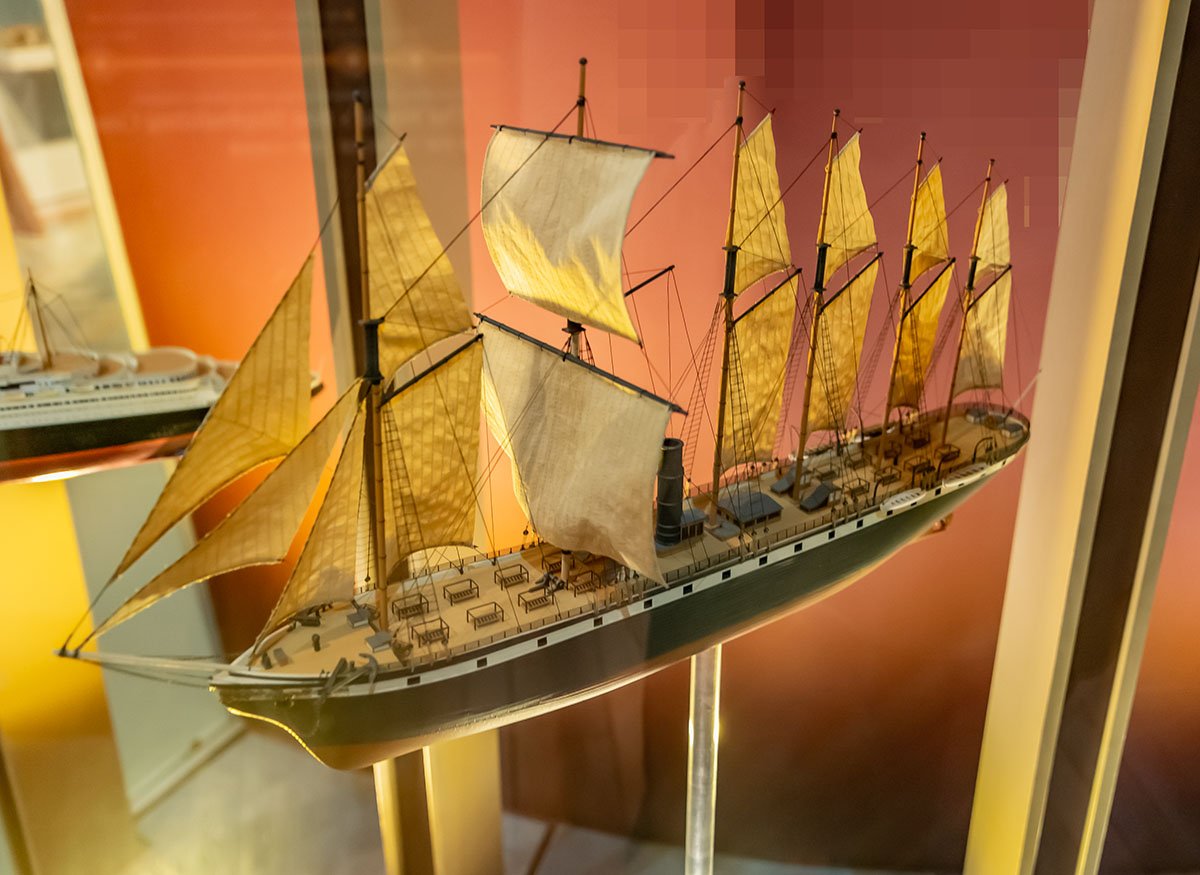
Is this Great Britain? I took the picture at a local museum. I guess that the museum purchased the completed model from a factory like this. https://www.stephensandkenau.com/ship/ss-great-britain/
-
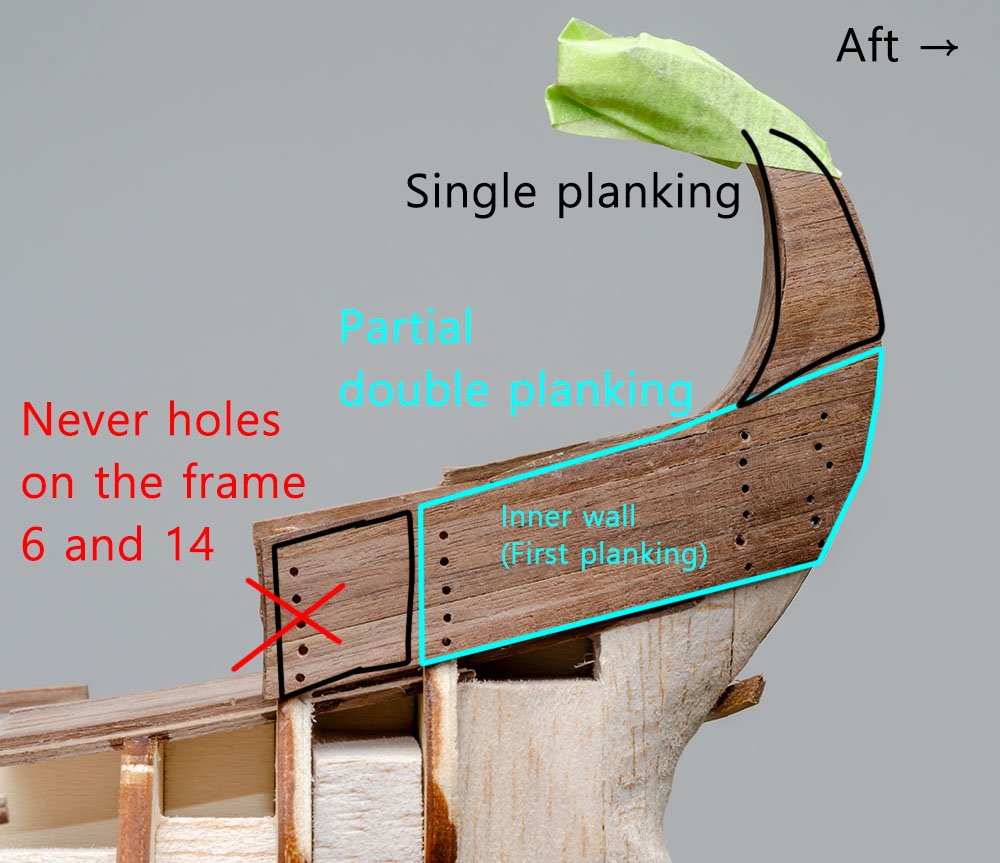
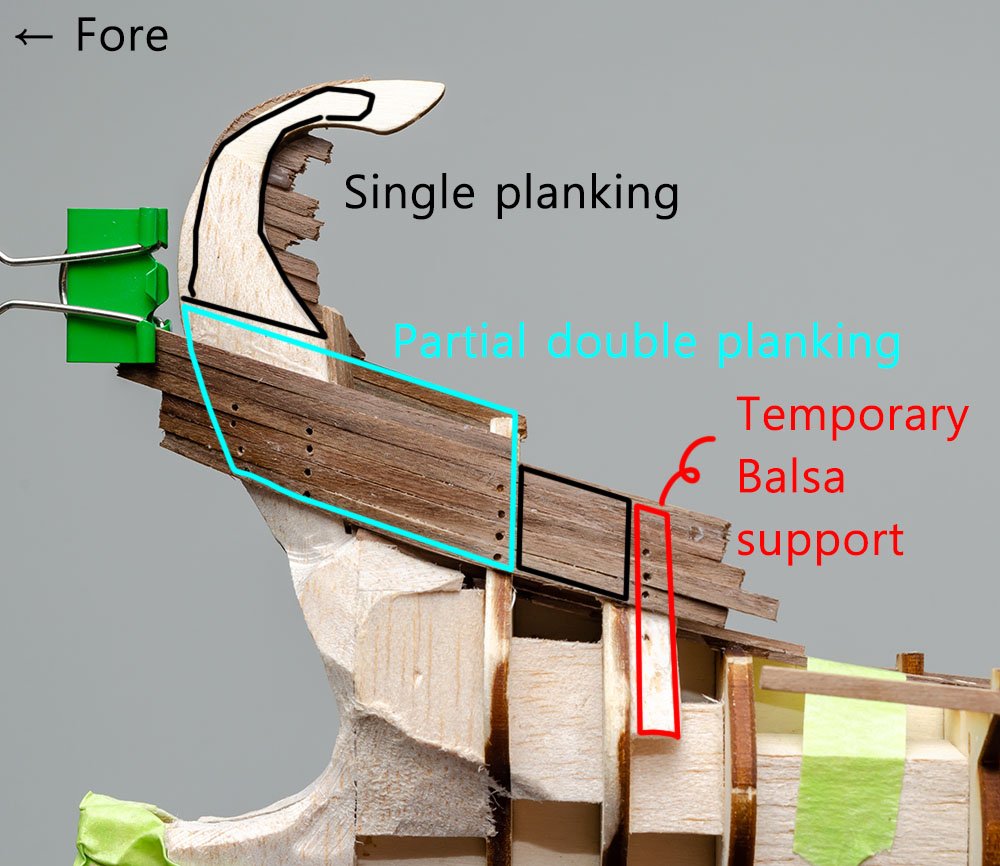
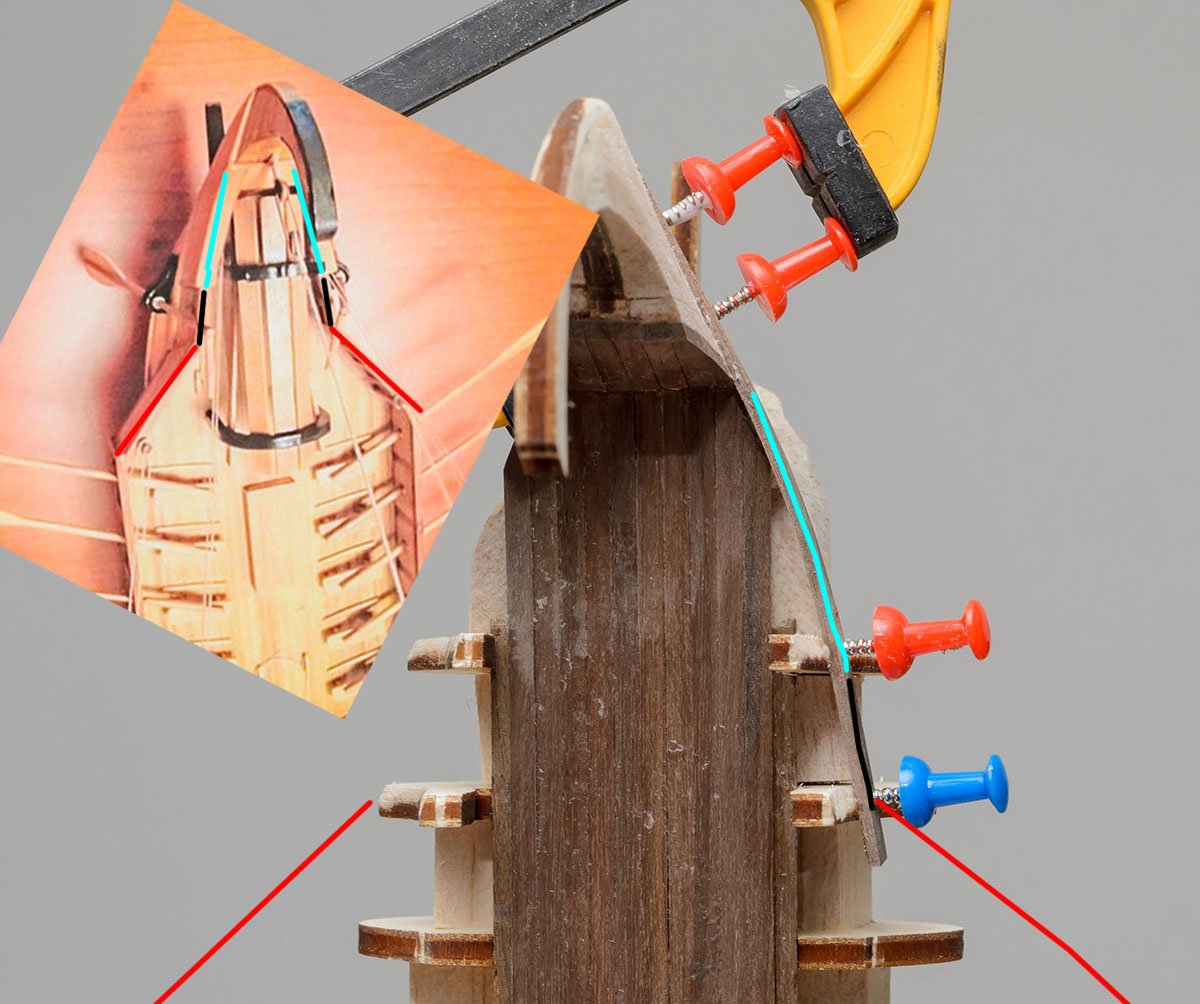
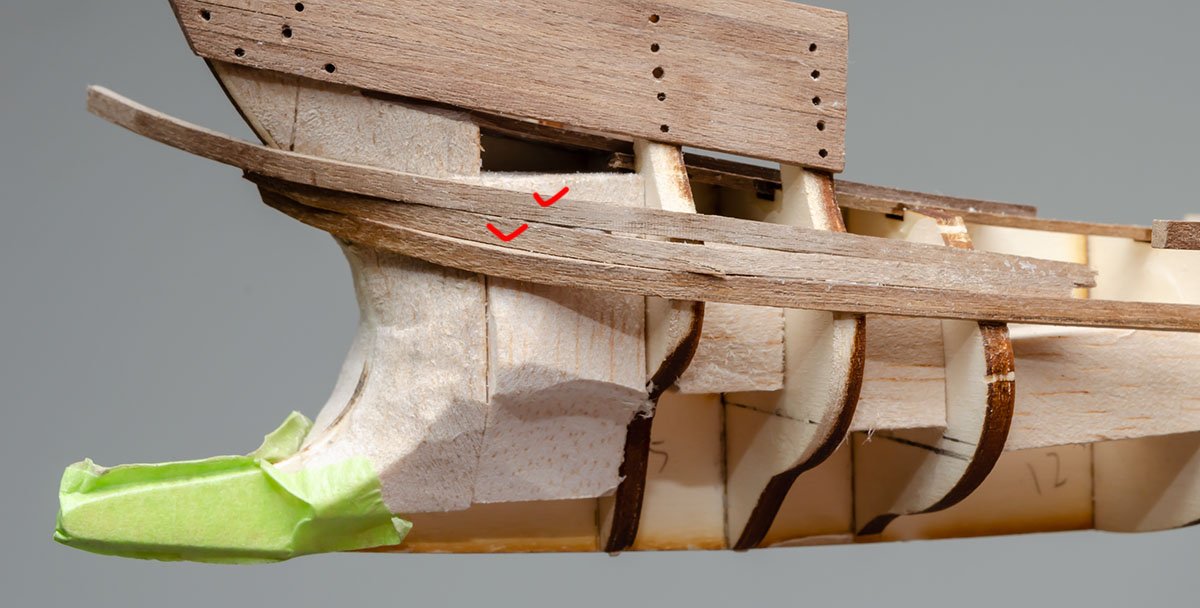
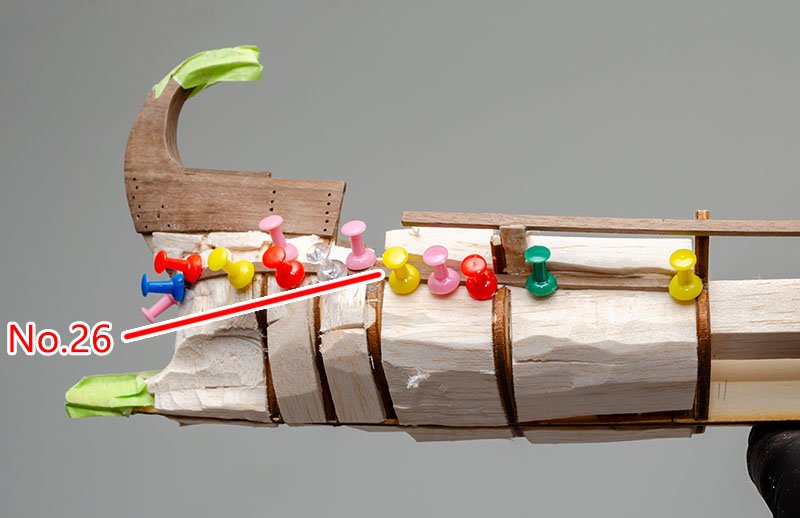
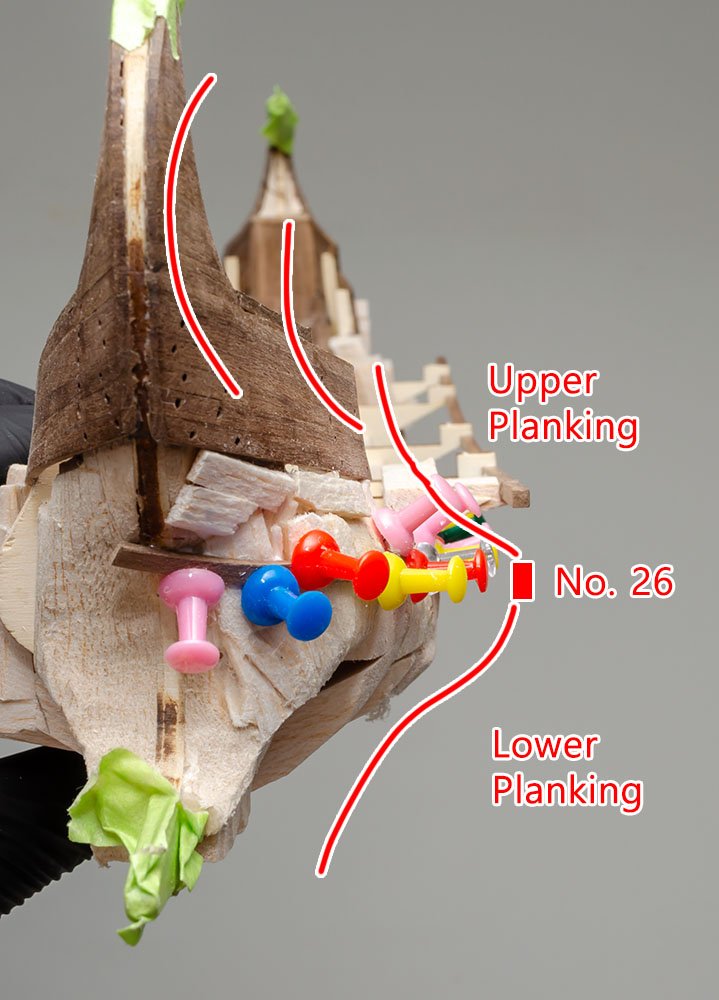
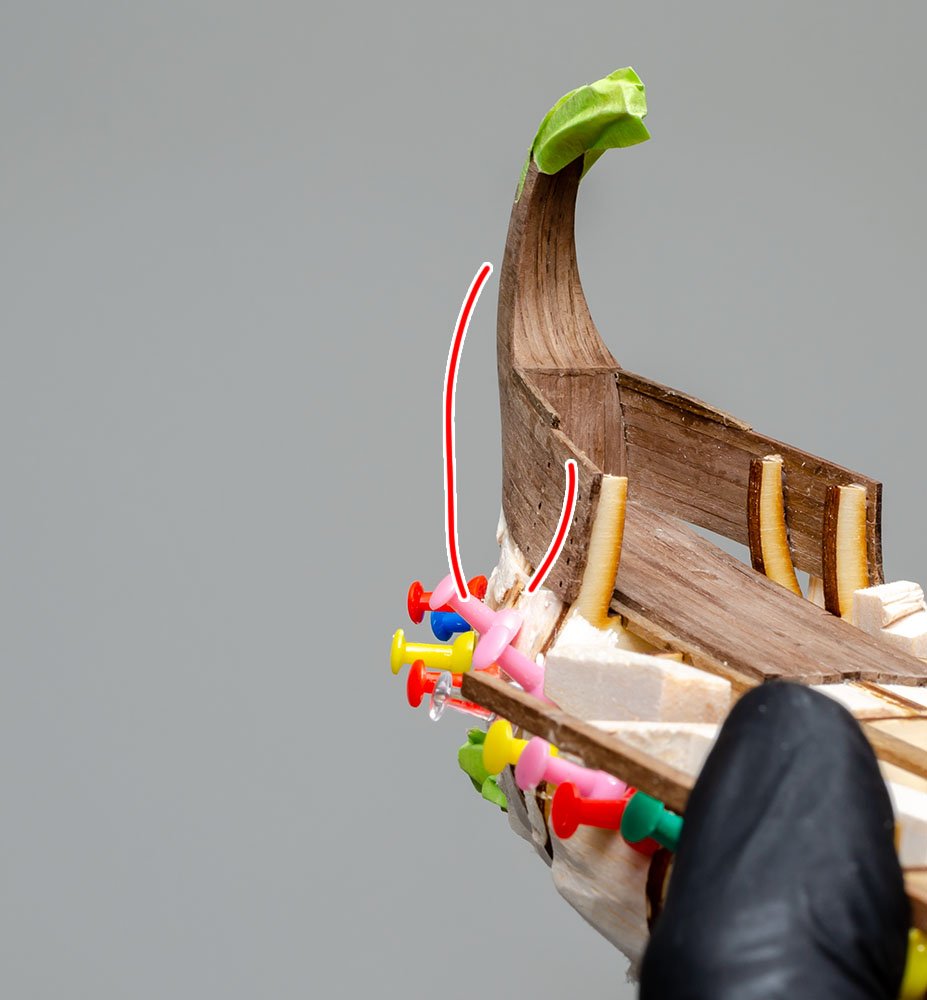
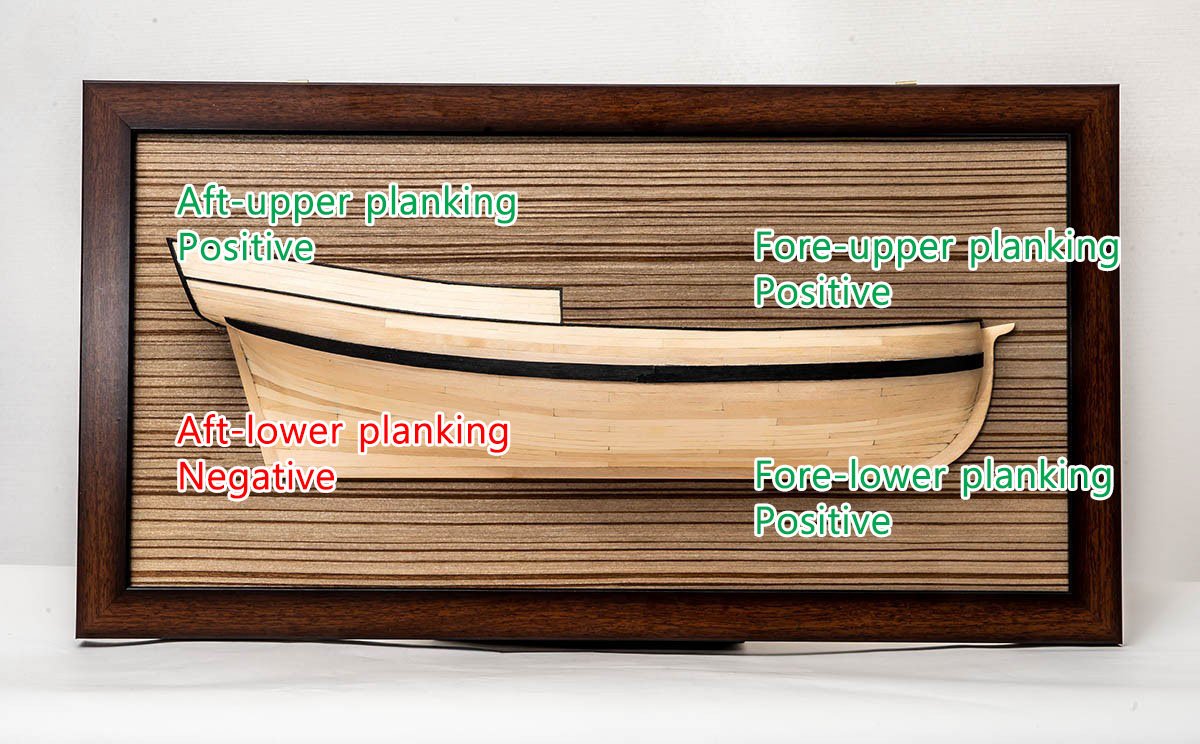
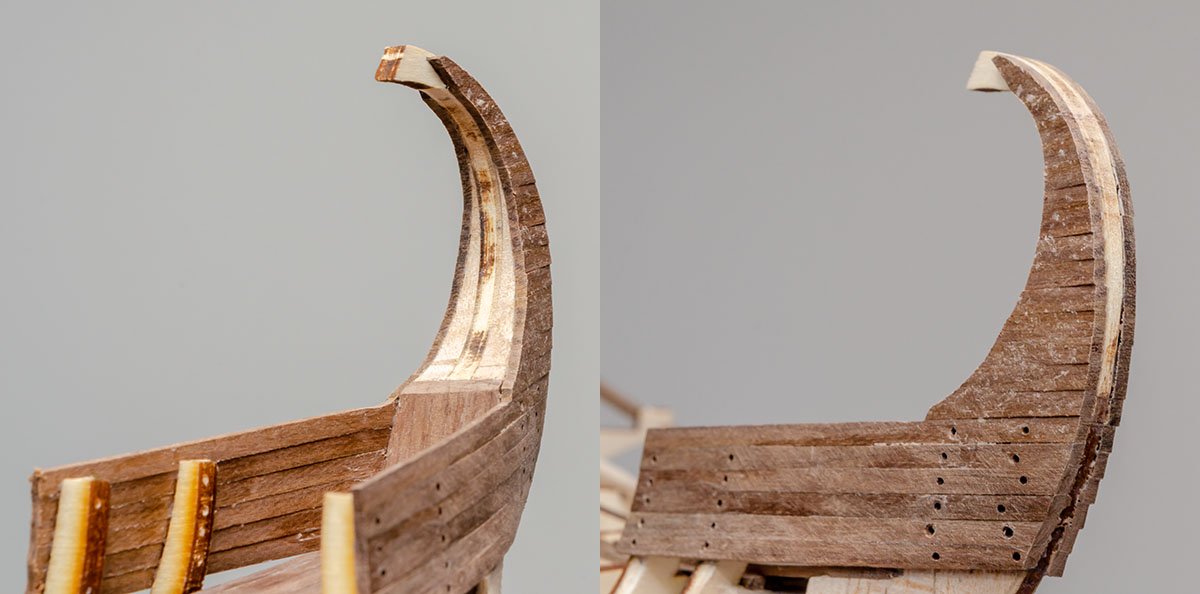
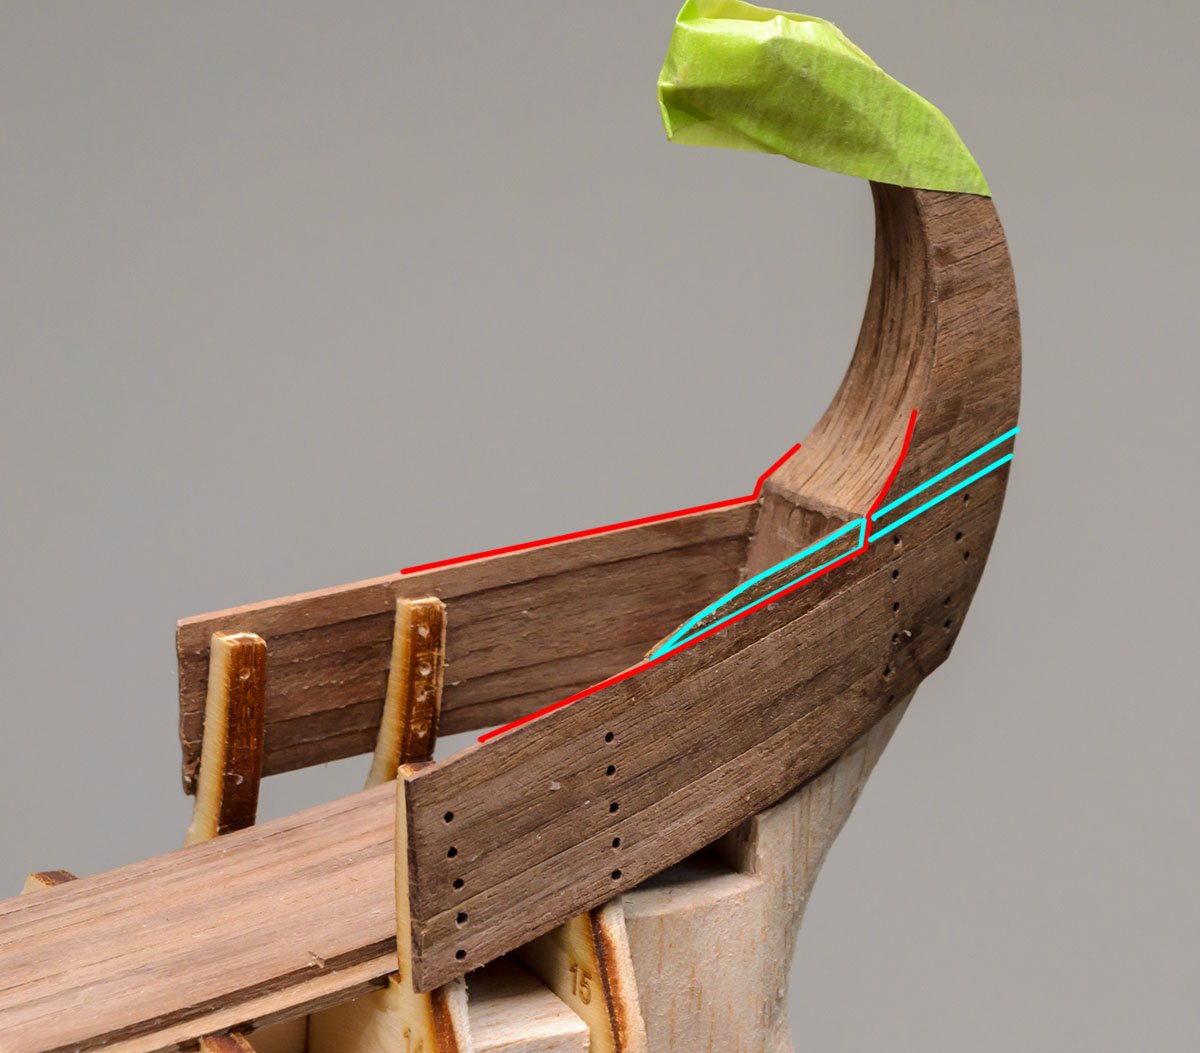
You made the right choice, VTHokiEE. This advanced kit, like the Vanguard Models or Syren, will give you intellectual pleasure. By the way, I found my critical mistake. 😱 These are small mistakes that can be recovered... I hope the red wall will cover the holes. It was too difficult to attach the lower hull planking. I tried to attach them like the English ships, but the strong curved frame made huge gaps between planks. I couldn't accept them because of a single planking ship. I stuck to a plan paper again, and found my mistake after a few days. The key was the 26th part. It is the widest plank, and it doesn't lean in any direction. Under the 26th plank, I can use a conventional planking method for the English ship's aft side. This ship is symmetrical so that both lower parts of the fore and aft planking have the same structure. However, unlike the English ships, this ship's aft-upper planking is concave. In other words, I had to use a planking method on the aft-lower side of the English ships to the aft-upper section. Therefore, this ship's lower and upper planking use the same planking technique as the aft-lower planking of the English ship. Also, this ship is symmetrical, so I had to use the same technique on all four sections! 🤪 I didn't realize it when I sanded balsa blocks for the upper part of stem and stern. I made them convex, which made my planking hell. It's not too late to fix my critical error, but I'm a lazy guy. 😴 I'll try to cure them, but the upper planking won't be corrected. I hope the other people won't make the same mistake.
-
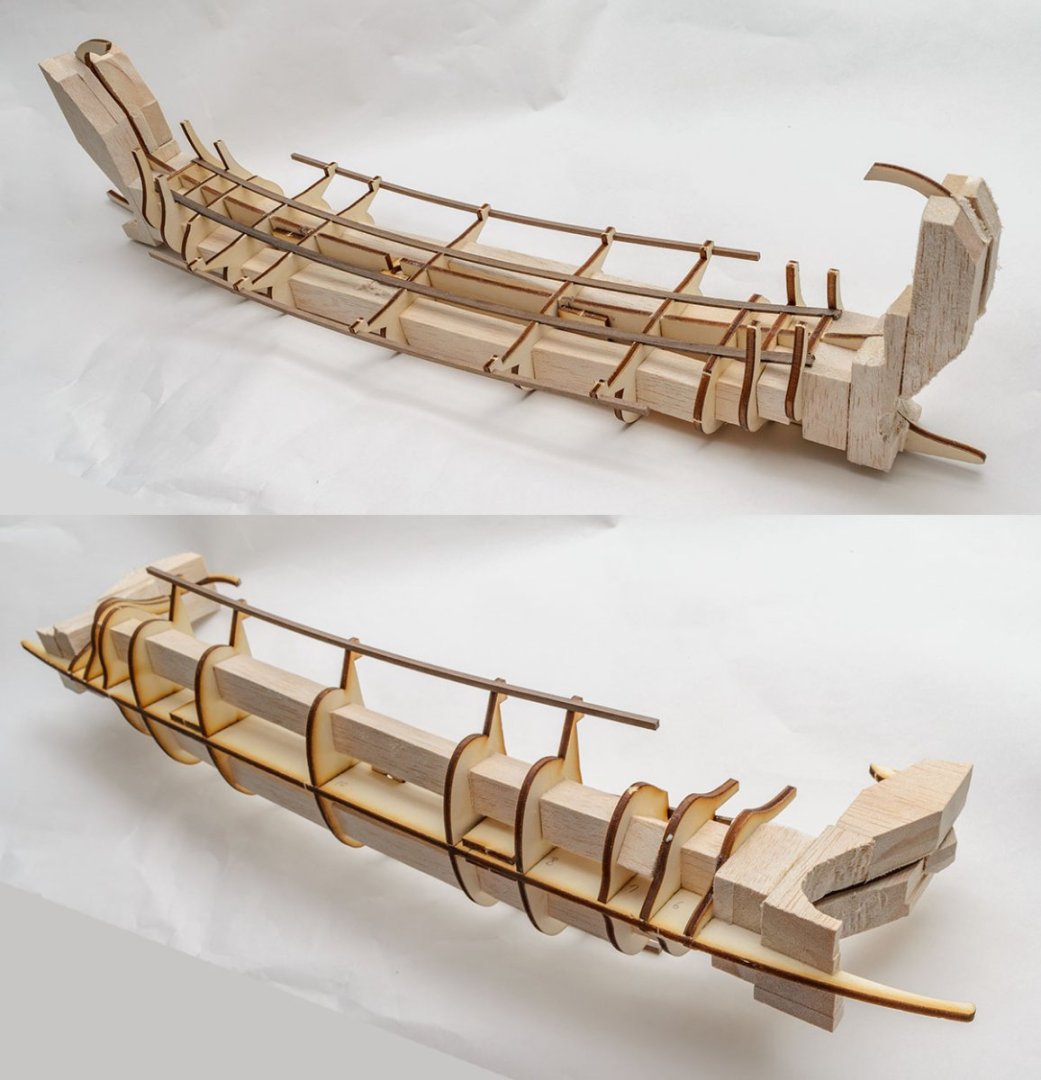
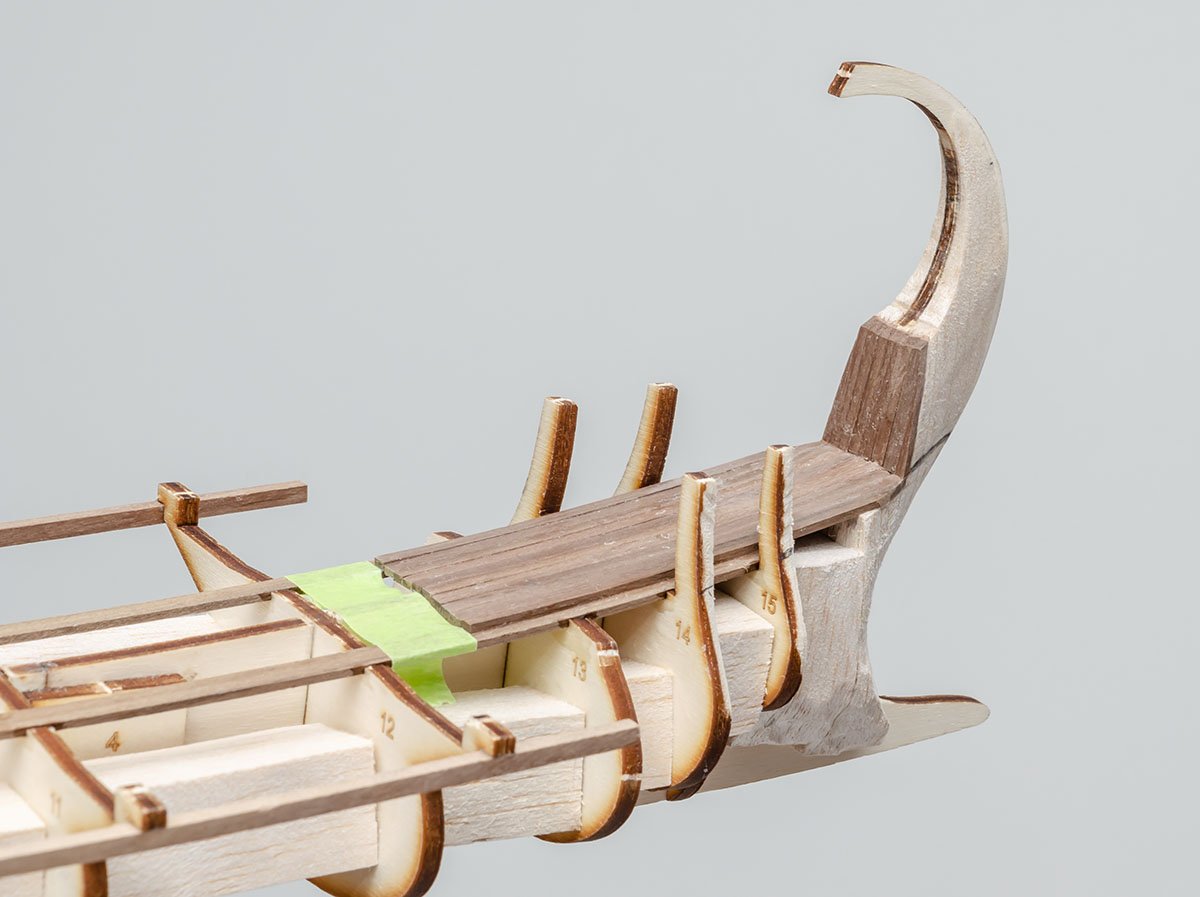
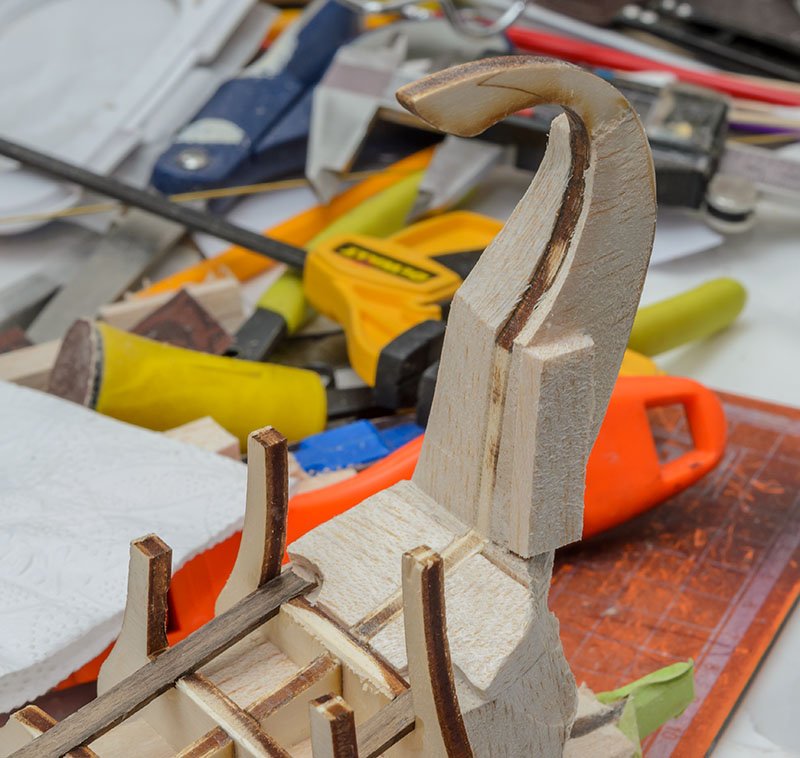
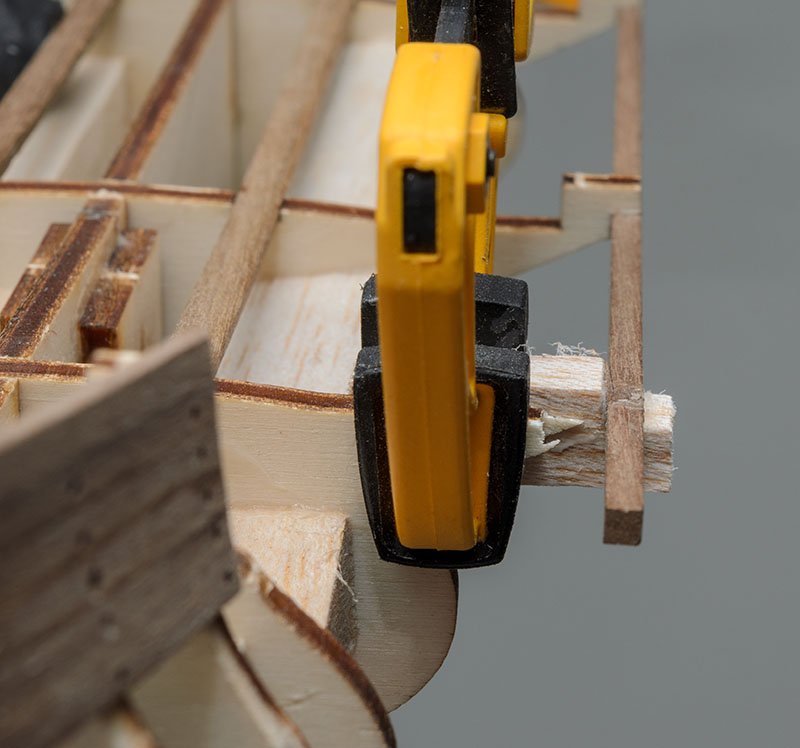
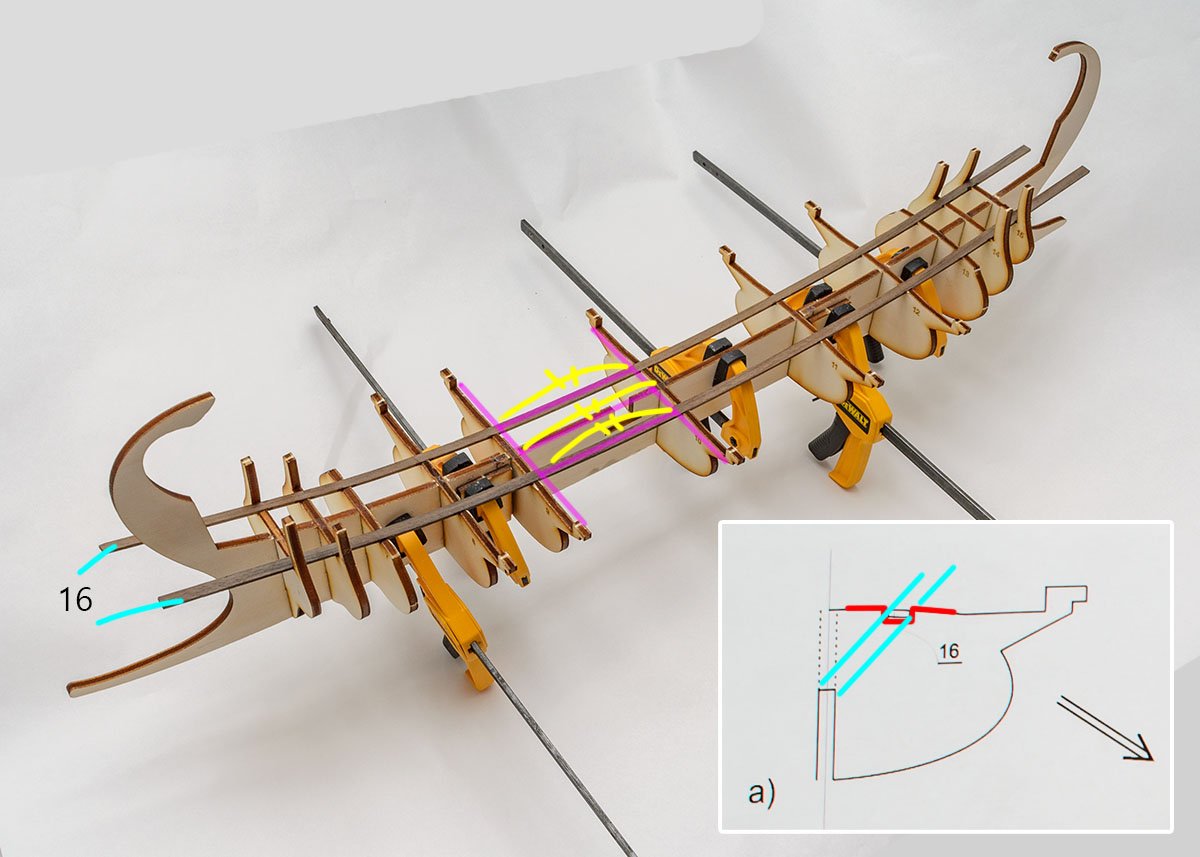
I attached NOT ENOUGH balsa blocks to frames in May. Don't follow it. As I said, I recommend FILLING the entire hull with balsa blocks. This is quite a small ship and has many spiky points that can be easily broken. Sand and attach polished balsa blocks. I had difficulties when I sanded narrow areas. In addition, it is good to read plans several times and leave hull fairing marks on frames before attaching the balsa blocks. I need to improve my ability to read a plan before using glue. After days of research on the plan, I confirmed part of the hull fairing lines. Unfortunately, the pictures in the manual book are blurred, and nobody has made this ship before... The upper part of the frame will be cut. The exposed edge will be capped with a brass crown. I missed one line of planking. The lines should be smooth curve, and the blue plank is a single wood plank. I glued small piece of wood later. I'm making a stem-planking using the same method. I accidentally sanded too much balsa block, so I cut it and attached a new balsa block. Yesterday, I dropped my ship. 😱 Some parts were broken, but I was able to fix them easily. 🤕


-
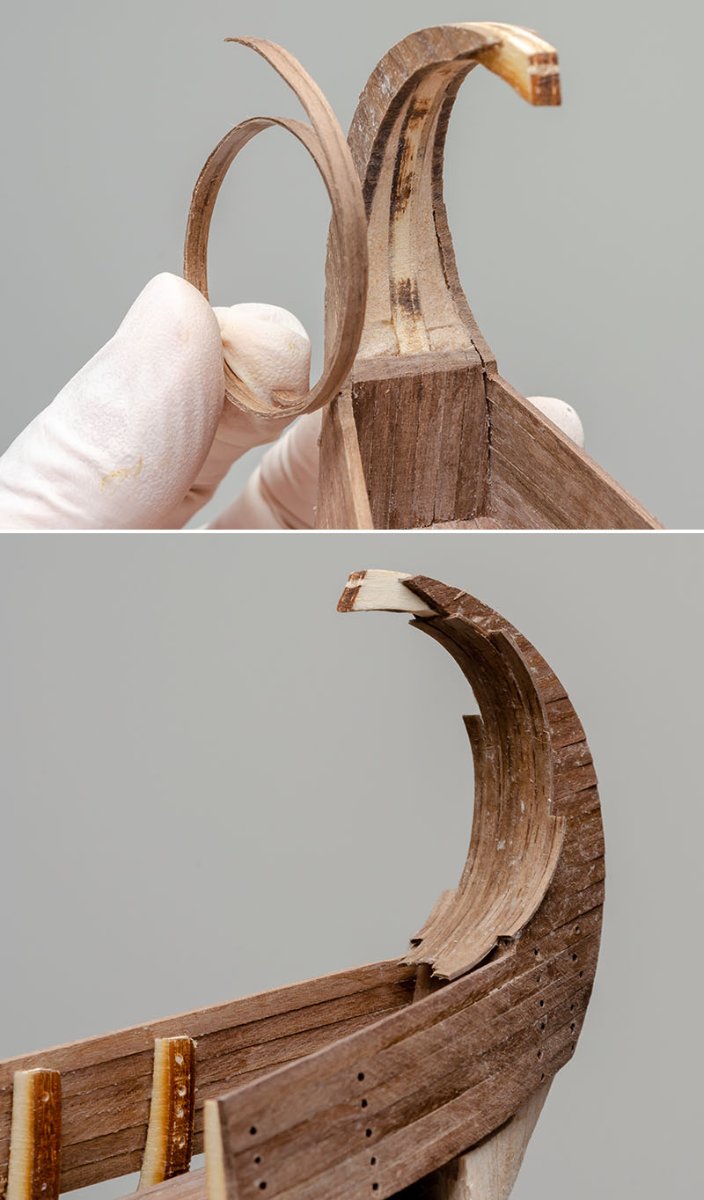
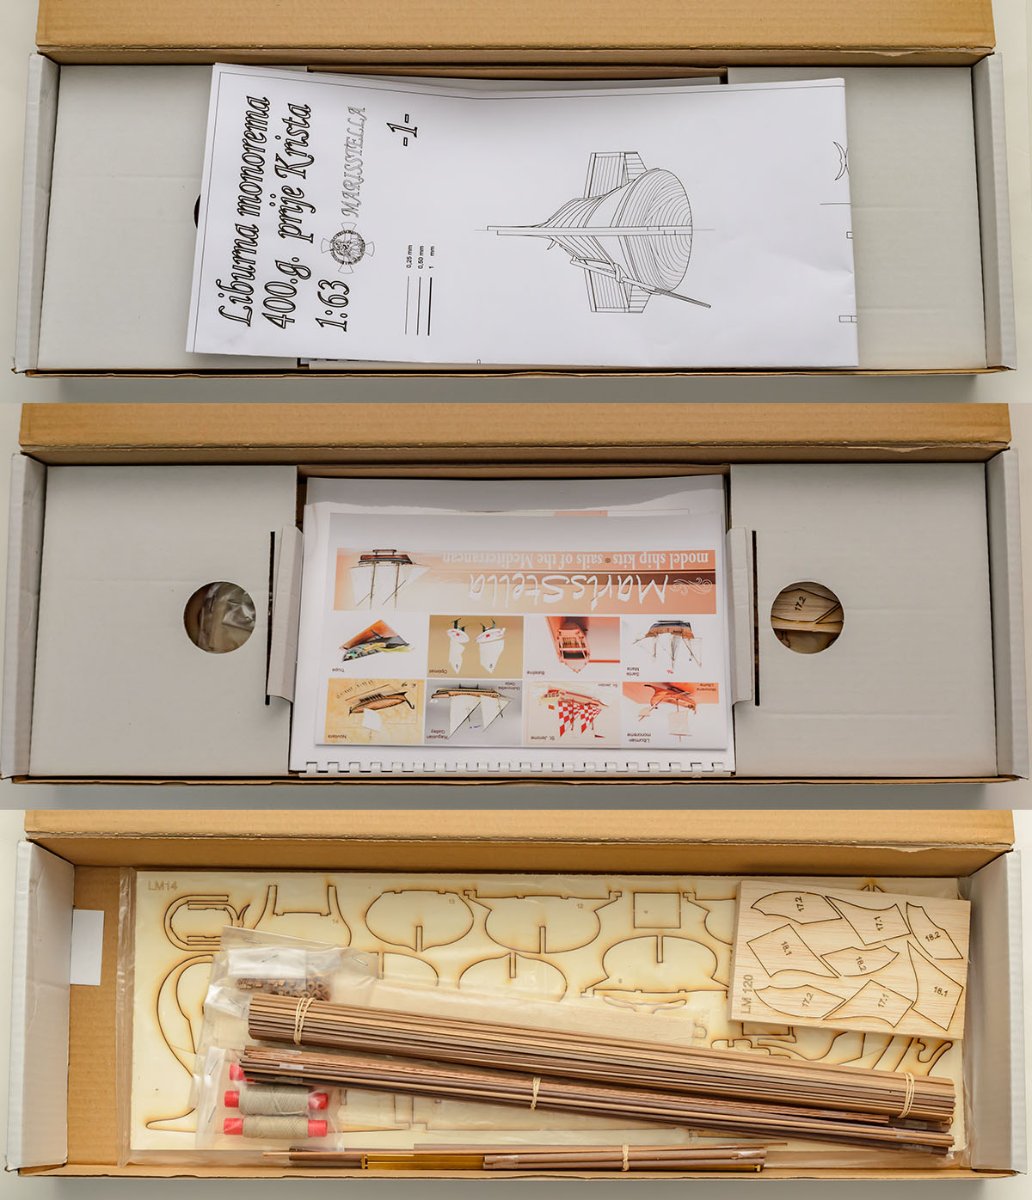
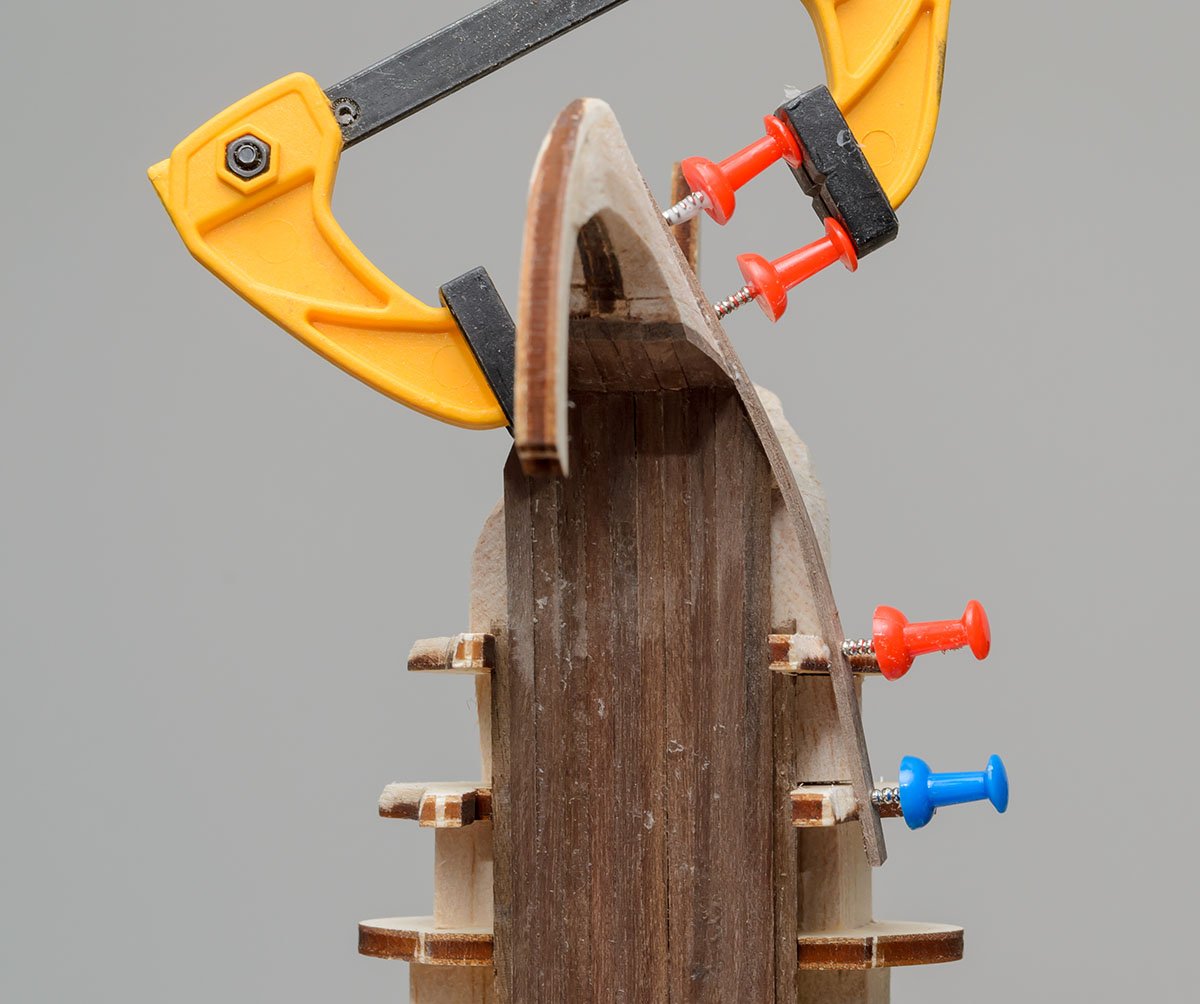
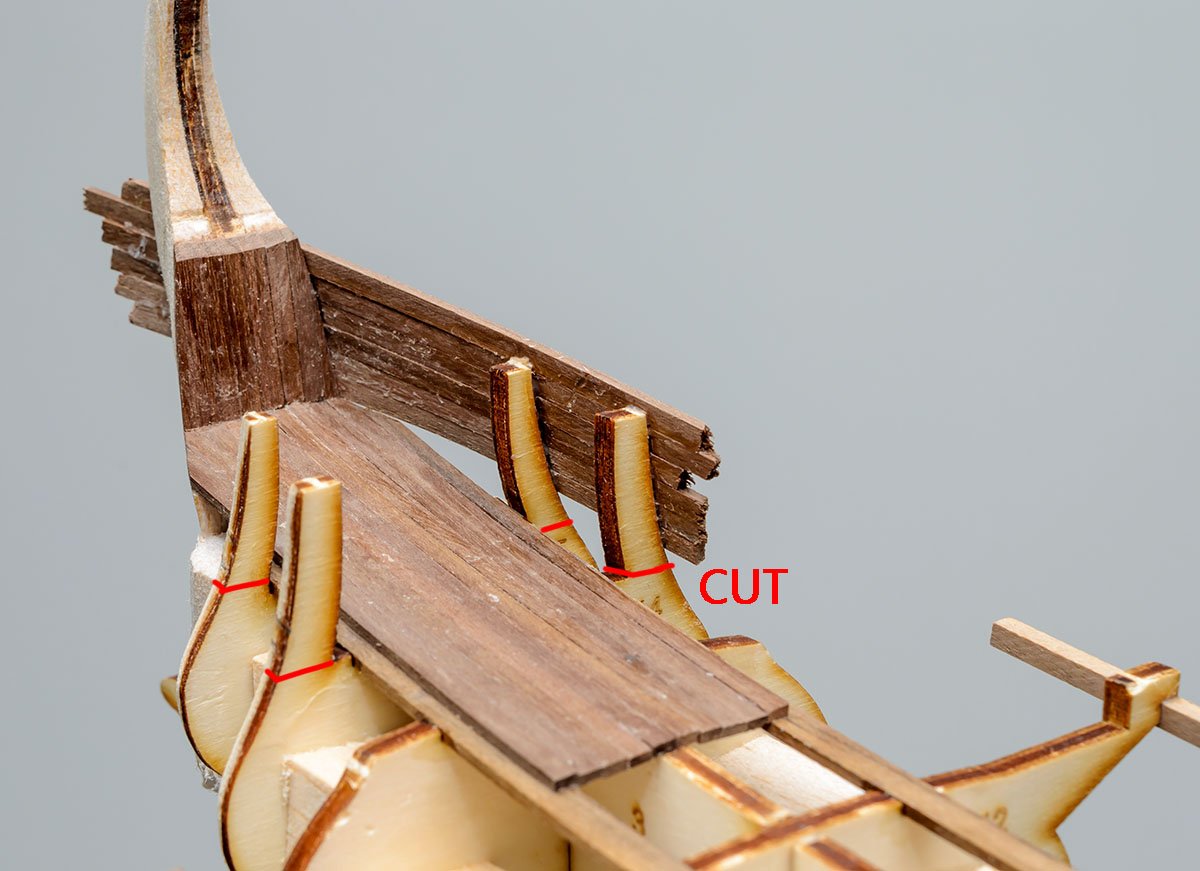
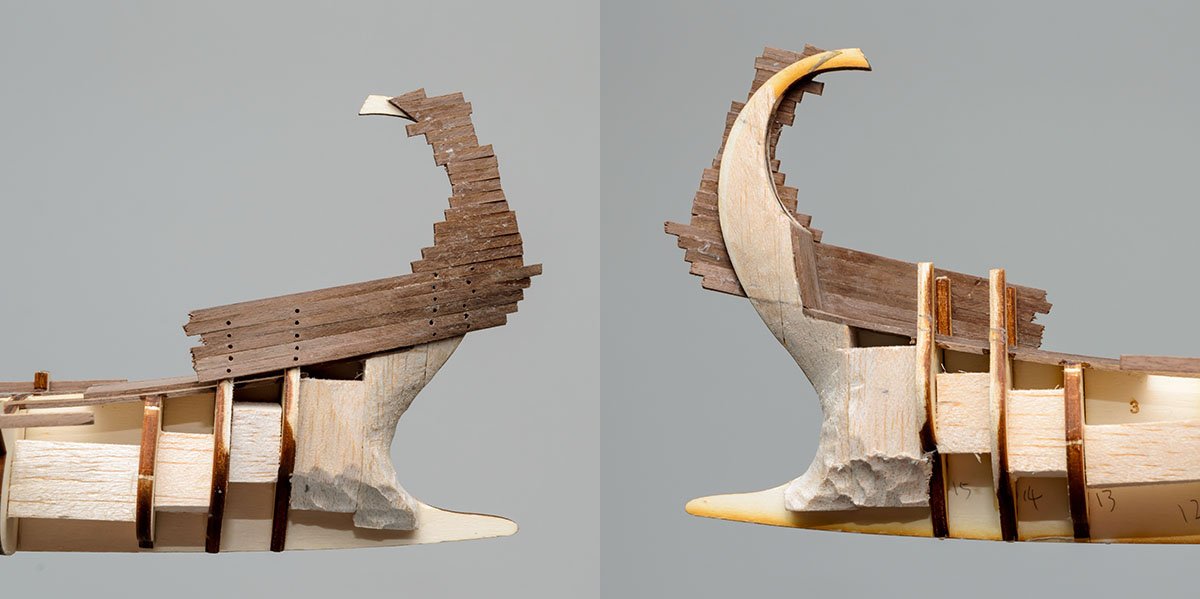
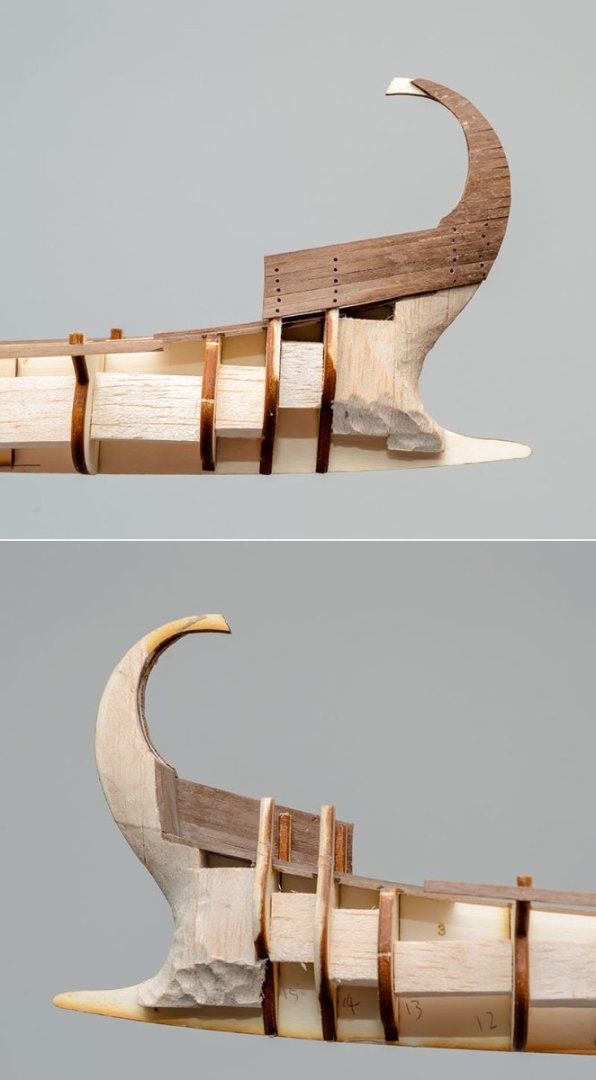
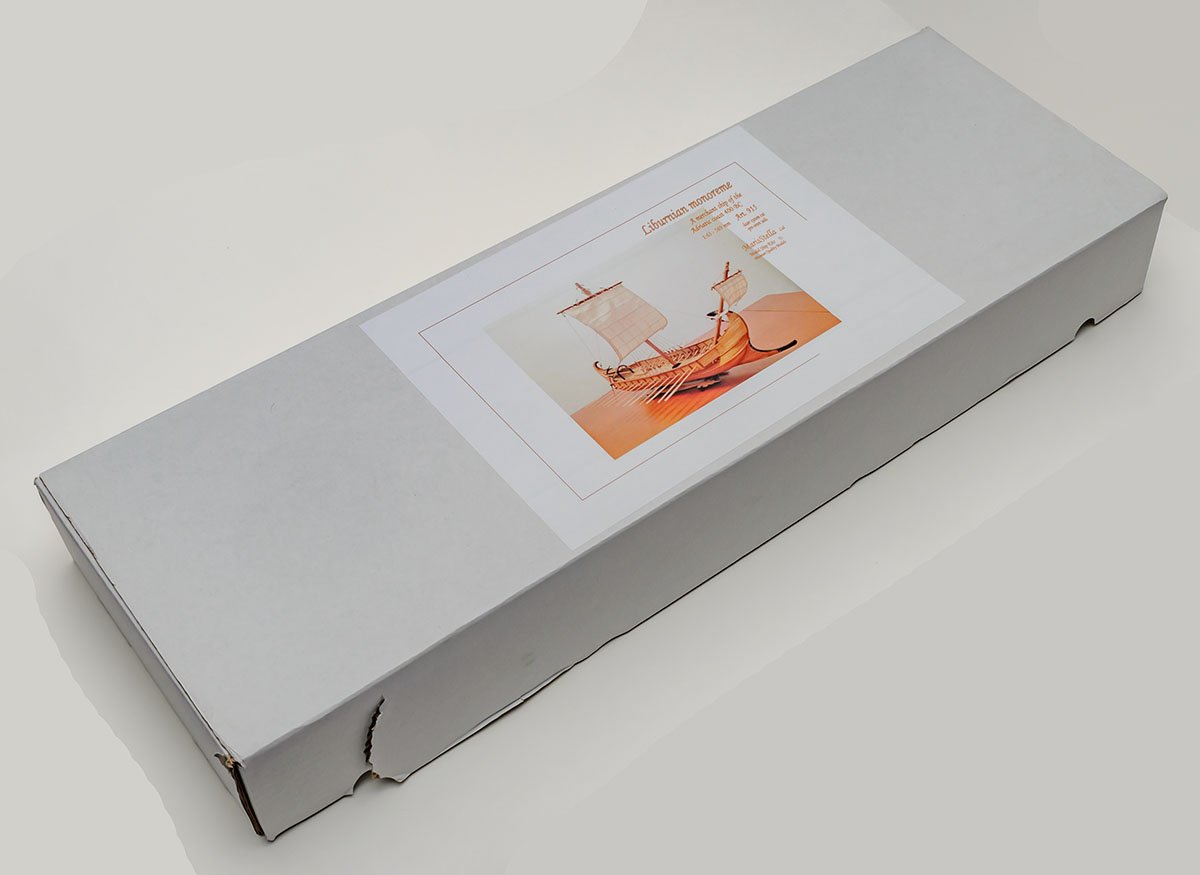
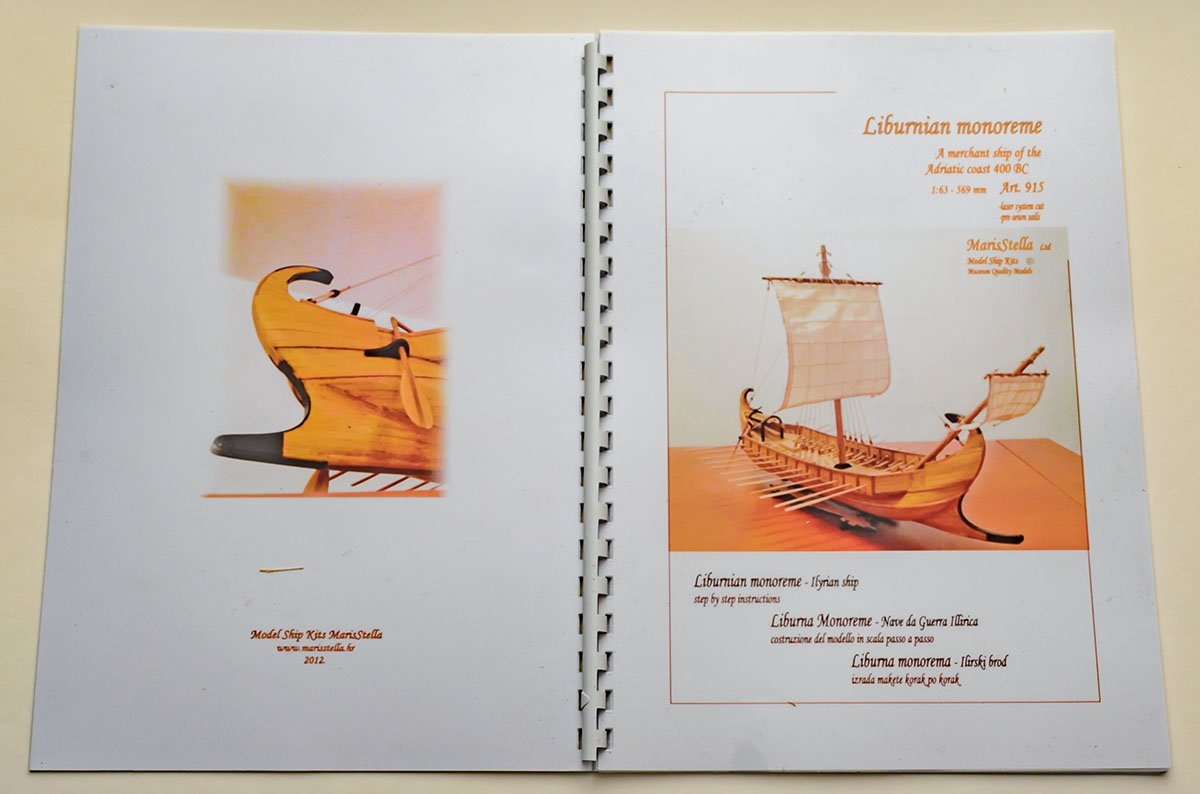
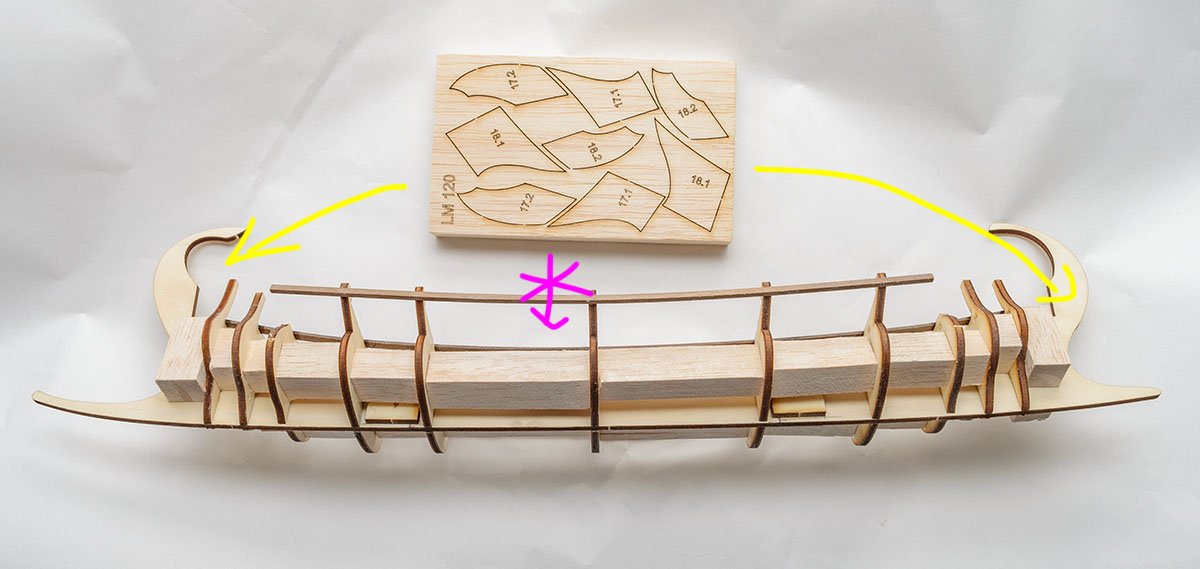
Nice to see you again. This is my second project this year. I had a motive to build the ancient Greek ship from two games I played; Assassin's creed Origins and Odyssey. They are based on the ancient Egypt and Greek eras. You may be familiar with the Amati or Dusek's Greek trireme, but those kinds of late greek ships aren't in the games. After days of research, I found an unfamiliar wooden ship model company, MarisStella, in Croatia. Unfortunately, I had a communication issue with the company when I tried to make a purchase at the EU store. When I received the kit, it was two months late and the iron was already cold. This is a reason I started it now. If you live in North America, you should buy the company's products at Model Expo or the Art of Age of Sail. Otherwise, you can order directly from the company in Croatia, but you should be patient because the the EU store is based on a mail-order system. The ordering system was a bit embarrassing, but the kit is the best I've ever tried. The laser cut is so accurate that I even don't need to sand anything. The selection of wood species is adequate; walnut strips and thick plywood. Manuals are traditional style and very detailed. Also, the manual introduces the spiling planking technique very shortly. They know how to drill. 😎 This is one of the innovative ways of aligning frames. With the super accurate laser cut frames, the 16th walnut strip made me a perfect equal hull fairing I've never made before. It is much simpler than the twin wood rods in the middle of frames the company used before, and still effective. Very clever! Of course, not everything is perfect. Some parts or materials are difficult to handle. For example, it is almost mandatory to fill the entire hull with balsa wood before hull planking or deck planking in my opinion. The balsa wood in the kit isn't enough and is difficult to cut. In addition, I have to make some accessories like cleats, which are usually offered as metal parts. The manual doesn't say anything about it, and the 1:1 plan suggests making cleats from walnut strips. Moreover, I have to sand 1.50mm walnut strips to make 0.70mm strips to fill some parts of the hull. Why shouldn't I sand it? I just used my 1/32 inch walnut sheets. It's not frustrating, but challenging and fun in my opinion. In general, the missing or self-made parts increase the difficulty level of the kit. The above pictures were taken in May. I'll upload the current process soon.

-
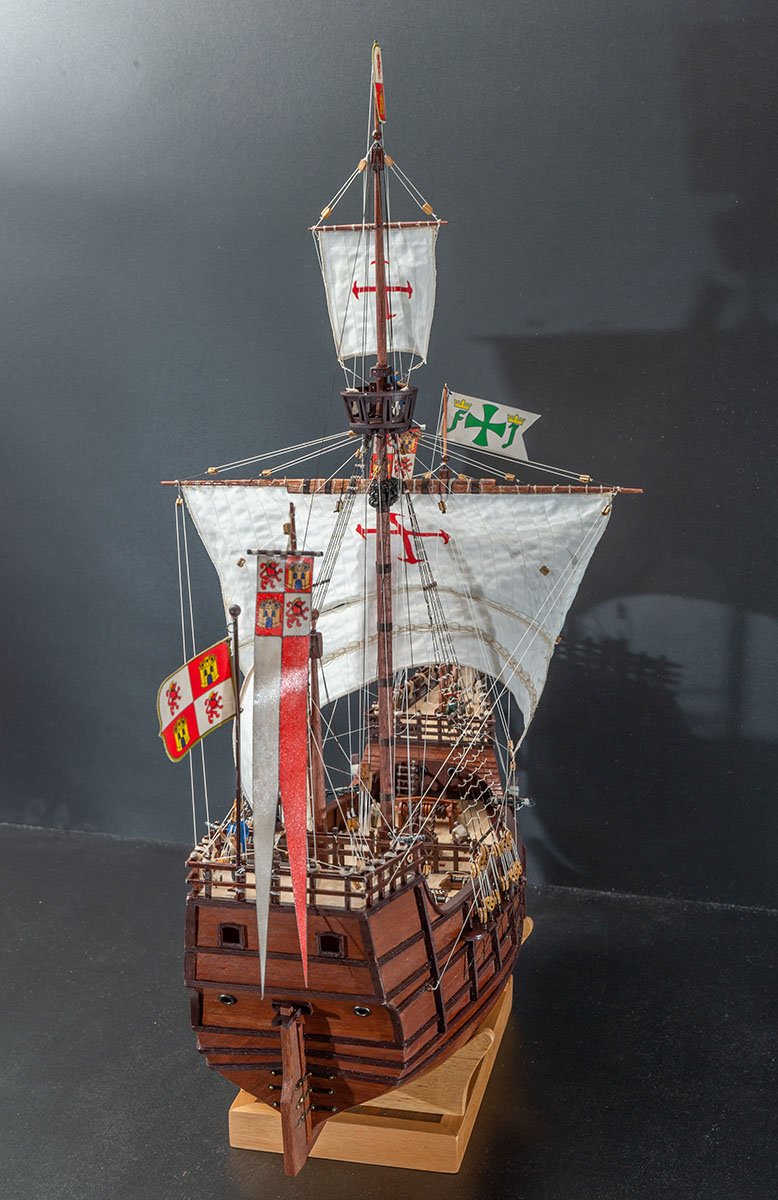
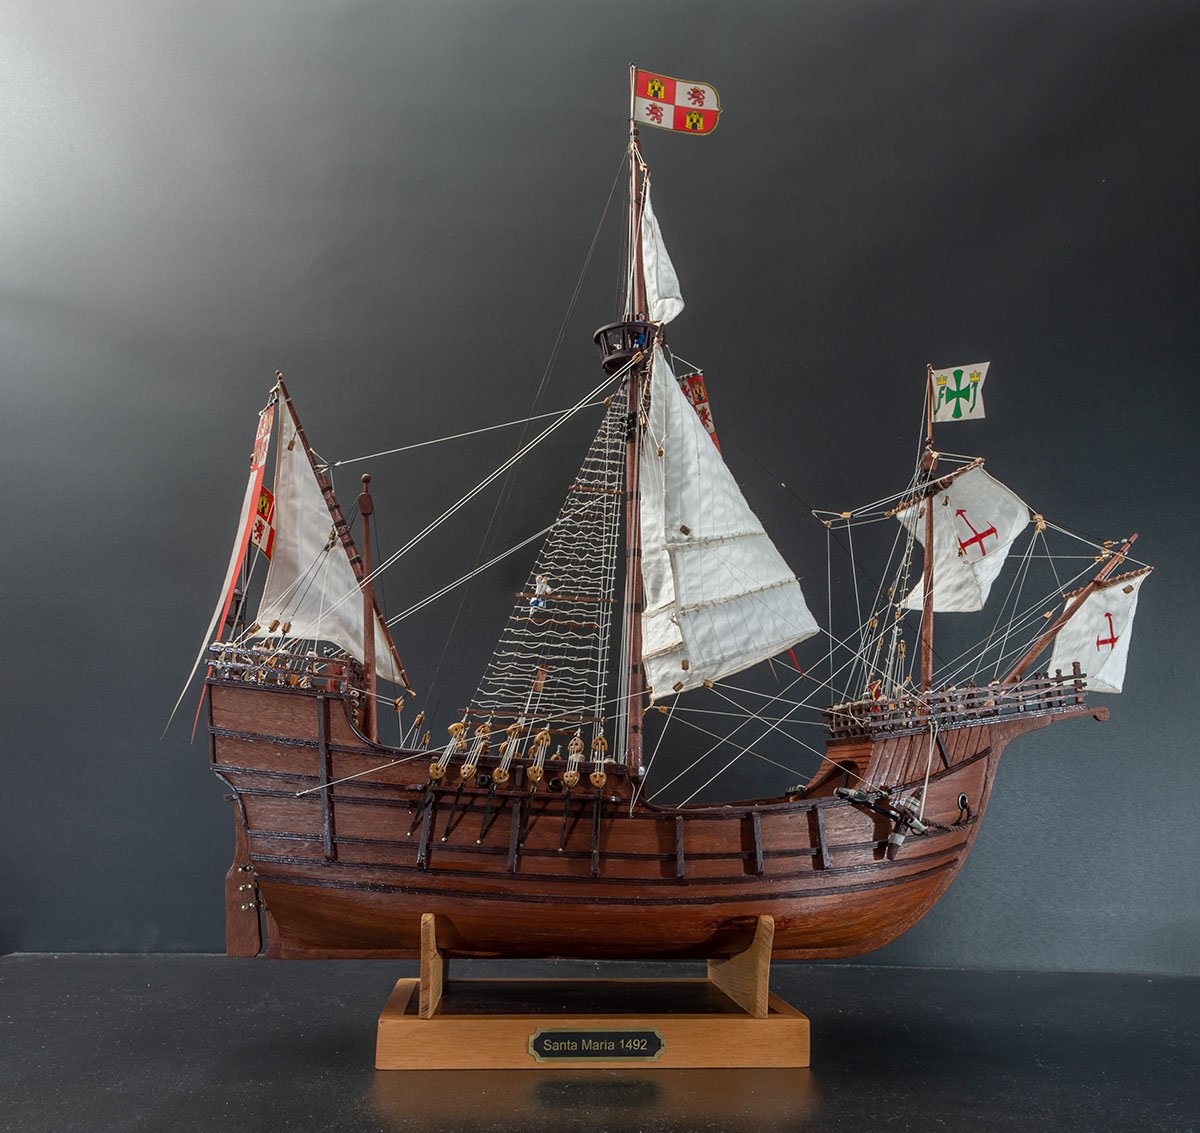
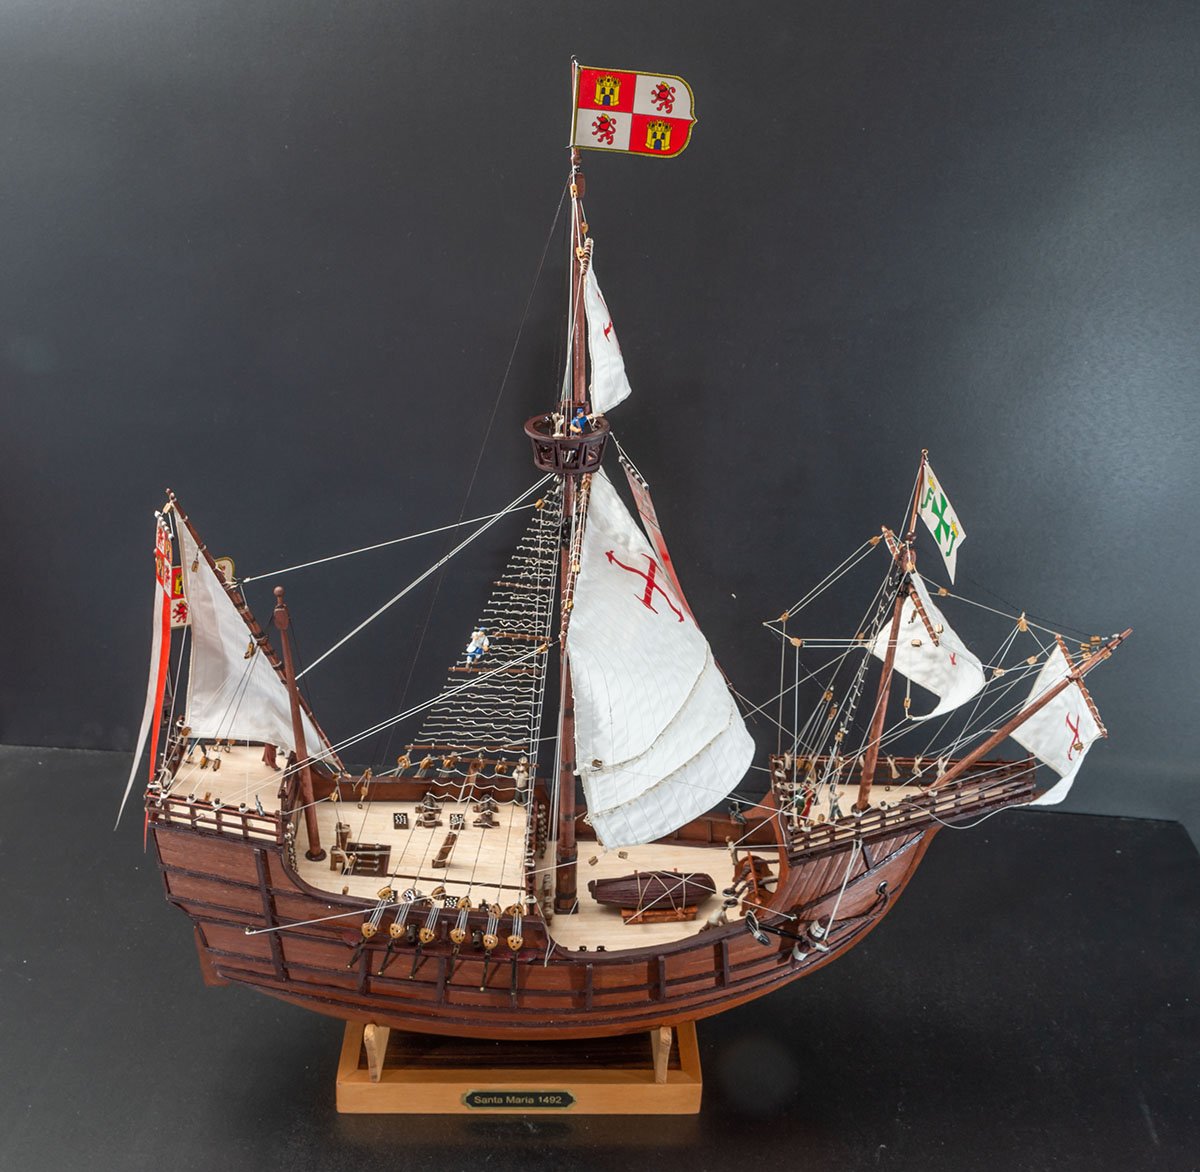
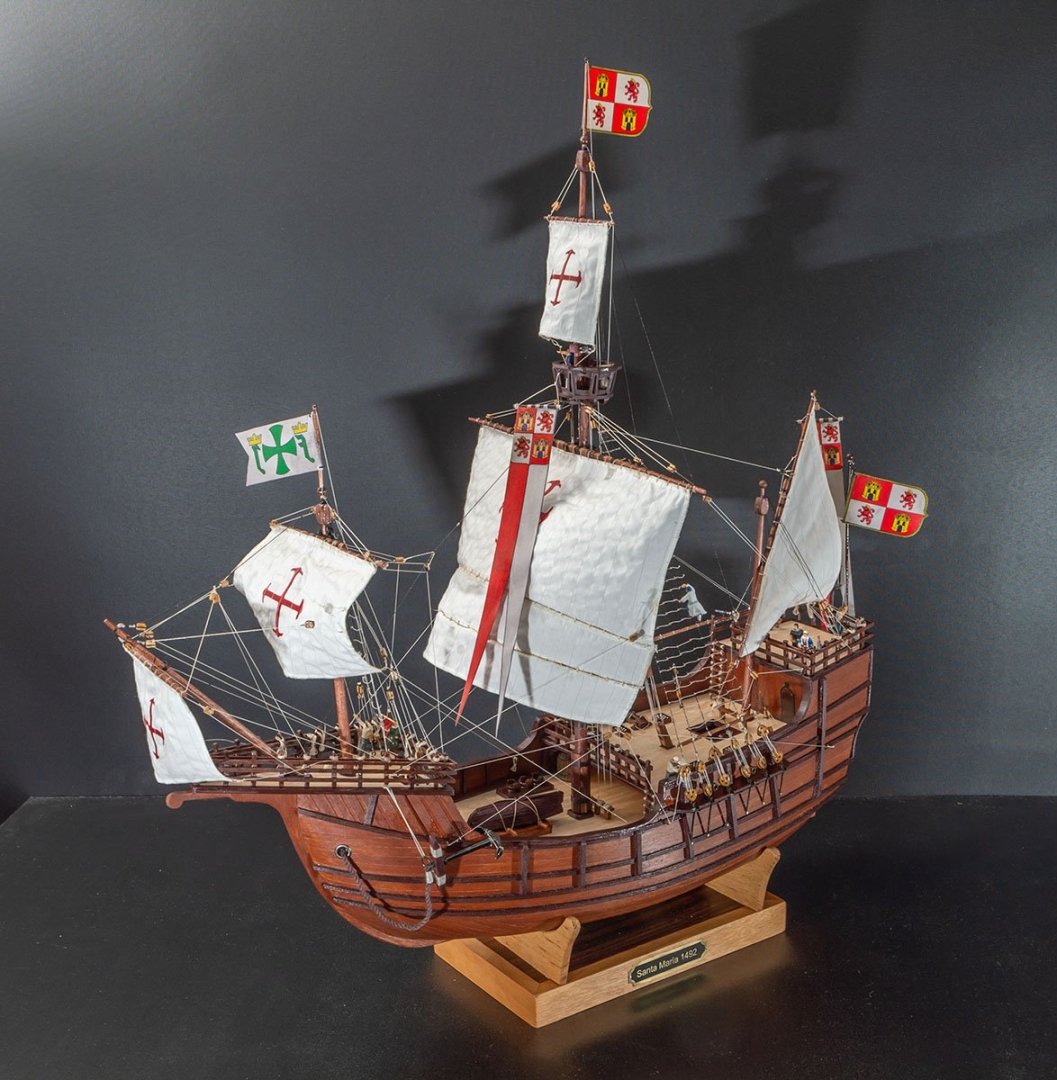
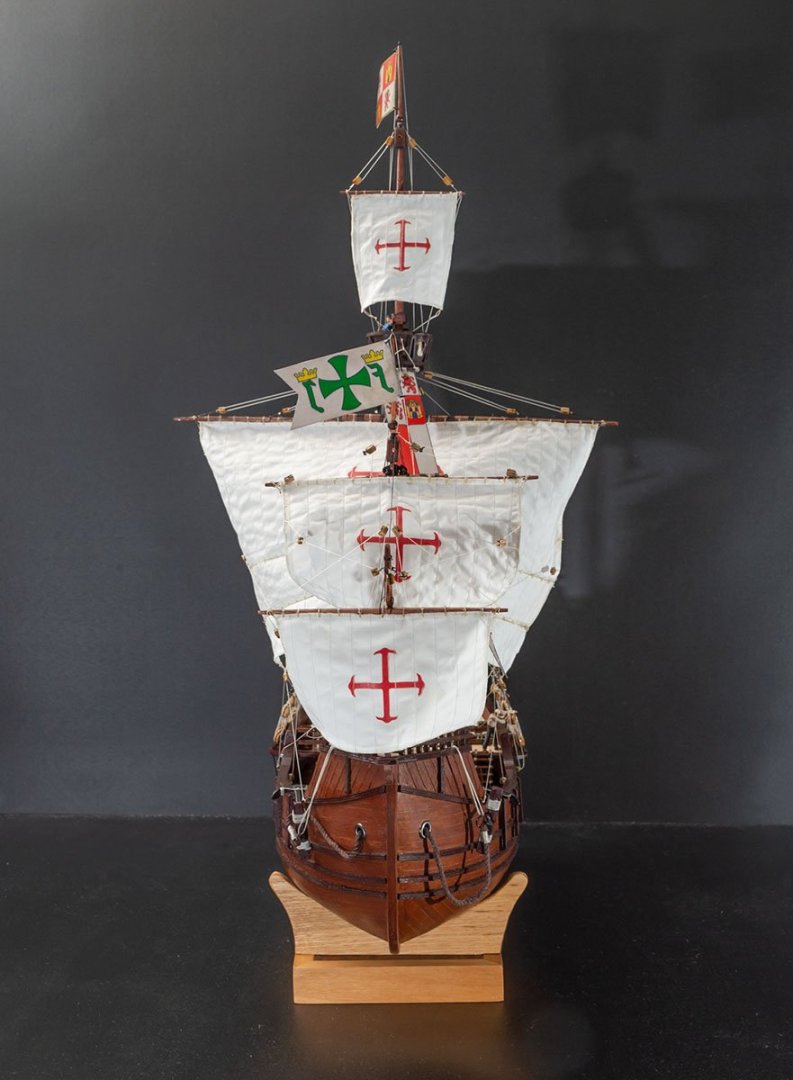
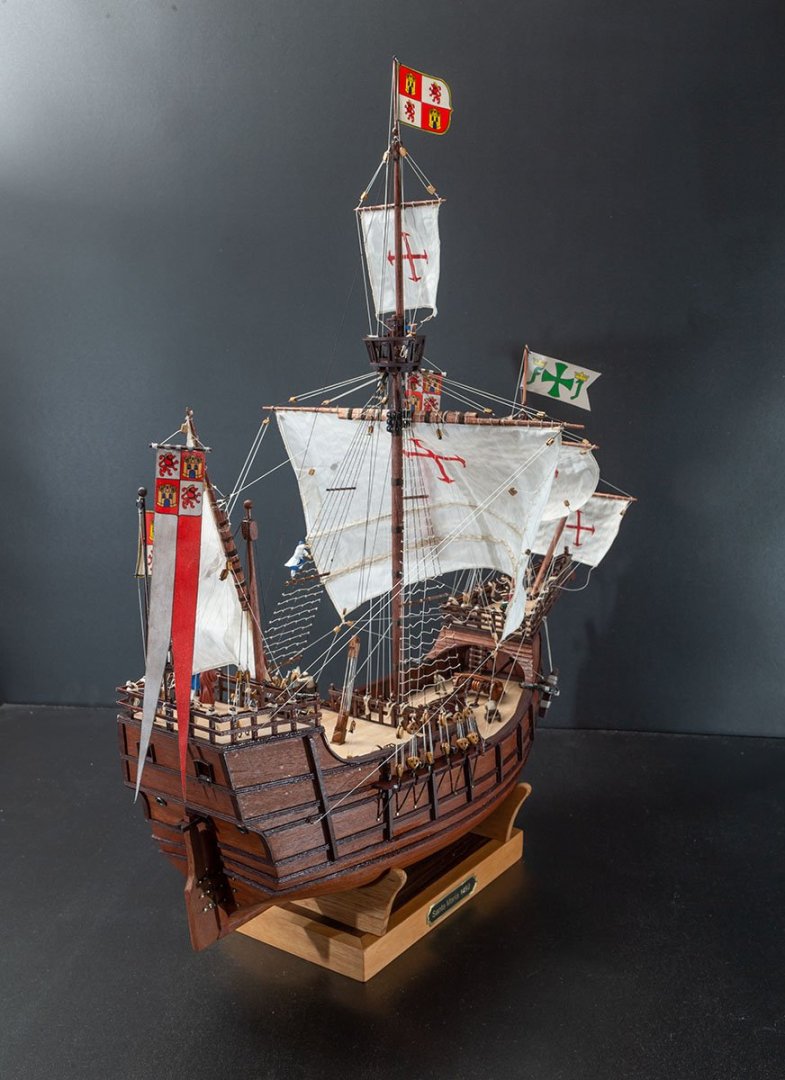
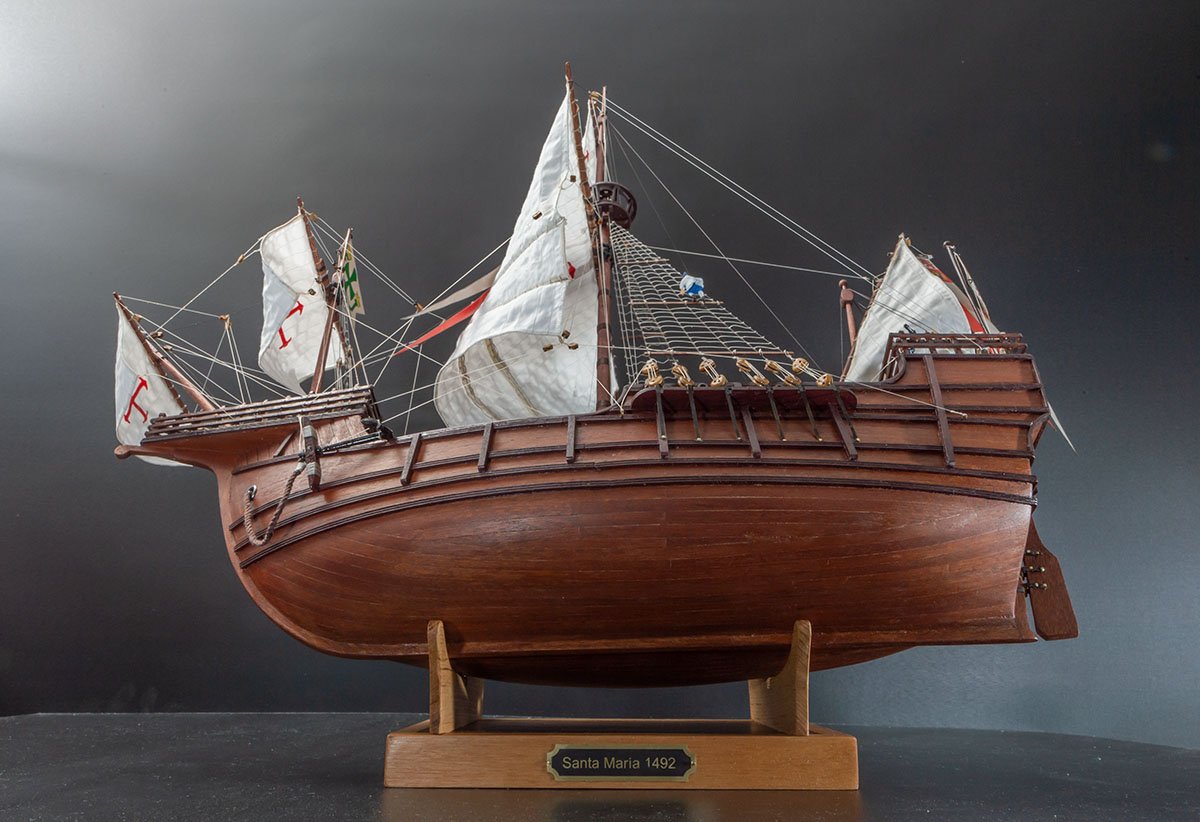
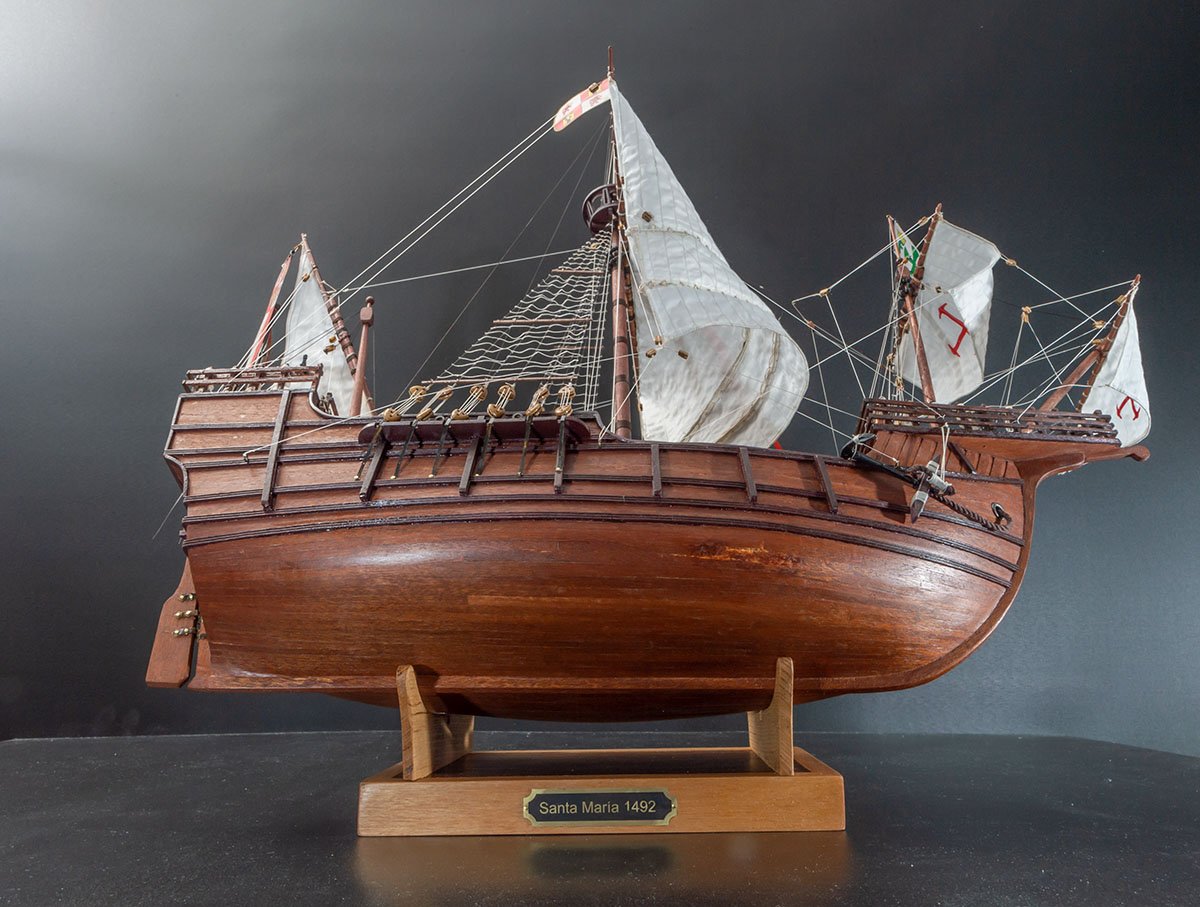
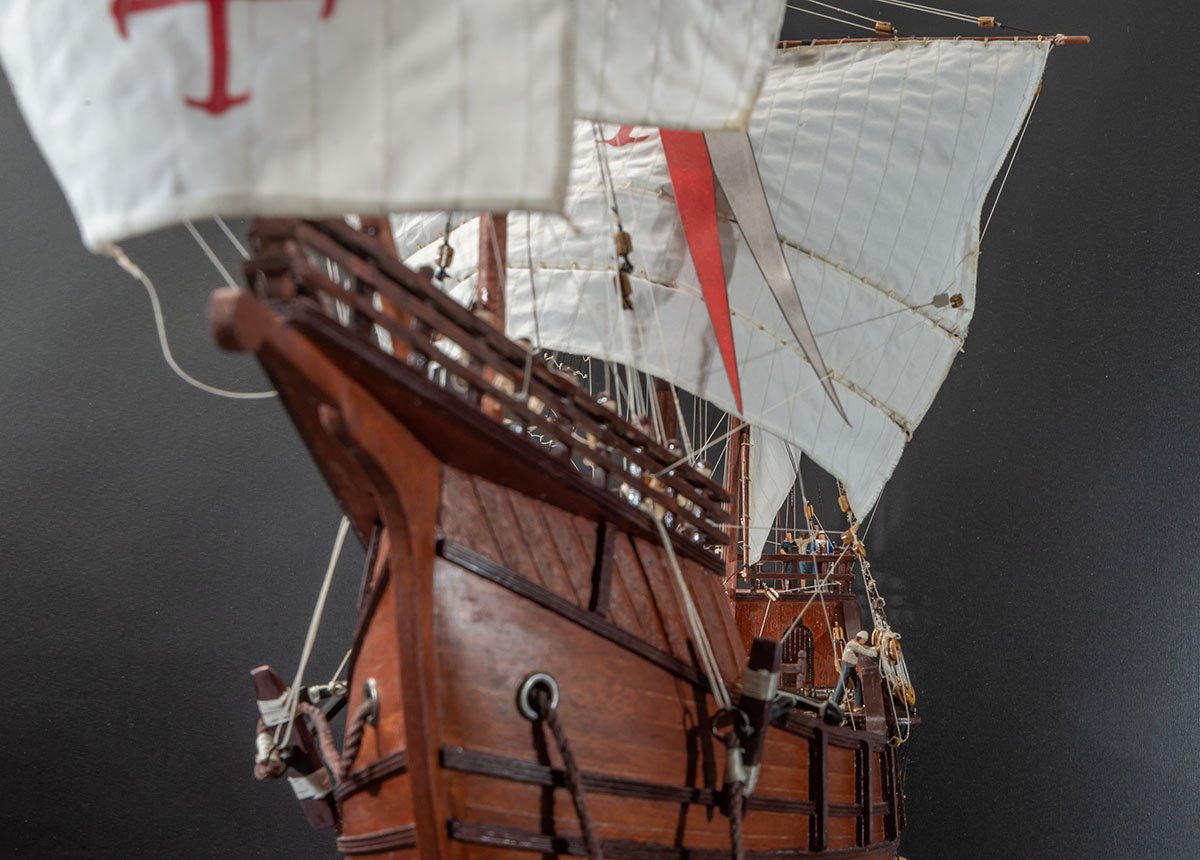
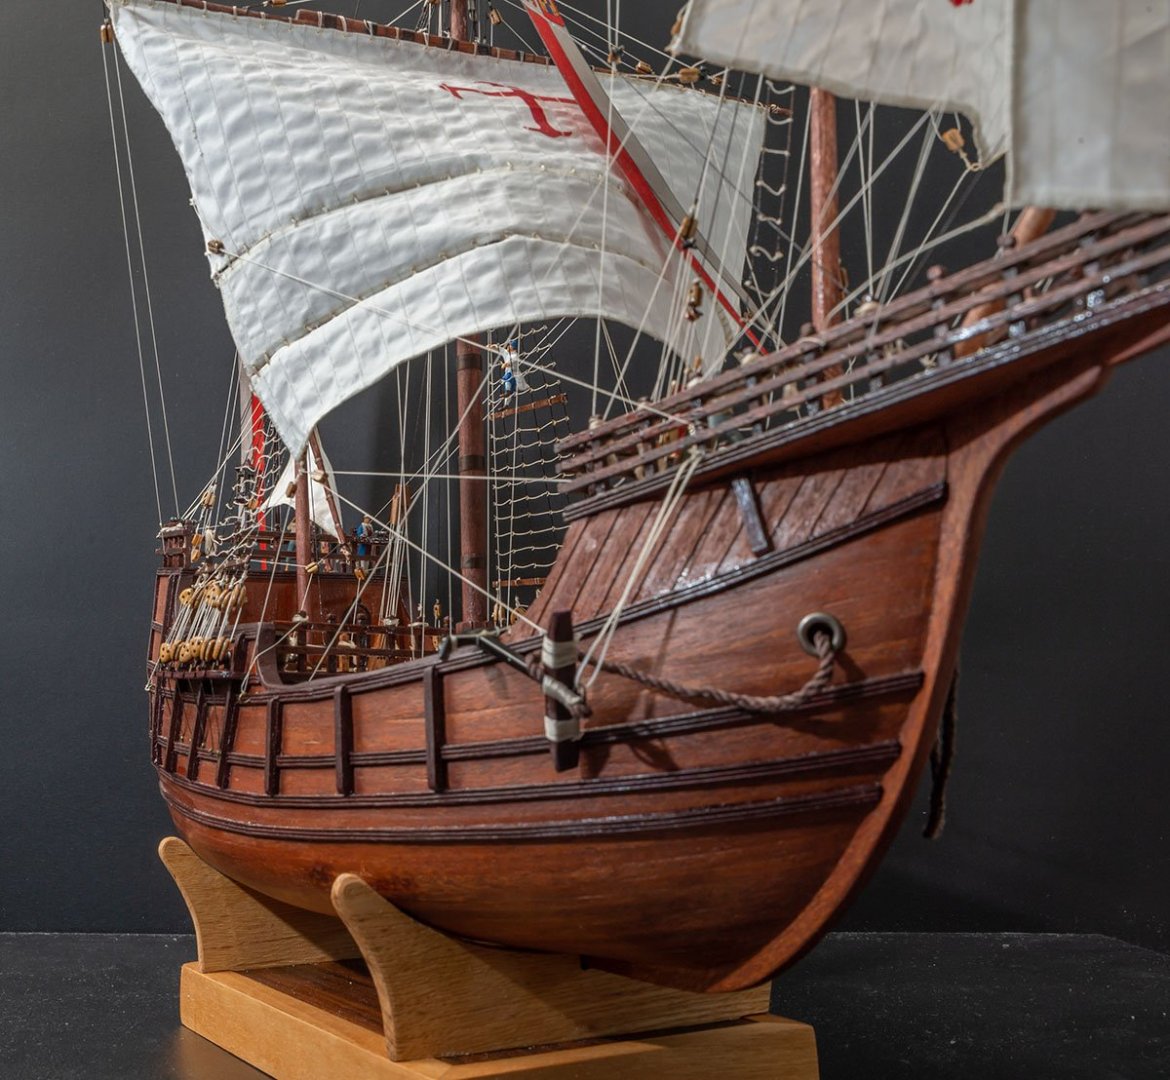
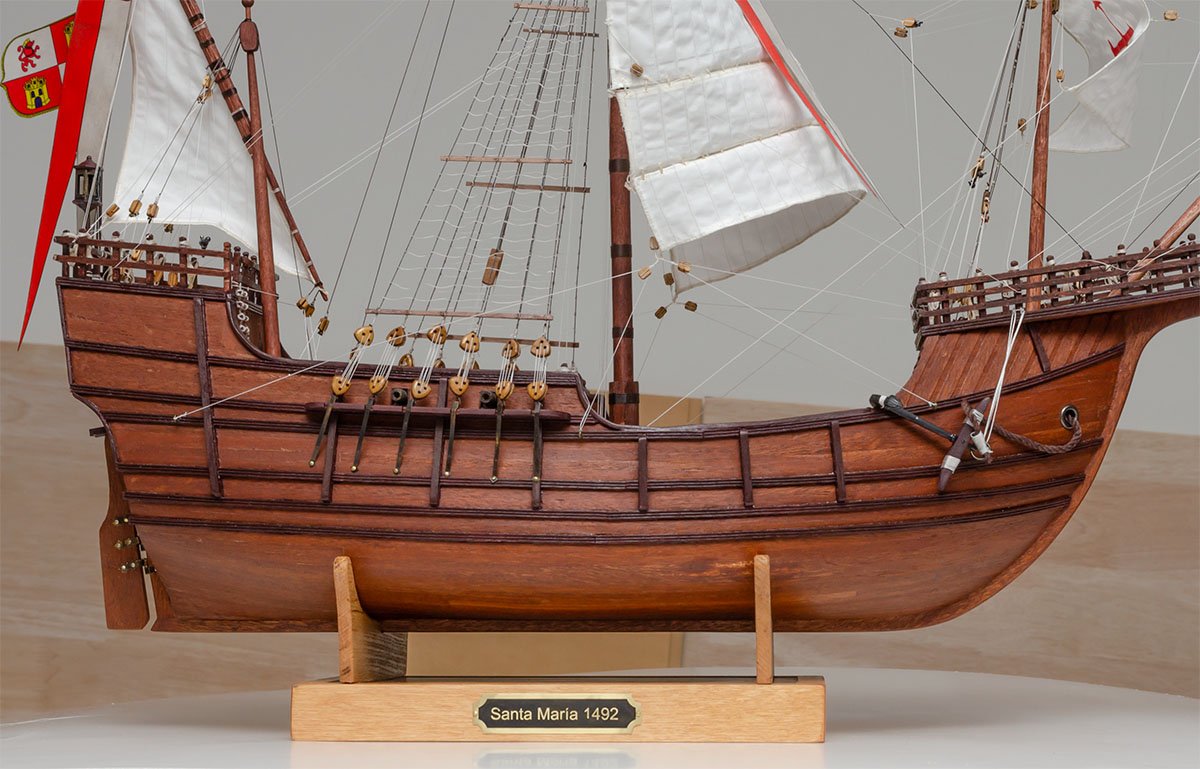
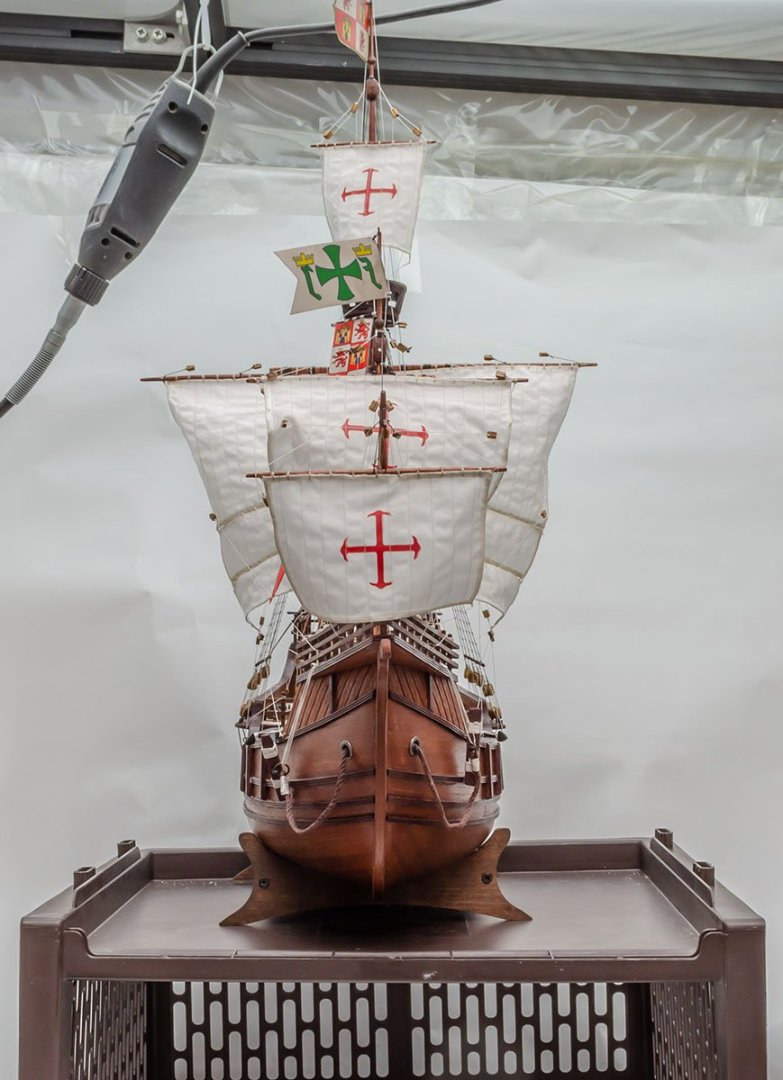
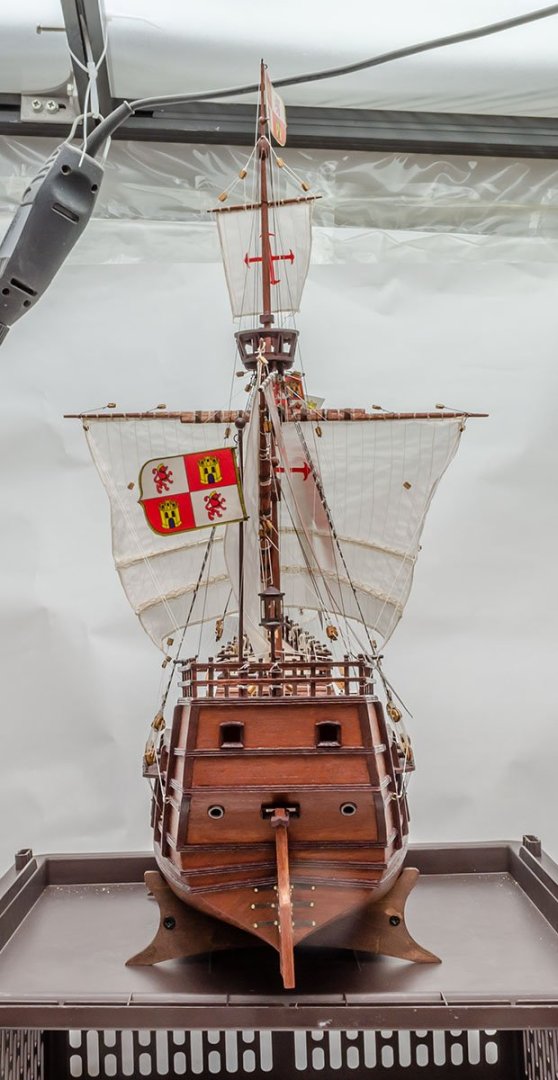
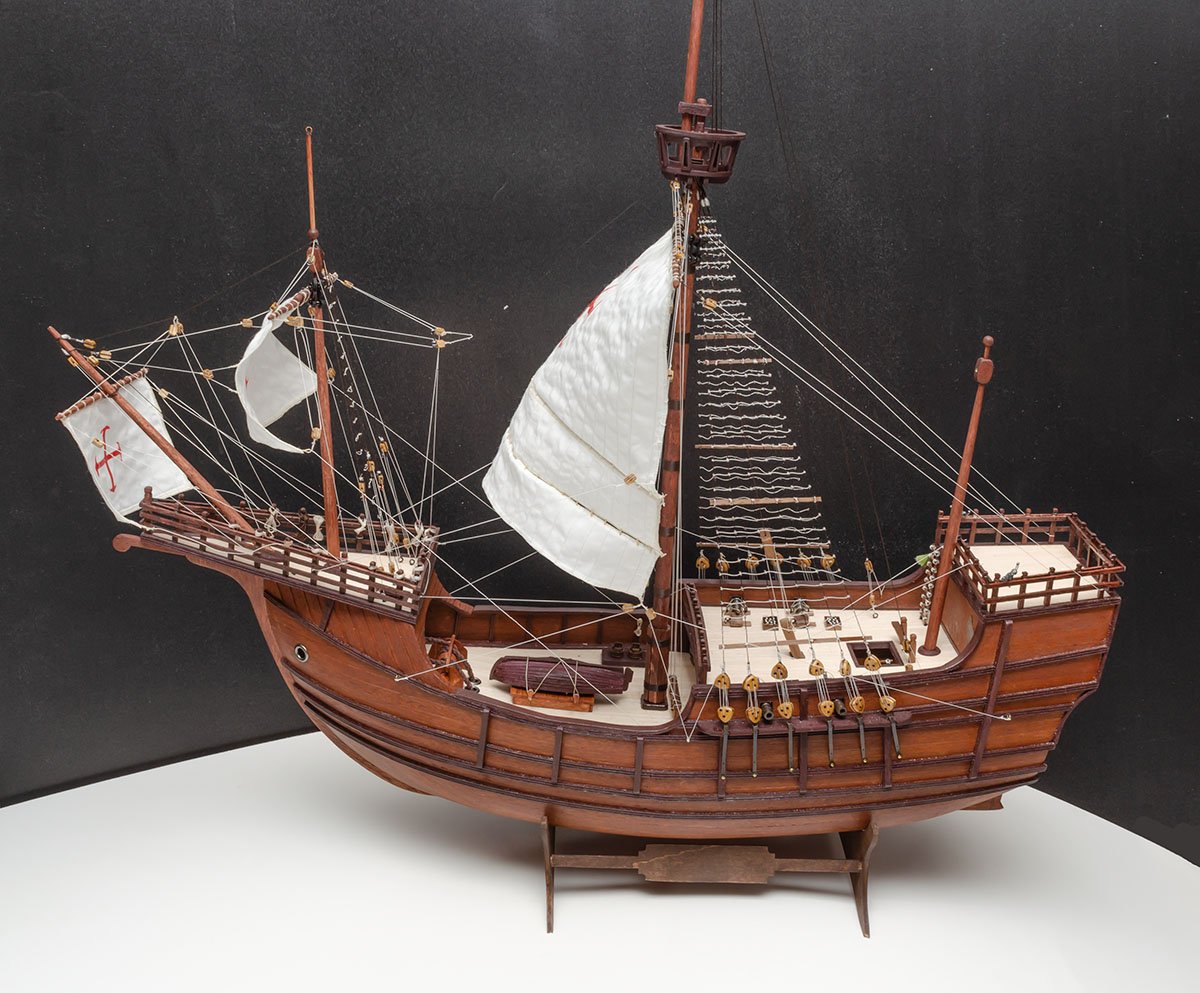
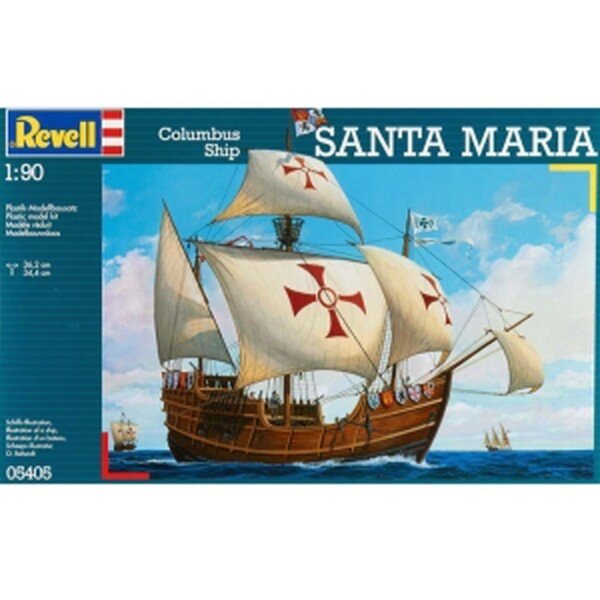
I finished the Artesania Latina Santa Maria 22411N. This is my opinion about the new kit. Pros. - Well known historical sailing ship, and excellent size to build and display - High resolution PDF manual. It definitely helps to understand the AL's "unique" planking method, and the rich pictures don't miss any rigging knots. - A lot of details are added or updated. Cons. - Most of the wood should be painted. It is time-consuming work, and inappropriate coloring may lead to frustration. - Essential ship designs, such as hull or planking, aren't changed at all. Only decoratives are updated. - The AL's "unique" planking method hasn't changed. - The picture manual has no words. This kit is a bit challanging for a new modeller. I saw some people were exhausted after they barely finished the old Santa Maria kit. The new high resolution manual should help with building it, but I doubt the know-how will help when they build the next model ship. The AL's planking method is kind of like making tattered clothes, so it is good to learn traditional planking technique, which is universal and makes much better quality. In my opinion, this kit is good for second-time builders who learned appropriate planking techniques by building some good introductory kits. I won't judge the historical accuracy of the kit because the original ship left no plan. I spent 8 months. If you are an expert modeller, the new kit may take at least 1~2 weeks to complete. (I saw someone built the old kit within 3 days!) The extended time is for painting and varnishing lime wood. I'm sure that the old kit is much easier and faster than the new kit for experts, although it has more difficult manual and lack of details. Thank you for your kind words, starlight. I'm very happy to have completed my first three masts kit. My next project will have a short and dense schedule, so I'll upload it on gallary. I also thank all the people who followed my marathon build log.


- 77 replies
-
- 6
-

-

-

-
- Santa Maria
- Artesania Latina
- (and 1 more)
-
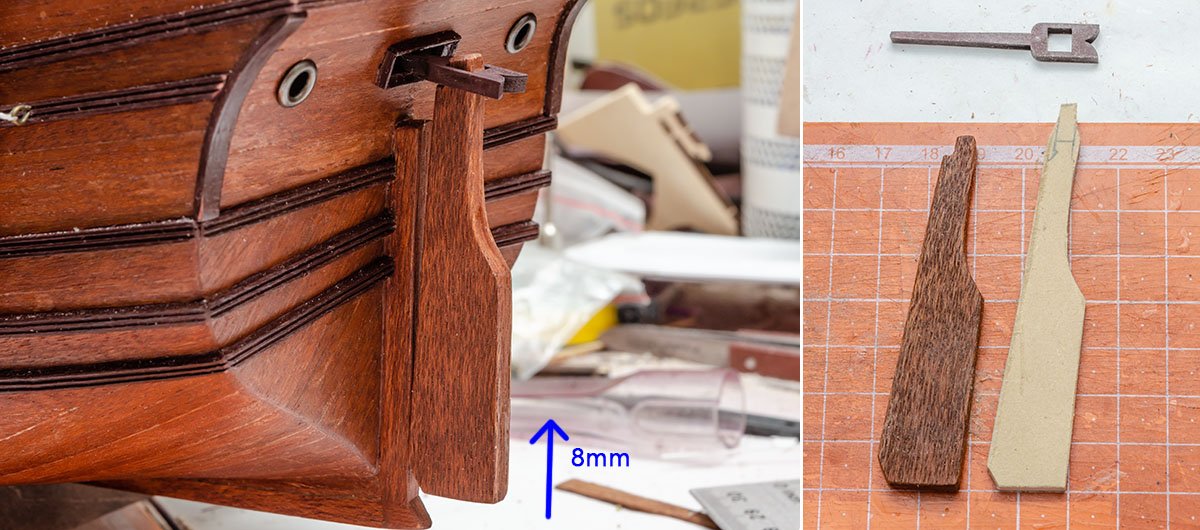
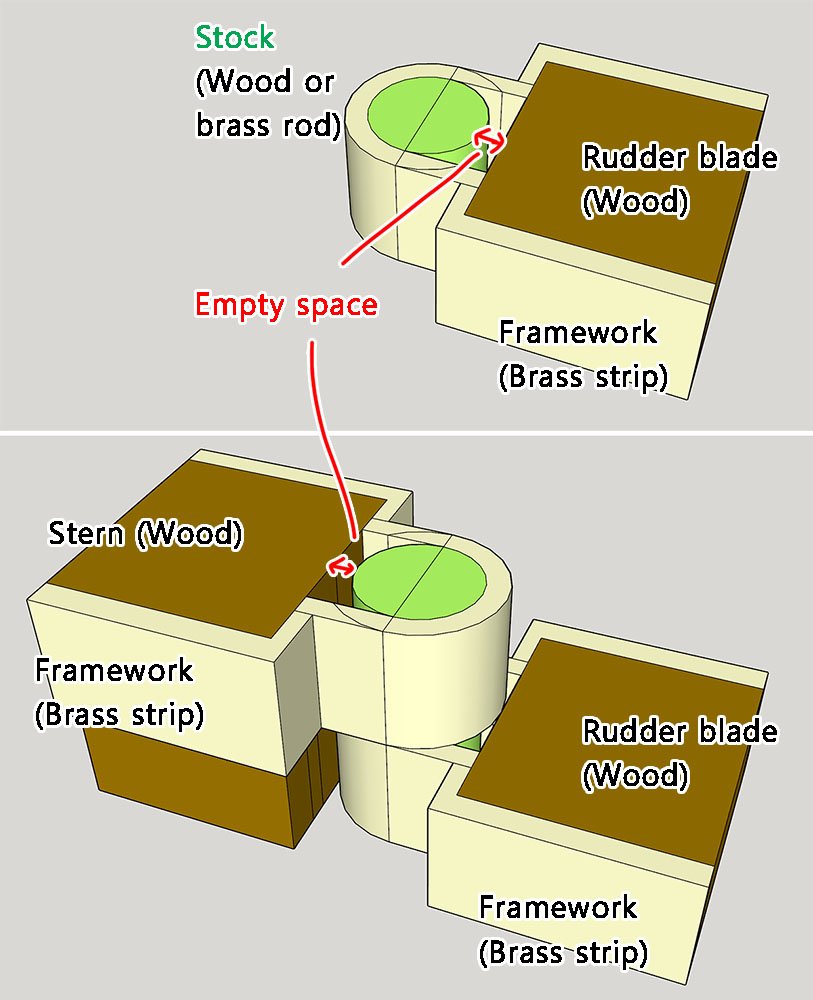
This is the second part of the rigging explanation. I had a minor issue when I made a rudder, so I made a new part. This is a small tip to make the rudder part. All right. I think I wrapped up the rest of necessary explanations. Thank you for reading my build log.

-
Many thanks to Ron and Roger. The Mariners museum sells all the historical Chris-craft racing runabout plans. The Wodenboat Magazine sells over 700 complete boat plans, including the above model. There are a lot of toy blocks to enjoy and research. https://www.marinersmuseum.org/library/#chris https://www.woodenboat.com/boat-plans-kits?ia=579&ssrnd=10855
-
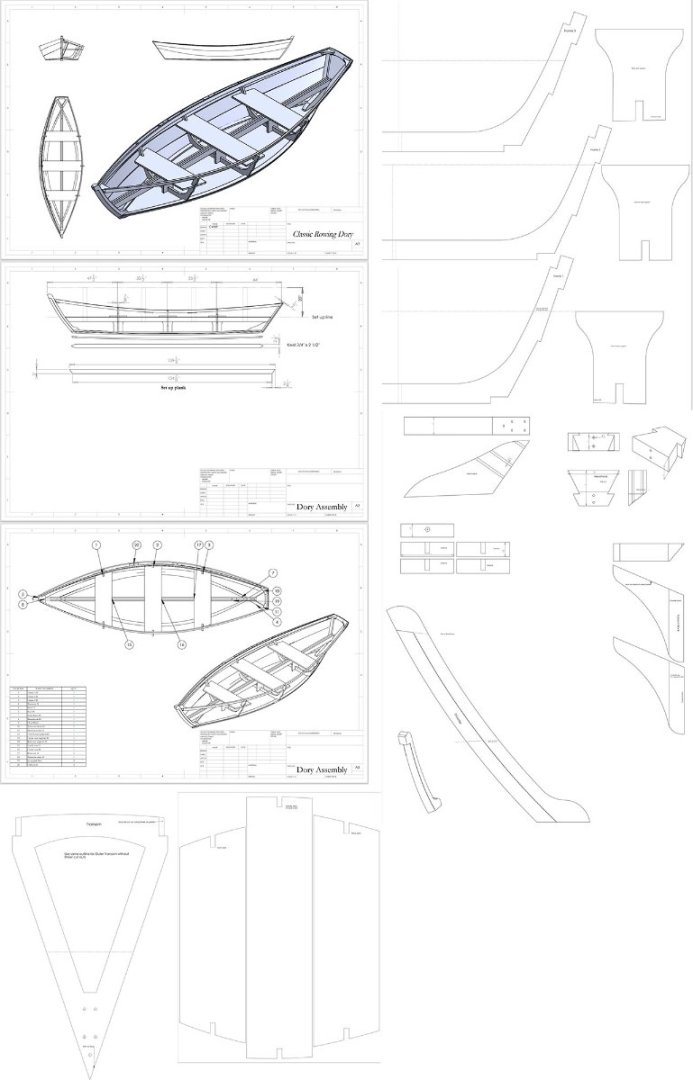
Hello, The mahogany runabout is my new item in my bucket list. I have a little interest on RC boats because I have no space to keep the devices. Therefore, I want to build a model rather than RC boat. One of the the downsides of the official Chris-craft runabout boat series from Dumas is that their 1/24 scale products are not serious model ships. They seems to be for beginner modellers. The detail issue will be solved if I buy a 3x expensive 1/8 scale RC runabout, but I want to build a 1/16 scale boat, which is no longer than 1 and a half feet. I planned to downscale the 1/8 boats, but the price and rebuilding parts remain a huge burden to me. (source : https://www.classicwoodenboatplans.com/shop/barrelback-custom-19 ) Instead of model boats, I focused on real boat plans. https://www.classicwoodenboatplans.com/shop The "classic wooden boat plans" company sells real mahogany runabout boat plans, and the details are just real world size. However, can I read and understand the real boat plan? I tested one of their plan by downloading a free sample plan, which is the famous Dory Rowboat 13'. ( Source : https://www.classicwoodenboatplans.com/free-sample-plan ) Their free plan appears to be a bit simpler than typical wooden model ship kits, but they also provide a 3D cad file that can be read by Solidworks. As you see, I was able to see and measure each part of the boat. Although it isn't a perfect 3D model, which has some gaps, I decided to build the dory boat as my first scratch-build wooden model ship. After the dory, I'll buy the Barrelback Custom 19' plan. It won't be easy to build from a real world plan, but I would say the real boat plan should be much more realistic and detailed than the Dumas kits. There are some advantages of real world plan over model ship plans. I won't reproduce the 1949 Chris-craft mahogany runabout but build a completely new boat. I'll give my boat a new name. 😎 This is testimony time. Is using real boat plans reliable and recommended way to build modern boat models? I couldn't find a proper mahogany runabout kit, so I changed to building a scrach model. I hope to hear any ideas about a building realistic runabout.

-
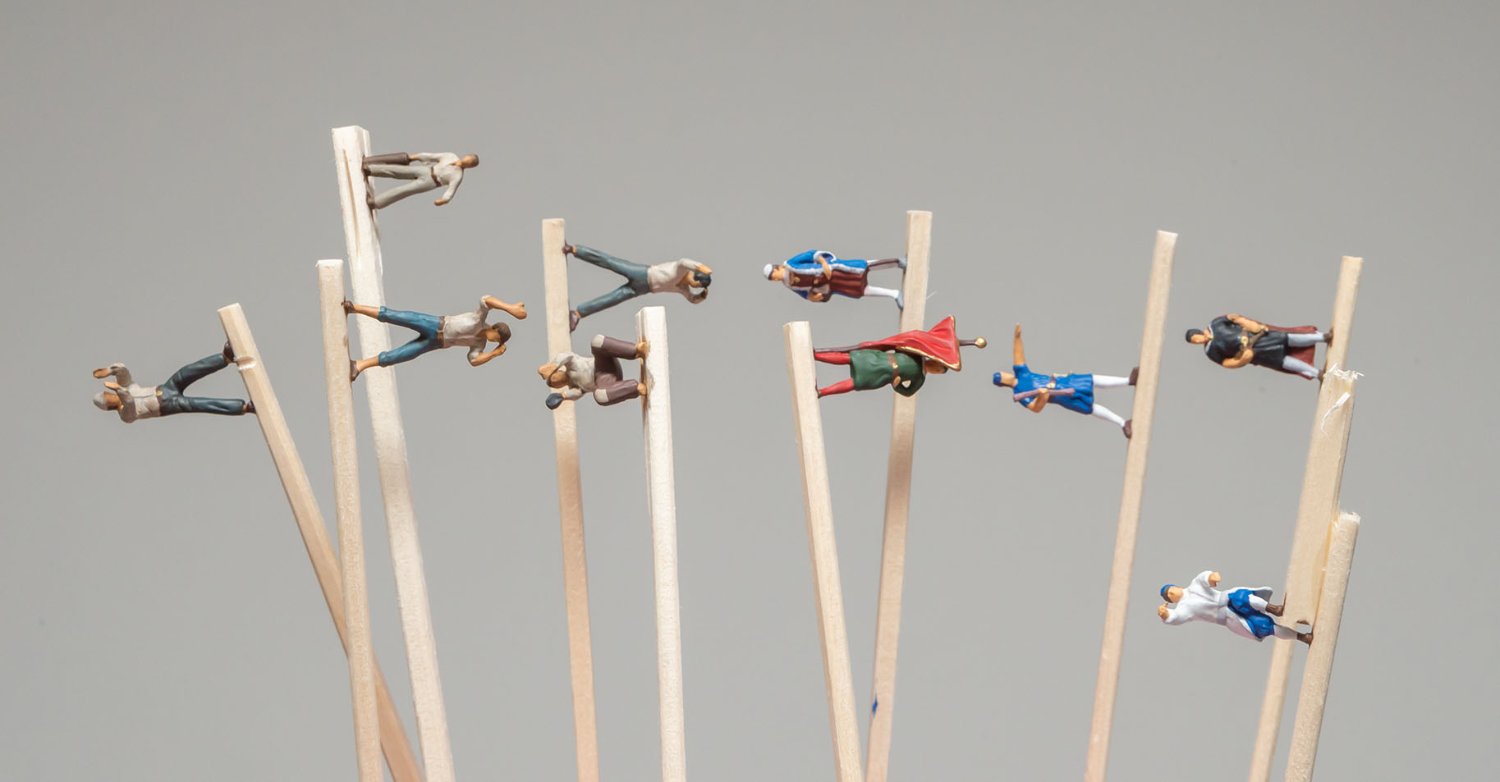
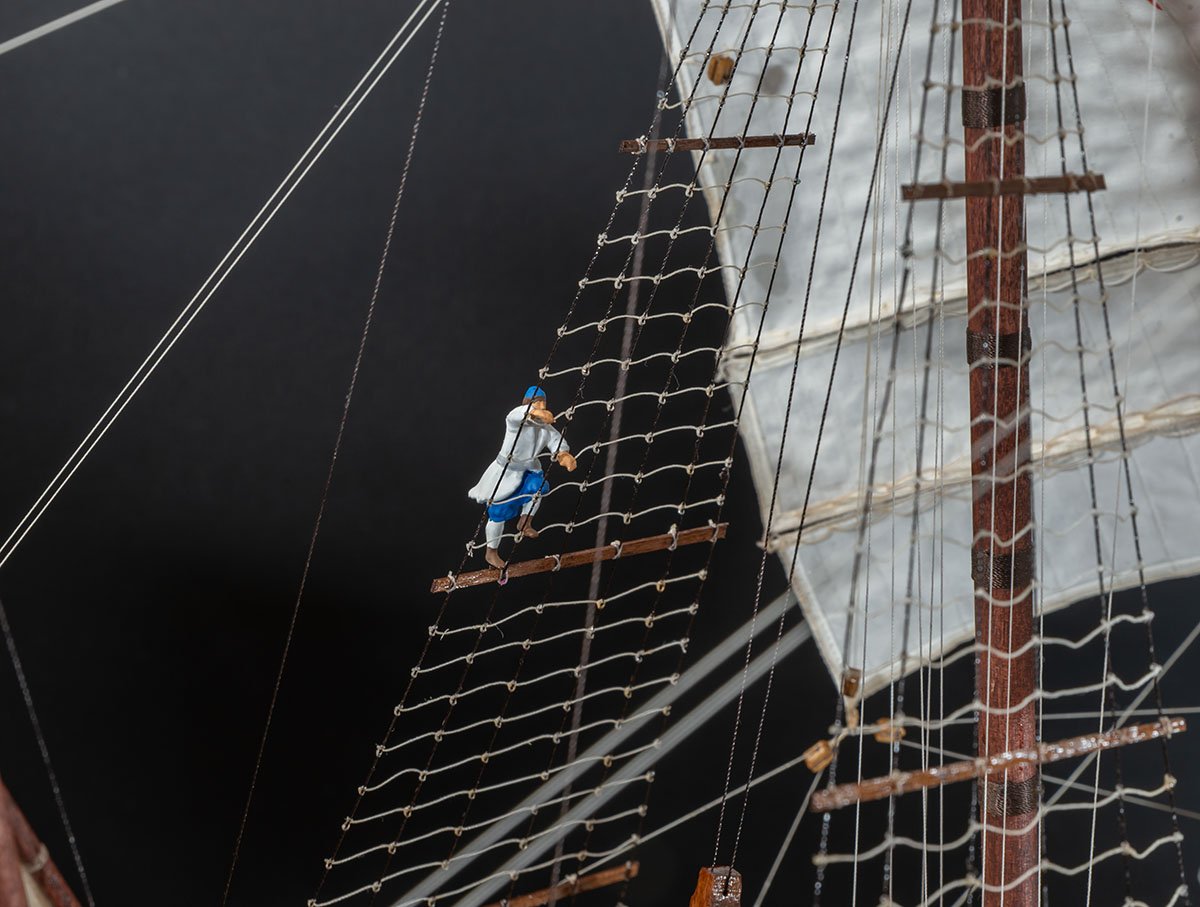
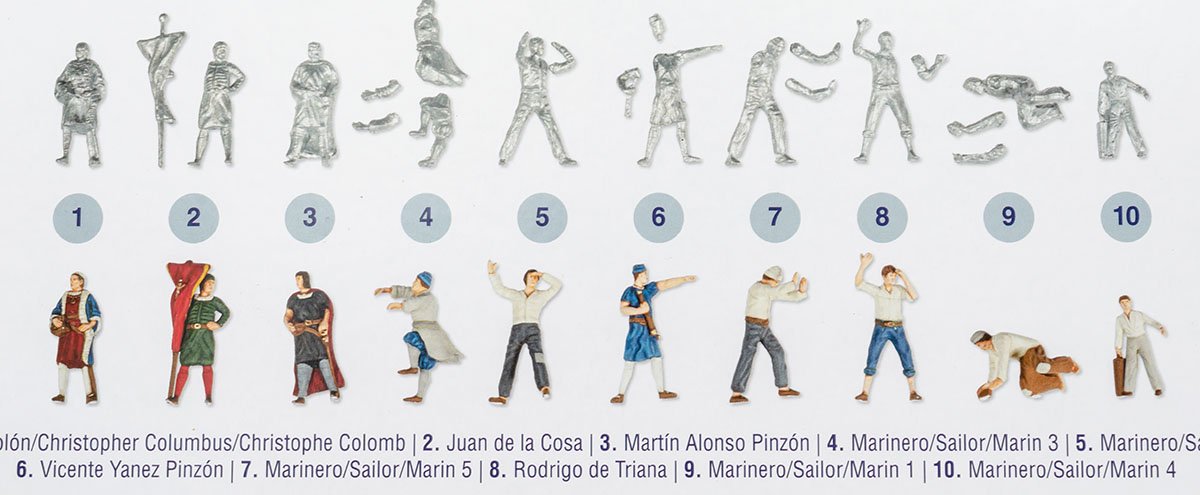
I finished a figure painting. Primer : Zinsser shellac Paints : Tamiya and Testors enamel paints Varnish : Vallejo polyurethane matte Weathering (Tars only) : Vallejo oiled earth I didn't draw faces because my ability would have made them emoticon faces. 🤣 I'll take pictures tomorrow and wrap it up.

- 77 replies
-
- 3
-
-
- Santa Maria
- Artesania Latina
- (and 1 more)
-
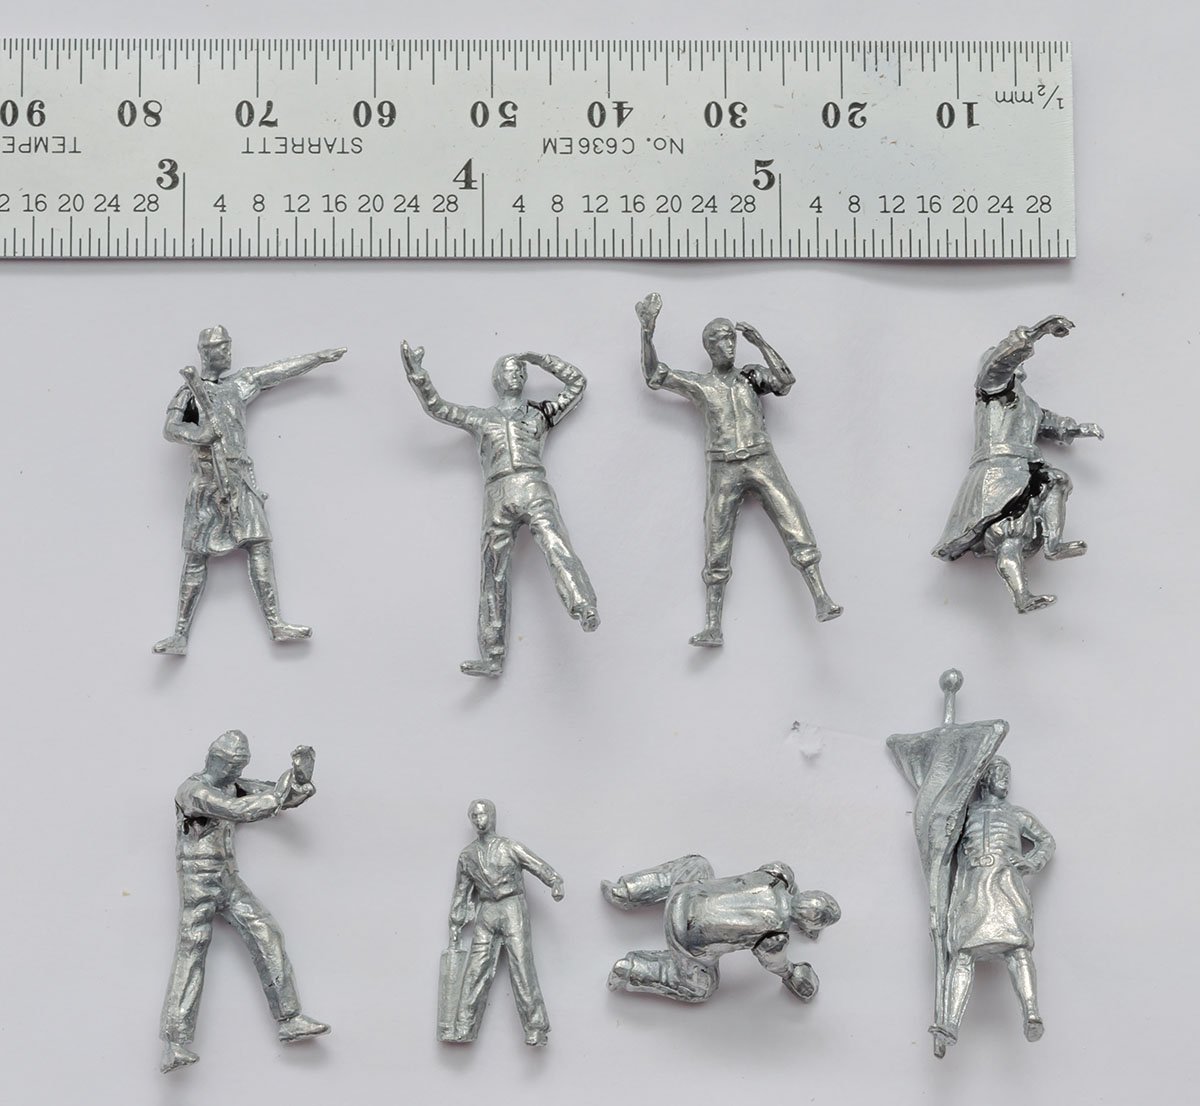
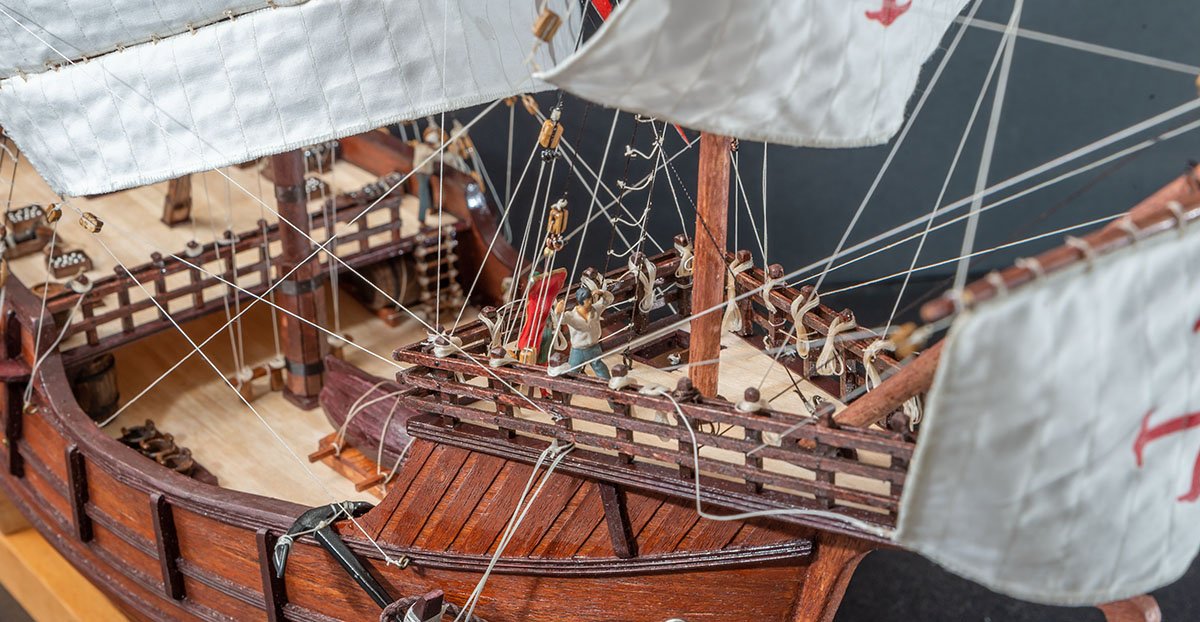
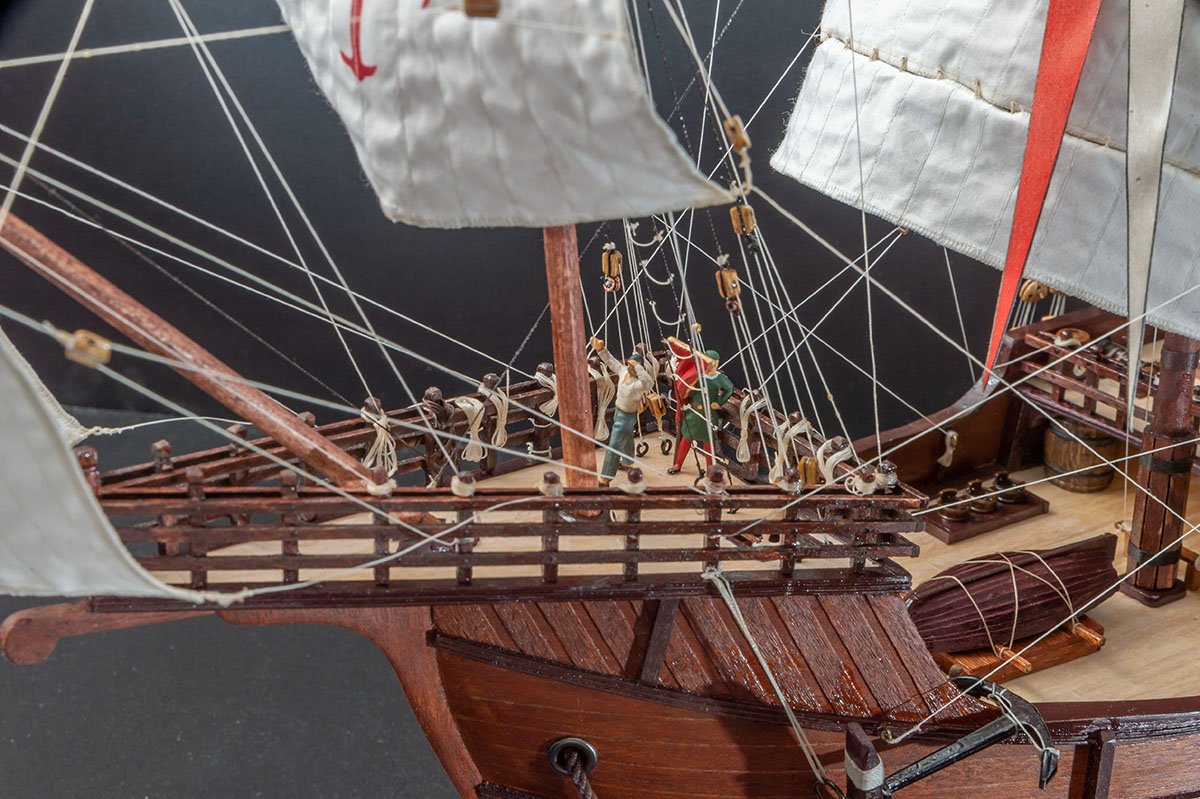
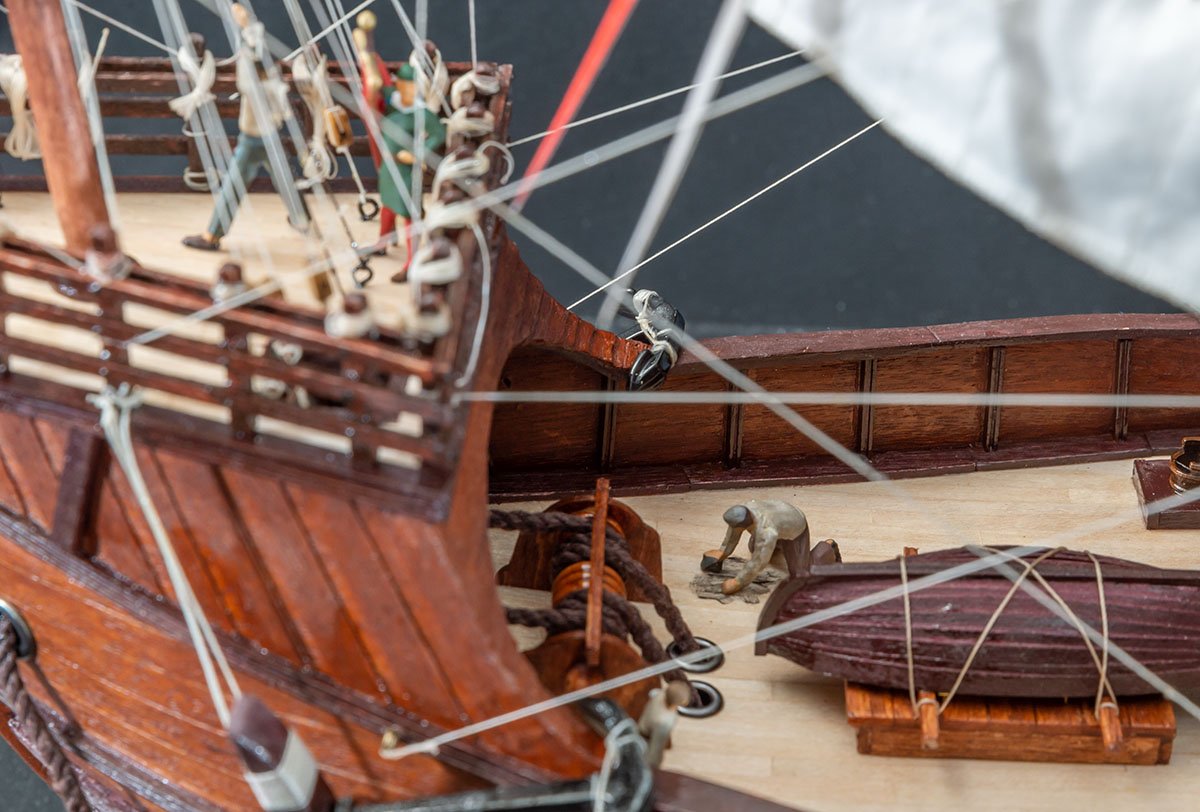
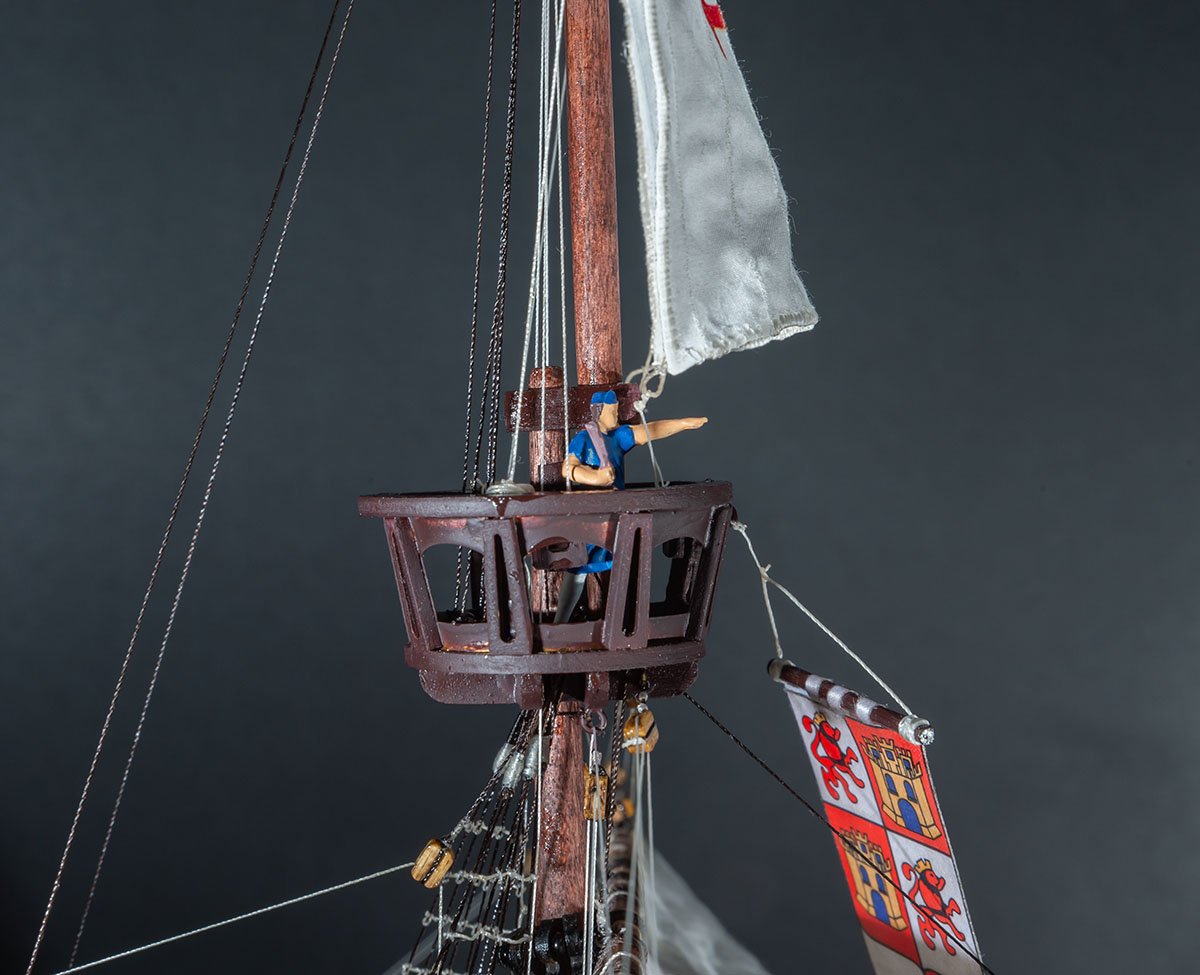
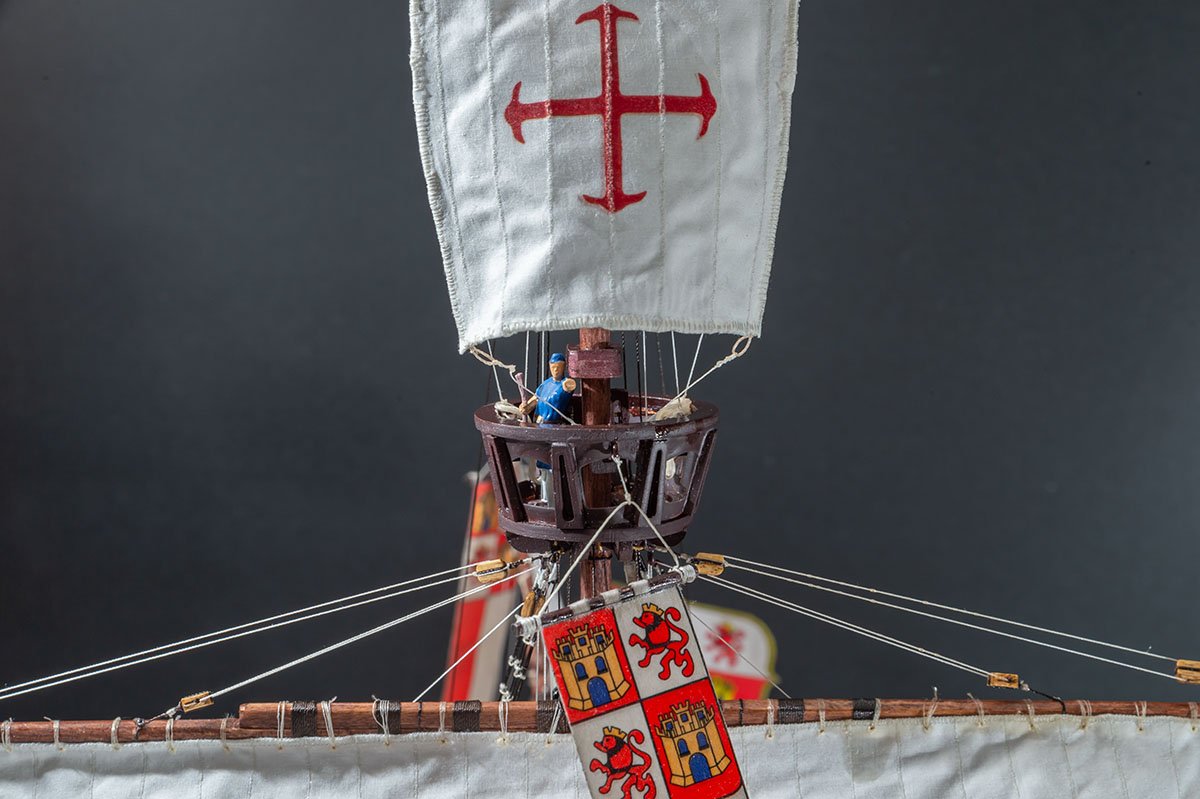
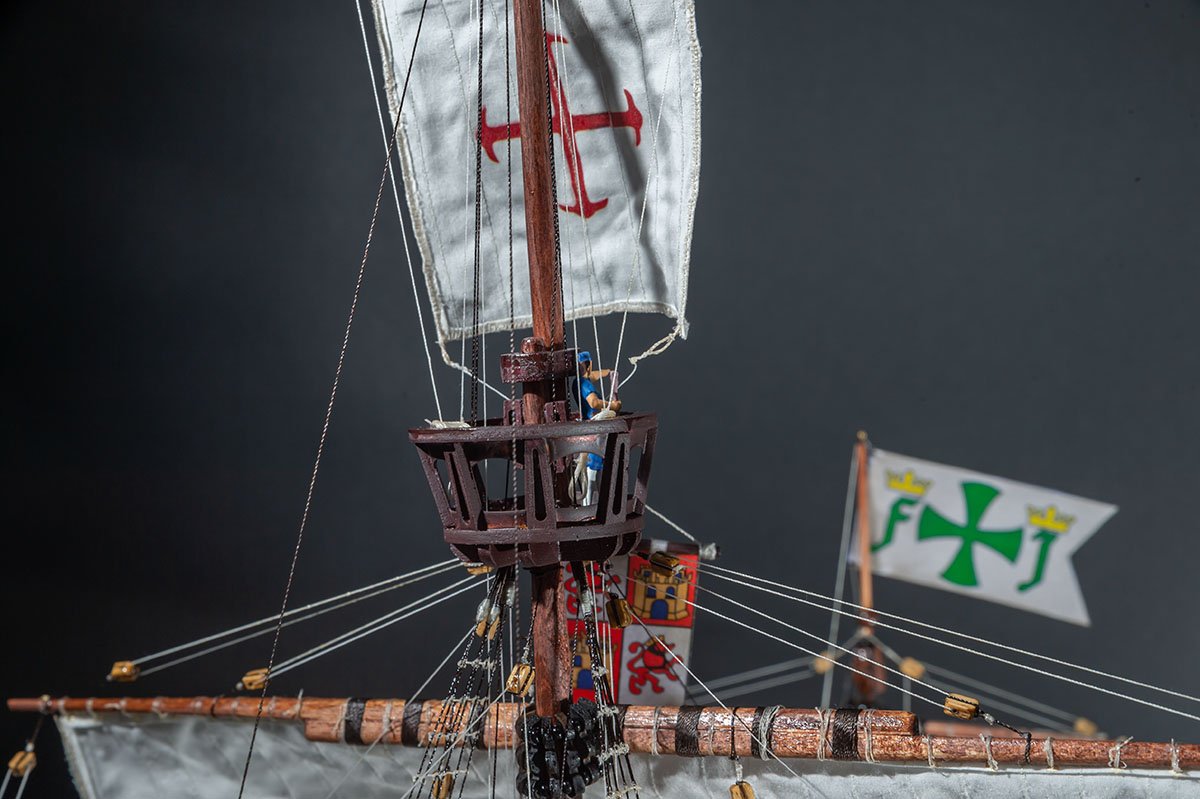
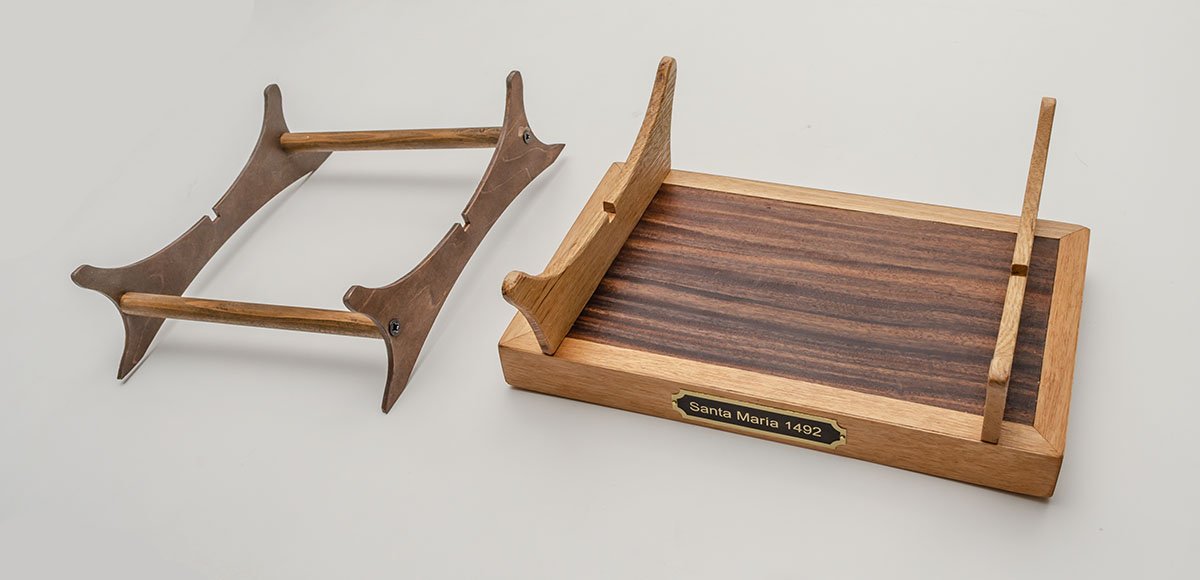
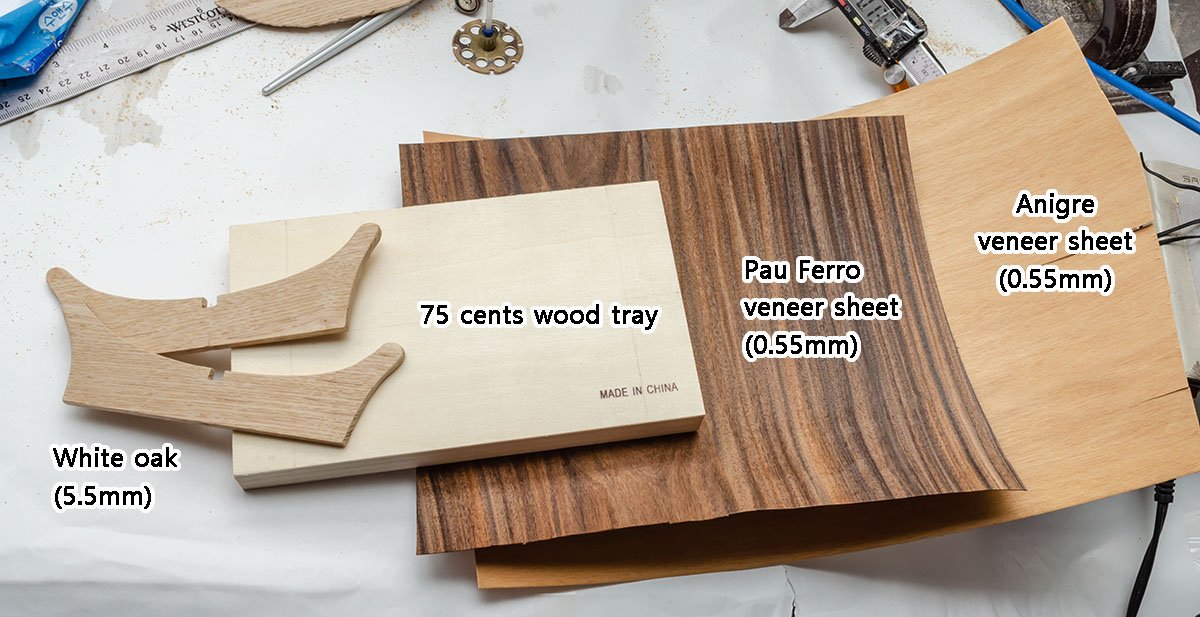
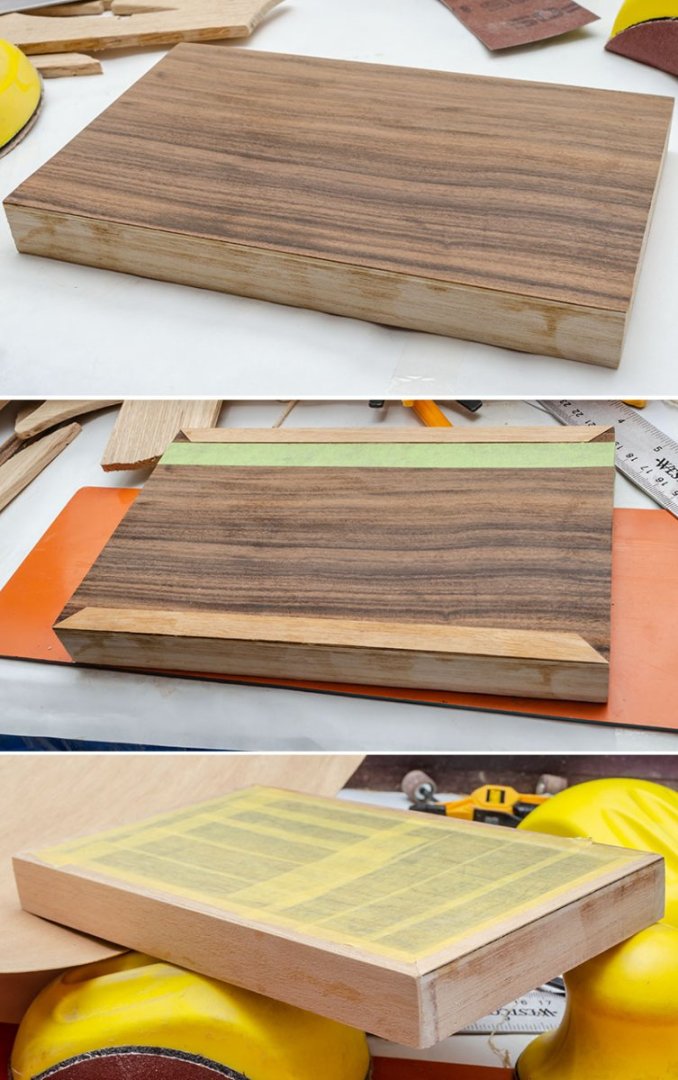
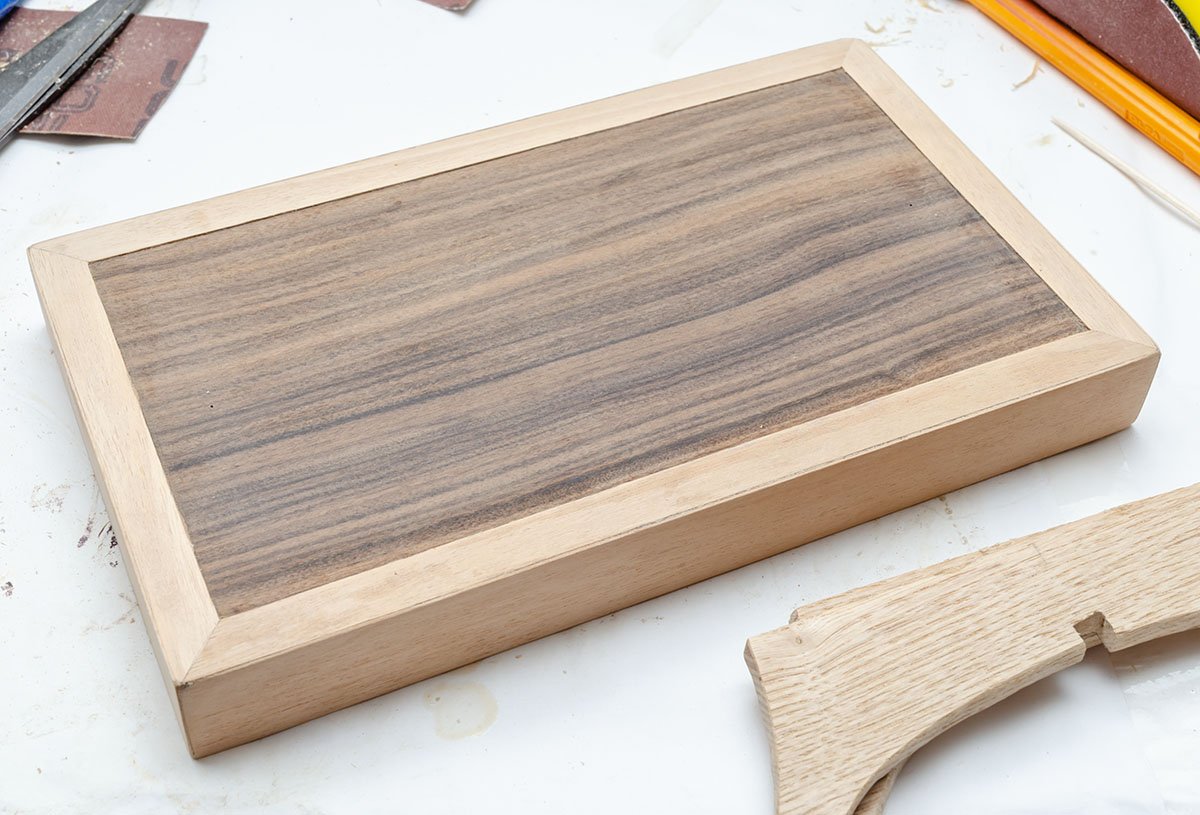
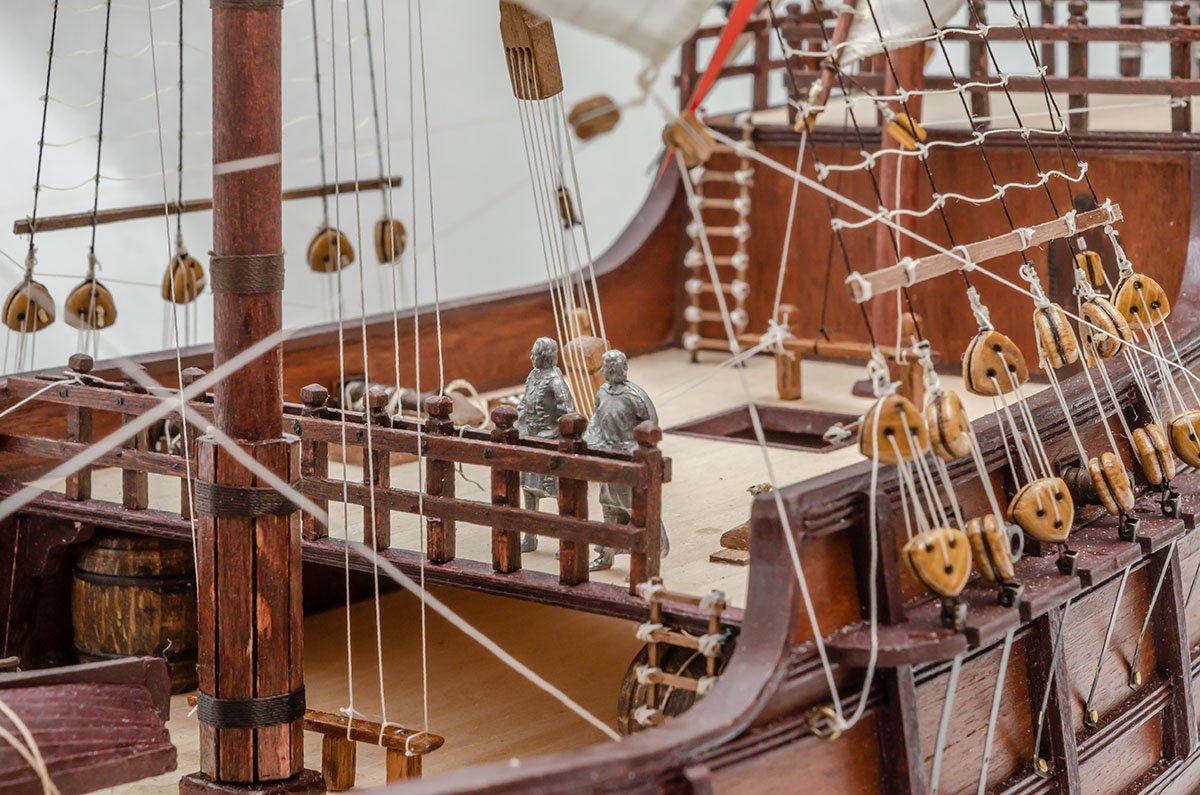
I made a stand. Next time, I'll try more complex stand design that includes metal bolts in the hull. The figures are pretty detailed. If we weren't in the age of the 3D printer, the tin figure kit should have had more value. This is a color reference on the box art. I found some more reference pictures from the official site.

- 77 replies
-
- 3
-
-
- Santa Maria
- Artesania Latina
- (and 1 more)
-
I decided to make a new stand. The default stand is unstable. I'll use wood bolts to hold the stands. On the other hand, I'm mass-producing dummy piles of ropes.
- 77 replies
-
- 2
-
-
- Santa Maria
- Artesania Latina
- (and 1 more)
-
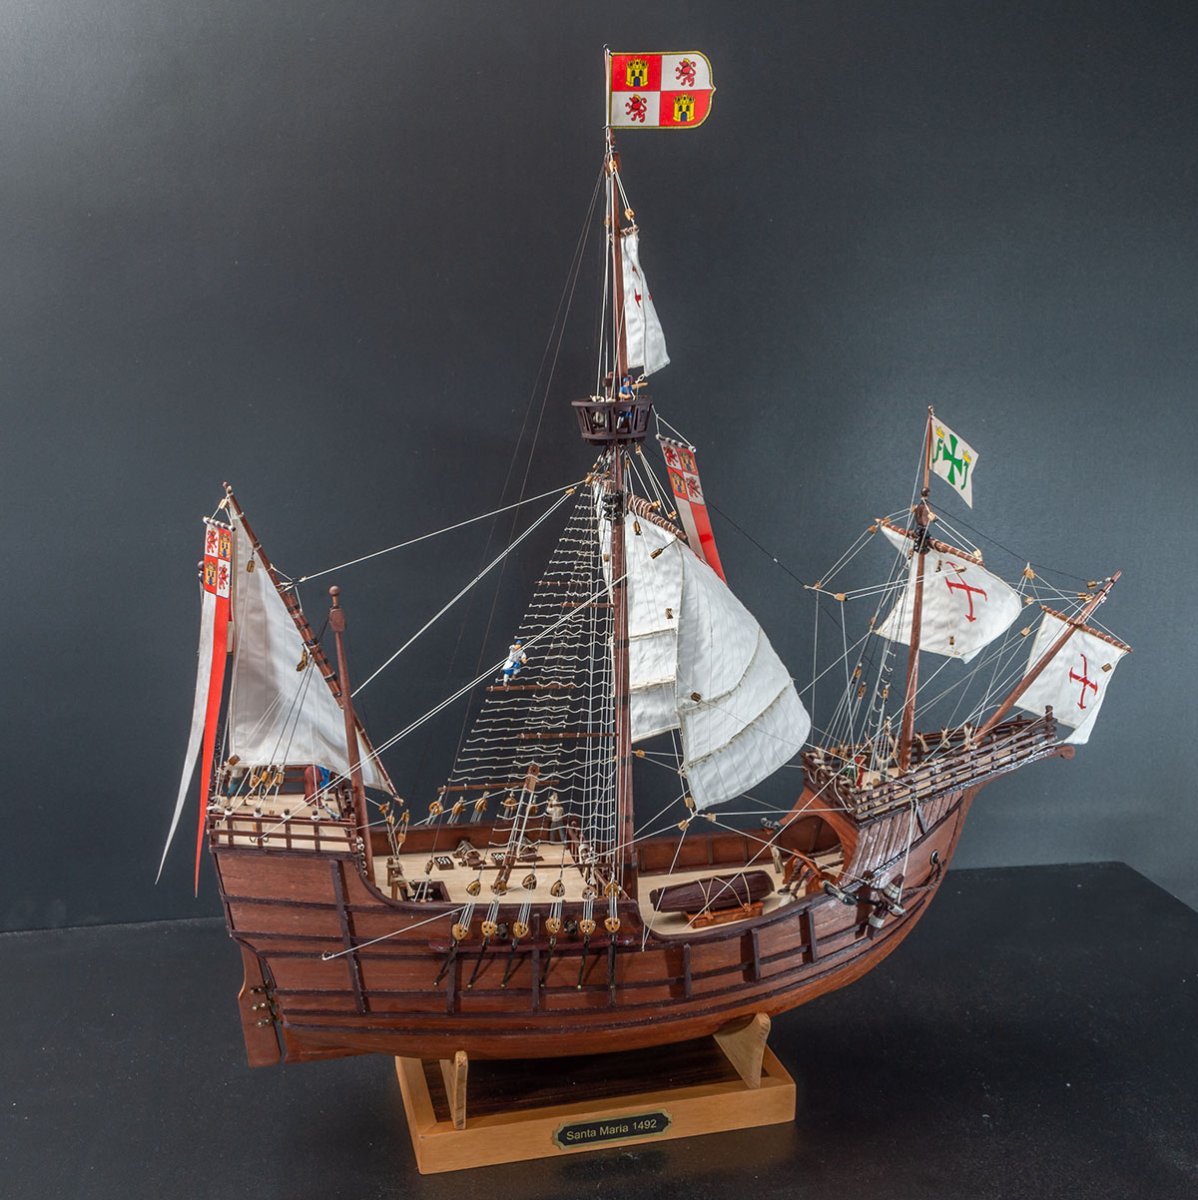
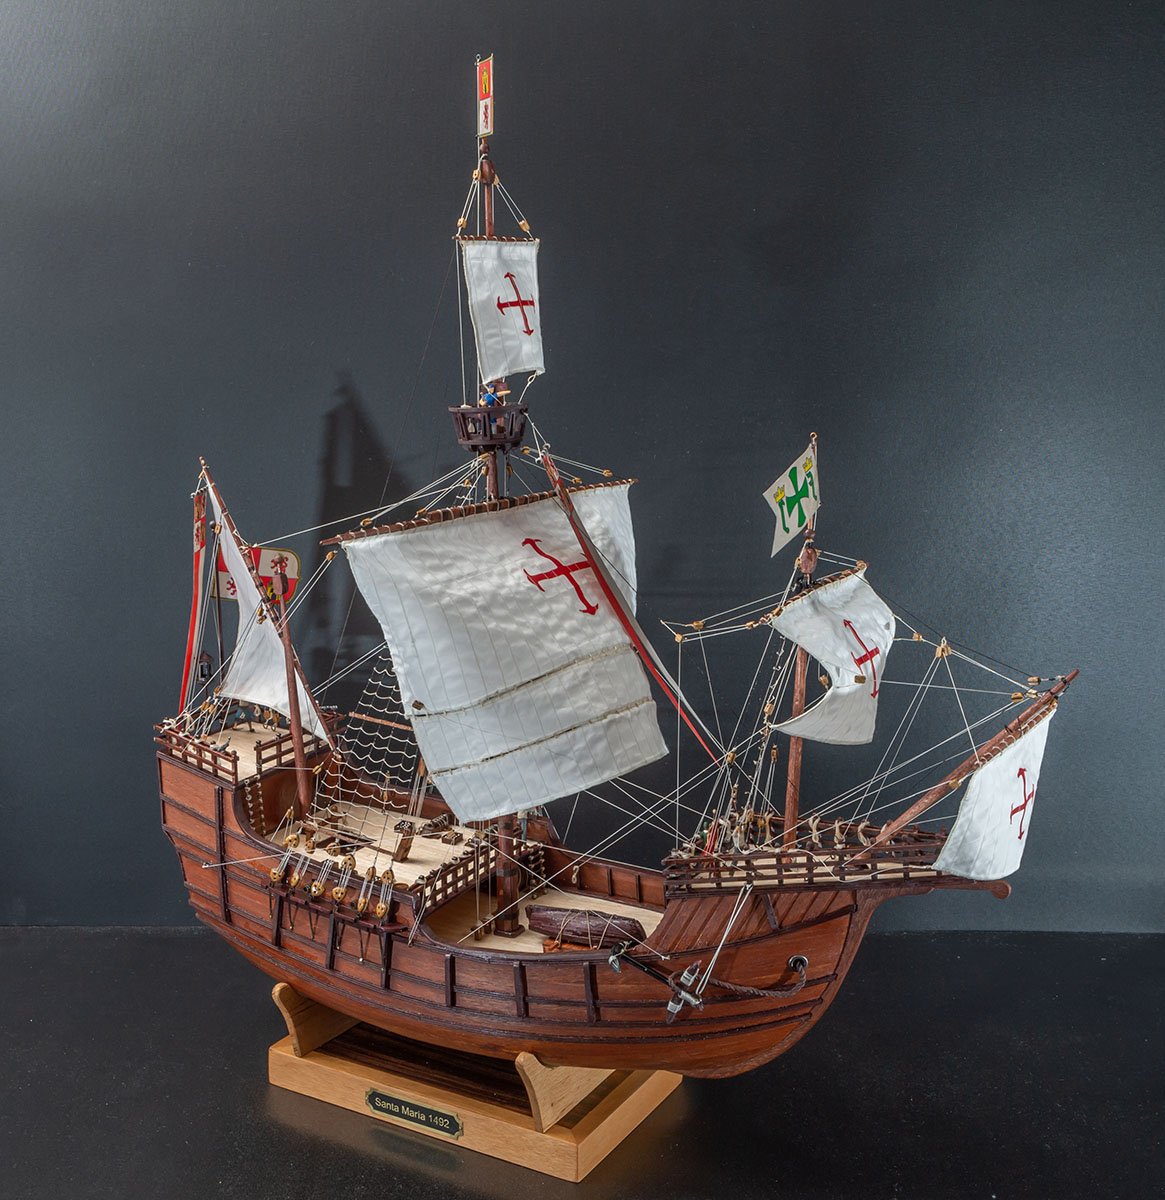
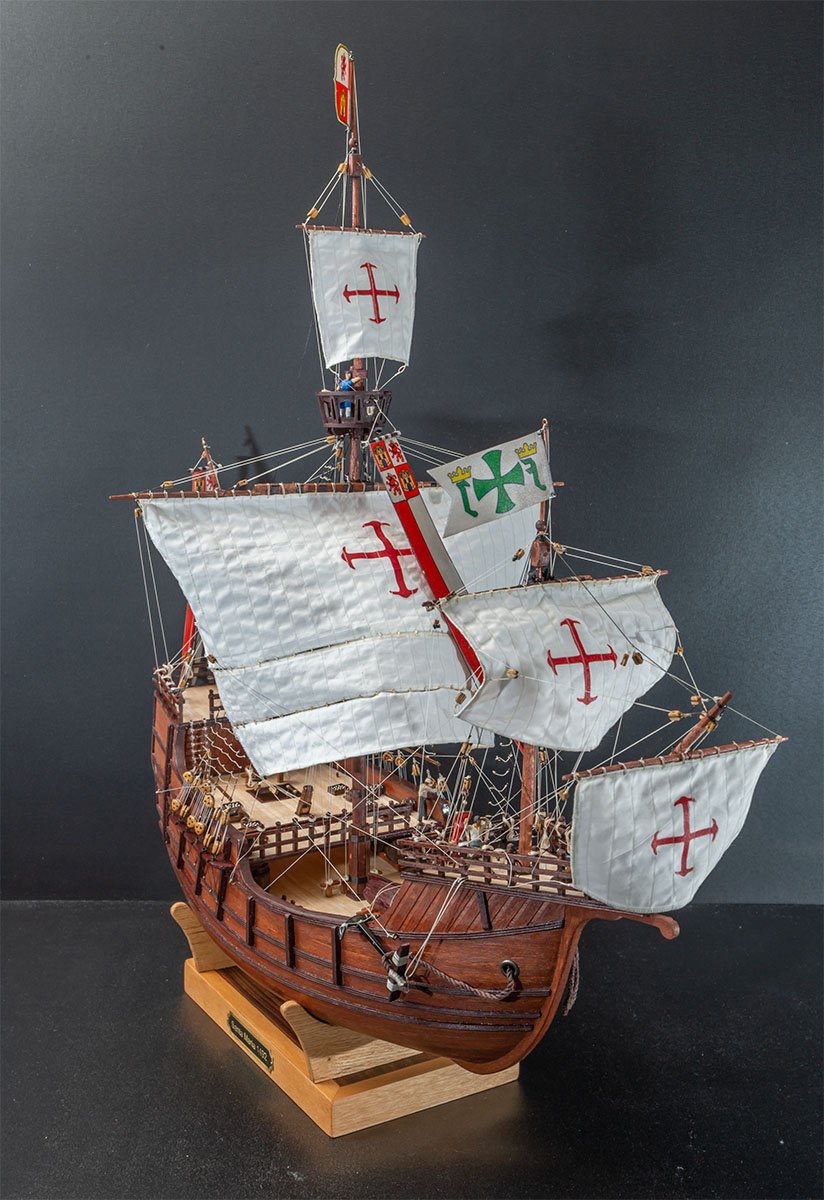
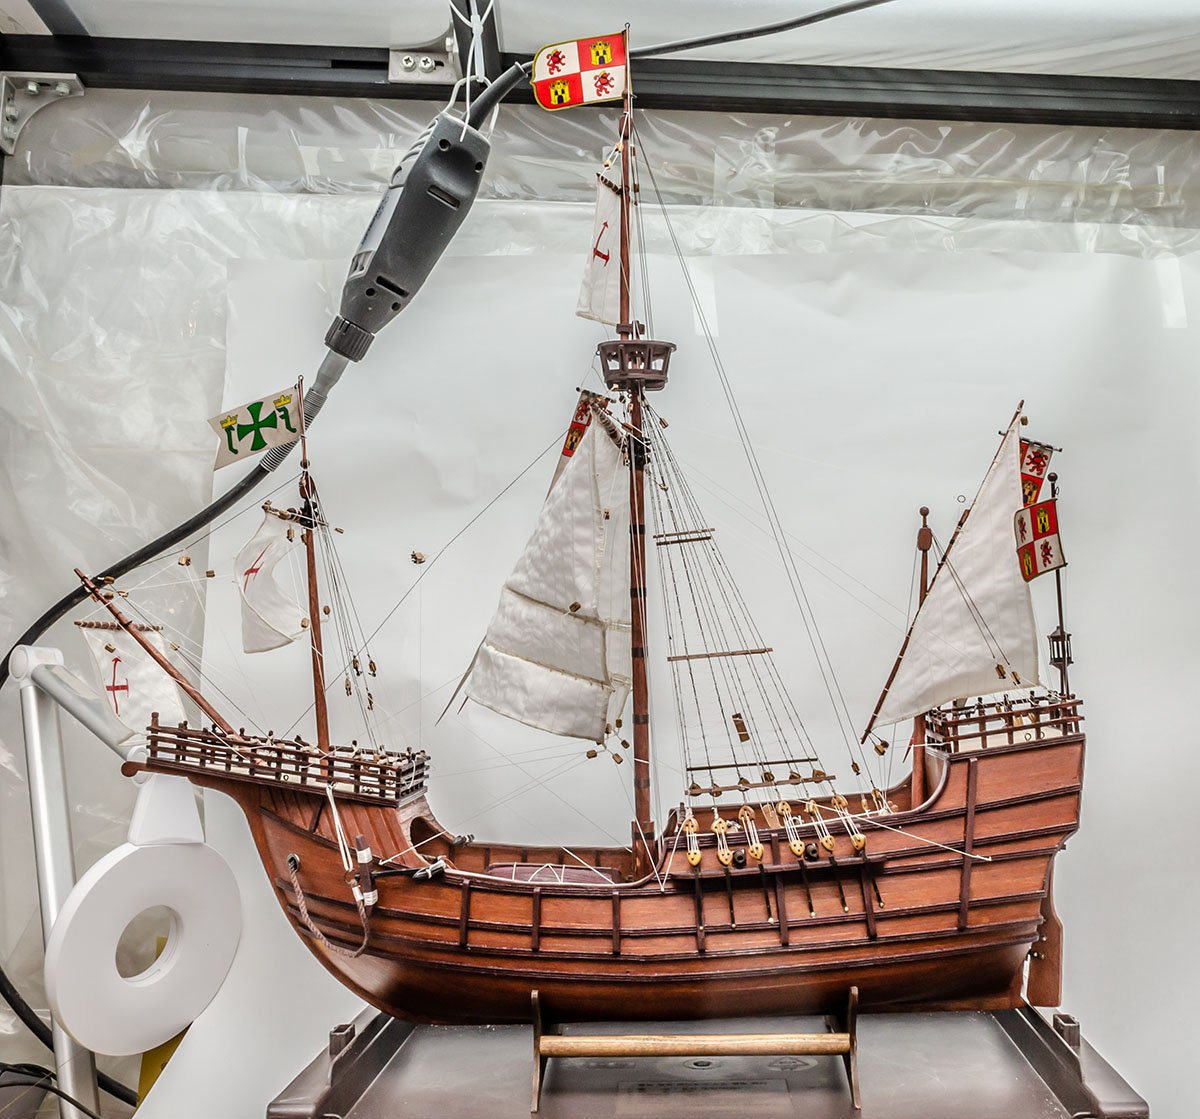
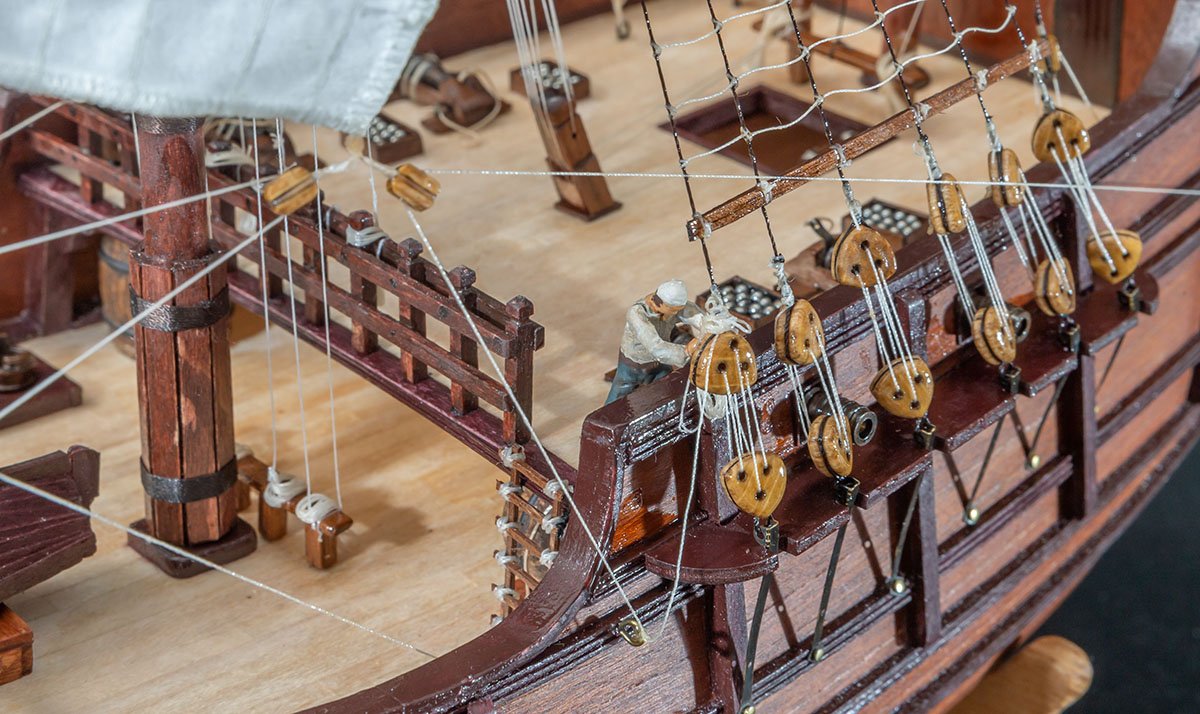
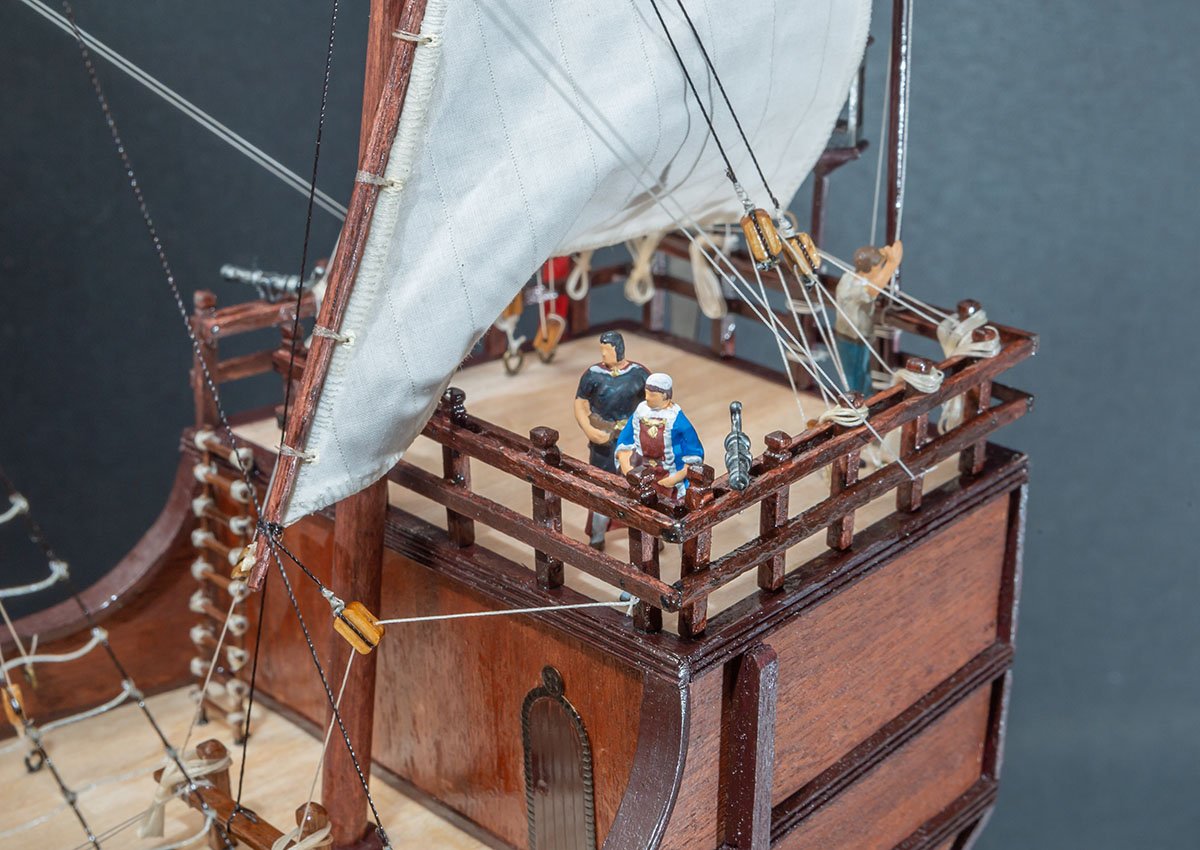
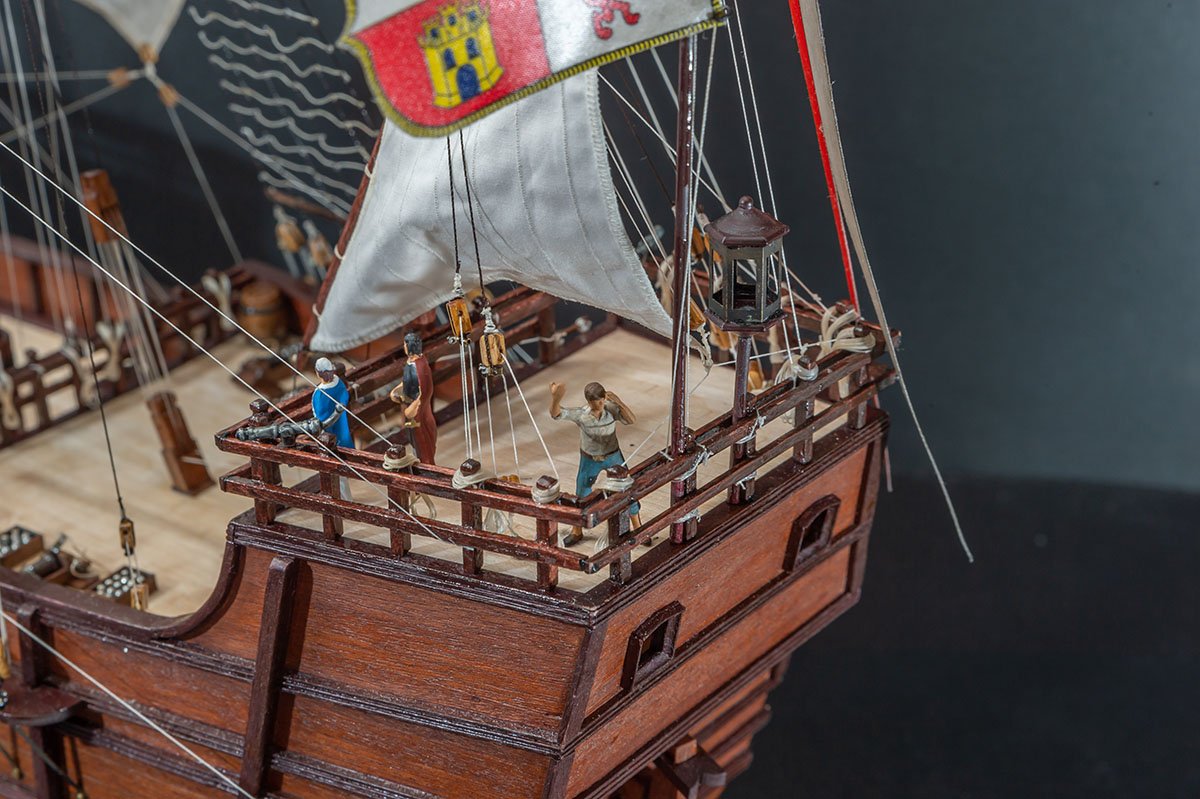
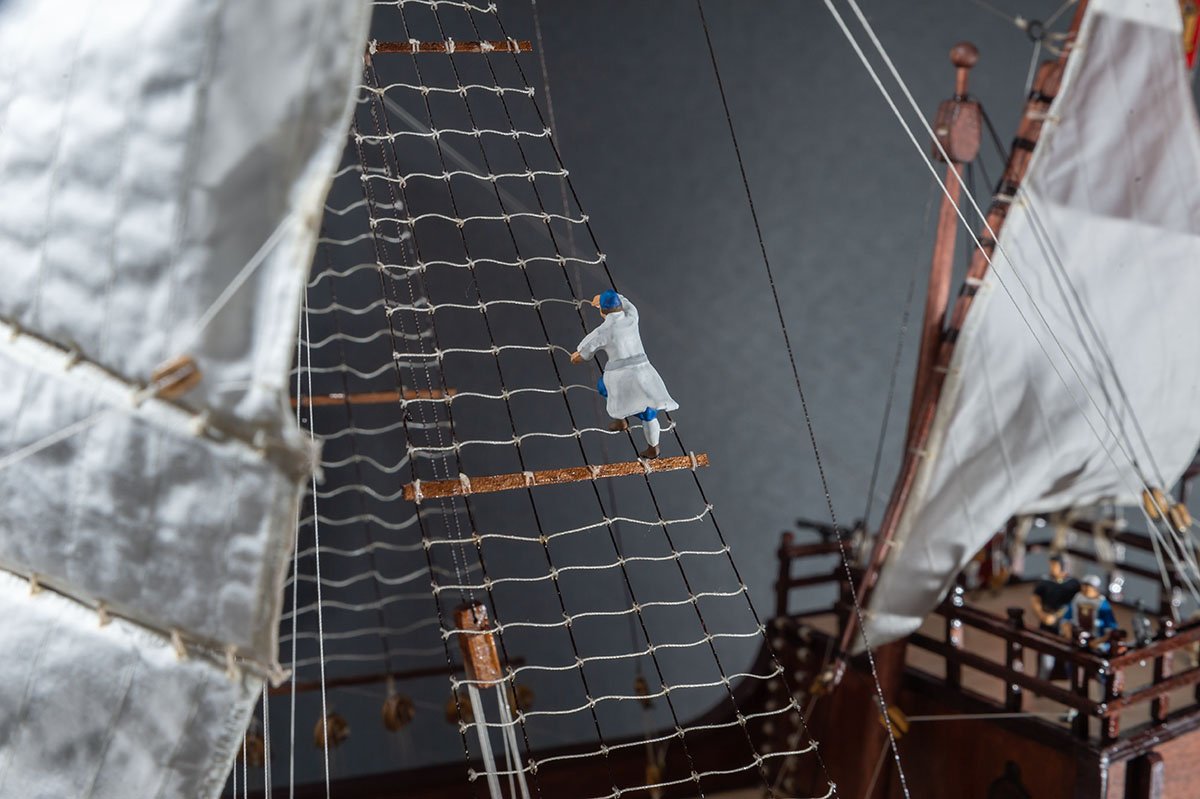
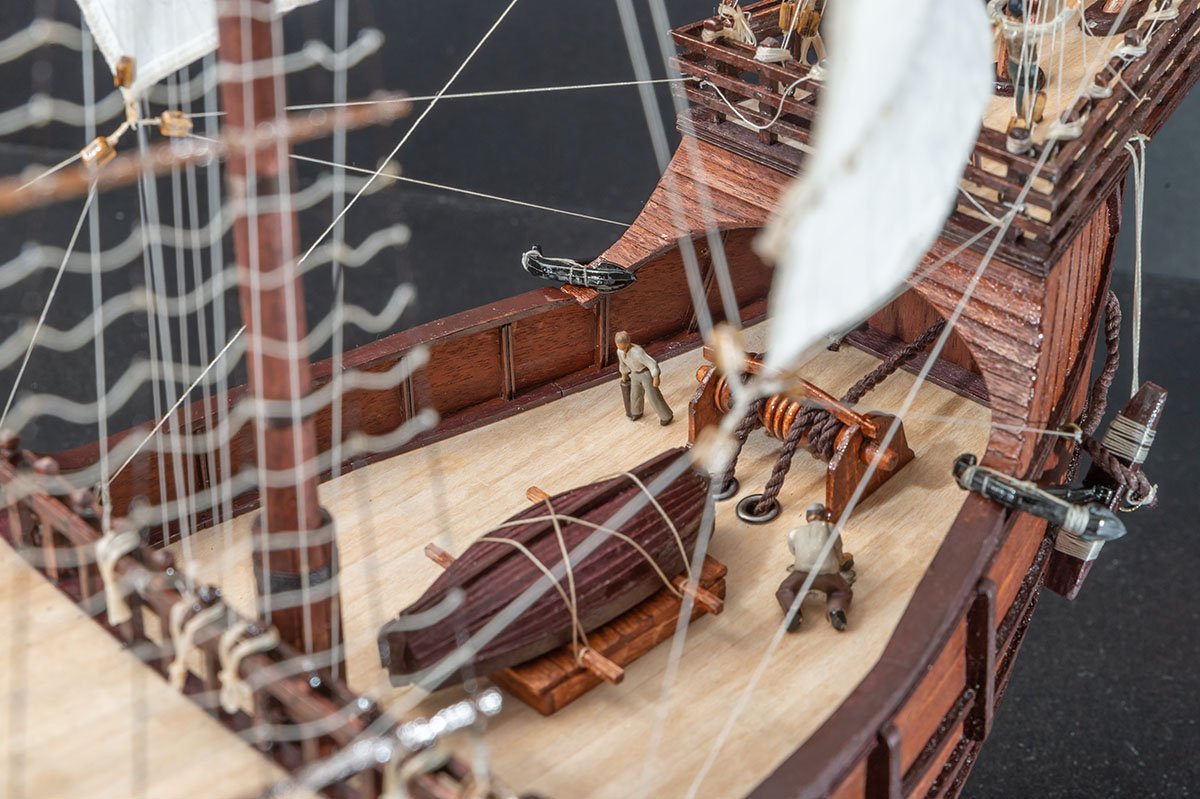
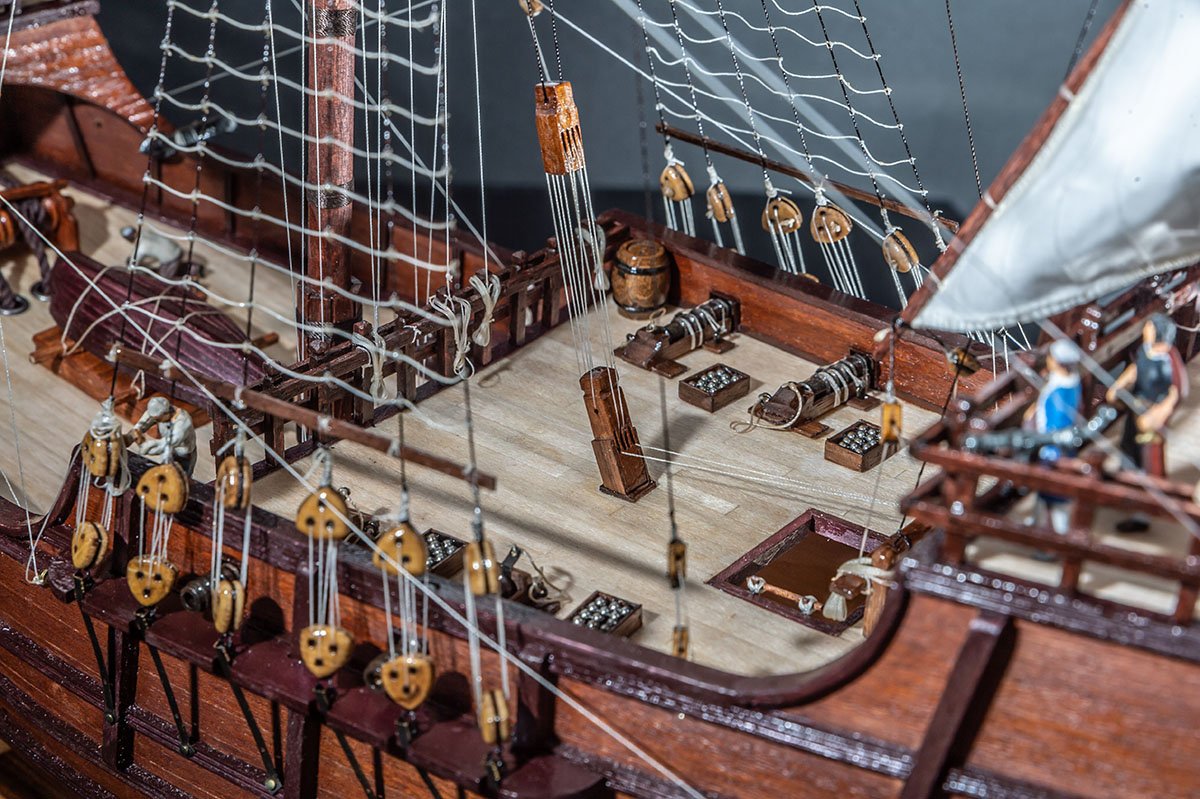
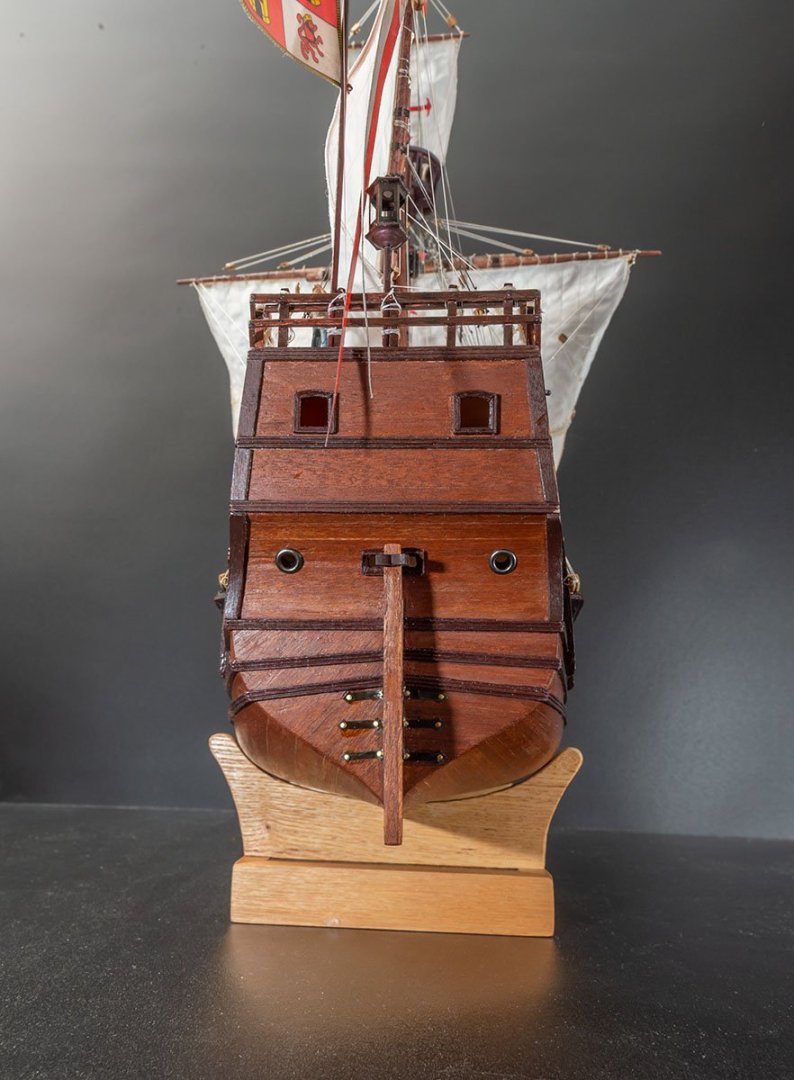
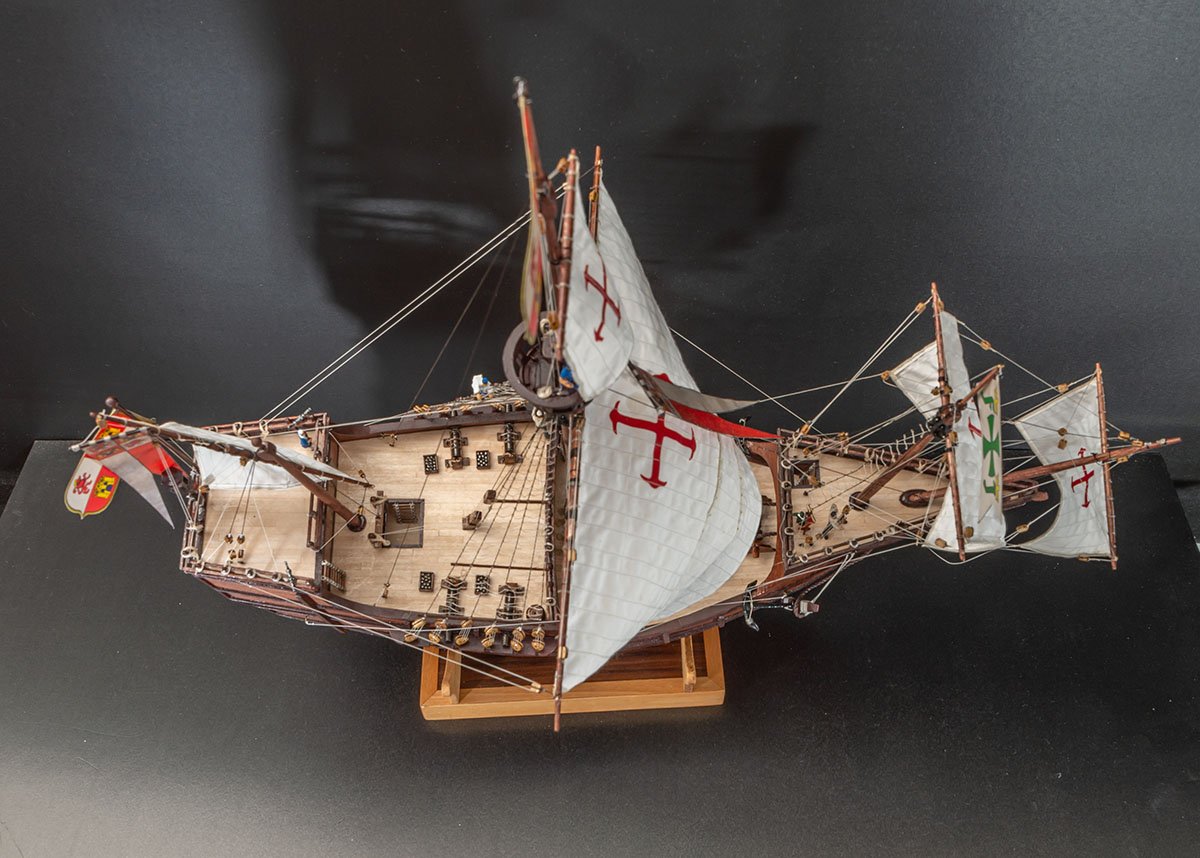
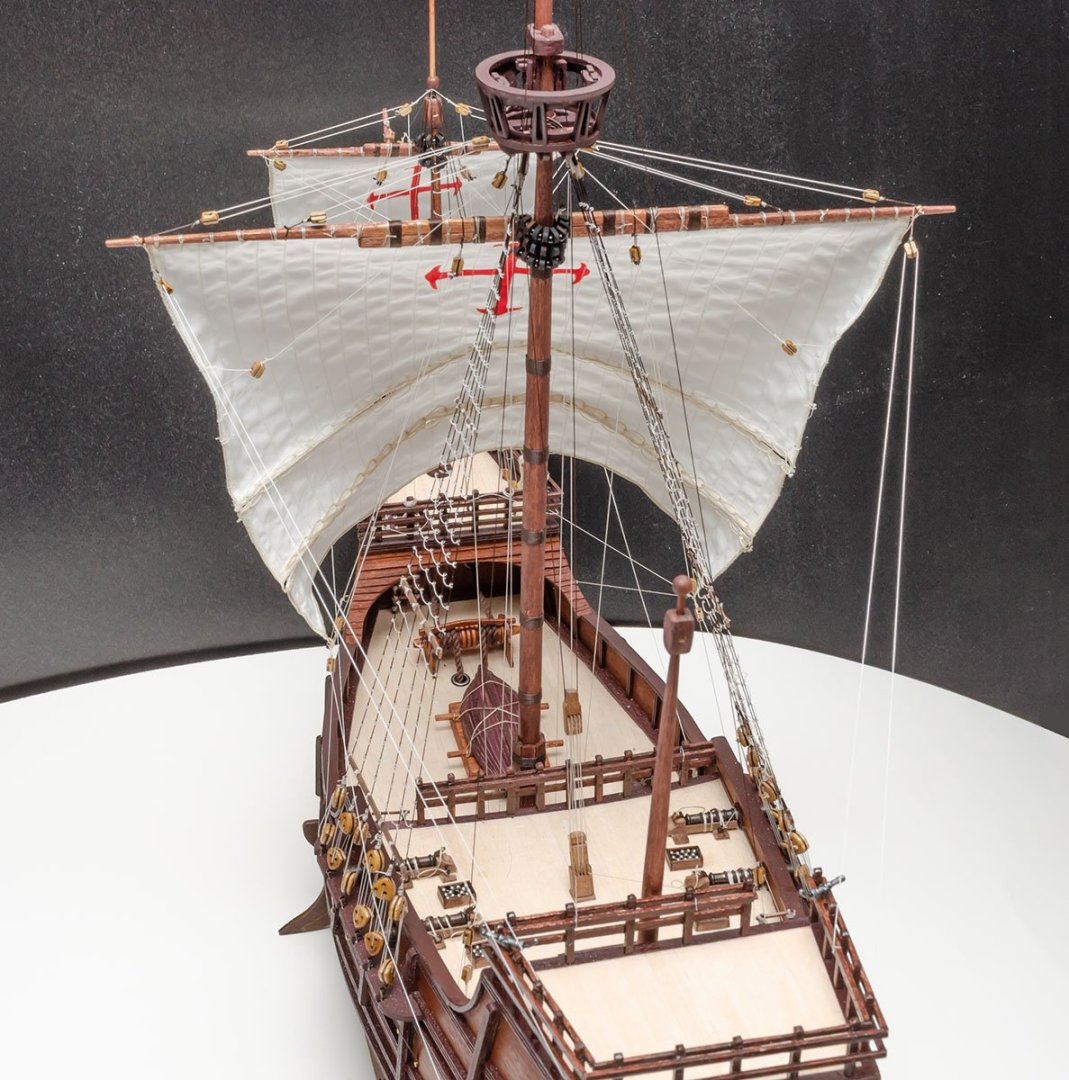
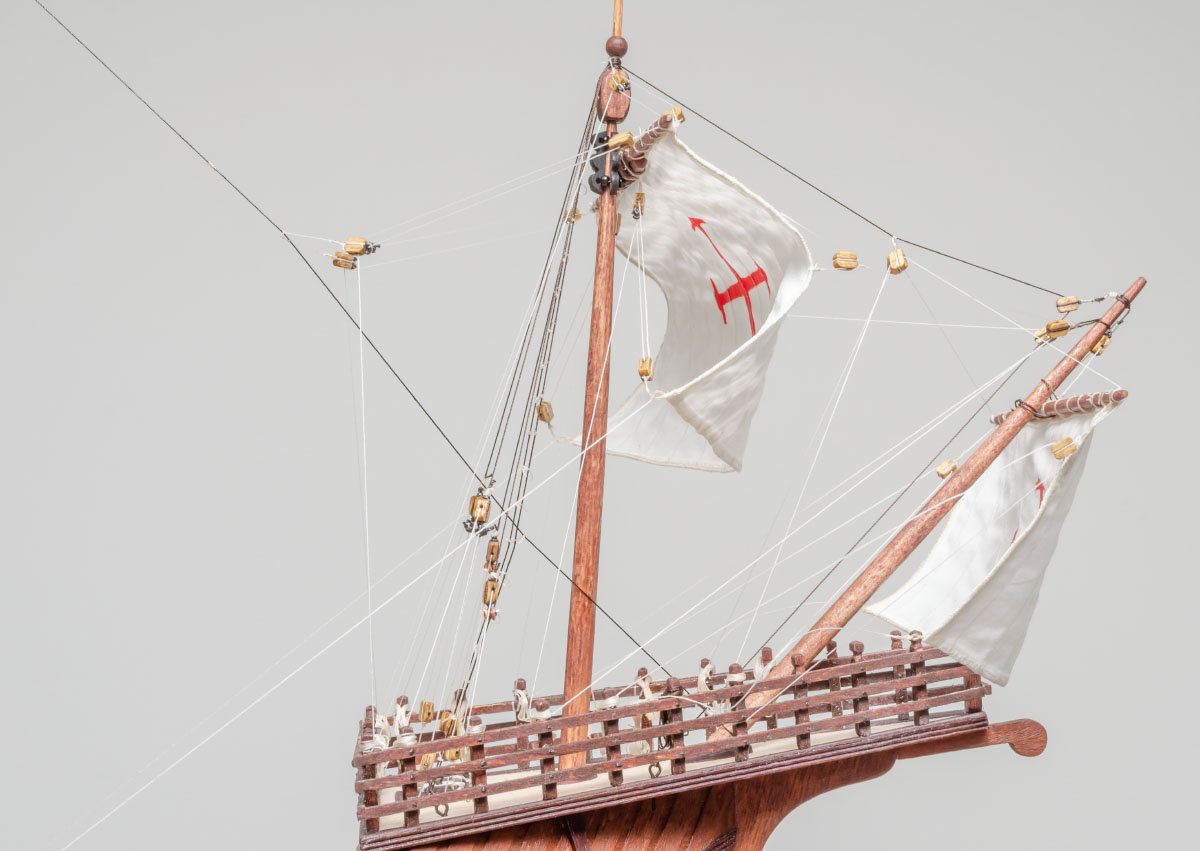
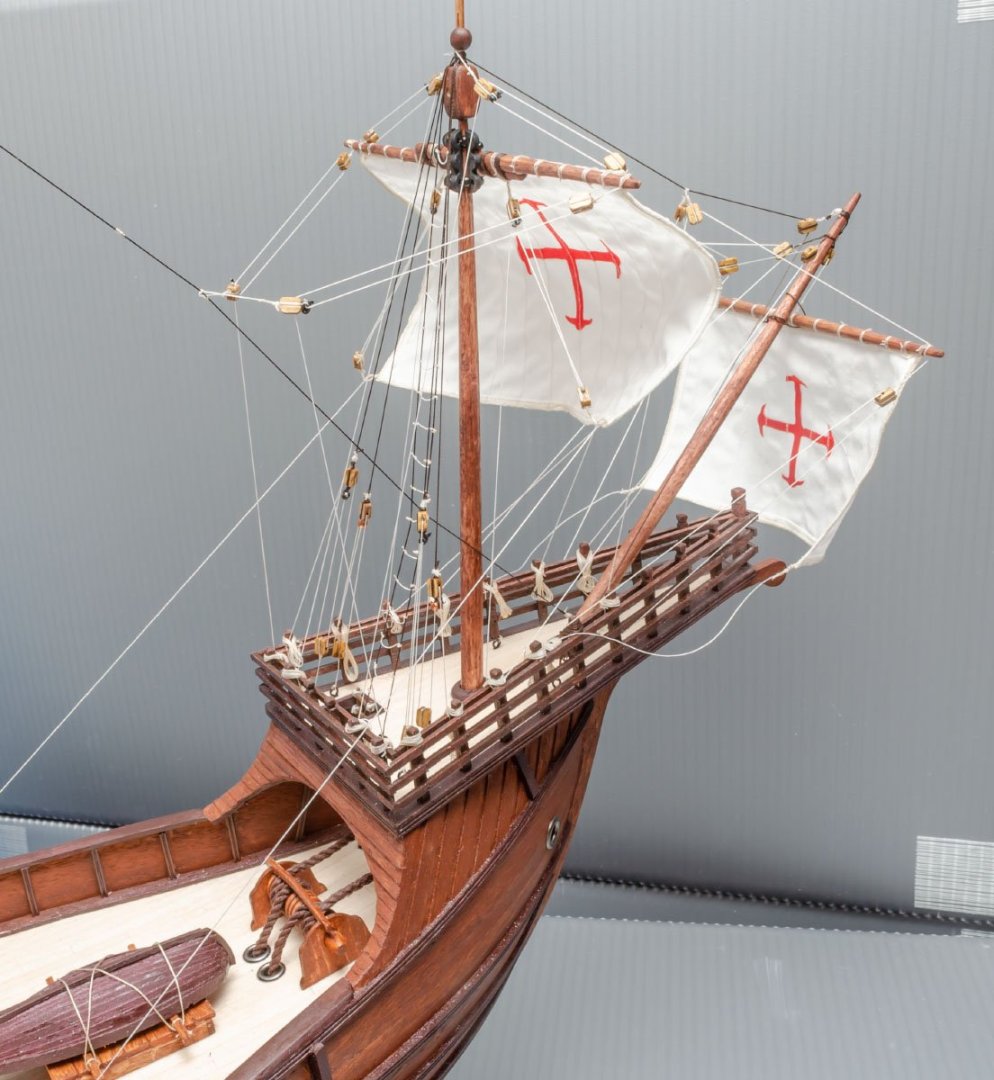
I finished an assembly of the Santa Maria 22411N. The assembly means all processes in the AL instruction. There are some minor tasks left, such as varnishing and detailing up using dummy ropes. In addition, I'll paint the 10 sailor figures that are sold sepately. It is the first time I have painted a human figure, so it may take some time. Before I wrap up the entire Santa Maria, I'll add some build logs, like rigging method videos. I figured out that most of the posts I planned to upload were not useful because they are no wonder. Therefore, I'll post only some build logs that I think are the most useful. Also, if you have any questions about my build, please don't hesitate to ask me.


- 77 replies
-
- 4
-
-
-
- Santa Maria
- Artesania Latina
- (and 1 more)
-
Mayflower by tj456 - 1/19 scale
modeller_masa replied to tj456's topic in - Build logs for subjects built 1501 - 1750
Actually, the heic is one of the failed successors of the JPEG format first adopted by Apple. There are so many tombs of JPEG successor because of compatibility issues. tj456, I recommend you change your cellphone's file save setting to JPEG. -
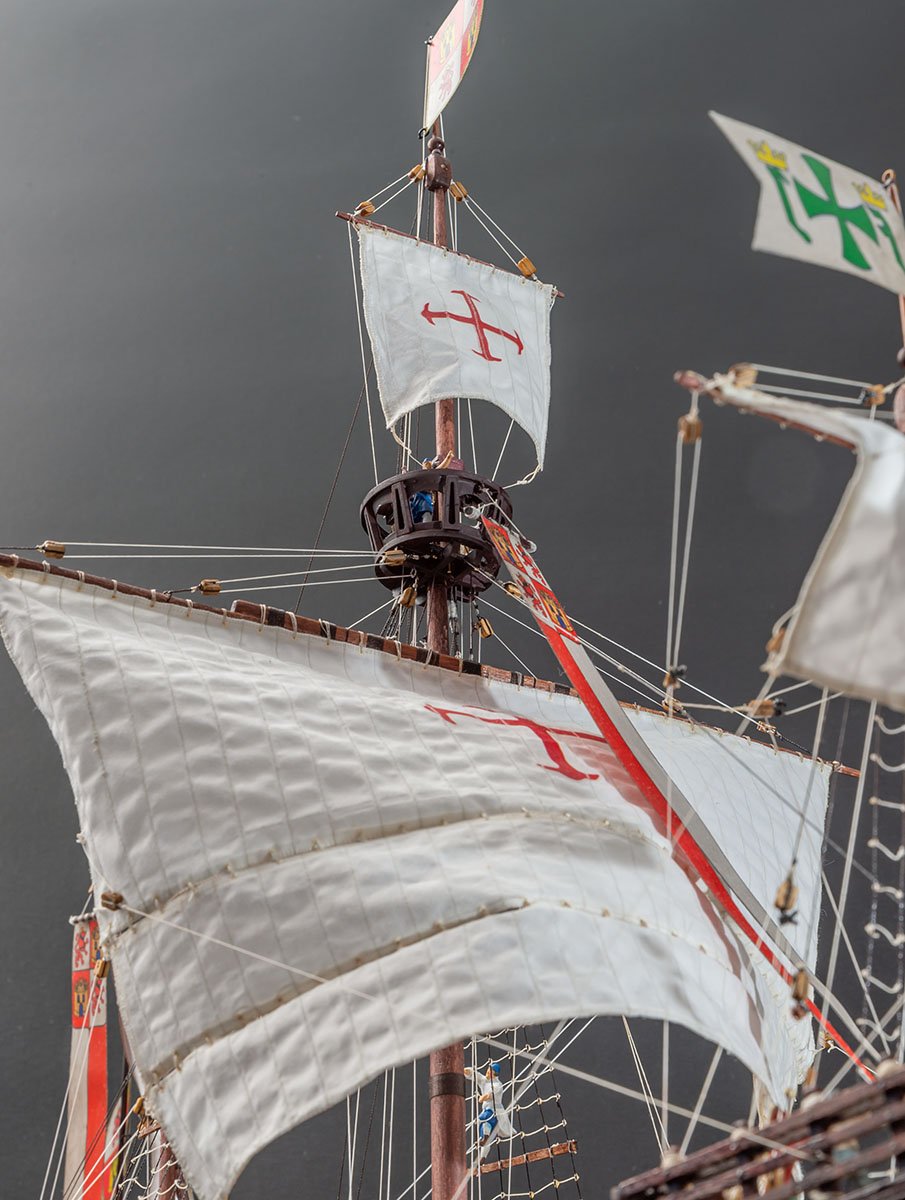
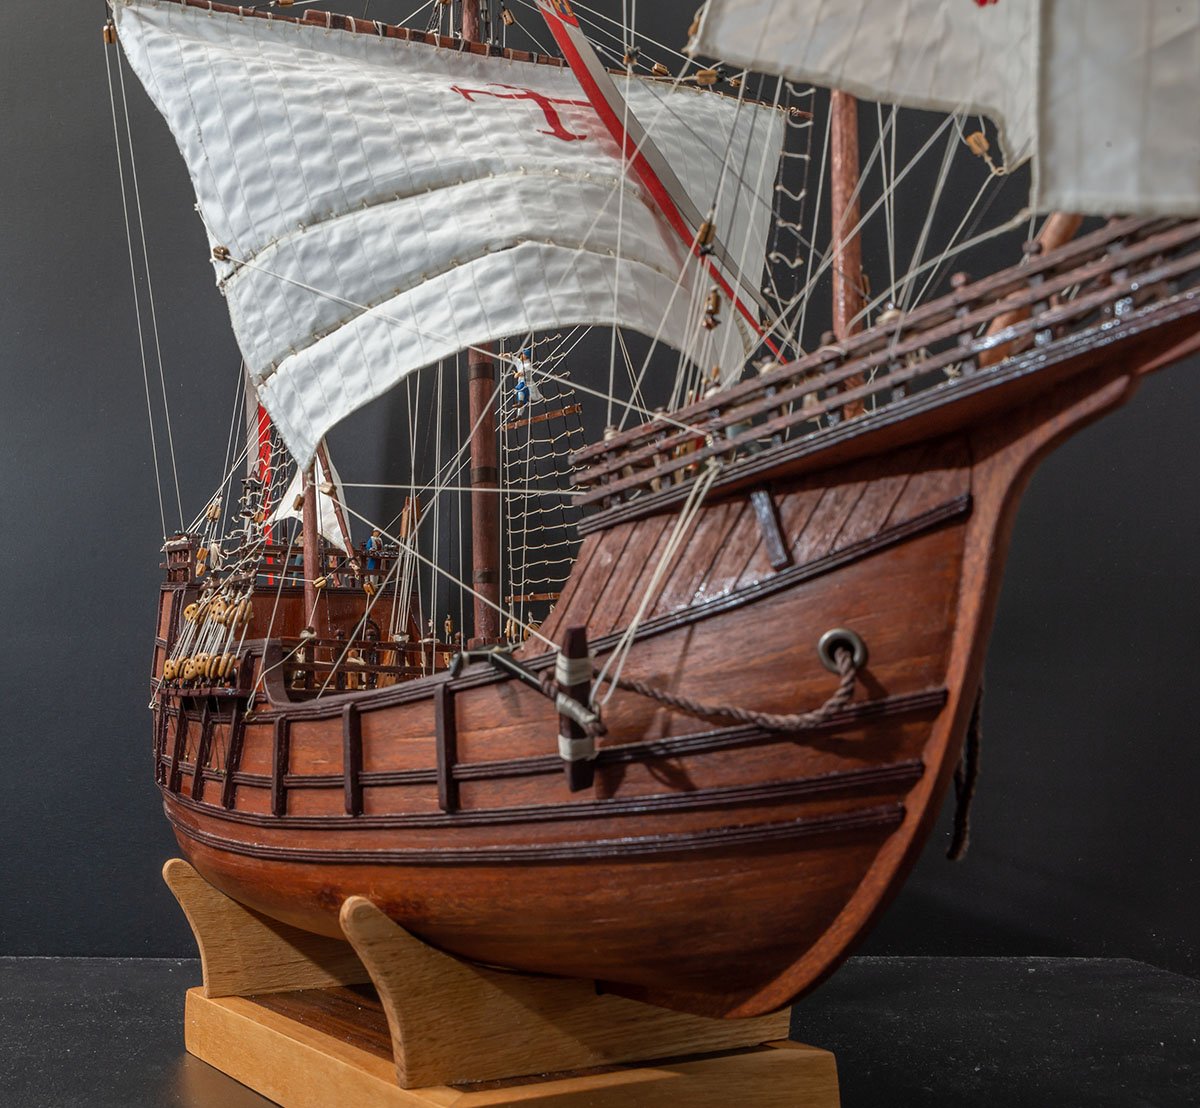
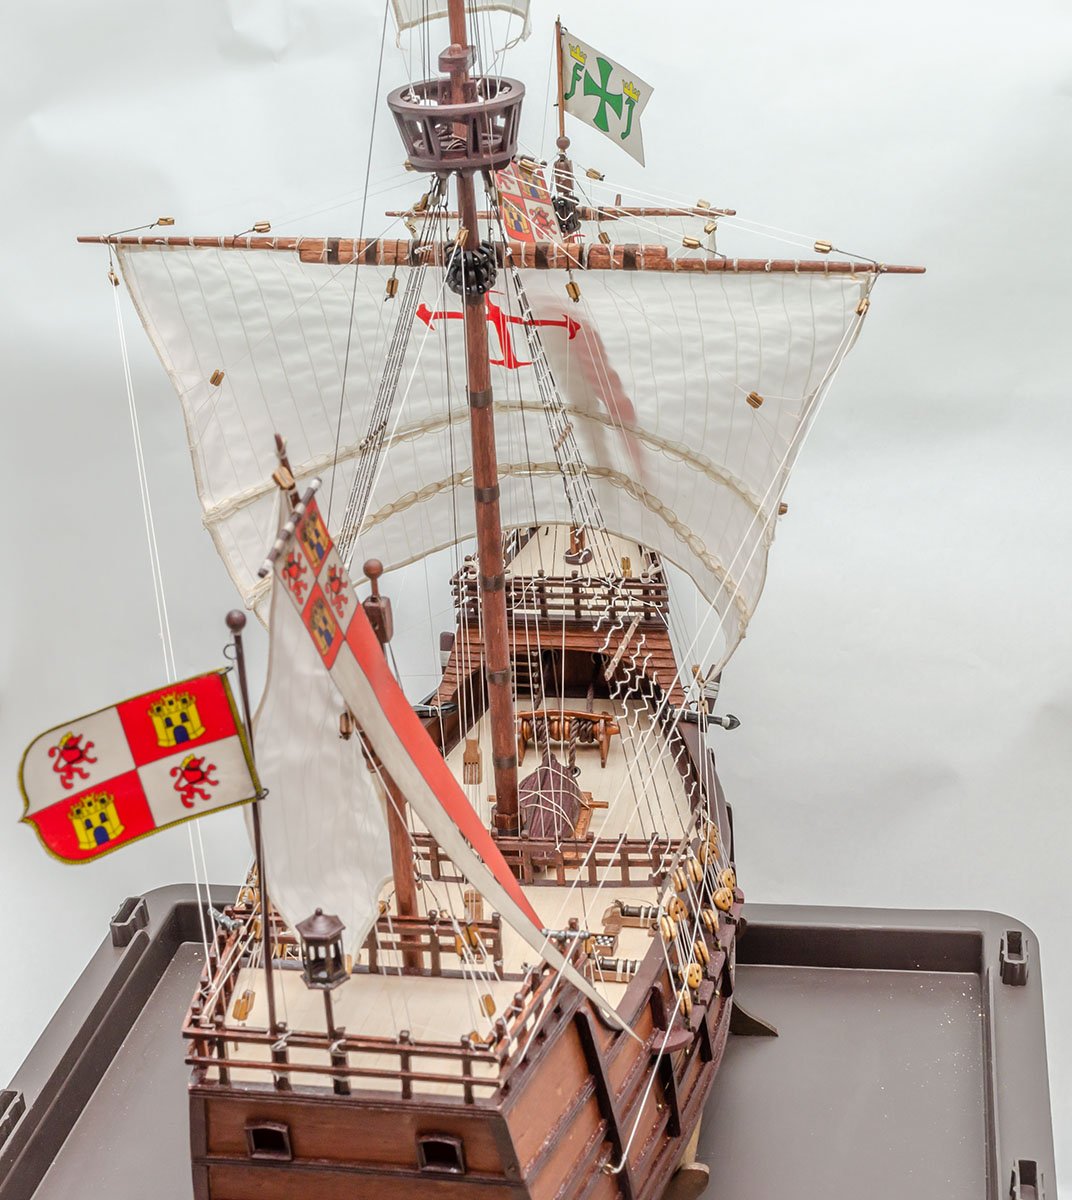
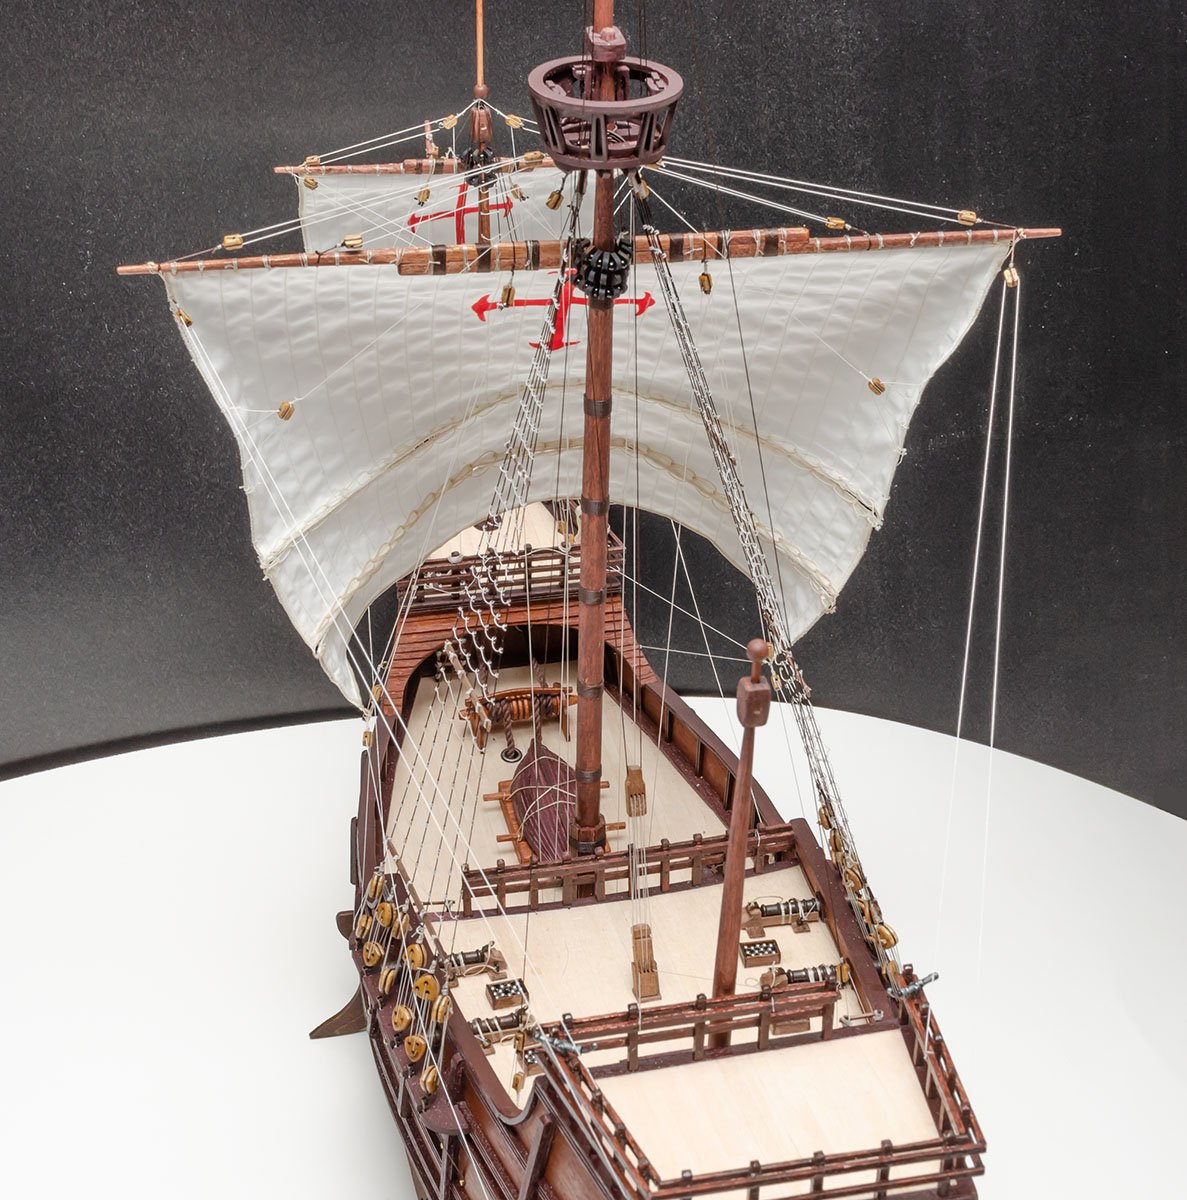
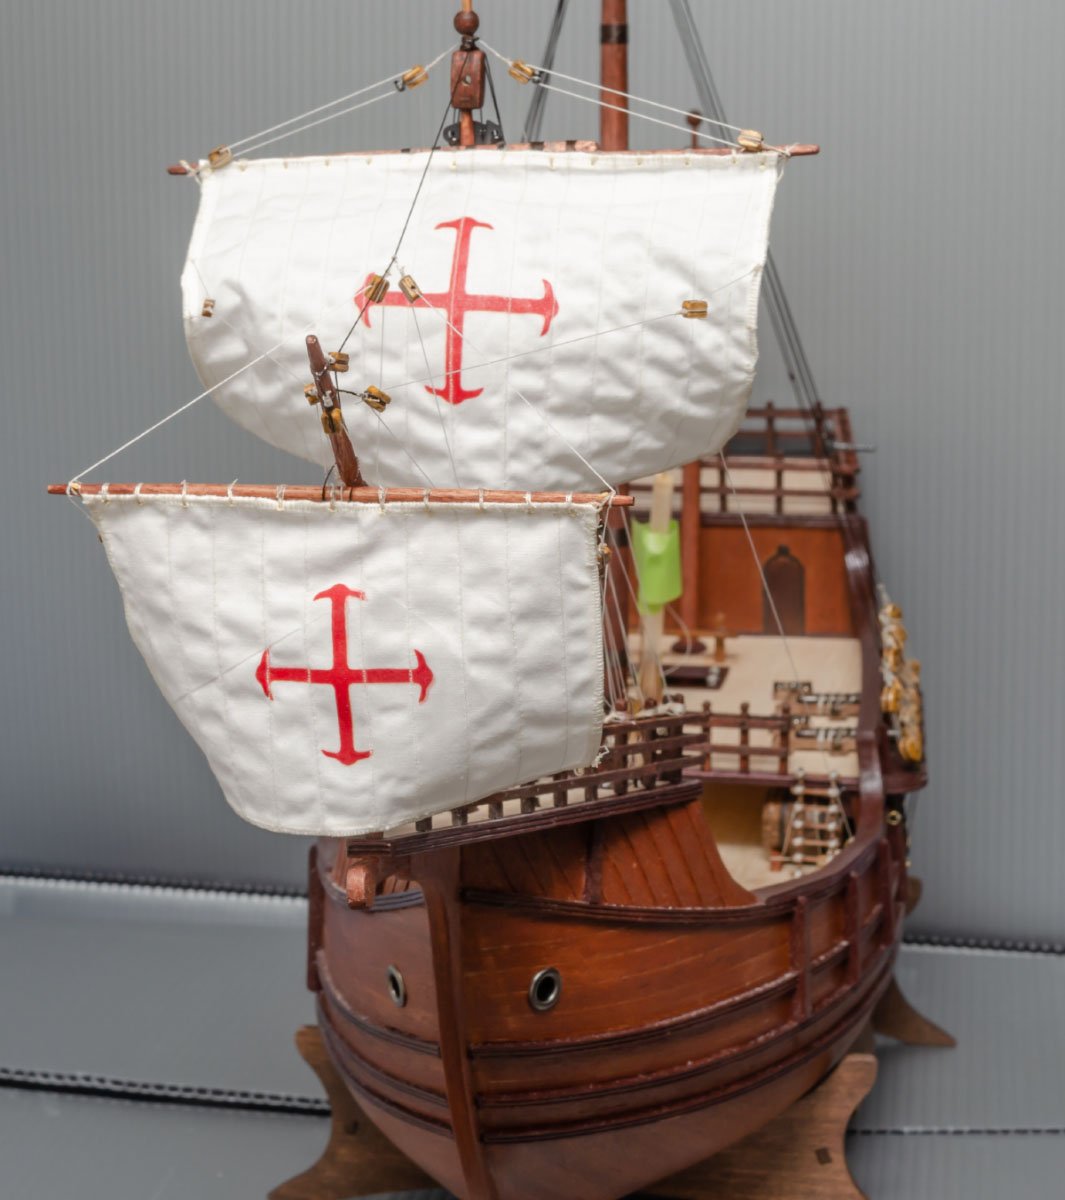
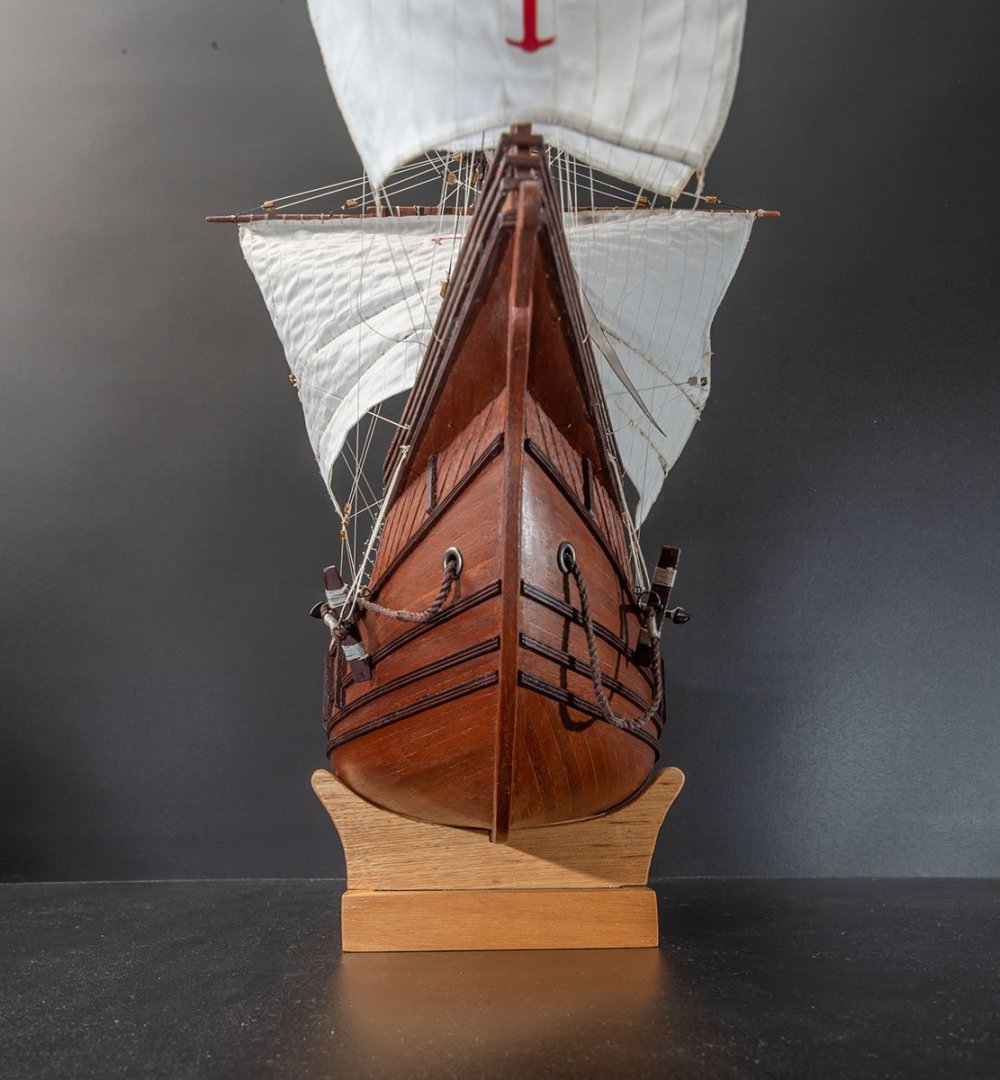
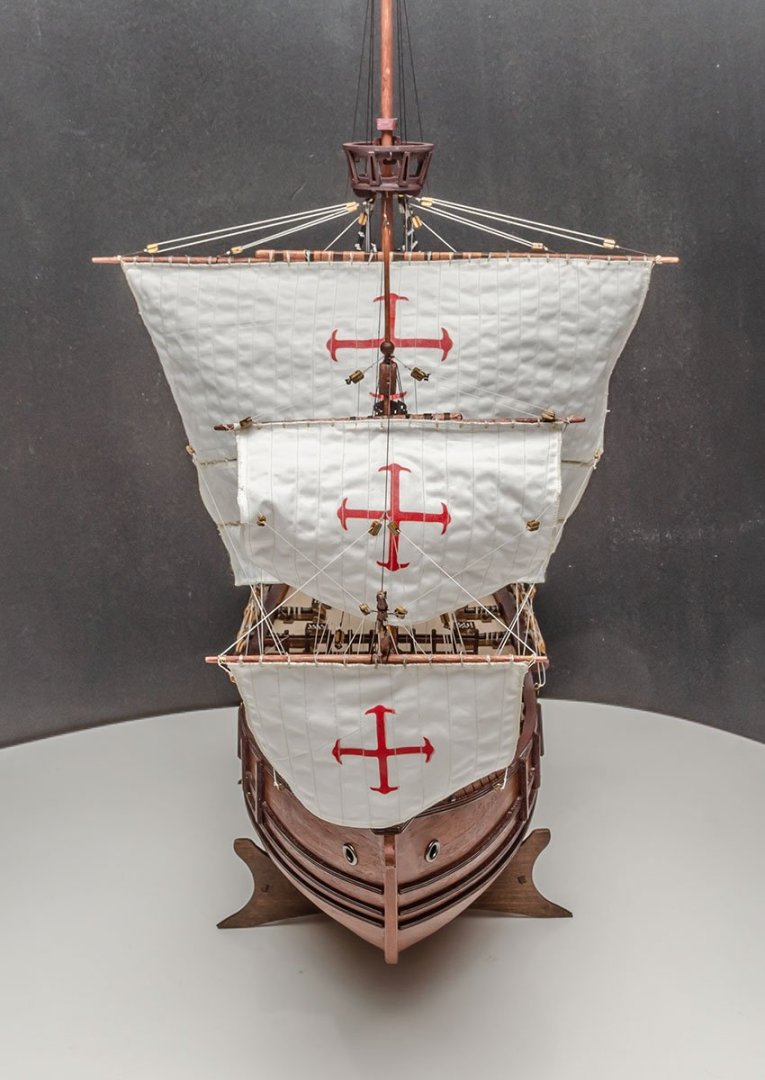
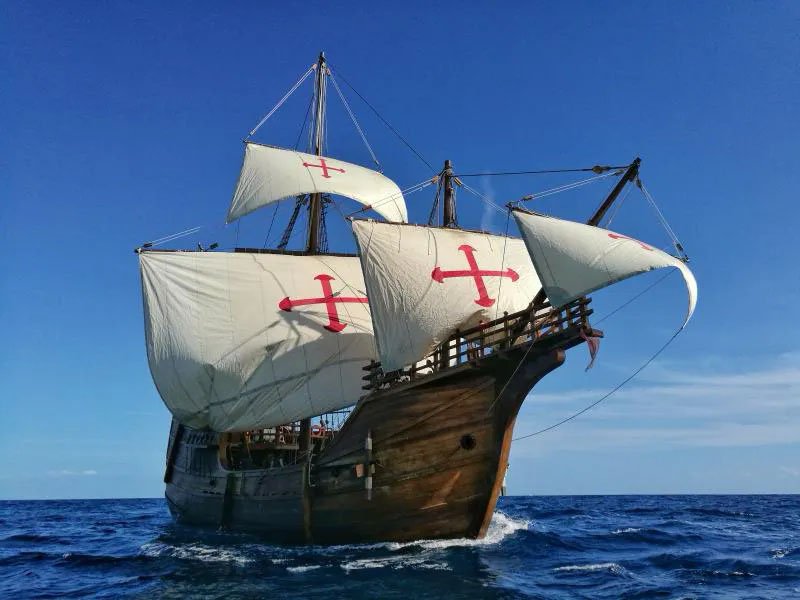
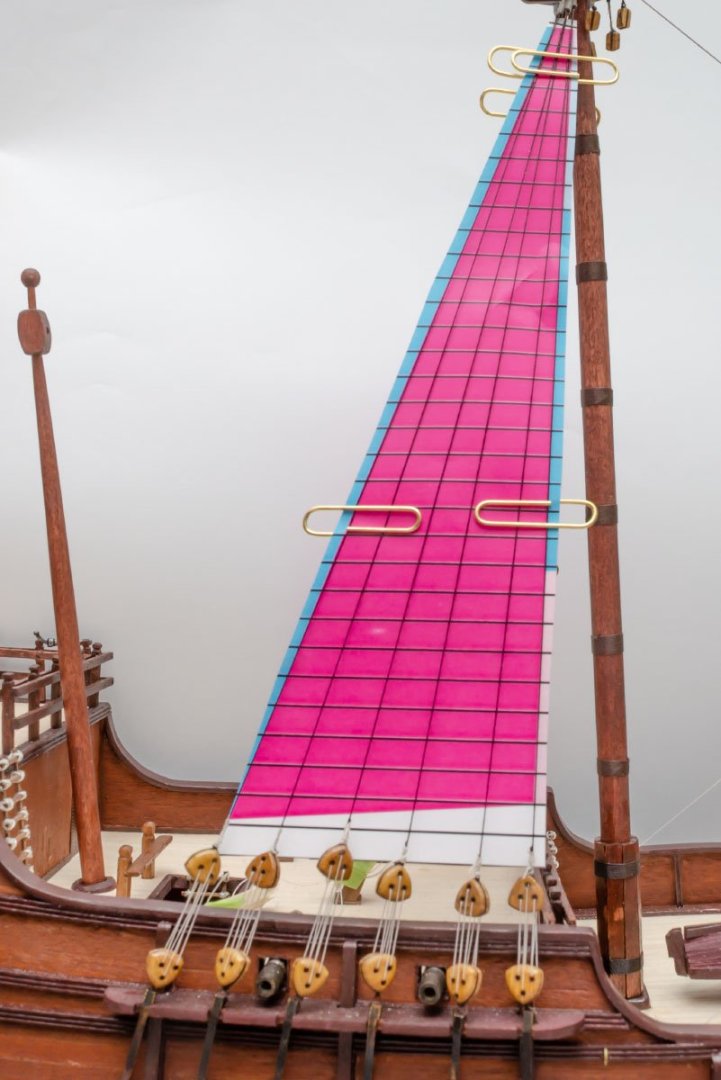
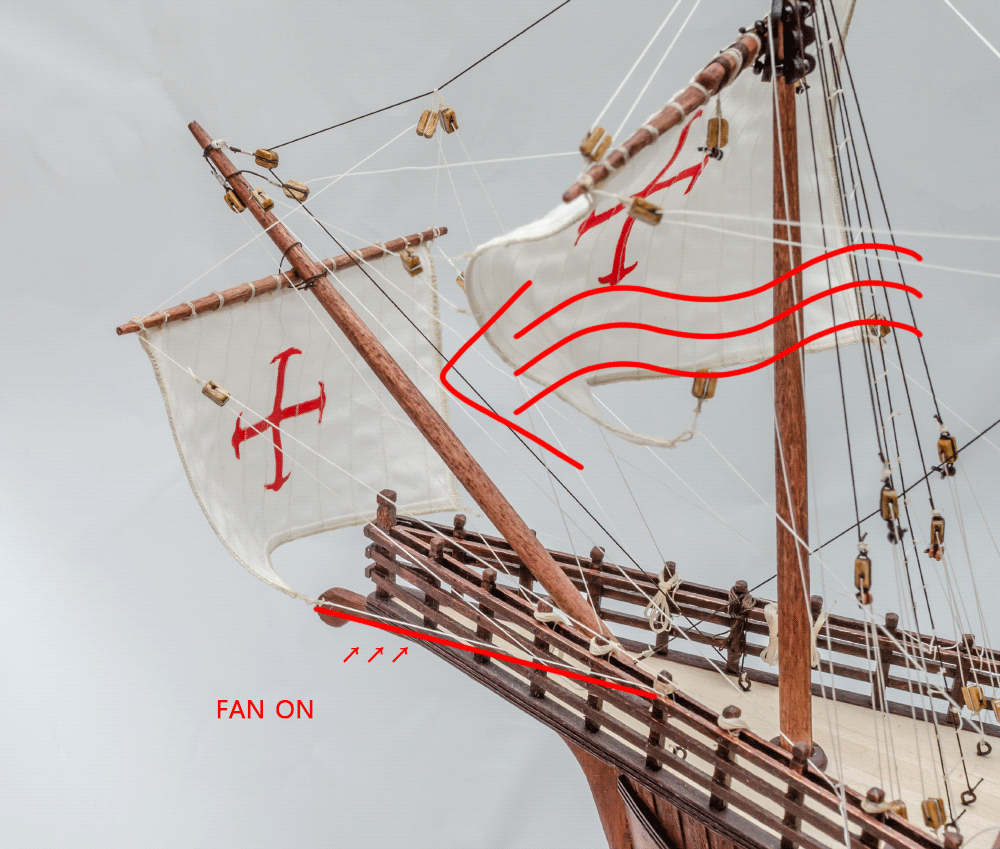
After some flooding and restoration, I finished the mainsail. I didn't harden the mainsail and followed the rigging method in the reference book only. Therefore, the "distended" sails made me embarrassed. In general, I anticipated that the full-sail is a "half-sphere" shape, like the box art of sailing ship kits. I tried to control ropes or change the fan's strength, but I failed to reproduce the half-sphere shaped full-sail. I don't know the reason, so I decided to search for real-world full-sails of Santa Maria replicas. Newton was right. 😎


- 77 replies
-
- 3
-
-
- Santa Maria
- Artesania Latina
- (and 1 more)
-
Where to find a copy of Antscherls sail making
modeller_masa replied to src's topic in Masting, rigging and sails
Finally in stock! Thanks for the information! -
Mini spot welder to weld railing
modeller_masa replied to modeller_masa's topic in Modeling tools and Workshop Equipment
I'm not a mechanical engineer but an IT engineer. Learning new techniques can be frustrating, but I enjoy the adventure. Resistance soldering seems to be a new challenging area. Thank you for the information, Roger. -
Mini spot welder to weld railing
modeller_masa replied to modeller_masa's topic in Modeling tools and Workshop Equipment
Thanks for the tip, Grandpa Phil. I used the ceramic tiles and metal holders when I soldered brass masts with a gas torch. This tiny spot welder isn't stronger than the gas torch, but it makes shiny sparks like an arc welder makes. 😎 Making a metal model ship is one of my future goals, but I feel it is still far from now... -
Mini spot welder to weld railing
modeller_masa replied to modeller_masa's topic in Modeling tools and Workshop Equipment
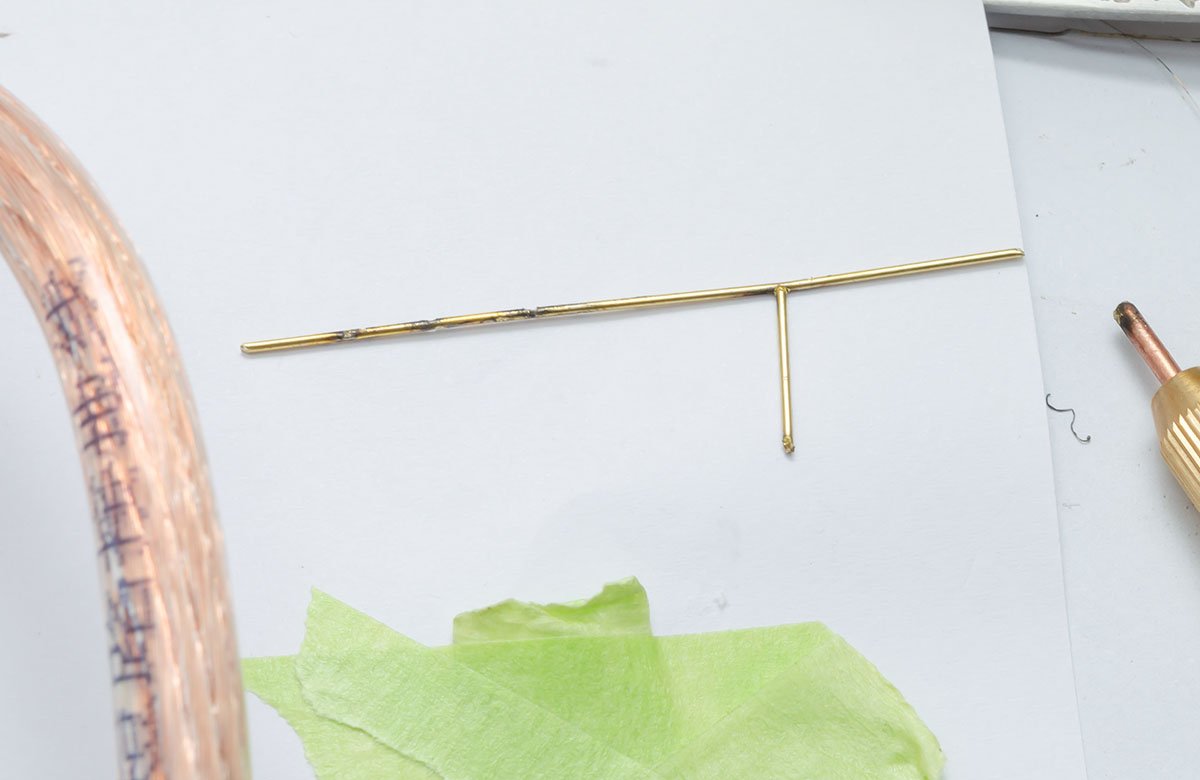
And, I'm experiencing a number of cons with welding... I imitated railings in the real world. Due to the unpredictable welding process, I need to think about a different method... -
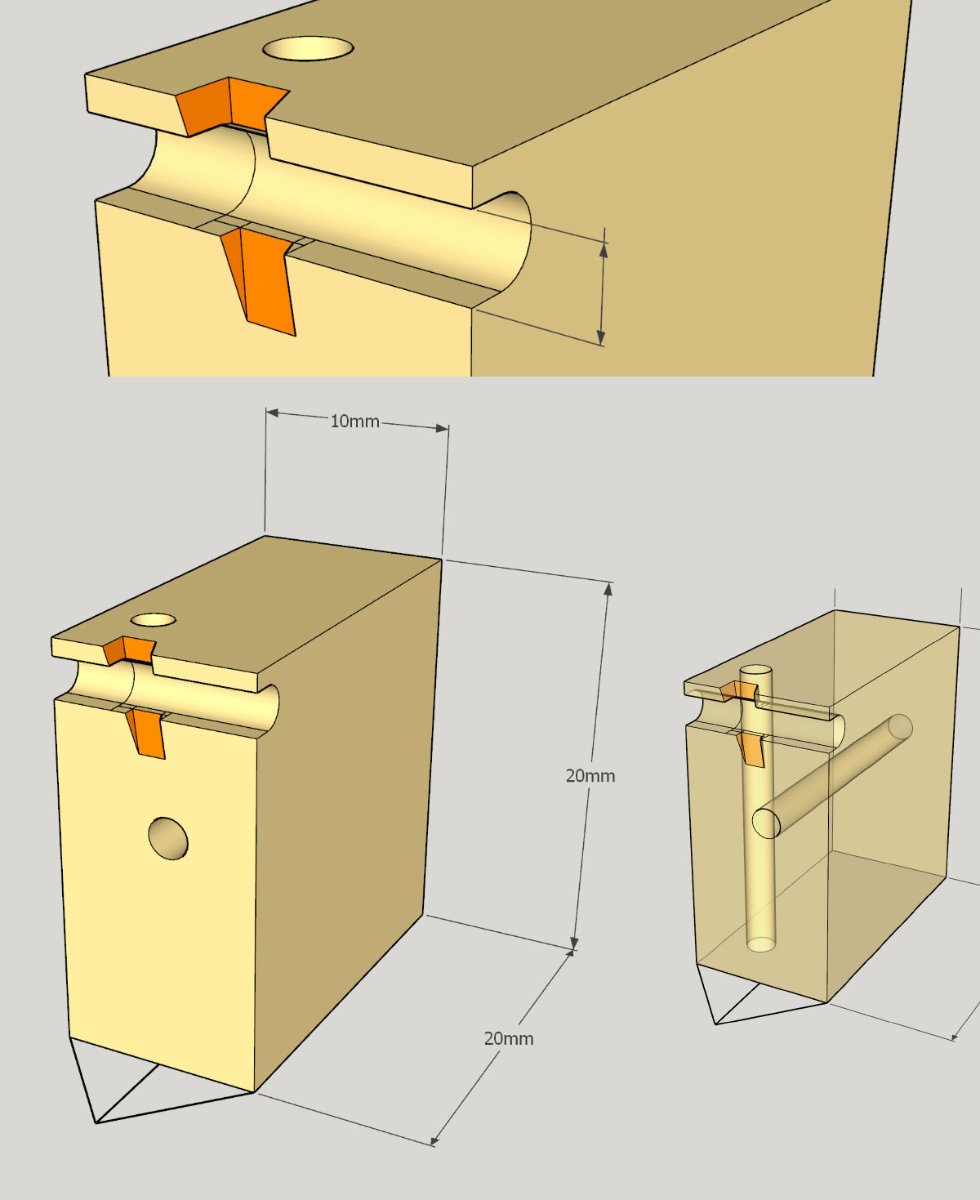
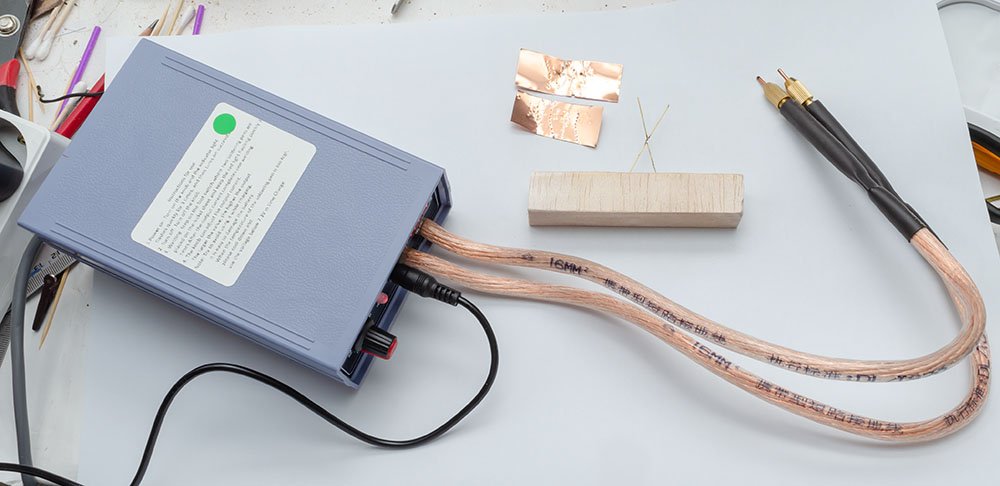
Hello, I bought the mini spot welder several months ago. It is the first time I've used an electric welder, so I don't know any specific safety rules. Obviously, I felt the tool was as dangerous as a table saw, so please don't use this electric shock welder before you're trained well. One of my goals was to weld yacht railings, but it seems like not simple. This mini welder is optimized for 18650 battery welding work, which uses nikel sheets, so that I had many difficulties with welding "weak" metals such as brass and tin. I was able to get successful result under only specific conditions. Good results Brass rod - Thicker than 0.80mm. Stainless steel or steel wire - Thicker than 0.30mm Bad results Brass tube - It sparks everywhere. Stainless steel or steel wire thinner than 0.20mm - Too easy to cut, like the brass rod thinner than 0.60mm The melting point of the brass is relatively low, and the thinner steel wire has high resistance, which causes higher temperatures and snapping. If I can make the welder weaker, I may be able to make more precise and smaller brass railings or shrouds for 1/350 scale models.
-
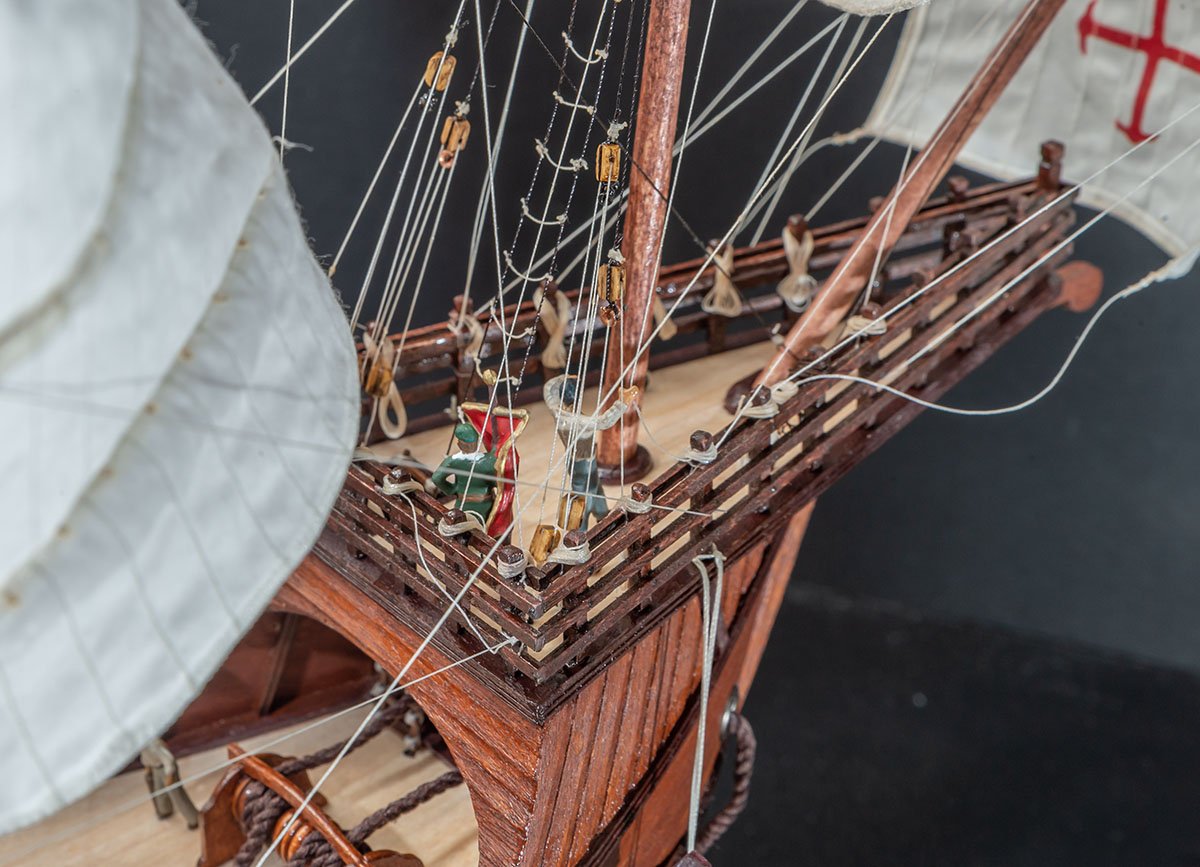
I made a tutorial video for the rigging part. The video editing took so much time that I'll complete the rest of video after I finish everything. 🤪 I began the main mast rigging. I repeated trial and error to print the exact shroud guide paper. The shroud rigging is called a clove hitch. It is a very simple and fast method.
- 77 replies
-
- 3
-
-
- Santa Maria
- Artesania Latina
- (and 1 more)
-
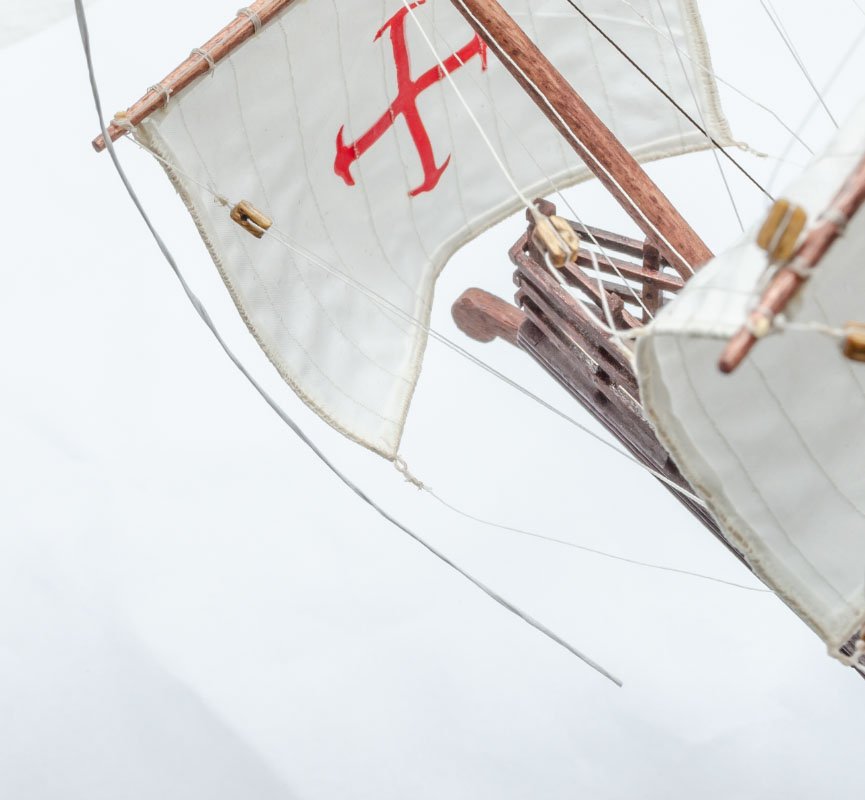
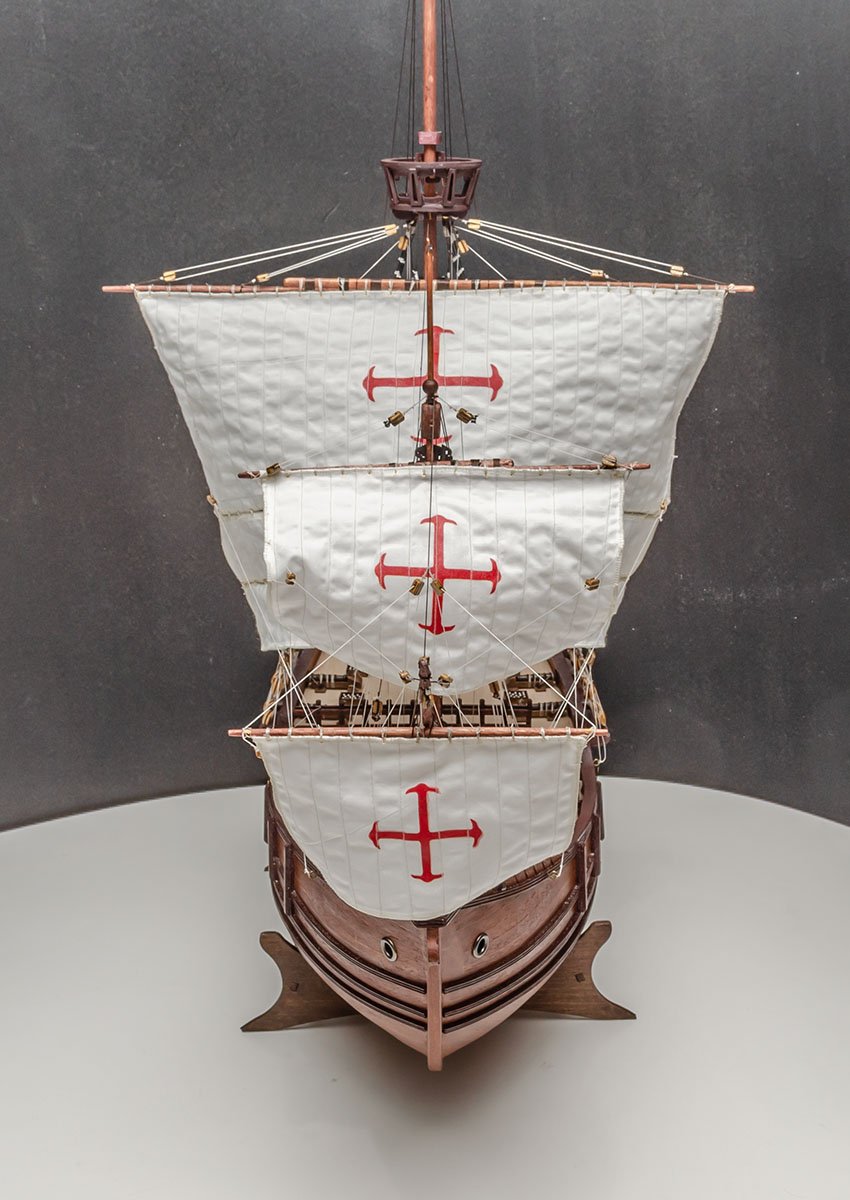
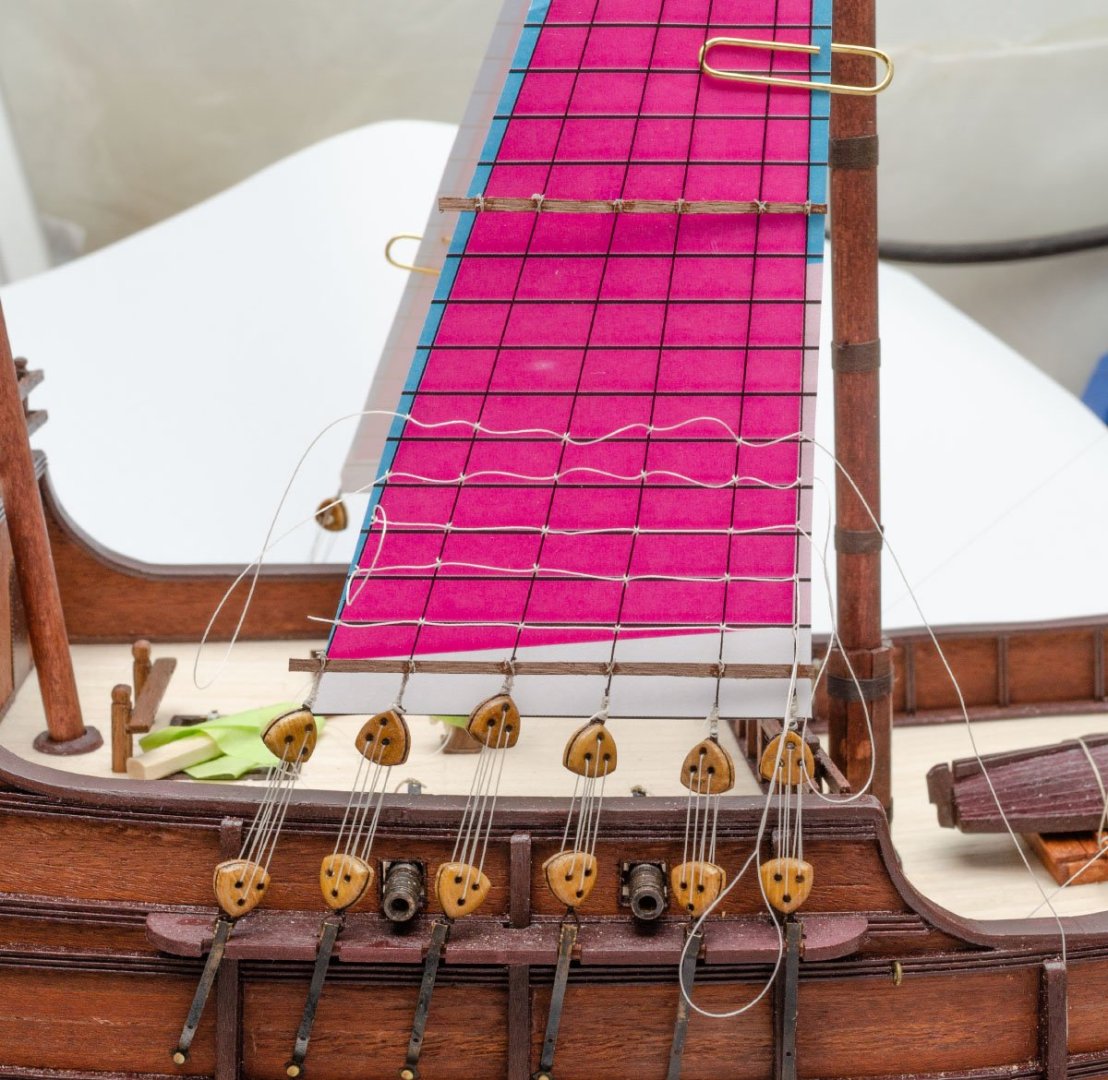
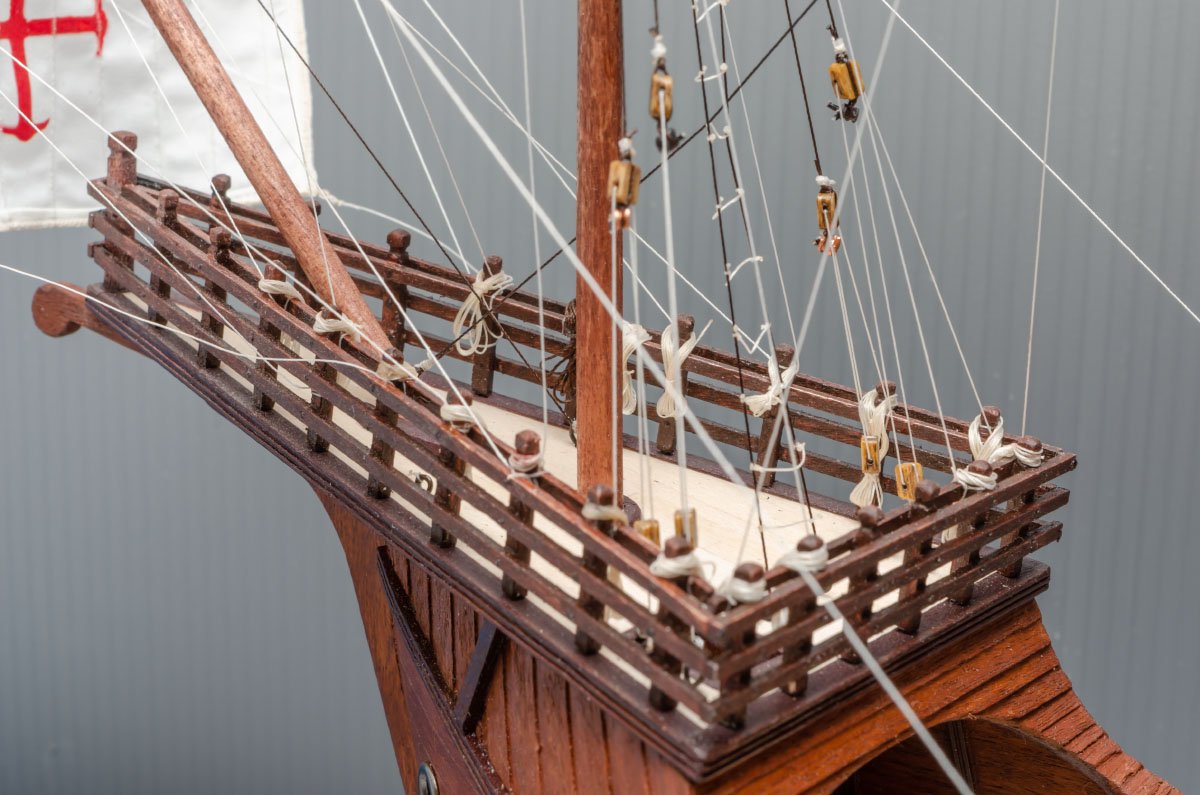
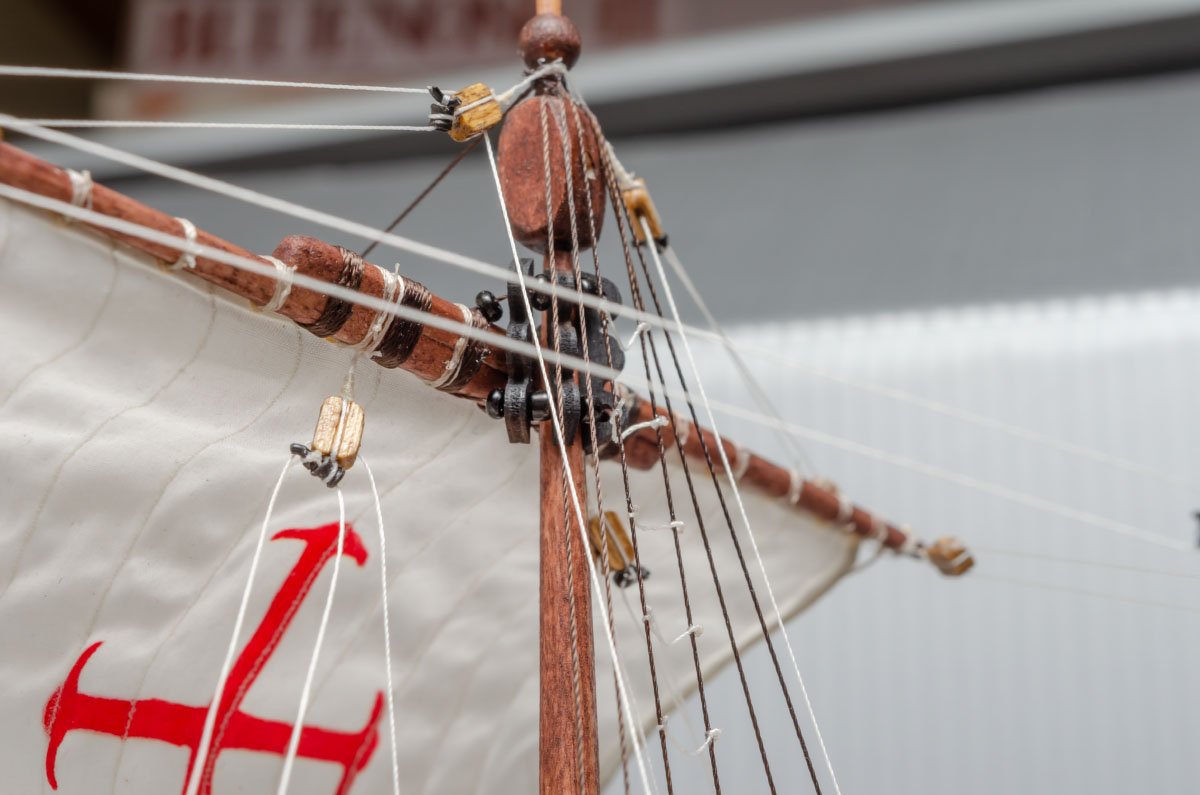
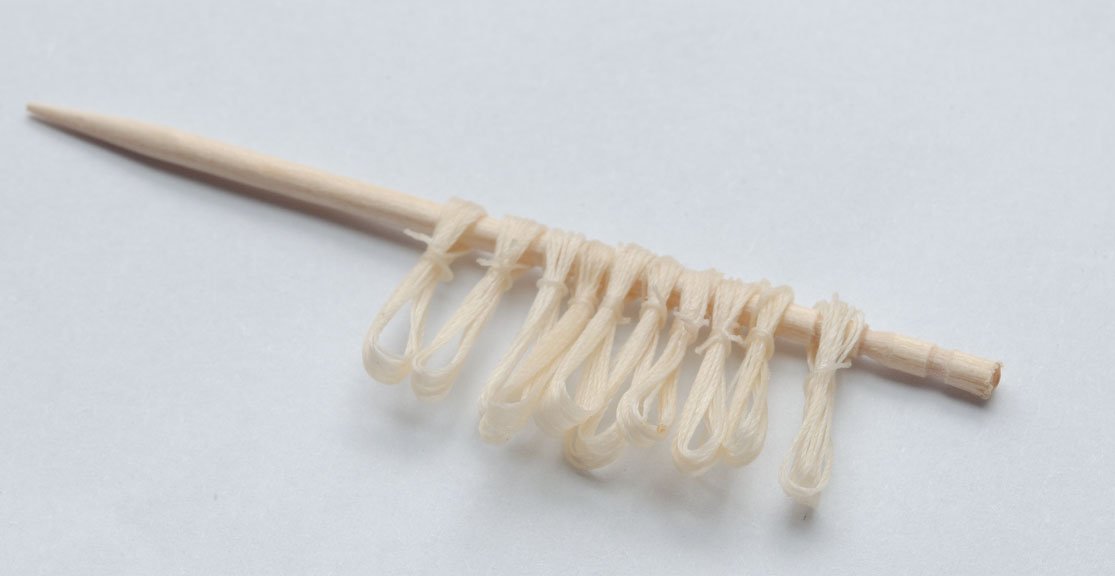
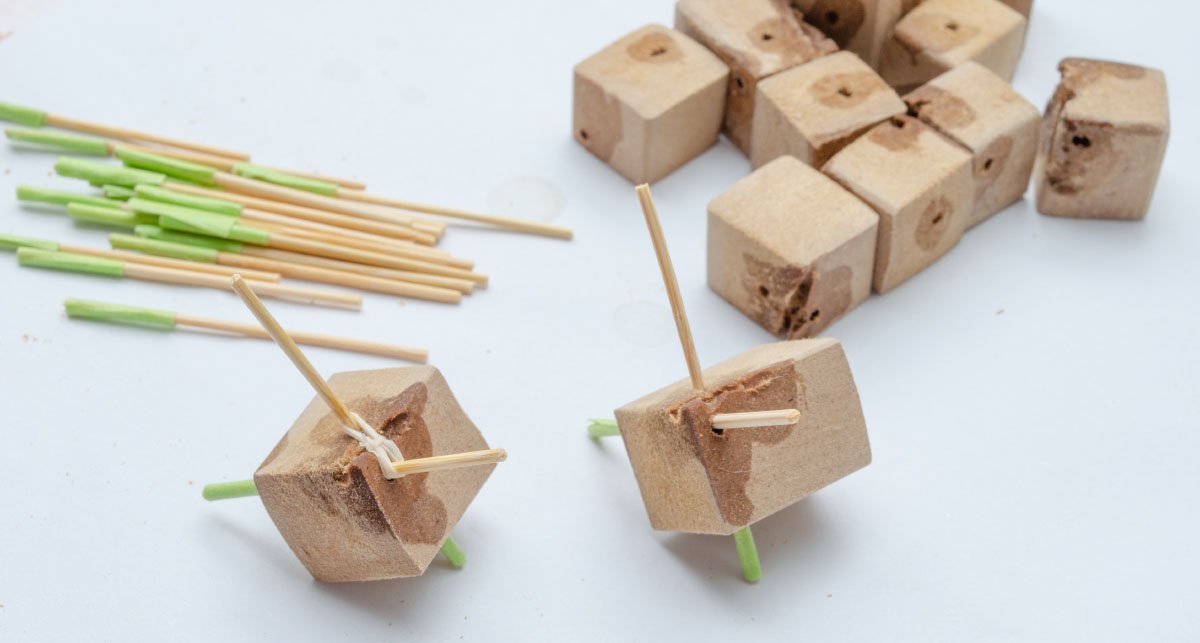
I finished the spritsail and foremast sail riggings. I discovered that the spritsail is a little loose without the help of a fan. I understood that the AL included the clueless rigging line to the spritsail becase of lifting it. However, I still think that the additional rigging line for the purpose of beauty is non-sense for wooden model ships. I thought about another way to overcome the saggy spritsail issue. First, a hard rigging line isn't good for now because I'm using very thin threads. Secondly, I may insert stainless steel wire into the spritsail when I make it. It's too late, but it seems to be the best way. I'll try this method next time. You can find a bundle of ropes at the end of each rigging line. The bundles are fake and don't connect to the original ropes. It is possible to make the bundles with live ropes, but it takes a lot of time. The fake bundle of ropes saves lots of time. This is a simpler jig for making a fake bundle of ropes. I used wooden junk and wooden toothpicks. The jig requires to push and pull out the toothpicks. This is a more advanced jig to make the angled shape of a bundle of ropes.


- 77 replies
-
- 4
-
-
- Santa Maria
- Artesania Latina
- (and 1 more)
-
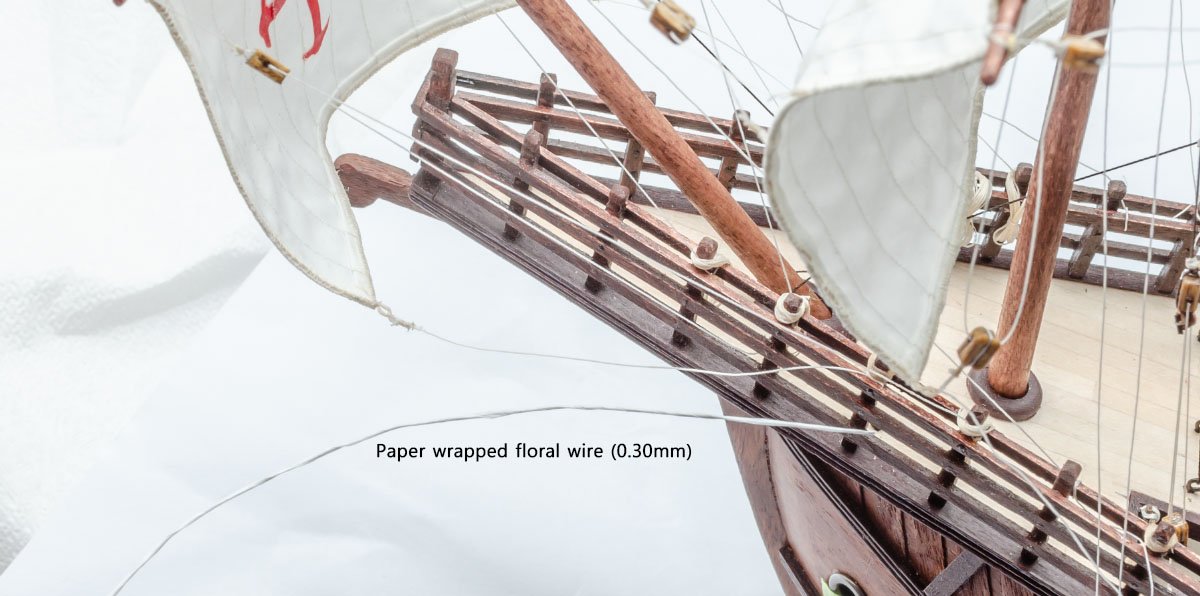
Question for full sail shape of spritsail
modeller_masa replied to modeller_masa's topic in Masting, rigging and sails
The idea seams similar to my plan that replaces the sheet rigging with floral wire. I'll apply shellac to the rigging threads, and stiffened thread may help a little bit. I'll insert stainless steel wire into the leech lines next time. By the way, now I understand why the kit maker included useless or clueless rigging into the spritsail. The purpose of the additional rigging line was only one - to lift spritsail.