DONATION DRIVE - SUPPORT MSW - DO YOUR PART TO KEEP THIS GREAT FORUM GOING!
×

.jpg.bc46b7394042cb22c3a08e1cfbd9877b.jpg)
BobCardone
-
Posts
142 -
Joined
-
Last visited
Content Type
Profiles
Forums
Gallery
Events
Everything posted by BobCardone
-
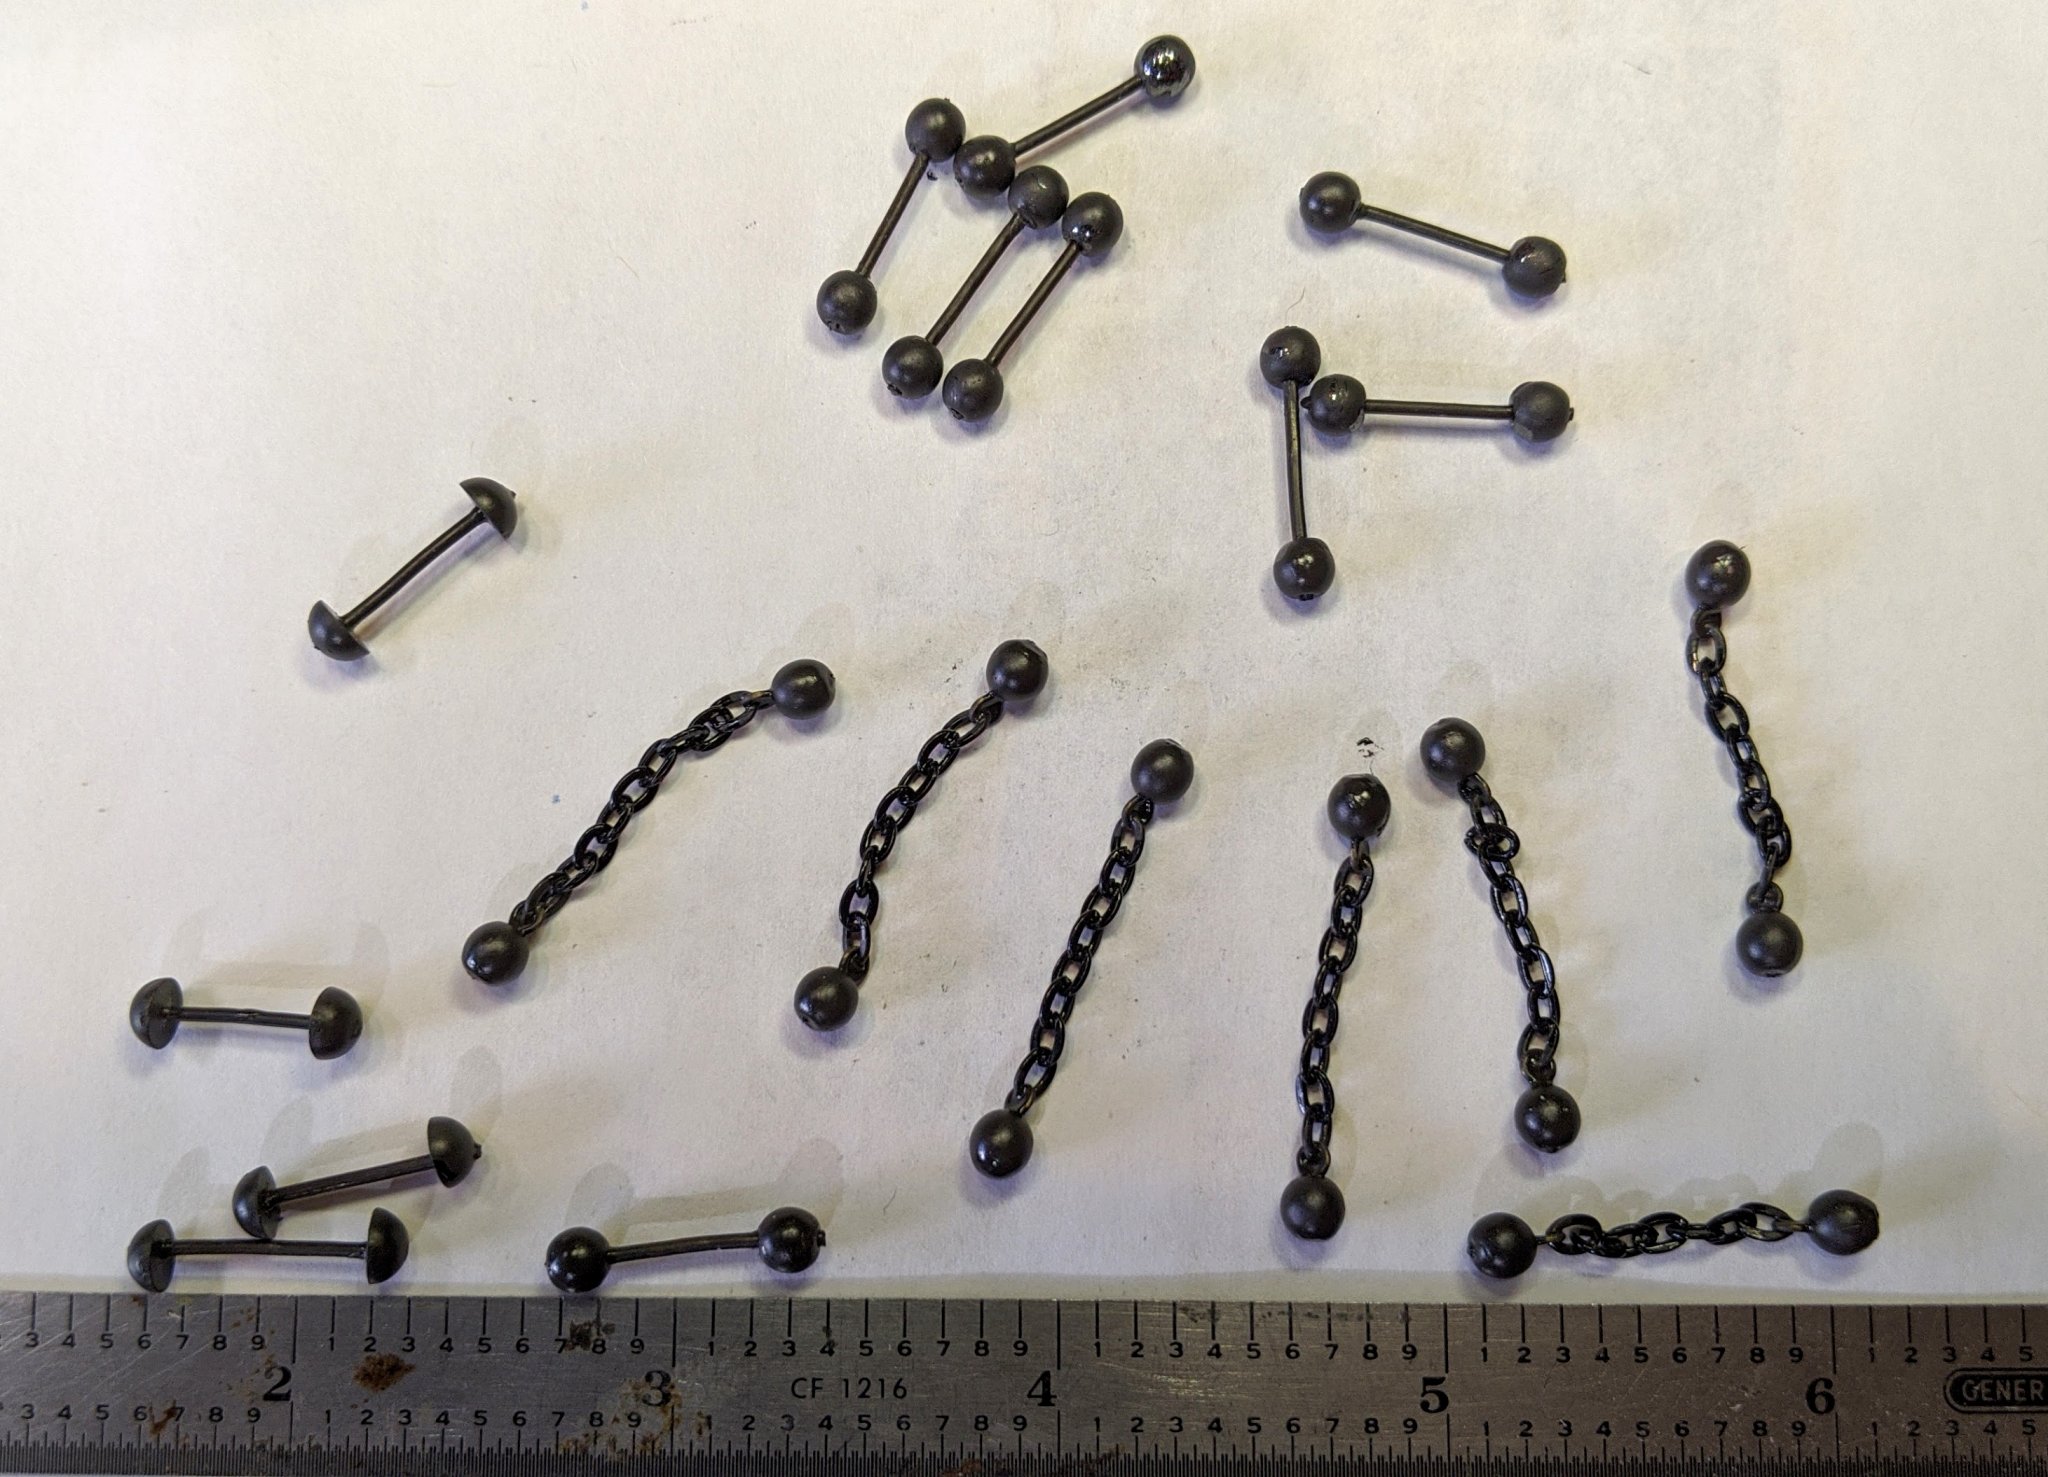
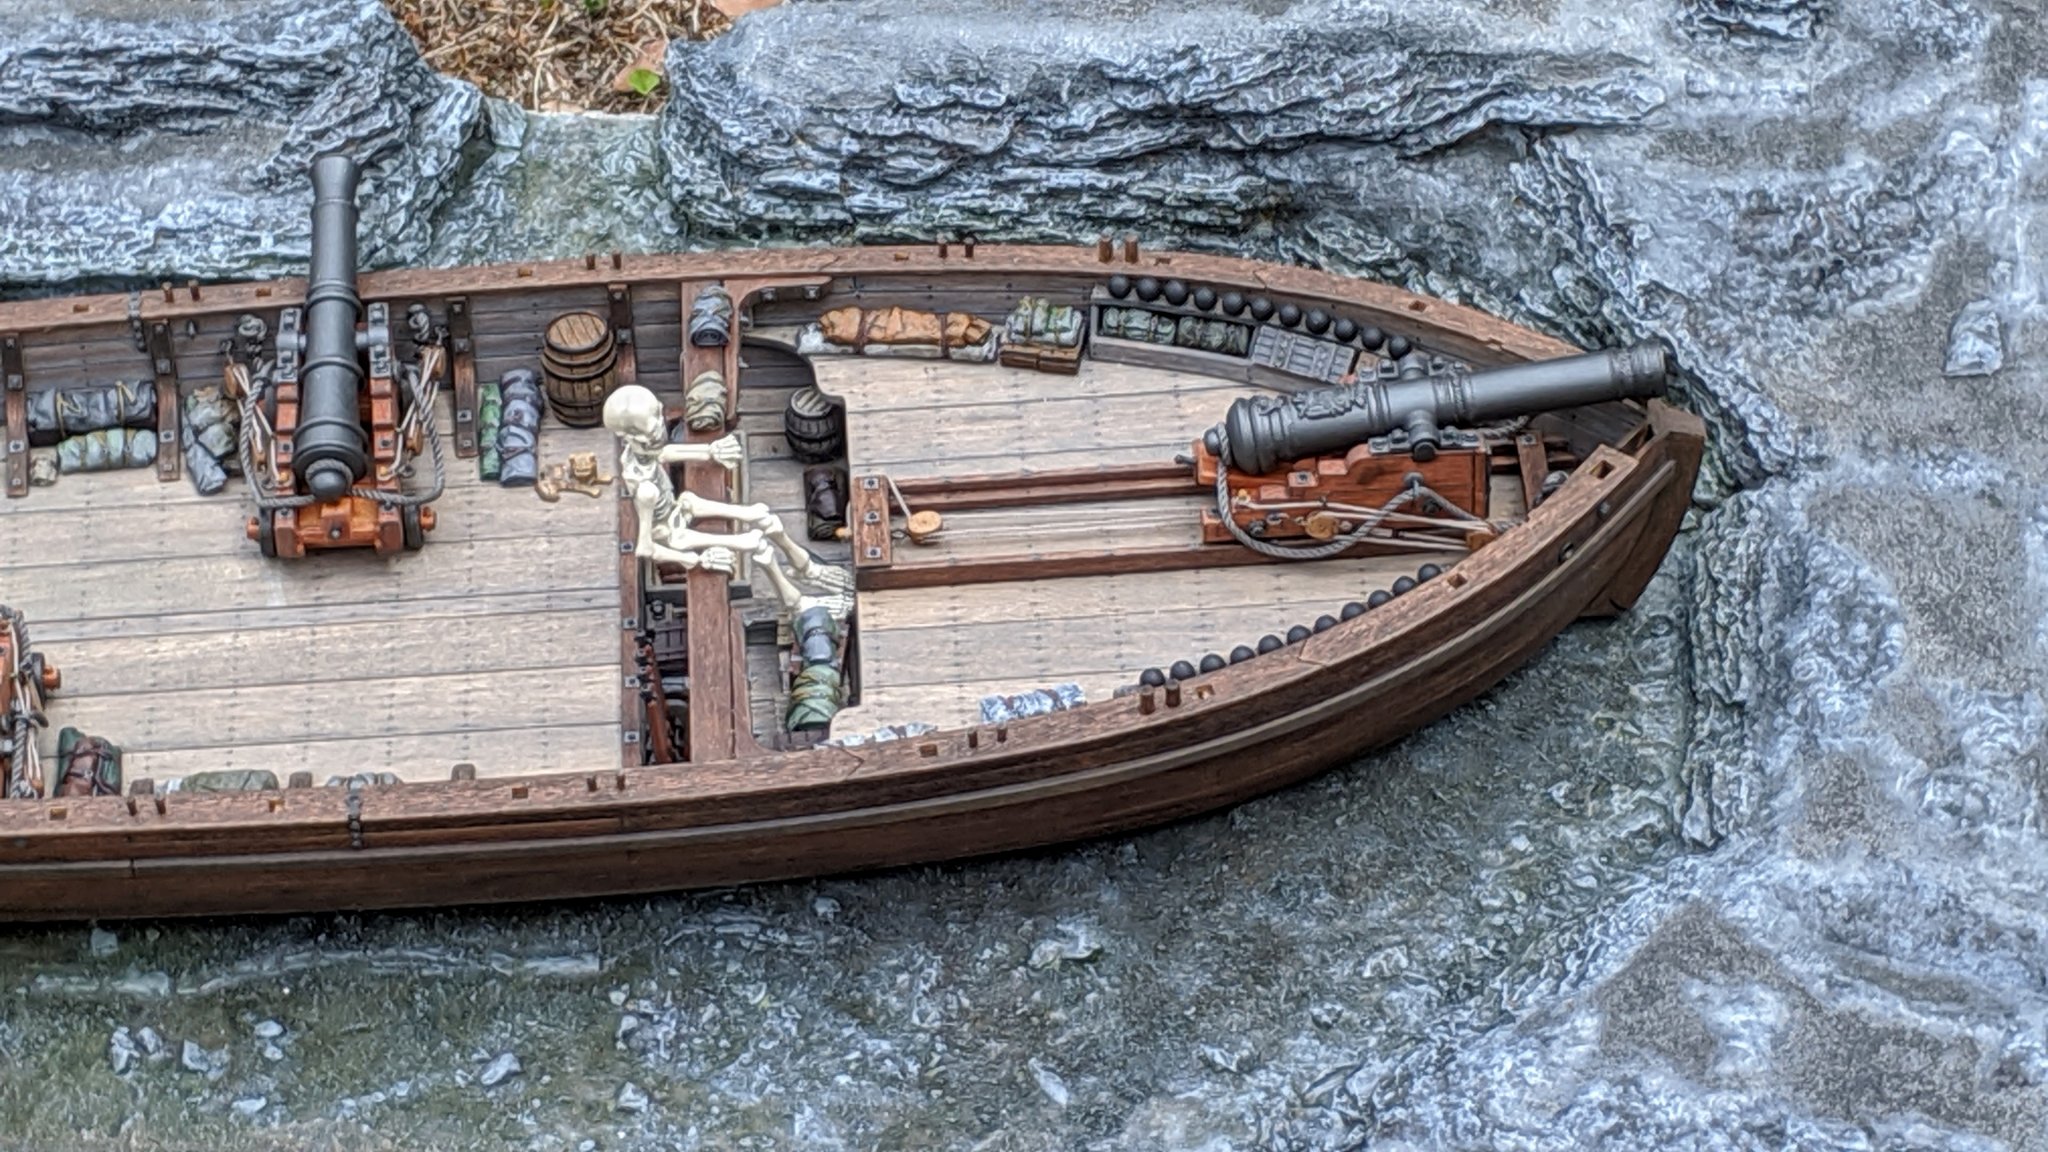
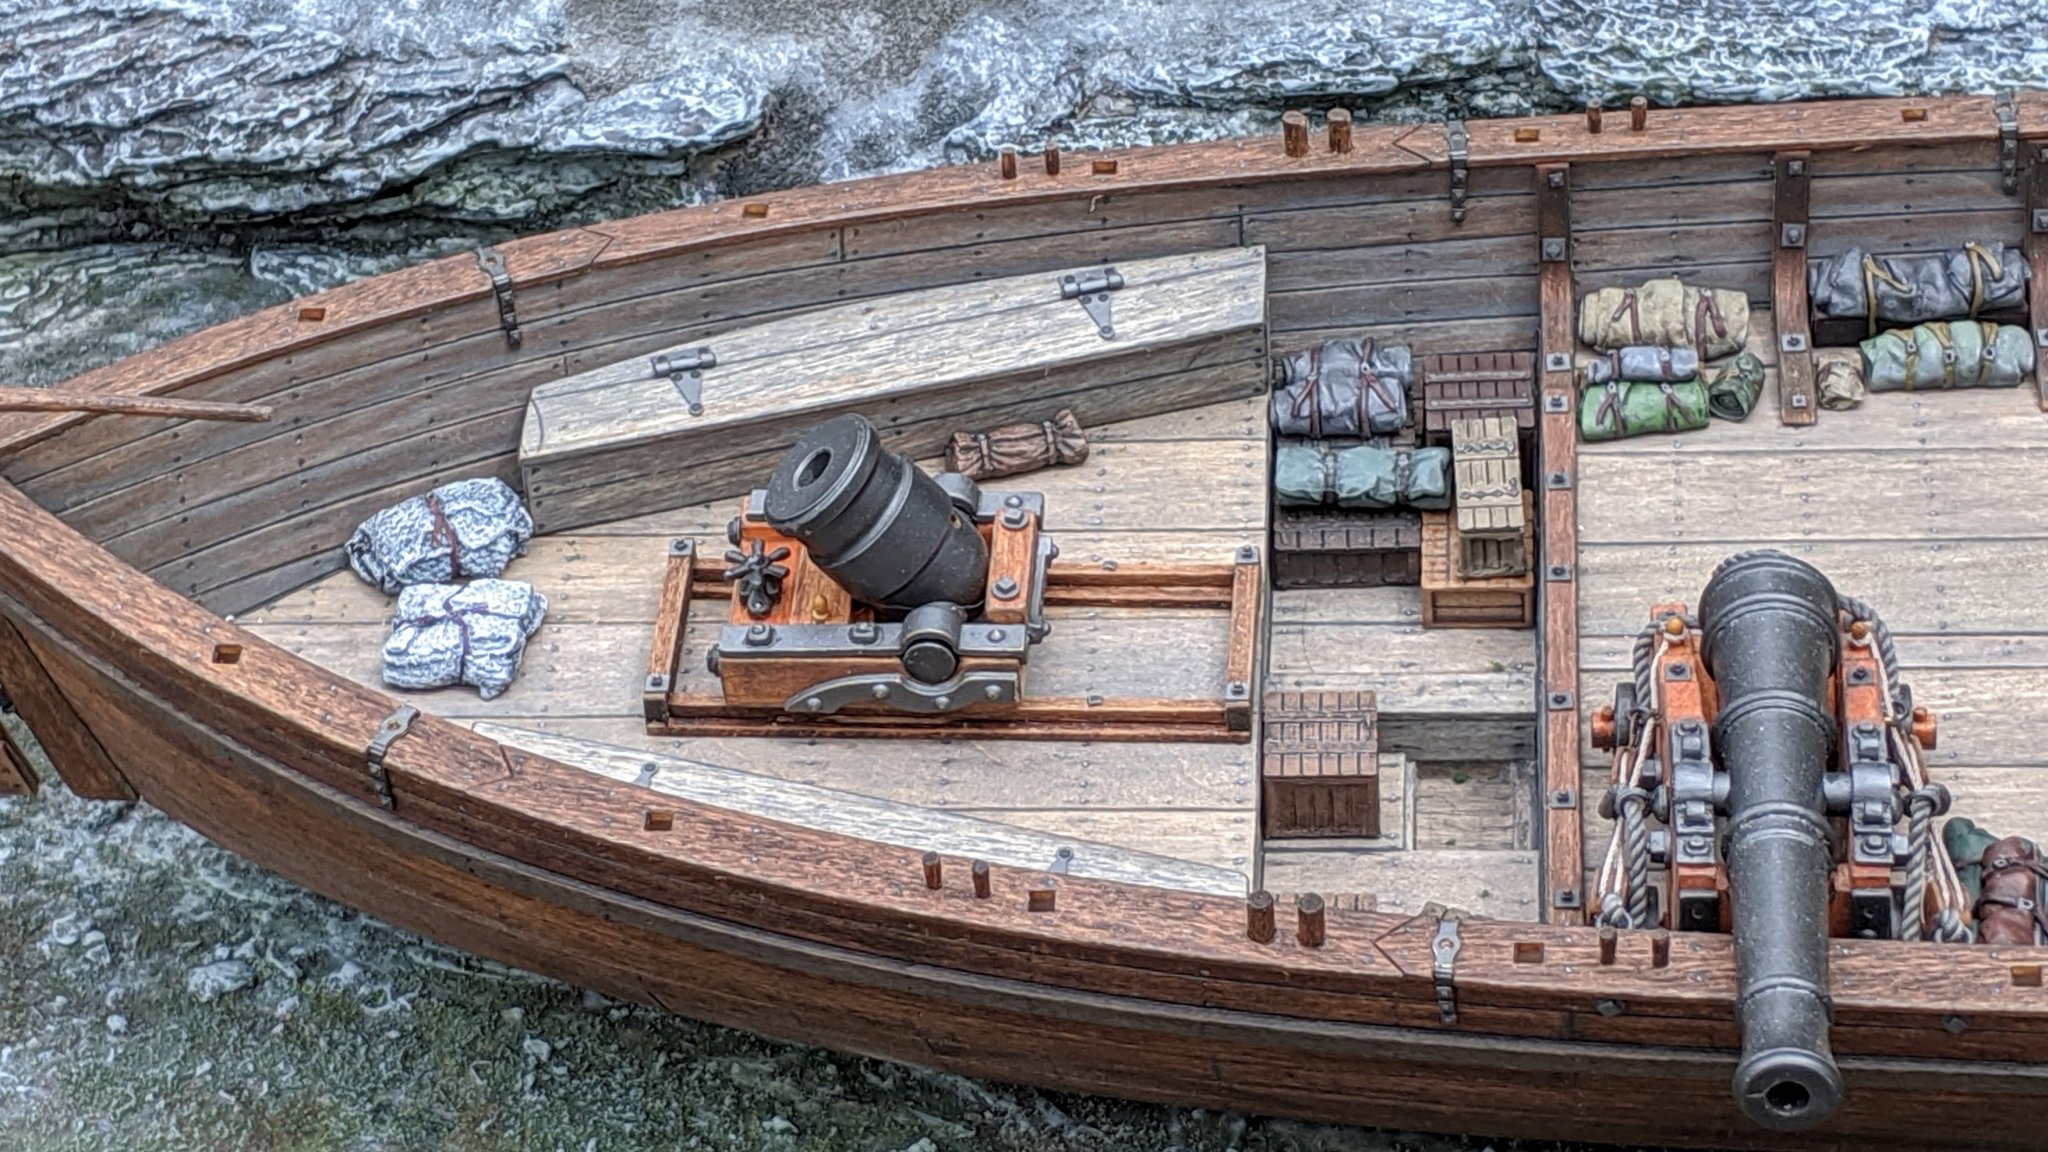
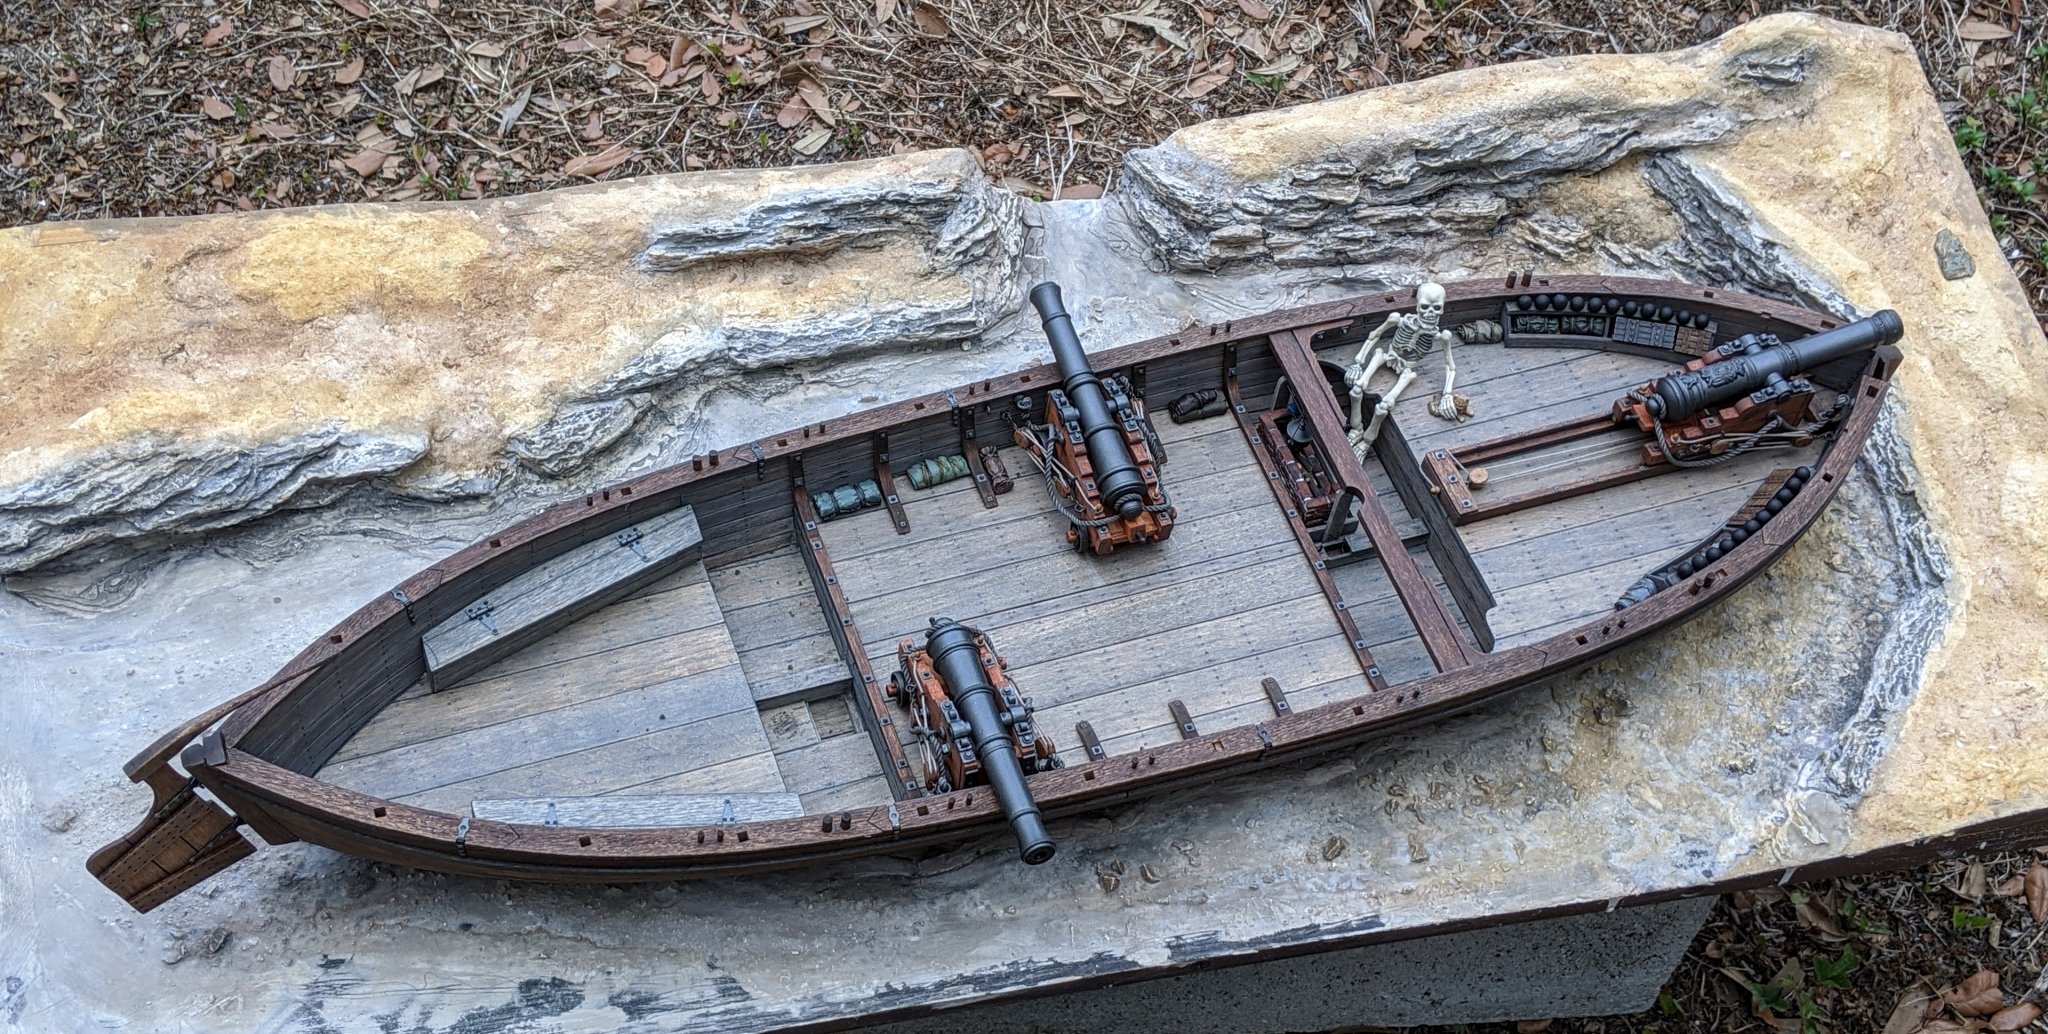
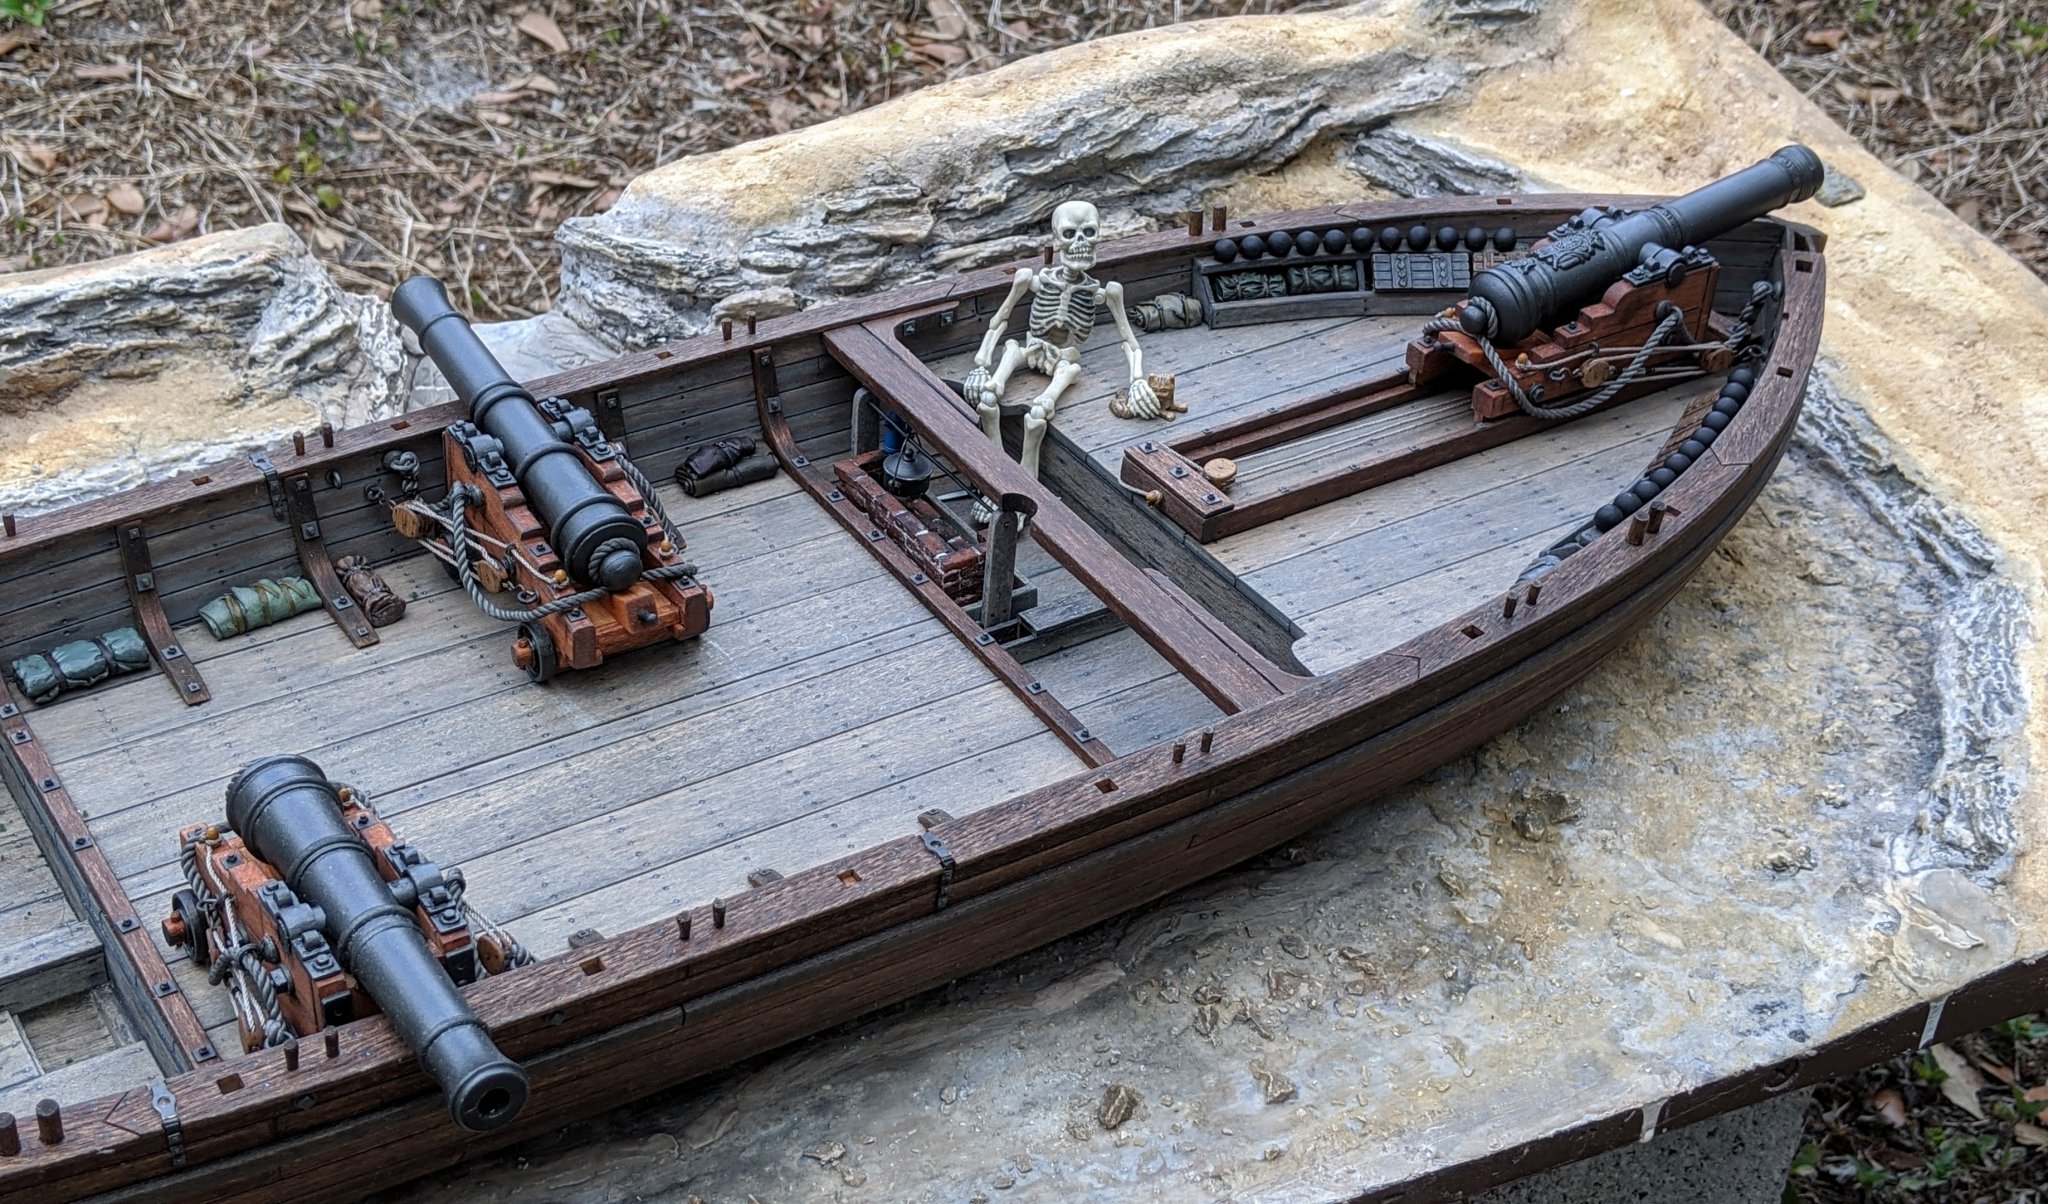
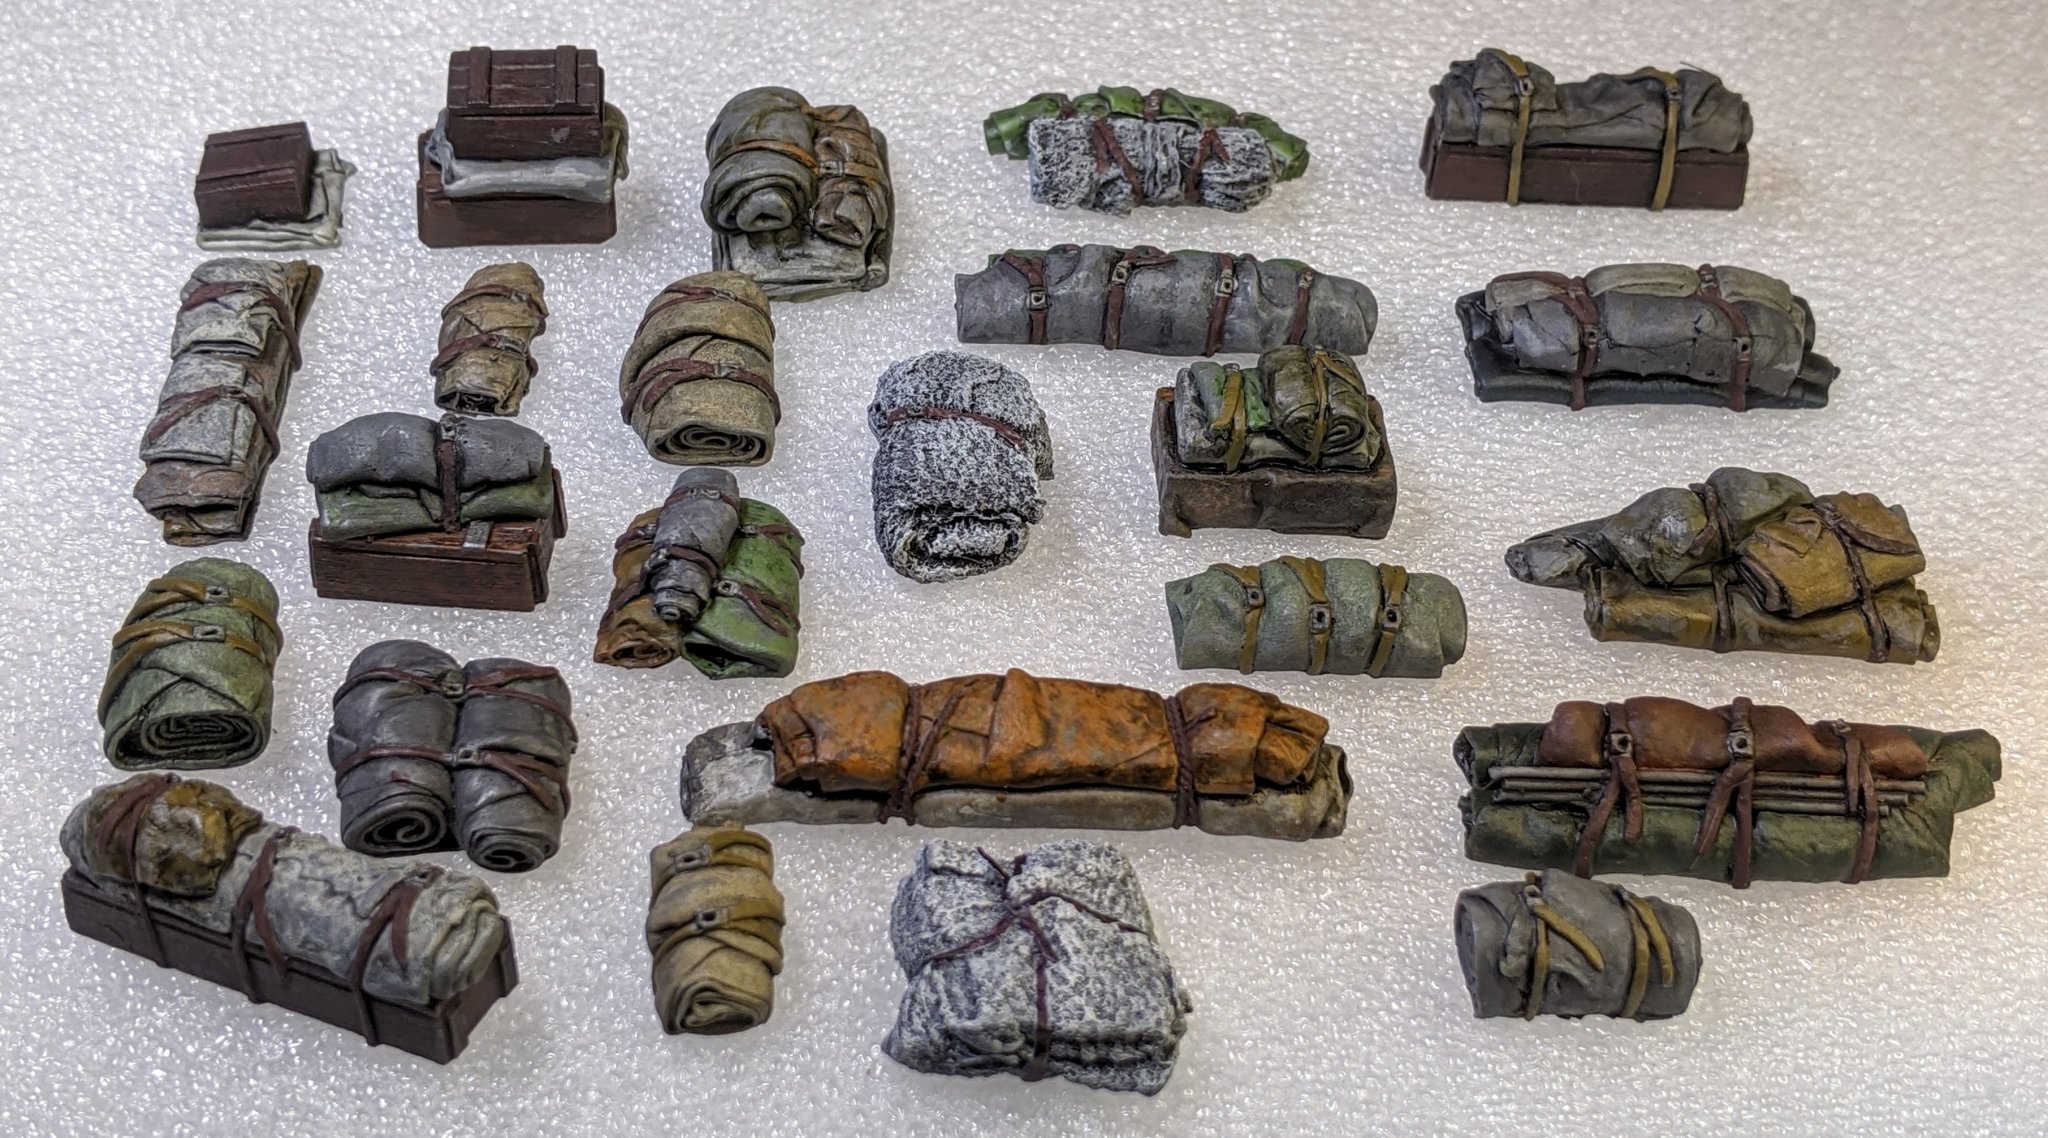
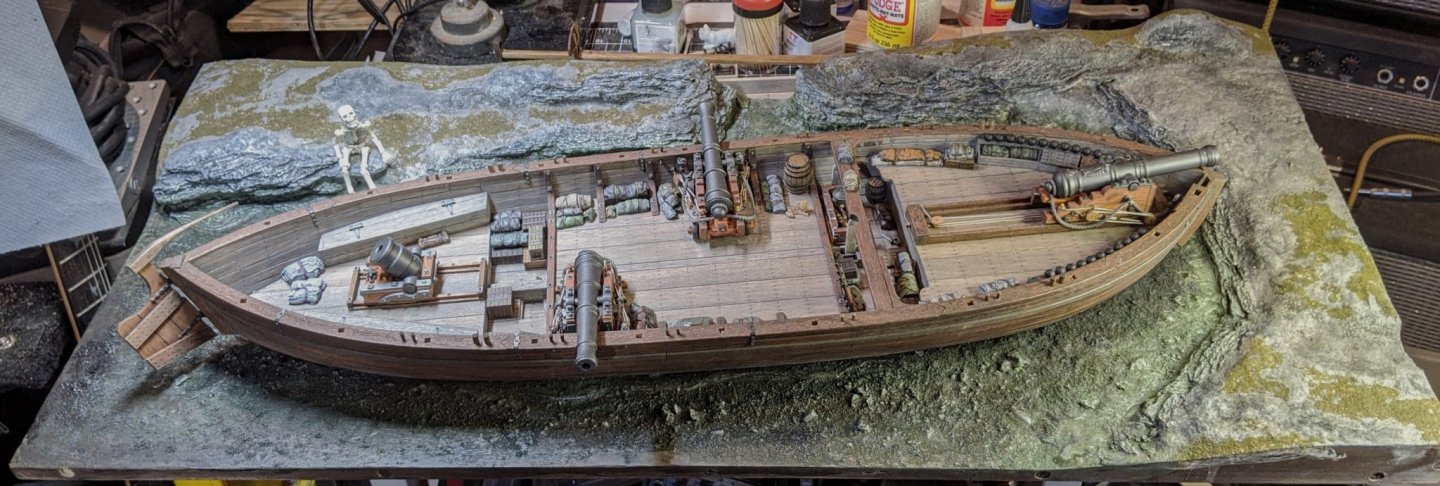
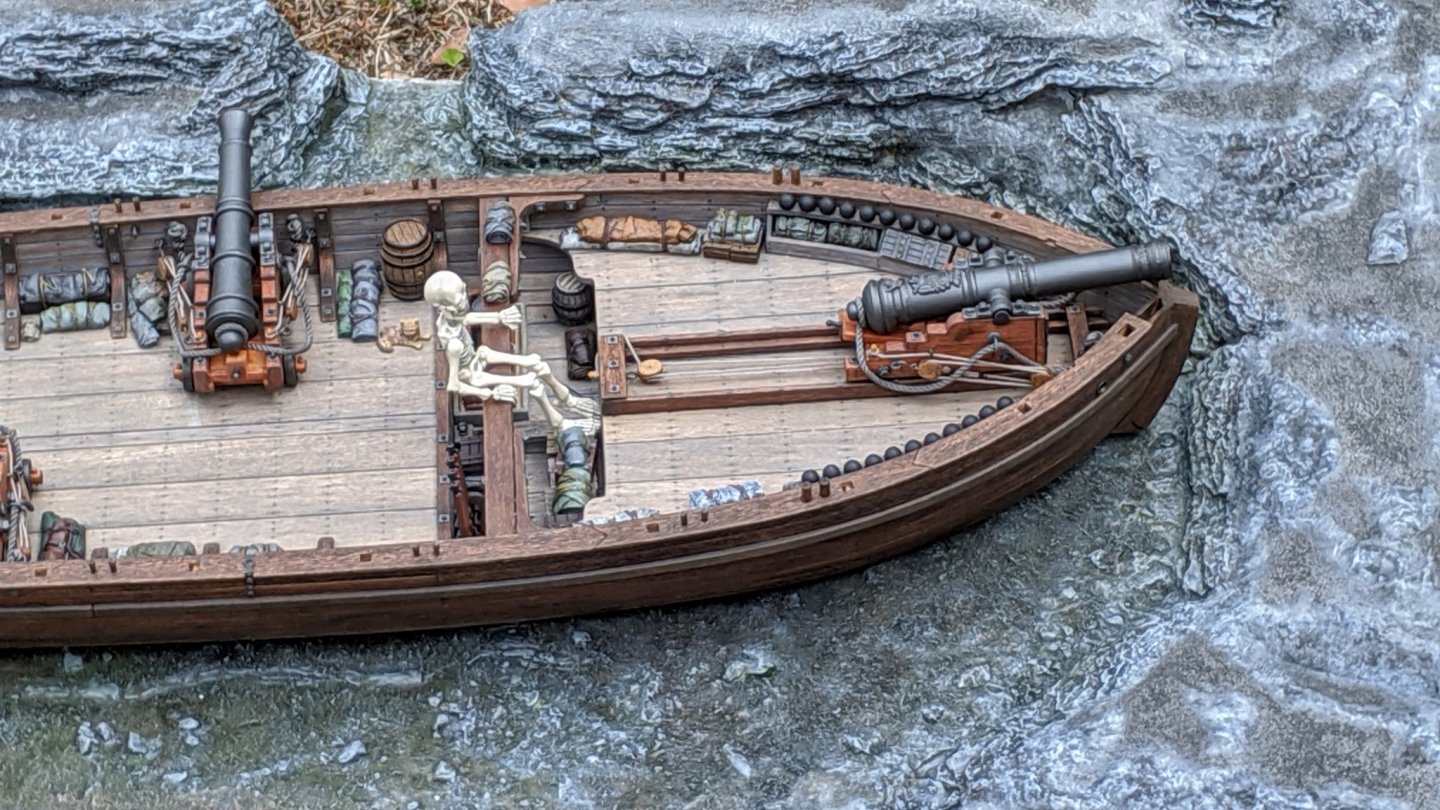
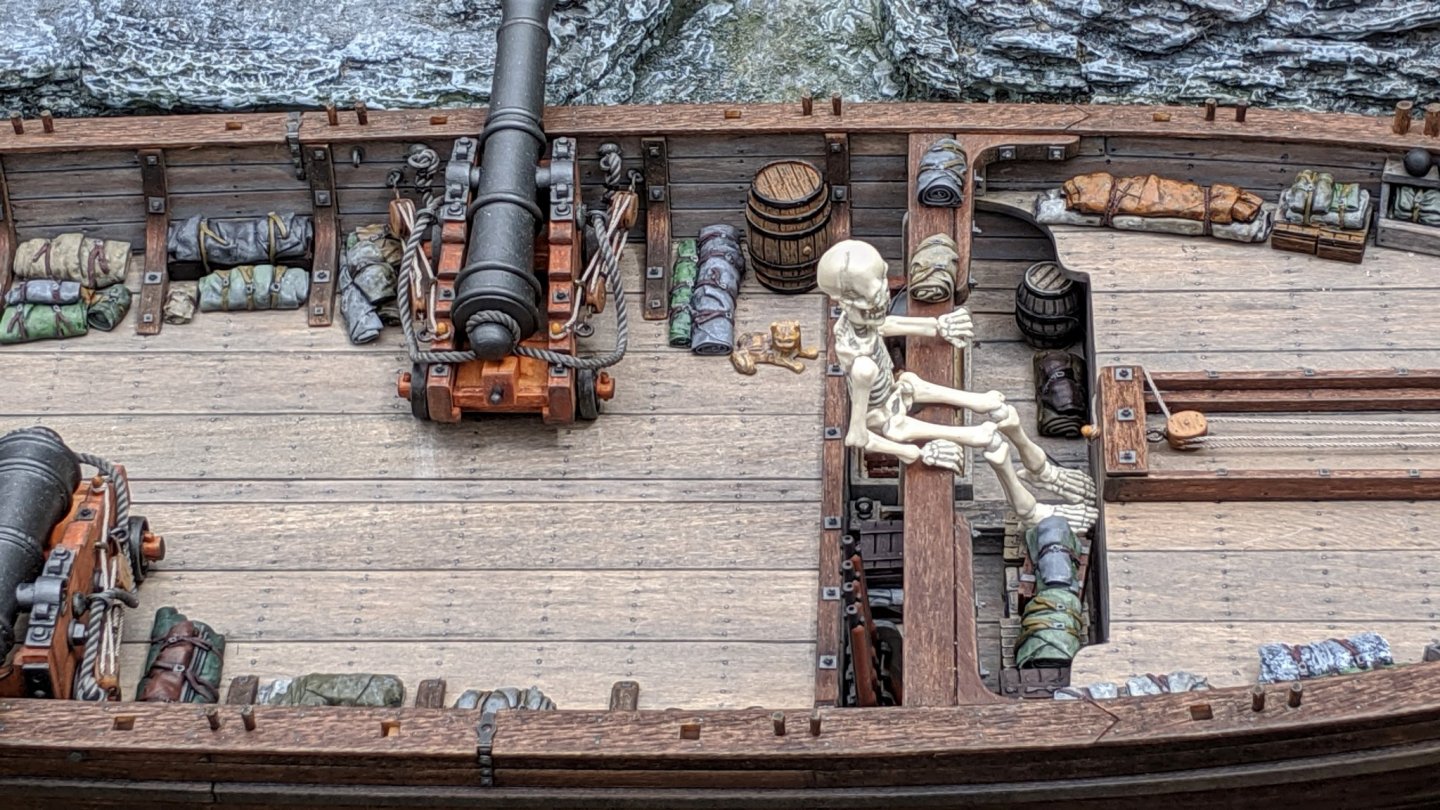
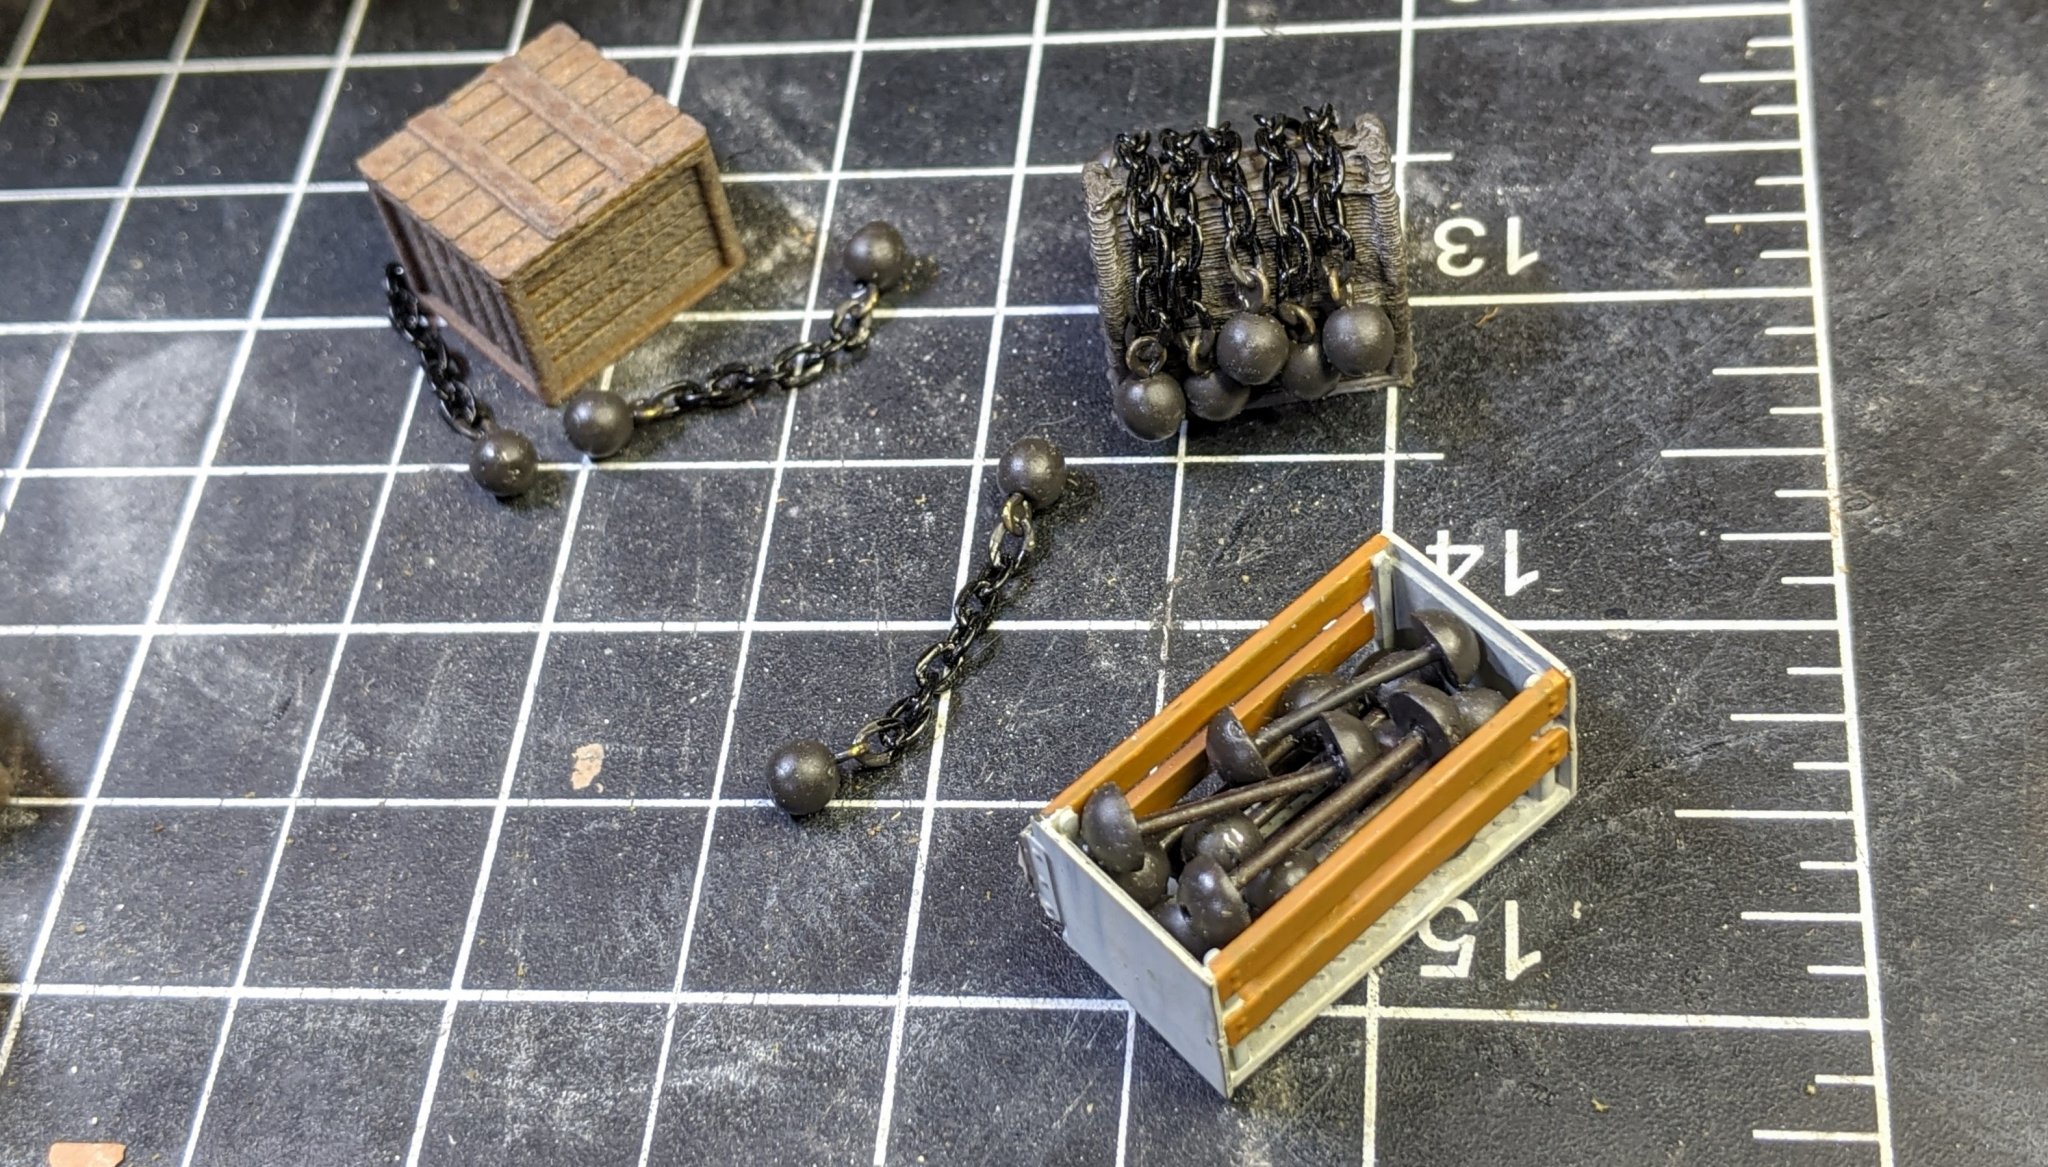
.thumb.jpg.2abae9c0194e4e915bb097b8a6d5c174.jpg) In the video I posted earlier there was storage under the forward gun deck (it was the whole width of the boat, about 2-3 foot high and went pretty deep into the bow). This was accessible through the mast well, and they had a whole bunch of stuff crammed in there. In fact, the whole boat was covered with so much stuff there was barely any room to move around. I don't know if the original Philly had the same access, but if I could do my boat over I'd trim down frame #12 (the one on the forward mast well) and replicate what they did for storage on Philly II. I've always thought that frame seemed "unfinished". Thanks to a Tamiya Tiger donor for the crate (I'm digging for more) and Goodwill for the beads, sequins and chain for all the types of shot. Now I have to figure out a cool way to do canister. I've found some 1:87 canvas potato sacks that are about the right size, and nice and lumpy.
In the video I posted earlier there was storage under the forward gun deck (it was the whole width of the boat, about 2-3 foot high and went pretty deep into the bow). This was accessible through the mast well, and they had a whole bunch of stuff crammed in there. In fact, the whole boat was covered with so much stuff there was barely any room to move around. I don't know if the original Philly had the same access, but if I could do my boat over I'd trim down frame #12 (the one on the forward mast well) and replicate what they did for storage on Philly II. I've always thought that frame seemed "unfinished". Thanks to a Tamiya Tiger donor for the crate (I'm digging for more) and Goodwill for the beads, sequins and chain for all the types of shot. Now I have to figure out a cool way to do canister. I've found some 1:87 canvas potato sacks that are about the right size, and nice and lumpy. -
It is satisfying to see the modules and hull come together. It gives a real perspective of how busy and cramped these boats were... Your workmanship is stellar.
-
Elijah, your build log was one of the main inspirations for my Philly build. I'm hoping to see some more also....
- 228 replies
-
- 3
-

-
- gunboat
- model shipways
- (and 1 more)
-
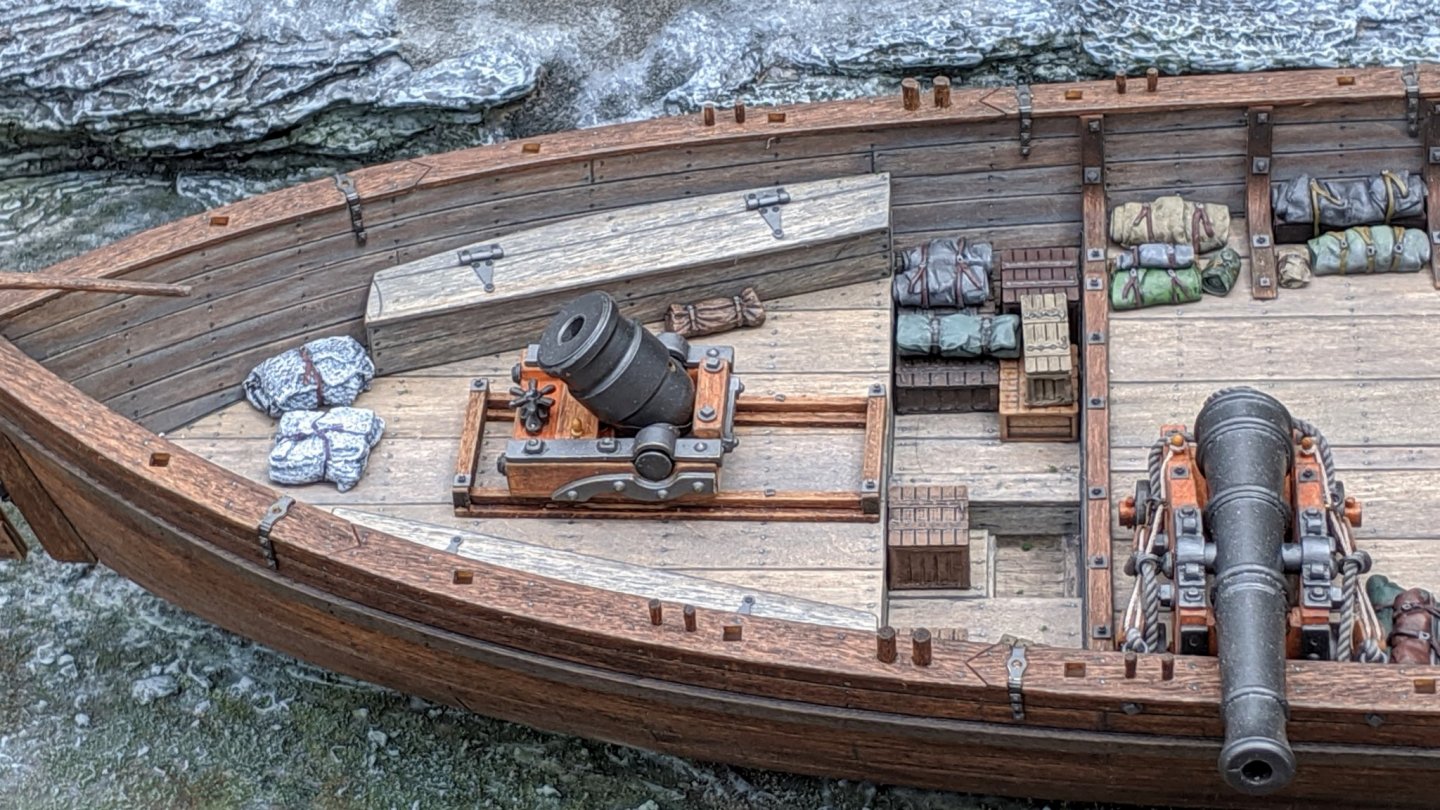
No, I based my detail on a combination of all the other Philly build logs on the forum and this awesome video I found on YouTube. (for some reason, the video starts in the middle...) Video Tour of Philly II It was recorded as a local cable show on WGOH in Plattsburgh in 1992. It's over an hour long and is painfully amateurish in a likable way. TONS of informative deck shots and a tour by one of the guys who built her. Here's an idea for a crate (stole from a Tiger Tank kit) for the bar shot, and possibly I could drape the chain shot (if I use it) over a chest (suitably disguised as a chain shot holder).

-
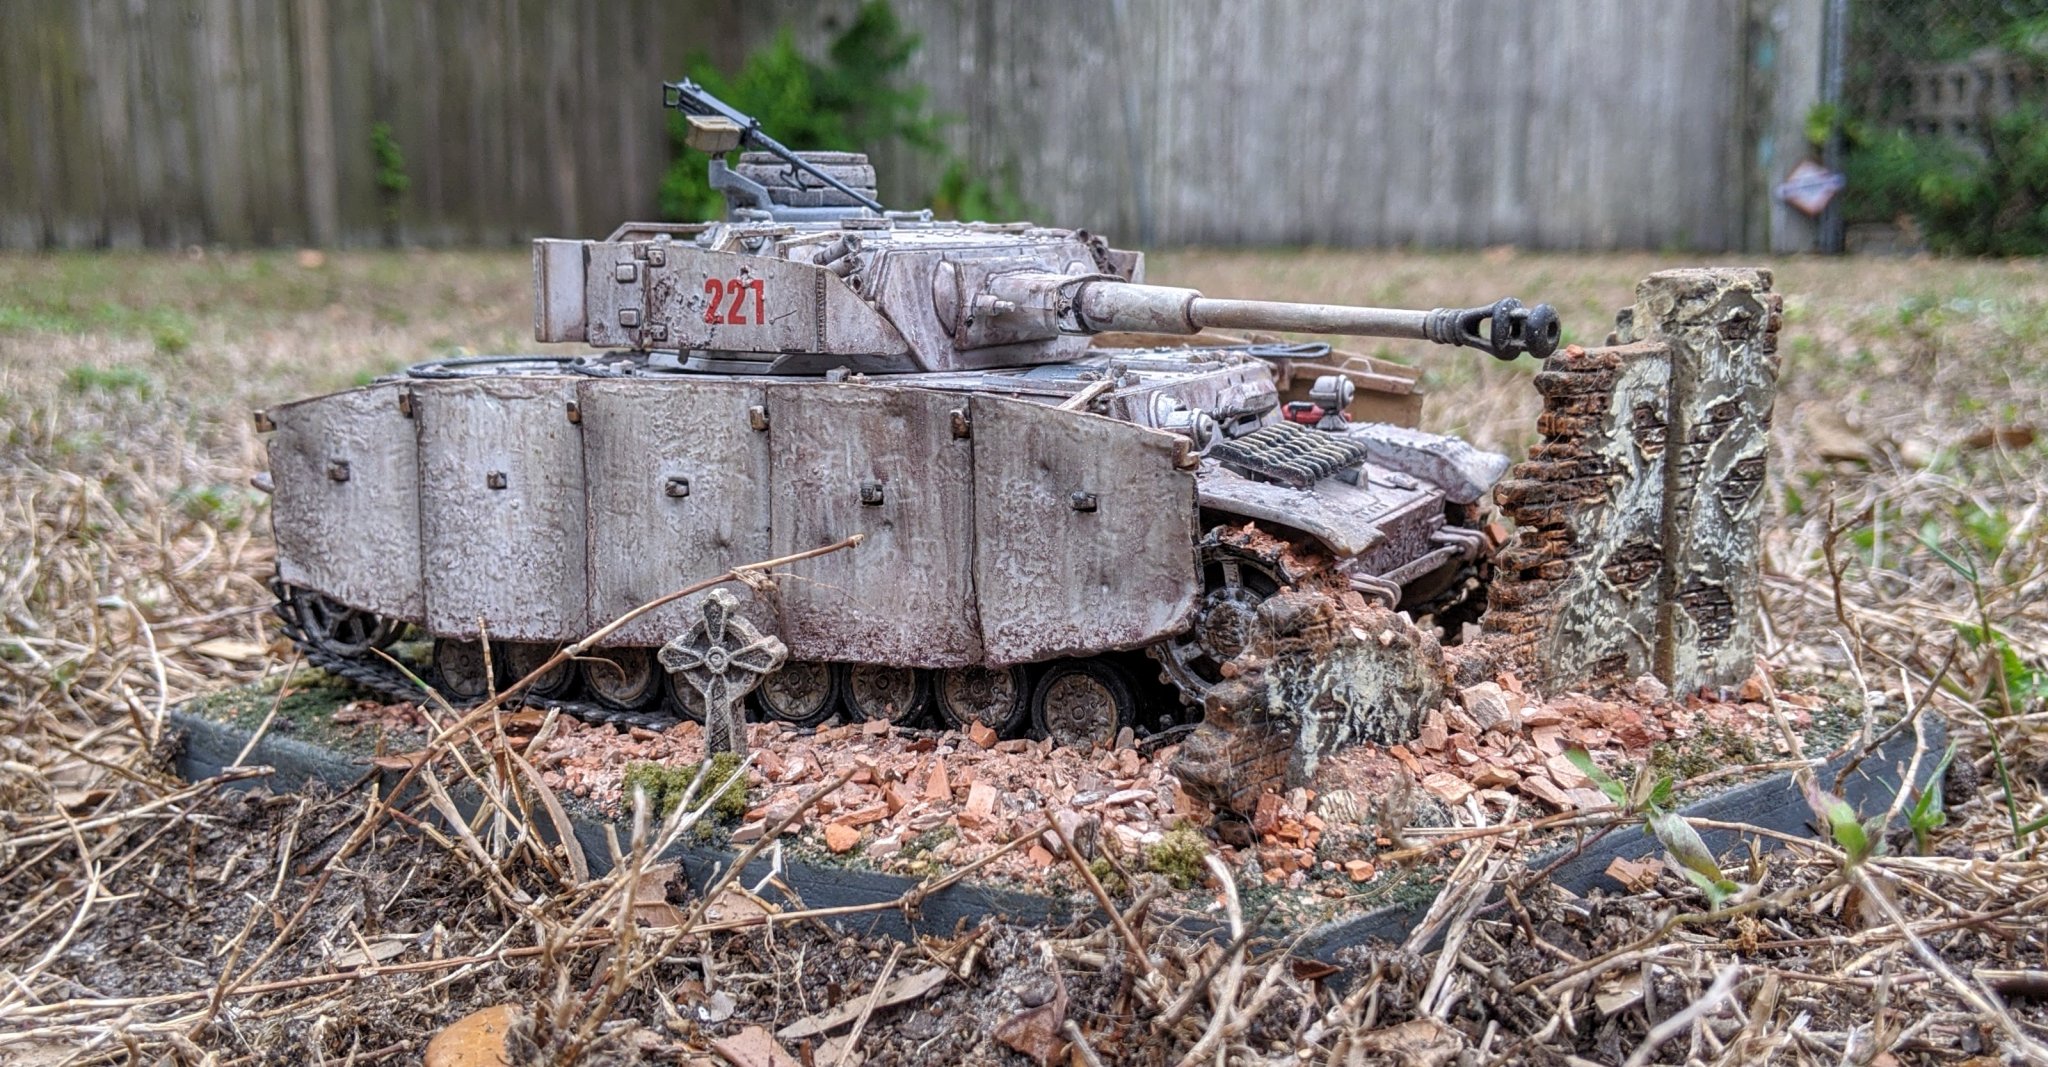
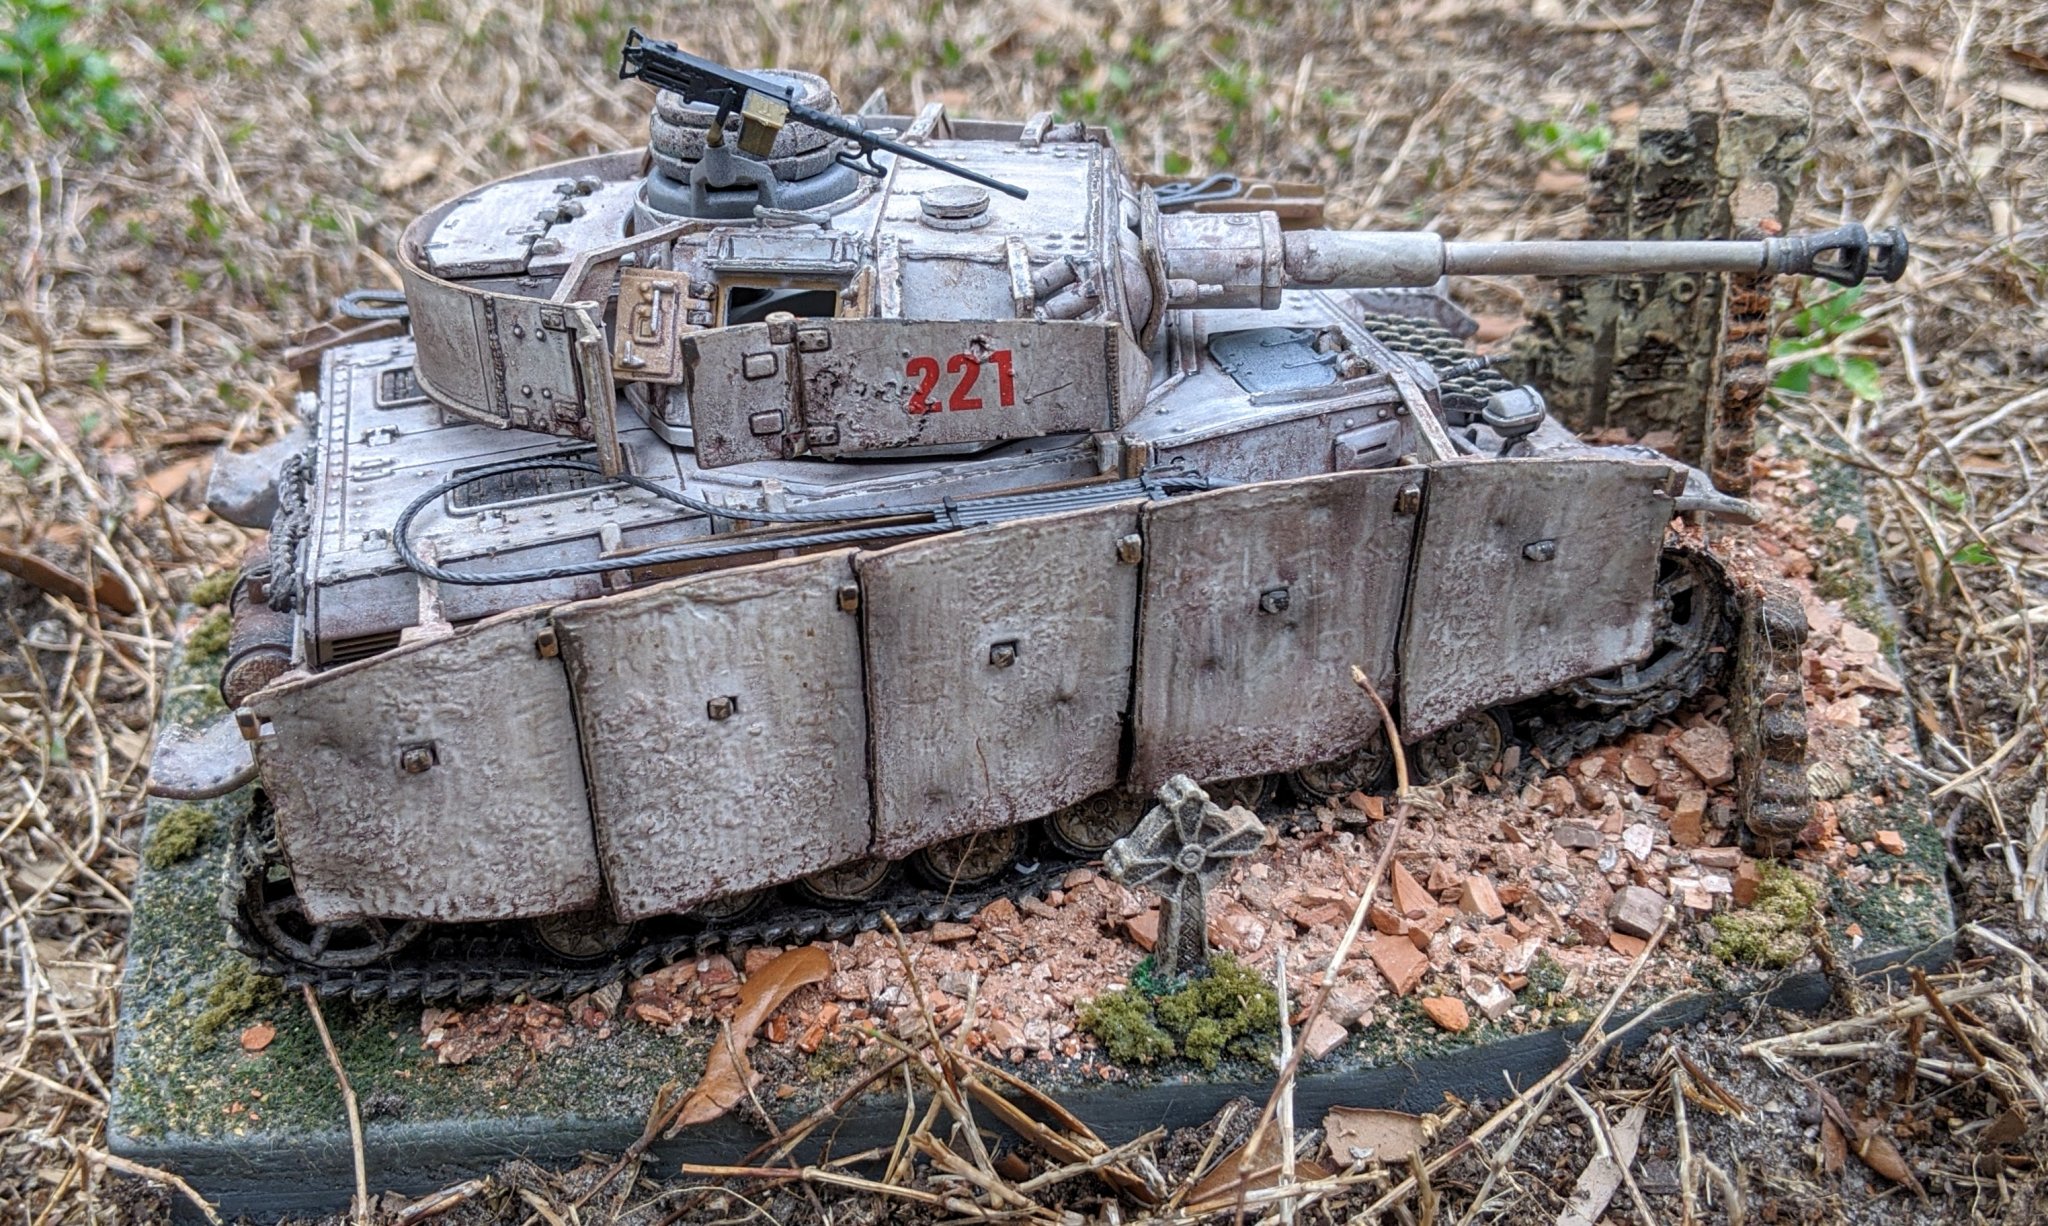
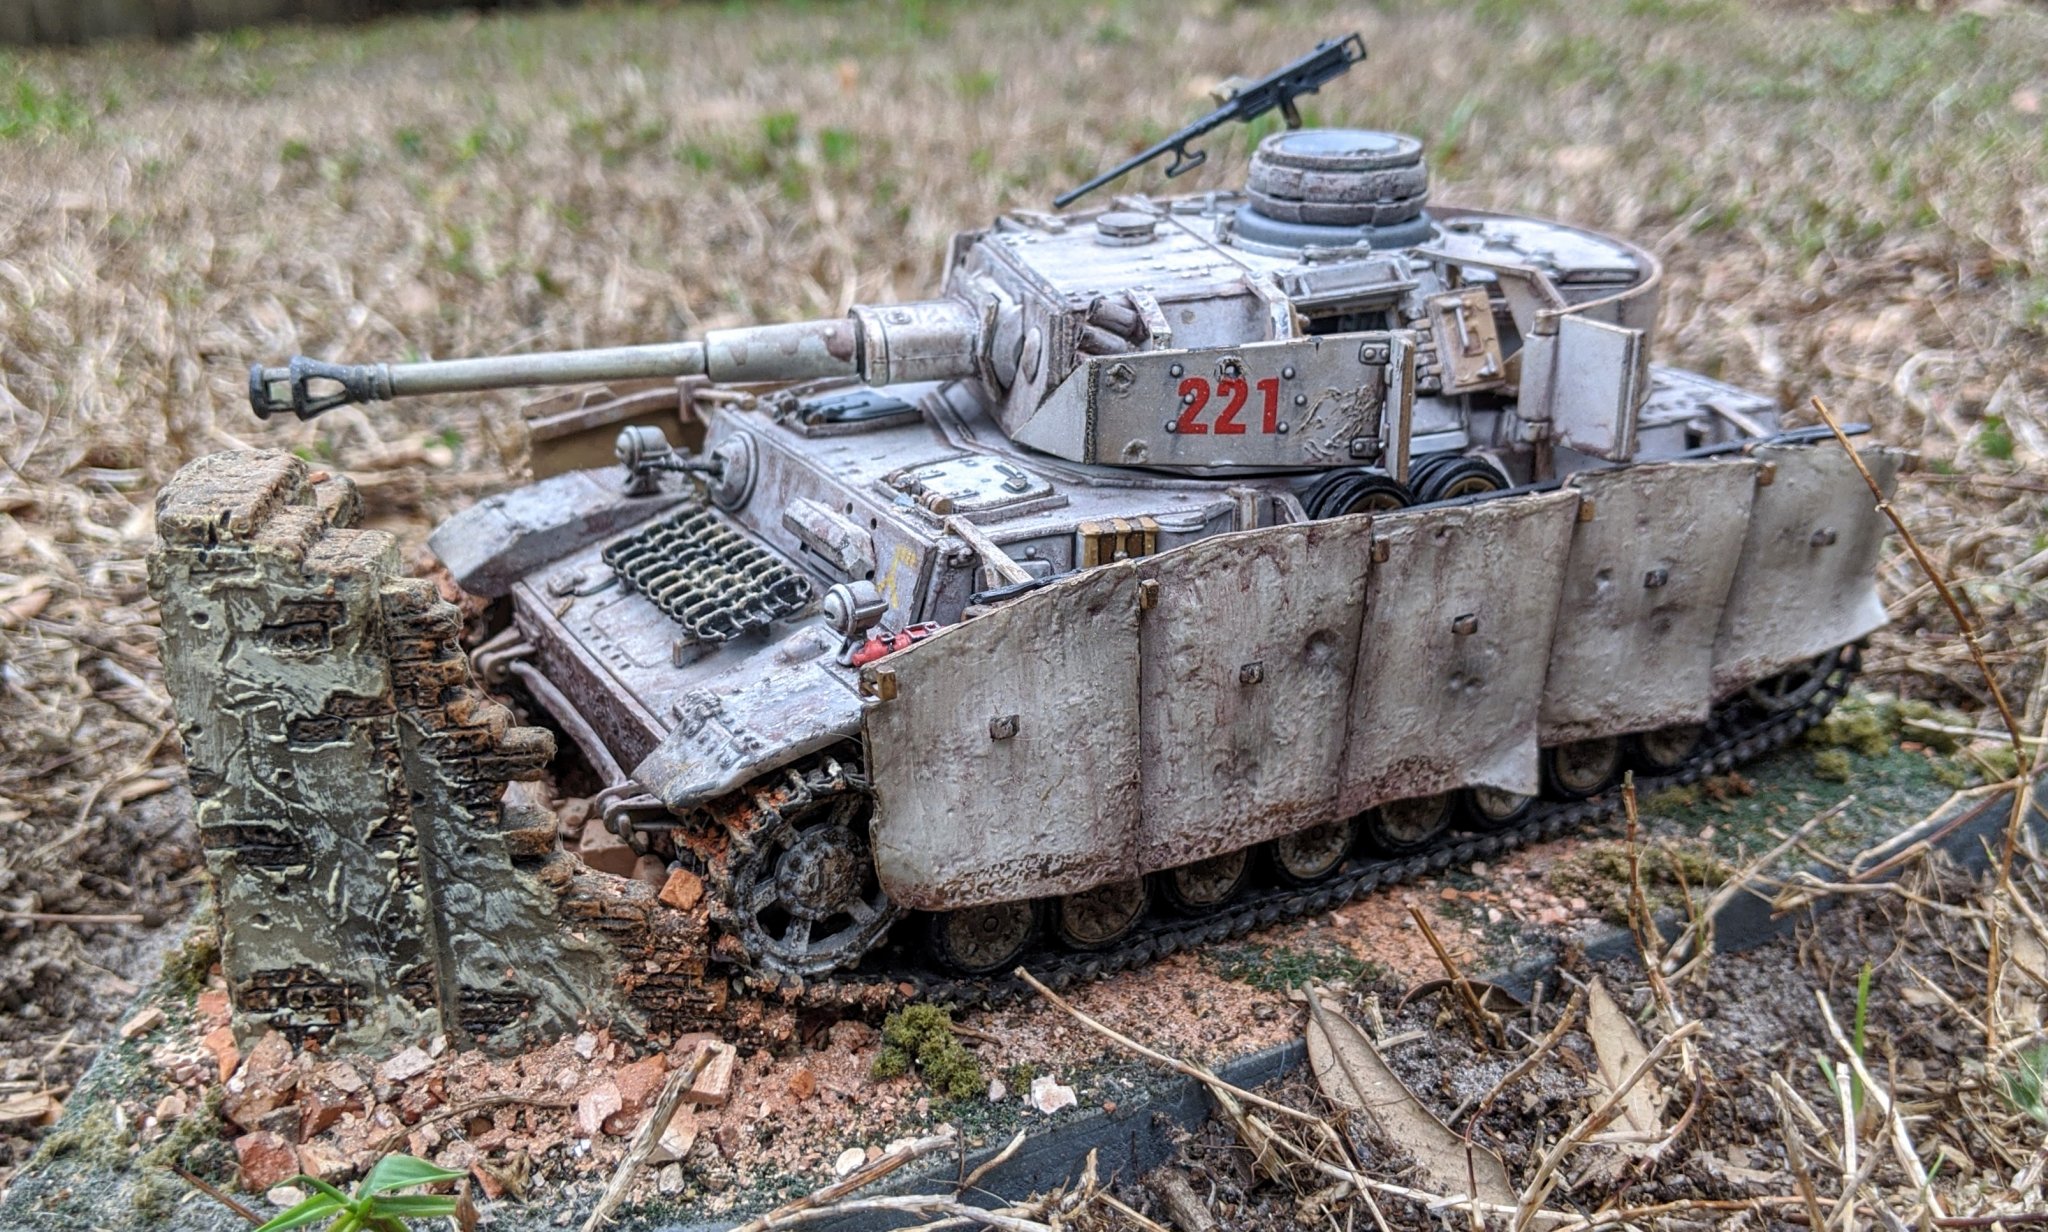
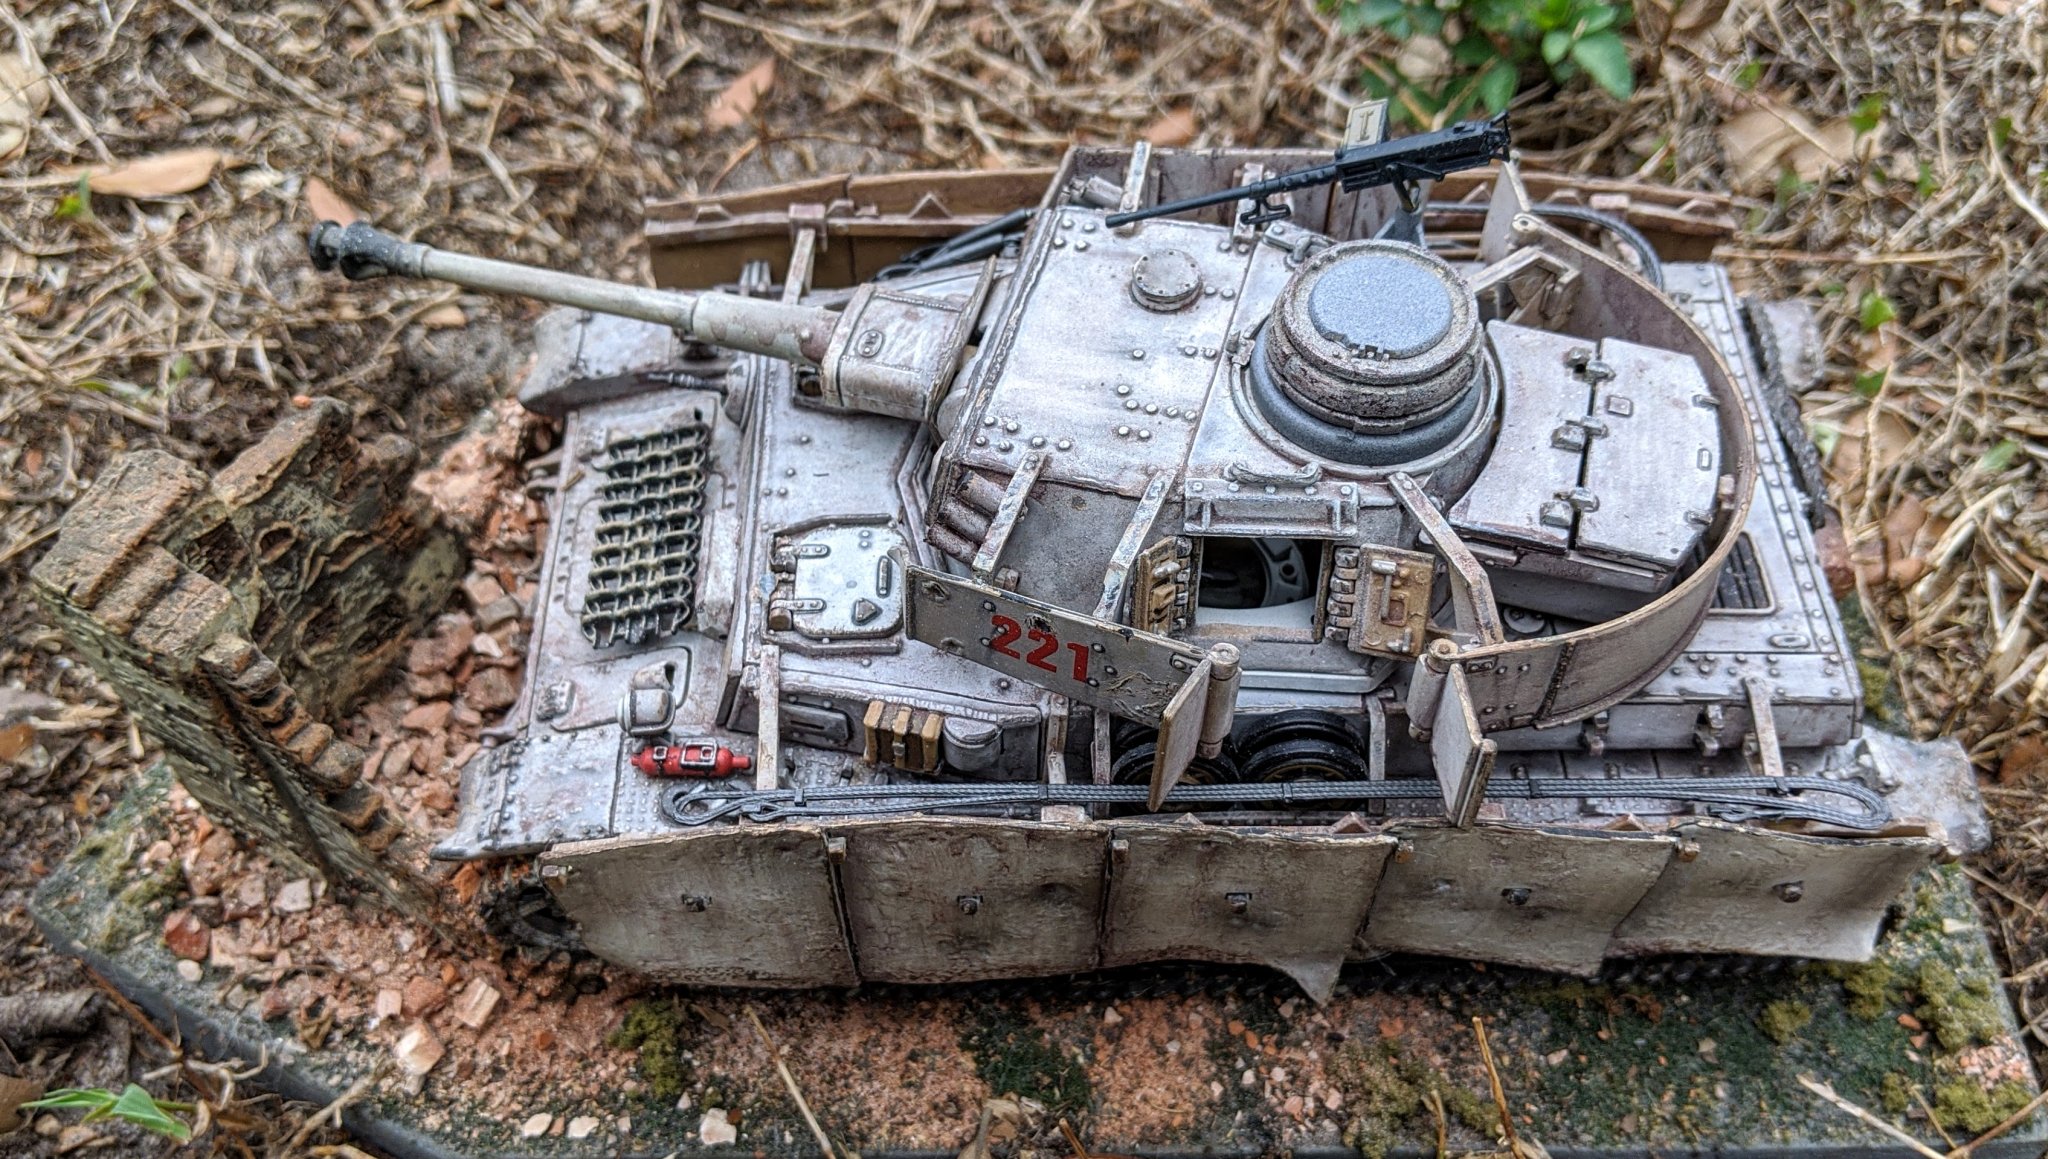
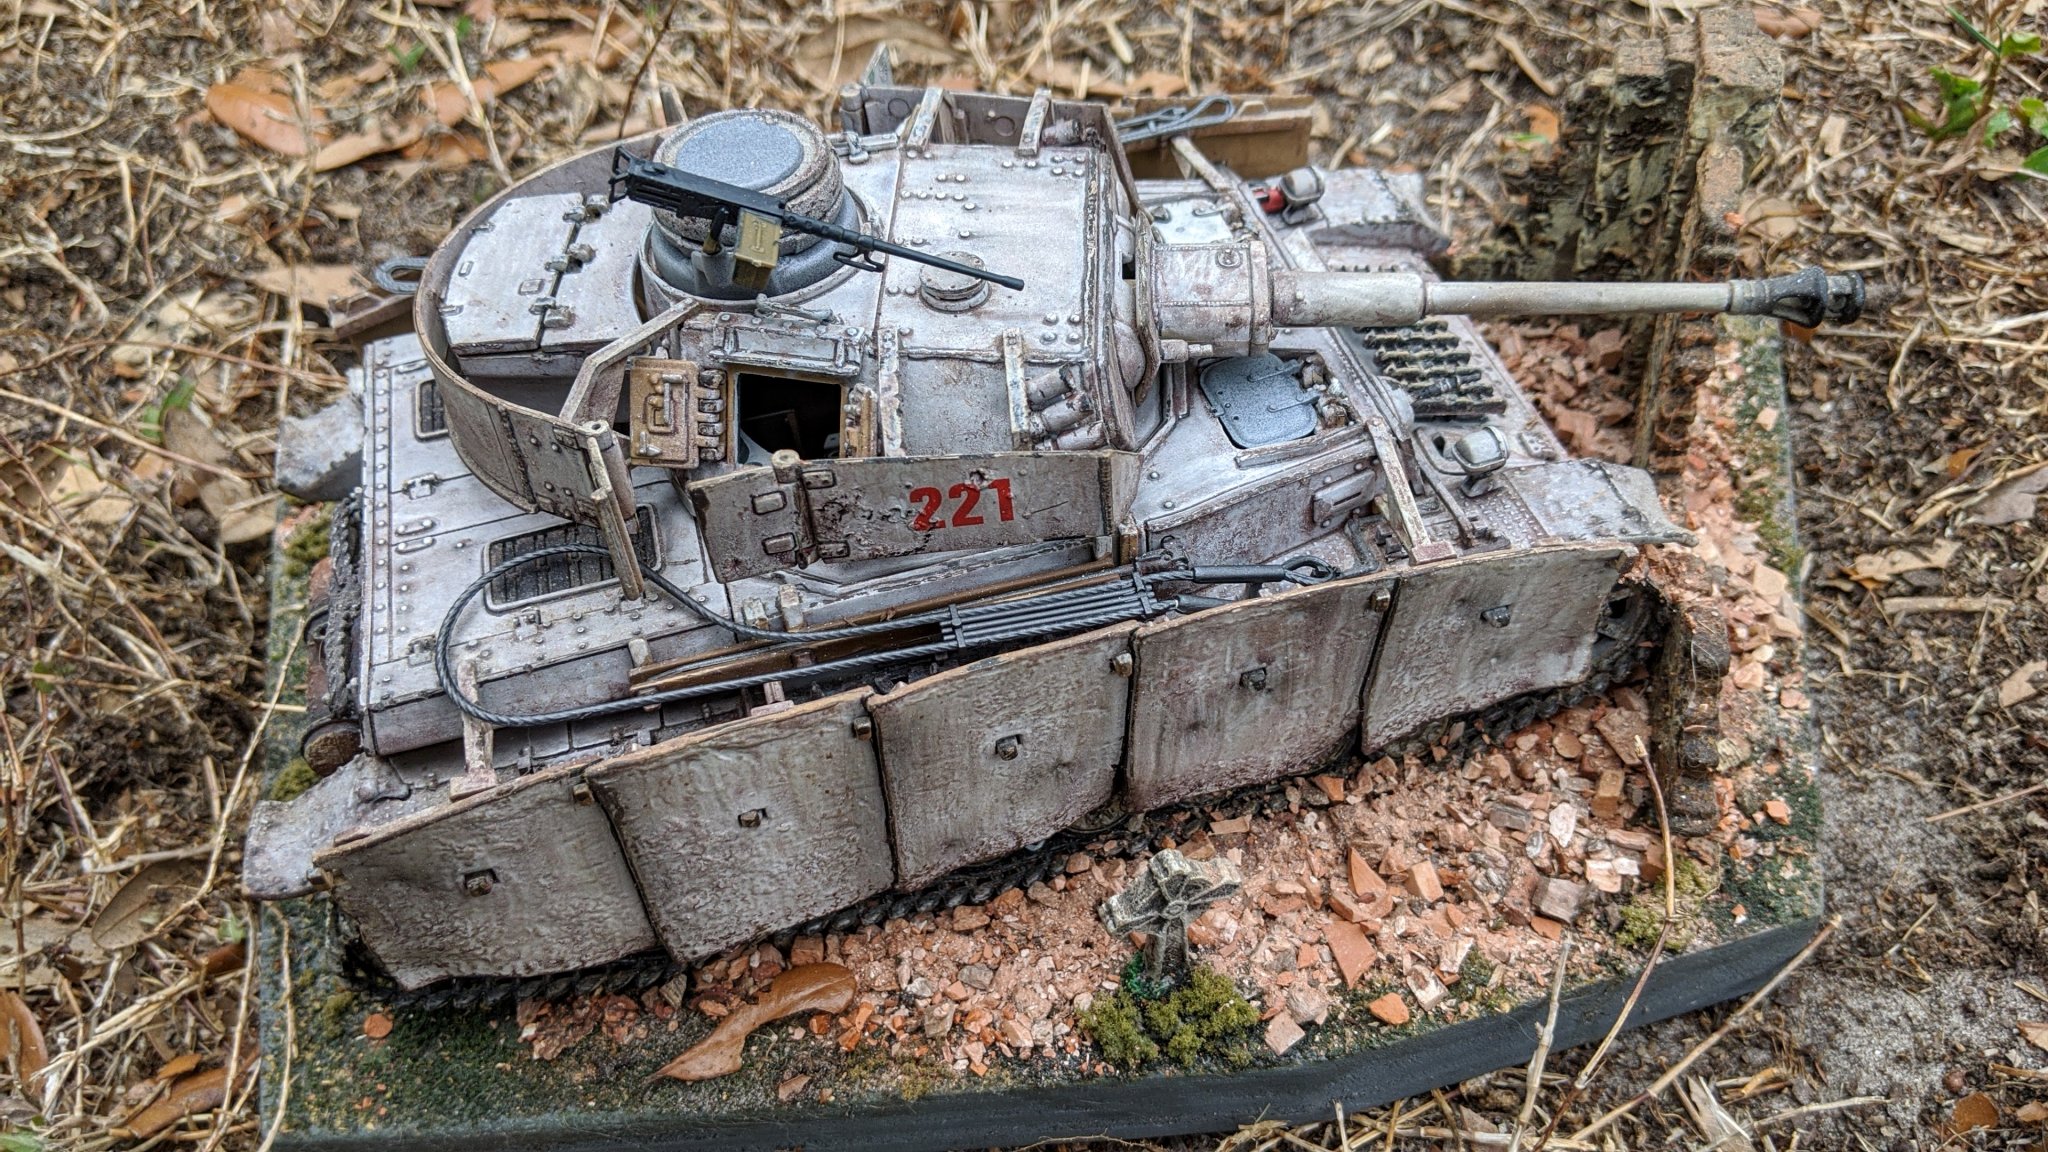
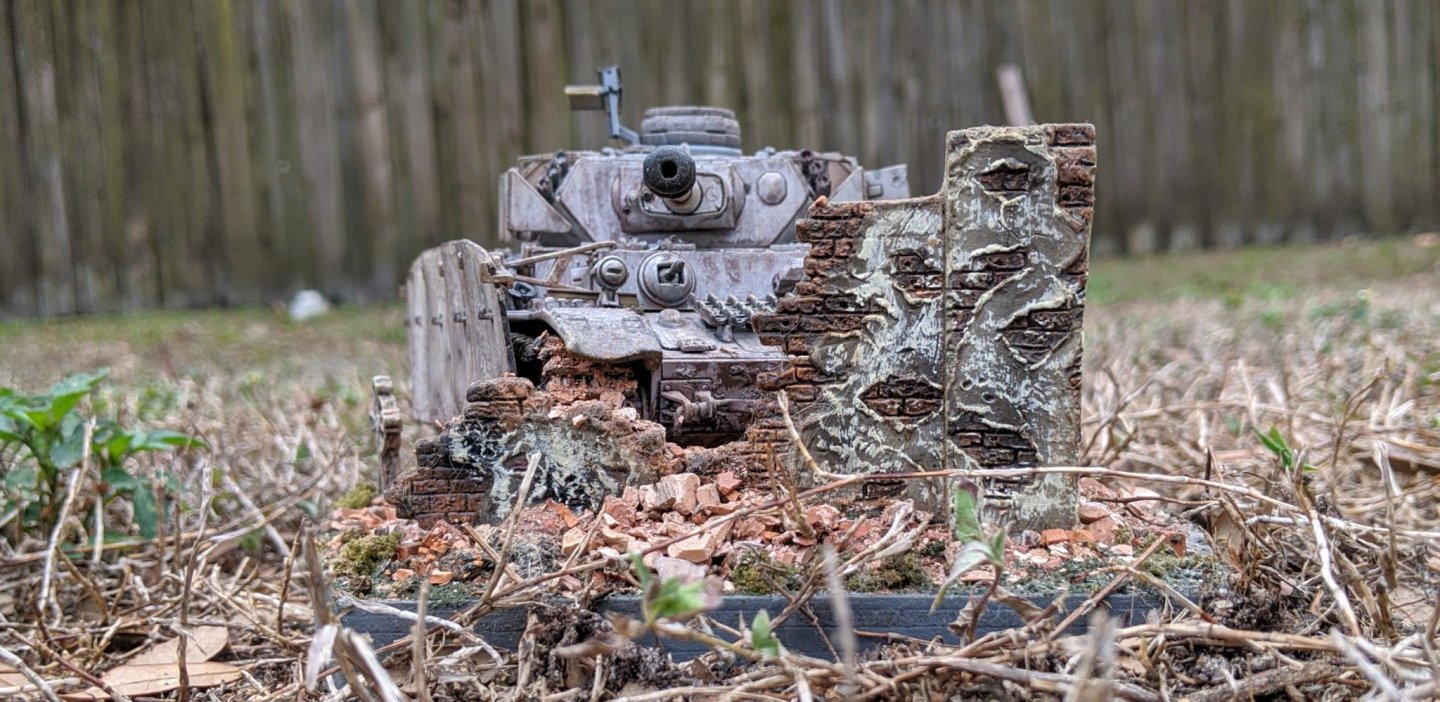
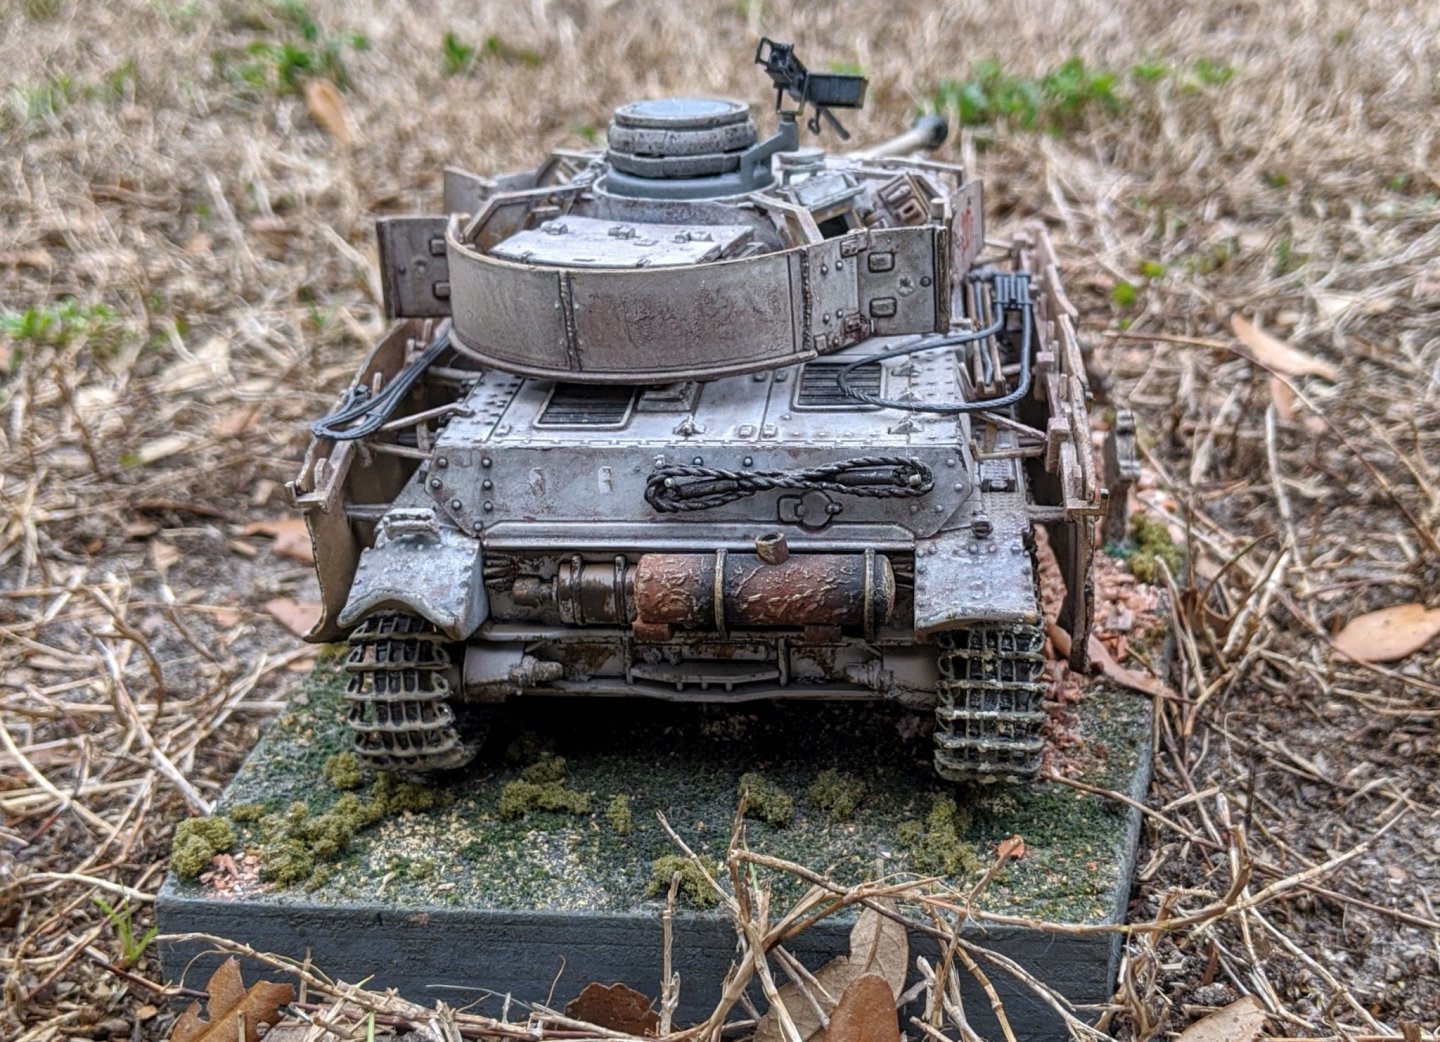
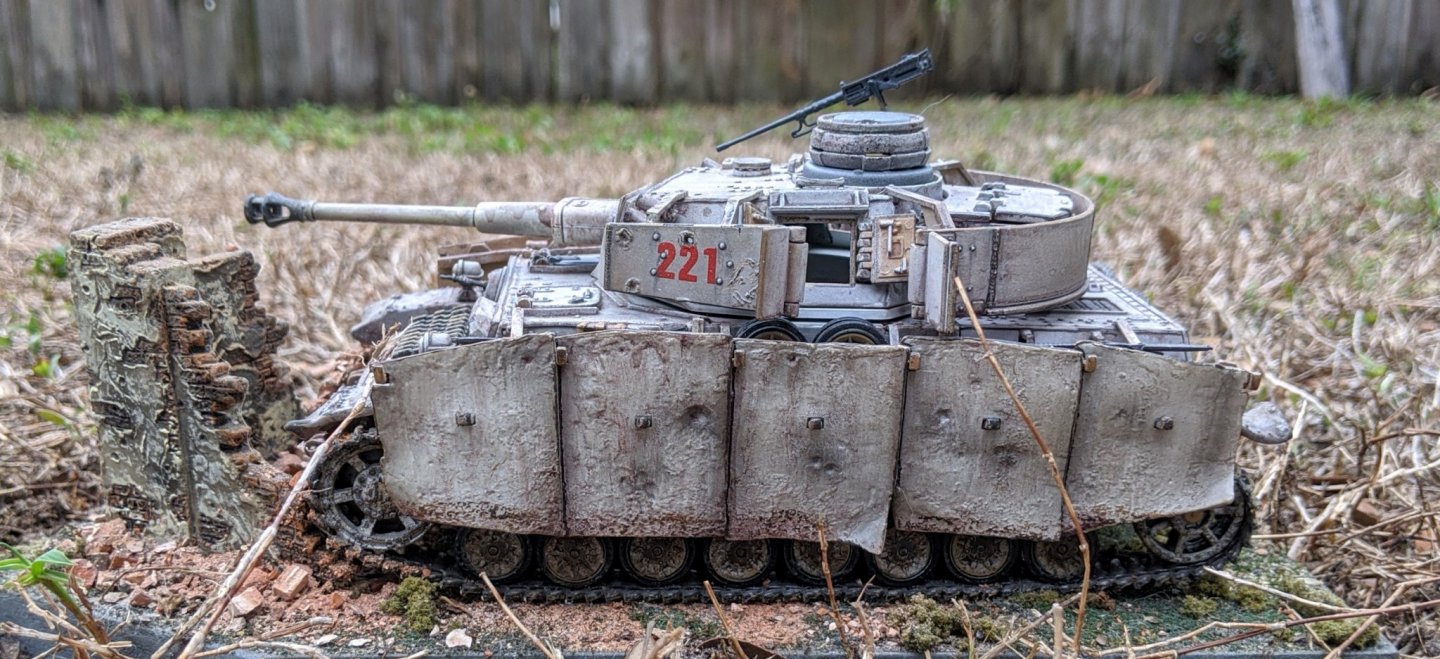
The diecast was a "premium" issue with some wear and battle damage from the factory, I just continued beating up the tank from there. I think I got a little carried away tho....😁
-
Found one in the parts bin, maybe wrong ammo can but I'll correct it if wrong.
.thumb.jpg.b167f6af20bafa5ff7cace529c701032.jpg)
-
That is one of the reasons I selected the Philly, and also (next on the bench) the MS USN Picket Boat. Simple enough rigging that I can use to learn on, and since they're both 1:24 scale I can have some symbosis action going on between them. After these builds are completed, I'll probably try a real "big boy pants" sailing ship. Thanks for the (as yet unearned) votes of confidence on the rigging. As I've said before, there's so much good info and helpful people on the forum that will help me muddle through this... I'm actually looking forward to it!
-
Great! That document is a wealth of interesting and useful info that I wish I would have had earlier. I'll be doing a lot of reading (and correcting things on the boat, I'm sure). I'm hoping to display the chain and bar, as they add interest and detail to the gun areas. I'll have to figure out some way to do it that's somewhat plausible.
-
OOPS! I lost the original machine gun included with the PZ IV, and just dug a replacement out of the parts bin without doing due diligence. I'll see if I have a MG 34 in the bin, only problem it will be 1:35. Maybe the crew "liberated" the Ma Deuce from an allied vehicle... it sure was (and still is) an awesome weapon!
-
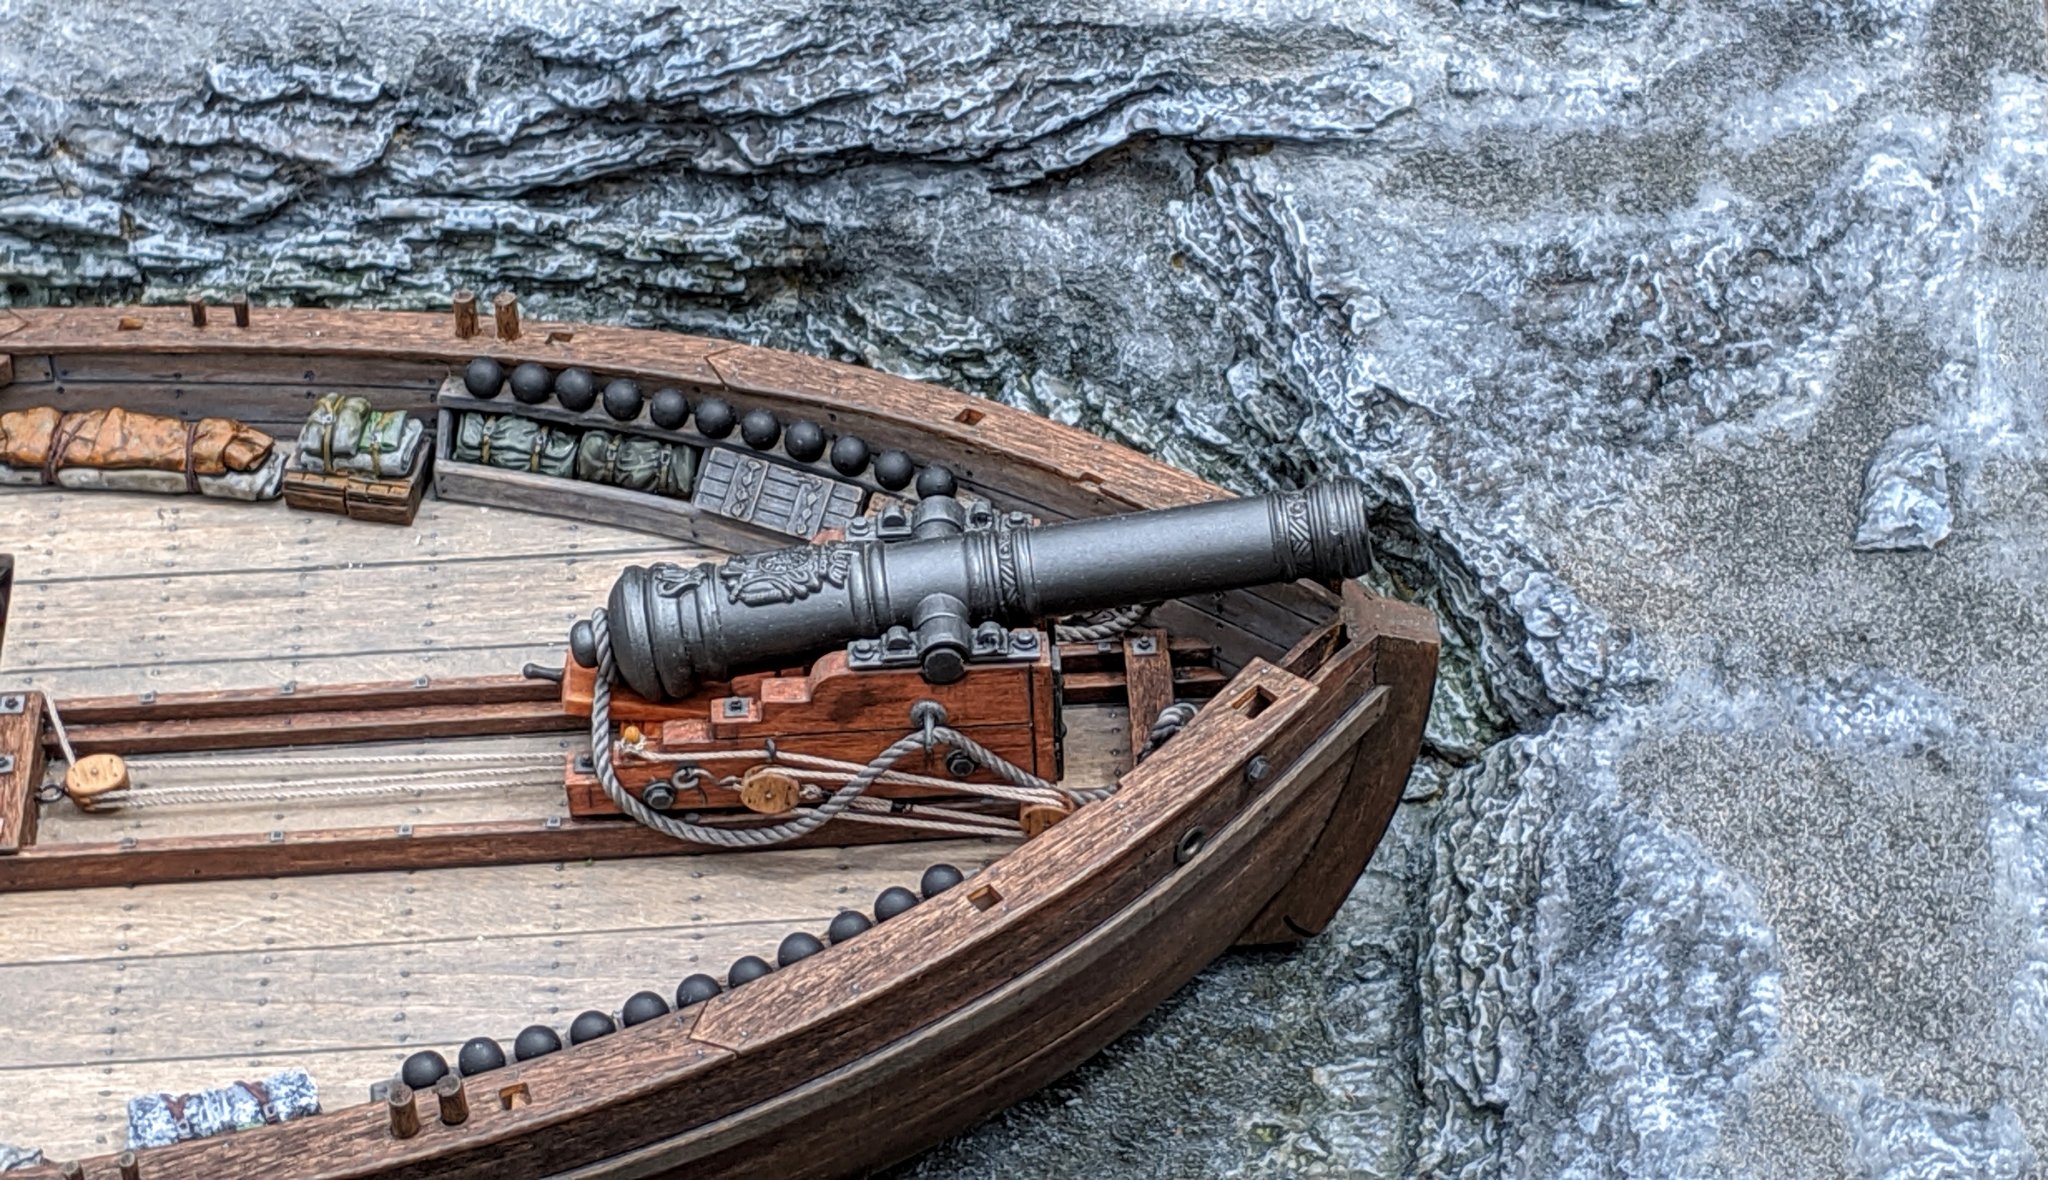
Oh well... No shot locker, and since they weren't used in the battle, they will be relegated to another project. I have two Model Shipways 1:24 Naval Smoothbore kits I'm going to combine into one, maybe the shot can be used on that.
-
The Panzer's job is to keep the squirrels away. Our indoor cats are too spoiled to do something as crude as "hunt".
-
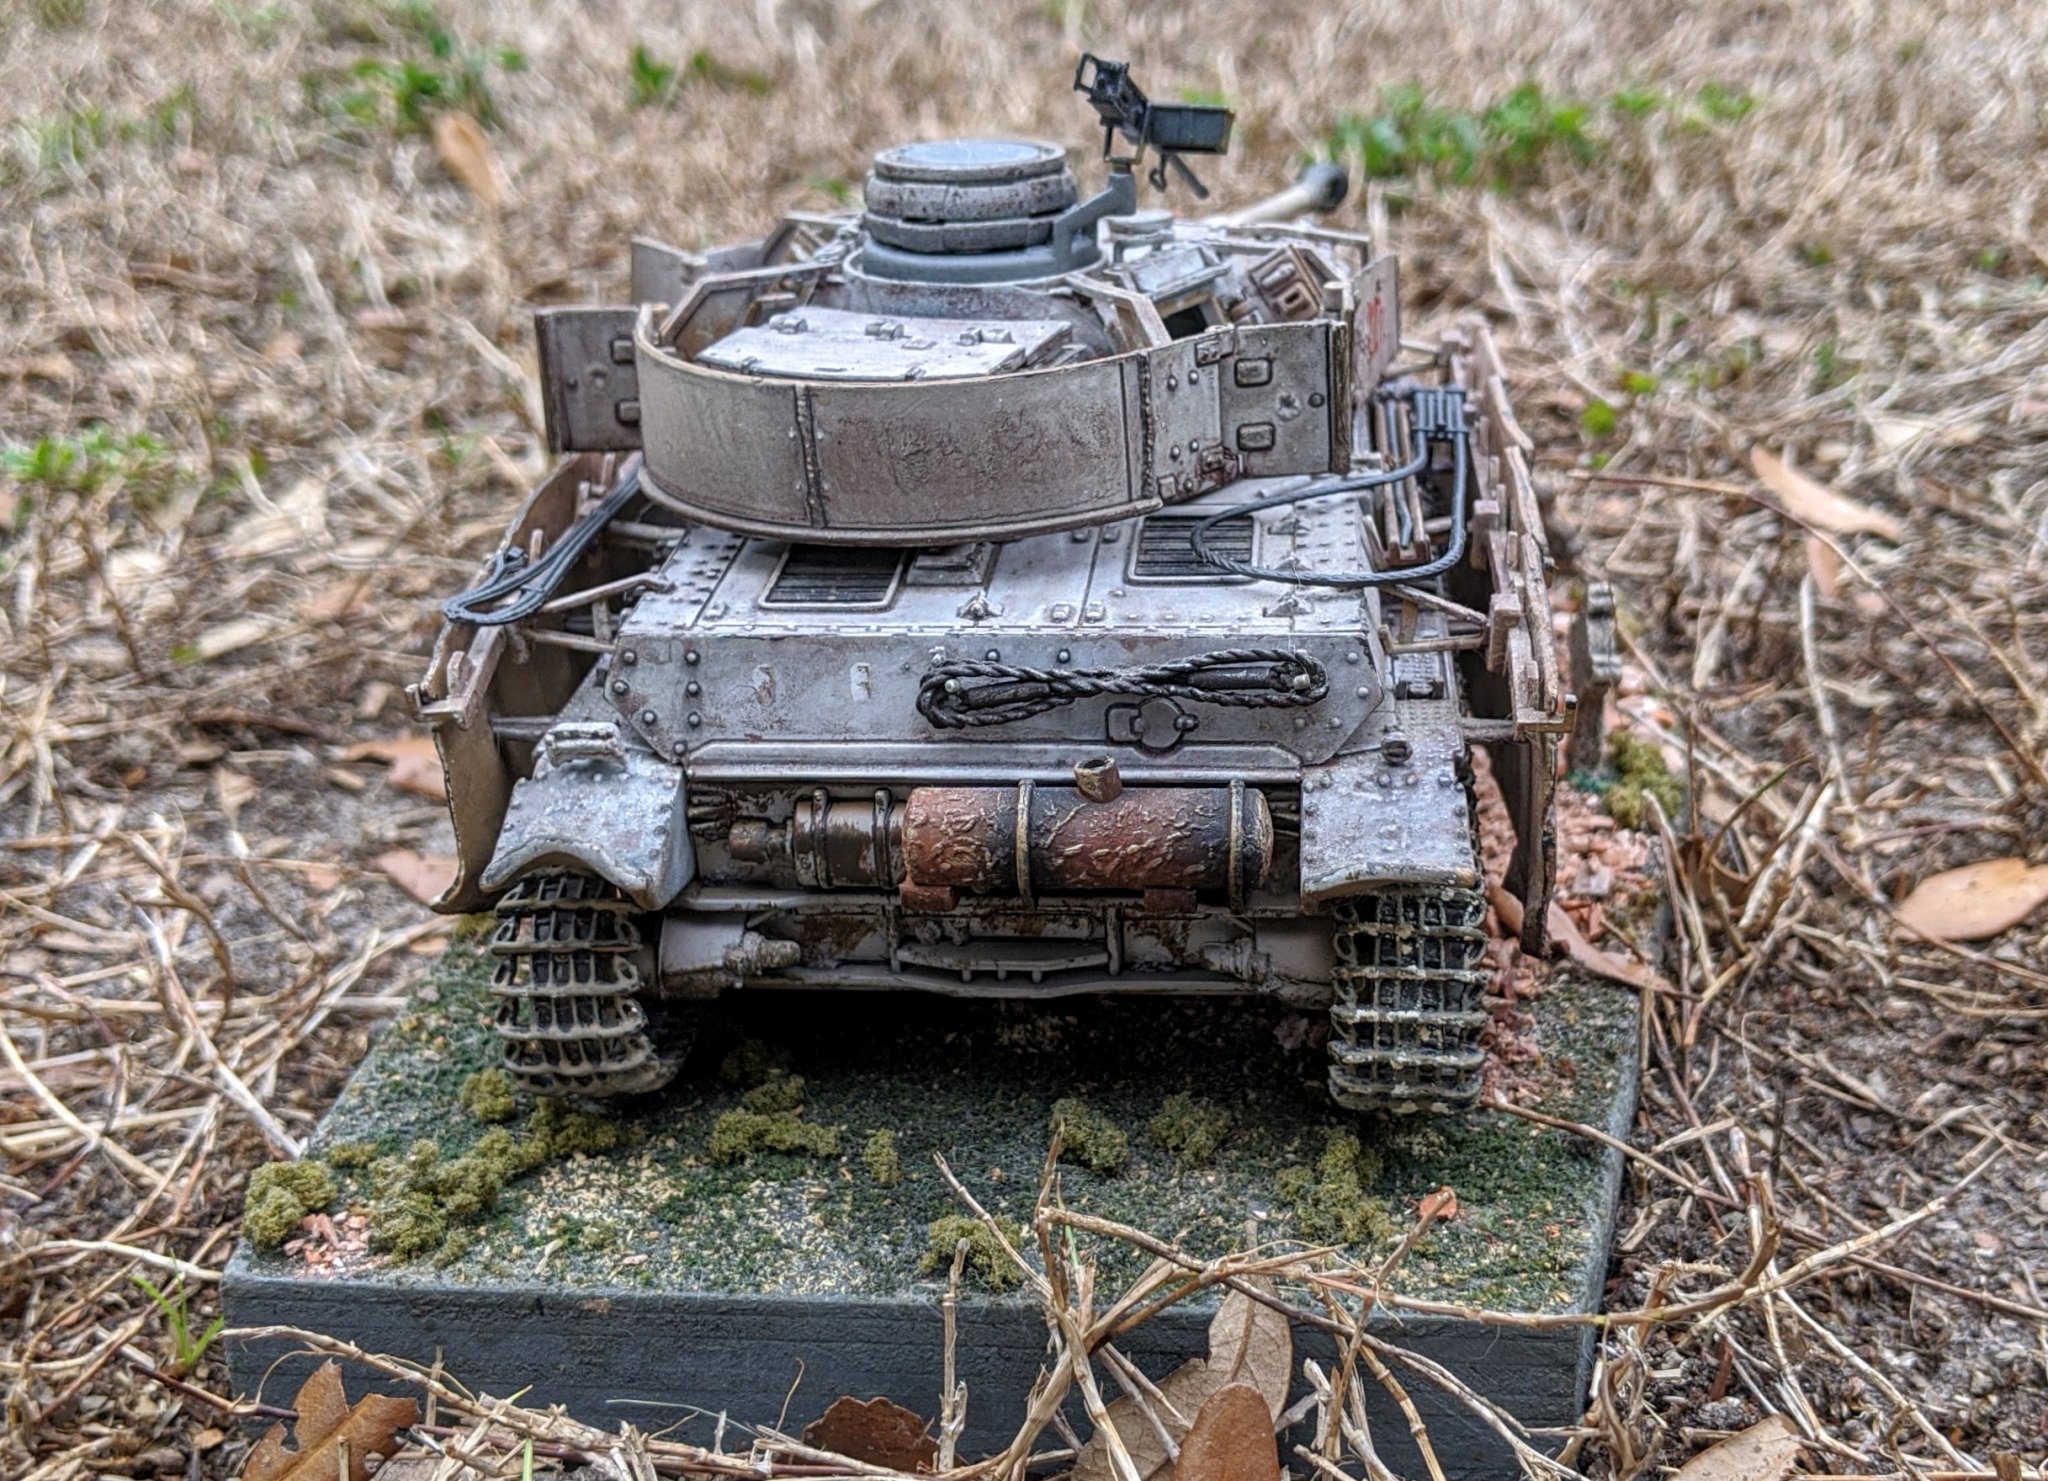
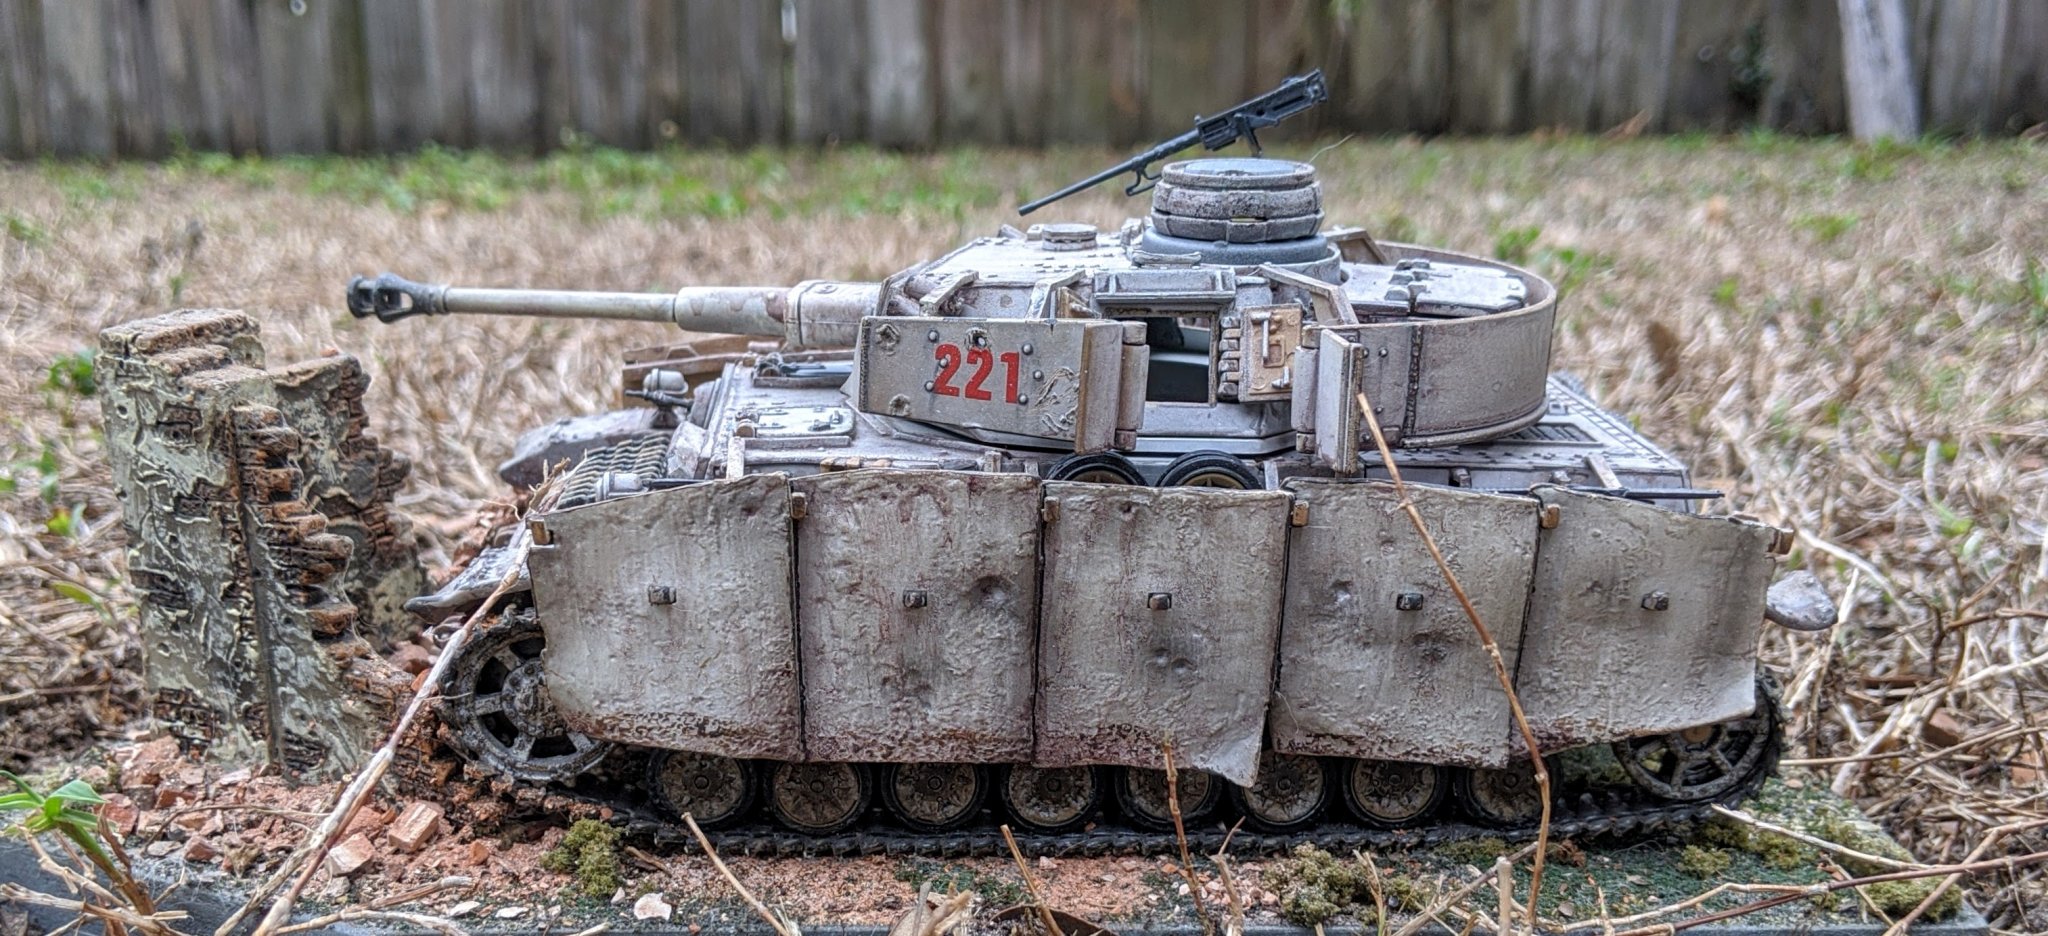
Hi all, I received this diecast pre-built Forces of Valor 1/32 German Panzer IV AusF G for Xmas a few years ago, and was impressed with the detail and weathering from the manufacturer. I've got some spare time during my other builds, and decided that this tank needed a base. Since I'm doing diorama type work on another project, I decided to put together a quick base to display the vehicle in context. I don't ordinarily do pre-builts, but since this was so nice to start with (and it was a gift) I built a small vignette to showcase it.


- 13 replies
-
- 10
-
-
Hi all, I'm currently building the 1:24 Model Shipways Philadelphia, and have some questions on the way that "odd" shot was commonly stored. Were they in crates, did they have dedicated racks or some other method? I've made up some chain, canister and bar shot and would like to have them visible and not in crates. Any ideas or suggestions?

-
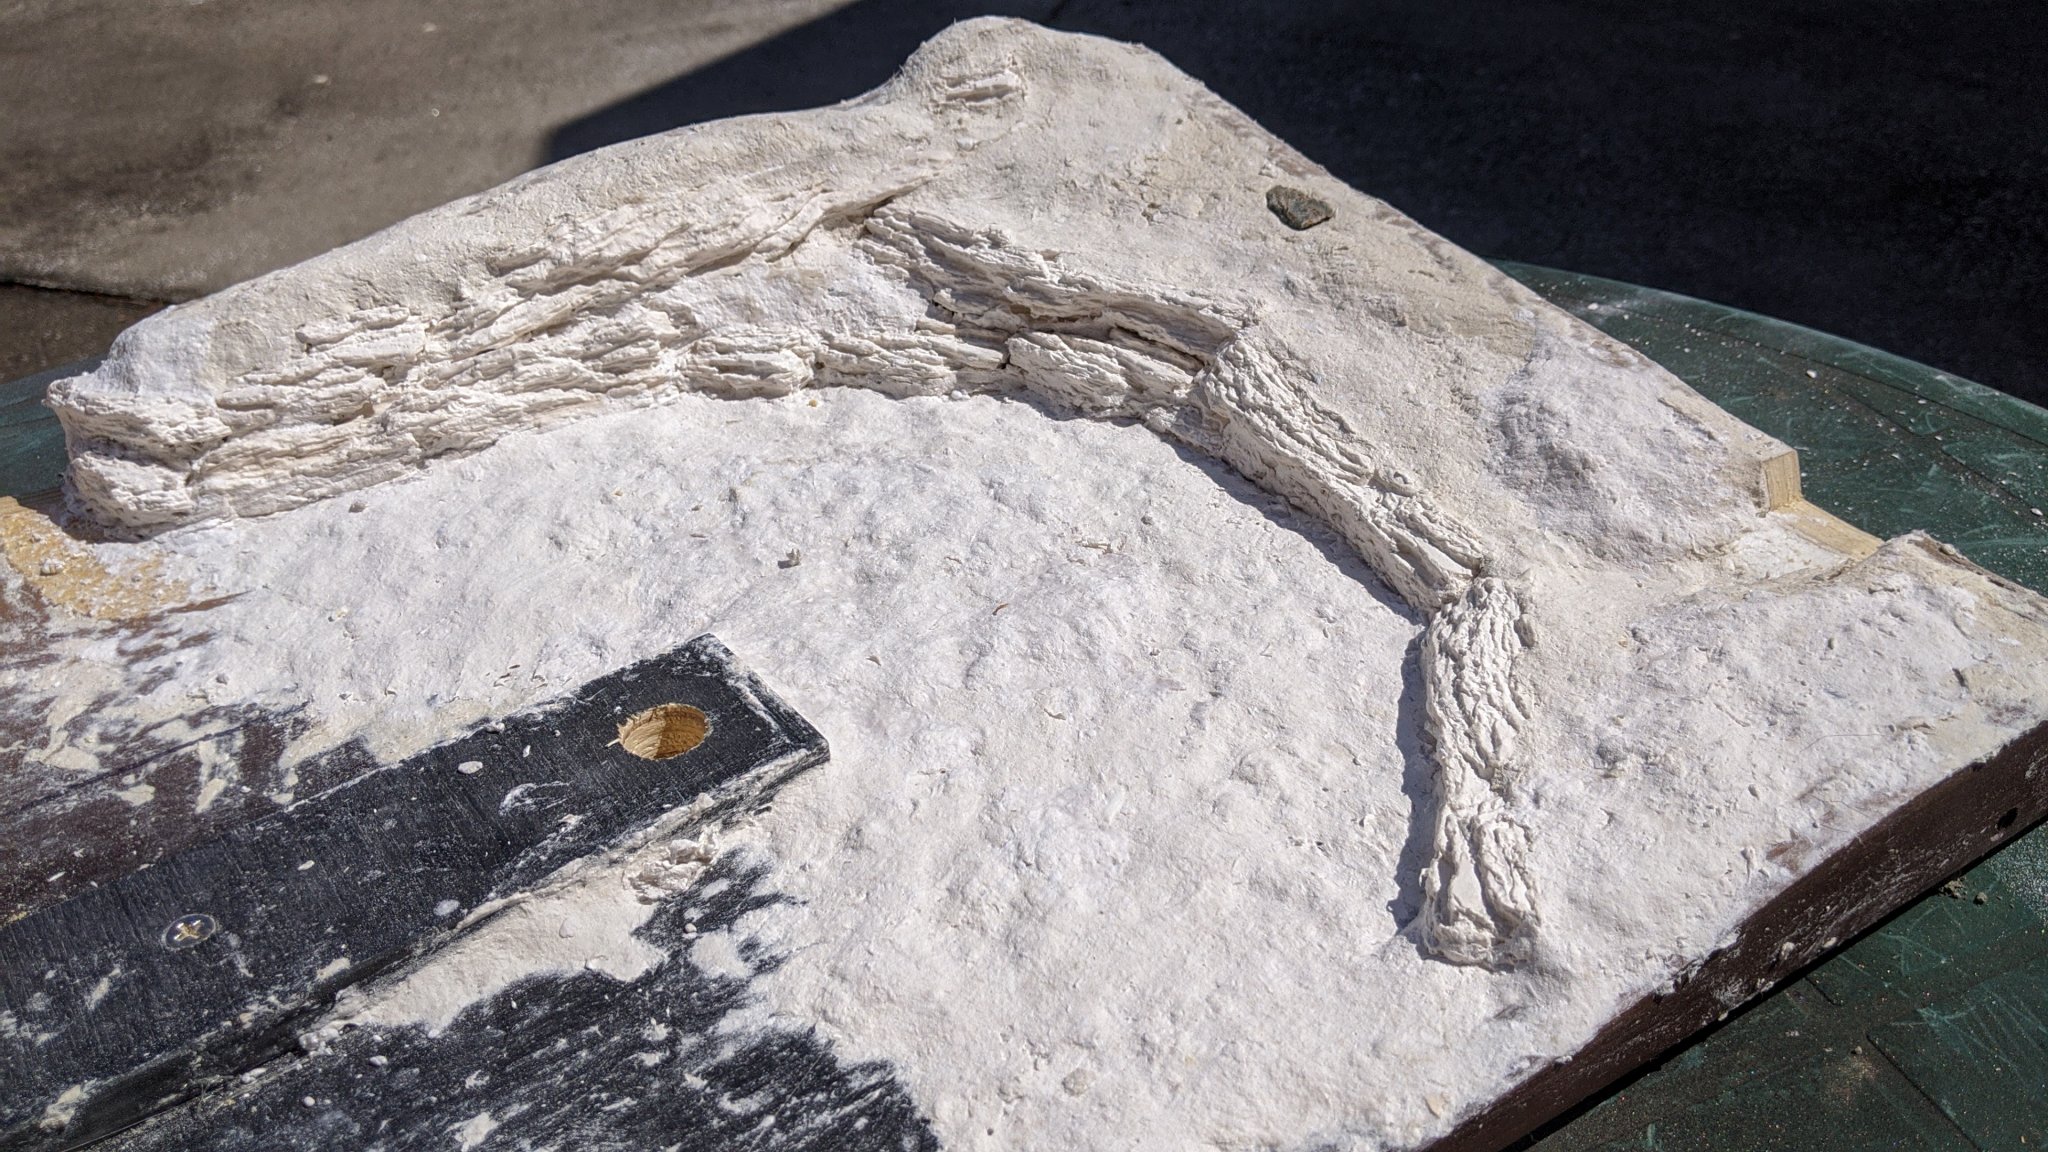
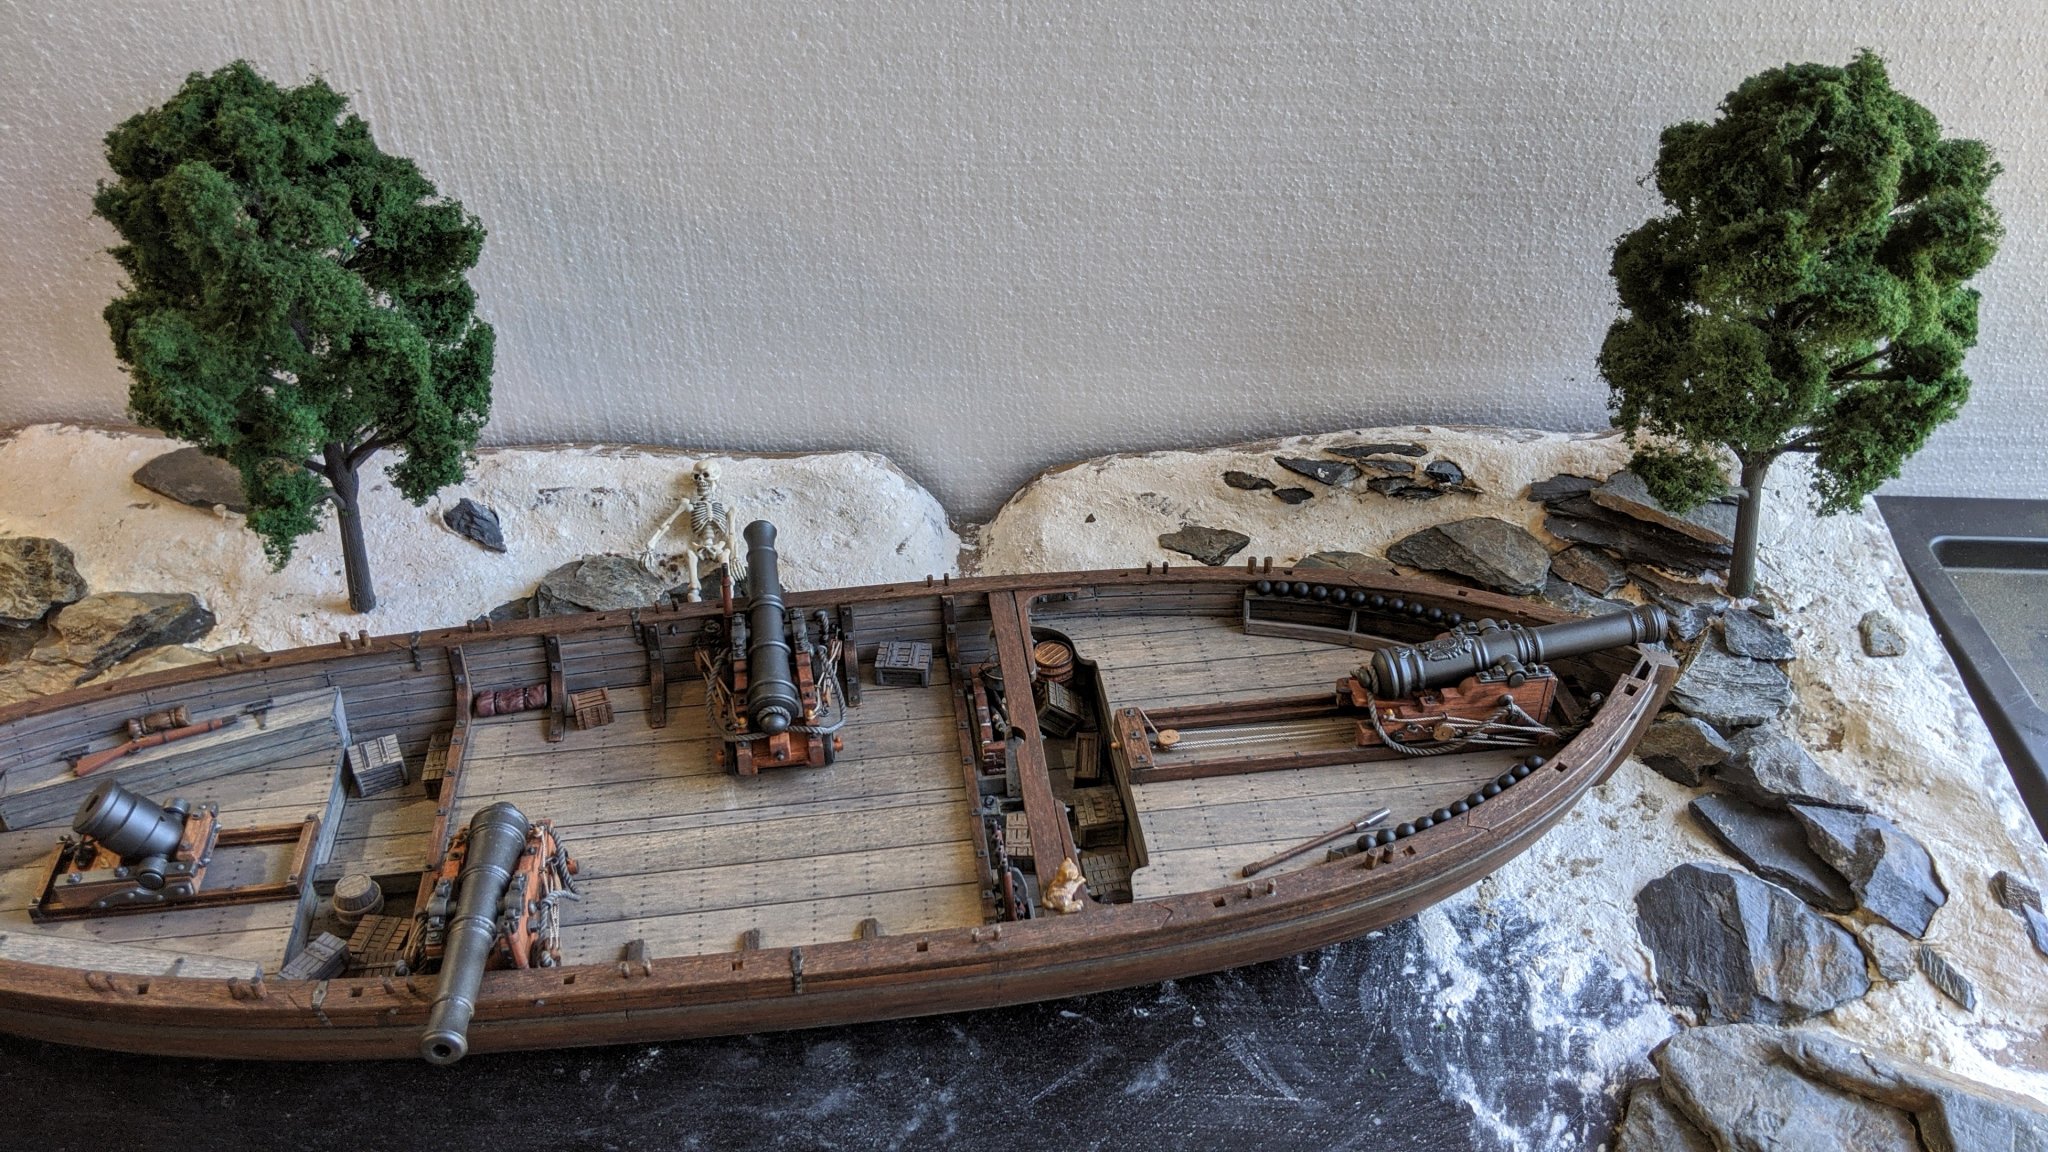
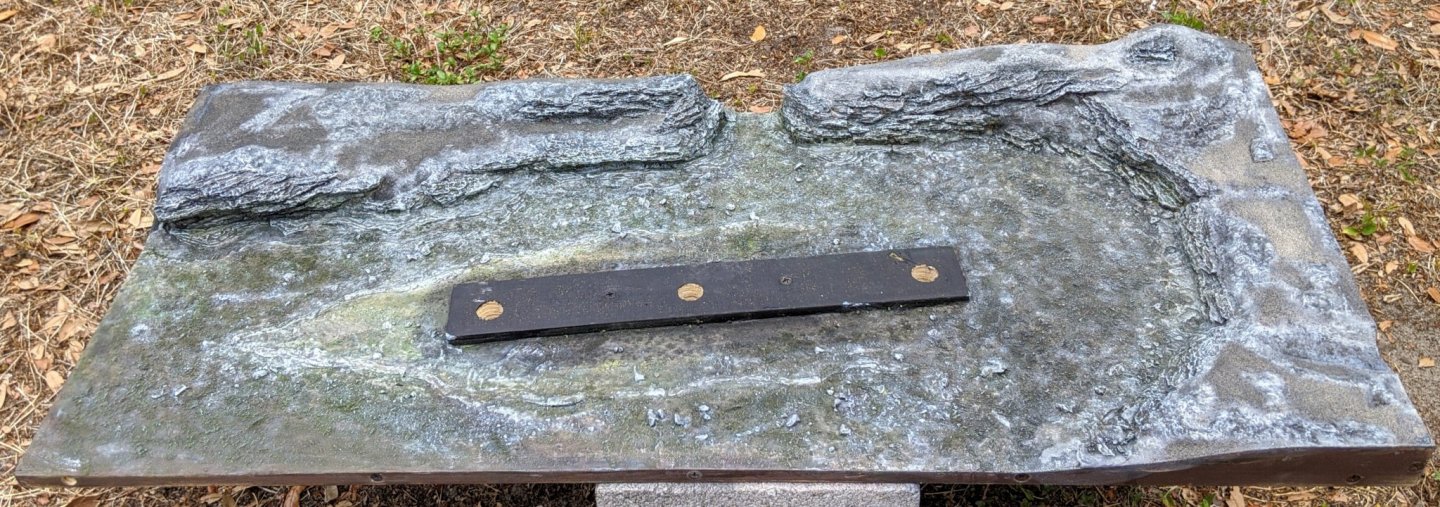
Thanks, Yves! Funny how "fake" rocks look more realistic in scale than real ones. Plus, making them is like being a 4 year old again... sloppy, messy and fun! I appreciate that, and hopefully soon I'll be able to attack the main thing I'm dreading in this build. The rigging... I've never done any, and reading and studying about it is not the same as doing it. I know I'll have a lot of questions for the forum when I inevitably get lost in the wilderness. Thanks, Bob. I believe that Slim and company will have some bone chilling schemes cooked up... 2 pics of progress this evening. Increased upper right elevation about 1" to accommodate a large tree in the future, cleaned up the rock/soil boundaries and added an algae tint and a boat shadow to the river bed.

-
That's sweet, Bob! The wood figuring is splendid, and the lighter color frame really sets it off. Can't wait to see them together...
- 170 replies
-
- 1
-
-
- medway longboat
- Syren Ship Model Company
- (and 1 more)
-
Looks like a decent set of parts to work with. Sealing up the wood should work. I'm looking forward to where you go with this... a lot of different possibilities for cargo!
-
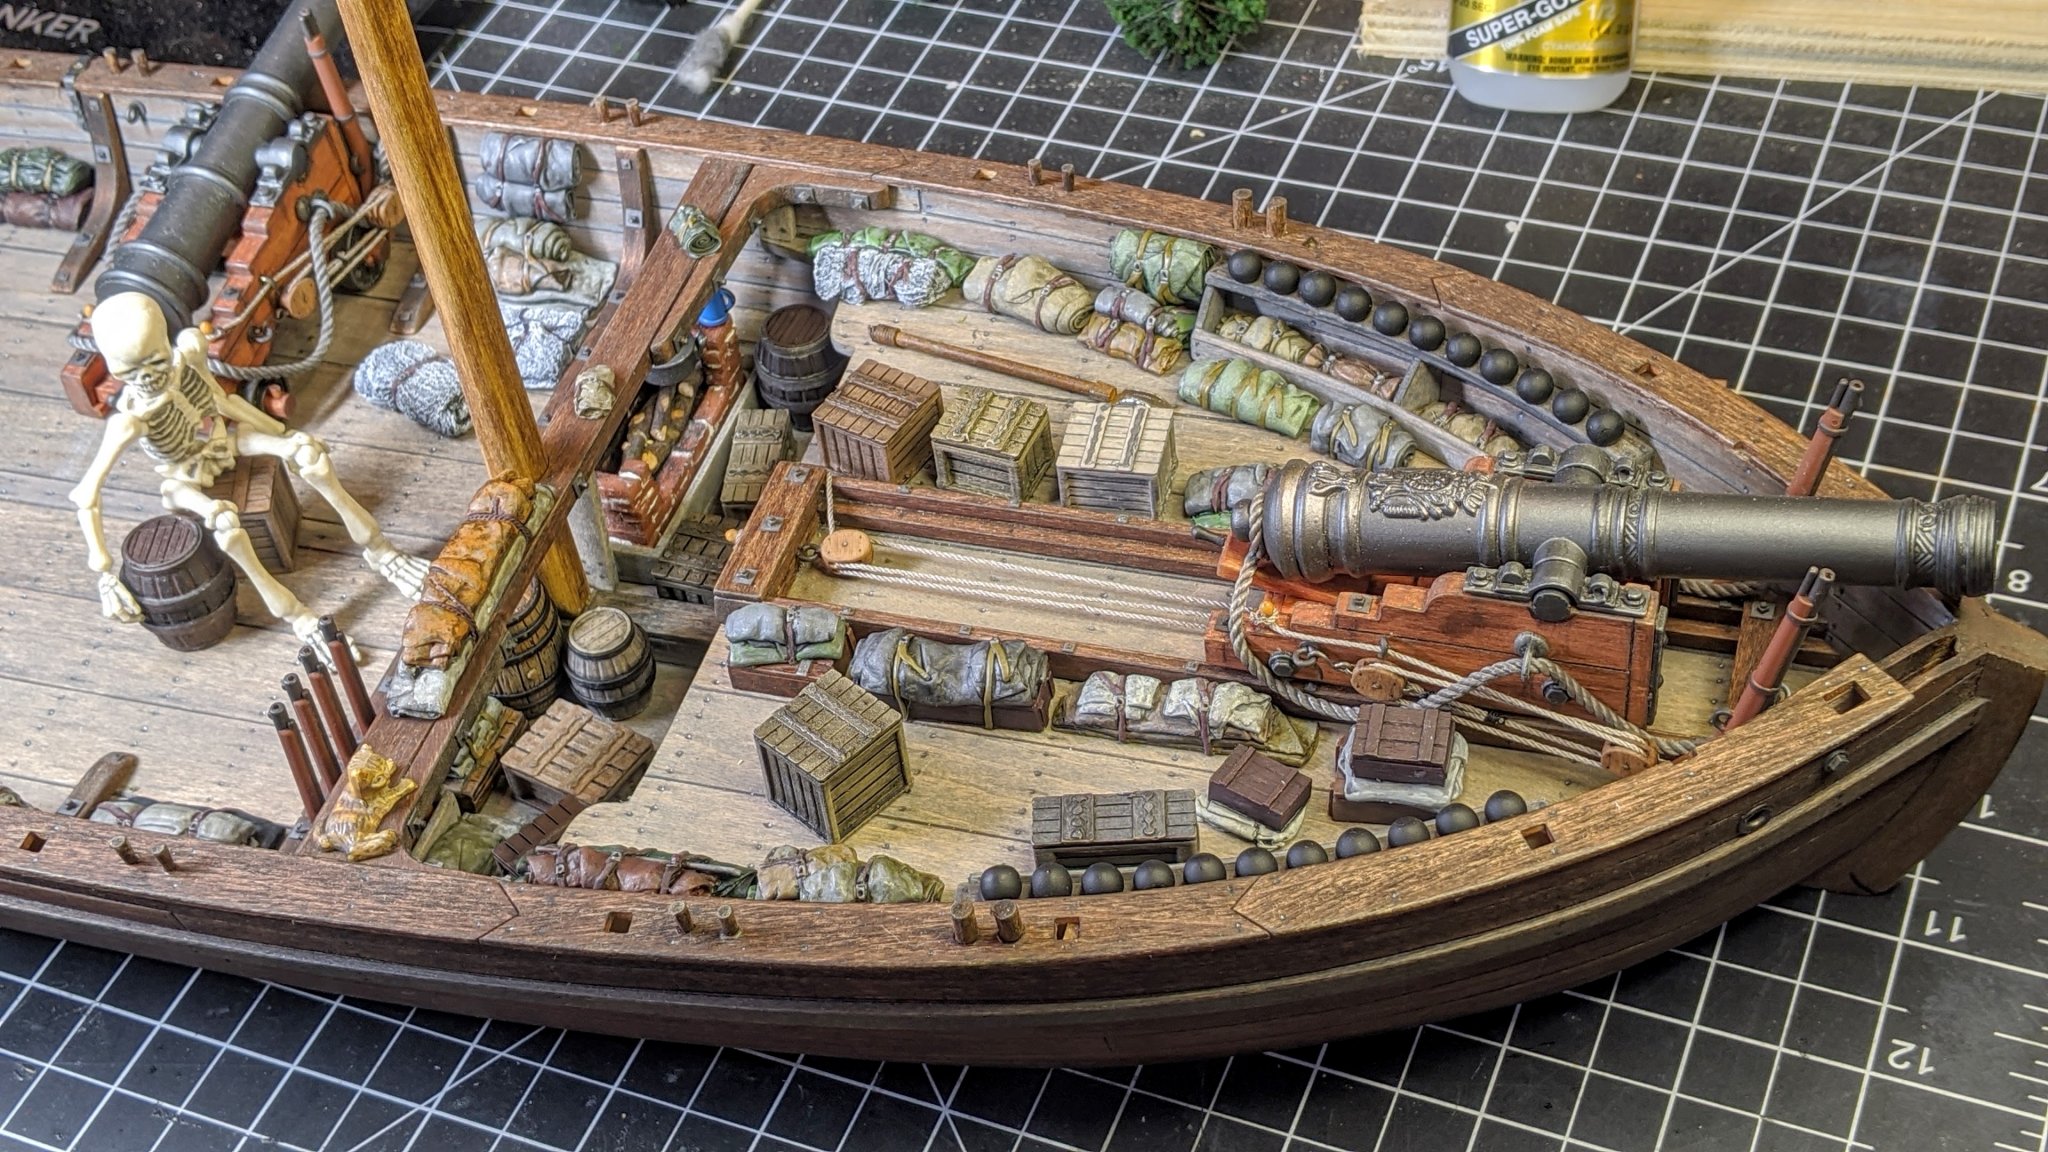
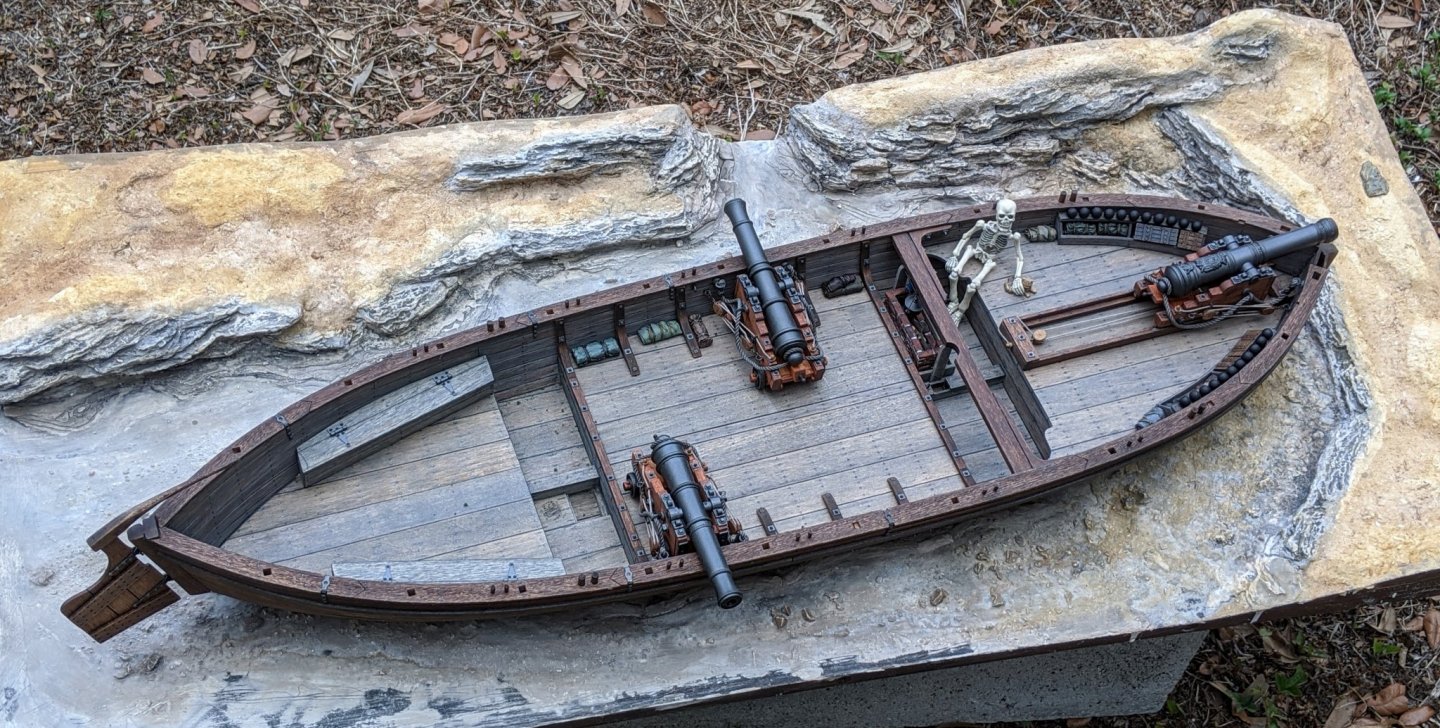
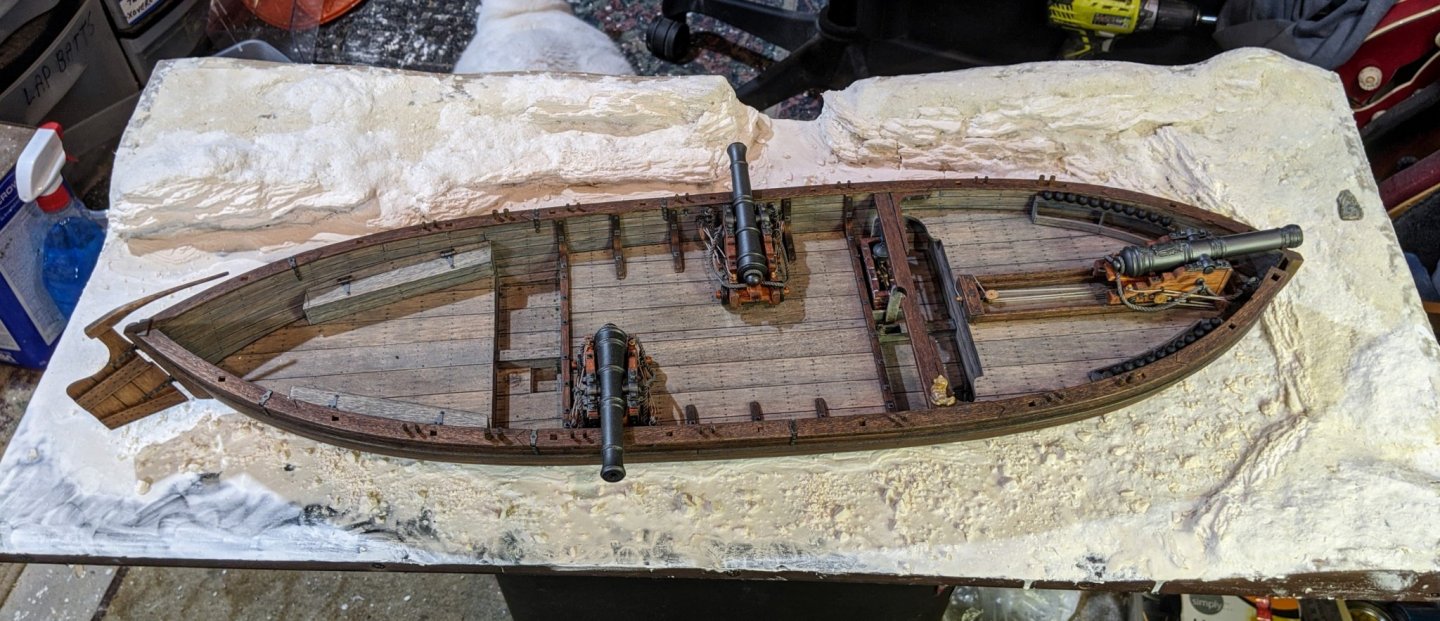
No worries, Eric. We welcome our cephalopod overlords... Thanks, Jean-Paul! I can't wait to finish the base. Boat building is the main focus of this forum! Again, I apologize for "going off the reservation" on the amount of time and posts I'm doing on the base. It became quite a bit larger project than I anticipated, but in the long run I think it will present the Philadelphia in a more effective way. As soon as the resin water pours are done I'll be back to finishing up the boat. The base should be dry enough to start pouring resin by Monday or Tuesday (depending on Florida sunshine). Progress.. The base is completed enough to build the dams and start the resin water pour. I'll leave everything left to do on the base (grass, foliage, bushes, trees etc.) until that's done. Here's some more pics, I know it doesn't seem like much progress, but there's about 10 or more tints, washes and paints applied since the last pics. Subtle, but necessary. Also, a lot more deck stuff has been attached. For those who have expressed concern about including the mortar, it's not permanent and can be removed if I decide not to use it. Still up in the air about that, tho... Three pics of the base: Some pics of the boat with added stuff.


-
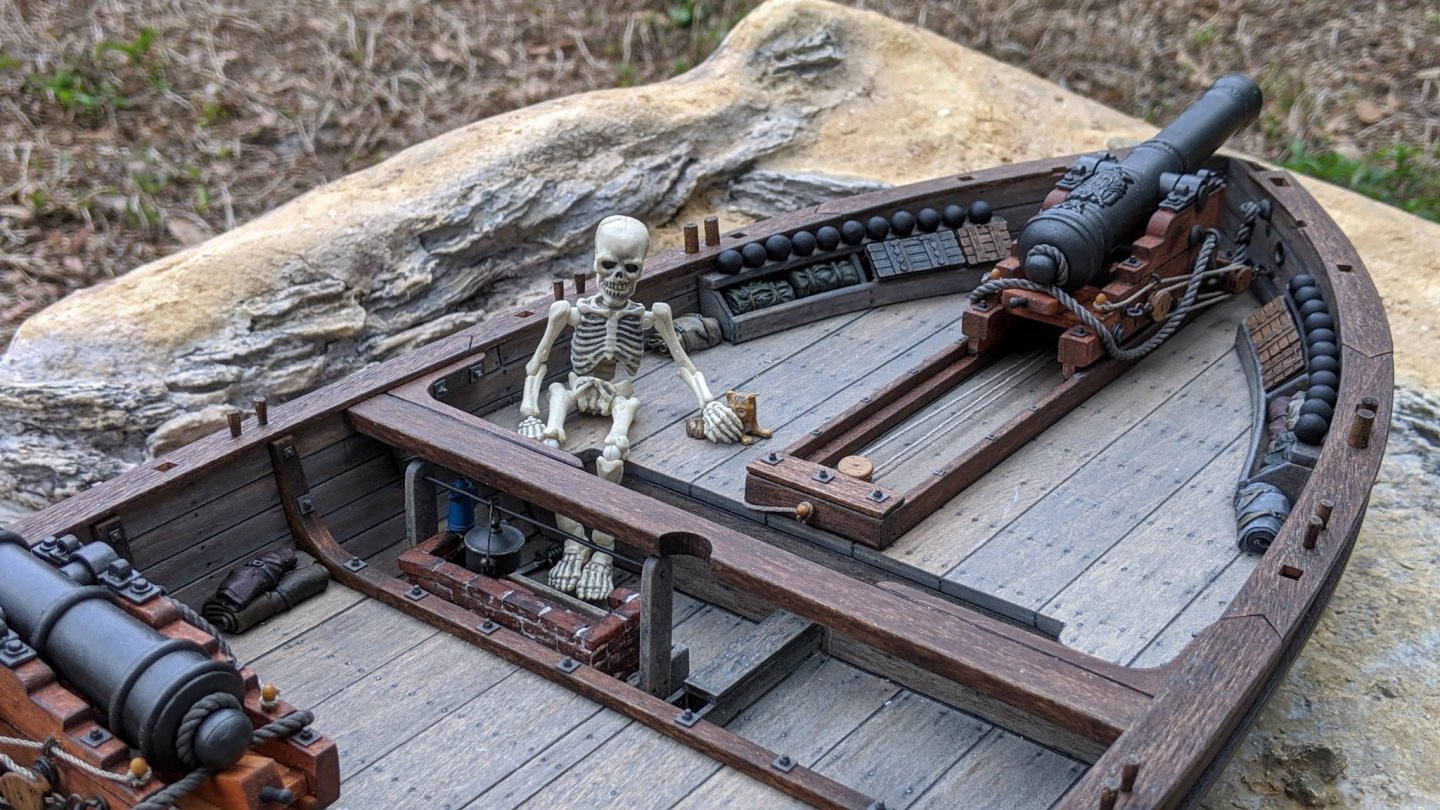
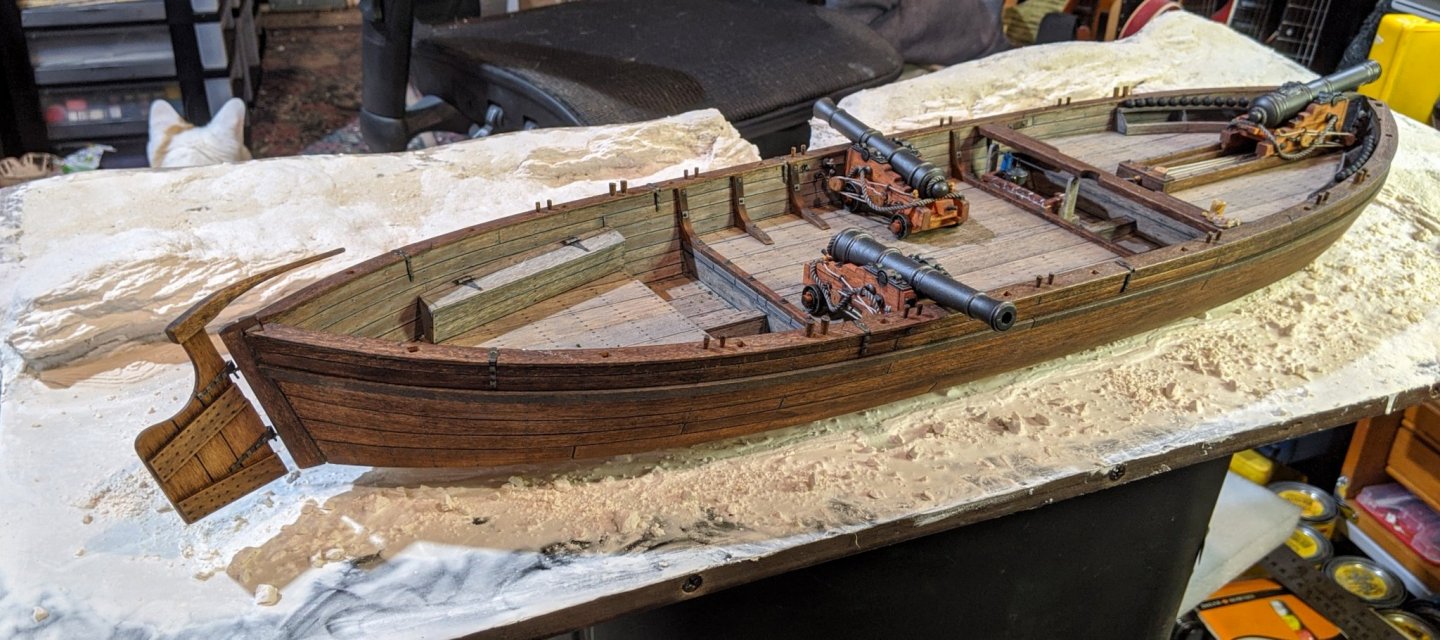
A nicely creative touch in the "heart" of the boat. Little elements like this (and the magazines and posters from a previous post) are taking this build to an amazing level. Your skills, attention to detail and exhaustive research are really paying off.
-
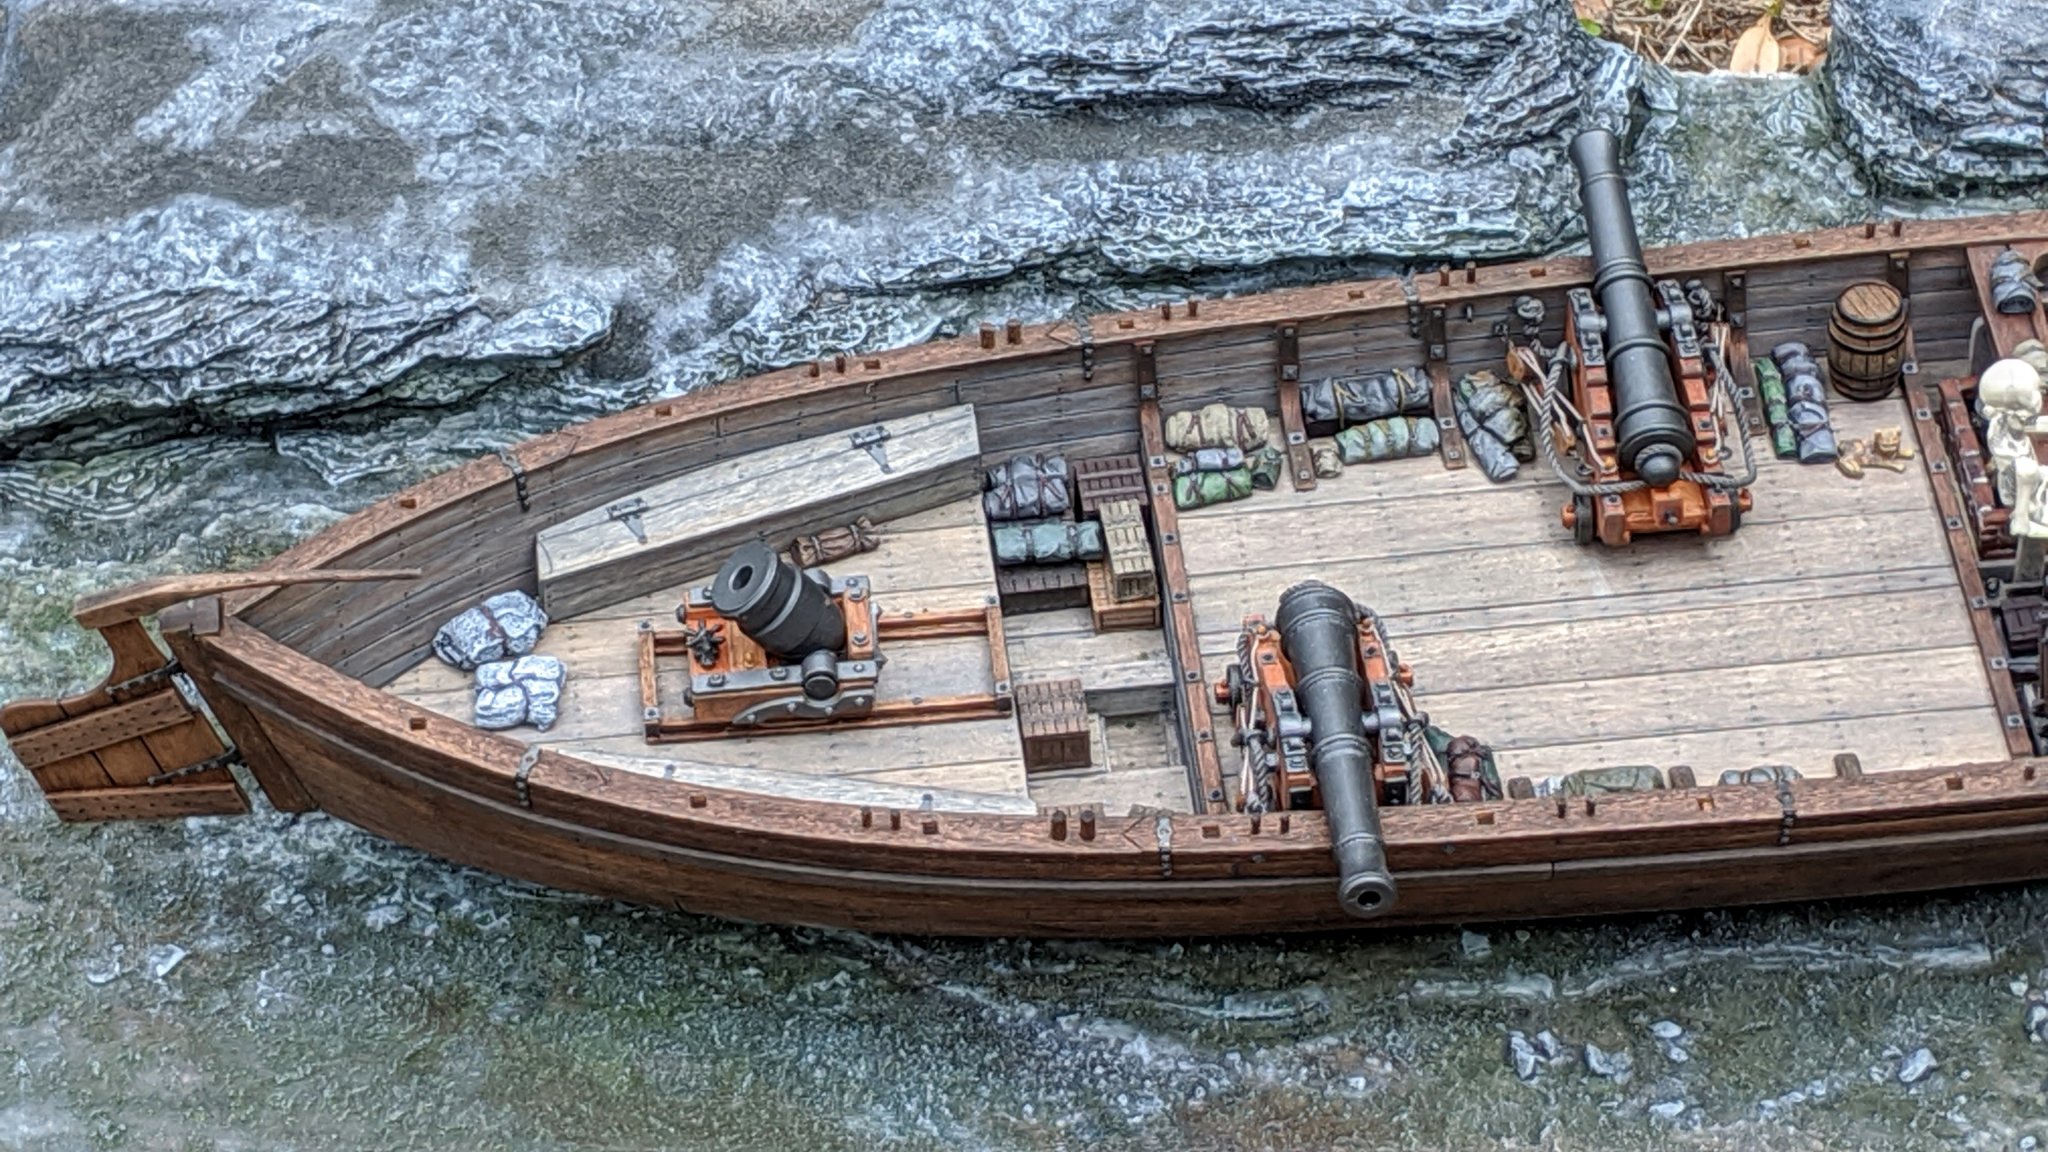
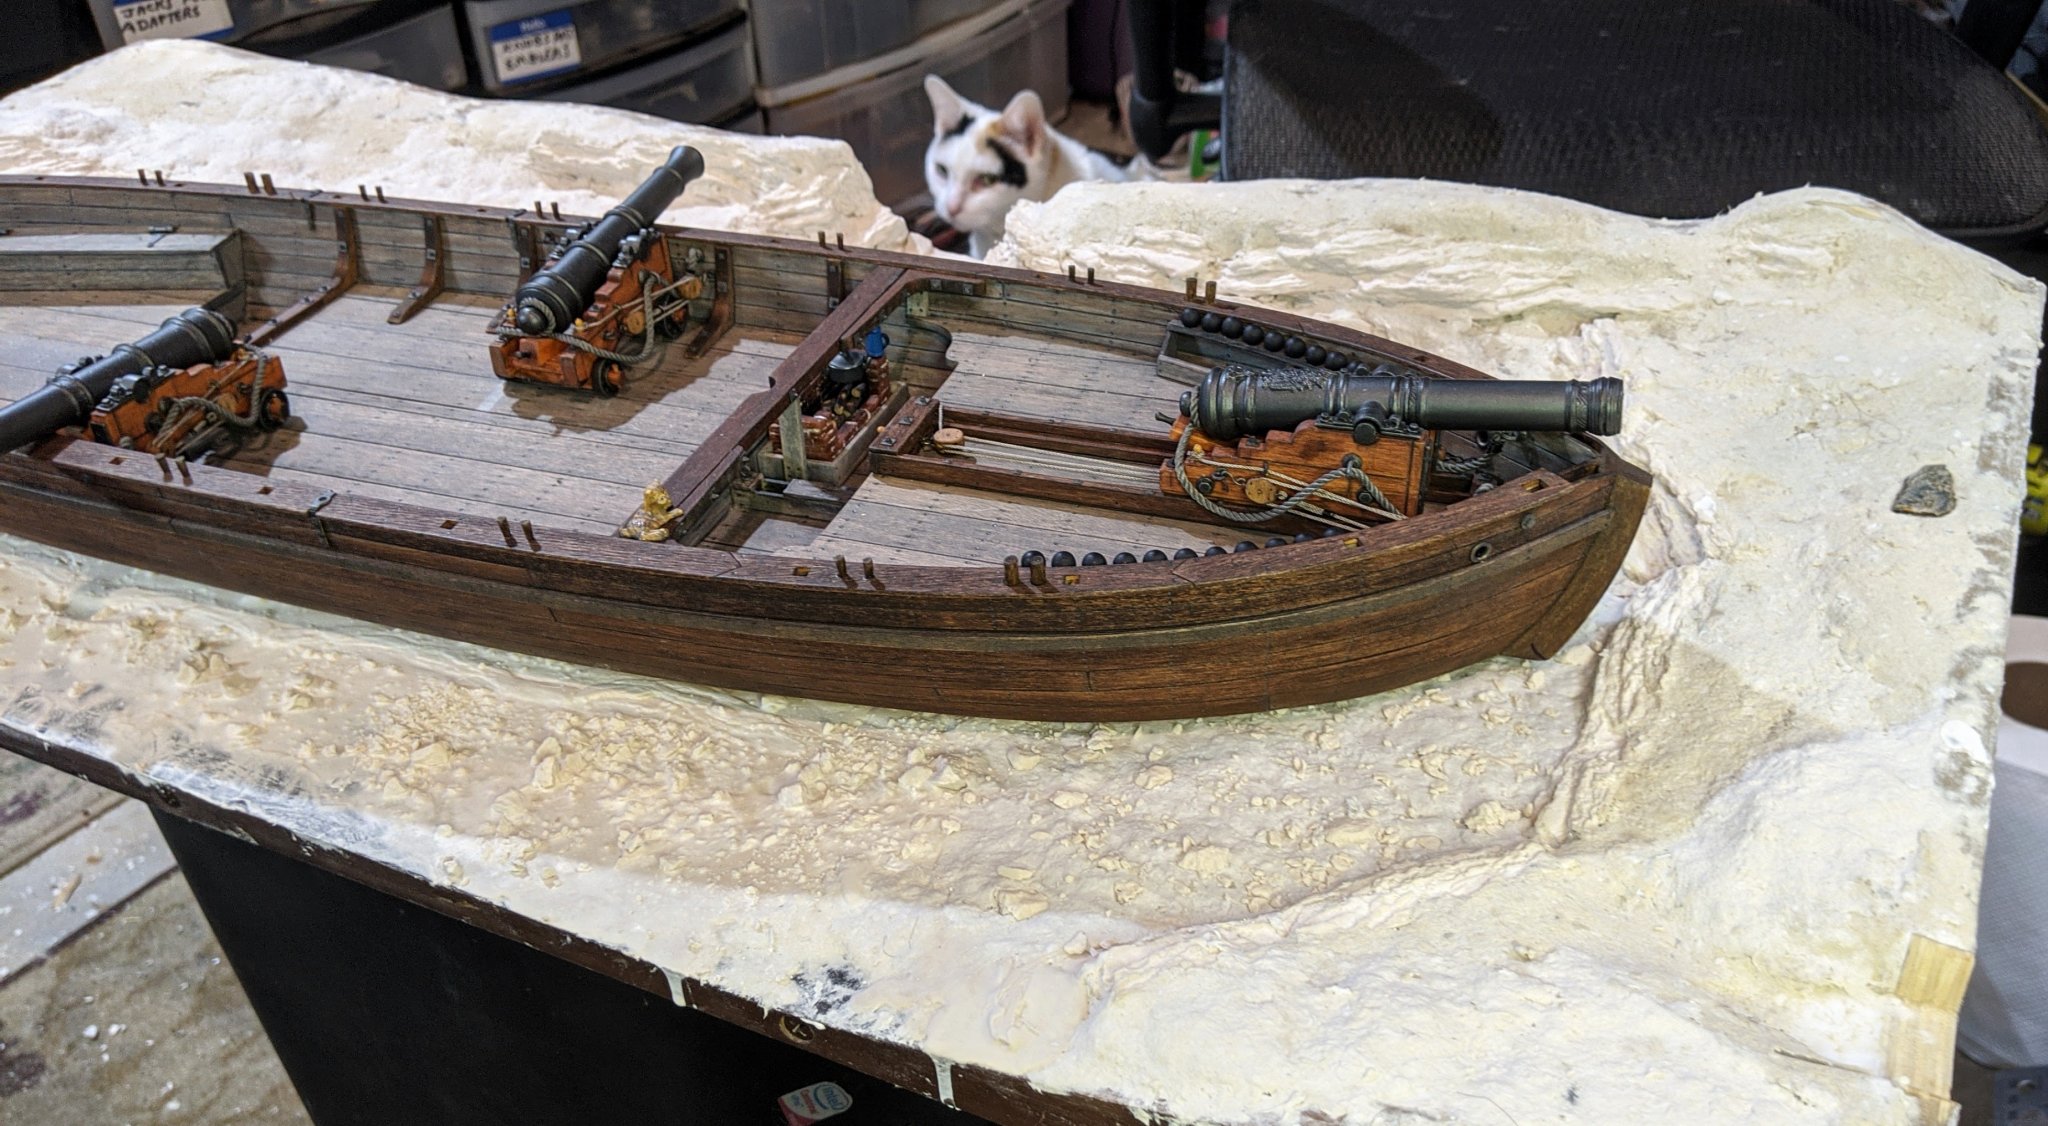
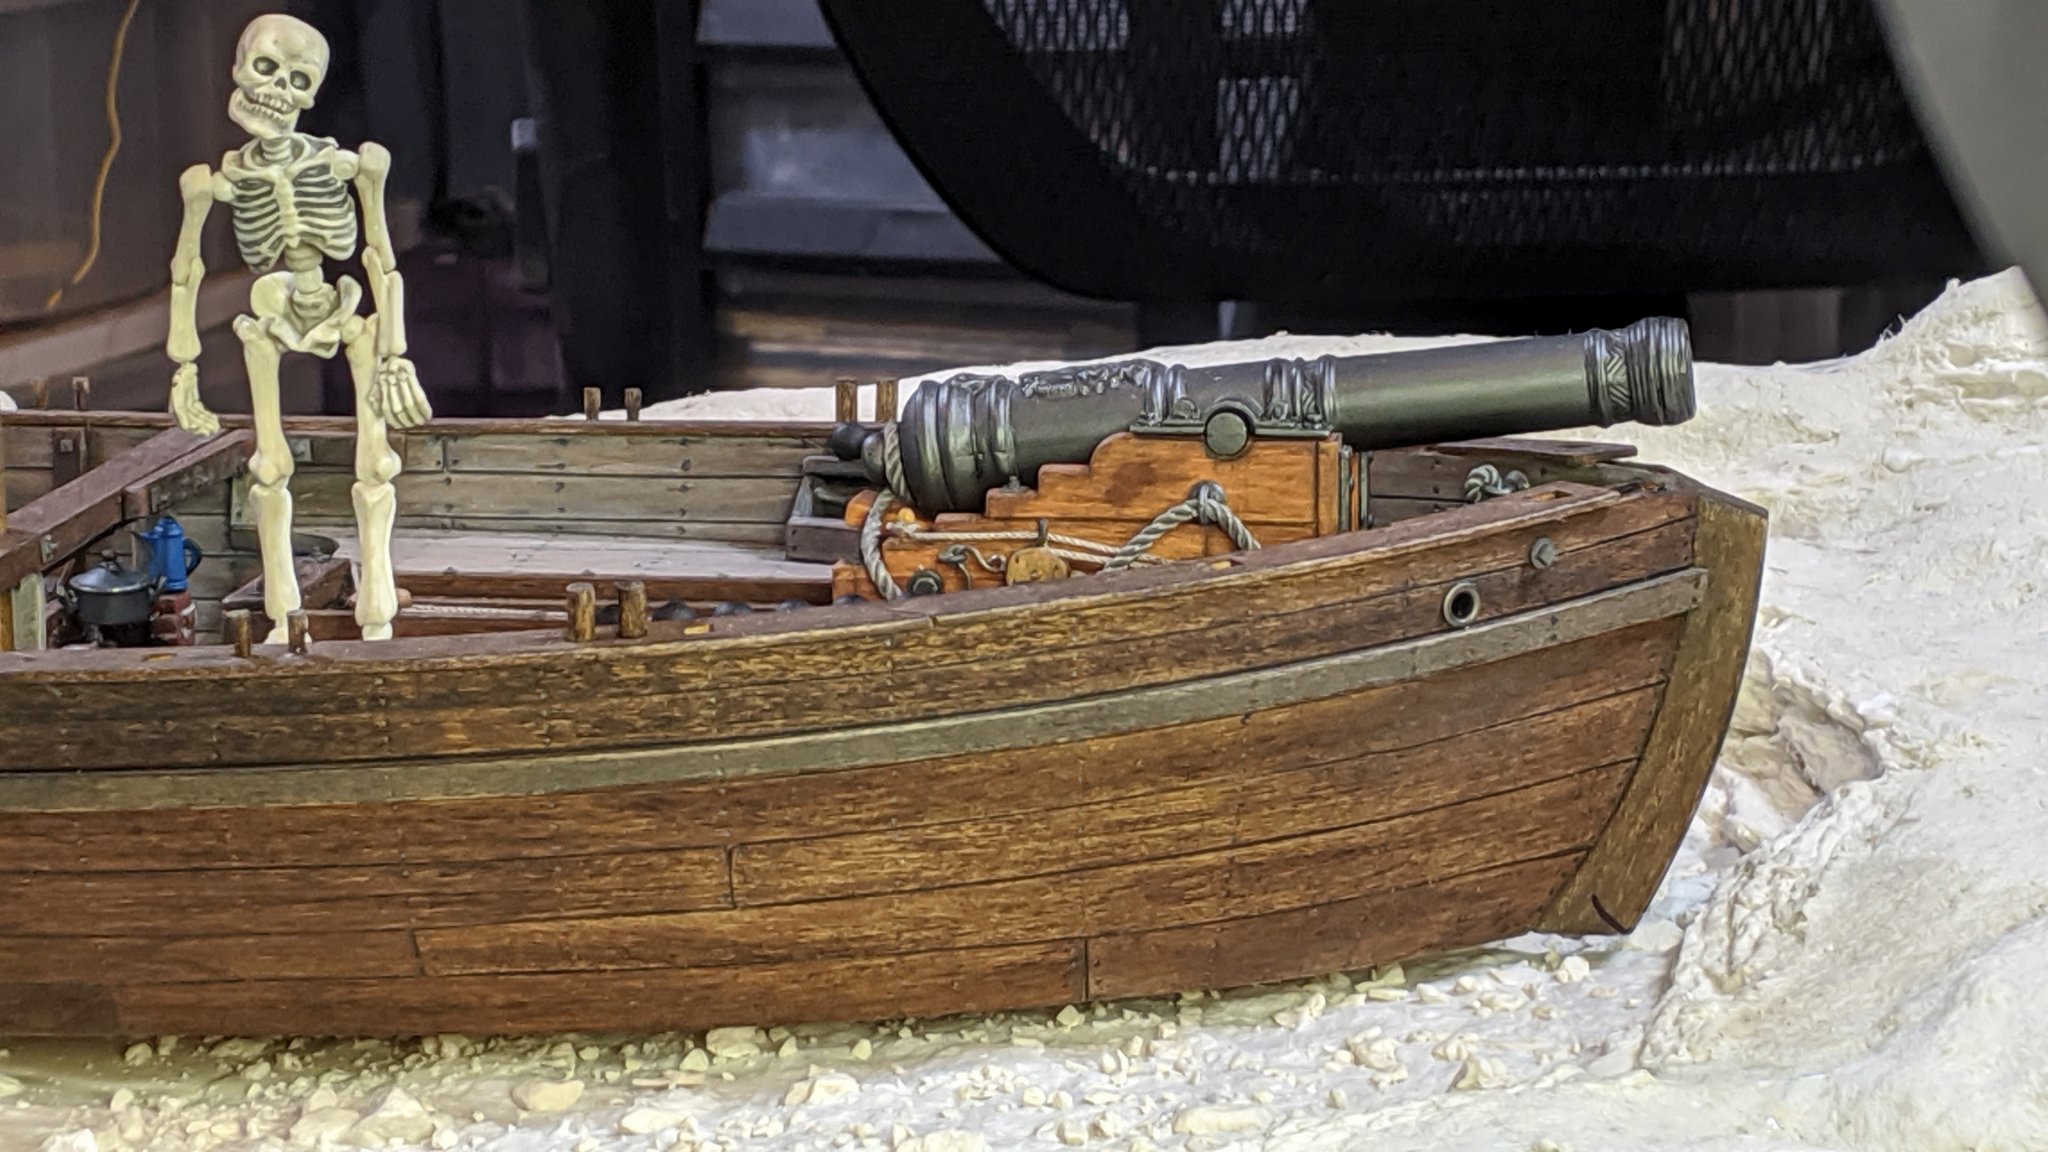
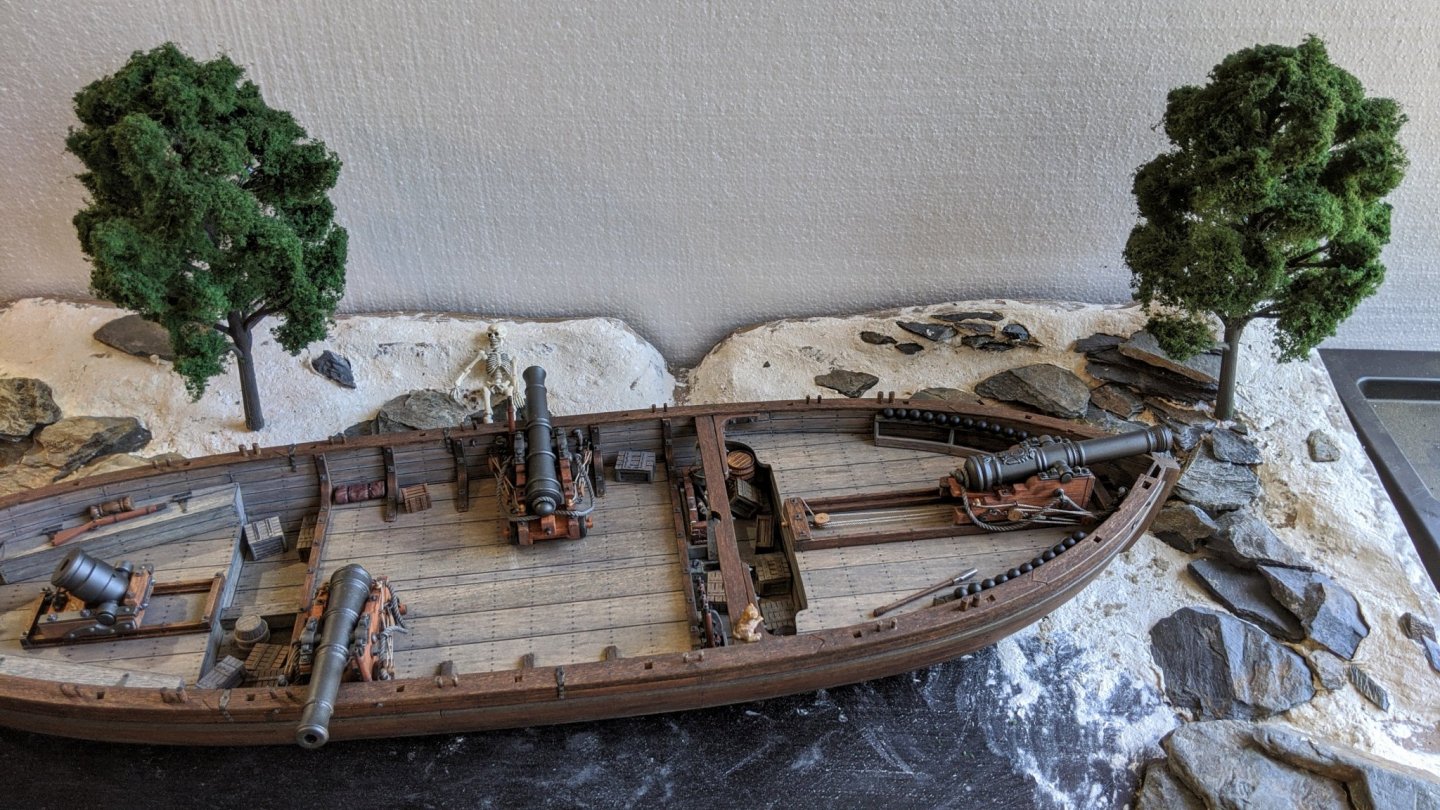
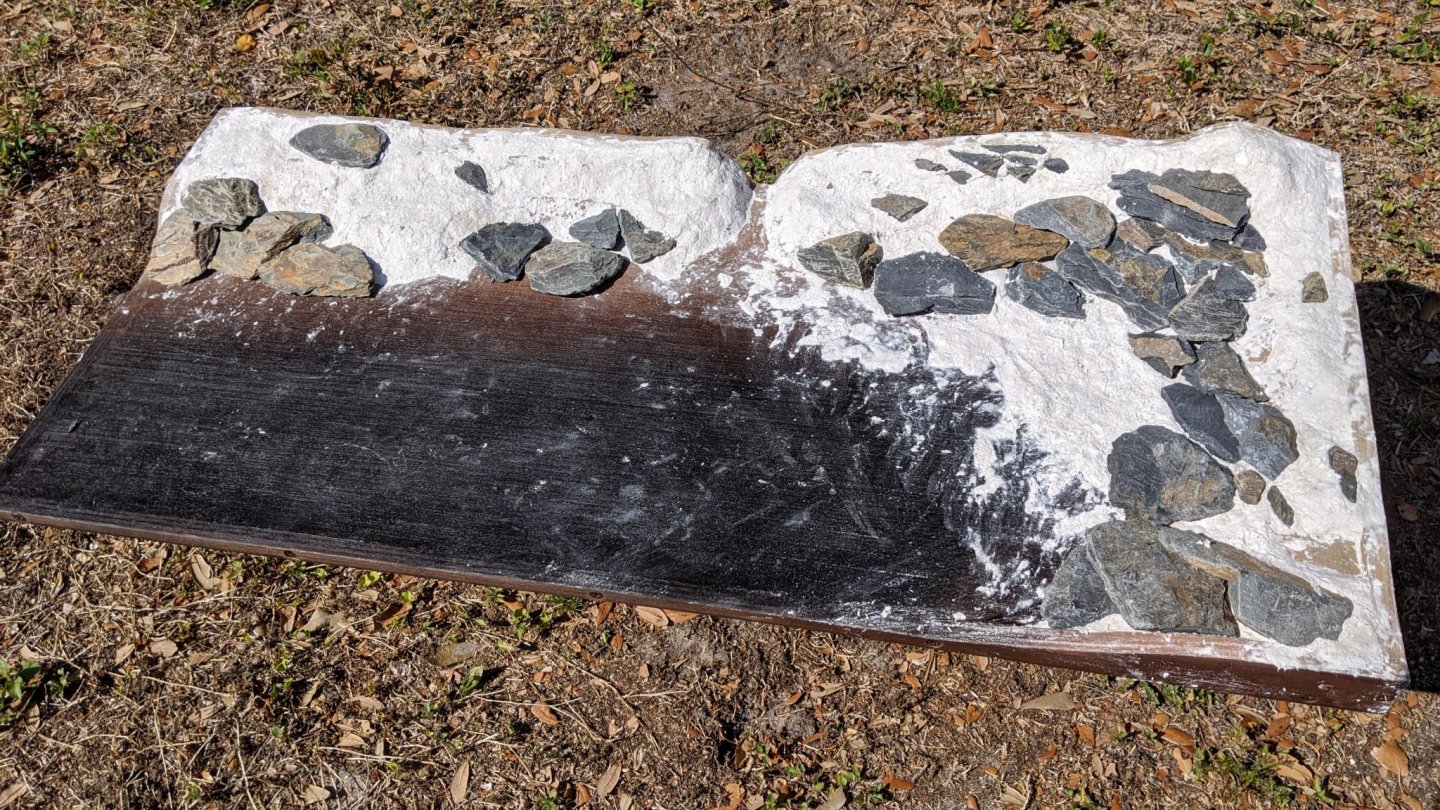
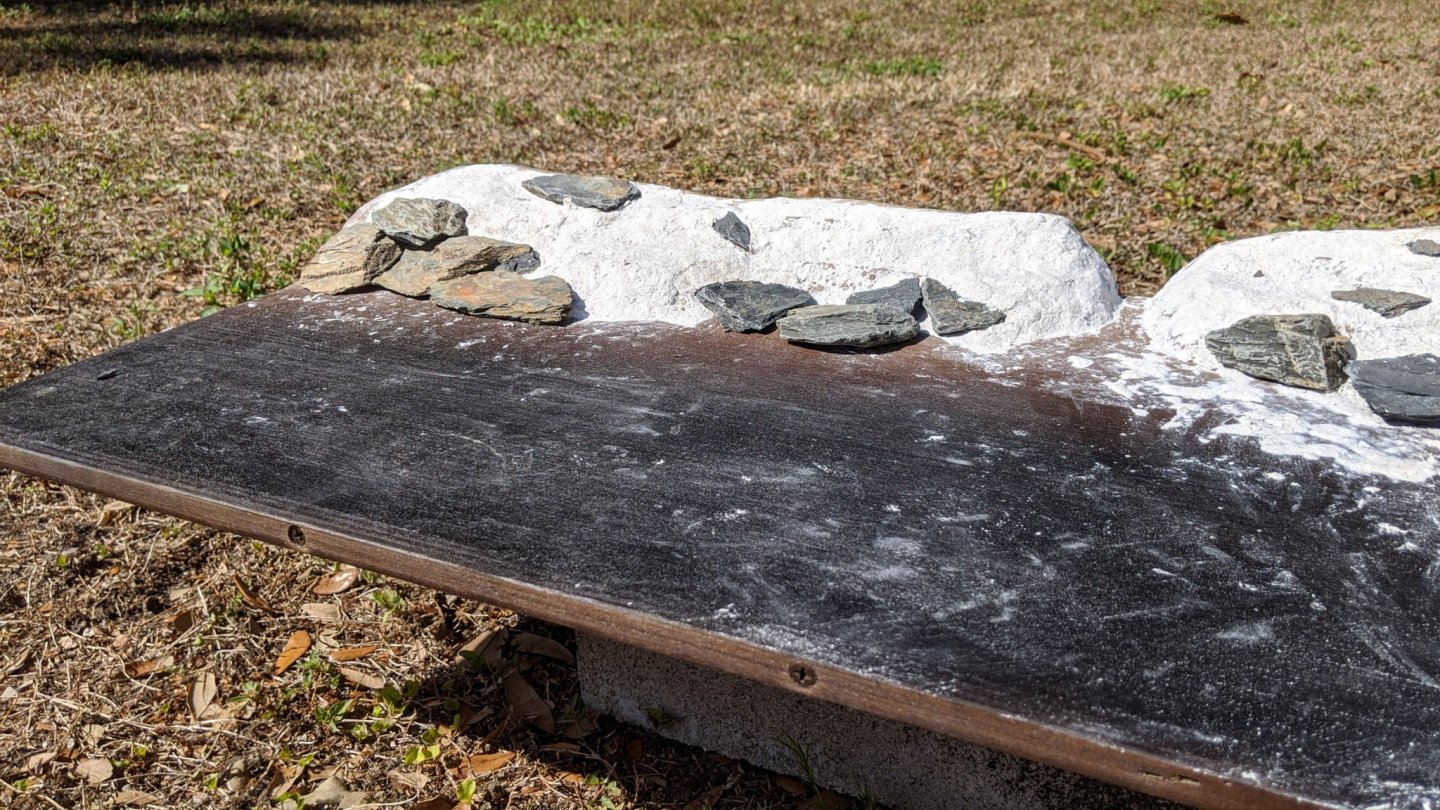
Hey all, Well, I finished all the casting and terrain forming, and did the first few passes of tint for the rocks, riverbed and ground. There will be more washes and drybrushing on the rocks and riverbed to make them "pop" and soil, rocks and gravel added to get the terrain ready for the water resin pours. The techniques I used for the rock staining are straight from this Woodland Scenics Video. I used raw sienna and burnt umber for my secondary colors, and concrete for my primary color. I'll let it dry overnight and then seal it with 3:1 water to ModPodge ratio scenery fixer. Then comes the black wash and drybrushing. For the terrain and riverbed I used a thicker wash of raw sienna, burnt umber and black with a lot of random variations to blend everything together. After the scenery fixer dries, I'll make my dams for the base edges and start the resin water pour. I'll do all the dirt, foliage, trees and detail stuff after the water is completed. I did get some work done on the boat, I started adding detail to the bow... bedrolls, crates etc. As soon as the resin water pour is done, I can start adding the delicate parts on the boat. I'm waiting until then because I'll be handling the boat A LOT and I don't want to break off the fiddly stuff. Here's Mr. Snowball telling me to get to work... Here's some shots of the base after first tints... Here's some shots of the boat included (to see if the colors tie together so far) and the added bow detail.


-
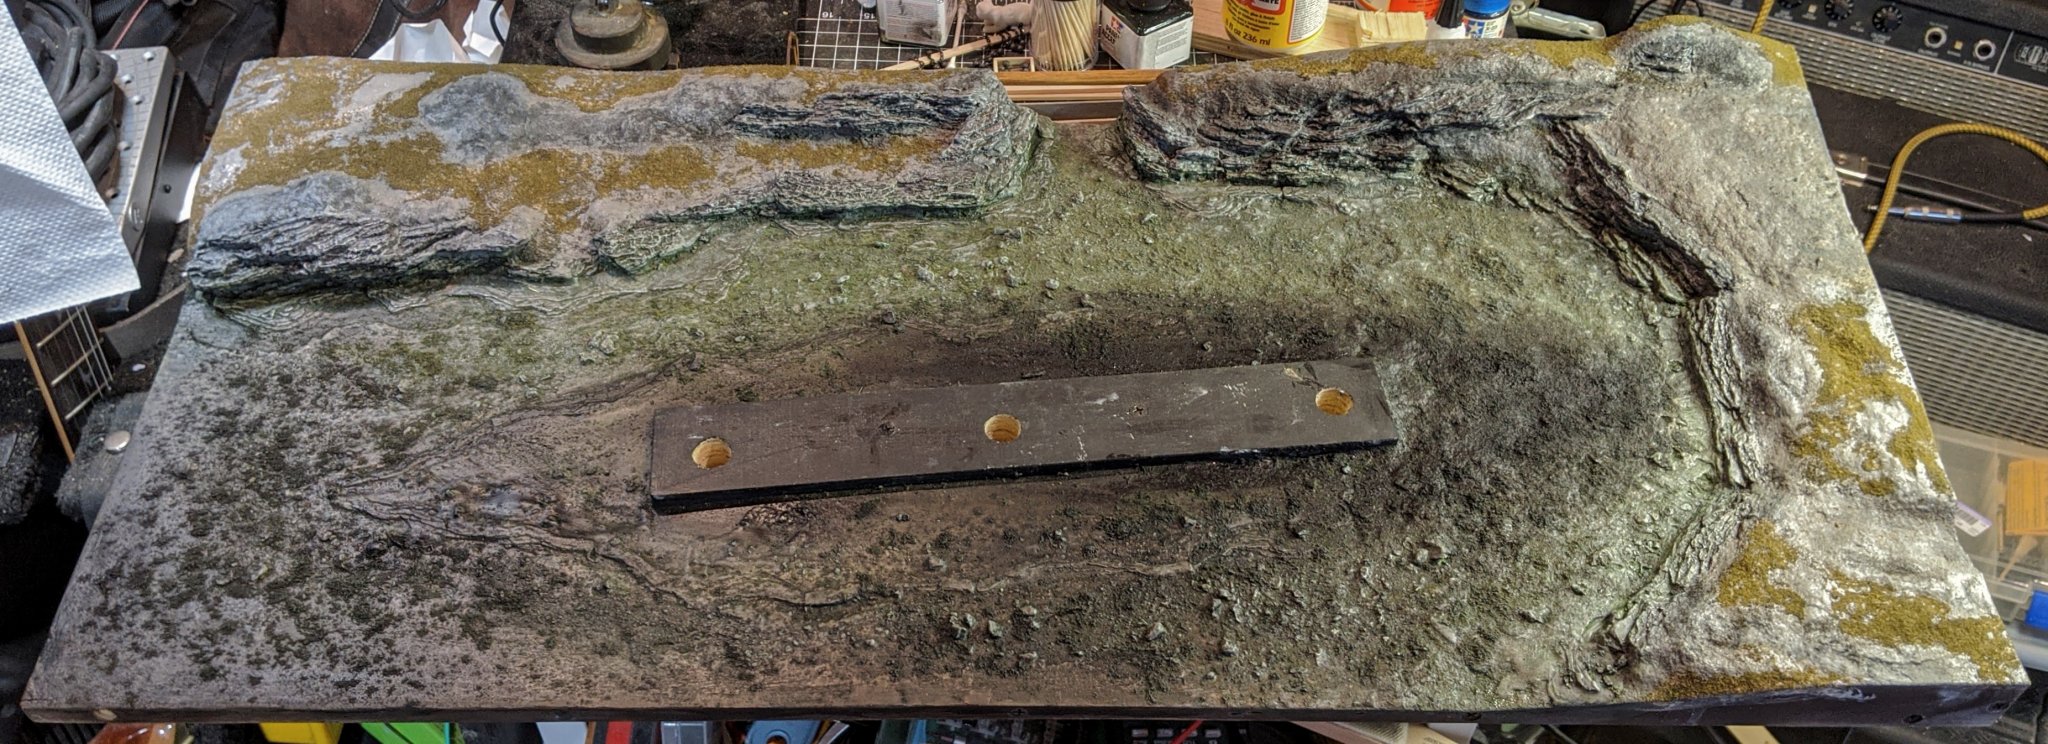
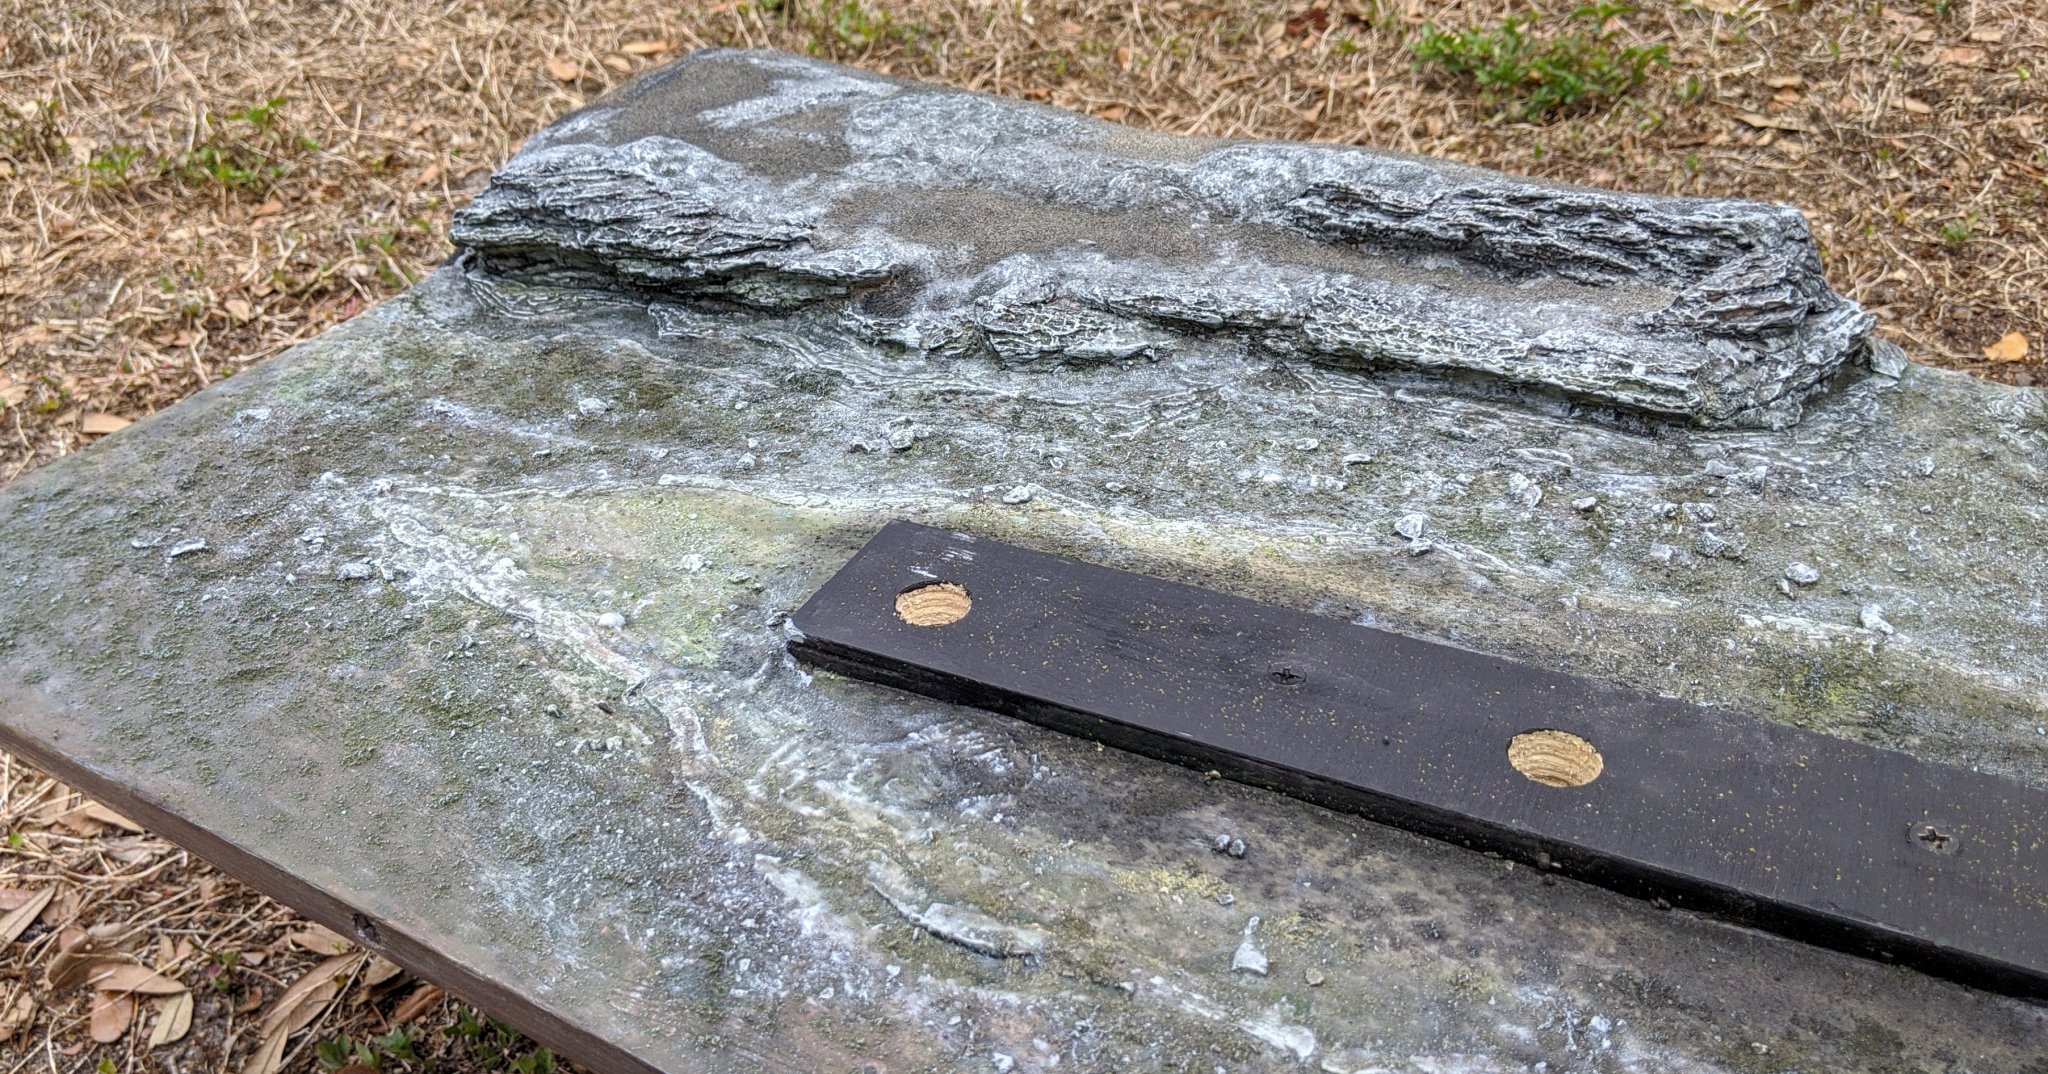
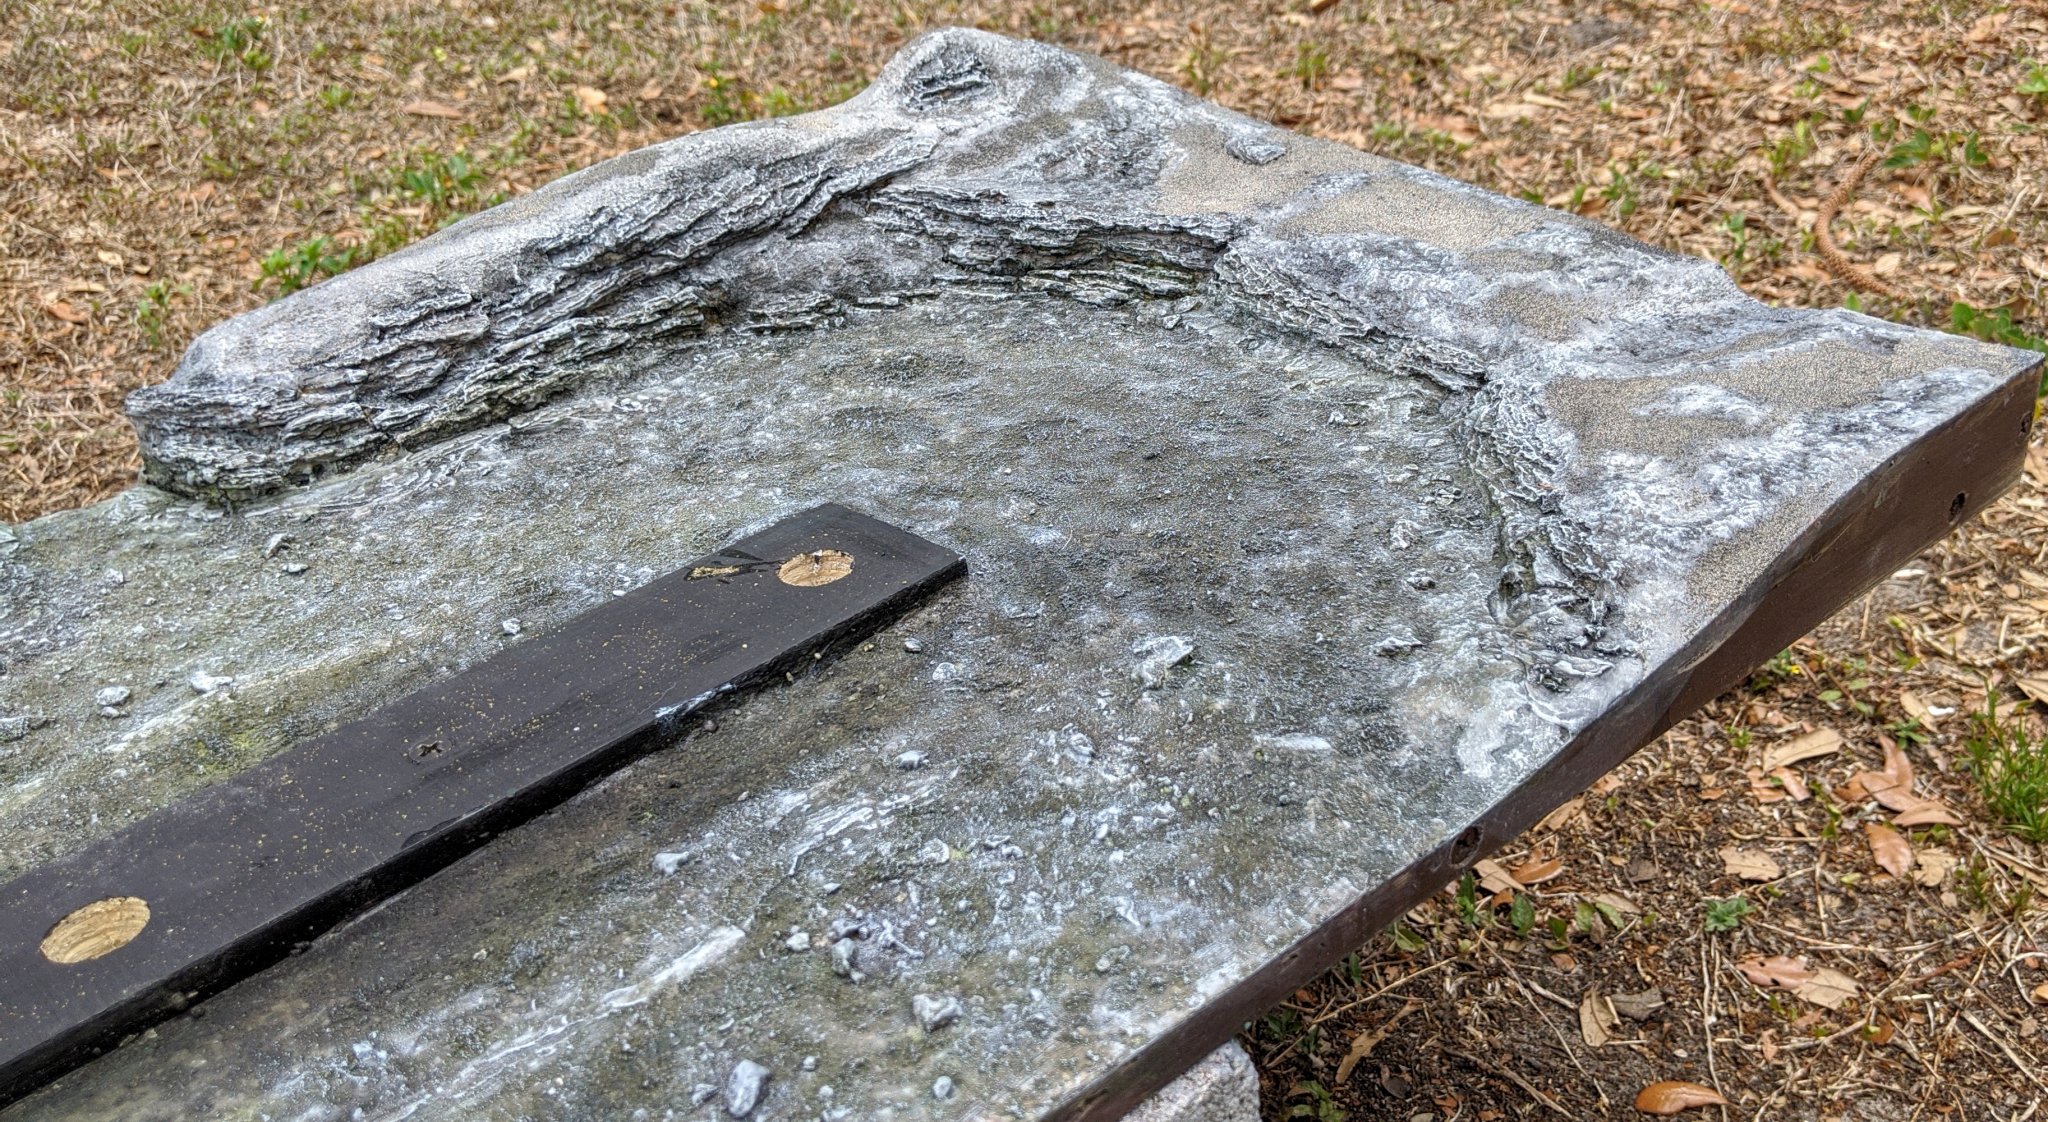
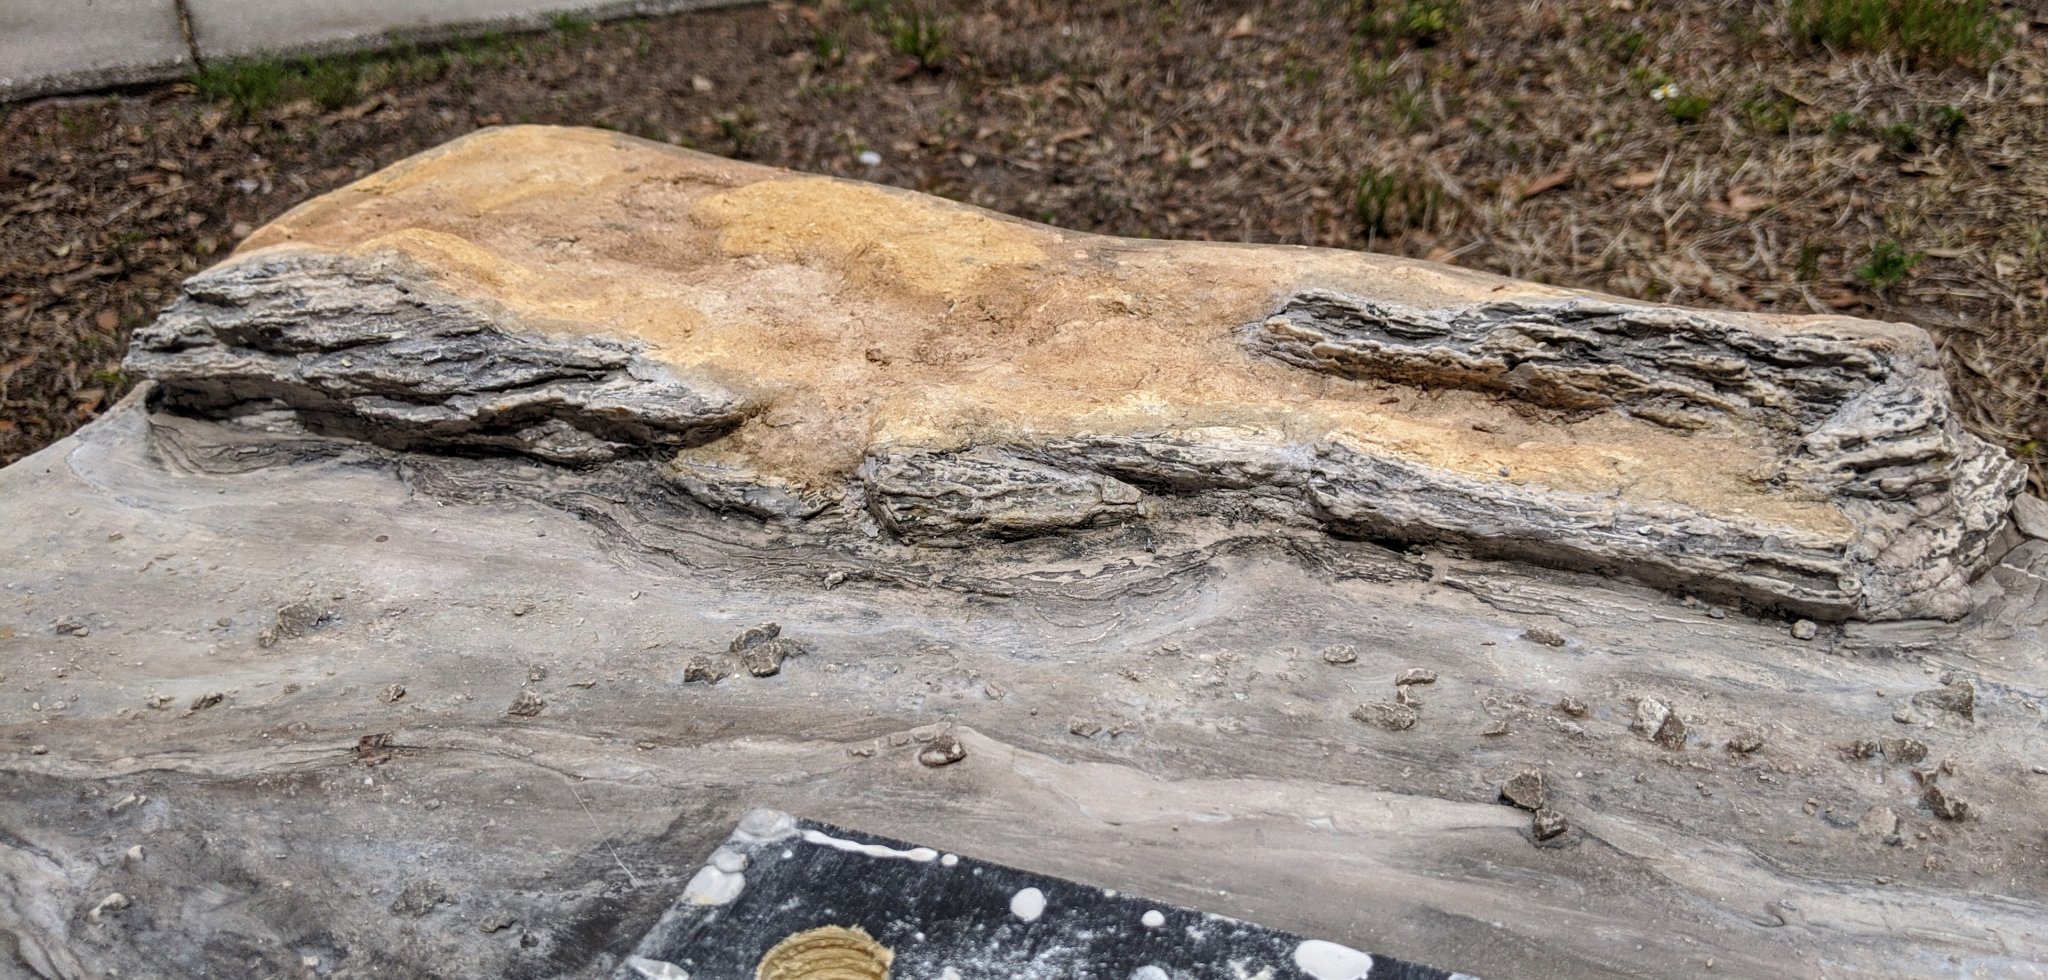
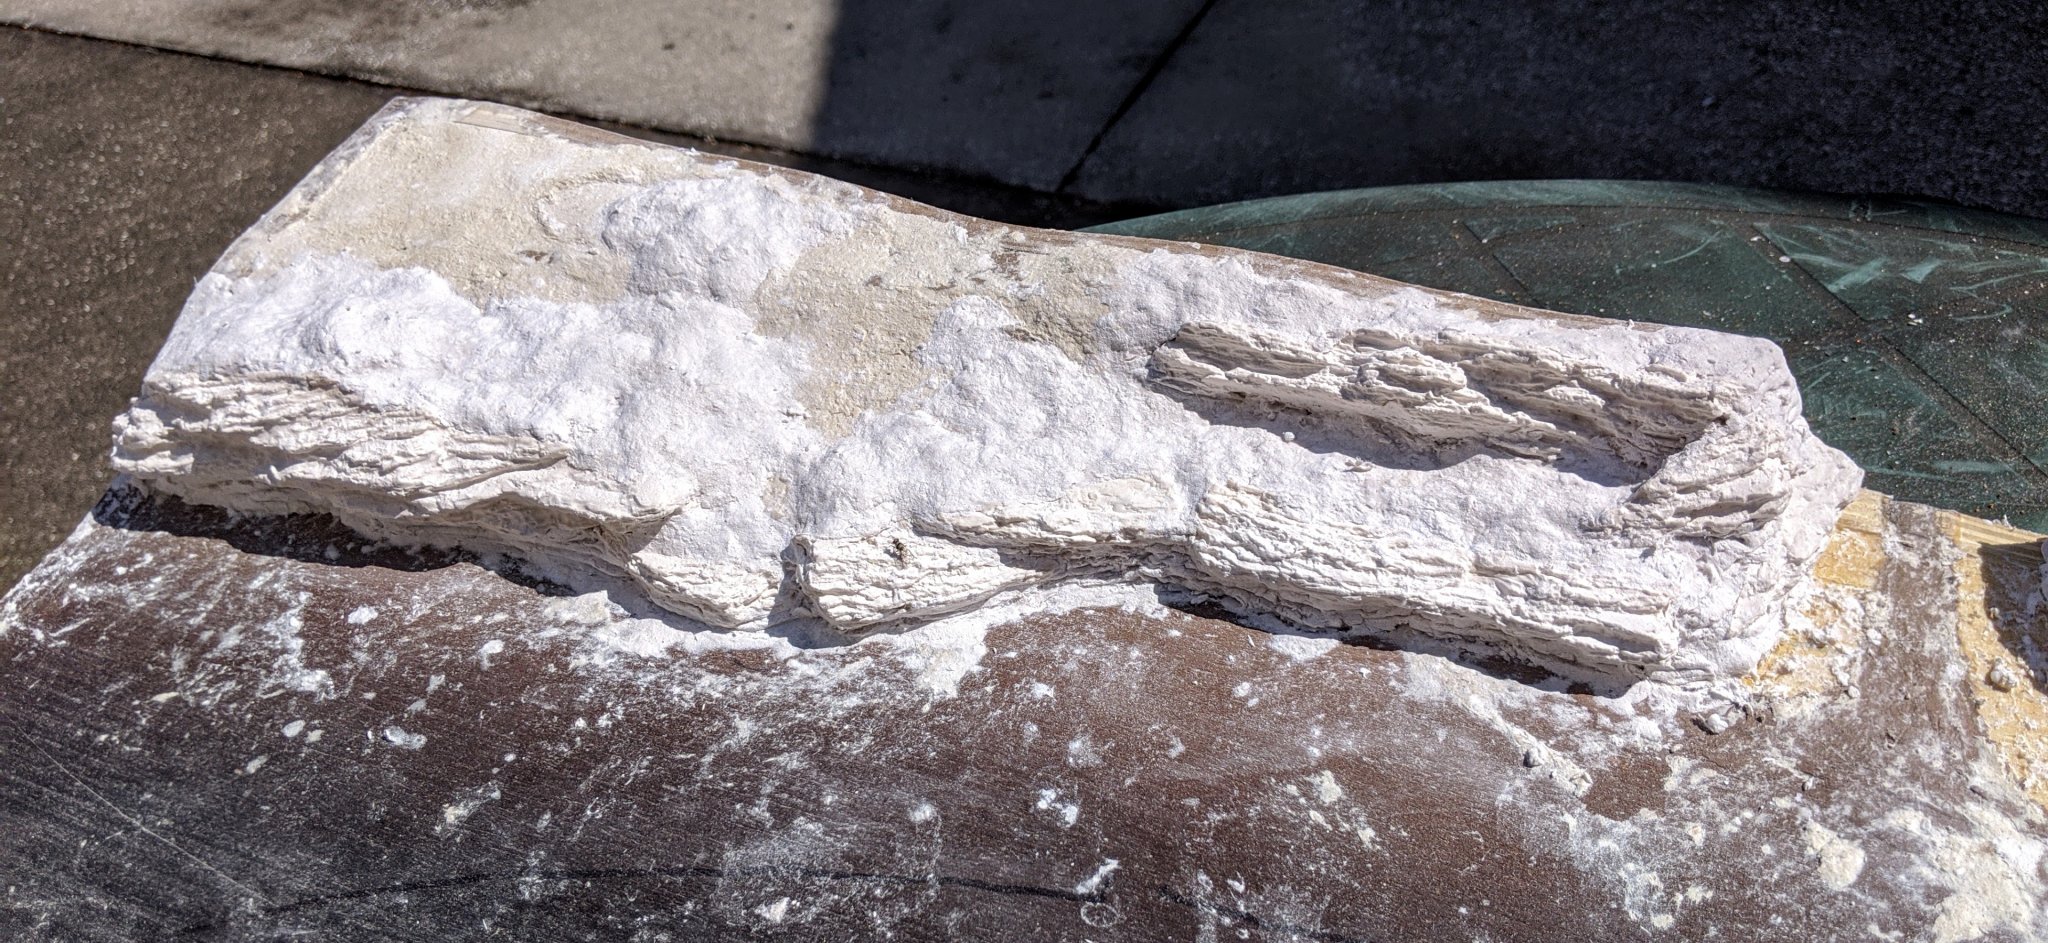
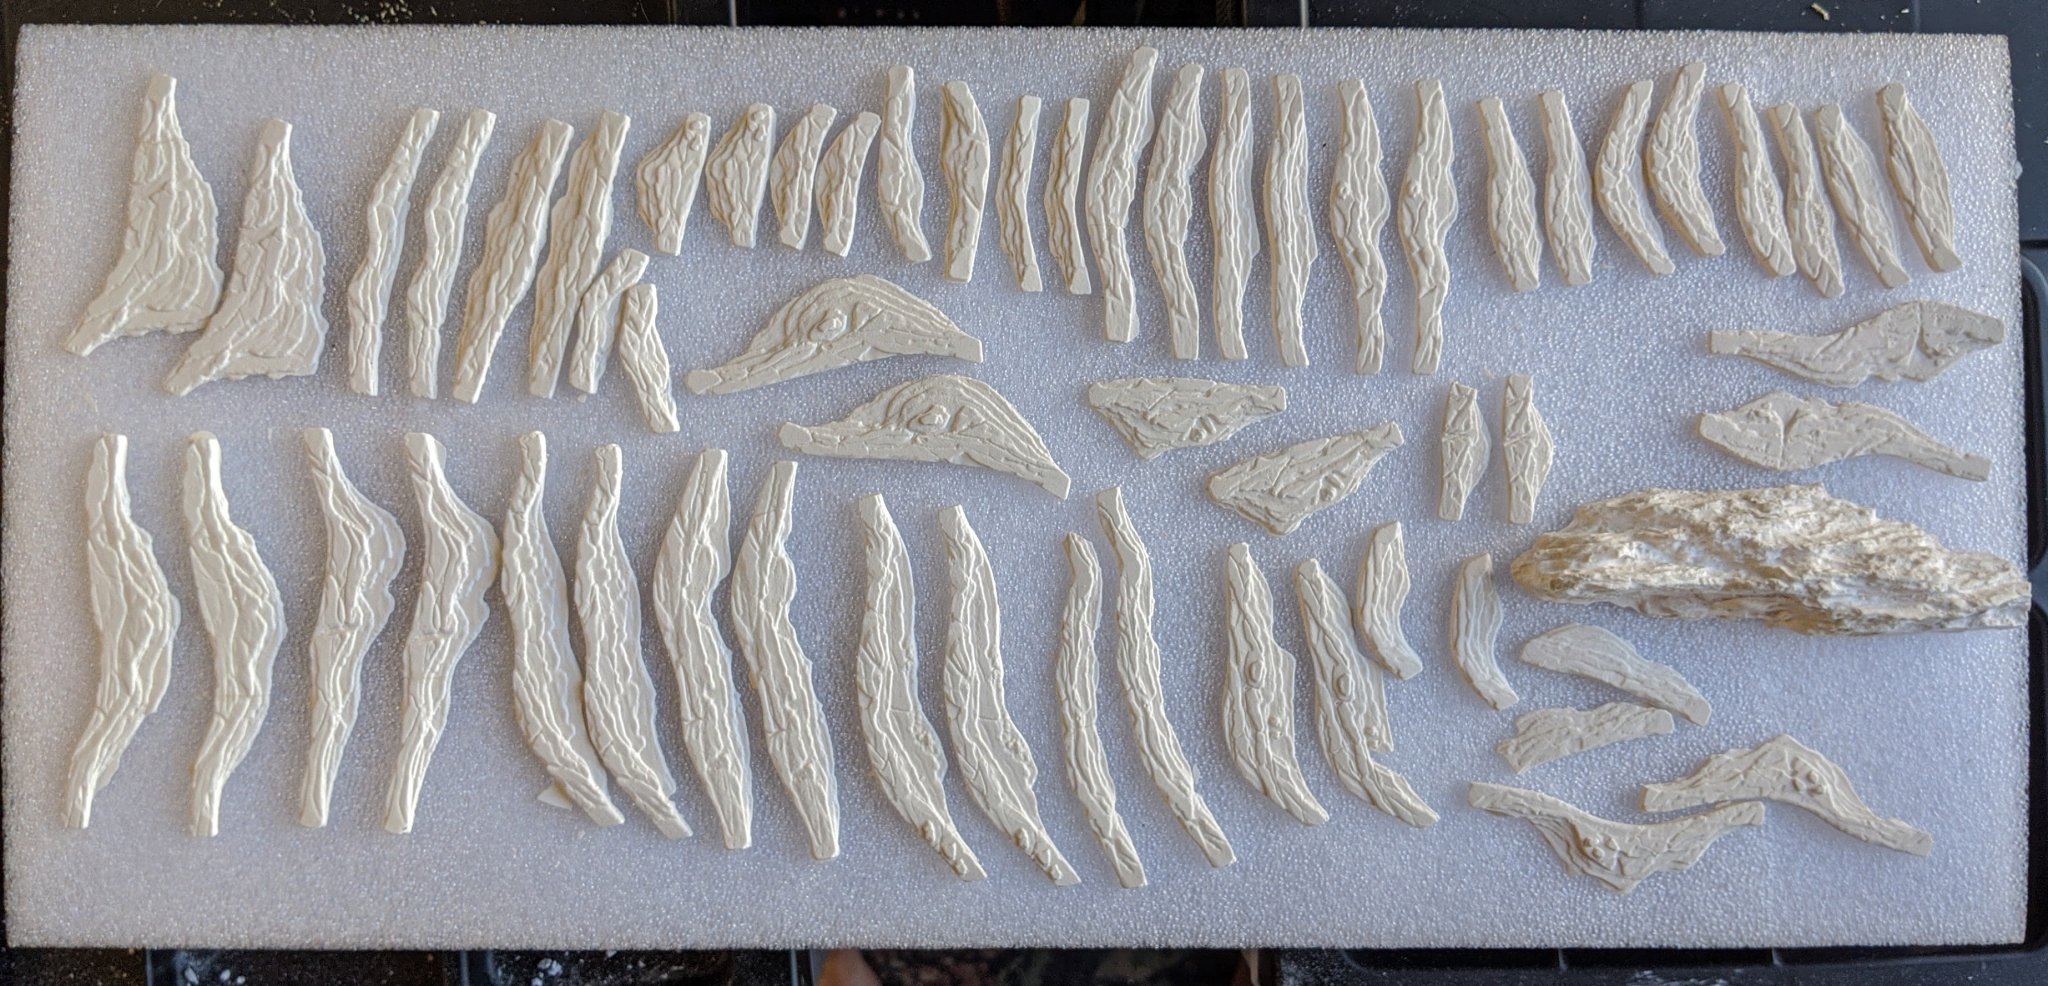
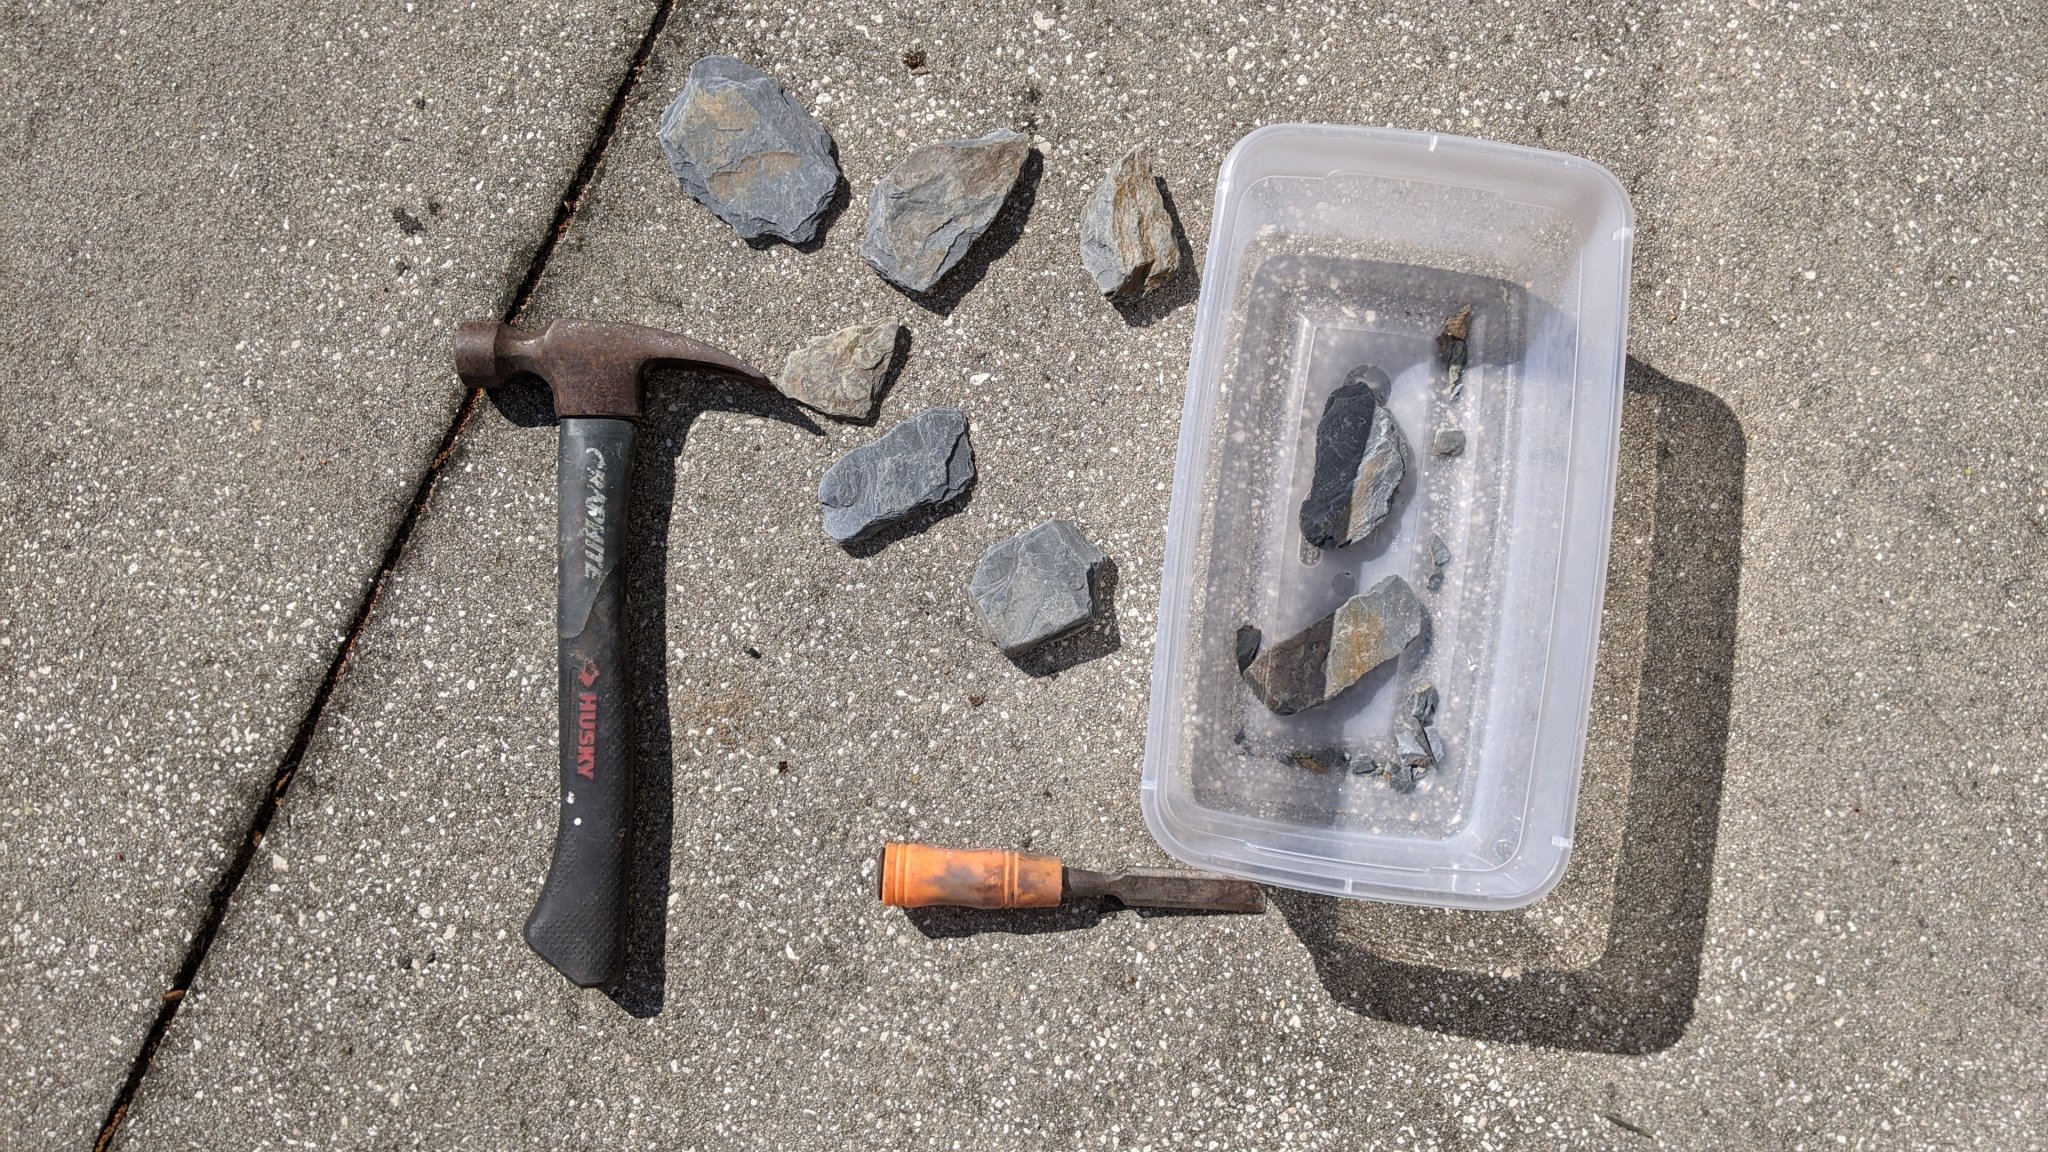
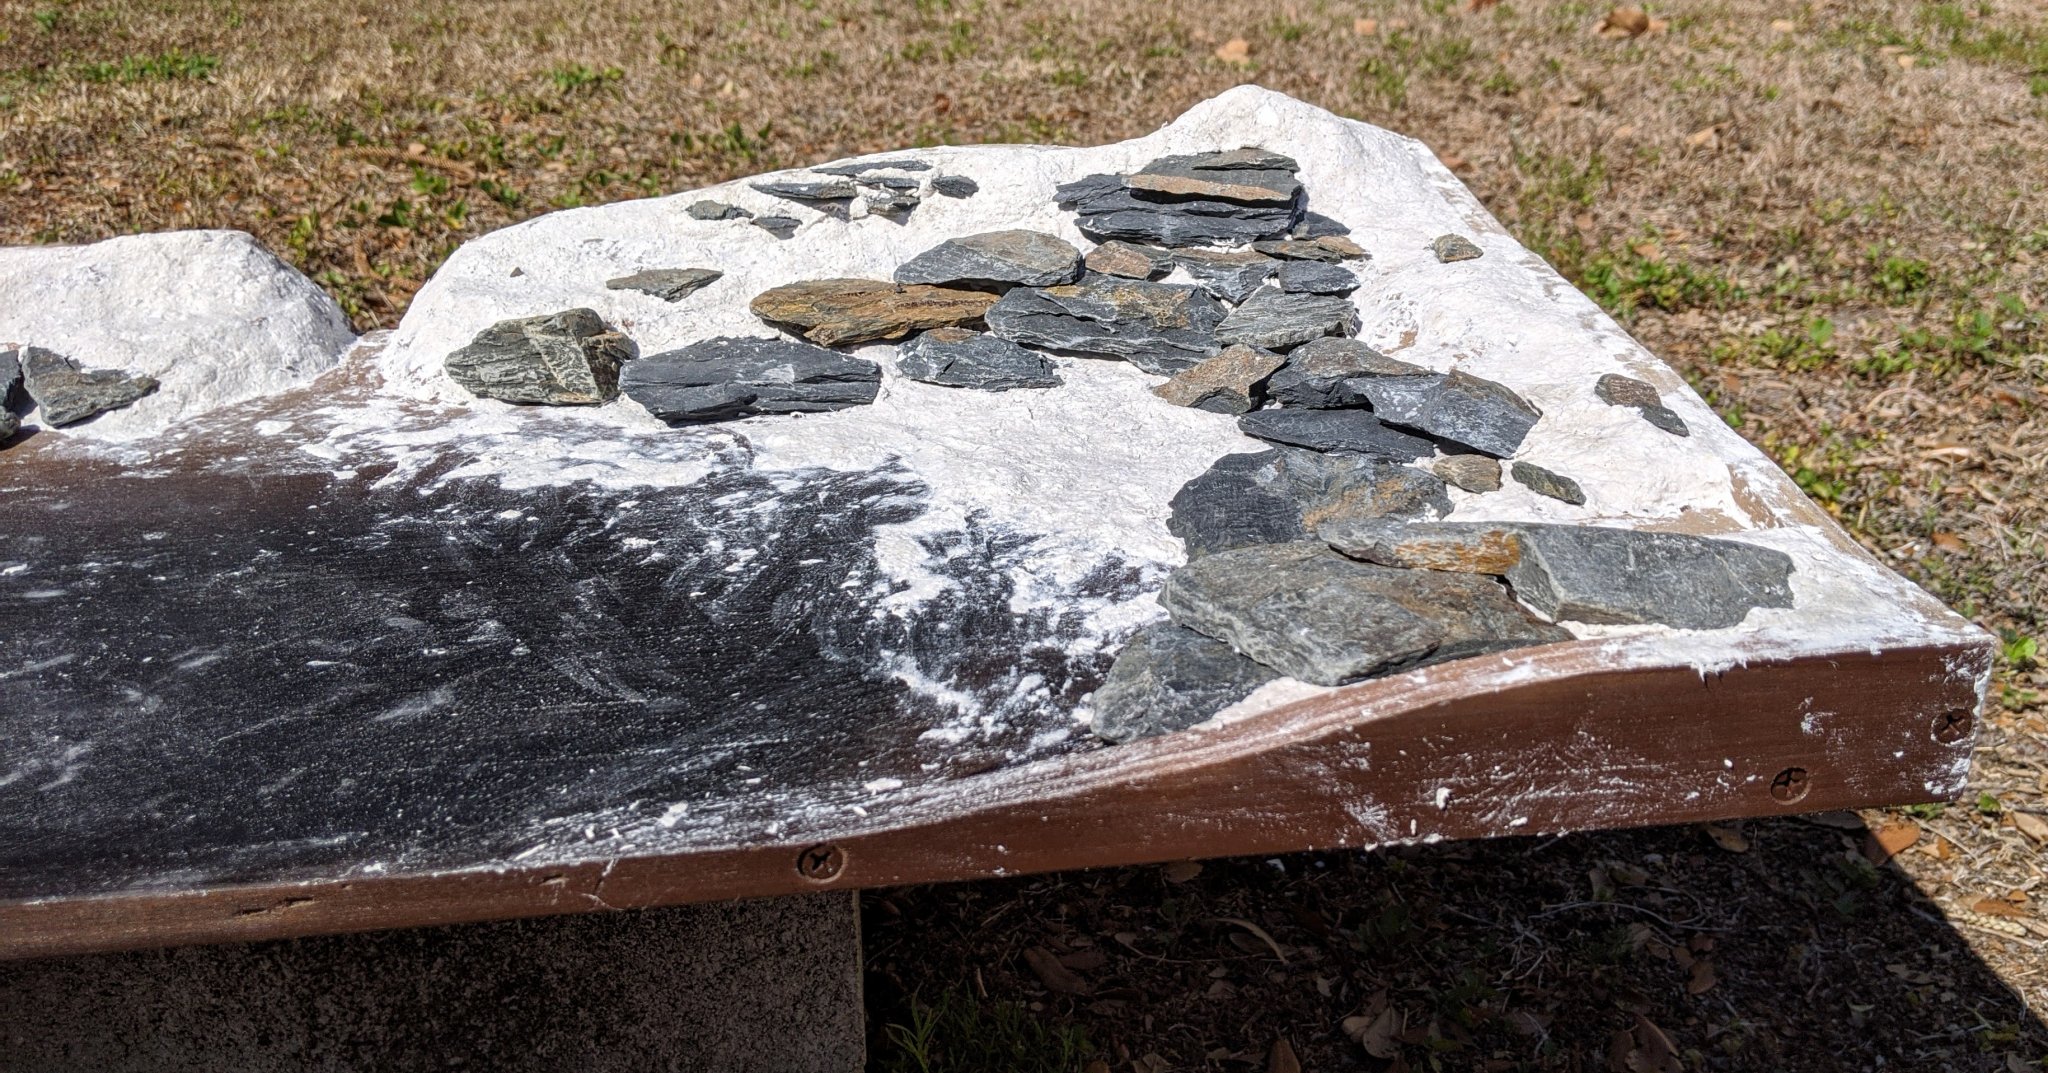
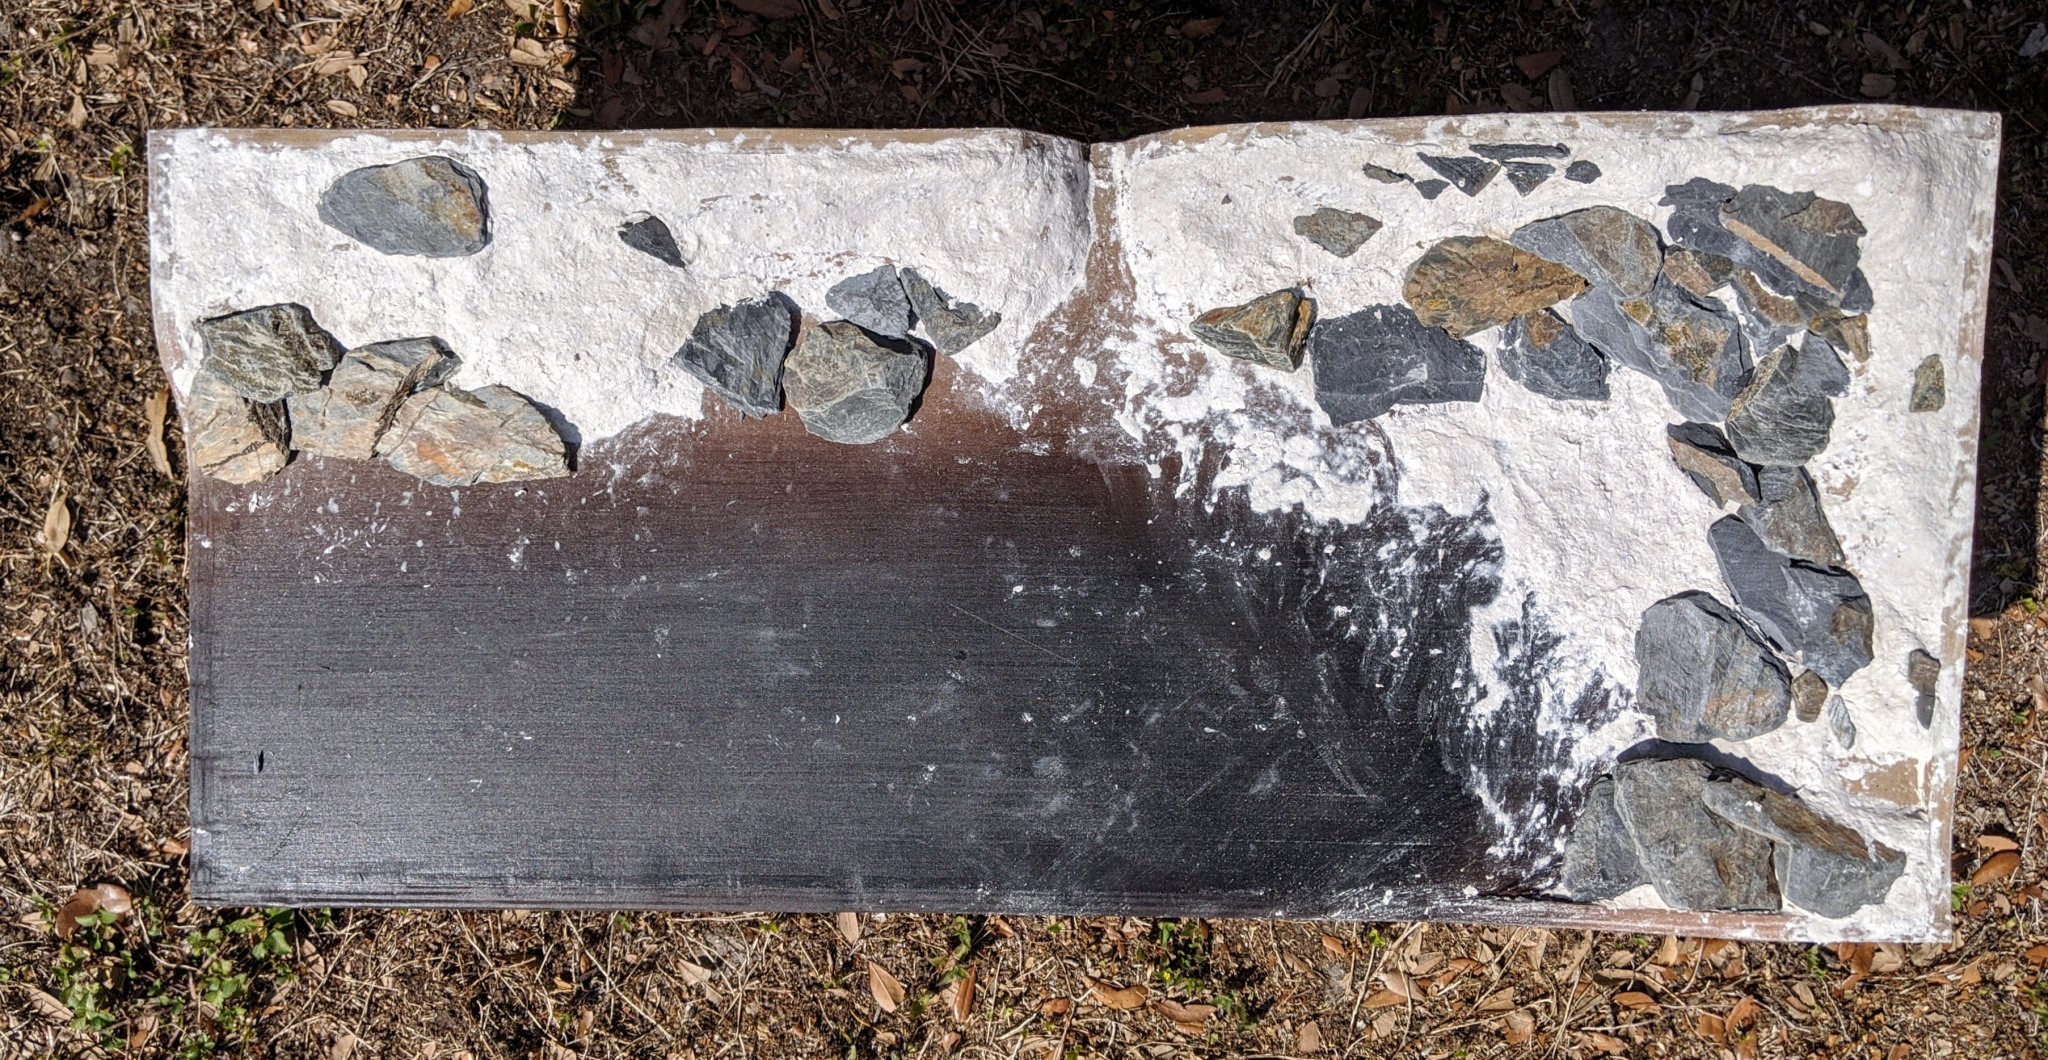
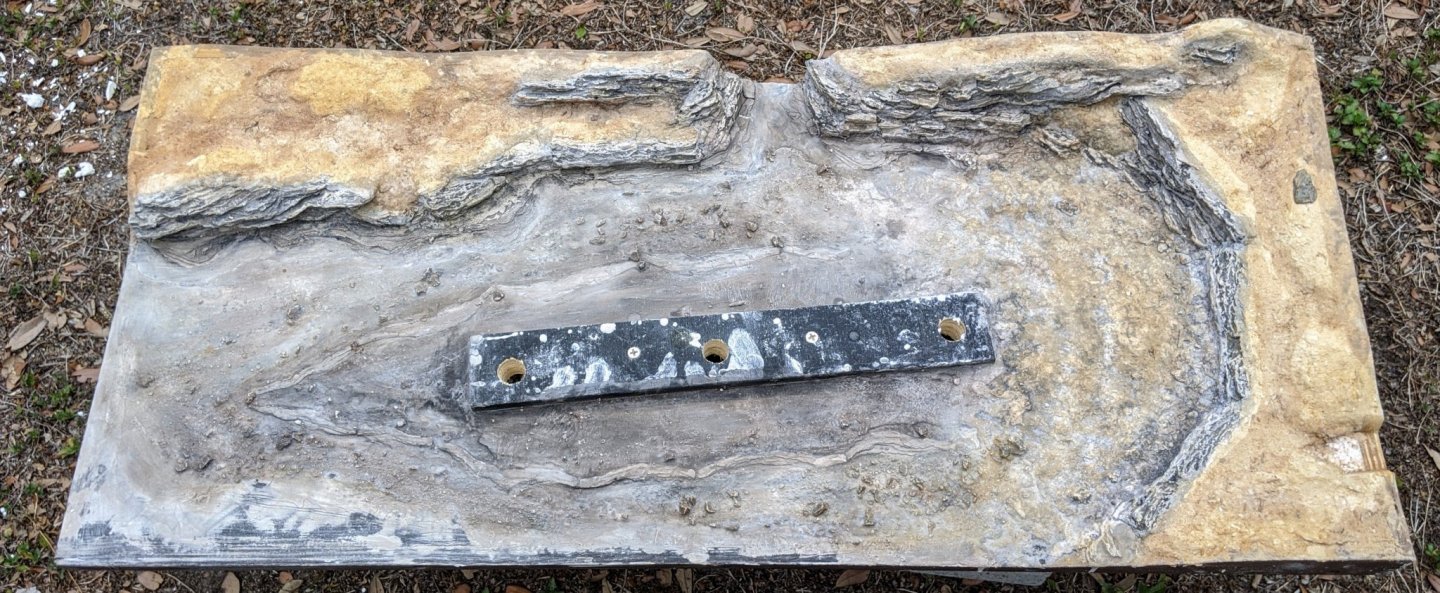
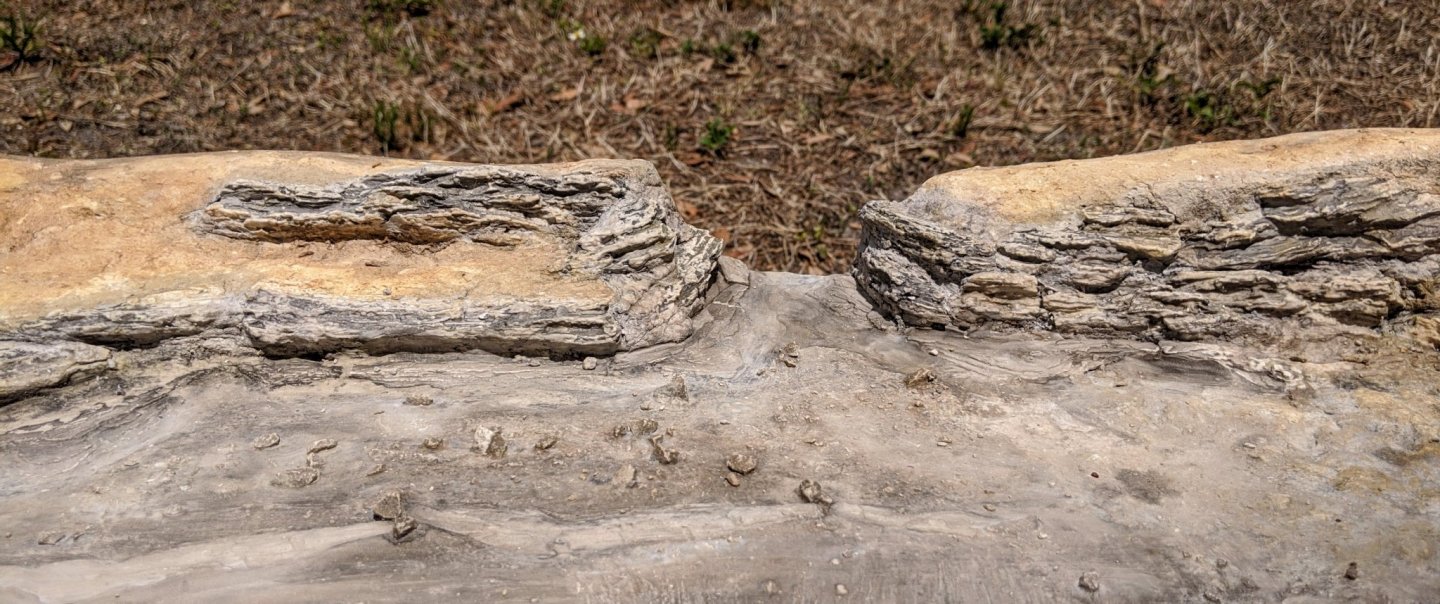
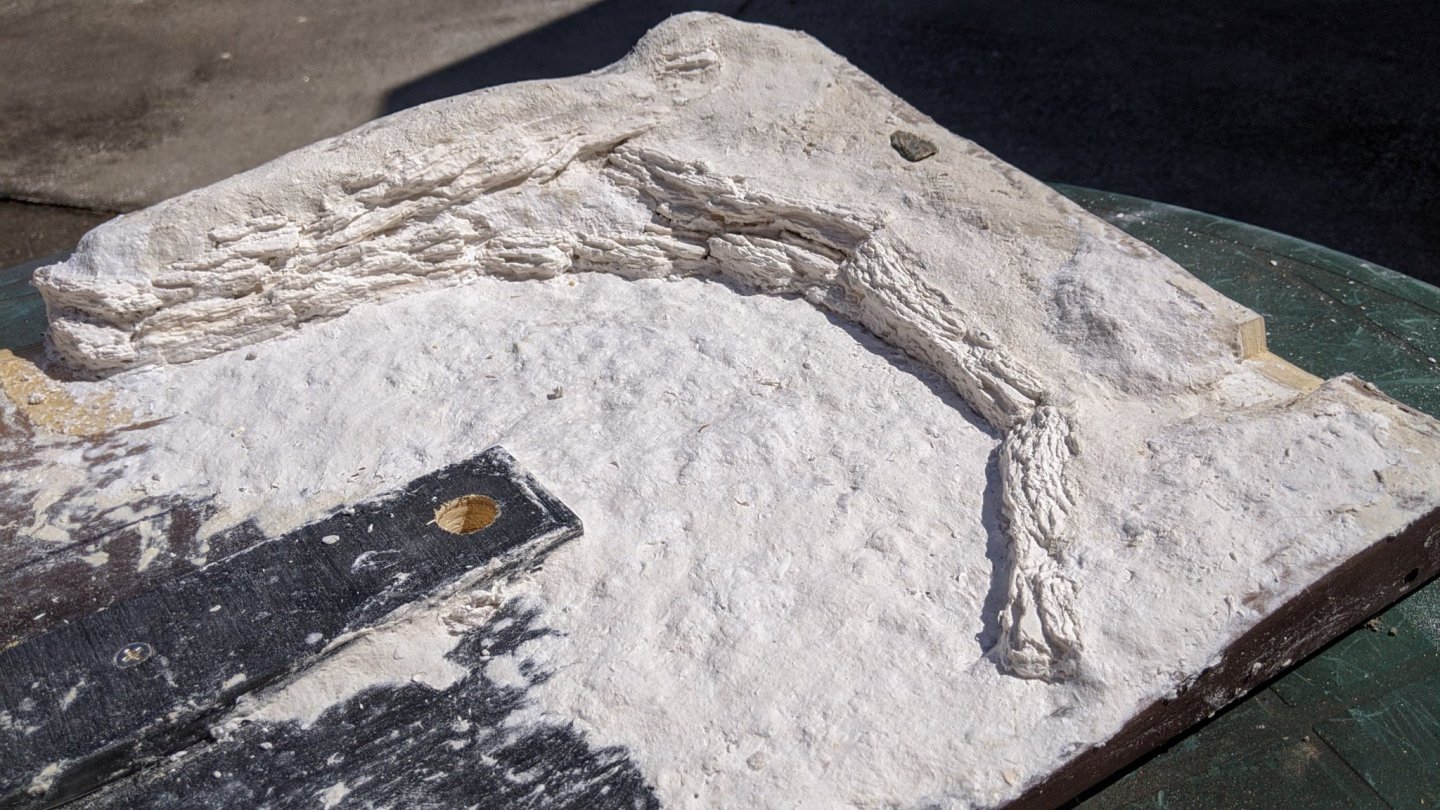
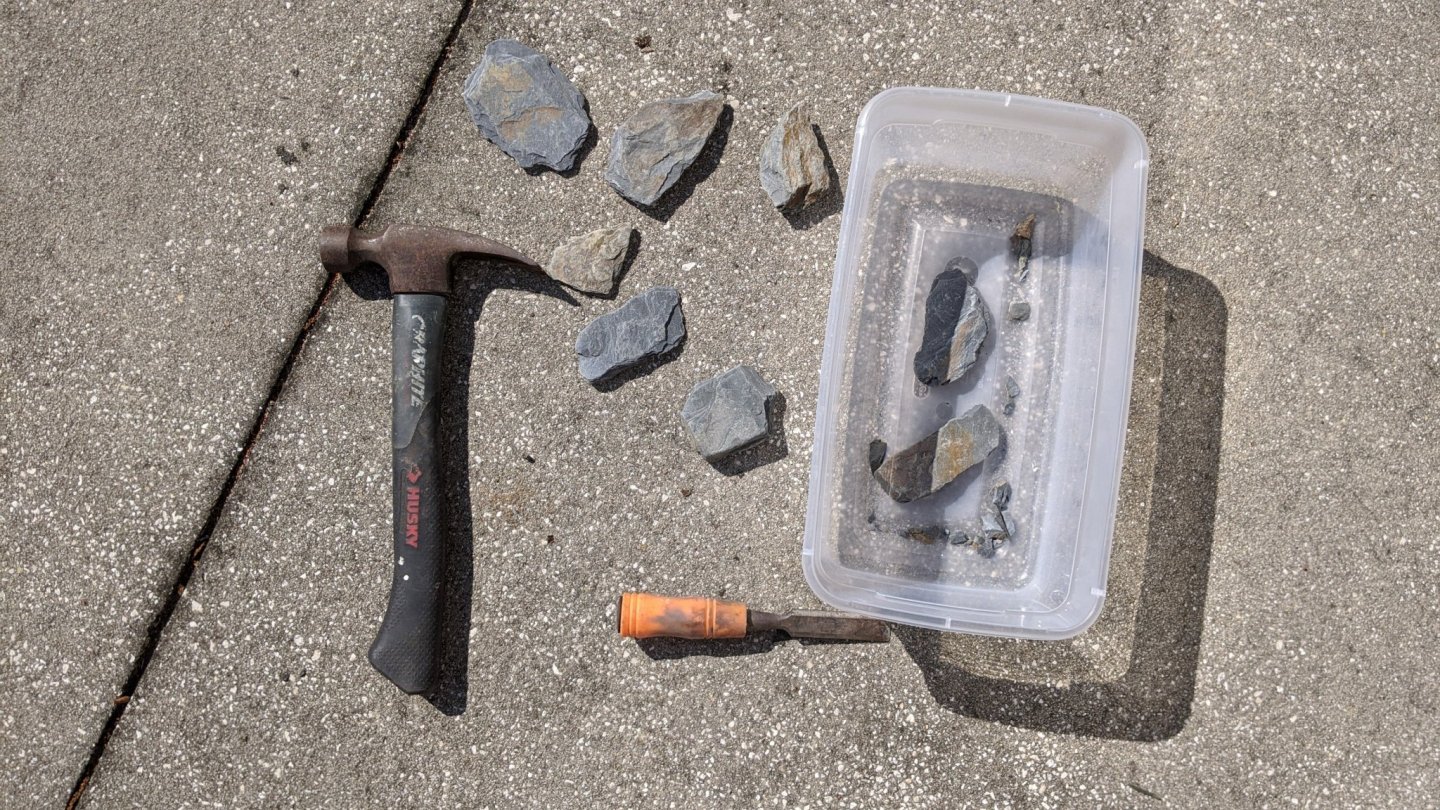
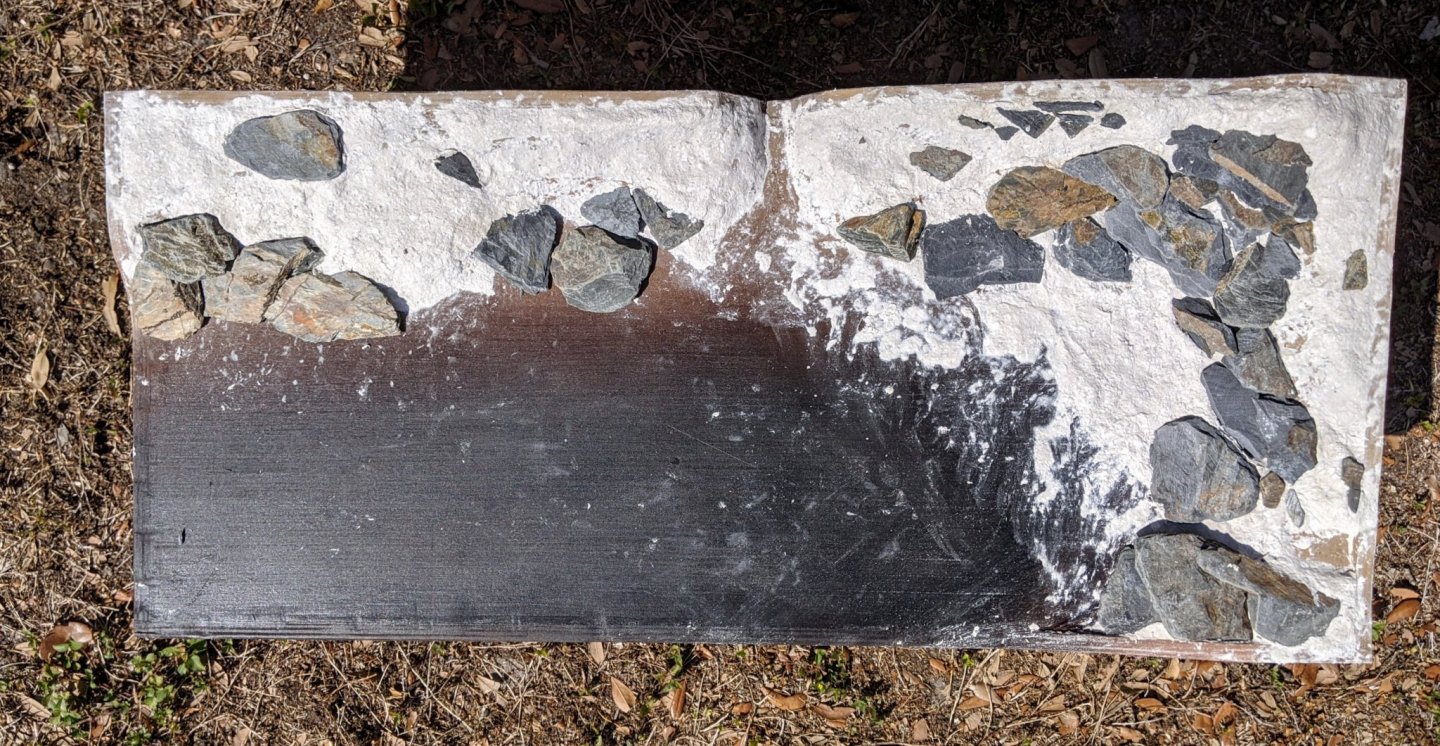
Thanks, Ken. I'm just about done, I've got enough extra for at least two more similar scale projects. Yeah, the bones don't fall far from the tree, do they? I made an EPIC SCREW-UP trying to use real rock on the base. Sure, it looks like rock (it is rock!) but "in scale" the rocks just don't cut it. Way too big and not fine enough detail. Also I had to "work around" the real rocks; compromising the overall layout of the base. My original idea was to cast the rocks using some Woodland Scenics silicone rock molds I have. I should have stuck with the original plan. So, out came the chisel and hammer. After about an hour of messy and curse filled pounding, I got the basic proportions back to my original concept. I cast up about four mold sheets (6 to 12 rocks per sheet) of layered rock that is typical of the area Philly sailed in. The rocks are universal scale, and the molds are really cut well with great detail. I used casting plaster for the rocks, and FastMache to attach them and blend everything together. I also decided to widen the feeder stream and provide a place for the gangway from the starboard bow to rest on the shore, and a path leading off the base. The above water part is now about done, it just needs to bake out a few days and then I can start adding color and detail. The riverbed is the last thing to finish. I still need to raise the elevation under the bow of the boat some more and add shore rocks around the area where the riverbed meets the shore. I included a pic of the shore rock castings, it's pretty slick how they designed them to be run in various different courses. Here's some really ugly shots of the newly modified base, drying mache and plaster. I think this will look TONS better than before. Oh well, only wasted some mache, styrofoam and time so I consider myself lucky... (BTW, I left one small real rock as a memento). In process pics from a few hours later. I still have to raise the riverbed under the bow about 1/4" so the stem will appear to be run slightly aground. Added some shore and bottom rocks and did some more blending. The black rectangle in the center is the base of the boat, and the three 5/8" holes are to push the hull out after casting the resin water. More on that later. A couple of days in the sun, and it'll be ready for finishing. Back to work on the boat.


-
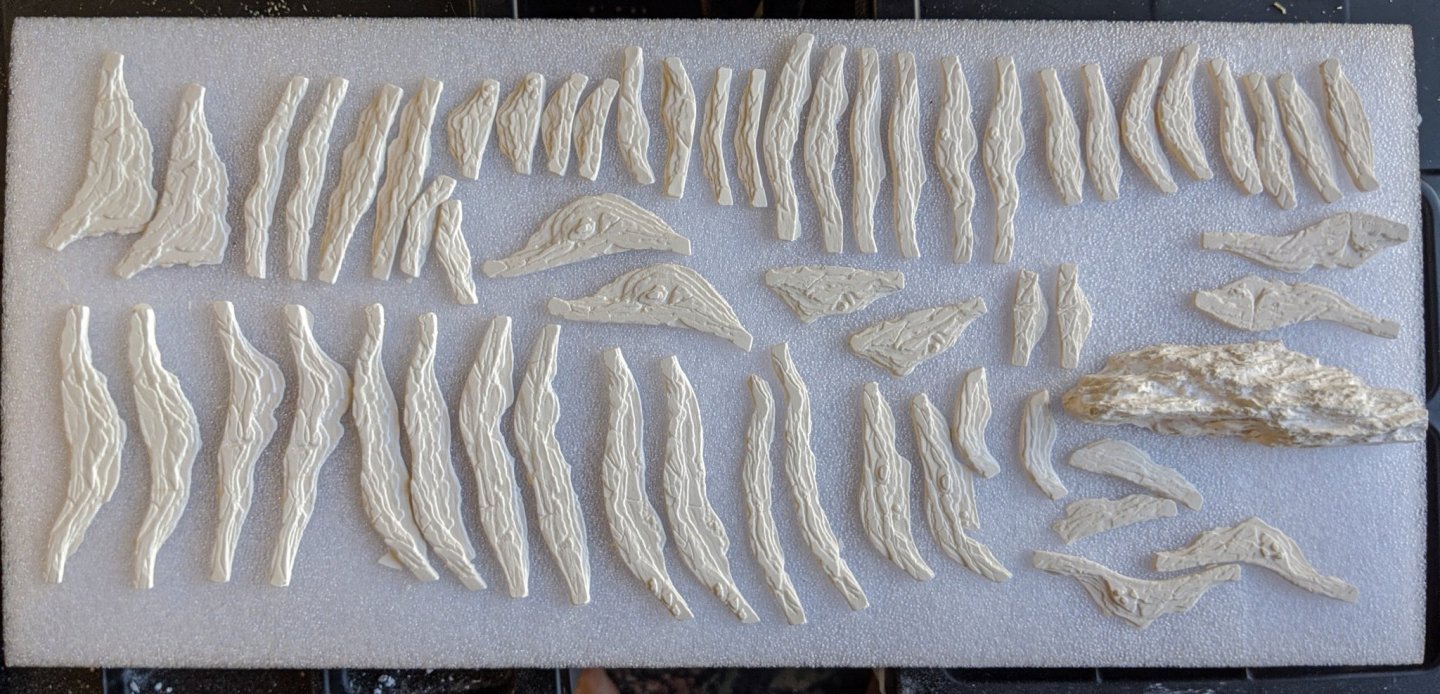
No problem today, it's been raining steadily since last night...🌧️ Because the higher humidity is slowing the base work to dry out, and the base work is delaying further work on the Philly, I went to work on some of the resin deck additions. I still have some touch up to do, and after everything dries I'll shoot them with Krylon matte tomorrow. They'll be scattered about on the deck with the crates, barrels and other stuff I've already completed. I have about 20 more to do, it seems like a lot but all this stuff will also be used on my next build, the 1:24 USN Picket Boat #1 (same scale). Here's the first batch: Added pic of stuff on deck (demo only... won't end up this crowded). Slim found another keg of grog... What could possibly go wrong? ...


-
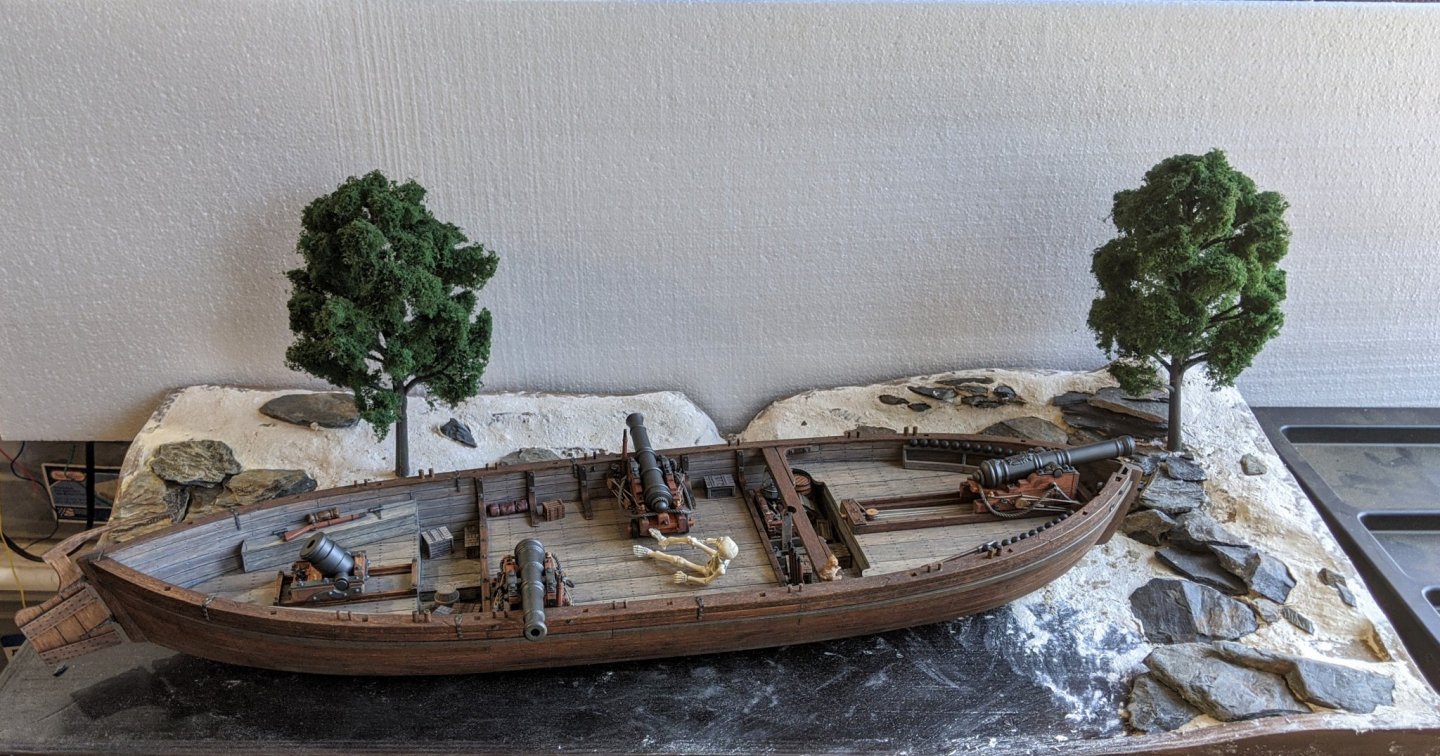
I got some Woodland Scenics trees today (cool shade #TR3521) and couldn't resist test fitting them... and the Philly... Pics:
-
Wow.. Your bulkhead detail is exquisite, and the resin usage is genius. If I may be so bold as to make a suggestion, look into Tamiya panel line accent color. Some judicious application on those bulkheads would really make them pop. The stuff comes in black, gray, dark gray and brown. The stuff works best over a gloss finish, and I use a finer brush than the one attached to the lid and let capillary action do most of the work.
-
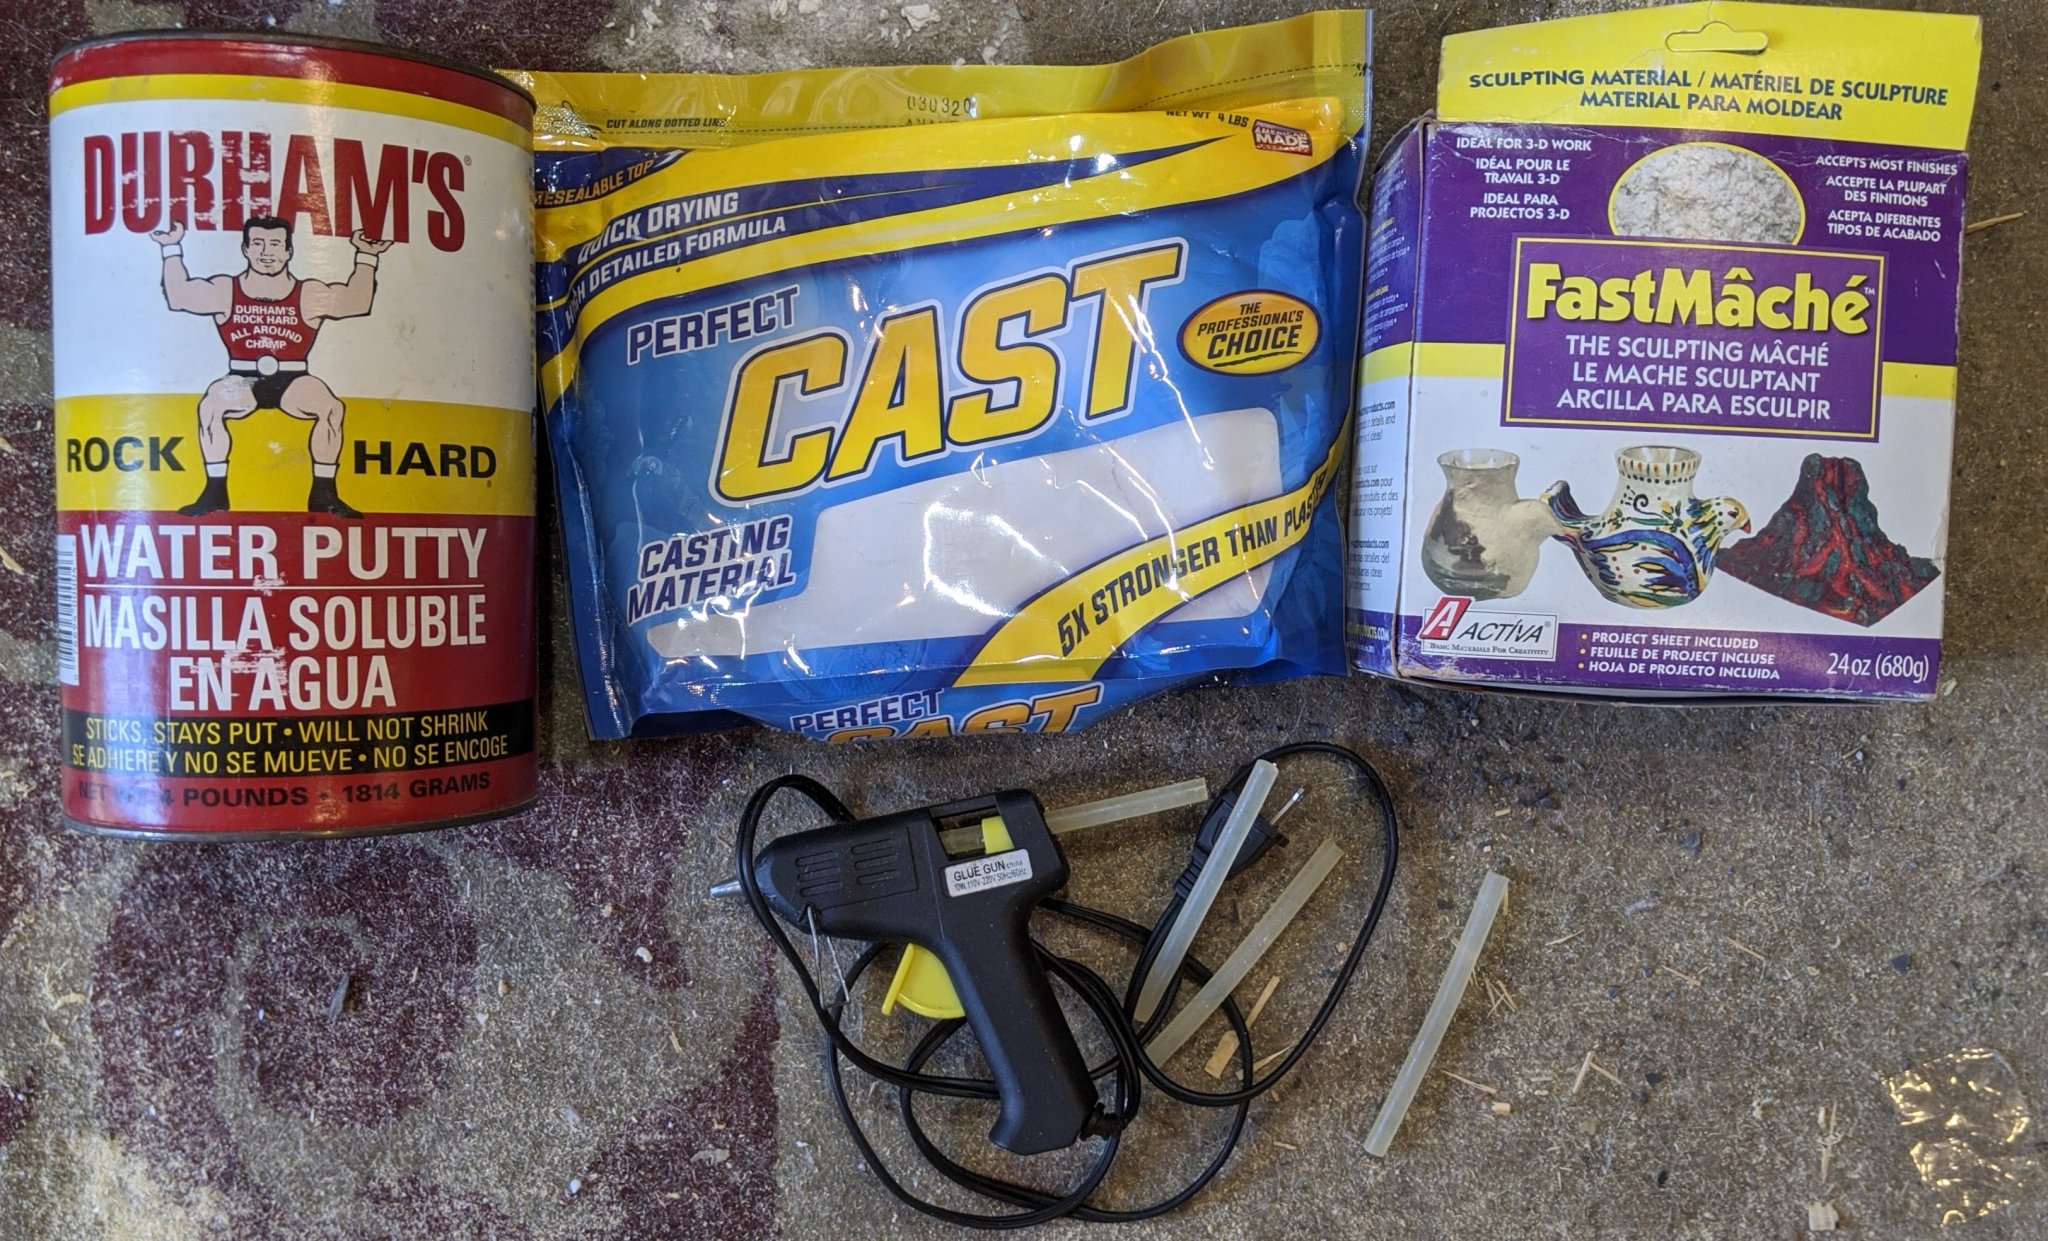
Thanks, Ken. I figured Philly needed a "picture frame" to provide context and concept. This is the messy (and fun... like a four old kid type of fun...) part of the build, and Slim and I are both slinging plaster outside. I'm getting tanner, but I think Slim is just bleaching out. I've been breaking rocks today, I kinda feel I'm in an old prison movie. I was going to cast all the rocks on the base, but I ran across some rocks that with a little "mechanical excitation" look like they'll work for most of the rock work. I'll still do some rock casting, but not near as many as I originally planned. Here's the main materials I use to do the terrain work. As mentioned earlier, I used Styrofoam for the coarse elevations. It's cheap, easy to rough form and doesn't add a lot of weight. The next pass is FastMache, kind of a blend of plaster and paper flakes. It works great for forming out the terrain, is light, has a long working time and dries hard. After I did this pass, while the mache was still workable I embedded some rocks and blended them in. I'll be using the casting plaster for some more rocks and detail, and The Durham's for the final pass before adding dirt, gravel, foliage, trees and other stuff. The hot melt glue gun is indispensable! Here's some shots with the mache and rocks...


.jpg.8cb0e47a4c2e1da353bb016eec0f9962.jpg)