


Egilman
-
Posts
4,364 -
Joined
-
Last visited
Content Type
Profiles
Forums
Gallery
Events
Everything posted by Egilman
-
 This is one of the things that scares me with MFH kits, they are beautifully made yes, meticulous details and assemble much like the real thing... But if they are off in any way in the first sections, it shows up way down the line... The interference issue seen here would have easily been handled with shaving the engine parts to lower the carb and intake profile just a few portions of a mm... Then it would make it an easier job to shave the bonnet to fit... I know back seat driver and monday morning quarterbacking... But I have faith that You will get it right my friend... You skills are far past anything I've seen before...
 -
Yep there is so much stealing of others customers that it is getting very hard to find some items online, like microfiles... And certain other tools of the trade... I still get my Micro-Mark catalogue in the mail, but seldom buy from them anymore, just about everything they have on specialty tools is sourced from somewhere else, low quality and almost twice as expensive as the original manufacturer... to me IMHO, they have become the Harbor Freight of online tool buying... Be very careful of what you order from them...
-
Jewelers micro file set... https://www.amazon.com/Micro-Mark-81845-12-piece-Micro-File/dp/B0058EDUM8/ref=asc_df_B0058EDUM8?mcid=71d1bde401673526aea980d2055a9046&hvocijid=16478961440123805471-B0058EDUM8-&hvexpln=73&tag=hyprod-20&linkCode=df0&hvadid=721245378154&hvpos=&hvnetw=g&hvrand=16478961440123805471&hvpone=&hvptwo=&hvqmt=&hvdev=c&hvdvcmdl=&hvlocint=&hvlocphy=9033430&hvtargid=pla-2281435178298&psc=1 It's a start, but do your research, there are many mfgr's labeling their needle files as micro files... make sure of what your getting..
-
I remember acquiring my two MFH kits, both of Sato's winning rides in the Indy 500... Pricy, pricy, hard to find... Definitely would have been cheaper off the website but they were both out of production with no though of re-release... I was lucky to find them...
-
Glad to hear that MFH is one of the few companies in this business that take CS seriously... Excellent to hear... Hopefully some of the others will take heed....
-
Doesn't matter brother, we'll still be here... (giggle)
-
Fokker D.VI by ccoyle - MPModel - 1/33 - CARD - TERMINATED
Egilman replied to ccoyle's topic in Non-ship/categorised builds
I can make a suggestion, It's a vent, a scoop facing backwards is a vent, it draws air out of the compartment it is open to... So, the rear will be open... And given the colored part of the fuselage where this vent is open I would say is the lower part of the vent where it meets the fuselage and the two parts are the inner and outer portions that cover the white section of the fuselage part... The smaller part glues to the larger outer part which is then bent to the appropriate shape and glued over the white section on the fuselage... It creates either a vent or a fairing, and yes some of these planes had a gauge of some type on the upper fuselage faired over, where the pilot could read it Only way it makes sense to me... -
Fokker D.VI by ccoyle - MPModel - 1/33 - CARD - TERMINATED
Egilman replied to ccoyle's topic in Non-ship/categorised builds
You said it brother, the gift that keeps on giving.... It seems like when one part of the process has these type of issues, ALL parts of the process develop the same or similar issues... {chuckle} You know it will pass with time... Keep on keeping on my friend... -
Fokker D.VI by ccoyle - MPModel - 1/33 - CARD - TERMINATED
Egilman replied to ccoyle's topic in Non-ship/categorised builds
...... For a designer, there is no excuse one can make... wrong is wrong.... Sad Very Sad... -
I'm still here brother... {chuckle}
-
It's been my experience that Tamiya primers work best on everything... (Even UHMW plastic which is notorious for NOTHING sticking to it) Standard Grey or Fine white is the best primer for high detail work... But use the Fine White when doing the bright colors, a lot better Color consistency, especially for the reds and yellows...
-
Skoda 30.5 cm 1911 Cannon by RGL - - WIP3D - 1/35
Egilman replied to RGL's topic in Non-ship/categorised builds
Resin has been around since since the middle ages, as what we today call plastics since the mid 30's, the funny thing is I'm still waiting for any scientist to show everyone the person that died from contact with Resins... That person just doesn't exist.... There are thousands of compounds that are a world sight more hazardous than resin in common usage every day... Breathing dust? I don't want to breath sawdust, but sawdust is not considered a health risk, but it is more carcinogenic that photopolymer resin... It's a simple fact, we can live in fear of things not likely to be proven, or we can live out lives taking normal precautions without fear... Brother, build those models, they are less dangerous than the margarine you spread on your toast... I did the research, I got the MSDS's pages... Heck they ship it around the world by the ton in bulk without any conditions, you want your kids to learn mold-making? Hobby Lobby sells it as stem kits to teach science and engineering to 10 year olds... How long are we going to live in fear? How long are we going to let the few dictate to the many? WE all learned a long time ago we can't believe everything we are told cause we aren't told all that much... And someone drops the words "Cancer causing" (without a shred of real proof mind you) on a material and everyone starts shivering in their diapers... Sorry, but I get more and more disgusted with the blind fear I see exhibited each day wondering when the world is going to wake up.... Getting off the high horse now brothers, just needed to vent a bit... 2.5 year cancer survivor here, I am working with photopolymer resins each and every day, there is no Oncologist in existence that can tell me that the resins caused my cancer, and that is from the HORSES MOUTH.... Build the models, the resin will not get you, but the paint you color them with will... EG -
A most excellent post-war Tempest!!! You too sir have captured the essence of an in-service BMF!!!! Another "Honey I shrunk the airplane award winner!!!! VERY well done and deserved!!!!! Two in a week!!! Wow..
-
Ferrari 250 GTO by CDW - Model Factory Hiro - 1:12 Scale
Egilman replied to CDW's topic in Non-ship/categorised builds
Amen brother... I don't sell online anymore, hard lessons learned the hard way... -
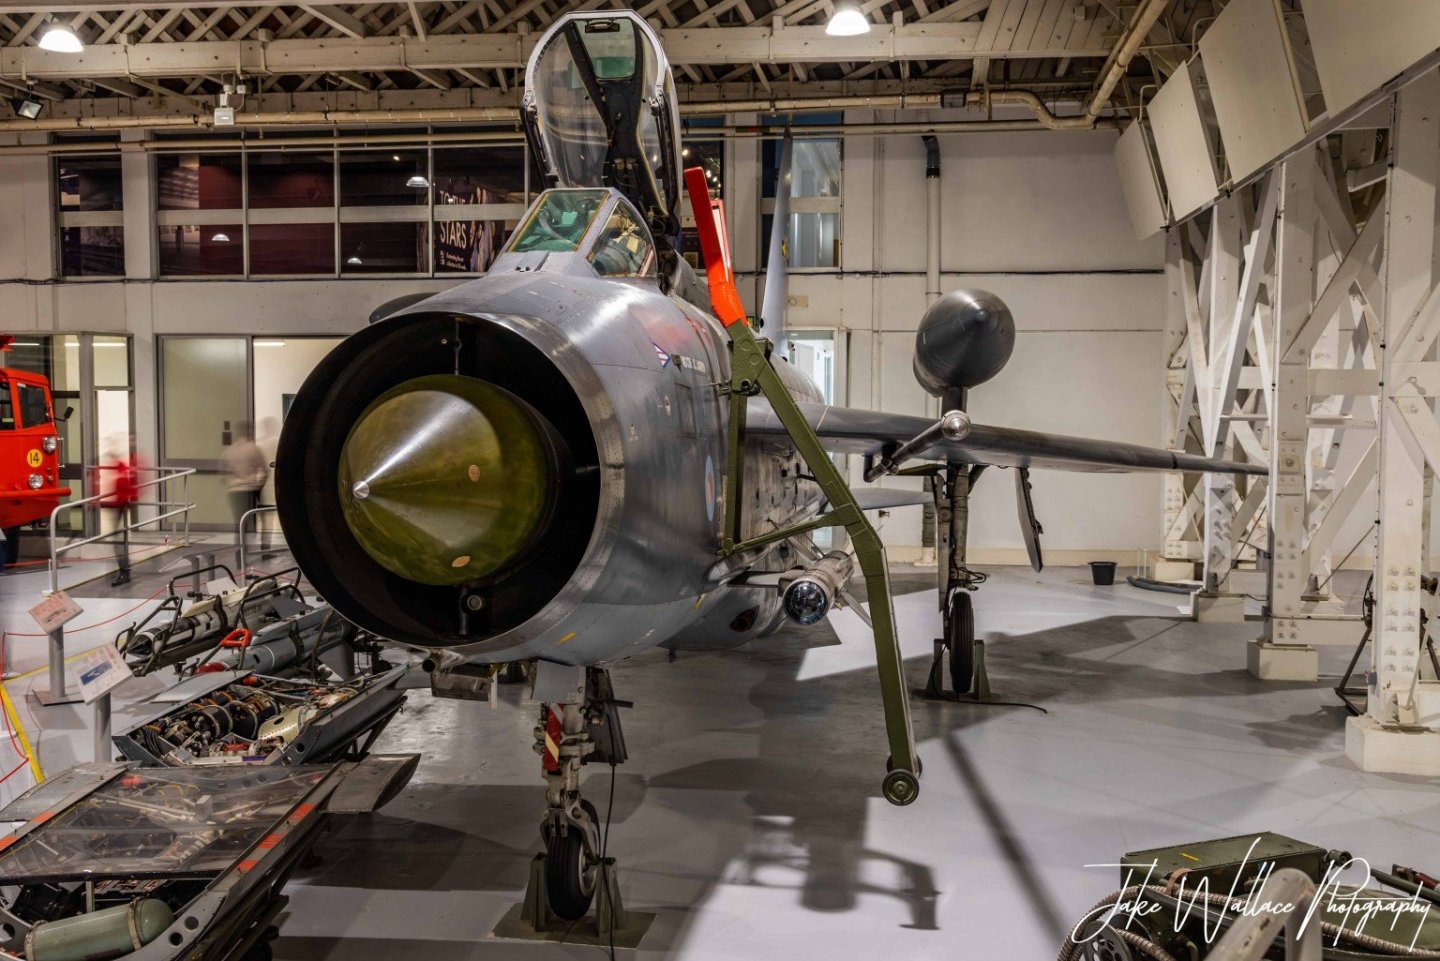
Nice work, difficult kit.... I second the vote for an EE Lightning, seldom done properly.... It would be a challenge.... https://www.thunder-and-lightnings.co.uk/lightning/survivor.php?id=224
-
Well, this is one of the best I've ever seen... MAN!!! it looks real in the sunlight... VERY well done brother, Display it prominently.... IMHO, I consider it another deserving of the "Honey I shrunk the Airplane" awards... Well deserved.... You earned it...
-
Ferrari 250 GTO by CDW - Model Factory Hiro - 1:12 Scale
Egilman replied to CDW's topic in Non-ship/categorised builds
I would suggest getting a paypal credit account and using it as your primary method to pay... If the deal goes bad, or the seller is a fraud, you will know within a week and paypal refunds the money almost immediately... I back that up with a low limit Visa card that carries the same protections... I've never lost money using a paypal account, this dates from back in the day when you needed a bank account setup with paypal to even have a paypal account.... It's one of those things that common sense goes a long way to protecting yourself online from scammers... I don't buy anything online without paypal's protections -
Yes it can, but never forget that accurate scale appearance is just as important as size... Absolutely stunning my friend, absolutely beautiful representation of a forward stationed P-51...
-
That's one of the things I like about this forum, Lots of master builders in all genre's of modeling, and I suspect several centuries of experience as well... Unlike most modeling fora out there which are nothing more than mutual admiration and back slapping societies...
-
Looks absolutely fantastic, (except for the fuel stains of course, the fuelers always had wipe up rags for any such thing ever happening and with the fuel systems they had in use at the fields at the time, (mid-late '44) fuel spills often enough to cause stains like that were very rare/never happened) A crew chief would lose his spot for letting something like that happen... You can see the fuselage fuel port at an angle where fuel stains would show up prominently, not there, in fact you can hardly see the fuel port... At a forward airbase.... Different aircraft same period, you can easily see both wing port and fuselage port, no fuel stains, the pic is good enough to show the hand oil discoloration around the wing port, no fuel stains... See the muddy crud on the wing root walkway? Forward airbase as well... Excellent work great skills on display here.... EG


-
Modeling ain't going anywhere, neither are we... ....and thank God brother you didn't....
-
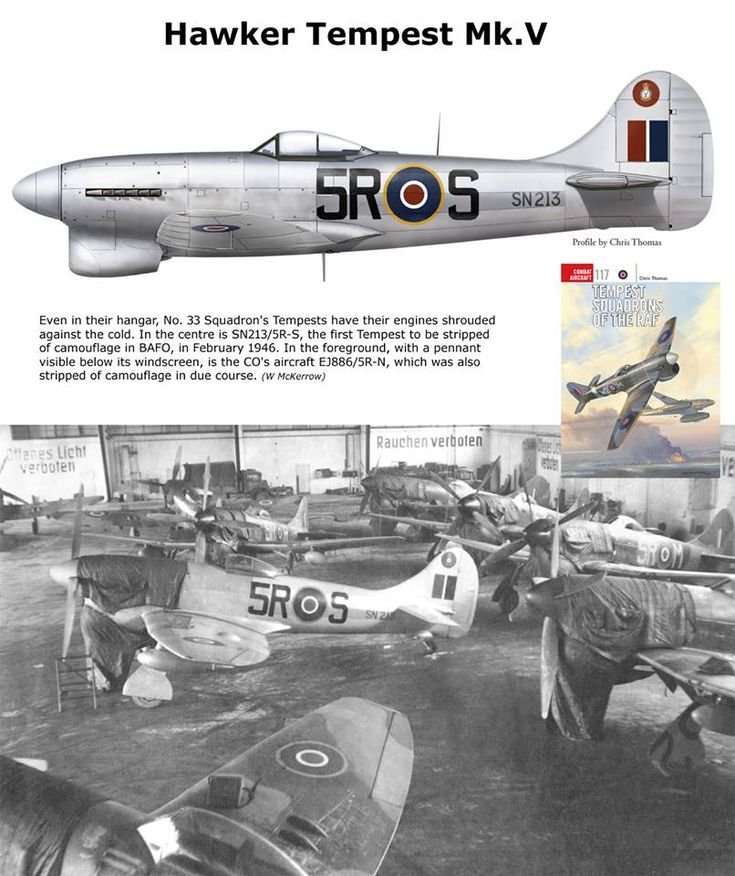
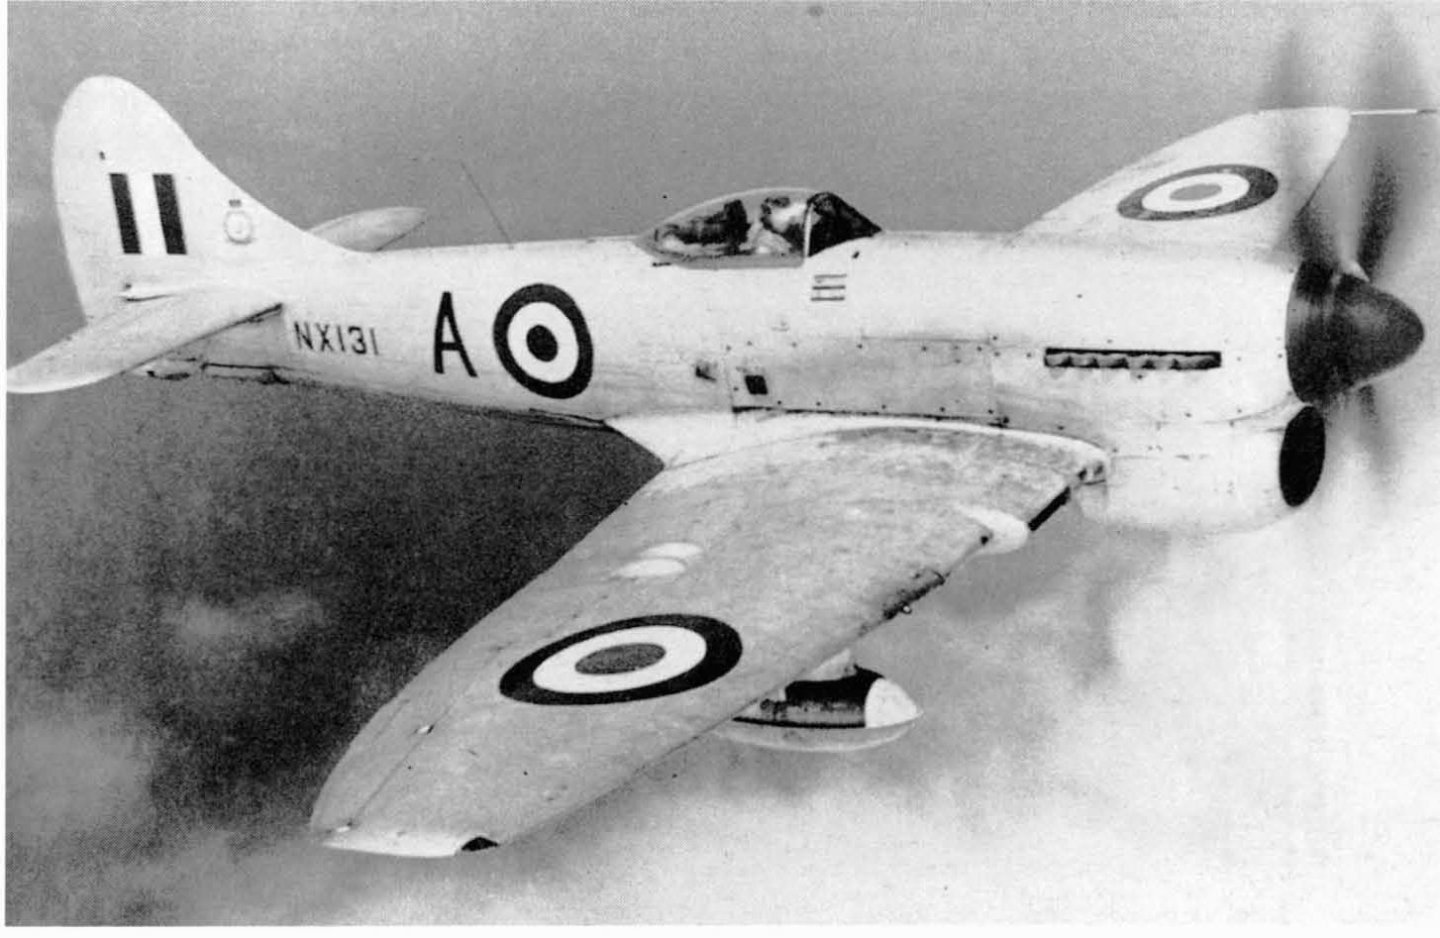
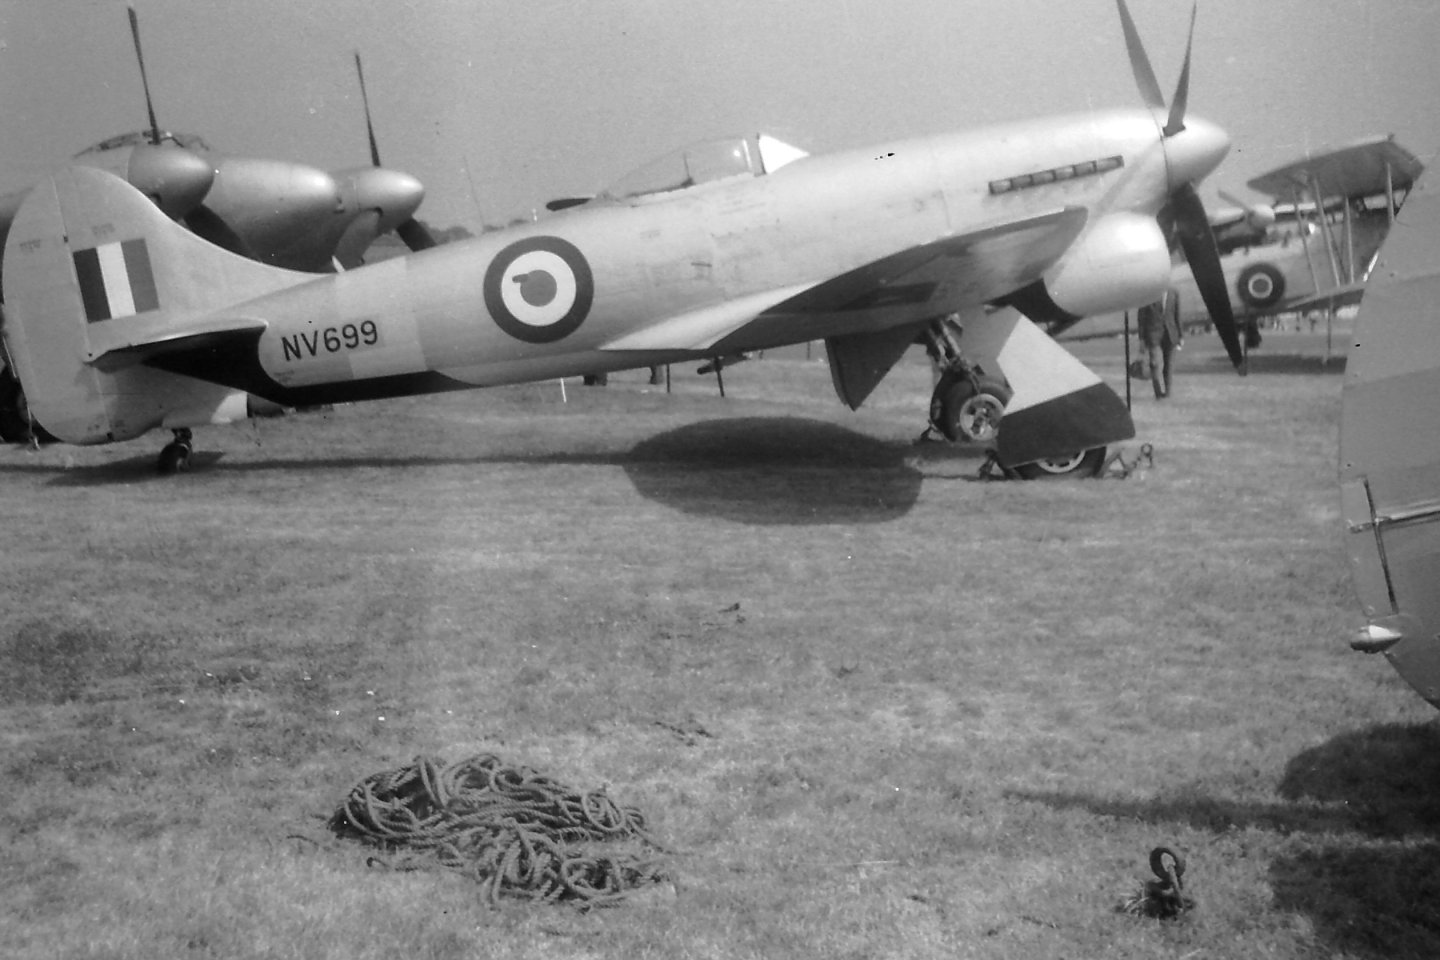
I know that postwar they had several squadrons go paintless... Some Photos... SN213 during the stripping in '46... (33 sqn. while stationed in Germany) NX131 a mkVI in '51... And NV699 a TT mk. V unk date... but definitely postwar... (I believe at Herndon in '51, and check out that pretty aluminized Mossie in the background) They decidedly show the effect of stripped paint, (which goes away with age and cleanings) BMF Tempests are not unknown but show me one in service during WWII....
-
The hard thing is finding anything about British aircraft in anything but Grey or Brown and Green paint... they were an island nation and their aircraft were going to be around water, primarily salt water their entire operational life... EVERYTHING got painted... {chuckle} There is the USAF's test/examination article that for part of it's life was unpainted while in US employ, but as soon as it was returned to the RAF, it was painted... It would help to know what year and which nation/wing/squadron... Cause a bare search of Hawker Tempest shows nothing but the aforementioned Grey or Green and Brown camo... (or overall sky grey) You have a pic showing one in BMF I would certainly like to see it... Highly unusual...
-
Looks just like a plane that recently had it's camo paint stripped.... Yes, bare metal but in a different state, looks greyish in a cloudy pattern rather than the streaky whiteish oxidized bare metal of a never painted aircraft... Hints of reflection underneath... The greyish tone comes from the chemical they use to strip the paint.... VERY, VERY WELL DONE, not a style of BMF you usually see replicated in scale... Impressive... A perfect example of all the variations you can have in BMF...
-
Yep it was pretty much the equal of anything in the sky below 25K ft, (when flown within it's envelope) but above that, the only thing that could keep up was the Spit Mk IX and above... It was the high mark class of the single engine propeller fighter planes.... It's why the USAF grounded everything else after the war and went exclusively Mustang... And it's only fitting that the last great propeller fighter plane was also one of the most beautiful airplanes ever designed...


