HOLIDAY DONATION DRIVE - SUPPORT MSW - DO YOUR PART TO KEEP THIS GREAT FORUM GOING! (89 donations so far out of 49,000 members - C'mon guys!)
×


Egilman
-
Posts
4,377 -
Joined
-
Last visited
Content Type
Profiles
Forums
Gallery
Events
Everything posted by Egilman
-
 A most excellent post-war Tempest!!! You too sir have captured the essence of an in-service BMF!!!! Another "Honey I shrunk the airplane award winner!!!! VERY well done and deserved!!!!! Two in a week!!! Wow..
 -
Ferrari 250 GTO by CDW - Model Factory Hiro - 1:12 Scale
Egilman replied to CDW's topic in Non-ship/categorised builds
Amen brother... I don't sell online anymore, hard lessons learned the hard way... -
Nice work, difficult kit.... I second the vote for an EE Lightning, seldom done properly.... It would be a challenge.... https://www.thunder-and-lightnings.co.uk/lightning/survivor.php?id=224
-
Well, this is one of the best I've ever seen... MAN!!! it looks real in the sunlight... VERY well done brother, Display it prominently.... IMHO, I consider it another deserving of the "Honey I shrunk the Airplane" awards... Well deserved.... You earned it...
-
Ferrari 250 GTO by CDW - Model Factory Hiro - 1:12 Scale
Egilman replied to CDW's topic in Non-ship/categorised builds
I would suggest getting a paypal credit account and using it as your primary method to pay... If the deal goes bad, or the seller is a fraud, you will know within a week and paypal refunds the money almost immediately... I back that up with a low limit Visa card that carries the same protections... I've never lost money using a paypal account, this dates from back in the day when you needed a bank account setup with paypal to even have a paypal account.... It's one of those things that common sense goes a long way to protecting yourself online from scammers... I don't buy anything online without paypal's protections -
Yes it can, but never forget that accurate scale appearance is just as important as size... Absolutely stunning my friend, absolutely beautiful representation of a forward stationed P-51...
-
That's one of the things I like about this forum, Lots of master builders in all genre's of modeling, and I suspect several centuries of experience as well... Unlike most modeling fora out there which are nothing more than mutual admiration and back slapping societies...
-
Looks absolutely fantastic, (except for the fuel stains of course, the fuelers always had wipe up rags for any such thing ever happening and with the fuel systems they had in use at the fields at the time, (mid-late '44) fuel spills often enough to cause stains like that were very rare/never happened) A crew chief would lose his spot for letting something like that happen... You can see the fuselage fuel port at an angle where fuel stains would show up prominently, not there, in fact you can hardly see the fuel port... At a forward airbase.... Different aircraft same period, you can easily see both wing port and fuselage port, no fuel stains, the pic is good enough to show the hand oil discoloration around the wing port, no fuel stains... See the muddy crud on the wing root walkway? Forward airbase as well... Excellent work great skills on display here.... EG


-
Modeling ain't going anywhere, neither are we... ....and thank God brother you didn't....
-
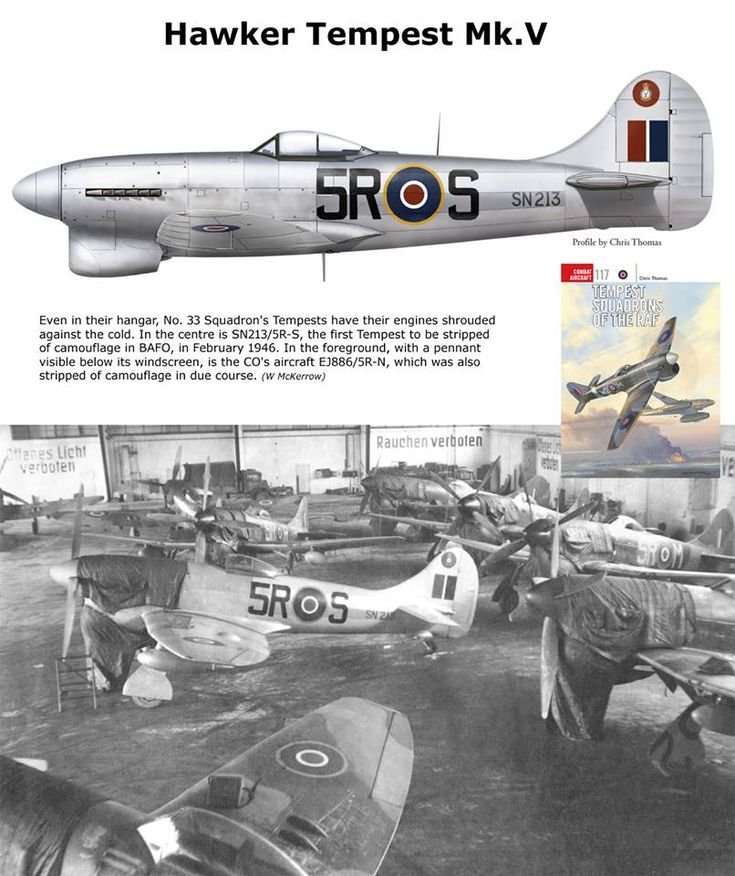
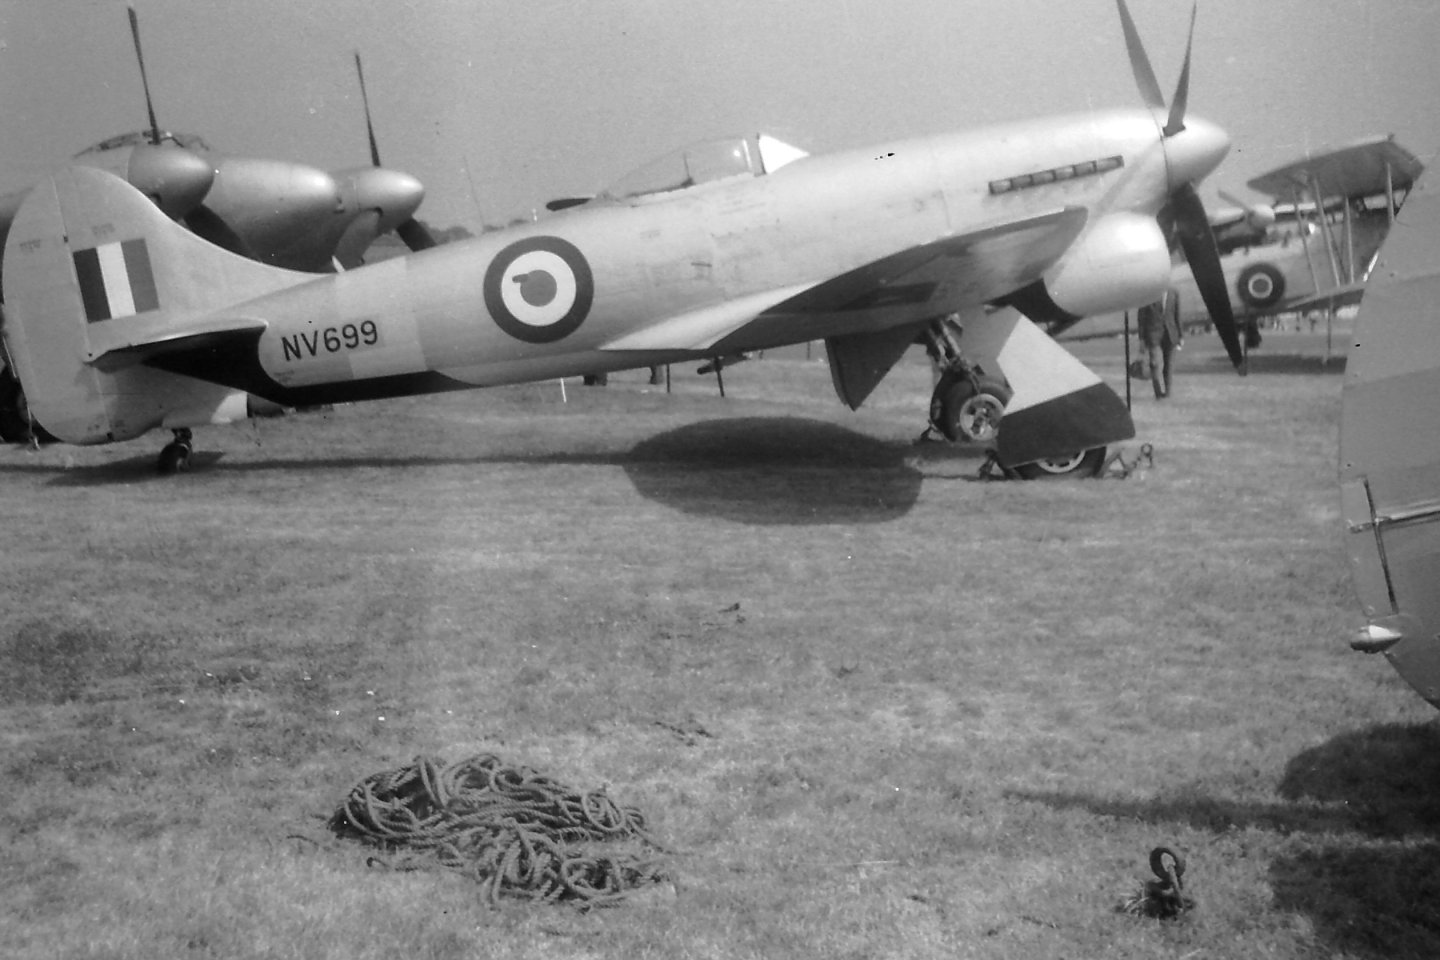
I know that postwar they had several squadrons go paintless... Some Photos... SN213 during the stripping in '46... (33 sqn. while stationed in Germany) NX131 a mkVI in '51... And NV699 a TT mk. V unk date... but definitely postwar... (I believe at Herndon in '51, and check out that pretty aluminized Mossie in the background) They decidedly show the effect of stripped paint, (which goes away with age and cleanings) BMF Tempests are not unknown but show me one in service during WWII....
-
The hard thing is finding anything about British aircraft in anything but Grey or Brown and Green paint... they were an island nation and their aircraft were going to be around water, primarily salt water their entire operational life... EVERYTHING got painted... {chuckle} There is the USAF's test/examination article that for part of it's life was unpainted while in US employ, but as soon as it was returned to the RAF, it was painted... It would help to know what year and which nation/wing/squadron... Cause a bare search of Hawker Tempest shows nothing but the aforementioned Grey or Green and Brown camo... (or overall sky grey) You have a pic showing one in BMF I would certainly like to see it... Highly unusual...
-
Looks just like a plane that recently had it's camo paint stripped.... Yes, bare metal but in a different state, looks greyish in a cloudy pattern rather than the streaky whiteish oxidized bare metal of a never painted aircraft... Hints of reflection underneath... The greyish tone comes from the chemical they use to strip the paint.... VERY, VERY WELL DONE, not a style of BMF you usually see replicated in scale... Impressive... A perfect example of all the variations you can have in BMF...
-
Yep it was pretty much the equal of anything in the sky below 25K ft, (when flown within it's envelope) but above that, the only thing that could keep up was the Spit Mk IX and above... It was the high mark class of the single engine propeller fighter planes.... It's why the USAF grounded everything else after the war and went exclusively Mustang... And it's only fitting that the last great propeller fighter plane was also one of the most beautiful airplanes ever designed...
-
Thank you, I am by no means an expert... I have been unable to find my copy of the tech manual on the P-51, but what you explained feels right to me... There are two thing here with Laminar Flow, normal L.F. and L.F.C... Normal L.F. is a you describe and is simply designed for the maximum smooth flow around the wing profile as far along the chord as possible... And, that the designs were for the most part finalized in the late '30's by Langley... That being said, the natural extension to such research was to see if such effects could be controlled, and both the Smithsonian (NACA) and MIT were working on those aspects by '38... Air pressure channeling is an aspect of L.F.C. Laminar Flow Control of which it was found that it is of no real advantage except at high AOA, which really came into it's own in the late 50's with highspeed aircraft that needed a high AOA to land... (and those aircraft that suffered from intake stall/disruption at high AOA) and sorry i gave such a confusing explanation... The technical explanations for how lift works is a LOT more technical than just faster airflow over the upper curved surface... (although Mr. Bernoulli would give you a long vigorous discussion about it) {chuckle} Thank you for clarifying that my friend...
-
The wind shear has to be out of this world!!! your already getting hammered and the hurricane hasn't even landed yet... Damn...
-
I just read a report that 180 mph is the current average windspeed... If true this one is going to be a real disaster...
-
Again it depends brother on what you want to depict with your model... If a wartime bird, fill them in smooth and paint... If an airshow warbird, all polished up then don't and use the panel lines for what they were intended for on the model... (creating shaded panels) It's really a simple question of what you want it to look like, then build it to suit... But if your going for scale realism, then fill them and forget them... Like your pic clearly shows, they are not to be seen on a real combat aircraft...The wings were epoxy painted with aluminized paint and made ultra smooth... And aside from a few experimental aircraft, it was the only one that NA did that made it into production... It's really not worth it in my opinion... Only two ways to go for a detail that no one will ever see whichever way you decide to do it... AS far as the details on the Laminar Flow Wings I'll have to dig around for my Dash-1's on it, and they are currently in the attic... But if you really want the info brother, I see what I can find...
-
I had this discussion with a kind soul a few months ago... it's a question of scale as in what your eye can see on a model... Yes the wings of all P-51's were painted aluminum, aluminum colored lacquer paint, they would never shine like a mirror, not in real life, they would reflect light and other images near to them but no mirror finish... The panel joints, we are talking about the riveted panel joints now were so close together that they didn't need filling and you wouldn't see them on the real aircraft even if the paint was stripped off and the wings polished to mirror finish like the airshow warbirds... So we need to know why the wing joints were filled and wings painted if the panel joints as built were so close.... Laminar Flow.... To get the maximum smooth airflow over the wings while maneuvering they incorporated Laminar Flow into the wings, what it was was tiny ports that release bleed air from the supercharger over the wing panel surface, this would cause the airflow to align with the wing surface reducing air turbulence over the wing and thence reducing inherent surface drag... So to get the smoothest surface possible the wings were epoxied with aluminized epoxy paint and not painted after that... This necessitated that the paper thin panel joints be filled which the epoxy paint did quite admirably.... How big were these joints in real life? a few thousandths of an inch, tolerance was 5-10 thousandths of an inch... There is no model at any scale under half scale that is going to represent the panel joints in any visible way... Yes the grain of the panel surface did come thru the epoxy paint and from that aspect you can have light reflectance variance in the individual panels from a distance but up close they look identical... In scale, they look good with different shaded panels but in real life that was seldom seen on an operational bird... It was also only used on a few of the NA produced aircraft and the P-51 was the only aircraft produced in WWII that became operational with it... By the time Korea came around even North American did away with it as it just added production costs.. Besides the jet aircraft had more than enough thrust to push the airframe to almost supersonic speeds without it, the F-86 is a prime example as a transonic aircraft... (the Bell X1 is officially known as the first supersonic aircraft, but amongst the test pilots flying out of Muroc Field in the day, it's the F-86F that is recognized, unofficially of course, as the first aircraft to go supersonic without disintegrating) And it had no laminar flow... On a scale model, there is nothing to fill and besides, who's going to see it under the aluminized paint? Of course there are those that will argue, but when actually discussing it they soon realize that the grooves created to represent the panel edges then filled on a model aircraft is a pure waste of time... This of course is my sole opinion, but I've had this discussion numerous times and no one has been able to refute the facts yet... think about it for a minute before doing all that work, your creating a detail so you can paint over it and hide it like on the real aircraft? We are smarter than that...
-
Yep, they always do, but I like his presentation, he covers the probabilities without sugarcoating it... I hope it stays south so it weaken as much as it can.... (good link Thanks, I'll hang on to that one) The equatorial easterlies are trying to push it north, but that westerly jetstream is predicted to strengthen over the next 24 hours which will help greatly in holding it to the south.... But all the models are showing a solid central Florida hit here the only question is how strong a hit... Whatever you do my friend, STAY SAFE....
-
Well the Jetstream as predicted for midnight tonight.... Heading straight for the northern gulf coast of Florida... It may shift in the next few days, but that is dictating the track at the present... It's acting like a huge vacuum pulling at and intensifying the low pressure system... If it's not a cat 5, it will be... EVERYONE STAY SAFE... PLEASE...
-
Yeah, I ran into that doing my research... Everyone's got an opinion, and theirs IS the way... {chuckle} And, because they posted in on the internet it is the "Best" way.... But, we have experienced veteran modelers here on MSW, and we know that there are many "Best" ways of doing things, find the one that works for you brother... I know you will...
-
Well, if you want the old oxidized aluminum finish, you can try it by hand.... (I know airbrushes are the "in" thing)... I know old school, over a rattlecan flat black primer.... Depends upon the look you want, new and freshly issued or well used flightline trooper, combat vet... The possibilities are endless brother...

-
F-51D Mustang by ERS Rich - Tamiya - 1/32 - PLASTIC
Egilman replied to ERS Rich's topic in Non-ship/categorised builds
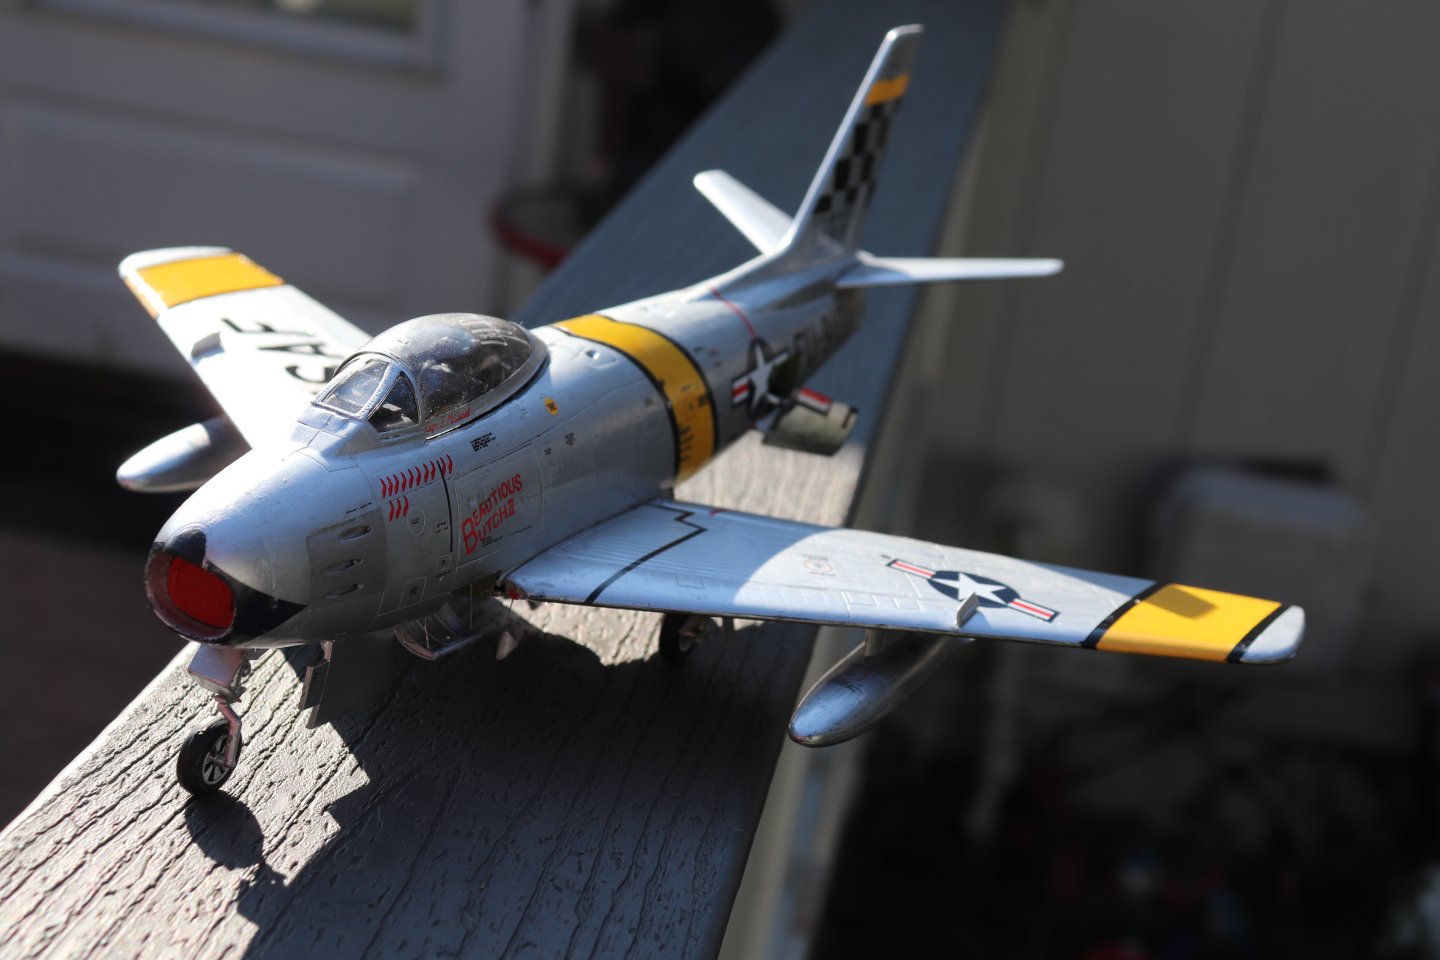
Yeah it does, and the gloss provides the reflectivity... they both look good but that 1/32 bird has the look of a brand new bird just off the assembly line.... simply beautiful.... Well done.. -
You too my friend, stay safe.... I went thru one of those early fall hurricanes way back as a younker, inside the house the wind was whistling like it was a train whistle roaring by, lost a lot of trees, those big willows, tipped out of the ground like they were growing out of mud.... Thankfully the one in the back yard didn't go over... Scary stuff....
-
It depends on the final look you want, most of the sprays give a flavor of new metallic with varying grades of shine, although I've been impressed with a few of the sprays that have been coming out... For shiny aluminum, gloss black undercoat with a thinned aluminum overcoat, for an oxidized aluminum finish dark grey gloss with a bit heavier coat of aluminum... Me I will still do it in RnB... But that's the old school way... I'll be following brother...