


Egilman
-
Posts
4,199 -
Joined
-
Last visited
Content Type
Profiles
Forums
Gallery
Events
Everything posted by Egilman
-
 You gots a PN brother... According to my references yes, it is the retracted version of the access step, the reason it is not covered by most model kits is it is flush and practically invisible in it's in flight retracted position... Also when on the ground, it is usually in its deployed position as seen on the USAFM's Hurricane, (thanks Andy) although you will see pics of it released but not fully extended... Looks like a little oval bump... with two edges/ridges across the top lengthwise...
 -
Keeping my head in the game.....
Egilman replied to Egilman's topic in 3D-Printing and Laser-Cutting.
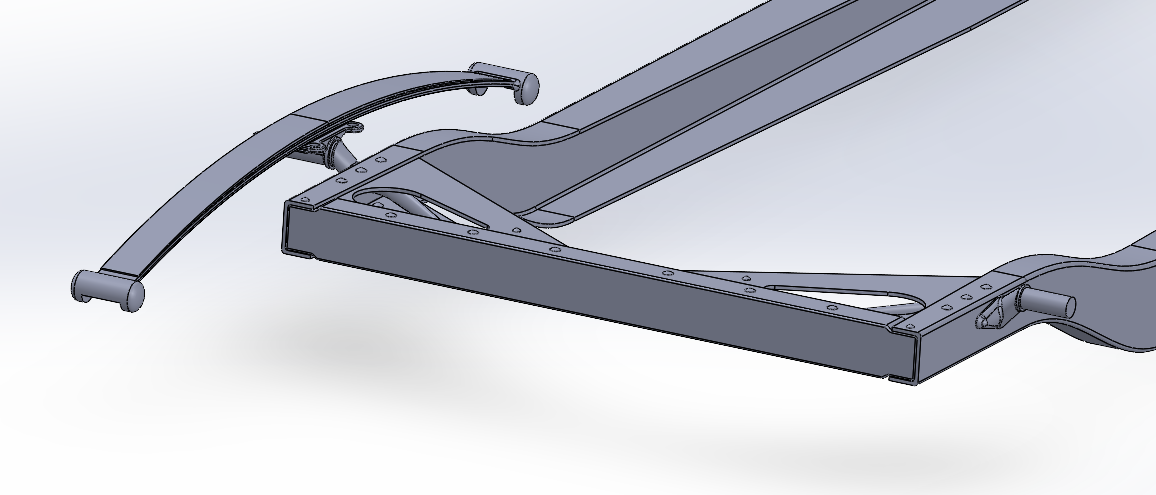
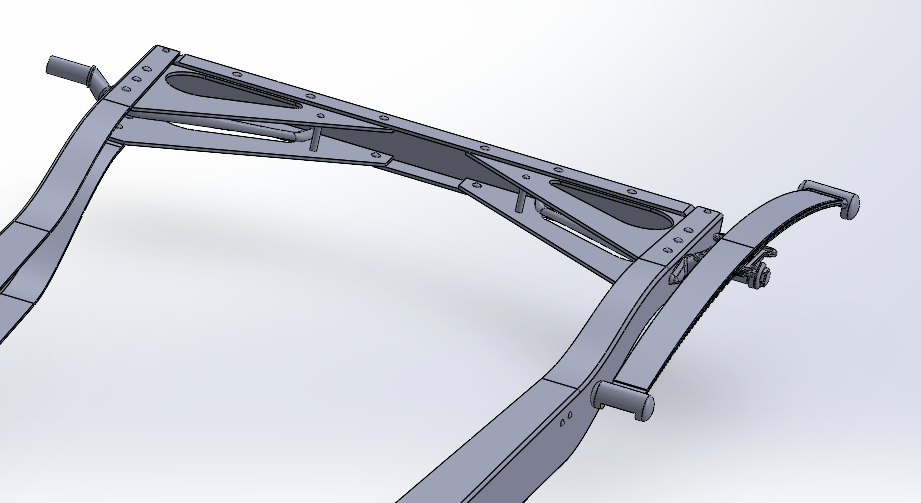
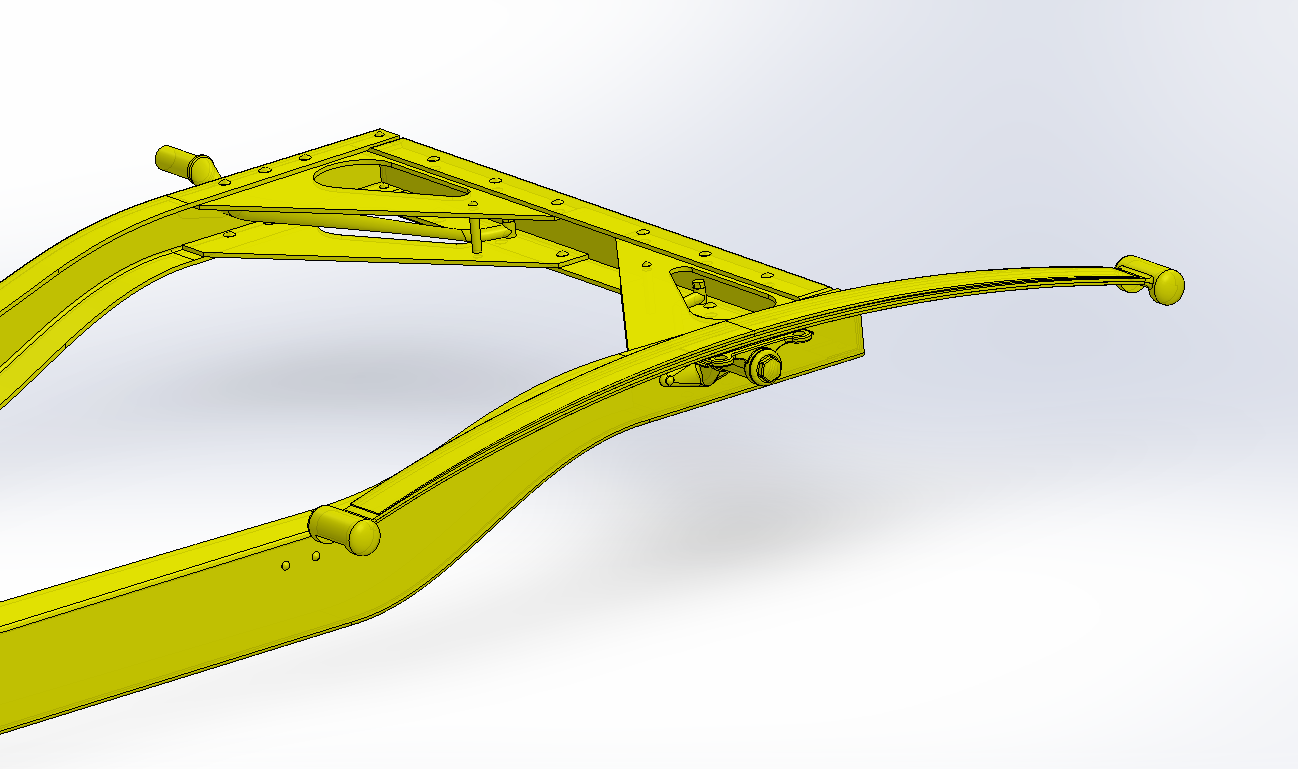
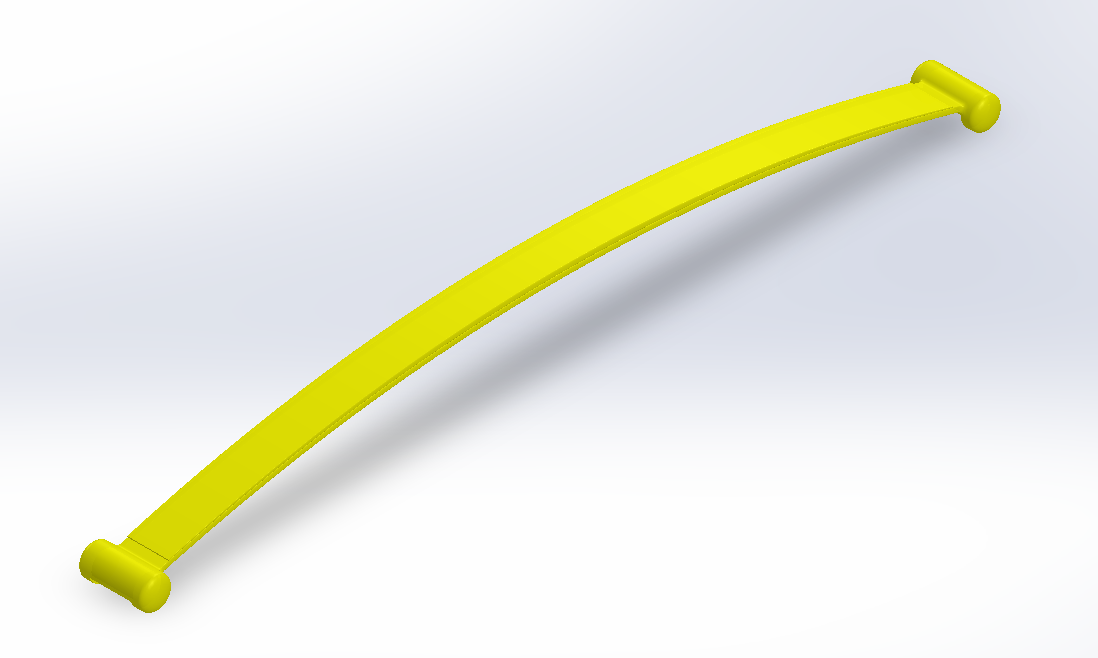
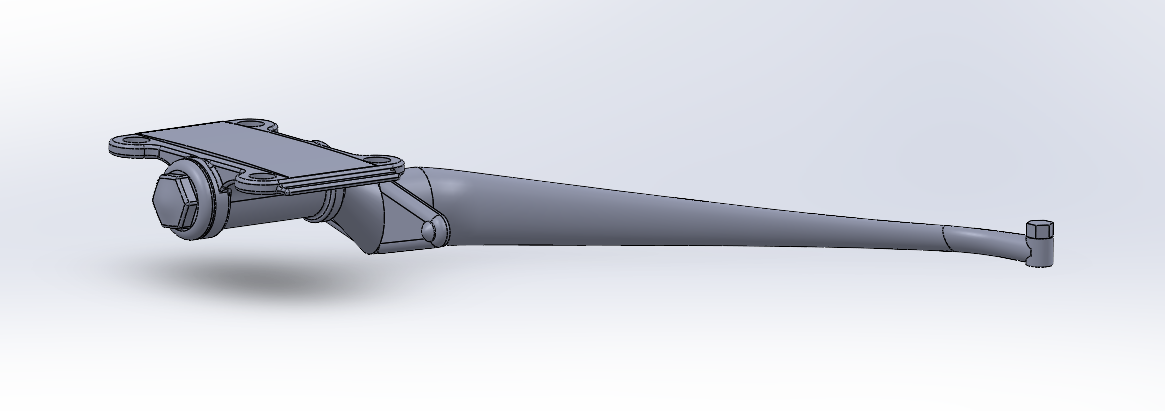
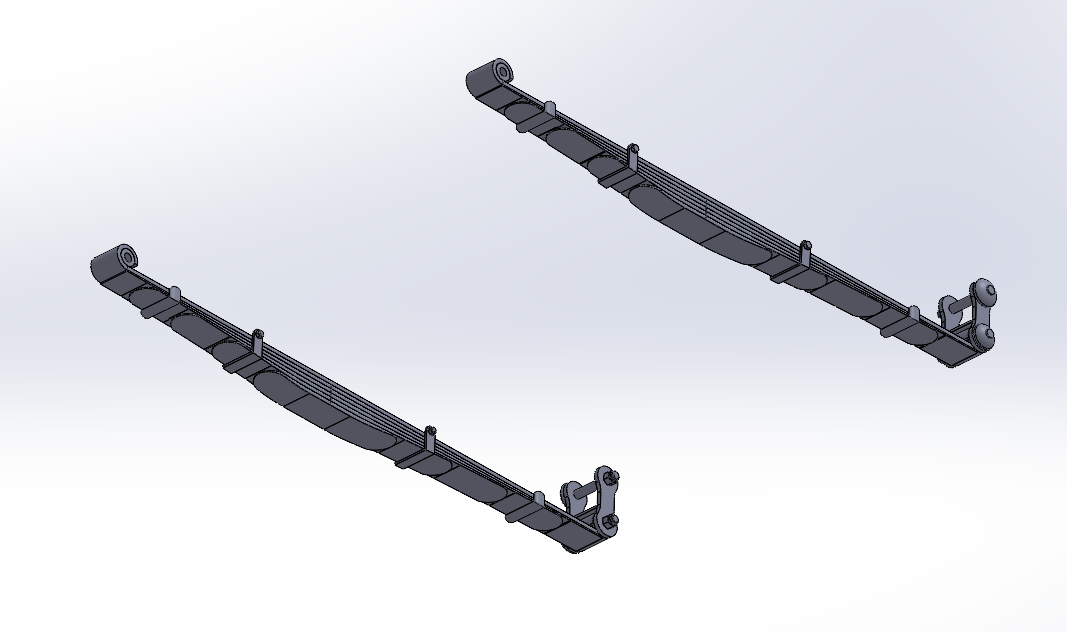
Well another update... Rear Springs, I was hoping that I would be able to use the springs I had already made to build the second version... Unfortunately no That wasn't going to work so I've set about building a whole new set of Rear Springs..... And in measuring it against the detailed photos I now have I found that I also needed to rework the Bracket as well to more accurately reflect it's true position on the car... 3/4ths inch closer to the rear and up at the turn of the curve on the frame rail... Then I added in the old springs and the ends sat way to low, so I was forced to completely rebuild the springs reflecting the correct measured position on the car... The curve is now accurate, 40" long by 2" wide with a 3" drop at each end... I've included two pics showing the current iteration colored in the cars natural yellow color.... And one of the spring itself showing the upper mainspring and first leaf... and it's one solid piece as well.... Next posting when the spring itself is finished... Onwards.....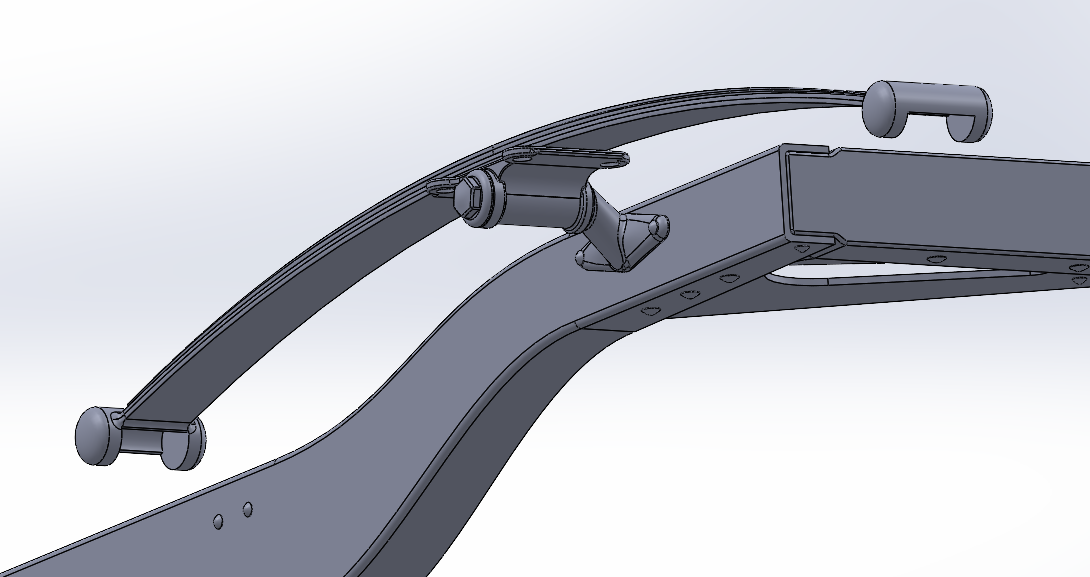
-
Monofilament, in the very smallest sizes, yes they make it that small... If you can't find it in black, that's ok you just use an indelible marker to color it.... If the fishing stores don't have it that small, the sewing/craft stores will.... .3mm ferrules for clinching the loops...
-
We've all been there done that!!! {chuckle} Not bad at all for a firstie..... Well done...
-
Well you made it, I on the other hand, have a few years to go before they start calling me an old fart.... (if I get that far) Happy Birthday Brother.... (and yes, I as well would like to have just half your talent my friend)
-
Keeping my head in the game.....
Egilman replied to Egilman's topic in 3D-Printing and Laser-Cutting.
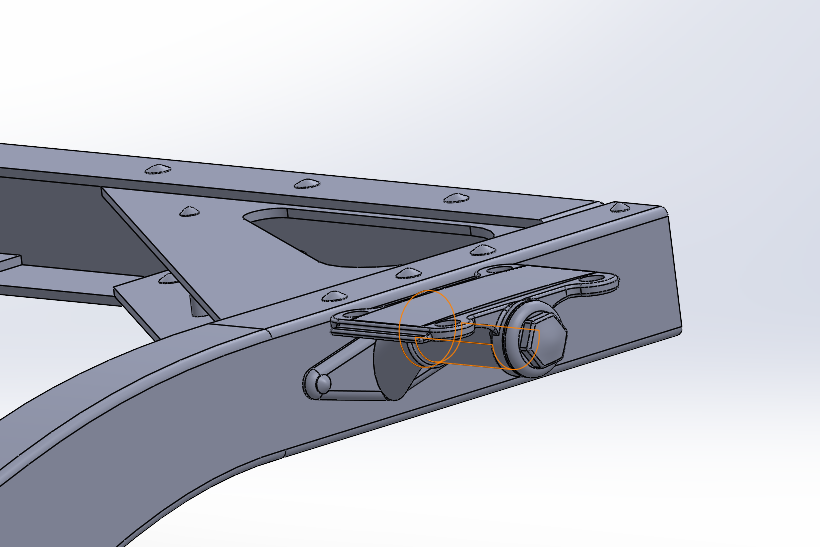
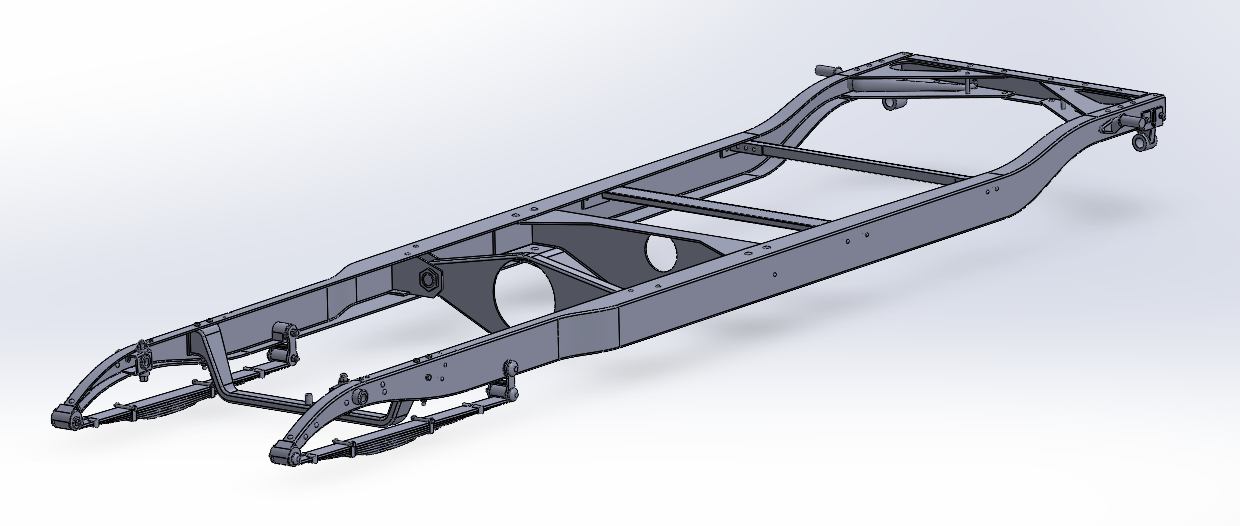
Update; Well starting off the rear springs, First we need the mounting plate.... The spring lays across the top and is bolted through the bottom on all four corners.... It also pivots on the shaft of the Mounting Bracket... Here it is attached to it's bracket.... And in it position in the frame.... Next up, the upper rear spring itself..... Onwards...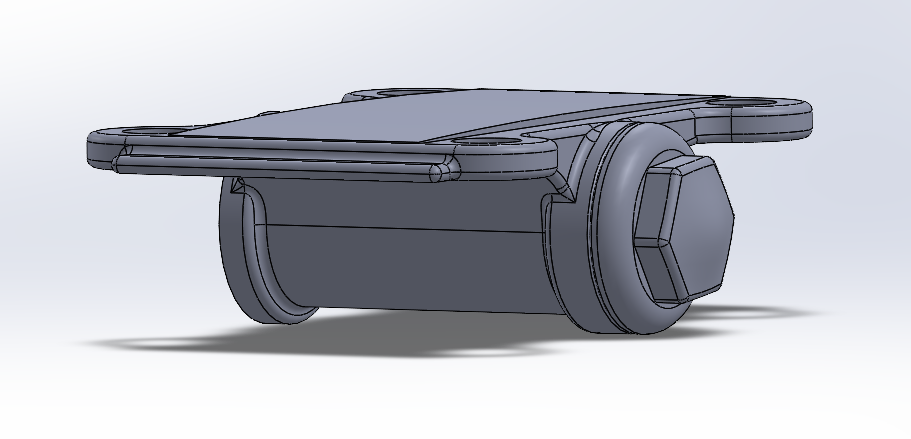
-
Keeping my head in the game.....
Egilman replied to Egilman's topic in 3D-Printing and Laser-Cutting.
Another Update, I know it's been a while, but this part took a bit of time to re-design.... Front Springs... And the bottoms.... All correctly laid out... They might look a little weird when compared to normal leaf springs, this is because they are asymmetric leaf springs... Asymmetric means that one end is longer than the other... This particular set of springs were 2" x 35" with a 15" forward axle mounting point leaving 20" behind the axle.... They have been through 8 iterations before I could finally get them to configure into a solid block and still look like the real thing... An overall view... They do look good if I do say so myself... {chuckle} Anyways, I'll be taking a few days to do some RL stuff before starting on the rear springs... (shouldn't be too bad as I now know how to do them) That's all for now, Onwards.....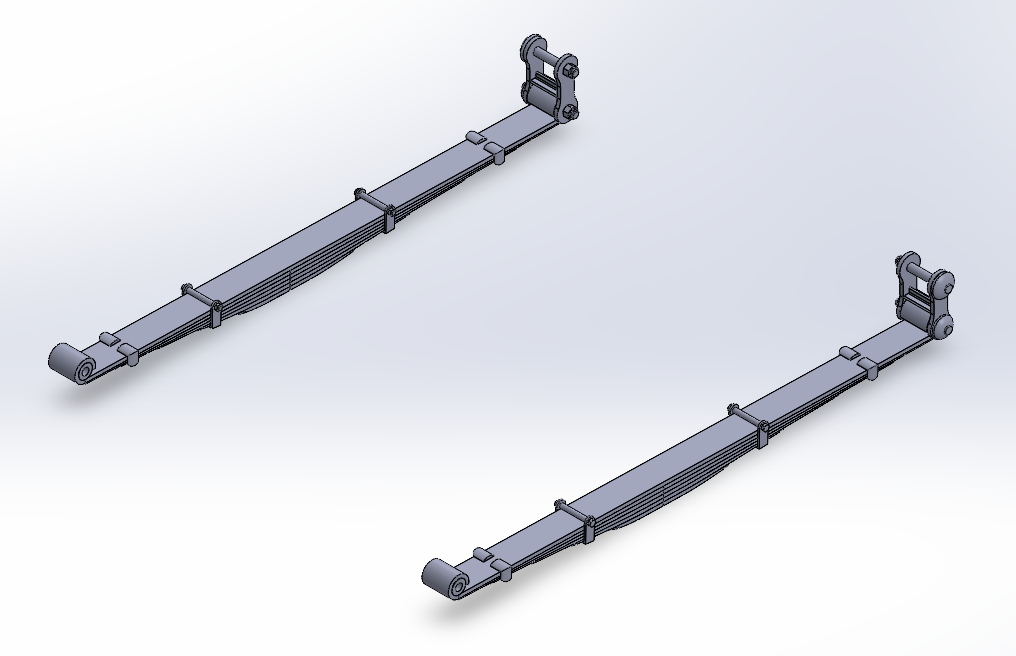
-
I have the Bug and the plate with the aluminum rods for bending curved pieces... (forgot what they called it) Just did a search of their vendors and most have little stock left and eBay has nothing listed in the US... The UK has a few available, but the prices are going thru the roof... The hardest one to get today is the 8" version, good for folding those long tank fenders but the price is over 100.00, there is one shop that still carries their long (4" + 8") blades for the larger hold & folds.... They won';t last long... It's a shame, they were the original, everyone else is a copy or a ripoff... A must have if you do a lot of PE....
-
Well one does have to admit that the King Tiger has a Cachet about it that no other WWII tank has... When it was in good repair and full of ammo and fuel it WAS the king of the battlefield in the hands of an experienced crew... Nothing else could touch it for effectiveness... But this is where it became the ultimate failure... Getting it into battle in that condition proved near impossible... It wasn't reliable, it had a weak final drive system based upon the Tiger I which they knew had problems, the weight of the Tiger II exacerbated that... It was a fuel hog with a range at best of 150k.. There were several occasion during the wart where a Battalion would leave their assembly point for the battlefield, around 40-45 tanks and none of them would make it to the battle... Either broke down or out of fuel... It was a handicap in offensive warfare... It really shone it's abilities in the defensive battle though when it didn't have to move very much and fuel would last a bit longer... And this is where most of them were lost... They would fight until disabled, usually by breakdown, occasionally by running out of fuel and every once in a while being destroyed by enemy action... There was never a recovery vehicle that could handle the king Tiger and when the retreat started they didn't have the facilities to being them in for repair consistently and hence when they were in the position where they were fully operational except for fuel, the crews would disable them, (by draining the recuperator in the gun and firing a high energy projectile through it, it would destroy the recoil system, then set them afire where the ammo would eventually explode) Estimates range to 35-50% losses this way.. By the end of the war the allies were developing guns that could handle the King Tiger, (the US 90mm and the Russian 128mm anti tank guns) not enough of them arived to really be tested in combat against the King Tiger... A beautiful piece of engineering when it worked an engineering disaster when it didn't... Overall as a combat vehicle it's history shows it was a poor one.... But it still impresses even today....
- 53 replies
-
- 10
-

-
Just in case anyone is interested.... Unit History of Schwere SS-Panzer-Abteilung 103. This unit was initially established as II. Battalion of 11. SS-Panzer-Regiment in July 1943. It was first deployed in anti-partisan duties in Croatia in July and took part in the disarmament of an Italian tank regiment in August. During September it then spent September training with the captured tanks and assault guns, before they were once again employed as infantry against the partisans. It wasn’t until February 1944 that they received their first Tiger I-E tanks for training after being moved back to Germany. They received specialist training at Paderborn during February and March. The Tigers were re-assigned to another unit and the battalion was moved to the Netherlands to continue their training with some old Panzer I tanks. In May 1944 the trained crews were transferred to the 101. and 102. Schwere SS-Panzer-Abteilungs. The battalion received six more Tiger tanks on 26 May 1944 to continue their training. Another four tanks were received on 22 August, but were quickly handed over to 301. Schwere Panzer-Abteilung Funklenk (Radio-control). The battalion immediately started retraining for the Tiger II. They receive the first four Tiger II tanks in October 1944. They continued to train and received more Tiger II tanks up until the end of January 1945. During this time they are redesignated 503. Schwere SS-Panzer-Abteilung. On 28 January they detrained in Pomerania and were soon thrust into combat against the Soviets. They fought in the area around Arnswald until forced to withdraw on Zachan in mid February. Some of the battalion was sent to Danzig on 17-18 February. The trains were heavily attacked by the Soviets and the battalion were forced to detrain on a number of occasions. Other elements of the battalion ended up supporting the 5.Jagerdivision during a Soviet attack around Reetz. By 12 March they are operating with I. battalion of the 7 Grenadier-Regiment around Groß Mishau. The rest of the battalion arrived in the Danzig Pocket on 22 February 1945. Their first engagement was around Stargard. On 7 March the Soviets launched a massive attack against the pocket. Two Tiger II, one Panzer IV, a StuG and an 8.8cm Flak 36 gun manage to destroy 57 of the 80 tanks attacking, but the Soviets were undaunted and continued the attack. Soviet attacks carried on throughout March and the Tiger II tanks face off against their Soviet counter part the JS-II heavy tank during many encounters. Later in the month the 503. Schwere SS-Panzer-Abteilung elements in Danzig support the 11. SS-Freiwilligen-Panzergrenadierdivision “Nordland”. In early may most of the crews in Danzig were transported back by sea to Swinemünde to rejoin the rest of the battalion around Berlin. During April the rest of the battalion fought a number of defensive battles to hold off Soviet thrusts towards Berlin. In one engagement near Bollersdorf, on 19 April 1945, Tiger II tanks under SS-Oberscharführer Körner destroyed an assembling armoured brigade of JS-II and T-34/85 tanks (a company of JS-II tanks and approximately 100 T-34 tanks). By 22 April the battalion has retreated back to Berlin and were engaged in heavy street fighting. On 3 May the remaining troops, after failing to breakout of the Soviet encirclement, are taken prisoner near Ketzin. Those few crews still in the Danzig pocket surrendered on 9 May 1945. So yes, it is possible that there were Tiger II's in Berlin in the final days of the war... (Uunabashedly stolen from the Flames Of War website)
-
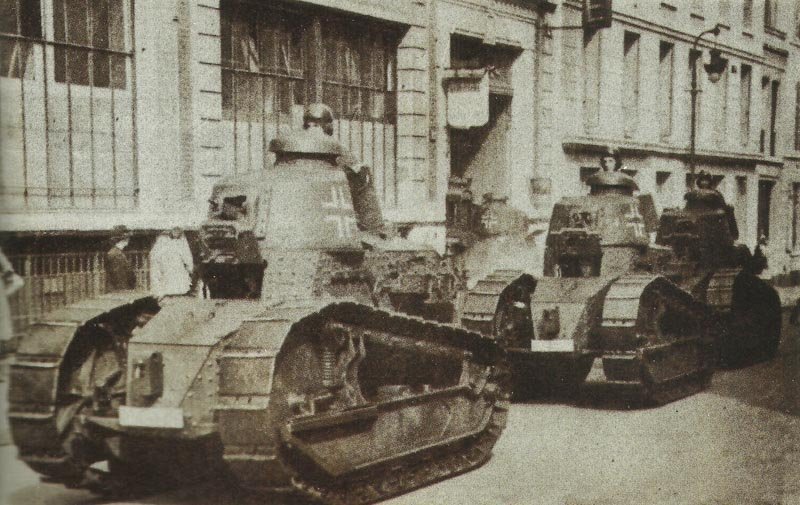
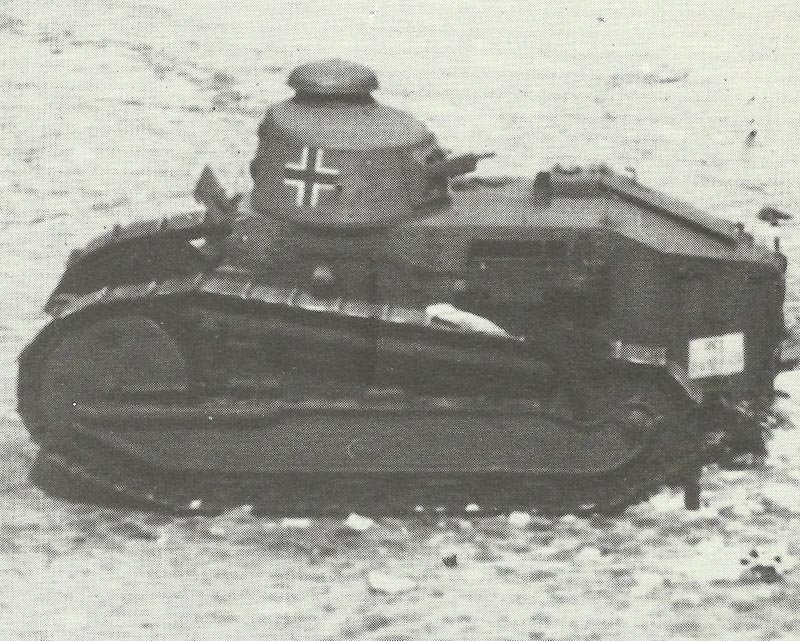
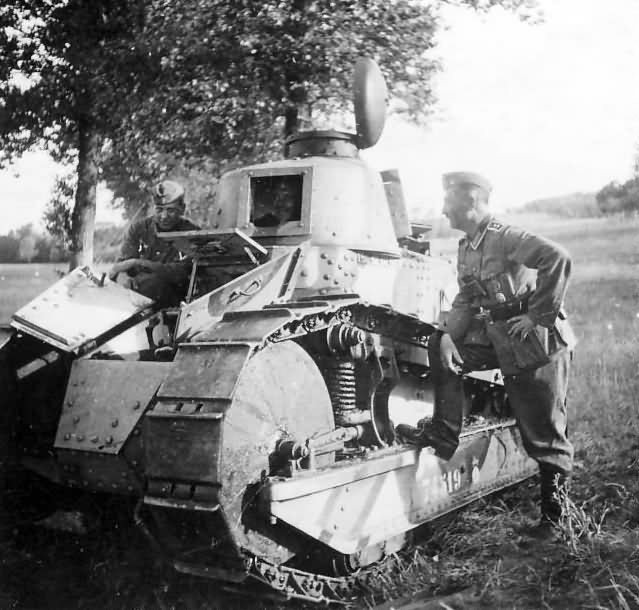
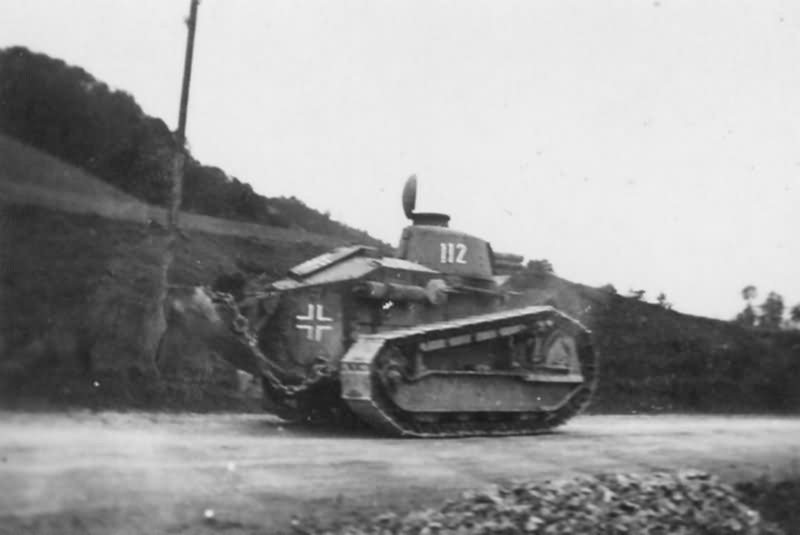
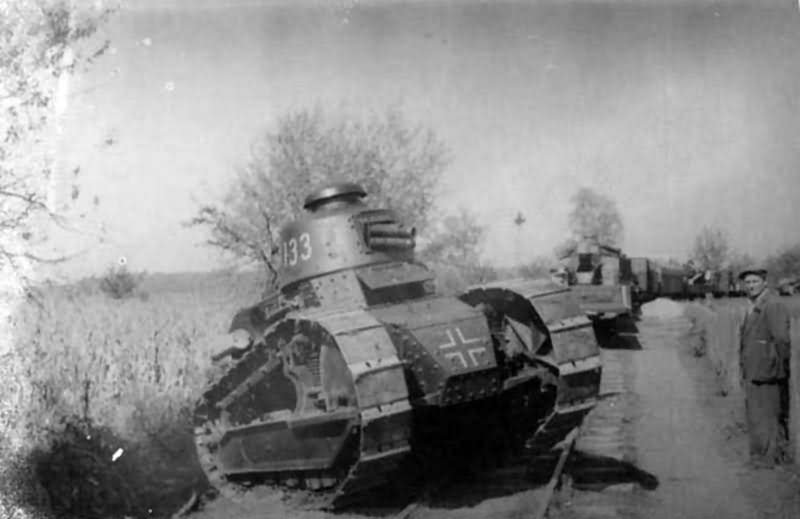
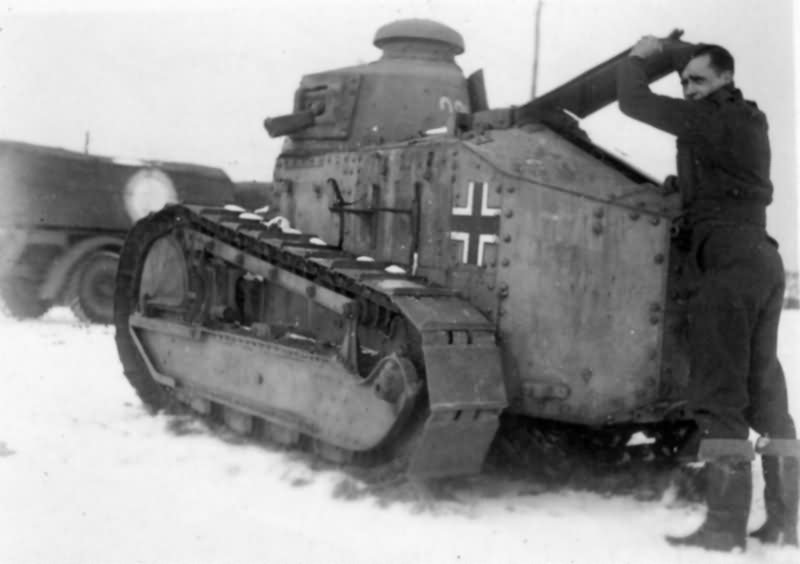
The Germans captured a large number of French vehicles in 1940, they used them for security and police service... (as well as bunker armaments) They were known as the Panzerkampfwagen FT-17/18 730(f) in Wehrmacht service... The Germans never let anything go to waste..... And we captured a few of them back at the end....

- 21 replies
-
- 10
-
-
There you go Brother Baker is the expert on German Armor... I'm just a bit player.... Well done sir... I knew you would track it down... So the kit is using a fictitious historical location as well... Happens all too often...
-
Like Darius says there is no "right" Especially in very late war German camo... Looks fine to me... If anyone ask, answer with this question... "were you there" {chuckle} Usually shuts them up.... (but there are die-hards) Looking good my friend, especially for a first build... I don't think I could do better...
-
If you going to open up the turret? you will want to take the white interior back to the rear rivet line, maybe even farther if your going to rotate the turret... The Turret has relatively large doors and when open, you can see all of the turret interior and quite a bit of the hull interior... It's a very nice Kit and can be built into a very nice example of an FT-17 of most any era...
-
How I would go about it? Tube glue, Good old Testors tube glue... Yep... Don't ever forget where you came from.... {chuckle} The reason? Tube glue takes time to harden up allowing you to shift the parts around a bit before it sets... but it will not glue paint... so I would paint in sub-assemblys as I go along... I always keep a couple of tubes around exactly for this type of application...
-
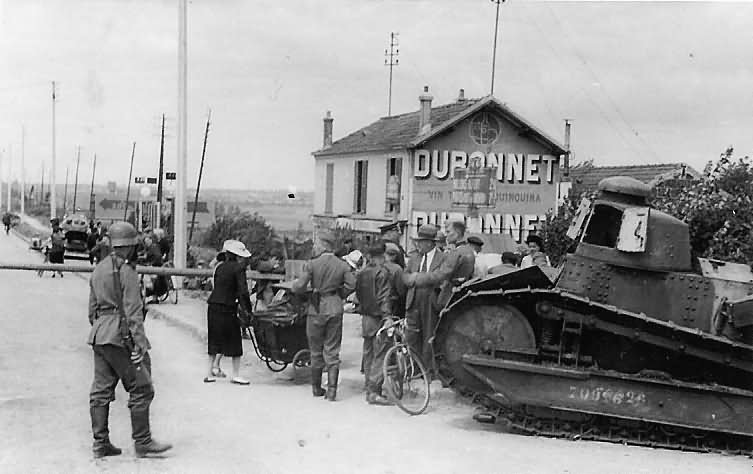
1st pic, Lithuania postwar... 2nd pic, Patton in France 1918 3rd pic, From NARA it is titled as, "French Renault tank with American crew Sgt. Edward White and Cpl. Edward J. Elliot, Military Road near Cigarette Butte, France." They wound up everywhere postwar cause they were the most successful design to come out of the war... They have all the features of a modern tank... And the ideas of how to correctly use them in combat came directly out of the brain of one Lt Colonel of the US army named George S Patton Jr.... I believe a couple of them were last found in a military dump in Iraq during Desert Storm....
-
Yeah, it's a very late war version, also see the other note right above the one you enclosed... The 9 tooth drive sprocket... So, what this all means is, if you want to produce a historically accurate Tiger II of Panzer Abieltung, (battalion) 503 during the defense of Berlin in 1945, you need to make those changes with aftermarket products expressed in the note... Otherwise you will have a generic representative Pz.kfg VIB from 1945 on transport tracks... For that transformation you will need a full set of combat pressed steel road wheels, a 9 toothed sprocket and workable combat tracks... That's the Airfix 1/35th King Tiger.... ok... Generic aftermarket, they don't make tracks and wheels specifically for the Airfix Kit... So we go with... Last production batch 18 tooth late type tracks... https://quickwheelstore.com/1-35-quicktracks-t-35068-tracks-for-sd-kfz-182-tiger-ii-kgs-73-800-152-last-production-batch.html 9 tooth sprocket late pattern... https://spruebrothers.com/trxtr35093-1-35-trex-disassembled-king-tiger-sprocket-9-teeth-late-type-pattern-2/ As far as the road wheels, in combat configuration she carried 40 of them {chuckle} the kit wheels are adequate just not enough of them.... There are other vendors and manufacturers out there those two links are just a sampling... And finding the road wheels in 1/35 is going to be a chore given all the 1/16th scale products out there...
- 53 replies
-
- 11
-

-
-
Your talking road wheels correct? Yes they are transport tracks, just wide enough they would fit on the rail cars without overhanging the sides... First thing the idler wheel on all versions was pressed steel, it's rolling surface would be bare shiny steel.... The road wheels could be either pressed steel, pressed steel with a rubber tyre, or cast steel with a rubber tyre... The easiest way to tell is the presence of the tyre.... it would be square shouldered and not shiny, there would be a steel bead affixed to the rim of the wheel to hold it in place... So you would have the flat surface of the tyre, and a square shoulder on the steel rim of the wheel... Pressed steel wheels wouldn't have that rim bead and would be curved right to the rolling surface.... What you have are late version pressed steel road wheels, the surface would be bare worn steel, light metallic grey unpainted... And that fits with your choice of late war yellow, red-brown and forest green camo.... Brother Baker will probably be able to pin it down even better... PS: the only German tanks with rust on their road wheel running surface? Destroyed tanks....
- 53 replies
-
- 11
-
-
-
Krupp 420mm Big Bertha by Haliburton - Takom - 1/35
Egilman replied to Haliburton's topic in Non-ship/categorised builds
Yep, Bertha was four tractor loads for the gun alone, not counting the equipment to emplace and assemble it... -
It was printed on the fabric before it was applied to the aircraft..
-
The presentation give a good indication of how well the camo worked... The only thing anyone would be able to see is the exhausts flares.......
-
F-100C Super Sabre by CDW - Trumpeter - 1:48 scale
Egilman replied to CDW's topic in Non-ship/categorised builds
Yes this does and will happen, but it doesn't happen to the tail of an F-100, the tail of an F-100 is solid Titanium sheets, not clad in anything... High chromium content steels like high end stainless will show the same discolorations when subjected to high heat although it appears grey like any other steel when new... Titanium alloys used for aircraft structural panels discolors like that starting at around 850 C.... In fact the reduction/elimination of that excess heating of the tail panels on aircraft led to the development of air bypass engines, to help keep the tail fuselage surfaces cool... -
F-100C Super Sabre by CDW - Trumpeter - 1:48 scale
Egilman replied to CDW's topic in Non-ship/categorised builds
You know brother, the Trumpy 1:48 F-100D #02822 has the decals for both the T-birds and Skyblazers.... It can be had for as low as $34.... It's out there, most have it for around $45 -50.... https://www.scalemates.com/kits/trumpeter-02822-f-100d-thunderbirds--203629 https://www.super-hobby.com/products/F-100D-IN-THUN.html?partner_id=9 -
F-100C Super Sabre by CDW - Trumpeter - 1:48 scale
Egilman replied to CDW's topic in Non-ship/categorised builds
Yeah, $45.00 is too much... I'm looking to see what I can find.... Warbirds does a set for the T-birds "D" models in 1/48th, If you can find them... Well the Skyblazers and the T-birds flew F-100C's for a number of seasons before they switched to "D" models... I have the 1/32nd scale Trumpy F-100D which is a gorgeous model, (needs an aftermarket nose) but finding decent T-bird decals for it is just as much a problem as Skyblazers... I fully understand it being a no-brainer... the F-100C will make a beautiful bird though it was one of the more colorful aircraft in the USAF inventory... -
F-100C Super Sabre by CDW - Trumpeter - 1:48 scale
Egilman replied to CDW's topic in Non-ship/categorised builds
Skyblazers decals are hard to find especially in 1/48... they are usually sold out... The Trumpy decals will work you just have to be extra careful with them... the Thing with skyblazers decals? the research shows that there isn't a great deal of demand for them so the printers don't print a lot of them, but when one does, they sell out quickly so fast you have to be there when they put the ad up... One of the weird things about modeling that comes about from time to time...