Supplies of the Ship Modeler's Handbook are running out. Get your copy NOW before they are gone! Click on photo to order.
×


Jeff59
-
Posts
563 -
Joined
-
Last visited
Content Type
Profiles
Forums
Gallery
Events
Everything posted by Jeff59
-
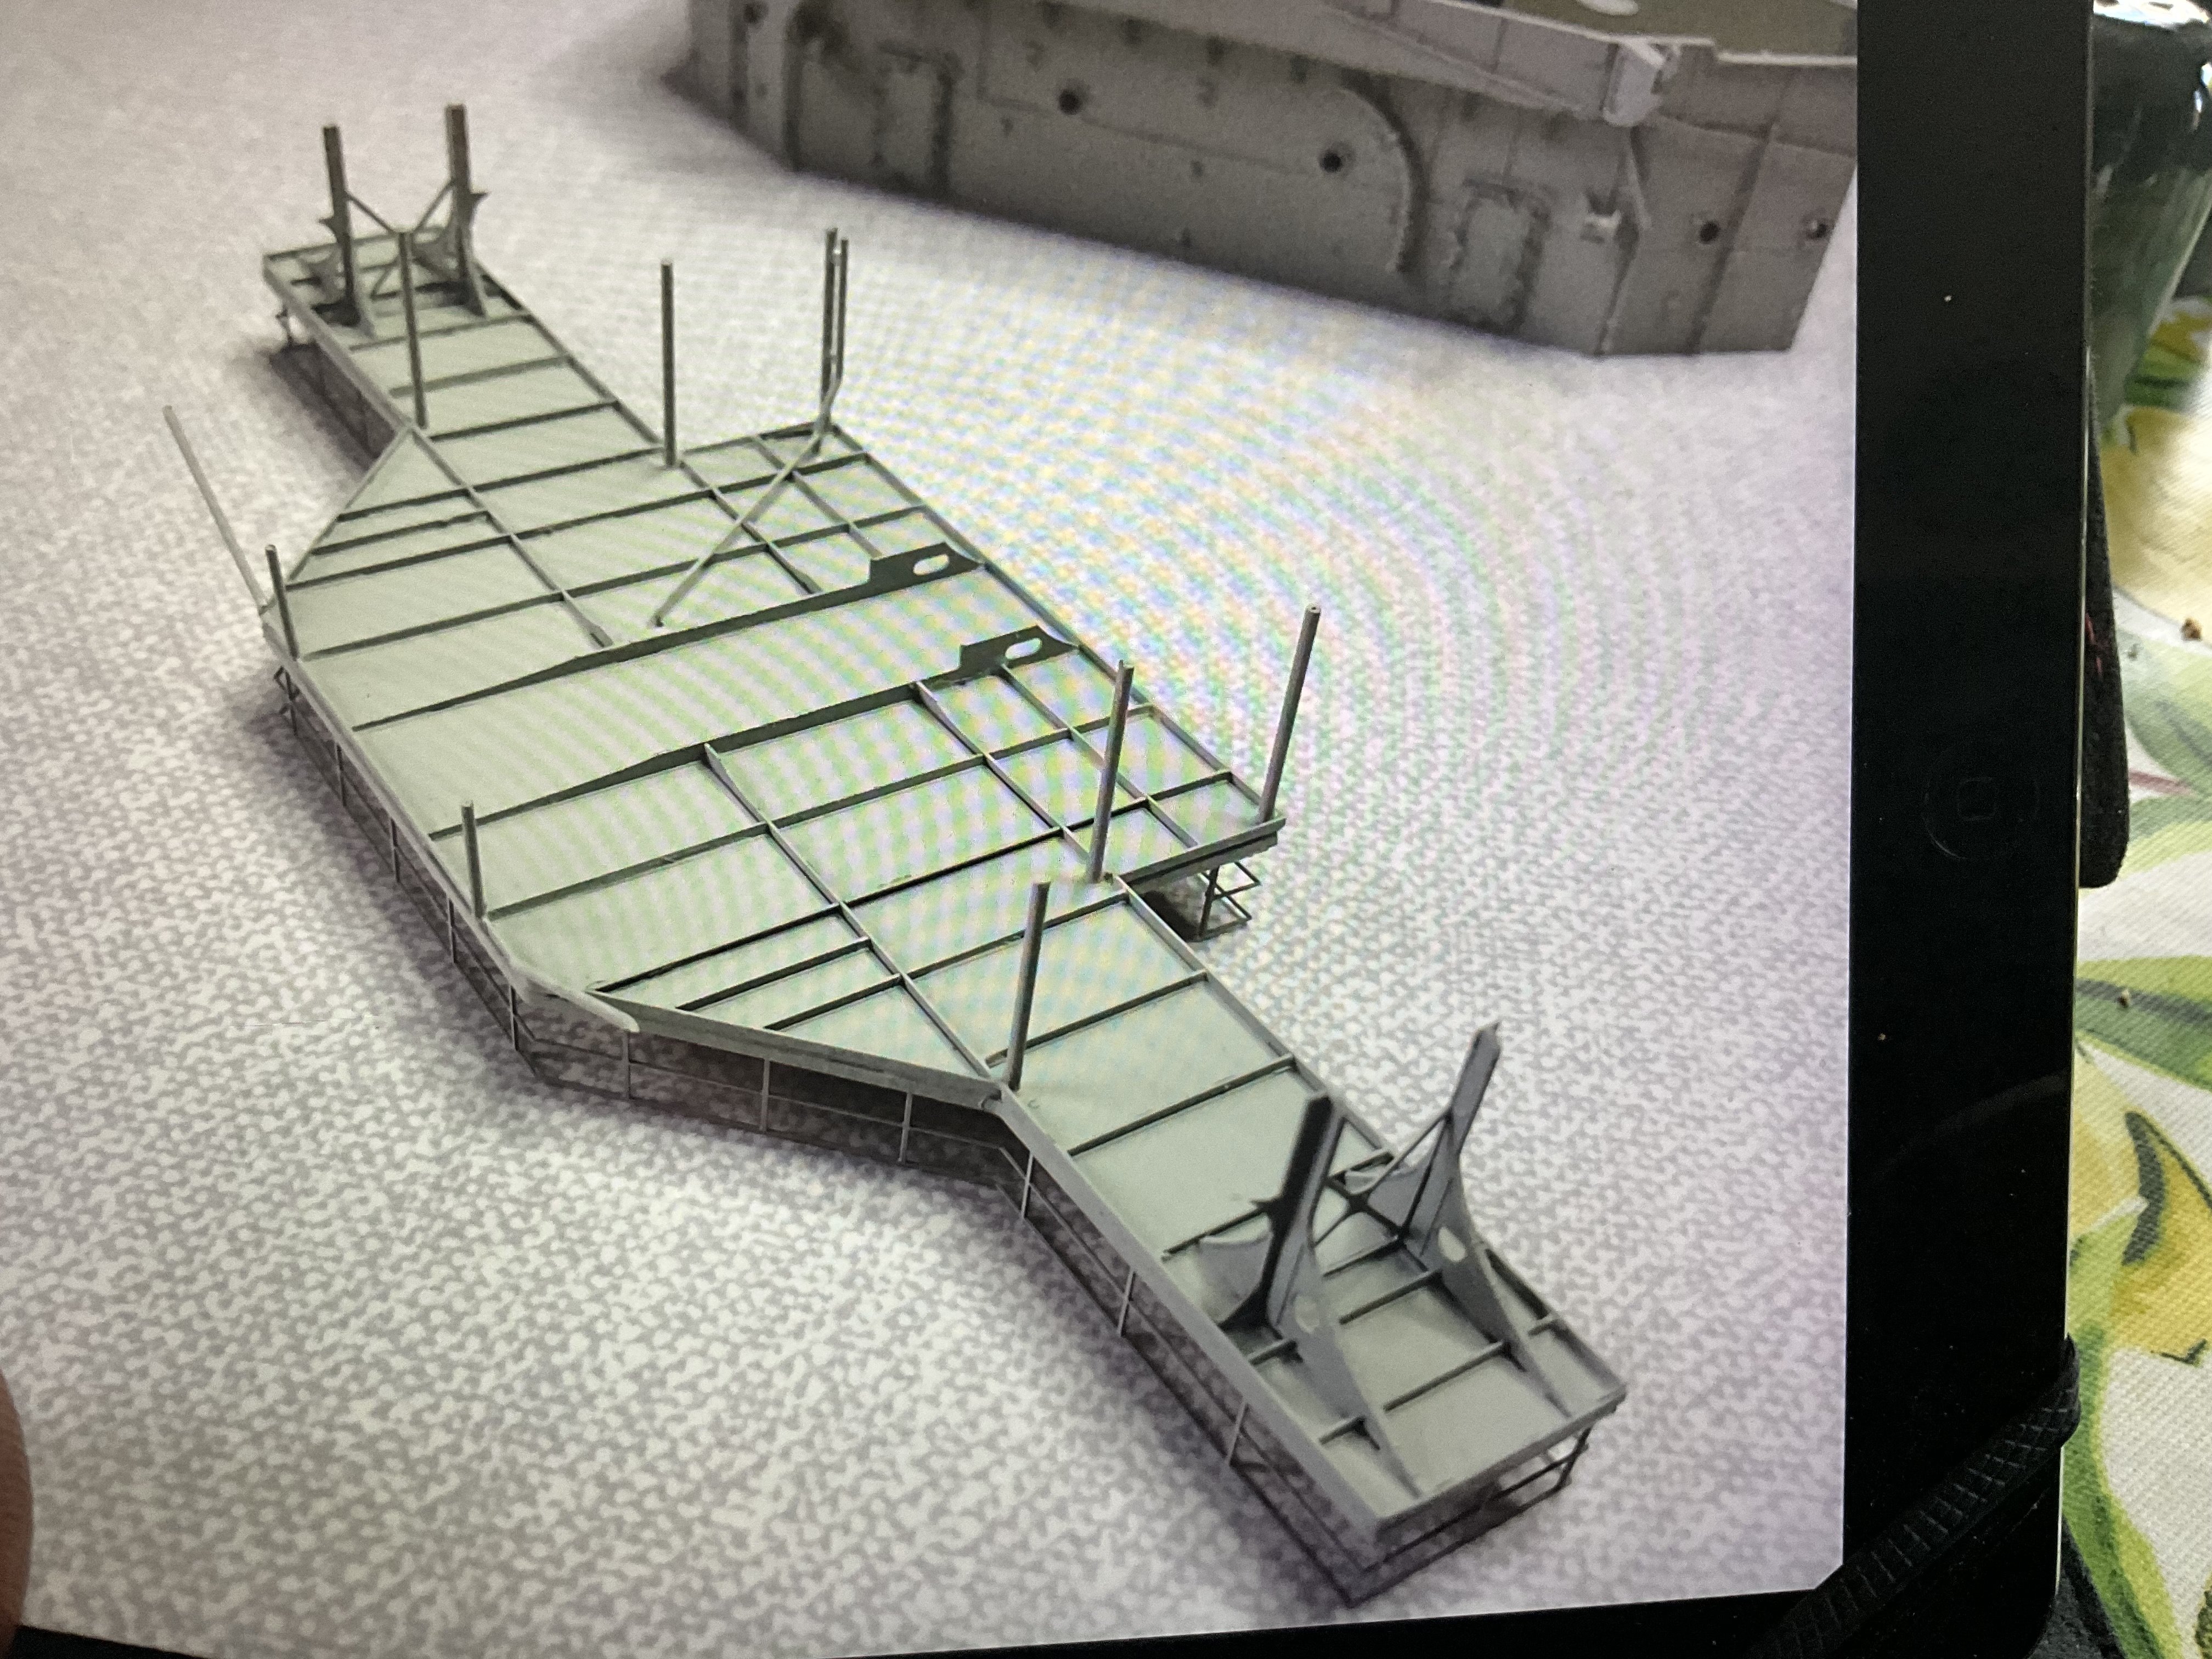
Also agree, happy medium gives the best off both worlds. Watch when you position the boats on this deck Jolle, space is a premium, considering the Micromaster Pinnace is quite a bit shorter than the kit one, l found it a tight squeeze to shoehorn them in, that’s when l had to add extra steelwork supports to support the extra boat cradles, it just goes on forever Jolle 😂, you might want to check out the pinnacle style, l did remove the helm screen on the last one that l made to make it look like it was from another ship, did manage to gently break this of and change the rear cabin, this probably makes it a bit nearer the period for 1905. Shall put up a photo off book l purchased that was a good help for photos and info. Shall also get said info from you on anchor chairs for Bismarck definitely 🤛 Your model is coming on a treat 👍

- 135 replies
-
- 3
-

-
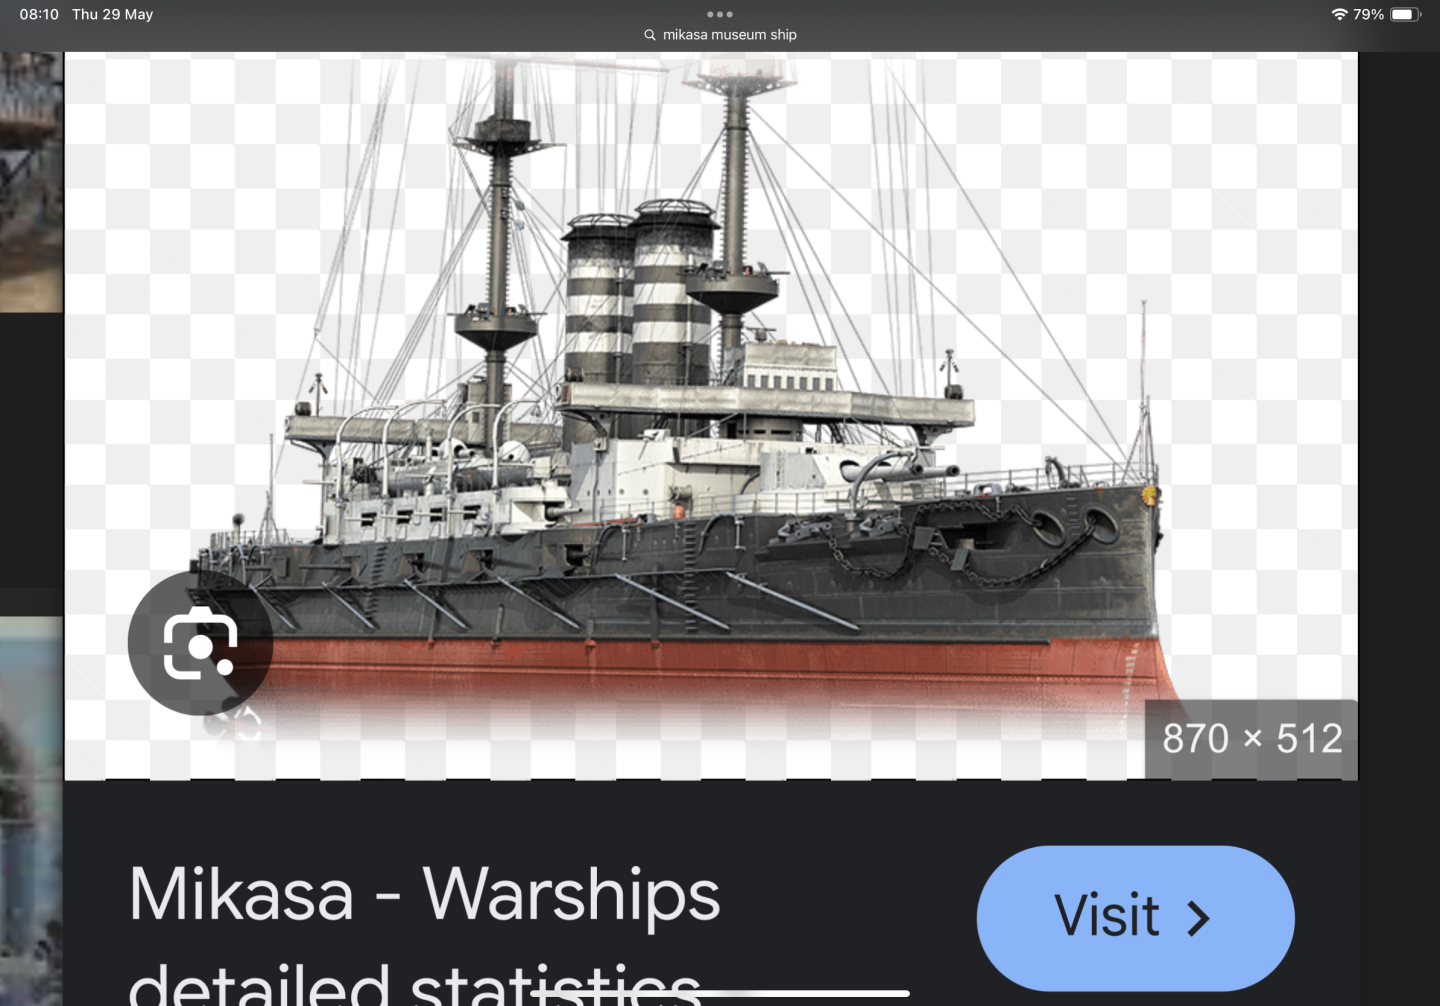
- Russo-Japanese War
- Mikasa
- (and 2 more)
-
High guys, hope you’re modelling is going faster than mine just now, l said would have more time for modelling since retirement but Jaqueline has also just retired so l will take that assumption back, l now have a full time Boss keeping me busy 😂 Haven’t been able to achieve much for weeks now, as l said before summer months frees up lots of home jobs, am sure you all know what l mean. Really looking forward to getting started on Bismarck again or is it looking forward to getting the chores done ? Either way, don’t give up on me, be back on her soon. Hope you’ve got all your chores done and are enjoying modelling 🤛
-
Was having another look at you’re build and clocked the Yamato next to Bismarck, first thoughts were bloody hell 😂 need to purchase this model, do have the Nickimo kit but it’s pretty naff now compared to what’s on market. You’re build on Mikasa is turning out stunning, know surprises there then 😂 🤛
-
See that you came to the same conclusion as myself as how to run the spare anchor chain as there was no information to go on here , l just stared at it for ages before thinking this set up made sense 👍 on the kit supplied anchor chains totally agree, didn’t know you could purchase these chains. Cracking job Jolle 🤛 haven’t been on site for a few weeks, busy finishing of my work shed that l started before retirement since summer weather permits this, looking forward to getting back to my own build soon though. You are right, the forward area at this point on Mikasa is crammed with details, but enjoyable.
- 135 replies
-
- 3
-

-
-
- Russo-Japanese War
- Mikasa
- (and 2 more)
-
Fabulous to see this build, really nice job, l have CV8 in my collection to build so shall follow this for sure 🤛 love the dedication put into the building of this, seems a common trait on this website. Excellent 👌
- 154 replies
-
- 1
-
-
- Enterprise
- Trumpeter
- (and 1 more)
-
Hope this is off help to you Jolle, on that Bridge wing on after supper structure it’s the back of the Bridge wing and etch that clashed with my model, maybe it was just a mistake on my part, but worth checking. That photo you showed of Mikasa at Vickers might be the same one l used to correct the bracing on the flag staff, it’s definitely not symmetrical, you’ll see what l mean. Glad to help 🤛
- 135 replies
-
- 2
-
-
-
- Russo-Japanese War
- Mikasa
- (and 2 more)
-
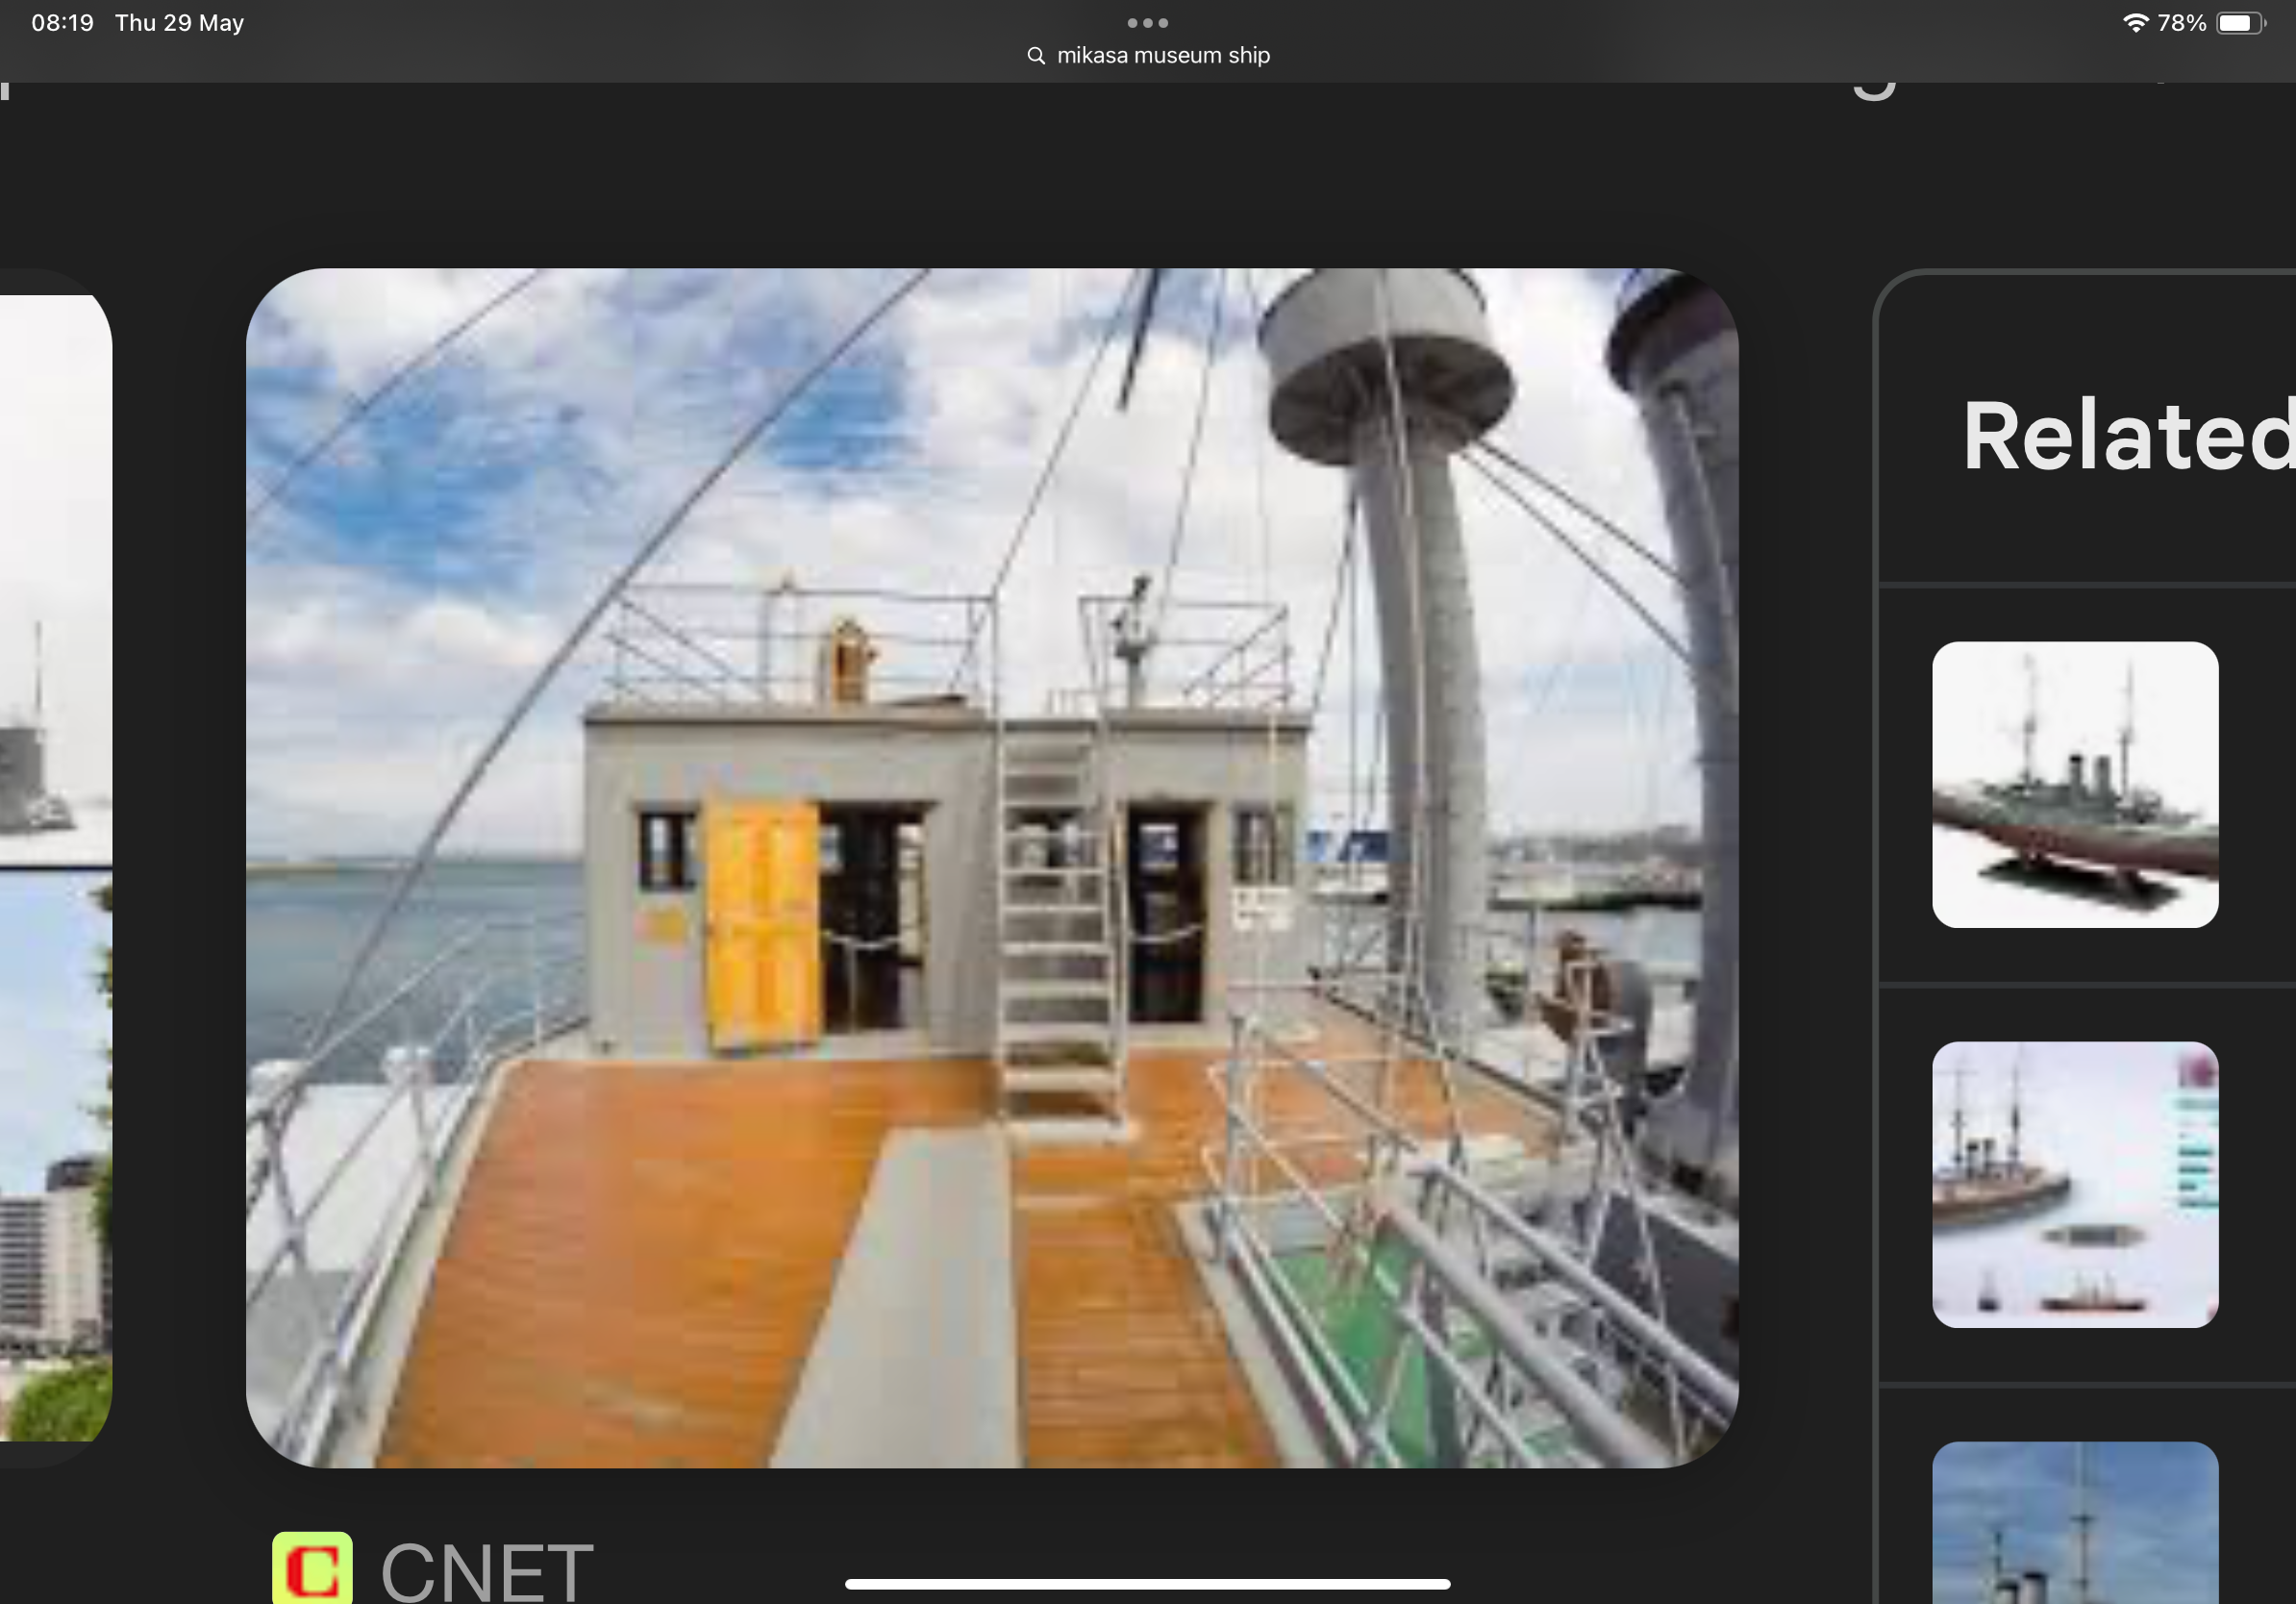
Had a Quick Look at lots of images on Mikasa Meuseum web site Jolle, you can spend many hours browsing , l know l did , always scanning the images looking for details. The drain pipes you mentioned, have found some older photos of ship that show them there, and one showing Bridge spaced in middle of Bridge wing 👍as l have said before a dedicated book on Mikasa is sorely needed.


- 135 replies
-
- 4
-
-
-
- Russo-Japanese War
- Mikasa
- (and 2 more)
-
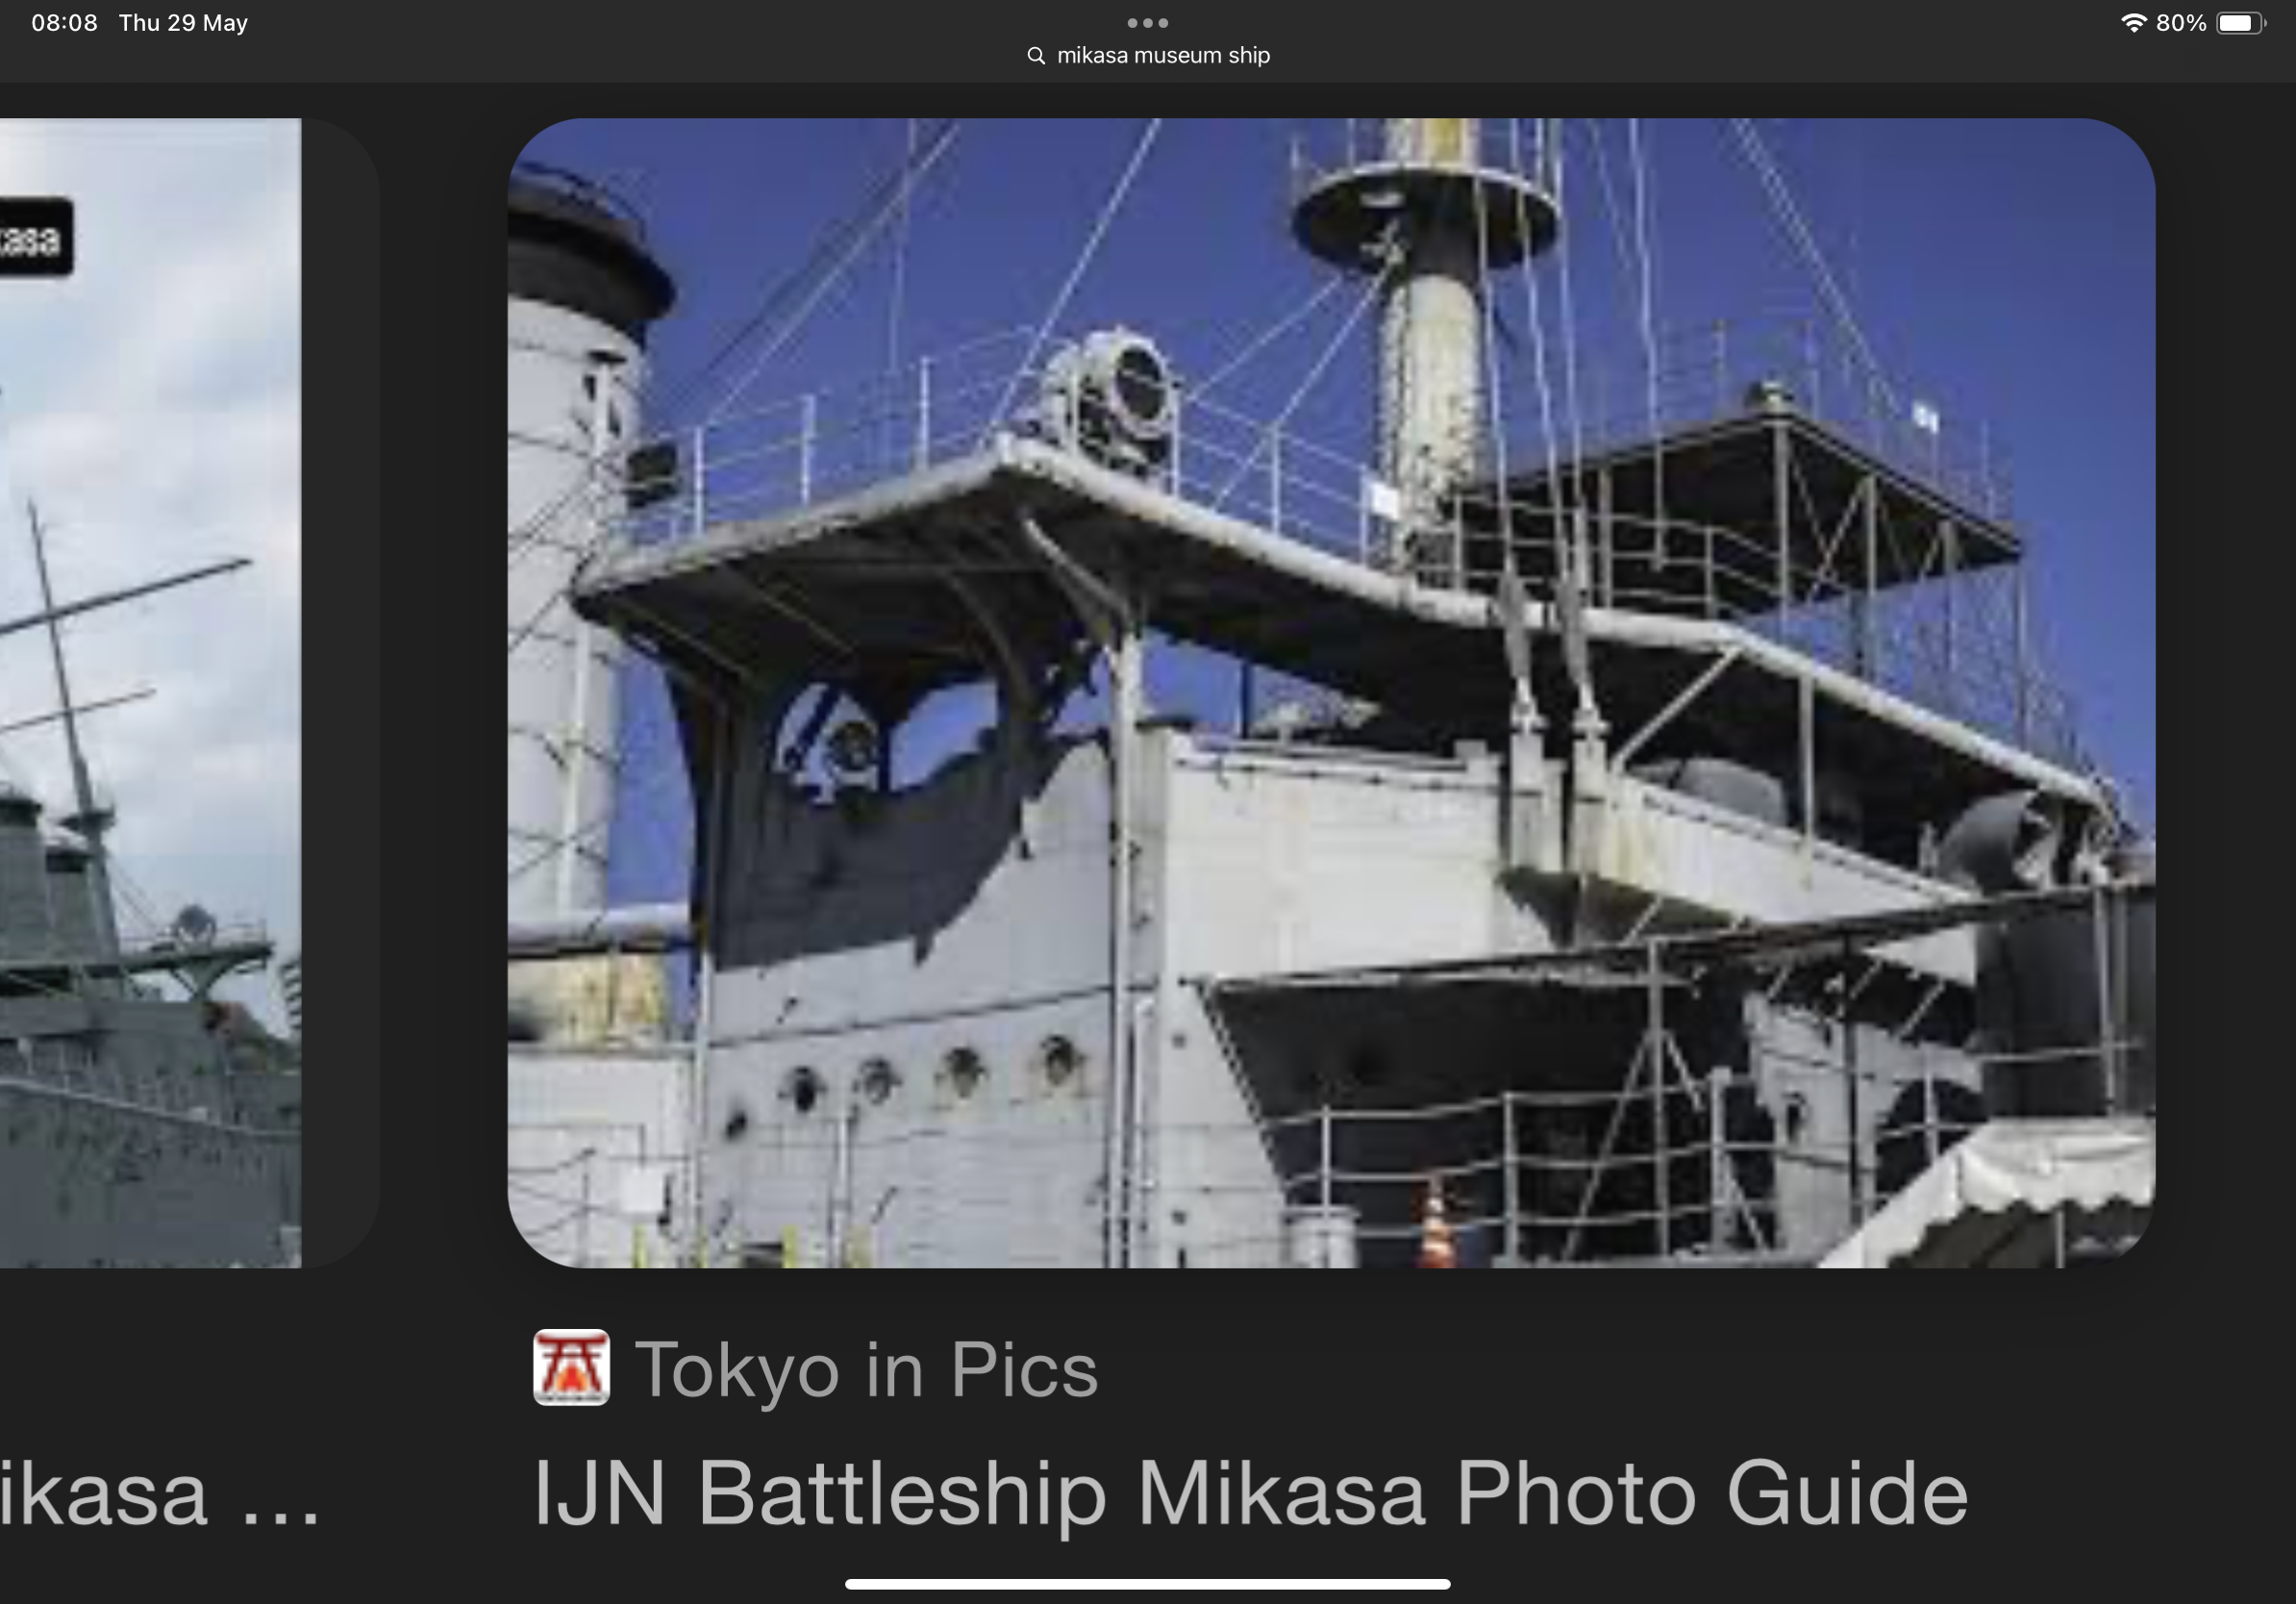
Hi Jolle, been a little while since l last looked at this, busy working on my shed come workshop, l did say summer weather slows up modelling a tad, mines has stopped for weeks now 😂 you’re models looking brilliant, no surprises there 🤛 that last photo you put up of Mikasas Bridge is the after Bridge, you can tell by the position of mast into the deck on Bridge structure, this also shows that the ventilation trunking was here as well, definitely closer to the edge. l didn’t move this cause the etch deck was already notched out to suit kit. There’s also a round ventilation duct just behind this ? But lm afraid it’s extremely difficult to define at what period this is relevant to, it’s just a minefield trying to decide on the right direction 👀 The cable drums on Bridge structure beside the doors just picked from some coloured cad drawings of ship in her early days found on Museum website when browsing, shall see if l can find them and post them 🤛 oh and watch out for Bridge wing clashing against the after mast, think l ended up notching a little bit out of mast to get it sitting vertical. It’s only when building this model you realise how hard it is to do without solid evidence, very difficult trying to do the early 1902 version, photos at Vickers the only source, even the Bridge wing is slightly different when you look at the supports at the edge of Bridge wing. Have to say your doing a great job with d difficult task. Shall get back to you on those images, away back to my shed just now. 🤛
- 135 replies
-
- 2
-
-
-
- Russo-Japanese War
- Mikasa
- (and 2 more)
-
Have to agree with you there Jolle, she is a very fragile model to work on, this increases as the build continues, think l said l was in a face to build her quicker than l could break her, only just won 😂 watch out for the wheel house bridge, not quite right position in kit, moved mine slightly forward 1.5 or 2 mm, balances out better for walking around the outside of bridge. Yip definitely one delicate stage you’re at just now. You also mentioned the masts, better to check at this stage so you see how it all comes together, that is the bridge wing to bridge superstructure and line up with mast in deck, this posed a few problems for me. I also found that the fixing point for the Pontos metal masts were rather weak. You have to consider that using super glue unless it’s slow bonding is out, need time to line up masts properly.. Welcome to the Mikasa club 😂 you’re doing great 🤛
- 135 replies
-
- 1
-
-
- Russo-Japanese War
- Mikasa
- (and 2 more)
-
Watch out for the hatches on these bridge structures, don’t think they are what Pontos or kit parts supply, l think they are ventilation ducts, did my aft bridge as instructed only to change my mind when doing forward bridge. When you look at the ship today you notice these parts are much taller than deck hatches 👍
- 135 replies
-
- 2
-
-
- Russo-Japanese War
- Mikasa
- (and 2 more)
-
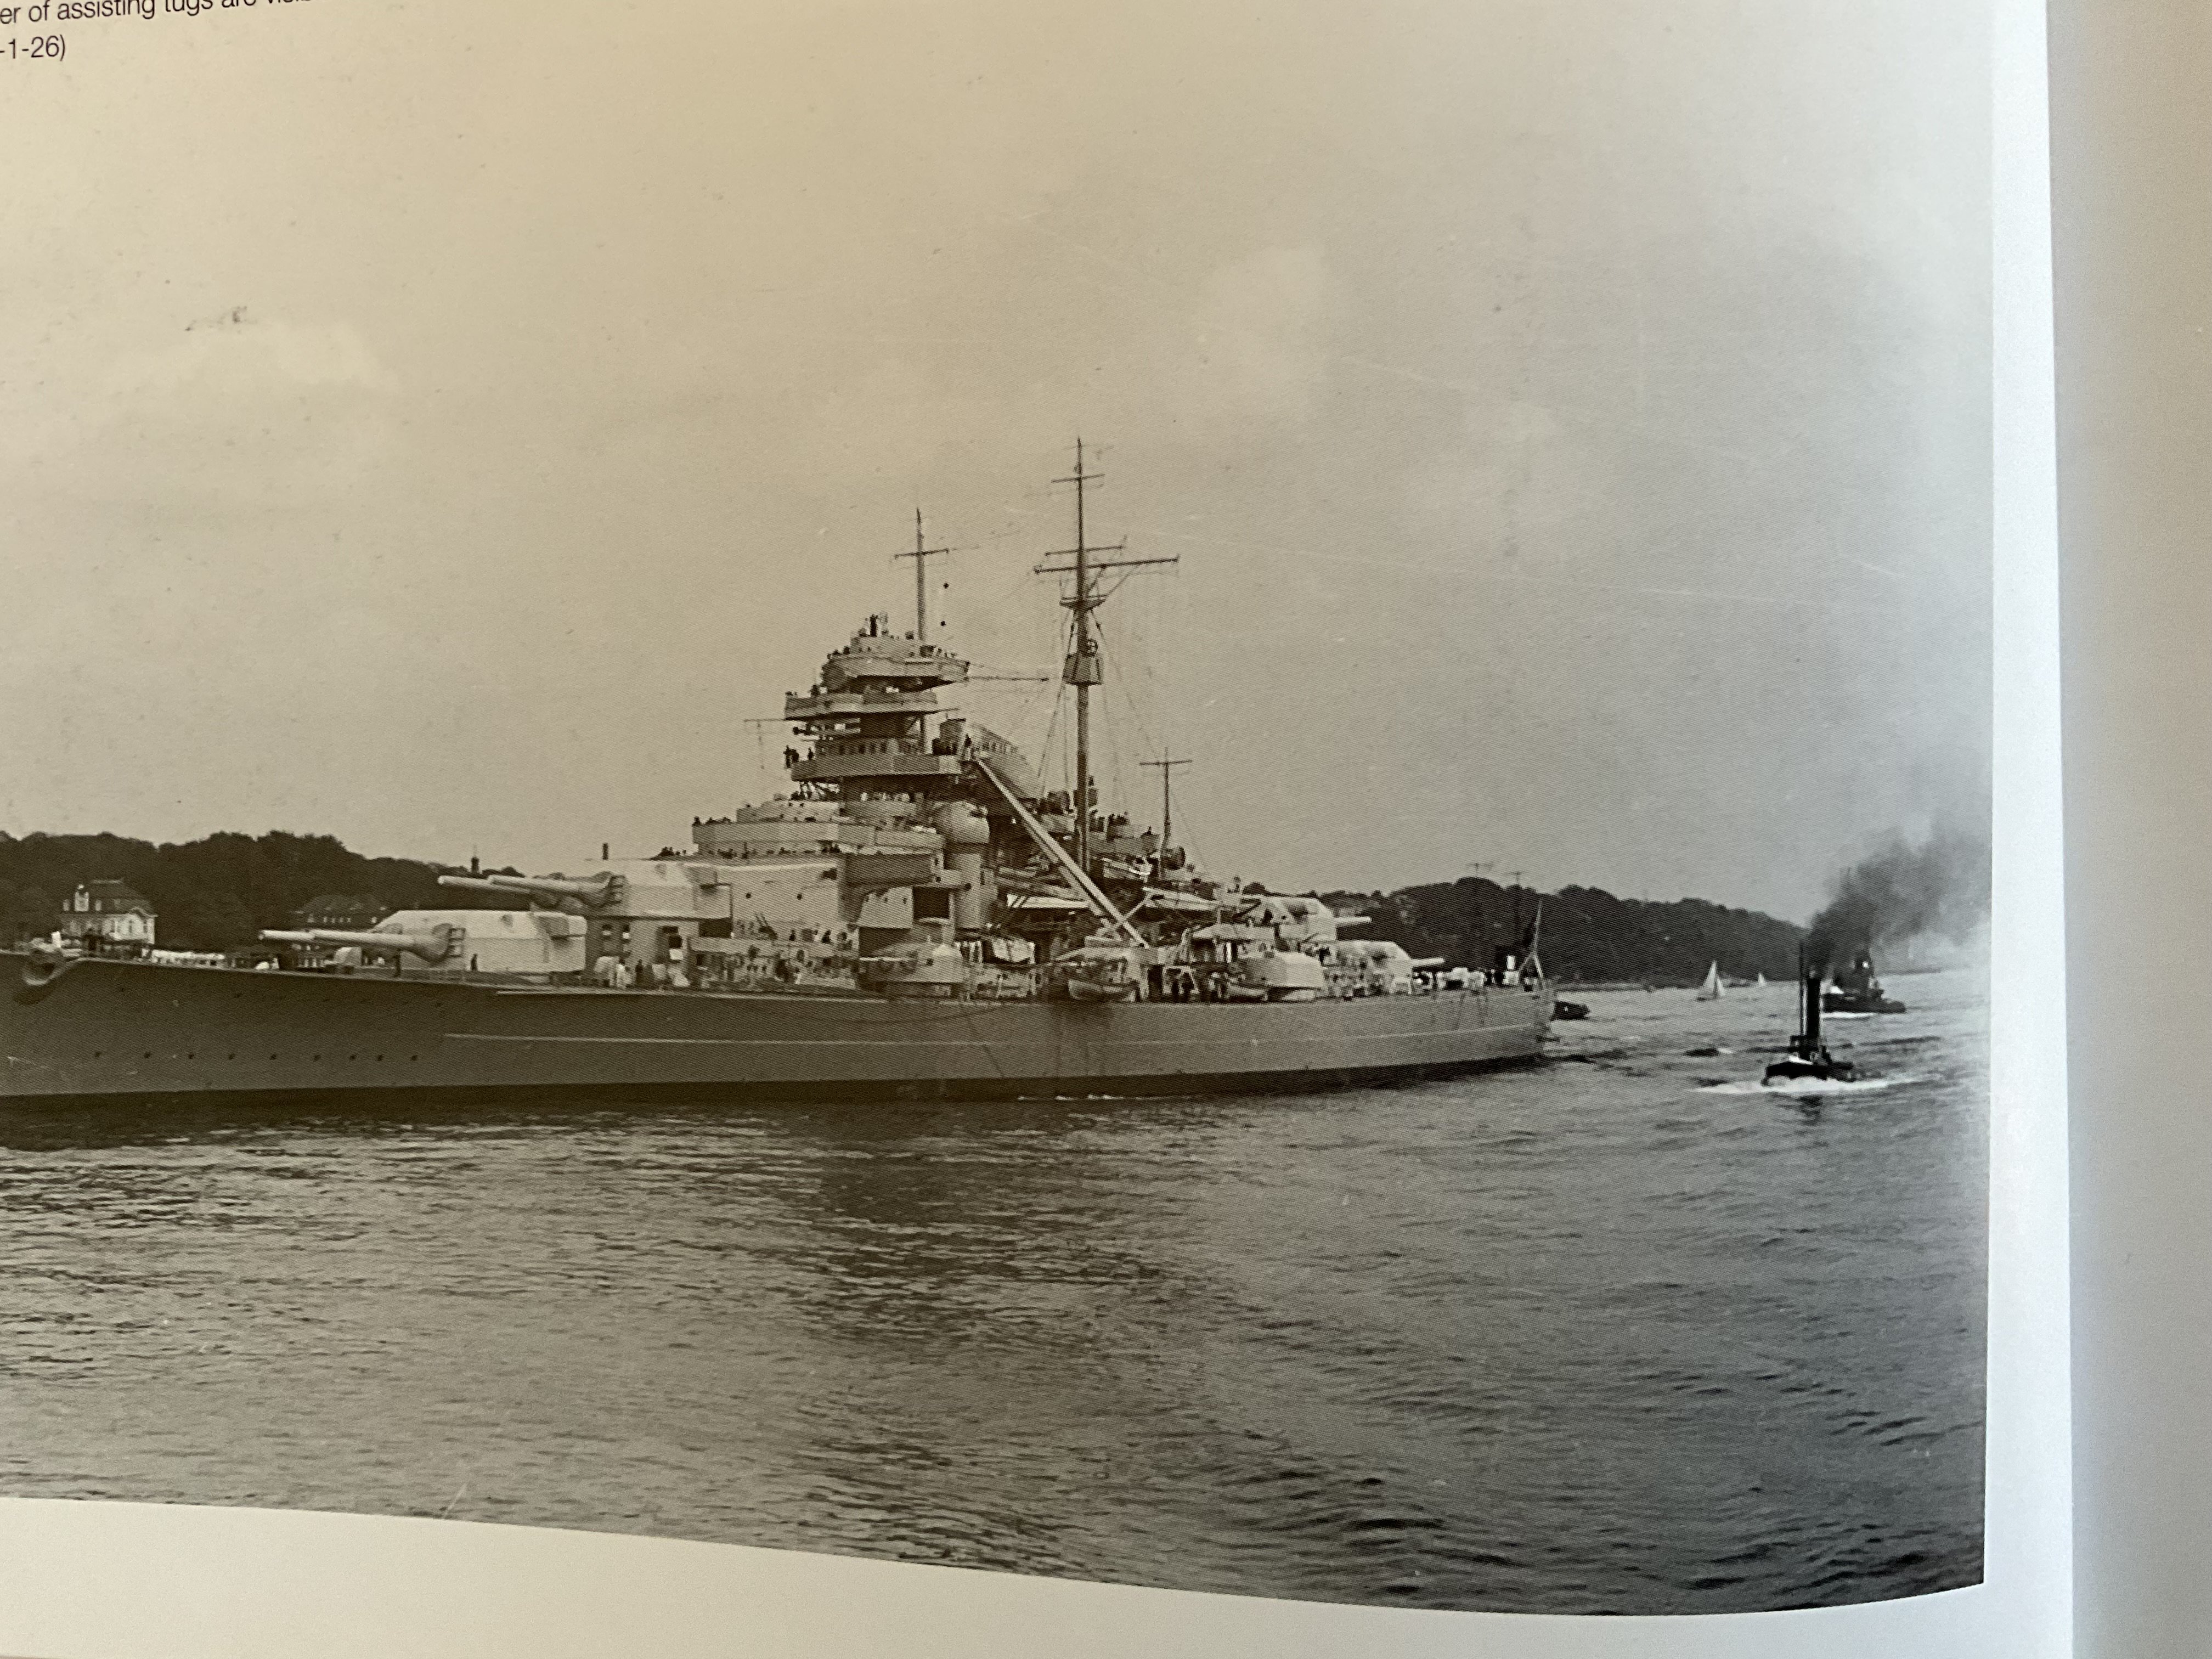
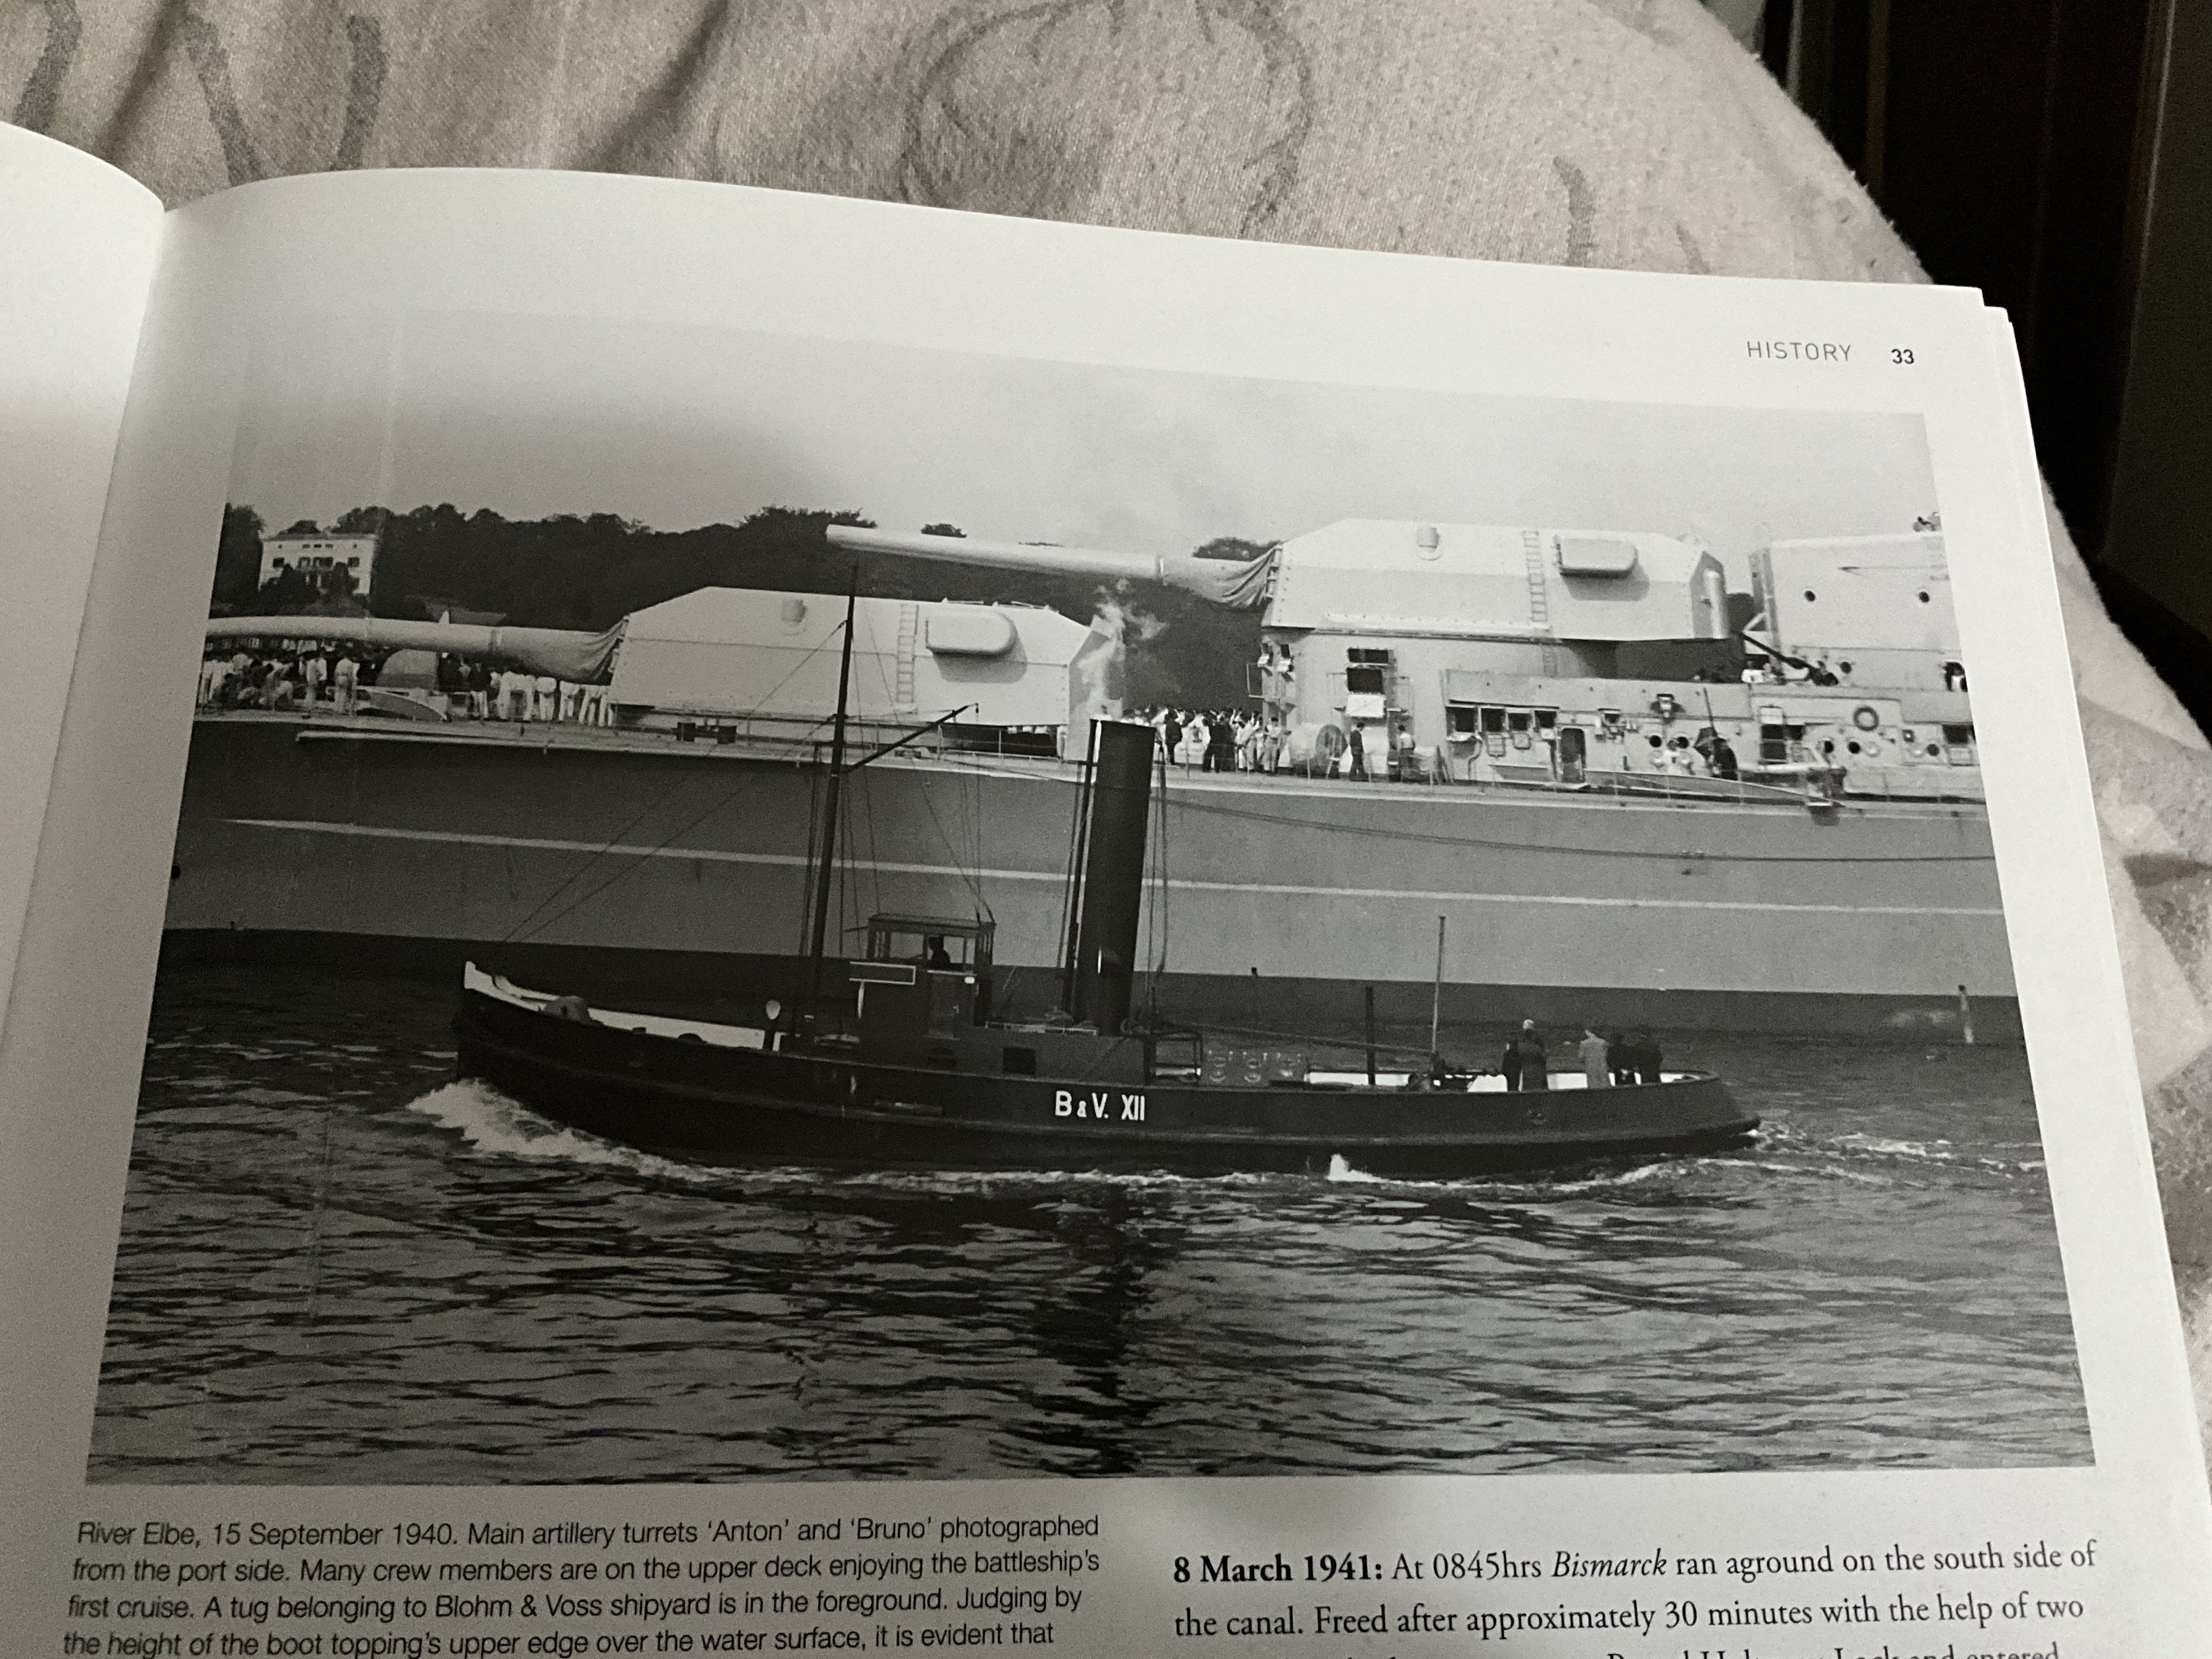
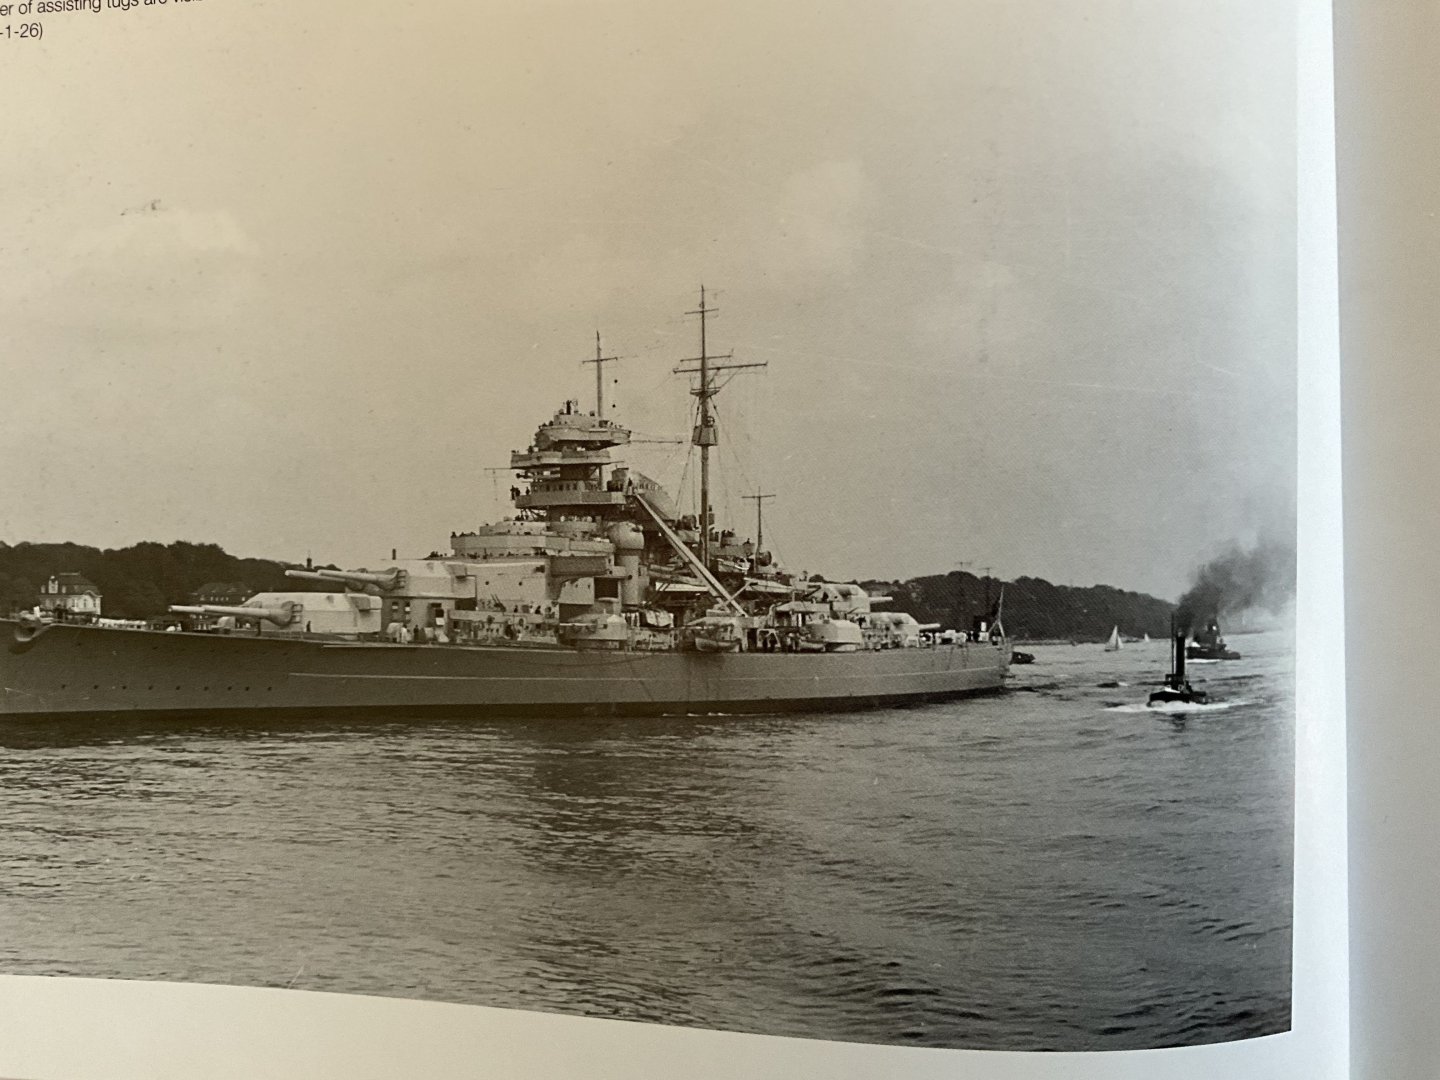
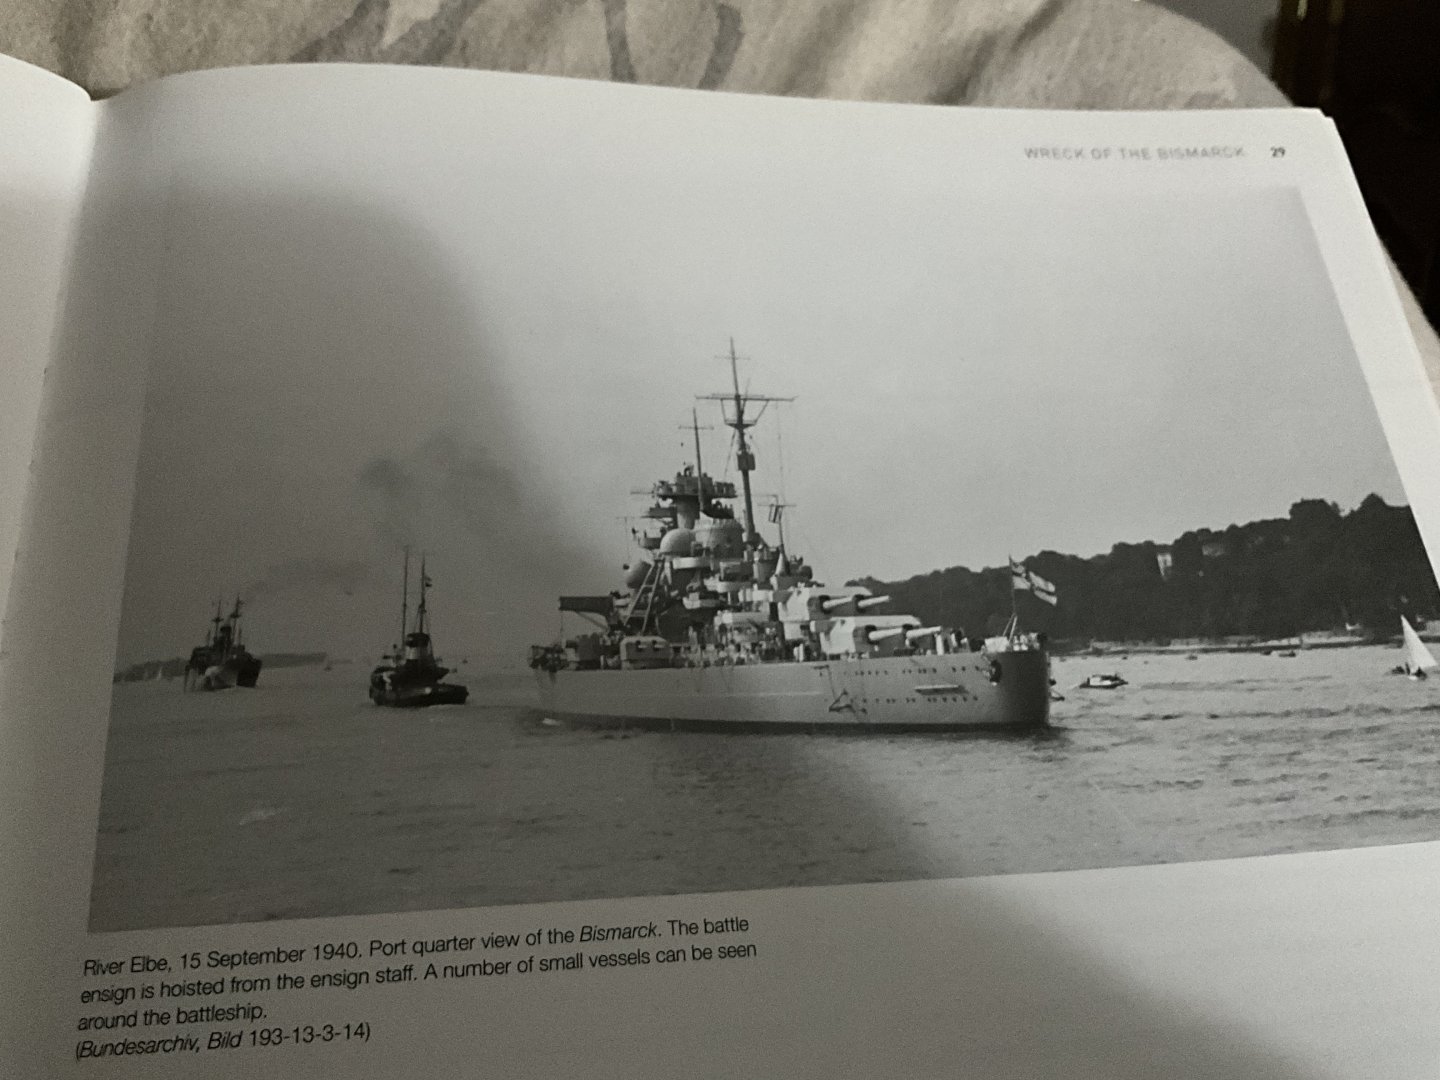
Did just notice on this photo stating it was 15th September that there’s two tugs attending the stern, some very nice houses in background but l think the display base might be a bit OTT 😂
-
Fresh head today, can’t even remember what l was babbling about 🫣 Haven’t managed to do any modelling in last fortnight, think the holiday break and summer weather kicking in seems to curtail modelling, probably the same for most of us, ever time l pass the Bismarck on the table l’m saying to myself l want to be working on you, just have to get certain jobs out of way first, such is life. Have to thank Jolle and his friends for their help, just awesome 🤛 it’s looking like l might just be able to pull this model of with their help 👍 just a case of finding out the right tugs and boats involved with her on the 15th of September, and then being able to replicate them. Would imagine there should be a lot of photographic evidence or footage on such a historic occasion as her maiden journey. Here’s hoping 🤞 Again thank you guys, means a lot getting your help. 👌
-
Tried editing last post now it has disappeared, must be getting tired. Frustrating or what.
-
Thanks very much Jolle for helping me here, and for other persons help, very humbling, if this all comes together l will have to try very hard to do justice to everyone’s efforts. 🤛 🙏🏻
-
Really really appreciate your efforts Jolle, definitely trying to catch her appearance on her maiden voyage 14 15 September 1940 covered by live film footage, so sounds like the Atlantic is definitely the lead tug that l need to replicate with the smaller B&V boat passing up Bismarck's port side, would be great to try and capture this moment in her history, even thinking of trying to pose anti aircraft guns in same positions and all crew figures just to give them their spot in history, sounds a bit over ambitious but lm up for the challenge.
-
Yes, decided that making a model of her that’s possible not very common will raise some eyebrows on a very popular battleship, shall do it in the same way as my Mikasa except with water all around ship, but raised high enough on plinths to make all the efforts on the underside visible, at least someone might notice it’s been changed a little bit 😂 This is where l’m looking for a bit help from you, l need to source drawings and photos of the Tugs and small pilot boats accompanying her so l can try and scratch build these, obviously with your contacts with your Bismarck build and speaking the language could greatly help me here. Am sure all the boats were from B&V maybe Hamburg Museum could help with info. 🤛 Here’s hoping.
-
Be aware that you have to fit the funnel pipe through the etch platform to fit the said pipes funnel brackets in place, they won’t pass through the hole in platform, it’s a bit fiddly but easier than trying to fix brackets in whilst assembly on funnel. Only seeing you doing this brings it all back to me. Rivet details work a treat Jolle 🤛
- 135 replies
-
- 2
-
-
-
- Russo-Japanese War
- Mikasa
- (and 2 more)
-
Really nice model, think l shall have to add this to my stash, yip very nice 🤛
- 63 replies
-
- 2
-
-
- Scharnhorst
- Trumpeter
- (and 1 more)
-
Still working on the hull Jolle 😂 After looking at your magnificent model l am really looking forward to this model, just don’t hold your breath, l can see this taking a while. Have decided to do Bismarck in my second favourite scheme, yours being my favourite, shall have her being towed up the river Elb on her maiden voyage, at least l won’t have to tackle all that superb weathering that you are an expert at. 🤛😂 Your model belongs in a museum where it can be admired everyday. Absolutely superb and thanks for sharing, shall be looking at this for ages, hey and your boats on Mikasa with canvas being pulled back. Brilliant. 🤛
-
Absolutely amazing build, think you have already added five years to my build plan for Titanic, thanks for that 🫣 Inspirational or bloody marvelous. 🤛