HOLIDAY DONATION DRIVE - SUPPORT MSW - DO YOUR PART TO KEEP THIS GREAT FORUM GOING!
×


Bill97
-
Posts
2,704 -
Joined
-
Last visited
Content Type
Profiles
Forums
Gallery
Events
Everything posted by Bill97
-
Marc I will need to get a better understanding of what you’re planning to do. Seems interesting.
-
Well two it will be then. Thanks Marc. I knew you would know.
-
Marc surly knows. I will look at the lids in the kit to see if they have one or two lanyard indentations.
-
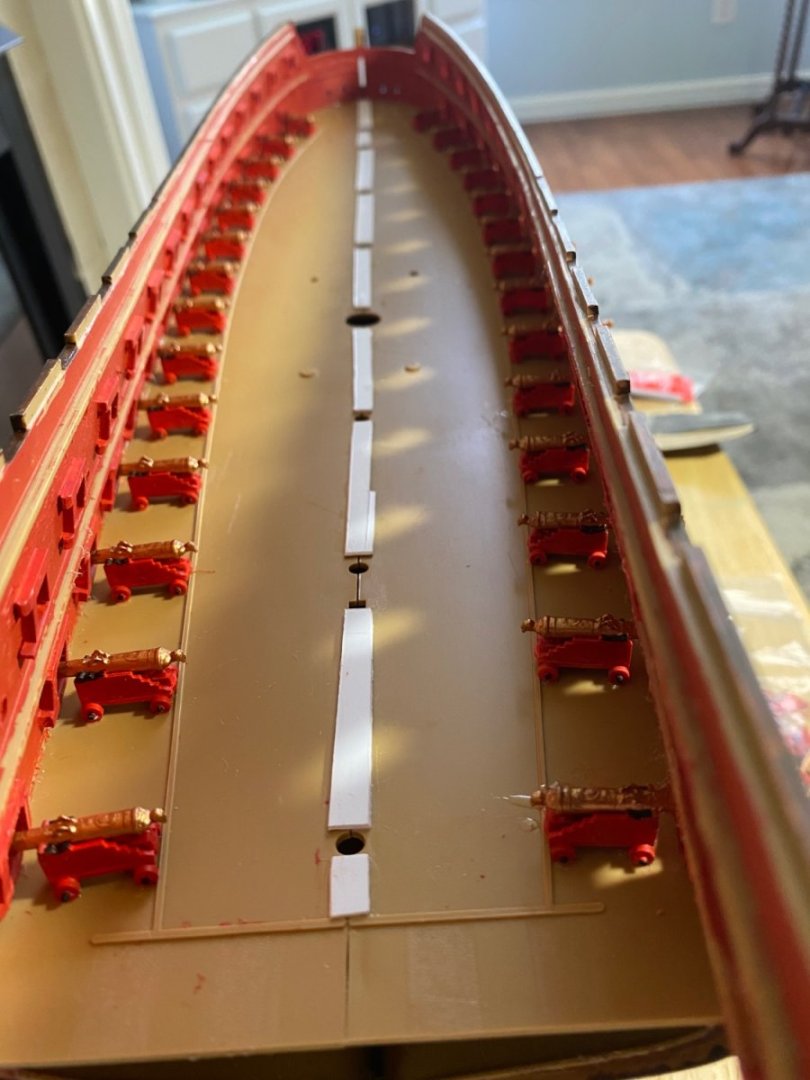
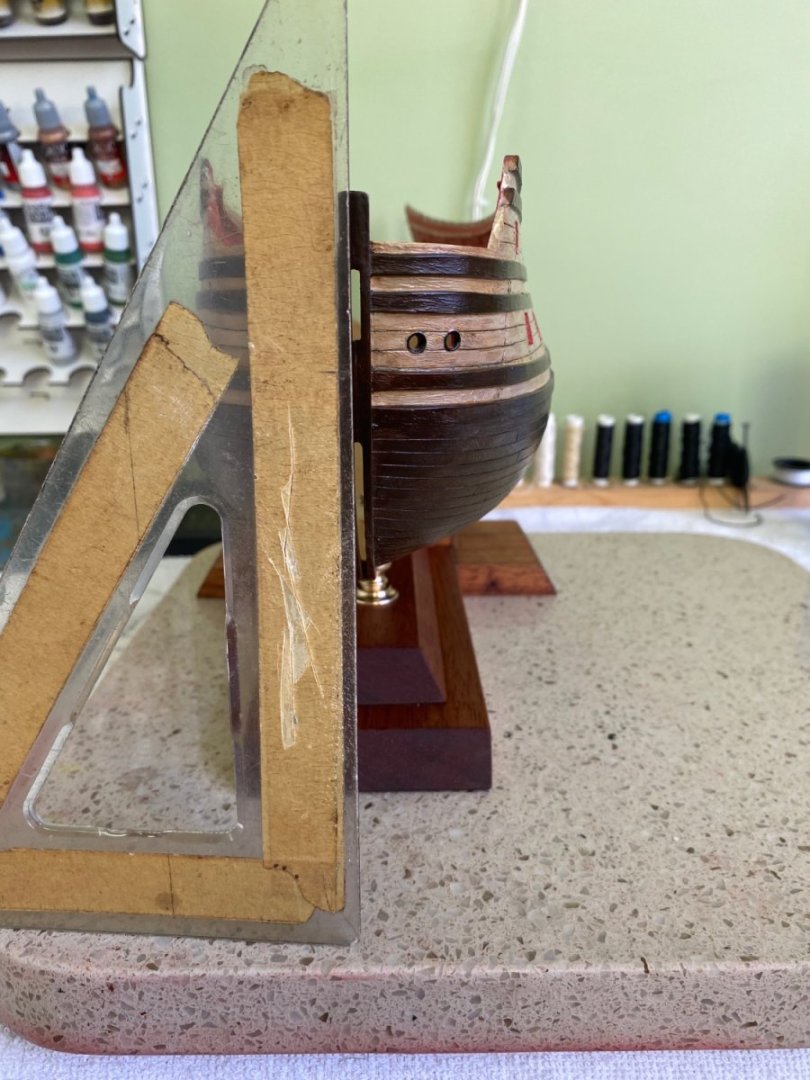
Would this be the best time to drill holes for the cannon hatch ropes? Should I drill a pair of holes above each hatch and put a thread through each with a knot on the inside for later attaching to the hatch cover? If so I would need to do it before I add the next deck. How do you guys do it? Got the cannons installed on the bottom deck. I sanded a flat spot on the wheels where they make contact with the deck to improve glue contact.
- 1,508 replies
-
- 2
-

-
- Le Soleil Royal
- Heller
- (and 1 more)
-
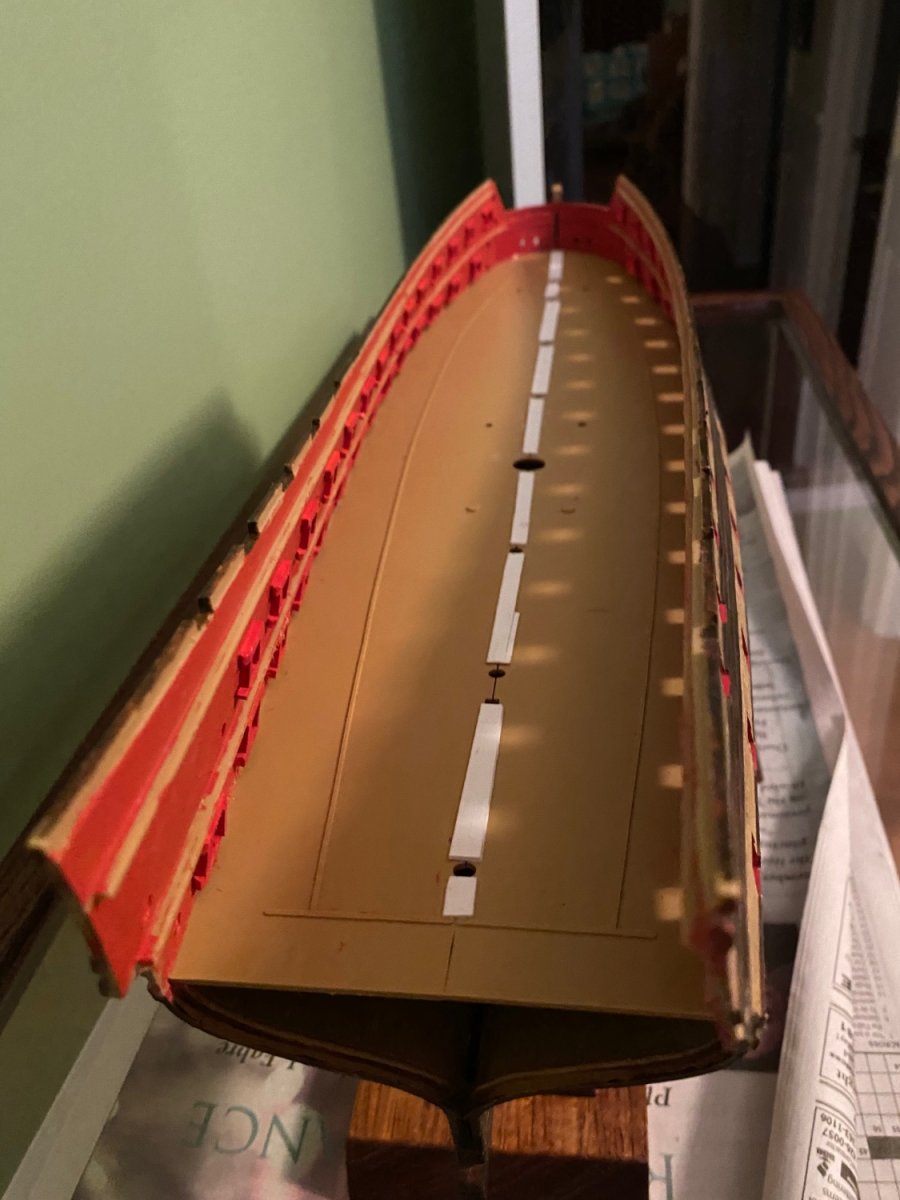
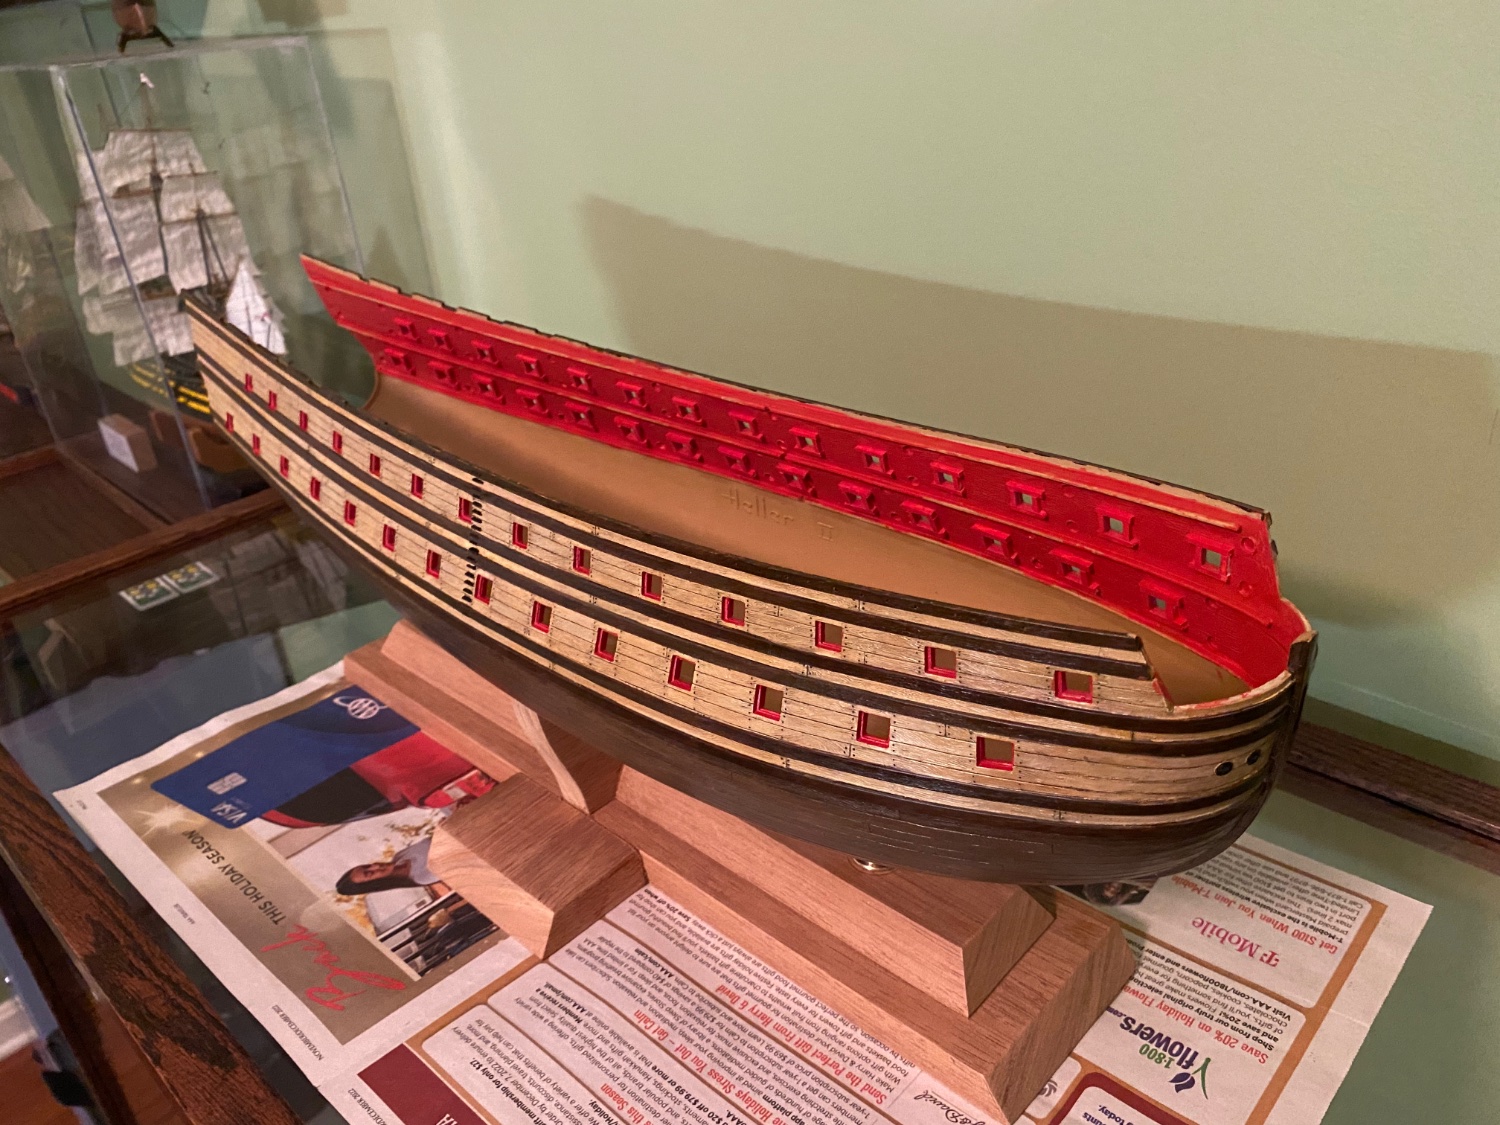
Bottom deck installed. That is always a battle of wills. I say it is going on and it says it is not! We had a pretty good battle but in the end I prevailed.


- 1,508 replies
-
- 5
-
-
- Le Soleil Royal
- Heller
- (and 1 more)
-
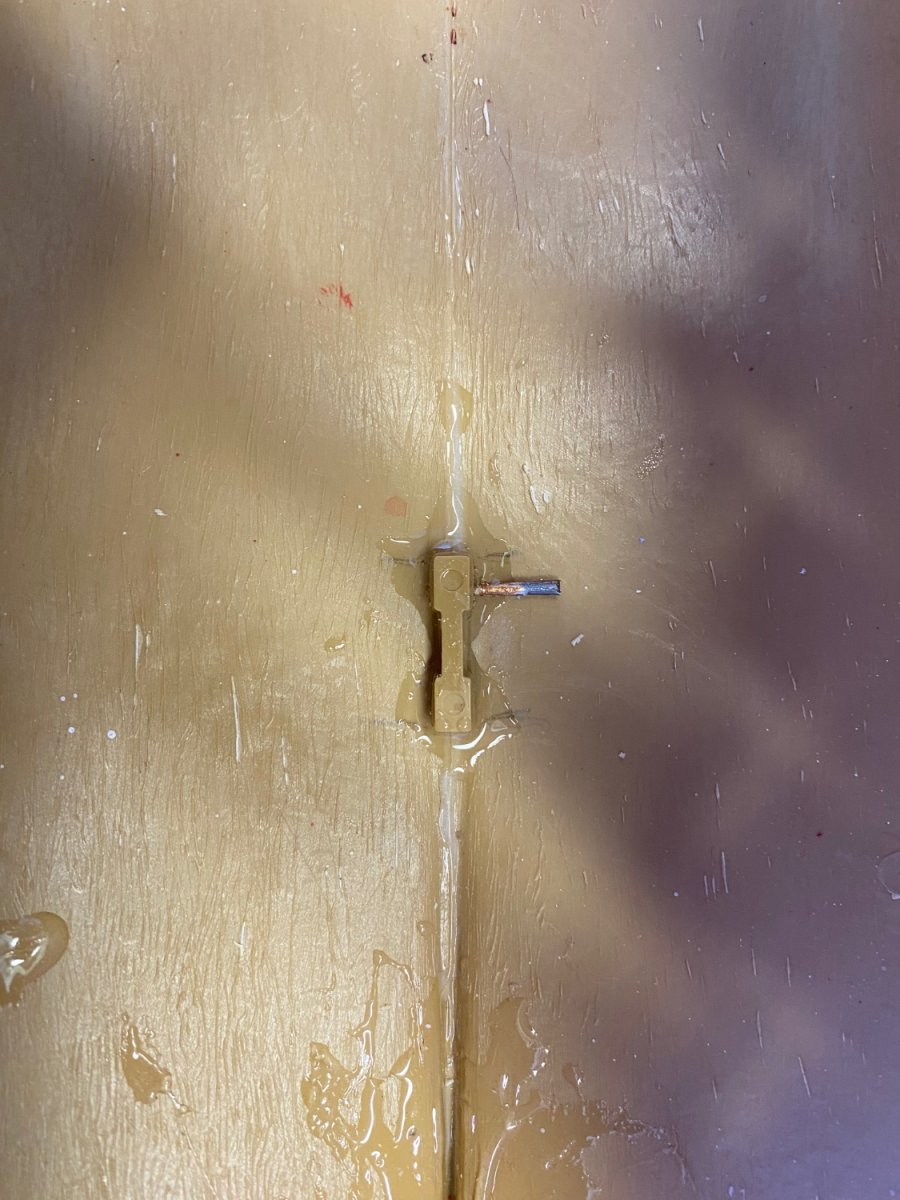
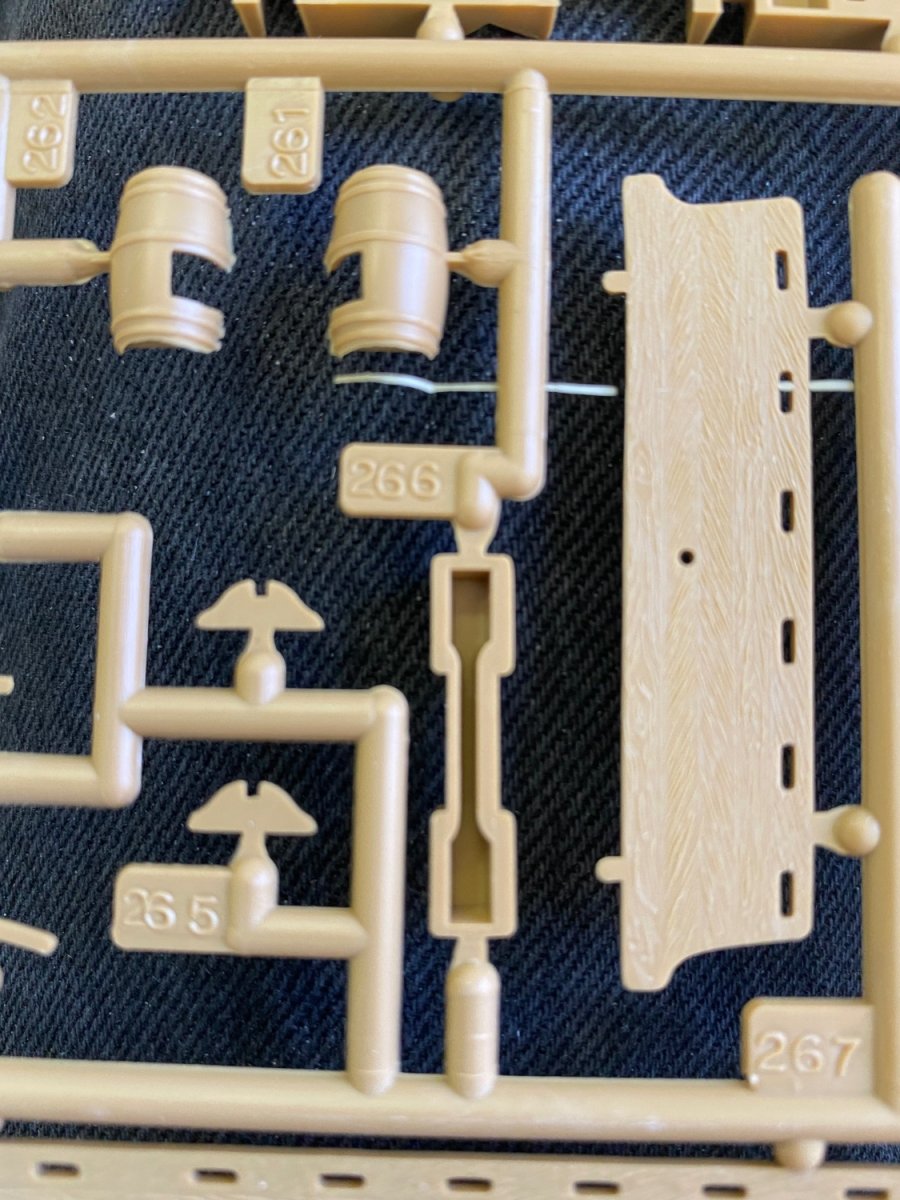
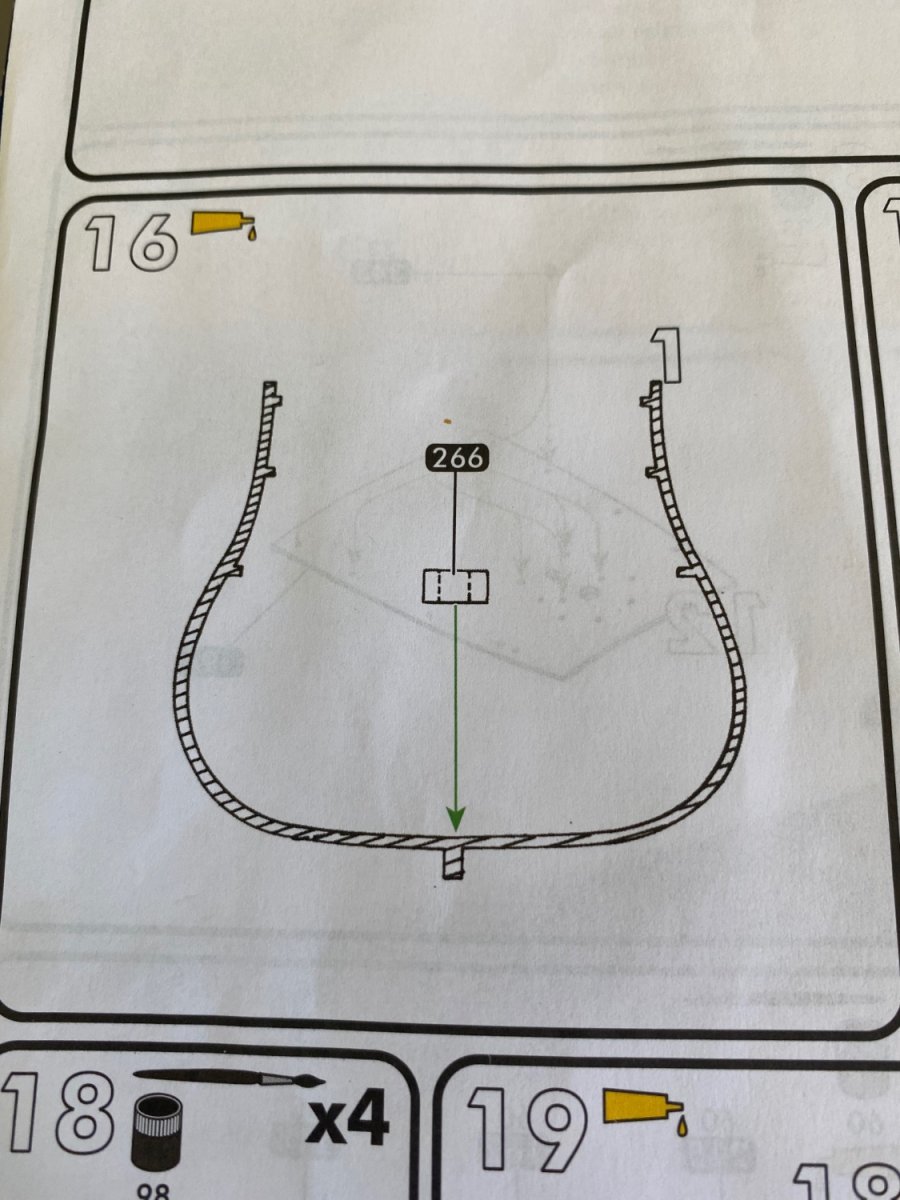
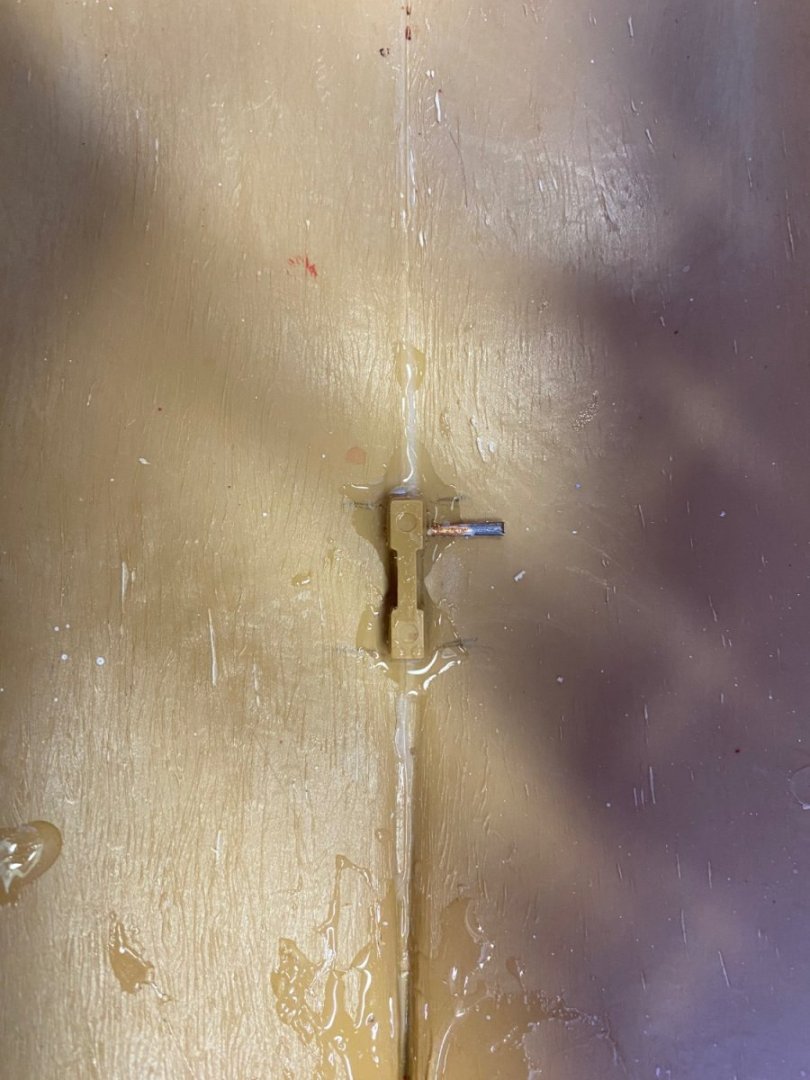
Part 266 epoxied in place with a little piece of tooth pick to get it level. Will skip capstains and just loop anchor through hawse holes.
- 1,508 replies
-
- 2
-
-
- Le Soleil Royal
- Heller
- (and 1 more)
-
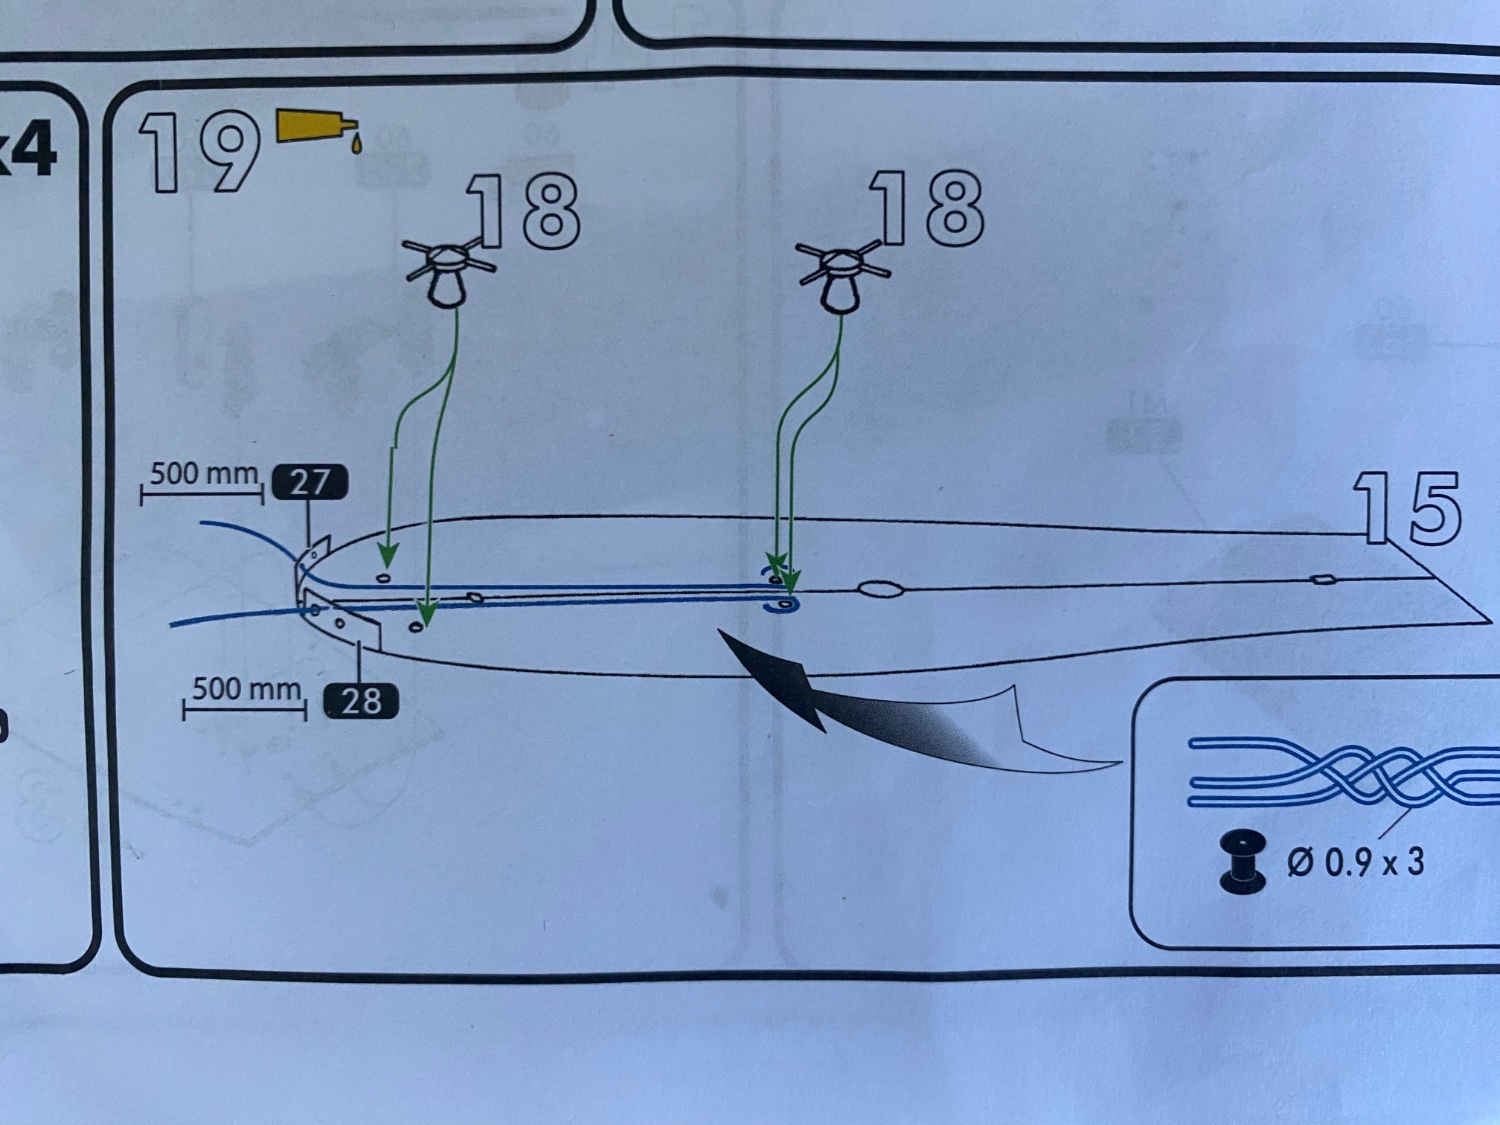
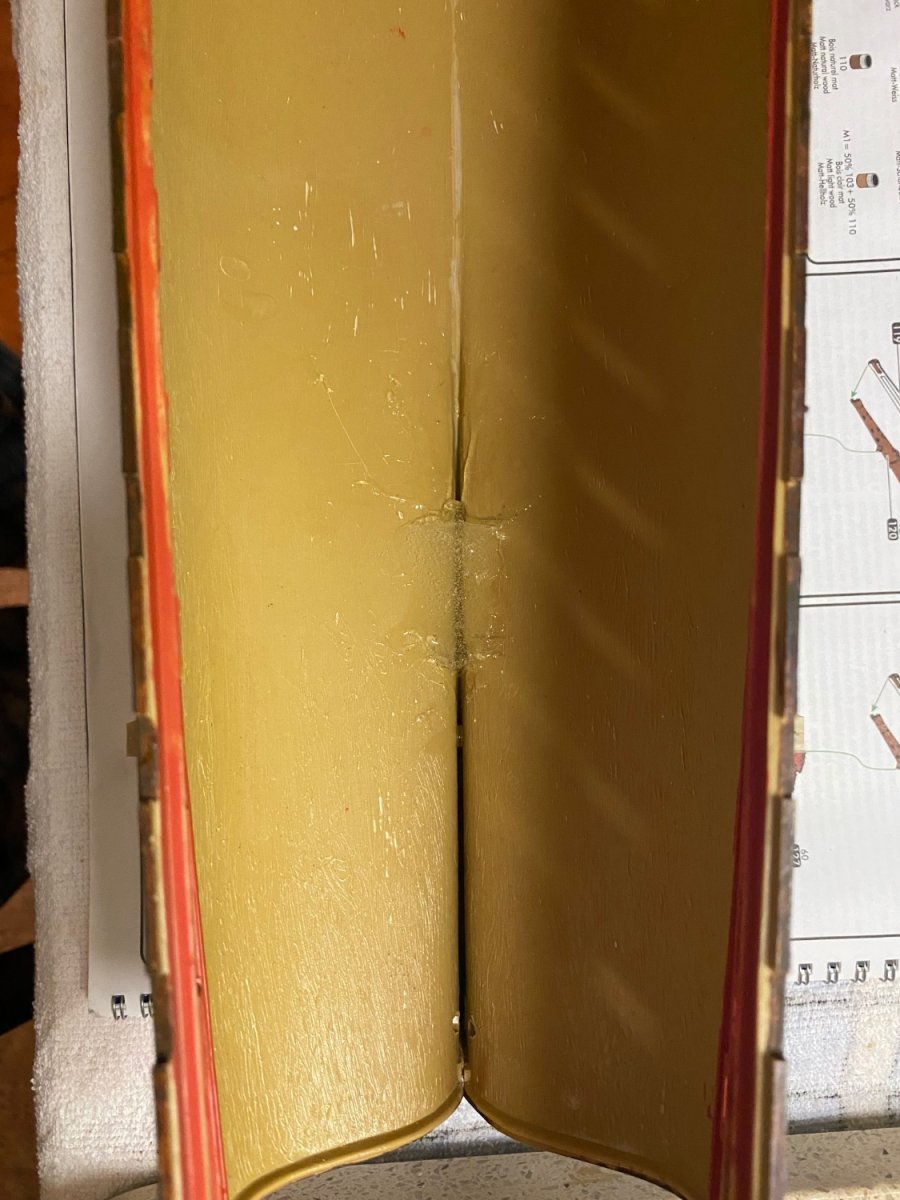
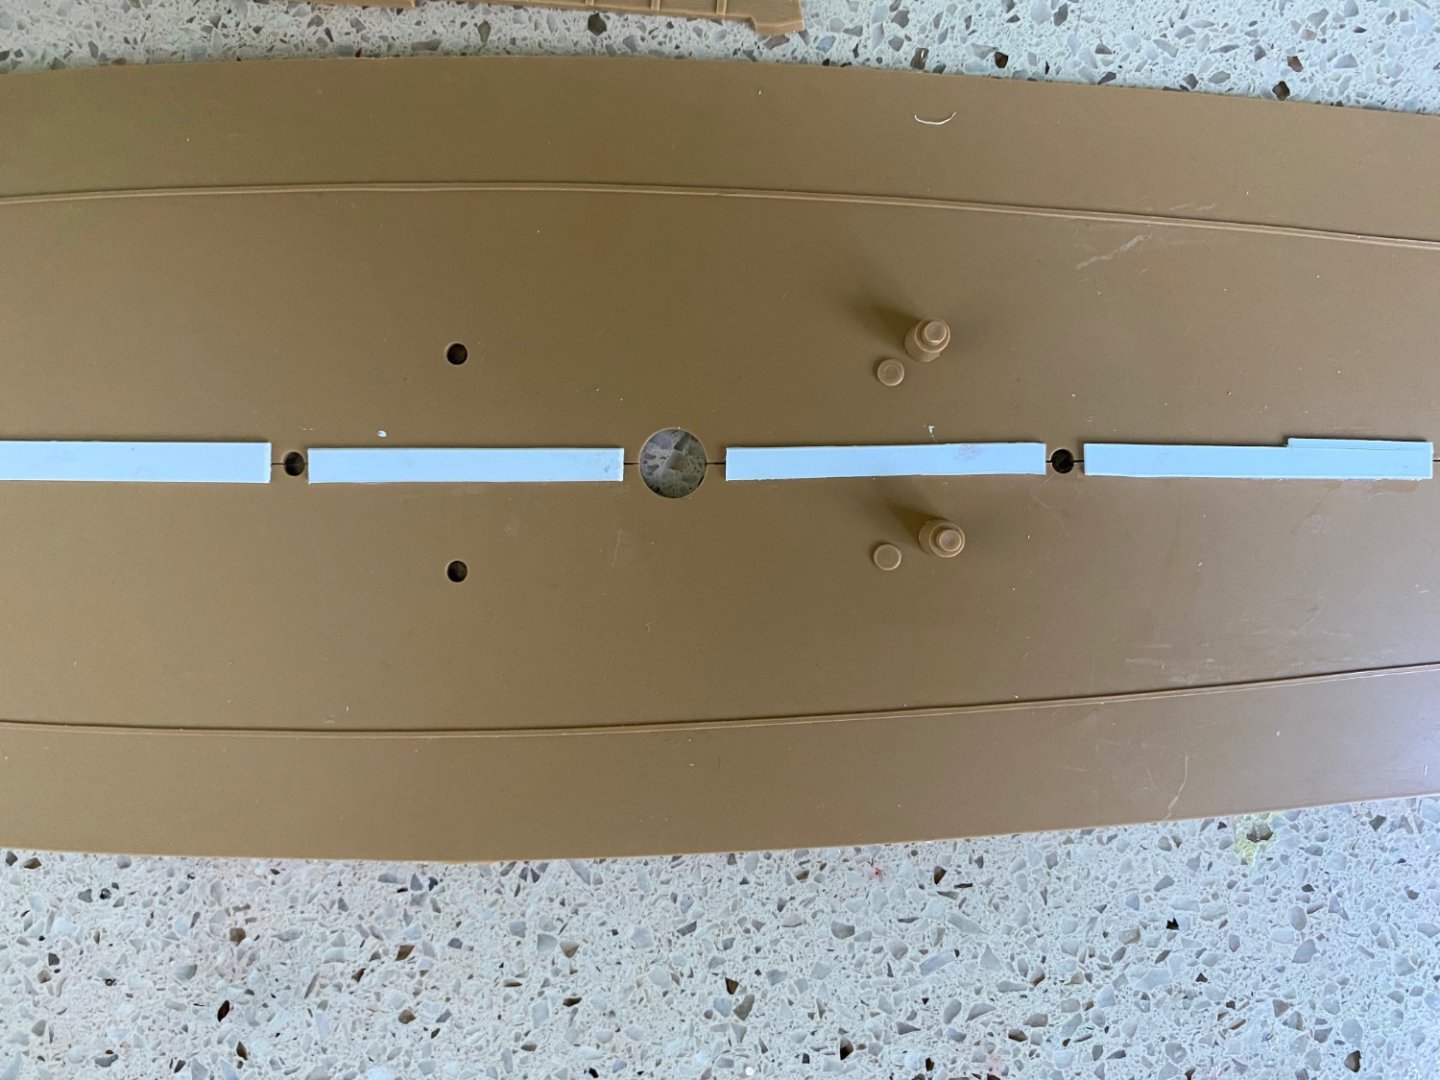
Thanks guys. Ian I was surprised to when I was putting the bottom deck halves together and discovered there is only a hole for the main mast to go through to the keel. We will see as I go along if it eclipses my Victory. Henry I appreciate your advice on securing the part 266. I will confirm it is secure before I cover it with the deck. While I have you guys here check this out for me. In the instructions it shows two capstains are to be placed forward of the main mast hole on the bottom deck. However the molded knobs on the deck that the two capstains will set on are to rear of the main mast hole. I don’t think that it makes a difference since they will not be seen but curious which is correct? You will notice I have reinforced the seam with Evergreen. Hope that is what you mean.
-
Great Marc. So that is how you spell sprues 😊 Not sure how I was trying to spell it.
-
Oh my gosh Marc! I had to really search for that rectangle. Thanks. One thing I can already tell I preferred about the Victory instructions over the SR instructions is the Victory instructions had a page showing you what sprul number each piece could be found on. If I needed part #52 the instruction page said it is on sprull #11 as an example. The SR instruction book does not have such a page. When I needed above part #266 I needed to search every piece on every sprull before finally locating it. This could be very time consuming in the future, especially when looking for a very small unrecognizable piece. I wish there was an online source to find such a list.
- 1,508 replies
-
- 2
-
-
- Le Soleil Royal
- Heller
- (and 1 more)
-
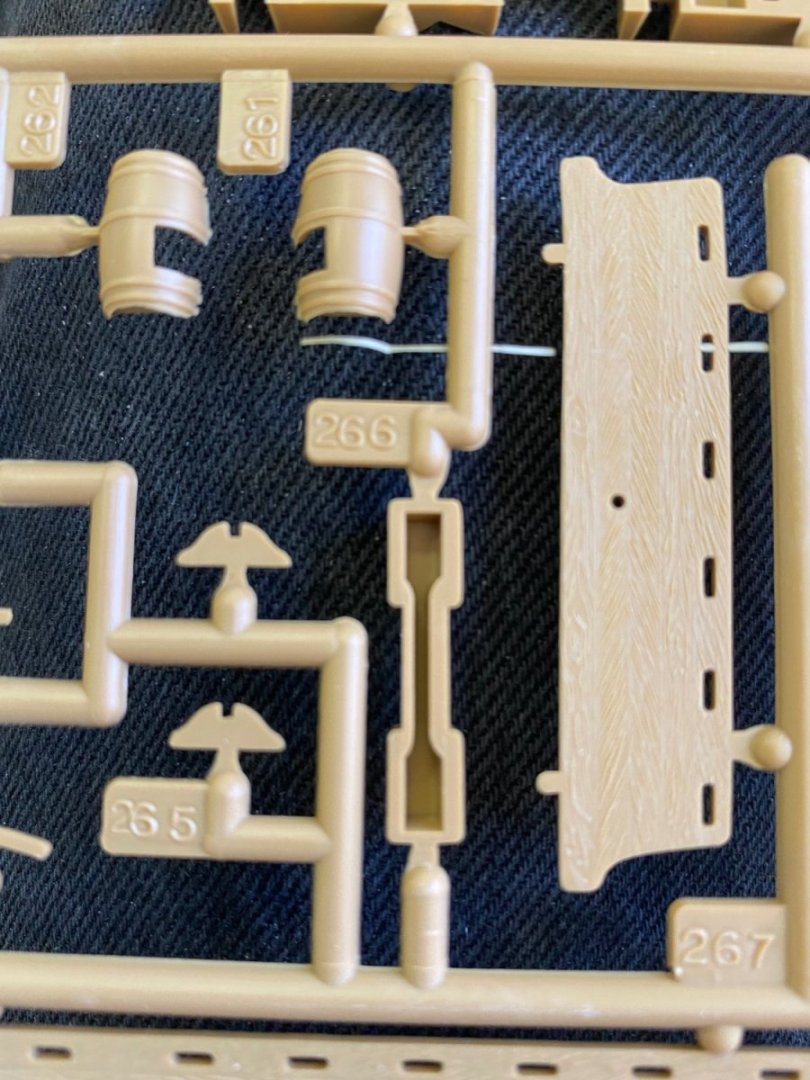
Any of you guys know what this part #266 is far? I found it in the parts but can not tell from the instructions what to do with it. Is it just some kind of seam brace?

-
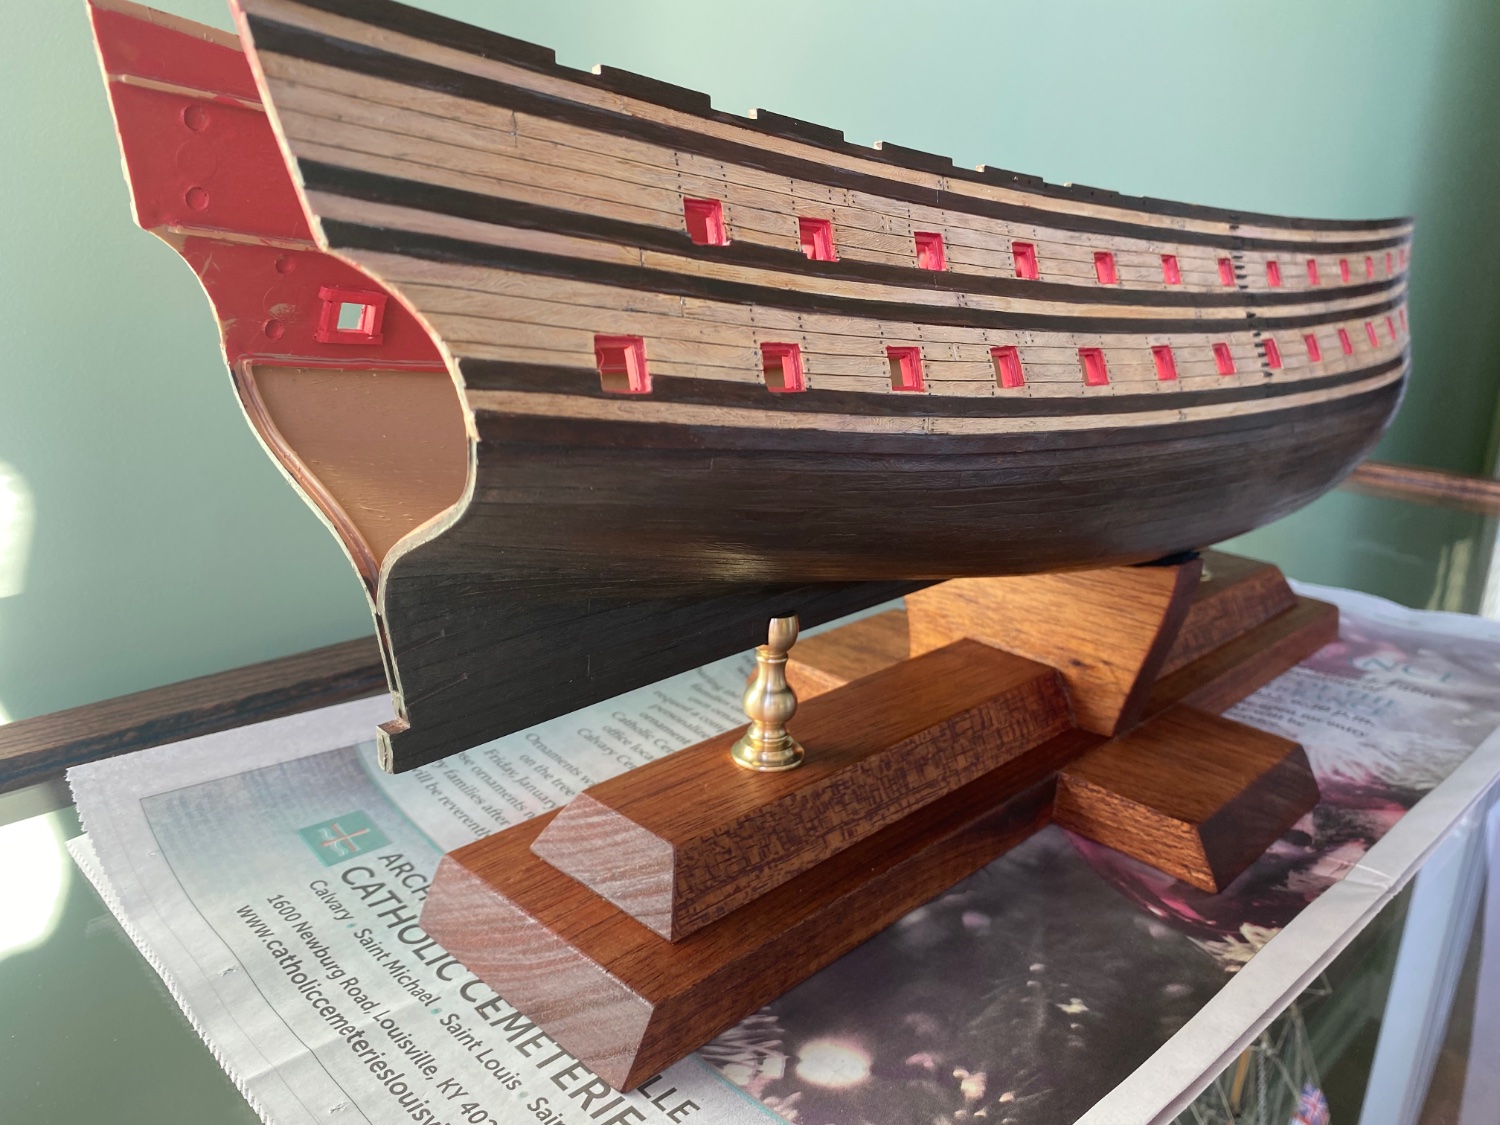
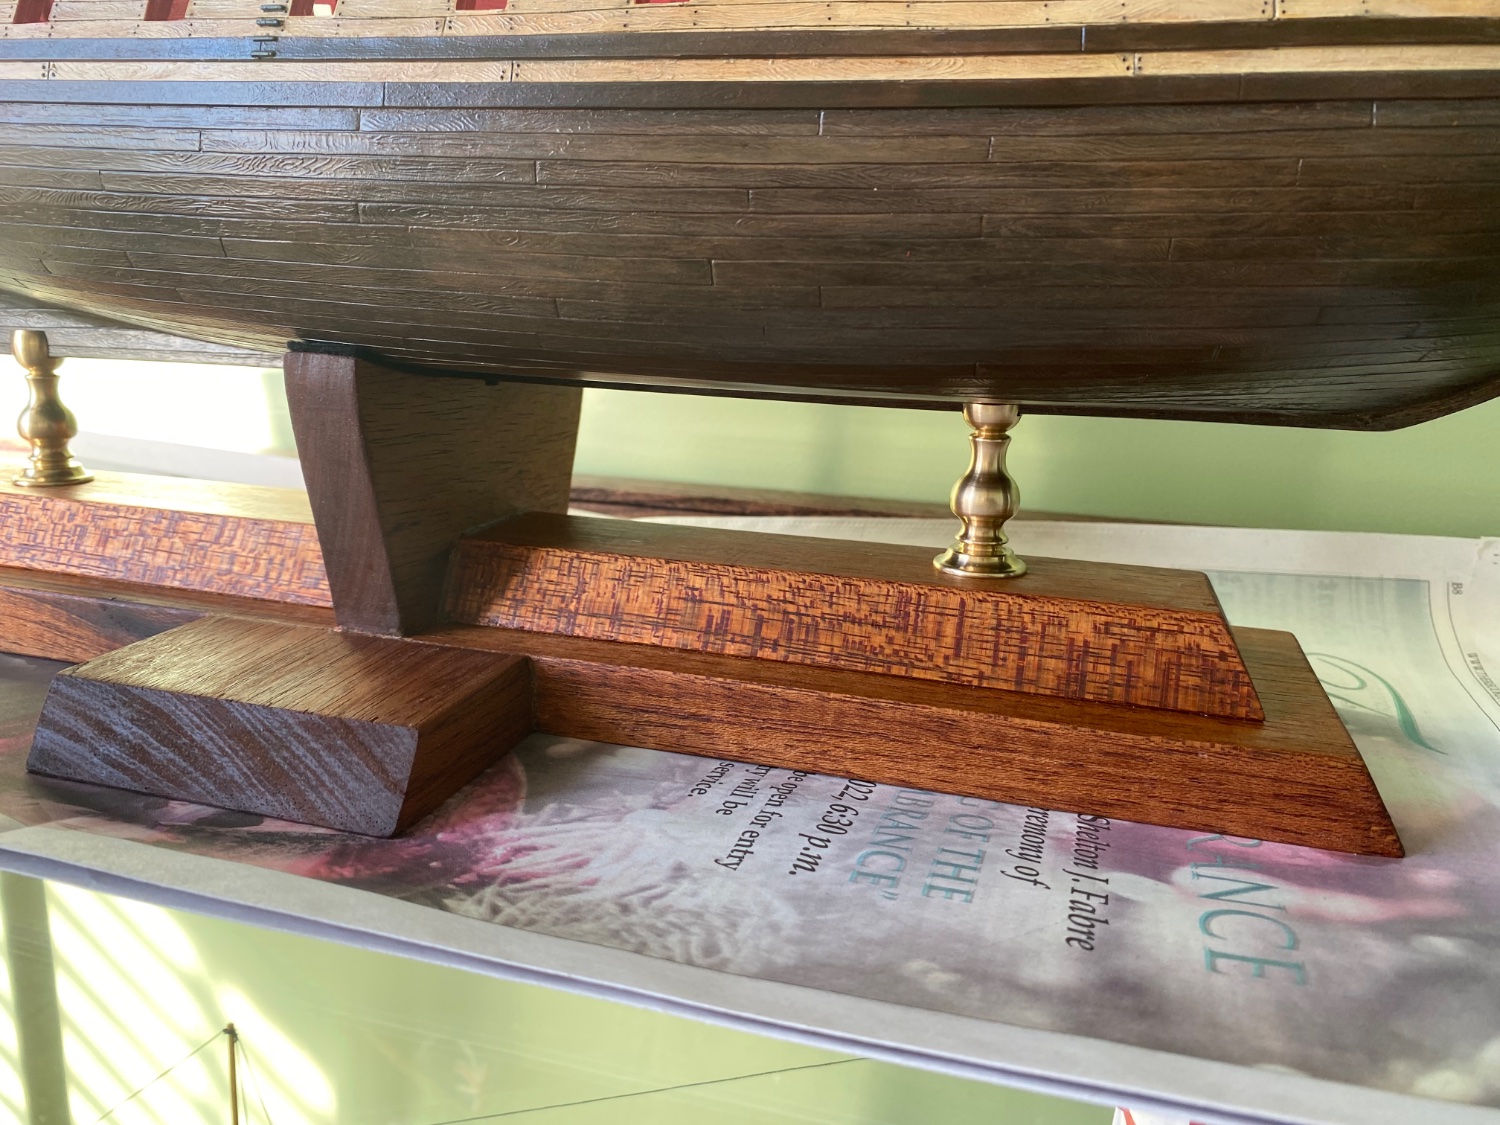
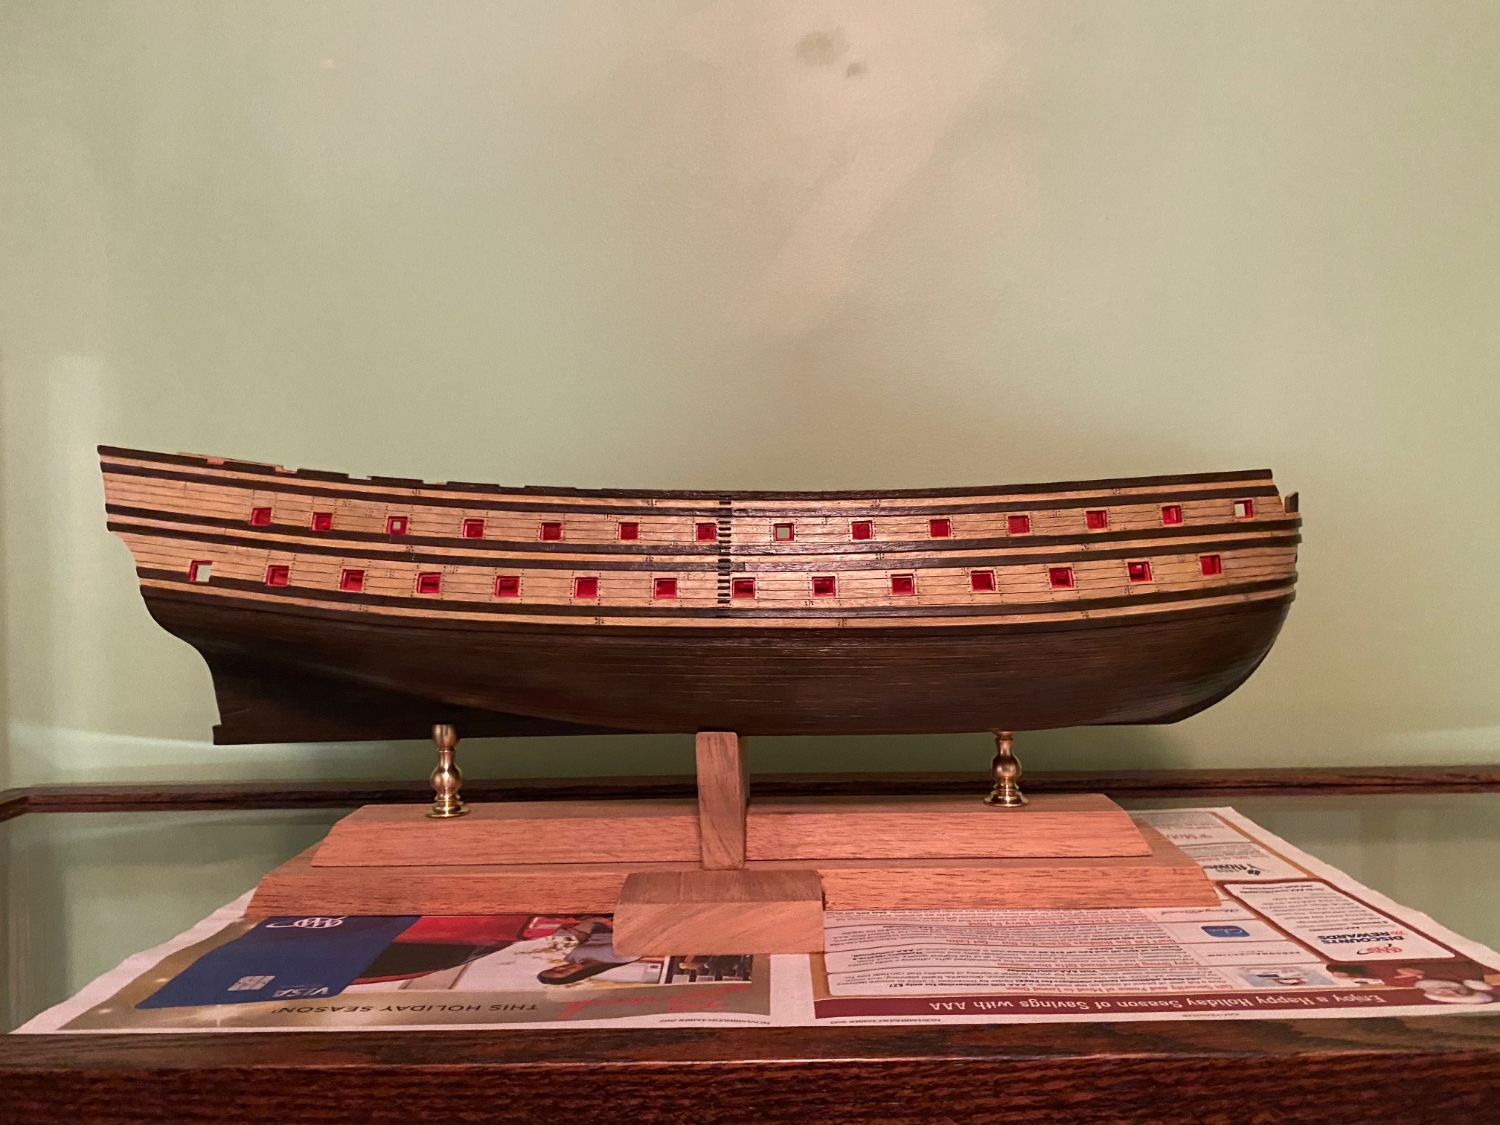
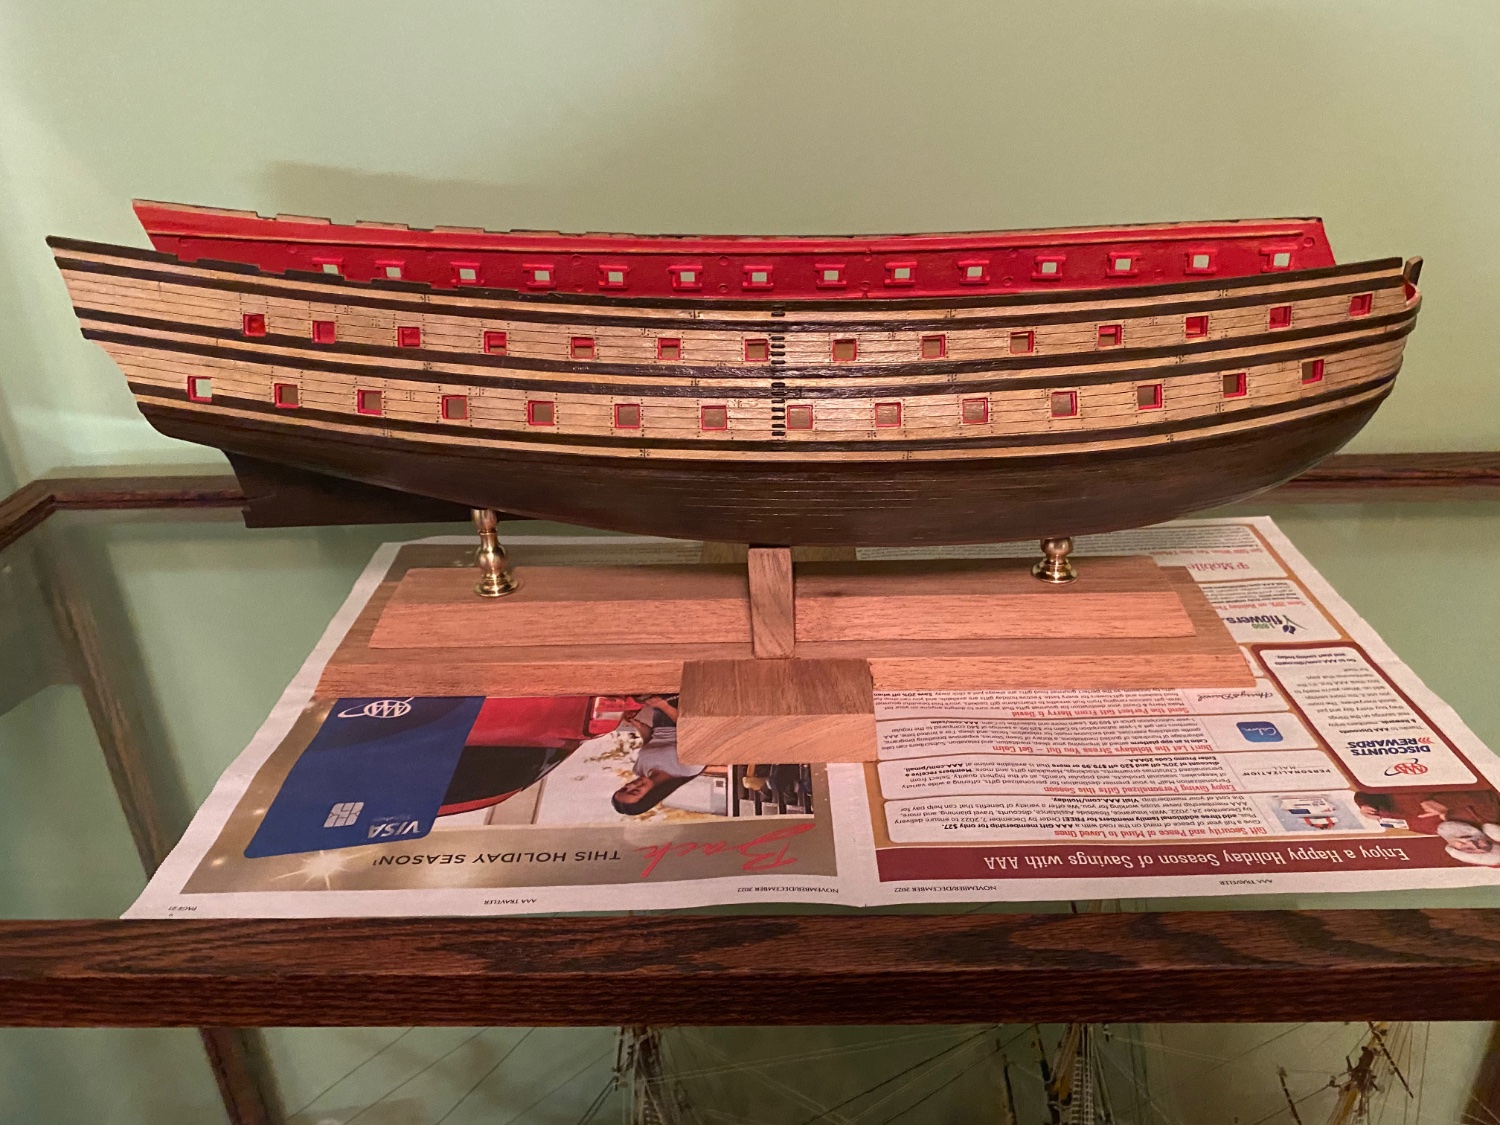
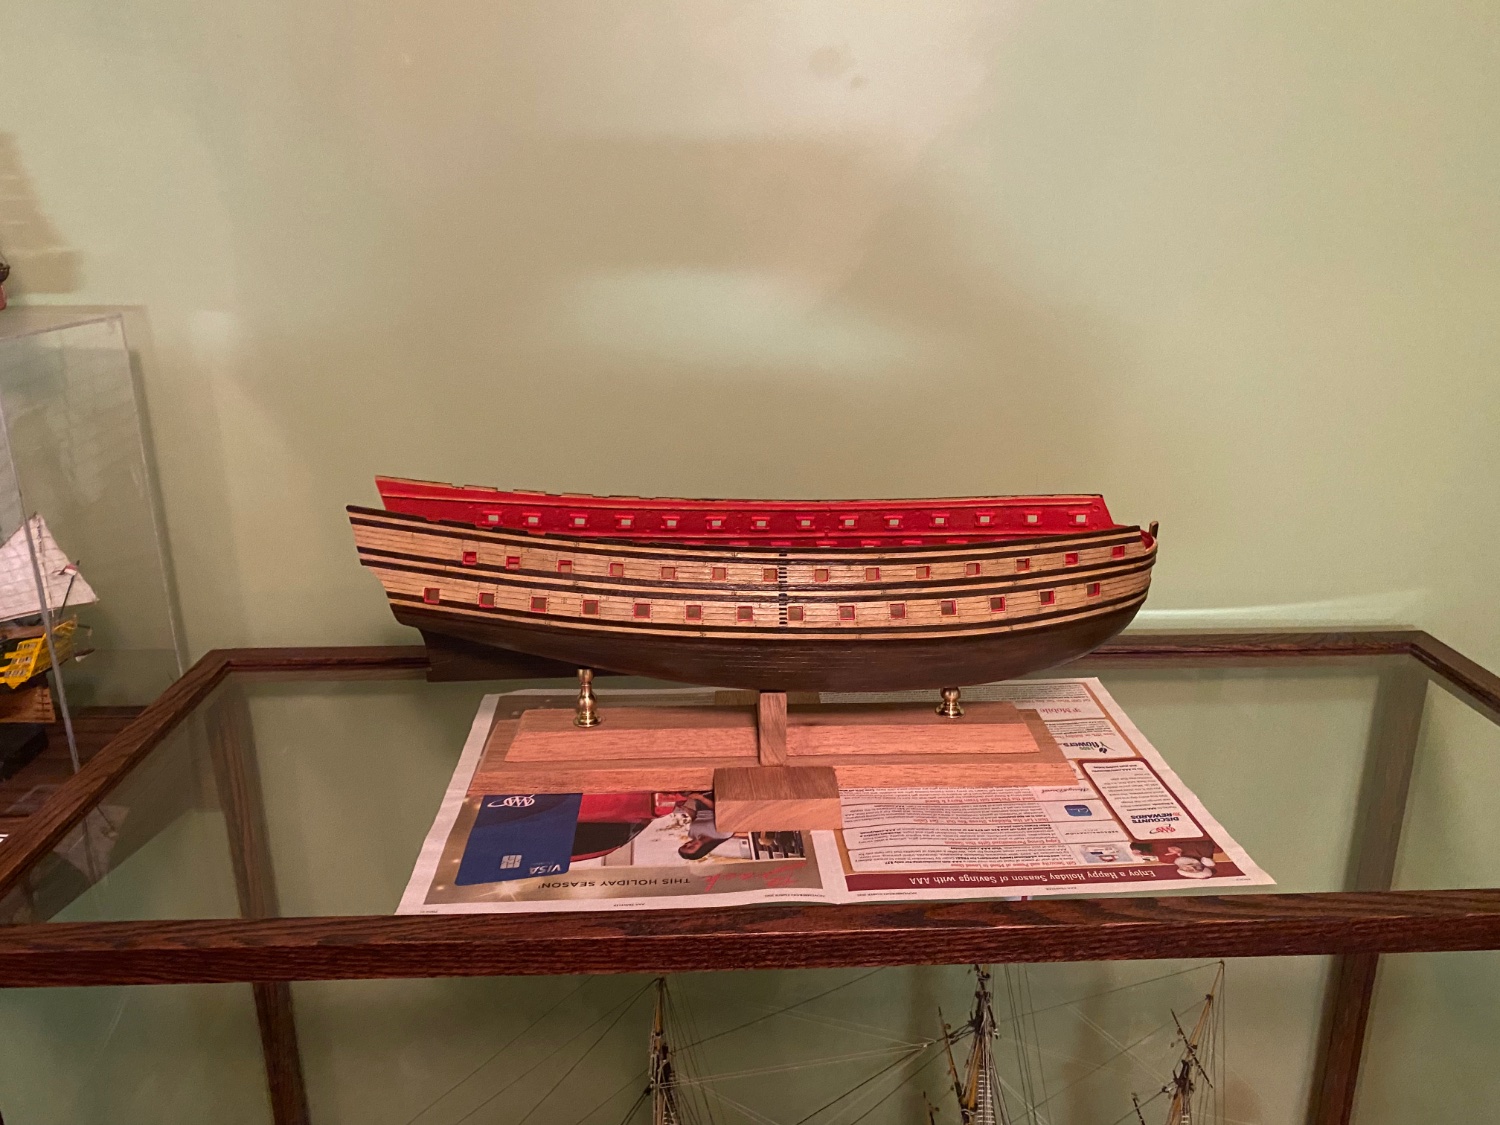
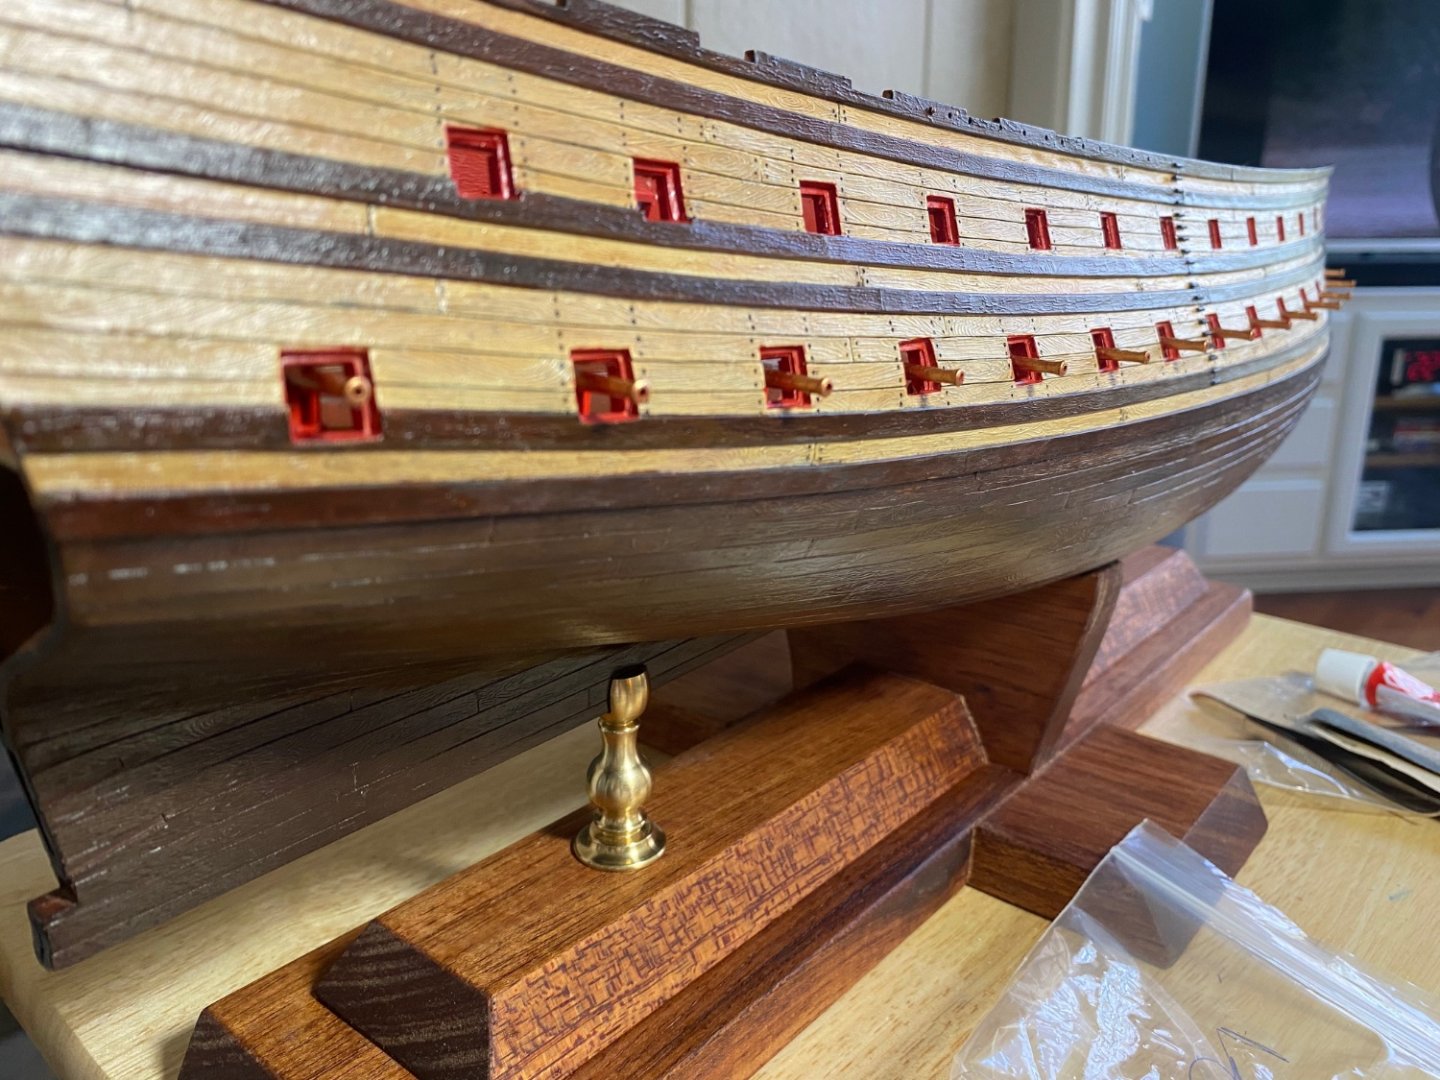
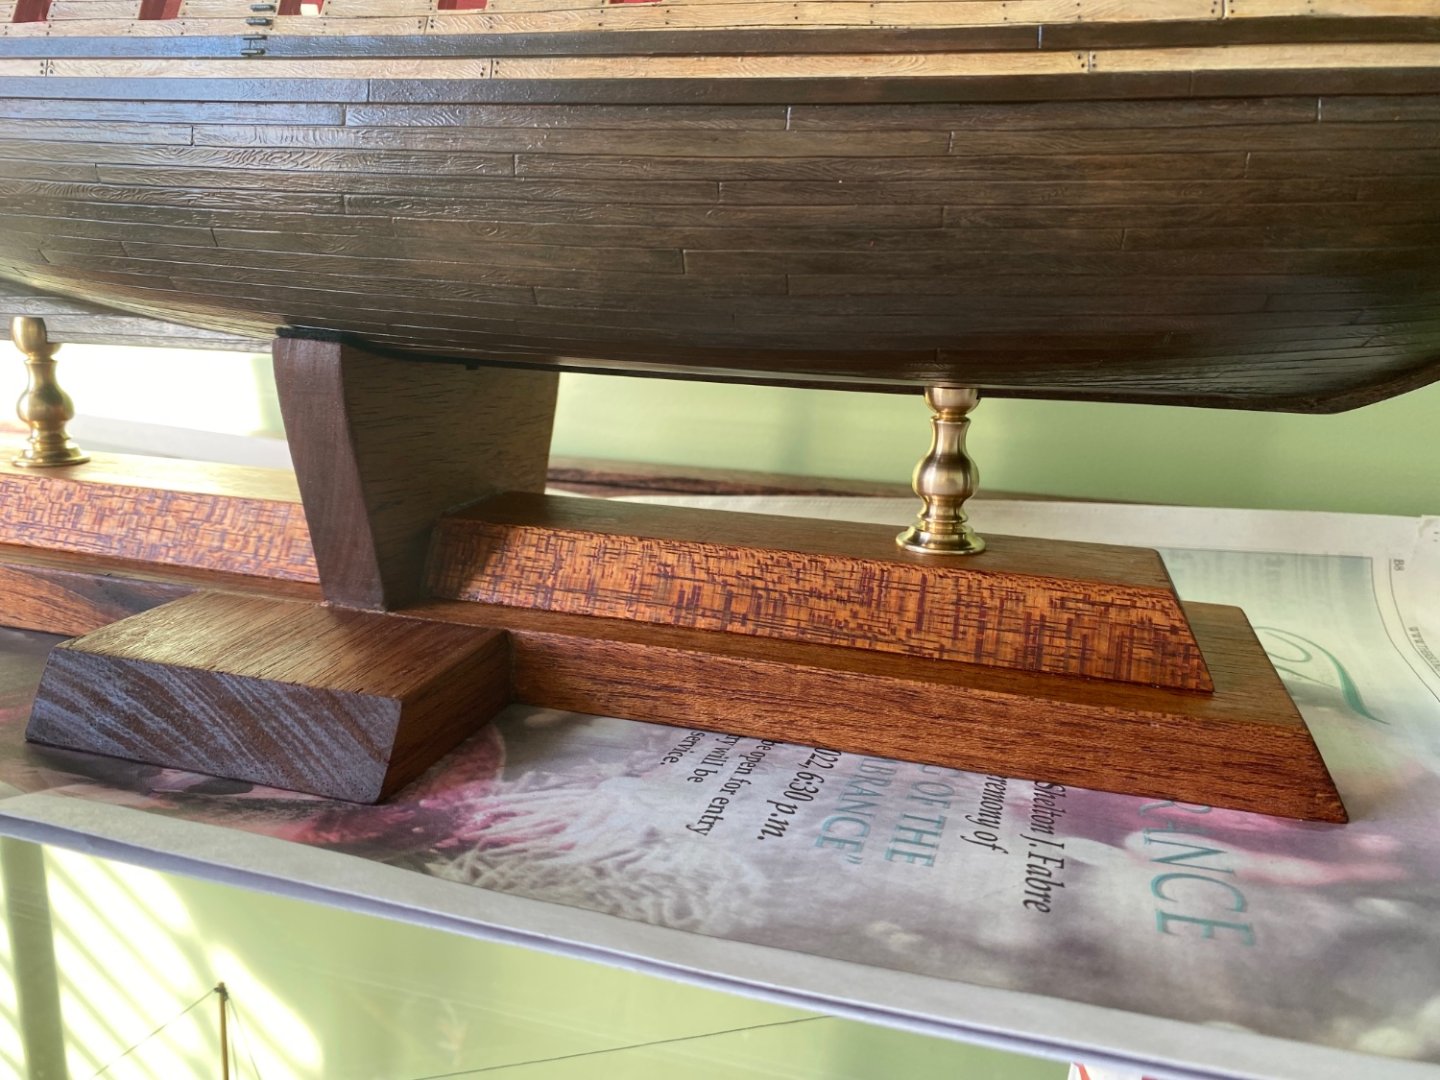
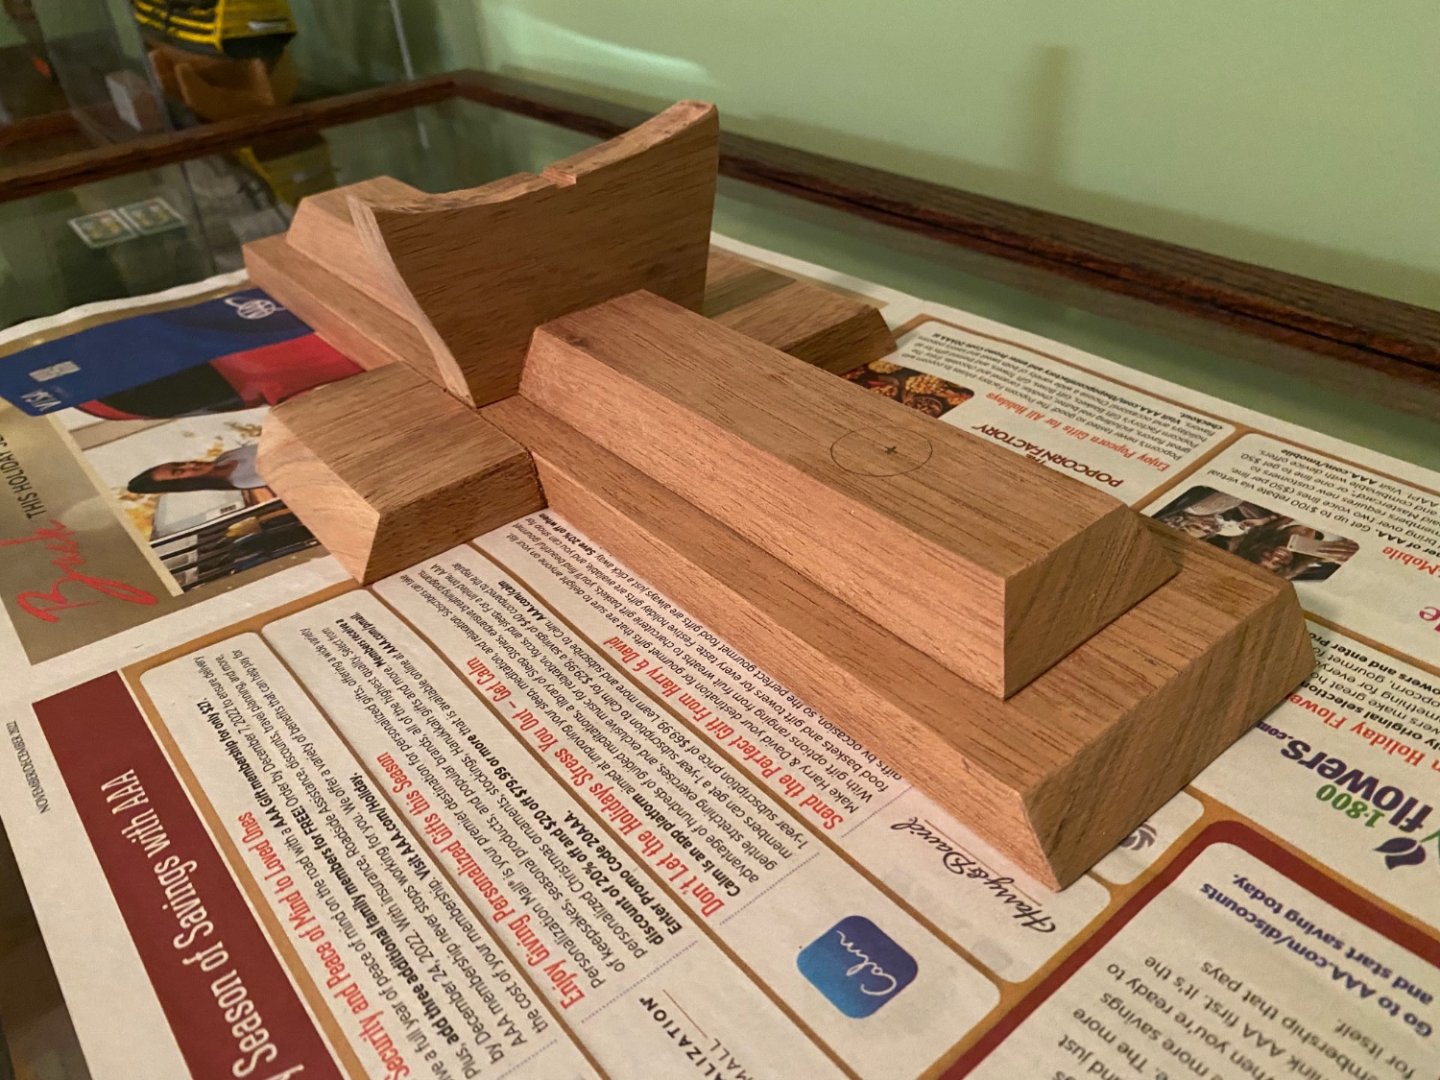
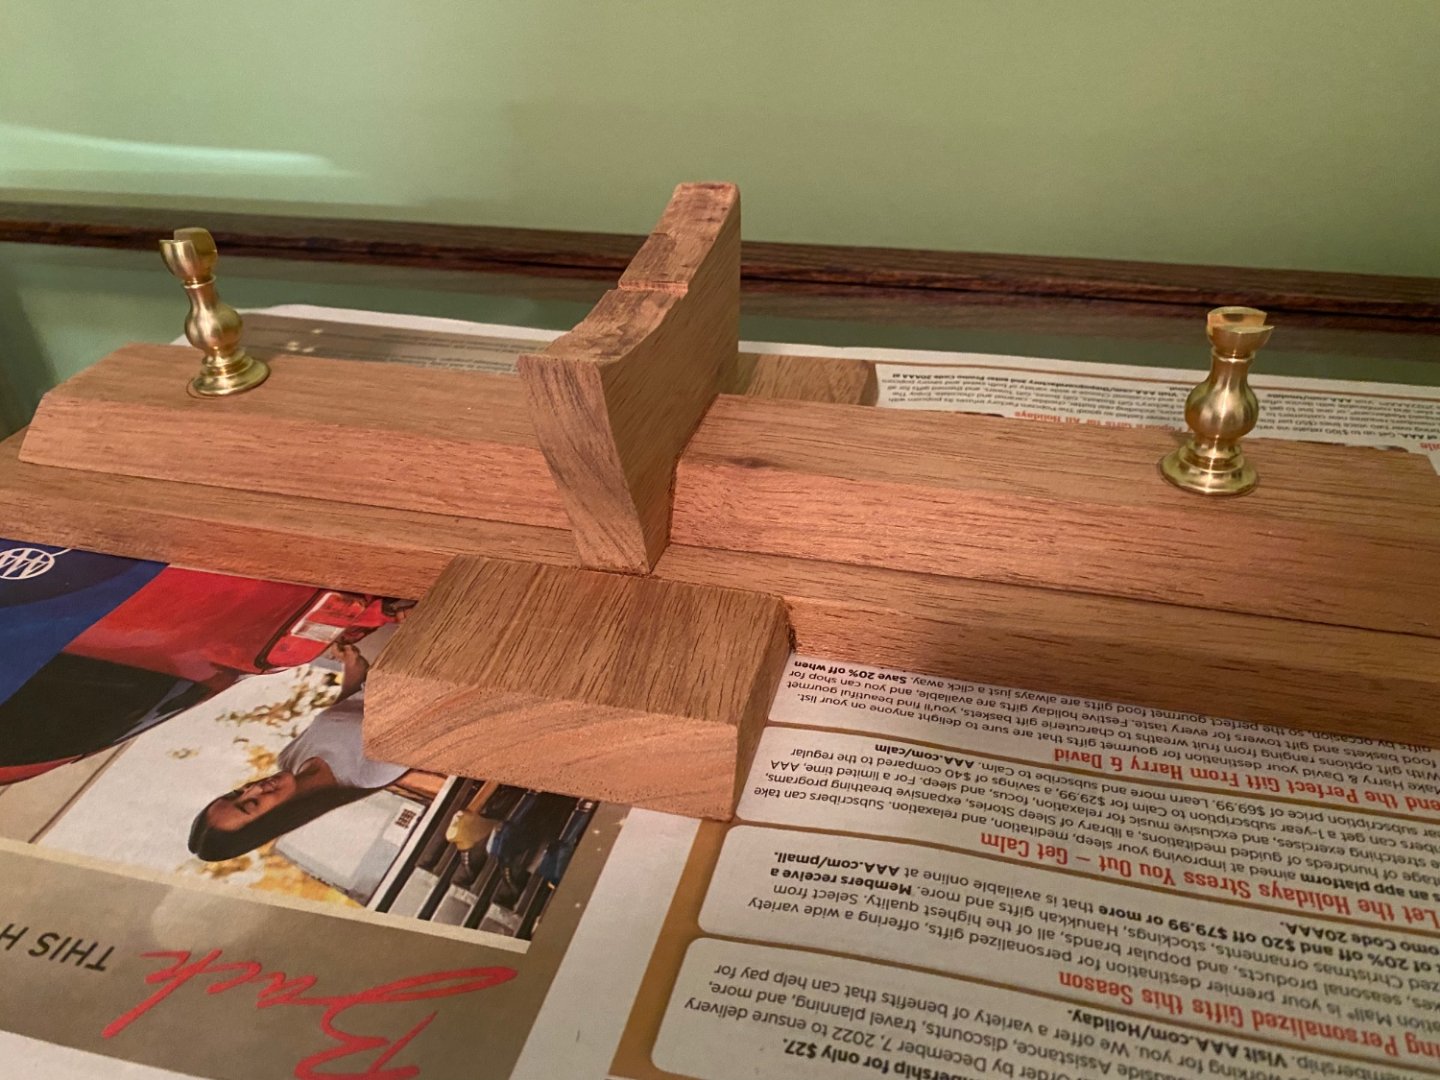
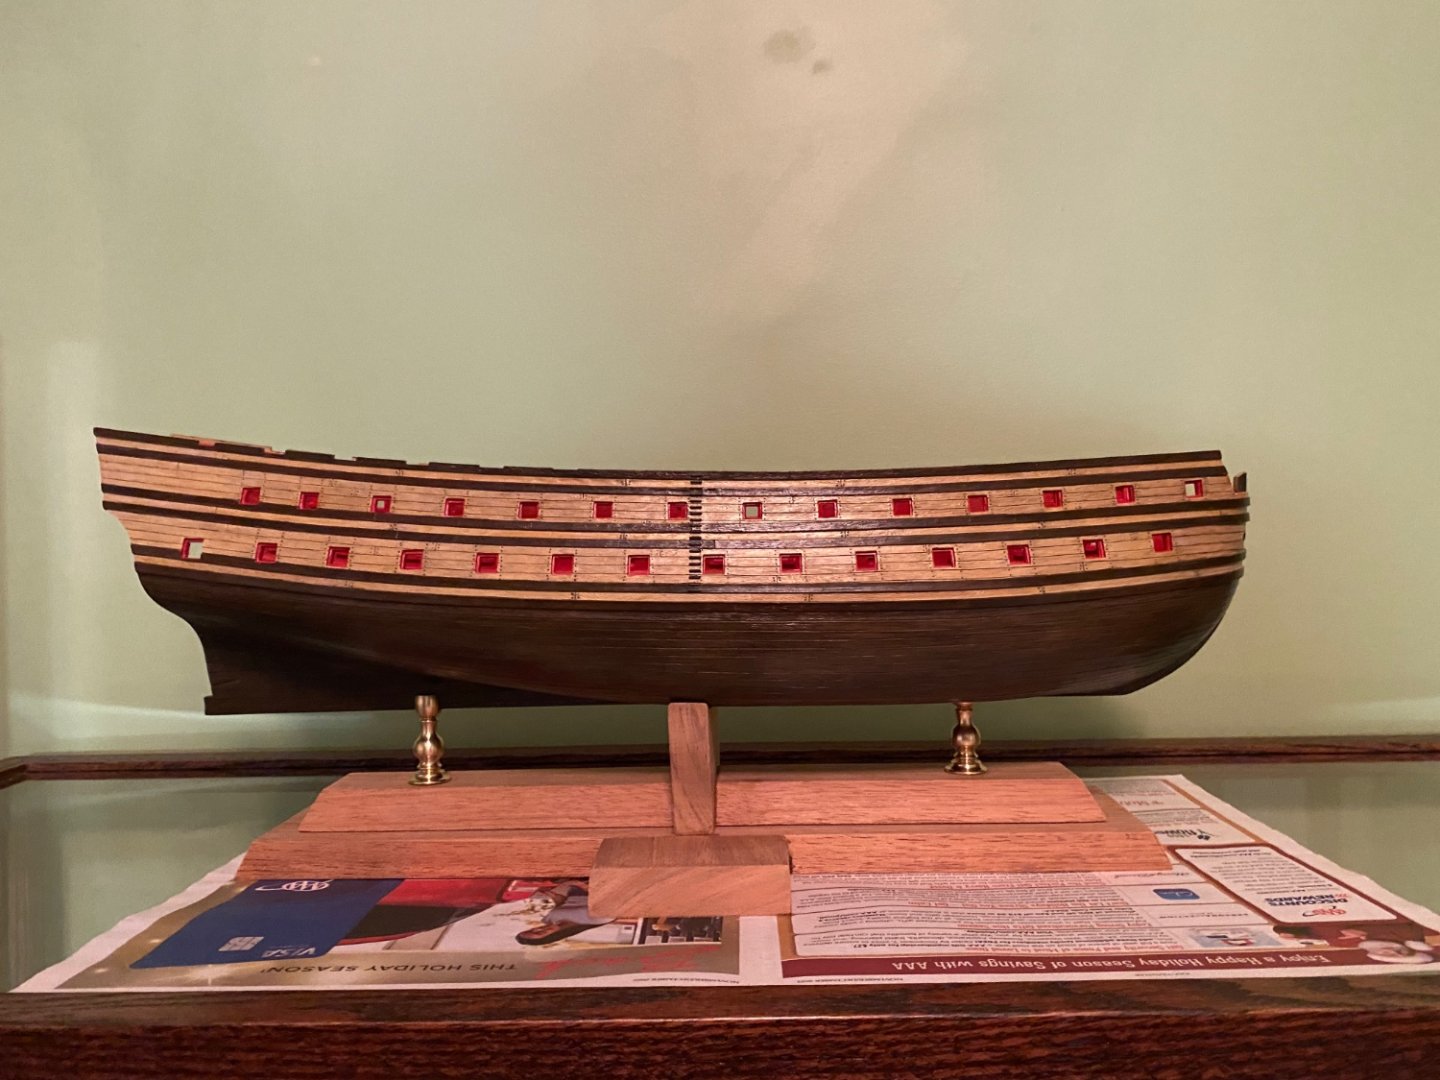
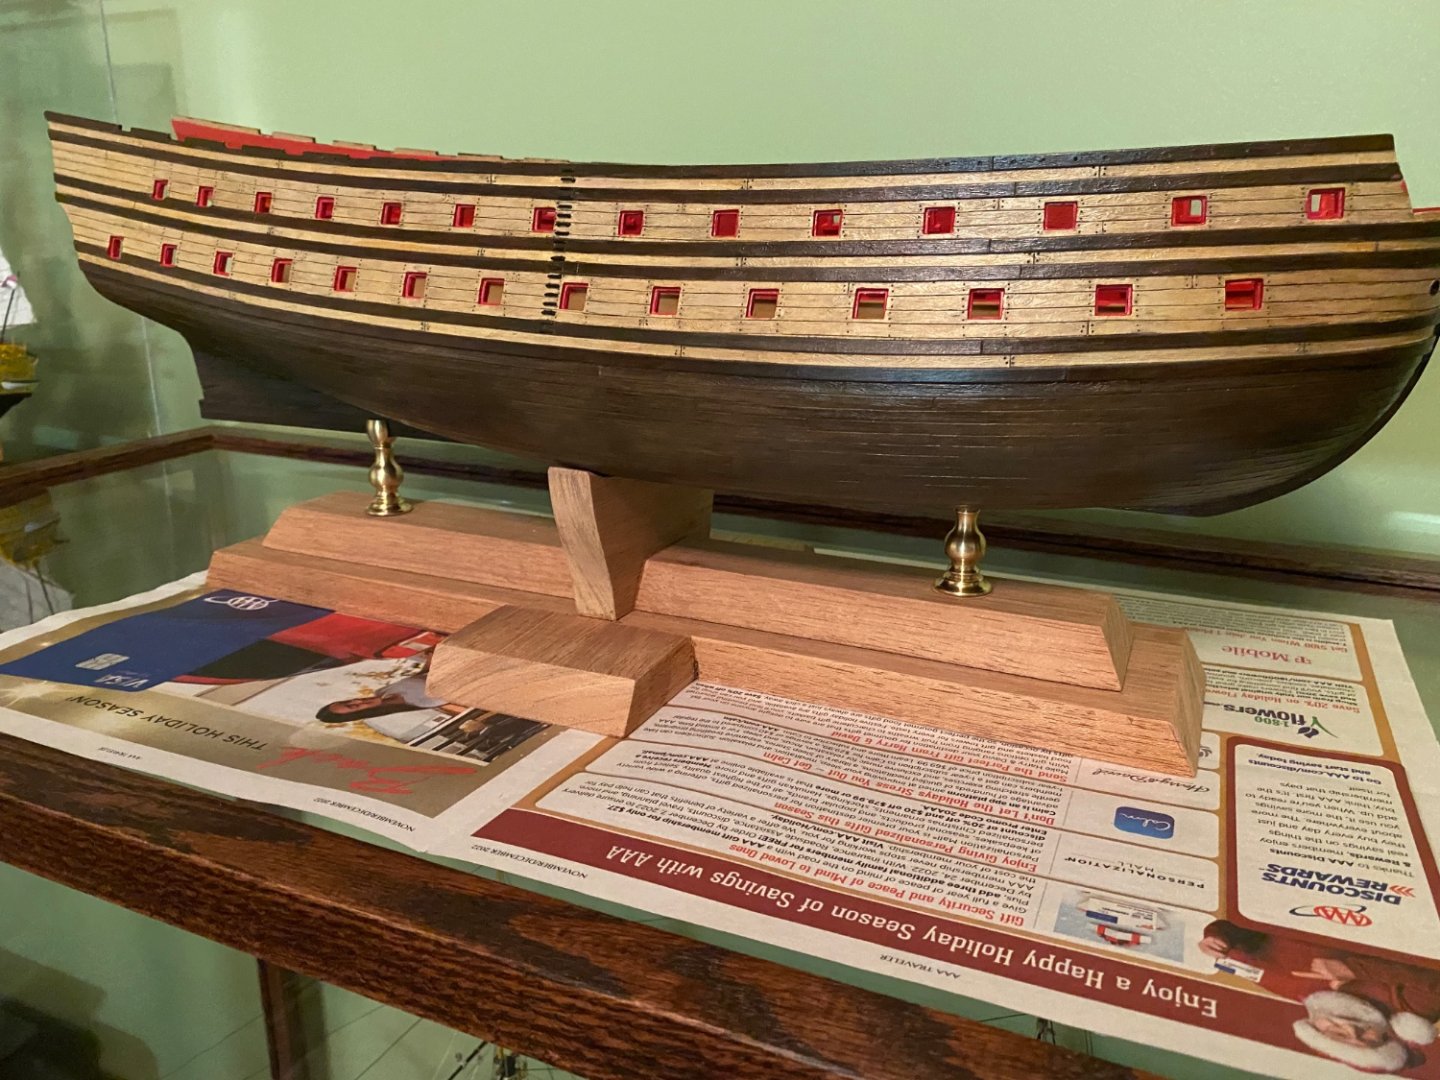
My mad scientist base design worked! Look how minutely precise I had to drill through the stern end of the keel! I could not afford to break through the edge of the keel or bottom of the hull since it would show above the pedestal. Drilling a hole through the keel at the bow end was not as critical since the entire keel is hidden down in the pedestal. A trying part of mounting the ship to the base was getting the hull level to the base. I had to add pieces of black felt to the port side of the cradle to make the hull tilt more to starboard. At the height of the edge of the hull being out of level would not have been real obvious. However once I got up to the height of the topgallant yards out of level would have been painfully obvious.


- 1,508 replies
-
- 4
-

-
-
- Le Soleil Royal
- Heller
- (and 1 more)
-
Marc are you shoveling snow?
-
Thanks Marc. Today I will find out if my mad scientist plan works when I attempt drilling everything and putting it together! 😳
- 1,508 replies
-
- 1
-

-
- Le Soleil Royal
- Heller
- (and 1 more)
-
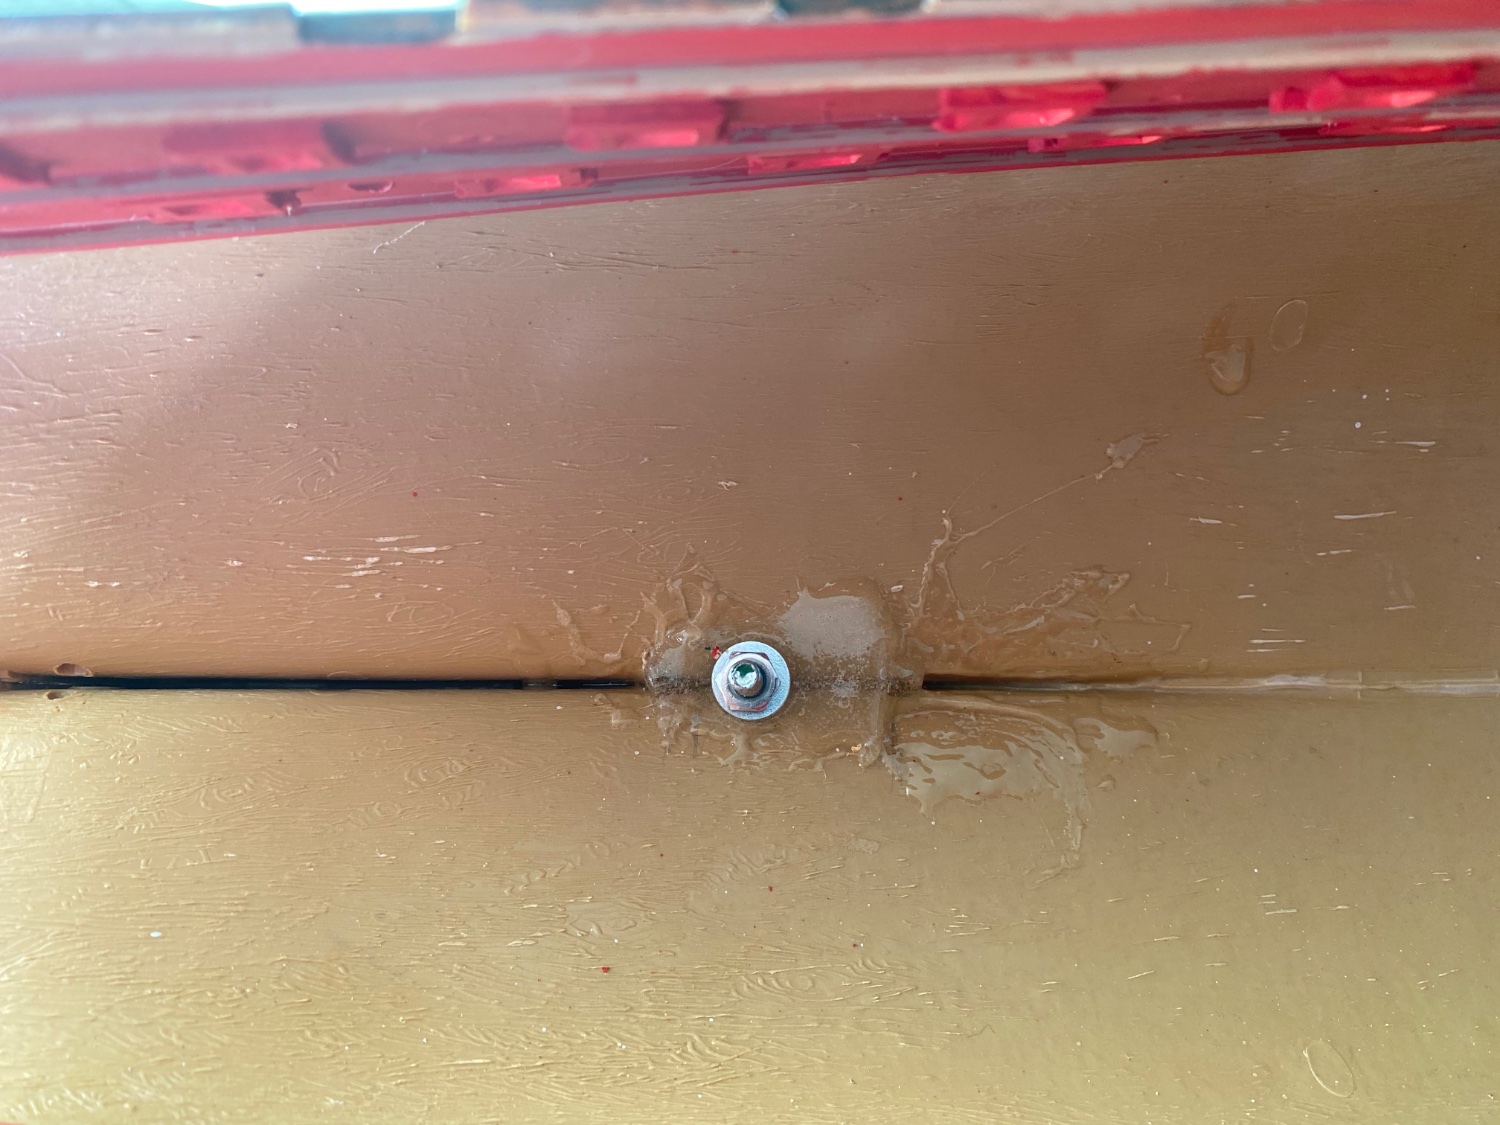
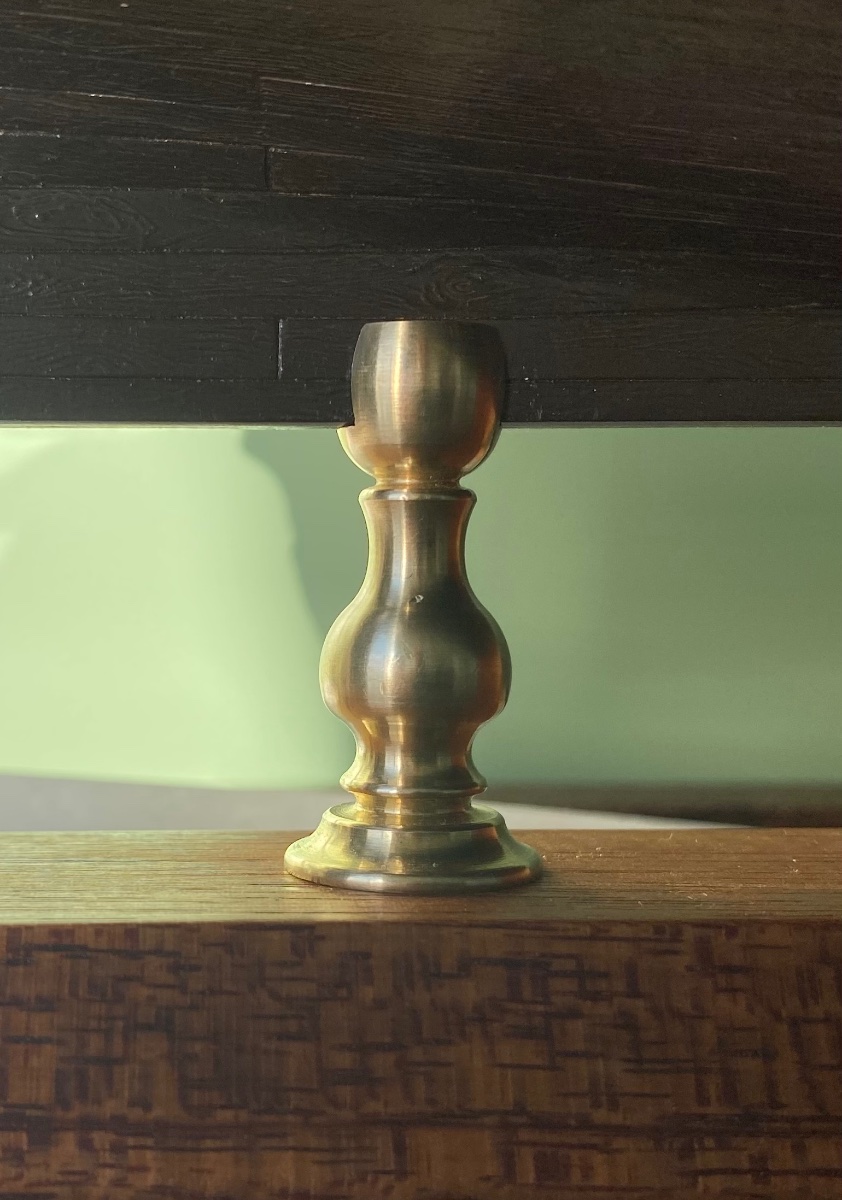
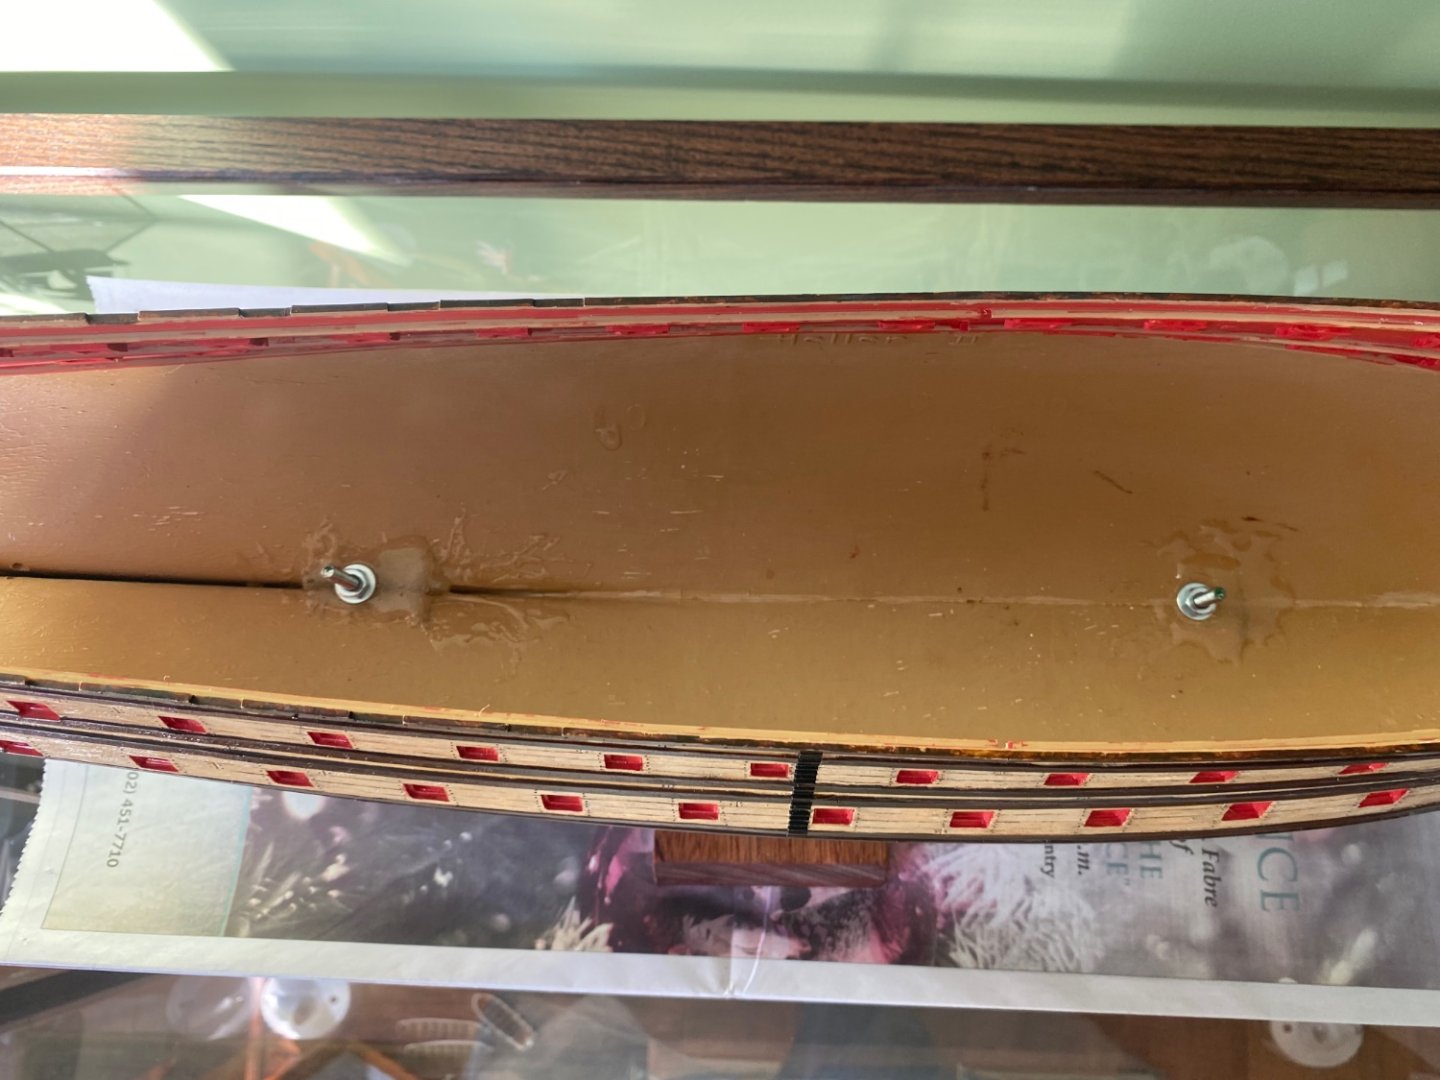
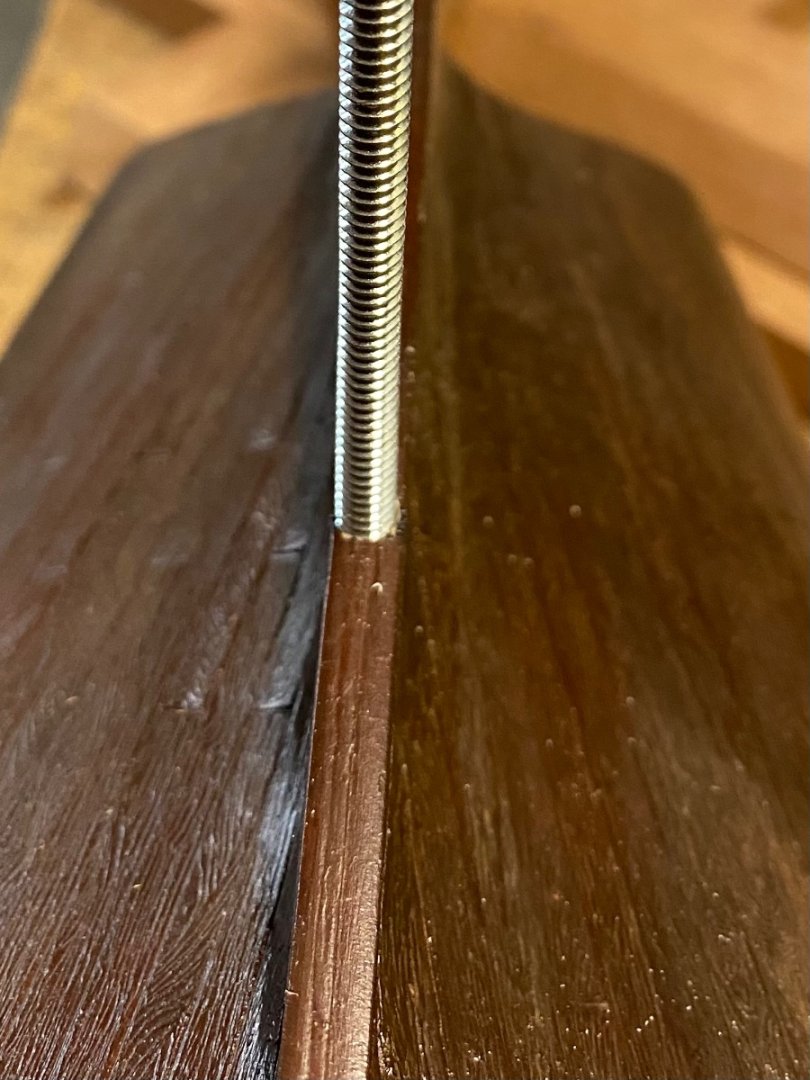
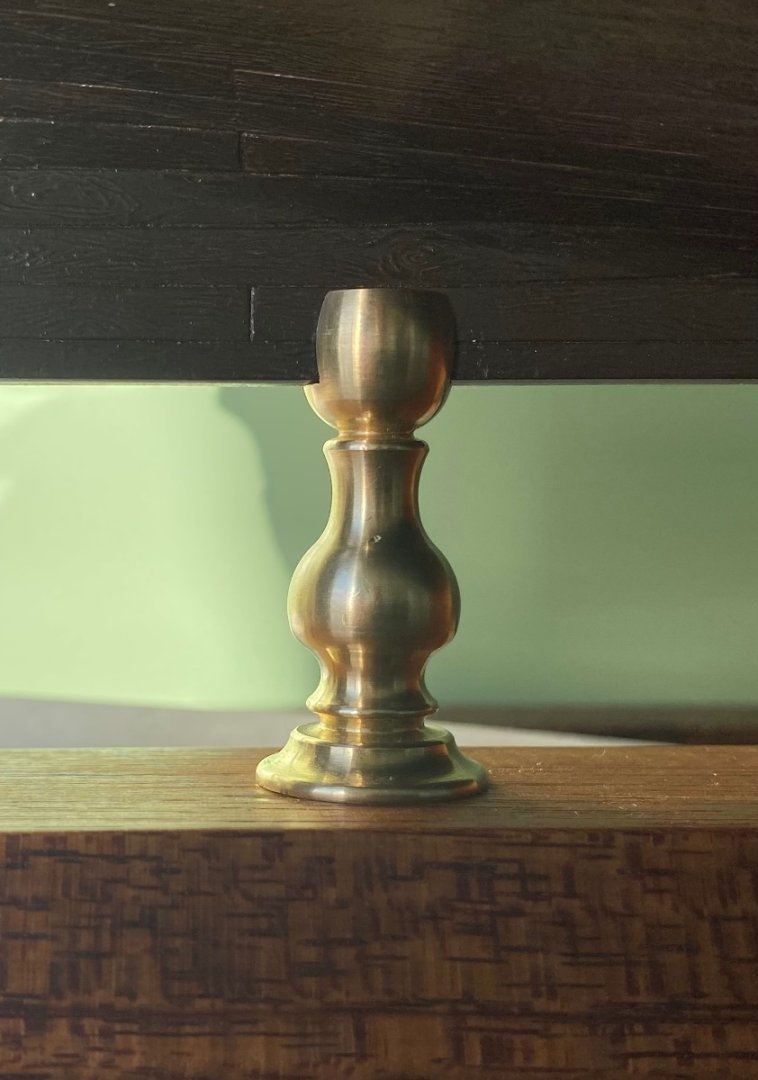
Worked on another battery of cannons. Still one to go. The last battery along with 10 cannons from the battery I am working on will have the trunnions modified and eyebolts installed for rigging. They will all be visible. I also designed and made my custom base. I decided not to use the Heller base. I made my base using mahogany and brass pedestals. I will finish it by doing a final very fine sanding and a thorough coat of teak oil to preserve the rich mahogany color. I had to grind the top of one of the brass pedestals down to match the small height of the keel at the front of the hull. I have a threaded rod I will run up through the base, pedestal, and hull. I poured a pool of epoxy inside the hull at the stern end where the rod will come up. I wanted a flat level surface for the nut to tighten. Henry I will epoxy around the nut once tightened. My original plan was just to have the two pedestals but I was concerned the SR would be quite a large ship to rely just on the top of the two pedestals to hold it solidly so I added the center cradle that will prevent the model from tilting on the base. Reference the reinforcement of the seam on the lower deck with styrene. Will I be able to expand the hull enough to get in? Luke the Victory the instructions show putting the two sections in separate and folding them together.


- 1,508 replies
-
- 5
-
-
-
- Le Soleil Royal
- Heller
- (and 1 more)
-
WHAT WOULD YOU RECOMMEND? OK this is my first what would you recommend post. I will soon be putting the bottom deck into the hull. I have thoroughly looked through the instructions and the blog of other builders. So far I have not found anything that different from just gluing it in. It does not appear any rigging or structural aspects go this far down into the ship so I don’t know if I need to strengthen it anymore than just the OOB instructions. I have yet to paint the deck sections. Not sure if I need to waste the paint since it will not be seen. Prior to putting in this deck I have to make my final decision on the display stand. I am thinking of a couple different designs that would use brass pedestals and need a bolt through the keel. If I go that way I obviously need to do that before putting in the deck. If I go with the Heller display stand or other cradle design I can move on with the deck. in the meantime I have two more batteries of cannons to make.
-
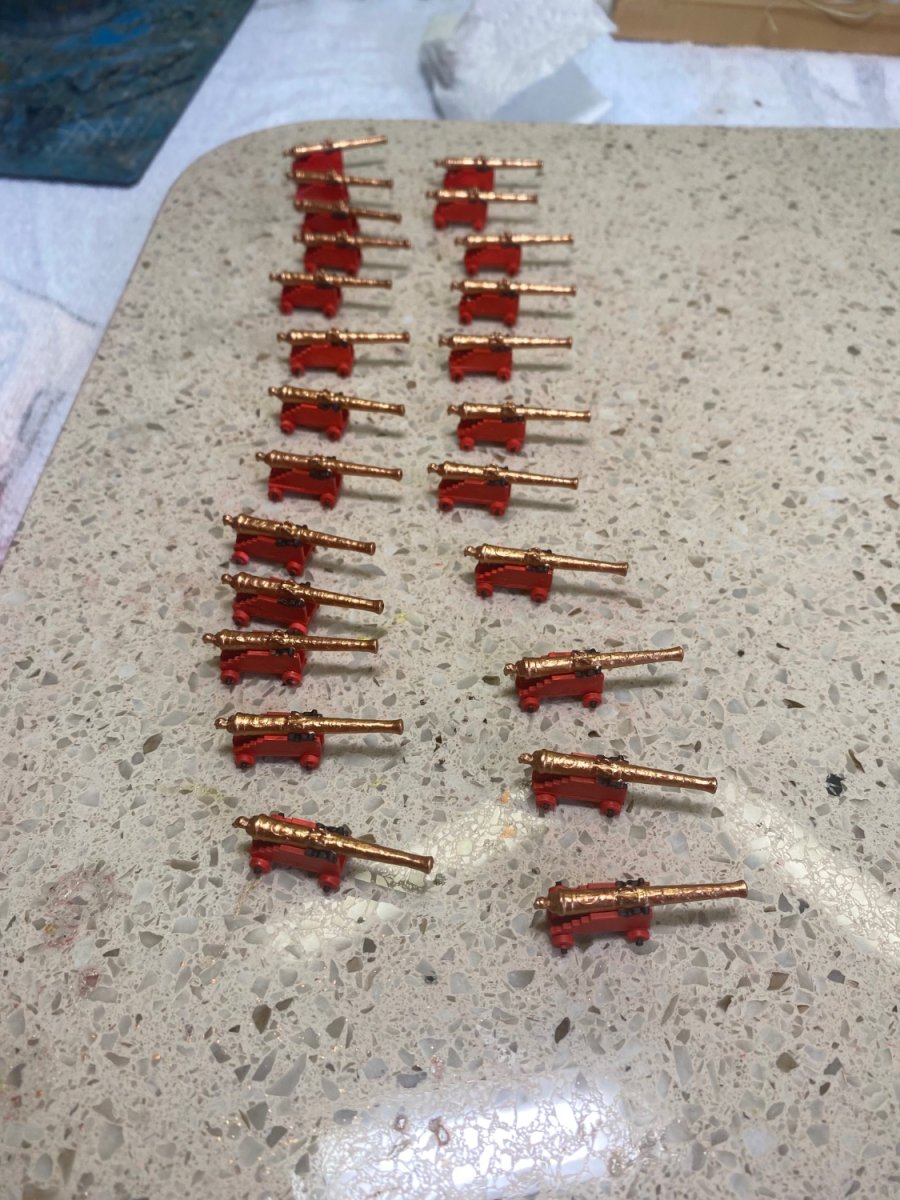
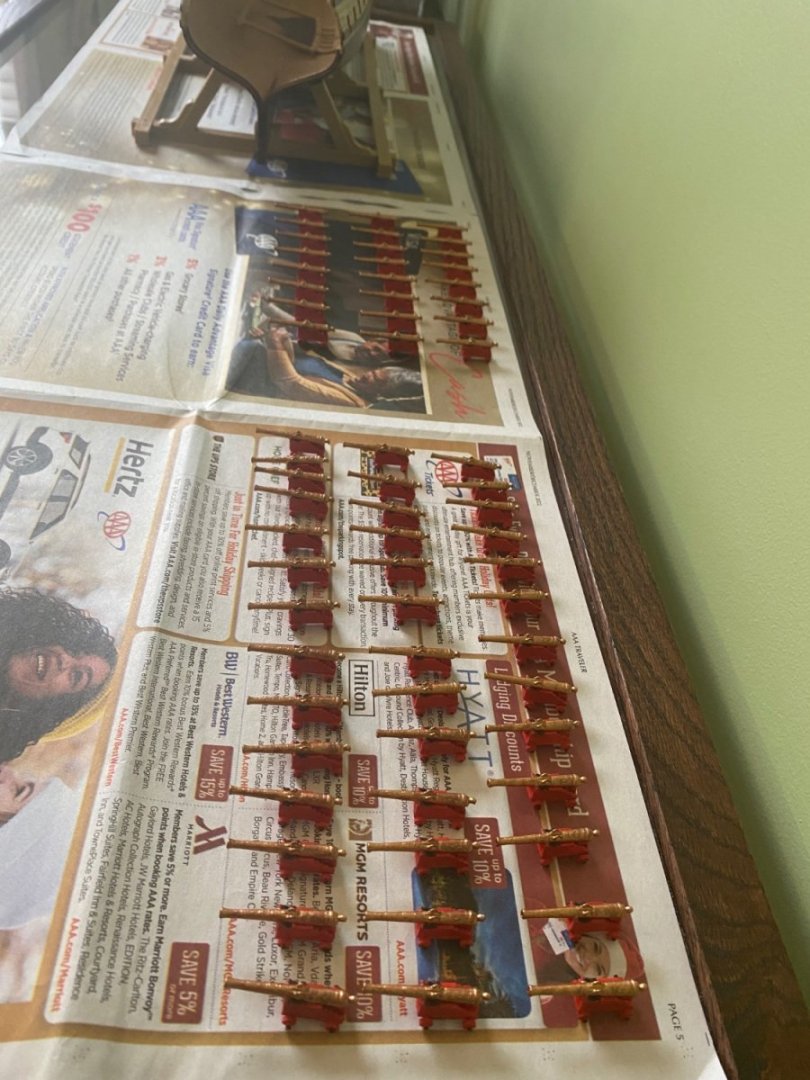
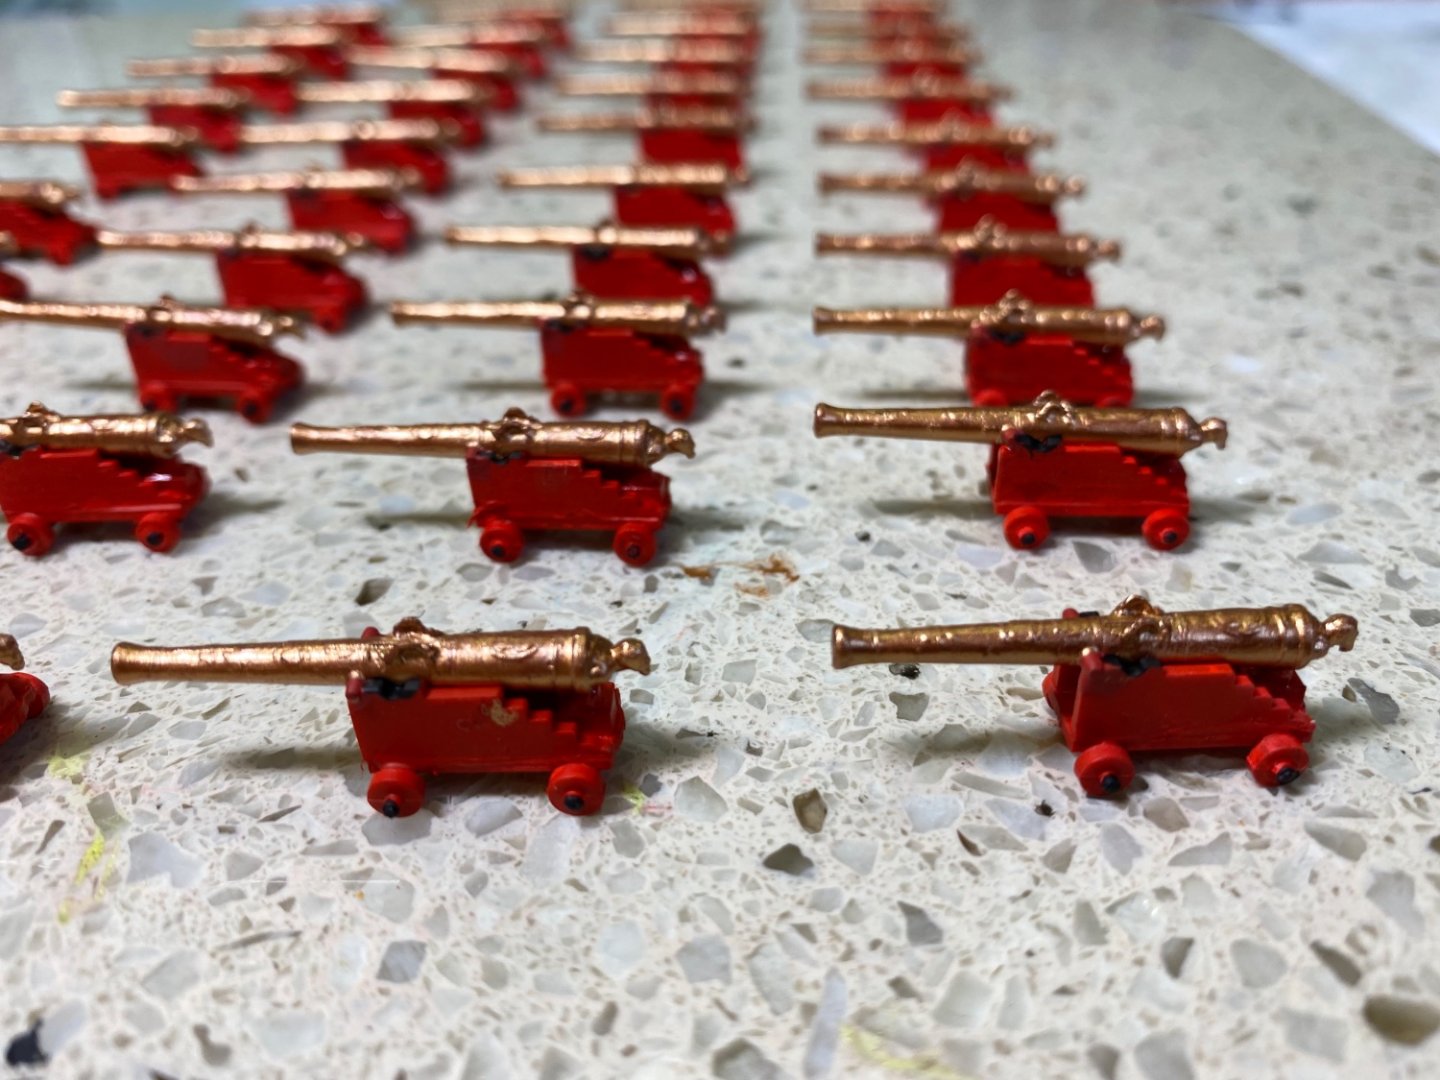
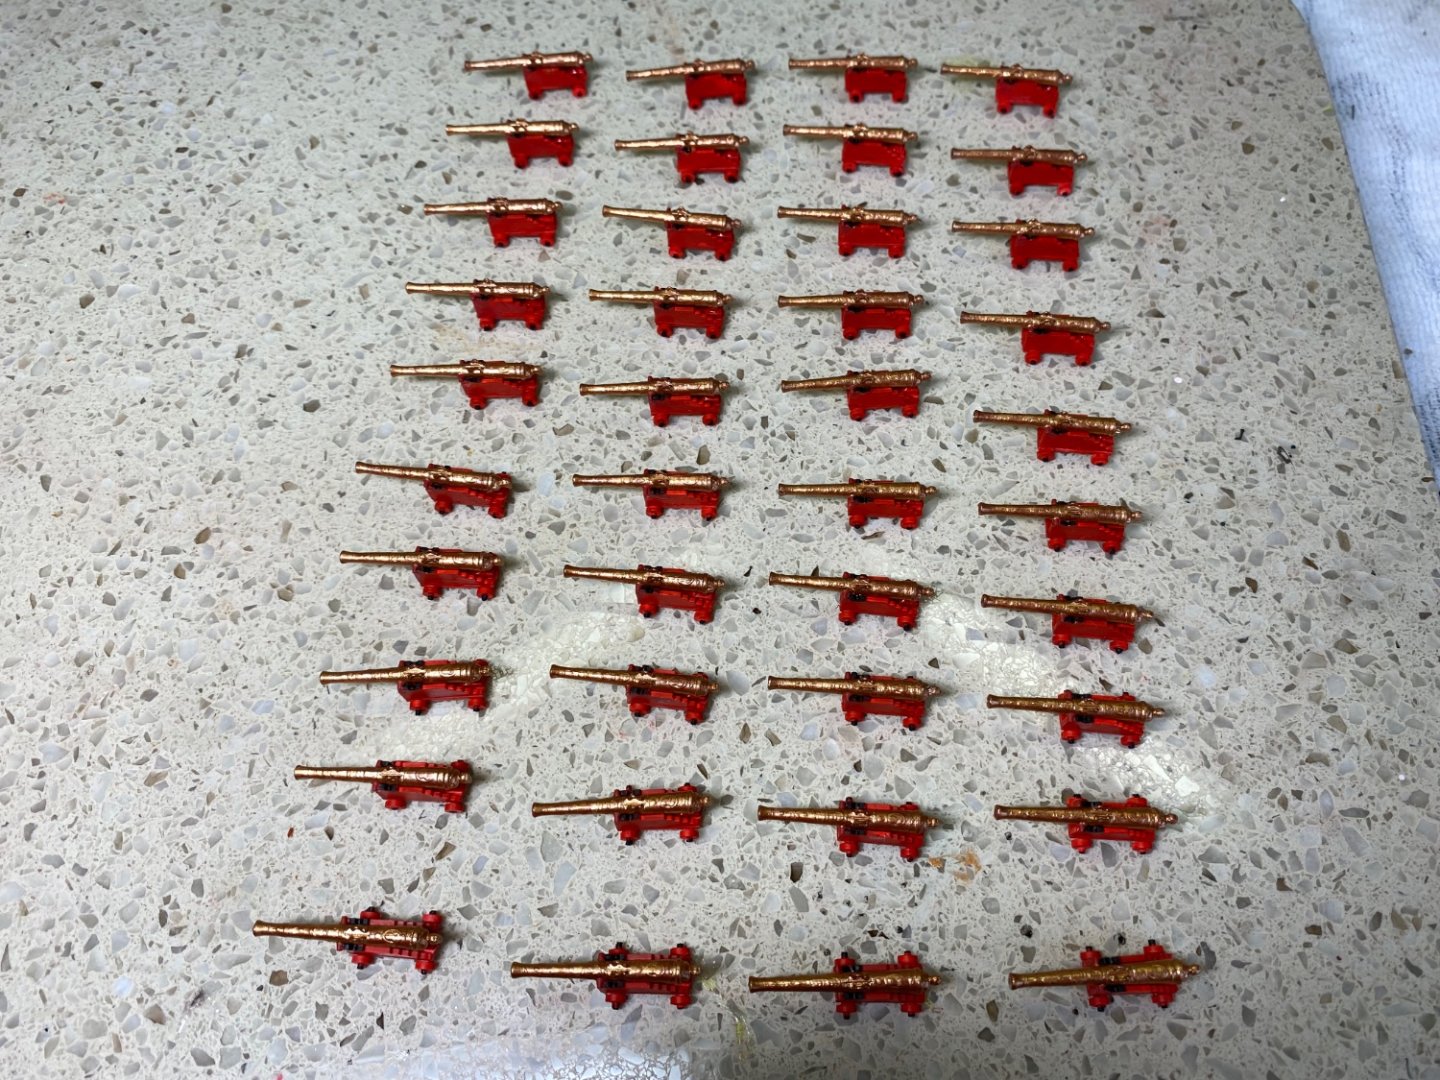
Second battery of cannons completed. These are the 64 cannons that will go on the two lower decks.

- 1,508 replies
-
- 5
-
-
- Le Soleil Royal
- Heller
- (and 1 more)
-
Good afternoon Marc!
-
I am planning to do something here on MSW as I make my way through the build. There were times during my Victory build that I completed an important task and posted about it only to have my friends suggest that it would have been better if I had done something a little different. With that in mind from time to time before I attack an important task I am going to put up post titled: WHAT WOULD YOU RECOMMEND? When you see a post from me with that lead in understand I am asking for your advise and recommendations. Feel free to reply if you like. I, of course, will not ask this before every task I start. This will just be before fairly important things that could effect later steps in the build. Hopefully with your recommendations and advice I can decide before I approach a task what I want to do and won’t have future regrets.
- 1,508 replies
-
- 5
-
-
- Le Soleil Royal
- Heller
- (and 1 more)
-
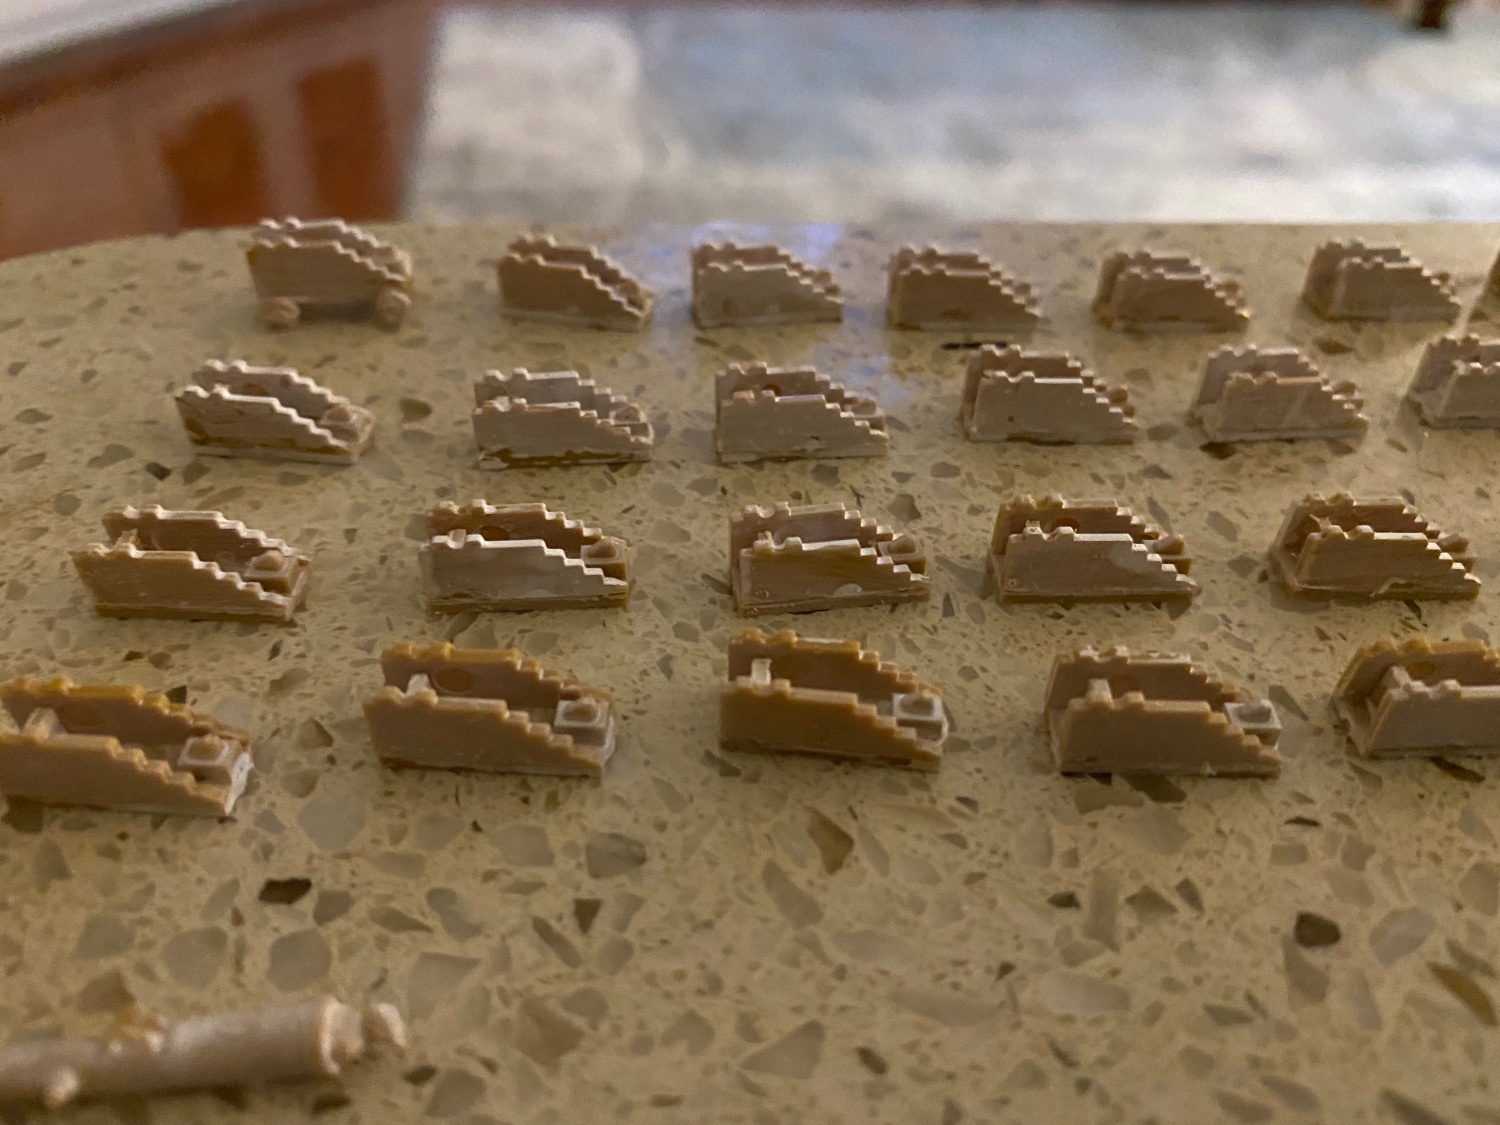
First battery of cannons complete. These will be on the lower decks with only the end of the barrel visible if I display with hatch open. As a result I did not bash the trunnions. I did move the wheels more forward and back. I painted the trunnions red and set the cannon with the trunnions positioned in front of the trunnion support. I then painted a little black stripe along the top of the support. Unless you look real close you cannot tell the red trunnions are not part of the red carriage. Also the black bit of paint looks like a plate to hold the trunnion in place. Of course no one is ever going to see this once under a deck.

- 1,508 replies
-
- 6
-
-
- Le Soleil Royal
- Heller
- (and 1 more)
-
I will do that Henry.
-
As I continue to read through builds like Henry’s, Marc’s, and several others I get so much inspiration for the little bashing details of this SR build. Before and during my HMS Victory build there was plenty of comments about the amount of time the build would take if I wanted to do a nice job. And in fact it did take a year and a half. The build time was the result of doing a lot OOB, a lot of bashing with MSW member recommendations, using Longridge’s book for rigging, using Daniel’s etched parts, etc. All of these things had a bearing on how long the build took. Some added time and some reduced overall build time. With everything I learned and reading everyone’s builds I plan to attempt many of the new things skills in my SR build. I fully expect this to add a great deal of build time, most likely longer than my Victory. Each little bash I think about, like making my own chains and eyebolts, causes me excitement to adventure and learn. This is going to be fun.
- 1,508 replies
-
- 4
-
-
- Le Soleil Royal
- Heller
- (and 1 more)
-
Popeye2sea i can not wait to follow that build when you start it. That would be great to see. As I mentioned I have built it twice. Once like you many years ago and another time about 3 years ago. Right when I got back into modeling after retiring. That build is here on MSW but looking back at it now I see how elementary my skills were and how I think I have improved over time with the help from you guys. If you have a photo of you on board in uniform I would love to see it! Post one here. Oh well, back to painting cannons!
- 1,508 replies
-
- 1
-
-
- Le Soleil Royal
- Heller
- (and 1 more)
-
Henry that is incredible! What an amazing experience. Have you built a model of the Constitution? Surly you have. I need to check the index. How great of an information source that would be. I can picture it. You working on your model and trying to figure out how something should be. Then thinking, I will just check the real thing tomorrow when I am on board. You have got to attach a photo of you on board in your 1812 marine uniform.
-
Henry I am steadily reading through your build now picking up a lot of great ideas and techniques. I was pleasantly surprised to read the part about you working as a character on the USS Constitution! That is pretty cool. I know that was a number of years ago when you wrote that comment. Are you still doing that in the summer? I have really enjoyed visiting the ship when I am in Boston. Have done it several times over the years. Who knows, our paths may have crossed on the ship one day in the past. I built the Revell 1/96 Constitution years ago. Some of its crew deserted and became crew on my Heller Victory 😊.
- 1,508 replies
-
- 1
-
-
- Le Soleil Royal
- Heller
- (and 1 more)
-
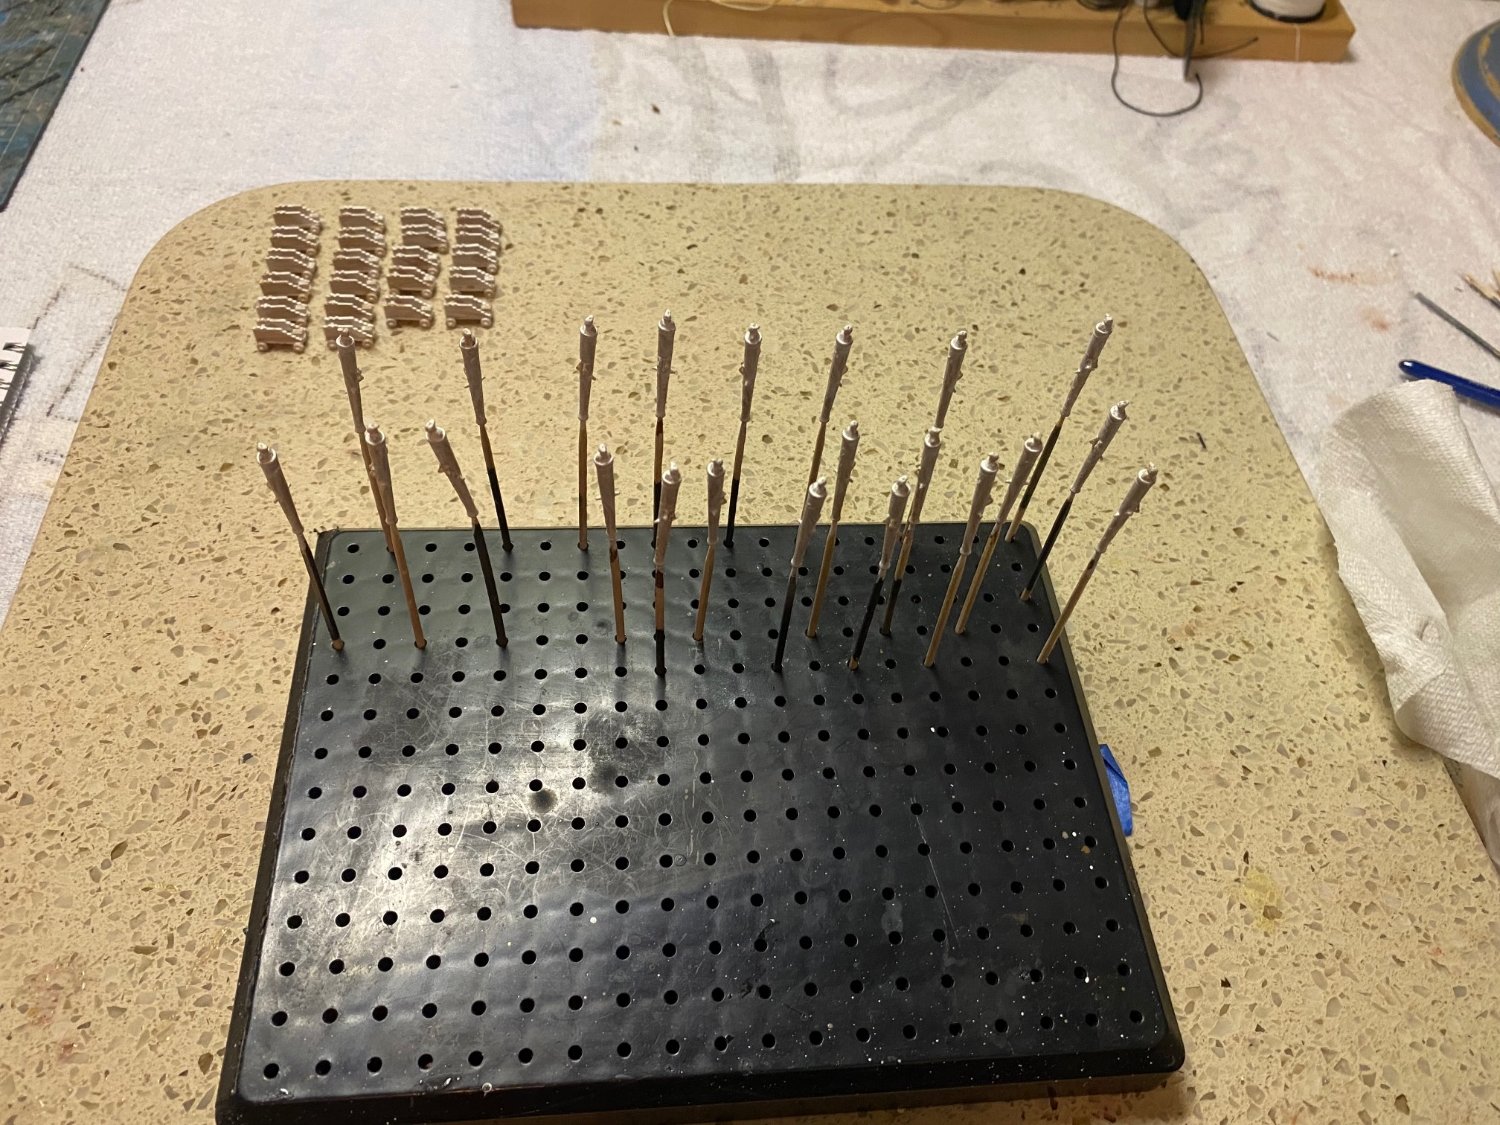
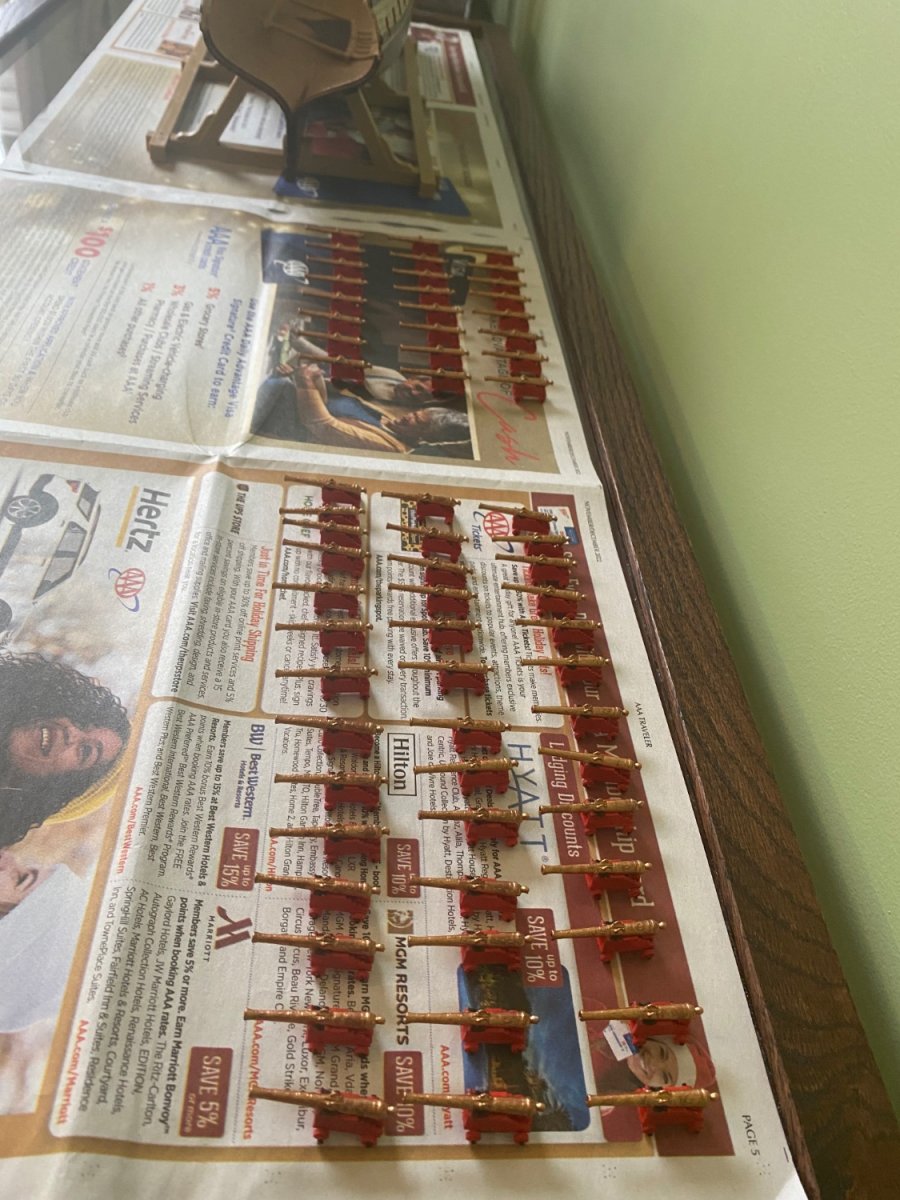
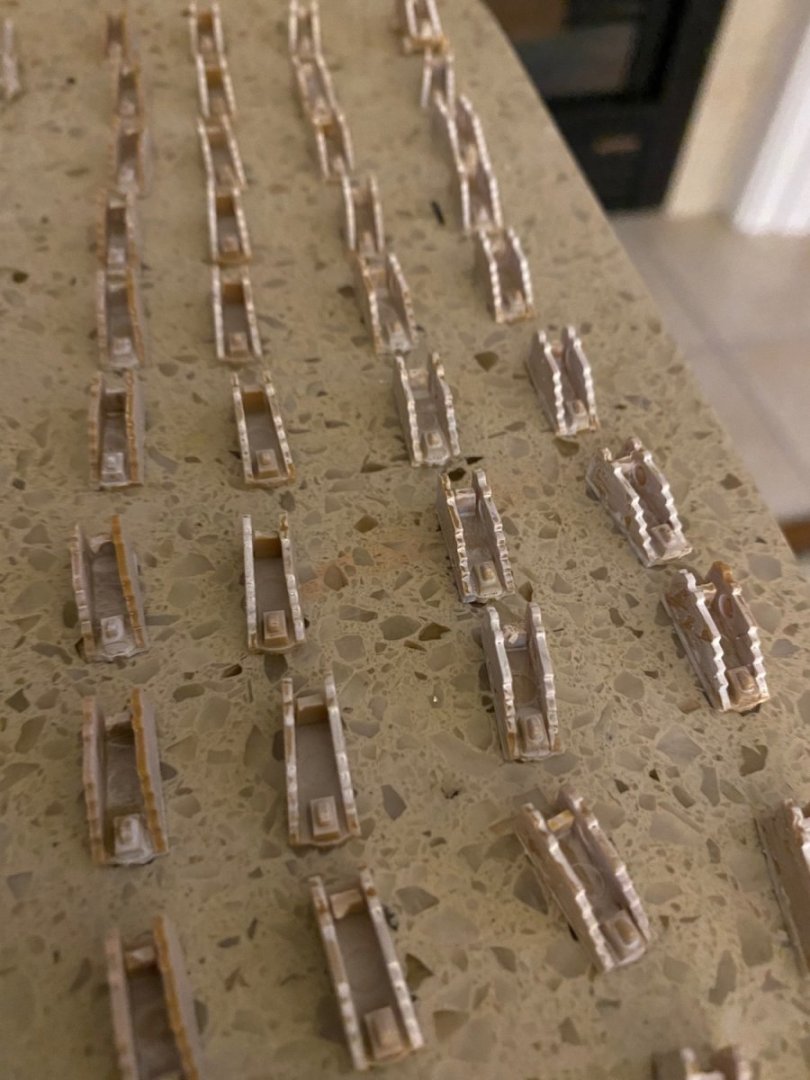
I have entered a phase of my build where there won’t be much progress to report on a daily basis so my post will be fewer for just a bit here. I don’t see a point in posting just to post. Of course the friendly exchange of conversation is nice even if not pertaining to model ship building. I am solid into building the hundred and some odd cannons. My building table looks like an old factory assembly line with many partially completed cannon carriages lined up to move forward for the wheel attachment. Barrels are also being assembled and painted in another “factory”. Soon the painted carriages and barrels will be joined together and prepared for loading on the SR. My intention is to separate out the cannons that will ultimately be seen. They will be in need of trunnions modifications.

- 1,508 replies
-
- 6
-
-
- Le Soleil Royal
- Heller
- (and 1 more)