HOLIDAY DONATION DRIVE - SUPPORT MSW - DO YOUR PART TO KEEP THIS GREAT FORUM GOING! (Only 64 donations so far out of 49,000 members - C'mon guys!)
×


Bill97
-
Posts
2,707 -
Joined
-
Last visited
Content Type
Profiles
Forums
Gallery
Events
Everything posted by Bill97
-
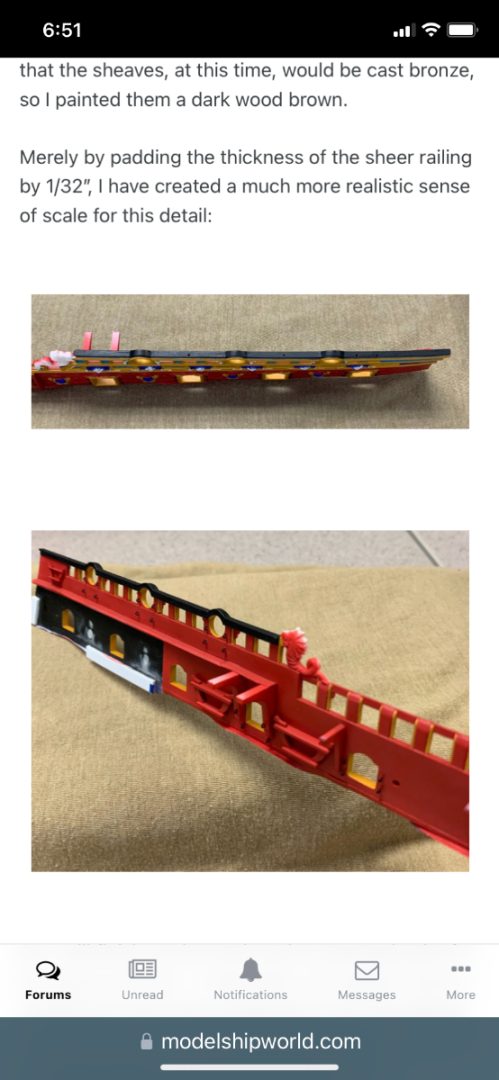
Yes Marc I believe I am having a complete change of mind set about my build speed. There is truly some kind eye opening when I realize I do not have to build at this pace. It is really kind of exciting to think about going back and adding “pop”! The best feeling about it is that I am not going back thinking “oh no look at this screw up I have to some how fix”. This is going to be a pleasant go back and add pop detail to a model that looks perfectly fine as is, but will improve greatly with the added attention. I did find in your blog the part about using .02 evergreen to make the bolts.
- 1,508 replies
-
- 1
-

-
- Le Soleil Royal
- Heller
- (and 1 more)
-
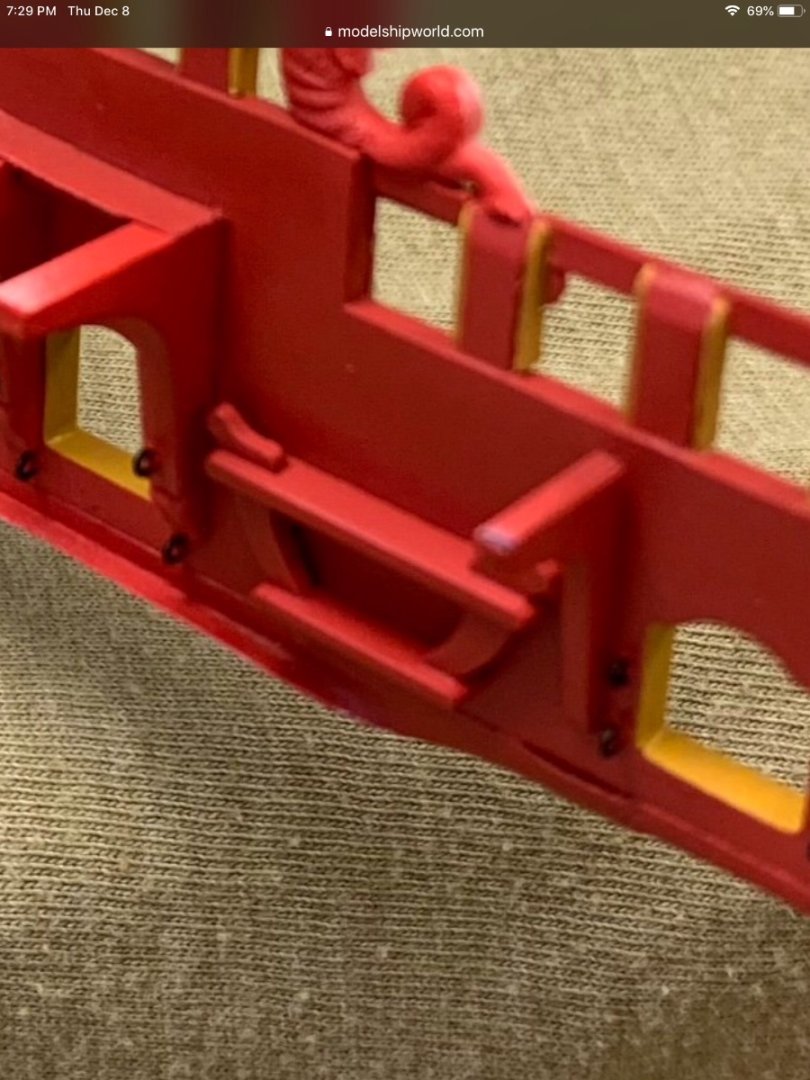
Marc whenever I read through your build I have to stop and look at your beautiful paint job. These three of the bow area caught my attention this evening. This is a true work of art my friend. I am so hopeful if I am patient I can come close to what you have done. Looking at them gives me second thoughts about adding the anchor lining while I still have a chance. I really like the way that looks. I may even go back and read through the early pages to find your process for making the bolt heads, especially on the wales. I remember reading that somewhere in your blog. I notice you have ropes in both holes on each side instead of just the two inside ones as shown in the Heller instructions.?
- 1,508 replies
-
- 1
-

-
- Le Soleil Royal
- Heller
- (and 1 more)
-
Henry I ordered some 2mm rope. Will switch it out when I get it. Luckily the decks are still open at the front so I can easily switch it out. In other news I adapted your support timbers at the knees but changed it up a little. I noticed that the piece supported by the timbers was molded to reflect two beams that the decking layer on. I added evergreen along the sides to give it a little more weight similar to the top edge of the UB. With that in mind, and my construction knowledge, I reasoned the beams needed to be supported by timbers. Timbers support the beam, the beam supports the decking. So I went with two sets of support timbers, one set at each beam. As you did, I made them wide enough to later accept some molded ornamentation.
- 1,508 replies
-
- 3
-
-
- Le Soleil Royal
- Heller
- (and 1 more)
-
I will research that a bit Henry. May be difficult to run it through the holes now with the deck above.
-
Actually Henry that is exactly what that is. The Heller instructions said to take three.9mm tan threads and braid them together.

-
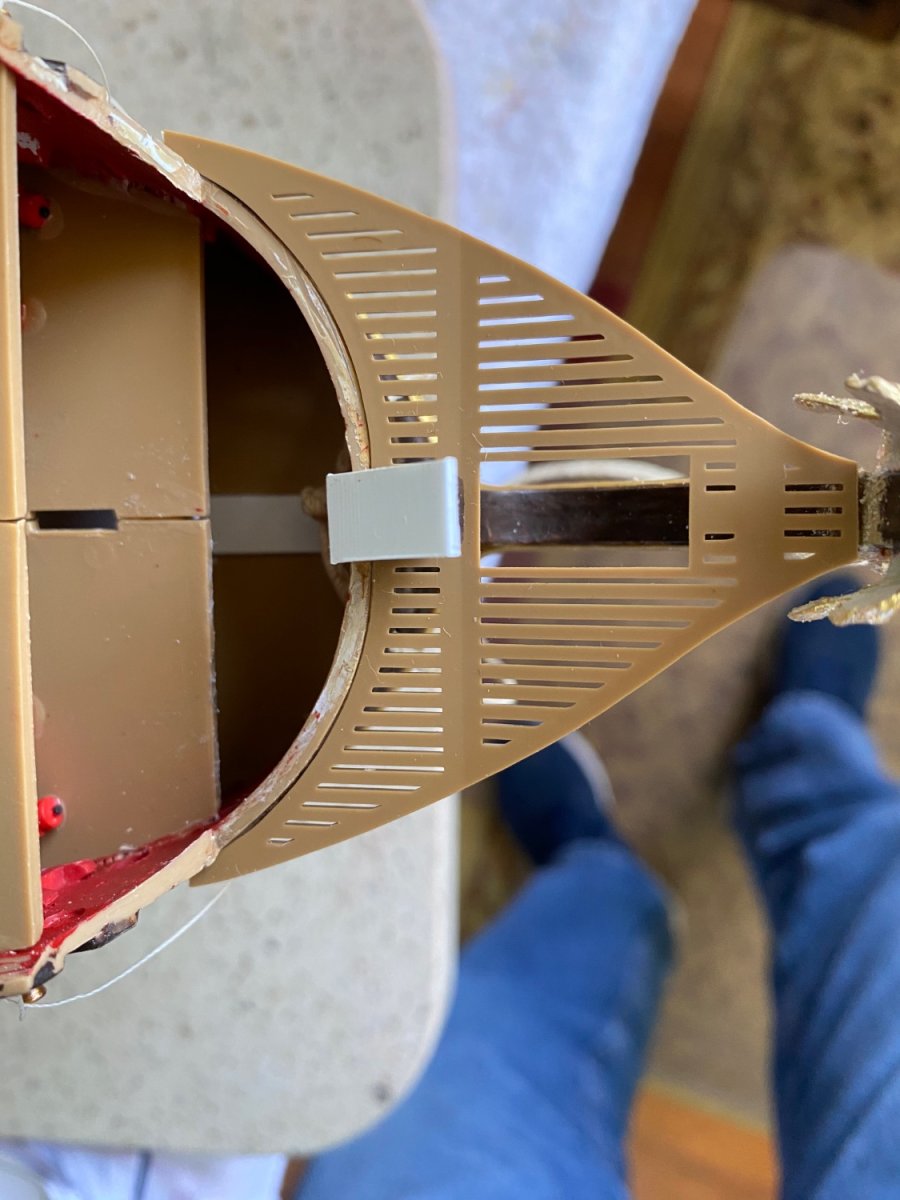
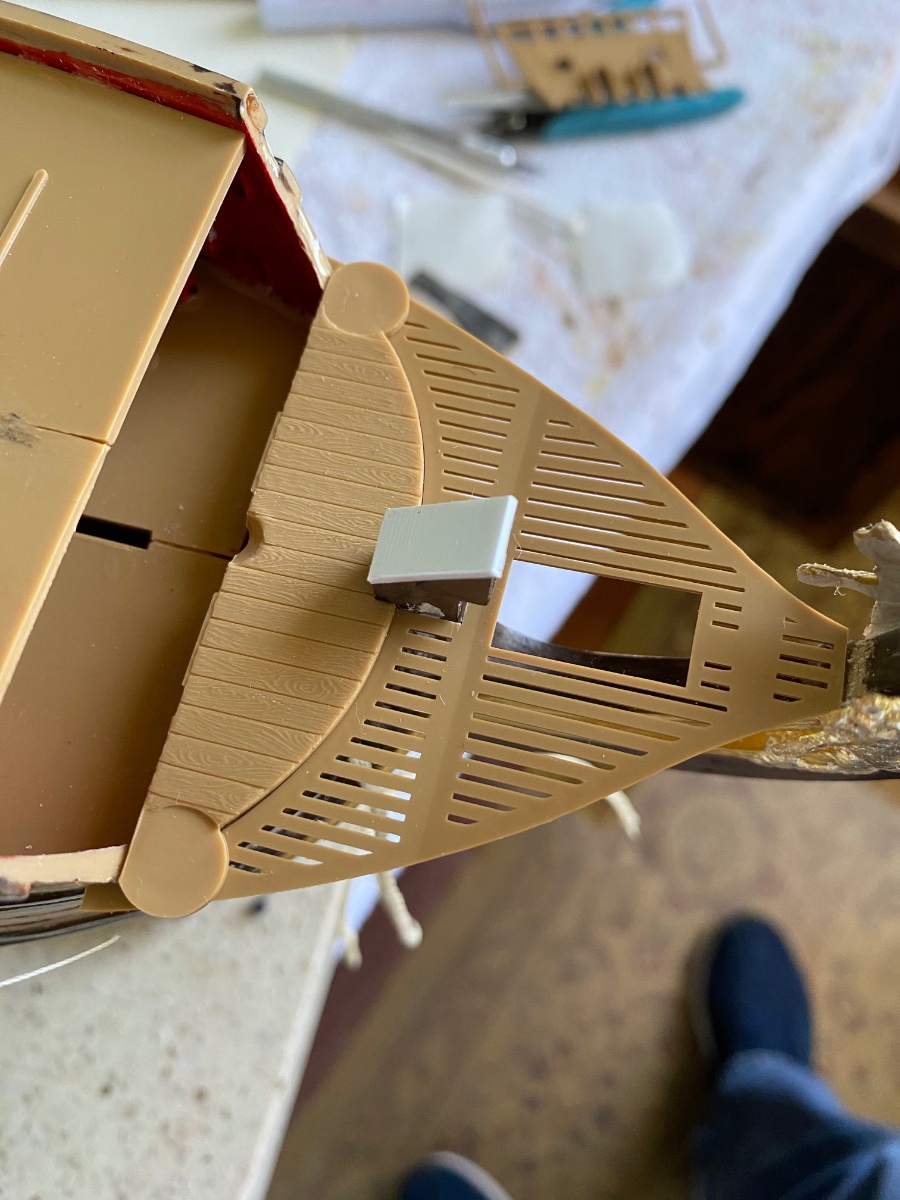
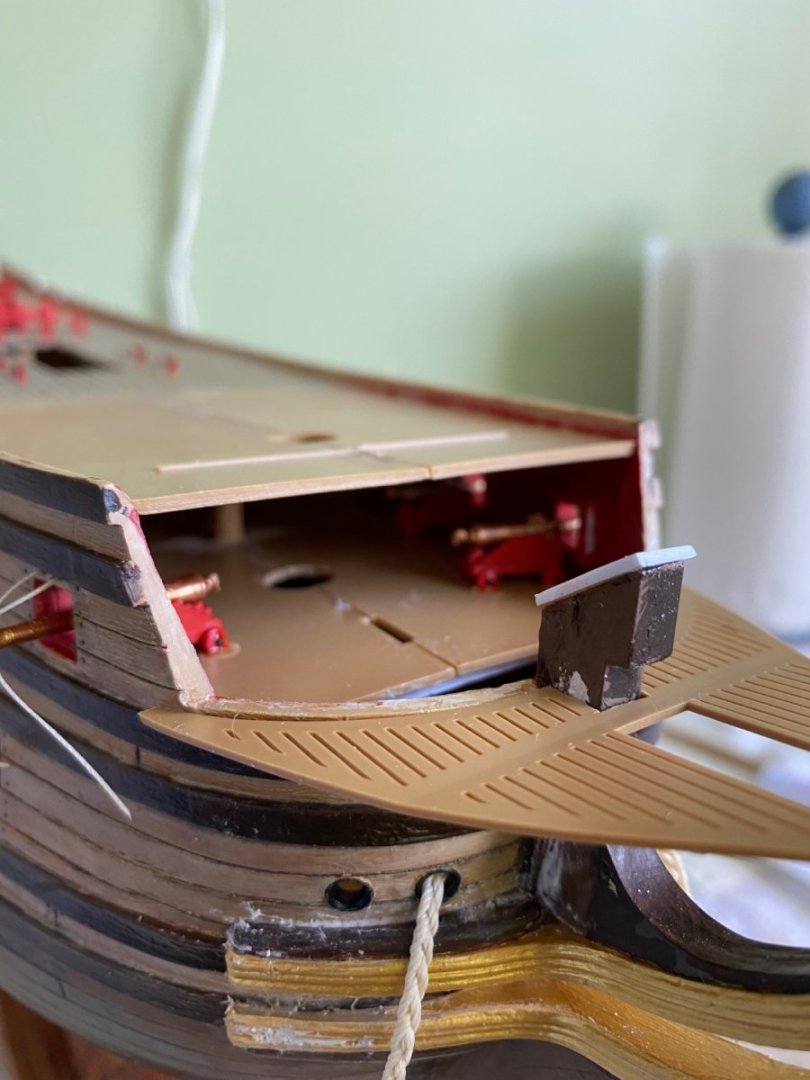
Dremel to the rescue! Was able to shape the thick styrene to fit the knees. Installed and puttied. Will sand putty when dry and repaint area. Molded ornaments will be added later b


- 1,508 replies
-
- 4
-
-
- Le Soleil Royal
- Heller
- (and 1 more)
-
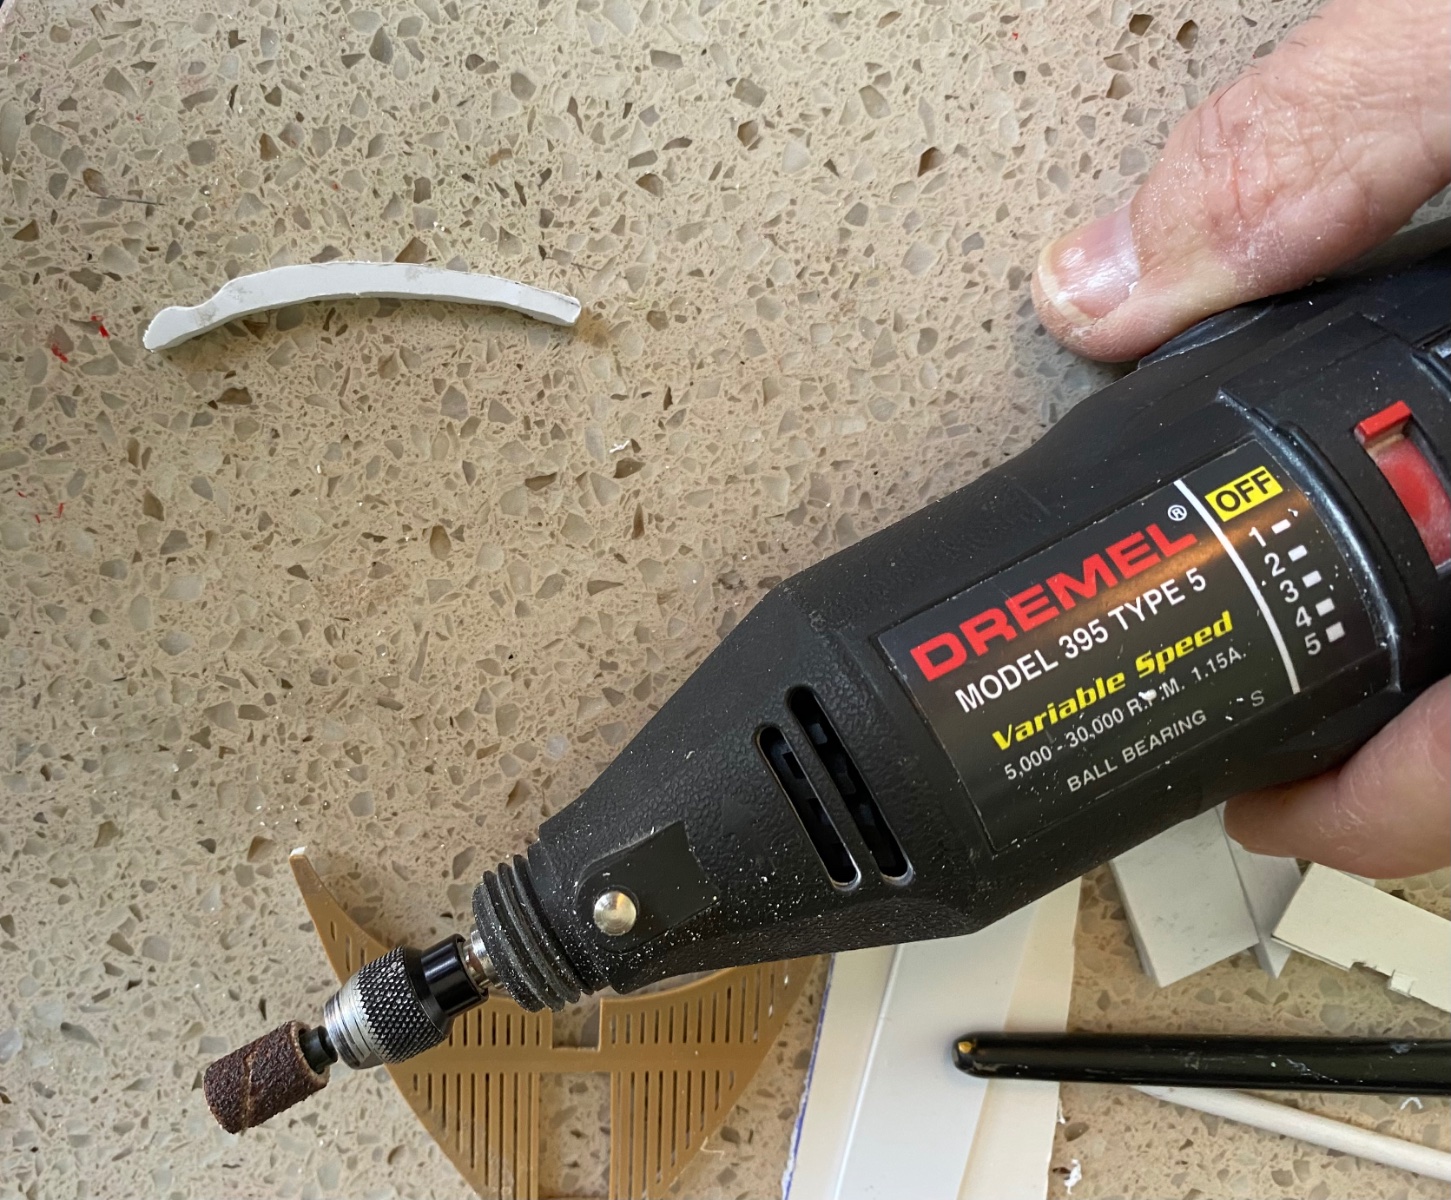
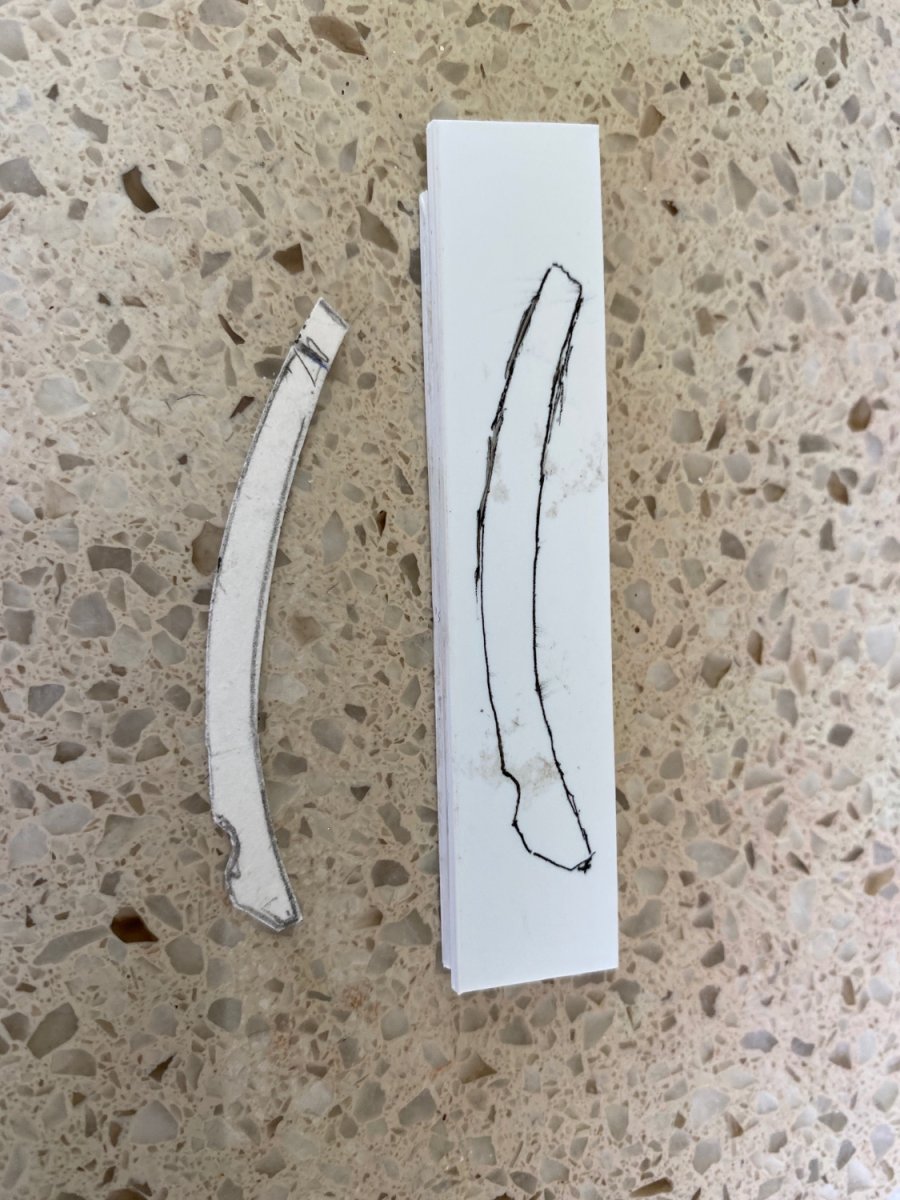
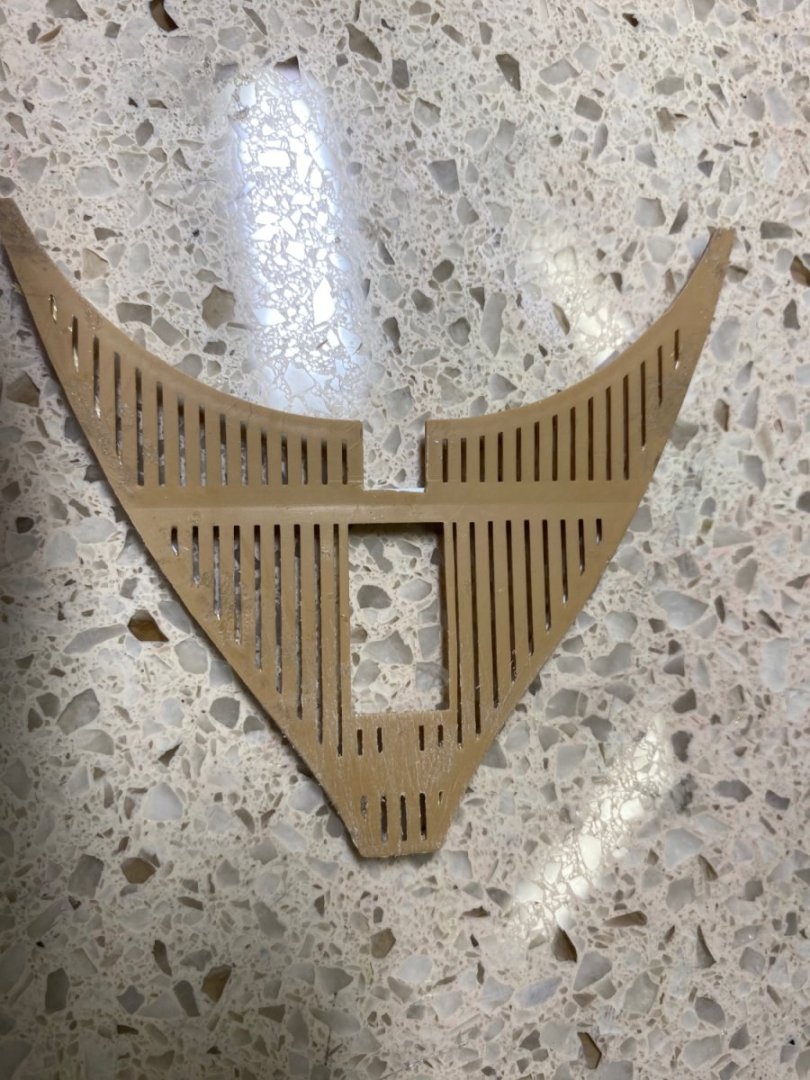
😀 Henry you are an excellent teacher. How did you cut/carve the piece you used? The pattern is obviously just paper. I glued together two pieces of 2mm thick Evergreen to get a 4mm thick piece of styrene to make the actual piece I am going to use. I started cutting the shape with my shark point xacto knife and quickly realized that will take forever. I then thought I had a brilliant idea to cut it out using my scroll saw in the wood shop. Not a good idea. The blade moving up and down at high speed creates friction and heat which melts the styrene back together behind the blade. Today I am going to try using a grinding bit in my Drimel to see if that will smoothly form the shape I want.
- 1,508 replies
-
- 1
-
-
- Le Soleil Royal
- Heller
- (and 1 more)
-
Thanks Marc. Thanks Henry. Working on the shape that fits between the knees, just as you did. Who said imitation is the greatest form of flattery. N Dr to see how you he timbers go.

- 1,508 replies
-
- 2
-
-
- Le Soleil Royal
- Heller
- (and 1 more)
-
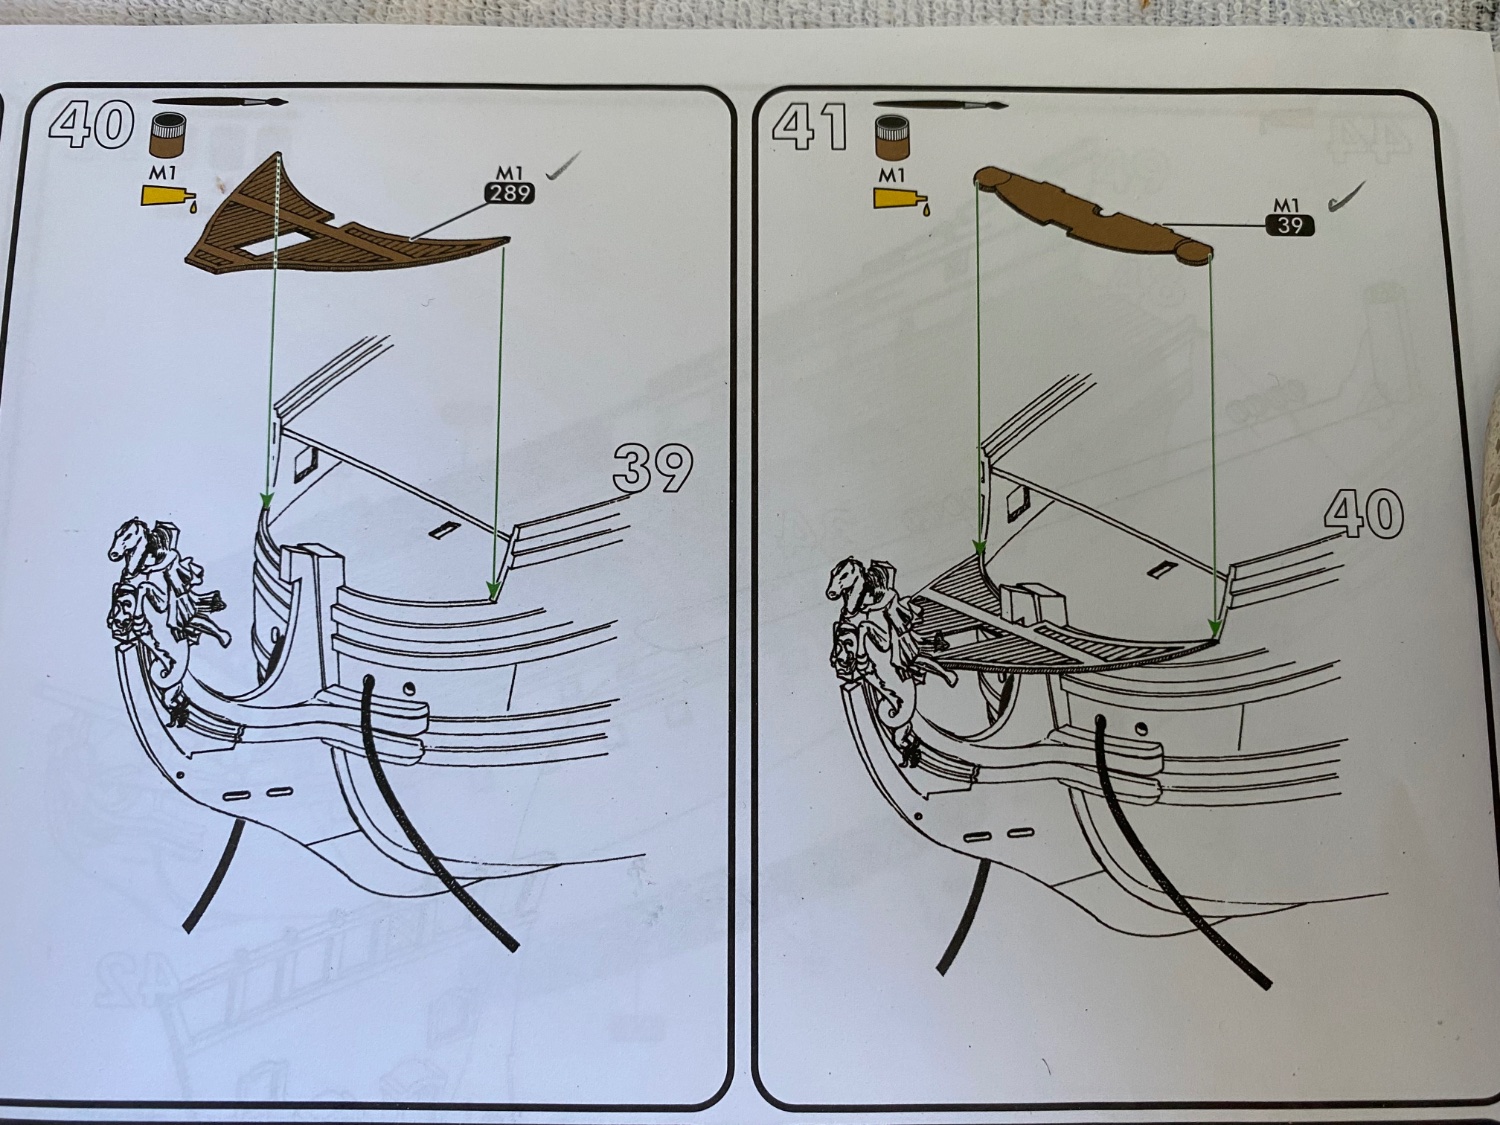
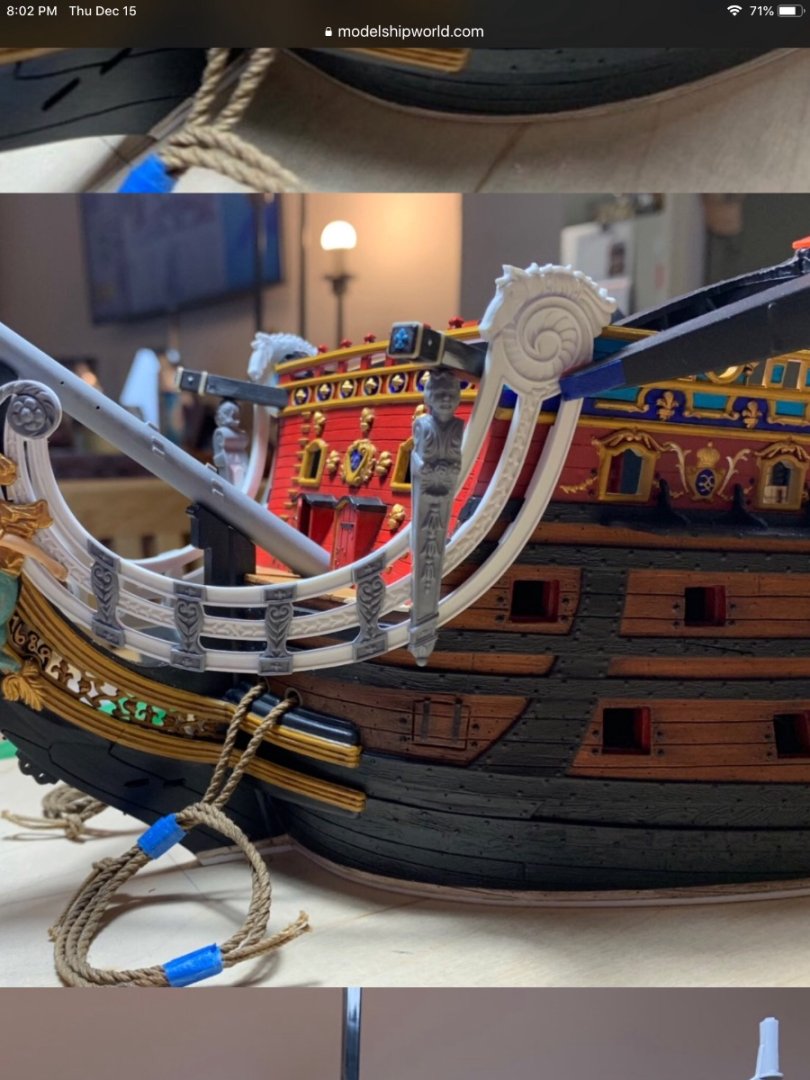
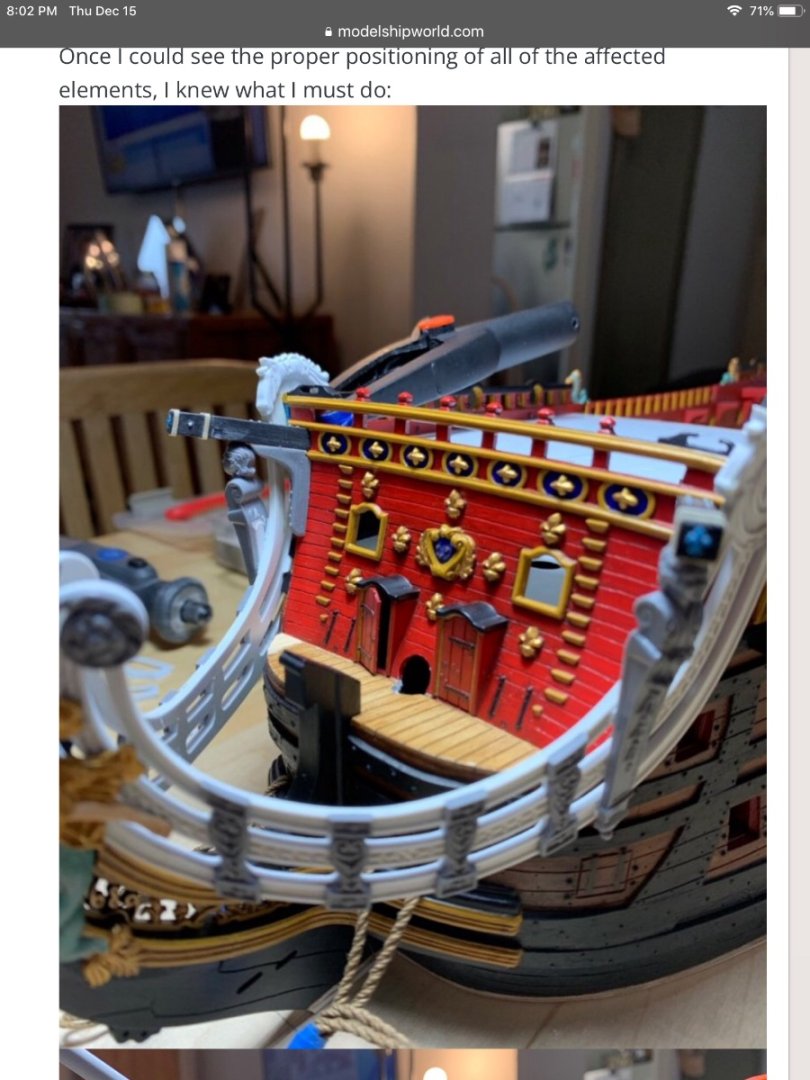
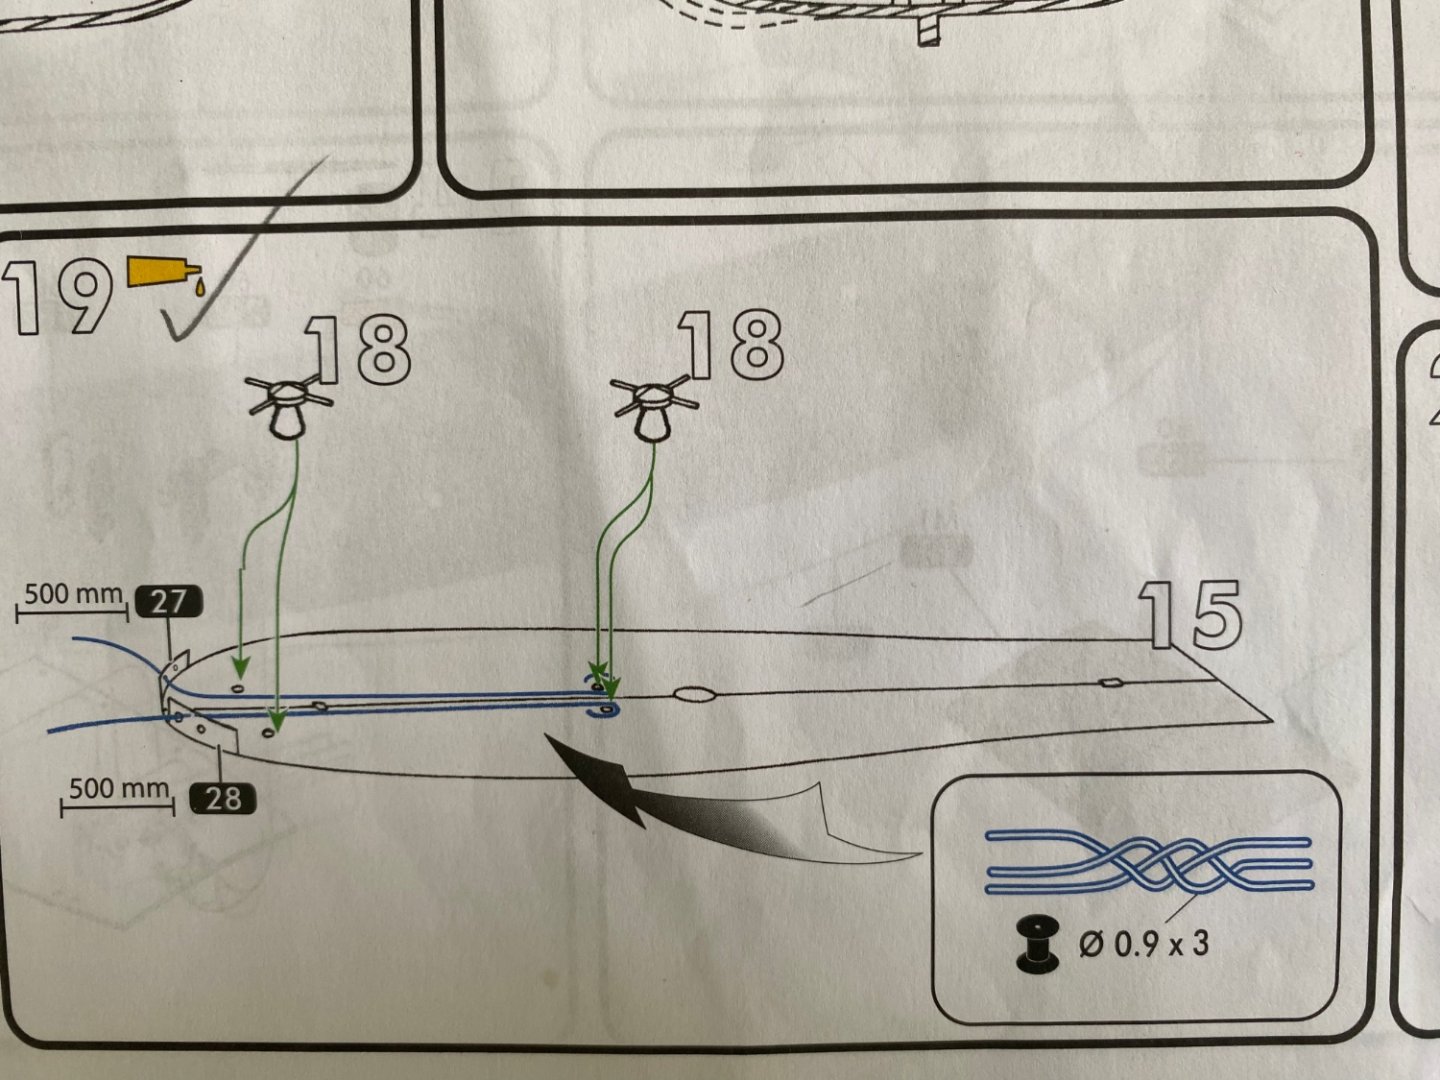
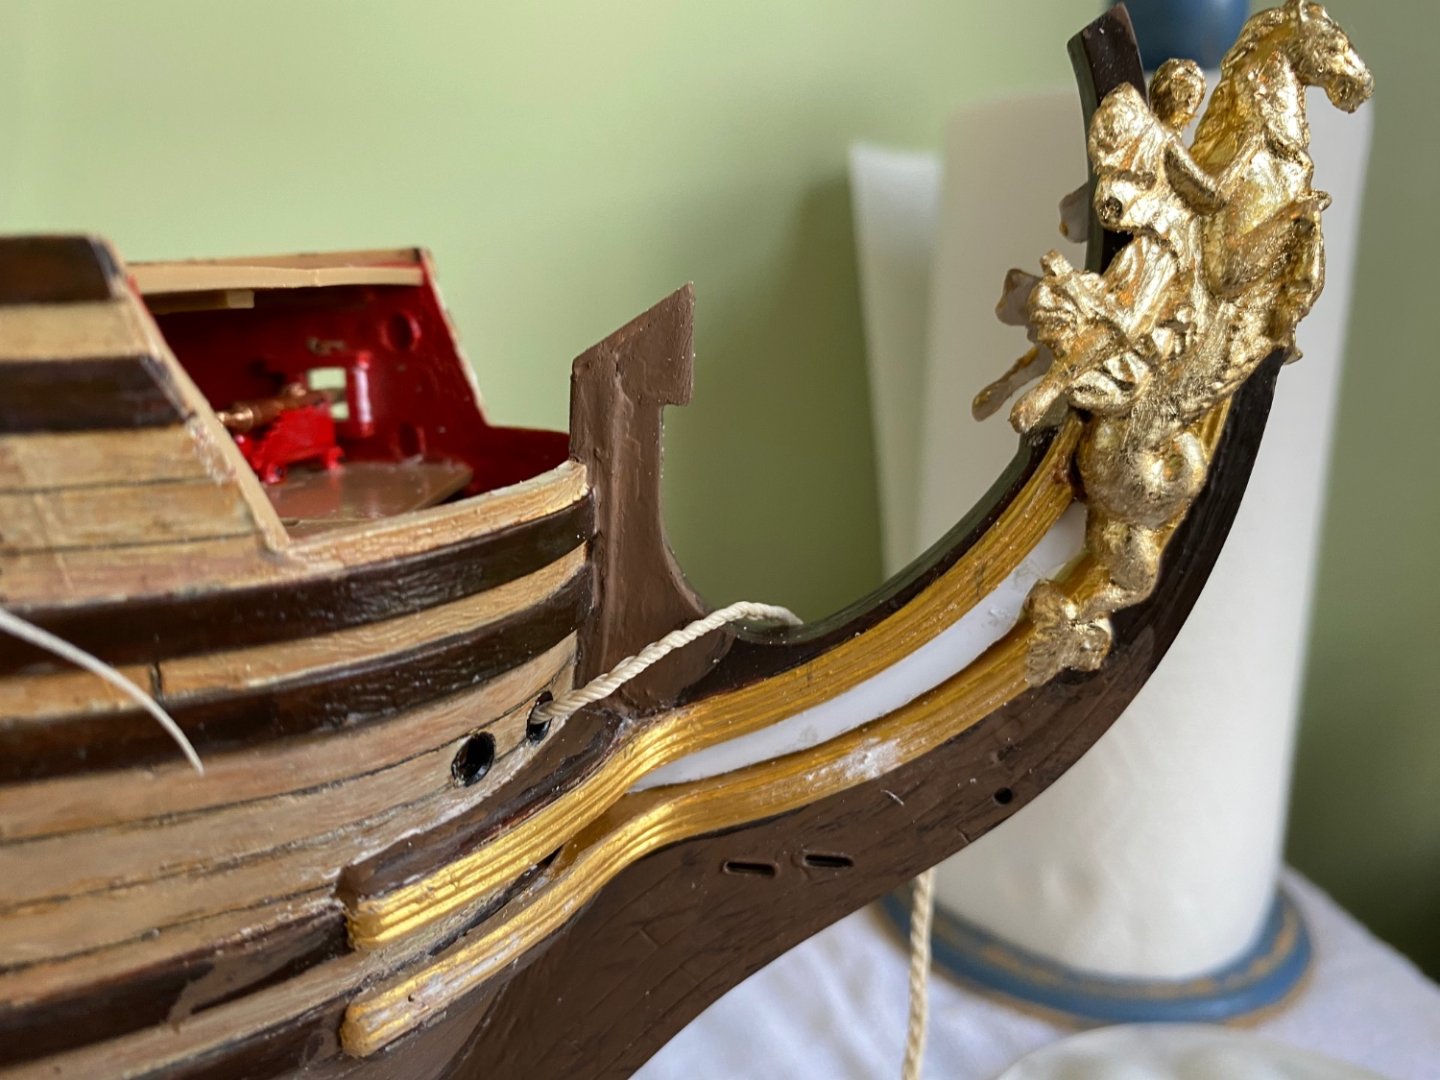
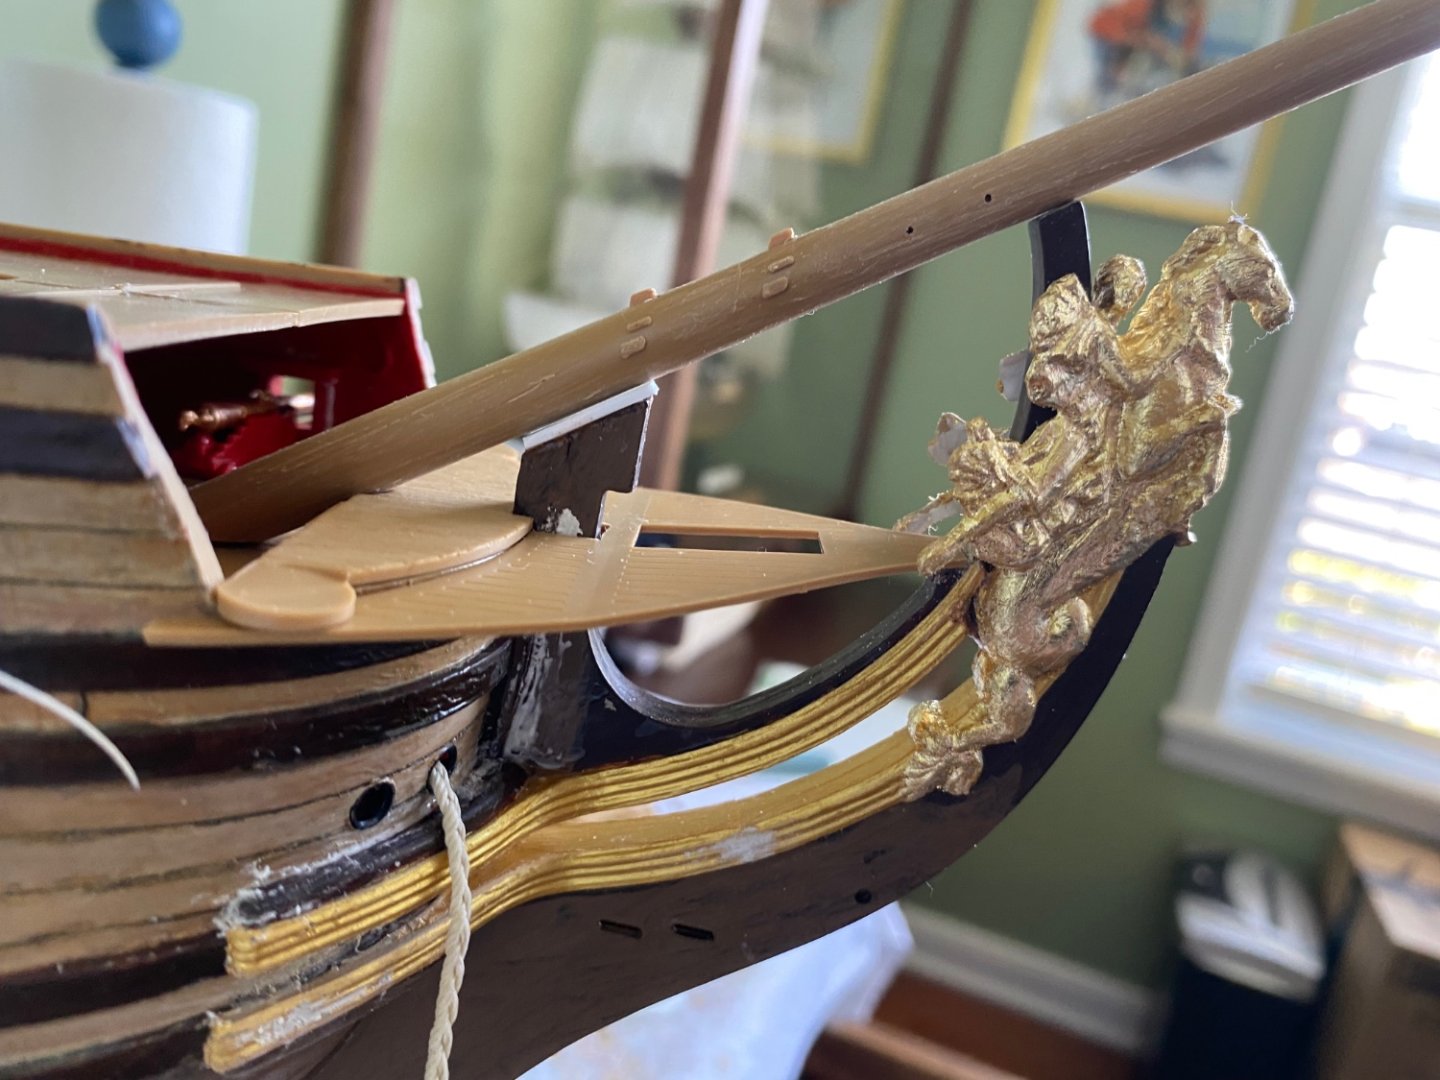
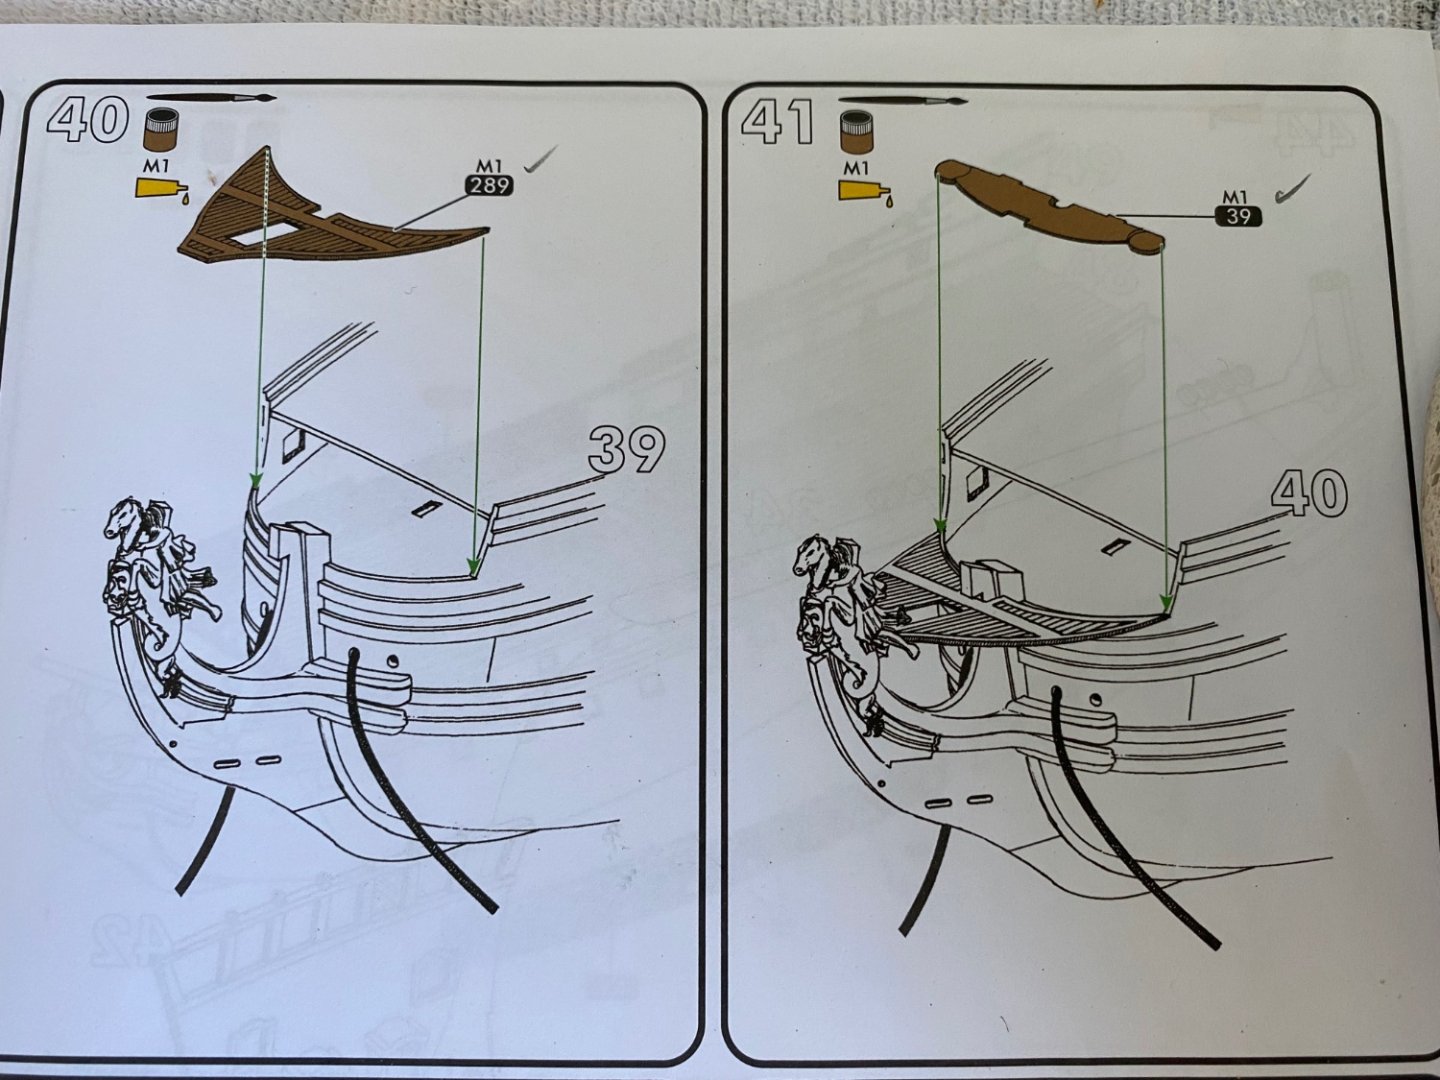
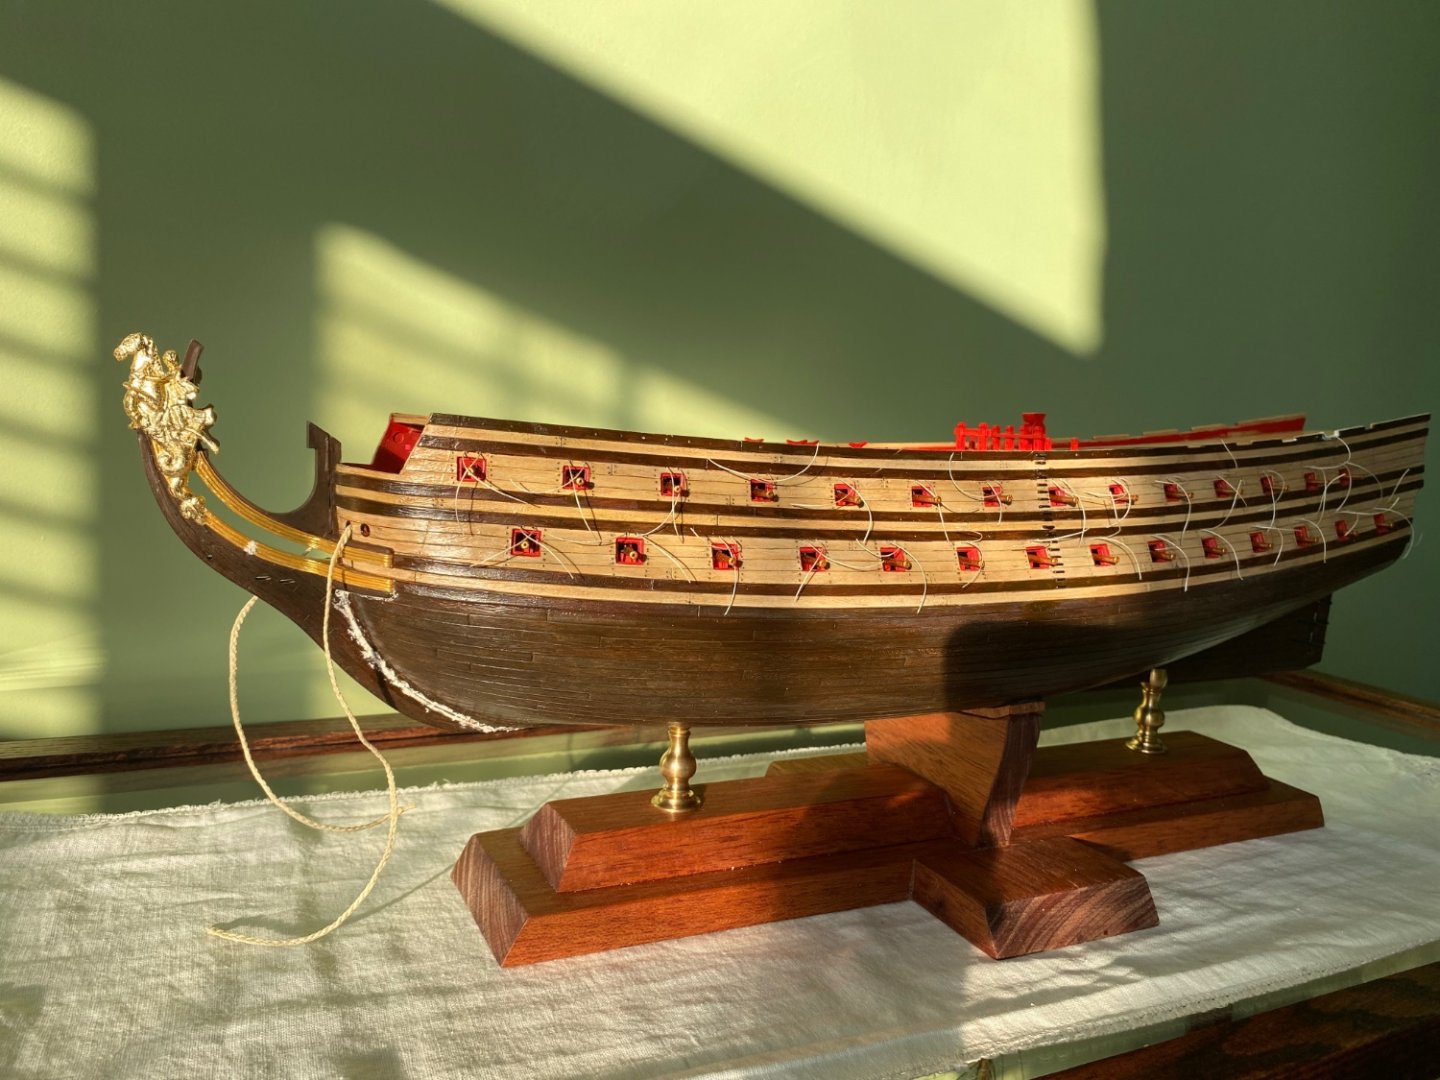
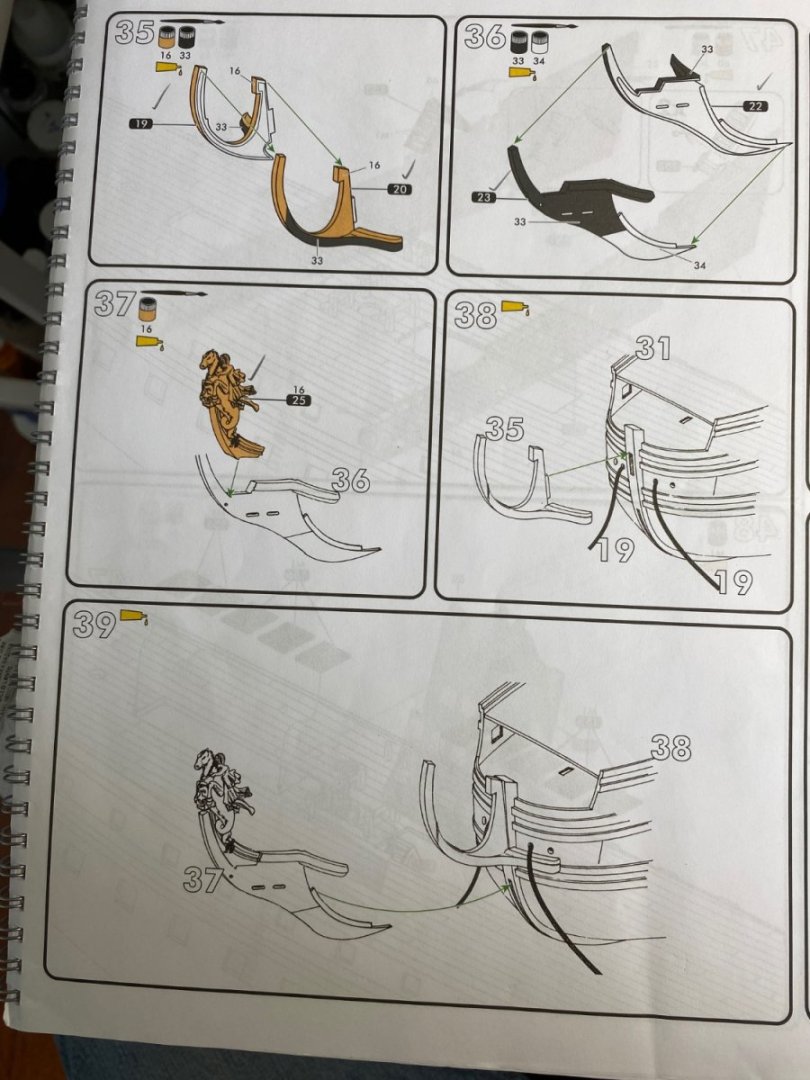
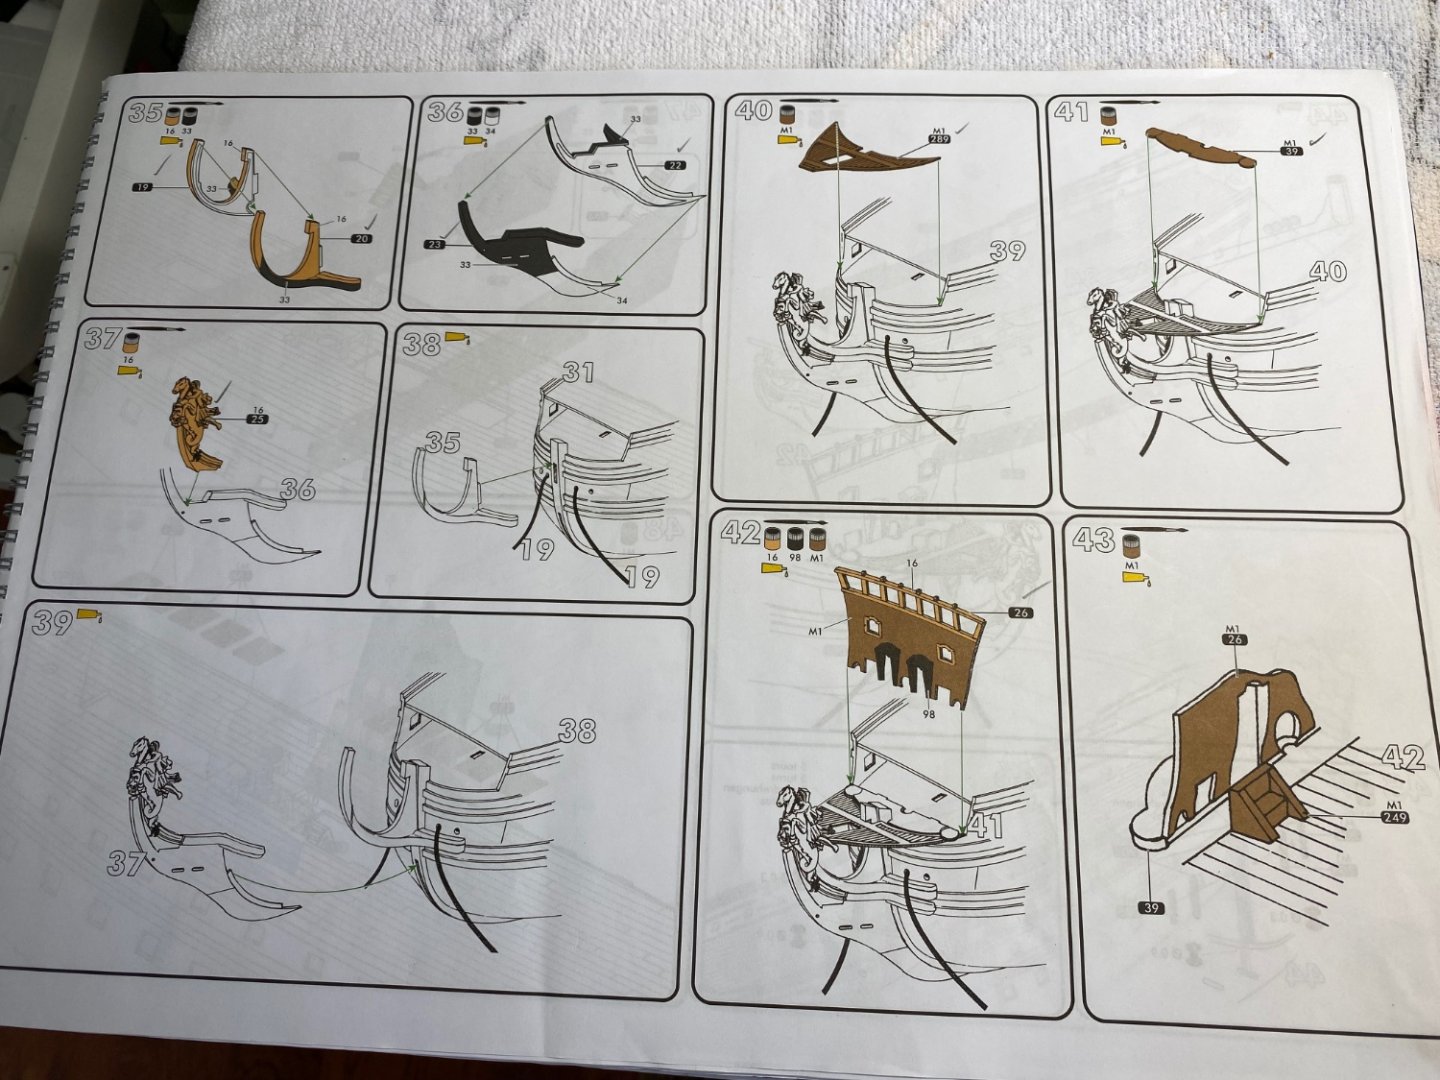
Gentlemen, a question if you don’t mind. As I am working on the bow section of the ship I am dry fitting parts to insure proper fit. One of the things I am getting ready to work on is the head timbers to support the grating (part 289 in step 40, what ever the nautical term) following Henry’s design. I dry fitted the grating in place and noticed it butts up flush with the front of the bow and the two back ends actually pass to the outside of the hull. Then part 39 in step 41 sets on top if it covering the seam. Is this correct? My initial thought looking at step 40 was that part 289 set on top of the bow instead of butting up to the front. Oh, and I added a thin piece of Evergreen to close the gap under the bowsprit.


- 1,508 replies
-
- 1
-
-
- Le Soleil Royal
- Heller
- (and 1 more)
-
Really enjoy reading your posts Kevin. I don’t know if you were ever told this in school but your writing style is smooth and relaxing while being very informative. It is much like I expect it would be if we were hanging out watching a soccer game. Speaking of that hasn’t this World Cup been full of surprises? That is a good amount in your scrap bin. What is fun is I recognize the CS part you were attempting in almost every scrap piece.
-
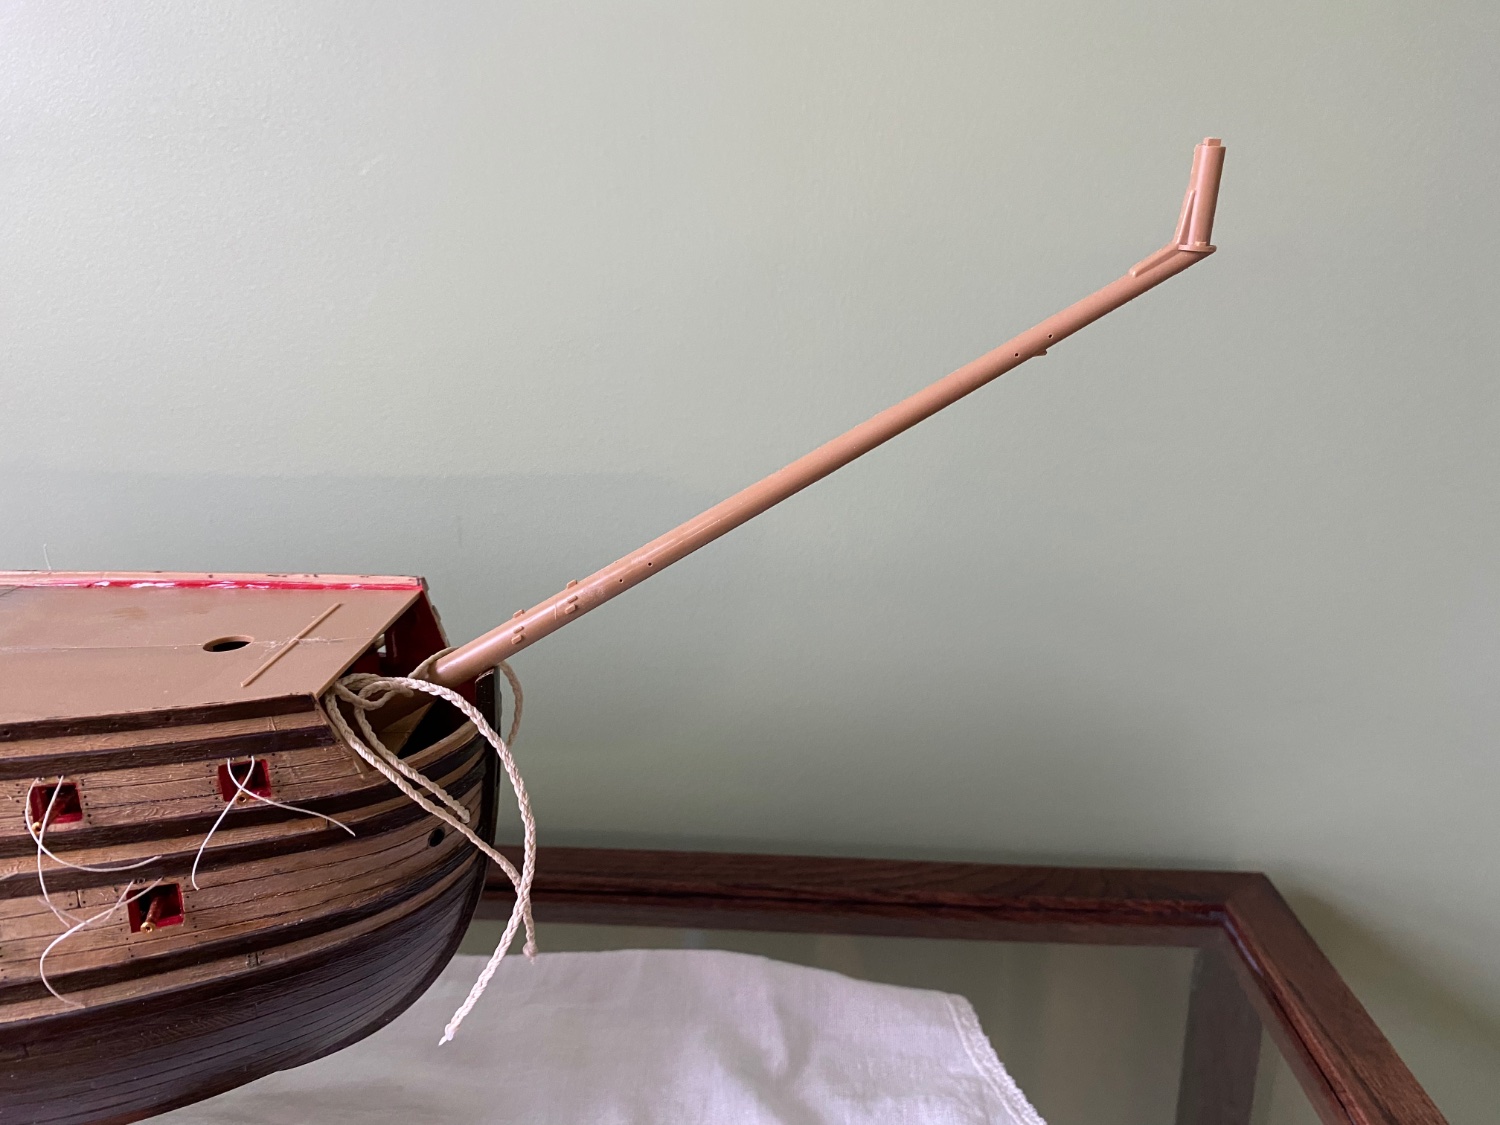
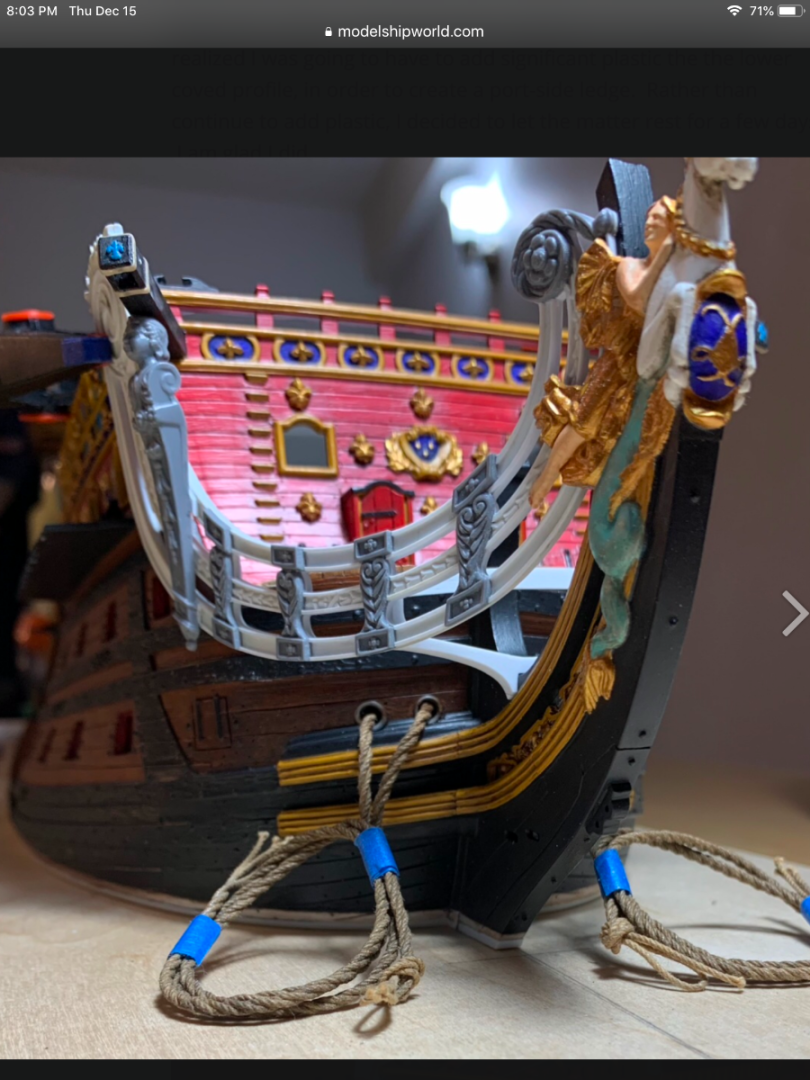
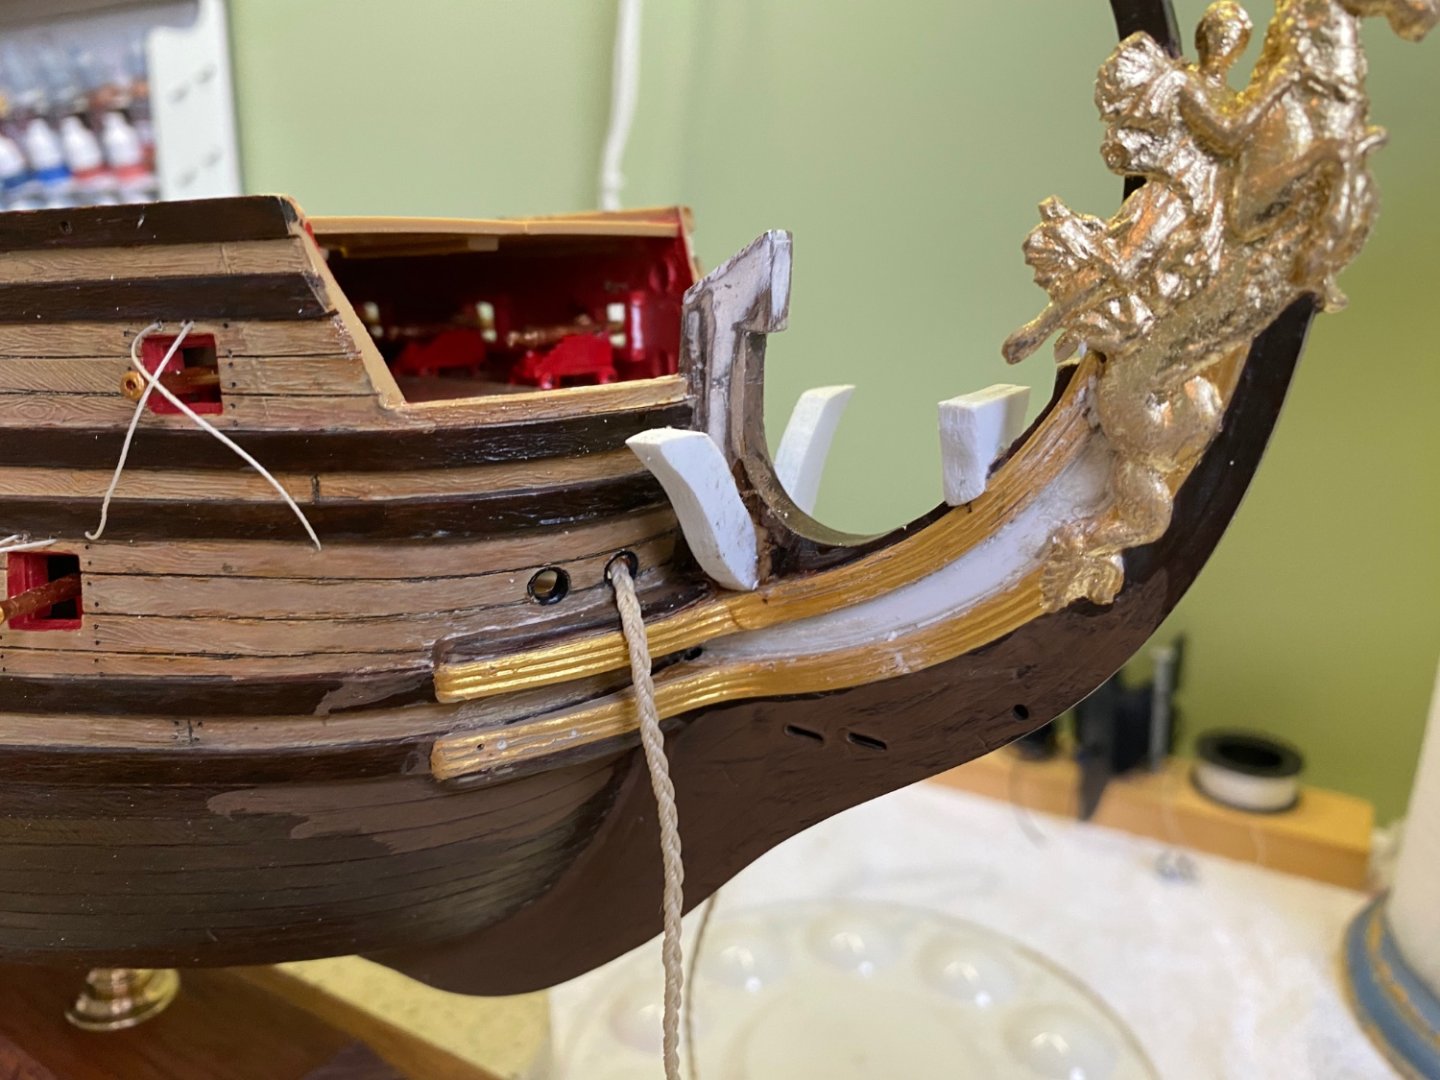
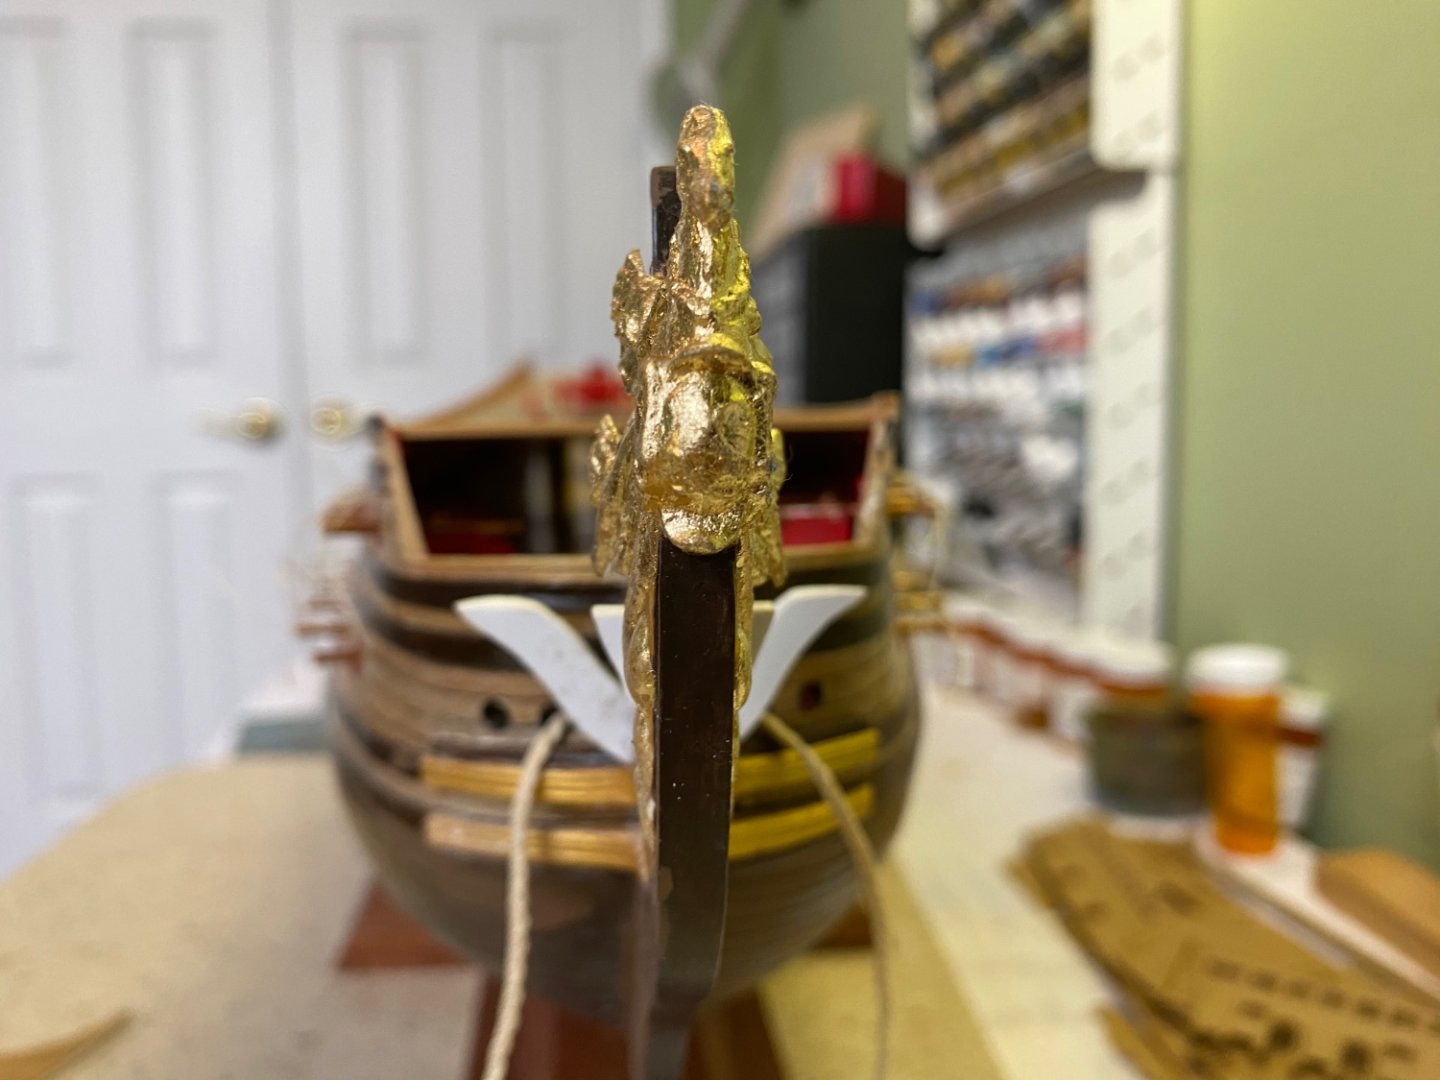
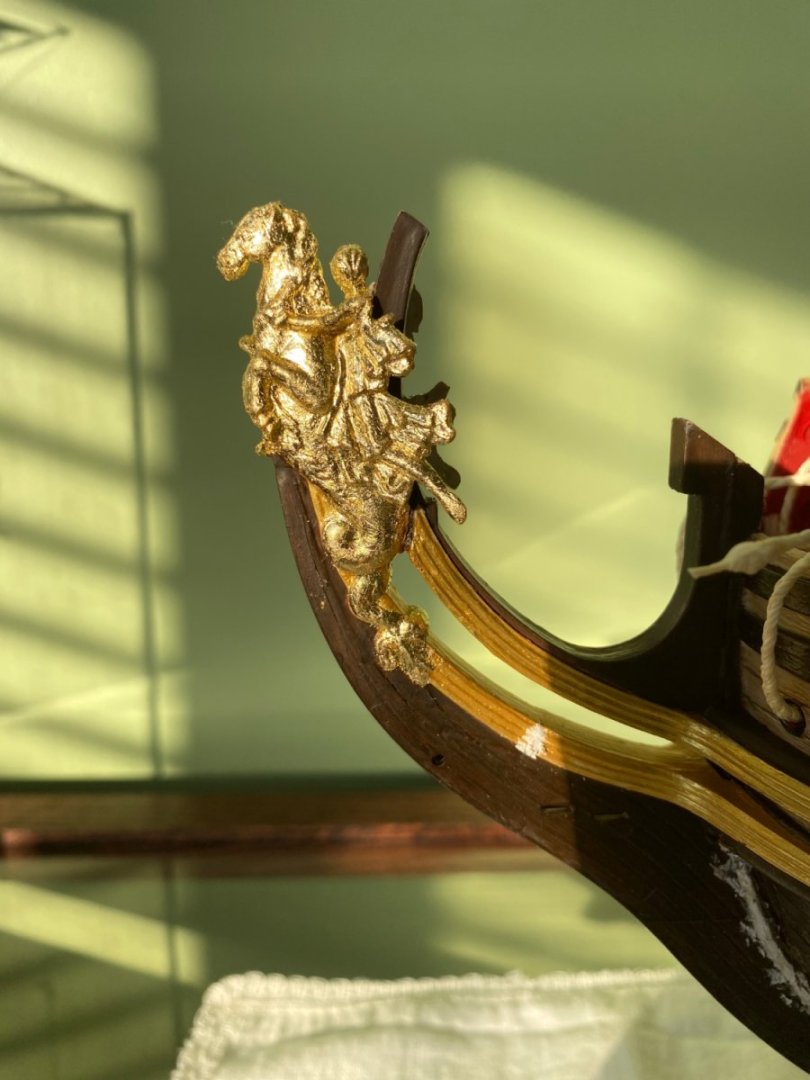
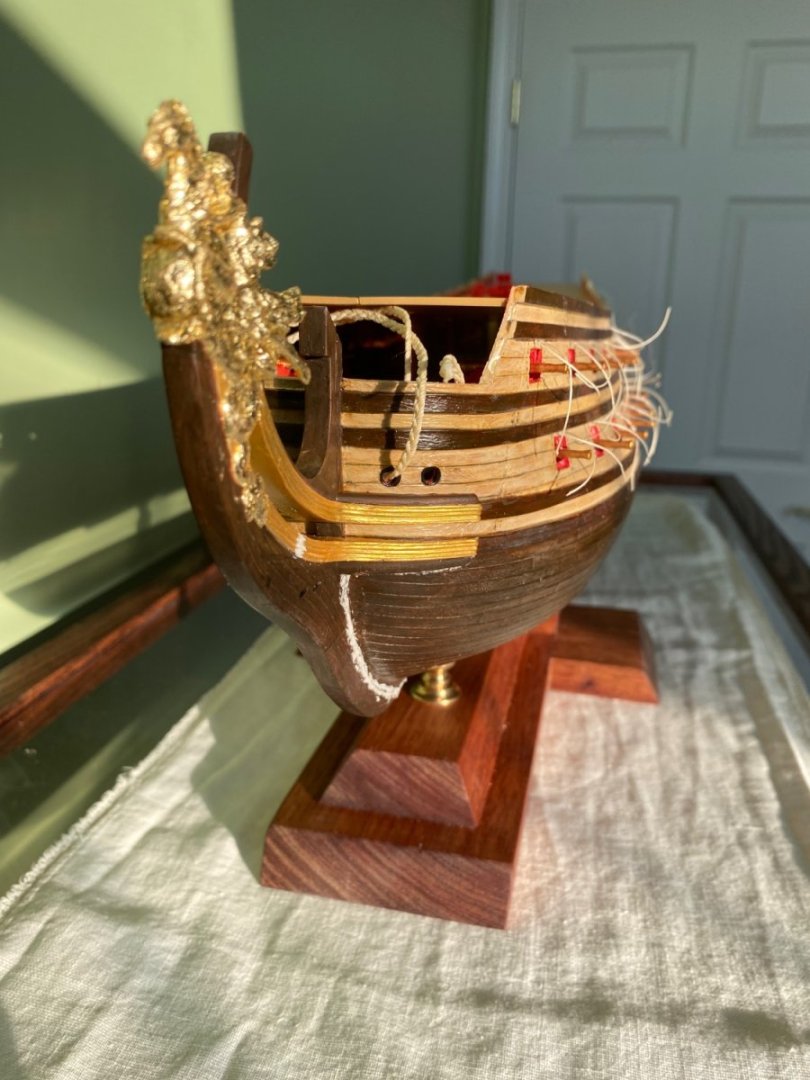
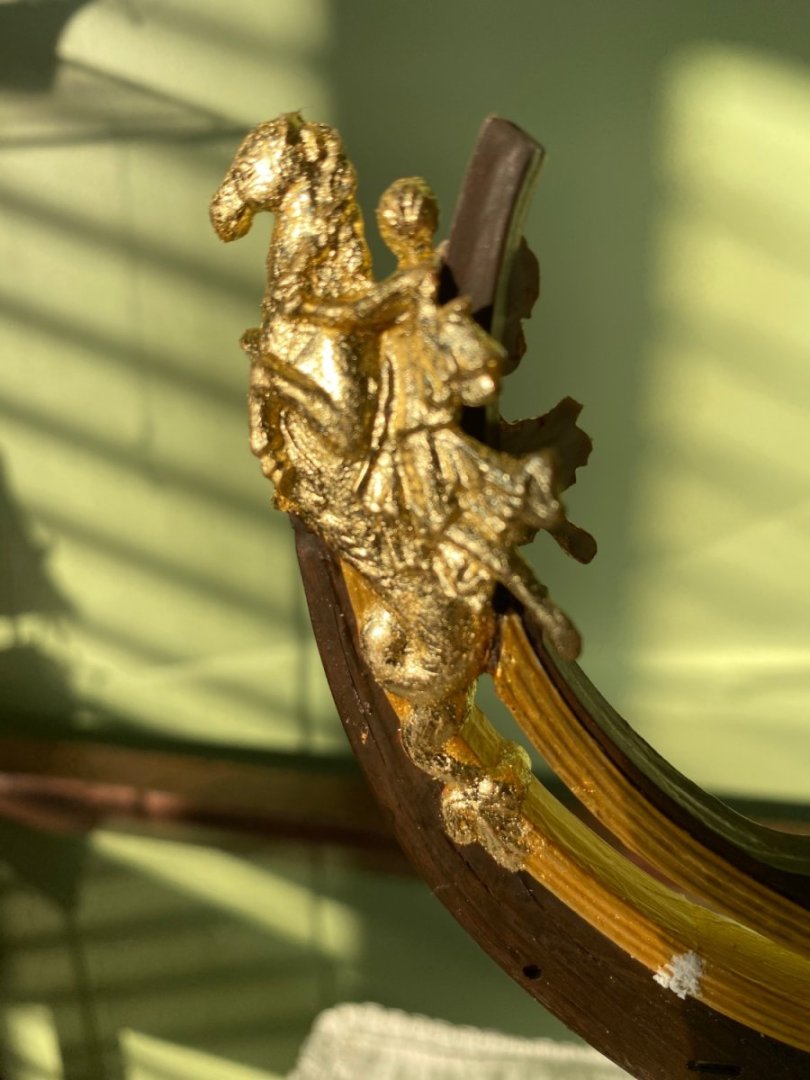
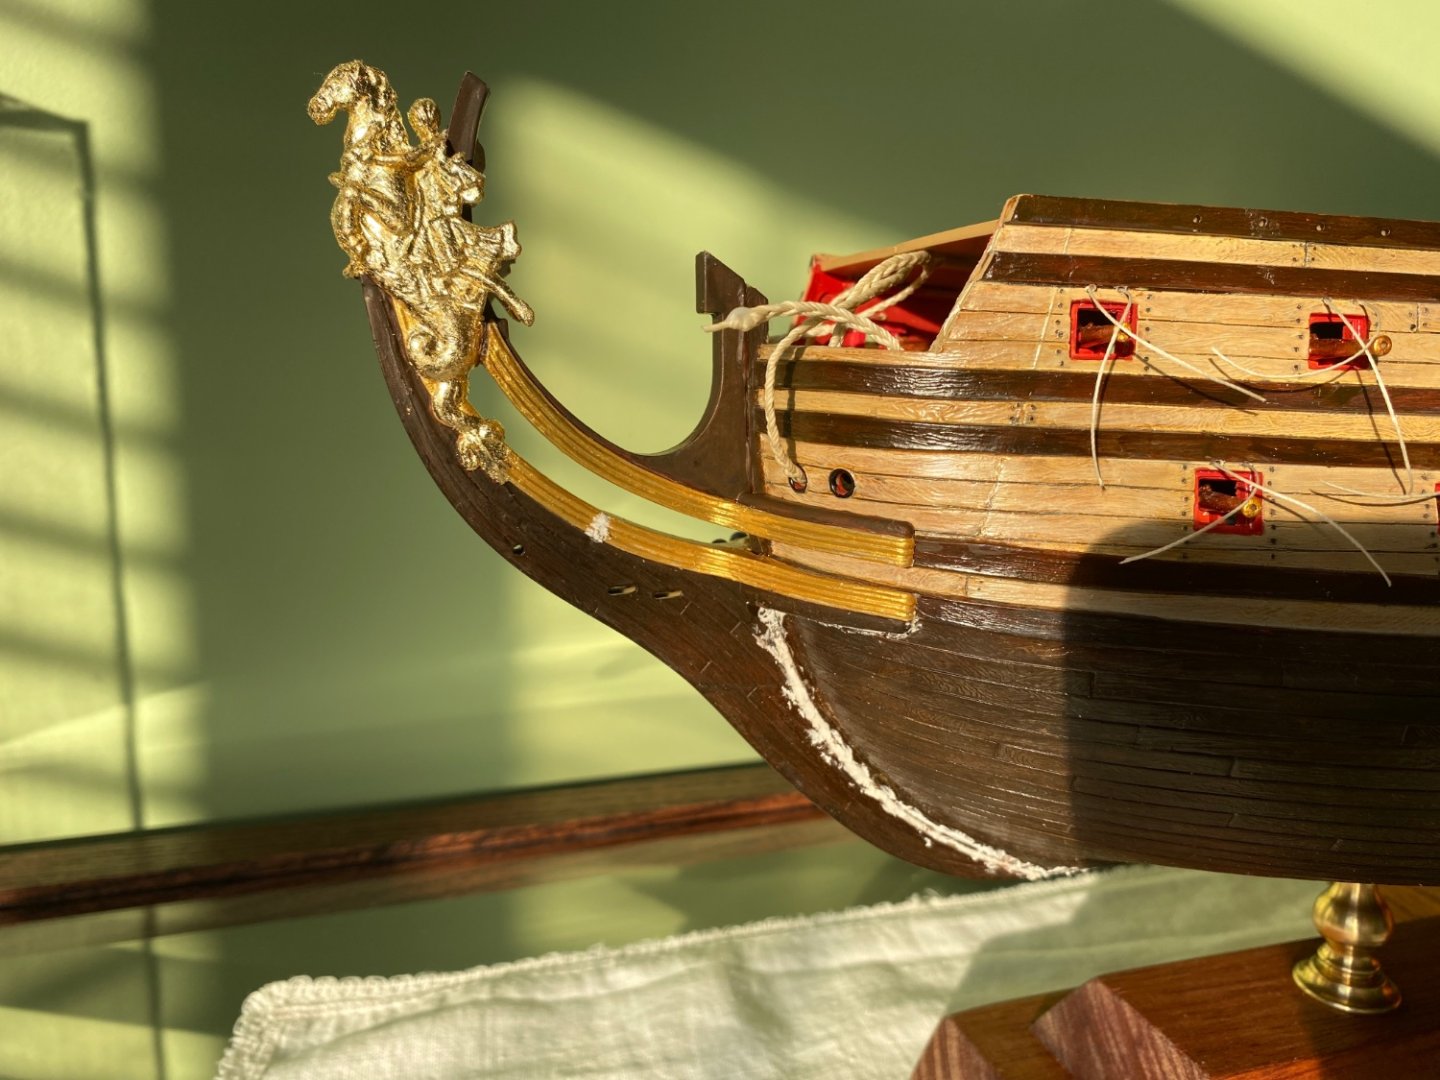
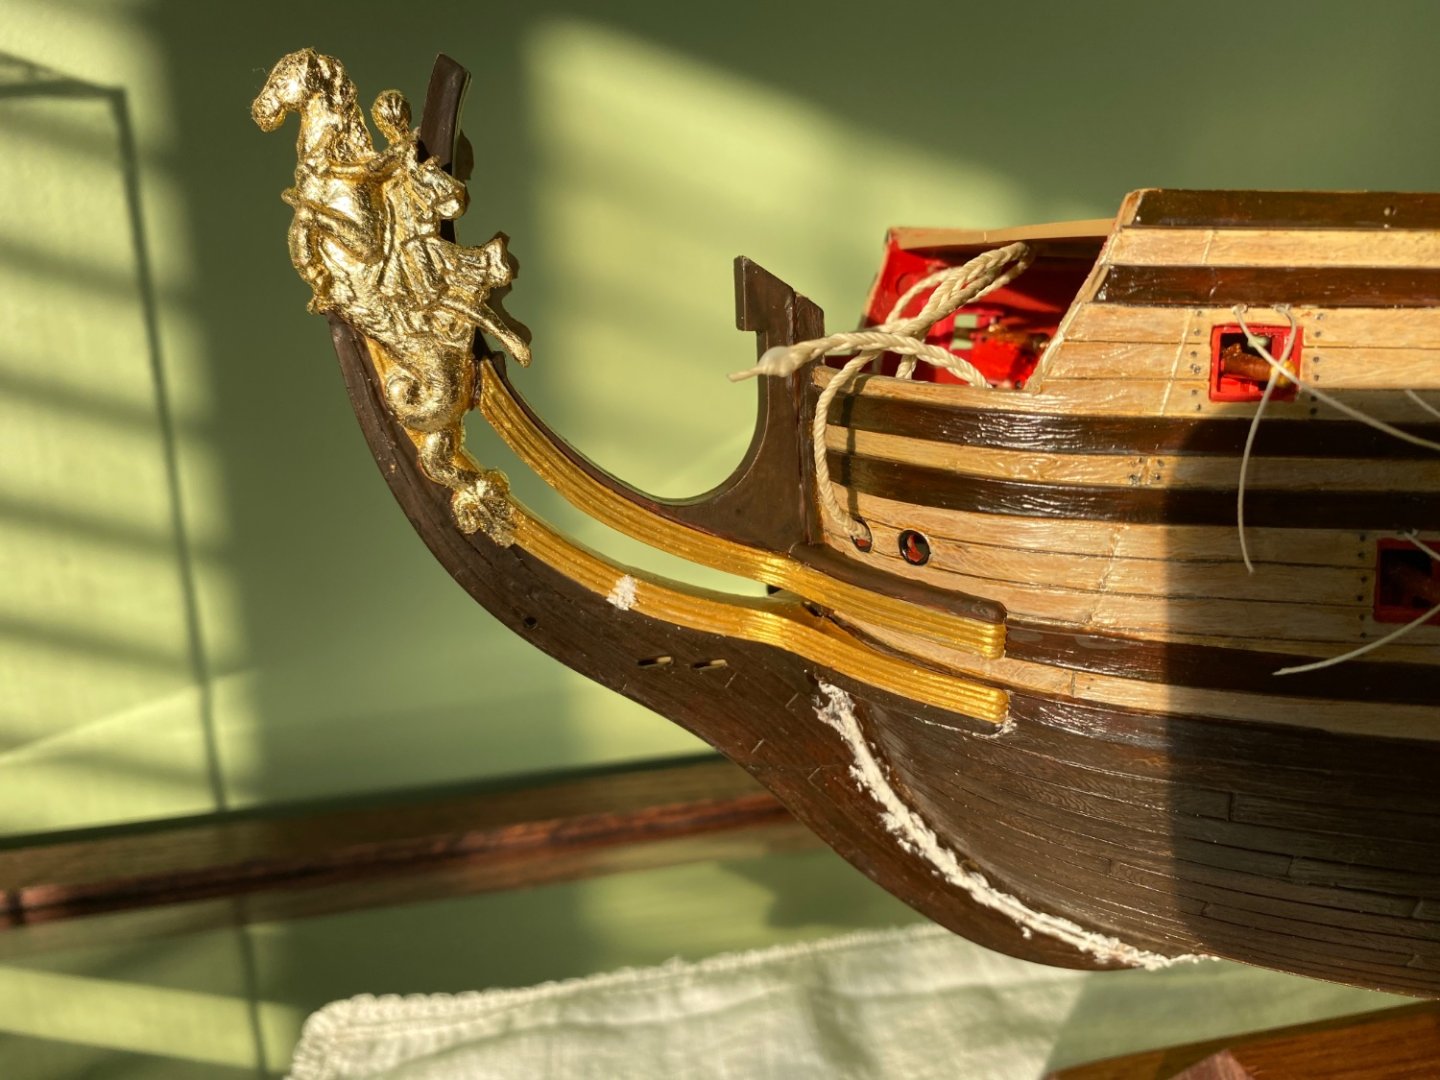
Worked on the head of the ship since my last post. I decided to gold leaf the figure head and paint Vellajo polished gold on the molding that follows the edges of the knees. I really like the gold leaf and will be anxious to do all the ornamentation on the UB’s, quarter galleries, and stern. I puttied the seam where the pieces attach to the hull and keel. Later I will sand, undercoat, and touch up the paint around the entire installation. Once dried and safe to handle I will attempt to carve the filler piece between the knees and the support timbers. I test fitted my bowsprit and notice I have a bit of space where it does not touch as it should. Will have to use a little tension and the gammoning to pull it down snug.
- 1,508 replies
-
- 7
-
-

-
- Le Soleil Royal
- Heller
- (and 1 more)
-
Kevin those are great photos you have now for reference as you continue your CS build. What an incredible luxury that is to have the actual ship available to you. Every time I read your blog to see updates I look at my Revell CS with disappointment. Of course at the time I built mine I was very ignorant of quality model ship building and bashing. I just did it almost 100% OOB. In retrospect seeing what could have been accomplished tempts me to consider building it again. Beautiful job my friend.
-
Thanks Henry. I ordered that as well as the Easy Mold. I also ordered ca spray can of cast releaser just in case I need it. Did you have any problems with getting the casts to release from the mold? Speaking of casts, I have read through your build here over and over again. Today I noticed, I guess for the first time, that way back in the early pictures you showed the gammoning done on the bowsprit. At that time there does not appear to inclusion of the carved piece between the knees nor your added ornaments. Did you have to go back and remove the already completed gammoning in order to add the pieces you made?
-
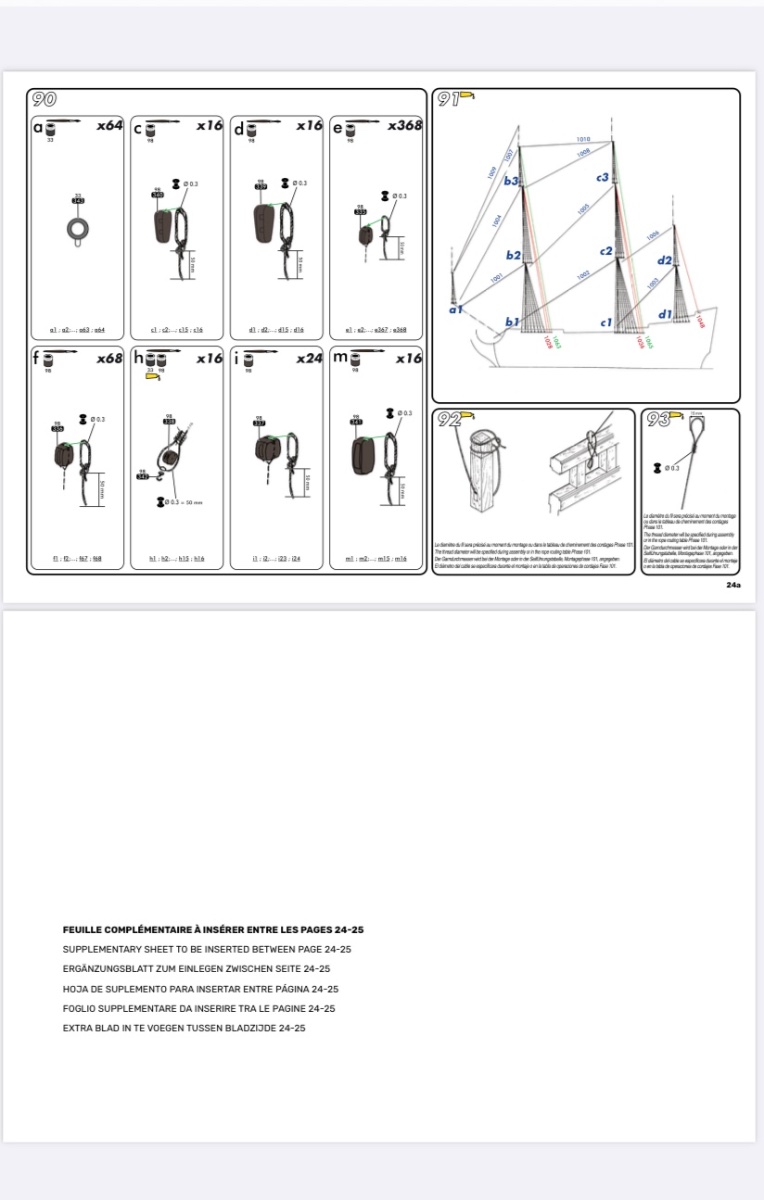
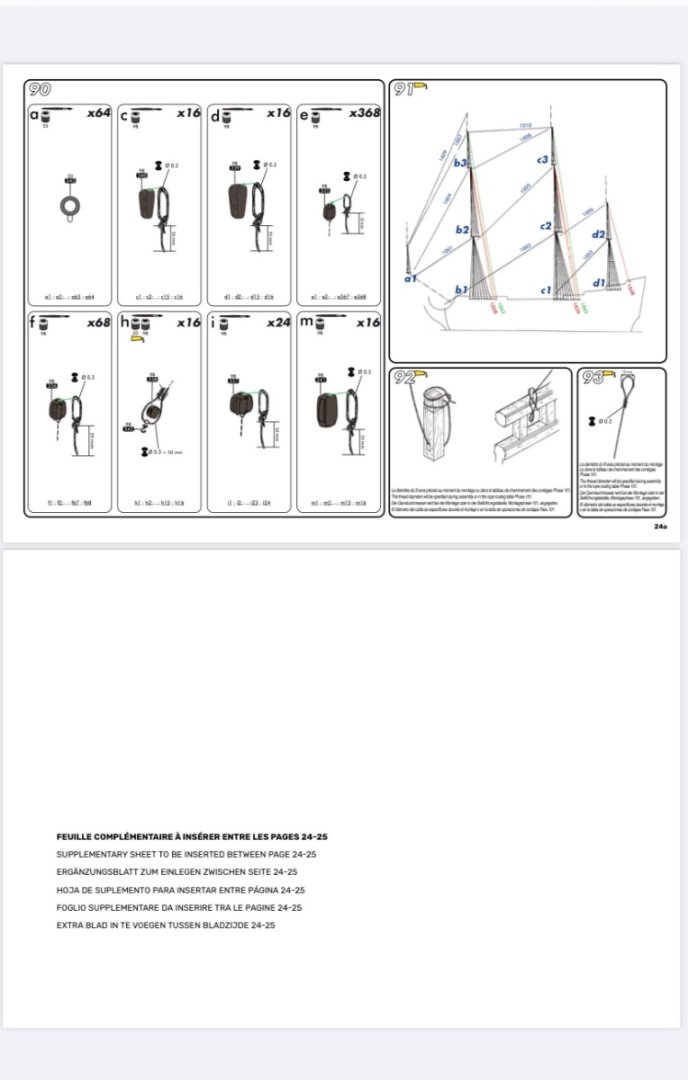
Well how cool is this? I was online looking for the missing steps in my instructions. Apparently Heller was made aware of this in the new instruction book. They published a supplementary sheet to be added. I guess they really have no way of knowing who has purchased the kit so as to inform them of the availability of the supplement. Will have to figure out exactly what Heller is explaining in step 90. I am guessing they are just saying how many of those different blocks I will rig along the way.
- 1,508 replies
-
- 1
-
-
- Le Soleil Royal
- Heller
- (and 1 more)
-
Thanks Marc. I actually have been doing that. I think your upper bulwarks are a piece of art. I study your’s constantly when I am working to see ways I can ant to do mine. I really want to gold leaf all the ornamentation. That is most likely not at all authentic but something I want to do for artistic display. I am tinkering with just doing all of he ornaments and hand paint gold hatch openings, railings, etc. Or gold leaf everything that is gold. My gold paint is noticeably different and of course the smoothness of the painted areas would look different from the gold leaf area. I can really appreciate the detail of the black rail. Just adding that to your’s really enhanced the visual interest.
- 1,508 replies
-
- 3
-
-
-
- Le Soleil Royal
- Heller
- (and 1 more)
-
Thanks Ian. It appears that Marc decided to install the kevels prior to mounting the upper bulwarks on the ship. Probably a great idea along with the eyebolts. I expect most everyone has the old instruction sheets. Wonder what is in the missing steps ? 🤔
- 1,508 replies
-
- 1
-
-
- Le Soleil Royal
- Heller
- (and 1 more)
-
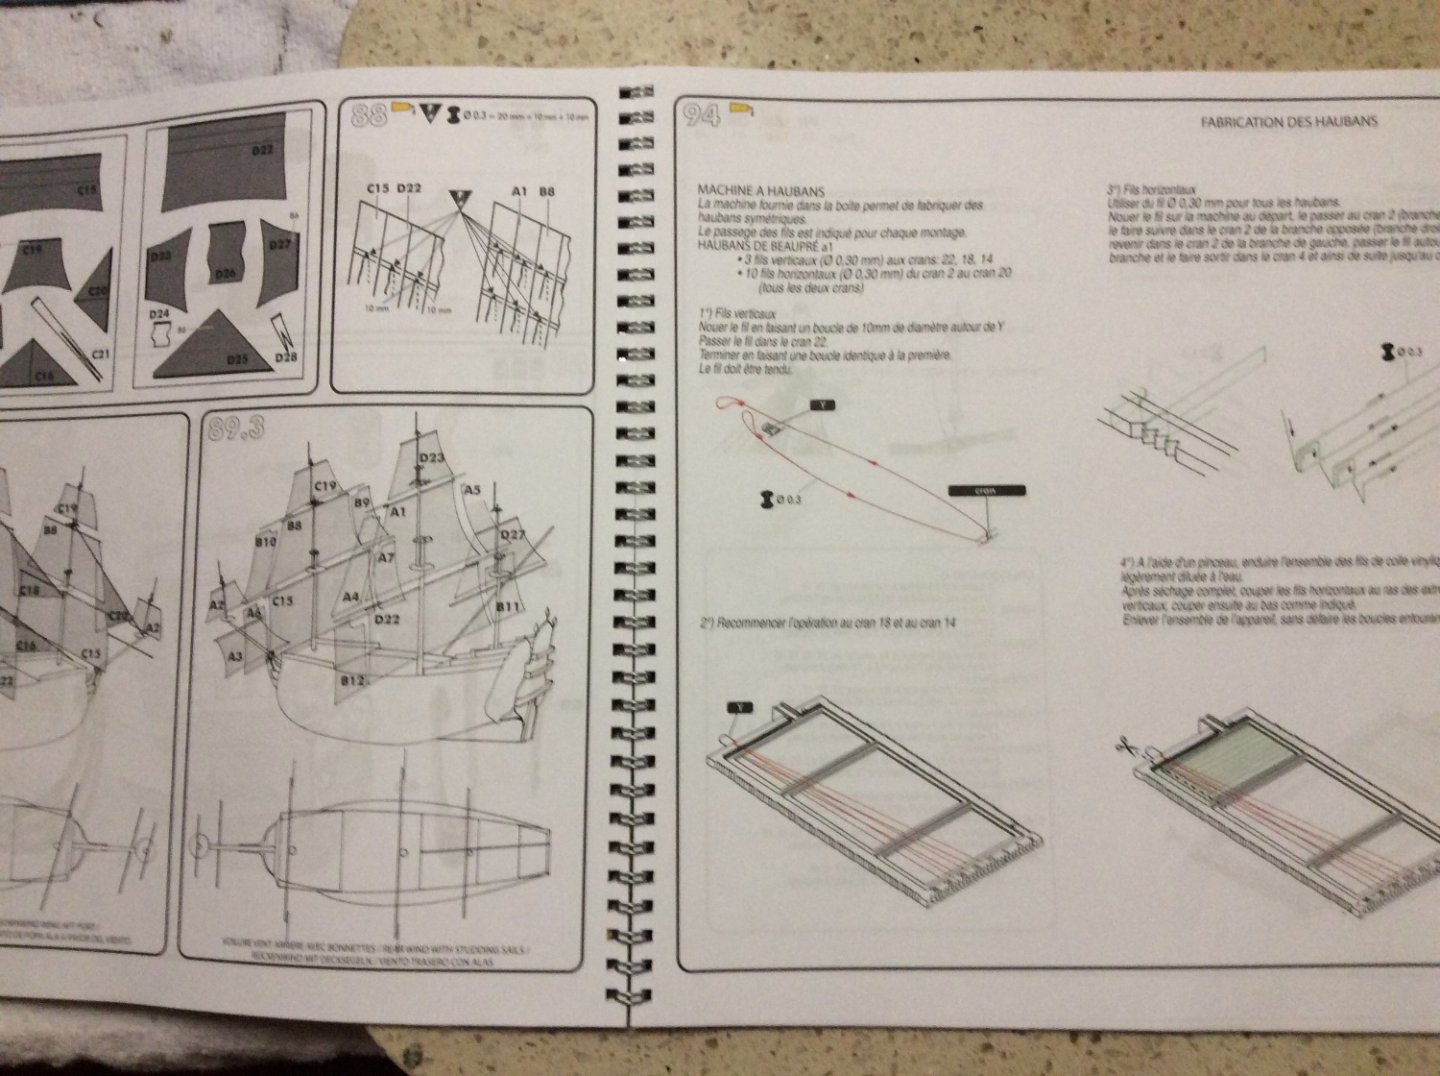
Henry, Marc, or Ian. I was just thumbing through my instructions and noticed I don’t have steps #90-93! Do any of you? It may just be a section on using the shroud/ratline jig. I don’t know.
-
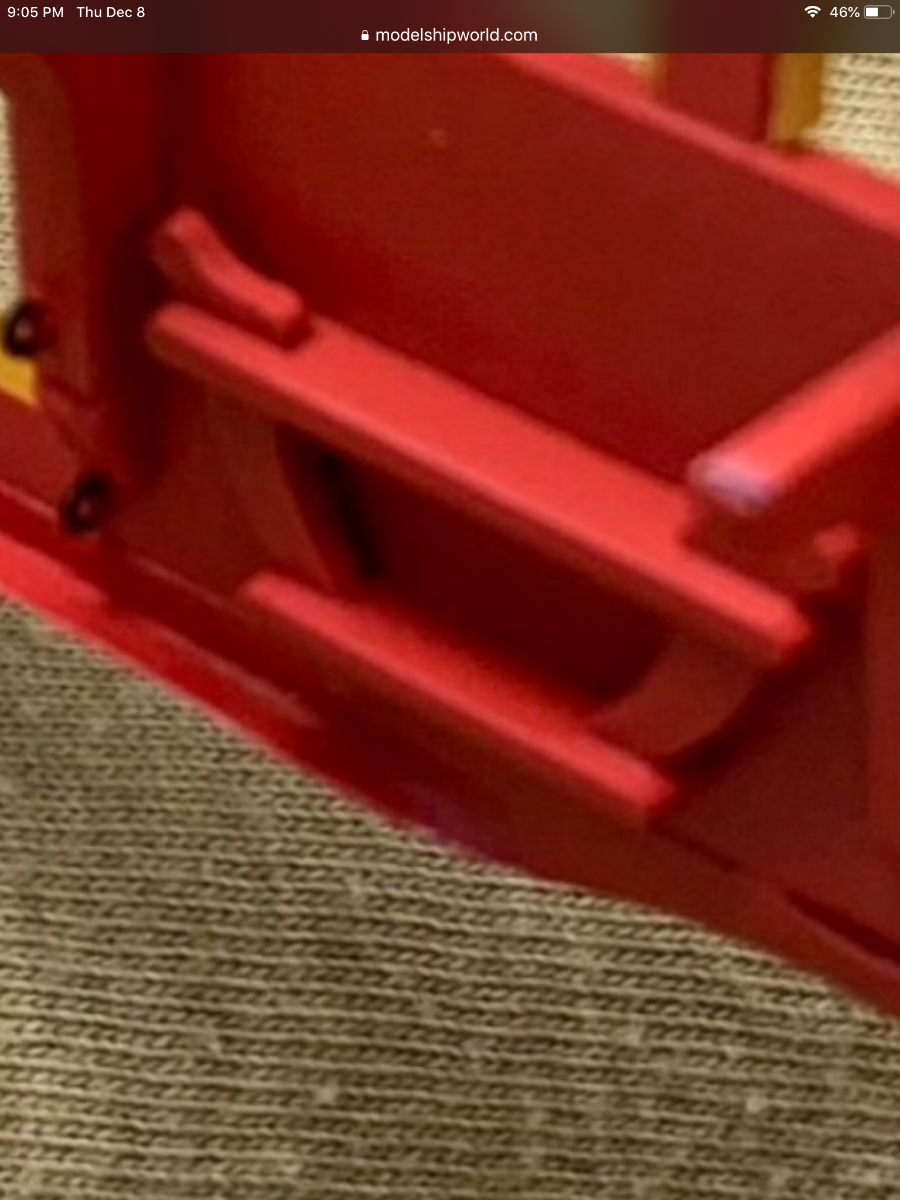
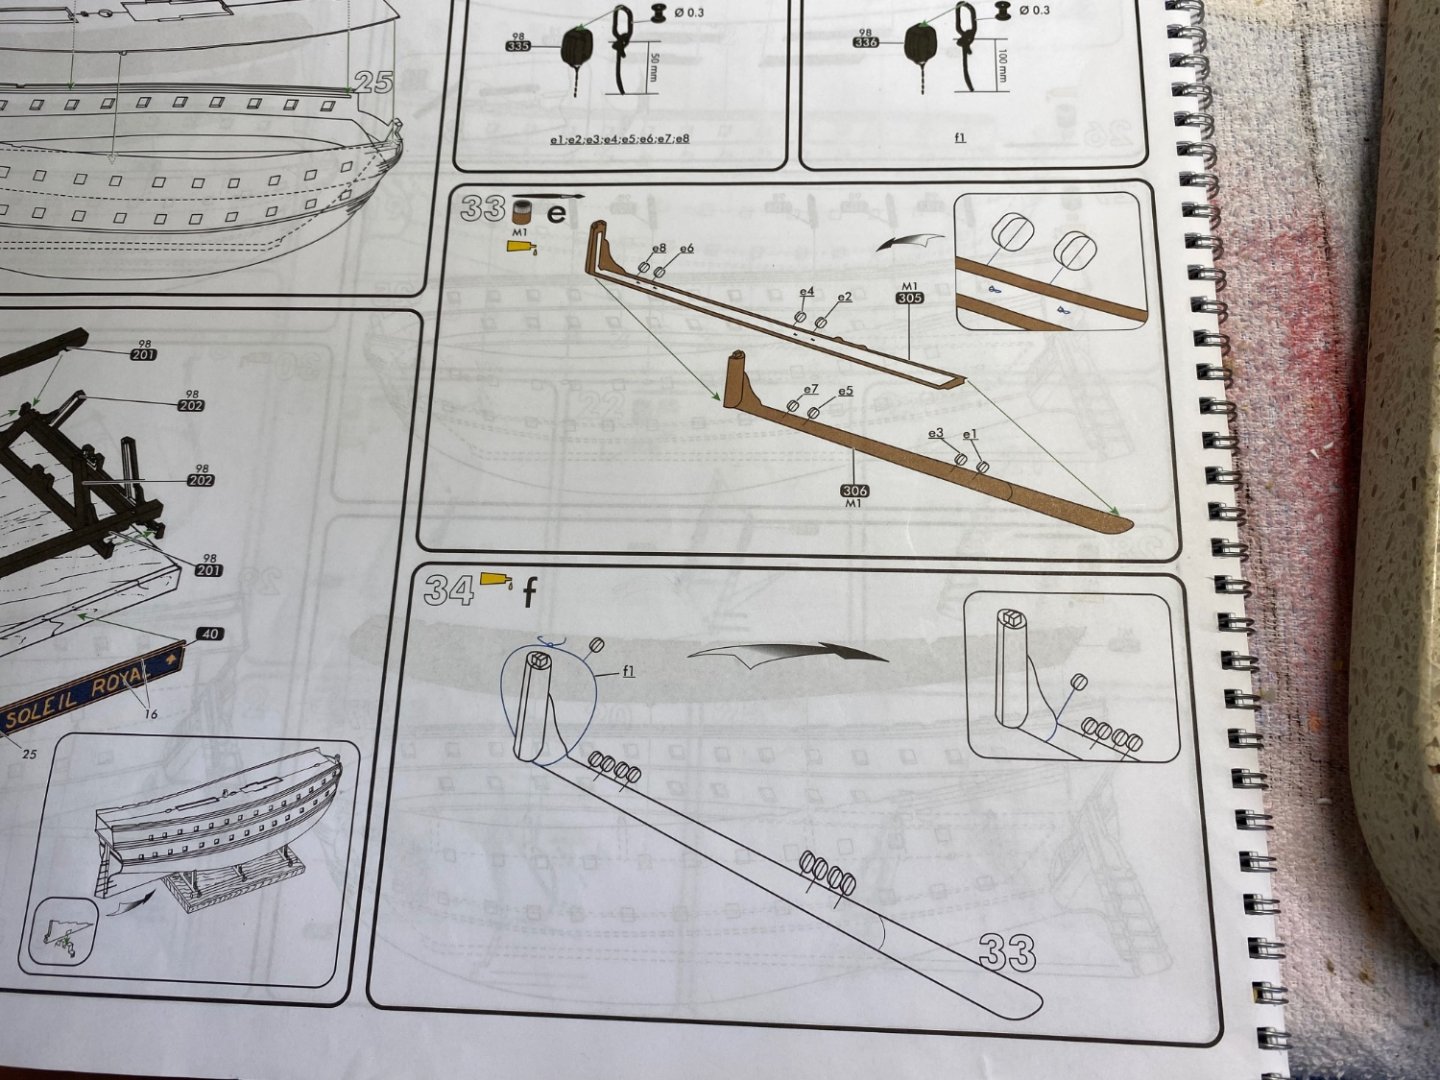
Marc I was referencing these guys. Not sure what they are called.

-
Marc I am up to page 55 reading through your blog. I see in the photo that you went ahead and attached the pieces shown in the photo to the inside of the upper bulwark. Was that simply for convenience? I also see you added the eyebolts to later rig he cannons. Brilliant!
-
Thanks Henry I will look on line for the larger styrene.
-
Just noticed I am at page 11 already and I am just into the hull and decks! 😳 I must be asking way to many questions and asking for too much help, or otherwise I am just posting to much.
-
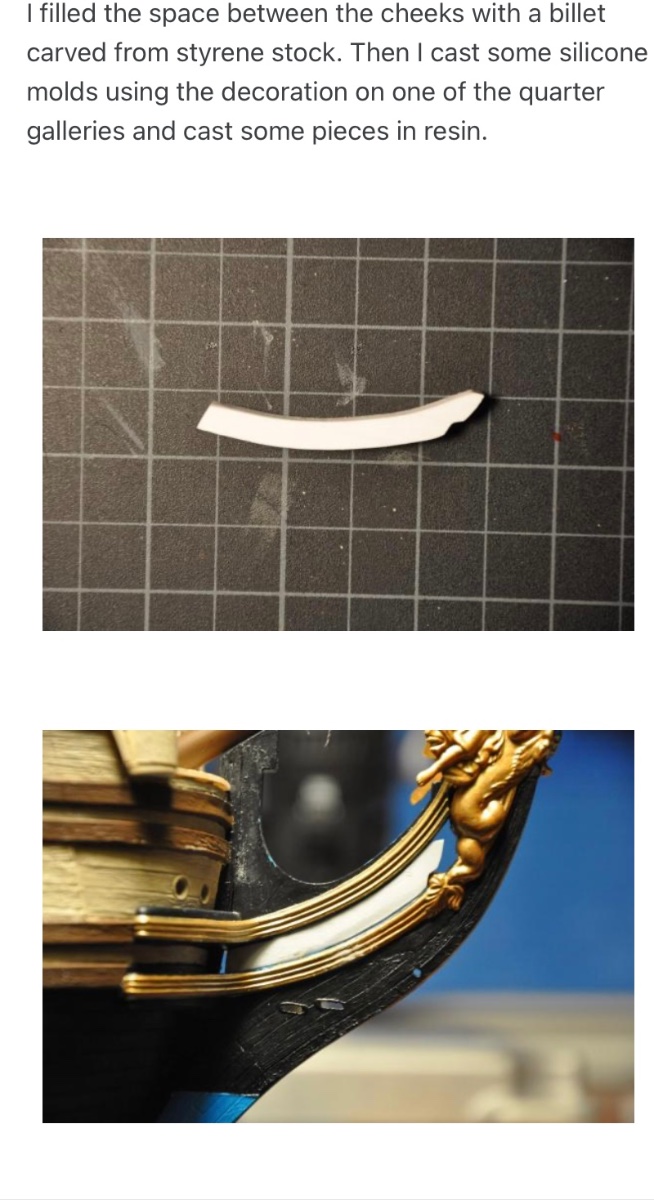
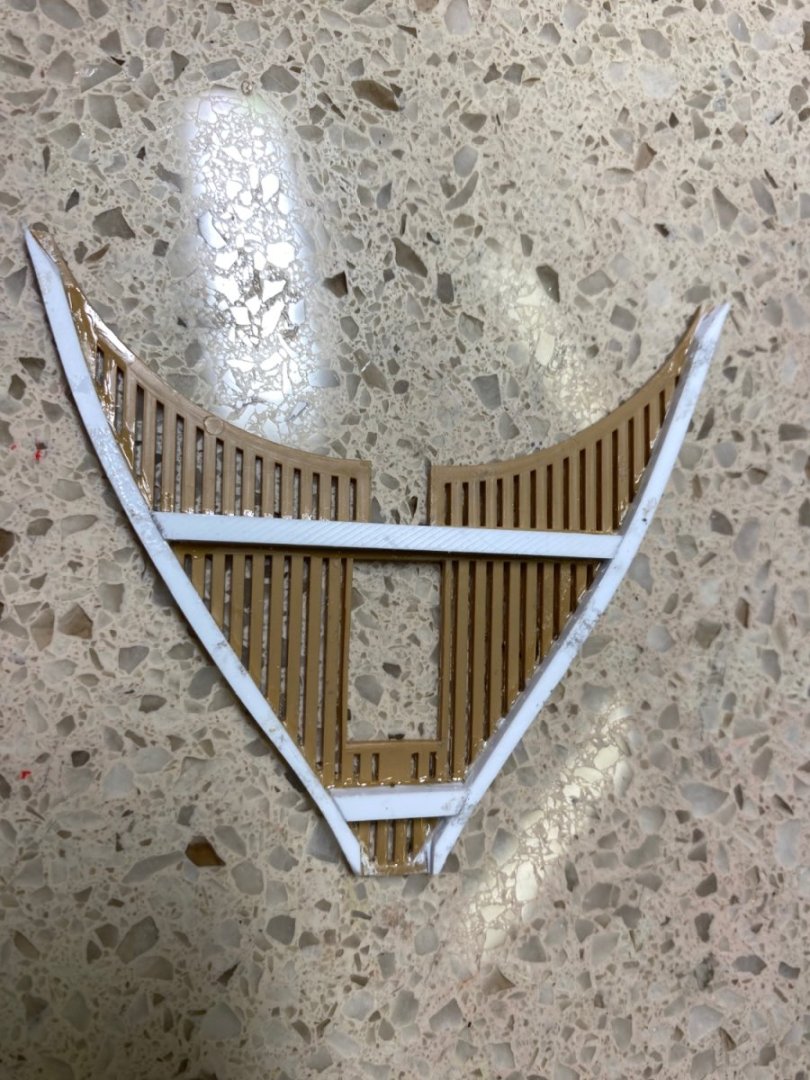
Henry I looked back at your build for reference again. In post #45 way back in 2013 you show making your filler for that open space and the head timbers. I added a couple of your photos but not all the ones in that post. Hope you consider it a compliment that I want to copy what you did! Would you care to tell me your process to make these parts? As you said above I will need to mount the two parts before I make the insert, so I can understand how I will need to trace the shape I guess. No idea, and impressed, with how you finalized the head temper shape. How thick is the sheet styrene? Not seen it that thick at my craft store. I ordered the product shown in your picture to make the ornamentation once I get the parts made. Thanks Again Henry Hope you don’t mind my asking your advice. Bill


- 1,508 replies
-
- 5
-
-
- Le Soleil Royal
- Heller
- (and 1 more)
-
Ian and Henry you both raise the same issue which makes since. I plan to try to do exactly what you did Henry. Hope I can come close. Thanks. Bill
-
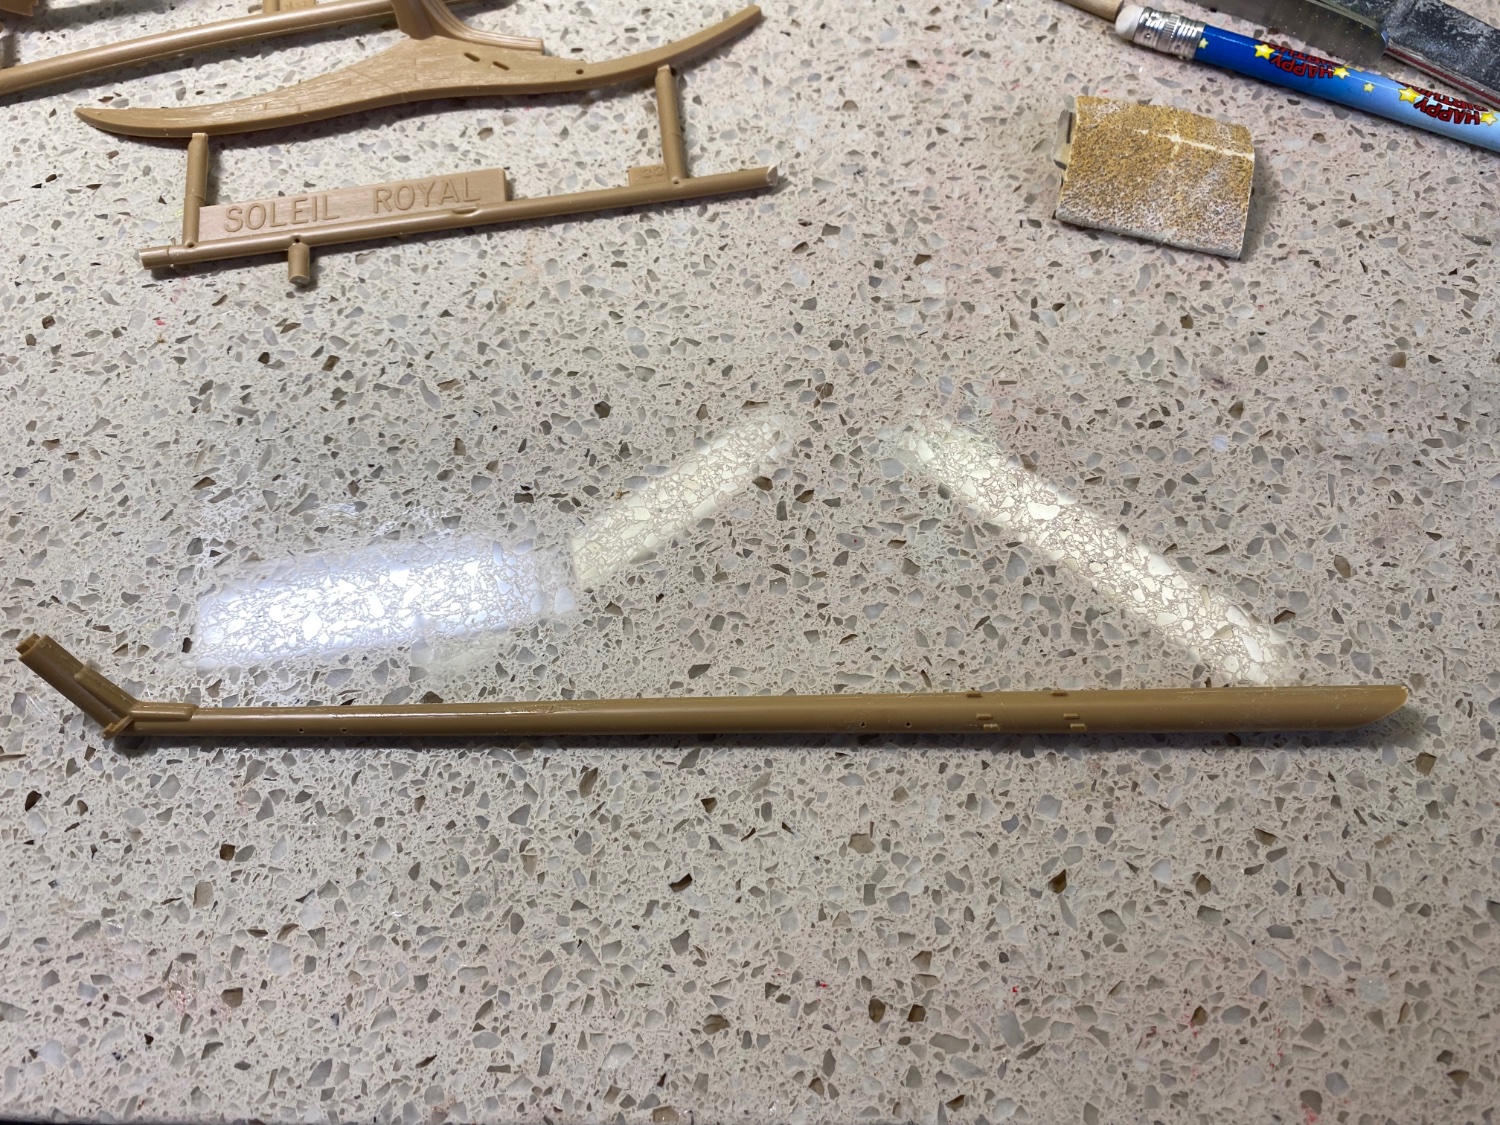
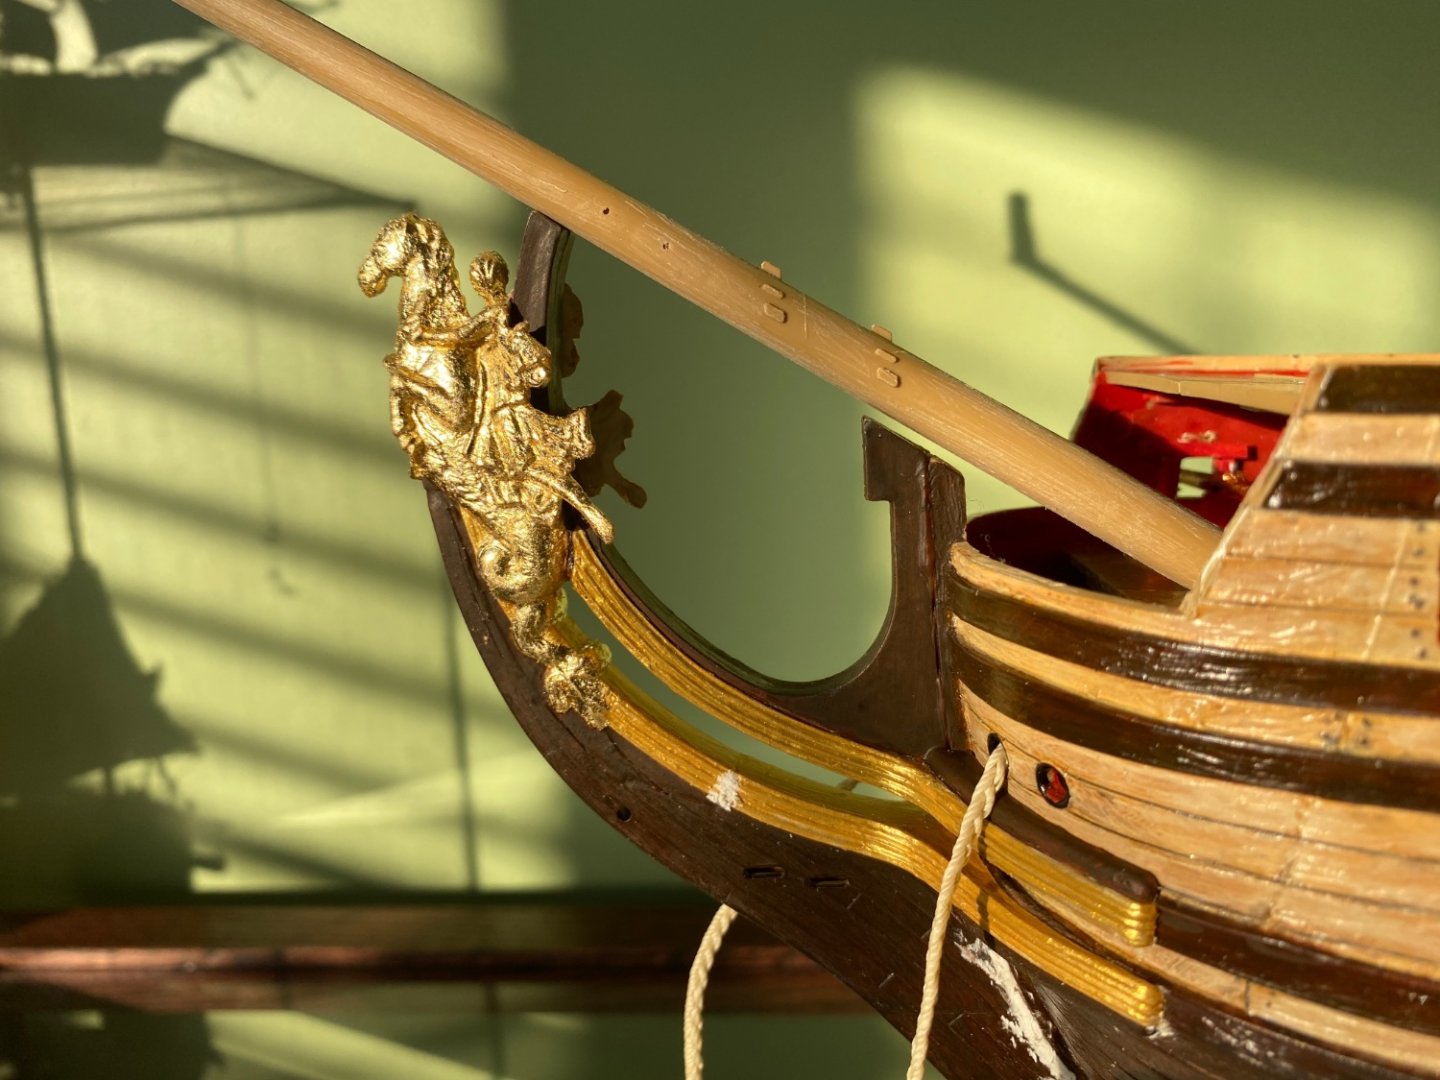
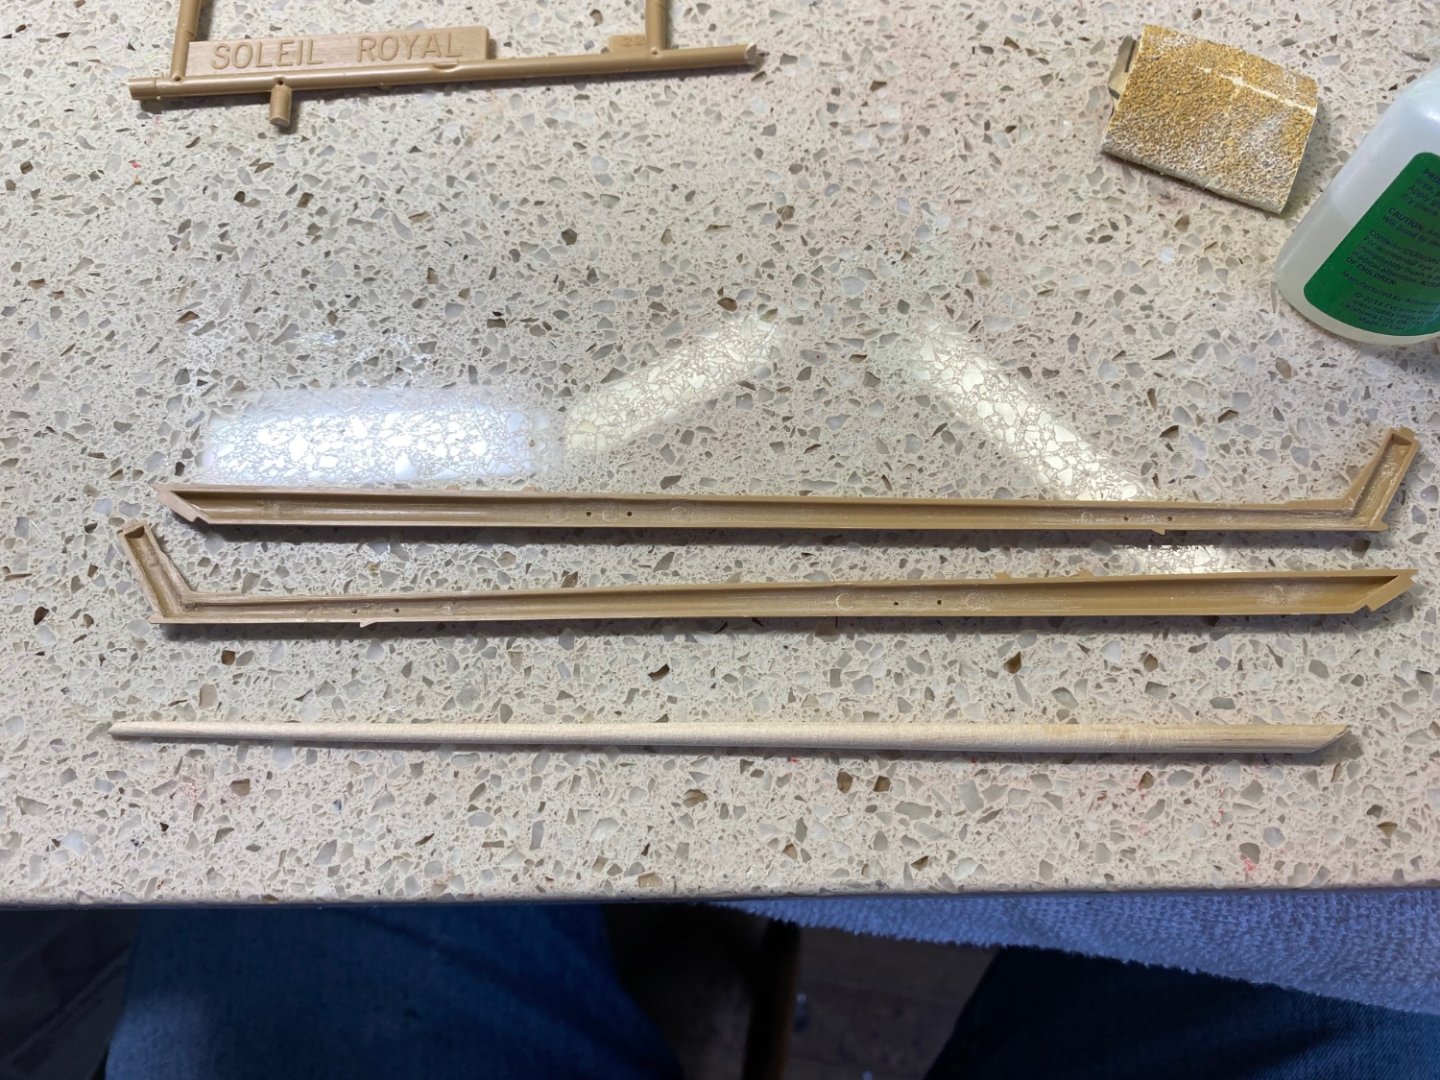
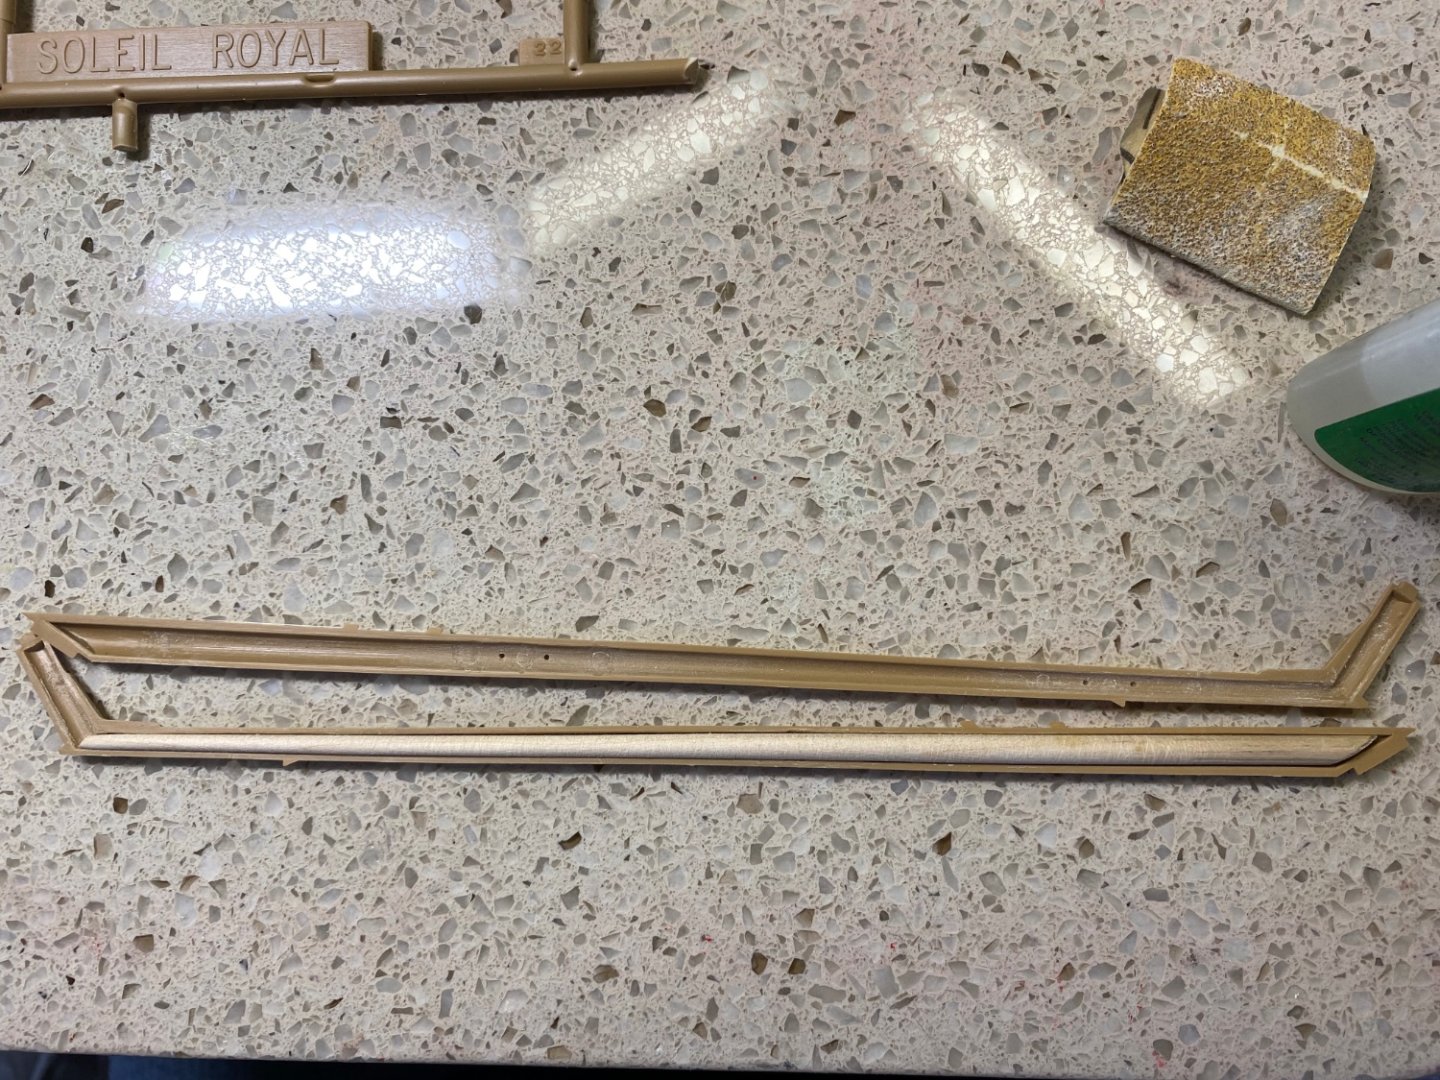
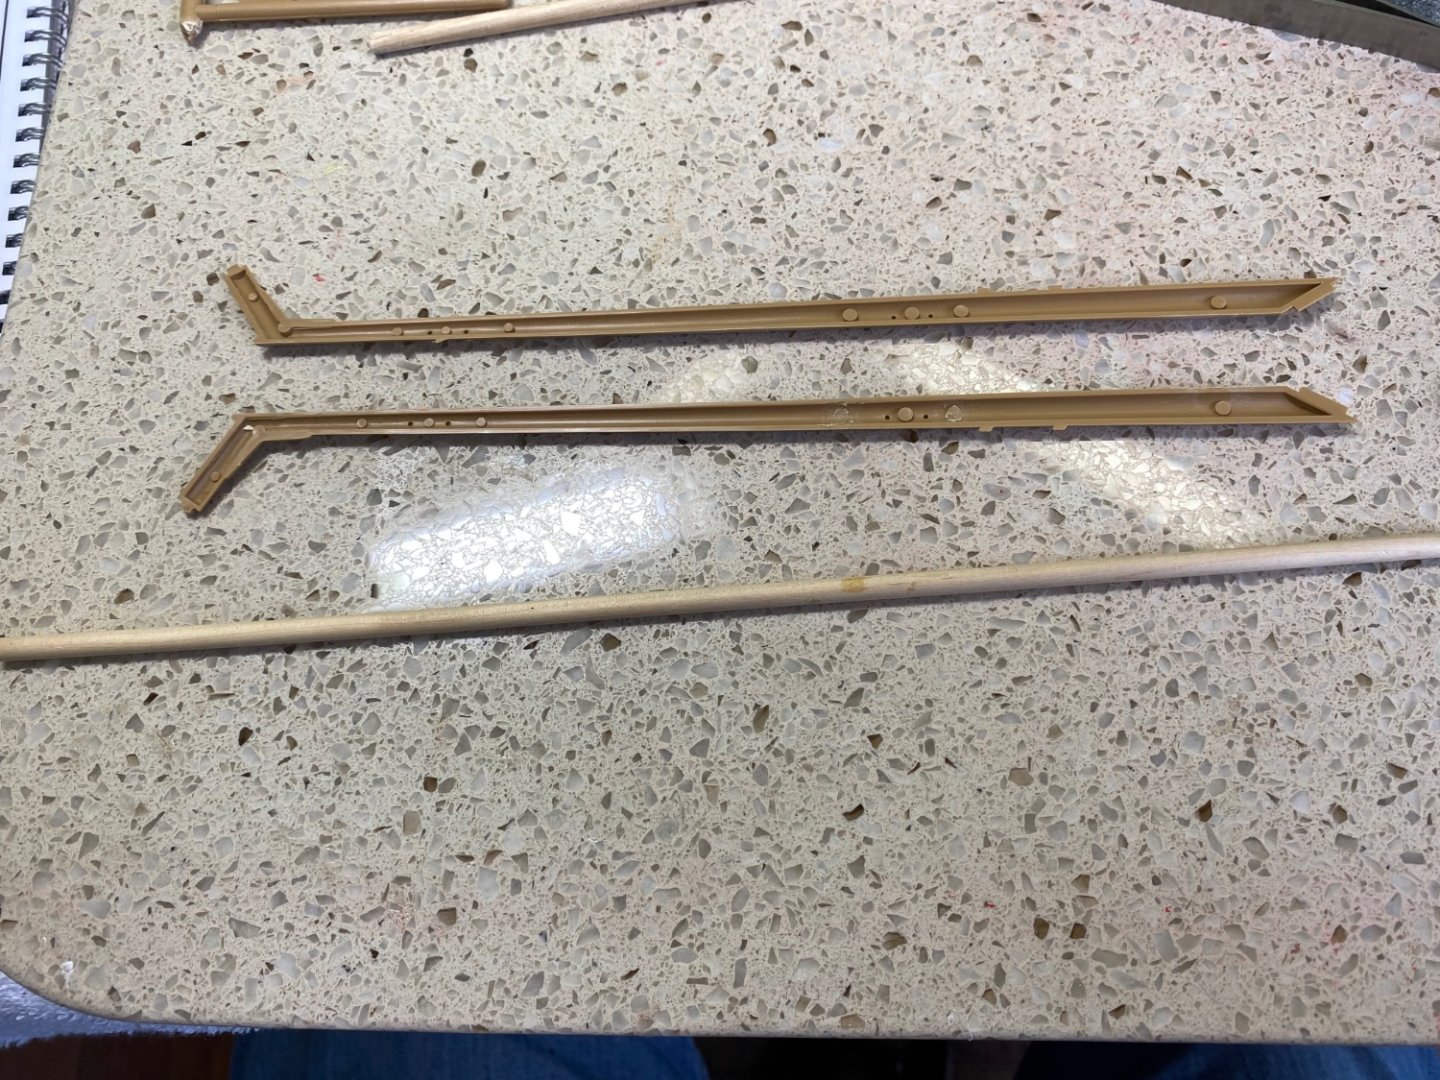
One reinforced dry fitted bowsprit. I put the dial rod in my drill and held it in a piece of course sandpaper to taper it to the desired shape. I then added CA glue to the inside of each side of the bowsprit and plastic cement along the edges. Then pressed it together with the dial rod inside. A test fit on the ship and this piece will be ready for further use.


- 1,508 replies
-
- 3
-
-
- Le Soleil Royal
- Heller
- (and 1 more)
-
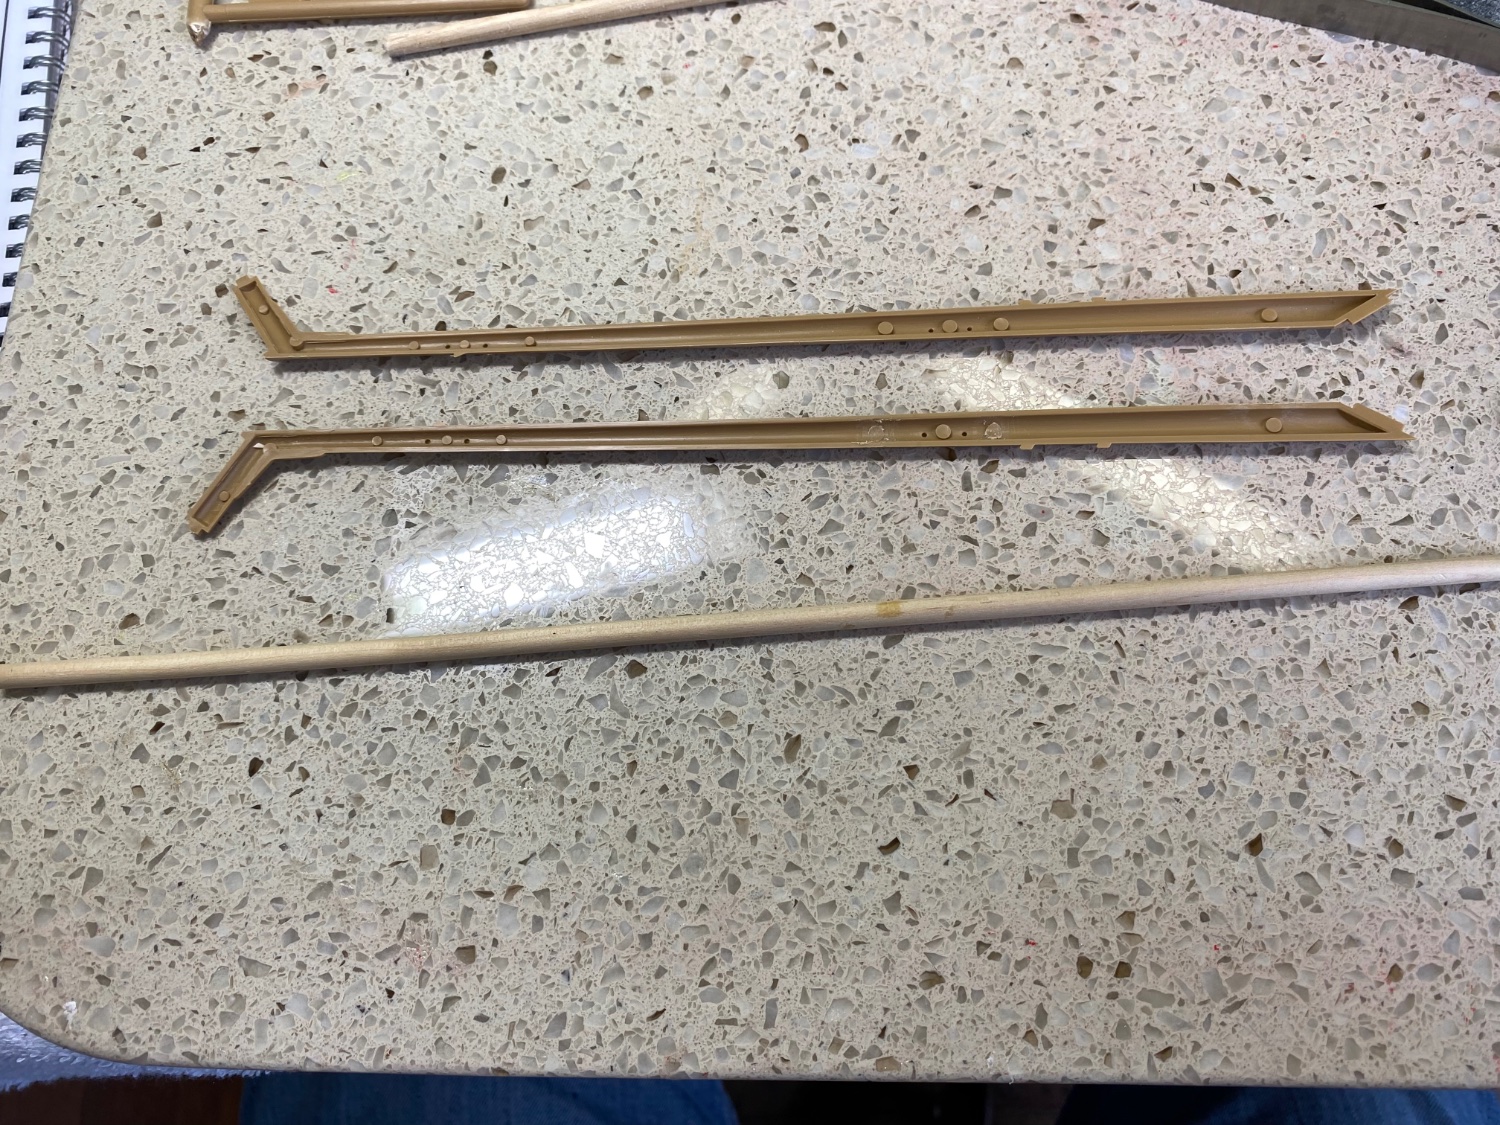
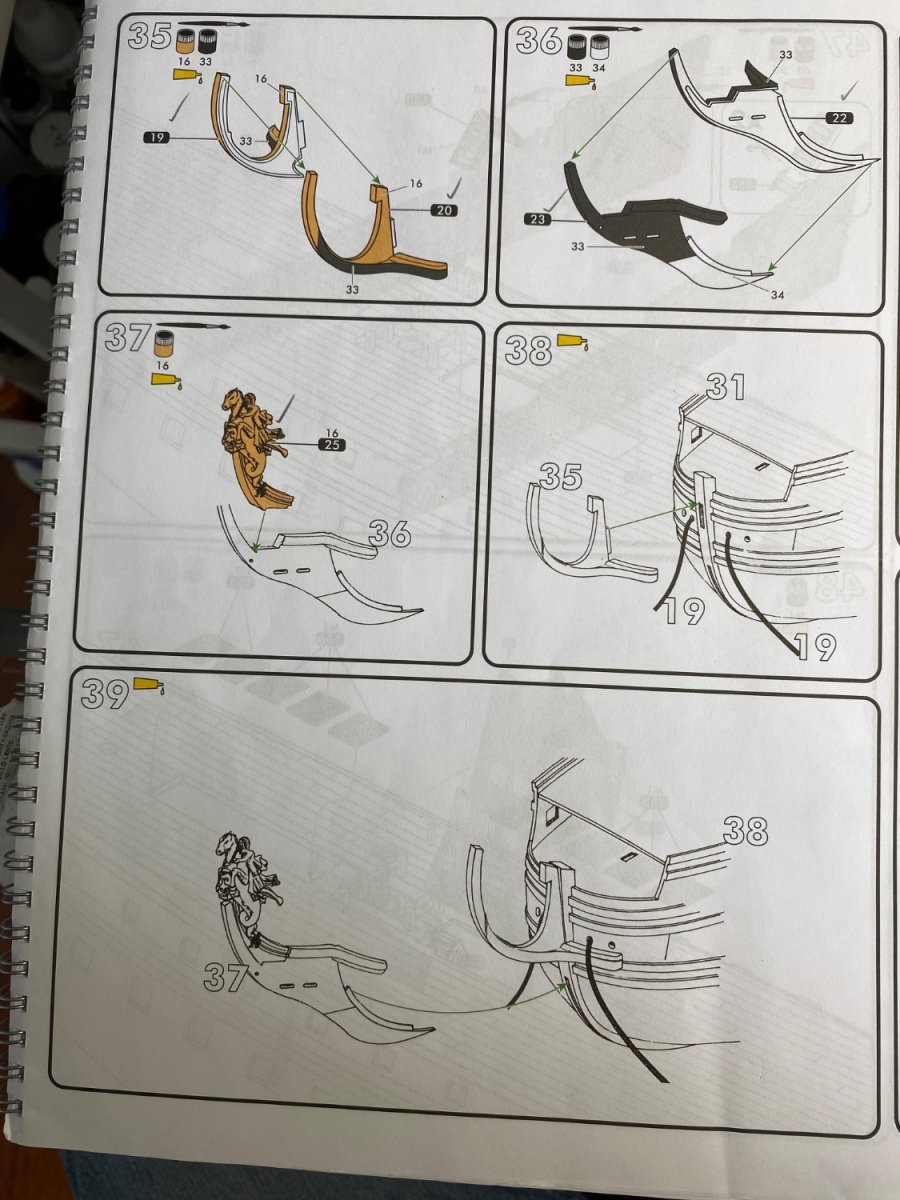
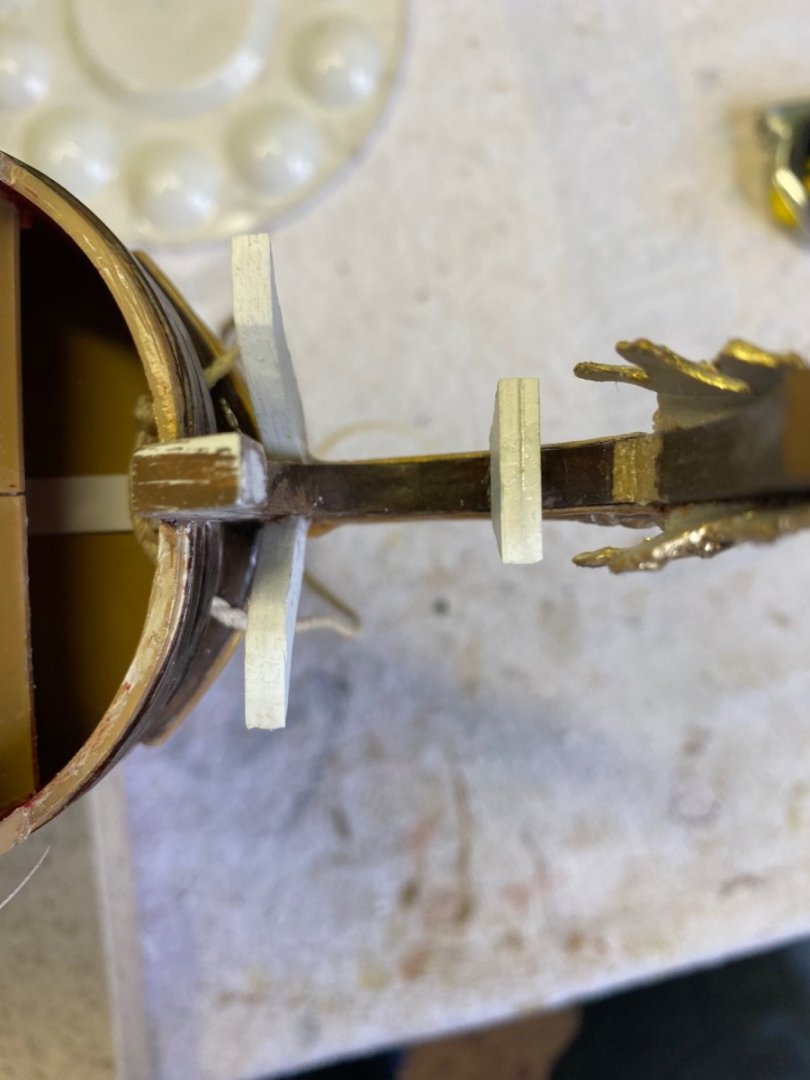
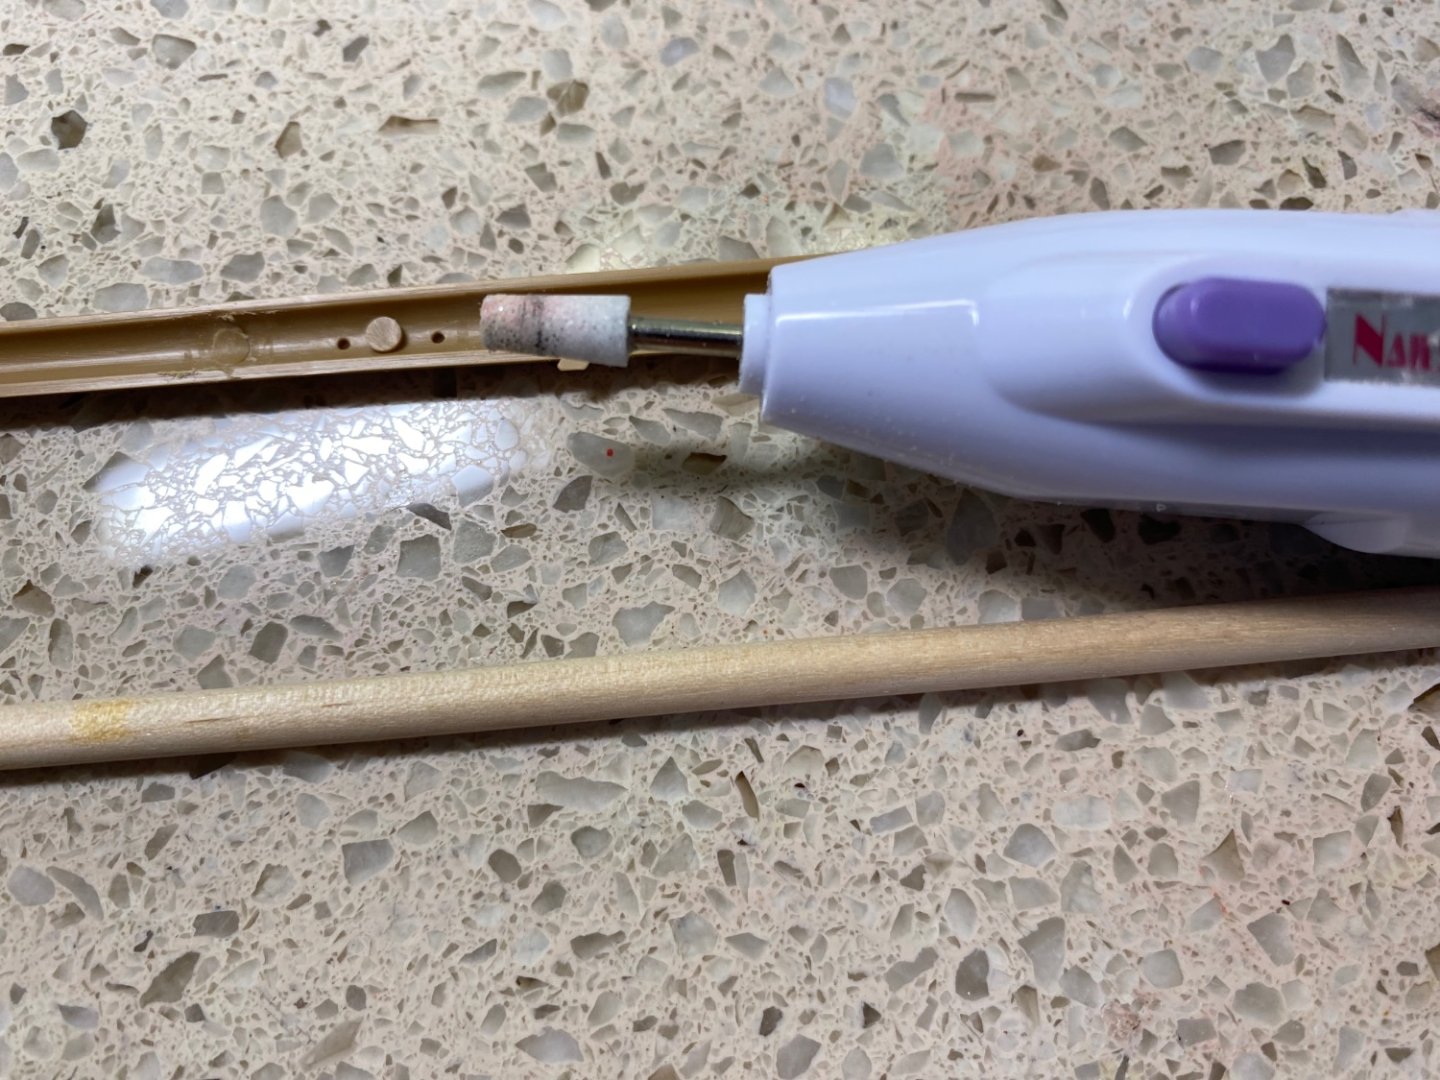
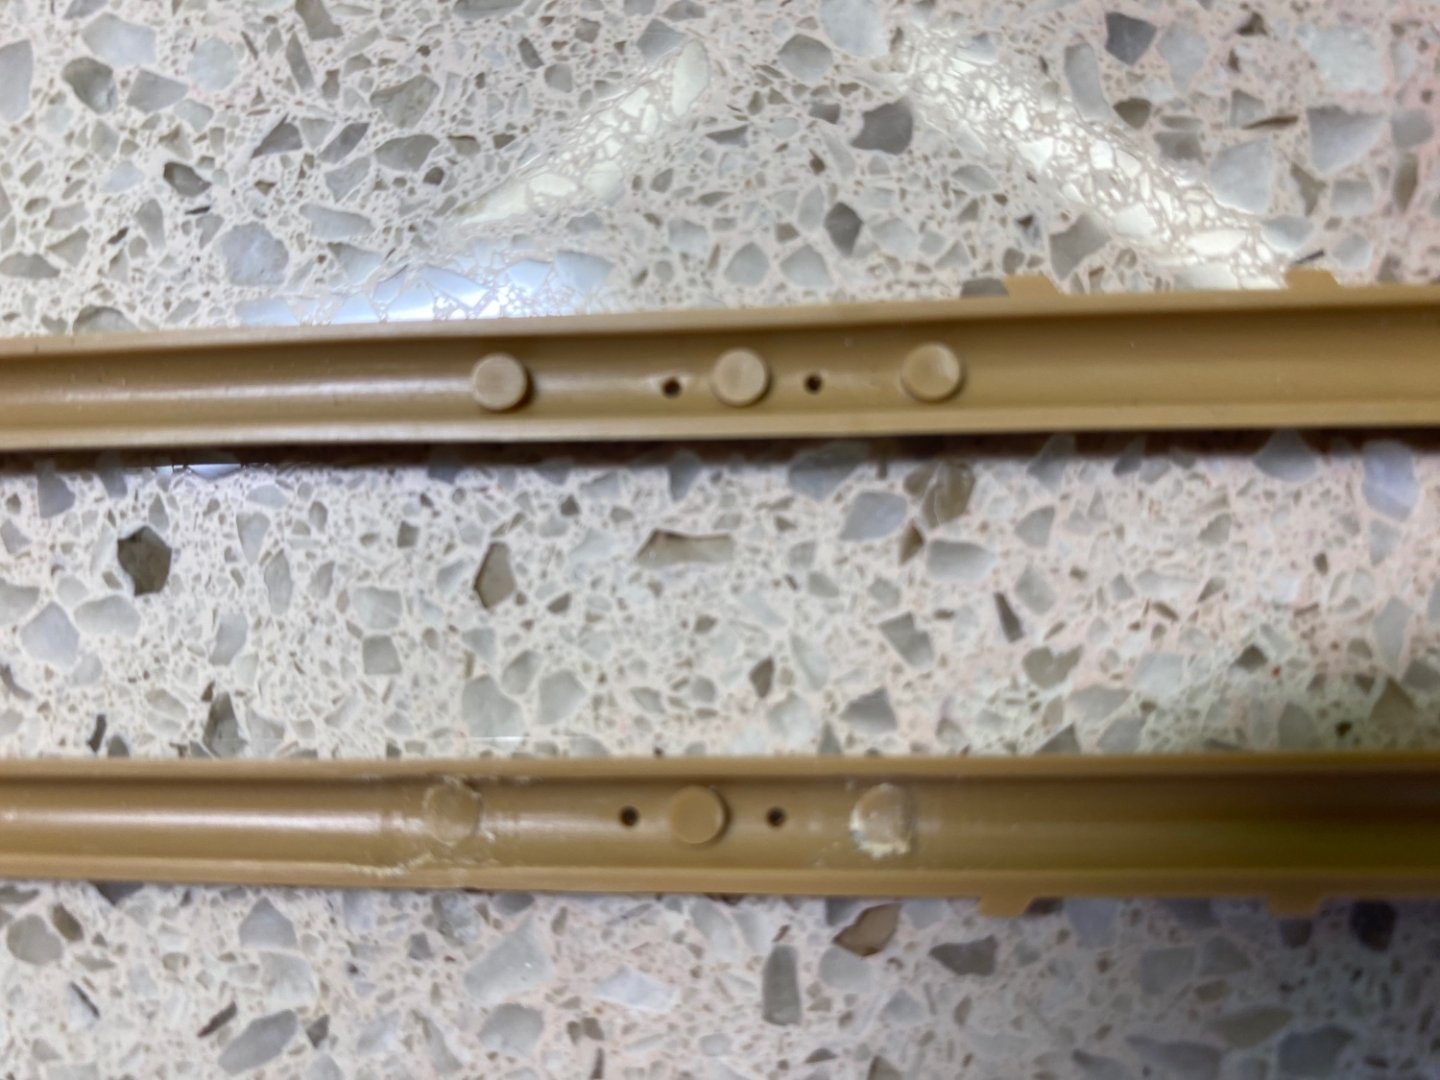
Decided to assemble and work on parts in the bow area. According to the instructions that is where I am supposed to go next anyway. Attaching the UB is still down the road a ways. On the previous page I was to put the two sections of the bowsprit together so that is my current mission. I always like to reinforce the bowsprit, and later the masts with wood, with wood rods so I will do that before gluing the halves together. The pieces have some pretty substantial molded waste areas inside I need to remove before I can fit the sanded down rod to taper and fit. I got out my handy dandy nail decorator which is a little more delicate than my Dremel might be in a his area. For future reference so I won’t need to bug you guys with another question. Do you know if there would be a problem with assembling steps #35-39 off the ship and put on in one piece? I want to fill the blank space between parts in 35 and 37 with a piece I make similar to the way you guys did. Seems as if that may be easier to do as one piece off the ship.
- 1,508 replies
-
- 1
-
-
- Le Soleil Royal
- Heller
- (and 1 more)