


albergman
-
Posts
73 -
Joined
-
Last visited
Content Type
Profiles
Forums
Gallery
Events
Posts posted by albergman
-
-
Hi Gil
I've been enjoying riding along and watching your Dragon come to life. I built a Billings Dragon probably 40 years ago when my wife gave it to me for Xmas. It was only in the last 5 or 6 years that I decided to tart it up a bit and showed it here. It's wonderful to see someone else disregard the plans and apply their own imagination to the project. You're taking yours much further than I ever did and I love it!!
Keep up the good work.
Frank
-
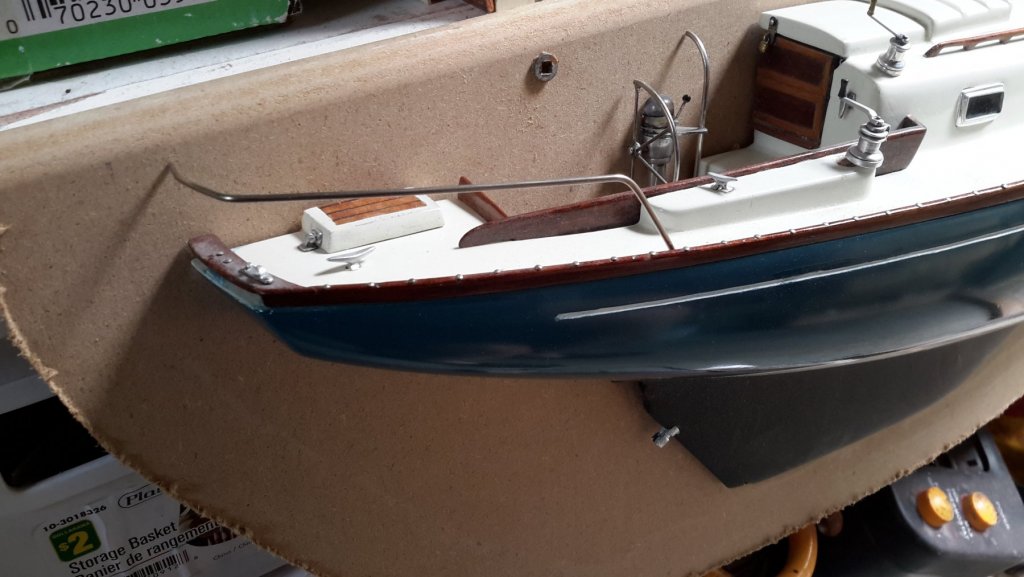
Time for a bit of an update. Been busy with mostly car projects for the past couple of years but now returning to do some much needed updates on the half hull model of our own Alberg 37 sloop (since sold). I mentioned at the beginning of this thread that I wasn't happy with the metal work on this model as it was done back in the days when I was using plain steel rod and ordinary solder. This has now tarnished and blackened so it's time to replace all that with stainless steel and S/S solder.
Have taken the model out to my shed and have it mounted on a work board which itself is screwed to a cabinet near my workbench. This lets me easily reach the model while reducing its handling.

It was pretty dirty after several years on the wall so after a wash down with Q-tips and soft, wetted rags I gave it a polish with the automotive stuff (Meguires polishing compound) I use on my car models. Gave it a shine it never had.
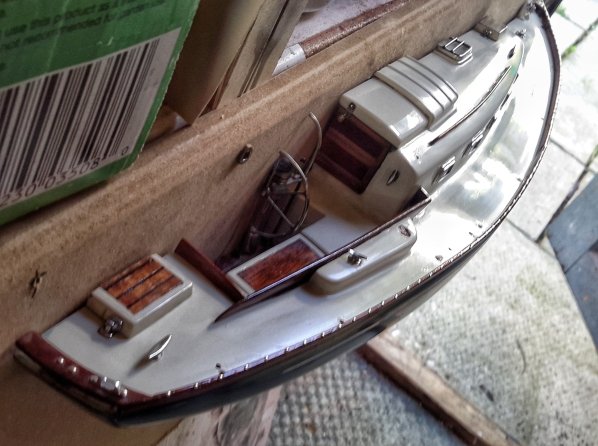
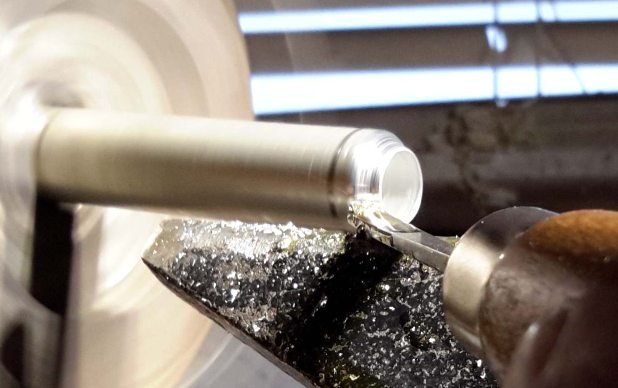
I've glued a couple chunks of Renshape together to give me a surface on which to build the new bow and stern pulpits. Drilled a few holes where needed and start bending stainless rod to the shapes. This rod is actually sold as stainless steel welding rods and is lovely to work with.

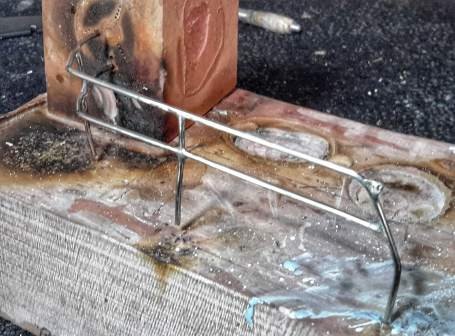
Solder in the extra rails then remove from the Ren. File down the excess solder. wet sand it and finally polish with a metal polish.
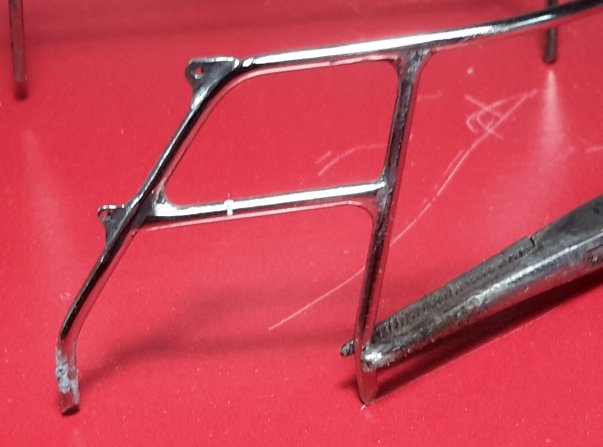
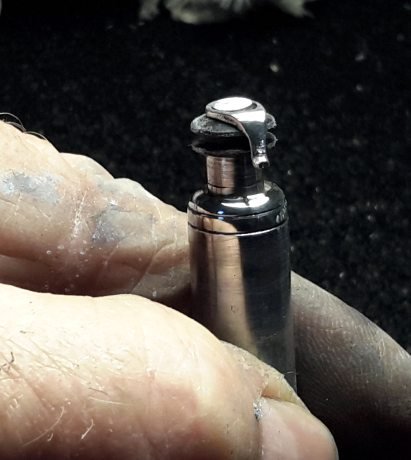
Here's my 2 new rails ...

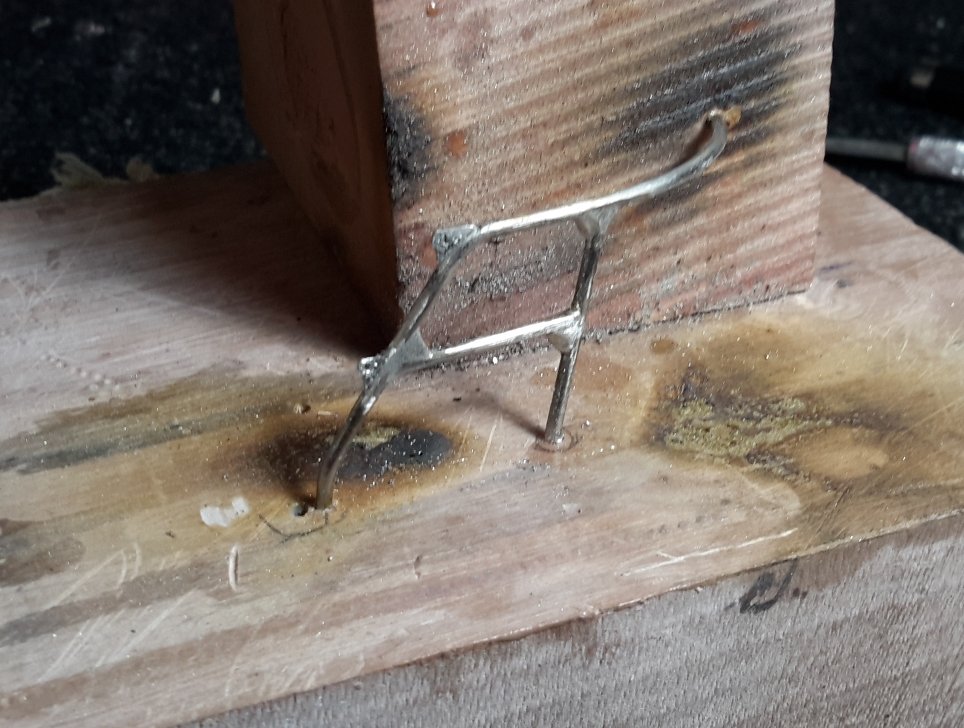
There are tiny tabs that need to be added to the rails where the lifelines will attach. These I cut from a tin can lid and soldered in place. I use a large piece for ease of holding then grind it to size with a Dremel grinding disk. Tabs seen here on the bow pulpit.
That's about as far as I've got. Need to make a few stanchions and the 2 special ones for the "gate".
Back later.
Frank
-
13 hours ago, Julie Mo said:
Frank, I'm new to this so I always appreciate input from experienced builders like you. Tell me if this plan is flawed but what I was thinking is I'd make the framing for the raised cabin and then lay the planking on the main deck. Next would be to plank the top of the raised cabin and then plank the sides. Would that be a proper order?
But first I have to figure out how to build the framing for the raised cabin. This is what I've been working on
The drawing is a view of the S130 interior, as if you were standing in the lower saloon and looking at the companionway. The intent was to create a two-piece laminate for the cabin frame. After the glue dried and the first section was placed where it might actually go, it became apparent it would probably be better to stick build it on the model. Kit framing will need to be cut out and I really don't know how that will affect the structural integrity over the long haul. The 7# of shot ballast may work against that effort.
Hi JudiThis is getting interesting! You probably know that your plank-on-frame approach to the cabin isn't exactly my style of building so, if your heart is set on the framework route. I'd invite Keith or any of the better scratch builders to chime in with ideas.
While it would be elegant and definitely more in keeping with proper yacht construction I'm thinking it might end up very fragmented if you know what I mean?Considering the smallness of the final shape I'm more inclined to take the "Bernini solution" and reduce a solid block of mahogany (or whatever you intend to use) to the shape you want. This piece can still be hollowed out inside if you wish to show some access to below deck and window openings are easily scooped out with Dremel bits.What you are aiming for, as I see it, is just a slightly larger version of the cabin roof I shaped for my Dragon.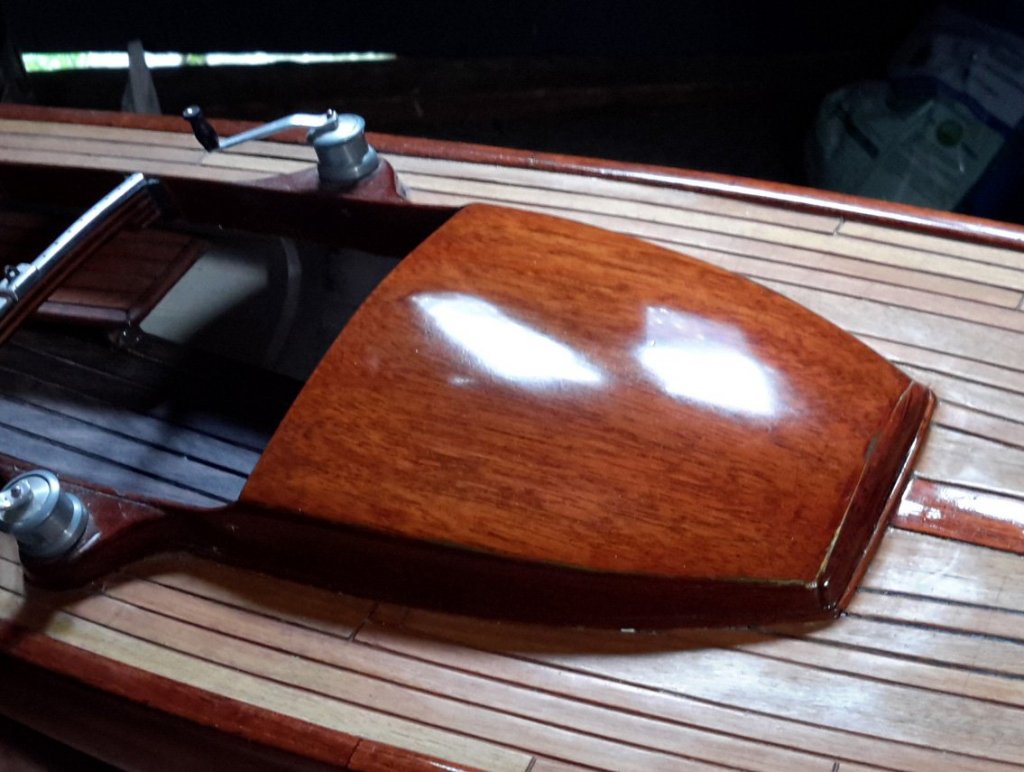 I know this isn't what you asked for but I know I couldn't assemble a (relatively) small cabin structure from frames and planks and have it look elegant at the end.Hope you have a great holiday.Frank
- Julie Mo and Salty Sea Dog
-
 2
2
-
1 hour ago, Julie Mo said:
Some time? Yes. But when depends on how long it takes me to recreate what's in my mind's eye. Right now I see mahogany framing for the raised cabin. The challenge here is to determine how many frames there should be and then building them so as to recreate the look of the S130 raised cabin. The plan is to at least build the upper level interior and if that's successful to build the lower level saloon.
Yet another challenge set before me. Masochism must be in my blood.

I was only asking because I thought you might want to have it down before you make your cabin. No doubt the planking could just as easily be cut to butt against it after the fact.
-
2 hours ago, Julie Mo said:
When the mind's door opens to solve a problem, one realizes the solution can be applied to other problems. This time the problem was how to cut the thin plywood accurately without a scroll saw. The router came into play again.
By using a 3/64" diameter bit, I was able to easily cut the curve of the raised deck. 1/2" foam board saves the bit from needless wear and makes cutting easier.
Not CNC accuracy but close enough to the line to leave little work for the fine tuning. I switched to a 1/32" diameter bit and cut the first glass out of the oval forward of the raised deck. Then I realized if the glass will be flush with the deck planking, I need to return to the drawing board and design a solution that will accomplish the flush appearance.
Looking good Julie. Will you be planking this deck at some time?
Frank
- cog, Salty Sea Dog and Julie Mo
-
3
-
3 hours ago, mtaylor said:
I guess since enginuity is the key on this... I turned all the cannons on my Constellation from brass using a Dremel and some files. Sometimes you just have to go for whatever works. Necessity is he mother of invention after all.
Mark
Good to hear about the cannons! Can you tell me how you did it?
Frank
-
5 hours ago, Julie Mo said:
I picked up a 1/2" aluminum rod the other day. I'll set the lathe up and see how my turning tools work on aluminum. This is from my last house but I have it only partially set up here and it's in the garage (HOT!)
That's a wonderful shop you had Julie ... truly envious. My entire shop is 5 x 8' and my "workbench" is 3 x 2'. Sure makes me stay tidy.
Can you fit a chuck on that lathe?
You might find the rod a bit too hard but maybe not ... depends on the alloy. I'm using an 8' 1/2" rod that I bought to make wire wheel parts and it IS hard. I used to have great success making winches out of aluminum Exacto handles.
Will you be using your wood lathe tools for this? The smaller the chisel the more agile you can be.
Here's a few pics of my setup and tools.
My old chisel collection ... actually carving tools.
I've said earlier that I salvaged a chuck out of a hand drill and it's great for getting small pieces away from the dangerous 3-jaws of the big one. Here's a winch (ex-Exacto handle) in progress ...
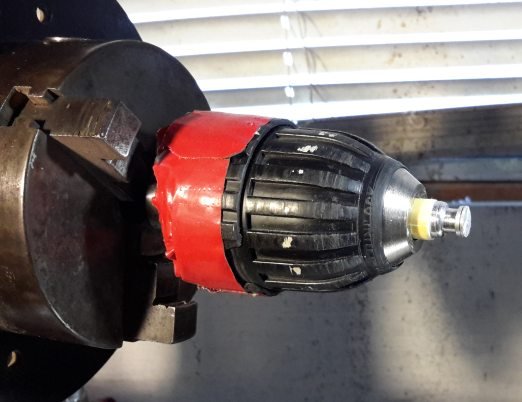
See ... it CAN be done.
OK, feel free to ask any questions. Good luck.
Frank
-
-
1 hour ago, Julie Mo said:
If you mean RC model, no, it will be a dust collector.
I was guessing it was going to be a sailing model because you mentioned adding shot ballast. Maybe I missed something there as my "dust collectors" don't require ballast and they work VERY well in that regard.
")
Frank
- Salty Sea Dog and Julie Mo
-
2
-
-
1 hour ago, Dilbert55 said:
Thanks for the info. Damn stuff appears to be made in Canada (Winnipeg, Manitoba) but doesn't look at all easy to buy here? It's about $20 on Amazon.ca but ships from the US so comes to $39 with shipping. There's a Canadian site selling it for 6 bucks but they have a minimum order of $25. Going to check out some local stained glass stores before trying to buy online.
Dilbert
I found it in a shop that sells stained glass supplies. Those people use it to darken the lead on a stained glass piece.
Frank
-
23 minutes ago, Julie Mo said:
Here's the S130 cockpit blowup of the CAD section I drew up above:
The raised wood surround isn't drawn up in CAD but would be used in the model.
As for the windows, I really like the flush deck windows but I'm not so sure about the side windows. It would seem more aesthetically pleasing to have windows on the front, too, and for the windows to be wider and fewer.
On another note, I added 4# of shot as ballast. It doesn't seem enough weight. It would have been desirable to get the weight into as much as of the keel as possible but the moveable centerboard occupies most of that space. Maybe a trip to pick up another 2#-4# of shot will give the hull a better feel. But I do like the additional weight.
Windows ... That's what I was hoping you'd say.
More like this maybe?
Is this going to be a sailing model?
F
-
14 hours ago, Julie Mo said:
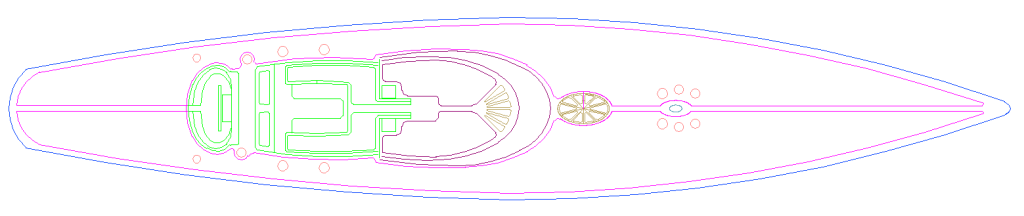
Been doing a lot of CAD work trying to find the key to the city. This is one part 3D, one part one-line perspective of how the S130 setup might look. Still a lot of work left to be done.
Dark blue lines are vertical in the cockpit and helmsman pit. Green lines represent horizontal edges and breaks between deck finishes. The brown box is a sub-pit for the 60" wheel. There would be a raised wood wrap around both the helmsman pit and cockpit.
Believe it or not, the squares just before entering the companionway represent two more companionways that go down to the lower level. Please don't ask me if I am going to recreate those stairs. I've already committed the rest of my life to this.
Hi Julie
Nice hi-tech way to approach the project. Not sure I know exactly what I'm looking at but I suspect this is your CAD drawing of the S130 cockpit ... no changes.
Anyway, will be a nice clean layout. Are you thinking about using their same style of windows?
F
-
21 minutes ago, Julie Mo said:
My dad had a 1973 Columbia 45. Not the prettiest or fastest thing on the water but solid and comfortable. I knew that boat inside and out.
Maybe I could find a carbon fibre rod and turn something close.
I found this RC Harken hardware on another site but the website that sells them is down. I'd have fun rigging a J Class model with modern racing gear.
All this makes me wish we bought the boat instead of the house.

That's the site I saw many years ago and couldn't find now ... out of business huh? Beautiful stuff they had.
I don't know if carbon fibre can be turned (probably) but there's lots of black plastics that could substitute. Y'know, if you were to go with a plastic or something that soft you could use a drill press or even a drill (held in a vise?) as a "lathe" and cobble up some sort of tool rest and go at it. If you're thinking of black winches then consider maybe using this new-fangled composite "wood" sold for decks and docks and paint them.
That's what I built the powerboat model with and it's interesting stuff ... uniform throughout, waterproof and dense (so it would take fine detailing).
Almost all of them have free samples.
An alternative might be acrylic rods ... here on eBay
Frank
-
Glad the picture meant something to you ... not everyone's cup 'o tea. That was Pipe Creek in the Exumas and we stayed there almost a month. What kind of boat did Dad have and ... have you done a model of it?
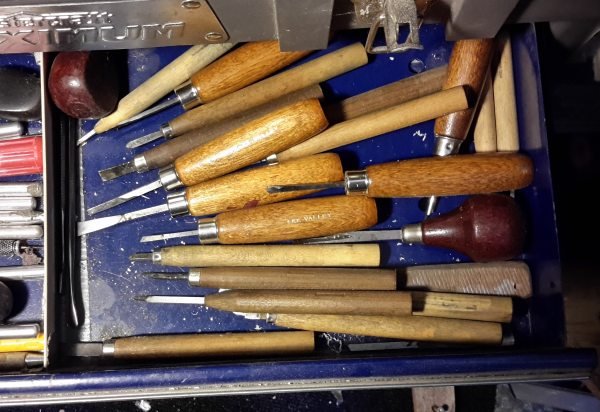
OK ... high speed tools, yes, I only use HSS blanks to make my tools for the machine lathe. You don't need carbide to work aluminum or brass (but carbide cuts them nicely too). As I said above I used to buy Chinese wood carving tools when I'd find them on sale then re-shape the heads using these disks you buy for Dremels if I needed a particular shape.
e.g. to make the self-tailing slot on a winch I'd taper a carving tool to that shape.
You'll find that HSS is actually what the better carving tools are made from. Pry one out of its handle and you'll find the familiar square shape of an HSS blank.
Just curious but what colour of finish will your modern winches have .. black, silver or brass. If black then maybe you could make them in wood or a composite and paint them.
Frank
-
30 minutes ago, Julie Mo said:
Frank, you are like Bernini, start with something that looks nothing like the finished result and end up with a masterpiece! It's like the old saying: Get a block of granite and chip away everything that doesn't look like sailboat. Easy peasy!
You do that amazingly well!
As a sailor, I appreciate your subjects. I think I have sailing in my blood. After we sold the last house we spent a while looking at live aboard sailboats. We bought another house because it was more "practical" but houses don't get the emotions stirred up like sailing into a harbor at dawn after an overnight journey.
It was interesting to see you used a wood lathe to turn winches. Up to this point I was believing only a metal lathe could accomplish that. Thank you for the education.
")
Hi Julie
Funny you should use that expression about "chipping away everything that ....". I had used it on a car model that started as a block of mahogany and a viewer asked me how I did it and I said "just chip away .... not Ferrari". I don't really know how it comes out (usually) correctly as I rarely have plans ... an eye for the correct line I suppose. As I said I'm a retired computer geek with nothing in my background to build on.
Ah, sailing. Retired at 55, sold everything, quit 2 good jobs, kicked out the last kid (23) and moved aboard the Alberg (top of this piece) then left for the Caribbean. Stayed aboard 4 years then sailed back to Toronto and sold it.
Waking up here is what I called living ...
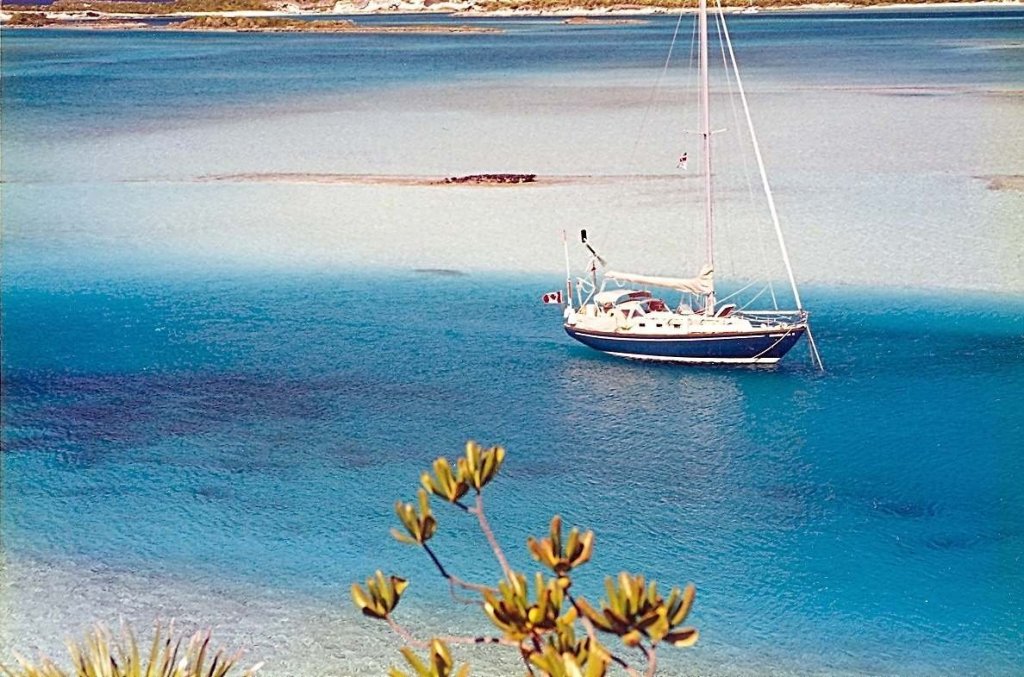
Sigh ....
OK, sounds like you've seen what I said about using a wood lathe and, if you don't want to get into a "real" lathe this isn't a bad option. There's a freedom of movement with a hand held chisel that you don't get with a metal lathe and that is often important with the kind of things you might want to shape.
Frank
-
2 hours ago, Julie Mo said:
Spent the day drawing the Spirit 130 deck to the scale of Slàinte (ex-Endeavour). When scaled to length, Spirit has a wider beam.
The kit doesn't have enough winches to do this winch layout. Have to figure out where I can buy winches. I'll print out some sheets and see how it fits but we may be onto something.
Oh lovely! This looks nicely proportioned too.
Winches ... I saw Harken miniature winches available years ago so maybe someone on here knows where to get them ... I turn my own and they're not hard to do. Be glad to chat about that if you want to try it.
Frank
- PeteB, Nirvana, Salty Sea Dog and 1 other
-
4
-
13 minutes ago, Julie Mo said:
OMG, Frank! That's it! It's perfect! Just what I was looking for. Thank you! I was doing searches for Wally and other maxi yachts but Spirit didn't come up. Wally was just too modern. But I think I can work the Spirit topsides into the J-Class Endeavour. I'll just have to figure out how do make it happen.
Thank you so much, Frank!
Now I've got to get back to the boat yard and get those planes and chisels out.

Woohoo!! Great! Look forward to seeing what you do with this.
I first came across Spirit when one was used in the Bond film Casino Royale ... when they took a pale blue one into the Grand Canal in Venice.
So-o-o glad you didn't pick Wally. Ahem, I'll say no more.
Frank
- Salty Sea Dog, Julie Mo and Nirvana
-
3
-
52 minutes ago, Julie Mo said:
The brain won't stop until it's happy. If I can be so bold, I admit to hating what the kit provides for the deck cabin. My vision is to have something less boxy, something that has accommodations for guests, something more inviting and maybe a bit more modern. Time to push the envelope without committing any aesthetic crimes.
I like the fact the forward part of the cabin doesn't look as boxy. Boxy is the one part of the J-Class boats I've never liked. So boxy has to go.
I'm with you there Julie ... that really old, boxy look just doesn't do it for me either.
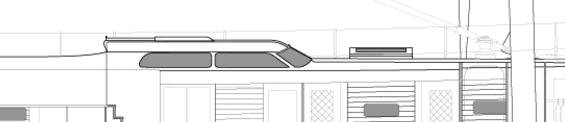
Can I be so bold as to suggest you look at this 130' modern yacht but with classic lines built by Spirit Yachts . I like the modern look of the deck "house" and you might get inspiration from it. I think it's a wonderful blend of the modern and classic.
Frank
- Salty Sea Dog, cog, Nirvana and 2 others
-
5
-
19 hours ago, Julie Mo said:
Frank, you're kind of like the miracle worker. Beautiful work!
16 hours ago, Omega1234 said:Hi Frank
I'm a bit confused by your You Tube video. Sorry.
I admit that I thoroughly enjoyed watching your video of the actual full-sized boat stuck on a massive slab of red wood. But, where was the model of Honey Bear?
Patrick
Thanks Julie ... you give me too much credit.
Patrick ... you got me there for a few seconds. I'm thinking ... maybe there's been something wrong with the video all along. Anyway, I think your eyes are just suffering from all that exquisite modelling you do in the micro-world.
Frank
- mtaylor, Omega1234 and Salty Sea Dog
-
3
-
Congratulations Julie
I've been watching quietly from the background and willing you on to finish this beautiful hull. Pity about the minor setback but I knew you'd figure it out.
That lacquer finish just makes it all worth while for me ... seeing all those individual planks suddenly transforming into a uniform, beautiful, organic shape!!
Love it.
Frank
- cog, Omega1234, Salty Sea Dog and 3 others
-
6
-
18 hours ago, Omega1234 said:
Hi Frank.
I know now that I've said it before, but I'll say it again..."Flipping amazing"!
I think there should be a law against making things look so easy.
Cheers
Patrick
Thanks Patrick ... but please don't bring the law after me!!
I just remembered that over a year ago I started a YouTube channel to show films I'd make about my models ... well, that was the plan and I only ever made one movie (this Honey Bear model) and posted it. After that, no matter how I searched for it using all the key words I'd given it I couldn't find the d*mn thing and, as a result, to date only 20 people have ever found it ... all of them being myself and the friend I made it for. Needless to say I gave up on that idea till I learned more about YouTube.
Anyone who wants to see it can find it here and I'd be curious to hear what they think of the idea.
Frank
-
3 hours ago, dvm27 said:
Let me get this straight. You made this beautiful model from scrap synthetic wood offcuts , bondo, cardboard and leftover scraps of various materials? I am truly humbled!
Greg ... When you put it that way even I find it hard to believe!!!
But yes, it's made just the way you said. The cardboard was used but just as a pattern for the sides. It was replaced by Arborite samples (you know those little 3x2 samples hanging on a board in the hardware store?) ... where a flat strong surface was needed. I found thin sheets of smoked plastic (sold as replacement for the visor of a welder's mask) and they made perfect tinted windows.
My neighbour is still puzzled by the missing boards in his deck!!
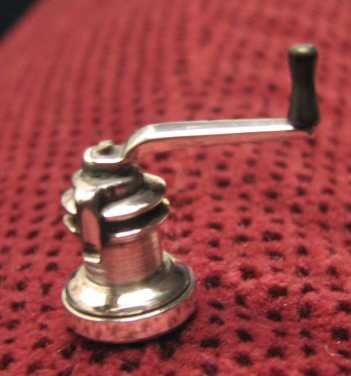
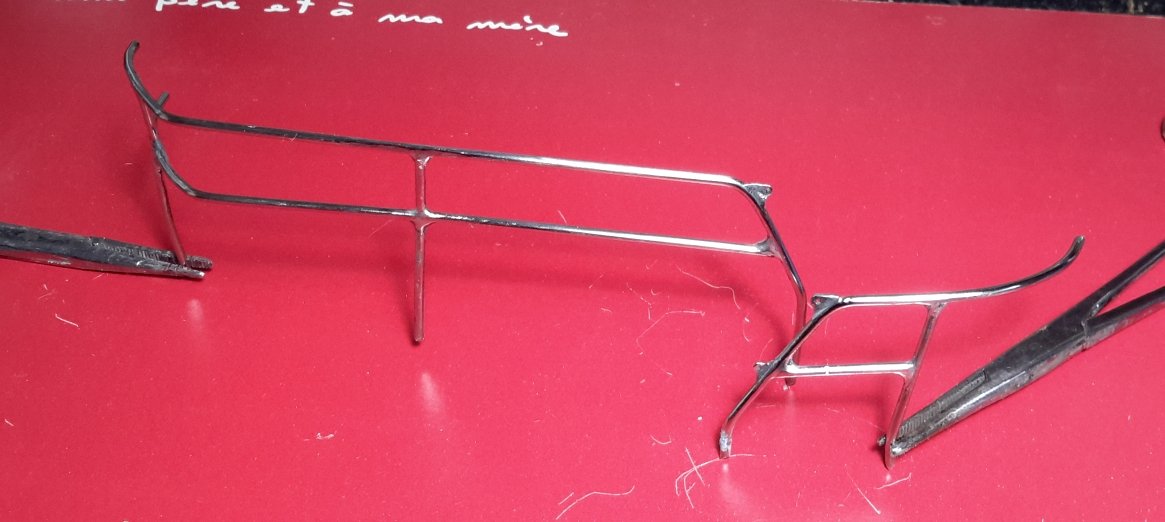
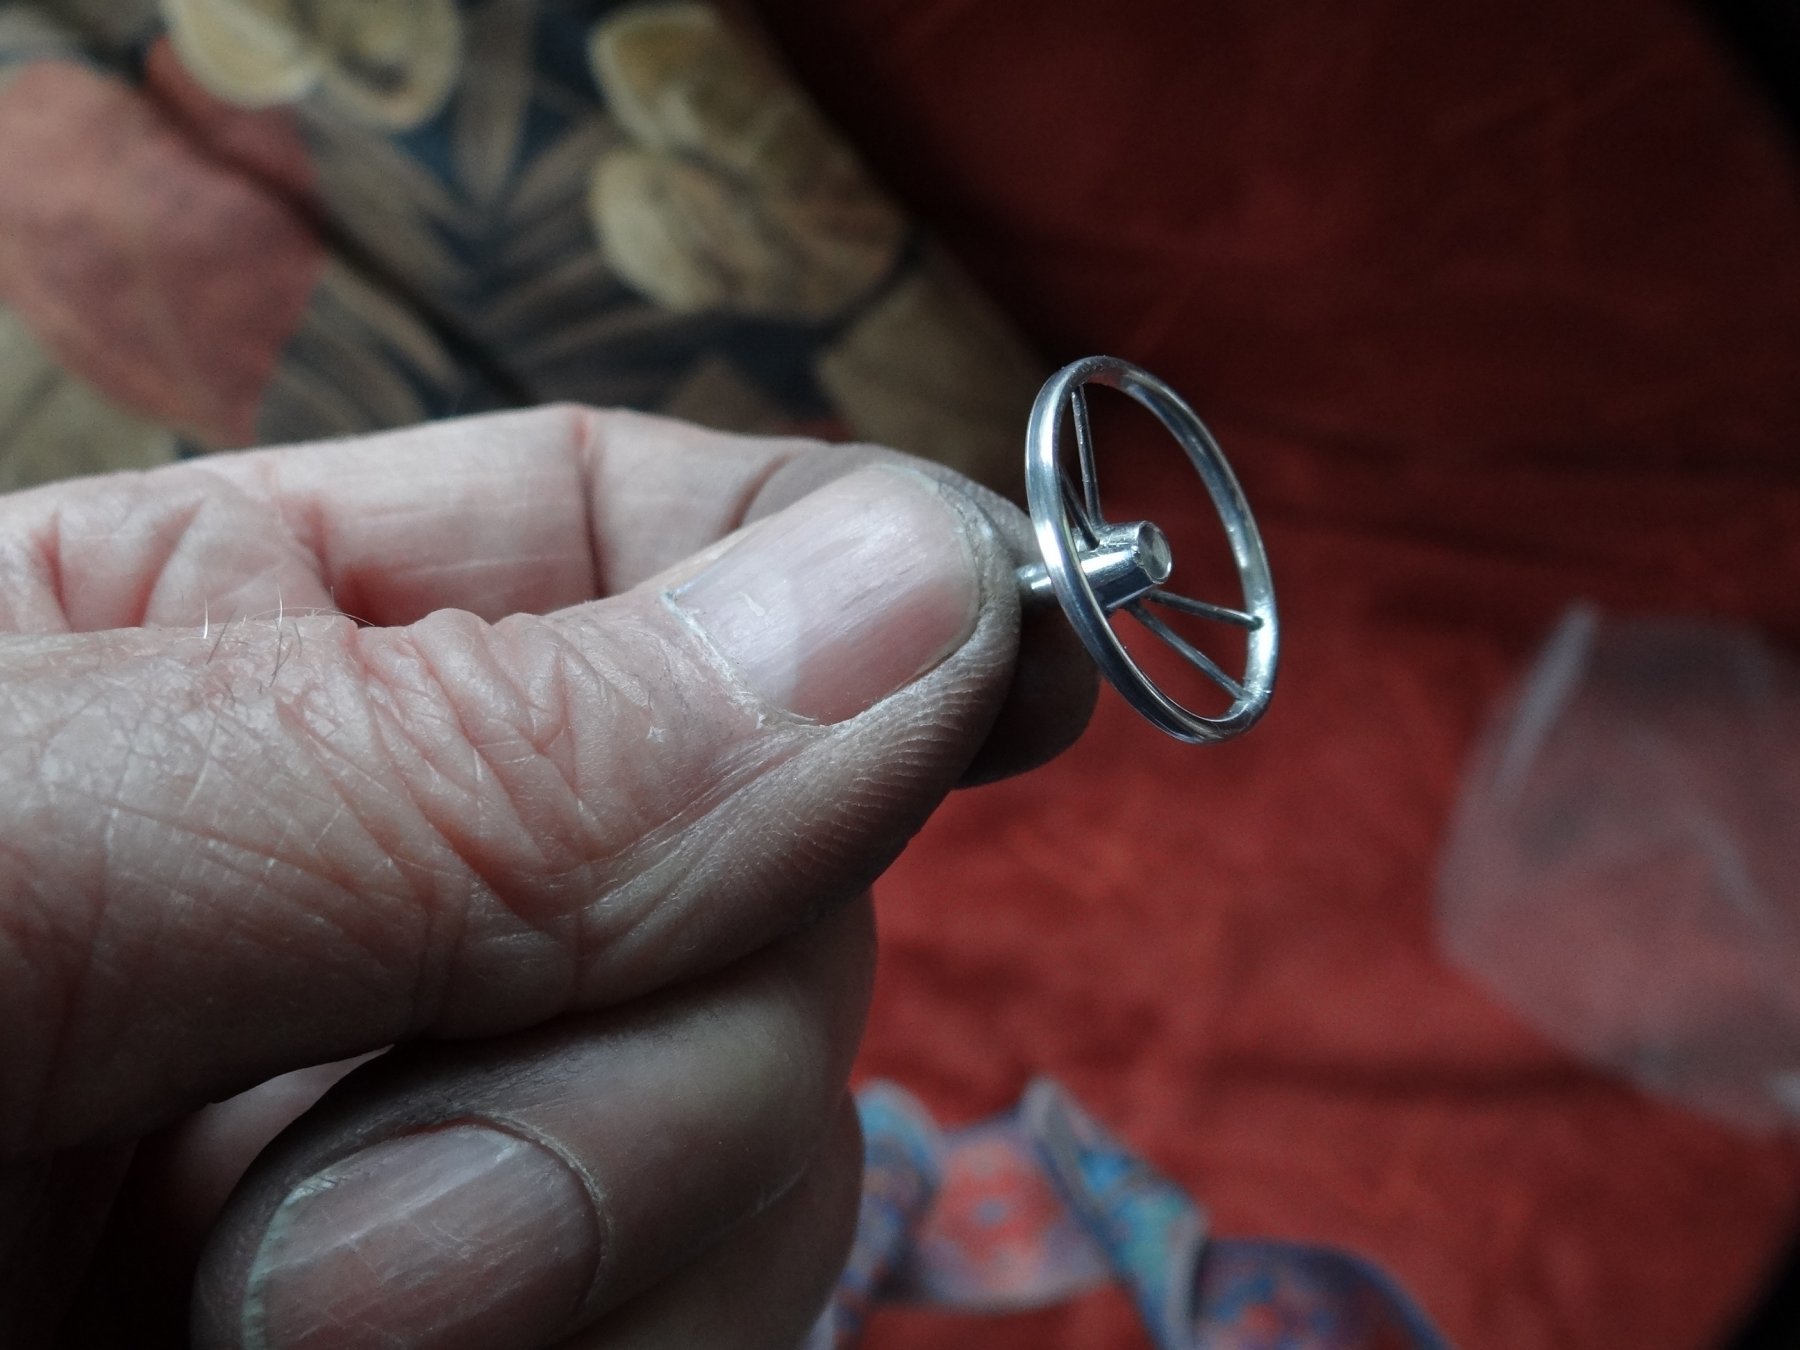
The steering wheel rim was made from a little aluminium flashlight I got when I bought a new razor ...

it had a solid ring of the right diameter on the end ... just needed to be liberated.
Made a perfect wheel with stainless rod bent to shape and pulled into 4 shallow holes

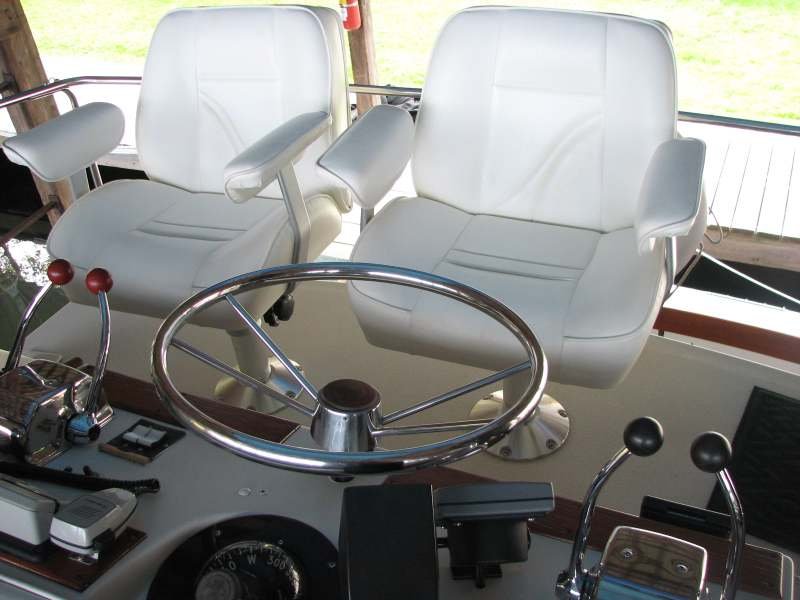
The real thing
All I'm trying to show is that with a little imagination (and a healthy stockpile of scrap metals) you can find items that contain the shape you need.
Frank
-
5 hours ago, Blighty said:
Welcome Frank, from sunny Windsor Ont.
3 hours ago, VACorsair said:Frank,
I love the way you used material, and pieces that you had on hand. Methods and processes that you wouldn't find in a model building handbook. All from you own eyes and brain. Computer heat sinks! That type of building to me is gift that not everyone has. It's a type of genius in my book. Great stuff Frank!

Stan
Thanks for the kind words gents ... and all others who have clicked the "Like" button.
I have to say I've looked at so many amazing builds on this site and believe me there are scratch builders here who are far more talented and that's not false modesty. Anyway, I just build for myself and usually give everything away ... I presently have 5 models out of 25 I've made. If you're interested you can see a couple of different things here and here.
Cheers
Frank


Schooner Altair by KeithAug - Scale 1:32 - 1931 - Finished
in - Build logs for subjects built 1901 - Present Day
Posted
I haven't been here for a while as I have no more maritime projects and I've turned to other subjects. However, I like to return occasionally just to check on Altair. This is such a tour de force and I know we've all run out of superlatives ... I have anyway. We should all just sit and watch quietly till it's done then all gush at once!!
Truly admire your ability to find an elegant solution for every problem that might be a show stopper for the rest of us.
You've raised the bar so high Keith that we can all wear our top hats as we walk under it.
You, of course, won't be wearing your topper as your head has probably swelled too much from all the well deserved admiration! LOL.
Now, get back to work!
Frank