


BANYAN
-
Posts
5,544 -
Joined
-
Last visited
Content Type
Profiles
Forums
Gallery
Events
Posts posted by BANYAN
-
-
Thanks Danny, filed away as a keep sake this time

cheers
Pat
-
Coming along very nicely Mark.
Do you have any issues with glue seeping from the deck to beam joint and 'wooden' clamps? Hate to see'em stuck there for good mate
cheers
Pat
-
Looks as good as the first time Paul

great details; always a pleasure to relook at this build.
cheers
Pat
-
Thanks Danny, a very useful collection for the scratch and kit builder alike.
cheers
-
Hi Tom and John.
Great photos John and some useful ideas - leave it with me
Tom, when I make up such coils I tend to do most of them off the model. I figure 8 the pin and finish with a dab of glue. I then use a former which is a simple scrap piece of square or rectangular wood and I place a pin on the upper and another on the side face. The position of the pins with respect to the edge determines the size of the loop and where the bend will occur - this needs to be closer to the top of one of the loops. I then create loops around the pins and the bend over the edge created a bit of a "bend" in trhe coil such that when I fit it, the tendency for it to stick out is eliminated.
This is not a problem when you actually use the tail of the line and use the method described in my first post as the loop thgrough the coil goes over the pin and the rest can hang vertically.
I hope that explains it clearly enough?
cheers
Pat
-
Thanks Greg. John (Jim Lad) sent me some photos of the replica which I can also use.
Cheers
Pat
-
42Rocker, what small head (for pop-off) are you referring to please?
cheers
Pat
-
I tend to hand wrap my spools - at the experimental stage - mostly only 50 wraps - until I am satisfied and want to make a bulk lot of a particular thread up. So I did 100 wraps on the spool - but nothing more yet - easy to keep focussed at 50 wraps
Hand wrap????
 Meredith you are a glutton for punishment. I hope to get back to some rope making very soon .
cheers
Pat
-
Hi all, glad to see it is of use to some of our members.
No arguement from me John, this is the 'grey-funnel' way of doing it. I was aware of merchant-navy practise but could not readily find a photo to support it; as I said not definitive
. If you have a photo, I can edit my original post to include it (along with your text if you are happy)?cheers
Pat
Edit: It may also be useful to collect all the different ways modellers do their splices, and form their coils (jigs etc) in a similar post to compliment this post?
-
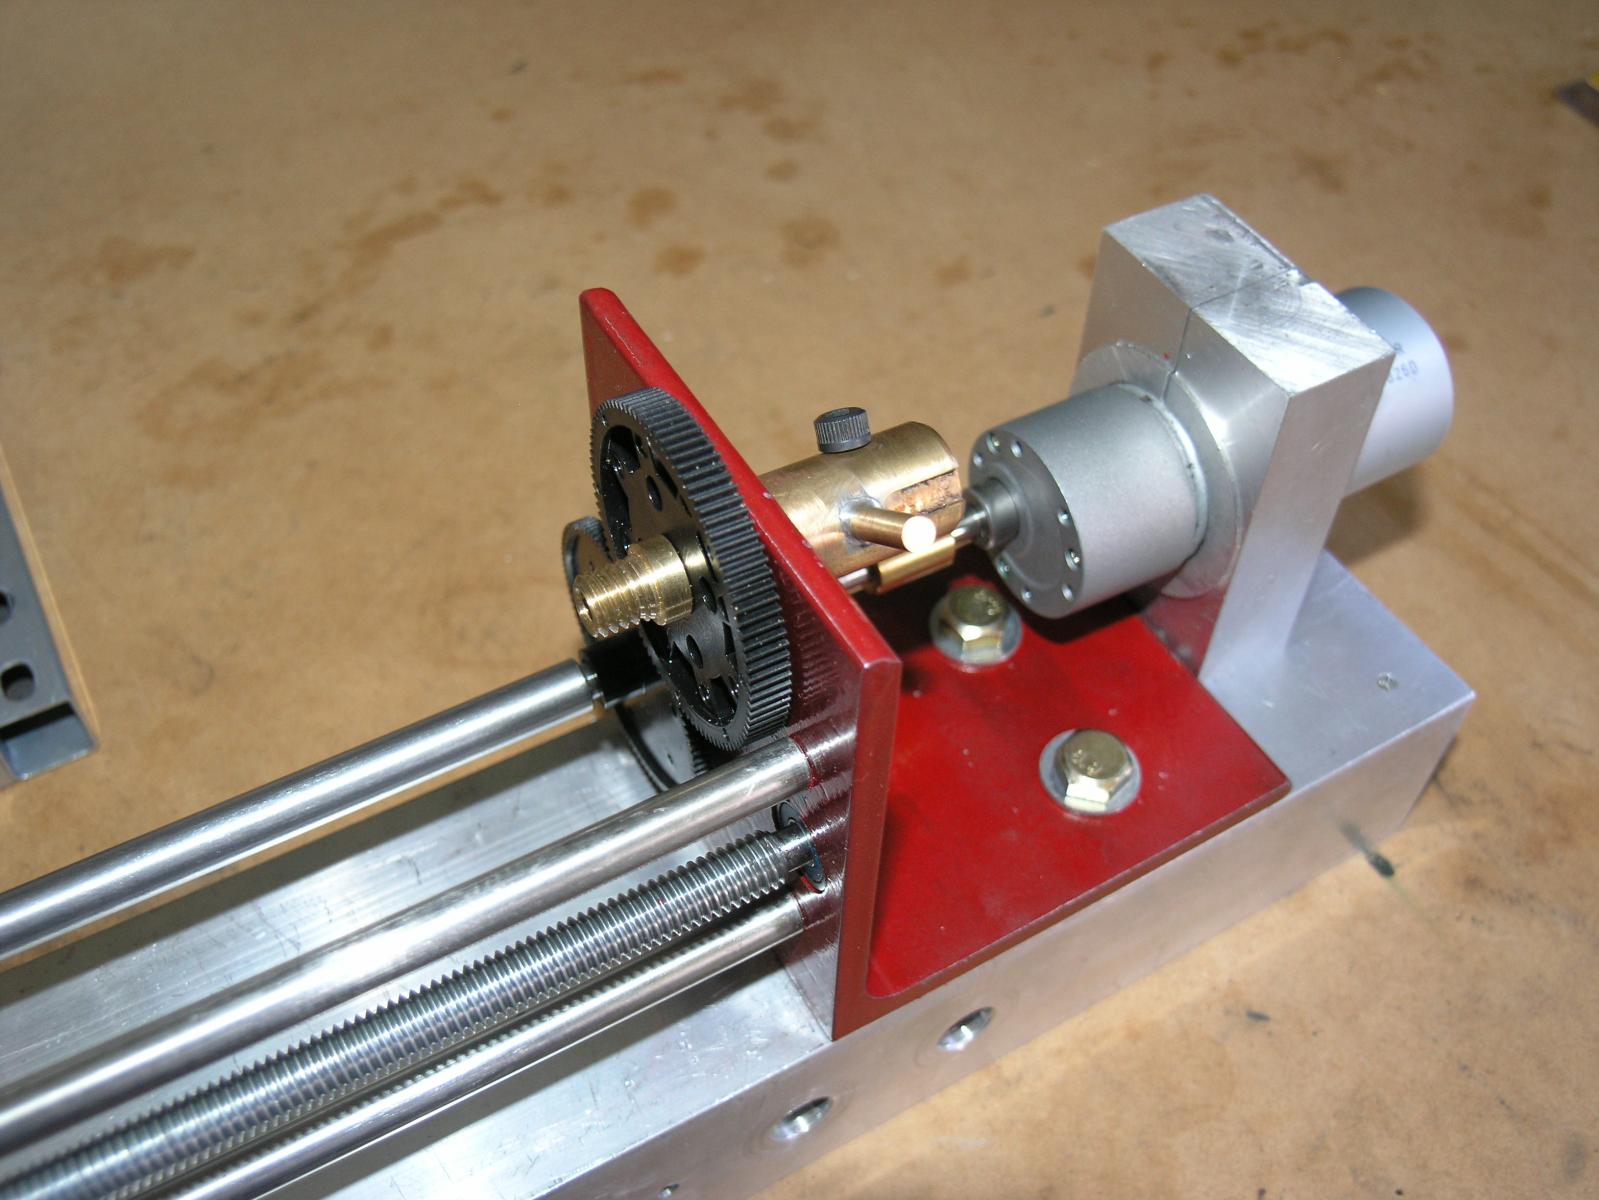
Hi folks, this is my serving jig. It is currently being modified with a different rope securing mechanism (soft wood collets will replace the dome nuts, and the feeder arm on the serving device will be extended slightly. Makes life a 'tad' easier when serving longer lengths
The stainless steel rods (not the drive rod) are from an A3 printer.And... no I am not the builder of this fine device, I am mechanically challenged
 , a friend built it for me.
cheers
Pat
The device is designed to take a full length of a shroud or preventer or stay (scale 1:48) and serve it as required in one pass.
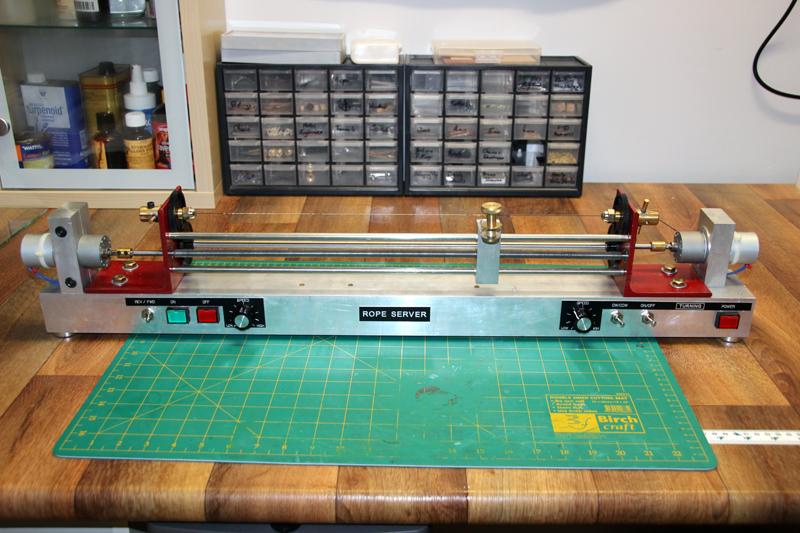
The motors are geared down 12V DC with a maximum rotation of 120rpm.

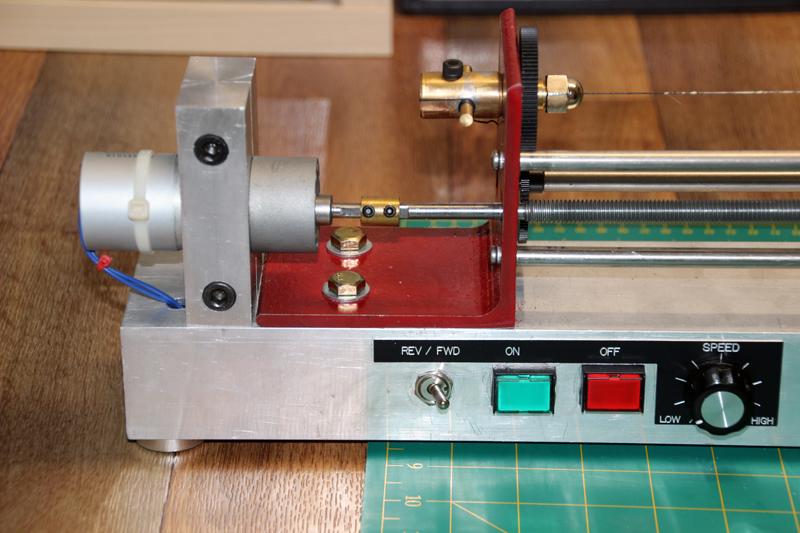
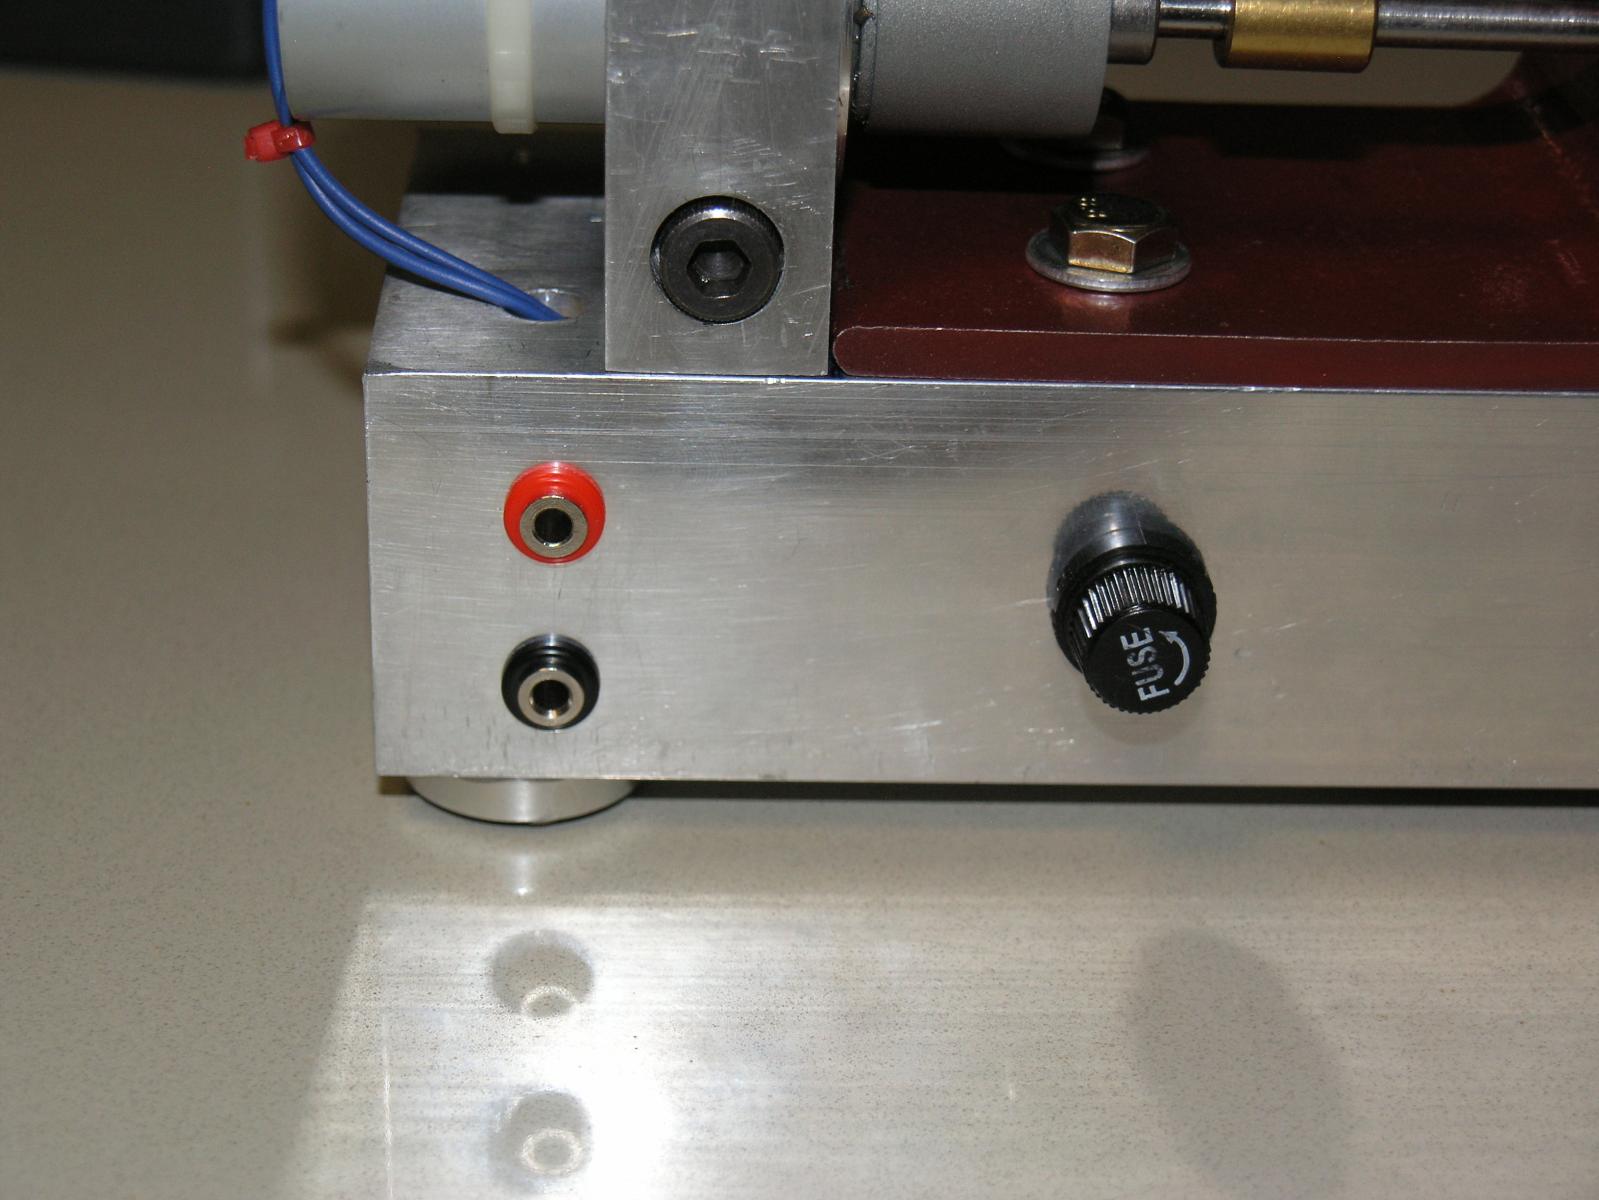
Controls the feed direction and speed of the serving stock assembly. Allows me to serve with or against the lay.
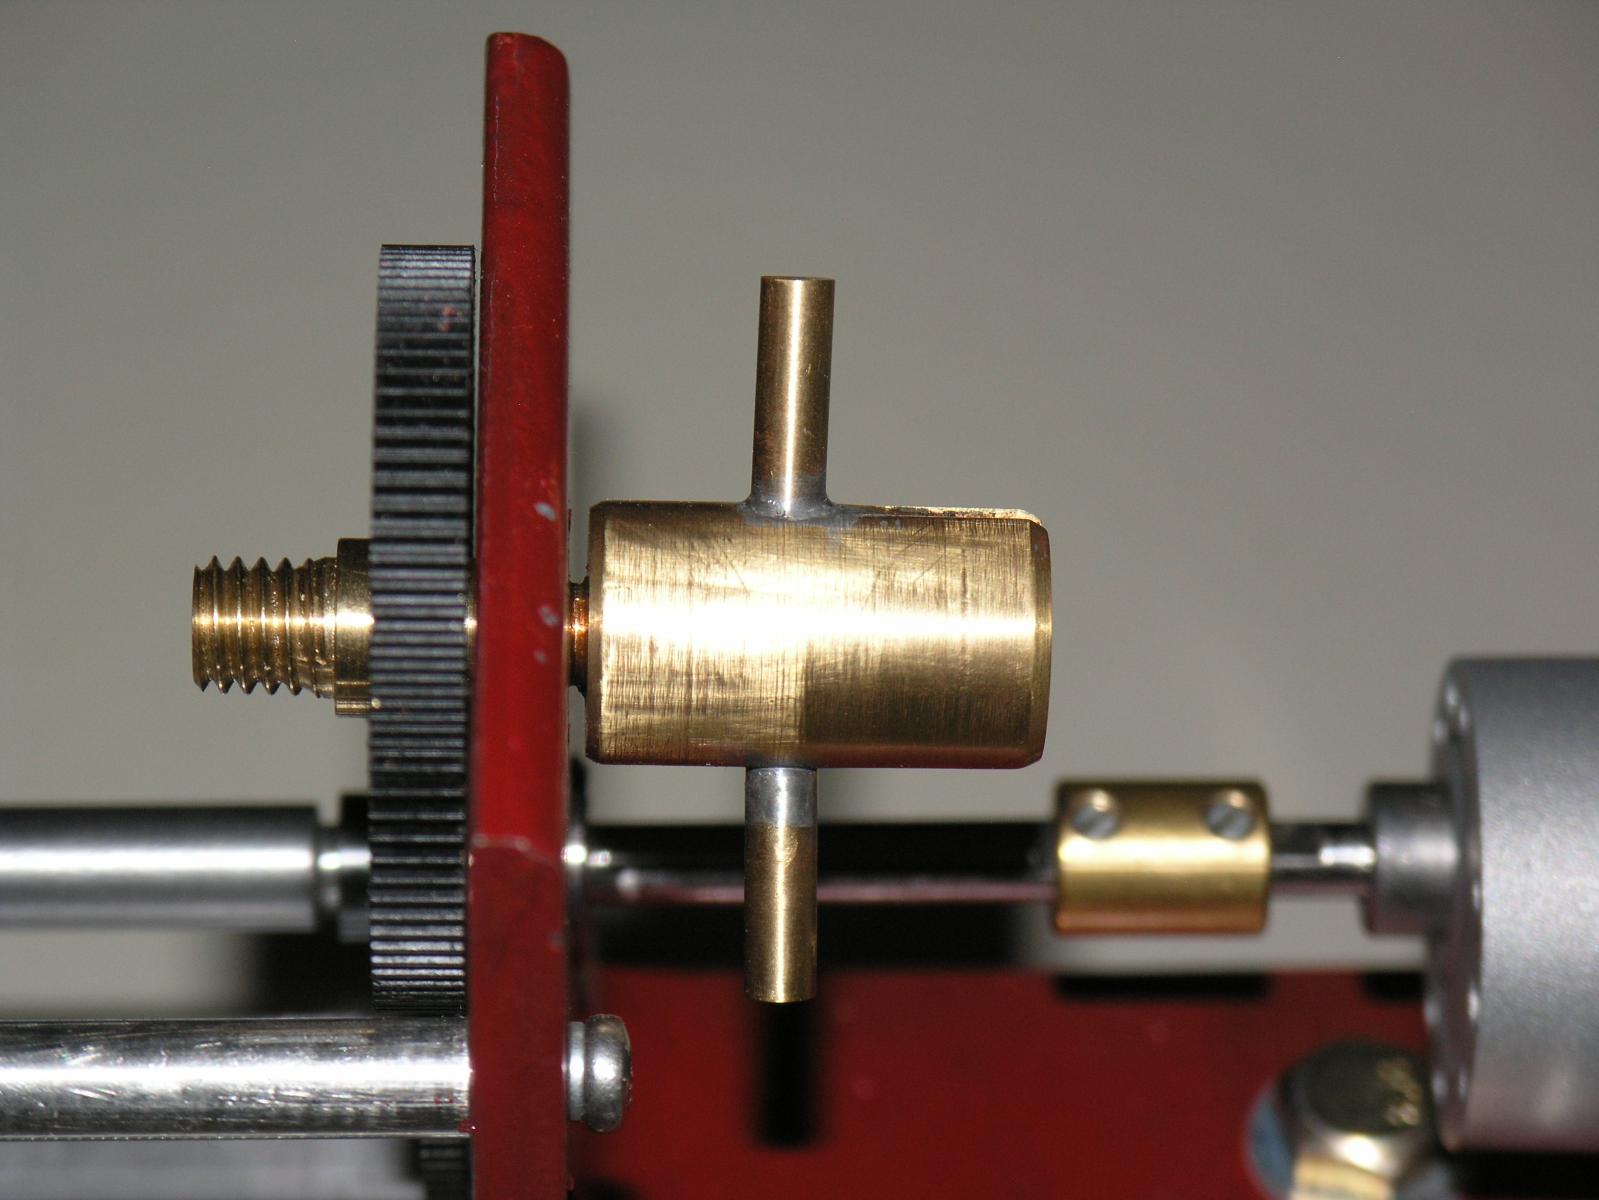
Controls the direction of turn and rotation speed of the scale rope to be served, The turning rope pulls the serving thread from the spool and is kept perpendicular to the served rope by adjusting the feed motor speed (previous picture)
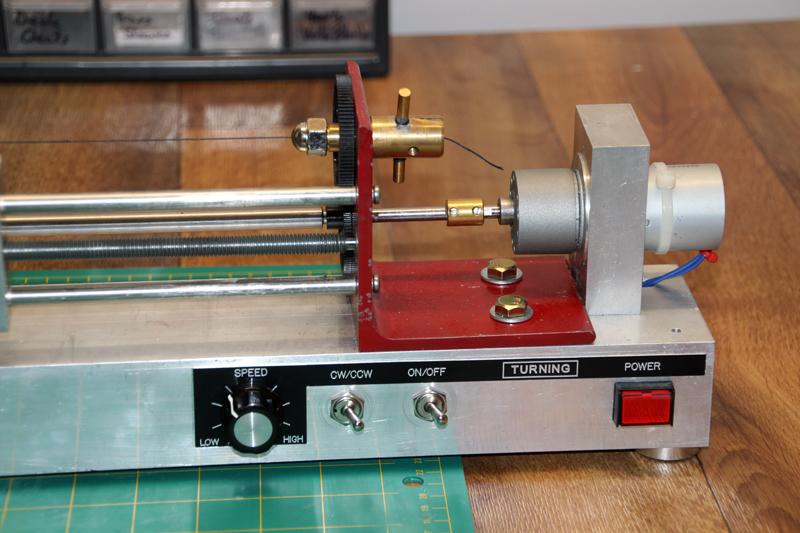
I attach a 12V supply here.

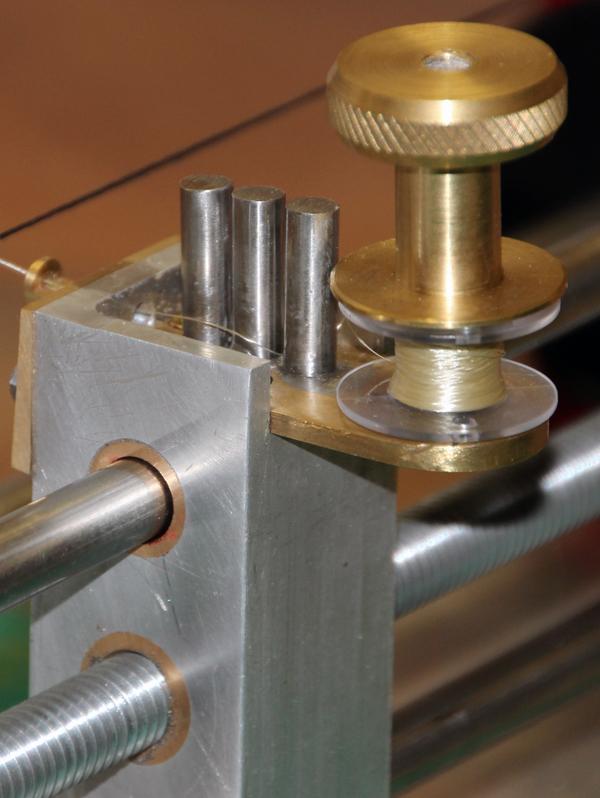
The purpose of the vertical bars is to provide friction to maintain steady tension on the serving stock thread.

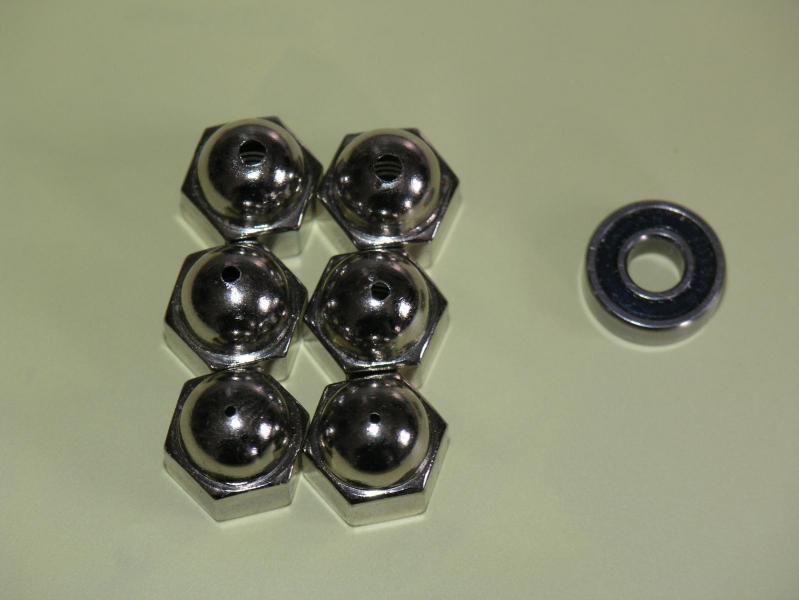
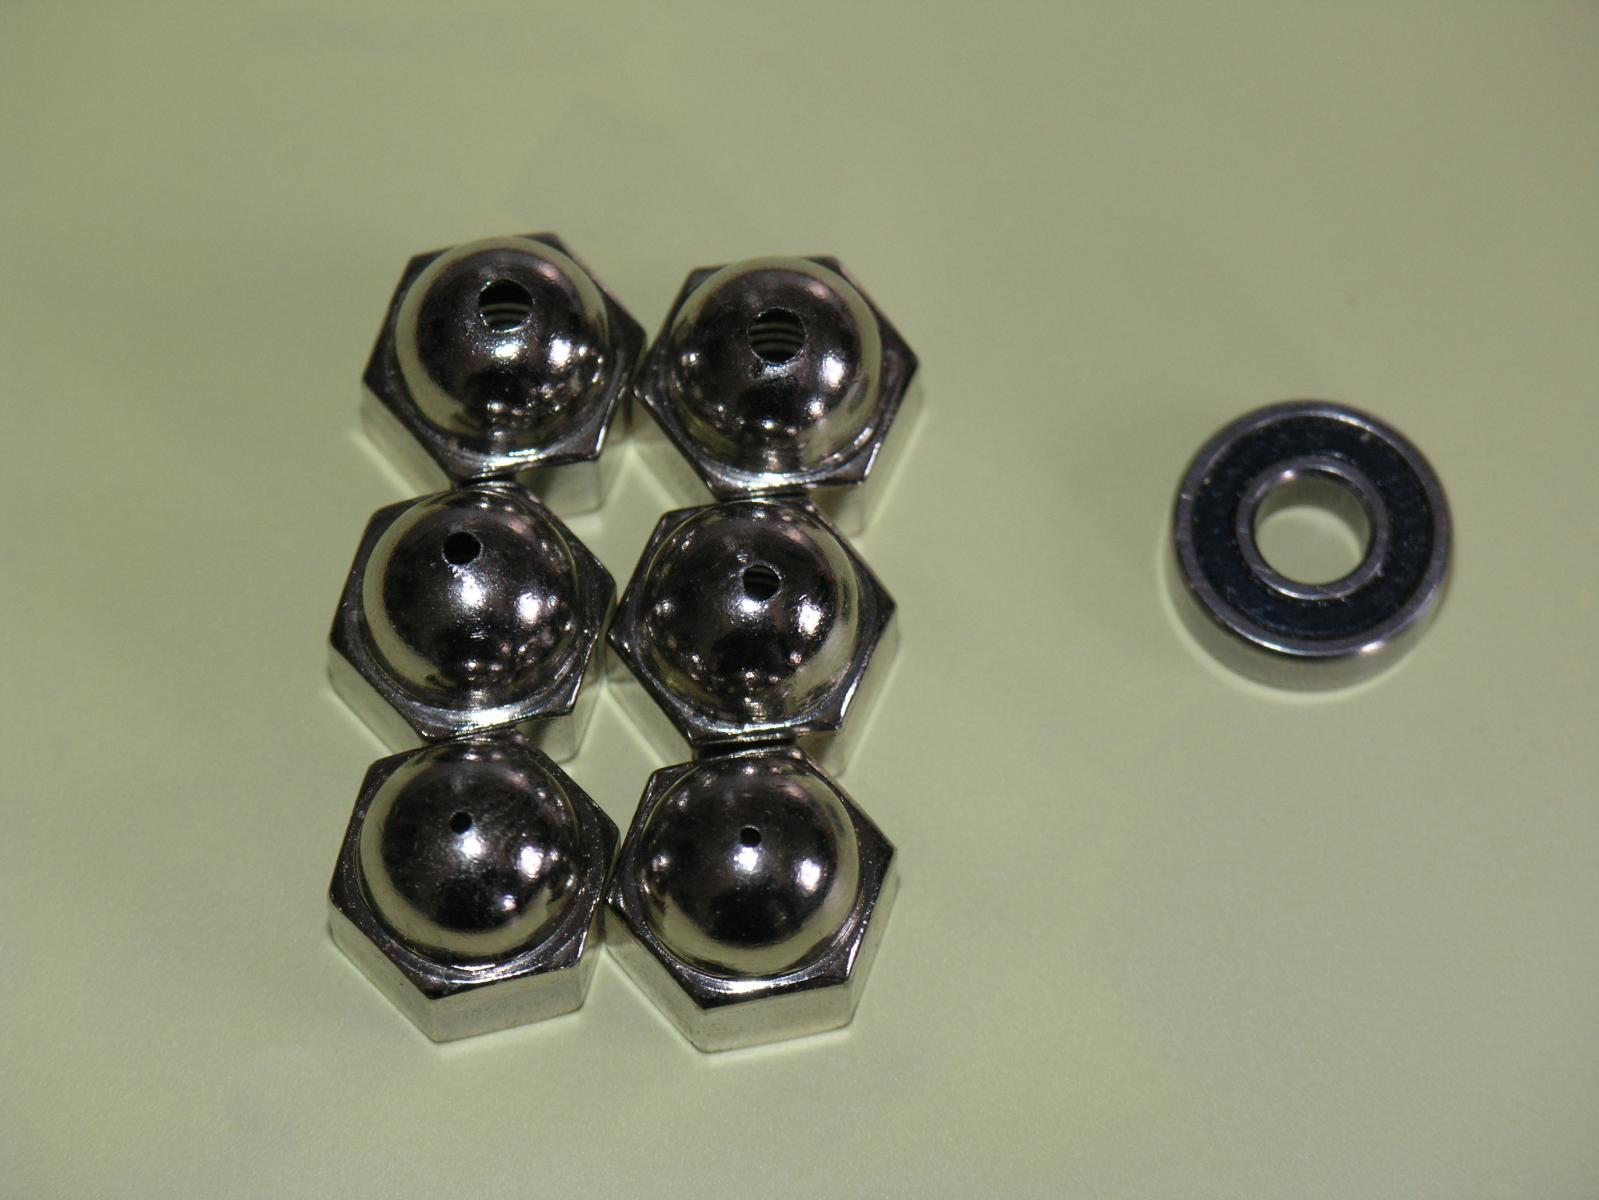
The rope to be served is fed through the dome nuts (next photo) through the shaft and figure 8 secured to the bars to maintain tension. Alternatively, the grub screws on the top of this assembly can be screwed down to bite on the rope.
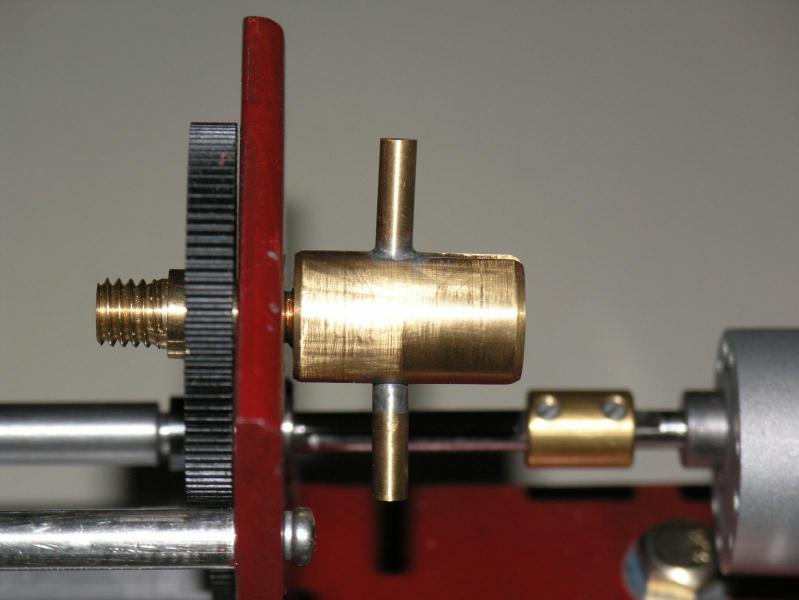
These dome nuts are attached to the ends of each drive shaft to hold the rope to be servved central; the size of the hole is determined by the rope diameter.
-
This post is not intended as a definitive discussion on the subject and there are other options used in the real world. It simply provides some background information and is an update of a post I placed on MSW 1.0.
Even in modern naval and merchant ship seamanship practice, the state/look of the ship depends on her current employment. If at sea, ropes, tails and fag-ends are left in a secure (won't move around) but ready to use state. In harbour, especially if under their lordship's eyes, most ropes are made up to look neat and tidy (exceptions might be the boat rope etc if at anchor or at a buoy).
In the days of sail, there were many lines and ropes used, and most running rigging had a tail that needed to be secured for ready use and/or be presented in a more tidy manner when in harbour / not underway.
When making up rope/lines ready for use, they are either coiled or flaked out. The greatest care is taken to prevent two things: the rope/line will run out freely without snagging, and minimising the chance of injury to crew and equipment.
The left/right twist of a rope needs to be considered when making-up a coil. Try making up a rope, especially natural fibre ropes, against their lay and you will soon get snarls/kinks. Once made-up, the coil can be put down opposite to its lay, but the direction of the lay of the coil (rope itself) will not change, only the aspect/perspective of the lay as you look at it.
Short story depending on the aspect you wish to model – steady state at sea or in harbour, or preparing for getting under way, will determine how to depict the ropes.
Flaking
Flaking a rope is to arrange it on the deck ready for easy use or made up as a decorative finish for the rope while in harbour etc.
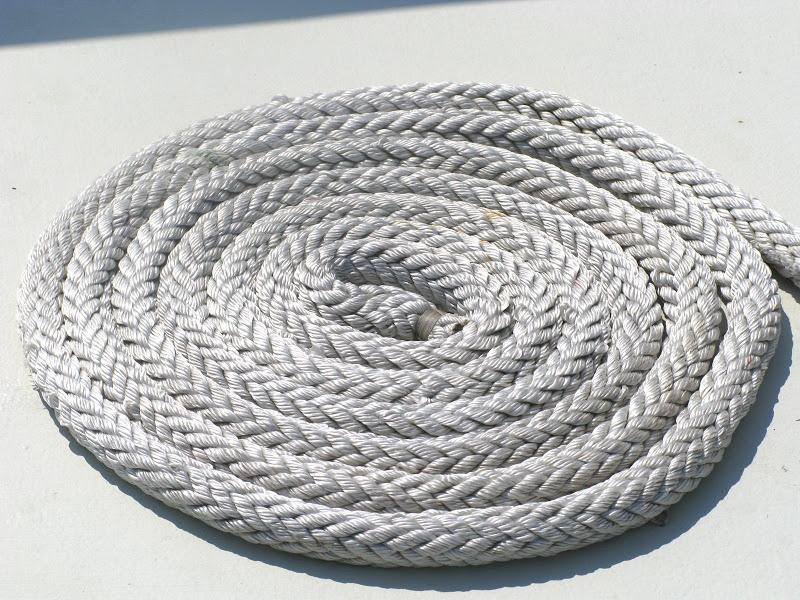
The Flemish Flake (or Flemish Coil) provides an attractive, neat way of temporarily stowing the end of a rope. A Flemish flake/coil, also called a cheesed coil, is a flat coil of rope with the end in the centre and the turns lying against, without riding over, each other. Flemish coils were, and still are, used by the 'Grey Funnel Line' (Navy) and by yachties when they want everything to look especially neat and tidy. See:
http://ikstremdom.is-a-chef.com/outdoor/rope/animatedknots/flemish/index.htm or
From: http://picasaweb.google.com/lh/photo/dsL-IPHIfHWmxdkiOjOBLg
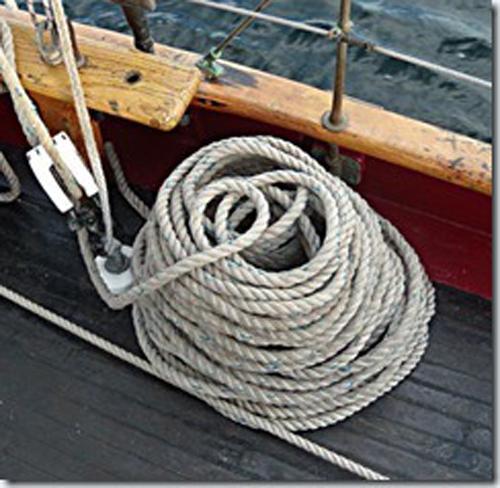
For larger ropes where the tail end is very long, an alternate pattern can be made-up by first laying the rope down flat on the deck, in long concentric loops. Take a bight (all loops) from the end opposite to the direction of the standing end, flip and draw it across itself to form the figure eight (as shown). The finished result is represented below in a more 'artistic' display which does not show the standing end.

From: http://www.seattleartmuseum.org/getout/artdescriptions_2011.asp
This decorative rope finish is not to be confused with a working flake of a similar name 'the figure 8 flake'. See: http://www.animatedknots.com/fig8flake/index.php?LogoImage=LogoGrog.jpg&Website=www.animatedknots.com
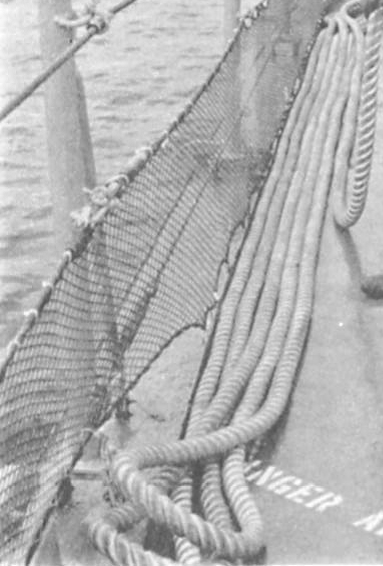
Another working flake is the zigzag or snaking flake also called 'faking' depending on whom you talk to, and is often used where you need the rope to run out without catching, snubbing or otherwise. This is normally only used when the rope is being, or about to be worked.
For working with running rigging, a more modern practice is to use the Ballantine Coil for the halyards when a sail is raised. With masts that may rise over 100 feet above the water, the halyards are quite long requiring very careful coiling to keep the lines organised so they will run free if needed and not become tangled. The Ballantine Coil builds a stable coil that is compact and stable.
See http://captnmike.com/2011/10/03/coiling-line-using-the-ballantine-coil-on-the-adventuress/ for details on how to make this coil up.
Line Coils
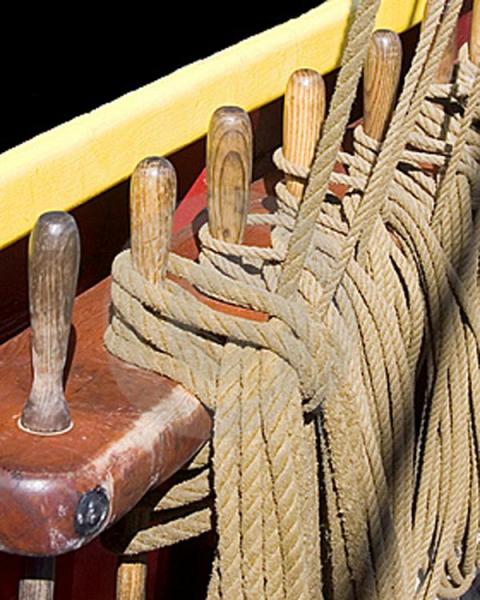
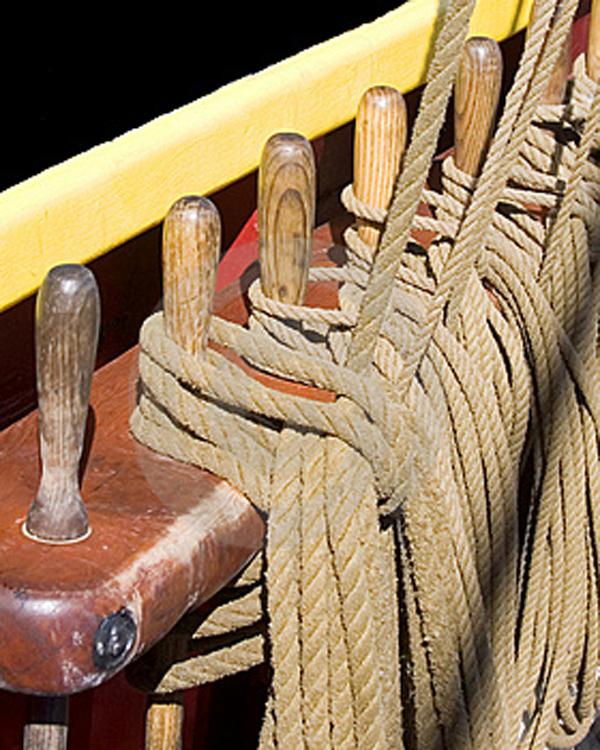
The tail end of a rope is always coiled with the direction of the twist. If the rope is the tail end of a halyard or such, which is to be belayed, the loops are started about half an arm’s length (adjust to scale) along the standing end from the belaying pin. Once the loops have been formed, a bight is taken in the standing-end, drawn through the top of the eye in the loops, and hung from the belaying pin, cleat or staghorn as shown in the following links.
http://ikstremdom.is-a-chef.com/outdoor/rope/animatedknots/coilattached/index.htm or
Some modellers prefer to form these coils off the model and hang it from the belaying pin which, at scale, covers the securing knot/line on the belaying pin which masks whether it has been formed on or off the model. As I prefer to be authentic, I prefer to form these on the model just as in real life using a few rigging tools. This should not done until all rigging (associated with these belaying pins/fixtures) has been completed and the final tensions applied to the ropes. Secure the rope-ends as you would in real life to that fitting (pin, cleats etc), dab it with a touch of diluted PVA glue, then form the loops over the end of one tool. Use the other tool or a pair of tweezers to
pull the bight through and loop it over the pin going to the side of the tool on which the loops have been formed.Some associated useful links include:
Knots:
http://www.animatedknots.com/indexboating.php?LogoImage=LogoGrog.jpg&Website=www.animatedknots.com
Whippings:
http://www.animatedknots.com/indexropecare.php?LogoImage=LogoGrog.jpg&Website=www.animatedknots.com or
http://ikstremdom.is-a-chef.com/outdoor/rope/animatedknots/sailmakers/index.htm
Splices:
http://www.animatedknots.com/indexsplicing.php?LogoImage=LogoGrog.jpg&Website=www.animatedknots.com or
http://ikstremdom.is-a-chef.com/outdoor/rope/animatedknots/backspliceropecare/index.htm
- shortgrass, rybakov, Blue Ensign and 2 others
-
 5
5
-
Very nice build Jason, looks great. Now a man who enjoys rigging, that's a rarity
I hope you had a bundy t celebrate her launching?cheers
Pat
-
Folks, my issue is a little different. When at home using Win7 and IE 9, no problems. At work (shhh! don\'t tell the boss
) I have XP and IE 8.x. At work, the editor selects the font size for my posts at random. Unless I keep a close eye on it the text will be shown from anything between 14 point or 6 point, bullted, supscript or subscript - Microsoft (or the board) simply decides what it would like to use -- hence the large number of edited posts I have when i go back to fix them It seems to be a compatibility issue between our current forum editor and XP and/or IE 8.x
cheers
Pat
-
She's coming along very nicely with some great detail there Pop-eye. I can help you out with a nautical dictionary mate, but that would take alot of the fun out of your posts
cheers
Pat
-
Great work Danny, although time consuming please be assured us mere mortal b uilders appreciate your efforts
I look forwartd to yourt tut on clamps as i am contemplating a set also.
cheers
Pat
-
Very nice work as usual Ilhan, your woodwork is very precise and clean. This will make a very nice addition to your collection of excellent models.
cheers
Pat
-
Hello again Paul and great to see your updates. Rereading these posts serves as a great reminder of the terrific amount of detailing you apply to your work. This is very motivating as it shows just what can be achieved with a litlle thought, work and large amount of talent
cheers
Pat
-
Hi Karl, very nice work and very skillfully built. You have asked for critical comments but my knowledge and ability levels do not provide me the capacity to find anything at all requiring such a comment against this exquisite model.
cheers
Pat
- Jeronimo and cabrapente
-
2
-
-
Sounds like you had an interesting day John. If it wasn't the Kleptomanic mice taking your parts, I think you have to assume you had a delegate with a very special interest in your work
At least you managed to retain a little of your work.
cheers
Pat
-
Pat,
I made a few ropes tonight - using DMC perle - size 5, 8 and 12 - they are already LH threads - so first spin on the ropewalk makes them RH - and very nice too. Too late tonight to take photos - I will do some after work tomorrow. I will also measure and work out their finished sizes.
Great news and very many thanks for that feedback Meredith. It is great to know there is some LH stock thread out there. Now to find a source
cheers
Pat
-
An interesting subject and niced build Wayne; thanks for taking the time to repost the log.
Wish I could find a helper - Seems to have impressed the Major too!
cheers
Pat
-
Amen to that, bit like building to an 'interim' plan!

Pat
-
Another option maybe to go by the actual proportions of the ship. That is, if at 1:60; calculate the actual size (from available/known data) of the relevant part etc (e.g. length of the keel or breadth etc) iaw the real dimensions and then see which of the above is closer in general (the part, the drawing/plan or the list
)In general, I found the skeletal dimensions pretty close as cut but needed some tweaking.
cheers
Pat
America by popeye the sailor - FINISHED - Billing Boats - 1:72 scale
in - Kit build logs for subjects built from 1851 - 1900
Posted · Edited by BANYAN
They look very good Popeye, a fine addition to a fine build - now you had better get on with it instead of talking about lobsters, popcorn and oysters or the thread police will come after you


cheers
Pat