GGibson
-
Posts
1,089 -
Joined
-
Last visited
Content Type
Profiles
Forums
Gallery
Events
Everything posted by GGibson
-
 Looks really sharp, John! Great work, sir! I can probably look back and see, but did you paint or blacken the small brass pieces around the mast? I'm working on the chain plates now, and the blackening has worked pretty well for them. Will do the same, I think, when I get to the stage you are at, as well. Going to take another approach to soldering and do some more practicing. Anyways, back to your Bluenose... you're about to the rigging stage now, aren't you? Super cool! Carry on, John!
- 282 replies
-
- 1
-

-
- Bluenose
- Model Shipways
- (and 1 more)
-
Yep... I'm just waiting on their email reply saying they are back from their vacay! 👍
-
USS Constitution by mtbediz - 1:76
GGibson replied to mtbediz's topic in - Build logs for subjects built 1751 - 1800
Thanks for clarifying, Mustafa! As I said before, it really looks like an awesome planking. Carry on, sir! -
USS Constitution by mtbediz - 1:76
GGibson replied to mtbediz's topic in - Build logs for subjects built 1751 - 1800
Planking looks really good, Mustafa. Congrats on a smooth job! Curious, though, on your choice of butt joint spacing. I generally read about recommendations for 3 or 4 plank spacing before repeated butt joints. Yours looks like only 2. Does the copper plating that will cover a good part of the hull have an effect on that decision? Not meant as criticism but genuinely curious as to process, being a new modeler. I'm enjoying watching your build log! -
Byrnes Table Saw Configeration
GGibson replied to Guyuti's topic in Modeling tools and Workshop Equipment
Reading all of this with great interest, as I've sent Jim & Donna a message on their website for when they return from their break. Appreciate all of the recommendations given above... 👍 -
I have sent Jim & Donna an email/message on their website, anxiously waiting for them to return from their time off. 👍👍
-
Excellent work, Wizard! Never really thought about a name plate for my first few ships. Great idea!
- 38 replies
-
- 2
-

-
- Model Shipways
- Shipwright Series
- (and 2 more)
-
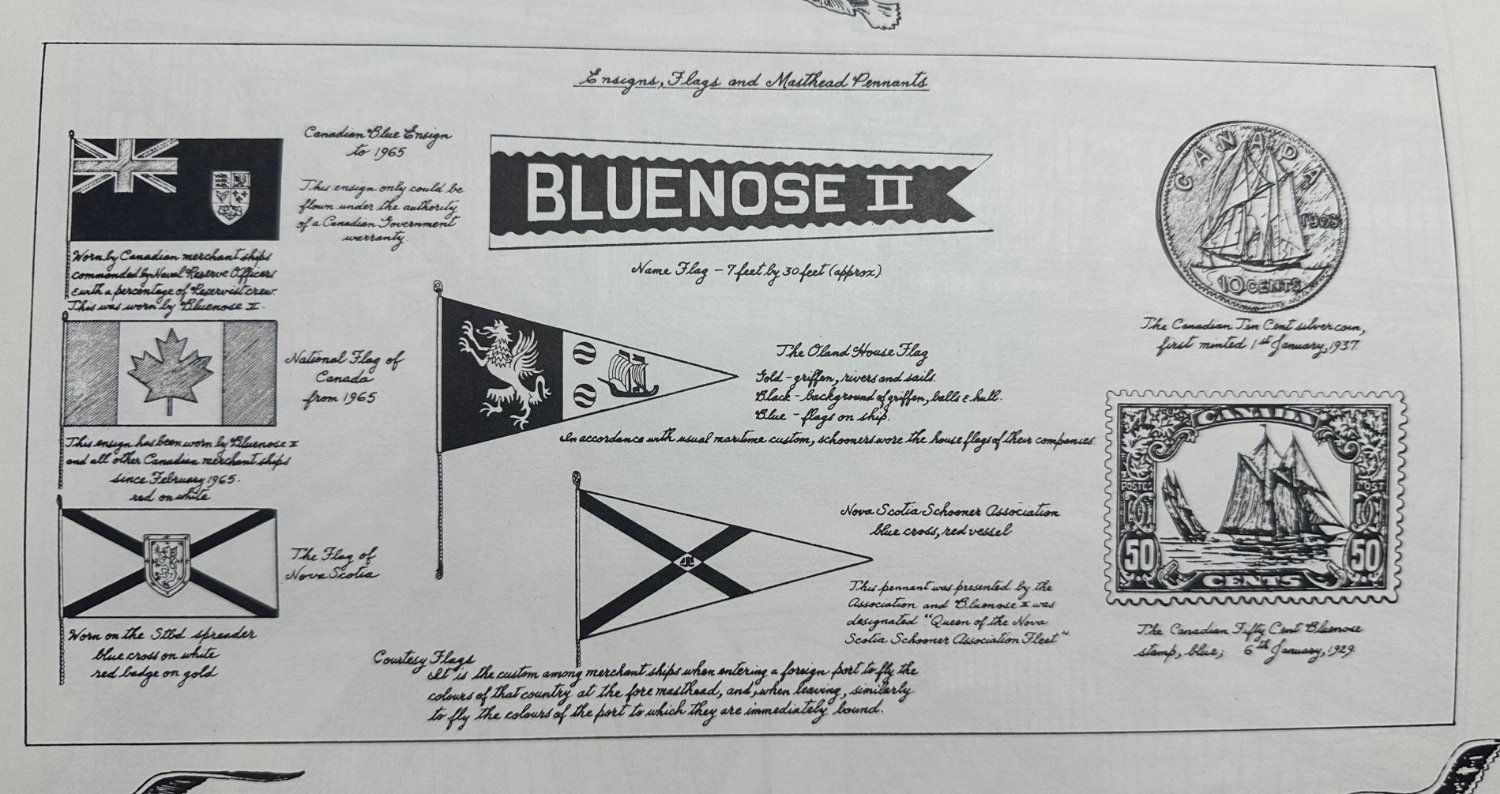
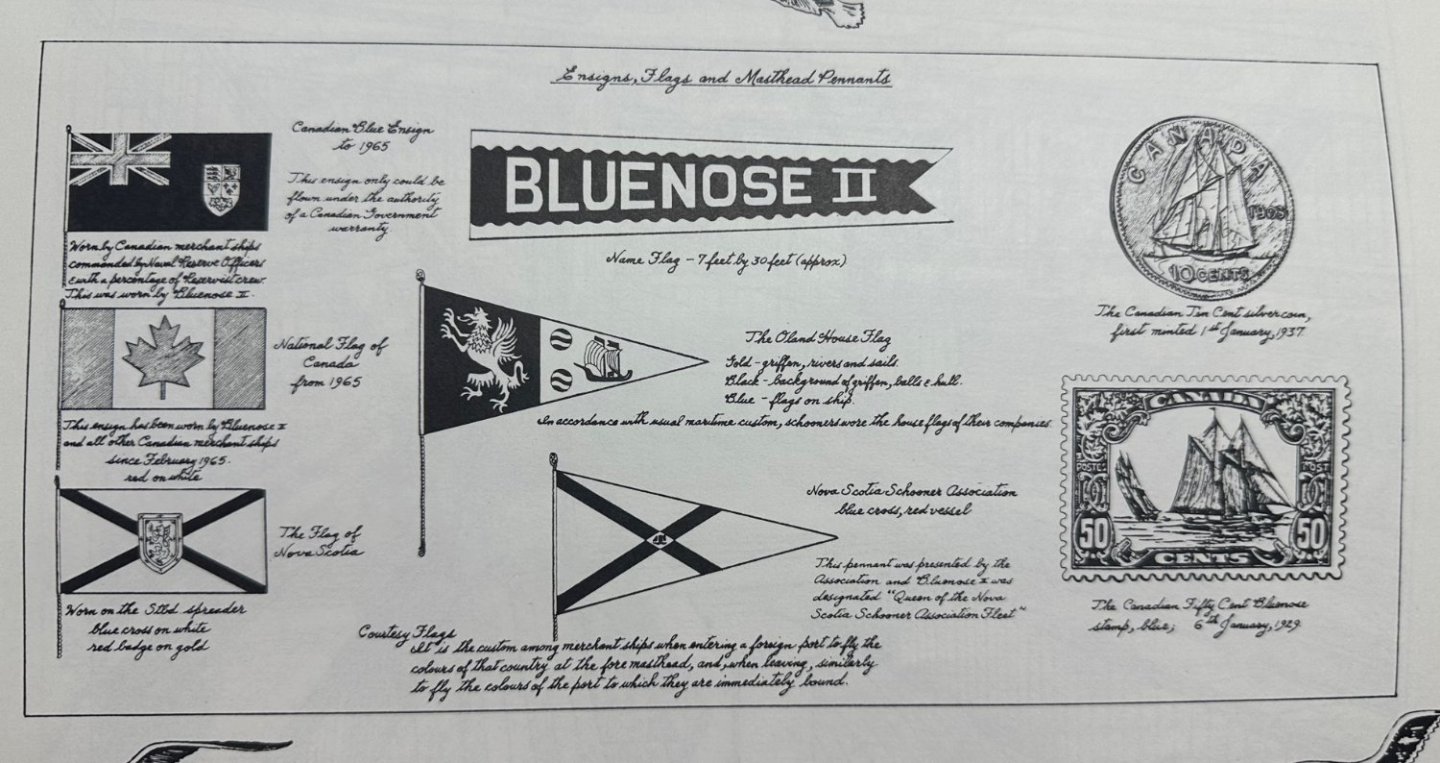
John - Here's some info in L.B. Jenson's Bluenose II - Saga of the Great Fishing Schooners on page 43 regarding ensigns, flags and masthead pennants. I am posting a picture of the page, but the typeset is difficult to read in the book, let alone with my poor photography skills, so I'll type here what is said about each item, as well. Upper Left - Canadian Blue Ensign to 1965 - This ensign only could be flown under the authority of a Canadian Government warranty. Worn by Canadian merchant ships commanded by Naval Reserve Officers & with a percentage of Reservist crew. This was worn by Bluenose II. Middle Left - National Flag of Canada from 1965 - This ensign has been worn by Bluenose II and all other Canadian merchant ships since February 1965. Red on white. Lower Left - The Flag of Nova Scotia - Worn on the Stbd. spreader. Blue cross on white. Red badge on gold. Center Top - Name Flag - 7 feet by 30 feet (approx.) Center Middle - The Oland House Flag - Gold - griffon, rivers and sails. Black - background of griffon, balls & hull. Blue - flags on ship. In accordance with usual maritime custom, schooners wore the house flags of their companies. Center Bottom - Nova Scotia Schooner Association - blue cross, red vessel. This pennant was presented by the Association and Bluenose II was designated "Queen of the Nova Scotia Schooner Association Fleet" Very Center Bottom - Courtesy Flags - It is the custom among merchant ships when entering a foreign port to fly the colours of that country at the fore masthead, and, when leaving, similarly to fly the colours of the port to which they are immediately bound. Upper Right - The Canadian Ten Cent Silver Coin, first minted 1st January 1937 Lower Right - The Canadian Fifty Cent Bluenose stamp, blue, 6th January, 1929.
- 282 replies
-
- 2
-
-
- Bluenose
- Model Shipways
- (and 1 more)
-
I have trouble soldering something at 7.64", let alone 7/64"... Speaking of the flag halliard, though, did you find a resource for a Canadian Red Ensign flag, or are you making your own? Continuing to look awesome, John! Totally envious..! Great work! I'll get there... eventually.
- 282 replies
-
- 2
-
-
-
- Bluenose
- Model Shipways
- (and 1 more)
-
Thanks, John! Plenty of great build logs to refer to, as well, including your current progress! 👍 And, yes, some great info/drawings on shrouds and rigging in the book. Will definitely be researching more. I mentioned working on anchors and cathead next, but I still need to put the chainplates in, so better do that before I knock the crap out of a cathead while drilling for the brass strip slots. I'm sure I had a valid reason for waiting until now to do these chainplates and deadeyes... <eyeroll>
- 184 replies
-
- 1
-
-
- Bluenose
- Model Shipways
- (and 1 more)
-
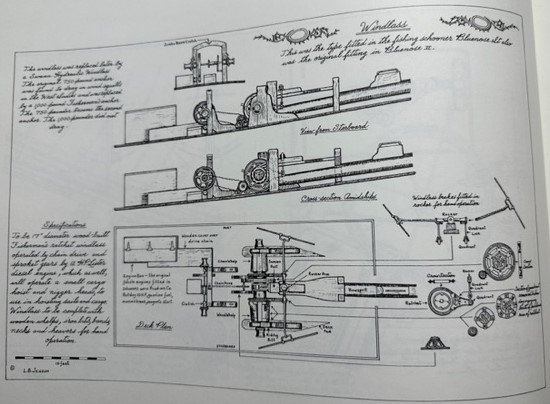
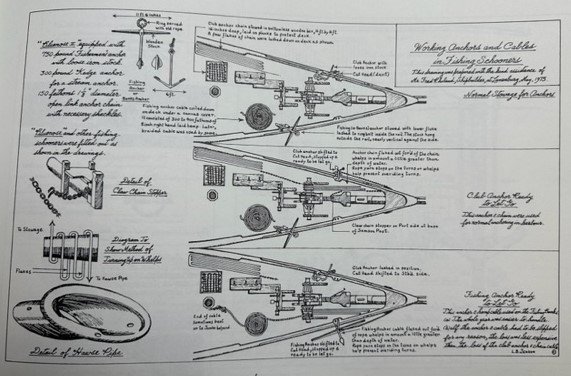
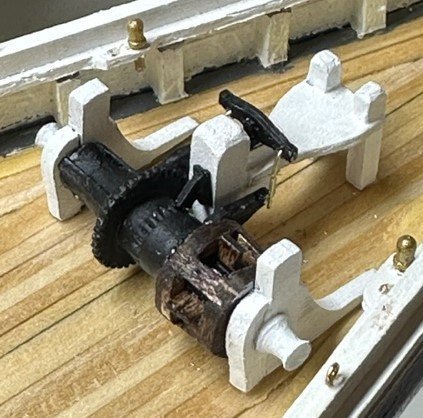
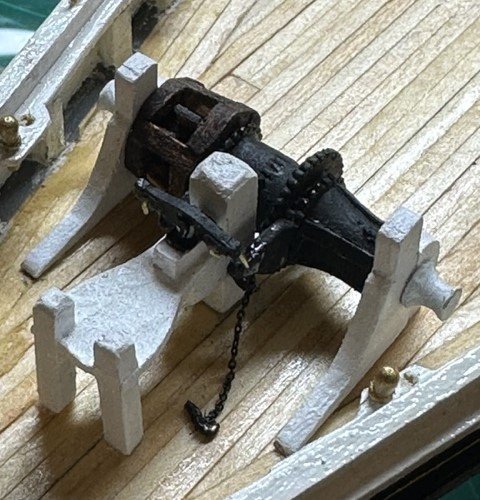
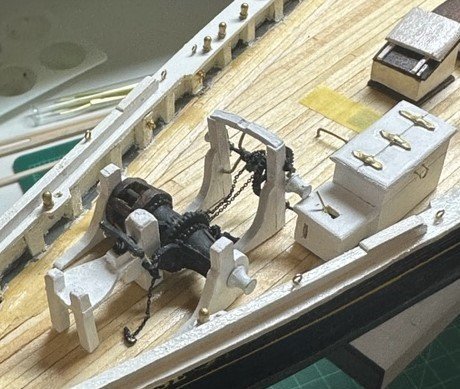
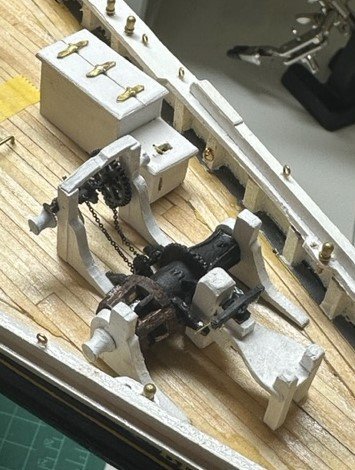
A small update, but an update, nonetheless... Time to get the windlass and other machinery placed on the deck. While everything was pretty straight-forward, it was definitely tedious, small-scale work. First thing I needed to do, though, as a pretty new ship modeler who had no real nautical experience, I needed to familiarize myself with the total operation of the windlass, how it affects the anchoring, hoisting the sails, hoisting cargo, etc. As I began this Bluenose build, another local builder whom I had met at a KC-area club meeting provided me with several books from his library. One of those was Bluenose II - Saga of the Great Fishing Schooners by L.B. Jenson. Others here on MSW have mentioned this book in some of their posts. In this book, the author discusses details of not only the Bluenose II, but the original Bluenose 1921. On pages 54-55 of the book, he has descriptions and drawings of the windlass and associated machinery, and the working anchors and cables. Very interesting and informative! (My apologies for any blurry photo shots.) All of the kit-provided cast metal pieces were in pretty good shape. Just needed some cleaning. The chain whelp side of the windlass barrel was lined with 1/64" brass strips using CA glue. The wood whelp side of the windlass was a little more tricky, as it was fitted with some very small pieces of 1/16" & 3/32" square strips, and it took a few tries to get something that looked decent enough to call good. The counter shaft assembly and the other winch machinery, including the arch that will make up the jumbo jib boom crutch, all came together pretty well. I also added the brake beam to the top of the bowsprit and added, as best I could, a thin brass rod from the brake beam down to the quadrants attached to the windlass barrel. Before it got too tight and busy on the deck for me to do it, I also added the claw chain stopper to the port side of the samson post, as was shown in Mr. Jenson's book. In order to simulate the gear chain on the windlass, I opted to not take any jewelry from my wife's jewelry box... I'M JOKING!... and I purchased some of the Mantua black chain that Model Expo had advertised on their website. This chain is approximately 24 links/inch. In reading what would be appropriate size chain for a 1:64 scale project like the Bluenose, I saw somewhere in the 22-24 links per inch range. The chain is definitely tiny, but didn't want the chain to look oversized on the deck, as I will also use this chain for the anchors and a display of a few flakes on the deck and in the chain box. Hopefully, it will look good. So... working on the anchors is probably the next thing on my Bluenose to-do list. Again, the aforementioned book by Mr. Jenson, on page 55, discusses working anchors and cables, their normal stowage positions, and how the cathead is shifted from port to starboard, depending on whether the club anchor or fishing anchor is prepared to be let go. Again, very interesting and informative.
- 184 replies
-
- 4
-
-

-
- Bluenose
- Model Shipways
- (and 1 more)
-
MicroMark or another similar precision tool company may have what you are looking for. Maybe a Harbor Freight close to where you live?
-
Hi Barbara! When you say "portable drill", are you referring to something like a pin vise, that you would manually use with small micro bits of 0.05"/1.3mm? Or are you looking for a power tool drill, still using micro bits? I recently purchased a Proxxon TBM115 bench drill press, and I am loving it.
-
Great Photo Etched Saw Blades
GGibson replied to kurtvd19's topic in NAUTICAL RESEARCH GUILD - News & Information
So, just a quick update and acknowledgement... After Kurt's initial post here providing additional information regarding my query during the NRG Virtual Workshop a few Saturdays ago, and several other members' agreement on the quality of the product, I got on John Votech's UMM-USA website this afternoon and ordered the Micro Saw Pack. I received an email acknowledgement of the order at 6:51PM, and at 7:12PM I received a notice that a USPS tracking number had been assigned to the shipment! What great customer service! And, just before I came on here to give him kudos, I sent John a personal thank you email for his speed and, while typing this post, received another thank you from him for doing business with him. All over one simple purchase. Those are the people we continue to work with! Thanks, Kurt, for the info! -
I am not a paint expert, but I have been using acrylic paint on my hand-brushed Bluenose. Goes on the wood well (after a white primer underneath) with a couple of coats on the hull, and the brushes clean up nicely with water and a drop of Dawn detergent.
-
Modeler12's USS Constitution Build Log & Website Info
GGibson posted a topic in Wood ship model kits
As I am continuing to work on my Bluenose and following others who are also working on their own Bluenose project or those who have FINISHED build logs that I continue to refer back to for guidance, I am, like many others who get hooked in this hobby, continuing to look at our possible "let's do THAT ONE next" project. For me, even though I already have a couple waiting on the shelf waiting for shipyard clearance, I am intrigued by the USS Constitution. Yes, the "Conny" has been built by many modelers. Perhaps, other than its tremendous US naval history, the wealth of previous logs and info that is on this MSW website is what keeps me looking at it. So, I have been doing lots of research and reading and looking at all of the great build logs for the Constitution. I noticed in one of the finished build logs by Modeler12, he references a personal website where he may have additional info regarding his build projects (he did both a 1:76 full build as well as a cross section model). However, I cannot find reference to the actual website in the log. In looking at his profile, it appears Jay has not visited this MSW website since January 2018, so even a personal message to him may go unanswered. Is anyone familiar with Jay/Modeler12 and his website? Appreciate passing along any info you may have. And, if a personal message is more appropriate in response, please do so. Thanks for your assistance!-
- 2
-
-
Hope the wood bends well for you for the main rail, Major! I ended up cutting the rails by hand from 1/16" stock sheets! Micro-Mark has been my go-to for various hobby-related tools. Every time a box ends up on my porch, I hear "NOW what did you get?!?" <shrug> If I copied the link correctly, this will take to the page with several reamer options. I got the set of 6 micro-size precision reamers #26108. Search results for "reamers" (micromark.com)
-
Looks really nice, Major! Scuppers should be able to be cleaned with some micro-size reamers. That's what I used and worked ok. Your painting will look awesome.
-
I second both of Glenn's comments. Nice work, John!
- 282 replies
-
- 2
-
-
-
- Bluenose
- Model Shipways
- (and 1 more)
-
I am not familiar with the HMS Bellona or its history (74 guns?!? 😲), but just looked at your log and it's a beauty! Your build there is looking great so far, as well!
-
Hi Oscar! Great start! Will follow, as the Constitution is on my "maybe some day" list. On this last post, can you edit your post and flip some of your pictures?
-
It all looks great, hamilton! Your "finishing touches" list will be a nice completion! Although, you mentioned rope coils on that list of final to-do's, but the picture of the rope coil/flake coming off the wood welp side of the windlass looks really sharp!
-
Nice completion, Nic! Congrats! And, yes, I've been looking back at your furling. And, also... like what you did in mounting it! Perhaps I could do some type of launching way display on my Bluenose with furled sails after all?!? Hmmm... Your display looks awesome! Will really be nice in the case.
- 121 replies
-
- 1
-
-
- Newsboy
- Model Shipways
- (and 2 more)