


GGibson
-
Posts
1,089 -
Joined
-
Last visited
Content Type
Profiles
Forums
Gallery
Events
Everything posted by GGibson
-
 An hour 52...?!? Will definitely have to sit down when I can with a favorite libation (or three) and enjoy this open box premiere. Thanks for sharing!
 -
Have been admiring your scratch build and referring to your Bluenose quite often. Thanks!
-
Wow... Excellent plan, hamilton! One of those "why didn't I do that sooner" ideas. Appreciate the awesome advice! That may be warranted when I get to working on the mast hoops, as well.
- 184 replies
-
- 1
-

-
- Bluenose
- Model Shipways
- (and 1 more)
-
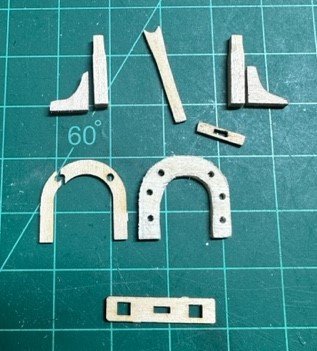
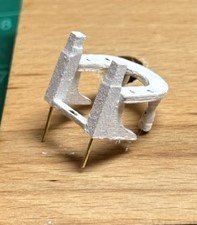
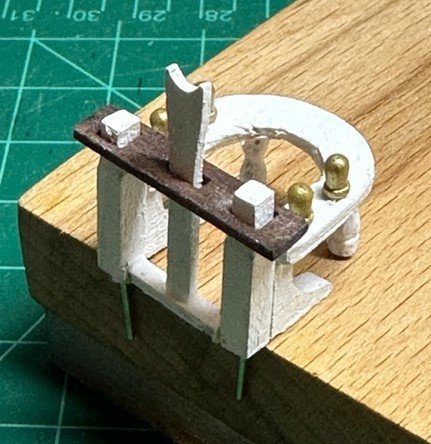
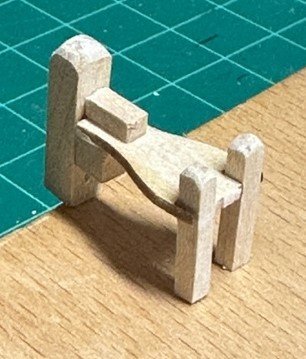
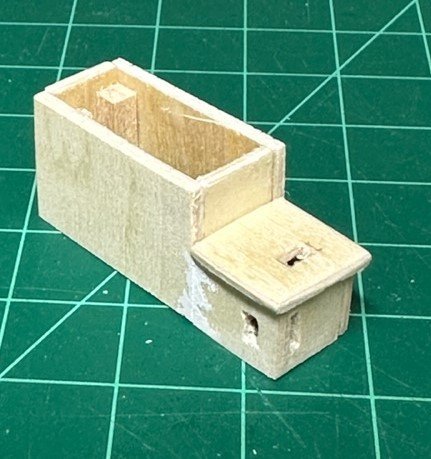
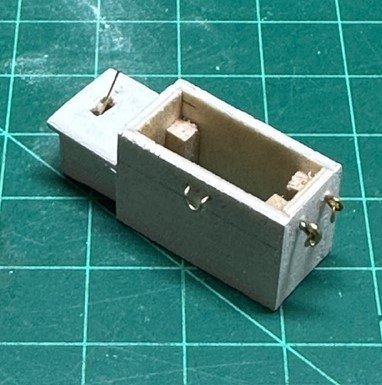
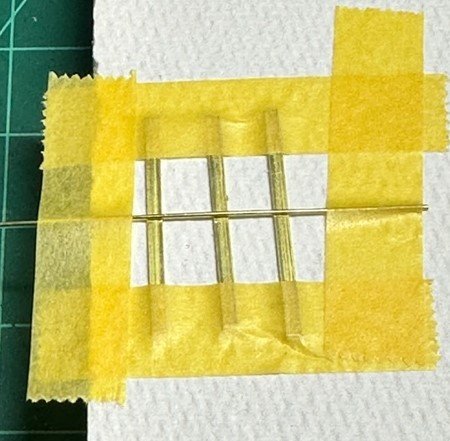
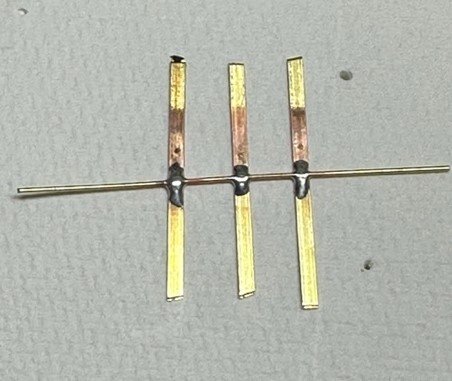
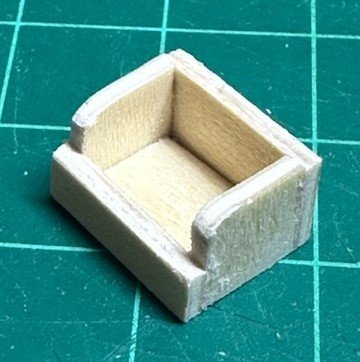
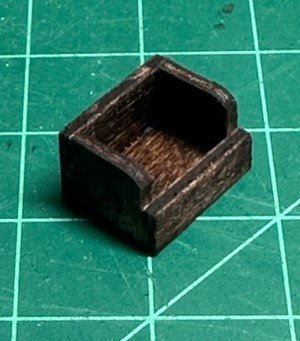
A couple more progress updates... FIFE RAIL - Like many others' builds, the laser cut rail broke while trying to ream out the holes for the stanchions. So, I traced and cut a new one using the 1/16" stock board. I used the Proxxon bench drill press to ensure the holes were cut straight, since there was so little space to work with. Primed and painted all the pieces white, except for the top bar, which I stained in order to give a bit of a color contrast. As I have done on other deck furnishings, I drilled a hole in the bottom of the posts, not only to help hold while painting, but also to provide a more secure fit on the deck when it comes time to glue onto the deck. I did shave off the bottom stubs of the stanchions that were designed to fit into holes in the deck. I'll simply glue the bottoms to the deck. I need to add the snatch blocks to the sides of the posts still. Also, I noticed that I need to add a belaying pin just in front of the boom crutch. Not sure if we've got enough room to do that without breaking the bar! As others have done, I will hold off on permanently installing on deck until the main mast is placed. Samson Post & Bowsprit Bitts - This was pretty straight-forward. The laser-cut platform had a super narrow and fragile outer edge, that I was sure would break during the construction. Fortunately, though, it survived! Everything else (post, bitts & support blocks) was cut from stock, and came together ok with no breaks. Glued, sanded, primed, final sanding and paint (Picture is prior to painting). Again, placed a small brass rod in bottom of samson post for securing to deck. Plans call for a square hole on the post under the platform for the heel of the bowsprit. I decided to just drill a hole and I will support the bowsprit with (another) brass rod in the end of the bowsprit when it comes time to work on it and install. Engine Box & Clutch Cover Box - Once again, another couple box builds. Cut all sides and top covers from 1/16" stock sheets and supported the inside corners with 1/8" square strips. Marked the locations for the lever opening, chain opening and shaft opening on clutch cover box. Drilled holes to start and then opened more and squared (as best I could) using files. Glued the clutch cover box to the side of the engine box, sanded, filed, primed and painted all. As it appears in the Nova Scotia Archives pictures, eyebolts were placed on the backside of the engine box. Also need to work on the top cover hinge replication that others have also done. I am still horrible at soldering! Think I may have mentioned previously that I am trying the resistance soldering technique. The brass strips that I soldered need to be cleaned up a bit. We'll see how I do with that and then I will add to the top cover of the engine box. Chain Box - Another box construction, but this one is a bit different, as it is lower on one side in order for crew to store and access chain, and since it is open, it has a visible bottom. Rather than painting this white, I decided to stain this chain box darker, again as it appeared in the Nova Scotia Archives pictures. Working now on all of the remaining machinery fittings and structures (windlass, etc.). Once these are all complete, I will work on how these are all positioned on the deck, add the chain, etc. Pretty exciting and intimidating all in all.
- 184 replies
-
- 4
-
-
- Bluenose
- Model Shipways
- (and 1 more)
-
Didn't know there was a "state of the build" thread... <shrug> Who knew?!? 😁 Anyways, as always, it all looks great, hamilton! Very envious of what you have accomplished on your Bluenose. Congrats!
-
Wow, Cleat! Those are (I'll say it...) sharp-looking knives! 👍🏆
-
Welcome to MSW, wdw140! Best wishes on your ship building, and hope you find the information and assistance in this forum helpful. I know I sure have!! When I first saw your mention of "river queen", my immediate thought was to one of the members named Cathead. (Sorry, I don't know how to link his name here so he gets notification of your query and my mention.) He is, from everything I have seen from his posts, the riverboat guru of MSW. Again, welcome!
-
Shrouds and ratlines look really nice, Geoff. All those clove hitches are horribly monotonous, but once you get into a rhythm, especially with a couple tweezers rather than fat fingers, it moves pretty well. Congrats on your success so far.
-
No rule that says you can't be both, Jon! 🤣 Keep up the great work!
-
Nice work, Major! You've been busy!! 👍
-
Hope JP found a saw that works for him within his budget. Although I am just a kit builder, and don't see myself doing any scratch building, there have been enough times in cutting wood when I have said to myself "...if I only had..." I just sent Jim & Donna an email for when they return... 👍🏆👍
-
This log just happened to catch my eye on an update, and I've been reading & catching up on your Newsboy. Great job, Nic! The deck reminds me a lot of what I'm doing on the Bluenose. And... I'm wanting to see how you do your furling!
- 121 replies
-
- 1
-
-
- Newsboy
- Model Shipways
- (and 2 more)
-
As a relative "noobie" to this hobby, Chris, I'd have to totally agree with that assessment. I was really expecting to be wow'd, to the point where I was fully prepared to be one of those first 999 purchasers before we got shut out. I have a ton of respect for the OcCre brand, that hasn't diminished, but was expecting a "fall off my chair while reaching for my credit card" moment. Happy for those that see an opportunity and new experience and I'm anxious to start seeing build logs for this, but... (maybe I was hoping for another USS Constitution release, after all, at maybe even a 1:64 scale) Haha.... <shrug>
-
Nice work, John! Totally impressed with (and envious of) your solder work. Need to do a ton of practice (and have patience) when I get to this stage. Awesome detailing! Carry on!
- 282 replies
-
- 2
-

-
-
- Bluenose
- Model Shipways
- (and 1 more)
-
$1,200 if you're one of the first 25 to order... <shrug> I'm back to thinking about adding one of the USS Constitution kits/plans to my shipyard... <2nd shrug>
-
As a relatively new amateur, the video presentation is amazing, very impressive, in my humble opinion. I will leave the greater analysis to those that are historians of the Royal Navy and the Battle of Trafalgar. Looking forward to reading more details from fellow hobbyists as you dive into this massive project. Best wishes! Fair winds and following seas!
-
USS Constitution by mtbediz - 1:76
GGibson replied to mtbediz's topic in - Build logs for subjects built 1751 - 1800
Planking looks really nice. I see your tick marks on the bulkheads and you mentioned having to taper some of the planks at bow and at stern. Are the tapers going according to how you planned them? -
I probably fall into that "lurker" category, as well, Evan. I've got the Titanic in my shipyard, but may never get to it. In case I do, though, I'm paying attention to as many build logs as I can! Great work on yours, sir! Carry on!
-
Got the email just now from Model Expo, as well... Kinda ruins OcCre's unveiling, huh? <shrug>
-
Thanks for the advanced analysis and insight, Gary.
-
Guess I missed where they referenced 1765 as a clue... We shall find out soon!
-
Looking good, Commodore! I was hoping you'd be satisfied with the transom after we all gave you the "it'll be ok" encouragement. In this hobby, like many other things in our lives, we become our own toughest critics and naysayers. Carry on!
-
Hi Ed! Great work so far on your Rattlesnake. Catching up on your build log here after referring back to your Bluenose log several times so far for guidance and info. Looking forward to seeing this Rattlesnake come together for you.
-
Ahhh, ok. Thanks. I'll stick with what I am using then. Watching all your rigging and above deck work with bated breath... or, since the Bluenose is a fishing vessel, perhaps it should be baited breath... <shrug> 👍
- 282 replies
-
- 1
-

-
- Bluenose
- Model Shipways
- (and 1 more)
-
Thanks for that info! Truth be told, though, the UPS and Fed Ex deliveries are outnumbering the other guy... <shrug>