Glen McGuire
-
Posts
1,984 -
Joined
-
Last visited
Content Type
Profiles
Forums
Gallery
Events
Everything posted by Glen McGuire
-
 Thank you, Joe, Keith, Grant, Ian, Mark, SH Johnny, Banyan, Roger, and John Fox III for the comments and likes. I gotta be honest, when I picked this ship, I was really sweating how in the world I'd be able to do those gun decks and all those cannons and make them look halfway decent. It came out better than I expected. So far anyway. But the sweating ain't over just yet. I've started work on the spar deck cannons with these tiny little carriages. Oh boy. TBD on how those will turn out. I've also got to figure out how to add a quarter gallery on the stern. I've never done a ship with one of those so I've got to go study some build logs. If y'all know any build logs off the top of your head that have good posts on a quarter gallery construction please let me know. Even without smoke or penguins or polar bears? You just made my day, Keith!!
- 177 replies
-
- 2
-

-

-
- Independence
- bottle
- (and 1 more)
-
OK. Here's a close-up where you can actually see the cannons sticking out of the gun ports. Looks like beard stubble.
.thumb.jpg.f3fee11805d6ecc0c091e6eb0dd3ebc1.jpg)
- 177 replies
-
- 10
-

-
-

-
- Independence
- bottle
- (and 1 more)
-
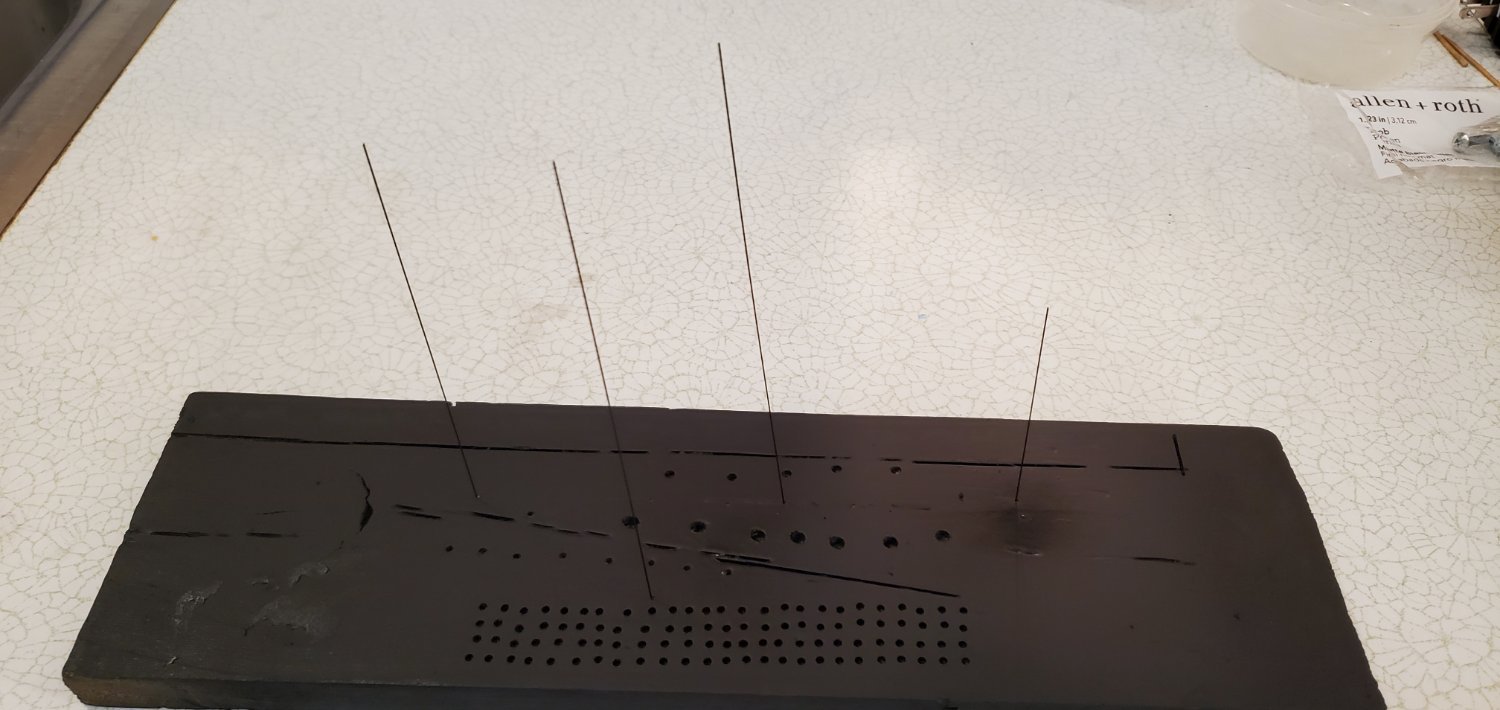
I got the hull layers painted so it's time to add cannons to the upper and lower gun decks and then squeeze the hull layers together. The pics show the construction process: 1. Five hull layers ready for assembly 2. Cannons painted (.015" music wire) 3. Cannons cut down to size 4. Cannons in place 5. Hull layers glued and clamped Those cannons are hard to see in that last pic, but you gotta trust me that they are in there!


- 177 replies
-
- 7
-
-
-
- Independence
- bottle
- (and 1 more)
-
Hey Brian, welcome aboard from a fellow Texan!
-
Thank you, Ian. Thanks, Keith. The hull and bulwarks are basswood pieces. Each piece is 1mm thick except for the bottom layer which is 2mm. That will give me some wiggle room if the ship needs to go on a diet to fit inside the bottle later. That's been a problem for me on previous builds. So I am determined to do a better job of planning during the construction phase.
- 177 replies
-
- 2
-
-
-
- Independence
- bottle
- (and 1 more)
-
Thanks, Mike. I tried to get them all the same size and as square as possible. Not perfect, but not too bad. The layers are still just dry-fitted so I can disassemble and paint the alternating black and white scheme. I'm still not sure what I'm doing with the prow.
- 177 replies
-
- 3
-
-
- Independence
- bottle
- (and 1 more)
-
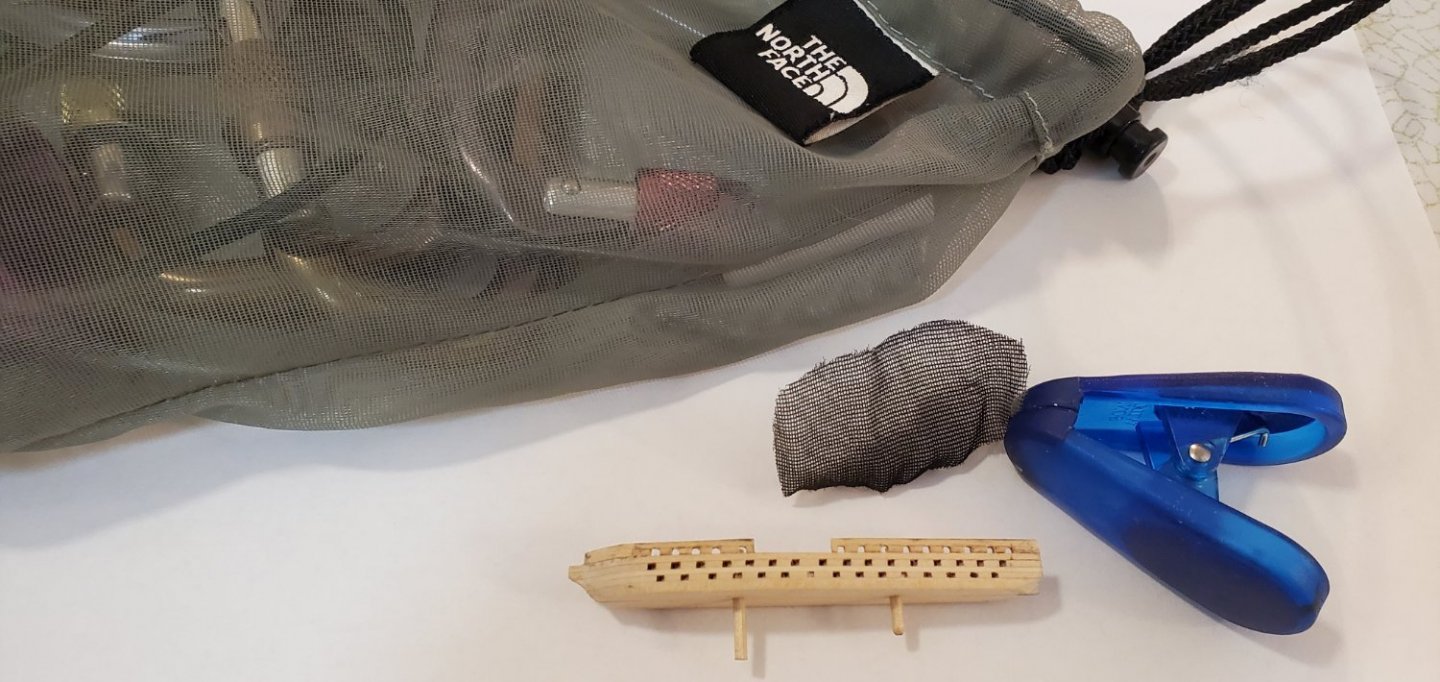
Thanks for the guidance, Mark. I went scrounging around the garage and found a finely woven mesh bag. And since nothing is else matters when you need just the right thing for a model, I cut off a small piece of the bag and gave it a light dusting of black spray paint. I think it will work perfectly.
- 177 replies
-
- 6
-
-
-
- Independence
- bottle
- (and 1 more)
-
How many kits do you have on the go at the moment?
Glen McGuire replied to CaptnBirdseye's topic in Wood ship model kits
Nope! I'm right there with you, Dave. One at a time. I have several requests/suggested ideas for SIBs piling up but I won't start on a new one till I finish the one I'm working on. -
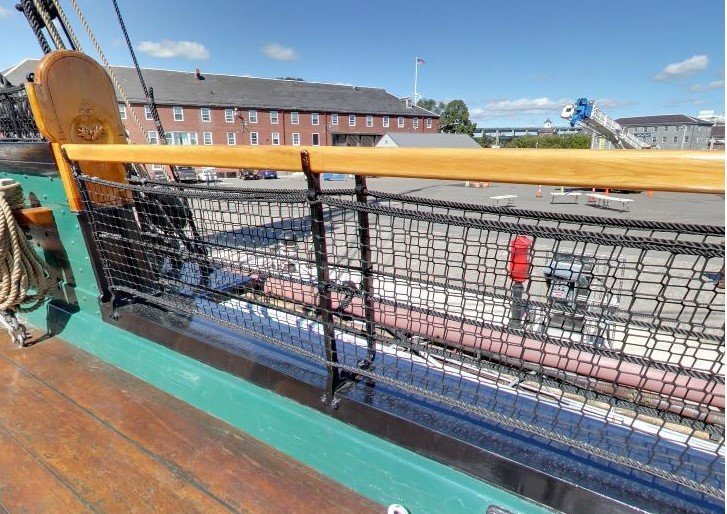
Thanks, Mark. I get A & C now. Are you talking about something like this below? I found this picture from a post by _SalD_ under a topic called "Hammock Netting Question". Supposed to be from the current Constitution.
- 177 replies
-
- 4
-
-
- Independence
- bottle
- (and 1 more)
-
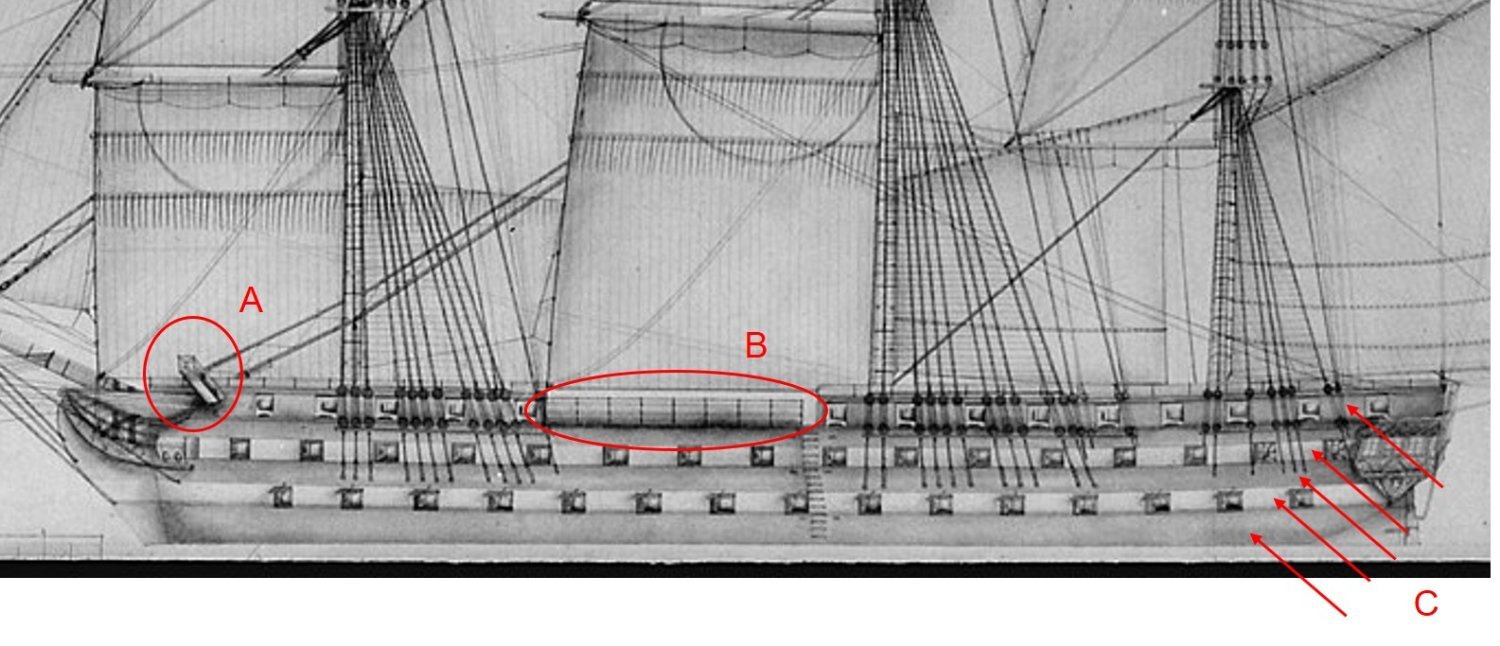
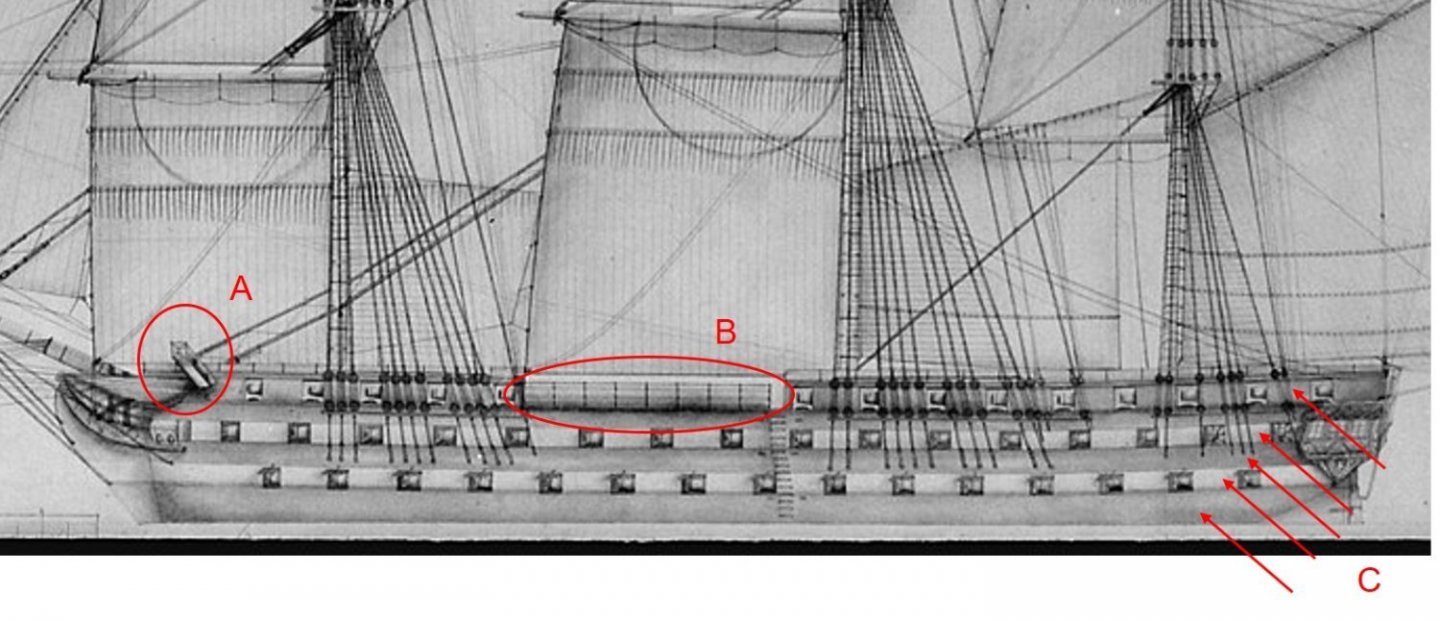
I have some questions I'm hoping someone can help with. This sail plan picture of the original 1814 Independence is the only thing I've got to build from and there are 3 things I'm not sure of (circled below). A - Is that an anchor? If not, any idea what it is? B - It looks like there's a gap in the bulwark and some kind of fence? Any idea what that is? C - Obviously it's a black and white pic, but it looks like there is an alternating color pattern between the gun deck levels and the wales. Is it likely that the color scheme would alternate black and white? If not, what would it probably be? Any insight/opinion y'all could provide would be greatly appreciated.
- 177 replies
-
- 3
-
-
- Independence
- bottle
- (and 1 more)
-
Fingers in ears.. LA LA LA LA LA LA LA LA LA LA LA...
- 177 replies
-
- 4
-
-
-
- Independence
- bottle
- (and 1 more)
-
OMG!!! Is there a moderator for this website that I can report y'all to for modeler abuse? Someone help me, PLEASE!!!!
- 177 replies
-
- 4
-
-
- Independence
- bottle
- (and 1 more)
-
Thanks, Keith! I hesitate to even mention the cannons because you and my son will start telling me how I need to have smoke coming out of them!
- 177 replies
-
- 4
-
-
- Independence
- bottle
- (and 1 more)
-
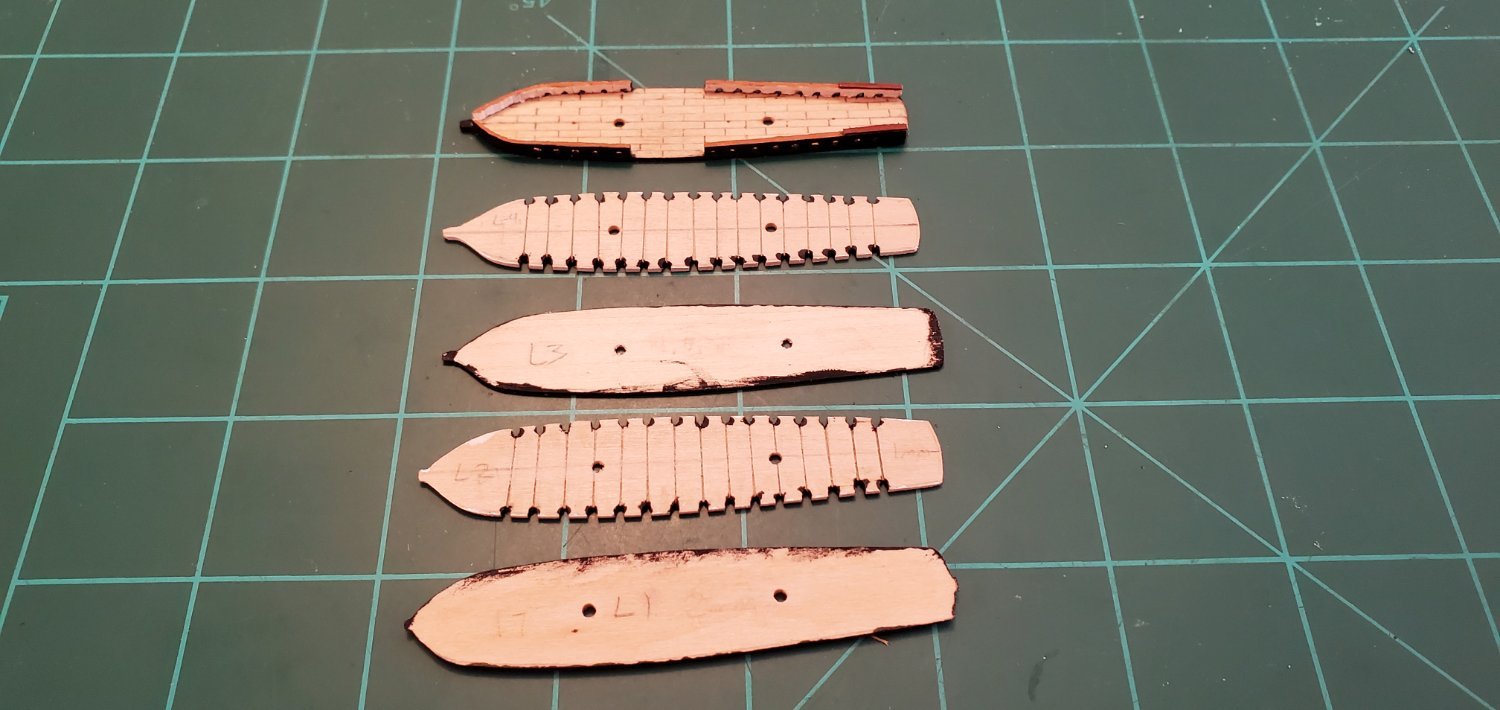
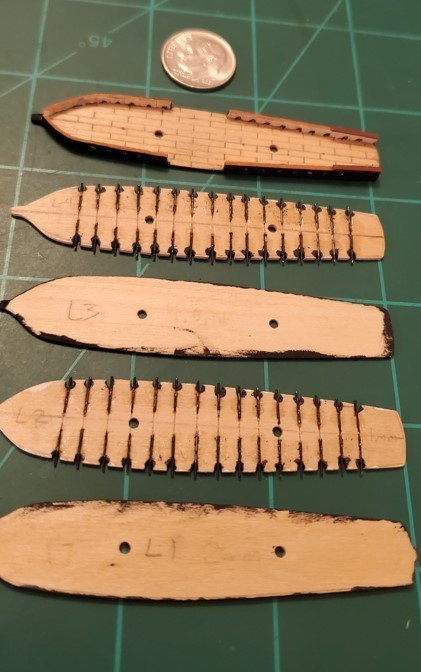
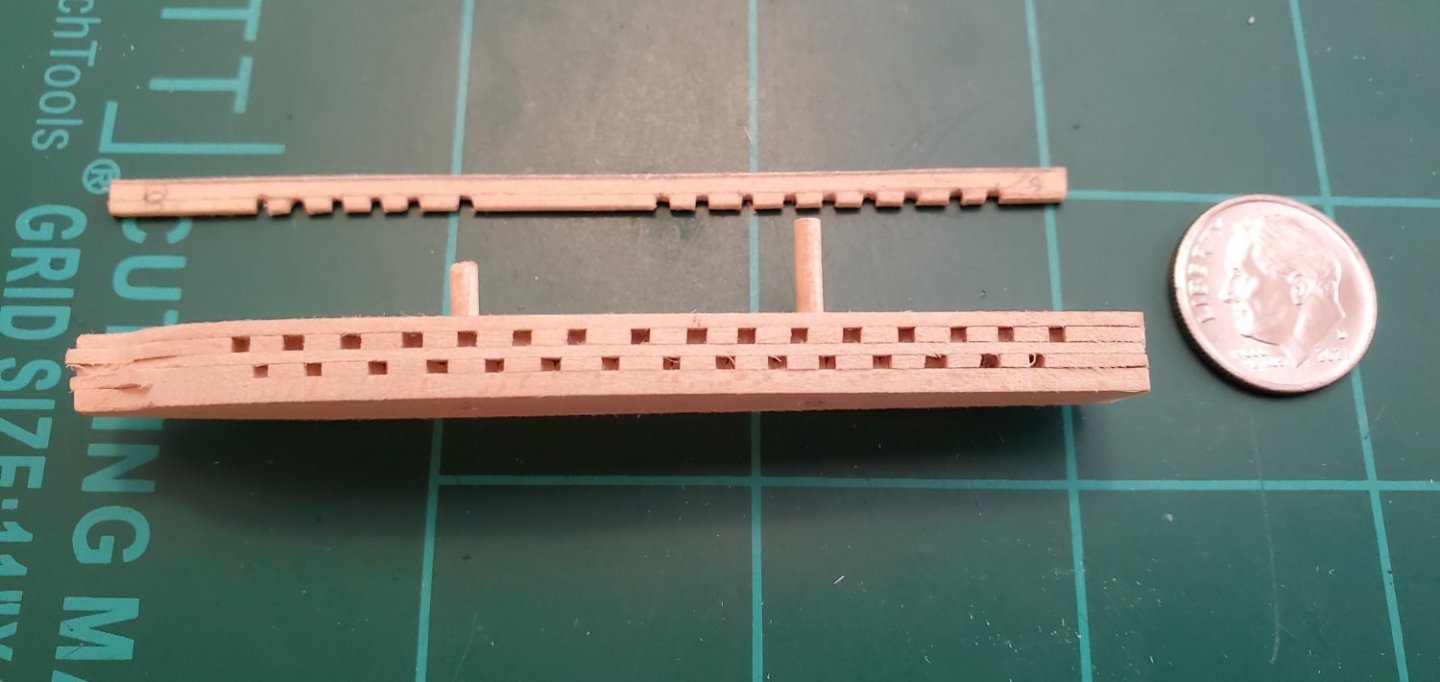
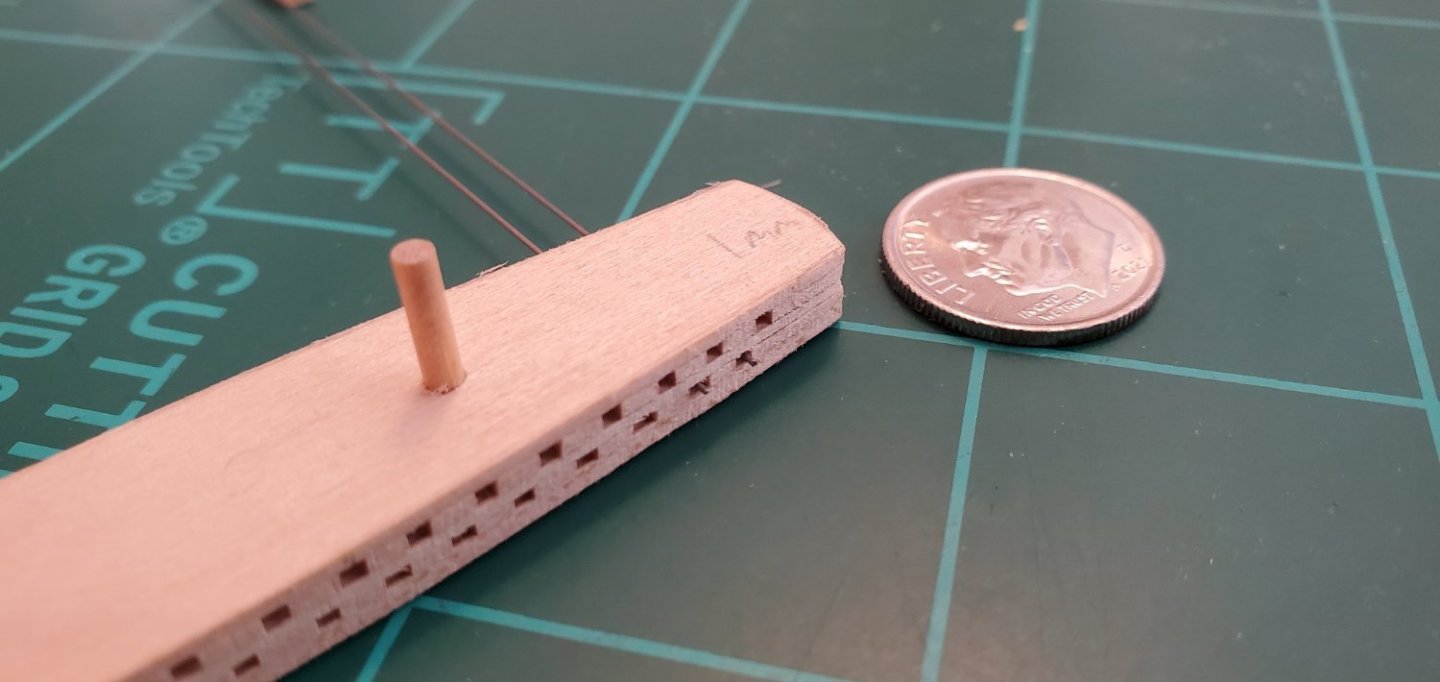
From the cannon yard to the ship yard. I’ve been struggling all week with how to make this hull with all the 1mm x 1mm gun ports. My first plan was to build the hull, then drill out the gun ports. After a trial run, it looked awful with round gun ports. And the holes are just too tiny to square off after drilling. So after a few more failed ideas, I settled on a lamination plan with alternating layers of 1mm thick basswood. That allowed me to carve out each gun port individually in a square shape (as best I could at this size anyway). The hull in the 2nd pic is not glued yet – it’s just held together by the dowels sticking out of the top layer. The last pic shows a couple of test cannons in place (.015” music wire). I cut a groove into the gun port layer connecting ports on each side of the ship and inserted the wire all the way thru. That will allow me to snip off each cannon at the appropriate length when ready. So now I’ve got to shape the hull, disassemble, paint the layers, reassemble, secure the bulwarks, then add the cannons. Still some details to flesh out but I think this is going to work. Maybe.

- 177 replies
-
- 9
-
-
-
- Independence
- bottle
- (and 1 more)
-
I love it! Unique idea and very well done.
-
Welcome aboard, Rick. When you say the folks on this site have more knowledge than Google, you have no idea how right you are!! Seems like I learn something new every time I log on.
-
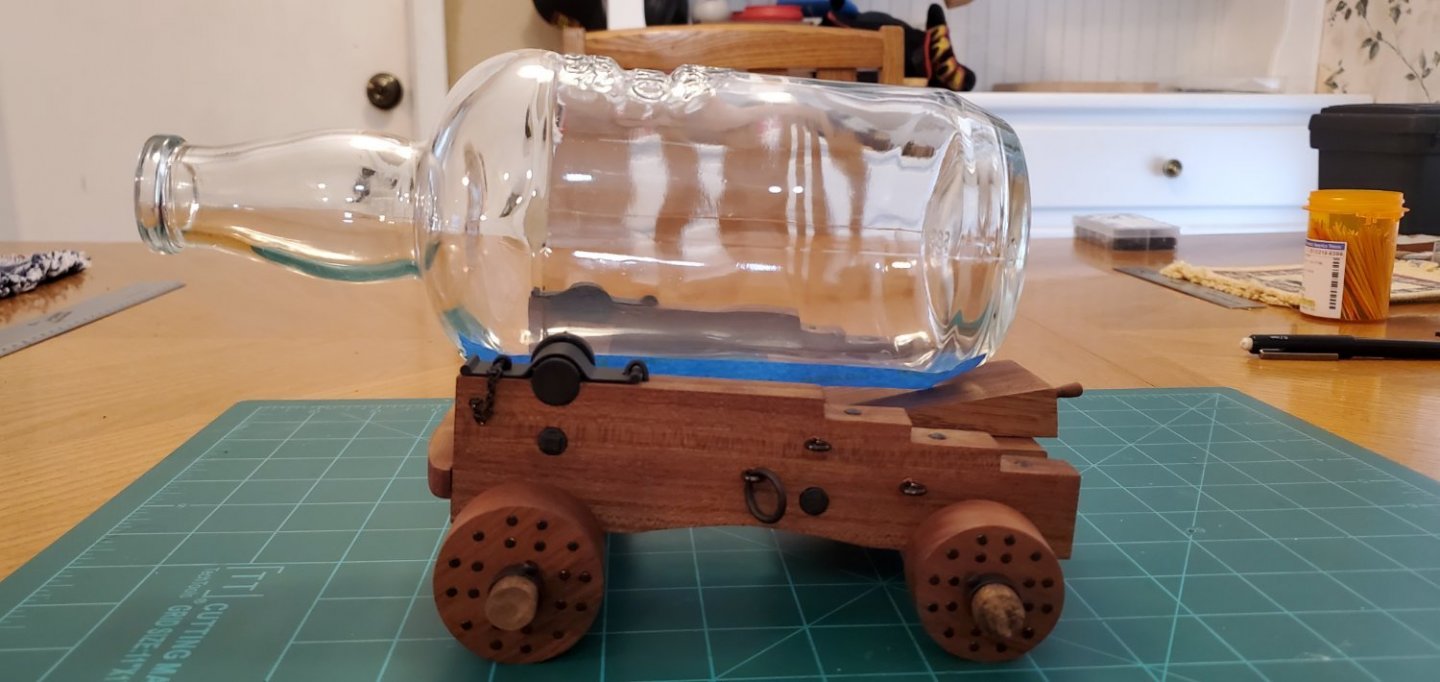
I also had a near heart attack moment during final assembly. Somehow I managed to drop a dime-sized blob of epoxy on the display-side of the carriage right between the trunion and the breech ring. And somehow I didn't notice it till the epoxy was almost dry. After alarming the entire neighborhood with my shrieks of anger and panic, I scraped off as much of the epoxy as I could with my fingernail, then spent about 20 minutes going over the spot very lightly with 220 sand paper trying not to take off any more of the wood surface. I finally got to a point where I thought there was no epoxy left, then gave the whole side a light rub with the tung oil. Afterwards, I could not tell any difference. OMG, what a relief.
- 177 replies
-
- 3
-
-
- Independence
- bottle
- (and 1 more)
-
Thanks, Mike. I tried the Jax Pewter Black stuff but it kept rubbing off. I tried brushing it on like others suggest as well as multiple coats but still could not get it to work well. So I ended up rubbing it all off and just spray painting with Rust-oleum flat black.
- 177 replies
-
- 3
-
-
- Independence
- bottle
- (and 1 more)
-
Thank you, Keith. That was certainly a change of pace working at a roughly 1/12 scale instead of the usual 1/500! A cannon model? Hmmmmm. That is an interesting idea. I may have to put that on the list. It would certainly be easier the 2nd time around. I screwed up so many things along the way while building this one it's not even funny.
- 177 replies
-
- 1
-
-
- Independence
- bottle
- (and 1 more)
-
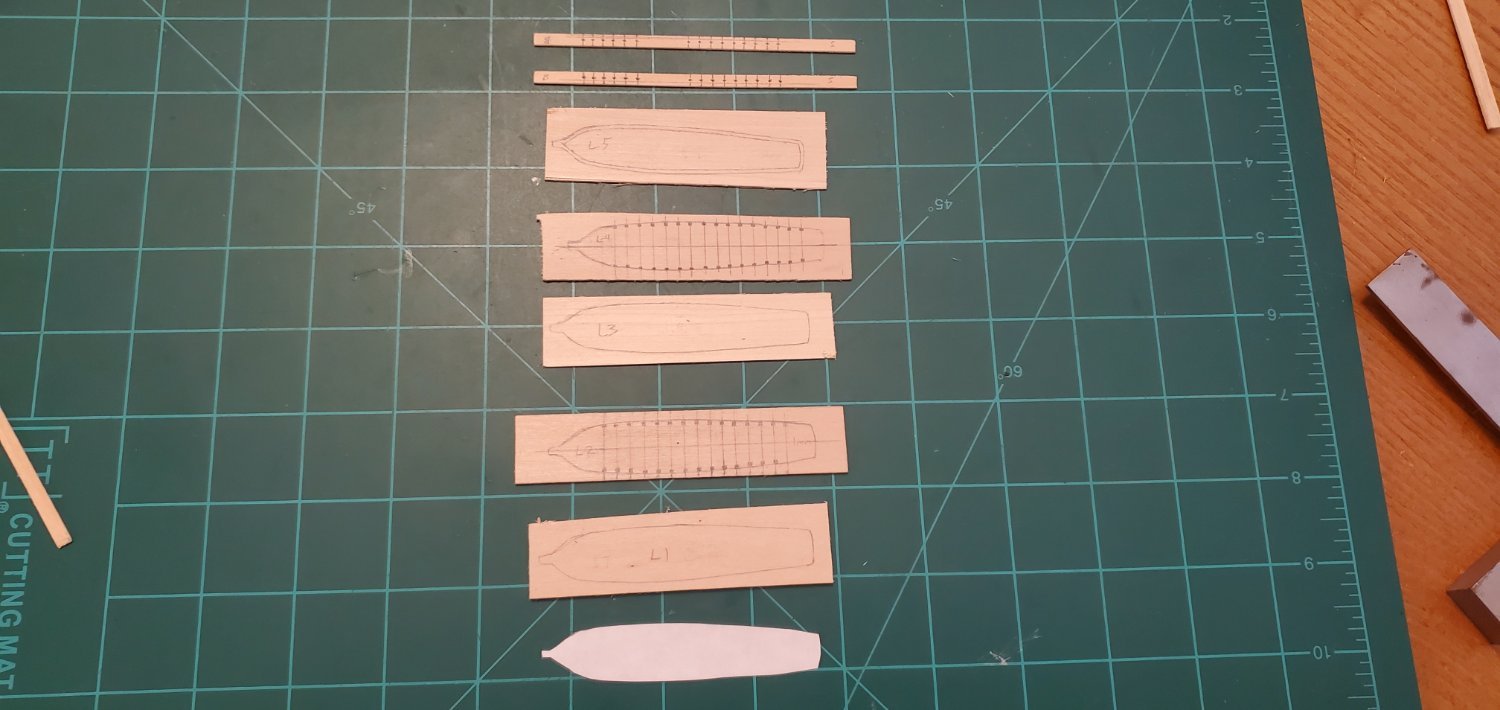
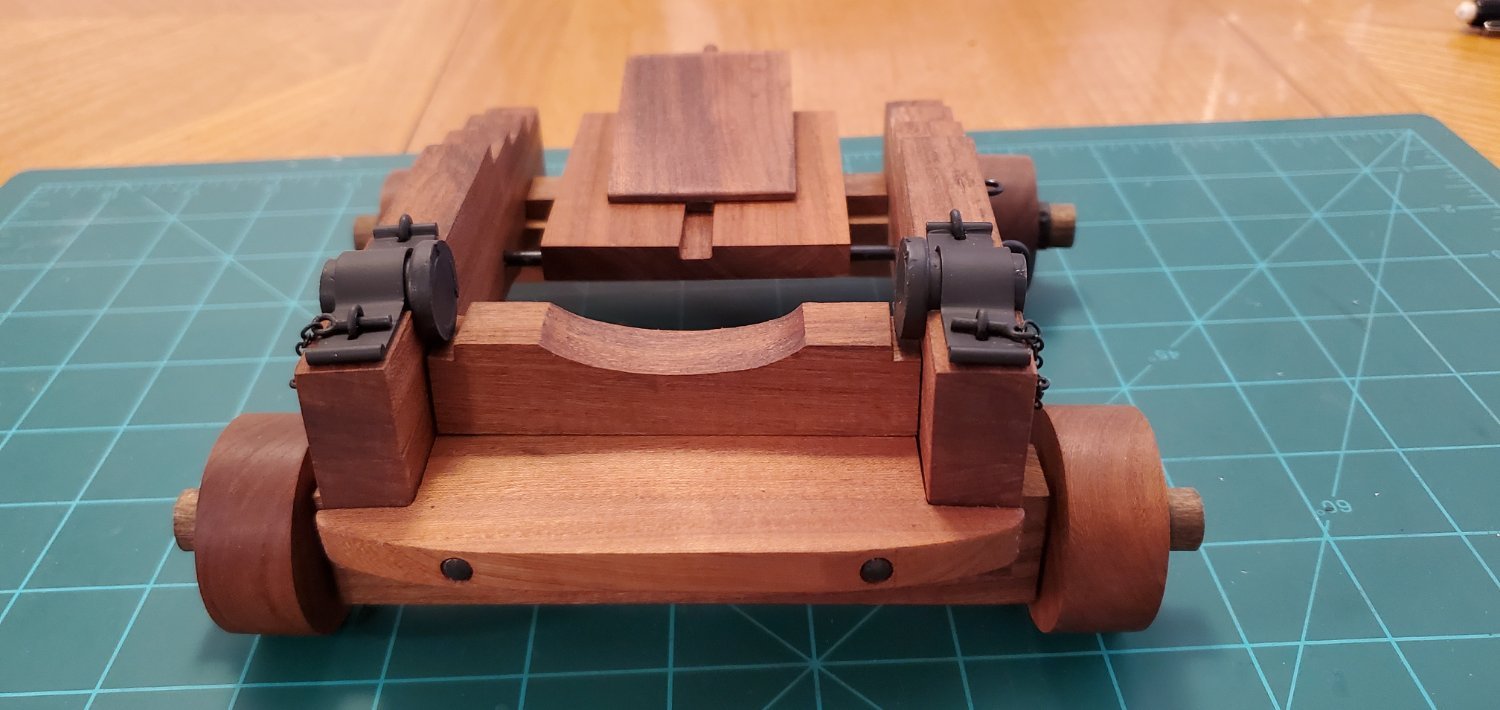
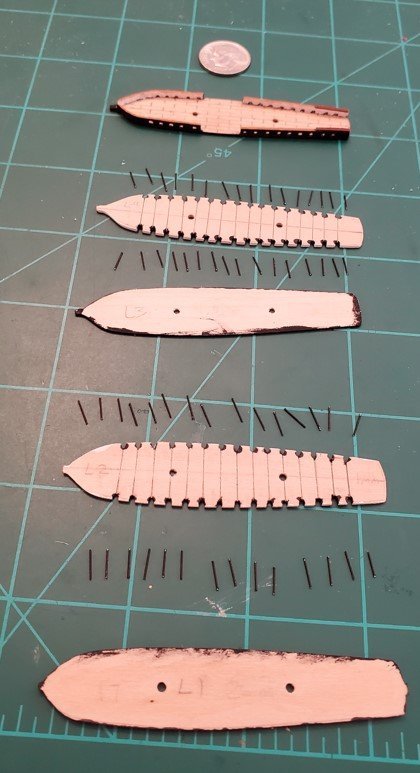
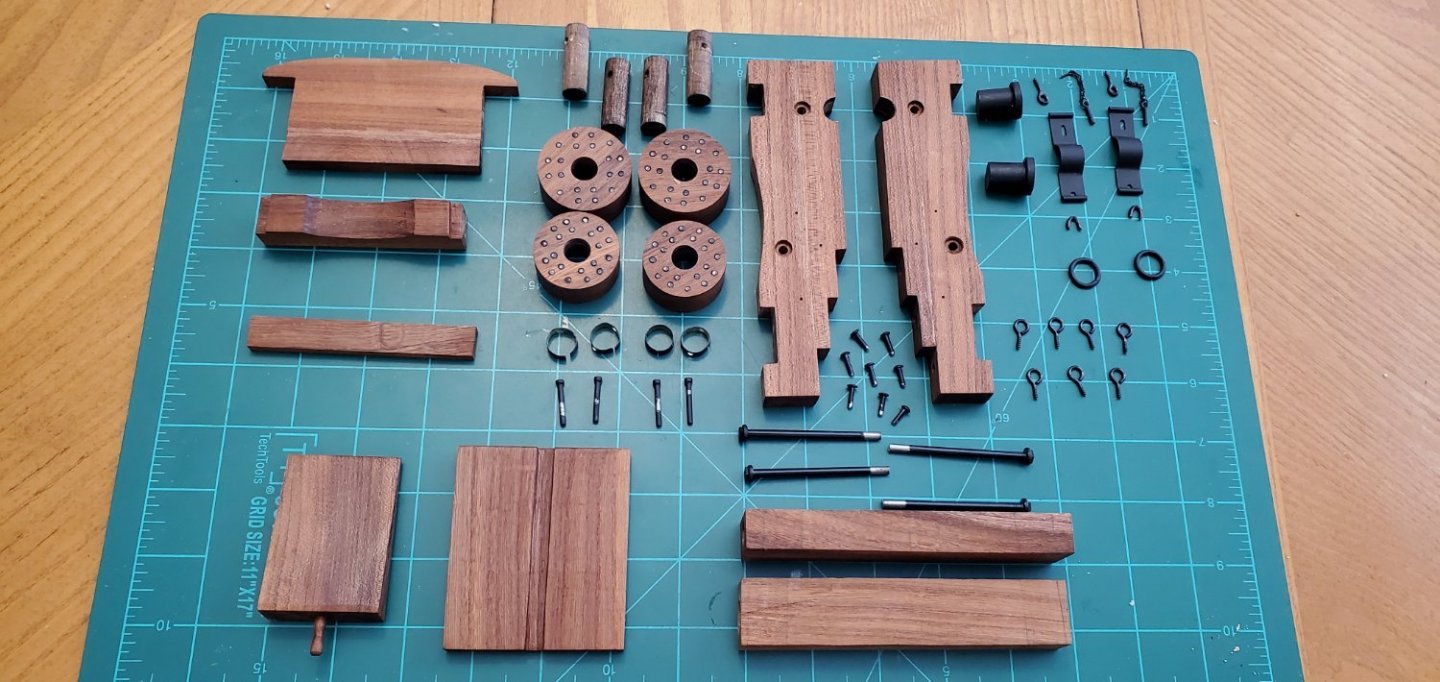
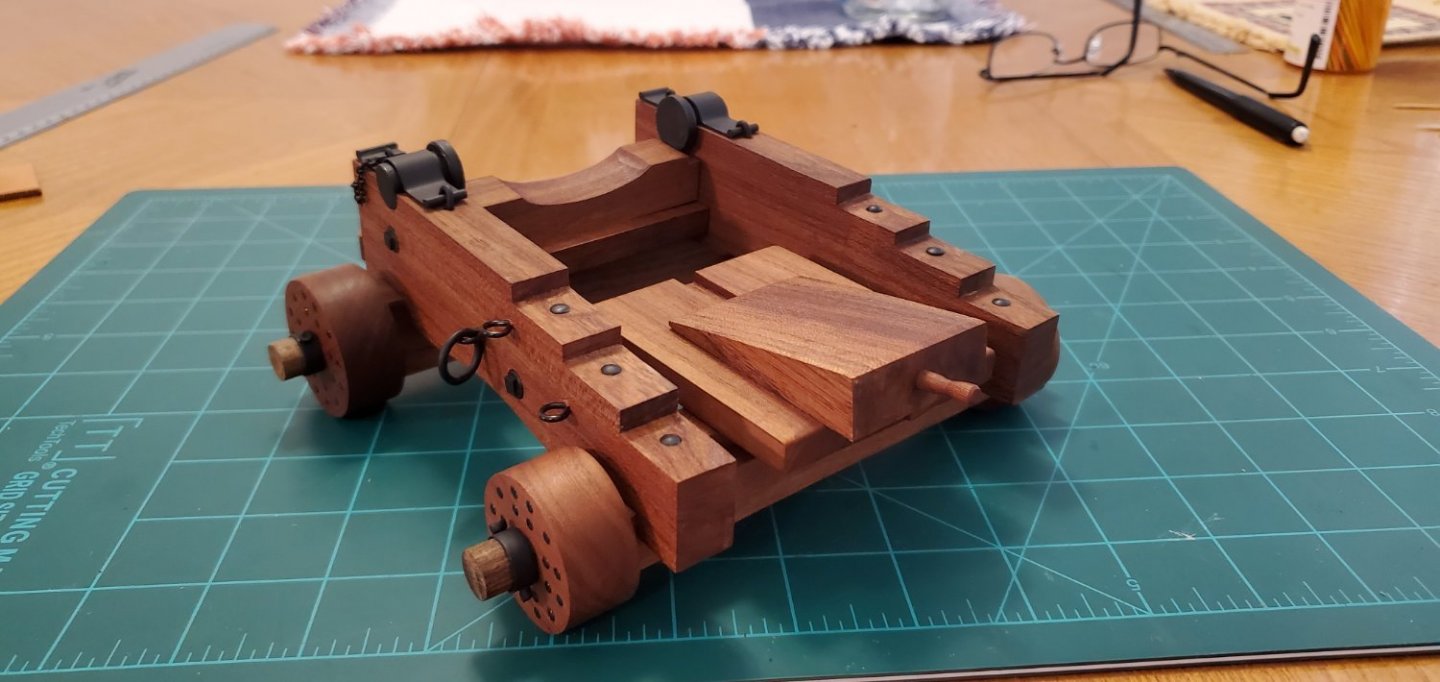
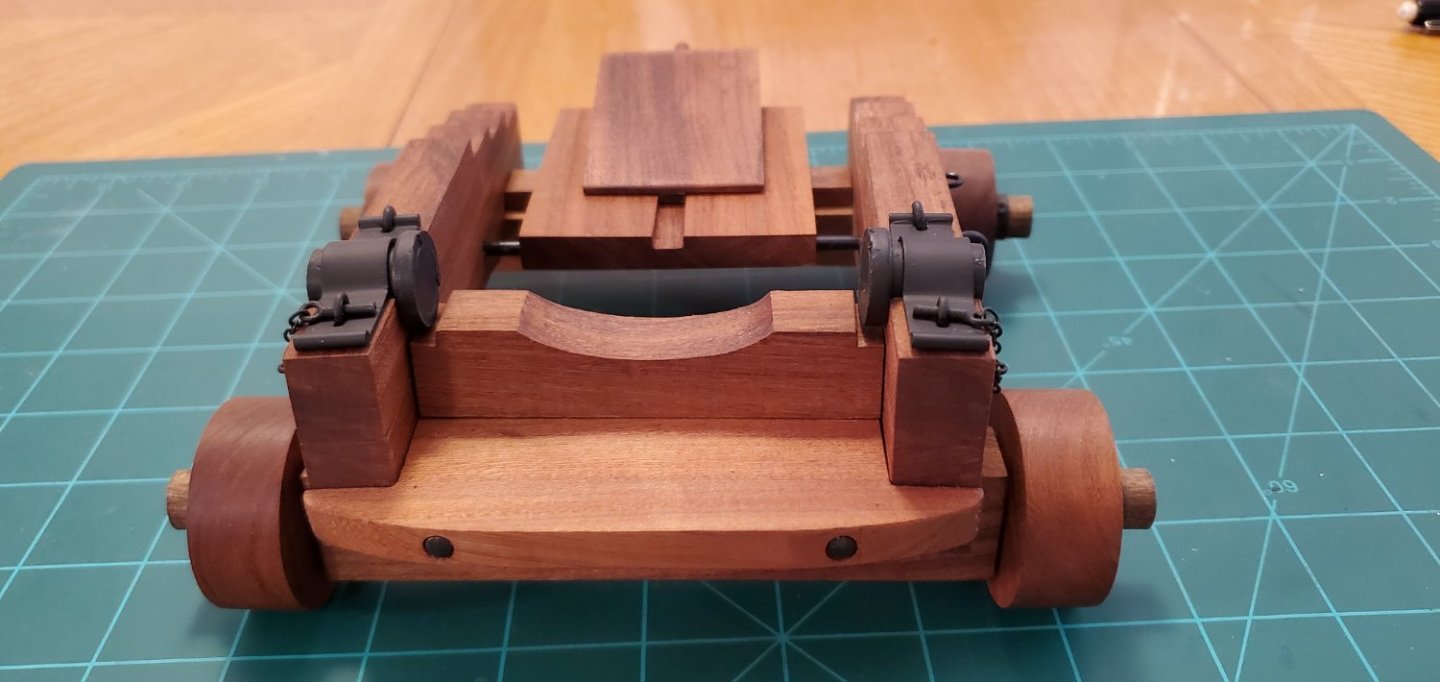
The carriage is now complete with the exception of the rigging. I’ll “tackle” that after finishing the ship. 🙄 The first pic shows all the pieces and parts of the carriage before assembly.
- 177 replies
-
- 11
-
-
-
- Independence
- bottle
- (and 1 more)
-
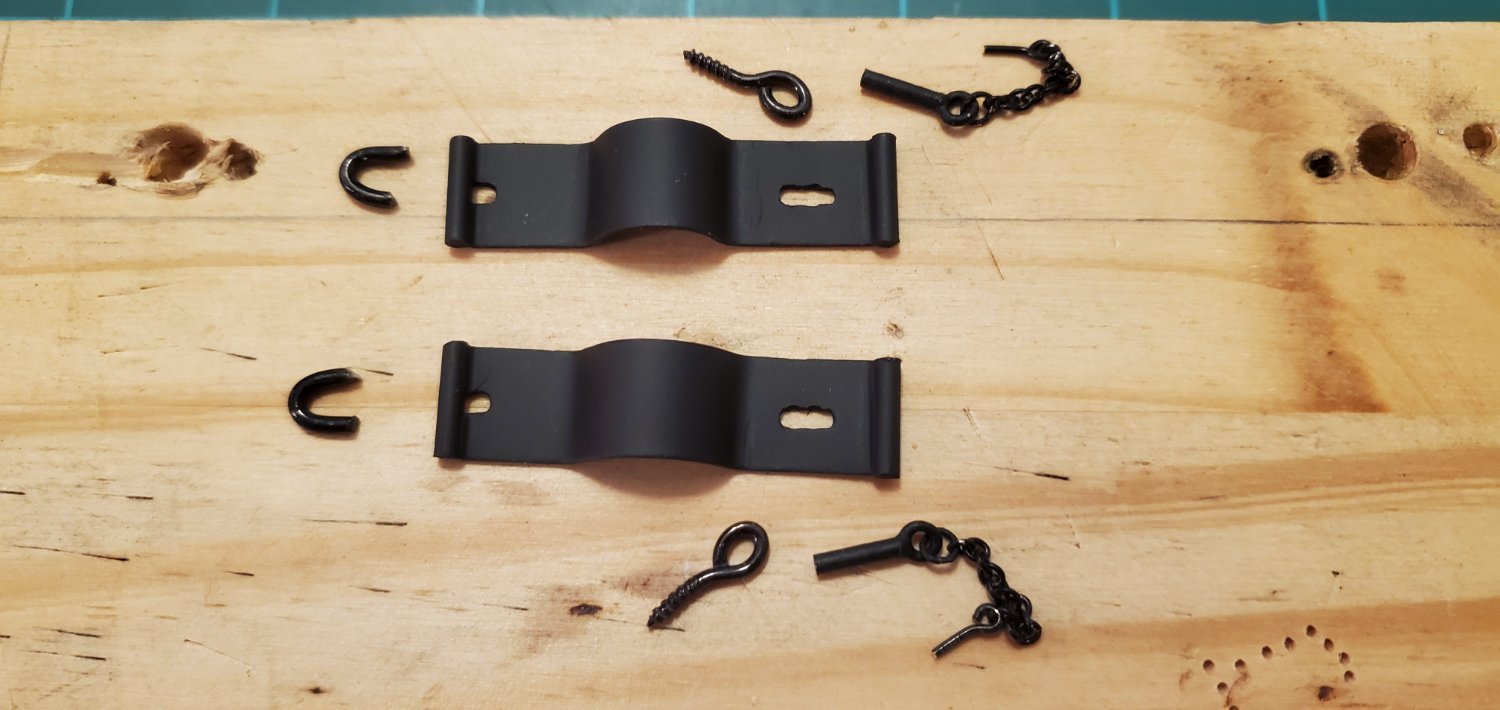
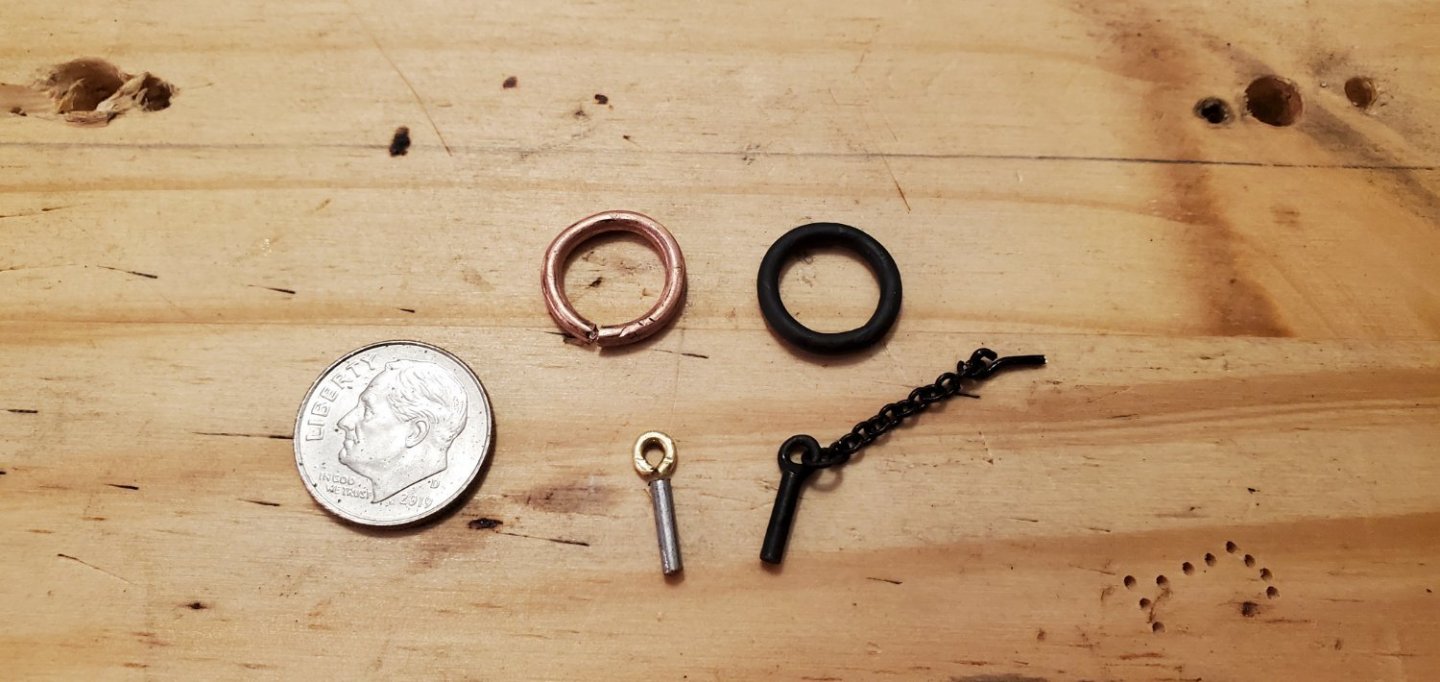
Finished making the last pieces of carriage hardware. For the breeching ringbolt I took a piece of copper wire, wrapped it around a dowel rod and soldered the ends. For the capsquare key I took a small brass rod, bent it into a circle around a small nail, and soldered it to part of a small finishing nail. The 2nd pic shows all the completed capsquare hardware.

- 177 replies
-
- 7
-
-
- Independence
- bottle
- (and 1 more)
-
@Deperdussin1910 Thanks for the comment. I do find the list very interesting. When Chappelle said the Independence was the first ship of the line commissioned by the US Navy, I assumed it was the first US ship of the line. But maybe he was alluding to the fact that the Dept of the Navy did not officially exist until 1794 and the Independence was the first one commissioned after that. The history is always fascinating.
- 177 replies
-
- 2
-
-
- Independence
- bottle
- (and 1 more)
-
Thanks, Mike. Yes, I did put a touch on the end grain of the carriage sides. It was going to be a hair light without it and a hair dark with it. It was not going to be perfect either way, so I went with the slight darkening.
- 177 replies
-
- 3
-
-
- Independence
- bottle
- (and 1 more)
.jpg.878178d2f714326c4f72e473d2503b8a.jpg)