HOLIDAY DONATION DRIVE - SUPPORT MSW - DO YOUR PART TO KEEP THIS GREAT FORUM GOING! (Only 20 donations so far - C'mon guys!)
×


Glen McGuire
-
Posts
1,956 -
Joined
-
Last visited
Content Type
Profiles
Forums
Gallery
Events
Everything posted by Glen McGuire
-
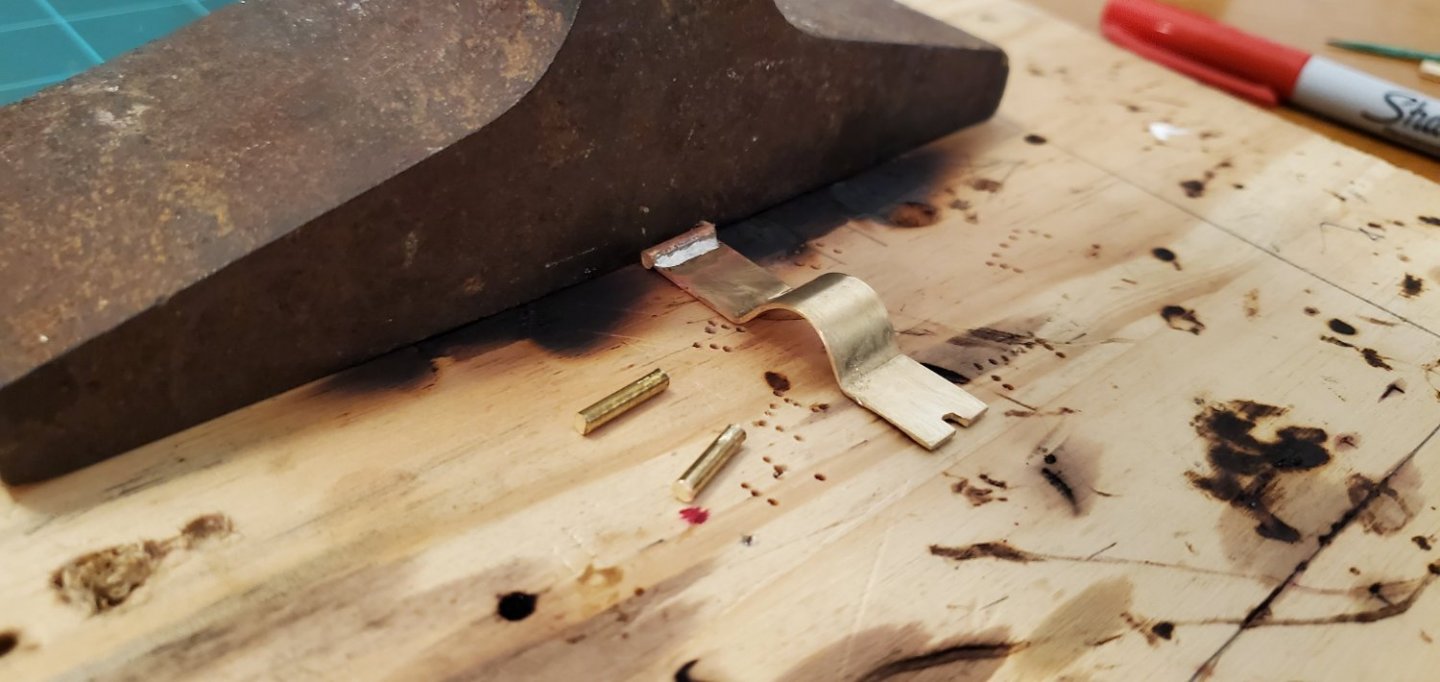
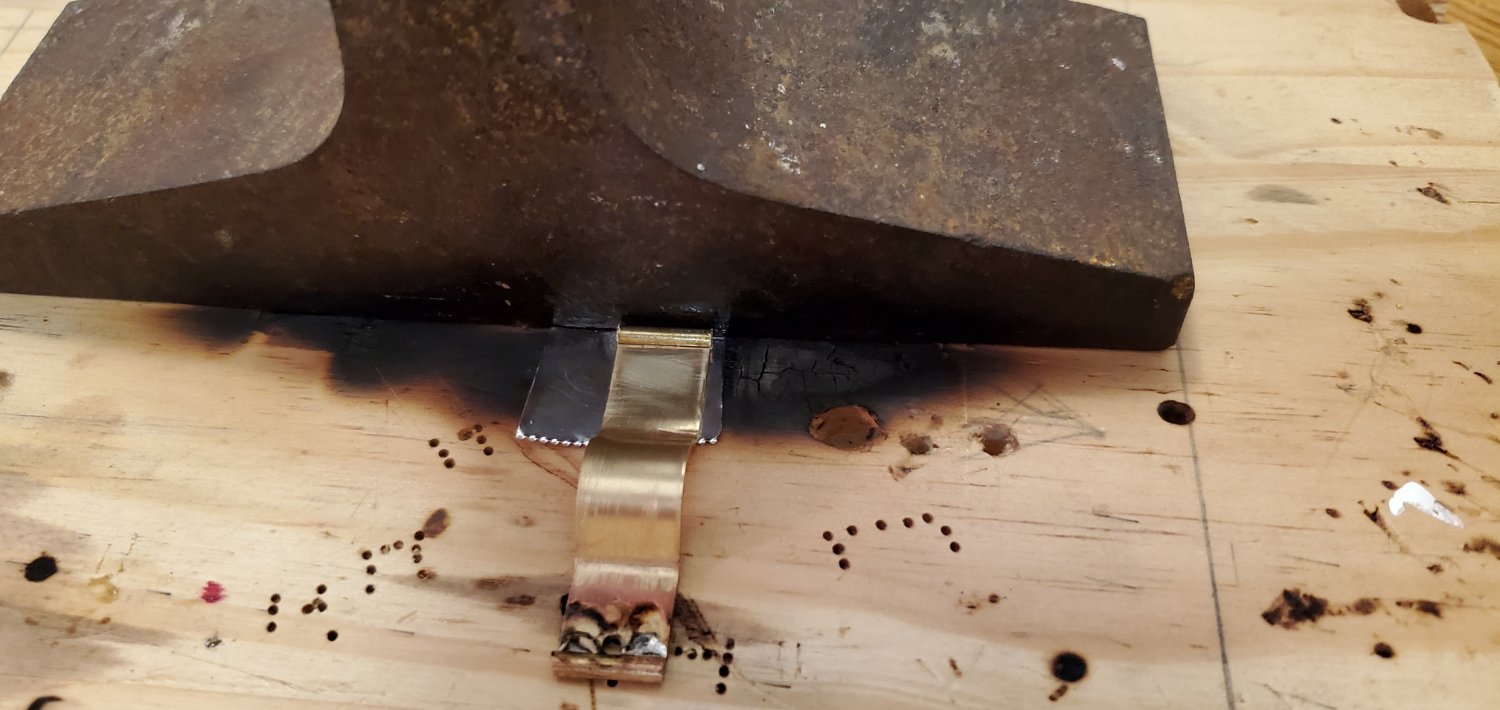
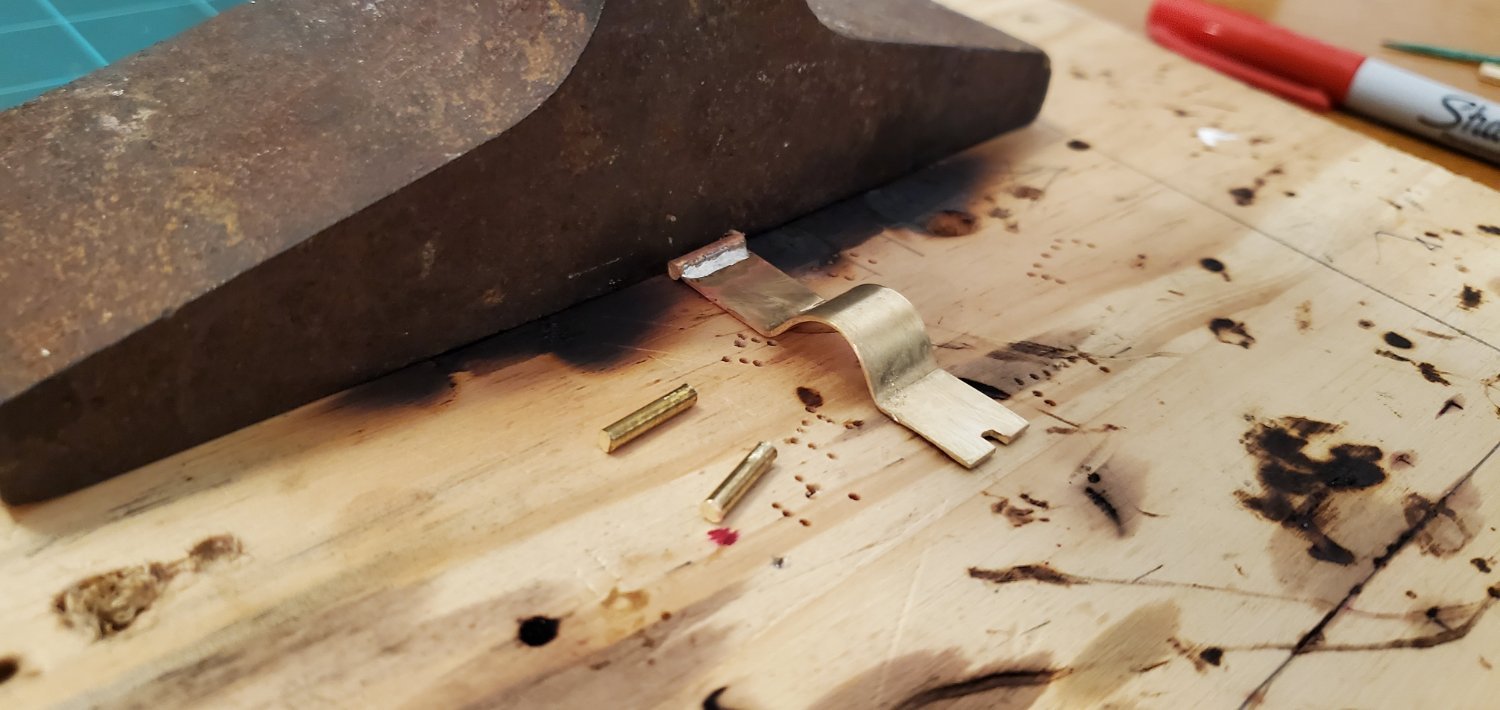
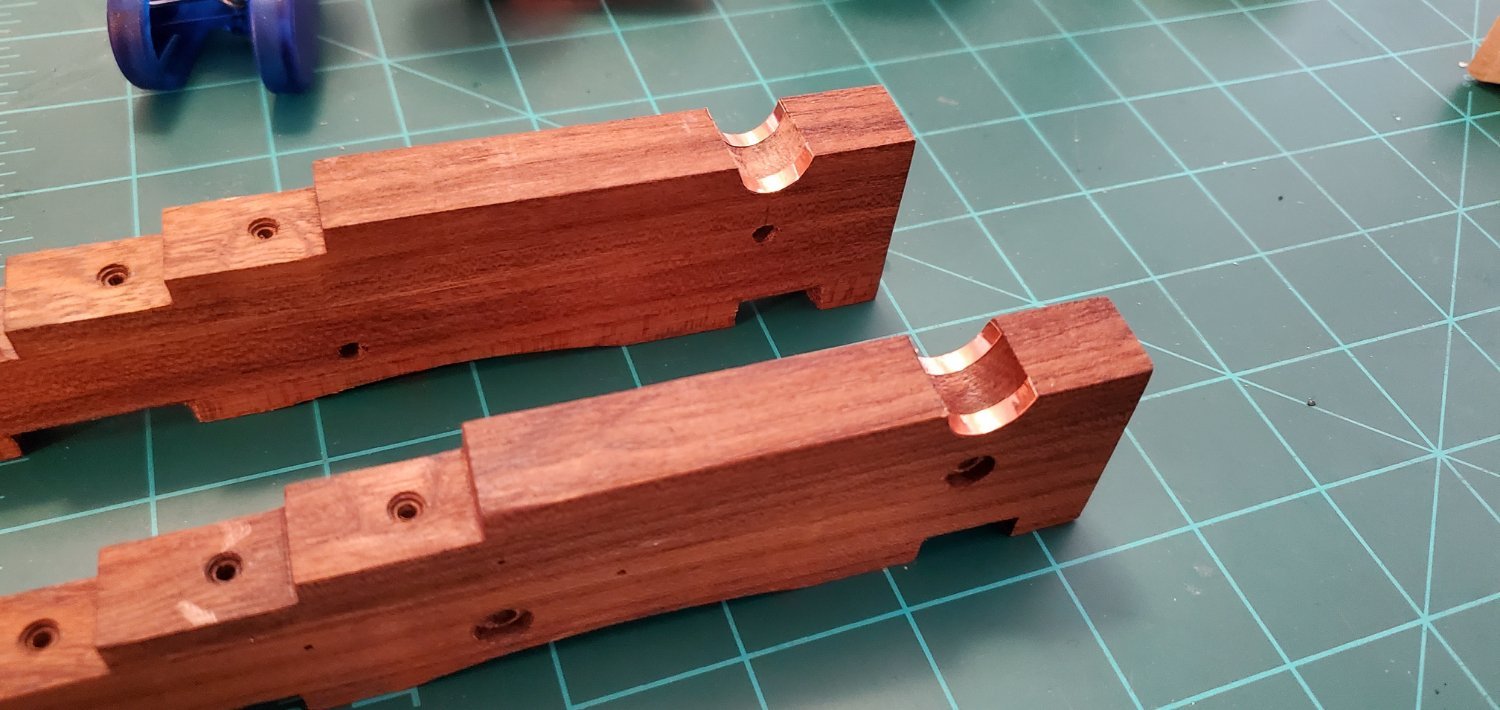
 After that minor detour, it’s now time for the capsquares. After playing around with several different materials I finally decided brass was the easiest to work with. I bought a 1mm thick brass sheet from Hobby Lobby, cut 8cm x 1mm strips, and bent them into shape (1st pic). Piece of cake! Uh, not so fast. I looked at the carriage picture again and once again spotted something I’d overlooked. The ends of the capsquares are rolled up (2nd pic). Ugh! The only thing I could figure out to do was solder a brass rod to each end. So that’s what I ended up doing. The last pic shows how they look before cleanup. I think they’ll be ok after some filing and painting.


- 177 replies
-
- 10
-

-
- Independence
- bottle
- (and 1 more)
-
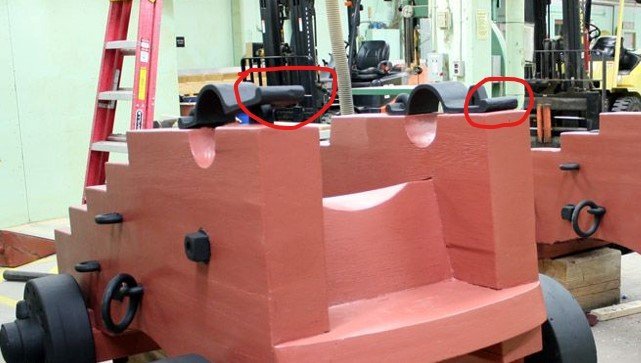
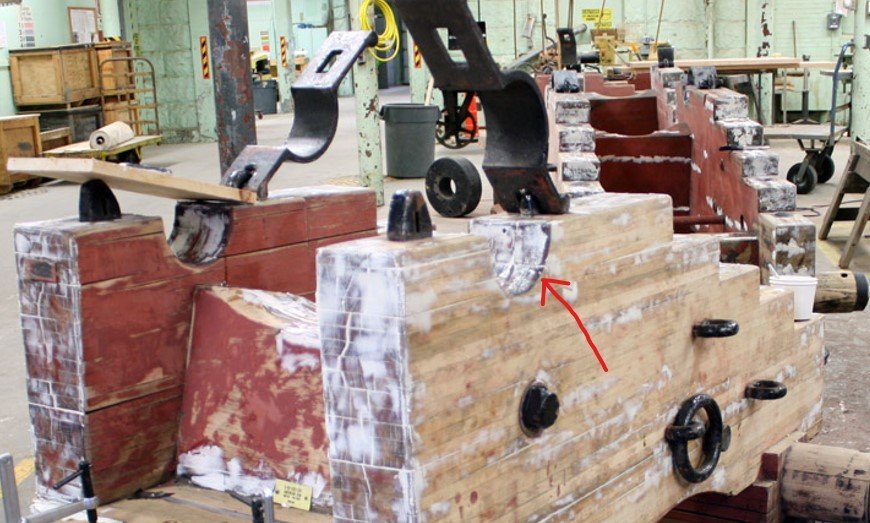
Every time I look at pictures of the real carriage it seems like I see something new. This time I noticed that it looks like there’s a thin sleeve bearing in the trunion groove on the top edge of the brackets. So I took some copper tape left over from the Alabama and used it for the bearing. It will be painted black later.

- 177 replies
-
- 5
-
-
- Independence
- bottle
- (and 1 more)
-
It's making my neck sore turning my head to study those pictures, but it's well worth it! Really beautiful work on that whole bowsprit assembly, Rob.
- 3,560 replies
-
- 1
-
-
- clipper
- hull model
- (and 2 more)
-
Welcome aboard! Your username reminds me of a really poor joke I heard the other day: Two robbers were robbing a liquor store when one robber grabs a bottle and asks the other robber "is this whiskey?" The other says "yeah but not as whiskey as wobbing a bank". Sorry! 😁
-
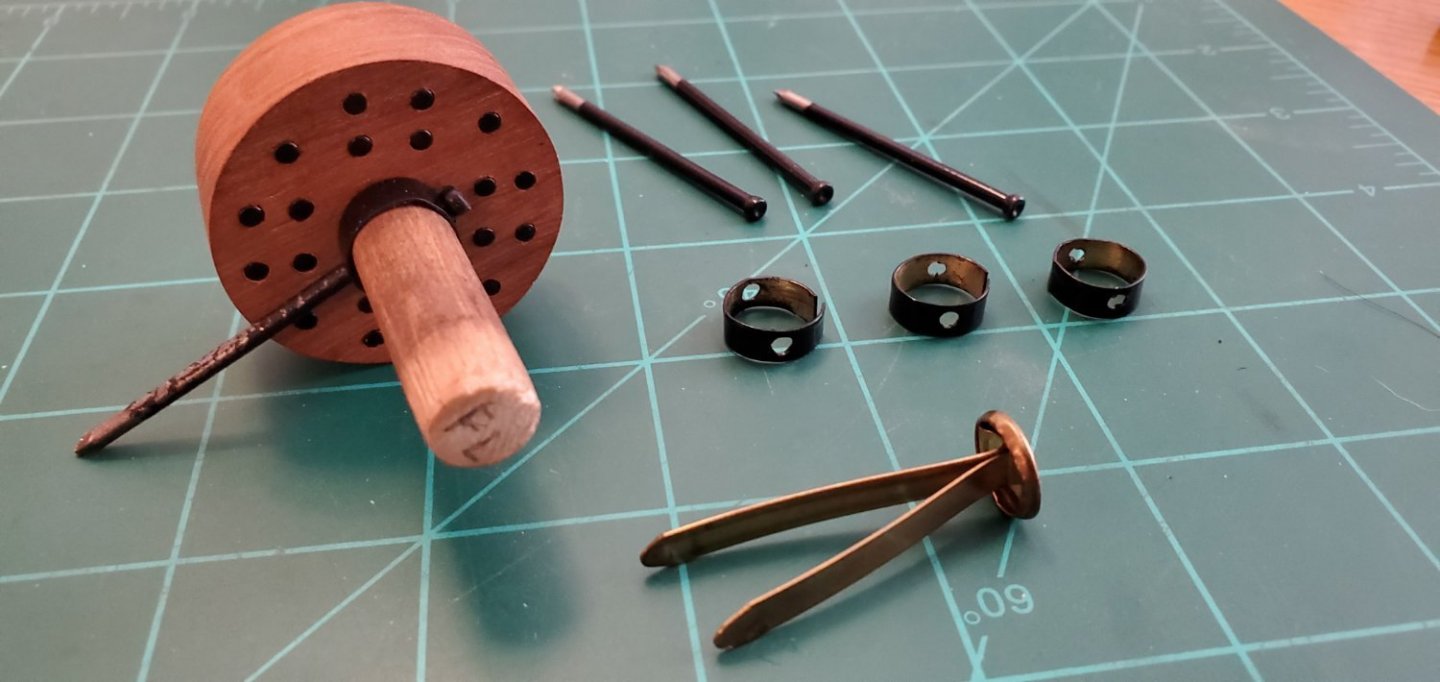
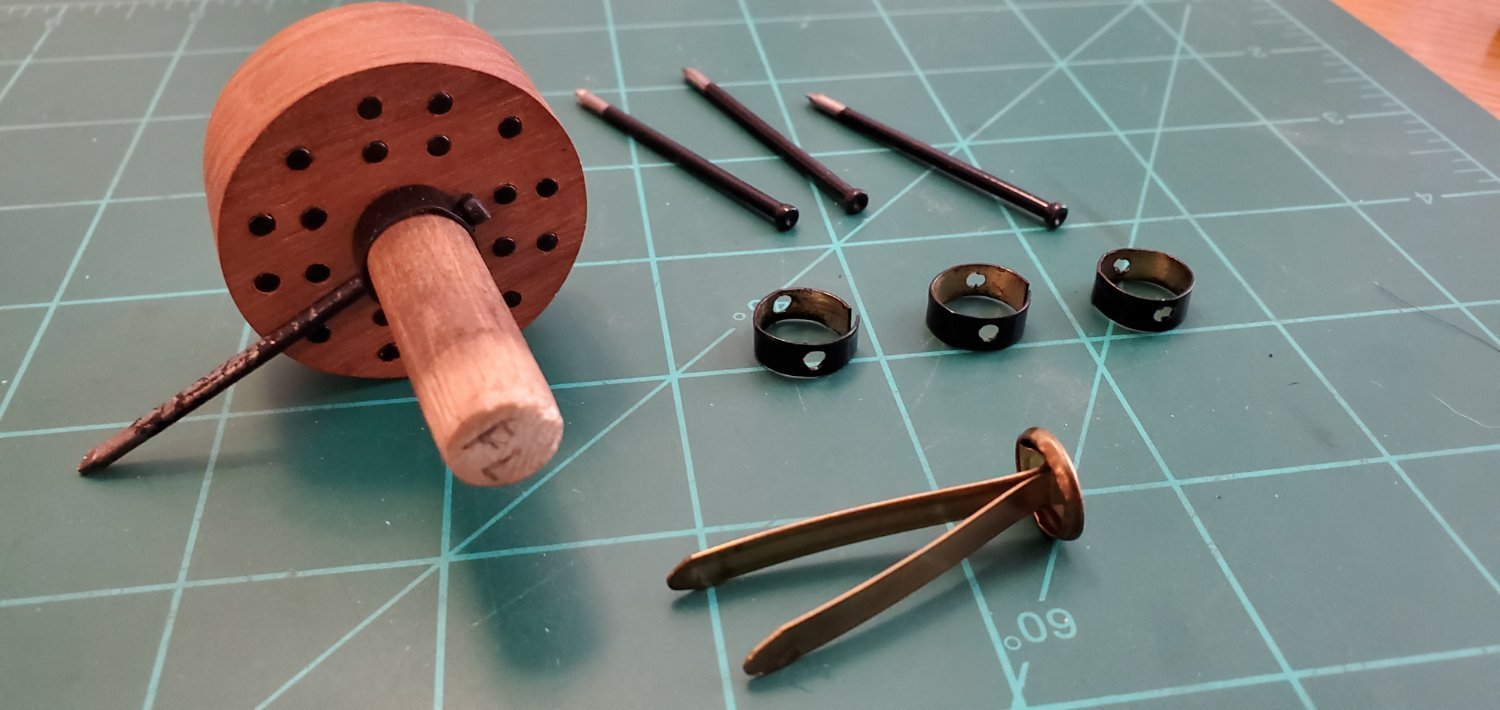
The axles have a collar and linch pin on each side that keeps the wheels (trucks) in place. For the collars, I took some brass brads, folded them around the axle, then drilled holes for the linch pins. For the linch pins, I’m using finishing nails since their head is similar in shape to what I see in the real pictures. For the trunions, my toolbox sacrificed a 6” long 3/8” socket extension. Unfortunately for it, it was the perfect diameter that I needed. The grommets on the end (which will rest against the bottle) are hard rubber dampeners from my dirt bike handlebars. Nothing is off limits when you’re scrounging pieces and parts! Next up, figuring out how to make the capsquares.
.thumb.jpg.79528104ecb6e4a19c849ff689fce75e.jpg)
- 177 replies
-
- 6
-
-
- Independence
- bottle
- (and 1 more)
-
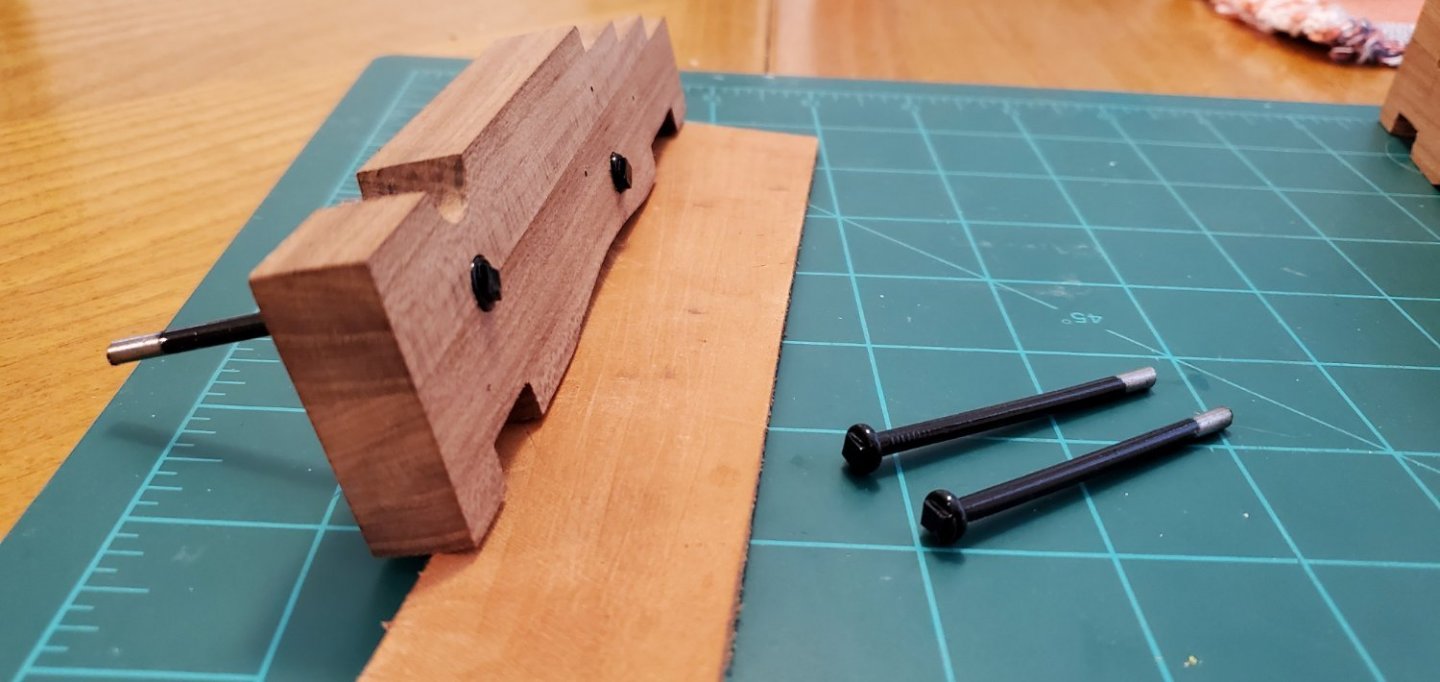
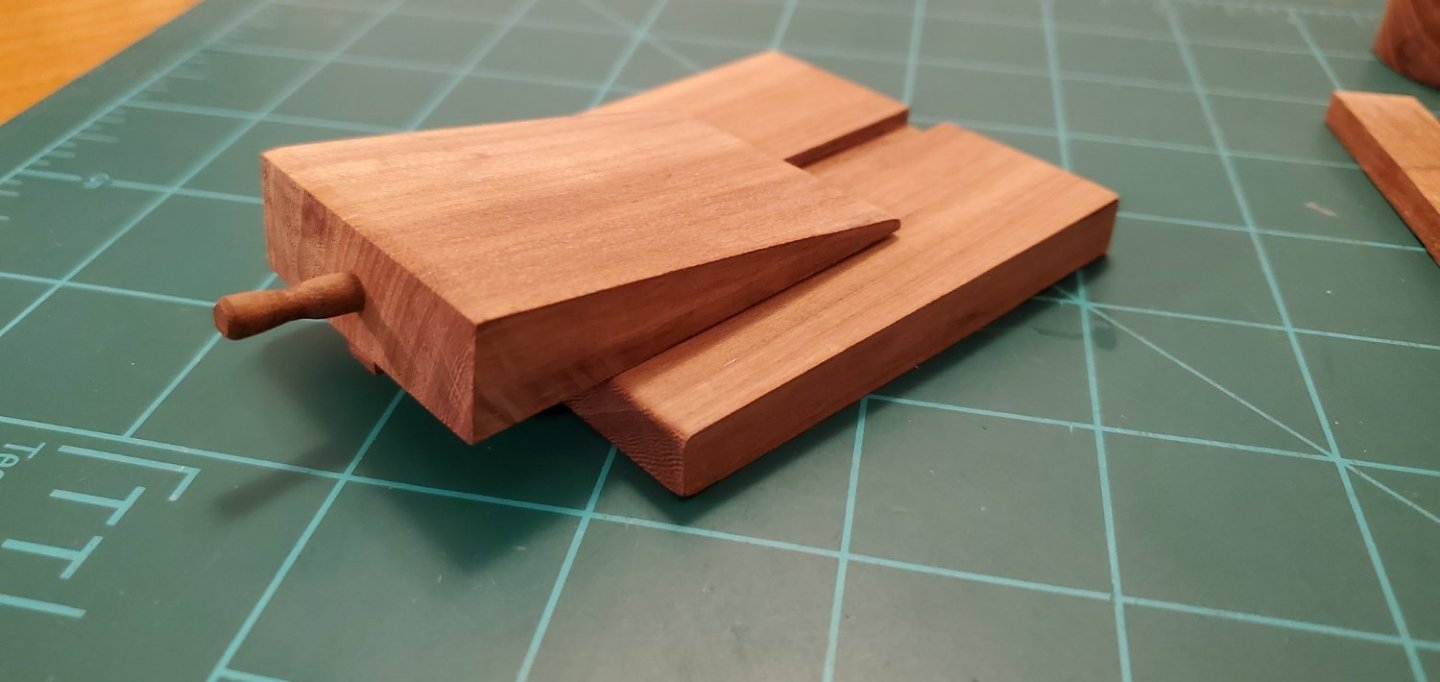
I am making slow progress on the carriage hardware – slow because it takes me forever to figure out what to use and what to do. I spend a ridiculous amount of time fiddling around with a whole bunch of different things trying to find something that works. The carriage has 2 tie-bolts with square heads that run the width of the carriage and protrude through countersunk holes in the side brackets. The front tie-bolt goes thru the transom and the rear supports the stool bed. To make the tie-bolts, I took a 1mm thick metal strip, cut it into 4mm x 4mm squares and soldered them onto the head of a common nail. There are 6 joint bolts that go thru the steps on top of the side brackets and 2 joint bolts that go thru the front bumper. I’m using some small nails with rounded heads for those. Mine are just for appearance as I am not pushing them all the way through.
- 177 replies
-
- 6
-
-
- Independence
- bottle
- (and 1 more)
-
Thank you, Pat! They help distract from all the flaws in my ship build! 😃
- 177 replies
-
- 2
-
-
- Independence
- bottle
- (and 1 more)
-
Hey Mike, I'm thankful to have you checking in on me. You always offer great ideas and insight which help make my builds better. For instance, I remember in your Charles Morgan log that you were using different woods for their natural color rather than staining or painting. I really liked that idea and it's one reason I wanted to go natural with the wood for this carriage. Thank you, Keith!
- 177 replies
-
- 3
-
-
- Independence
- bottle
- (and 1 more)
-
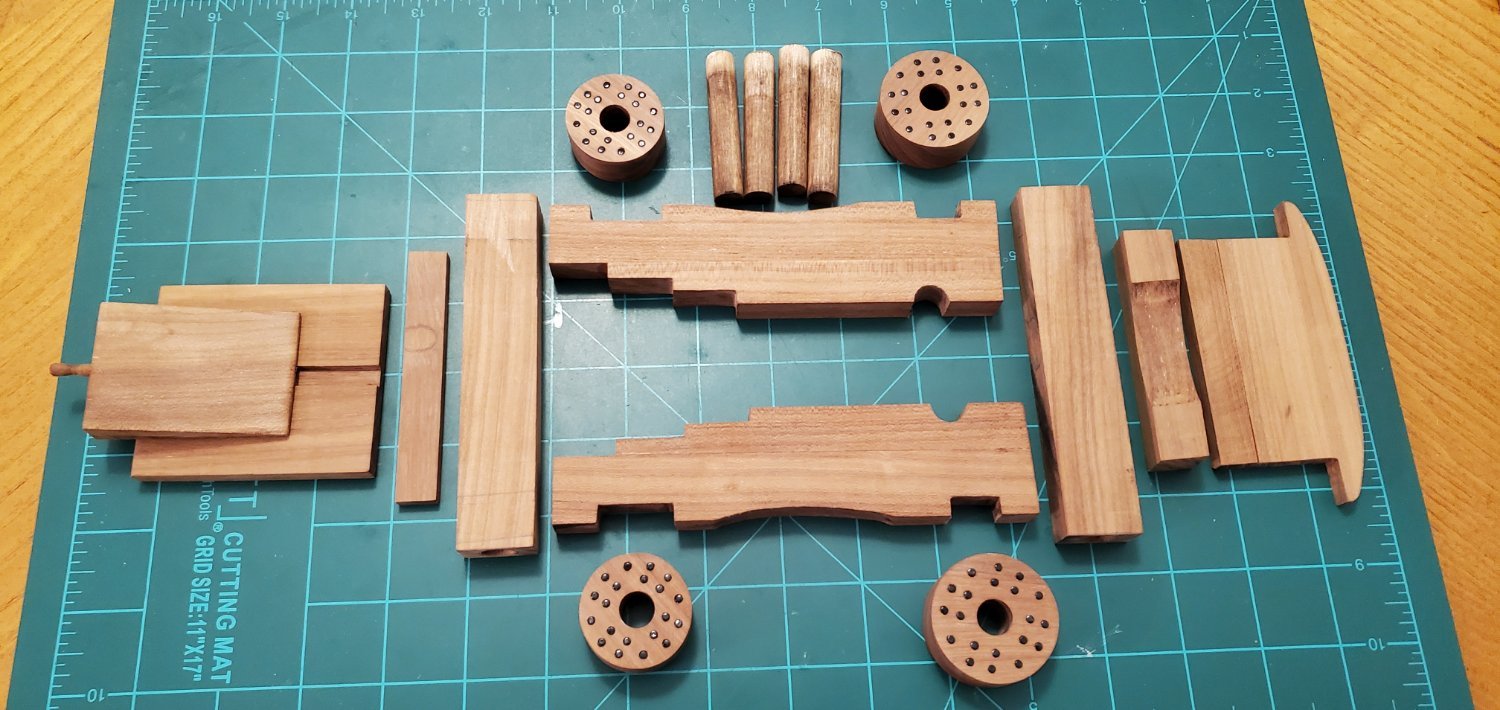
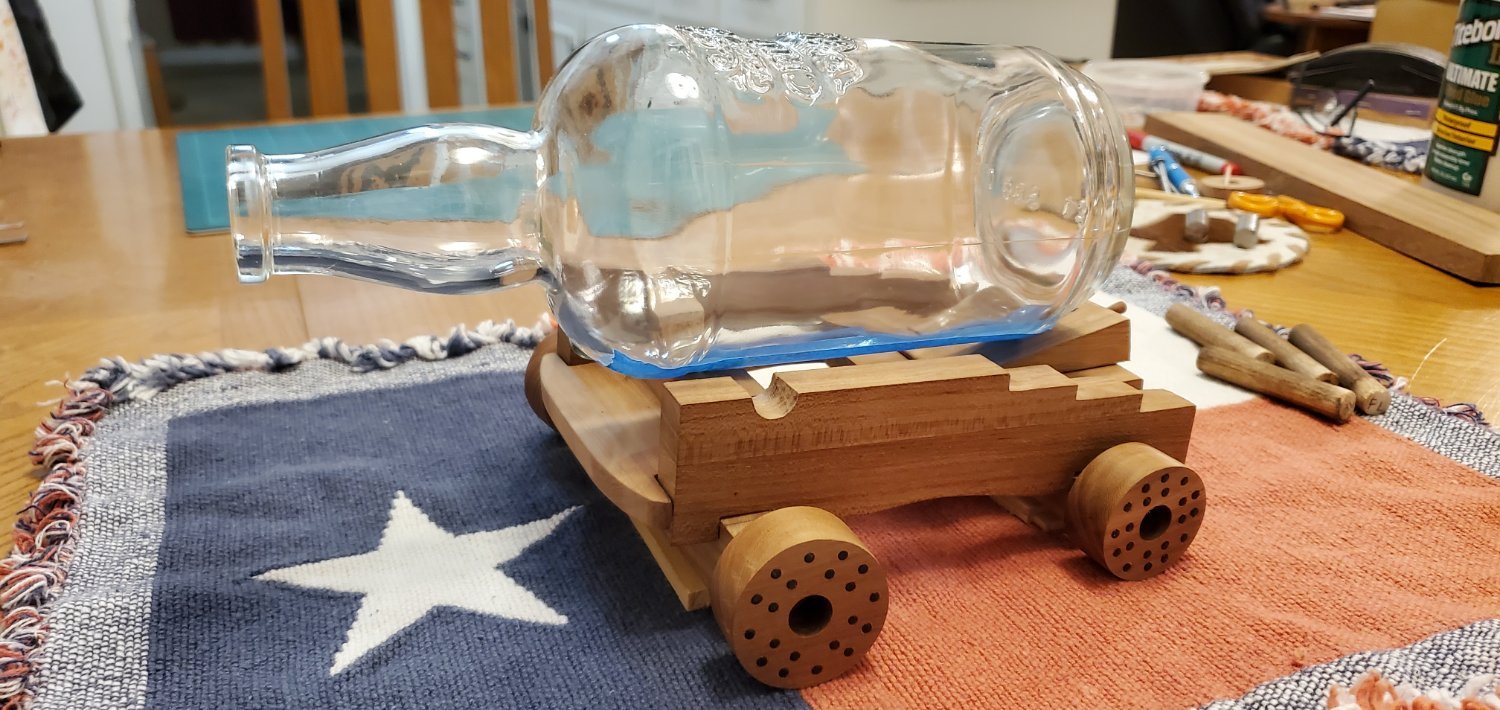
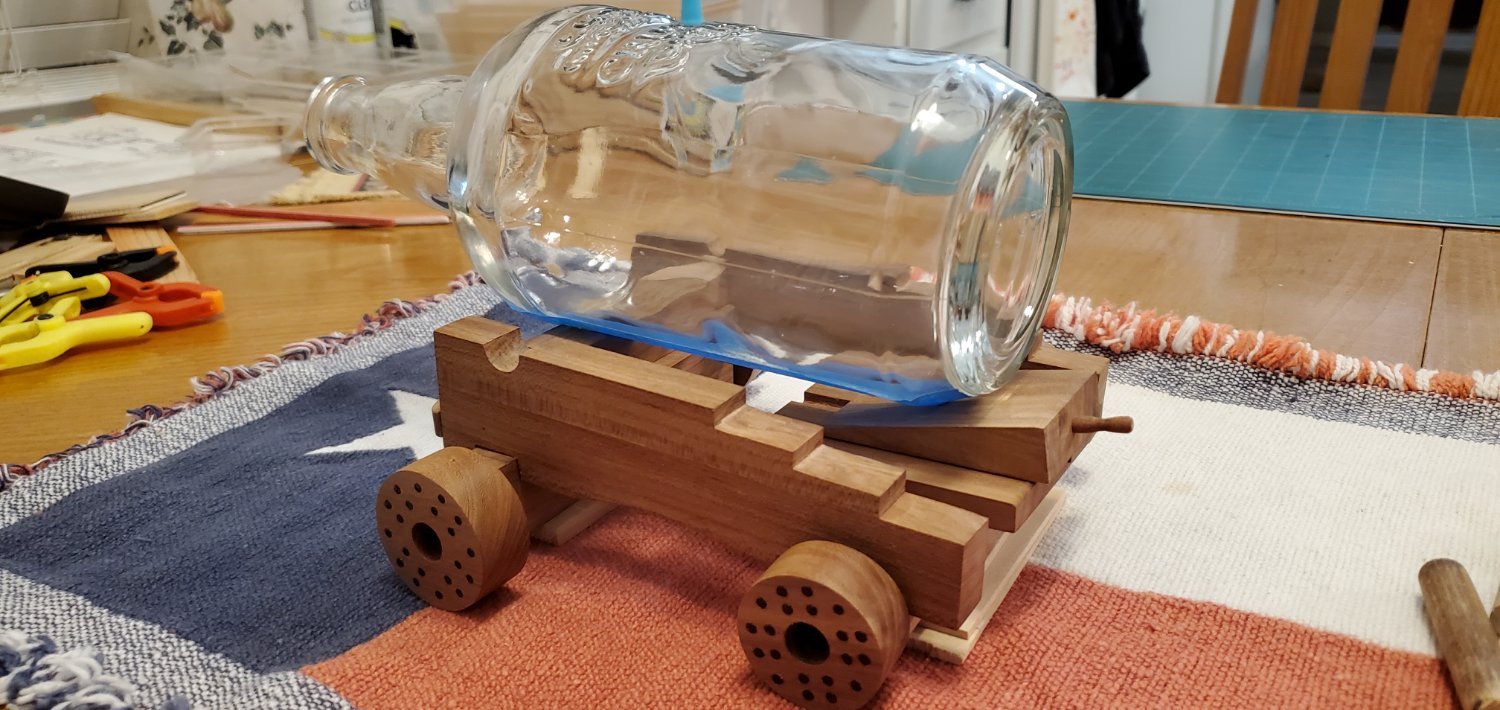
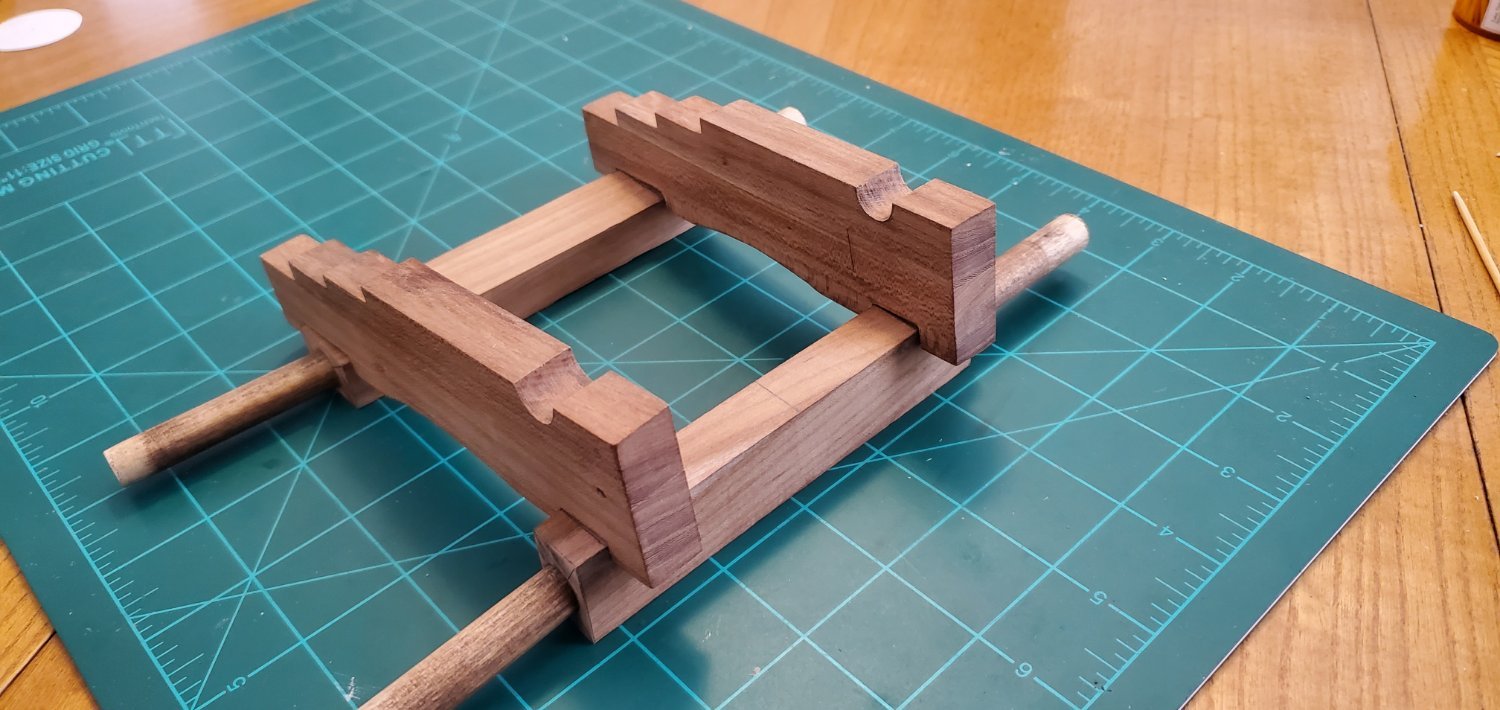
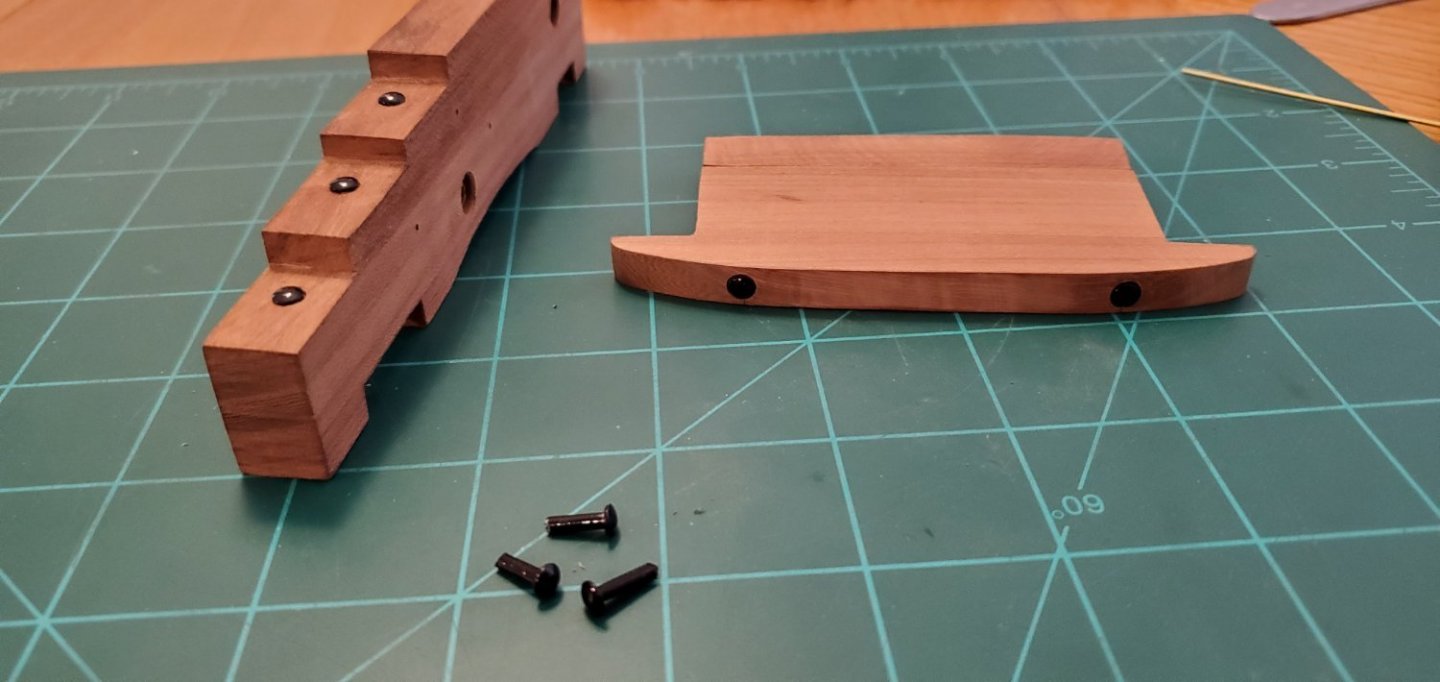
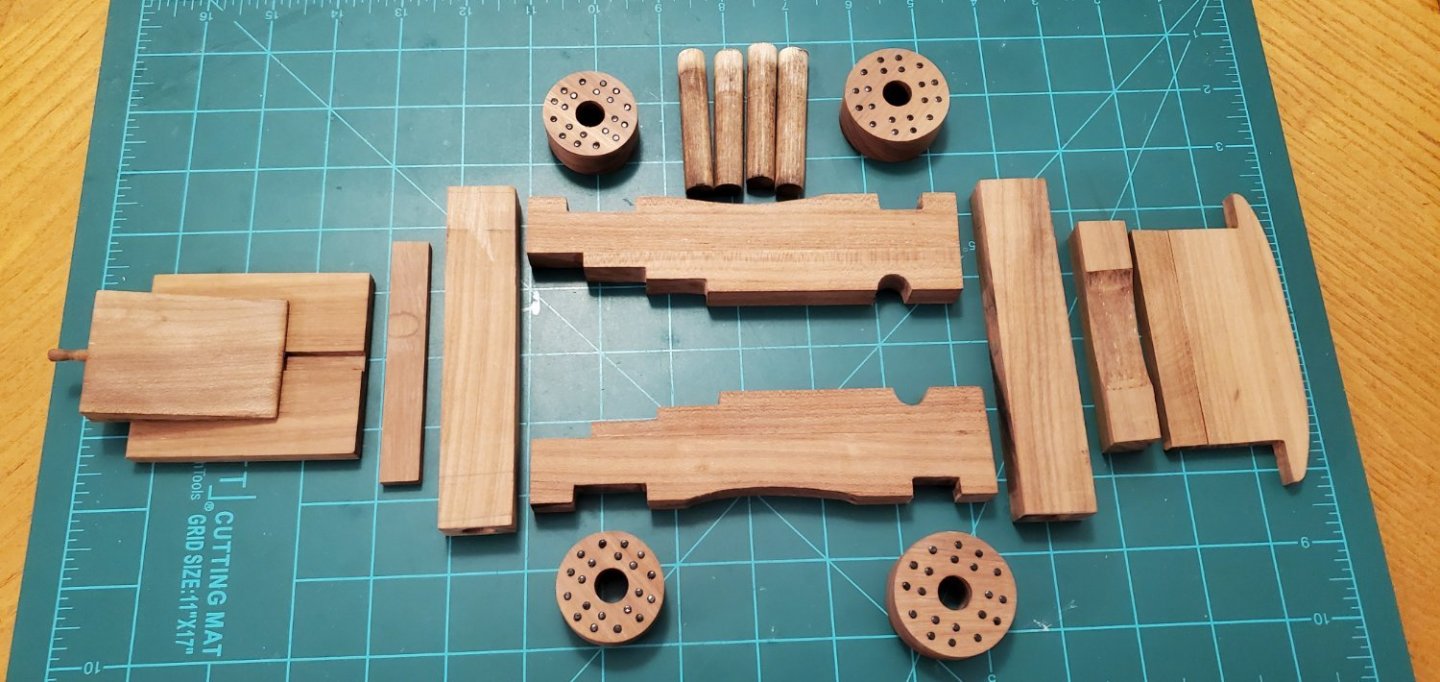
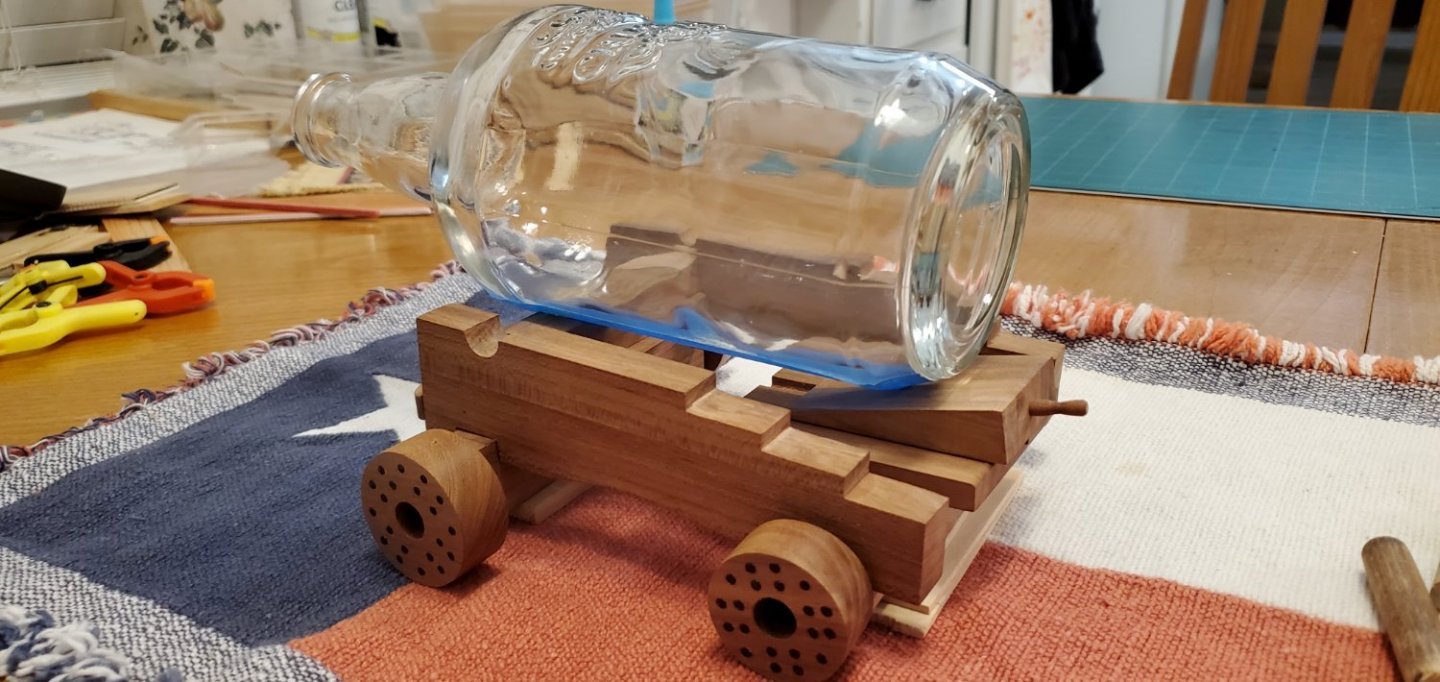
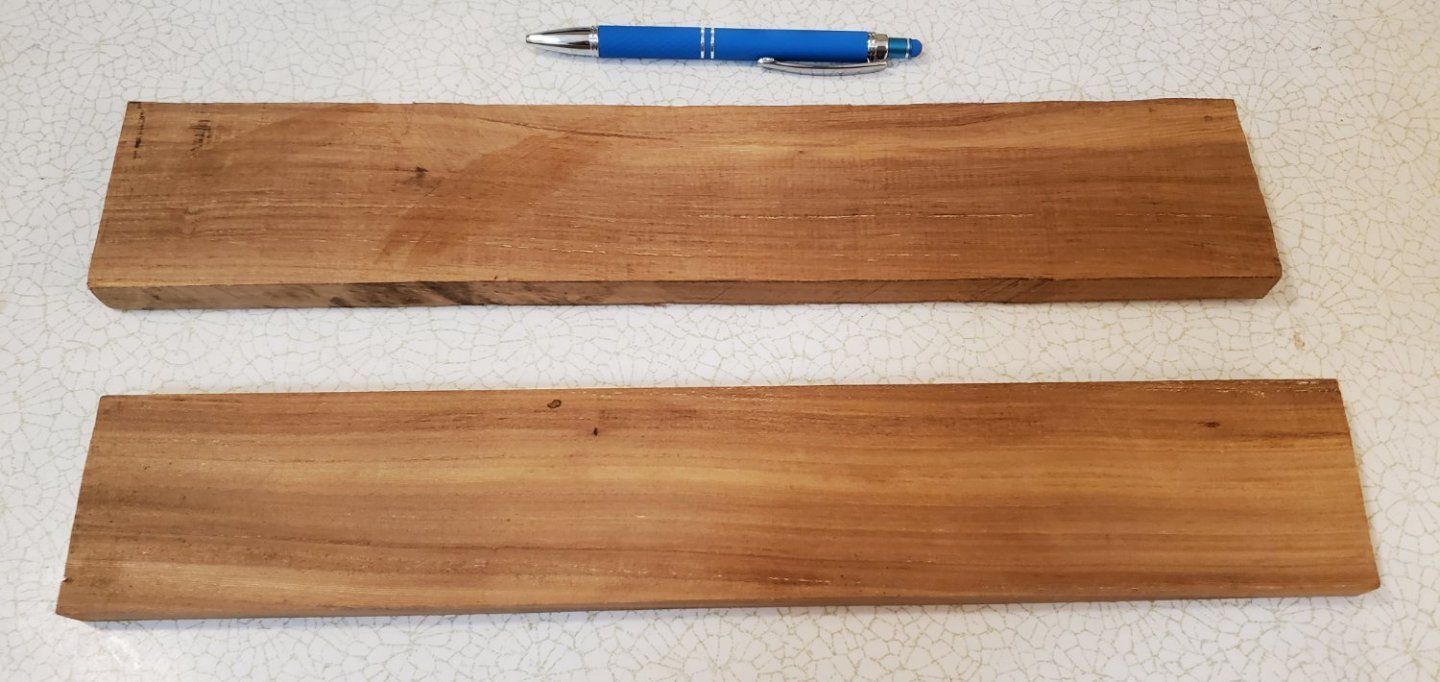
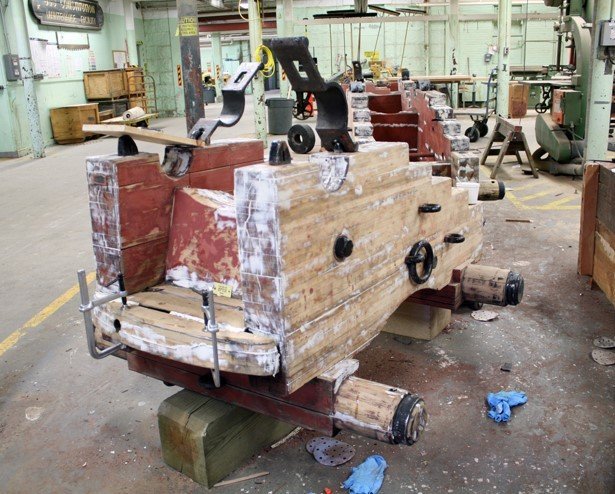
I finished all the woodworking for the carriage. This was definitely harder than I originally thought it would be! Just looking at carriage pictures, it seemed like a simple build. But when I got into the details, there was quite a bit more to it. I could probably say the same thing about my ship modeling in general! One thing I learned for sure is that if I’m going to do much more of this type of wood work, I’ve got to invest in some better tools. It took a looooong time to file, sand, file, sand, file, sand all these pieces to size. Regardless, this was fun! The last couple of pics are a dry fit just to get an idea if this thing is going to have a good look or not. There’s still some hardware to build/add (trunions, linch pins, cap squares, breach rings, etc), which is my next step. I’ll wait till the very end to add the rigging.

- 177 replies
-
- 8
-
-

-
- Independence
- bottle
- (and 1 more)
-
It was either house chores or another ship project. No brainer!!
- 177 replies
-
- 3
-

-
- Independence
- bottle
- (and 1 more)
-
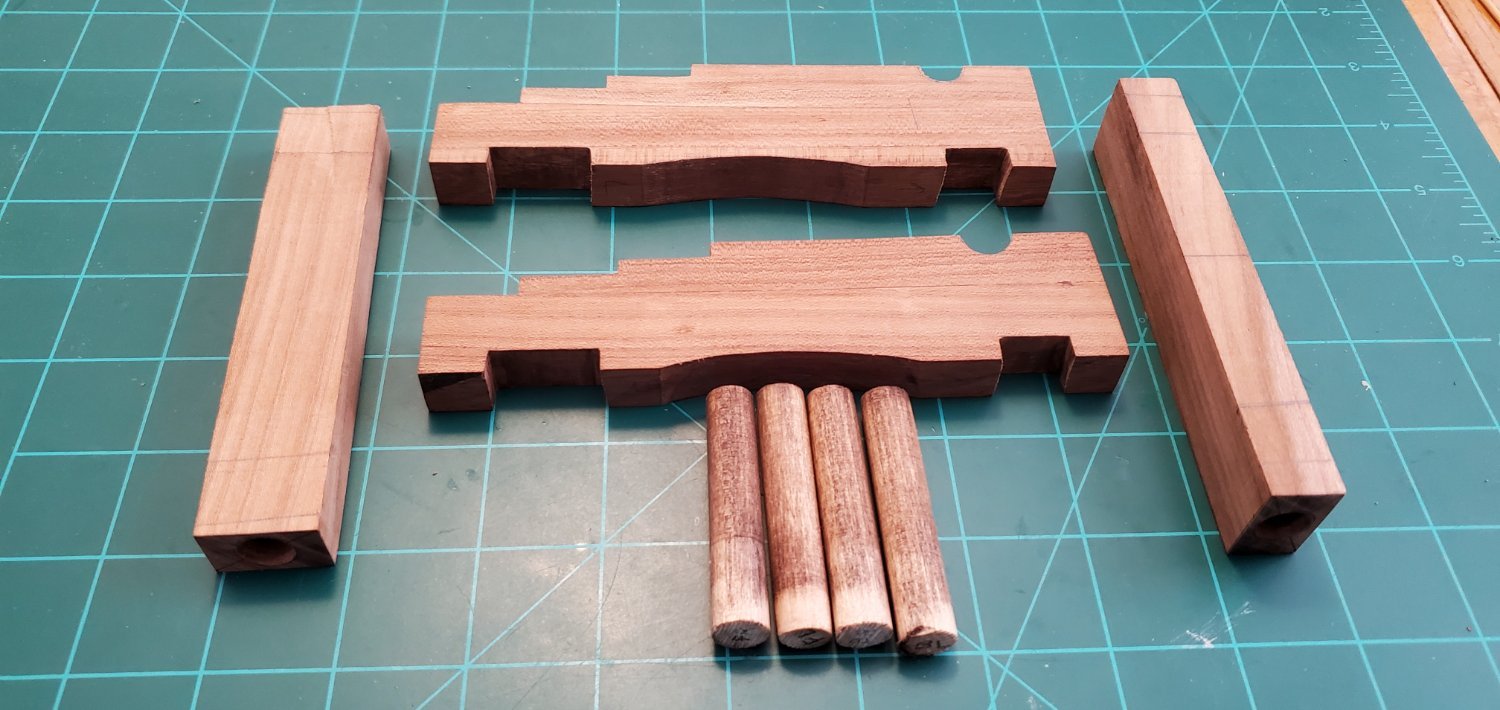
Below are the side brackets, the fore and hind axletrees, and axles. The axles will be cut to their final length later. For the side brackets, I made them with 4 “steps” instead of 5 like the plans show (and pretty much every other carriage I’ve seen). I need a lower profile for the brackets. The normal profile would hide too much of the bottle and potentially obscure the front half of the ship. The fore axletree will sit vertically in the final assembly and the hind will lay flat.


- 177 replies
-
- 7
-
-
- Independence
- bottle
- (and 1 more)
-
Rum buttered popcorn??? Dang you, Keith. Now I've got to go shopping tonight.
- 177 replies
-
- 2
-
-
- Independence
- bottle
- (and 1 more)
-
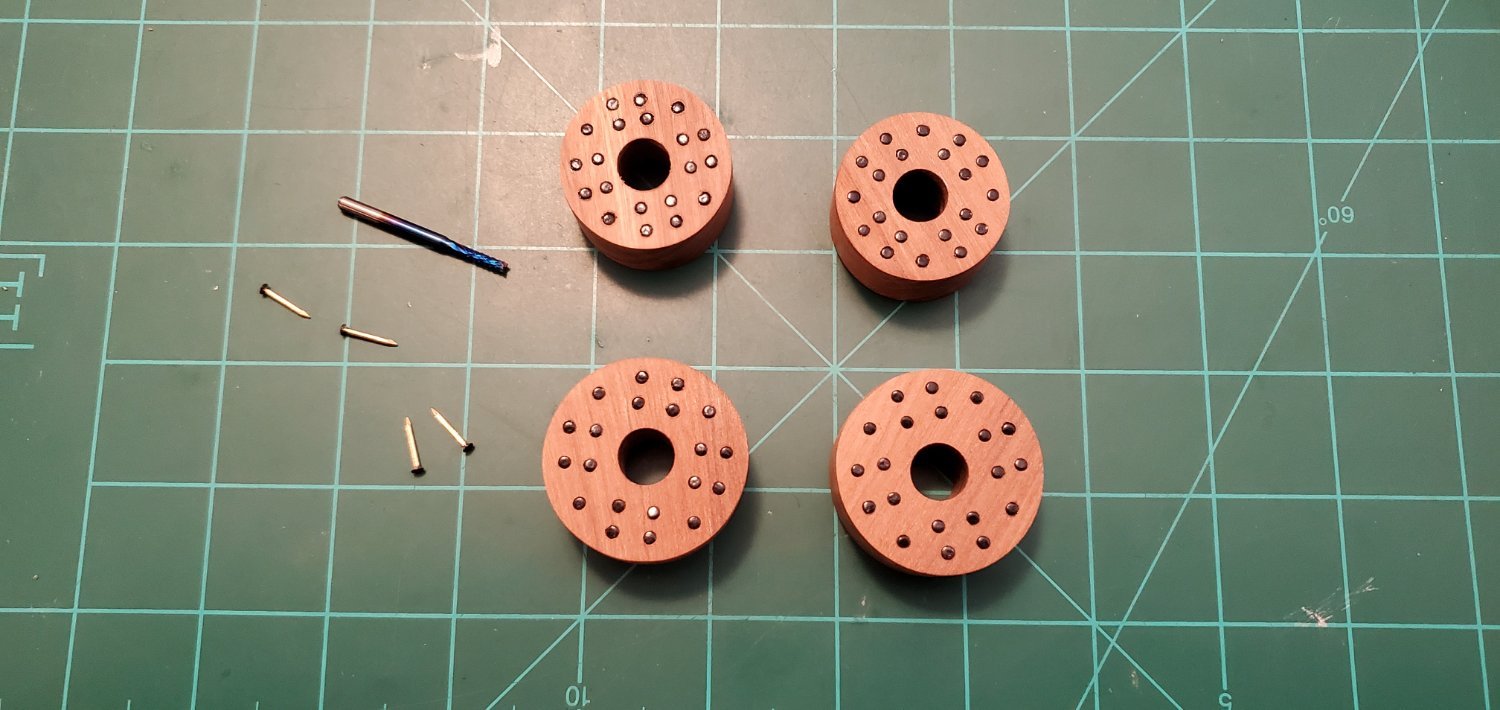
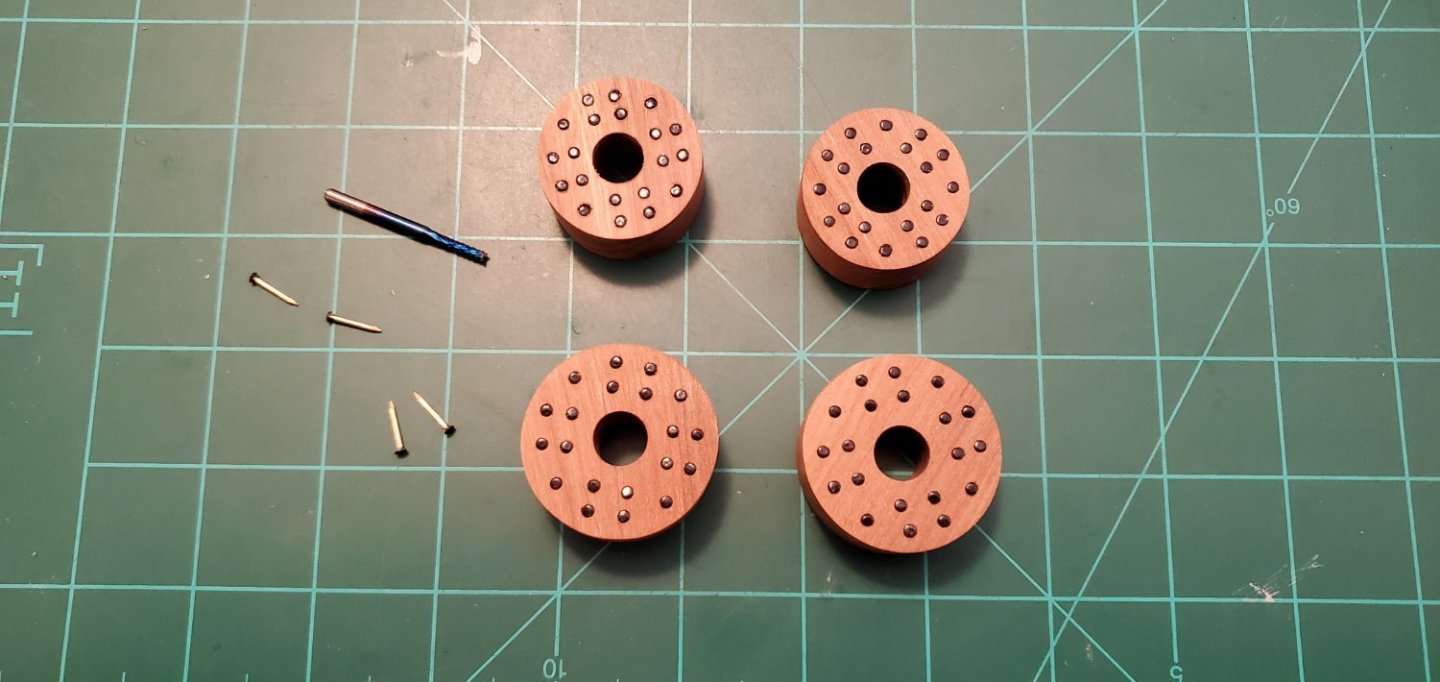
For the “lug nuts” on the wheels, I used brass nails that are 3/8” long with a 3/32” diameter head, which I ground down to a flatter surface. They are supposed to sit flush in the wheel, but I do not have a flat base counter-sinker. So I used an end mill router bit to countersink each of the 80 holes.
- 177 replies
-
- 8
-
-
- Independence
- bottle
- (and 1 more)
-
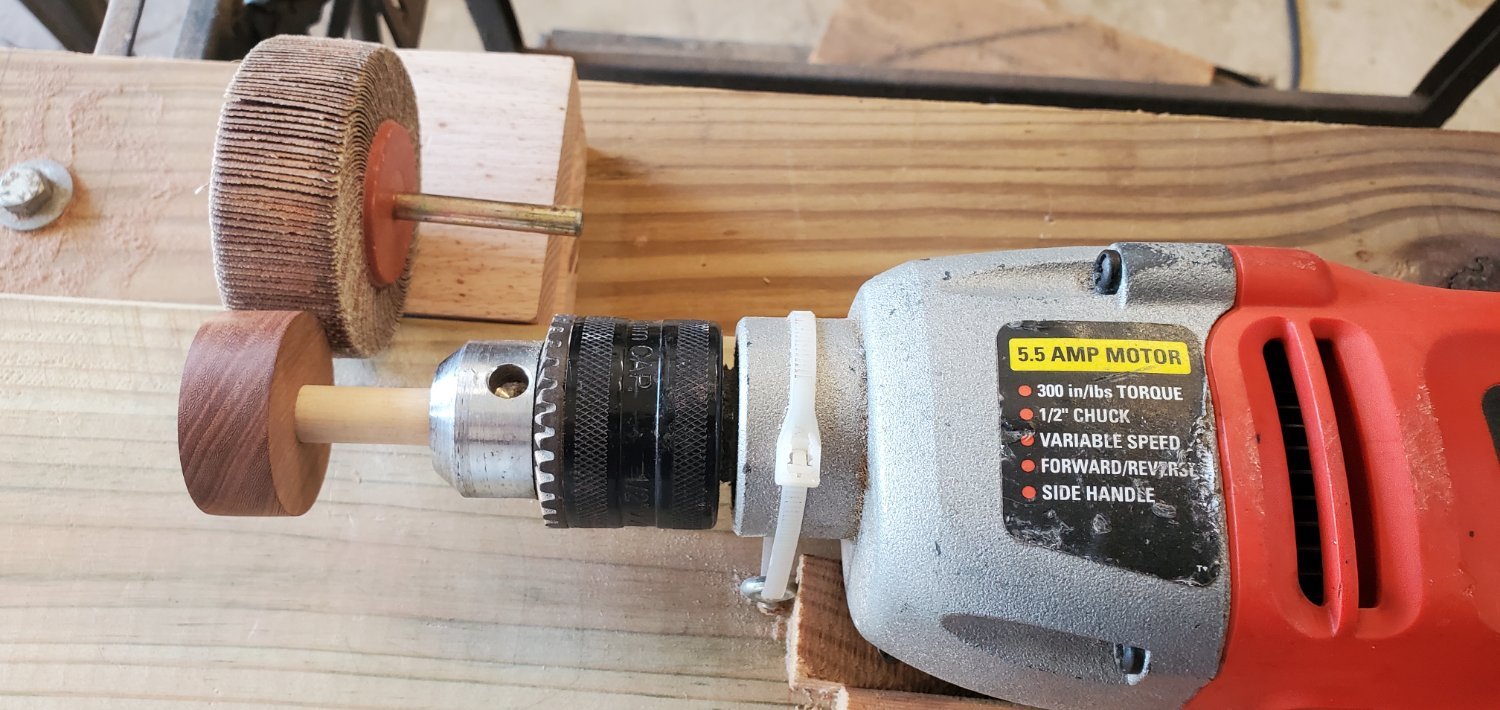
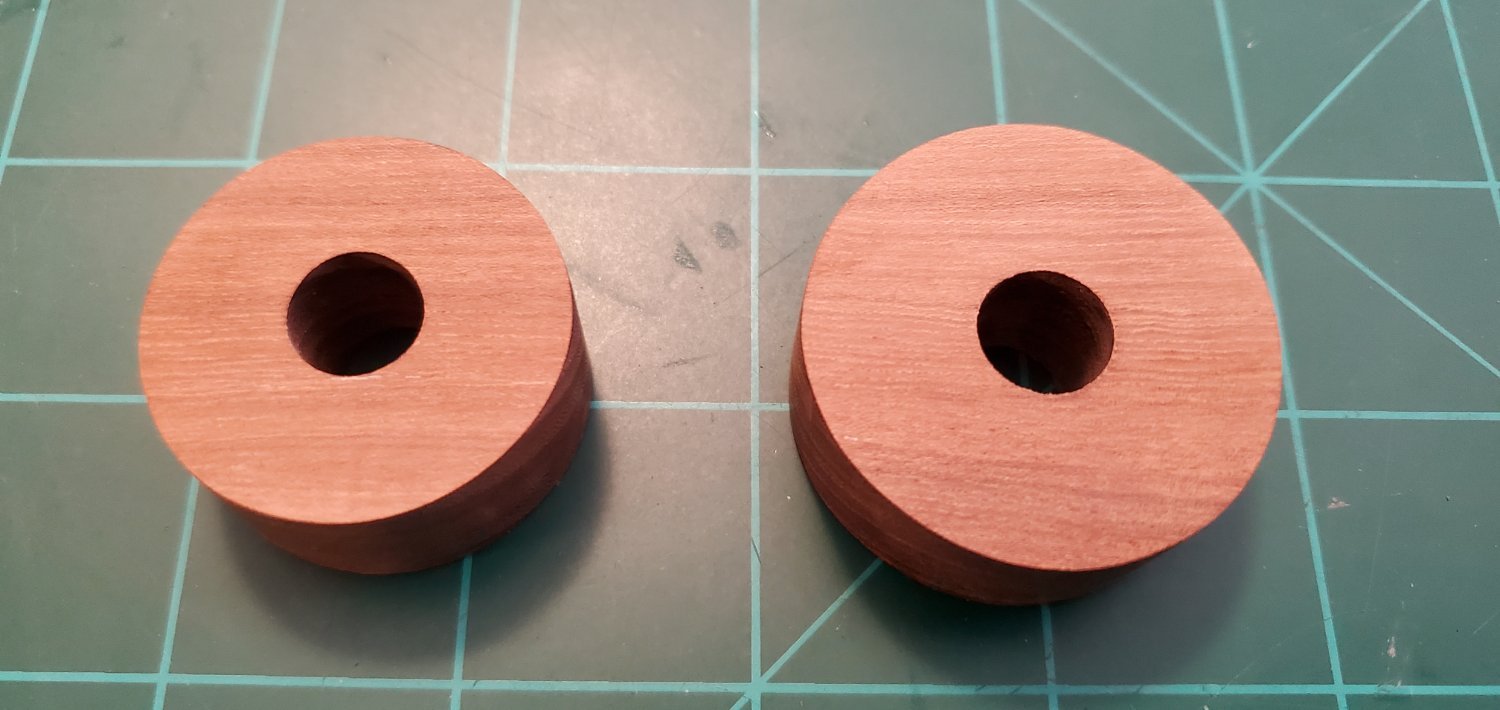
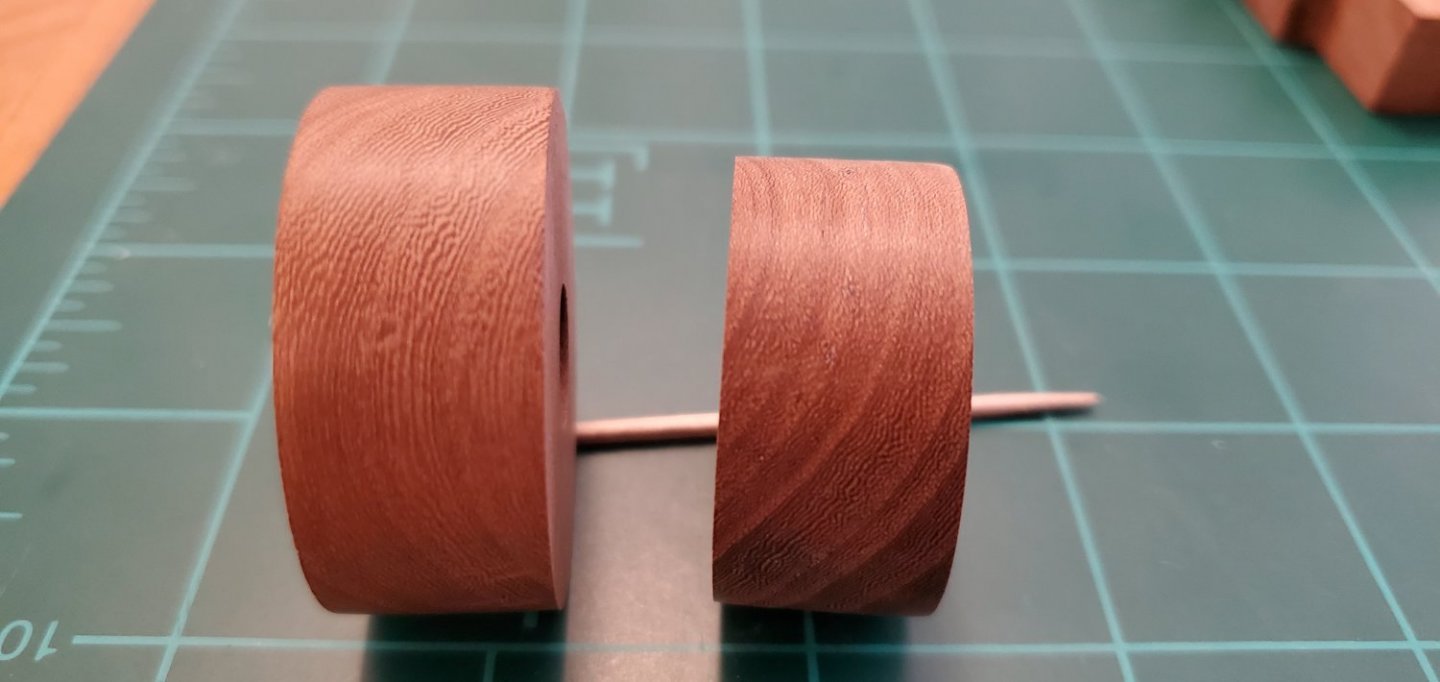
The wheels were a particular challenge for me. I do not have any hole saws that were the sizes I needed, so I cut the wood into rough circles and hand sanded them into a final rounded shape. Then I used a flap sanding bit with my drill lathe to give them their final finish. I just love the end grain of the wood, which shows really well when looking up close at the wheels.


- 177 replies
-
- 8
-
-
- Independence
- bottle
- (and 1 more)
-
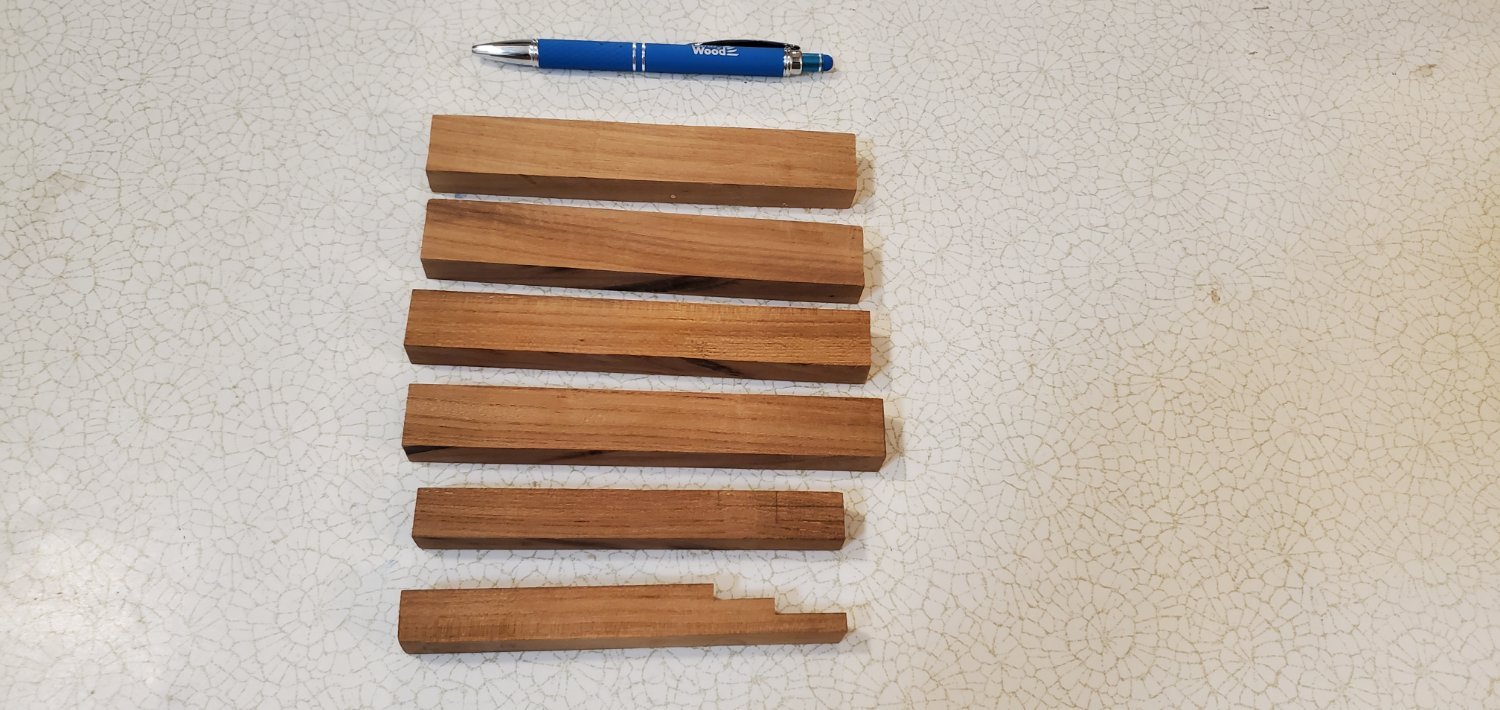
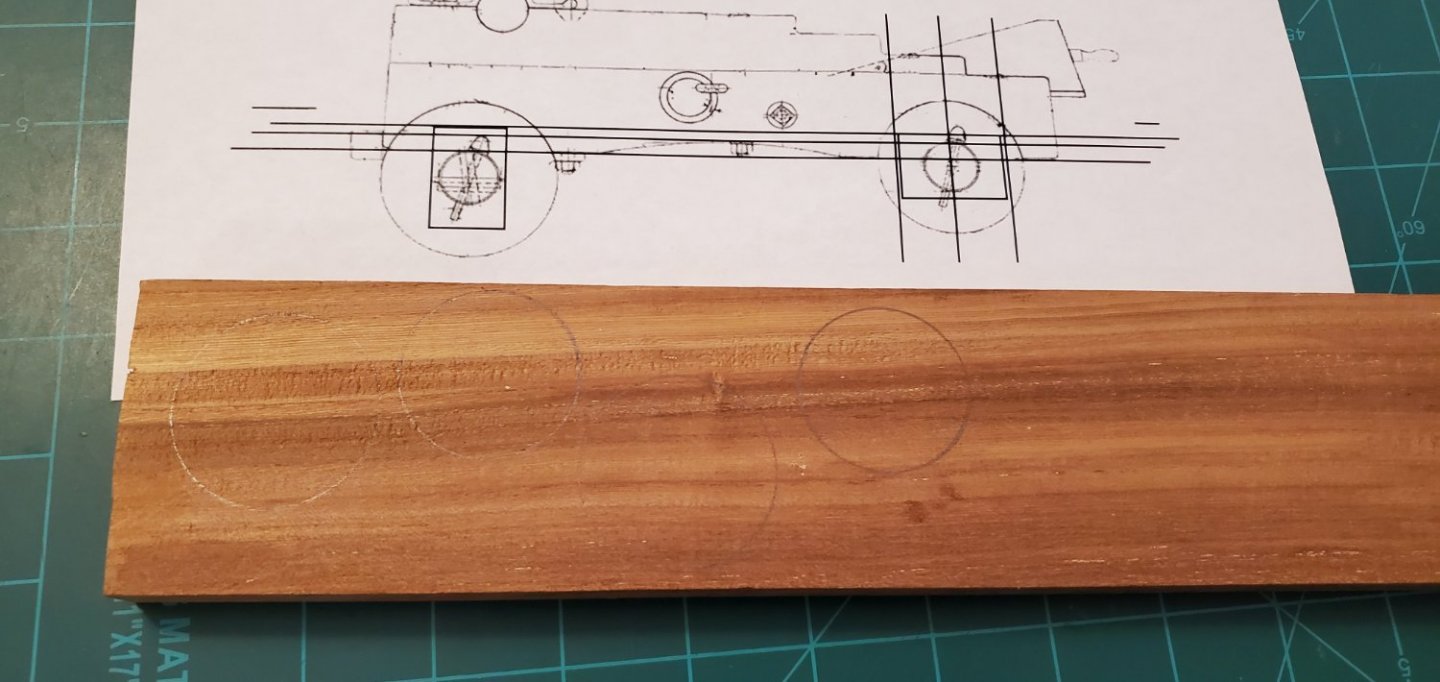
The only thing more meager than my woodworking skills is my array of woodworking tools which consist of a 10” table saw, a bench sander, and a band saw. When I was following @gjdale's capstan project, I almost quit looking at his posts because I was so jealous of all the tools in his workshop (as well as his high level of skill). But I’ll do the best I can here with this carriage. The wood I’m using is the heartwood from a large english elm tree that came from the south lawn of the Texas capital. It is really hard, dense wood and has a beautiful natural color and grain. Unfortunately, it tends to scorch if the cutting or sanding is not done carefully. I started with a couple of slats that are about 14” long, 2 ½” wide, and 5/8” deep and cut them into the basic shapes for the sides and axletrees.

- 177 replies
-
- 5
-
-
- Independence
- bottle
- (and 1 more)
-
Well done, Keith! I don't know how you'd get the rest of them to look any better than those!
-
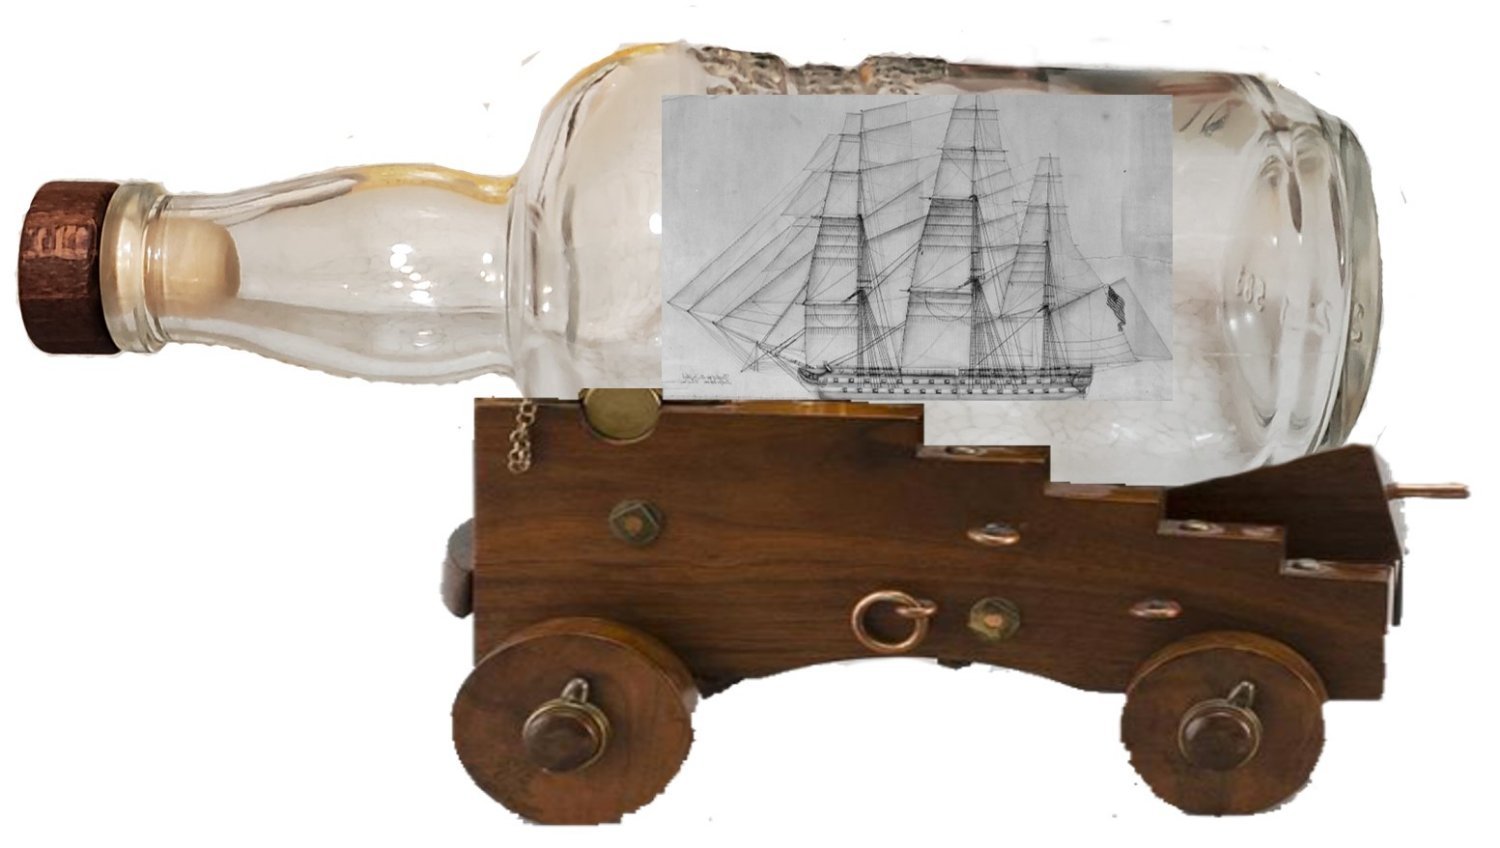
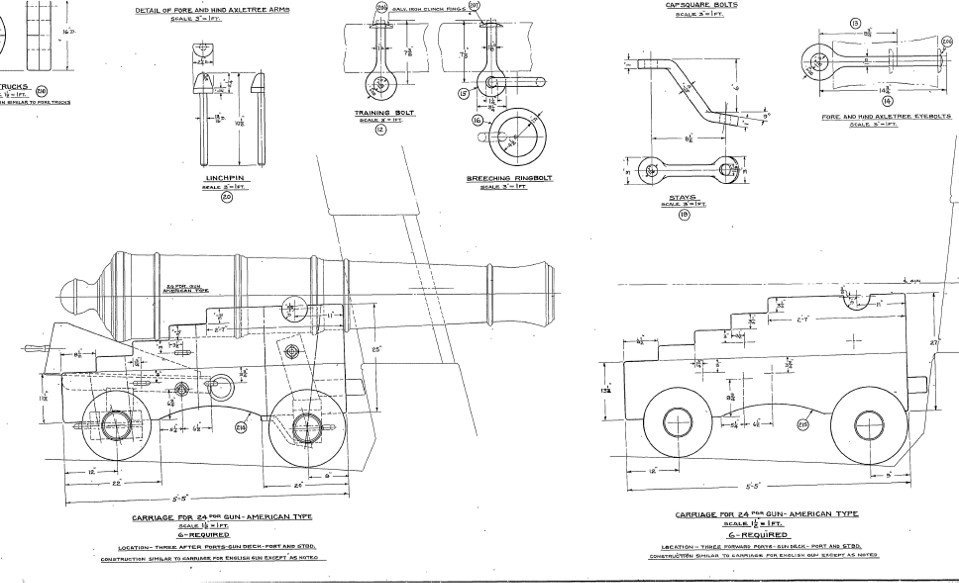
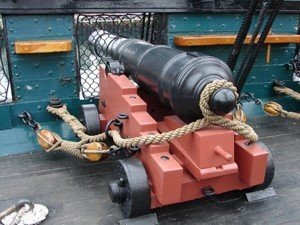
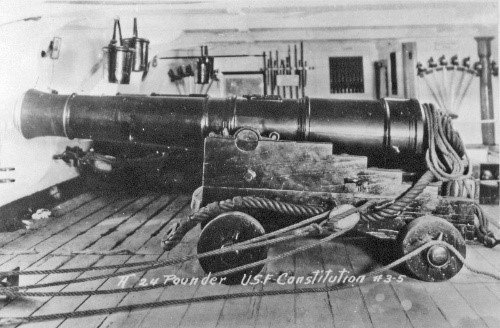
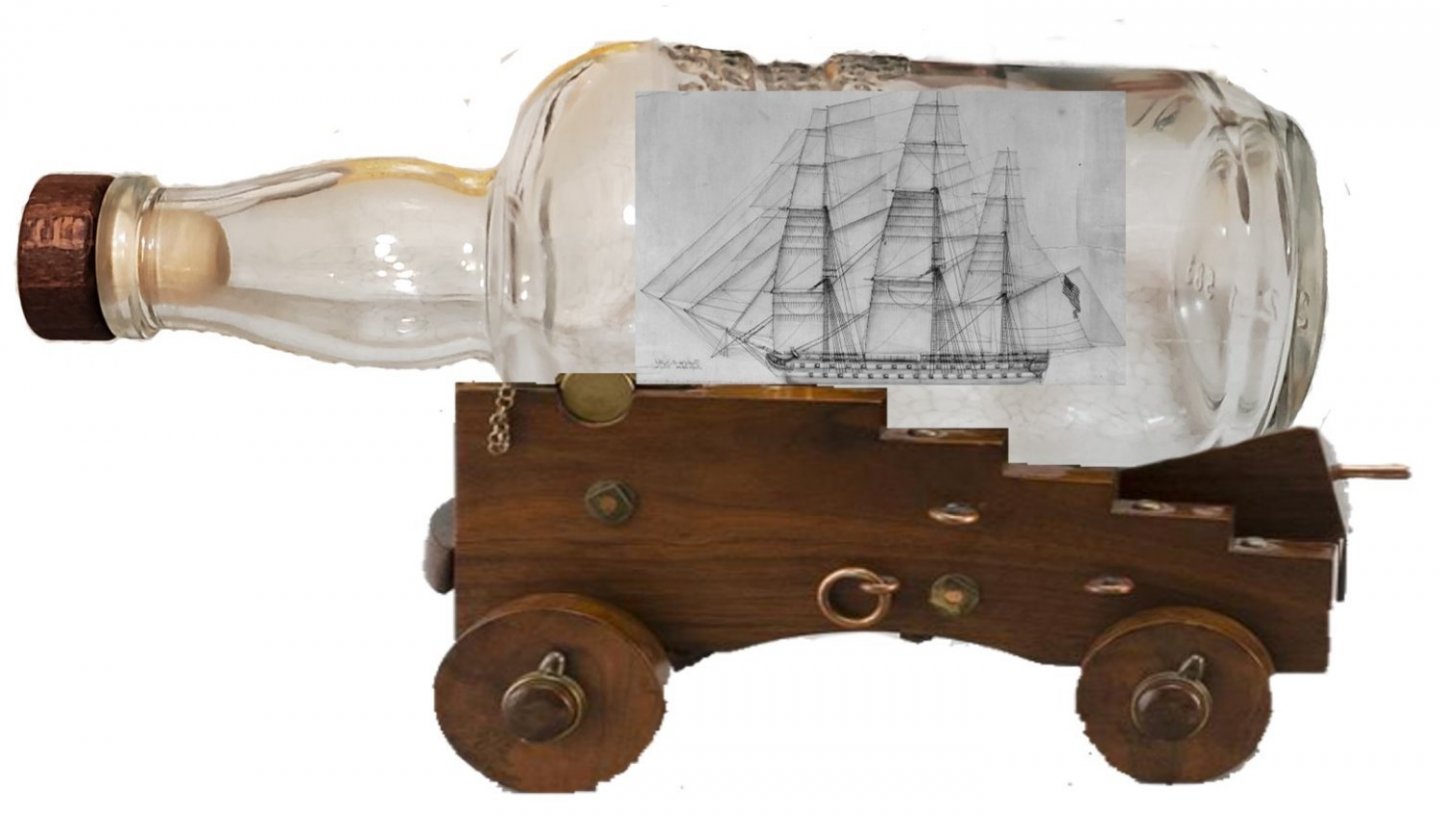
In the meantime, I’m going to start by trying to build the cannon carriage for the display first. With so little info available on the 1814 Independence, I’m going to assume that it had cannons and carriages similar to the USS Constitution since both were launched in sort of the same time period. I found carriage plans on the USS Constitution Museum website for a 24 lb “American-Type” cannon so I’ll try to make my display carriage similar to it. There will certainly be some deviations required to accommodate the rum bottle vs a cannon barrel. Plus, one thing I know I’ll change for sure is the color. Pictures from the website show the restored Constitution carriages painted a reddish color. However, old black and white pictures make the carriage appear unpainted. I like the look of natural wood much better than painted wood so I’m going au naturale. Here we go!
- 177 replies
-
- 5
-
-
- Independence
- bottle
- (and 1 more)
-
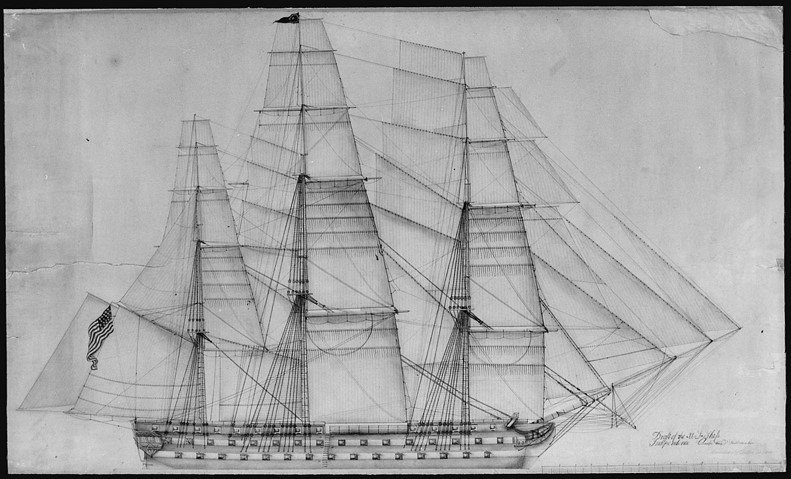
According to Chapelle, no plans exist for the original Independence. I could not find any model kits nor could I find any builds on MSW. And the only picture of the 1814 version I could find was a sketch of the sail plan (see below). I’ll continue to research the ship and if anyone out there knows where I can find more info please comment.
- 177 replies
-
- 4
-
-
- Independence
- bottle
- (and 1 more)
-
Since finishing the Aurora a few weeks ago, I found myself stressing out about all the yardwork and home fix-up things needing attention. I figured the only way out of that trap was to get started on another ship project. So I took a trip to Total Wine looking for cheap alcohol in unique bottles. You get some interesting reactions from store clerks when they see you grabbing bottles off the shelf, turning them sideways, and just staring at them. After an hour of perusing the aisles, a bottle of Cruzan rum with a longer neck caught my eye (1st pic below). When I turned it sideways, it sort of looked like a cannon barrel to me. Or maybe I had too many of the numerous free samples they were giving out around the store. Regardless, I got this idea about a display with a warship in the bottle and the bottle sitting in a cannon carriage. Hmmmmm. So I bought the $20 bottle of Cruzan. That’s over my usual budget for this stuff, but I do like rum drinks so it won’t go to waste like the rotgut I bought for the Aurora. I did some searching to see if I could find where someone else had done a similar SIB. I found several cannon carriage wine bottle holders for sale but nothing with a ship in the bottle. So maybe I’ve got something that’s a bit unique here, which would be pretty cool. Next was deciding what warship to build. I went thru Chapelle’s book on US naval history as well as the Naval History and Heritage Command website and decided on the USS Independence - the 1814 version and not the later Razee (new term I learned in my research). I liked the name of the ship, its history, and the fact that it was the first US Navy ship-of-the-line. Plus, a ship armed with 90 cannons would be a new challenge for me compared to my previous builds of commercial ships (Morgan and Aurora). The 2nd pic shows the basic concept I’ve got in mind.

- 177 replies
-
- 7
-

-
-
- Independence
- bottle
- (and 1 more)
-
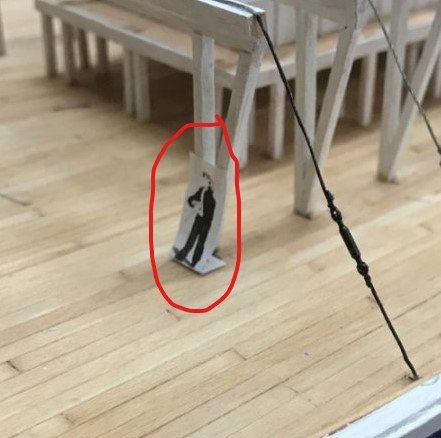
Superb work and amazing perseverance - especially on the paddle wheels. Wow. But I gotta ask, who is this little dude that keeps photo-bombing your pics?
- 238 replies
-
- 3
-
-
-
- Robert E Lee
- steamboat
- (and 3 more)
-
Keith - gluing is also how I attach ratlines to my shrouds for SIBs. No way for me to tie a knot that small and I had not thought of threading through the shrouds like you describe (interesting idea). Aleen's fabric glue has worked well for me. It's clear and has good strength and a bit of flexibility after drying, which is crucial for me since my shrouds and ratlines get folded over and twisted numerous times before reaching their final resting spot. Rob - that was an eye-opener to see that you glue ratlines at the larger scale (larger meaning compared to SIBs). I thought that everyone always tied them. Assuming that's what you did on your Glory of the Seas, they look really good. Thanks for giving away one of your trade secrets!
-
That is interesting, Keith. I had no idea they made it so thin. I will definitely keep that in mind when I kick off the next project. Thanks for the heads-up.
-
Whatever the repairs were, looks like you did a great job fixing them! Your excellent work continues.
- 505 replies
-
- 5
-
-
- vanguard models
- Sphinx
- (and 1 more)
-
Olha, beautiful work with your first ship-in-bottle build!


.jpg.f1ed9981c5d19a6a690a906fe1fd3fd3.jpg)