HOLIDAY DONATION DRIVE - SUPPORT MSW - DO YOUR PART TO KEEP THIS GREAT FORUM GOING! (Only 20 donations so far - C'mon guys!)
×


Glen McGuire
-
Posts
1,957 -
Joined
-
Last visited
Content Type
Profiles
Forums
Gallery
Events
Everything posted by Glen McGuire
-
 Olha, beautiful work with your first ship-in-bottle build!
 -
@Joe100 Thank you, Joe. Please let me know if you decide to do another version of the Endurance. I'd love to see what you would do differently from the first go (which I think is amazing).
-
@curtbroo Thank you for checking in and commenting. As with Malas above, I apologize for the late response to your post. Congratulations on trying this kit for your first wooden model ship. I hope you enjoy the effort as much as I did. If you have not done so already, I would highly recommend posting a build log for your work in progress. The support of this community is absolutely fantastic. There are so many incredible people with amazing modeling talents that are willing to offer comments, advice, guidance, tips, trick, etc. I wish I'd discovered this forum before I finished (or started) my Alabama. On the other hand, if you have started a build log, please let me know. I'd love to follow along.
-
@Malas@1 Hey Malas, I apologize for the late response to your post. I have not visited this log in a while and just noticed your comment. I hope it's not too late to help. Yes, I planked to the top of the frames, all the way up to the top of the "goalposts". Then I went back and broke off/sanded down the goal posts. Then I carved out the gun ports afterwards. Thus, the bulwarks are really planking strips. I do not know if that was how I was supposed to do it, but that's the only way I could figure out how to do it at the time. I was worried about how sturdy it would be, and it is a bit flimsy, but it came out ok. As for the quantity of planking strips, I had plenty of the 1/4" strips but the 3/16" quantity was tight. Do not waste any! Yes, the deck gets glued to the top of the frames, kind of like a bed with box springs sitting on slats. Again, I apologize for just now seeing this and getting back to you. Are you posting a build log?
-
Hey Keith - After seeing all the incredible, fine work you have done up to this point, I am 100% certain you can get past this rough patch. Mule time!
-
Hey Grant - if you drink enough of that $8 brandy, you will see more penguins than you can count!
-
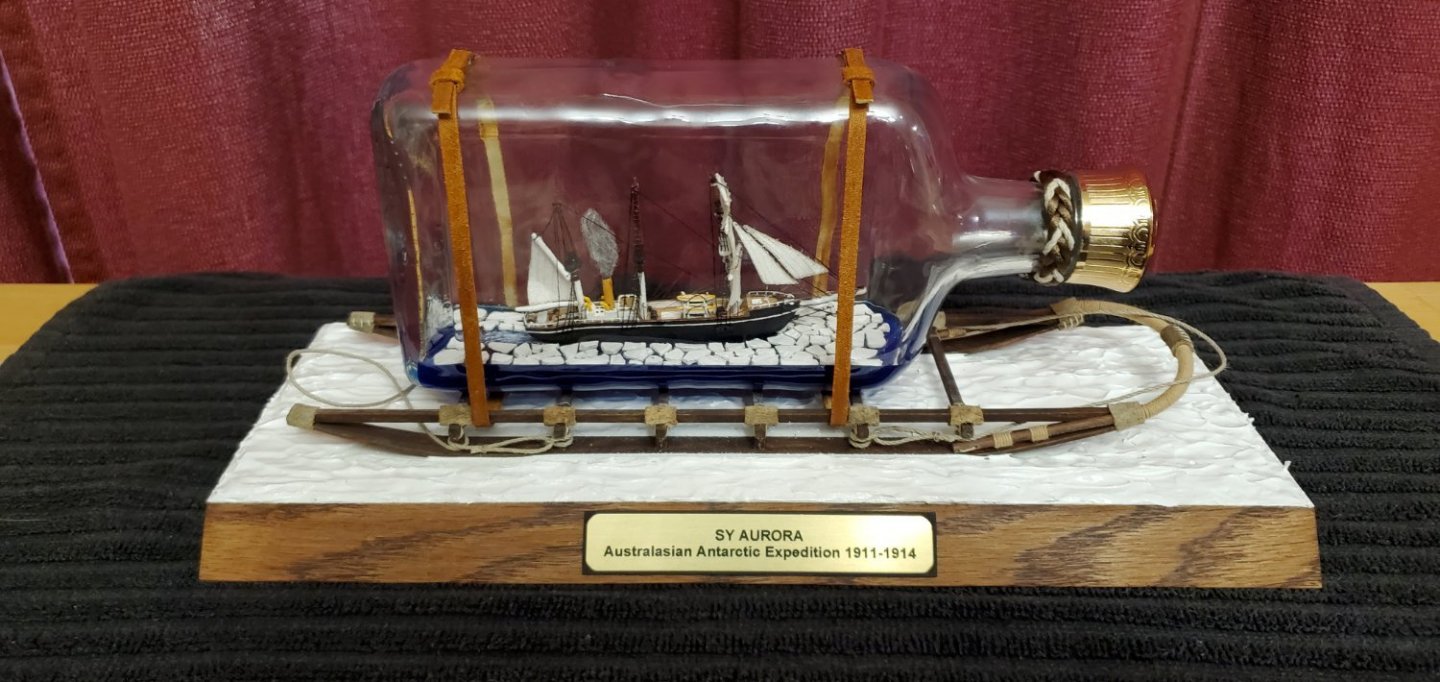
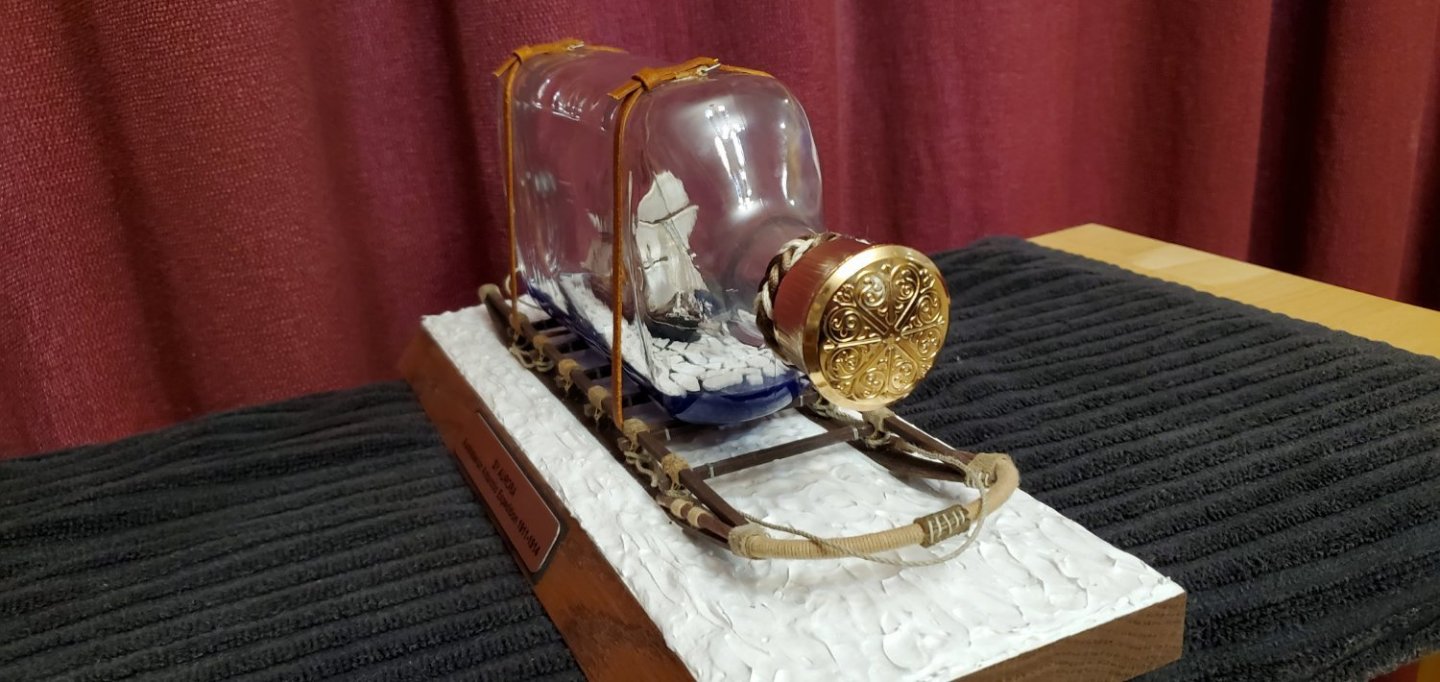
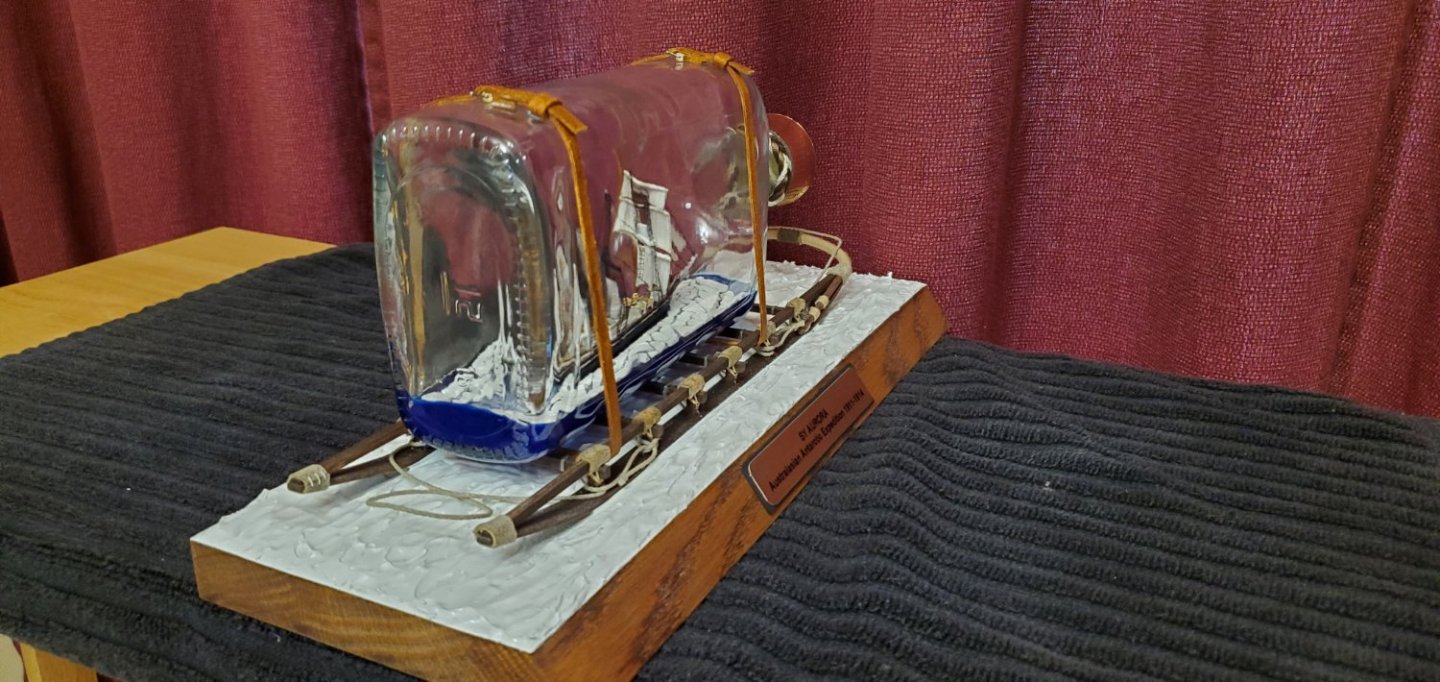
The project is complete! For all of you that have been following along, I cannot thank you enough for the likes, encouragement, comments, ideas, and suggestions along the way. I feel like each one of you had a hand in this effort and I can guarantee you it would not have come out near as well without your help.
- 156 replies
-
- 15
-

-

-
Hey Dan - thanks for the idea about hairspray and rope coils. I'm gonna keep that bottle of Paul Mitchell and hope my friend forgets she loaned it to me! Regarding the putty and sea, I actually used "Easy Cast - Clear Casting Epoxy" for the sea. I did not notice any fogging as it degassed. After dripping the epoxy in the bottle, I let it sit on a table in a wide open room with a ceiling fan running so it had plenty of ventilation for drying. Not sure if that helped keep the bottle from fogging or I just got lucky! For the ice, @Joe100 made an earlier comment about his use of Deluxe Materials plastic putty for ice. I did not have any putty handy, but I did have some white modeling clay. His putty idea made me think of trying the clay. I rolled it out thin, painted it with a mix of acrylic white and gloss gel medium (for a bit of shine), and cut it up into a bunch of random, odd shaped pieces.
-
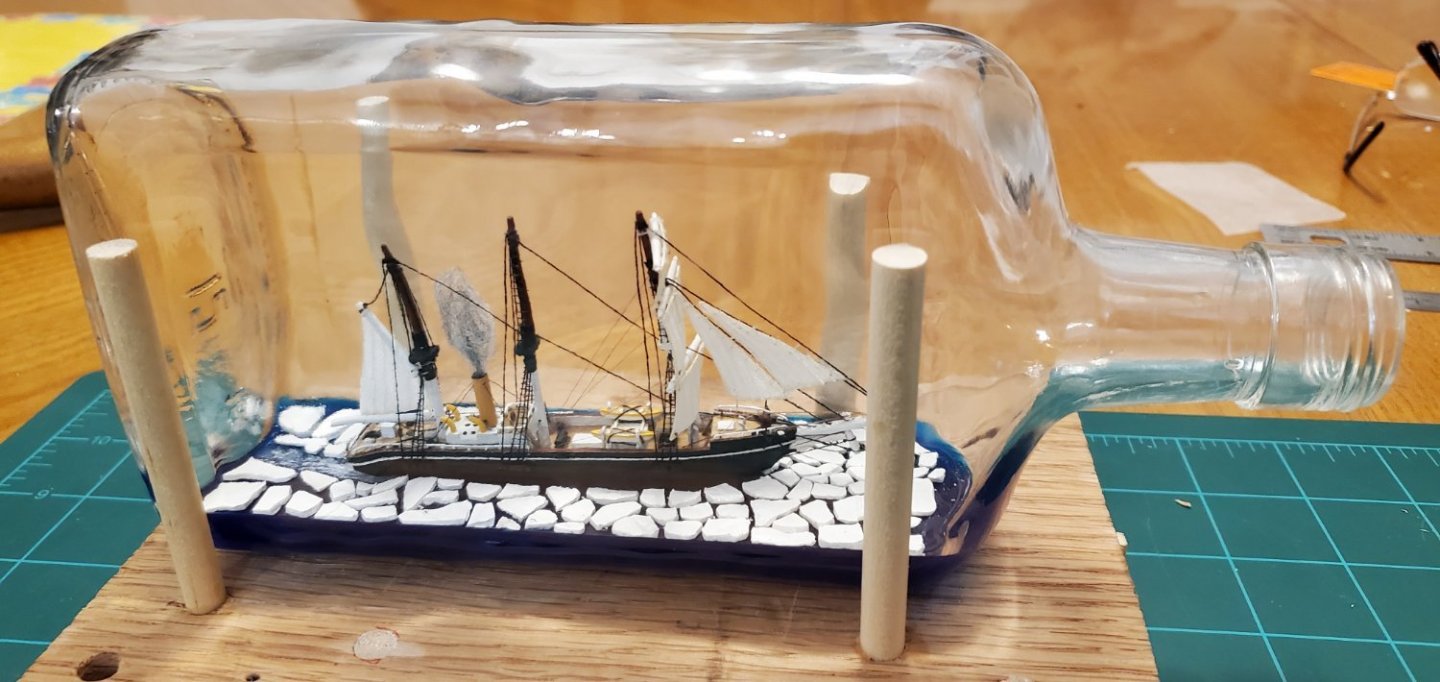
Success!!! Only a few minor snags (so to speak) when pulling all the strings and raising everything up. My last SIB (Charles W Morgan) had 5 pull strings. This one had 12 so it was a very careful process. But all went well. The thing I struggle with most is cutting the strings at the bowsprit after I've got everything up and in place. I need to improve my technique or tools or both there. The finish line is in sight!
- 156 replies
-
- 12
-

-
-
-
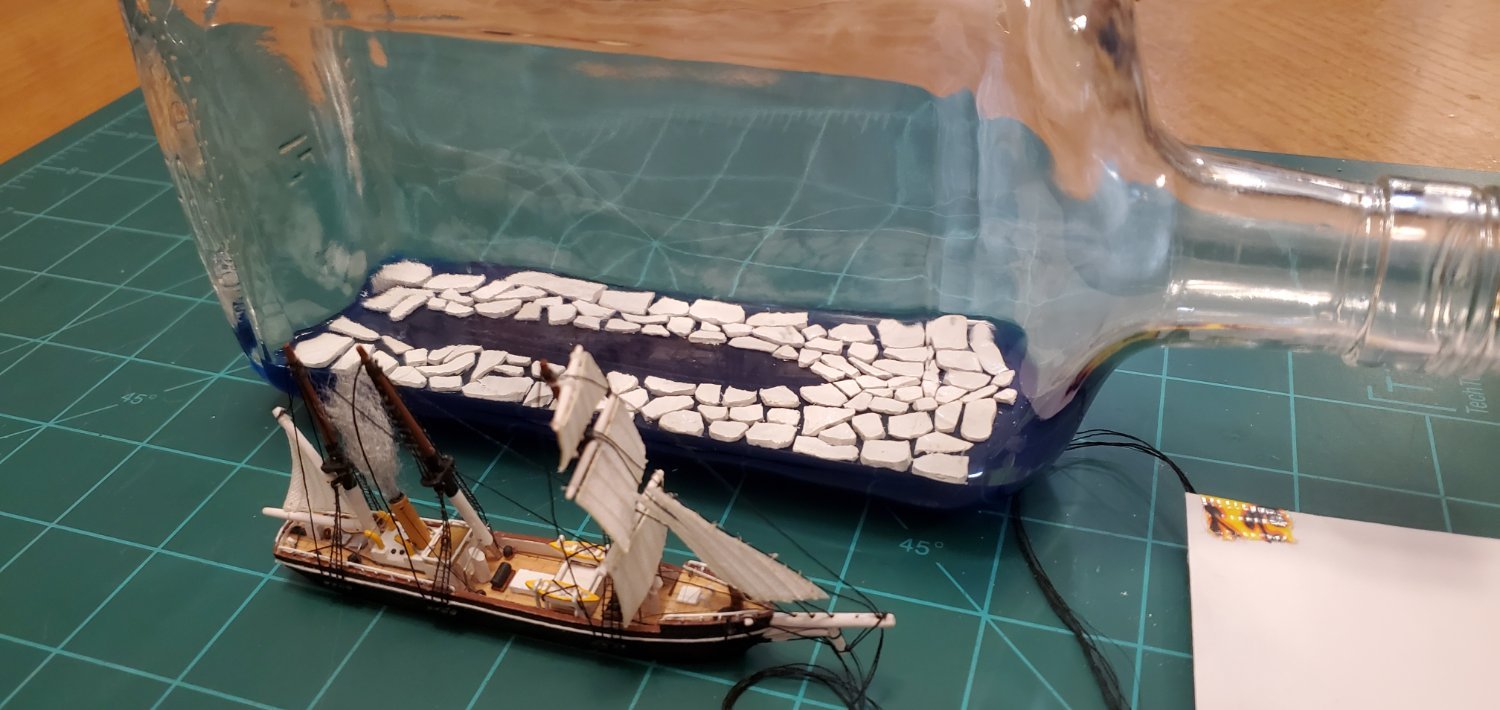
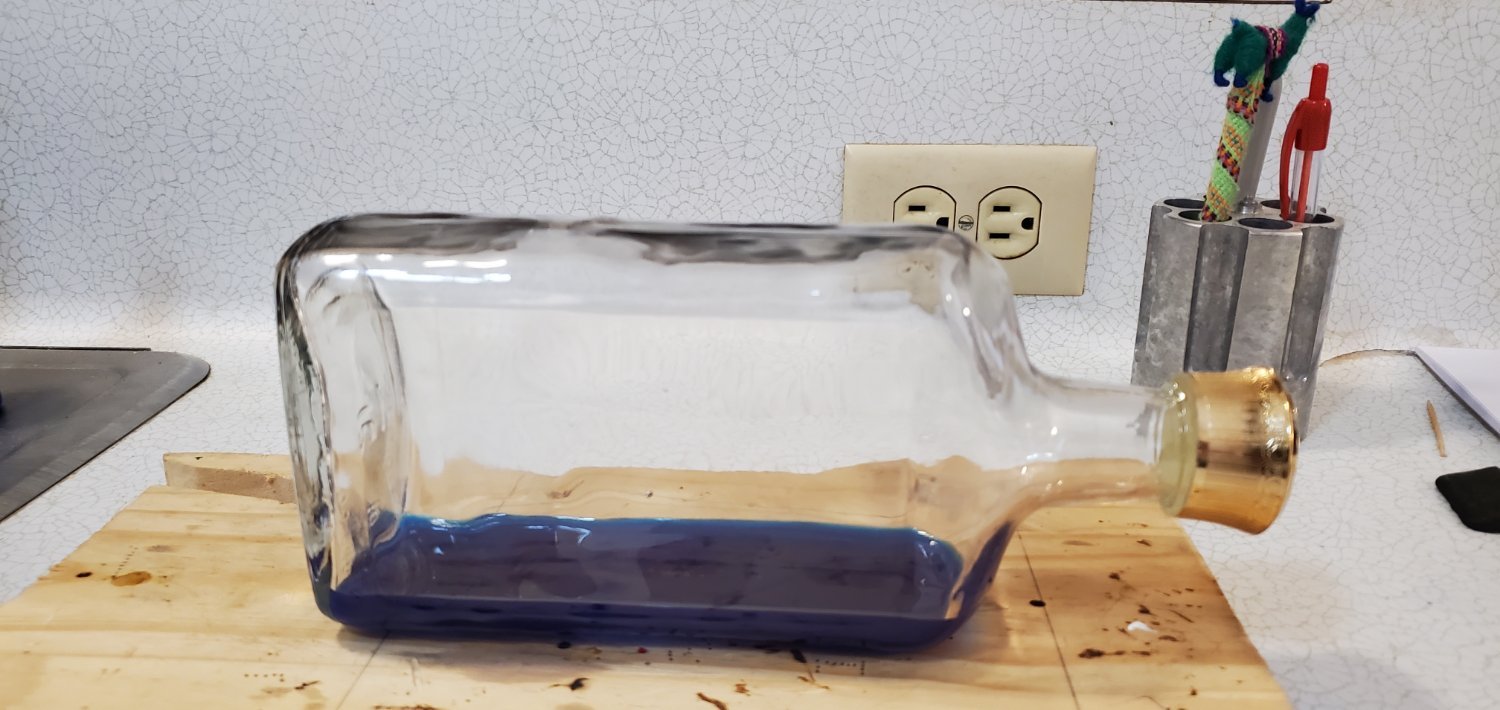
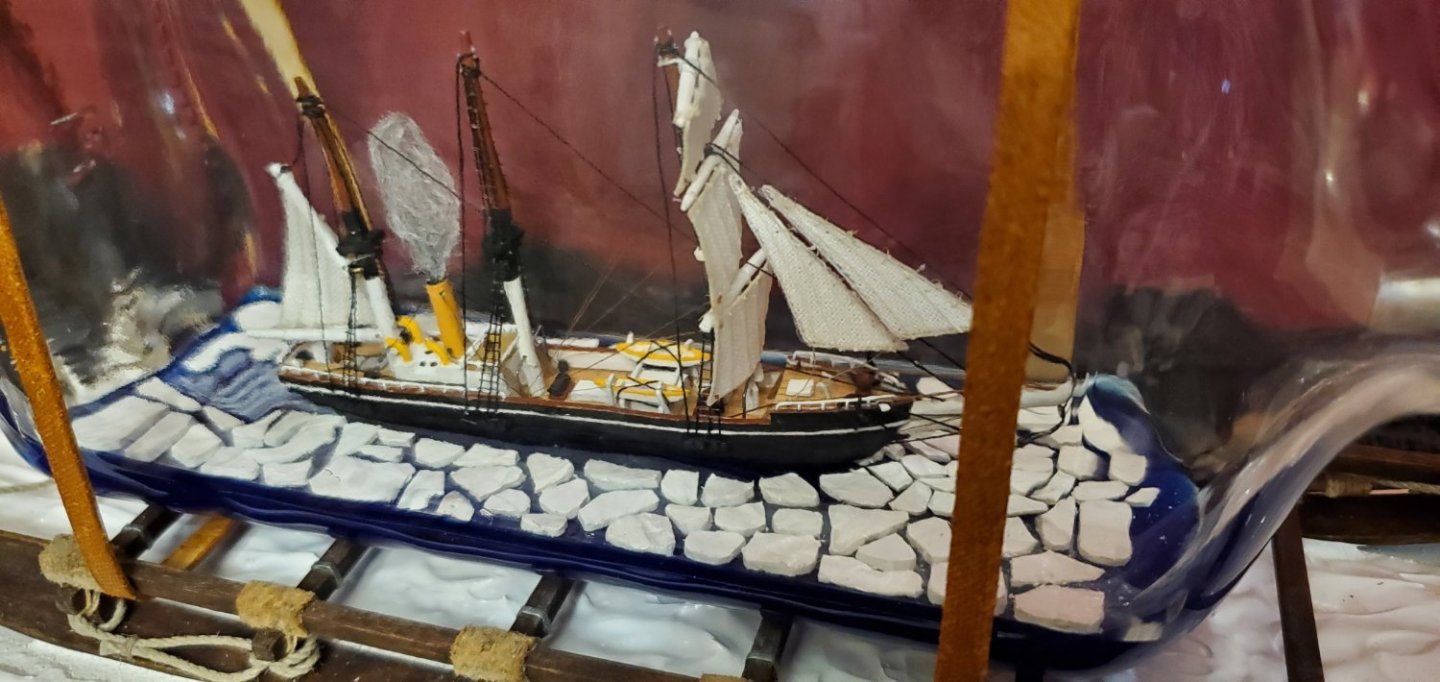
The Aurora is in the bottle! But I cannot say that the ship has fully launched until the masts and smokestack are successfully raised and everything in its proper place. So the bubbly is still on ice for a little while longer. This time, there was no stomach-turning "pop" or other ominous noises when I did the big push. In fact, I'm a little nervous because it went sooooo easy. I mean it just slid right in with relatively little resistance, much smoother than the practice pushes I had done. I think maybe I did just a bit better at getting everything to lie flat for the real push. We will see tomorrow when I start yanking on all the strings. If it doesn't work out, I will be adopting the same nickname as the captain of the Aurora - John King "Gloomy" Davis. On another note, a dear friend of mine had a brilliant last-minute idea. I was telling her about my anxiety with the frail smoke. She suggested using hairspray on the yarn to give it strength and keep it from fraying further. She gave me a little spritzer bottle of Paul Mitchell Freeze and Shine Super Spray to use. Of course I'll find out for sure tomorrow, but I believe was a great solution. Anyone else have hairspray in their toolbox? Hard to see it in this picture, but I also added some white in the ship's wake for some slushy, prop churn.

-
OK. Despite shaky hands from thinking about polar bears and penguins, I managed to get all of the pack ice in place. And BTW, thanks to @Joe100 for the idea of using putty for the ice. I will let things sit for a day to make sure everything is set. Then we're gonna see if this whole thing will work or not. Moment of truth coming up!

-
At 1/500, I think if I glue a couple pieces of salt and pepper together it will look more like a penguin than anything I could carve!
-
OMG!!! NOOOOOO!!! OK. First of all, the ship is in Antarctica so thankfully there are no polar bears. There are mainly penguins. And second of all, uh.....crap! 🐧
-
Hey Roger - Thanks for the suggestion. I will consider that after I see how things look when all the chunks of ice are in place. Quick in-progress update. I've begun putting the ice chunks in place...very carefully and very slowly! So far I've only dropped 1 by accident inside the bottle. I got lucky and it landed glue side up so was able to retrieve it for another try! Only about 50 more pieces to go!
-
Dang, Mark. Very sorry to hear that. I hope that you can quickly get new glasses and that they fix things for you. I look forward to you being able to resume this cool build.
- 505 replies
-
- 7
-
-
- vanguard models
- Sphinx
- (and 1 more)
-
Keith - Hmmmmm. I'm with Mark, I think that vacuum tool could have a lot of uses for a lot of things including SIBs. Hmmmmmm again.
-
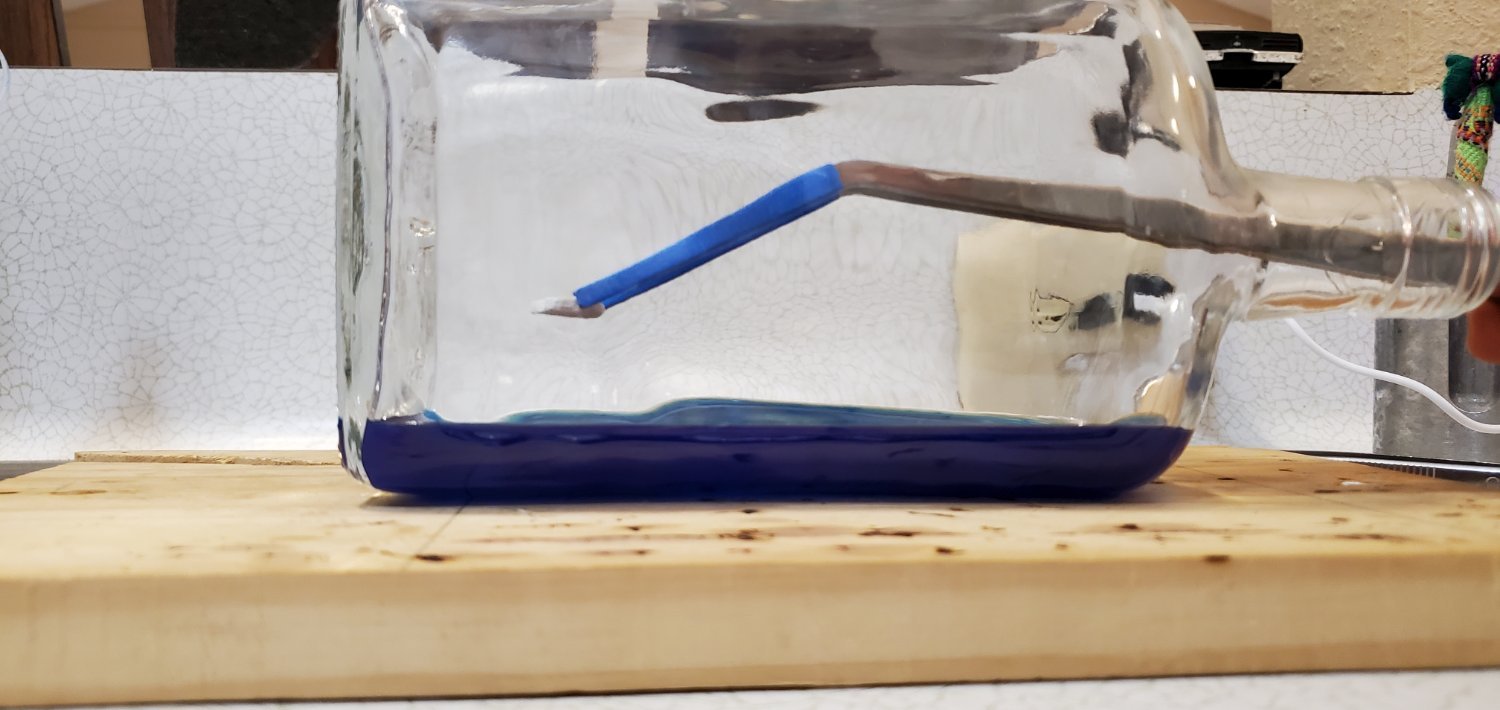
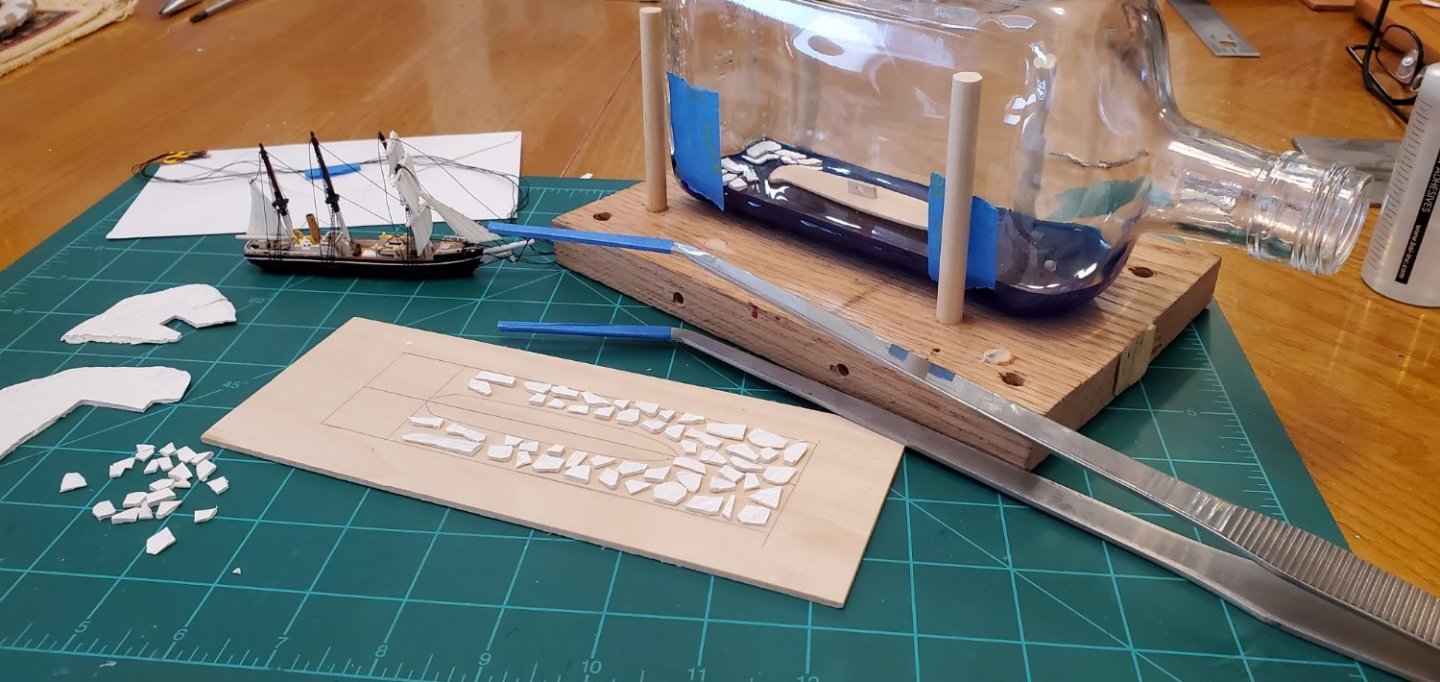
Keith - I appreciate the questions because they are the same ones I'm trying to answer as this thing moves along! I come up with these ideas of how I want things to look but don't really have any idea how to do it until it's time. That's the challenge being a newbie modeler trying to do this from scratch. I have no instructions or plan!! But that's also what makes this so much fun! So here's what I'm thinking - first, take a small piece of wood that's the size of the ship's bottom and place it where I want the ship to go. Next, dab some 30 minute epoxy on the bottom of each ice piece and place them inside the bottle around the piece of wood. After all the ice is in place and the epoxy dry, remove the wood and replace with the ship. After reading you question, I went and did a short test since I had not actually tried the long tweezer/ice idea yet. It went ok as you can see in the pic below. It's going to be tedious with so many ice pieces, but should work. I may err on the side of somewhat bigger pieces just so I don't have so many to deal with. Plus, those long tweezers are pretty large - they handle larger things better than smaller ones. I will do some testing with different size pieces and then make a final decision on what to do.

-
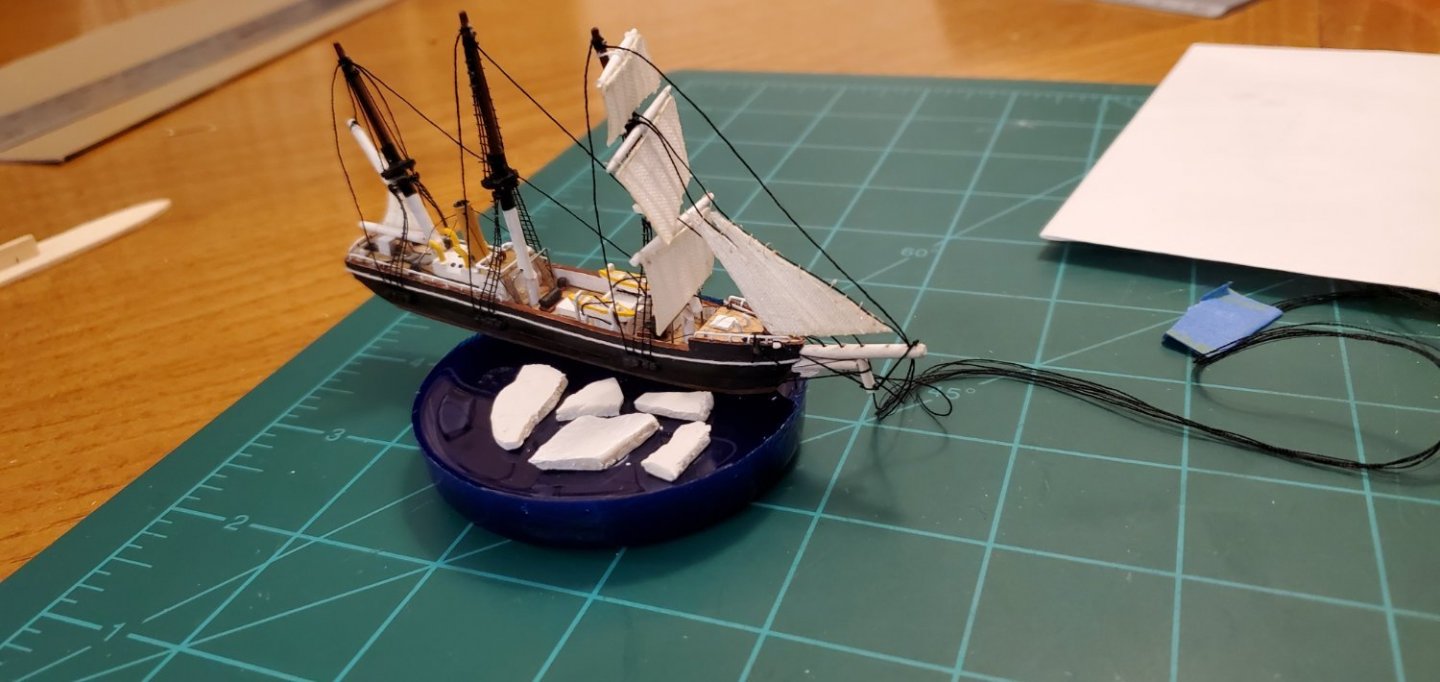
Thanks, Mike and Keith! Keith, I hear you about the slush but I think it's beyond my capabilities. It's going to be hard enough for me to get those pieces in their proper place by dropping them in with long tweezers. I'm definitely going to do some unglued, practice drops! Below is kind of what I have in mind. Probably a little more space between the pieces of ice and no slushy stuff in between. And yes, almost time for the big push. Anxious moments ahead!!! 😳
-
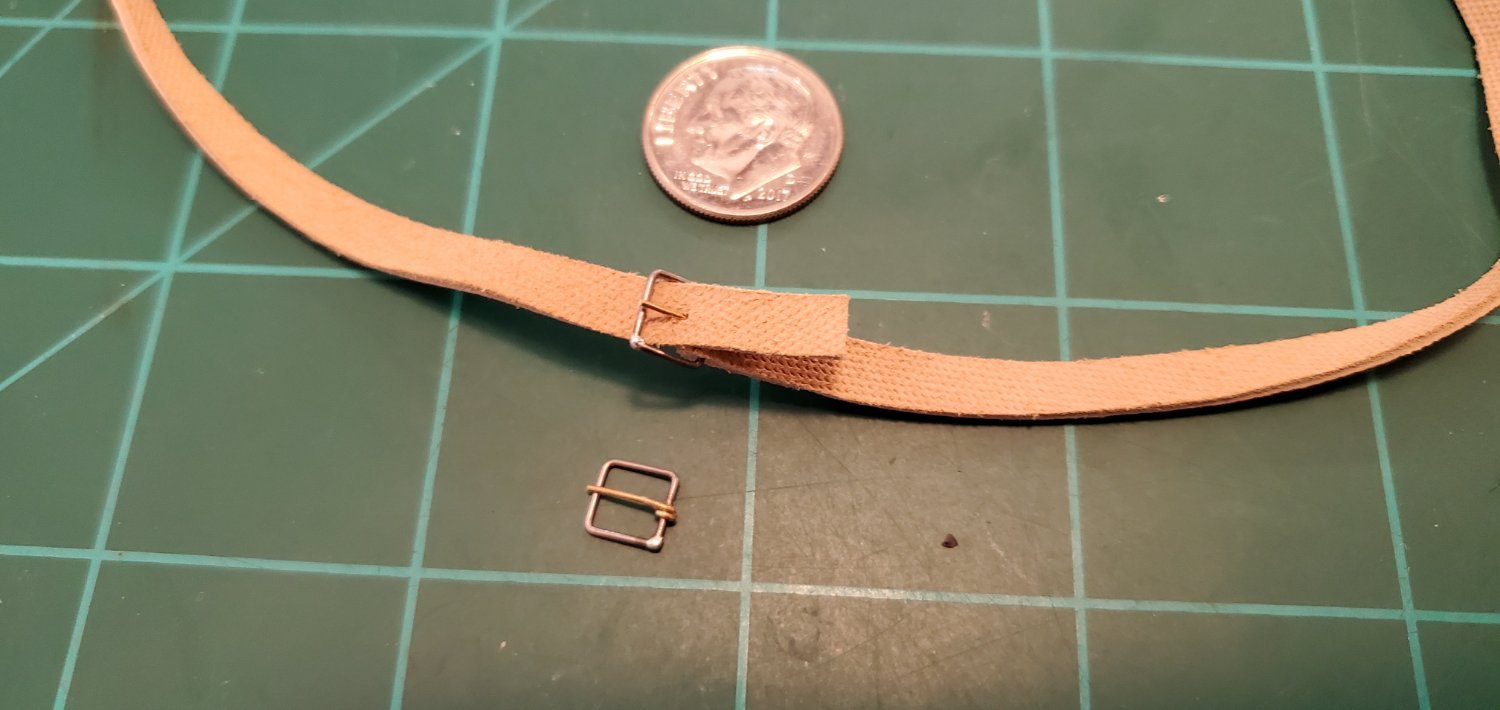
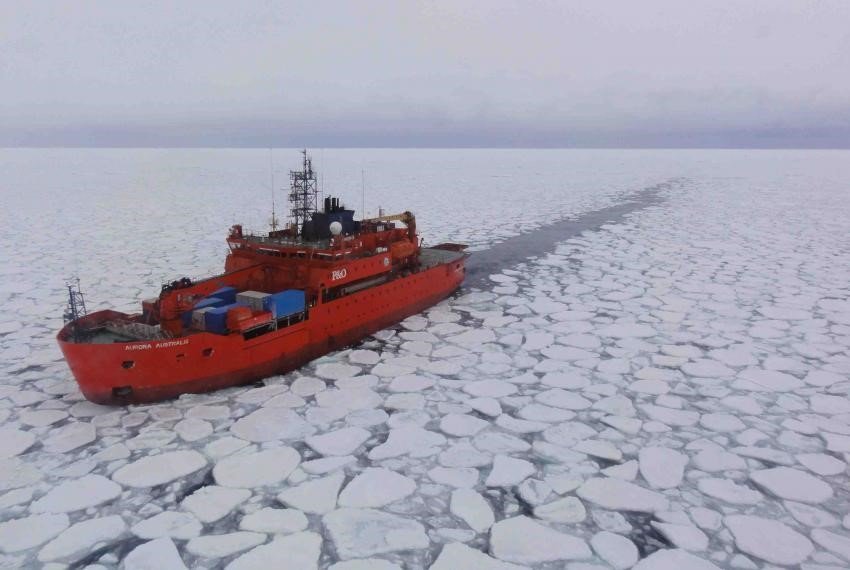
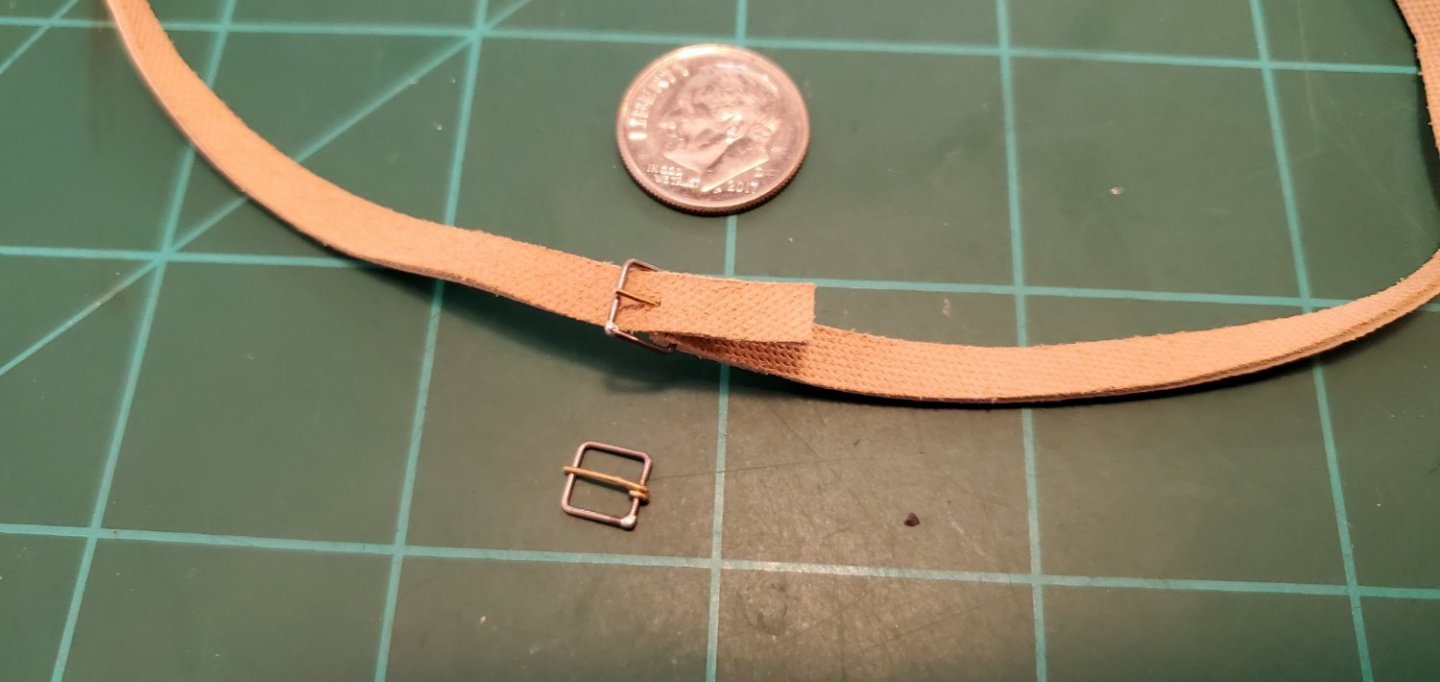
It takes 72 hours for max hardening of the resin. In the meantime, I decided to jump ahead and work on the very last step of the whole project - how to secure the bottle to the sledge. The Museum Discovery Centre of Sydney, Australia has one of the sledges from Mawson’s Australiasian Antarctic expedition. On their website they have a picture of the sledge with a bunch of straps which they describe as follows, “Leather straps are wound around the top rails. These have holes and buckles and were used to secure the load while in transit. The leather appears to be vegetable-tanned cowhide.” I decided to try and secure my bottle to the sledge in the same manner. I found some strips of deerskin leather that I thought would work well for the strap. For the buckles, I bent some .025” music wire into a rough square and soldered the joint for the frame. For the prong, I used some soft brass wire of the same diameter so I could attach by twisting the end around the frame. Looks like this will work ok.

-
I finished up my YouTube U classes on epoxy resin and did a test run in a red solo cup. I also rolled out a small piece of white modeling clay and cut it into a few pieces for broken pack ice. When the test resin was dry, I popped it out of the cup and placed the ice and ship on top to see what kind of look I had. The ice looks a little thick and maybe the pieces are too large, but overall I think I’m on track. So I went ahead and poured the resin into the bottle for real and set it aside.