


Snug Harbor Johnny
-
Posts
1,507 -
Joined
-
Last visited
5 Followers


About Snug Harbor Johnny

-
 Snug Harbor Johnny reacted to a post in a topic:
Endurance by GeneralNuisance - OcCre - 1:70
Snug Harbor Johnny reacted to a post in a topic:
Endurance by GeneralNuisance - OcCre - 1:70
-
 GrandpaPhil reacted to a post in a topic:
Wasa 1628 by Knocklouder - Billing Boats - 1:75
GrandpaPhil reacted to a post in a topic:
Wasa 1628 by Knocklouder - Billing Boats - 1:75
-
Knocklouder reacted to a post in a topic:
Wasa 1628 by Knocklouder - Billing Boats - 1:75
-
Keith Black reacted to a post in a topic:
Wasa 1628 by Knocklouder - Billing Boats - 1:75
-
 So rum was your favorite? Here's part of a rowing song ... (chorus) Away, away with rum by gum - rum by gum, rum by gum. Away, away with rum by gum - the song of the Temperance Union ! We never eat cookies because they have yeast, and one single bite turns a man to a beast. Can you imagine a greater disgrace, than a man in the gutter with crumbs on his face ? (chorus) We never eat fruitcake because it has rum, and one single bite turns a man to a bum. Can you imagine a sorrier sight, than a man eating fruitcake until he gets tight ? (chorus)
 -
GrandpaPhil reacted to a post in a topic:
Chris Watton and Vanguard Models news and updates Volume 2
-
Admiral Rick reacted to a post in a topic:
Endurance by Pierre Greborio - OcCre - 1:70
-
 sheepsail reacted to a post in a topic:
Endurance by Pierre Greborio - OcCre - 1:70
sheepsail reacted to a post in a topic:
Endurance by Pierre Greborio - OcCre - 1:70
-
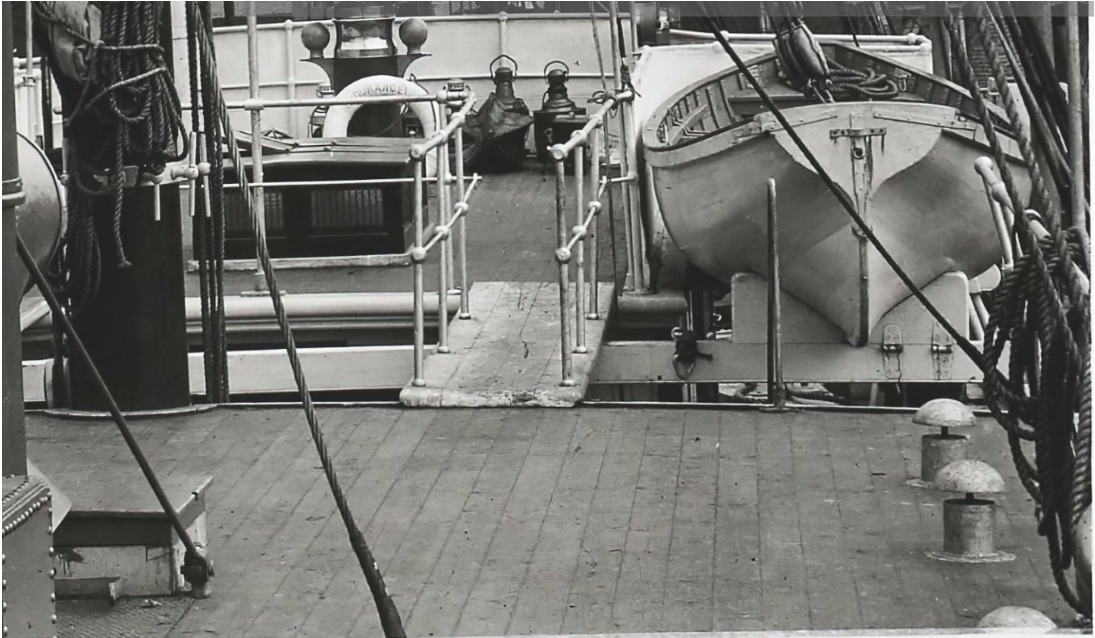
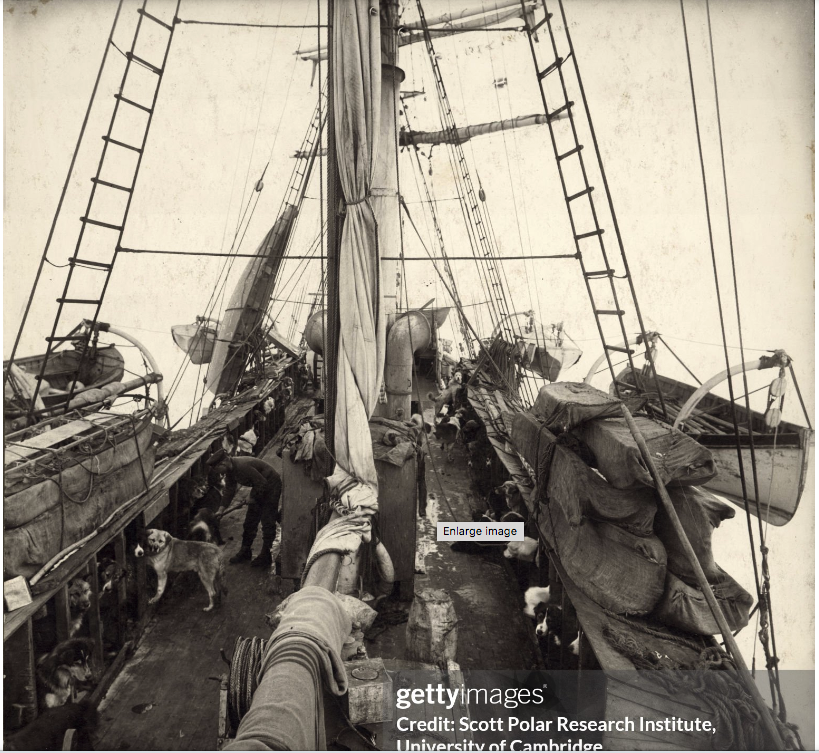
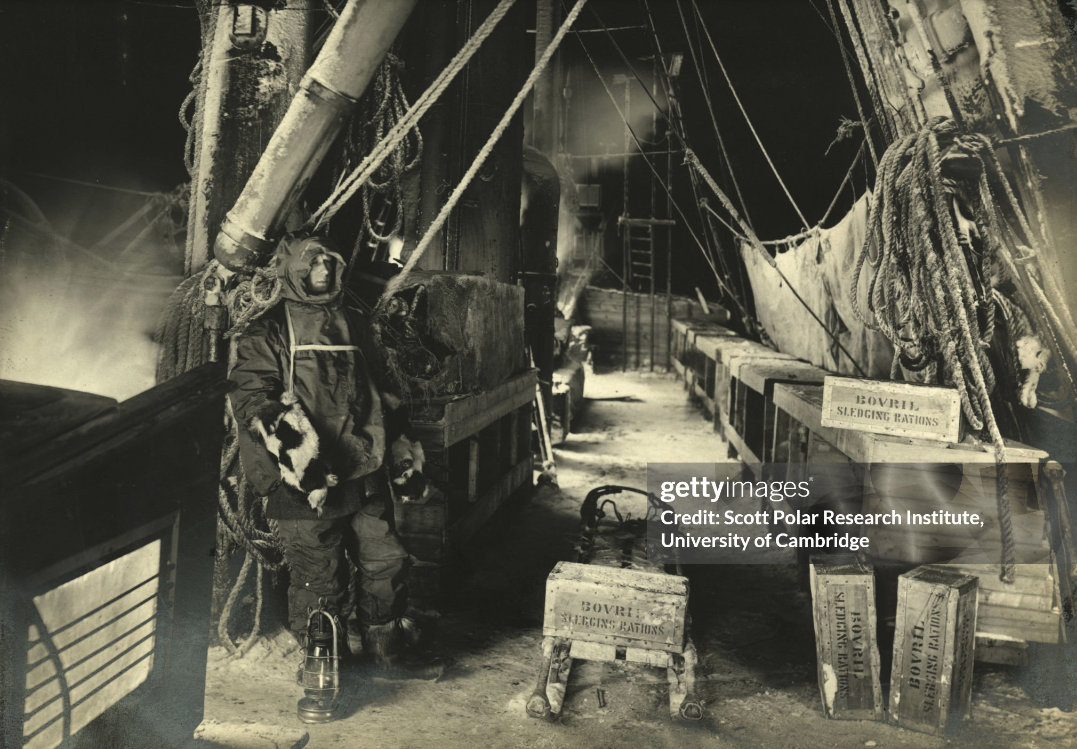
Since the hull will be painted (ruddy red below waterline - anti fouling paint - and black above), you don't have to worry too much about "exact" planking other than the width to use. Thinner scale widths may be easier to work with anyway. A single coat of paint will let the planking lines and some of the wood grain 'telegraph' through - which is a good appearance. After all, its not a racing yacht that gets completely filled to a glossy smooth surface. The Endurance had several configurations: her prior life as Polaris; the initial modifications in England; the additional modifications in South America (the one she had before getting stuck in the ice); and the later modifications made after getting stuck. Note that there are pictures from all phases available on line, and it is not always clear which phase you're looking at. Prior to getting stuck, the steering mechanism was enclosed by a wooden shed (kit provided) to keep the gear from getting iced. This feature was one added in South America prior to departing for the Southern pole. (She did not have the steering shed in England, and the shed was later removed after getting stuck, and was used as a shed on the icepack.) Another key feature is that the deck amidships was completely planked over to the forward cabin in South America, to provide a greater enclosed space against the anticipated cold. This is why the inboard boat mounts were changed into having all the boats hung outboard on davits prior to heading southbound. A phot below shows the open space 'bridged' by the walkways (kit config.) setting out from England, contrasted with 2 other photos showing the polar configuration with extra decking amidships and boats hung outboard ... as well as the kennels added in South America. This can make the model easier to rig, since the pin rail around the main mast was moved (or another one added) higher up above the added decking - where it is more accessible to the modeler (rather than have to use long tweezers to attach lines down in a confined area).
-
 Snug Harbor Johnny reacted to a post in a topic:
In which offense is taken (or, "hey! I resemble that remark")
Snug Harbor Johnny reacted to a post in a topic:
In which offense is taken (or, "hey! I resemble that remark")
-
Keith Black reacted to a post in a topic:
In which offense is taken (or, "hey! I resemble that remark")
-
'Recently saw a builder doing amazing things with a Revell 1:96 Connie kit ... like it looks like an 'ultimate' kit bust ... link: https://modelshipworld.com/topic/31709-uss-constitution-by-dafi-revell-plastic-to-constitution-and-beyond/ And there is a nearly complete build of the Revell 1:96 Cutty Sark by Bruma that was something to drool over ... link: https://modelshipworld.com/topic/25323-cutty-sark-by-bruma-revell-196-plastic/ Whether just 'built out of the box' or enhanced to whatever degree, there's a lot one can do with plastic - or any medium whether wood, card or metal.
-
scrubbyj427 reacted to a post in a topic:
In which offense is taken (or, "hey! I resemble that remark")
-
Kenny, the figurehead might do for the clipper Thermopylae - representing King Leonidas ... even closer if the sword arm were to point the weapon downward as documented elsewhere for the Thermie's figurehead.
-
Snug Harbor Johnny reacted to a post in a topic:
Trireme Olympias by Richard Braithwaite
-
Cena reacted to a post in a topic:
In which offense is taken (or, "hey! I resemble that remark")
-
Snug Harbor Johnny reacted to a post in a topic:
Learning Ship Modeling One Wrong Step at a Time: Hello, I am new here.
-
Cena wrote "... And me here with the self-same Revell USS Constitution 1/96 you're likely envisioning ..." I'm no mind-reader, but I believe Chris was referring to were the very challenging large-scale wood kits of the Connie or Victory, and not the Revell 1:96 version of the USS Constitution. I built that great kit (and the Revell 1:96 Cutty Sark as well) before working in wood and having to model a ton of complexities in structure and rigging. Its like comparing apples with oranges. Do what interests you and see how far you can taker any project - learning as you go. Said Alice Walker, "Much of the satisfying work of life begins as an experiment, and no experiment is ever quite a failure."
-
Completed builds: Khufu Solar Barge - 1:72 Woody Joe Current project(s): Gorch Fock restoration 1:100; Billing Wasa (bust) - 1:100; Great Harry (bust) 1:88 ex. Sergal 1:65
-
 Snug Harbor Johnny reacted to a post in a topic:
Add your LONG signatures in here!
Snug Harbor Johnny reacted to a post in a topic:
Add your LONG signatures in here!
-
Snug Harbor Johnny reacted to a post in a topic:
San Bartolome 1584 by Kevin - Ships of Pavel Nikitin - 1/48 - Jan 2026
-
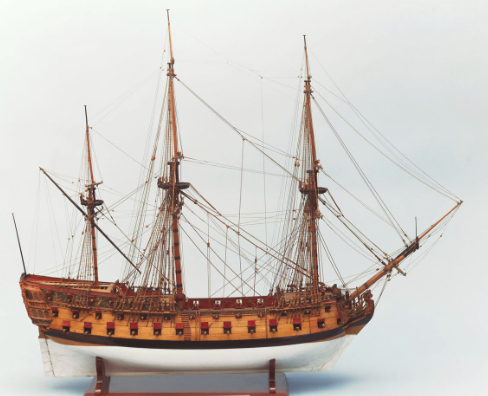
Here's a fine idea for 'one last worthy design ... HMS Centurion. My friend John Fitzhugh Millar, of Williamsburg, VA, built a fine admiralty model of her in the parlor of Newport House on South Henry Street - made primarily of balsa (yes it can be done in balsa and still look fine). The 1:48 hull model is a good 3' long and makes quite a statement (I'll see if they'll send me a photo), so 1:60 or 1:72 are options. No way would Centurion be mistaken for Victory, and the story behind the epic voyage is compelling. Anson's ship that went around the globe was the HMS Centurion, his flagship during a famous circumnavigation from 1740 to 1744, where it became the sole surviving vessel from his squadron and successfully captured a Spanish treasure galleon before returning to England with immense riches. Key Facts About the Voyage & Centurion The Mission: Commodore George Anson led a squadron to disrupt Spanish interests in the Pacific during the War of Jenkins' Ear. The Journey: The squadron, consisting of six ships including the 60-gun Centurion, sailed around Cape Horn, facing horrific storms, disease, and heavy losses, with Centurion being the only ship to complete the journey. The Prize: In 1743, the Centurion captured the Spanish treasure galleon Nuestra Señora de Covadonga, securing a massive haul of silver, which was a major success. Return to England: Anson returned in 1744, completing the circumnavigation aboard the Centurion, bringing back vast treasure and making him famous. Legacy: The voyage, detailed in A Voyage Round the World, became a bestseller, and the captured treasure significantly funded Britain's war effort. Images of the Centurion model at the Royal Museum in Greenwich, England are pasted below:

-
Snug Harbor Johnny reacted to a post in a topic:
Best way to finish wood?
-
I sup[pose the 'best' way to finish wood is whatever way gets you the appearance you desire. There are many to choose from.
-
We awl make misteaks ... Hmmmm, I need a better spell Czech.
-
Snug Harbor Johnny reacted to a post in a topic:
removing ca glued rigging
-
Ahoy, mate ! There's nothing 'wrong' with building a model "out of the box' ... no kit 'busting', no photo-etch or market enhancements. Do what you want, when you want, and how you want to do it ... or be an 'armchair modeler'. Its all up to you. Like that mesmerizing oil painter Bob Ross says ... "Its your world, you can do anything you want." (BTW good job on the Beagle.)
-
removing ca glued rigging
Snug Harbor Johnny replied to Lost and Confused's topic in Masting, rigging and sails
Test it on a sample off the model to see. Natural fibers should fare OK, but I don't know about polyester thread ... never tried it. Also, try it on a piece of plastic sprue form the kit. Just a minute ... You got me going, so I went into the shop, glued some of my own scale rope made of poly thread over on itself and to a piece of wood with thick CA. Then a dabbed a little accelerator on it for a quick cure. I did get a bit of CA on a fingertip, and the acetone loosened it after about 45 seconds. Then I applied acetone with a fine brush to the glued line, and it loosened in about a minute. Now there was a small blob of glue to work on, and it took another minute for the line to pull free of the wood it was glued to. No harm was done to the line, nor was there any harm to the plastic sprue I tried it on repeatedly. So you should be OK. Bear in mind that acetone will remove any oil from the surface of your skin, and can be absorbed through the skin as well (as can a lot of things). Breathing fumes isn't so good either. The de-bonder might do the job quicker, so it may be good to try -
I just love your model of the HMS Beagle ... The hull is the star, and what interests me the most. The style of build has many advantages, like easy to display - and occasional cleaning with compressed air is easy. My friend has a couple nice display models like yours, and an observer can get 'up close and personal'. Congratulations !
-
Ahoy, mate ... and welcome to MSW ! If you enjoyed the novel Moby Dick, you should read 'In the Heart of the Sea' - pasted below ... the REAL 'Moby Dick'. In the Heart of the Sea Book by Nathaniel Philbrick In the Heart of the Sea: The Tragedy of the Whaleship Essex by Nathaniel Philbrick is a 2000 National Book Award-winning nonfiction book detailing the 1820 sinking of the whaleship Essex by a sperm whale, leading to a harrowing 90-day ordeal at sea for the survivors, who faced starvation, dehydration, and cannibalism, and it inspired the 2015 film of the same name. Philbrick uses newly discovered documents, including the cabin boy's account, to create a gripping narrative about human endurance, leadership, and the brutal realities of 19th-century whaling. the true story of the Essex, which was rammed and sunk by a whale in the Pacific, forcing the crew into small boats to face the elements, with only a few surviving. And if you want to SEE how the men handled a whaler at sea, watch the thrilling movie by the same title ... I was truly 'blown away' by it. You can view the official trailer for In the Heart of the Sea on YouTube via the following short link: Official Final Trailer: https://www.youtube.com/watch?v=K-H35Mpj4uk

-
removing ca glued rigging
Snug Harbor Johnny replied to Lost and Confused's topic in Masting, rigging and sails
For ratlines, it may be better not to glue anything until all the ratlines on a given set of shrouds are done and adjusted (by nudging the clove hitches up or down. Using a cow hitch on the first and last shroud will direct the line inward, so trimming won't leave unsightly bits sticking out beyond the end shrouds. For un-doing CA'd rigging, acetone can be somewhat harsh, and an alternative designed for the purpose exists as copied below: A CA glue debonder (cyanoacrylate debonder) is a specialized solvent that breaks down the molecular structure of super glue (CA glue) to remove it from skin, tools, and surfaces, allowing for correction of mistakes, freeing stuck fingers, and cleaning up dried glue without damaging most materials. It works by softening the adhesive, making it non-tacky and wipeable, and comes in formulas that are often skin-safe and effective on cured glue, with some brands offering brush applicators for precision. EDIT: A user test of 'Goof Off' debonder did not seem to work ... so until I can test it myself, the acetone will have to do ********