


Dan Vadas
-
Posts
3,261 -
Joined
-
Last visited
Content Type
Profiles
Forums
Gallery
Events
Everything posted by Dan Vadas
-
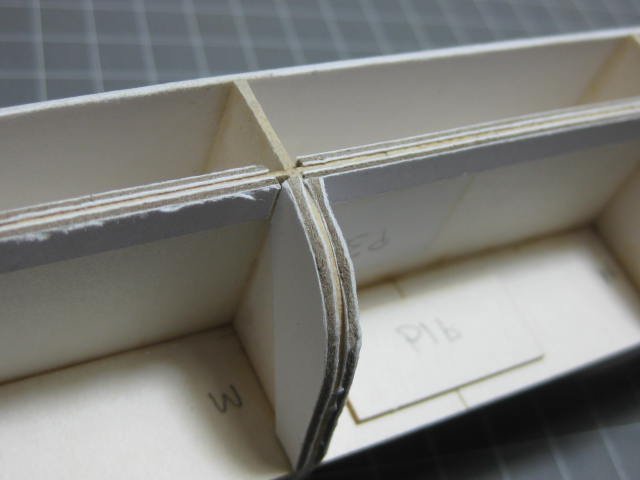
Ok, things haven't got any easier yet . I've fitted the skins around the bow. These are in four pieces with a join straight down the centre and two small pieces at the top. The centre join is totally invisible, and the port side came out pretty well. The joins look a lot better than the macro lens brings them up , the "shadows" that look like dents are actually some water-colour touch-up (I still haven't quite nailed the right formula for the grey, but I'll get it eventually ) : However, despite my best efforts, I finished up with a bit of a dog's dinner when I fitted the top piece to the starboard side. Any suggestions on how to fill the gap? I'll probably end up pulling the top piece out again and cut a new one : Danny
.thumb.JPG.b9ca607a8a256bfdf79210b6c4fa177a.JPG)
.thumb.JPG.21868e9eeced0300835d7a2f7f603789.JPG)
.thumb.JPG.dfcb81f4d89083150634fac136a33502.JPG)
- 295 replies
-
- 16
-

-
- amatsukaze
- halinski
- (and 2 more)
-
It will be in bold until you open it. When you open the log it reverts back to normal text the next time you open the Scratchbuild Forum unless someone replies to it, in which case it will be bold again. It's a way of telling you that no-one has replied to the log since your last visit. Danny
-
Thanks again John and Carl. The hawse skins both fitted up really well. The pieces that overhang at the bow will be trimmed off later. It took me nearly all day to finish the hawses and fit the skins, things should be easier from now on : Danny
.thumb.JPG.0c68b5e122e310f35db010d8bac62bb2.JPG)
.thumb.JPG.f23c304e68e310397d6662caf69094be.JPG)
- 295 replies
-
- 18
-
-
- amatsukaze
- halinski
- (and 2 more)
-
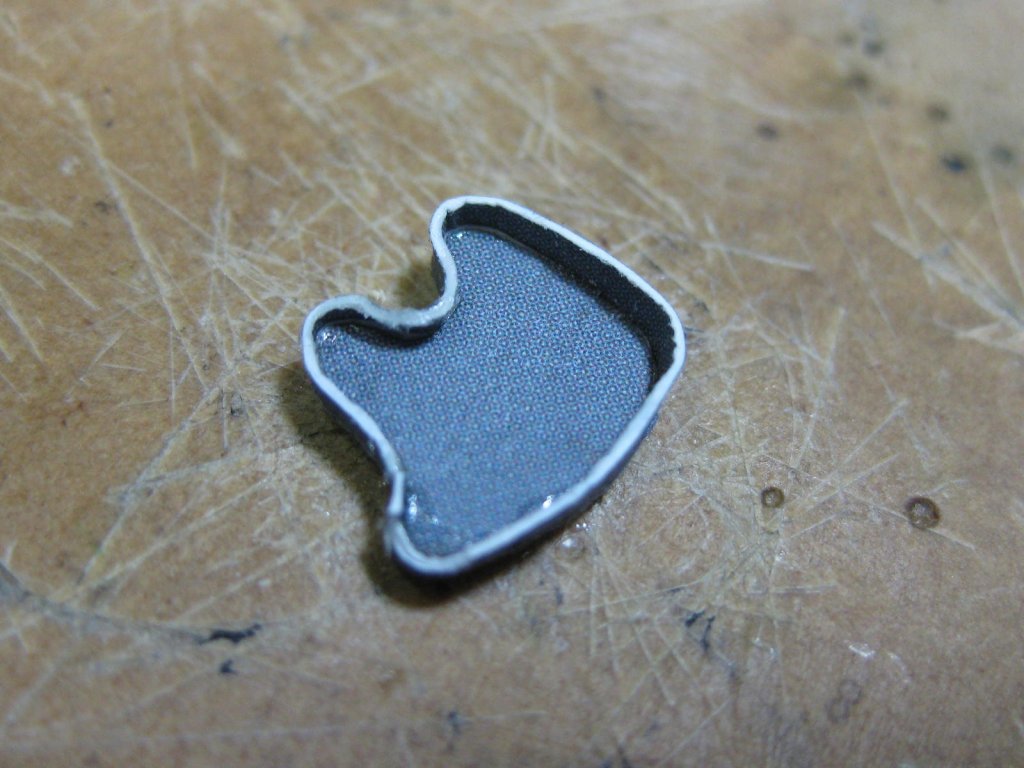
Thank you Pat. This is one of the Hawses, a rather tricky piece to get right. It didn't help that the edging piece was 1mm short so I had to glue in a piece of filler. I've glued a spare piece of coloured card to the 2nd one's edge piece in anticipation of the same thing happening. Luckily the kit has several blank pieces of coloured card which can be used for situations like this. I'll need to be very careful that I shape the outer edge correctly to suit the curvature of the hull sheet, or I may experience the same problem that Slog did with the Mylar insert for one of his Portholes on Borodino which was on a bend. I'll sand and paint the edges in matching grey before fitting : Danny
.thumb.JPG.a002325387670571c6d6e840400d8ba3.JPG)
.thumb.JPG.da789d3022e335e1abfe212f48223949.JPG)
- 295 replies
-
- 14
-
-
- amatsukaze
- halinski
- (and 2 more)
-
Thanks Slog and Popeye, appreciated . Elijah, when I was Fairing them I had to keep reminding myself they were Card so that I didn't sand too much off them . Danny
- 295 replies
-
- 7
-
-
- amatsukaze
- halinski
- (and 2 more)
-
The extra frame supports I put in have come into use already. I've fitted the first two hull skins, and without them I would have had all sorts of problems. The "bumps" opposite the forecastle bulkhead are supposed to be there, as is the odd way the forecastle deck is fitted to the top of the hull. It'll look a lot different when more pieces are installed : I'm really happy with the way these went on, it was something I was dreading a bit but these are probably the two hardest ones to fit . Cheers, Danny
.thumb.JPG.2b29ab5144aad80d7393d11f0fc70bc2.JPG)
.thumb.JPG.49af297f5d8d9da9da3e015863b0e69a.JPG)
.thumb.JPG.4ace094086979d21e5c54c1401cfd33b.JPG)
.thumb.JPG.6f4dfa46bd7e845e543f5a18811e4676.JPG)
- 295 replies
-
- 24
-
-
- amatsukaze
- halinski
- (and 2 more)
-
Thank you Thomas. I'd already worked out "dalocelonik" : Also with "cz." - Google Translate actually came up with "part" when I tried it on it's own. Thanks for "kolowroty " - that one I couldn't get at all . Good story Vossie . My late father was actually born in Poland, but his family moved to Germany when he was a boy not long before the start of WW2. Danny
- 295 replies
-
- 7
-
-
- amatsukaze
- halinski
- (and 2 more)
-
Hi Sam, better late than never . While Fairing the frames I had a little Oopsie (or four ) - a bit of a slip with the sanding stick : This sort of thing can lead to bigger problems down the track when I skin the hull, as the panel could get "sucked" into the dip when the glue dries and shrinks, leaving a dent. Rather than using some kind of Filler to fix the problem I sanded the whole section down to the thickness of a piece of paper and glued a strip in : The Fairing is turning out to be the best I've ever done, even better than Vulture's . It needs to be, as there's no going back once the skins get glued on without some major dramas. Danny
.JPG.dd6e309738707c6d627d5feecf70990d.JPG)
.JPG.83f405005a3de8ea06aafc096a2bac27.JPG)
.JPG.5e90763db7595adaf89404b1847aa603.JPG)
.thumb.JPG.5a94bbffc34e9fc54173384b0c235ebf.JPG)
- 295 replies
-
- 20
-
-
- amatsukaze
- halinski
- (and 2 more)
-
Thanks John and Slog . Carl, the instructions actually mention that there are no parts with those numbers. It must have been an error when they had the pages printed. Danny
- 295 replies
-
- 6
-
-
- amatsukaze
- halinski
- (and 2 more)
-
The Frames are only 1mm thick, and the horizontal centre brace is 0.5mm thick. That's not a real lot to butt two hull sheets together and glue, so I've glued in extra 1mm card to both sides of them. I've Faired half of the hull frames using 150 grit sandpaper on various shaped sanding sticks : Danny
.JPG.c8a4cc0c967dbf832891803cd6197756.JPG)
.JPG.9546408f639a5a50d5bb0a591ecb49ca.JPG)
- 295 replies
-
- 18
-
-
- amatsukaze
- halinski
- (and 2 more)
-
Joe, the only thing to be aware of is that the Build Log will show as being posted by either yourself or another member of MSW who starts it - i.e. it will be your Profile picture and Username at the head of the Log. It probably won't be an issue, just thought I'd let you know. Danny
-
Thanks Slog and Pat. I think I've got the main part of the destructions sorted . I've fitted the two decks. Everything lined up perfectly. The dip in the forecastle is supposed to be there : Danny
.JPG.ab2d6df3ac0c21ba8a9cd021e1542be2.JPG)
.JPG.331a6a508e67cd086aec94e3d5a37e81.JPG)
- 295 replies
-
- 15
-
-
- amatsukaze
- halinski
- (and 2 more)
-
Thanks John, yeah it seems that way - at least for a while . There are two sheets of laser cut frames, a deck section and other assorted pieces. One sheet is 1.0mm thick mostly for the frames. It's not of the quality of the printed sheets, but it doesn't have to be. The other is 0.6mm thick and is actually of a BETTER quality than the printed ones - it seems more "dense" and has a glossy surface. The printed sheets are matte, as they should be. 6 of them are 0.25mm thick, the other which contains mostly elements that need rolling into tubes is fairly thin, about the same as normal 80gsm paper. I can't speak for other Card Kits, this is the 1st one I've actually bought. Cerberus was printed out by a local Photocopy shop from a free Download, and the quality wasn't as good as this kit mainly due to the choice of paper and probably the Setup of the Printer. Danny
- 295 replies
-
- 7
-
-
- amatsukaze
- halinski
- (and 2 more)
-
Yeah, I get the bit about economy . Anyway, I've fixed the problem - I went through all 9 pages of parts and typed all the part numbers on each sheet into a single column in a Spreadsheet, entering the sheet number in the 2nd column. Then I did a Data-Sort on the part numbers column, split the columns into a Printable Page format and "Bob's your uncle" . I keep each Parts Sheet in a separate sleeve in a clear Display Folder and return the sheet to the sleeve after I cut out the parts I need (at least that's the theory for now ). Danny

- 295 replies
-
- 11
-
-
- amatsukaze
- halinski
- (and 2 more)
-
Welcome Greg . There's one thing I've found already that Papershipwright has all over Halinski (apart from the Instructions language of course) - PSW give you two pages of "Parts Identification" for the relatively few parts in the model. This lists the Part Number, a Description of what it actually is in most cases, and WHICH SHEET TO FIND IT ON. It can be very time-consuming finding that one tiny piece of a sub-assembly wading through the 8 sheets of printed Amatsukaze parts. It seems a lot of these assemblies have parts on different sheets . Danny
- 295 replies
-
- 8
-
-
- amatsukaze
- halinski
- (and 2 more)
-
Thanks for the comments guys. I used Spyglass's idea of splitting the "cockroach" one step further. I'd already established that "cz." means "part" and "Sklejamy" is "We glue" - the Polish destructions are full of those words - so I tried "Sklejamy kolo wroty cz." and came up with "We glue the faces" (of 47/50 ) which DOES make more sense than "We glue the cockroaches" . Using the same idea I broke "dalocelonik" down to "dalo celo nik" which came up with "gave the viewer" (parts 43) - the assembly is a Range-finder . And I thought that getting into Card Modelling was just all about how to handle thin paper and roll tiny tubes from it . Isn't learning Polish fun . Danny
- 295 replies
-
- 13
-
-
- amatsukaze
- halinski
- (and 2 more)
-
Thanks for dropping in Popeye and Paul. I've spent all day attempting to translate the Polish instructions into workable English. Without a great deal of success, but it'll have to do. Google Translate came up with some real doozies on my 1st attempt, and there are still a few very weird passages. Here's one example : I couldn't find a cockroach anywhere in the book. I might have to ask Halinski to send a replacement . Seriously though, can anyone translate this for me? It's the passage in Polish (without the accents etc) : This word won't translate either : dalocelownik Danny
- 295 replies
-
- 7
-
-
- amatsukaze
- halinski
- (and 2 more)
-
Looking good Slog, I bet you're glad to get the hull skinning out of the way. Now for the fun bits . Danny
- 244 replies
-
- 2
-
-
- borodino
- dom bumagi
- (and 1 more)
-
You got that right Jan - there's a pack of PE on it's way to me as well . Welcome to the show Grant, Jack and Chris . Danny
- 295 replies
-
- 5
-
-
- amatsukaze
- halinski
- (and 2 more)
-
Thanks for all the kind comments guys. This kit was a big learning curve, mostly on what NOT to do, but it was also a heap of fun. Now on to the next one, which came today . New Link in my signature. Danny
- 193 replies
-
- 7
-
-
- cerberus
- paper shipwright
- (and 1 more)
-
Hi Ken . What laser marks ? Brilliant laser cutting - no char whatsoever . Apart from using a scalpel instead of a razor blade, that's exactly what I did too. Ya gotta love laser-cut frames - how long would it have taken to get this far if I had to laminate and cut heavy card? And it's as straight as a gun barrel . Danny
.JPG.13f86be4a32f48aeda5268d401cef02c.JPG)
.JPG.38792f1560d2914db95657dc5ff52556.JPG)
.JPG.0bf7f68375e20067a7a09c8fe2038e8a.JPG)
.JPG.01ac6528388c2f3399e2f81dd4477286.JPG)
.JPG.ecf0c1ee2f2a771442a339a021da5d90.JPG)
- 295 replies
-
- 20
-
-
- amatsukaze
- halinski
- (and 2 more)
-
I hope you're right . One question - does the laser cutting of the frames affect the adhesion of PVA when fitting the hull skins? I guess it'll be OK, but if it needs a light sand I'm up for it . Danny
- 295 replies
-
- 6
-
-
- amatsukaze
- halinski
- (and 2 more)
-
Good work Jeff, I'm glad it came out OK. If you had OVER-bent the keel after damping it to get the stress out of the bend it MAY have worked too, but at least this way you know it's going to be right. Danny
-
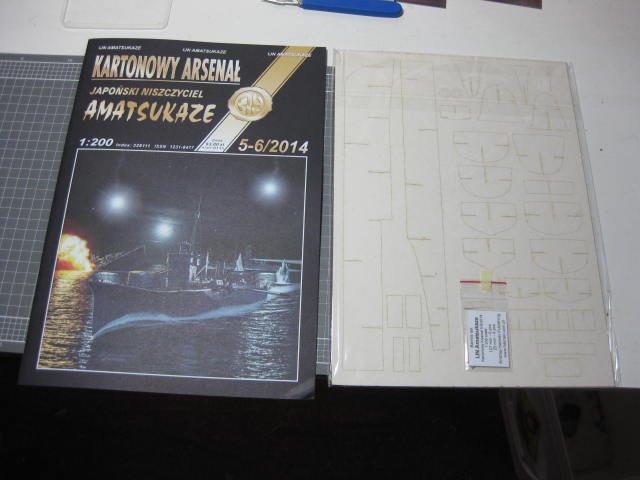
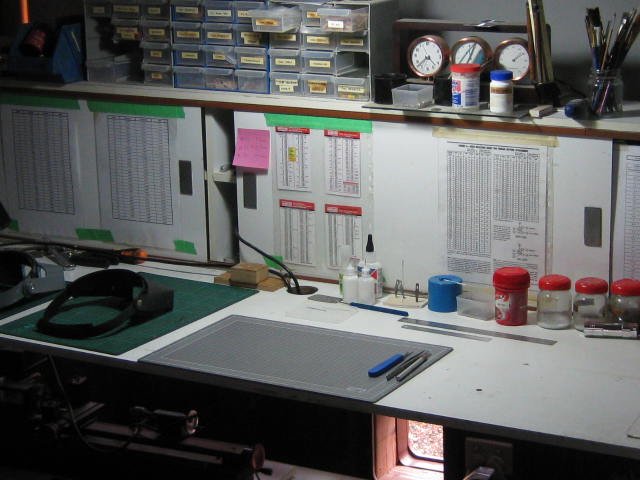
Hi all, I was expecting to get my Card Kit of the Japanese Destroyer IJN (Imperial Japanese Navy) Amatsukaze any day, so I thought it might be a good idea to tidy up my workbench : I finished the job, made myself a cuppa, and sat down in front of the tellie to watch an afternoon of V8 Supercars when ..... there was a knock on the door. UNBELIEVABLE - the Kit arrived, not 5 minutes after I'd finished the cleanup. Here's a shot of the cover and the laser-cut frames : Work will commence in the next Ad break . Danny
- 295 replies
-
- 21
-
-
- amatsukaze
- halinski
- (and 2 more)
.JPG.86b4b78ea406ef171e005da22e8c90a6.JPG)
.JPG.1c7432214224f2357c97fd32d00ccde2.JPG)
.JPG.df2f301ea07faac5aaa3c26adba05d87.JPG)
.JPG.68e2bc7a9f782e0d1b9f5529198460bb.JPG)
.JPG.eba77aaed92b47a36619a0f7a87dbd8a.JPG)
.JPG.a30258de5910aaaec1039c85341a2a87.JPG)
.JPG.60a2a76cd81810b545600e1b661873c5.JPG)

.JPG.c22d00251528d3cce202abeb9161d975.JPG)
.JPG.aa60fbffb4a222da445ccc9d595eb0e0.JPG)
.JPG.349eba1e1d93aa2be839fa2a805a4dea.JPG)
.JPG.56458c2e8498fc159e3af9c3bf65fd0f.JPG)
.JPG.2f8adeaf7ed3b8d9f9dcac814794ebbe.JPG)